

Gigaset C810/810 A / CHN en/ A31008-M2327-Y101-1-7619 / overview.fm / 15.09.2011
Menu
2011-08-17 09:30
Gigaset
12 1411
1
2
3
4
5
6
7
8
9
10
13
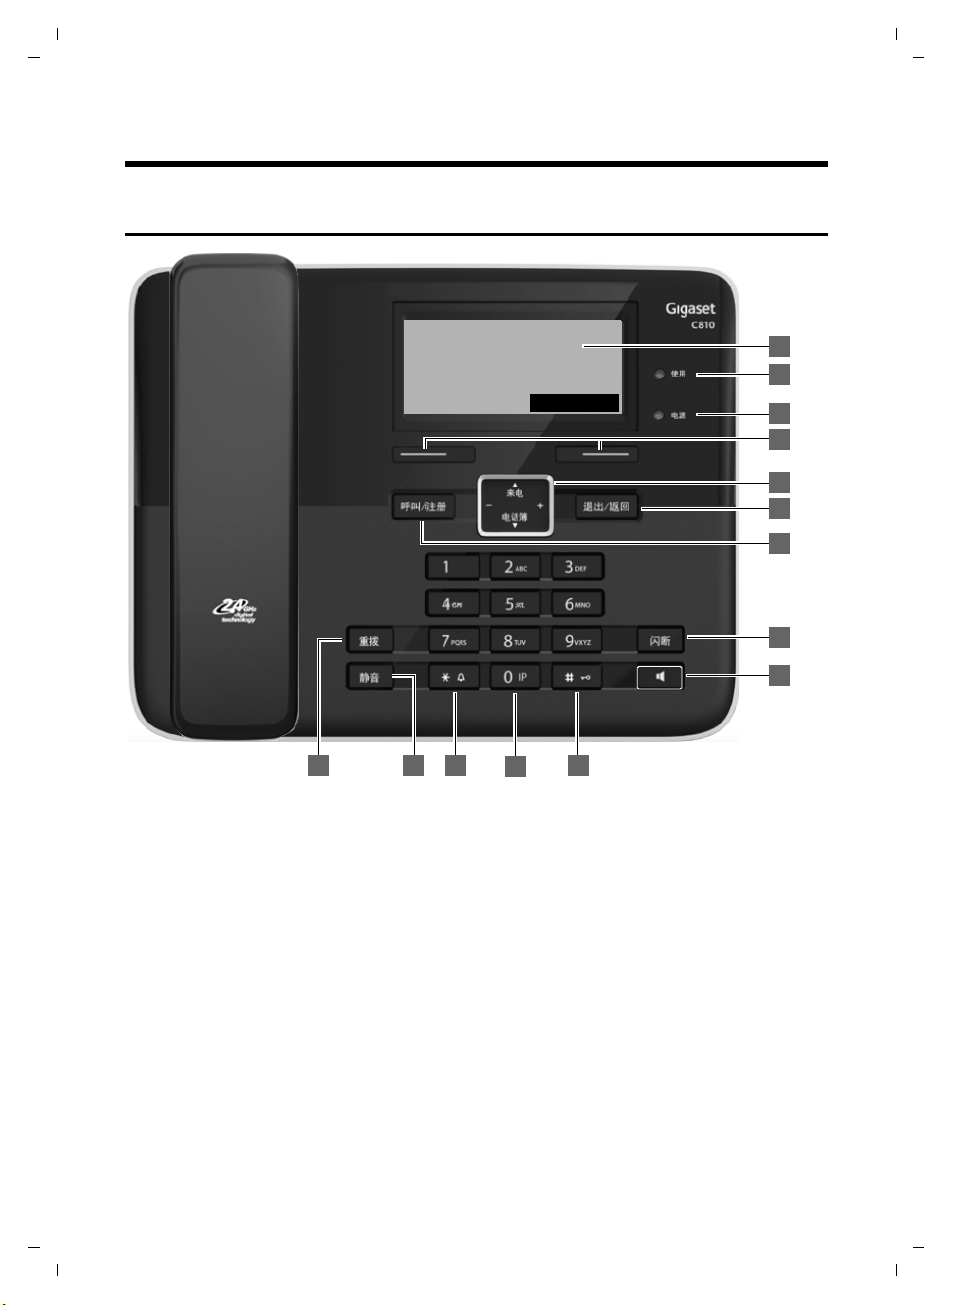
The base at a glance
The base at a glance
Gigaset C810
Version 4, 16.09.2005
1 Display in idle status
2 Tal k LED (green)
– Lights up when the line is in use.
– Flashes on incoming call.
3 Power LED (red)
Indicates that the telephone is powered on.
4 Display keys (
5 Control key (
6 End/Back key
7 INT key
– making internal calls (
– registering handsets (
8 Recall key
– Consultation call (flash)
– Insert a dialling pause (press and hold)
2
¢page 19)
¢page 19)
¢page 25)
¢page 39)
9 Speaker key
Switch between earpiece and speaker mode.
Lights up when the speaker is switched on.
10 Redial key (
11 Mute key
Mute the microphone (
12 Star key
Ringtone on/off (press and hold);
with an open connection: switch between dial
pulsing/tone dialling (press briefly);
Text input: Open table of special characters
13 Priority key (
Memory key for IP code (press and hold)
14 Hash key
Keypad lock on/off (press and hold in
idle status);
toggles between upper/lower case and digits
(in editing mode)
¢page 28)
¢page 24)
¢page 23)
Gigaset C810/810 A / CHN en/ A31008-M2327-Y101-1-7619 / overview.fm / 15.09.2011
1
2
3
4
5
6
7
8
9
10
11
MenuMemo
2011-08-17 09:30
Gigaset
12 14 1513 16 1817
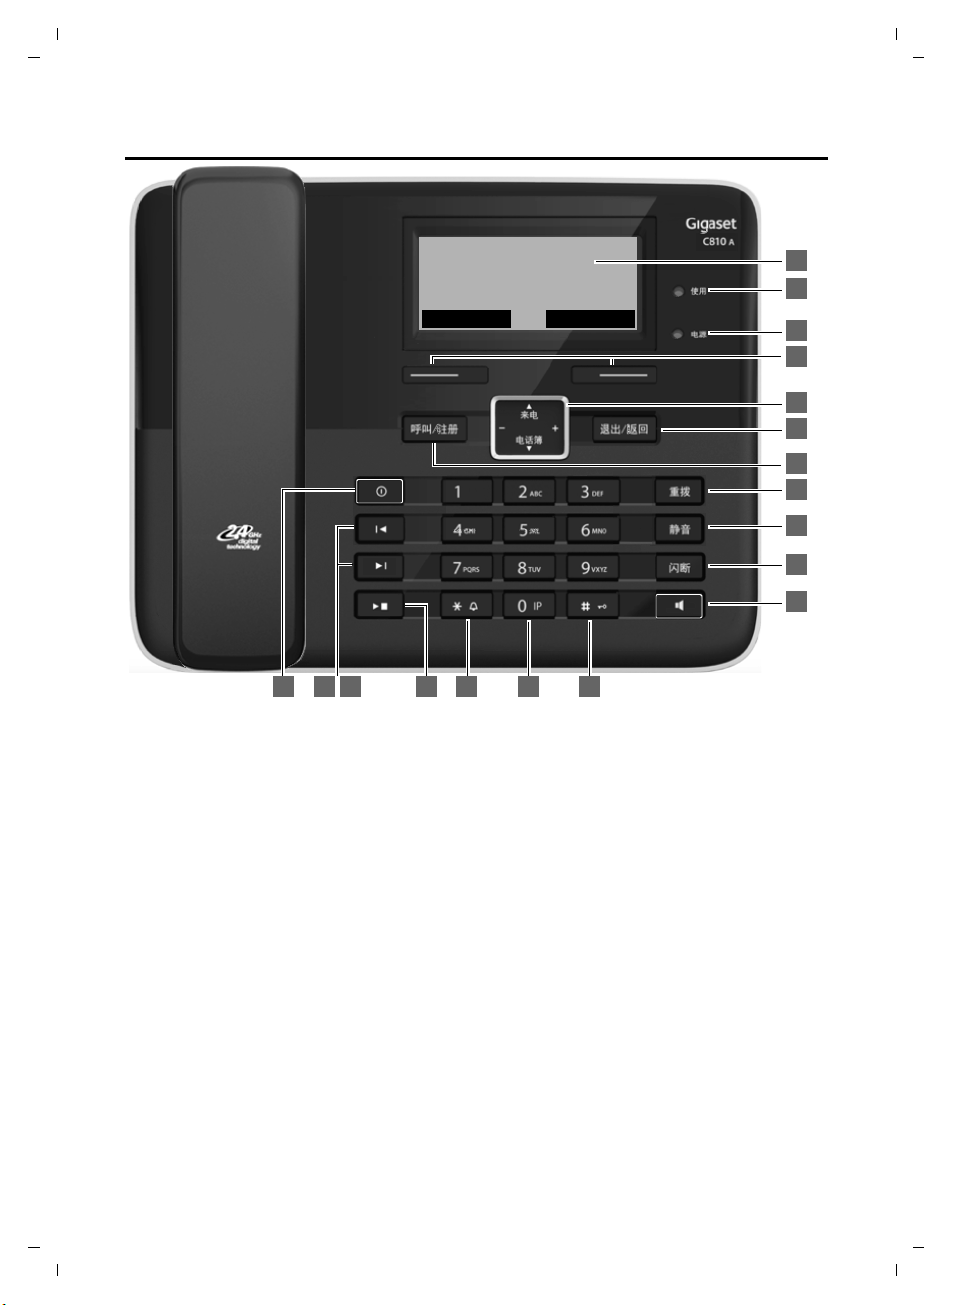
Gigaset C810 A
The base at a glance
Version 4, 16.09.2005
1 Display in idle status
2 Tal k LED (green)
– Lights up when the line is in use.
– Flashes on incoming call.
– Flashes during paging.
3 Power LED (red)
Indicates that the telephone is powered on.
4 Display keys (
5 Control key (
6 End/Back key
7 INT key
– making internal calls (
– registering handsets (
8 Redial key (
9 Mute key (
Mute the microphone
10 Recall key
- Consultation call (flash)
- Insert a dialling pause (press and hold)
11 Speaker key
Switch between earpiece and speaker mode
12 Answering machine key (
Switch answering machine (AM) on/off.
Lights up: AM is switched on.
Flashes: Unheard messages on the AM.
¢page 19)
¢page 19)
¢page 28)
¢page 23)
¢page 25)
¢page 39)
¢page 58)
13 Skip back to the beginning of the message or
skip back to the previous message (press
twice).
14 Skip to next message (press once) or next
message but one (press twice).
15 Play/stop key
Play back new messages from answering
machine or cancel playback (press briefly).
Play back new and old messages (press and
hold).
16 Star key
Ringtone on/off (press and hold);
with an open connection: switch between dial
pulsing/tone dialling (press briefly);
Text input: Open table of special characters
17 Priority key (
Memory key for IP code (press and hold)
18 Hash key
Keypad lock on/off (press and hold in
idle status);
toggles between upper/lower case and digits
¢page 24)
3
Gigaset C810/810 A / CHN en/ A31008-M2327-Y101-1-7619 / overview.fm / 15.09.2011
ôÃ æ î ˝ Z
Memo
2011-08-17 09:30
Gigaset
Ã1
Menu
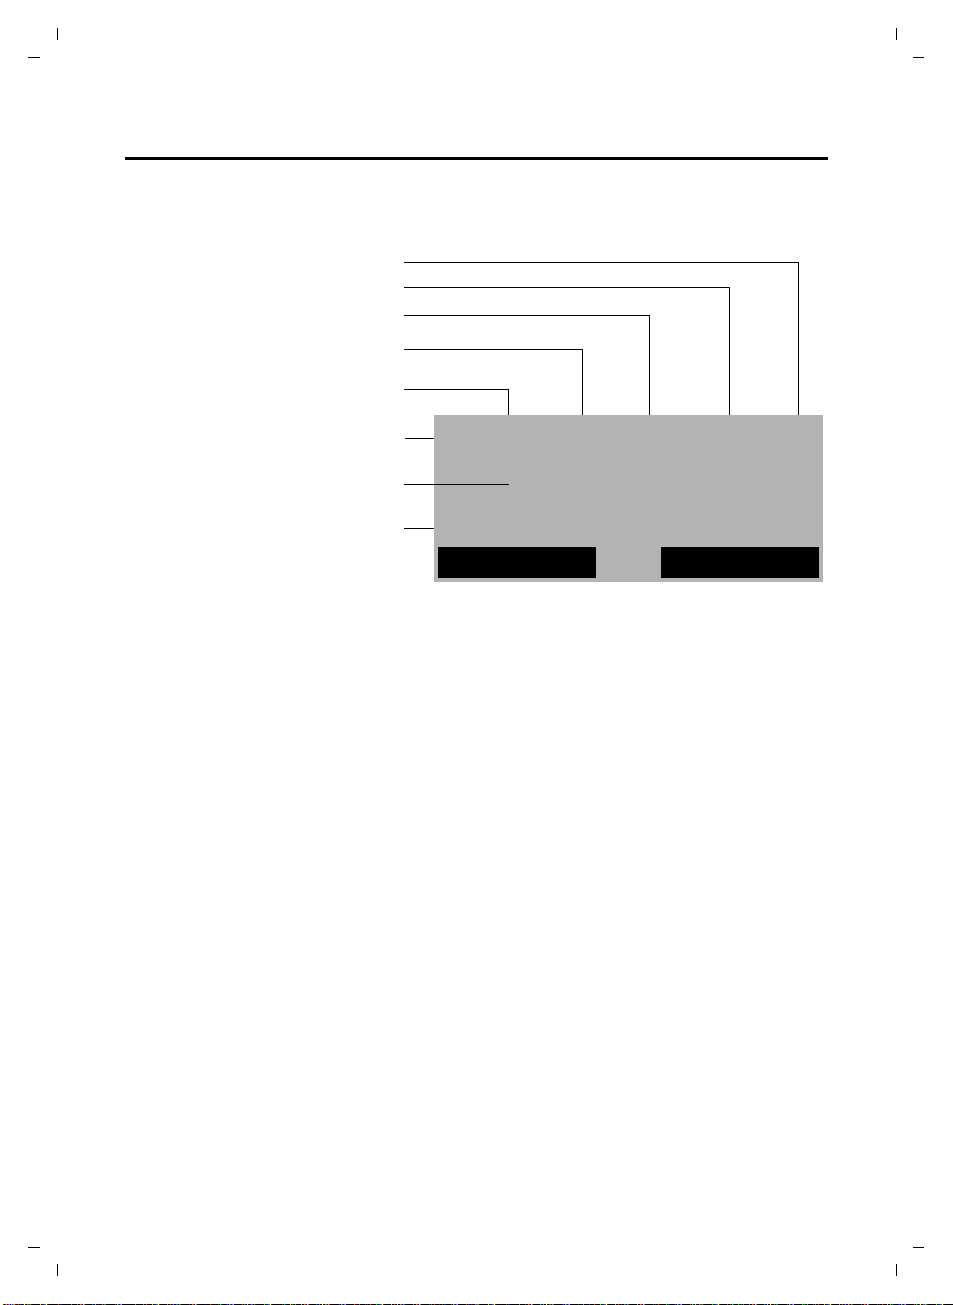
Directory opened (¢ page 27)
Keypad locked (¢ page 20)
New missed calls (¢ page 29)
Telephone in talk mode
(receiver lifted or speaker activated)
Answering machine activated
(C810 A only) (
¢ page 58)
Ringtone switched off (¢ page 31)
Current date and time (¢page 30)
Number of new messages on the
answering machine (C810 A only),
(
¢ page 58)
The base at a glance
Base display symbols
The following symbols are displayed dependent on the settings and the operating status of
your telephone:
Version 4, 16.09.2005
4

Gigaset C810/810 A / CHN en/ A31008-M2327-Y101-1-7619 / overview.fm / 15.09.2011
ÐÃ U
Menu
07:15
Redial
2011-10-14
INT 1
§§2§§
§§3§§
§§4§§
§§5§§
§§6§§
§13§
§12§
§§7§§
§§1§§
§§8§§
§§9§§
§11§
§14§
§15§
§10§
The handset at a glance
The handset at a glance
5 Hash key
Keypad lock on/off (press and hold in
idle status);
toggles between upper/lower case and digits
6 Recall key
– Consultation call (flash)
– Insert a dialling pause (press and hold)
7 Microphone
8 Message key (
Access to calls and message lists;
Flashes: new message or new call
9 Star key
Ringtone on/off (press and hold);
with an open connection: switch between dial
pulsing/tone dialling (press briefly);
Text input: Open table of special characters
10 Priority key (
Memory key for IP code (press and hold)
11 Key 1 (
Dial answering machine (C810 A only) (press
and hold)
12 Talk k ey
Flashes: incoming call;
Accept a call (press briefly);
13 Control key (
u initiate an internal call;
v mute the microphone during a call;
t open audio settings;
s open the directory;
14 Signal strength icon of the connection to the
base
15 Answering machine icon (C810 A only)
(
¢page 61)
Answering machine switched on;
Flashes: Answering machine is recording a
message or is being operated by another inter-
nal party.
¢page 48)
¢page 43)
¢page 61)
¢page 34)
You can register up to four handsets to the
Gigaset C810/810 A, (
¢ page 39).
Version 4, 16.09.2005
1 Display in idle status
2 Battery charge status
(
¢page 6)
3 Display keys (
4 End call key, On/Off key
End call, cancel function, go back one menu
level (press briefly), back to idle status (press
and hold), activate/deactivate handset (press
and hold in idle status)
¢page 34)
5
Gigaset C810/810 A / CHN en/ A31008-M2327-Y101-1-7619 / overview.fm / 15.09.2011
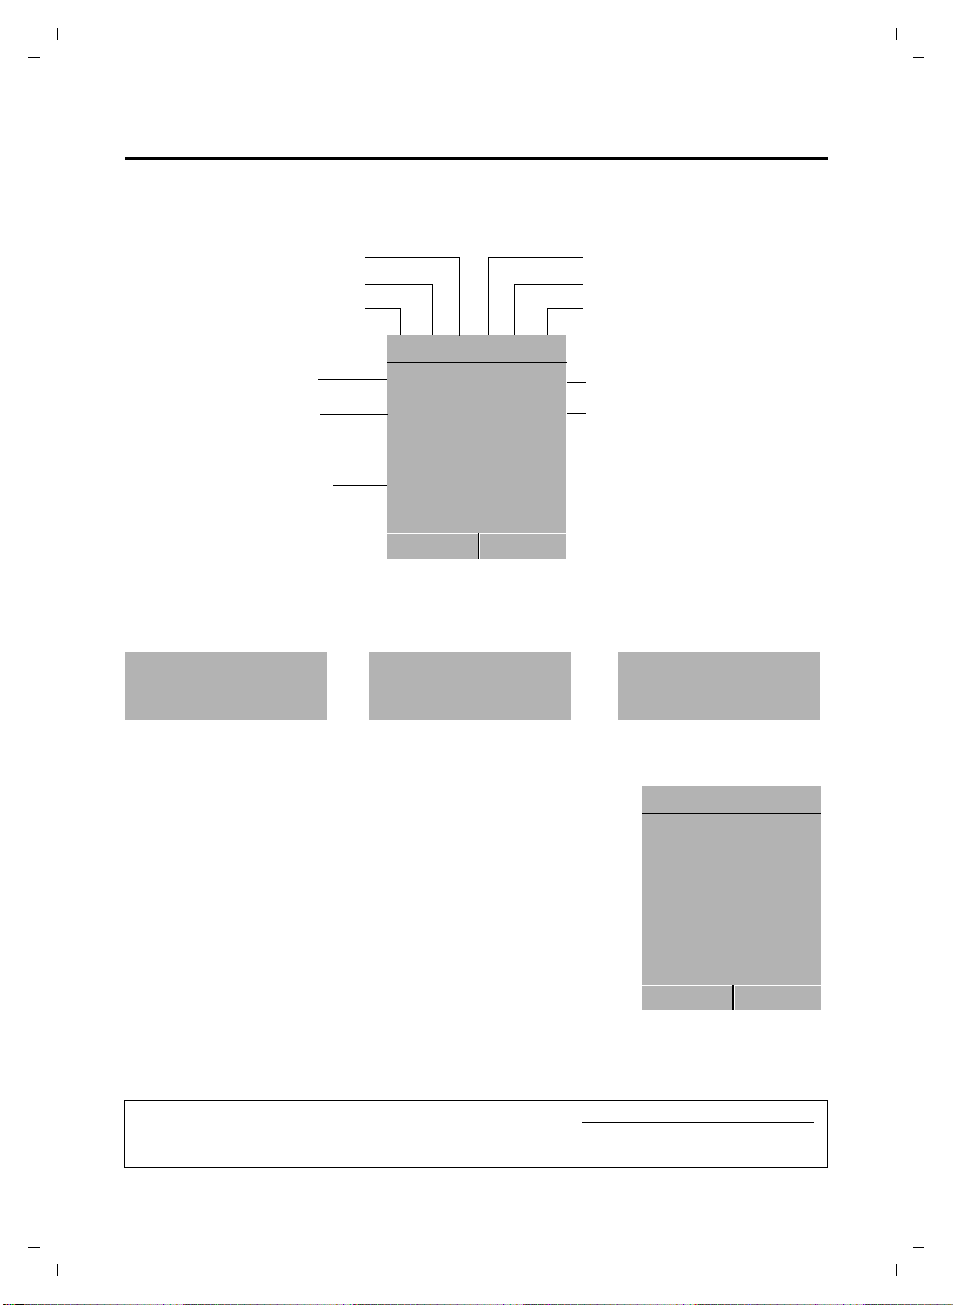
Keypad locked
Ringtone switched off
Signal strength
Number of new messages
u
à on the answering
machine (C810 A only)
u ™ in the list of missed calls
Answering machine activated
(C810 A only)
Handset in talk mode
Battery charging state
Name of the handset
Ðó˝ Ã æU
Menu
07:15
Redial
2011-10-14
INT 1
™
3
Ã
1
¼ 08:00
Current date
Current time
Alarm switched on and
wake-up time
Ð
Ã
U
Menu
07:15
Redial
2011-10-14
INT 1
The handset at a glance
Handset display symbols
The following symbols are displayed dependent on the settings and the operating status of
your telephone:
Signalling
External call Internal call Alarm clock
Display in idle status
u Reception signal between the base and handset:
good to poor: ÐiÑÒ
If the handset goes out of range a warning tone will be heard.
u Battery charge status:
–
– = flashes red: batteries almost empty
–
u INT 1
Internal name of the handset (
u If the answering machine is activated, the
played in the header (Gigaset C810 A only).
You can find additional information about your telephone at www.gigaset.com/gigasetc810
Have fun using your new phone!
Ø«Ú ØåÚ Ø¼Ú
=eVU (empty to full)
eVU during charging, the symbol is outlined red
while the charging state changes periodically
¢ page 54)
Ã
icon will be dis-
.
Version 4, 16.09.2005
6

Gigaset C810/810 A / CHN en/ A31008-M2327-Y101-1-7619 / C810-C810A_KomboIVZ.fm / 15.09.2011
Contents
Contents
The base at a glance . . . . . . . . . . . . . . . . . . . . . . . . . . . . . . . . . . . . . . . . . . . . . . . . . . . . . . 2
Gigaset C810 . . . . . . . . . . . . . . . . . . . . . . . . . . . . . . . . . . . . . . . . . . . . . . . . . . . . . . . . . . . . . . . . . . . . . . . . . . 2
Gigaset C810 A . . . . . . . . . . . . . . . . . . . . . . . . . . . . . . . . . . . . . . . . . . . . . . . . . . . . . . . . . . . . . . . . . . . . . . . . 3
Base display symbols . . . . . . . . . . . . . . . . . . . . . . . . . . . . . . . . . . . . . . . . . . . . . . . . . . . . . . . . . . . . . . . . . . . 4
The handset at a glance . . . . . . . . . . . . . . . . . . . . . . . . . . . . . . . . . . . . . . . . . . . . . . . . . . . .5
Handset display symbols . . . . . . . . . . . . . . . . . . . . . . . . . . . . . . . . . . . . . . . . . . . . . . . . . . . . . . . . . . . . . . . 6
Safety precautions . . . . . . . . . . . . . . . . . . . . . . . . . . . . . . . . . . . . . . . . . . . . . . . . . . . . . . . 11
First steps . . . . . . . . . . . . . . . . . . . . . . . . . . . . . . . . . . . . . . . . . . . . . . . . . . . . . . . . . . . . . . . 12
Checking the pack contents . . . . . . . . . . . . . . . . . . . . . . . . . . . . . . . . . . . . . . . . . . . . . . . . . . . . . . . . . . . 12
Setting up the base and handset charging cradle . . . . . . . . . . . . . . . . . . . . . . . . . . . . . . . . . . . . . . 13
Setting up the handset for use . . . . . . . . . . . . . . . . . . . . . . . . . . . . . . . . . . . . . . . . . . . . . . . . . . . . . . . . 15
Setting the date and time . . . . . . . . . . . . . . . . . . . . . . . . . . . . . . . . . . . . . . . . . . . . . . . . . . . . . . . . . . . . . 17
The Gigaset C810/810 A base . . . . . . . . . . . . . . . . . . . . . . . . . . . . . . . . 19
Using the base . . . . . . . . . . . . . . . . . . . . . . . . . . . . . . . . . . . . . . . . . . . . . . . . . . . . . . . . . . . 19
Control key . . . . . . . . . . . . . . . . . . . . . . . . . . . . . . . . . . . . . . . . . . . . . . . . . . . . . . . . . . . . . . . . . . . . . . . . . . . 19
Display keys . . . . . . . . . . . . . . . . . . . . . . . . . . . . . . . . . . . . . . . . . . . . . . . . . . . . . . . . . . . . . . . . . . . . . . . . . . 19
Keys on the keypad . . . . . . . . . . . . . . . . . . . . . . . . . . . . . . . . . . . . . . . . . . . . . . . . . . . . . . . . . . . . . . . . . . . 19
Correcting incorrect entries . . . . . . . . . . . . . . . . . . . . . . . . . . . . . . . . . . . . . . . . . . . . . . . . . . . . . . . . . . . 20
Activating/deactivating the keypad lock . . . . . . . . . . . . . . . . . . . . . . . . . . . . . . . . . . . . . . . . . . . . . . . 20
Menu guidance . . . . . . . . . . . . . . . . . . . . . . . . . . . . . . . . . . . . . . . . . . . . . . . . . . . . . . . . . . . . . . . . . . . . . . . 20
Base menu overview . . . . . . . . . . . . . . . . . . . . . . . . . . . . . . . . . . . . . . . . . . . . . . . . . . . . . . . . . . . . . . . . . . 21
Making calls . . . . . . . . . . . . . . . . . . . . . . . . . . . . . . . . . . . . . . . . . . . . . . . . . . . . . . . . . . . . . 22
Making an external call . . . . . . . . . . . . . . . . . . . . . . . . . . . . . . . . . . . . . . . . . . . . . . . . . . . . . . . . . . . . . . . . 22
Quick dialling . . . . . . . . . . . . . . . . . . . . . . . . . . . . . . . . . . . . . . . . . . . . . . . . . . . . . . . . . . . . . . . . . . . . . . . . . 22
Ending a call . . . . . . . . . . . . . . . . . . . . . . . . . . . . . . . . . . . . . . . . . . . . . . . . . . . . . . . . . . . . . . . . . . . . . . . . . . 22
Accepting a call . . . . . . . . . . . . . . . . . . . . . . . . . . . . . . . . . . . . . . . . . . . . . . . . . . . . . . . . . . . . . . . . . . . . . . . 22
Calling Line Identification (CLI) . . . . . . . . . . . . . . . . . . . . . . . . . . . . . . . . . . . . . . . . . . . . . . . . . . . . . . . . 23
Speaker mode . . . . . . . . . . . . . . . . . . . . . . . . . . . . . . . . . . . . . . . . . . . . . . . . . . . . . . . . . . . . . . . . . . . . . . . . 23
Adjusting the earpiece/speaker volume during a call . . . . . . . . . . . . . . . . . . . . . . . . . . . . . . . . . . . 23
Switching to mute . . . . . . . . . . . . . . . . . . . . . . . . . . . . . . . . . . . . . . . . . . . . . . . . . . . . . . . . . . . . . . . . . . . . 23
IP dialling . . . . . . . . . . . . . . . . . . . . . . . . . . . . . . . . . . . . . . . . . . . . . . . . . . . . . . . . . . . . . . . . . . . . . . . . . . . . . 24
Making internal calls . . . . . . . . . . . . . . . . . . . . . . . . . . . . . . . . . . . . . . . . . . . . . . . . . . . . . 25
Transferring a call . . . . . . . . . . . . . . . . . . . . . . . . . . . . . . . . . . . . . . . . . . . . . . . . . . . . . . . . . . . . . . . . . . . . . 25
Internal consultation/conference calls . . . . . . . . . . . . . . . . . . . . . . . . . . . . . . . . . . . . . . . . . . . . . . . . . 25
Accepting/rejecting call waiting . . . . . . . . . . . . . . . . . . . . . . . . . . . . . . . . . . . . . . . . . . . . . . . . . . . . . . . 26
Barging in to an external call . . . . . . . . . . . . . . . . . . . . . . . . . . . . . . . . . . . . . . . . . . . . . . . . . . . . . . . . . . 26
Using the directory and lists . . . . . . . . . . . . . . . . . . . . . . . . . . . . . . . . . . . . . . . . . . . . . . 27
Directory . . . . . . . . . . . . . . . . . . . . . . . . . . . . . . . . . . . . . . . . . . . . . . . . . . . . . . . . . . . . . . . . . . . . . . . . . . . . . 27
Redial list . . . . . . . . . . . . . . . . . . . . . . . . . . . . . . . . . . . . . . . . . . . . . . . . . . . . . . . . . . . . . . . . . . . . . . . . . . . . . 28
Call lists . . . . . . . . . . . . . . . . . . . . . . . . . . . . . . . . . . . . . . . . . . . . . . . . . . . . . . . . . . . . . . . . . . . . . . . . . . . . . . 29
Version 4, 16.09.2005
7

Gigaset C810/810 A / CHN en/ A31008-M2327-Y101-1-7619 / C810-C810A_KomboIVZ.fm / 15.09.2011
Contents
Base settings . . . . . . . . . . . . . . . . . . . . . . . . . . . . . . . . . . . . . . . . . . . . . . . . . . . . . . . . . . . . 30
Changing the display language . . . . . . . . . . . . . . . . . . . . . . . . . . . . . . . . . . . . . . . . . . . . . . . . . . . . . . . 30
Quick access to numbers . . . . . . . . . . . . . . . . . . . . . . . . . . . . . . . . . . . . . . . . . . . . . . . . . . . . . . . . . . . . . . 30
Setting the date and time . . . . . . . . . . . . . . . . . . . . . . . . . . . . . . . . . . . . . . . . . . . . . . . . . . . . . . . . . . . . . 30
Setting the earpiece and speaker volume . . . . . . . . . . . . . . . . . . . . . . . . . . . . . . . . . . . . . . . . . . . . . . 31
Setting the ringer . . . . . . . . . . . . . . . . . . . . . . . . . . . . . . . . . . . . . . . . . . . . . . . . . . . . . . . . . . . . . . . . . . . . . 31
Activating/deactivating advisory tones . . . . . . . . . . . . . . . . . . . . . . . . . . . . . . . . . . . . . . . . . . . . . . . . 32
Setting the display contrast . . . . . . . . . . . . . . . . . . . . . . . . . . . . . . . . . . . . . . . . . . . . . . . . . . . . . . . . . . . 32
System settings . . . . . . . . . . . . . . . . . . . . . . . . . . . . . . . . . . . . . . . . . . . . . . . . . . . . . . . . . . . . . . . . . . . . . . . 32
Restoring the base factory settings . . . . . . . . . . . . . . . . . . . . . . . . . . . . . . . . . . . . . . . . . . . . . . . . . . . . 33
The Gigaset C810H handset . . . . . . . . . . . . . . . . . . . . . . . . . . . . . . . . . 34
Using the handset . . . . . . . . . . . . . . . . . . . . . . . . . . . . . . . . . . . . . . . . . . . . . . . . . . . . . . . 34
Control key . . . . . . . . . . . . . . . . . . . . . . . . . . . . . . . . . . . . . . . . . . . . . . . . . . . . . . . . . . . . . . . . . . . . . . . . . . . 34
Display keys . . . . . . . . . . . . . . . . . . . . . . . . . . . . . . . . . . . . . . . . . . . . . . . . . . . . . . . . . . . . . . . . . . . . . . . . . . 34
Keys on the keypad . . . . . . . . . . . . . . . . . . . . . . . . . . . . . . . . . . . . . . . . . . . . . . . . . . . . . . . . . . . . . . . . . . . 35
Correcting incorrect entries . . . . . . . . . . . . . . . . . . . . . . . . . . . . . . . . . . . . . . . . . . . . . . . . . . . . . . . . . . . 35
Activating/deactivating the keypad lock . . . . . . . . . . . . . . . . . . . . . . . . . . . . . . . . . . . . . . . . . . . . . . . 35
Activating/deactivating the handset . . . . . . . . . . . . . . . . . . . . . . . . . . . . . . . . . . . . . . . . . . . . . . . . . . . 35
Menu guidance . . . . . . . . . . . . . . . . . . . . . . . . . . . . . . . . . . . . . . . . . . . . . . . . . . . . . . . . . . . . . . . . . . . . . . . 35
Handset menu overview . . . . . . . . . . . . . . . . . . . . . . . . . . . . . . . . . . . . . . . . . . . . . . . . . . . . . . . . . . . . . . 37
Registering handsets . . . . . . . . . . . . . . . . . . . . . . . . . . . . . . . . . . . . . . . . . . . . . . . . . . . . . . . . . . . . . . . . . . 39
Registering other handsets . . . . . . . . . . . . . . . . . . . . . . . . . . . . . . . . . . . . . . . . . . . . . . . . . . . . . . . . . . . . 39
De-registering handsets . . . . . . . . . . . . . . . . . . . . . . . . . . . . . . . . . . . . . . . . . . . . . . . . . . . . . . . . . . . . . . . 39
Locating a handset (paging) . . . . . . . . . . . . . . . . . . . . . . . . . . . . . . . . . . . . . . . . . . . . . . . . . . . . . . . . . . . 40
Making calls . . . . . . . . . . . . . . . . . . . . . . . . . . . . . . . . . . . . . . . . . . . . . . . . . . . . . . . . . . . . . 41
Making an external call . . . . . . . . . . . . . . . . . . . . . . . . . . . . . . . . . . . . . . . . . . . . . . . . . . . . . . . . . . . . . . . . 41
Quick dialling . . . . . . . . . . . . . . . . . . . . . . . . . . . . . . . . . . . . . . . . . . . . . . . . . . . . . . . . . . . . . . . . . . . . . . . . . 41
Ending a call . . . . . . . . . . . . . . . . . . . . . . . . . . . . . . . . . . . . . . . . . . . . . . . . . . . . . . . . . . . . . . . . . . . . . . . . . . 41
Accepting a call . . . . . . . . . . . . . . . . . . . . . . . . . . . . . . . . . . . . . . . . . . . . . . . . . . . . . . . . . . . . . . . . . . . . . . . 41
Calling Line Identification (CLI) . . . . . . . . . . . . . . . . . . . . . . . . . . . . . . . . . . . . . . . . . . . . . . . . . . . . . . . . 42
Speaker mode . . . . . . . . . . . . . . . . . . . . . . . . . . . . . . . . . . . . . . . . . . . . . . . . . . . . . . . . . . . . . . . . . . . . . . . . 42
Adjusting the earpiece/speaker volume during a call . . . . . . . . . . . . . . . . . . . . . . . . . . . . . . . . . . . 42
Switching to mute . . . . . . . . . . . . . . . . . . . . . . . . . . . . . . . . . . . . . . . . . . . . . . . . . . . . . . . . . . . . . . . . . . . . 42
Battery status control during a call . . . . . . . . . . . . . . . . . . . . . . . . . . . . . . . . . . . . . . . . . . . . . . . . . . . . . 43
IP dialling . . . . . . . . . . . . . . . . . . . . . . . . . . . . . . . . . . . . . . . . . . . . . . . . . . . . . . . . . . . . . . . . . . . . . . . . . . . . . 43
Making internal calls . . . . . . . . . . . . . . . . . . . . . . . . . . . . . . . . . . . . . . . . . . . . . . . . . . . . . 44
Transferring a call . . . . . . . . . . . . . . . . . . . . . . . . . . . . . . . . . . . . . . . . . . . . . . . . . . . . . . . . . . . . . . . . . . . . . 44
Internal consultation/conference calls . . . . . . . . . . . . . . . . . . . . . . . . . . . . . . . . . . . . . . . . . . . . . . . . . 44
Accepting/rejecting call waiting . . . . . . . . . . . . . . . . . . . . . . . . . . . . . . . . . . . . . . . . . . . . . . . . . . . . . . . 45
Barging in to an external call . . . . . . . . . . . . . . . . . . . . . . . . . . . . . . . . . . . . . . . . . . . . . . . . . . . . . . . . . . 45
Using the directory and lists . . . . . . . . . . . . . . . . . . . . . . . . . . . . . . . . . . . . . . . . . . . . . . 46
Directory . . . . . . . . . . . . . . . . . . . . . . . . . . . . . . . . . . . . . . . . . . . . . . . . . . . . . . . . . . . . . . . . . . . . . . . . . . . . . 46
Redial list . . . . . . . . . . . . . . . . . . . . . . . . . . . . . . . . . . . . . . . . . . . . . . . . . . . . . . . . . . . . . . . . . . . . . . . . . . . . . 47
Call lists . . . . . . . . . . . . . . . . . . . . . . . . . . . . . . . . . . . . . . . . . . . . . . . . . . . . . . . . . . . . . . . . . . . . . . . . . . . . . . 48
Version 4, 16.09.2005
8

Gigaset C810/810 A / CHN en/ A31008-M2327-Y101-1-7619 / C810-C810A_KomboIVZ.fm / 15.09.2011
Contents
Handset settings . . . . . . . . . . . . . . . . . . . . . . . . . . . . . . . . . . . . . . . . . . . . . . . . . . . . . . . . . 50
Changing the display language . . . . . . . . . . . . . . . . . . . . . . . . . . . . . . . . . . . . . . . . . . . . . . . . . . . . . . . 50
Quick access to numbers . . . . . . . . . . . . . . . . . . . . . . . . . . . . . . . . . . . . . . . . . . . . . . . . . . . . . . . . . . . . . . 50
Setting the date and time . . . . . . . . . . . . . . . . . . . . . . . . . . . . . . . . . . . . . . . . . . . . . . . . . . . . . . . . . . . . . 50
Setting the alarm clock . . . . . . . . . . . . . . . . . . . . . . . . . . . . . . . . . . . . . . . . . . . . . . . . . . . . . . . . . . . . . . . . 51
Audio settings . . . . . . . . . . . . . . . . . . . . . . . . . . . . . . . . . . . . . . . . . . . . . . . . . . . . . . . . . . . . . . . . . . . . . . . . 51
Setting the display . . . . . . . . . . . . . . . . . . . . . . . . . . . . . . . . . . . . . . . . . . . . . . . . . . . . . . . . . . . . . . . . . . . . 53
Activating/deactivating auto answer . . . . . . . . . . . . . . . . . . . . . . . . . . . . . . . . . . . . . . . . . . . . . . . . . . 53
Changing the name of the handset . . . . . . . . . . . . . . . . . . . . . . . . . . . . . . . . . . . . . . . . . . . . . . . . . . . . 54
Restoring the handset factory settings . . . . . . . . . . . . . . . . . . . . . . . . . . . . . . . . . . . . . . . . . . . . . . . . . 54
System settings . . . . . . . . . . . . . . . . . . . . . . . . . . . . . . . . . . . . . . . . . . . . . . . . . . . . . . . . . . . . . . . . . . . . . . . 54
Connecting the telephone to the PABX . . . . . . . . . . . . . . . . . . . . . . . 56
Settings on the base . . . . . . . . . . . . . . . . . . . . . . . . . . . . . . . . . . . . . . . . . . . . . . . . . . . . . 56
Changing the dialling mode . . . . . . . . . . . . . . . . . . . . . . . . . . . . . . . . . . . . . . . . . . . . . . . . . . . . . . . . . . . 56
Setting recall . . . . . . . . . . . . . . . . . . . . . . . . . . . . . . . . . . . . . . . . . . . . . . . . . . . . . . . . . . . . . . . . . . . . . . . . . 56
Setting an automatic prefix . . . . . . . . . . . . . . . . . . . . . . . . . . . . . . . . . . . . . . . . . . . . . . . . . . . . . . . . . . . 56
Temporarily switching to tone dialling (DTMF) . . . . . . . . . . . . . . . . . . . . . . . . . . . . . . . . . . . . . . . . . 56
Settings on the handset . . . . . . . . . . . . . . . . . . . . . . . . . . . . . . . . . . . . . . . . . . . . . . . . . . 57
Changing the dialling mode . . . . . . . . . . . . . . . . . . . . . . . . . . . . . . . . . . . . . . . . . . . . . . . . . . . . . . . . . . . 57
Setting recall . . . . . . . . . . . . . . . . . . . . . . . . . . . . . . . . . . . . . . . . . . . . . . . . . . . . . . . . . . . . . . . . . . . . . . . . . 57
Setting an automatic prefix . . . . . . . . . . . . . . . . . . . . . . . . . . . . . . . . . . . . . . . . . . . . . . . . . . . . . . . . . . . 57
Temporarily switching to tone dialling (DTMF) . . . . . . . . . . . . . . . . . . . . . . . . . . . . . . . . . . . . . . . . . 57
Operating the answering machine (Gigaset C810 A only) . . . . . . 58
Operation via the base . . . . . . . . . . . . . . . . . . . . . . . . . . . . . . . . . . . . . . . . . . . . . . . . . . . 58
Activating/deactivating the answering machine . . . . . . . . . . . . . . . . . . . . . . . . . . . . . . . . . . . 58
Playing back messages/memos . . . . . . . . . . . . . . . . . . . . . . . . . . . . . . . . . . . . . . . . . . . . . . . . . . . . . . . 59
Picking up a call from the answering machine . . . . . . . . . . . . . . . . . . . . . . . . . . . . . . . . . . . . . . . . . 59
Activating/deactivating call screening . . . . . . . . . . . . . . . . . . . . . . . . . . . . . . . . . . . . . . . . . . . . . . . . . 59
Recording memos . . . . . . . . . . . . . . . . . . . . . . . . . . . . . . . . . . . . . . . . . . . . . . . . . . . . . . . . . . . . . . . . . . . . 60
Recording an announcement . . . . . . . . . . . . . . . . . . . . . . . . . . . . . . . . . . . . . . . . . . . . . . . . . . . . . . . . . 60
Operation via the handset . . . . . . . . . . . . . . . . . . . . . . . . . . . . . . . . . . . . . . . . . . . . . . . . 61
Activating/deactivating the answering machine . . . . . . . . . . . . . . . . . . . . . . . . . . . . . . . . . . . 61
Playing back messages/memos . . . . . . . . . . . . . . . . . . . . . . . . . . . . . . . . . . . . . . . . . . . . . . . . . . . . . . . 61
Picking up a call from the answering machine . . . . . . . . . . . . . . . . . . . . . . . . . . . . . . . . . . . . . . . . . 62
Activating/deactivating call screening . . . . . . . . . . . . . . . . . . . . . . . . . . . . . . . . . . . . . . . . . . . . . . . . . 62
Recording an announcement . . . . . . . . . . . . . . . . . . . . . . . . . . . . . . . . . . . . . . . . . . . . . . . . . . . . . . . . . 62
Setting the answering machine mode . . . . . . . . . . . . . . . . . . . . . . . . . . . . . . . . . . . . . . . . . . . . . . . . . 63
Setting the recording parameters . . . . . . . . . . . . . . . . . . . . . . . . . . . . . . . . . . . . . . . . . . . . . . . . . . . . . 63
Remote operation . . . . . . . . . . . . . . . . . . . . . . . . . . . . . . . . . . . . . . . . . . . . . . . . . . . . . . . 64
Calling the answering machine . . . . . . . . . . . . . . . . . . . . . . . . . . . . . . . . . . . . . . . . . . . . . . . . . . . . . . . . 64
Operating the answering machine remotely . . . . . . . . . . . . . . . . . . . . . . . . . . . . . . . . . . . . . . . . . . . 64
Replaying messages remotely . . . . . . . . . . . . . . . . . . . . . . . . . . . . . . . . . . . . . . . . . . . . . . . . . . . . . . . . . 64
Activating/deactivating the answering machine remotely . . . . . . . . . . . . . . . . . . . . . . . . . . . . . . 64
Version 4, 16.09.2005
9

Gigaset C810/810 A / CHN en/ A31008-M2327-Y101-1-7619 / C810-C810A_KomboIVZ.fm / 15.09.2011
Contents
Customer Service & Assistance . . . . . . . . . . . . . . . . . . . . . . . . . . . . . . . . . . . . . . . . . . . 65
Questions and answers . . . . . . . . . . . . . . . . . . . . . . . . . . . . . . . . . . . . . . . . . . . . . . . . . . 65
Appendix . . . . . . . . . . . . . . . . . . . . . . . . . . . . . . . . . . . . . . . . . . . . . . . . . . . . . . . . . . . . . . . 66
Care . . . . . . . . . . . . . . . . . . . . . . . . . . . . . . . . . . . . . . . . . . . . . . . . . . . . . . . . . . . . . . . . . . . . . . . . . . . . . . . . . . 66
Contact with liquid . . . . . . . . . . . . . . . . . . . . . . . . . . . . . . . . . . . . . . . . . . . . . . . . . . . . . . . . . . . . . . . . . . . 66
Specifications . . . . . . . . . . . . . . . . . . . . . . . . . . . . . . . . . . . . . . . . . . . . . . . . . . . . . . . . . . . . . . . . . . . . . . . . . 66
Writing and editing text . . . . . . . . . . . . . . . . . . . . . . . . . . . . . . . . . . . . . . . . . . . . . . . . . . . . . . . . . . . . . . . 67
Index . . . . . . . . . . . . . . . . . . . . . . . . . . . . . . . . . . . . . . . . . . . . . . . . . . . . . . . . . . . . . . . . . . . 68
Version 4, 16.09.2005
10
Gigaset C810/810 A / CHN en/ A31008-M2327-Y101-1-7619 / security.fm / 15.09.2011
$
ƒ
Safety precautions
Warning
Read the safety precautions and the user guide before use.
Explain their content and the potential hazards associated with using the telephone to your
children.
Only use the mains adapters supplied, as indicated on the underside of the base.
Safety precautions
Only use the recommended, rechargeable batteries (
erwise result in significant health risks and personal injury.
The operation of medical appliances may be affected. Be aware of the technical conditions in your particular environment, e.g. doctor's surgery.
Do not hold the rear of the handset to your ear when it is ringing or when speaker
mode is activated. Otherwise you risk serious and permanent damage to your hearing.
Your Gigaset is compatible with the majority of digital hearing aids on the market.
However, perfect function with all hearing aids cannot be guaranteed.
The handset may cause an unpleasant humming or whistling noise in hearing aids
or cause them to overload. If you require assistance, please contact the hearing aid
supplier.
Do not install the base or charging cradle in bathrooms or shower rooms. The base
is not splashproof (
Do not use your phone in environments with a potential explosion hazard (e.g. paint
shops).
If you give your Gigaset to someone else, make sure you also give them the
user guide.
Please remove faulty bases from use or have them repaired by our Service department, as they could interfere with other wireless services.
¢ page 66).
¢ page 66) as this could oth-
Version 4, 16.09.2005
11
Gigaset C810/810 A / CHN en/ A31008-M2327-Y101-1-7619 / starting.fm / 15.09.2011
1
2 3
4
5
6
7
8
9
10
First steps
First steps
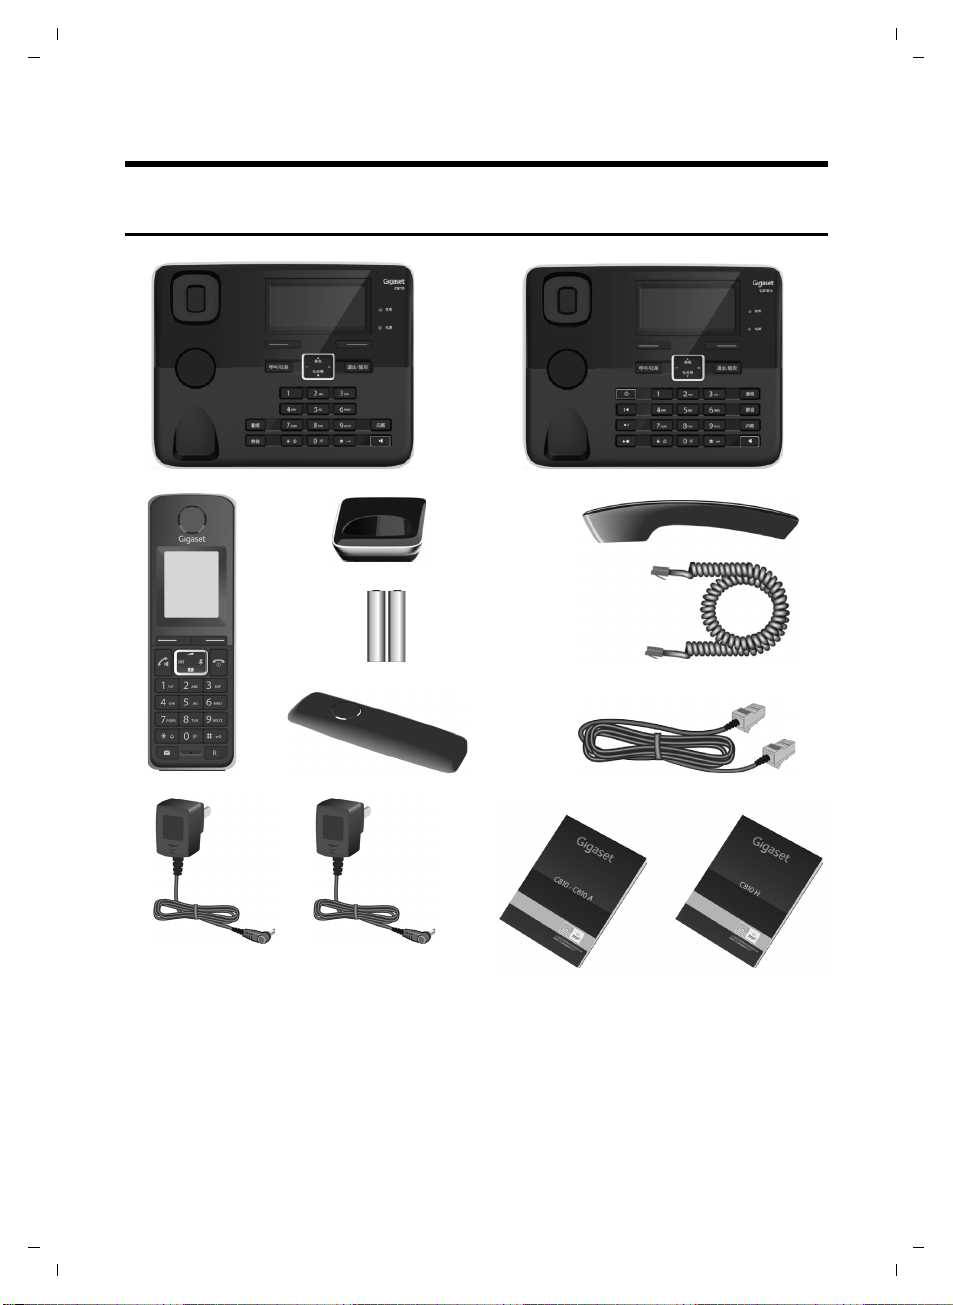
Checking the pack contents
or
1. one Gigaset C810 or C810 A base
2. one Gigaset C810H handset
3. one charger for Gigaset C810H
4. two batteries
5. one battery cover
6. one receiver
7. one receiver cable
12
Version 4, 16.09.2005
8. one phone cable
9. two mains adapter
10.one user guide C810/C810 A
11.one user guide C810H
Gigaset C810/810 A / CHN en/ A31008-M2327-Y101-1-7619 / starting.fm / 15.09.2011
1
2
1
1
1
2
1
3
1
3
Setting up the base and handset charging cradle
The base and charging cradle are designed for use in enclosed dry rooms with a temperature
range of +5°C to +45°C.
¤ Install the base on a level, non-slip surface in a central location in your house or flat.
Please note
Make sure you observe the range of the base for the handset connection.
This is up to 300 m in unobstructed outdoor areas and up to 50 m inside buildings.
The phone's feet do not usually leave any marks on surfaces. However, due to the multitude of
different varnishes and polishes used on today's furnishings, the occurrence of marks on the
surfaces cannot be completely ruled out.
¤ The display is protected by a plastic film. Please remove the protective film!
Please note:
u Never expose the telephone to the influence of heat sources, direct sunlight or other electri-
cal devices.
u Protect your Gigaset from moisture, dust, corrosive liquids and vapours.
First steps
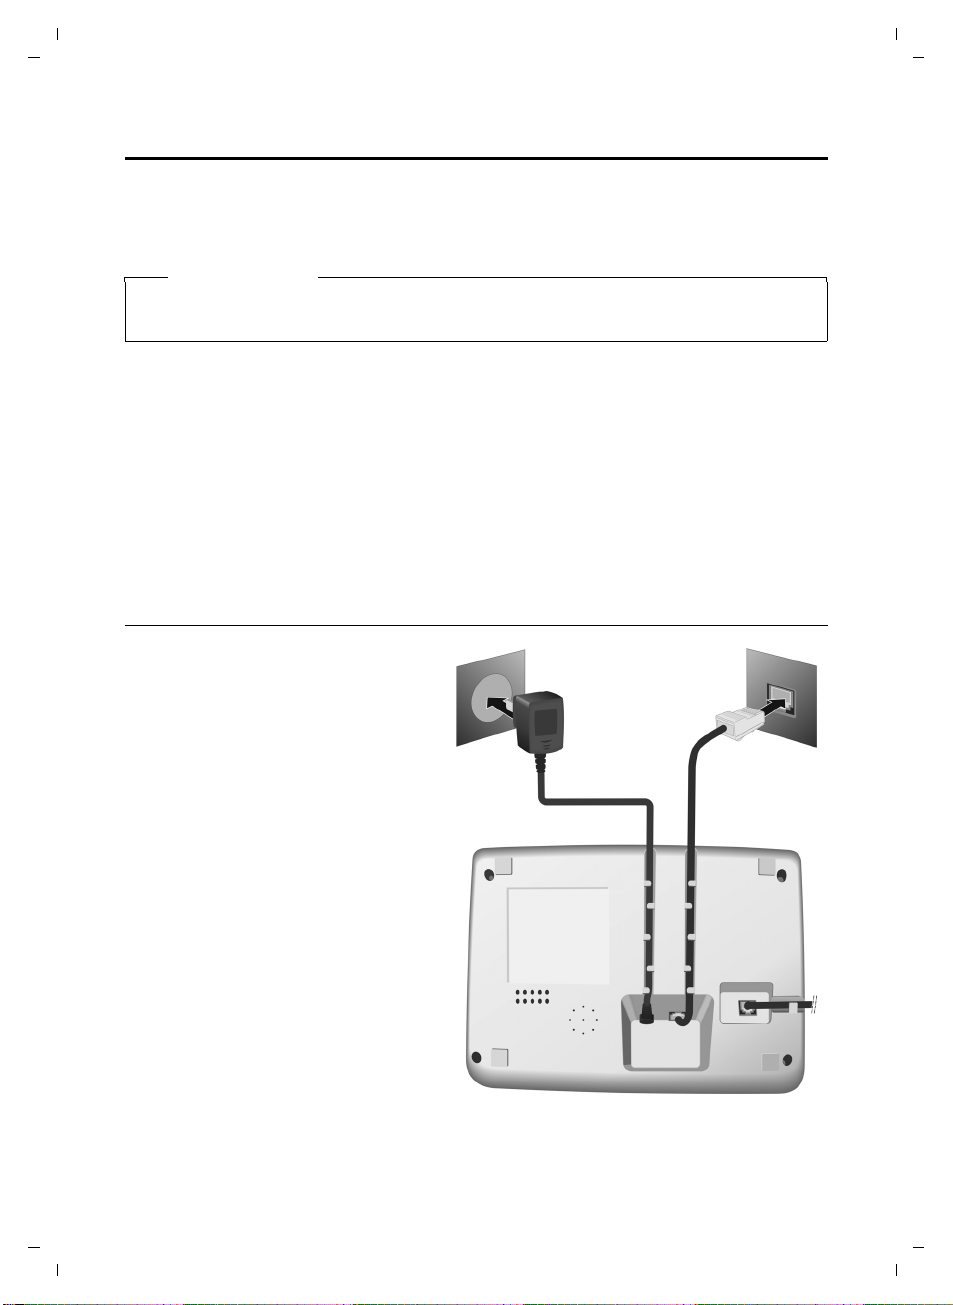
Connecting the base
¤ Connect the receiver to the
telephone using the coiled cable
supplied 1.
¤ Connect the telephone jack 2.
¤ Then connect the mains adapter 3.
¤ Insert the cables into the cable
ducts.
Please note:
u The mains adapter must always be
connected, as the phone will not
operate without a mains connection.
¤ Only use the mains adapter and
phone cord supplied. Pin connections on telephone cables can vary
(pin connections
¢ page 67).
13
Version 4, 16.09.2005
Gigaset C810/810 A / CHN en/ A31008-M2327-Y101-1-7619 / starting.fm / 15.09.2011
1
2
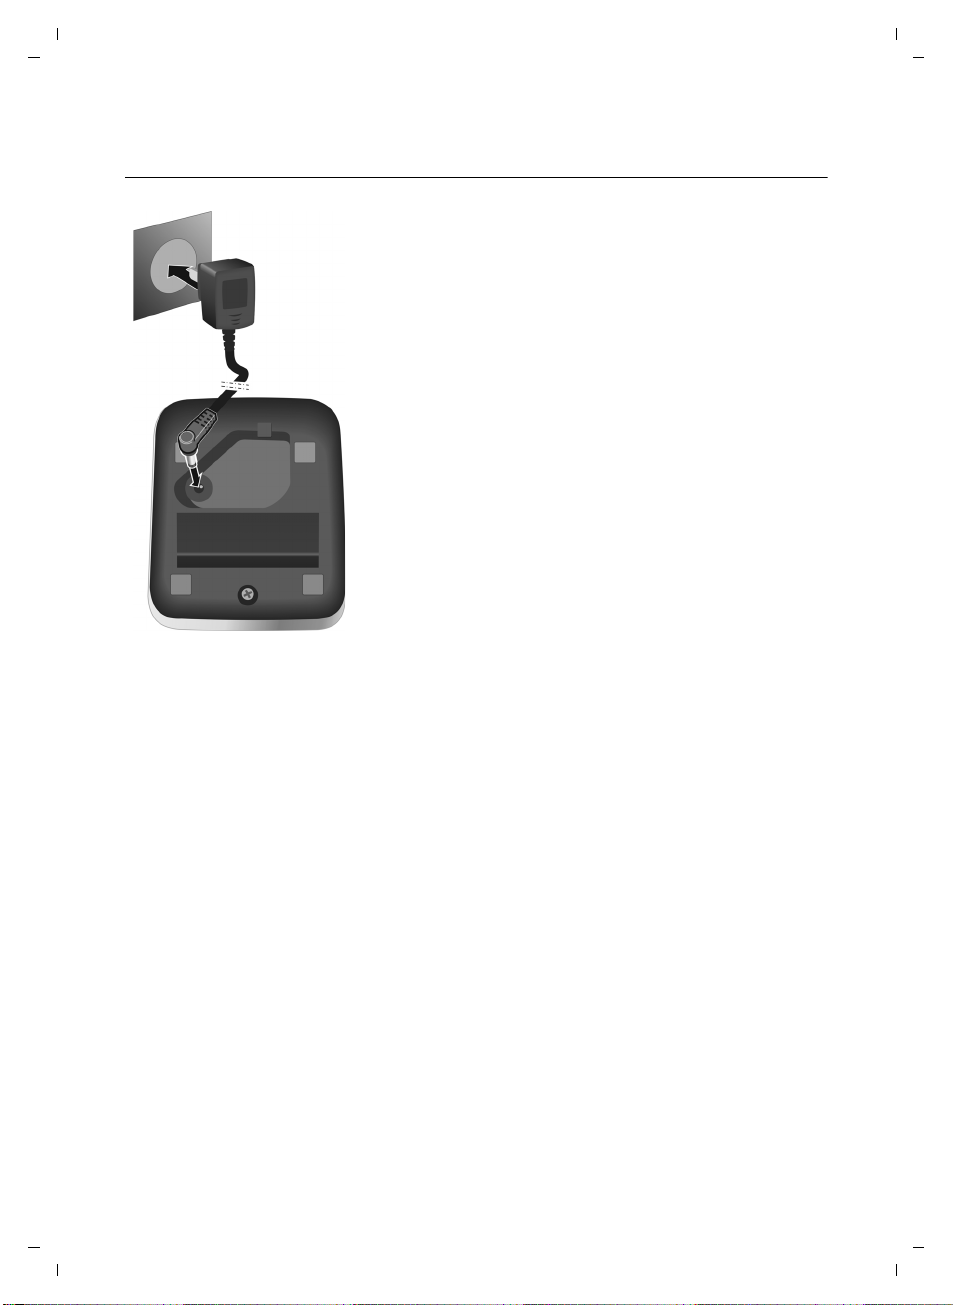
¤ Connect the mains adapter to the port on the underside
of the charger 1.
¤ Plug the mains adapter into the plug socket 2.
First steps
Connecting the handset charging cradle
Version 4, 16.09.2005
14
Gigaset C810/810 A / CHN en/ A31008-M2327-Y101-1-7619 / starting.fm / 15.09.2011
First steps
Setting up the handset for use
The display is protected by a plastic film. Please remove the protective film!
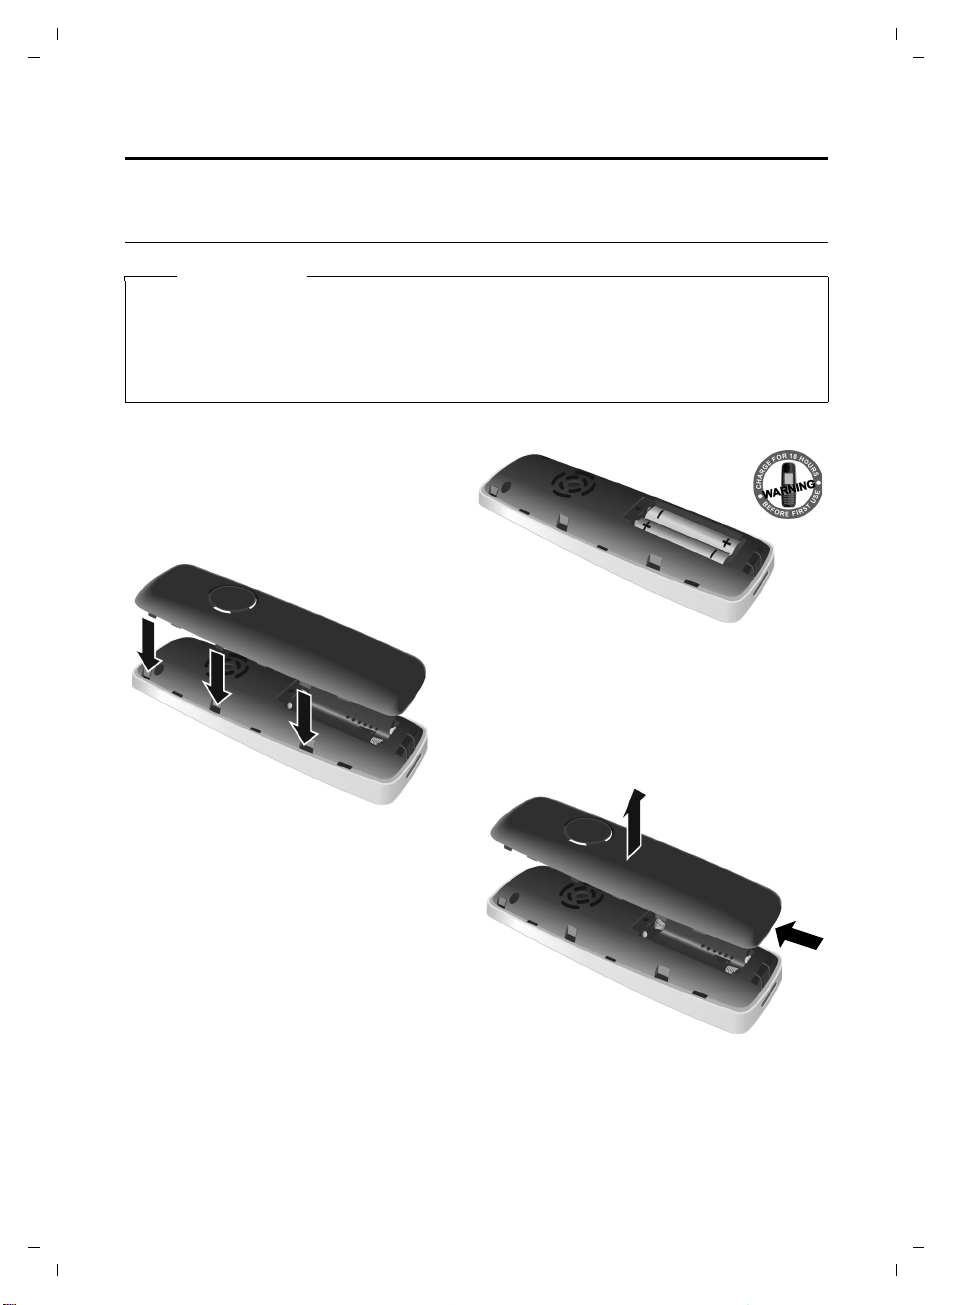
Inserting the batteries and closing the battery cover
Warning
Only use the rechargeable batteries (¢page 66) recommended by Gigaset Communications GmbH, i.e. never use conventional (non-rechargeable) batteries, as this could result in
significant health risks and personal injury. For example, the outer casing of the batteries
could be damaged or the batteries could explode. The phone could also malfunction or be
damaged as a result of using batteries that are not of the recommended type.
¤ Insert the batteries the right way round.
The polarity is indicated in/on the battery
compartment.
If you need to open the battery cover, for
instance to replace the batteries, place your
fingertip in the cavity at the lower side of the
cover and pull the battery cover upwards.
15
¤ First insert the battery cover at the top.
Then press the cover until it clicks into
place.
Version 4, 16.09.2005
Gigaset C810/810 A / CHN en/ A31008-M2327-Y101-1-7619 / starting.fm / 15.09.2011
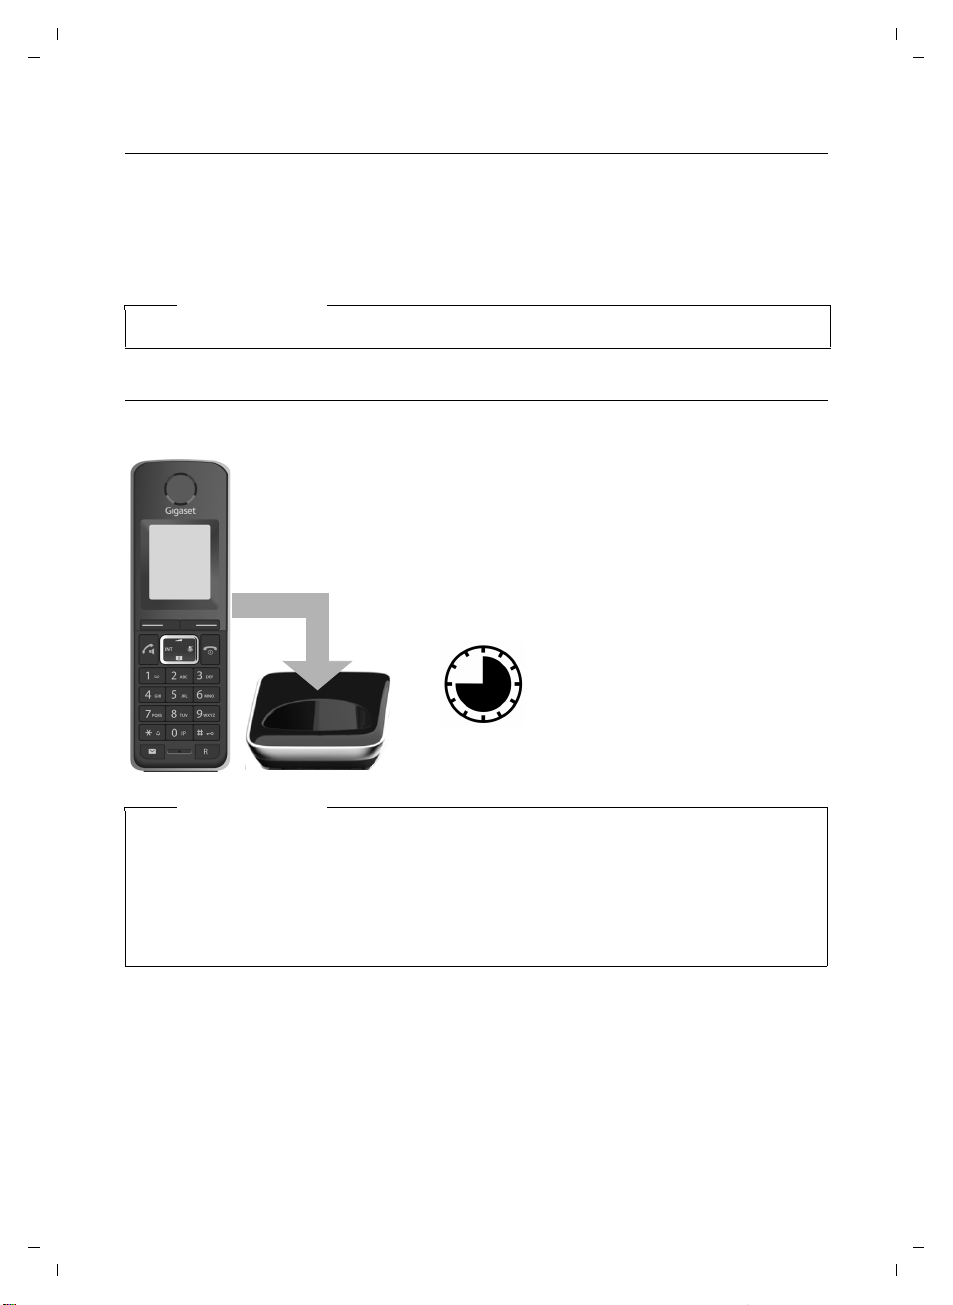
¤ Place the handset in the charging cradle for 10
hours.
¤ Then remove the handset
from the charging cradle
and do not replace it until
the batteries are fully discharged.
10 h
Placing the handset in the charging cradle
¤ Place the handset in the charging cradle with its display facing forward.
The handset delivered is registered with the base at the factory. You do not need to complete a
registration. If you wish to use your handset with a different base or use further handsets with
your base, you will have to register the handset manually,
To charge the batteries, leave the handset in the charging cradle.
Please note
Only place the handset in the charging cradle that is intended for it.
Initial charging and discharging of the batteries
The correct charge level can only be displayed if the batteries are first fully charged and discharged.
¢ page 39.
First steps
Version 4, 16.09.2005
Please note
u After the first battery charge and discharge you may replace your handset in the charg-
ing cradle after every call.
u Always repeat the charging and discharging procedure if you remove the batteries from
the handset and reinsert them.
u The batteries may warm up during charging. This is not dangerous.
u After a while, the charge capacity of the batteries will decrease for technical reasons.
16
Gigaset C810/810 A / CHN en/ A31008-M2327-Y101-1-7619 / starting.fm / 15.09.2011
MenuMemo
2011-08-17 09:30
Gigaset
Date/Time
OkBack
2011-08-17
Date/Time
OkBack
02:30
First steps
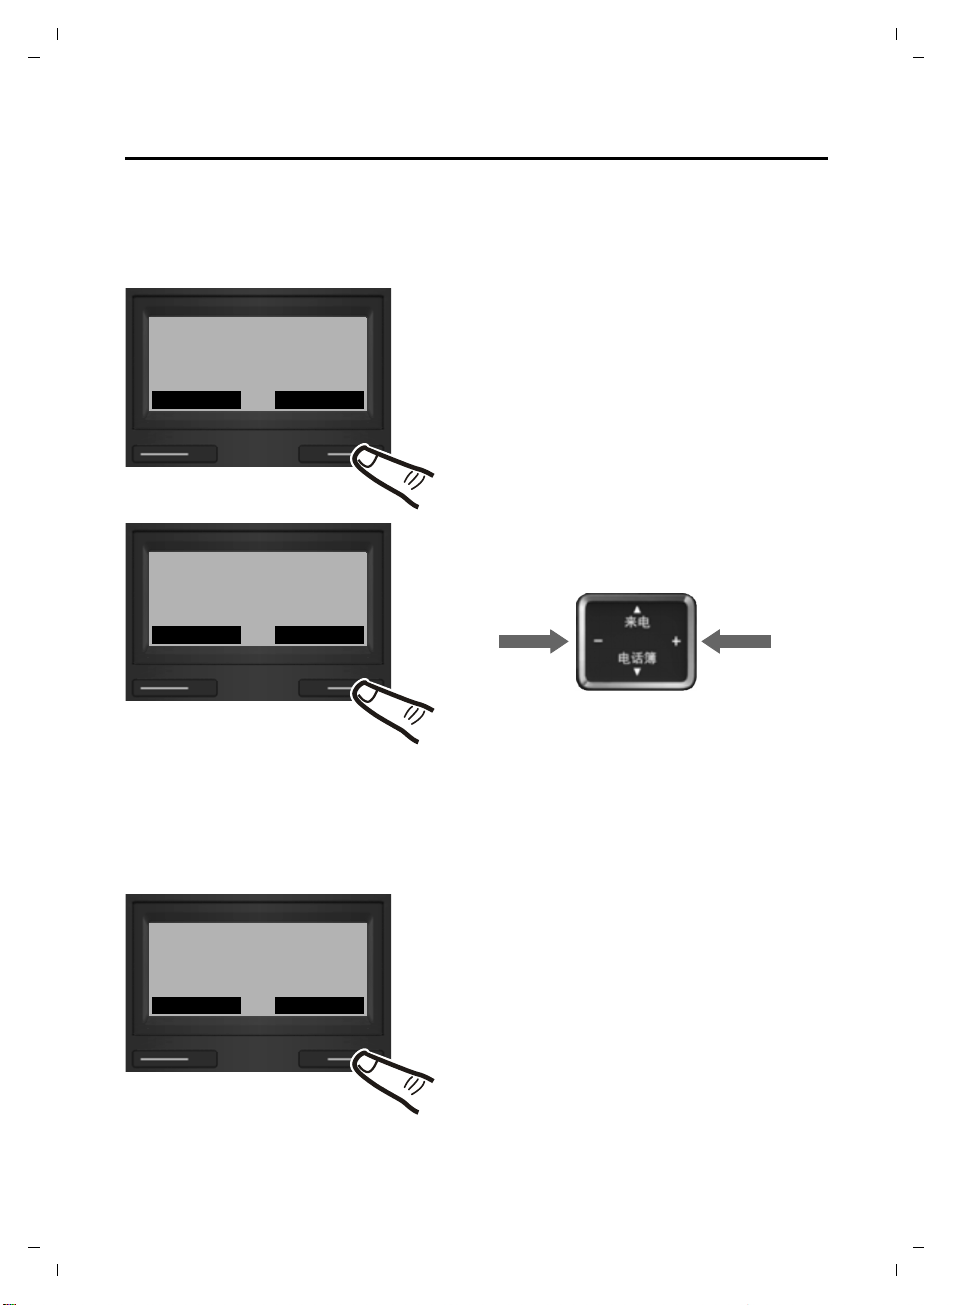
Setting the date and time
Set the date and time so that the correct date and time can be assigned to incoming calls, and
so that the alarm can be used. You can set date and time on the base or any registered handset.
On the base
¤ Press the key below §§Menu§§ on the screen dis-
play to open the display menu.
The menu is opened. The first entry Date/
Time is selected.
¤ Press the key below §§Ok§§ to start the date and
time settings.
¤ The active input position flashes.
¤ Press the right or left control key to change
the input position and correct an entry.
Version 4, 16.09.2005
Your telephone is now ready to use!
17
¤ Enter the year, month and day as an 8-digit
number via the keypad. The first two digits
(20) are fixed, i.e. you only have to enter six
digits.
E.g. QO2L for
26/09/2011.
¤ Press the key below §§Ok§§ to set the time.
¤ Enter the hours and minutes in 4-digit for-
mat via the keypad, e.g. QM/5
for 07:15 am.
Change the input position with the control
key if necessary.
¤ Press the key below §§Ok§§ to save your set-
tings.
The display shows Saved. You will hear a confirmation tone and the display will automatically
return to the main menu.

Gigaset C810/810 A / CHN en/ A31008-M2327-Y101-1-7619 / starting.fm / 15.09.2011
g
g
g
g
g
g
First steps
What would you like to do next?
Now you have successfully started your Gigaset, you will probably want to adapt it to your personal requirements. Use the following guide to quickly locate the most important subjects.
If you are unfamiliar with menu-driven devices such as other Gigaset telephones you should
first read the sections entitled "Using the base" on page 19 or "Using the handset" on page 34.
Information on ... ... is located here.
Setting the ringtone and volume
Setting the earpiece volume
Recording a personal announcement for the
answering machine
Operating the telephone on a PABX page 56
Registering new Gigaset handsets to the base page 39
Transferring directory entries to new handset(s) page 28
If you have any questions about using your phone, please read the tips on
troubleshooting (
¢ page 65) or contact our Customer Care team (¢ page 65).
for the base
for the handset
for the base
for the handset
at the base
at the handset
page 31
page 51
page 31
page 51
page 60
page 62
Version 4, 16.09.2005
18
Gigaset C810/810 A / CHN en/ A31008-M2327-Y101-1-7619 / BS_using.fm / 15.09.2011
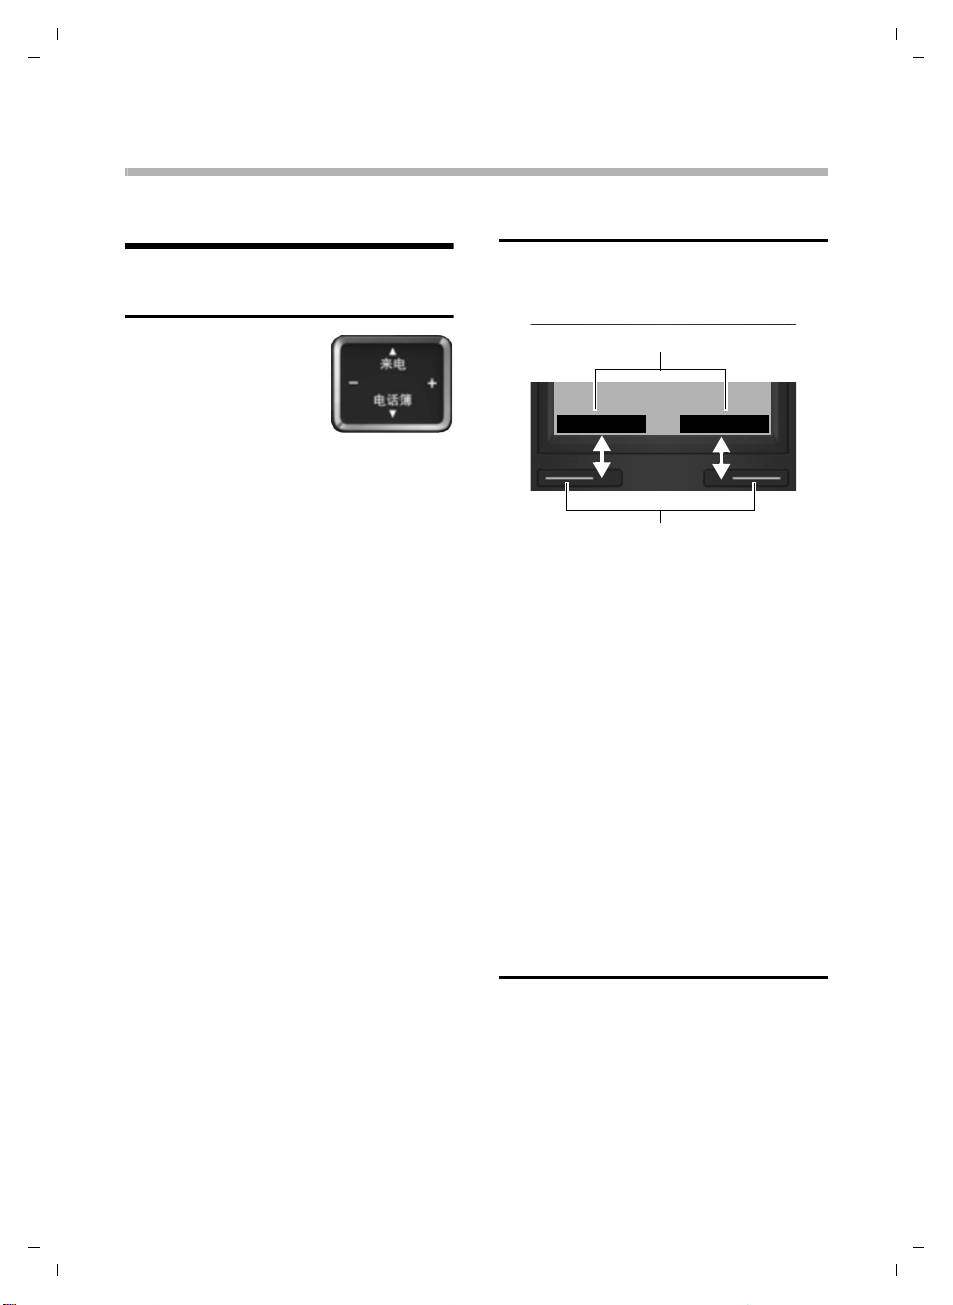
Display keys
MenuMemo
Display key functions
The Gigaset C810/810 A base
Using the base
Using the base
Control key
Below, the side of the control key you need to press
in the respective operating situation is marked in
black (top, bottom, right,
left), e.g. v for "press
right on the control key" or t for "press at
the top of the control key".
The control key has a number of different
functions:
When the base is in idle status
s Open the directory.
v Increase the ringer volume.
u Decrease the ringer volume.
t Open the call list.
In the main menu
t, s, v or u
Navigate to the required function.
In submenus and lists
t / s Scroll up/down line by line.
In input fields
Use the control key to move the cursor up
t, down s, right v or left u. Press and
hold v or u to move the cursor word by
word.
During an call
s Open the directory.
u / v Adjust the loudspeaker volume
for earpiece and speaker mode.
Display keys
The functions of the display keys change
depending on the particular operating situation. Example:
Some important display keys:
§§Menu§§ Open the menu..
§§Option§§ Open a submenu for further
functions.
§§Ok§§ Confirm selection.
§§< C§§ Delete key: delete one charac-
ter/word at a time from right to
left.
§§Back§§ Go back one menu level or can-
cel operation.
§§Save§§ Store entry.
In the following description the instruction
“press the display key
“press the display key below the display key
function labelled XXX“.
§XXX§“ means:
Keys on the keypad
#/ Q/ G etc.
Press the matching key on the
keypad.
~ Enter digits or letters.
Version 4, 16.09.2005
19

Gigaset C810/810 A / CHN en/ A31008-M2327-Y101-1-7619 / BS_using.fm / 15.09.2011
Using the base
Correcting incorrect entries
You can correct incorrect characters in the
input fields by navigating to the incorrect
entry using the control key. You can then:
u Delete the character by briefly pressing
Ñ or press and hold to delete the word
to the left of the cursor.
u Insert characters next to the cursor.
u Overwrite the highlighted (flashing)
character, e.g. when entering time and
date.
Activating/deactivating the keypad lock
The keypad lock prevents any inadvertent
use of the phone.
# Press and hold the hash key in
idle status to activate or deactivate the keypad lock. You will
hear the confirmation tone.
If the keypad lock is activated, the
bol is displayed and a warning tone will be
emitted when you press a key.
The keypad lock deactivates automatically
when you receive a call. It is reactivated
when the call is ended.
˝ sym-
Please note
When the keypad lock is active, you can
call emergency numbers only using the
receiver at the base.
Menu guidance
You can access your telephone's functions
using a menu that has a number of levels.
The full menu tree is shown in the next sec-
¢ page 21.
tion,
Opening the main menu
Browsing through the menu
To access a function or to open the corresponding submenu (next menu level):
¤ Use the control key q to select the
required function/submenu and press
the display key
To return to the previous menu level or to
cancel the operation.
§Ok§.
¤ Briefly press the display key §Back§.
Reverting to idle status
You can revert to idle status from anywhere
in the menu as follows:
¤ Press the end key B.
Or:
¤ Do not press any key: after 2 minutes the
display will automatically revert to idle
status.
Settings that have not been saved by selecting the display key
§Ok§ or §Save§ will be lost.
Illustration of menu operation in the user guide
Menu operations are shown in the user
guide in abbreviated form.
Example:
The illustration:
§§Menu§§ ¢Audio Settings ¢ Ringer
Settings
means:
¢ Ringer Melody
¤ Press the §§Menu§§ display key to open the
menu.
¤ Use the control key q to select Audio
Settings, press
§Ok§.
¤ Use the control key q to select Ringer
Settings, press
§Ok§.
¤ Use the control key q to select Ringer
Melody, press
§Ok§.
Version 4, 16.09.2005
¤ When the telephone is in idle status press
the Menu display key to open the main
menu.
20
Gigaset C810/810 A / CHN en/ A31008-M2327-Y101-1-7619 / BS_using.fm / 15.09.2011
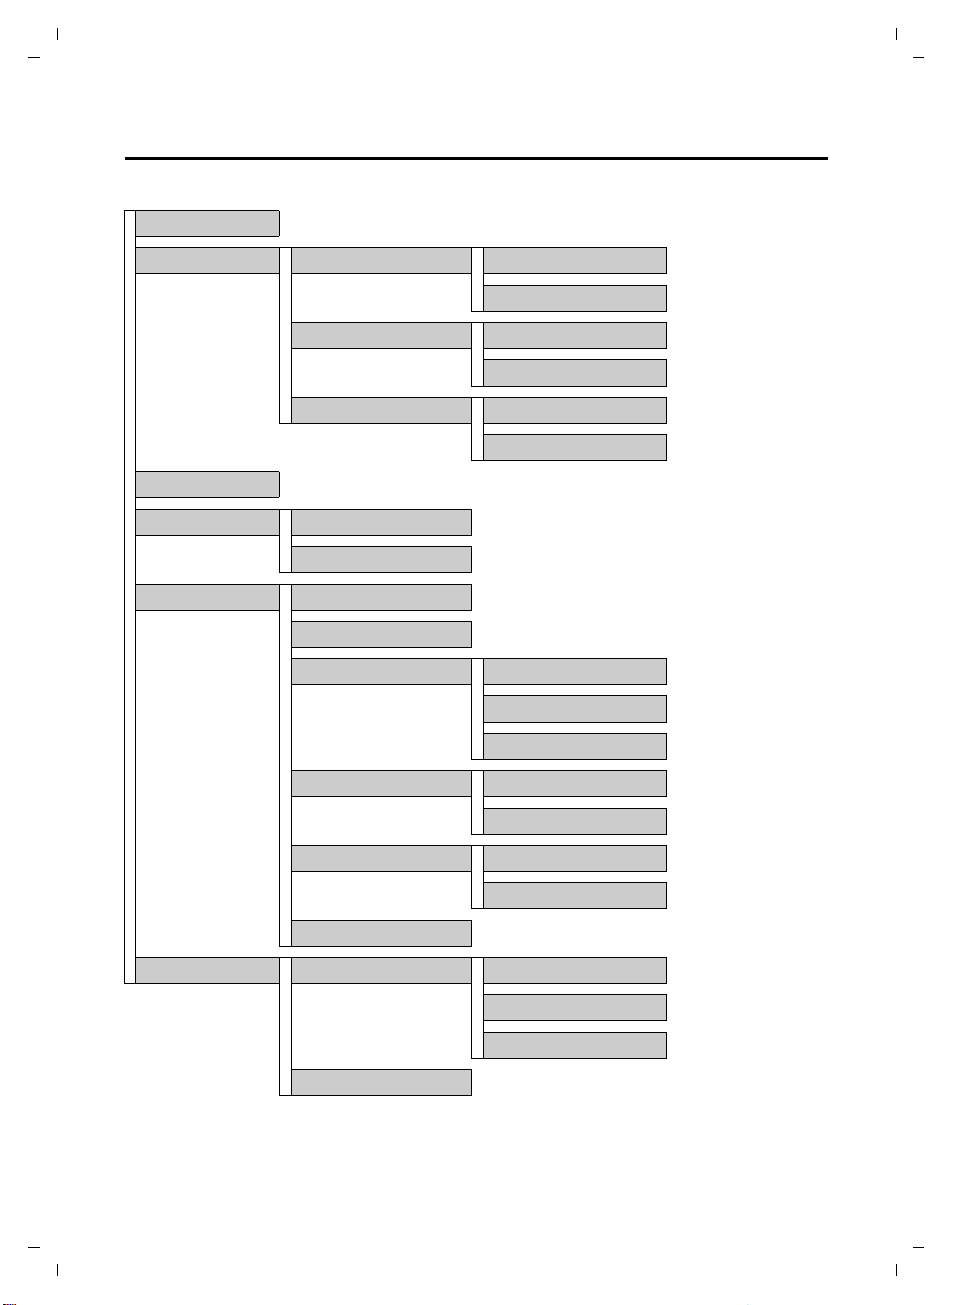
Base menu overview
To open the main menu press the §Menu§ display key.
Date/Time ¢ page 30
Audio Settings Call Volume Earpiece Volume ¢ page 31
Handsfree Volume ¢ page 31
Ringer Settings Ringer Volume ¢ page 31
Ringer Melody ¢ page 31
Advisory Tones Key Tones ¢ page 32
Confirmation Tones ¢ page 32
Display Contrast ¢ page 32
Base Settings Language ¢ page 30
Reset Base ¢ page 33
Using the base
System Settings Music on Hold ¢ page 32
System PIN ¢ page 32
Additional Features Dialing Mode ¢ page 56
Recall ¢ page 56
Barge In ¢ page 26
Auto Prefix Activation ¢page 56
Prefix No. ¢ page 56
Call List Type All Calls ¢page 29
Missed Calls ¢ page 29
Call Barring ¢ page 33
Voice Mail Announcements Rec. Announcement ¢ page 60
Play Announcement ¢ page 60
Del. Announcement ¢ page 60
Call Screening ¢ page 59
Version 4, 16.09.2005
21
Gigaset C810/810 A / CHN en/ A31008-M2327-Y101-1-7619 / BS_telefony.fm / 15.09.2011
Making calls
Making calls
You make a call using the phone's receiver or
the speaker.
Making an external call
External calls are calls using the public telephone network.
~P Enter the number and lift the
receiver.
Or:
P~ Lift the receiver and then enter
the number.
The number is limited to 32 digits.
You are shown the duration of the call while
the call is in progress.
Instead of using the receiver:
ø Press the speaker key to make a
call via the speaker.
You can also switch at any time during the
call. Throughout the whole of this section,
the P (or Q) icon can always represent
ø.
If the line is in use by a handset Line In Use is
displayed.
Please note
Dialling with the directory (¢page 27),
call list (
(
keying in phone numbers.
¢ page 29) and redial list
¢ page 28) saves you from repeatedly
Quick dialling
You can assign a number from the directory
to each of the digit keys
2 to O,
¢ page 50.
When the base is in idle status:
¤ Press and hold the digit key.
The number is dialled immediately.
Please note
If no quick dial number has been stored
on the digit key, the directory opens,
allowing you to assign a number.
Ending a call
Q Put down the receiver, or press
the speaker key ø if the call
was made handsfree.
Accepting a call
The base indicates an incoming call in three
ways: by ringing, by a display on the screen
and by the flashing talk LED.
You can accept the call by:
¤ Lifting the receiver P.
¤ Pressing the speaker key ø to make
the call handsfree.
To deactivate the ringtone, press the
display key. You can accept the call as long as
it is displayed on the screen.
§Silence§
Version 4, 16.09.2005
Please note
Specific numbers may not being allowed
to be dialled, because they are barred
¢ page 33).
(
22

Gigaset C810/810 A / CHN en/ A31008-M2327-Y101-1-7619 / BS_telefony.fm / 15.09.2011
Silence
Peter Smith
01234567890
Making calls
Calling Line Identification (CLI)
Calling Line Identification is a telephony
service that transmits caller identification
information (number and name). When you
receive a call, the caller's number and/or
name is displayed on the screen according
to the following rules:
Number/name is transmitted and
stored in the directory
The caller’s number and the name according
to the directory entry are displayed.
Number/name is transmitted but not
stored in the directory
If the number is transmitted it is displayed. If
the name is transmitted, it replaces the
number.
If the name exceeds 16 characters, only the
first 16 characters are displayed. If the
number exceeds 24 digits, only the first 24
digits are displayed.
Number/name is not transmitted
External Call is displayed.
Activating/deactivating speaker mode
Activating while dialling
~ø Enter the number and press the
speaker key.
When the speaker mode is activated, the
ø key lights up.
¤ You should inform your caller before you
use the speaker function so that they
know someone else is listening.
Switching between earpiece and
speaker mode
ø Press the speaker key.
During a call and when listening to the
answering machine (Gigaset C810 A only),
activate or deactivate speaker mode.
If you wish to place the receiver in the base
during a call:
¤ Press and hold the speaker key ø while
placing the receiver in the base.
For instructions on how to adjust the loudspeaker volume,
Adjusting the earpiece/ speaker volume during a call
To adjust the earpiece or speaker volume
during a call:
r Use the control key to adjust the
¢ page 31.
volume in five levels.
Version 4, 16.09.2005
Speaker mode
Instead of putting the receiver to your ear
you can make a call using the speaker. This
allows other people to participate in the call.
Switching to mute
You can deactivate the microphone in the
receiver of the base during an external call.
F Press the key to mute the micro-
phone. The display shows Mute
On. Press the key again to reactivate the microphone.
23
 Loading...