

Page 1

Page 2
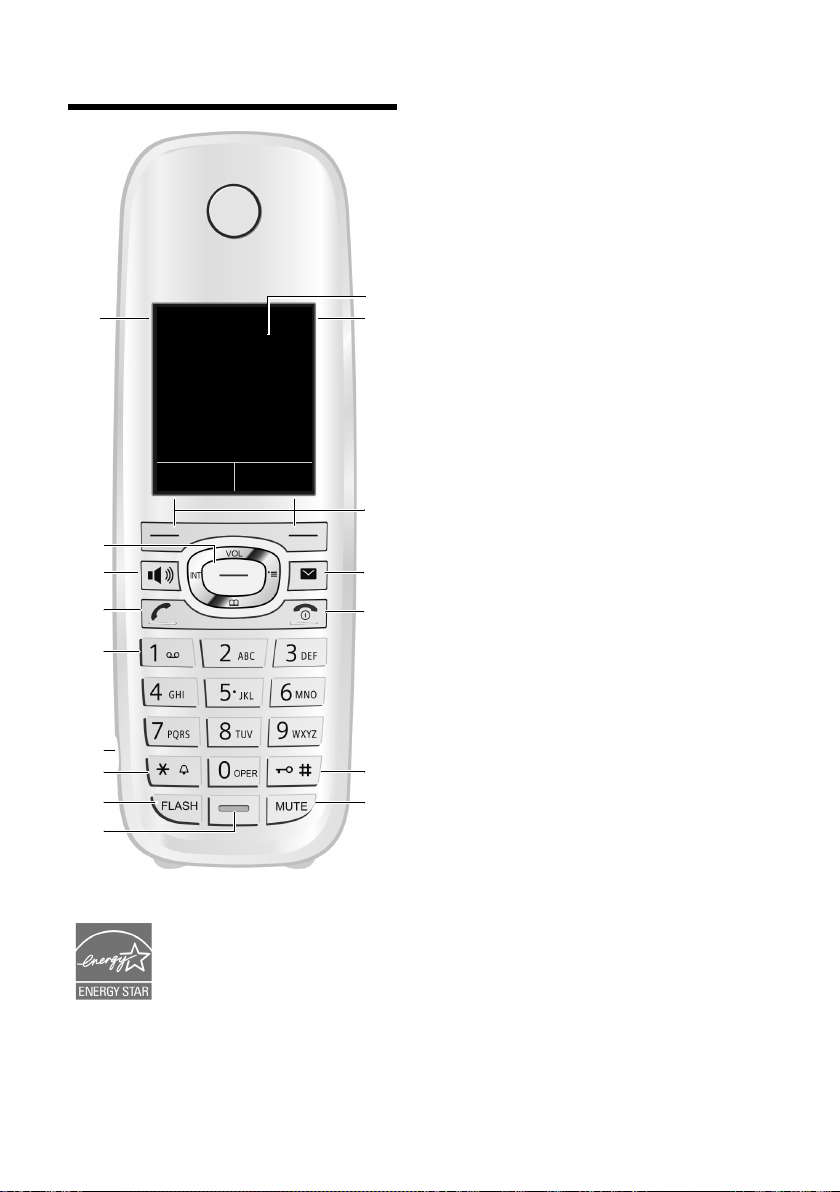
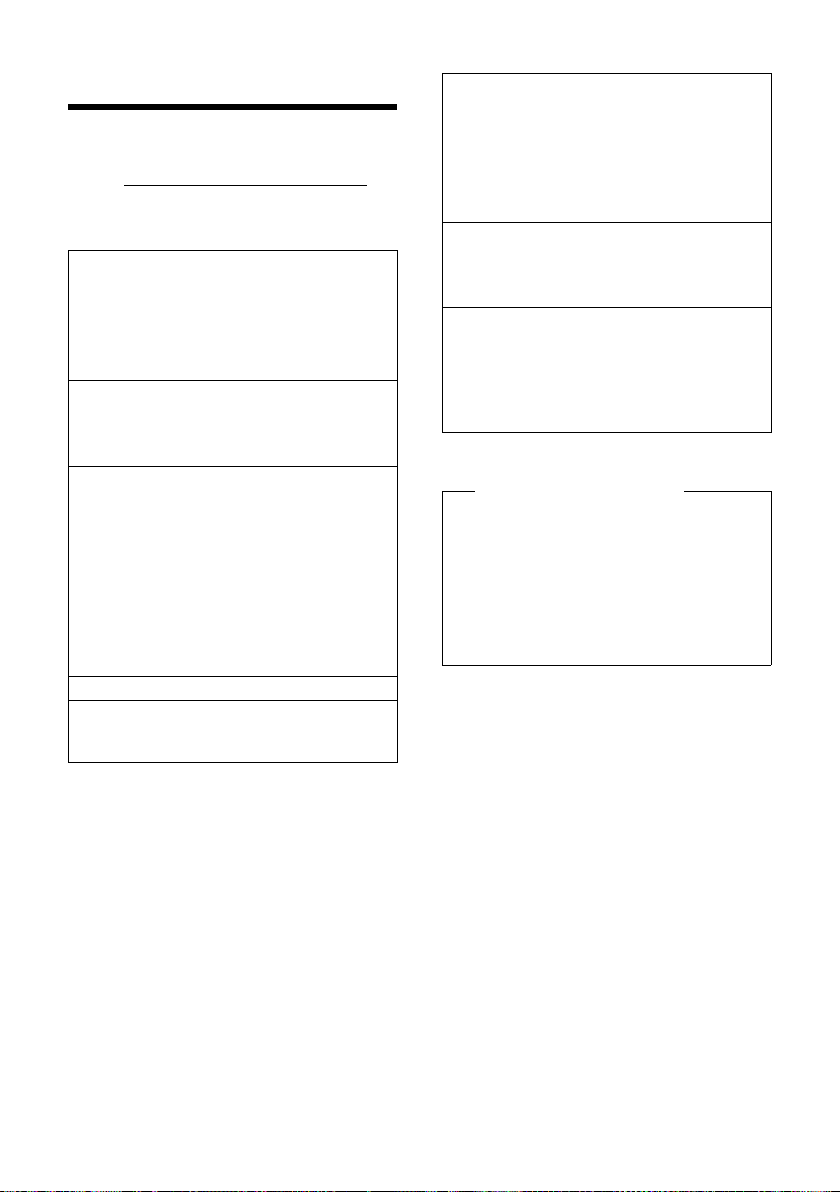
The handset at a glance
i
V
07:15am
INT 1 14 Oct
INT
Calls
2
3
5
4
6
7
15
13
11
8
1
14
16
9
10
12
The handset at a glance
1 Display in idle status
2 Battery charge status (
3 Display keys (
4 Message key (
Access to call and message lists;
Flashes: new message or new call
5 End call key, On/Off key
End call, cancel function, go back one menu
level (press briefly), back to idle status (press
and hold), activate/deactivate handset (press
and hold in idle status)
6 Pound key
Keypad lock on/off (press and hold in
idle status);
toggles between upper/lower case and digits
7 MUTE key (
Mute the microphone
8 Microphone
9 FLASH key
- Flashes: consultation call
- Insert a dialing pause (press and hold)
10 Star key
Ringtone on/off (press and hold);
with an open connection: switch between
pulse dialing/tone dialing (press briefly);
Text input: Open table of special characters
11 Headset connection (
12 Key 1
Dial network mailbox (press and hold)
13 Talk k ey
Flashes: incoming call;
Accept a call; open redial list (press and hold);
start dialing (press briefly)
14 Speaker key
Switch between earpiece and speaker mode
15 Control key (
16 Signal strength (
Green: Eco Mode activated (
¢page 19)
¢page 27)
¢page 18)
¢page 15)
¢page 33)
¢page 16)
¢page 15)
¢page 35)
2
Page 3
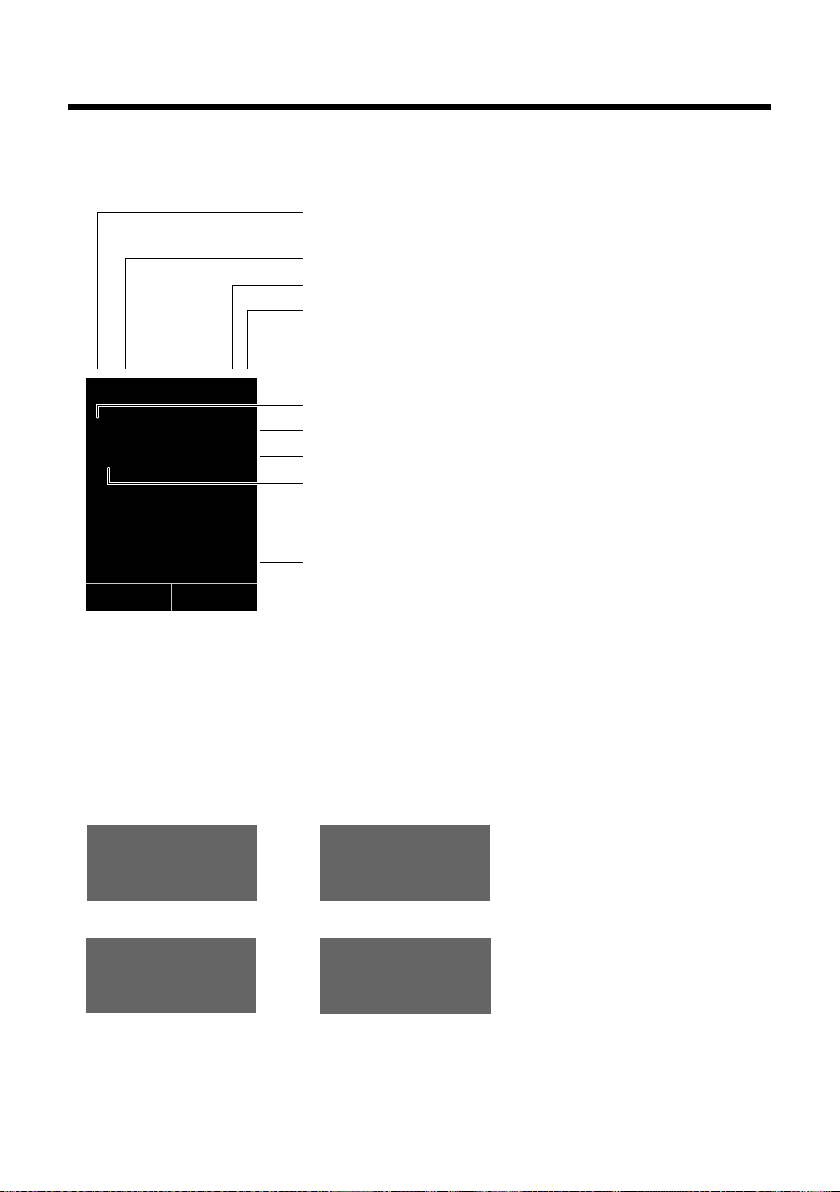
Display symbols
Ø
«
Ú
Signaling
External call (¢ page 26)
ØåÚ
Internal call (¢page 27)
i ó V
Û 08:00
07:15am
INT 1 Oct 14
Ã
™
02 10 08
INT
Calls
ØðÚ
Anniversary (¢ page 31)
ØìÚ
Alarm clock (¢ page 35)
Signal strength i (¢ page 35)
Ringtone switched off (
¢ page 40)
Battery charging (
¢ page 15)
Battery charge status (
¢ page 15)
Alarm switched on and wake-up time (
¢ page 35)
Current time (
¢ page 15)
Current day and month (
¢ page 15)
Name of the handset
Number of new messages:
u à on the network mailbox (¢page 32)
u ™ in the list of missed calls (¢ page 33)
u in the list of missed alarms (¢ page 33)
Display symbols
The following symbols may display, depending on the settings and the operating status of your
telephone:
3
Page 4

Contents
Contents
The handset at a glance . . . . . . . . . . . . . . . . . . . . . . . . . . . . . . . . . . . . . . . . . . . . 2
Display symbols . . . . . . . . . . . . . . . . . . . . . . . . . . . . . . . . . . . . . . . . . . . . . . . . . . . 3
Safety precautions . . . . . . . . . . . . . . . . . . . . . . . . . . . . . . . . . . . . . . . . . . . . . . . . . 6
Gigaset C59H – more than just a telephone . . . . . . . . . . . . . . . . . . . . . . . . . 7
First steps . . . . . . . . . . . . . . . . . . . . . . . . . . . . . . . . . . . . . . . . . . . . . . . . . . . . . . . . . 8
Checking the package contents . . . . . . . . . . . . . . . . . . . . . . . . . . . . . . . . . . . . . . . . . . . . . . . 8
Setting up the charging cradle . . . . . . . . . . . . . . . . . . . . . . . . . . . . . . . . . . . . . . . . . . . . . . . . 9
Connecting the charging cradle . . . . . . . . . . . . . . . . . . . . . . . . . . . . . . . . . . . . . . . . . . . . . . . 9
Setting up the handset . . . . . . . . . . . . . . . . . . . . . . . . . . . . . . . . . . . . . . . . . . . . . . . . . . . . . . 10
Registering the handset . . . . . . . . . . . . . . . . . . . . . . . . . . . . . . . . . . . . . . . . . . . . . . . . . . . . . . 12
Setting the date and time . . . . . . . . . . . . . . . . . . . . . . . . . . . . . . . . . . . . . . . . . . . . . . . . . . . . 14
Setting up area codes . . . . . . . . . . . . . . . . . . . . . . . . . . . . . . . . . . . . . . . . . . . . . . . . . . . . . . . . 16
Connecting a headset . . . . . . . . . . . . . . . . . . . . . . . . . . . . . . . . . . . . . . . . . . . . . . . . . . . . . . . . 16
What would you like to do next? . . . . . . . . . . . . . . . . . . . . . . . . . . . . . . . . . . . . . . . . . . . . . . 17
Using the phone . . . . . . . . . . . . . . . . . . . . . . . . . . . . . . . . . . . . . . . . . . . . . . . . . . 18
Using the control key . . . . . . . . . . . . . . . . . . . . . . . . . . . . . . . . . . . . . . . . . . . . . . . . . . . . . . . . 18
Using the display keys . . . . . . . . . . . . . . . . . . . . . . . . . . . . . . . . . . . . . . . . . . . . . . . . . . . . . . . 19
Using the keys on the keypad . . . . . . . . . . . . . . . . . . . . . . . . . . . . . . . . . . . . . . . . . . . . . . . . 19
Correcting incorrect entries . . . . . . . . . . . . . . . . . . . . . . . . . . . . . . . . . . . . . . . . . . . . . . . . . . 19
Using the menus . . . . . . . . . . . . . . . . . . . . . . . . . . . . . . . . . . . . . . . . . . . . . . . . . . . . . . . . . . . . . 20
Activating/deactivating the handset . . . . . . . . . . . . . . . . . . . . . . . . . . . . . . . . . . . . . . . . . . 21
Activating/deactivating the keypad lock . . . . . . . . . . . . . . . . . . . . . . . . . . . . . . . . . . . . . . 21
Using this guide . . . . . . . . . . . . . . . . . . . . . . . . . . . . . . . . . . . . . . . . . . . . . . . . . . . . . . . . . . . . . 22
Menu overview . . . . . . . . . . . . . . . . . . . . . . . . . . . . . . . . . . . . . . . . . . . . . . . . . . . 24
Making calls . . . . . . . . . . . . . . . . . . . . . . . . . . . . . . . . . . . . . . . . . . . . . . . . . . . . . . 26
Making an external call . . . . . . . . . . . . . . . . . . . . . . . . . . . . . . . . . . . . . . . . . . . . . . . . . . . . . . 26
Ending a call . . . . . . . . . . . . . . . . . . . . . . . . . . . . . . . . . . . . . . . . . . . . . . . . . . . . . . . . . . . . . . . . . 26
Accepting a call . . . . . . . . . . . . . . . . . . . . . . . . . . . . . . . . . . . . . . . . . . . . . . . . . . . . . . . . . . . . . . 26
Using speaker mode . . . . . . . . . . . . . . . . . . . . . . . . . . . . . . . . . . . . . . . . . . . . . . . . . . . . . . . . . 26
Switching to mute . . . . . . . . . . . . . . . . . . . . . . . . . . . . . . . . . . . . . . . . . . . . . . . . . . . . . . . . . . . 27
Making internal calls . . . . . . . . . . . . . . . . . . . . . . . . . . . . . . . . . . . . . . . . . . . . . . . . . . . . . . . . . 27
Using the directory and lists . . . . . . . . . . . . . . . . . . . . . . . . . . . . . . . . . . . . . . . 28
Using the directory . . . . . . . . . . . . . . . . . . . . . . . . . . . . . . . . . . . . . . . . . . . . . . . . . . . . . . . . . . 28
Using the redial list . . . . . . . . . . . . . . . . . . . . . . . . . . . . . . . . . . . . . . . . . . . . . . . . . . . . . . . . . . 31
Using call lists . . . . . . . . . . . . . . . . . . . . . . . . . . . . . . . . . . . . . . . . . . . . . . . . . . . . . . . . . . . . . . . . 32
Opening lists with the message key . . . . . . . . . . . . . . . . . . . . . . . . . . . . . . . . . . . . . . . . . . 33
Using the Missed Alarms list . . . . . . . . . . . . . . . . . . . . . . . . . . . . . . . . . . . . . . . . . . . . . . . . . . 33
Using the network mailbox . . . . . . . . . . . . . . . . . . . . . . . . . . . . . . . . . . . . . . . 34
Configuring fast access for the network mailbox . . . . . . . . . . . . . . . . . . . . . . . . . . . . . . 34
Viewing the network mailbox message . . . . . . . . . . . . . . . . . . . . . . . . . . . . . . . . . . . . . . . 34
4
Page 5

Contents
ECO DECT . . . . . . . . . . . . . . . . . . . . . . . . . . . . . . . . . . . . . . . . . . . . . . . . . . . . . . . . 35
Setting the alarm clock . . . . . . . . . . . . . . . . . . . . . . . . . . . . . . . . . . . . . . . . . . . 35
Using a handset as a room monitor . . . . . . . . . . . . . . . . . . . . . . . . . . . . . . . . 36
Setting the handset . . . . . . . . . . . . . . . . . . . . . . . . . . . . . . . . . . . . . . . . . . . . . . 37
Quickly accessing numbers and functions . . . . . . . . . . . . . . . . . . . . . . . . . . . . . . . . . . . . 37
Changing the display language . . . . . . . . . . . . . . . . . . . . . . . . . . . . . . . . . . . . . . . . . . . . . . 38
Setting the display . . . . . . . . . . . . . . . . . . . . . . . . . . . . . . . . . . . . . . . . . . . . . . . . . . . . . . . . . . . 38
Activating/deactivating auto answer . . . . . . . . . . . . . . . . . . . . . . . . . . . . . . . . . . . . . . . . . 39
Changing the speaker/earpiece volume . . . . . . . . . . . . . . . . . . . . . . . . . . . . . . . . . . . . . . 39
Changing ringtones . . . . . . . . . . . . . . . . . . . . . . . . . . . . . . . . . . . . . . . . . . . . . . . . . . . . . . . . . . 40
Activating/deactivating advisory tones . . . . . . . . . . . . . . . . . . . . . . . . . . . . . . . . . . . . . . . 41
Restoring the handset default settings . . . . . . . . . . . . . . . . . . . . . . . . . . . . . . . . . . . . . . . . 41
Troubleshooting . . . . . . . . . . . . . . . . . . . . . . . . . . . . . . . . . . . . . . . . . . . . . . . . . 42
Appendix . . . . . . . . . . . . . . . . . . . . . . . . . . . . . . . . . . . . . . . . . . . . . . . . . . . . . . . . 43
Caring for your phone . . . . . . . . . . . . . . . . . . . . . . . . . . . . . . . . . . . . . . . . . . . . . . . . . . . . . . . . 43
Contact with liquid . . . . . . . . . . . . . . . . . . . . . . . . . . . . . . . . . . . . . . . . . . . . . . . . . . . . . . . . . . 43
Specifications . . . . . . . . . . . . . . . . . . . . . . . . . . . . . . . . . . . . . . . . . . . . . . . . . . . . . . . . . . . . . . . . 43
Writing and editing text . . . . . . . . . . . . . . . . . . . . . . . . . . . . . . . . . . . . . . . . . . . . . . . . . . . . . . 44
Industry Canada Certification . . . . . . . . . . . . . . . . . . . . . . . . . . . . . . . . . . . . . . . . . . . . . . . . 45
FCC / ACTA Information . . . . . . . . . . . . . . . . . . . . . . . . . . . . . . . . . . . . . . . . . . . 45
Safety precautions . . . . . . . . . . . . . . . . . . . . . . . . . . . . . . . . . . . . . . . . . . . . . . . . . . . . . . . . . . . 47
Service (Customer Care) . . . . . . . . . . . . . . . . . . . . . . . . . . . . . . . . . . . . . . . . . . . 48
End-user limited warranty . . . . . . . . . . . . . . . . . . . . . . . . . . . . . . . . . . . . . . . . . . . . . . . . . . . . 48
Accessories . . . . . . . . . . . . . . . . . . . . . . . . . . . . . . . . . . . . . . . . . . . . . . . . . . . . . . . 51
Mounting the charging cradle on the wall . . . . . . . . . . . . . . . . . . . . . . . . . . 51
Index . . . . . . . . . . . . . . . . . . . . . . . . . . . . . . . . . . . . . . . . . . . . . . . . . . . . . . . . . . . . 52
5
Page 6
Safety precautions
$
ƒ
Safety precautions
Warning
Be sure to read this user guide and the safety precautions before using your telephone.
Explain their content and the potential hazards associated with using the telephone to your
children.
Use only the power adapter supplied.
Use only the recommended, rechargeable batteries (
erwise result in significant health risks and personal injury.
Do not charge the handset in the charging unit or base station while the headset is
connected.
Using your phone may affect nearby medical equipment. Be aware of the technical
conditions in your particular environment, e.g., doctor's surgery.
Do not hold the rear of the handset to your ear when it is ringing or when speaker
mode is activated. You risk serious and permanent damage to your hearing.
Your telephone is compatible with the majority of digital hearing aids on the market.
However, perfect function with all hearing aids cannot be guaranteed.
The handset may cause an unpleasant humming or whistling noise in hearing aids
or cause them to overload. For assistance please contact the hearing aid supplier.
Do not install the base or charging cradle in bathrooms or shower rooms. The base
and charging cradle are not splashproof (
Do not use your phone in environments with a potential explosion hazard
(e.g., paint shops).
If you give your telephone to a third party, make sure you also give them the
user guide.
Remove faulty bases from use or have them repaired by our Service, as they could
interfere with other wireless services.
¢ page 43).
¢ page 43) as this could oth-
Please note
Not all of the functions described in this user guide are available in all countries.
6
Page 7

Gigaset C59H – more than just a telephone
Gigaset C59H – more than just a telephone
Your telephone sets new standards for the way you communicate at home.
The large TFT display, user-friendly keypad and clearly laid out menu are very sim-
ple to use.
Your telephone can do a whole lot more:
u Store anniversaries such as birthdays in your phone and it will remind you of
them in advance.
u Assign important people to one of six VIP groups so you can identify important
calls from the ringtone and the color of the assigned VIP group.
u Set your handset to ring only when a telephone number is transmitted.
u Assign important numbers to the number keys on your phone (quick dial). The
number is then dialed by simply pressing the key.
u Set the display to large print to increase readability in particularly important
screens (e.g., the directory and lists).
u Set the menu display to suit your individual requirements so that only the most
important functions (standard mode) or all functions are displayed
(expert mode •). Settings or functions that are only available in expert mode
are marked in these instructions by the •icon.
u Gigaset Green Home — be environmentally aware when using your phone. For
more information, see www.gigaset.com/customercare
.
You can find additional information about your telephone at
www.gigaset.com/gigasetc59h
.
Have fun using your new phone!
7
Page 8

First steps
213
45
76
8
First steps
Checking the package contents
1 One Gigaset C59H handset
2 Two batteries
3 One battery cover
4 One charging cradle
5 One power adapter
6 One belt clip
7 One user guide
8
Page 9
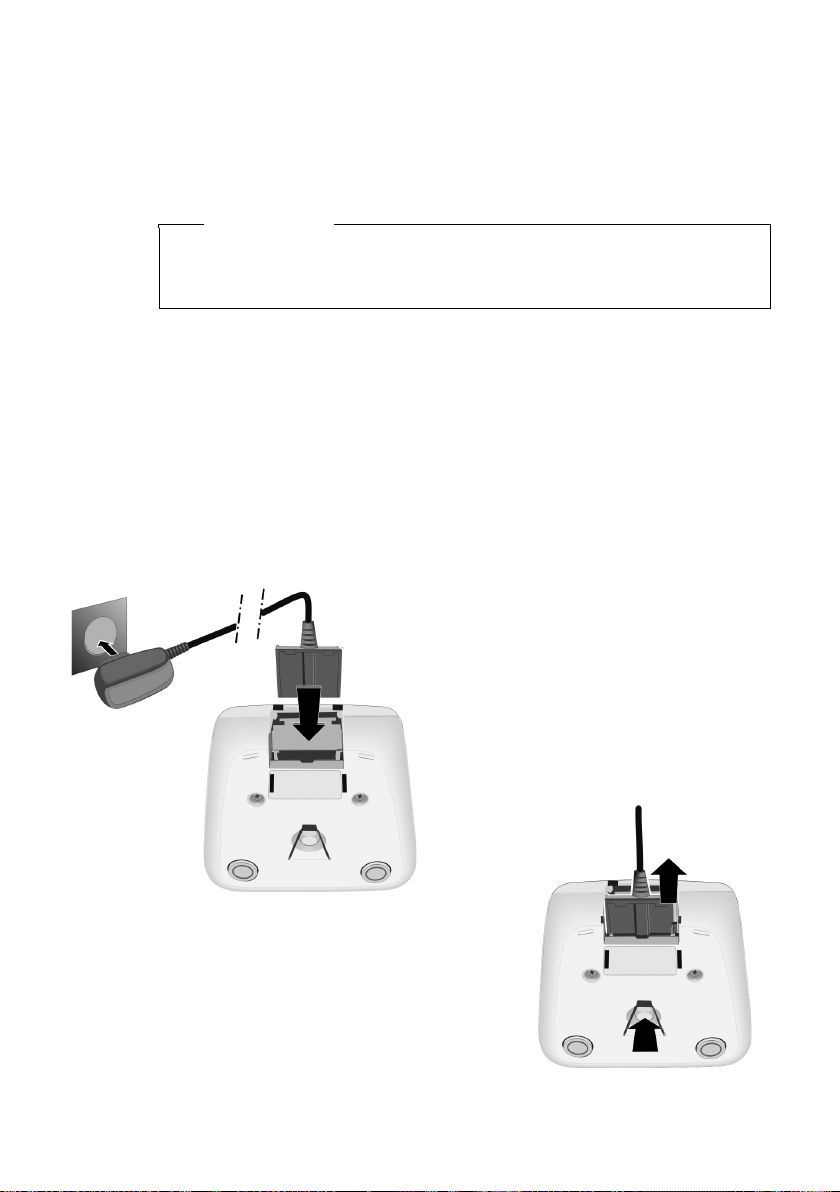
Setting up the charging cradle
¤ Plug the power adapter into the plug
socket 2.
¤ Connect the flat plug from the power
adapter 1.
To disconnect the plug from the charger, press
the release button 1 and disconnect the plug
2.
1
2
1
2
The charging cradle is designed for use in dry rooms in a temperature range of
+41°F to +113°F.
¤ Set up the charging cradle on a flat, non-slip surface or mount it on the wall
¢ page 51).
(
Please note
Pay attention to the range of the base.
This is up to 984 feet in unobstructed outdoor areas and up to 165 feet inside
buildings. The range is reduced when Eco Mode (
The phone's feet do not usually leave any marks on surfaces. However, due to the
multitude of different varnishes and polishes used on today's furnishings, the
occurrence of marks on the surfaces cannot be completely ruled out.
Please note:
u Never expose the telephone to the influence of heat sources, direct sunlight or
other electrical devices.
u Protect your telephone from moisture, dust, corrosive liquids and fumes.
Connecting the charging cradle
First steps
¢ page 35) is activated.
9
Page 10
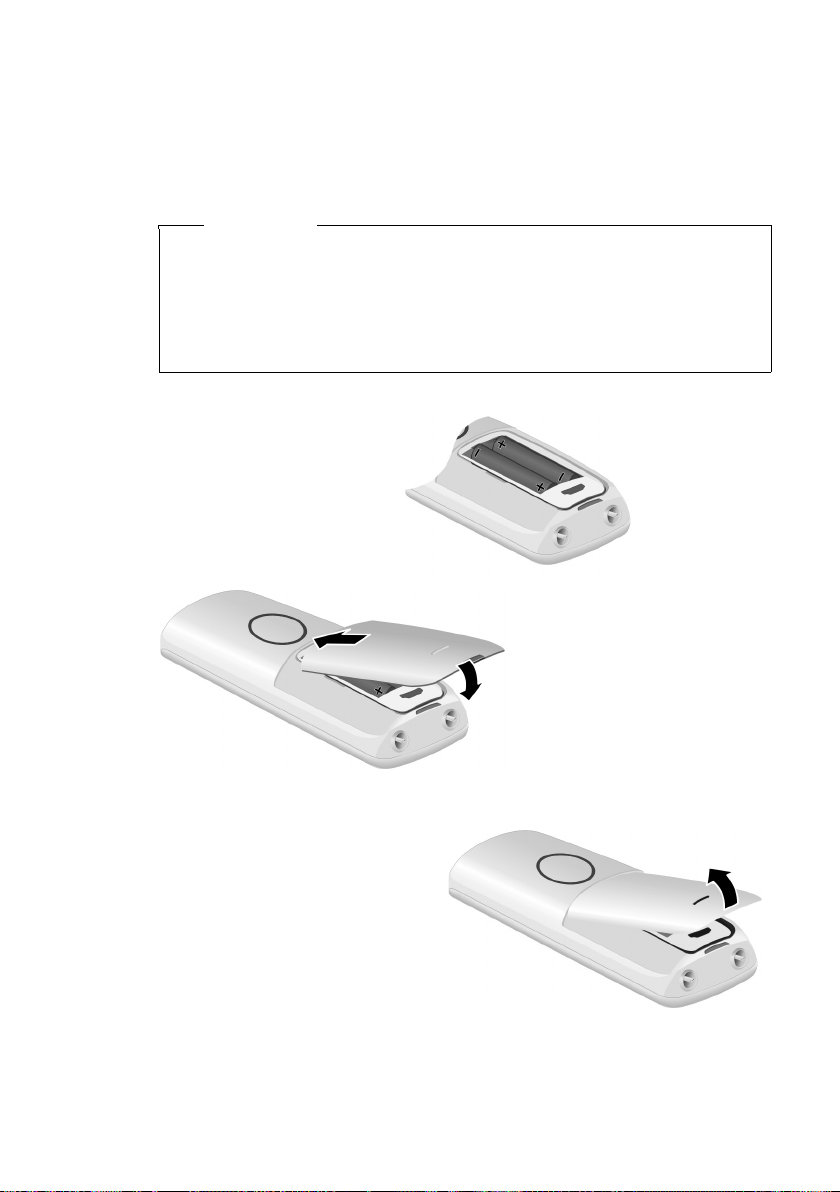
First steps
¤ Insert the batteries with
the polarity in the correct direction.
The polarity is indicated
in/on the battery compartment.
¤ First insert the battery
cover at the top a.
¤ Then press the cover b
until it clicks into place.
To open the battery cover, for
instance to replace the batteries,
insert a coin into the cavity on the
casing, then pull the battery cover
in an upward direction.
a
b
Setting up the handset
The display is protected by a plastic film.
Please remove the protective film!
Inserting the batteries and closing the battery cover
Use only rechargeable nickel-metal hydride (NiMH) UL-approved AAA batteries.
Never use conventional (non-rechargeable) batteries, as this could result in significant health risks and personal injury. For example, the outer casing of the
batteries could be damaged or the batteries could explode. The phone could
also malfunction or be damaged as a result of using batteries that are not of the
recommended type.
Warning
10
Page 11
First steps
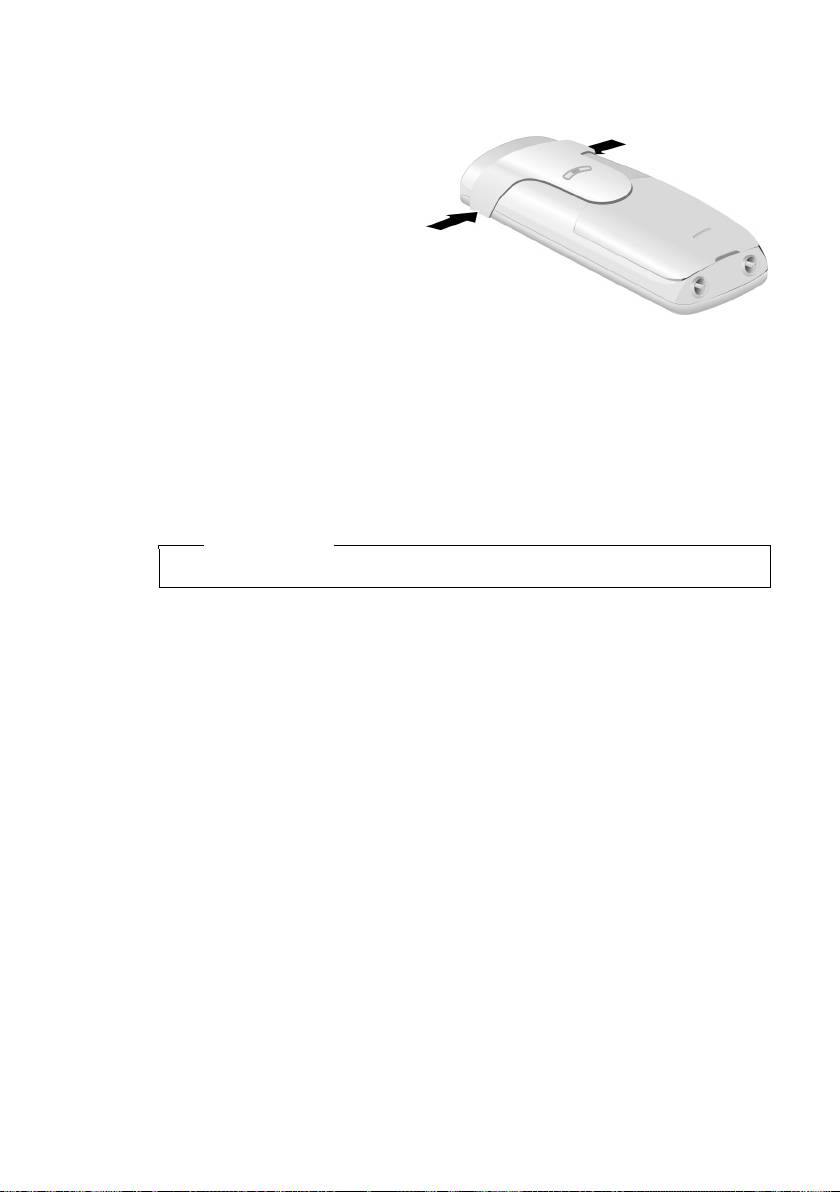
Attaching the belt clip
The handset has notches on each side to attach the belt clip.
¤ To att ach — press the belt
clip onto the back of the
handset so that the protrusions on the belt clip engage
with the notches.
¤ To re mo ve — using your right
thumb apply pressure to the
centre of the belt clip, push
the fingernail of your left
index finger between the clip
and the casing and lift the clip
upwards.
Placing the handset in the charging cradle
¤ Place the handset in the charging cradle with its display facing forward.
To charge the batteries, leave the handset in the charging cradle.
Please note
Only place the handset in the charging cradle that is intended for it.
11
Page 12
First steps
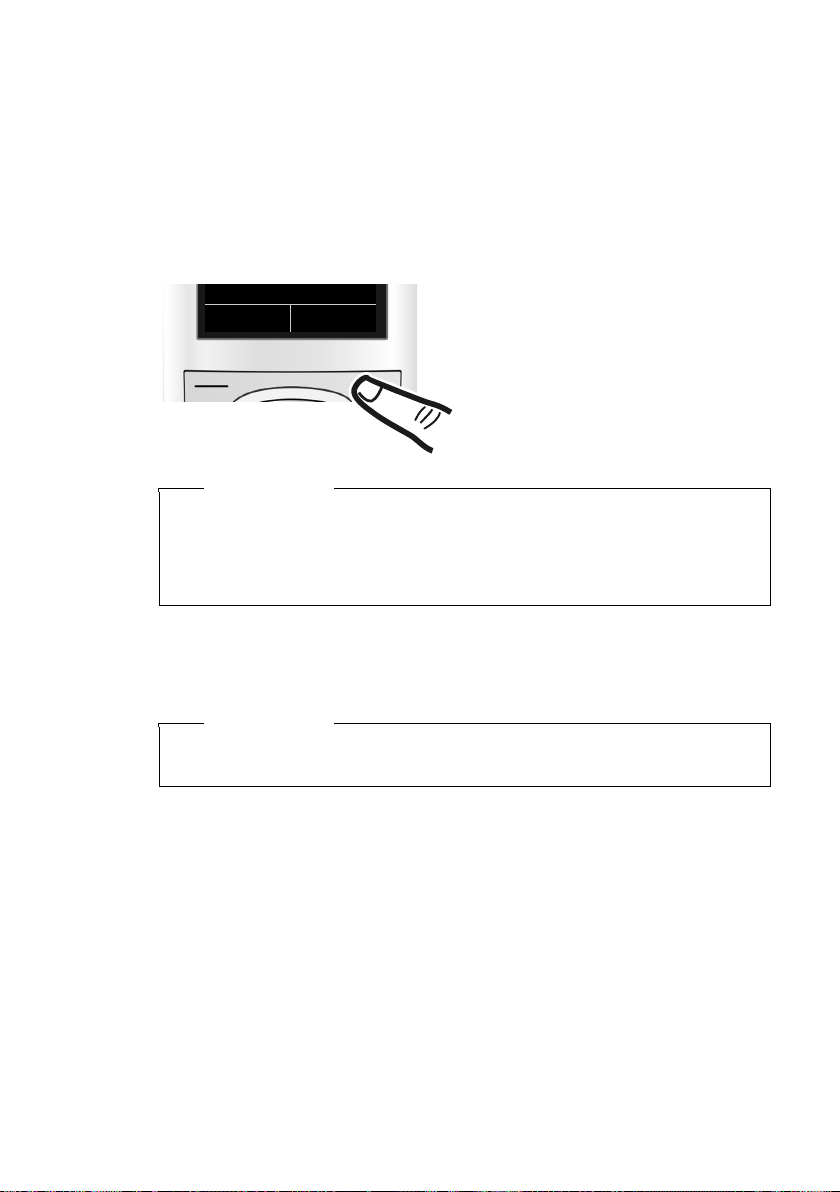
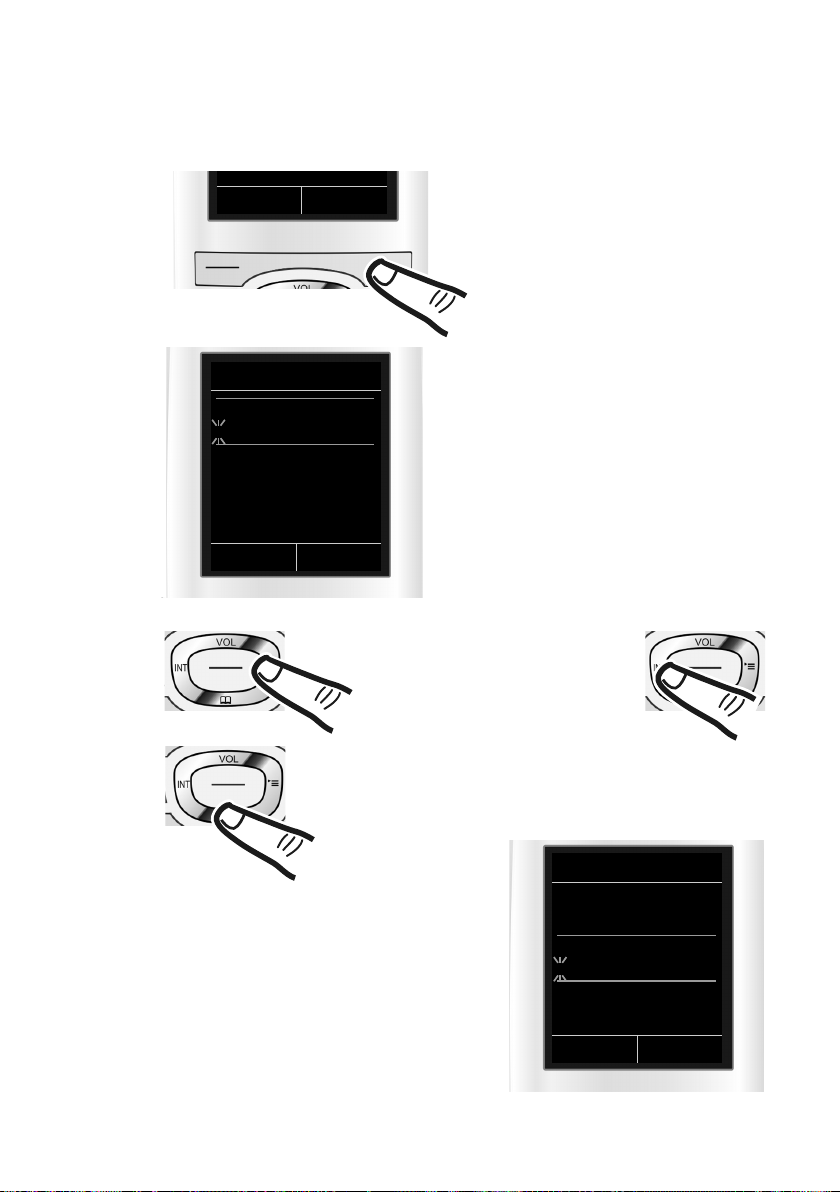
¤ Press the key below §Register§ on the
display screen.
A message displays that a search for a
base that is ready for registration is
being carried out.
Register
Registering the handset
A Gigaset C59H handset can be registered on up to four bases. You must initiate
handset registration on the handset (1) and on the base (2).
When the registration process has completed successfully, the handset returns to
idle status. The handset's internal number is shown in the display e.g., INT 1. If not,
repeat the procedure.
1) On the handset
Please note
If the handset is already registered to at least one base, start the registration
process as follows:
Ï
¢
v
If the handset is already registered to four bases, select the required base.
¢ Registration ¢Register Handset
12
2) On the base
Within 60 sec. press and hold the registration/paging key on the base (approx. 3
sec.).
Please note
For instructions on deregistering the handsets, please consult the base
user guide.
Page 13
First steps
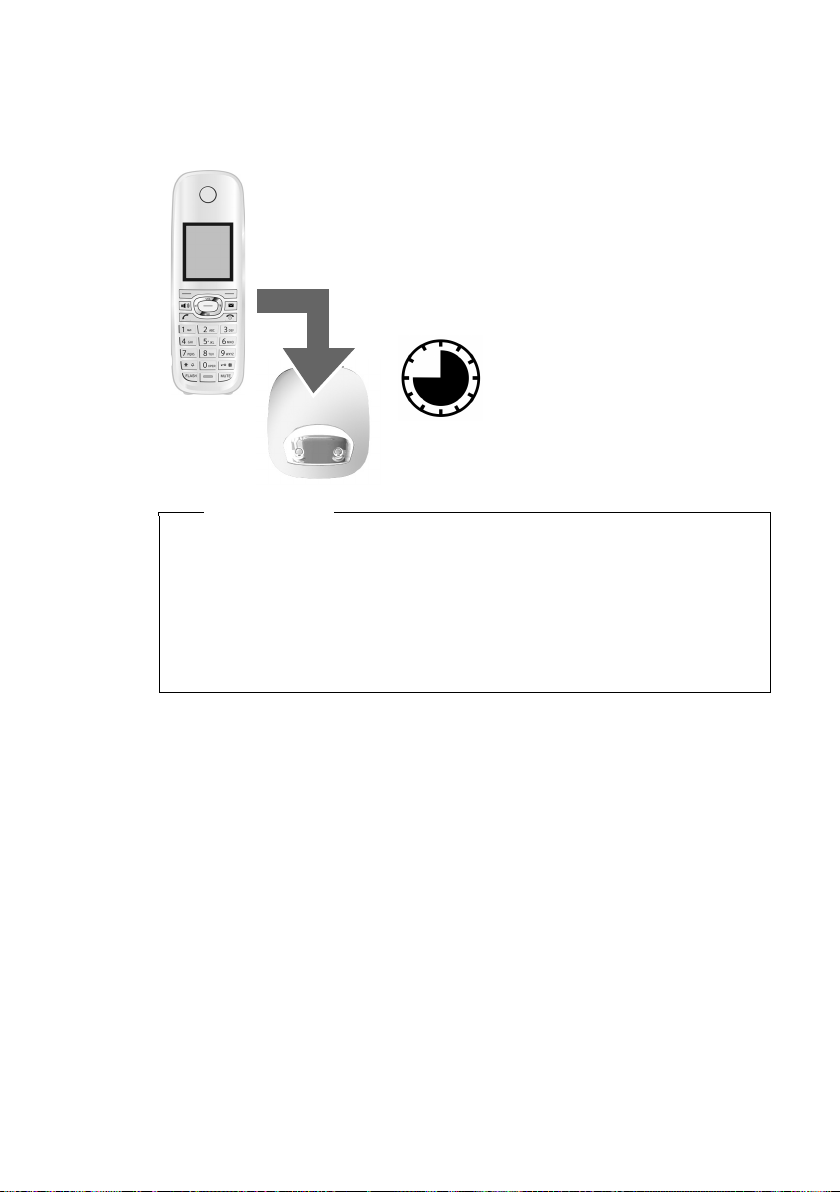
¤ Place the handset in the charging cradle for
ten hours.
¤ Remove the handset from
the charging cradle and do
not replace it until the batteries are fully discharged.
10 h
Initial charging and discharging of the batteries
The correct charge level can only display if the batteries are first fully charged and
discharged.
Please note
u After the first battery charge and discharge, you may place your handset in
the charging cradle after every call.
u If you remove the batteries from the handset and reinsert them, always
repeat the charging and discharging procedure.
u The batteries may warm up during charging. This is not dangerous.
u After a while, the charge capacity of the batteries will decrease for technical
reasons.
13
Page 14
First steps
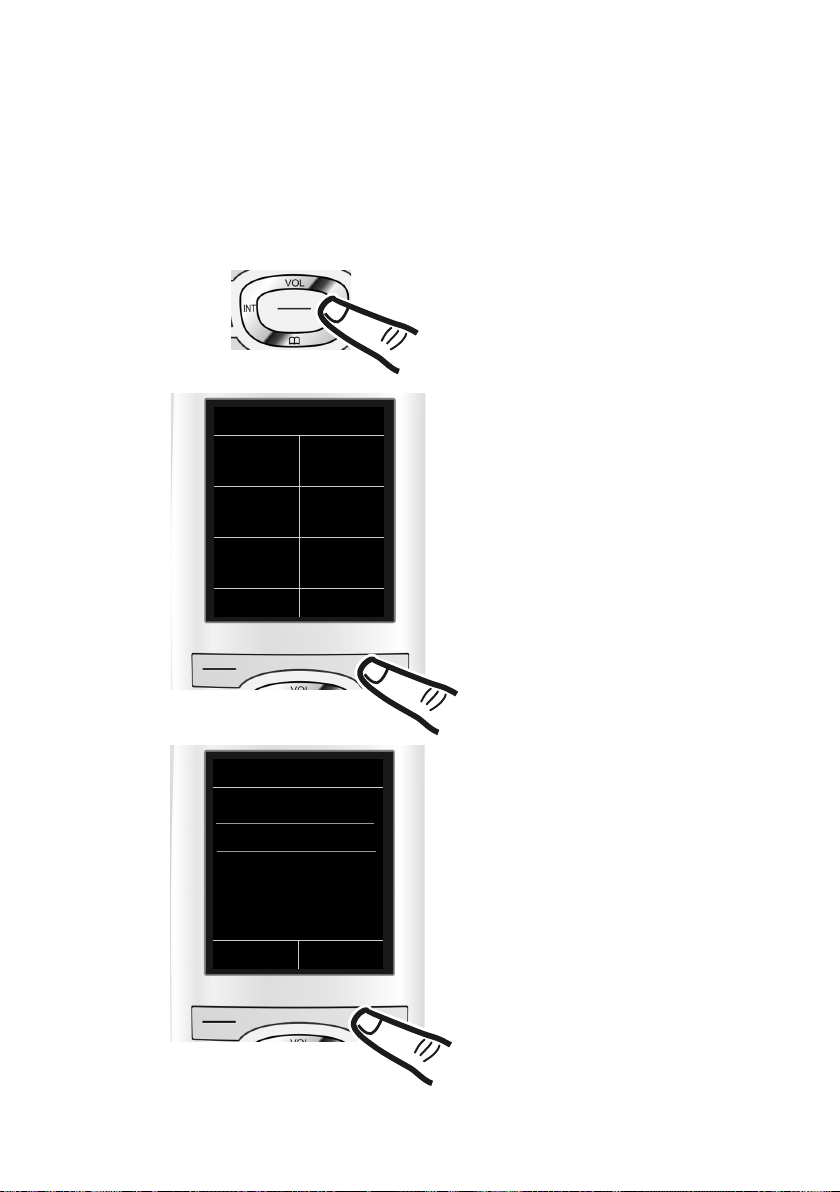
Date/Time
Date:
10/14/2009
Time:
00:00am
AM/PM Save
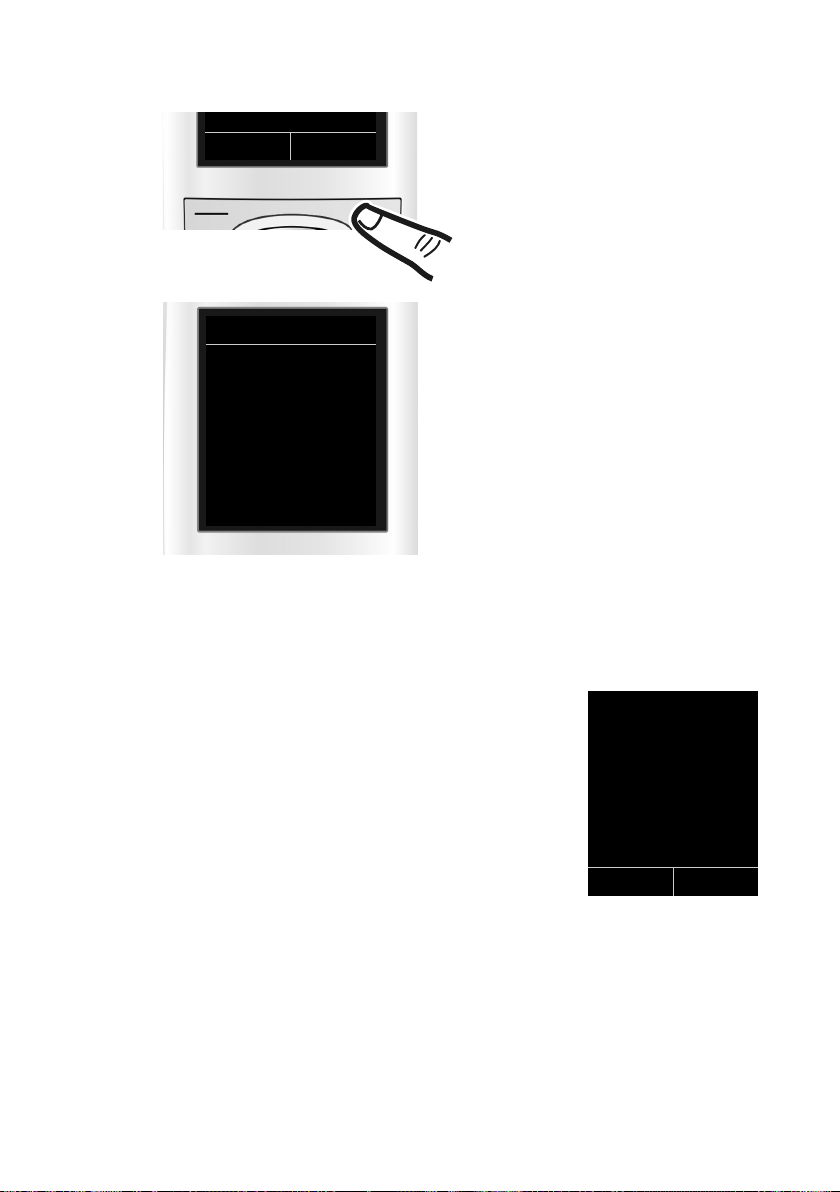
¤ Press the key below §Time§ on the dis-
play to open the input field.
If you have already set the time and
date, open the input field via the menu
(
¢ page 25.)
The Date/Time submenu displays.
¤ The active input position flashes.
Enter the month, day and year as an
8-digit number via the keypad,
e.g., Q42QQ
O for 10/14/2009.
Date/Time
Date:
01/31/2009
Time:
00:00am
Back Save
INT Time
Press the right or left control key
to change the input position and
correct an entry.
¤ Enter the hours and minutes in 4-digit
format via the keypad,
e.g., QM5for 07:15 am.
Change the input position with
the control key if necessary.
¤ If necessary, press the AM/PM display
key to change the time setting from
AM to PM.
¤ Press down on the control key to switch to the
Time input field.
Setting the date and time
Set the date and time so that the correct date and time can be assigned to incoming
calls, and so that the alarm can be used.
14
Page 15
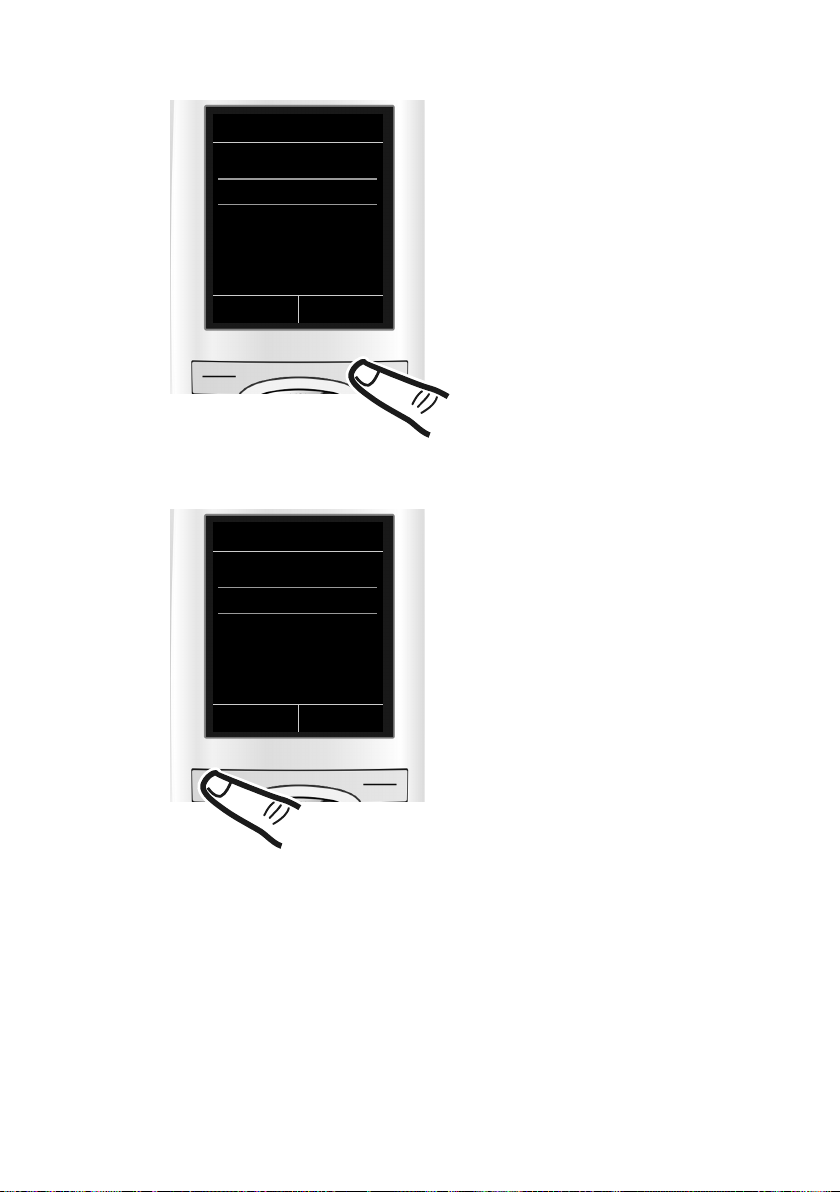
First steps
¤ Press the key below §Save§ on the dis-
play to confirm your entry.
The display shows Saved. You will hear a
confirmation tone and the handset
automatically returns to idle status
when you set the date and time for the
first time.
AM/PM Save
Date/Time
‰
Saved
i V
07:15 am
INT 1 14 Oct
INT Calls
Display in idle status
After registering the phone and setting the time, the idle display shows as in this
example.
Displays
u Reception signal between the base and handset:
u Battery charge status:
u INT 1
Your phone is now ready to use!
– Poor to good: ÒÑiÐ
–No reception: |
Green: Eco Mode activated (
– yy{{ Empty to full
– y Flashes red: batteries almost empty
– xyx{x{ Charging
Internal name of the handset
¢ page 35)
15
Page 16
First steps
Setting up area codes
Before you can return a call from the Calls list (¢ page 32), you must store the local
area code of the area in which your phone is being used. If your phone is in a multiple area code area, you must also store the extra codes for that area.
Local Area Code
v ¢Ï ¢ Te le ph o ny ¢ Local Area Code
~ Enter the local area code.
§Save§ Press the Display key.
a When the Saved message displays, press and hold to return to idle sta-
tus.
Extra Codes
v ¢Ï ¢ Te le ph o ny ¢ Extra Codes
~ Enter the extra code.
§Save§ Press the Display key.
a When the Saved message displays, press and hold to return to idle sta-
tus.
Repeat the above steps until all the extra codes have been entered for your area. A
maximum of five (5) extra codes can be stored.
Connecting a headset
16
You can connect a headset with a 2.5 mm jack connector.
See the relevant product page at www.gigaset.com
information on recommended headsets.
The headset volume corresponds to the settings for the
handset volume (
replace the plastic cover to enable optimum sound in
speaker mode.
¢ page 39). After using the headset,
Warning
Do not charge the handset in charging unit or base while the headset is
connected.
for
Page 17

What would you like to do next?
g
g
g
g
Now that you have successfully started your phone, you will probably want to
adapt it to your personal requirements. Use the following guide to quickly locate
the most important subjects.
If you are unfamiliar with menu-driven devices such as other telephones, be sure to
read the section entitled "Using the phone" (
Information about ... ... go to ...
Setting the ringtone and volume page 40
Setting the earpiece volume page 39
Setting Eco Mode page 35
First steps
¢ page 18) first.
Transferring directory entries from existing
Gigasethandsets to new Gigaset handset(s)
If you have any questions about using your phone, please read the tips
on troubleshooting (
(
¢ page 48).
¢ page 42) or contact our Customer Care team
page 30
17
Page 18

Using the phone
Using the phone
Using the control key
Below, the side of the control key that you must press in
the respective operating situation is marked in black (top, bottom, right, left, centre), e.g., v for "press right on the control
key" or w for "press the centre of the control key".
The control key has a number of different functions:
When the handset is in idle status
s Open the directory.
v Open the main menu.
u Open the list of handsets.
t Call up the menu to set the call volume (¢ page 39) of the handset.
In the main menu
t, s, v or u
Navigate to the required function.
In submenus and lists
t / s Scroll up/down line by line.
In input fields
Use the control key to move the cursor up t, down s, right v or left u.
Press and hold v or u to move the cursor word by word.
18
During an external call
s Open the directory.
u Initiate an internal consultation call.
t Adjust the speaker volume for an earpiece and speaker mode.
Functions when pressing the middle of the control key
Depending on the operating situation, the key has different functions.
u In idle status the key opens the main menu.
u In submenus, selection and input fields the key takes on the function of the dis-
play keys
§OK§, §Yes§, §Save§, §Select§ or §Change§.
Please note
These instructions demonstrate the main menu being opened by pressing the
right of the control key and functions being actuated by pressing the appropriate display key. However, if you prefer, you can use the control key as described
above.
Page 19
Using the display keys
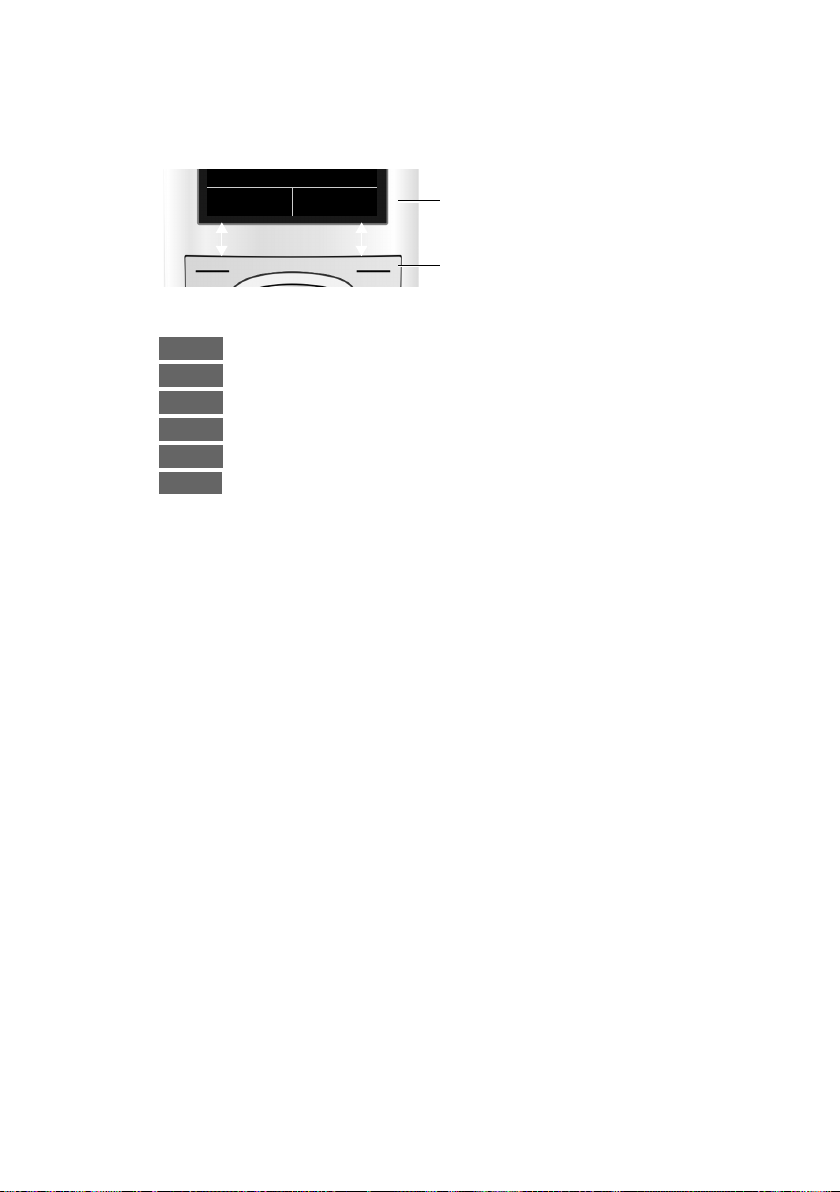
Back Save
Current display key functions.
Display keys
Options
OK
Û
Back
Save
Þ
The functions of the display keys change depending on the particular operating situation. Example:
Some important display keys:
Open a menu for further functions.
Confirm selection.
Delete key: delete one character/word at a time from right to left.
Go back one menu level or cancel operation.
Store entry.
Open the redial list.
Using the keys on the keypad
c/ Q / * etc.
Press the matching key on the handset.
~ Enter digits or letters.
Using the phone
Correcting incorrect entries
You can correct incorrect characters in the input fields by navigating to the incorrect entry using the control key. You can then:
u Delete the character by briefly pressing Ñ or press and hold to delete the
word to the left of the cursor
u Insert characters next to the cursor
u Overwrite the highlighted (flashing) character, e.g., when entering time and
date.
19
Page 20

Using the phone
Settings
ì
Ê
Ì
×
É Ï
Back OK
Settings
Date/Time
Display
Language
Registration
Telephony
Back OK
Using the menus
You can access your telephone's functions using a menu that has a number
of levels.
The menu display can be extended (Expert mode
mode). Expert mode is the default setting.
Settings or functions that are only available in expert mode are marked in these
instructions with the
Switching between standard/expert mode and the menu overview (¢ page 24).
Main menu (first menu level)
¤ When the handset is in idle status press the right v control key to open the
main menu.
The main menu functions display with icons. The icon
for the selected function is marked in orange and the
name of the associated function appears in the display's
header.
To access a function, i.e., to open the corresponding
submenu (next menu level):
¤ Use the control key p to select the required func-
tion and press the display key
Briefly press the display key §Back§ or the end call key
a to revert back to idle status.
•
icon.
§OK§.
) or reduced (Standard
•
Submenus
The functions in the submenus are displayed as lists
(example on the right).
To access a function:
¤ Scroll to the function with the control key q and
Briefly press the display key §Back§ or the end call key
a to return to the previous menu level/cancel the
operation.
20
press
§OK§.
Page 21

Reverting to idle status
You can revert to idle status from anywhere in the menu as follows:
¤ Press and hold the end call key a.
or:
¤ Do not press any key: after 2 minutes the display automatically reverts to idle
status.
Settings that have not been saved by selecting the display keys
§Change§ are lost.
An example of the display in idle status appears on page 15.
Activating/deactivating the handset
a With the phone in idle status, press and hold the end call key
(confirmation tone) to switch off the handset.
Press and hold the end call key again to switch the handset on.
Please note
When the handset is switched on, an animation of the Gigaset logo is displayed
for several seconds.
Activating/deactivating the keypad lock
The keypad lock prevents any unauthorized or accidental use of the phone.
# Press and hold the pound key in idle status to activate or deactivate the
keypad lock. You will hear the confirmation tone.
If the keypad lock is activate a warning is shown when you press a key.
The keypad lock deactivates automatically when you receive a call. It is reactivated
when the call is ended.
Using the phone
§OK§, §Yes§, §Save§ or
Please note
When the keypad lock is active, you cannot call emergency numbers.
Emergency numbers cannot be dialed if the keypad lock is activated!
21
Page 22
Using the phone
¤ Press right on the control key v
to open the main menu.
¤ Use the right, left, down and up
control key p to navigate to the
Settings submenu.
¤ Press the display key §OK§ to confirm
your selection.
¤ Press down on the control key
s
until the Display menu appears on
the display.
¤ Press the display key §OK§ to confirm
your selection.
Settings
Date/Time
Display
Language
Registration
Tel ep h on y
Back OK
Settings
ì
Ê
Ì
×
É Ï
Back OK
Using this guide
The operating steps are shown in abbreviated form.
Example:
The illustration:
v ¢Ï ¢ Display ¢Large Font (³=on)
means:
22
Page 23
Using the phone
Changes are effective immediately
and do not have to be confirmed.
¤ Press down on the control key
s
until the Large Font menu appears
on the display.
¤ Press the display key §Change§ to acti-
vate/deactivate the function.
Display
Screensaver
Large Font
³
Color Schemes
Back Change
Display
Screensaver
Large Font
´
Color Schemes
Back Change
¤ Press the key below §Back§ on the dis-
play to jump back to the previous
menu level.
or
Press and hold the end call key a
to return to idle status.
23
Page 24
Menu overview
Menu overview
Setting standard or expert mode
The menu display can be extended (Expert mode •) or restricted (standard mode). Expert
mode is the active default setting. Settings or functions that are only available in expert mode
are marked in these instructions by the •icon. The icon does not appear on the handset.
To change these settings:
¢
Select v
¢ §Select§ (the active mode is marked with Ø).
Open the main menu: Pressv when the telephone is in idle mode.
¢Menu View ¢Simplified (standard mode) or Complete (expert mode)
Ï
Alarm Clock
¼
Call Lists
Ê
All Calls ¢page 32
Outgoing Calls
Accepted Calls
Missed Calls
Voice Mail
Ì
ï
Audio Settings
Additional Features
É
Room Monitor ¢page 36
¢page 35
¢page 32
¢page 32
¢page 32
(Menu dependent on base)
Handset Volume ¢page 39
Advisory Tones ¢page 41
•
Ringtones(Handset)
Music on Hold (dependent on base)
•
¢page 40
24
Page 25
Settings
Ï
Date/Time ¢page 14
Menu overview
Display Screensaver
Large Font
Color Schemes
Backlight ¢ page 39
•
Language
Registration Register Handset
Telephony Auto Answer ¢page 39
•
System Handset Reset ¢page 41
•
Menu View Simplified
¢page 38
De-reg. Handset (dependent on base)
Select Base
(further submenus dependent on base)
Local Area Code
Extra Codes
(further submenus dependent on base)
Complete
¢page 38
¢page 39
¢page 39
¢page 12
¢page 12
¢page 16
¢page 16
¢page 24
¢page 24
25
Page 26

Making calls
Making calls
If the backlight is deactivated (¢ page 39) it
is switched on by pressing any key . In this
case the pressed key has no other function.
Making an external call
External calls are calls using the public telephone network.
~c Enter the number and press the
talk key.
or:
c~ Press and hold the talk key c
and then enter the number.
You can cancel the dialing operation with
the end call key a.
While the call is in progress, the duration of
the call displays.
Please note
Dialing with the directory (¢ page 28),
call list (
(
keying in phone numbers.
Ending a call
a Press the end call key.
¢ page 32) and redial list
¢ page 31) saves you from repeatedly
Accepting a call
The handset indicates an incoming call in
three ways: by ringing, by a display on the
screen and by the flashing talk key c.
You can accept the call by:
¤ Pressing the talk key c.
¤ Pressing the speaker key d.
¤ Pressing the display key §Accept§ (depend-
ent on base).
If the handset is in the charging cradle and
the Auto Answer function is activated
¢ page 39), the handset automatically
(
answers the call when you remove it from
the charging cradle.
To deactivate the ringtone, press the
display key. You can accept the call as long as
it displays on the screen.
§Silence§
Using speaker mode
In speaker mode, instead of holding the
handset to your ear, you can put it down, for
example on the table in front of you. This
allows others to participate in the call.
Activating/deactivating speaker
mode
Activating while dialing
~d Enter the number and press the
speaker key.
¤ Inform your caller before you use the
speaker function so that the caller knows
someone else may be listening.
26
Switching between earpiece and
speaker mode
d Press the speaker key.
Activate/deactivate speaker mode during a
call.
If you wish to place the handset in the charg-
ing cradle during a call:
¤ Press and hold the speaker key d while
placing the handset in the base.
For instructions on adjusting the loudspeaker volume (
¢ page 39).
Page 27

Making calls
Switching to mute
You can deactivate the microphone in your
handset during an external call.
h Press key to mute the handset.
The display shows Microphone
is off
Press the key again to reactivate
the microphone.
Please note
If the telephone is muted, all keys except
the MUTE key h and the end-call key
a will not work.
Making internal calls
Internal calls to other handsets registered on
the same base are free.
Calling a specific handset
u Initiate internal call.
~ Enter the number of the hand-
set.
or:
u Initiate internal call.
s Select handset.
c Press the talk key.
Calling all handsets ("group call")
u Initiate internal call.
* Press the star key.
or
Call All Select menu option and
c Press the talk key.
All handsets are called.
Ending a call
a Press the end call key.
27
Page 28

Using the directory and lists
Using the directory and
lists
The options are:
u Directory
u Redial list
u Call lists
u List of missed alarms
u (Network mailbox) list
You can create a personalized directory for
your own handset. You can also send lists/
entries to other handsets (
Using the directory
You can save up to 150 entries in the directory.
Please note
To quickly access a number from the
directory (quick dial), you can assign the
number to a key (
Using the directory
In the directory, you can save:
u For each directory entry, one first name,
one surname, and up to three telephone
numbers.
u E-mail address
u Anniversaries with reminder
u VIP ringtones with VIP symbol.
Open the directory in idle status using the
s key.
Length of the entries
u 3 numbers:
each max. 32 digits
u First name and surname:
each max. 16 characters
u E-mail address:
max. 64 characters
¢ page 30).
¢ page 37).
Saving a number in the directory
s ¢ <New Entry>
¤ You can enter data in the following fields:
First Name: / Last Name:
If only the first name or surname is
entered into these fields, the number is
saved and displayed under that entry.
(For instructions on entering text and
special characters, please see
¢ page 44.)
Phone (Home): / Phone (Office): /
Phone (Mobile):
Enter a number in at least one of the
fields.
When scrolling through the directory, the
entries are highlighted by a prefixed symbol: ä/ k/ l.
E-Mail:
Enter the e-mail address.
Anniversary:
Select On or Off.
With setting On:
Enter Anniversary Date and Anniv.
(Time) and select reminder type: Anniv.
(Signal) (
VIP Group:
Mark directory entry as VIP (Very Important Person).
Each entry can be assigned to one of 6 VIP
groups, defined by the color of the Æ
symbol, the name of the VIP group and
the corresponding ringtone.
VIP calls are recognized by the ringtone.
The background color of the ringtone
animation changes to the color of the VIP
group.
Prerequisite: Caller ID service subscription (CID).
§Save§ Press the display key.
¢ page 30).
28
Page 29

Using the directory and lists
Order of directory entries
Directory entries are generally sorted alphabetically by surname. Spaces and digits take
first priority. If only the first name was
entered in the directory, this is incorporated
into the sort order instead of the surname.
The sort order is as follows:
1. Space
2. Digits (0–9)
3. Letters (alphabetical)
4. Other characters
To force an entry to appear at the beginning
of the list, insert a space or digit in front of
the first letter of the surname.
Select a directory entry
s Open directory.
You have the following options:
u Use s to scroll through the entries until
the required name is selected.
u Enter the first letters of the name; if nec-
essary scroll to the entry with the s key.
The directory searches for the surname. If
a surname has not been entered, the
directory searches for the first name.
Select from the directory
s ¢ s(Select entry)
c Press the talk key.
(If several numbers have been
entered, select the required
number and press the talk key
cagain).
The number is dialed.
Managing directory entries
Viewing entries
s ¢ s(Select entry)
§View§ Press the display key. The entry
displays.
§Options§ Press the display key.
The following functions can be selected with
q:
Display Number
To edit or add to a saved number, or to
save it as a new entry, press Óafter the
number displays.
Delete Entry
Delete the selected entry.
Copy Entry
to Internal: Send a single entry to a hand-
¢ page 30).
set (
Editing entries
s ¢ s(Select entry)
§View§ §Edit§ Press the display keys one after
the other.
¤ Carry out changes and save.
Using other functions
s ¢ s(Select entry) ¢ §Options§ (Open
menu)
The following functions can be selected with
q:
Display Number
Edit or add to a saved number and then
dial with c or save as a new entry; to
do this, press Óafter the number
appears on the display.
Edit Entry
Edit the selected entry.
Delete Entry
Delete selected entry.
Copy Entry
to Internal: Send a single entry to a hand-
¢ page 30).
set (
29
Page 30

Using the directory and lists
VIP Groups
Change the name and ringtone of VIP
groups; to do this:
Select the VIP group
¢ Change entry ¢ §Save§.
Delete All
Delete all entries in the directory.
Copy All
to Internal: Send the complete list to a
handset (
Available Memory
Display the number of entries that are still
available in the directory (
¢ page 30).
¢ §Change§
¢ page 28).
Using shortcut keys
¤ Press and hold the required shortcut key
¢ page 37).
(
Transferring the directory to
another handset
Prerequisites:
u The sending and receiving handsets must
both be registered to the same base.
u The other handset and the base can send
and receive directory entries.
¢ s(Select entry) ¢ §Options§ (Open
s
¢ Copy Entry / Copy All ¢ to
menu)
Internal
s Select the internal number
assigned to the receiving handset and press
You can transfer several individual entries
one after the other by responding to
the Entry copied - Copy next entry? prompt
§Yes§.
with
A successful transfer is confirmed by a mes-
sage and confirmation tone on the receiving
handset.
§OK§.
Please note:
u Entries with identical numbers are not
overwritten on the receiving handset.
u If the phone rings or if the memory of the
receiving handset is full, the transfer is
cancelled.
u VIP group assignments and sounds
assigned to entries are not transferred.
Copying the displayed number to
the directory
You can copy numbers displayed in a list,
e.g., the call list or the redial list, to the directory.
If you have CID, the first 16 characters of the
transmitted name are also copied to the Last
Name line.
A number displays:
§Options§ ¢Copy to Directory
¤ Complete the entry (¢ page 28).
Copying a number or e-mail
address from the directory
In some operating situations, you can open
the directory to copy a number or e-mail
address, for example. Your handset need not
be in idle status.
¤ Depending on the operating situation,
open the directory with s or Ó.
q Select entry (
Storing an anniversary in the
directory
For each number in the directory, you can
save an anniversary and specify a time at
which a reminder call should be made
on the anniversary (the default setting is:
Anniversary: Off).
¢ s (Select entry)
s
§View§ §Edit§ Press the display keys one after
the other.
s Scroll to the Anniversary line.
v Select On.
¢ page 29).
30
Page 31

Using the directory and lists
ØðÚ
Miller,
Frank
Off
¤ You can enter data in the following fields:
Anniversary Date
Enter month/day/year in 8-digit format.
Anniv. (Time)
Enter the hour/minute for the reminder
call in 4-digit format.
Anniv. (Signal)
Select the type of signal for the reminder.
§Save§ Press the display key.
Please note
You must specify a time for reminder
calls. If you select a visual signal or melody the time is automatically set to 12.00
am.
Deactivating anniversaries
s ¢ s (Select entry)
§View§ §Edit§ Press the display keys one after
the other.
s Scroll to the Anniversary line.
v Select Off.
§Save§ Press the display key.
Reminder call on an anniversary
When the handset is in idle state, a
reminder call is shown in the handset display
and indicated by the selected ringtone.
You can:
§Off§ Press the display key to
acknowledge and end the
reminder call.
If you are on a call at the time of the
reminder, call is indicated on the handset
with a single advisory tone.
Anniversaries that are indicated during a call
and that are elapsed are entered in
the Missed Alarms list (
¢ page 33).
Using the redial list
The redial list contains the twenty numbers
last dialed with the handset (max. 32 digits
each). If one of the numbers is in the directory, the corresponding name is displayed.
Manual redial
c Press the key briefly.
s Select entry.
c Press the talk key again. The
number is dialed.
When a name displays , you can display the
corresponding phone number by pressing
the display key
Managing entries in the redial list
c Press the key briefly.
s Select entry.
§Options§ Open menu.
The following functions can be selected with
q:
Copy to Directory
Copy an entry to the directory (page 28).
Display Number (as in the directory,
page 29)
Delete Entry (as in the directory, page 29)
Delete All (as in the directory, page 30)
§View§.
31
Page 32

Using the directory and lists
All Calls
™ Frank
10/14/09, 5:40pm
š 9725551234
10/14/09, 5:32pm
™ ...15125551234
10/14/09, 5:07pm
View Options
Using call lists
Prerequisite: Caller ID service subscription
(CID
Your telephone stores various types of calls:
u Accepted calls
u Outgoing calls
u Missed calls
You can view each type of call separately or
view an overview of all calls. Each call record
contains the last 20 numbers in its category.
When in idle status, open the call lists by
selecting the
menu:
¢
v
List entry
New messages display at the top.
An example of list entries:
§Calls§ display key or via the
Ê
Press the talk key c to return the calls
selected.
Select the §View§ display key to access additional information, including, for example,
the number linked to the name. If you have
CID, then the name that is registered with
your network provider for the calling
number is displayed. If the name is not
shown, it means that the caller has not
requested CID or that CID has been withheld.
Select the
§Options§ display key to choose
from the following options:
Copy to Directory
Copy the number to the directory.
Delete Entry
Delete selected entry.
Delete All
Delete all entries.
When you quit the call lists, all entries are set
to the status "old", i.e., the next time you
open the call list they will no longer appear
in bold.
u List type
u Status of entry
Bold: New entry
u Number or name of caller
u Date and time of call (if set, page 14)
u Type of entry:
– Accepted calls (
– Missed calls (
– Outgoing calls (
32
› )
™ )
š )
Page 33

Using the directory and lists
Ã
œ
02 10
08
Messages & Calls
Calls: (3)
Missed Alarms (1)
Back OK
Opening lists with the
message key
You can use the message key f to open the
following list selection:
u Network mailbox, if your network pro-
vider supports this function and fast
access is set for the network mailbox
¢ page 34).
(
u List of missed calls (¢ page 33)
u List of missed alarms (¢ page 33)
An advisory tone sounds as soon as a
new message arrives in a list. The f key
flashes (it goes off when the key is pressed).
In idle status, the display shows an icon for
the new message:
Icon New message...
... on the network mailbox
Ã
™
The number of new entries displays under
the corresponding icon.
If calls are saved in the network mailbox
and the appropriate settings have been
made, you will receive a message (see
your network provider user guide).
After pressing the message key f you will
see all the lists that contain messages and
the network mailbox list.
... in list of missed calls
... in the Missed Alarms list:
Please note
Lists containing new messages are at the top
of the list and are marked in a bold font.
Select a list with q. To open, press
§OK§.
Using the Missed Alarms list
Missed anniversaries (¢ page 30) are saved
in the Missed Alarms list if:
u You do not accept an anniversary.
u The anniversary was signaled during a
phone call.
u The handset is deactivated at the time of
the anniversary.
u Open the list by pressing the message
key f (
Each entry is shown with
u Number or name
u Date and time
The most recent entry is at the head of the
list.
Press the display key
selected entry.
If 10 entries are already stored in the list, the
next appointment reminder will delete the
oldest entry.
¢ page 33).
§Delete§, to delete the
33
Page 34

Using the network mailbox
•
Using the network
mailbox
The network mailbox is your network provider's answering machine within the network. You cannot use the network mailbox
unless you have requested it from your network provider.
Configuring fast access
for the network mailbox
With fast access, you can dial either the network mailbox or your integrated answering
machine (dependent on base) directly.
On bases without an answering machine,
fast access to the network mailbox is preconfigured. You only need to enter the number
of the network mailbox.
On bases with an answering machine, the
integrated answering machine is preconfigured. You can configure the network mailbox instead.
Configuring fast access for the
network mailbox and entering the
network mailbox number
Bases with an answering machine:
v ¢Ì ¢ Set Key 1
Network Mailbox
Select and press
Ø = selected).
(
Bases without an answering machine:
v ¢Ì ¢ Network Mailbox
Then:
~ Entering the number for the
network mailbox.
§Save§ Pressing the display key.
The fast access setting applies to all Gigaset
C59H handsets.
§Select§
Calling the network mailbox
Press and hold. You are con-
nected directly to the network
mailbox.
d Press the speaker key d if
required. You will hear the network mailbox announcement.
Viewing the network mailbox
message
When a message is recorded to the network
mailbox, you receive a call from the network
mailbox. If you have requested Calling Line
Identification (CID), the network mailbox
number displays. If you accept the call, the
new messages are played back. If you do not
accept the call, the network mailbox number
is saved in the missed call list and the message key flashes (
¢ page 33).
34
Page 35

ECO DECT
ECO DECT
You are helping to protect the environment
with your Gigaset handset.
Reducing energy consumption
By using a power-saving adapter plug, your
telephone consumes less power.
Reducing radiation
(dependent on base)
The radiation can only be reduced if your
base supports this function.
The transmission power of your telephone is
automatically reduced depending on the
distance to the base.
You can reduce the radiation of the handset
and base even further by using Eco Mode .
For further information, please refer to
your base user guide.
Setting the alarm clock
Prerequisite: The date and time have
already been set (
¢ page 14).
In idle status, the ¼ icon and wake-up time
display.
A wake-up call is signaled on the display and
with the selected melody (
wake-up call sounds for 60 seconds. If a key
is not pressed, the wake-up call repeats
twice at five minute intervals and then
switched off.
During an active call, the wake-up call is only
signaled by a short tone.
¢ page 3). The
Deactivating the wake-up call/
repeating after a pause (snooze
mode)
Prerequisite: A wake-up call is sounding.
§Off§ Press the display key. The wake-
up call is deactivated.
or:
§Snooze§ Press the display key or any key.
The wake-up call is deactivated
and then repeated after 5 minutes. After the second repetition
the wake-up call is deactivated
completely.
Activating/deactivating the alarm
clock and setting the wake-up time
v ¢ Alarm Clock
¤ You can enter data in the following fields:
Activation:
Select On or Off.
Time:
Enter the wake-up time in 4-digit format.
Use the display key to select AM or PM.
Volume:
Use the right and left arrows on the control key to set the volume.
Melody:
Select the melody to play as the alarm
signal.
§Save§ Press the display key.
35
Page 36

Using a handset as a room monitor
Using a handset as a
room monitor
If the room monitor is activated, a previously
saved destination number is called as soon
as a set noise level is reached. You can save
an internal or external number in your handset as the destination number. All of the
handset keys are deactivated, with the
exception of the display keys and control
key.
The room monitor call to an external
number is terminated after approximately
90 seconds. The room monitor call to an
internal number (handset) stops after
approx. 3 minutes (depending on the base).
When the room monitor is activated, all keys
are locked except the end call key. The handset's speaker is muted.
When the room monitor is activated, incoming calls to the handset are indicated with-
out a ringtone and only display on the
screen. The display and keypad are not illuminated and advisory tones are also turned
off.
If you accept an incoming call, the room
monitor is suspended for the duration of the
call, but the function remains activate.
If you deactivate, then reactivate the handset, the room monitor remains activated.
Warning!
u Always check the operation of
the room monitor before using it.
For example, test its noise sensitivity. If you are diverting the room
monitor to an external number,
check the connection.
u When the function is switched on, the
handset's operating time is considerably reduced. If necessary, place the
handset in the charging cradle. This
ensures that the battery does not run
down.
u Ideally position the handset 1 to
2 metres away from the baby.
The microphone must be directed
towards the baby.
u The connection to which the room
monitor is diverted must not be
blocked by an activated answering
machine.
Activating the room monitor and
entering the destination number
v ¢ É ¢ Room Monitor
¤ You can enter data in the following fields:
Activation:
Select On to activate.
Alarm to:
Select Internal or External.
External number: Select the number
from the directory (press the display key
ö) or enter it directly.
Internal number: Select the display key
§Change§ ¢ Select the handset or Call All
to call all registered handsets
¢ §OK§.
¤ Press §Save§ to save the settings.
In idle status, the destination number or
the internal destination number displays.
36
Page 37

Setting the handset
i V
07:15 am
INT 1 Oct 22
Á
Room Monitor
9725551234
Off Options
When the room monitor function is activated, the idle display appears as shown
below:
Changing the set destination
number
v ¢ É ¢ Room Monitor
¤ Enter and save number as described
under "Activating the room monitor and
entering the destination number"
¢ page 36).
(
Cancel/deactivate room monitor
Press the end call key a to cancel the call
when the room monitor is activated.
In the idle status, press the display key
to deactivate room monitor mode.
Deactivating the room monitor
remotely
Prerequisites: The phone must support tone
dialing and the room monitor should be set
for an external destination number.
¤ Accept the call from the room monitor
and press keys 9 ;.
The call ends immediately and the room
monitor function deactivates. There will be
no further room monitor calls.
To reactivate the room monitor function
with the same phone number:
¤ Reactivate and save with §Save§
¢ page 36).
(
§Off§
Setting the handset
Your handset is preconfigured, but you can
change the settings to suit your individual
requirements.
Quickly accessing numbers
and functions
You can assign a number from the directory
to each of the digit keys Q and 2to
O.
The left and right display keys have a func-
tion pre-selected by def ault. You can change
the assignment (
The number is then dialed or the function
started by simply pressing a key.
Assigning digit keys (quick dial)
Prerequisite: You have not yet assigned a
number to the digit key.
¤ Press and hold the digit key.
or:
Press the digit key briefly and press the
§QuickDial§ display key.
The directory opens.
¤ Select an entry and press §OK§.
The entry is saved to the appropriate digit
key.
Please note
If you delete or edit the entry in the directory at a later date, this will not affect the
assignment to the number key.
¢ page 38).
37
Page 38

Setting the handset
Dialing a number/changing
assignment
Prerequisite: The digit key already has a
number assigned to it.
When the handset is in idle status
¤ Press and hold the digit key.
The number is dialed immediately.
or:
¤ Briefly press the digit key:
Press the display key with number/name
(abbreviated if necessary) to dial the
number
or:
Press the
the digit key assignment or to delete the
assignment.
§Change§ display key to change
Changing display key assignments
¤ Press and hold the left or right display
key.
The list of possible key assignments opens.
Select any of the following:
Room Monitor
Assign menu for setting and activating
the room monitor to a key (
Alarm Clock
Assign menu for setting and activating
the alarm clock to a key (
Redial
Display the redial list.
More Functions...
More features are available:
INT
Internal calls (
¢ page 27).
¢ page 36).
¢ page 35).
¤ Select an entry and press §OK§.
Changing the display
language
You can view the display texts in different
languages.
Ï
¢
v
The current language is indicated by a Ø.
s Select language and
¢ Language
§Select§.
press
Setting the display
Setting the screensaver
You can set a picture or the time to display
as a screensaver when the handset is in idle
status. This will replace the idle status display. Depending on the size of the screensaver, it may conceal the date, time and
name.
The screensaver does not display in certain
situations, e.g., during a call or if the handset
is deregistered.
If a screensaver is activated, the Screensaver
menu option is marked with μ.
Ï
¢
v
The current setting displays.
¢ Display ¢ Screensaver
¤ You can enter data in the following fields:
Activation:
Select On (screensaver displays) or Off
(no screensaver).
Selection :
Use the right and left control keys to
select a screensaver
§View§ Press the display key. The active
screensaverdisplays.
s Select screensaver and
press
§Save§ Press the display key.
If the screensaver conceals the display,
briefly press a to show the idle display.
, or
§OK§.
38
Page 39

Setting the handset
•
•
Setting the large font
You can increase the font size of print and
symbols in call lists and in the directory to
improve readability. When using the large
font only one entry instead of multiple
entries can be shown at the same time on
each display and names are shortened
where necessary.
Ï
¢
v
§Change§ Press display key (³=on).
¢ Display ¢Large Font
Setting the color scheme
You can set the display to have a dark or light
background.
Ï
¢
v
Select Color Scheme 1 or Color Scheme 2
and press
¢ Display ¢Color Schemes
§Select§.
Setting the display backlight
Depending on whether or not the handset is
in the charging cradle, you can activate or
deactivate the backlight. If it is deactivated,
the display is permanently dimmed. If the
backlight is deactivated it is switched on by
pressing any key. In this case the pressed key
has no other function.
Ï
¢
v
The current setting displays.
¢ Display ¢Backlight
¤ You can enter data in the following fields:
In Charger
Select On or Off.
Out of Charger
Select On or Off.
Please note
With the On setting, the standby time
of the handset can be significantly
reduced.
Activating/deactivating
auto answer
If you activate this function you can answer
an incoming call simply by lifting the handset out of the charging cradle without having to press the talk key c.
Ï
¢
v
§Change§ Press the display key (³=on).
¢Tel e ph o ny ¢Auto Answer
Changing the speaker/
earpiece volume
You can set the speaker volume for speaker
mode and the earpiece volume to five different levels.
In idle status:
t Open the Handset Volume
menu.
r Set the earpiece volume.
s Scroll to the Speaker: line.
r Set the speaker volume.
§Save§ Press the display key if neces-
sary to save the setting permanently.
To set the volume during a call:
t Press the control key.
r Select volume.
The setting will automatically be saved after
approximately 3 seconds, if not then press
the display key
If t is assigned a different function:
§Options§ Open the menu.
Volu me Select and press §OK§.
Configure the setting (see above).
§Save§.
§Save§ Press the display key.
39
Page 40

Setting the handset
Changing ringtones
u Volume:
You can choose between five levels of
volumes (1–5; e.g., level 3 = Š) and
the "crescendo" ringtone (6; where the
volume increases with each ring =
‡).
u Ringtones:
You can select a ringtone from a list of
pre-loaded ringtones.
You can set different ringtones for the following functions:
u Intrnl Calls
u Ext. Calls
Setting volume/melody
In idle status:
v ¢ Audio Settings
¢ Ringtones(Handset) ¢ Volume /
Melodies
r Set volume/melody for internal
calls and anniversaries.
s Scroll to the next input field line.
r Set volume/melody for external
calls.
§Save§ Press the display key to save the
setting.
Switching the ringtone on/off for
anonymous calls
If a caller blocks their number, you can set
your handset not to ring. The call will only be
signaled in the display.
In idle status:
¢ Audio Settings
v
¢ Ringtones(Handset)
¢ Anon. Calls Silent
Press §Change§ to activate/deactivate the function (³= on).
Activating/deactivating the
ringtone
You can deactivate the ringtone on your
handset before you answer a call or when
the handset is in idle status. You can deactivate the ringtone permanently, or only for
the current call. You cannot reactivate the
ringtone while an external call is in progress.
Deactivating the ringtone
permanently
* Press and hold the star key.
The ó icon appears in the display.
Reactivating the ringtone
* Press and hold the star key.
Deactivating the ringtone for the
current call
§Silence§ Press the display key.
Activating/deactivating the alert
tone
In place of the ringtone you can activate an
alert tone. When you receive a call, you will
hear a short tone ("Beep") instead of the
ringtone.
* Press and hold the star key.
§Beep§ Within 3 seconds press the dis-
play key. A call will now be signaled by one short alert tone.
The ñ icon appears in the display.
40
Page 41

Setting the handset
•
•
Activating/deactivating
advisory tones
Your handset uses advisory tones to notify
you about different activities and statuses.
The following advisory tones can be activated/deactivated independently of each
other:
u Key tone: every key press is confirmed.
u Acknowledge tones:
– Confirmation tone (ascending tone
sequence): at the end of an entry/setting and when a new entry arrives in
the call list
– Error tone (descending tone
sequence): when you make an incorrect entry
– Menu end tone: when scrolling to the
end of a menu
u Battery low beep: the battery requires
charging.
In idle status:
¢ Audio Settings
v
¢ Advisory Tones
¤ You can enter data in the following fields:
Key Tones:
Select On or Off.
Confirmation:
Select On or Off.
Battery:
Select On or Off.
§Save§ Press the display key.
Restoring the handset
default settings
You can reset individual settings and
changes that you have made.
When you perform a reset, the settings listed
below are automatically retained:
u Registration to the base
u Date and time
u Directory entries and the call lists
v ¢Ï ¢ System ¢ Handset Reset
§Yes§ Press the display key.
Please note
You can also set the call volume, the ringtones and the advisory tones via the
¢ page 24).
menu (
41
Page 42
Troubleshooting
Troubleshooting
If you have any questions about the use of
your telephone, you can contact us at any
time at www.gigaset.com/customercare
The table below contains a list of common
problems and possible solutions.
The display is blank.
1. The handset is not switched on.
¥ Press and hold the end call key a.
2. The battery is empty.
¥ Charge the battery or replace it
(
¢page 10).
Not all menu options are displayed.
The menu display is reduced (Standard mode).
¥ Activate extended menu display
(Expert mode
No Base flashes on the display.
1. The handset is outside the range of the base.
) (¢page 24).
•
¥ Move the handset closer to the base.
2. The range of the base is reduced because Eco
Mode is activated.
¥ Deactivate Eco Mode (¢page 35) or
reduce the distance between the handset
and the base.
3. The base is not switched on.
¥ Check the power adapter of the base.
Please register handset flashes on the display.
Handset has not been registered with the base or
has been deregistered.
¥ Register the handset (¢page 12).
.
Handset does not ring.
1. The ringtone is deactivated.
¥ Activate the ringtone (¢page 40).
2. The telephone only rings when the phone
number is transmitted.
¥ Switch on the ringtone for anonymous
calls (
¢page 40).
The other party cannot hear you.
You have pressed the mute key h. The handset
is "muted".
¥ Reactivate the microphone (¢ page 27).
You hear an error tone when keying an input (a
descending tone sequence).
Action has failed/invalid input.
¥ Repeat the operation.
Watch the display and refer to the user guide
if necessary.
Exclusion of liability
Some displays may contain pixels
(picture elements), which remain activated or deactivated. As a pixel is made
up of three sub-pixels (red, green, blue),
it is possible that pixel colors may vary.
This is completely normal and does not
indicate an error.
42
Page 43
Appendix
!
Appendix
Caring for your phone
Wipe down the base station and handset
with a damp cloth (do not use solvent or a
microfiber cloth) or an antistatic cloth. Never
use a dry cloth. This can cause static.
Contact with liquid
If the handset comes into contact with liquid:
1. Switch the handset off and remove the
batteries immediately.
2. Allow the liquid to drain from the handset.
3. Pat all parts dry, then with the battery
compartment open and the keypad facing down place the handset in a dry,
warm place for at least 72 hours (not in a
microwave, oven, etc.).
4. Do not switch on the handset again un-
til it is completely dry.
When it has fully dried out, you will normally
be able to use it again.
Specifications
Technology: Nickel-metal-hydride (NiMH)
Size: AAA (Micro, HR03)
Voltage: 1.2 V
Capacity: 550 - 1000 mAh.
We recommend the following battery types,
because these are the only ones that guarantee the specified operating times, full
functionality and long service life:
u Yuasa AAA 800 mAh
The handset is supplied with nickel-metal
hydride UL-approved AAA batteries.
Handset operating times/charging
times
The operating time of your telephone
depends on the capacity and age of the batteries and the way they are used. (All times
are maximum possible times).
Capacity (mAh) approx.
550 700 800 1000
Standby time
(hours)*
Talktime (hours) 10121317
Operating time
for 1.5 hrs of calls
per day (hours)**
Charging time in
charging cradle
(hours)
* without/with display backlight
** without display backlight
(Setting the display backlight
160/ 48185/ 56210/ 64260/
79
85 100 115 140
6.5 7.5 8.5 10.5
¢page 39)
Due to the constant progression in battery
development, the list of recommended batteries is regularly updated.
43
Page 44

Appendix
1)
2)
General specifications
DECT standard is supported
GAP standard is supported
No. of channels 60 duplex channels
Radio frequency range 1880–1900 MHz
Duplex method Time multiplex,
Channel grid 1728 kHz
Bit rate 1152 kbit/s
Modulation GFSK
Language code 32 kbit/s
Transmission power 10 mW, average power
Range Up to 984 feet outdoors,
Environmental conditions in operation
Dialling mode DTMF (tone dialling)/
10 ms frame length
per channel
up to 165 feet indoors
+41°F to +113°F, 20% to
75% relative humidity
DP (pulse dialling)
Writing and editing text
The following rules apply when writing text:
u Each key between Q and O is
assigned several letters and characters.
u Control the cursor with uvts
Press and hold u or v to move the
cursor word by word.
u Characters are inserted at the cursor posi-
tion.
u Press the star key
table of special characters. Select the
required character and press the display
§Insert§ to insert the character at the
key
cursor position.
u Press and hold Q to O to insert dig-
its.
u Press Ñ display key to delete the char-
acters to the left of the cursor. Press and
hold to delete the word to the left of the
cursor.
u The first letter of the name of directory
entries is automatically capitalised, followed by lower case letters.
to display the
*
Writing names
Press the relevant key several times to enter
letters/characters.
If you press and hold a key, the corresponding digit is inserted.
Standard characters
1x 2x 3x 4x 5x 6x 7x 8x 9x 10x
2
3
4
5
L
M
N
O
Q
1) Space
2) Line break
Setting upper/lower case or digits
Press the hash key # briefly to switch
from "Abc" mode to "123" and from "123" to
"abc" and from "abc" to "Abc" (upper case:
1st letter upper case, all others lower case).
Press the hash key #before entering the
letter.
You can see in the display whether upper
case, lower case or digits is selected.
1
abc2дбавгз
def3лйик
gh i4ïíìî
jkl5
mno6цсутфх
pqr s 7ß
tuv8üúùû
wx y z 9 яэжше
.,?!0
44
Page 45

FCC / ACTA Information
Industry Canada Certification
Operation is subject to the following two conditions (1) this device may not cause interference,
and (2) this device must accept any interference,
including interference that may cause undesired
operation of the device.
NOTICE: The Industry Canada label identifies certified equipment. This certification means that the
equipment meets certain telecommunications
network, protective, operational and safety
requirements as prescribed in the appropriate Terminal Equipment Technical Requirements document(s). The Department does not guarantee the
equipment will operate to the user’s satisfaction.
Before installing this equipment, users should
ensure that it is permissible to be connected to
the facilities of the local telecommunications
company. The equipment must also be installed
using an acceptable method of connection. The
customer should be aware that compliance with
the above conditions may not prevent
degradation of service in some situations.
Repairs to certified equipment should be coordinated by a representative designated by the supplier. Any repairs or alterations made by the user
to this equipment, or equipment malfunctions,
may give the telecommunications company cause
to request the user to disconnect the equipment.
Users should ensure for their own protection that
the electrical ground connections of the power
utility, telephone lines and internal metallic water
pipe system, if present, are connected together.
This precaution may be particularly important in
rural areas
NOTE: Users should not attempt to make such
connections themselves, but should contact the
appropriate electric inspection authority,
or electrician, as appropriate.
This product meets the applicable Industry
Canada technical specifications.
The Ringer Equivalence Number is an indication of
the maximum number of devices allowed to be
connected to a telephone interface. The termination of an interface may consist of any combination of devices subject only to the requirement
that the sum of the RENs of all devices does not
exceed five.
This Class B digital apparatus complies with Canadian ICES-003.
Cet appareil numérique de la classe B est conforme à la norme NMB-003 du Canada.
FCC / ACTA Information
Warning: Changes or modifications to this unit
not expressly approved by Gigaset Communications USA LLC could void the FCC authority to
operate the equipment. This includes the addition
of any external antenna device.
This equipment complies with Part 68 of the FCC
rules and the requirements adopted by the ACTA.
On the bottom of the base station is a label that
contains, among other information, a product
identifier in the format US:AAAEQ##TXXXX. If
requested, this number must be provided to the
telephone company.
A p lu g an d j ack us ed to c on nec t t hi s eq ui pme nt to
the premises wiring and telephone network must
comply with the applicable FCC Part 68 rules and
requirements adopted by the ACTA. A compliant
telephone cord and modular plug is provided
with this product. It is designed to be connected
to a compatible modular jack that is also compliant. See installation instructions for details.
The REN is used to determine the number of
devices that may be connected to a telephone
line. Excessive RENs on a telephone line may result
in the devices not ringing in response to an
incoming call. In most but not all areas, the sum of
RENs should not exceed five (5.0). To be certain of
the number of devices that may be connected to
a line, as determined by the total RENs, contact
the local telephone company. For products
approved after July 23, 2001, the REN for this product is part of the product identifier that has the
format US:AAAEQ##TXXXX. The digits represented by ## are the REN without a decimal point
(e.g., 03 is a REN of 0.3). For earlier products, the
REN is separately shown on the label.
A copy of the supplier's Declaration of Conformity
(SDoC) is available at this Internet address:
www.gigaset.com/docs.
If this equipment causes harm to the telephone
network, the telephone company will notify you
advance, that temporary discontinuance of service may be required. But if advance notice isn’t
practical, the telephone company will notify the
customer as soon as possible. Also, you will be
advised of your right to file a complaint with the
FCC if you believe it is necessary.
The telephone company may make changes in its
facilities, equipment, operations or procedures
that could affect the operation of the equipment.
If this happens the telephone company will provide advance notice in order for you to make necessary modifications to maintain uninterrupted
service. If you experience trouble with this telephone system, disconnect it from the network
in
45
Page 46

FCC / ACTA Information
until the problem has been corrected or until you
are sure that the equipment is not malfunctioning.
If trouble is experienced with this equipment, for
repair or warranty information, please contact
Support at 1-866 247-8758. If the equipment is
causing harm to the telephone network, the telephone company may request that you disconnect
the equipment until the problem is resolved. This
equipment is of a type that is not intended to be
repaired by the Customer (user).
This telephone system may not be used on coin
service provided by the telephone company. Connection to party line service is subject to state tariffs. Contact the state public utility commission,
public service commission or corporation commission for information. Privacy of communications may not be ensured when using this phone.
If your home has specially wired alarm equipment
connected to the telephone line, ensure the
installation of this equipment does not disable
your alarm equipment. If you have questions
about what will disable alarm equipment, consult
your telephone company or a qualified installer.
This telephone system equipment has been
tested and found to comply with the limits for
Class B digital device, pursuant to Part 15 of the
FCC Rules. Operation is subject to the following
two conditions: (1) This device may not cause
harmful interference, and (2) This device must
accept any interference received, including interference that may cause undesired operation.
These limits are designed to provide reasonable
protection against harmful interference in a residential installation. Some cordless telephones
operate at frequencies that may cause interference to nearby T V’s and VCR’s; to minimize or prevent such interference, the system base should
not be placed near or on top of a TV or VCR; and, if
interference is experienced, moving the base farther away from the TV or VCR will often reduce or
eliminate the interference.
However, there is no guarantee that interference
will not occur in a particular installation. If this telephone system does cause harmful interference
to radio or television reception, which can be
determined by turning the system off and on, the
user is encouraged to try to correct the interference by one or more of the following measures:
1. Reorient or relocate the receiving antenna.
2. Increase the separation between the base station and receiver.
3. Connect the base station into an outlet on a circuit different from that to which the receiver is
connected.
4. Consult the dealer or an experienced radio TV
technician for help.
Notice for Direct Inward Dialing
("DID")
ALLOWING THIS EQUIPMENT TO BE OPERATED IN
SUCH A MANNER AS TO NOT PROVIDE FOR
PROPER ANSWER SUPERVISION IS A VIOLATION
OF PART 68 OF THE FCC‘S RULES.
Notice to Hearing Aid Wearers:
This phone system is compatible with inductively
coupled hearing aids.
Power Outage:
In the event of a power outage, your cordless
telephone will not operate. The cordless telephone requires electricity for operation. You
should have a telephone that does not require
electricity available for use during power outages.
Notice:
The installation of the base unit should allow
at least 8 inches between the base and persons to
be in compliance with FCC RF exposure guidelines.
For body worn operation, the portable part (handset) has been tested and meets FCC RF exposure
guidelines. Use with an accessory that contains
metal parts may not ensure compliance with FCC
RF exposure guidelines.
Notice to telephone company service:
If you need service from your telephone company,
please provide them with the information
– Facility interface Code (FIC)
– Service Order Code (SOC)
– Universal Service Order Code (USOC)
as indicated on the label on the bottom side of the
base station.
46
Page 47

FCC / ACTA Information
Safety precautions
Before using your telephone equipment, basic
safety instructions should always be followed to
reduce the risk of fire, electric shock and injury to
persons.
1. Read and understand all instructions.
2. Follow all warnings and instructio ns marked on
the product.
3. Unplug this product from the wall telephone
jack and power outlet before cleaning. Do not use
liquid cleaners or aerosol cleaners. Use damp
cloth for cleaning.
4. Do n ot u se t hi s pro du ct n ear wat er, f or e xam ple ,
near a bathtub, wash bowl, kitchen sink, or laundry tub, in a wet basement or near a swimming
pool.
5. Place this product securely on a stable surface.
Serious damage and/or injury may result if the
unit falls.
6. Slots or openings in the cabinet and the back
and bottom are provided for ventilation, to protect it from overheating. These openings must not
be blocked or covered. This product should never
be placed near or over a radiator or heat register,
or in a place where proper ventilation is not provided.
7. This product should be operated only from the
type of power source indicated on the marking
label. If you are not sure of the type of AC line
power to your home, consult your dealer or local
power company.
8. Do not place objects on the power cord. Install
the unit where no one can step or trip on the cord.
9. Do not overload wall outlets and extension
cords as this can result in the risk of fire or electric
shock.
10. Never push objects of any kind into this product through cabinet slots as they may touch dangerous voltage points or short out parts that could
result in the risk of fire or electric shock. Never spill
liquid of any kind on this product.
11. To reduce the risk of electric shock or burns, do
not disassemble this product. Take it to a qualified
service center when service is required. Opening
or removing covers may expose you to dangerous
voltages, dangerous electrical current or other
risks. Incorrect reassembly can cause electric
shock when the appliance is subsequently used.
12. Unplug the product from the wall outlet and
refer servicing to qualified service personnel
under the following conditions:
a.) When the power cord is damaged or frayed.
b.) If liquid has been spilled into the product.
c.) If the product has been exposed to rain or
water.
d.) If the product does not operate normally by follow
ing the operating instructions. Adjust only
those controls
instructions because improper adjustment of
other controls may result in damage and may
require extensive work by a qualified technician to
restore the product to normal operation.
e.) If the product has been dropped or physically
has been damaged.
f.) If the product exhibits a distinct change in performance.
13. Avoid using a telephone (other than a cordless
type) during a thunderstorm. There may be a
remote risk of electrical shock from lightning.
Therefore we suggest a surge arrestor.
14. Do not use the telephone to report a gas leak
in the vicinity of the leak.
15. Emergency/911 numbers may not be dialed if
the keypad is locked.
16. Minimum No. 26 AWG telecommunication line
cord must be used with this phone.
that are covered by the operating
BATTERY SAFETY PRECAUTIONS
To reduce the risk of fire, injury or electric shock,
and to properly dispose of batteries, please read
and understand the following instructions.
CONTAINS NICKEL METAL HYDRIDE BATTERY. BATTERY MUST BE RECYCLED OR DISPOSED OF PROPERLY. DO NOT DISPOSE OF IN MUNICIPAL WASTE.
1. Only use the batteries specified for use with this
product.
2. DO NOT USE NICKEL CADMIUM OR LITHIUM
BATTERIES, or mix batteries ofdifferent sizes or
from different manufacturers in this product. DO
NOT USE NONRECHARGEABLE BATTERIES.
3. Do not dispose of the batteries in a fire; the cells
may explode. Do not expose batteries to water.
Check with local codes for special disposal instructions.
4. Do not open or mutilate the batteries. Released
electrolyte is corrosive and may cause damage to
the eyes or skin. The electrolyte may be toxic if
swallowed.
5. Exercise care in handling the batteries in order
not to short the batteries with conducting materials such as rings, bracelets, and keys. The batteries
or conducting material may overheat and cause
burns or fire.
6. Charge the batteries provided with, or identified for use with, this product only in accordance
with the instructions and limitations specified in
the user’s manual. Do not attempt to charge the
batteries with any means other than that specified
in the users manual.
7. Periodically clean the charge contacts on both
the charger and handset.
47
Page 48

Service (Customer Care)
Service (Customer Care)
Customer Care Warranty for Cordless Products
To obtain Customer Care Warranty service,
product operation information, or for problem resolution, call:
Toll Free:
1-866 247-8758
End-user limited warranty
This product is covered by a one year limited warranty. Any repair replacement or warranty ser vice,
and all questions about this product should be
directed to: 1-866 247-8758.
This limited, non-transferable warranty is provided to the original buyer/end-consumer ("you")
for systems, handsets and accessories (collectively, "Product") provided by Gigaset Communications USA LLC or Gigaset Communications Canada Inc. (collectively "Gigaset NAM"). Gigaset NAM
warrants to you that at the date of purchase, the
Product is free of defects in workmanship and
materials and the software included in the Product will perform in substantial compliance to its
program specifications.
1. WARRANTY PERIOD
The Product warranty period is one (1) year from
the original date of purchase by you. Proof of purchase (e.g., sales slip or invoice) must be provided
with any Product returned during the warranty
period. Batteries supplied with the Products are
warranted to be free from defects at the time of
purchase only.
2. EXCLUSIVE REMEDY
Gigaset NAM's entire liability and your exclusive
remedy if the Product is defective in materials or
workmanship during the warranty period and is
returned shall be that the Product will be repaired
or replaced as set forth in Section 4 below. Reconditioned replacement components, parts or materials may be used in the replacement or repair.
Data in the memory of the Product may be lost
during repair.
3. THIS LIMITED WARRANTY DOES NOT
COVER AND IS VOID WITH RESPECT
TO THE FOLLOWING:
– Cosmetic damage, physical damage to the sur-
face of the Product, including, without limitation, breakage, cracks, dents, scratches or
adhesive marks on the LCD screen or outside
casing of the Product.
– Products which have been repaired, main-
tained or modified (including the antenna) by
anyone other than Gigaset NAM or a Gigaset
NAM-approved repair facility, or that have
been improperly installed.
– Cost of installation, removal or reinstallation.
– Damage due to any telephone, electronic,
hardware or software program, network, Inter-
net or computer malfunctions, failures, or diffi-
culties of any kind, including without limita-
tion, server failure or incomplete, incorrect,
garbled or delayed computer transmissions.
– Equipment and components not manufac-
tured, supplied or authorized by Gigaset NAM.
– Modification of the Product's components, or
operation of the Product in an unsuitable envi-
ronment or in a manner for which it is not
intended, including but not limited to failures
or defects caused by misuse, abuse, accidents,
physical damage, abnormal operation,
improper handling or storage, neglect, altera-
tions, unauthorized installation, removal or
repairs, failure to follow instructions, problems
caused by the carrier's network coverage,
exposure to fire, water or excessive moisture or
dampness, floods, or extreme changes in cli-
mate or temperature, ac ts of God, riots, acts of
terrorism, spills of food or liquids, viruses or
other software flaws introduced into the Prod-
uct or other acts which are not the fault of
Gigaset NAM and which the Product is not
specified to tolerate, including damage caused
by mishandling or blown fuses.
– Products which have had warranty stickers,
electronic serial number and/or serial number
label removed, altered, rendered illegible or
fraudulently applied to other equipment.
– Signal reception problems (unless caused by
defect in material or workmanship in the Prod-
uct).
– Products operated outside published maxi-
mum ratings.
– Performance of the Products when used in
combination with other products or equip-
ment not manufactured, supplied or author-
ized by Gigaset NAM.
– Consumables (such as batteries and fuses).
48
Page 49

Service (Customer Care)
– Payments for labor or service to representa-
tives or service centers not authorized to per-
form product maintenance by Gigaset NAM.
– Loss of data.
– Testing and examination discloses that the
alleged defect or malfunction in the Product
does not exist.
This warranty does not cover customer education,
instruction, installation or removal, set up adjustments, problems related to service(s) provided by
a carrier or other service provider, and/or signal
reception problems. Gigaset NAM shall not be
responsible for software, firmware, information, or
memory data contained in, stored on, or integrated with any Products returned for repair,
whether under warranty or not. This warranty is
valid only in the country in which it is purchased
(i.e., the United States of America or Canada
respectively, but not both).
USE WITH ACCESSORIES NOT SUPPLIED BY
GIGASET NAM OR NOT OTHERWISE EXPRESSLY
AUTHORIZED BY GIGASET NAM MAY VOID
WAR RAN TY.
4. WARRANTY CLAIM PROCEDURE
All warranty claims must be made by notifying
Gigaset NAM prior to the expiration of the warranty period. Gigaset NAM's obligation to provide
warranty support shall not extend past the end of
the warranty period, except that any product
repaired or replaced during the warranty period
shall continue to be warranted for the balance of
such warranty period or thirty (30) days, whichever is greater.
Support service will be provided for you by
accessing the toll free customer service number:
1-866 247-8758
5. LIMITATION OF WARRANTY
Gigaset NAM makes no warranty or representation that the software in the Products will meet
your requirements or will work in combination
with any hardware or applications software products provided by third parties, that the operation
of the software will be uninterrupted or error free,
or that all defects in the software products will be
corrected.
6. LIMITATION ON REMEDIES; NO
CONSEQUENTIAL OR OTHER
DAMAGES
Your exclusive remedy for any breach of this limited warranty is as set forth above. Except for any
refund elected by Gigaset NAM, YOU ARE NOT
ENTITLED TO ANY DAMAGES, INCLUDING BUT
NOT LIMITED TO CONSEQUENTIAL DAMAGES,
if the Product does not meet the limited warranty
, and, to the maximum extent allowed by applicable law, even if any remedy fails of its essential
purpose. The terms below ("Exclusion of Incidental, Consequential and Certain Other Damages")
are also incorporated into this limited warranty .
Some states/jurisdictions/provinces do not allow
the exclusion or limitation of incidental or consequential damages, so the above limitation or
exclusion may not apply to you. This limited warranty gives you specific legal rights. You may have
others which vary from state/jurisdiction/province to state/jurisdiction/province.
7. DISCLAIMER OF WARRANTIES
GIGASET NAM AND ITS SUPPLIERS PROVIDE THE
PRODUCT AND SUPPORT SERVICES (IF ANY) AS IS
AND WITH ALL FAULTS. THE LIMITED WARRANTY
IS IN LIEU OF ANY OTHER EXPRESS WARRANTIES
(IF ANY) CREATED BY ANY DOCUMENTATION OR
PACKAGING EXCEPT FOR THE LIMITED WARRANTY, AND TO THE MAXIMUM EXTENT PERMITTED BY APPLICABLE LAW IS IN LIEU OF ANY
IMPLIED OR STATUTORY WARRANTIES, INCLUDING, BUT NOT LIMITED TO, THE IMPLIED WARRANTIES OF MERCHANTABILITY AND FITNESS FOR A
PARTICULAR PURPOSE, OF ACCURACY OR COMPLETENESS OR RESPONSES, OF RESULTS, OF
WORKMANLIKE EFFORT, OF LACK OF VIRUSES
AND OF LACK OF NEGLIGENCE, ALL WITH REGARD
TO THE PRODUCT, AND THE PROVISION OF OR
FAILURE TO PROVIDE SUPPORT SERVICES. ALSO,
THERE IS NO WARRANTY OR CONDITION OF TITLE,
QUIET ENJOYMENT, QUIET POSSESSION, OR CORRESPONDENCE TO DESCRIPTION OR NONINFRINGEMENT WITH REGARD TO THE PRODUCT.
Some states/jurisdictions/provinces do not allow
limitations on how long an implied warranty lasts
or the exclusion or limitation of incidental or consequential damages, so the above exclusions or
limitations may not apply to you. If an implied
warranty or condition is created by your state/
province and federal or state/provincial law prohibits disclaimer of it, you also have an implied
warranty or condition, BUT ONLY AS TO DEFECTS
DISCOVERED DURING THE PERIOD OF THIS LIMITED WARRANTY (ONE YEAR). AS TO ANY DEFEC TS
DISCOVERED AFTER THE ONE YEAR PERIOD,
THERE IS NO WARRANTY OR CONDITION OF ANY
49
Page 50

Service (Customer Care)
KIND. This limited warranty gives you specific legal
rights, and you may also have other rights which
vary from state to state/province to province. In
no event shall Gigaset NAM's liability exceed the
cost of repairing or replacing defective Products
as provided herein, and any such liabilities will terminate upon expiration of the warranty period.
Any supplements or updates to the Product or the
software in the Product, including without limitatio n, an y (if any ) sof tware fixe s or u pgrad es or bug
fixes provided to you after the expiration of the
one year limited warranty period are not covered
by any warranty or condition, express, implied or
statutory.
8. EXCLUSION OF INCIDENTAL,
CONSEQUENTIAL AND CERTAIN
OTHER DAMAGES
TO THE MAXIMUM EXTENT PERMITTED BY APPLICABLE LAW, IN NO EVENT SHALL GIGASET NAM,
SELLER OR THEIR SUPPLIERS BE LIABLE FOR ANY
SPECIAL, INCIDENTAL, INDIRECT, OR CONSEQUENTIAL DAMAGES WHATSOEVER (INCLUDING, BUT
NOT LIMITED TO, DAMAGES FOR LOSS OF PROFITS
OR CONFIDENTIAL OR OTHER INFORMATION, FOR
BUSINESS INTERRUPTION, FOR PERSONAL INJURY,
FOR LOSS OF PRIVACY, FOR FAILURE TO MEET ANY
DUTY INCLUDING OF GOOD FAITH OR OF REASONABLE CARE, FOR NEGLIGENCE, AND FOR ANY
OTHER PECUNIARY OR OTHER LOSS WHATSOEVER) ARISING OUT OF OR IN ANY WAY RELATED
TO THE USE OF OR INABILITY TO USE THE PRODUCT, THE PROVISION OF OR FAILURE TO PROVIDE
SUPPORT SERVICES, OR OTHERWISE UNDER OR IN
CONNECTION WITH ANY PROVISION OF THIS LIMITED WARRANTY, EVEN IN THE EVENT OF THE
FAULT, TORT (INCLUDING NEGLIGENCE), STRICT
LIABILITY, BREACH OF CONTRACT OR BREACH OF
WARRANTY OF GIGASET NAM OR SELLER OR ANY
SUPPLIER, AND EVEN IF GIGASET NAM OR SELLER
OR ANY SUPPLIER HAS BEEN ADVISED OF THE
POSSIBILITY OF SUCH DAMAGES. REPAIR OR
REPLACEMENT, AS PROVIDED UNDER THE WARRANTY, IS YOUR SOLE AND EXCLUSIVE REMEDY
FOR BREACH OF THE LIMITED WARRANTY.
9. LIMITATION OF LIABILITY AND
REMEDIES
NOTWITHSTANDING ANY DAMAGES THAT YOU
MIGHT INCUR FOR ANY REASON WHATSOEVER
(INCLUDING, WITHOUT LIMITATION, ALL DAMAGES REFERENCED ABOVE AND ALL DIRECT OR
GENERAL DAMAGES), THE ENTIRE LIABILITY OF
GIGASET NAM, SELLER AND ANY OF THEIR SUPPLIERS UNDER ANY PROVISION OF THIS LIMITED
WARRANTY AND YOUR EXCLUSIVE REMEDY FOR
ALL OF THE FOREGOING (EXCEPT FOR ANY REMEDY OF REPAIR OR REPLACEMENT ELECTED BY
GIGASET NAM OR SELLER OR SUPPLIER WITH
RESPECT TO ANY BREACH OF THE LIMITED WARRANTY) SHALL BE LIMITED TO THE GREATER OF
THE AMOUNT ACTUALLY PAID BY YOU FOR THE
PRODUCT OR FIVE DOLLARS ($5.00 USD/CAN).
THE FOREGOING LIMITATIONS, EXCLUSIONS AND
DISCLAIMERS SHALL APPLY TO THE MAXIMUM
EXTENT PERMITTED BY APPLICABLE LAW, EVEN IF
ANY REMEDY FAILS ITS ESSENTIAL PURPOSE.
10. GOVERNING LAW
If this Product was purchased in the United States
of America this limited warranty will be governed
by the laws of Texas, and exclude the United
Nations Convention on Contracts for the International Sale of Goods. If this Product was purchased
in Canada this limited warranty will be governed
by the laws of the Province of Ontario and the federal laws of Canada applicable therein, and
exclude the United Nations Convention on Contracts for the
International Sale of Goods.
If you want to learn more about Gigaset Service or
for Support on your Gigaset phone, visit our web
site at http://www.gigaset.com or please call
1-866 247-8758.
Issued by
Gigaset Communications GmbH
Frankenstr. 2a, D-46395 Bocholt
Manufactured by Gigaset Communications GmbH
under trademark license of Siemens AG.
© Gigaset Communications GmbH 2010
All rights reserved.
Subject to availability. Rights of modifications
reserved.
Product attributes subject to change.
We reserve the right, to make changes without
notice in equipment design and/or components.
Part Number: A31008-M2150-R301-1-3S19
© Copyright 2010.
50
Page 51

Accessories
approx.
2.5 mm
21 mm
Ordering Gigaset products
You can order Gigaset products from your specialist retailer.
Use only original accessories. This will avoid possible health risks and personal
injury, and also ensure that all the relevant regulations are complied with.
Mounting the charging cradle on the wall
Accessories
51
Page 52

Index
Index
A
Accepting a call . . . . . . . . . . . . . . . . . . . . . . . 26
Accessories
Acknowledge tones
Activating
advisory tones
auto answer
handset
keypad lock
room monitor
Advisory tones
Alarm clock
Alert tone
Anniversary
deactivating
missed
saving in the directory
Answering machine, see also
Area codes
extra codes
local area code
Assigning a number key
Auto answer
B
Battery
charging
display
icon
inserting
tone
Birthday, see Anniversary
C
Call
ending
external
internal
Call duration
Call lists
Calling
external
internal
Care of the telephone
Changing
display language
. . . . . . . . . . . . . . . . . . . . . . . . . . . 51
. . . . . . . . . . . . . . . . . . . 41
. . . . . . . . . . . . . . . . . . . . . . 41
. . . . . . . . . . . . . . . . . . . . . . . . 39
. . . . . . . . . . . . . . . . . . . . . . . . . . . . 21
. . . . . . . . . . . . . . . . . . . . . . . . 21
. . . . . . . . . . . . . . . . . . . . . . 36
. . . . . . . . . . . . . . . . . . . . . . . . 41
. . . . . . . . . . . . . . . . . . . . . . . . . . . 35
. . . . . . . . . . . . . . . . . . . . . . . . . . . . 40
. . . . . . . . . . . . . . . . . . . . . . . . . . . 30
. . . . . . . . . . . . . . . . . . . . . . . . 31
. . . . . . . . . . . . . . . . . . . . . . . . . . . . . 33
. . . . . . . . . . . . . . . 30
Network mailbox
. . . . . . . . . . . . . . . . . . . . . . . . . 16
. . . . . . . . . . . . . . . . . . . . . . 16
. . . . . . . . . . . . . . . 37
. . . . . . . . . . . . . . . . . . . . . . . 26, 39
. . . . . . . . . . . . . . . . . . . . . . . 2, 3, 13
. . . . . . . . . . . . . . . . . . . . . . . . . . . . 2, 3
. . . . . . . . . . . . . . . . . . . . . . . . . . . . . . . 2, 3
. . . . . . . . . . . . . . . . . . . . . . . . . . . 10
. . . . . . . . . . . . . . . . . . . . . . . . . . . . . . . 41
. . . . . . . . . . . . . . . . . . . . . . . . . . . . . 26
. . . . . . . . . . . . . . . . . . . . . . . . . . . . 26
. . . . . . . . . . . . . . . . . . . . . . . . . . . . 27
. . . . . . . . . . . . . . . . . . . . . . . . . . 26
. . . . . . . . . . . . . . . . . . . . . . . . . . . . . . 32
. . . . . . . . . . . . . . . . . . . . . . . . . . . . 26
. . . . . . . . . . . . . . . . . . . . . . . . . . . . 27
. . . . . . . . . . . . . . . . . 43
. . . . . . . . . . . . . . . . . . . . 38
earpiece volume
ringtone
speaker volume
Character set
Charge status display
Color scheme
Confirmation tone
Connecting the headset
Control key
Correcting incorrect entries
Customer Care
. . . . . . . . . . . . . . . . . . . . 39
. . . . . . . . . . . . . . . . . . . . . . . . . . . 40
. . . . . . . . . . . . . . . . . . . . . 39
. . . . . . . . . . . . . . . . . . . . . . . . . 44
. . . . . . . . . . . . . . . . . 2, 3
. . . . . . . . . . . . . . . . . . . . . . . . . 39
. . . . . . . . . . . . . . . . . . . . 41
. . . . . . . . . . . . . . . 16
. . . . . . . . . . . . . . . . . . . . . . . . . 2, 18
. . . . . . . . . . . . 19
. . . . . . . . . . . . . . . . . . . . . . . . 48
D
Deactivate anonymous calls. . . . . . . . . . . . 40
Deactivating
advisory tones
auto answer
handset
keypad lock
room monitor
Delete key
Deleting
characters
Destination number (room monitor)
Dialing
using quick dial
using the directory
Directory
copying number from text
managing entries
opening
order of entries
saving anniversary
saving entry
sending entry/list to handset
using to enter numbers
Display
backlight
changing display language
color scheme
directory memory
in idle status
missed alarms
network mailbox message
screensaver
setting
Display keys
assigning
Display symbols
. . . . . . . . . . . . . . . . . . . . . . 41
. . . . . . . . . . . . . . . . . . . . . . . . 39
. . . . . . . . . . . . . . . . . . . . . . . . . . . . 21
. . . . . . . . . . . . . . . . . . . . . . . . 21
. . . . . . . . . . . . . . . . . . . . . . 37
. . . . . . . . . . . . . . . . . . . . . . . . . . . . 19
. . . . . . . . . . . . . . . . . . . . . . . . . . 19
. . . . 36
. . . . . . . . . . . . . . . . . . 30, 37
. . . . . . . . . . . . . . . . . . 29
. . . . . . . . . . . . . . . . . . . . . . . . . . . . . 28
. . . . . . . . . . . 30
. . . . . . . . . . . . . . . . . . . 29
. . . . . . . . . . . . . . . . . . . . . . . . . . . . 18
. . . . . . . . . . . . . . . . . . . . . 29
. . . . . . . . . . . . . . . . . . 30
. . . . . . . . . . . . . . . . . . . . . . . . 28
. . . . . . . . . 30
. . . . . . . . . . . . . . 30
. . . . . . . . . . . . . . . . . . . . . . . . . . . 39
. . . . . . . . . . 38
. . . . . . . . . . . . . . . . . . . . . . . 39
. . . . . . . . . . . . . . . . . . . 30
. . . . . . . . . . . . . . . . . . . . . 15, 21
. . . . . . . . . . . . . . . . . . . . . . 33
. . . . . . . . . . . 34
. . . . . . . . . . . . . . . . . . . . . . . . . 38
. . . . . . . . . . . . . . . . . . . . . . . . . . . . . 38
. . . . . . . . . . . . . . . . . . . . . . . . 2, 19
. . . . . . . . . . . . . . . . . . . . . . . . . . . 37
. . . . . . . . . . . . . . . . . . . . . . . . .3
52
Page 53

Index
E
Earpiece volume . . . . . . . . . . . . . . . . . . . . . . 39
ECO DECT
Editing
destination number
E-mail address
copying from the directory
End call key
Ending, call
Entry
saving (network mailbox)
selecting from directory
Error tone
Expert mode
Extra codes
. . . . . . . . . . . . . . . . . . . . . . . . . . . . 35
(room monitor)
. . . . . . . . . . . . . . . . . 37
. . . . . . . . . . 30
. . . . . . . . . . . . . . . . . . . . . . . . . 2, 26
. . . . . . . . . . . . . . . . . . . . . . . . . . . 26
. . . . . . . . . . . . 34
. . . . . . . . . . . . . 29
. . . . . . . . . . . . . . . . . . . . . . . . . . . . 41
. . . . . . . . . . . . . . . . . . . . . . . 24, 42
. . . . . . . . . . . . . . . . . . . . . . . . . . . 16
F
Fast access, network mailbox. . . . . . . . . . . 34
FLASH key
. . . . . . . . . . . . . . . . . . . . . . . . . . . . . .2
G
Group call . . . . . . . . . . . . . . . . . . . . . . . . . . . . 27
H
Handset
activating/deactivating
advisory tones
color scheme
contact with liquid
de-registering
display backlight
display language
earpiece volume
idle status
large font
. . . . . . . . . . . . . . . . . . . . . . . . . . . . . . . . . 18
list
. . . . . . . . . . . . . . . . . . . . . . . . . . . . . . 26
mode
muting
registering
restoring to factory settings
screensaver
set up for use
setting
speaker volume
using room monitor
Handset operating time
in room monitor mode
Headset socket
Hearing aids
. . . . . . . . . . . . . . . . . . . . . . 41
. . . . . . . . . . . . . . . . . . . . . . . 39
. . . . . . . . . . . . . . . . . . . . . . 12
. . . . . . . . . . . . . . . . . . . . . . . . . . 21
. . . . . . . . . . . . . . . . . . . . . . . . . . . 39
. . . . . . . . . . . . . . . . . . . . . . . . . . . . . 27
. . . . . . . . . . . . . . . . . . . . . . . . . 12
. . . . . . . . . . . . . . . . . . . . . . . . . 38
. . . . . . . . . . . . . . . . . . . . . . . 10
. . . . . . . . . . . . . . . . . . . . . . . . . . . . . 37
. . . . . . . . . . . . . . . . . . . . . . . . 16
. . . . . . . . . . . . . . . . . . . . . . . . . . . .6
. . . . . . . . . . . . . . 21
. . . . . . . . . . . . . . . . . . 43
. . . . . . . . . . . . . . . . . . . . 39
. . . . . . . . . . . . . . . . . . . . 38
. . . . . . . . . . . . . . . . . . . . 39
. . . . . . . . . . 41
. . . . . . . . . . . . . . . . . . . . . 39
. . . . . . . . . . . . . . . . . 36
. . . . . . . . . . . . . . 36
I
Icon
alarm clock
for new messages
keypad lock
ringtone
Icons
display
Idle status
display
returning to
Incorrect input (correction)
Industry Canada Certification
Installing the base
Internal call
. . . . . . . . . . . . . . . . . . . . . . . . . 35
. . . . . . . . . . . . . . . . . . . 33
. . . . . . . . . . . . . . . . . . . . . . . . 21
. . . . . . . . . . . . . . . . . . . . . . . . . . . 40
. . . . . . . . . . . . . . . . . . . . . . . . . . . . . . .3
. . . . . . . . . . . . . . . . . . . . . . . . . . 15, 21
. . . . . . . . . . . . . . . . . . . . . . . . 21
. . . . . . . . . . . . 19
. . . . . . . . . . 45
. . . . . . . . . . . . . . . . . . . . . . .9
. . . . . . . . . . . . . . . . . . . . . . . . . . . 27
K
Key
assign function or number
Key 1 (fast access)
Keypad lock
Keys
control key
delete key
display keys
end call key
fast access
FLASH key
message key
MUTE key
On/Off key
pound key
quick dial
speaker key
star key
talk key
. . . . . . . . . . . . . . . . . . . . . . .2
. . . . . . . . . . . . . . . . . . . . . . . . . . 21
. . . . . . . . . . . . . . . . . . . . . . . 2, 18
. . . . . . . . . . . . . . . . . . . . . . . . . . 19
. . . . . . . . . . . . . . . . . . . . . . 2, 19
. . . . . . . . . . . . . . . . . . . . . . . 2, 26
. . . . . . . . . . . . . . . . . . . . . . . . . . . .2
. . . . . . . . . . . . . . . . . . . . . . . . . . . .2
. . . . . . . . . . . . . . . . . . . . . . . . . .2
. . . . . . . . . . . . . . . . . . . . . . . . . . . .2
. . . . . . . . . . . . . . . . . . . . . . . . . . .2
. . . . . . . . . . . . . . . . . . . . . . . . 2, 21
. . . . . . . . . . . . . . . . . . . . . . . . . . . 30
. . . . . . . . . . . . . . . . . . . . . . . . . . .2
. . . . . . . . . . . . . . . . . . . . . . . . . . . . . .2
. . . . . . . . . . . . . . . . . . . . . . . . . . 2, 26
. . . . . . . . . . . 37
L
Language, display. . . . . . . . . . . . . . . . . . . . . 38
Large font
Liquid
List
call lists
handsets
missed calls
network mailbox
Local area code
Lock
activating/deactivating keypad lock
. . . . . . . . . . . . . . . . . . . . . . . . . . . . 39
. . . . . . . . . . . . . . . . . . . . . . . . . . . . . . . . 43
. . . . . . . . . . . . . . . . . . . . . . . . . . . . 32
. . . . . . . . . . . . . . . . . . . . . . . . . . . 18
. . . . . . . . . . . . . . . . . . . . . . . . 32
. . . . . . . . . . . . . . . . . . . . 33
. . . . . . . . . . . . . . . . . . . . . . . 16
. . 21
53
Page 54

Index
M
Making calls
accepting a call
external
internal
Manual redial
Medical equipment
Memory
directory
Menu
end tone
opening
overview
prompting
Menu display
Expert mode
Standard mode
Message key
opening lists
Microphone
Missed calls
MUTE key
Muting the handset
. . . . . . . . . . . . . . . . . . . . . . . . . . . . . . .2
. . . . . . . . . . . . . . . . . . . . . 26
. . . . . . . . . . . . . . . . . . . . . . . . . . . . 26
. . . . . . . . . . . . . . . . . . . . . . . . . . . . 27
. . . . . . . . . . . . . . . . . . . . . . . . . 31
. . . . . . . . . . . . . . . . . . . . .6
. . . . . . . . . . . . . . . . . . . . . . . . . . . 30
. . . . . . . . . . . . . . . . . . . . . . . . . . . 41
. . . . . . . . . . . . . . . . . . . . . . . . . . . . 18
. . . . . . . . . . . . . . . . . . . . . . . . . . . 24
. . . . . . . . . . . . . . . . . . . . . . . . . 20
. . . . . . . . . . . . . . . . . . . . . 24, 42
. . . . . . . . . . . . . . . . . . 24, 42
. . . . . . . . . . . . . . . . . . . . . . . . . . . .2
. . . . . . . . . . . . . . . . . . . . . . . . 33
. . . . . . . . . . . . . . . . . . . . . . . . . . . .2
. . . . . . . . . . . . . . . . . . . . . . . . . . . 32
. . . . . . . . . . . . . . . . . . . 27
N
Network mailbox. . . . . . . . . . . . . . . . . . . . . . 34
Number
as destination for room monitor
copying from directory
copying to the directory
entering network mailbox number
entering with directory
saving in directory
. . . . . . . . . . . . . . 30
. . . . . . . . . . . . . . 30
. . . . . . . . . . . . . . . . . . 28
. . . . . . 36
. . . . . . . . . . . . . 30
. . . 34
O
On/Off key. . . . . . . . . . . . . . . . . . . . . . . . . . . . . .2
Order in directory
. . . . . . . . . . . . . . . . . . . . . 29
P
Package contents . . . . . . . . . . . . . . . . . . . . . . .8
Pound key
Power adapter
. . . . . . . . . . . . . . . . . . . . . . . . . . 2, 21
. . . . . . . . . . . . . . . . . . . . . . . . . .6
Q
Quick dial. . . . . . . . . . . . . . . . . . . . . . . . . . 28, 37
R
Range. . . . . . . . . . . . . . . . . . . . . . . . . . . . . . . . . .9
. . . . . . . . . . . . . . . . . . . . . . . . . . . . . . . . 31
Redial
Registering (handset)
Reminder call
Ringtone
changing
setting volume
Room monitor
. . . . . . . . . . . . . . . . . . . . . . . . . . . 40
. . . . . . . . . . . . . . . . . . 12
. . . . . . . . . . . . . . . . . . . . . . . . . 31
. . . . . . . . . . . . . . . . . . . . . 40
. . . . . . . . . . . . . . . . . . . . . . . . 36
S
Screensaver . . . . . . . . . . . . . . . . . . . . . . . . . . 38
Search directory
Sending
directory entry to handset
Service (Customer Care)
Setting the date
Setting the time
Setting up the handset
Signal tone, see Advisory tones
Snooze mode
Sound, see Ringtone
Speaker key
Speaker mode
Specifications
Standard mode
Star key
. . . . . . . . . . . . . . . . . . . . . . . . . . . . . . . .2
. . . . . . . . . . . . . . . . . . . . . . 29
. . . . . . . . . . . 30
. . . . . . . . . . . . . . . 48
. . . . . . . . . . . . . . . . . . . . 14, 25
. . . . . . . . . . . . . . . . . . . . 14, 25
. . . . . . . . . . . . . . . . 10
. . . . . . . . . . . . . . . . . . . . . . . . . 35
. . . . . . . . . . . . . . . . . . . . . . . . . . . .2
. . . . . . . . . . . . . . . . . . . . . . . . 26
. . . . . . . . . . . . . . . . . . . . . . . . . 43
. . . . . . . . . . . . . . . . . . . . 24, 42
T
Talk key . . . . . . . . . . . . . . . . . . . . . . . . . . . . 2, 26
Troubleshooting
. . . . . . . . . . . . . . . . . . . . . . 42
V
Viewing the network mailbox
message
VIP group (directory entry)
Volume
earpiece
handset speaker volume
loudspeaker
ringtone
. . . . . . . . . . . . . . . . . . . . . . . . . 34
. . . . . . . . . . 28, 30
. . . . . . . . . . . . . . . . . . . . . . . . . . . . 39
. . . . . . . . . . . . . 39
. . . . . . . . . . . . . . . . . . . . . . . . 39
. . . . . . . . . . . . . . . . . . . . . . . . . . . 40
W
Warning tone, see Advisory tones
Writing and editing text
. . . . . . . . . . . . . . . 44
54
Page 55

Présentation combiné
i
V
07:15am
INT 1 Oct 14
INT
Appels
2
3
5
4
6
7
15
13
11
8
1
14
16
9
10
12
Présentation combiné
1 Ecran en mode veille
2 Niveau de charge des batteries (
3 Tou ches écra n (
4 Touches Messages (
Accès au journal des appels et à la liste
desmessages;
Clignote : nouveau message ou nouvel appel
5 Touches Raccrocher et Marche/Arrêt
Arrêt de la communication, annulation de la
fonction, retour au niveau de menu précédent
(appui bref), retour au mode veille (appui
long), activation/désactivation du combiné
(appui long en mode veille)
6 Tou che Di èse
Verrouillage/déverrouillage du clavier
(appui long en mode veille) ;
Commuter entre l'emploi de majuscules,
minuscules et de chiffres
7 Touche secret microphone (
Désactivation du microphone
8 Microphone
9 Tou che FL ASH
- Clignote : double appel
- Insertion d'une pause entre les chiffres
(appui long)
10 Touche Etoile
Activation/désactivation des sonneries (appui
long),
Pendant la communication : passage du mode
de numérotation par impulsions au mode fréquence vocale (appui bref)
Lors de la saisie d'un texte : ouverture
du tableau des caractères spéciaux
11 Raccordement du kit piéton (
12 Tou c he 1
Appel de la messagerie externe (appui long)
13 Touche Décrocher
Clignote : appel entrant ;
Prise de la communication, ouverture de la
liste des numéros bis (appui long), début de la
composition (appui bref )
14 Tou che M ains-L ibre s
Passage du mode écouteur au mode
Mains-Libres et inversement
15 Touche de navigation (
16 Intensité de la réception (
En vert : Mode Eco activé (¢ p. 34)
¢p. 18)
¢p. 32)
¢p. 17)
¢p. 14)
¢p. 24)
¢p. 15)
¢p. 14)
1
Page 56

Icônes d'affichage
Ø
«
Ú
Signalisation de
Appel externe (¢ p. 23)
ØåÚ
Appel interne (¢p. 24)
i ó V
Û 08:00
07:15am
INT 1 Oct 14
Ã
™
02 10 08
INT
Appels
ØðÚ
Anniversaire (¢p. 30)
ØìÚ
Réveil (¢p. 34)
Intensité de la réception i (¢ p. 34)
Sonnerie désactivée (
¢ p. 40)
Batterie en charge (
¢ p. 14)
Niveau de charge de la batterie (
¢ p. 14)
Réveil activé et heure de réveil (
¢ p. 34)
Heure actuelle (
¢ p. 14)
Jour et mois actuels (
¢ p. 14)
Nom du combiné
Nombre de nouveaux messages :
u à sur la messagerie (externe) (¢p. 31)
u ™ dans la liste des appels manqués (¢ p. 32)
u dans la liste des rendez-vous manqués (¢ p. 32)
Icônes d'affichage
Les icônes suivantes s'affichent en fonction des paramètres et du mode de fonctionnement de
votre téléphone :
2
Page 57

Sommaire
Présentation combiné . . . . . . . . . . . . . . . . . . . . . . . . . . . . . . . . . . . . . . . . . . . . . 1
Icônes d'affichage . . . . . . . . . . . . . . . . . . . . . . . . . . . . . . . . . . . . . . . . . . . . . . . . . 2
Consignes de sécurité . . . . . . . . . . . . . . . . . . . . . . . . . . . . . . . . . . . . . . . . . . . . . . 5
Gigaset C59H – Plus qu'un simple téléphone . . . . . . . . . . . . . . . . . . . . . . . . 6
Premières étapes . . . . . . . . . . . . . . . . . . . . . . . . . . . . . . . . . . . . . . . . . . . . . . . . . . 7
Vérification du contenu de l'emballage . . . . . . . . . . . . . . . . . . . . . . . . . . . . . . . . . . . . . . . . 7
Installation du chargeur . . . . . . . . . . . . . . . . . . . . . . . . . . . . . . . . . . . . . . . . . . . . . . . . . . . . . . . 8
Raccordement du chargeur . . . . . . . . . . . . . . . . . . . . . . . . . . . . . . . . . . . . . . . . . . . . . . . . . . . 8
Mise en service du combiné . . . . . . . . . . . . . . . . . . . . . . . . . . . . . . . . . . . . . . . . . . . . . . . . . . . 9
Inscription du combiné . . . . . . . . . . . . . . . . . . . . . . . . . . . . . . . . . . . . . . . . . . . . . . . . . . . . . . 11
Réglage de la date et de l'heure . . . . . . . . . . . . . . . . . . . . . . . . . . . . . . . . . . . . . . . . . . . . . . 13
Paramétrage des codes de réglage local . . . . . . . . . . . . . . . . . . . . . . . . . . . . . . . . . . . . . . 15
Raccordement du kit piéton . . . . . . . . . . . . . . . . . . . . . . . . . . . . . . . . . . . . . . . . . . . . . . . . . . 15
Que souhaitez-vous faire ensuite ? . . . . . . . . . . . . . . . . . . . . . . . . . . . . . . . . . . . . . . . . . . . . 16
Utilisation du téléphone . . . . . . . . . . . . . . . . . . . . . . . . . . . . . . . . . . . . . . . . . . 17
Touche de navigation . . . . . . . . . . . . . . . . . . . . . . . . . . . . . . . . . . . . . . . . . . . . . . . . . . . . . . . . 17
Touches écran . . . . . . . . . . . . . . . . . . . . . . . . . . . . . . . . . . . . . . . . . . . . . . . . . . . . . . . . . . . . . . . 18
Touches du clavier . . . . . . . . . . . . . . . . . . . . . . . . . . . . . . . . . . . . . . . . . . . . . . . . . . . . . . . . . . . 18
Correction d'erreurs de saisie . . . . . . . . . . . . . . . . . . . . . . . . . . . . . . . . . . . . . . . . . . . . . . . . . 18
Navigation par menu . . . . . . . . . . . . . . . . . . . . . . . . . . . . . . . . . . . . . . . . . . . . . . . . . . . . . . . . 19
Activation/désactivation du combiné . . . . . . . . . . . . . . . . . . . . . . . . . . . . . . . . . . . . . . . . . 20
Verrouillage/déverrouillage du clavier . . . . . . . . . . . . . . . . . . . . . . . . . . . . . . . . . . . . . . . . 20
Présentation des instructions dans le manuel d'utilisation . . . . . . . . . . . . . . . . . . . . . 21
Téléphoner . . . . . . . . . . . . . . . . . . . . . . . . . . . . . . . . . . . . . . . . . . . . . . . . . . . . . . . 23
Appels externes . . . . . . . . . . . . . . . . . . . . . . . . . . . . . . . . . . . . . . . . . . . . . . . . . . . . . . . . . . . . . 23
Fin de la communication . . . . . . . . . . . . . . . . . . . . . . . . . . . . . . . . . . . . . . . . . . . . . . . . . . . . . 23
Prise d’appel . . . . . . . . . . . . . . . . . . . . . . . . . . . . . . . . . . . . . . . . . . . . . . . . . . . . . . . . . . . . . . . . . 23
Mode Mains-Libres . . . . . . . . . . . . . . . . . . . . . . . . . . . . . . . . . . . . . . . . . . . . . . . . . . . . . . . . . . . 23
Fonction secret . . . . . . . . . . . . . . . . . . . . . . . . . . . . . . . . . . . . . . . . . . . . . . . . . . . . . . . . . . . . . . 24
Appels internes . . . . . . . . . . . . . . . . . . . . . . . . . . . . . . . . . . . . . . . . . . . . . . . . . . . . . . . . . . . . . . 24
Présentation du menu . . . . . . . . . . . . . . . . . . . . . . . . . . . . . . . . . . . . . . . . . . . . 25
Utilisation du répertoire et des listes . . . . . . . . . . . . . . . . . . . . . . . . . . . . . . . 27
Répertoire . . . . . . . . . . . . . . . . . . . . . . . . . . . . . . . . . . . . . . . . . . . . . . . . . . . . . . . . . . . . . . . . . . . 27
Liste des numéros bis . . . . . . . . . . . . . . . . . . . . . . . . . . . . . . . . . . . . . . . . . . . . . . . . . . . . . . . . 30
Journal des appels . . . . . . . . . . . . . . . . . . . . . . . . . . . . . . . . . . . . . . . . . . . . . . . . . . . . . . . . . . . 31
Affichage de listes avec la touche Messages . . . . . . . . . . . . . . . . . . . . . . . . . . . . . . . . . . 32
Liste des rendez-vous manqués . . . . . . . . . . . . . . . . . . . . . . . . . . . . . . . . . . . . . . . . . . . . . . 32
Utilisation de la messagerie externe . . . . . . . . . . . . . . . . . . . . . . . . . . . . . . . 33
Définition de la messagerie externe pour l'accès rapide . . . . . . . . . . . . . . . . . . . . . . . 33
Consultation des messages de la messagerie externe . . . . . . . . . . . . . . . . . . . . . . . . . 33
Sommaire
3
Page 58

Sommaire
ECO DECT . . . . . . . . . . . . . . . . . . . . . . . . . . . . . . . . . . . . . . . . . . . . . . . . . . . . . . . . 34
Réveil/Alarme . . . . . . . . . . . . . . . . . . . . . . . . . . . . . . . . . . . . . . . . . . . . . . . . . . . . 34
Utilisation d'un combiné pour la surveillance de pièce . . . . . . . . . . . . . . 35
Réglages du combiné . . . . . . . . . . . . . . . . . . . . . . . . . . . . . . . . . . . . . . . . . . . . . 37
Accès rapide aux numéros et aux fonctions . . . . . . . . . . . . . . . . . . . . . . . . . . . . . . . . . . . 37
Modification de la langue de l'écran . . . . . . . . . . . . . . . . . . . . . . . . . . . . . . . . . . . . . . . . . . 38
Réglages de l'écran . . . . . . . . . . . . . . . . . . . . . . . . . . . . . . . . . . . . . . . . . . . . . . . . . . . . . . . . . . 38
Activation/désactivation du décroché automatique . . . . . . . . . . . . . . . . . . . . . . . . . . . 39
Modification du volume de l'écouteur ou du volume
du mode Mains-Libres . . . . . . . . . . . . . . . . . . . . . . . . . . . . . . . . . . . . . . . . . . . . . . . . . . . . . . . 39
Réglage des sonneries . . . . . . . . . . . . . . . . . . . . . . . . . . . . . . . . . . . . . . . . . . . . . . . . . . . . . . . 39
Activation/désactivation des tonalités d'avertissement . . . . . . . . . . . . . . . . . . . . . . . . 40
Rétablissement des réglages par défaut du combiné . . . . . . . . . . . . . . . . . . . . . . . . . . 41
Dépannage . . . . . . . . . . . . . . . . . . . . . . . . . . . . . . . . . . . . . . . . . . . . . . . . . . . . . . 42
Annexe . . . . . . . . . . . . . . . . . . . . . . . . . . . . . . . . . . . . . . . . . . . . . . . . . . . . . . . . . . 43
Entretien de votre téléphone . . . . . . . . . . . . . . . . . . . . . . . . . . . . . . . . . . . . . . . . . . . . . . . . . 43
Contact avec les liquides . . . . . . . . . . . . . . . . . . . . . . . . . . . . . . . . . . . . . . . . . . . . . . . . . . . . . 43
Caractéristiques techniques . . . . . . . . . . . . . . . . . . . . . . . . . . . . . . . . . . . . . . . . . . . . . . . . . . 43
Edition de texte . . . . . . . . . . . . . . . . . . . . . . . . . . . . . . . . . . . . . . . . . . . . . . . . . . . . . . . . . . . . . . 44
Homologation d'Industrie Canada . . . . . . . . . . . . . . . . . . . . . . . . . . . . . . . . . . . . . . . . . . . . 45
Avis FCC/ACTA . . . . . . . . . . . . . . . . . . . . . . . . . . . . . . . . . . . . . . . . . . . . . . . . . . . 45
Consignes de sécurité . . . . . . . . . . . . . . . . . . . . . . . . . . . . . . . . . . . . . . . . . . . . . . . . . . . . . . . . 47
Service à la clientèle . . . . . . . . . . . . . . . . . . . . . . . . . . . . . . . . . . . . . . . . . . . . . . 49
Garantie limitée de l'utilisateur final . . . . . . . . . . . . . . . . . . . . . . . . . . . . . . . . . . . . . . . . . . 49
Accessoires . . . . . . . . . . . . . . . . . . . . . . . . . . . . . . . . . . . . . . . . . . . . . . . . . . . . . . . 53
Montage mural du chargeur . . . . . . . . . . . . . . . . . . . . . . . . . . . . . . . . . . . . . . 53
Index . . . . . . . . . . . . . . . . . . . . . . . . . . . . . . . . . . . . . . . . . . . . . . . . . . . . . . . . . . . . 54
4
Page 59
Consignes de sécurité
$
ƒ
Consignes de sécurité
Attention
Lire les consignes de sécurité et le mode d'emploi avant utilisation.
Informer les enfants sur les recommandations qui y figurent et les mettre en garde contre les
risques liés à l'utilisation du téléphone.
Utiliser exclusivement le bloc secteur fourni.
Utiliser uniquement les batteries rechargeables recommandées (
autre type de batterie est susceptible d'entraîner un risque considérable pour la
santé et de provoquer des blessures.
Ne pas charger le combiné sur la base ou le chargeur pendant que le casque
d'écoute est connecté.
Le combiné peut perturber le fonctionnement de certains équipements médicaux.
Tenir compte des recommandations émises à ce sujet par le corps médical.
Ne pas porter le combiné à l'oreille lorsqu'il sonne ou lorsque la fonction MainsLibres est activée, ceci pouvant entraîner des troubles auditifs durables et importants.
Votre téléphone est compatible avec la plupart des appareils auditifs numériques
commercialisés. Toutefois, une utilisation optimale avec tous les appareils auditifs
n'est pas garantie.
Le combiné peut provoquer des bourdonnements ou sifflements désagréables dans
les appareils auditifs ou les saturer. En cas de problèmes, contacter un
audioprothésiste.
Ne pas utiliser la base et le chargeur dans une salle de bain ou de douche. La base et
le chargeur ne sont pas étanches aux projections d'eau (
Ne pas utiliser le téléphone dans un environnement présentant un risque d'explosion (par exemple, ateliers de peinture).
En cas de cession du téléphone à un tiers, toujours joindre le mode d'emploi.
¢ p. 43).
¢ p. 43), tout
Débrancher les stations de base défectueuses ou les faire réparer par le service compétent. Elles peuvent perturber le fonctionnement d'autres appareils électriques.
Remarque
Toutes les fonctions décrites dans ce mode d'emploi ne sont pas nécessairement
disponibles dans tous les pays.
5
Page 60

Gigaset C59H – Plus qu'un simple téléphone
Gigaset C59H – Plus qu'un simple téléphone
Votre téléphone définit de nouveaux standards en matière de téléphonie personnelle.
Son grand écran TFT, la convivialité de son clavier et la clarté d'organisation de ses
menus sont autant d'arguments en faveur de sa facilité d'utilisation.
Il ne s'agit pas d'un simple téléphone :
u Enregistrez les dates anniversaire de vos proches. Le téléphone vous les
rappellera en temps utile.
u Attribuez vos contacts importants à l'un des 6 groupes VIP : vous pourrez ainsi
reconnaître leurs appels grâce à une sonnerie spécifique et à la couleur attribuée
au groupe VIP.
u Paramétrez votre téléphone de façon à ce qu'il ne sonne que lorsque le numéro
de téléphone de l'appelant n'est pas masqué.
u Affectez des touches de votre téléphone à des numéros importants (numéro
raccourci). Il suffit alors d'une pression pour composer le numéro attribué.
u Activez la fonction Grande police sur votre écran : vous obtenez alors une
meilleure lisibilité pour consulter les rubriques importantes (par ex. le répertoire
et les listes).
u Paramétrez le menu selon vos besoins et affichez uniquement les fonctionnali-
tés les plus importantes (mode standard) ou toutes les fonctionnalités (mode
expert
mode expert sont signalés par l'icône
u Téléphonez tout en respectant l'environnement avec Gigaset Green Home. Pour
en savoir plus, rendez-vous sur www.gigaset.com/customercare.
). Les réglages ou les fonctionnalités disponibles uniquement en
•
dans ce mode d'emploi.
•
Pour plus d'informations sur votre téléphone, rendez-vous sur
www.gigaset.com/gigasetc59h
.
Appréciez votre nouveau téléphone !
6
Page 61
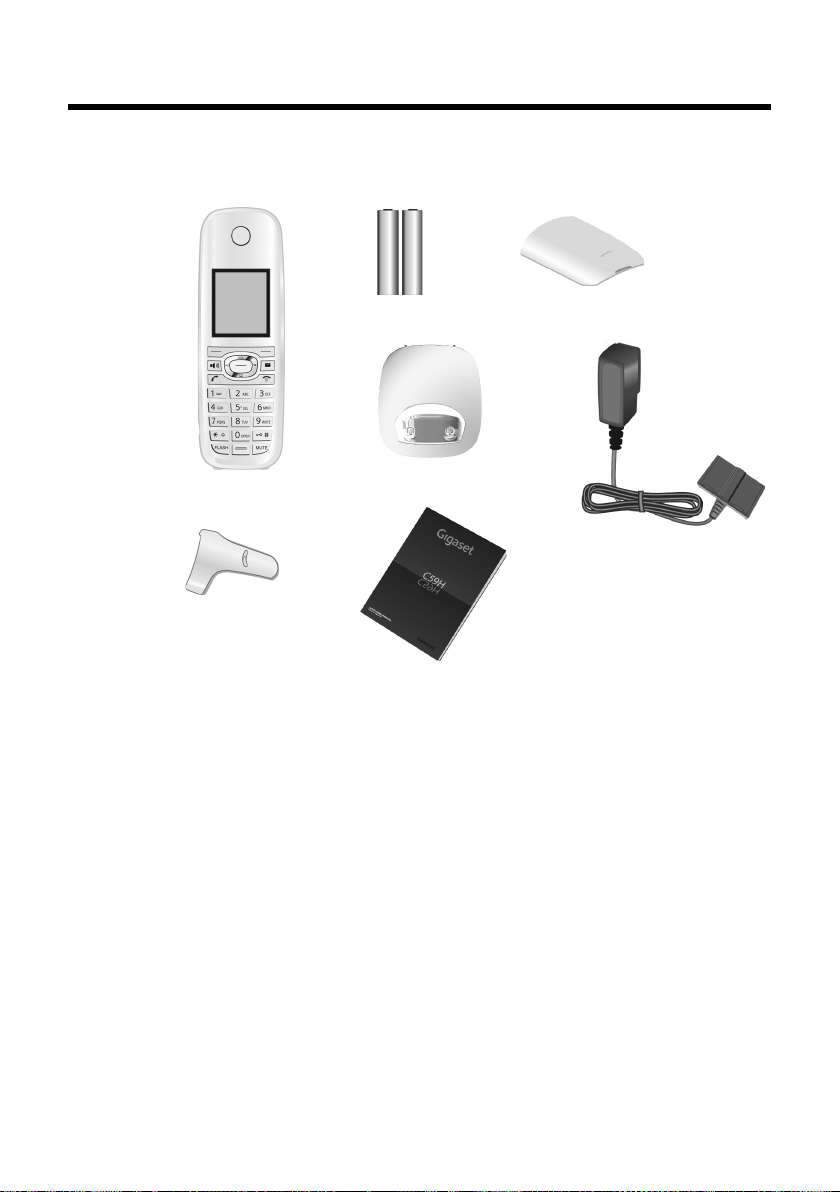
Premières étapes
213
45
76
8
Vérification du contenu de l'emballage
Premières étapes
1 un combiné Gigaset C59H,
2 deux batteries,
3 un couvercle de batterie,
4 un chargeur,
5 un bloc-secteur
6 un clip ceinture,
7 un mode d’emploi.
7
Page 62
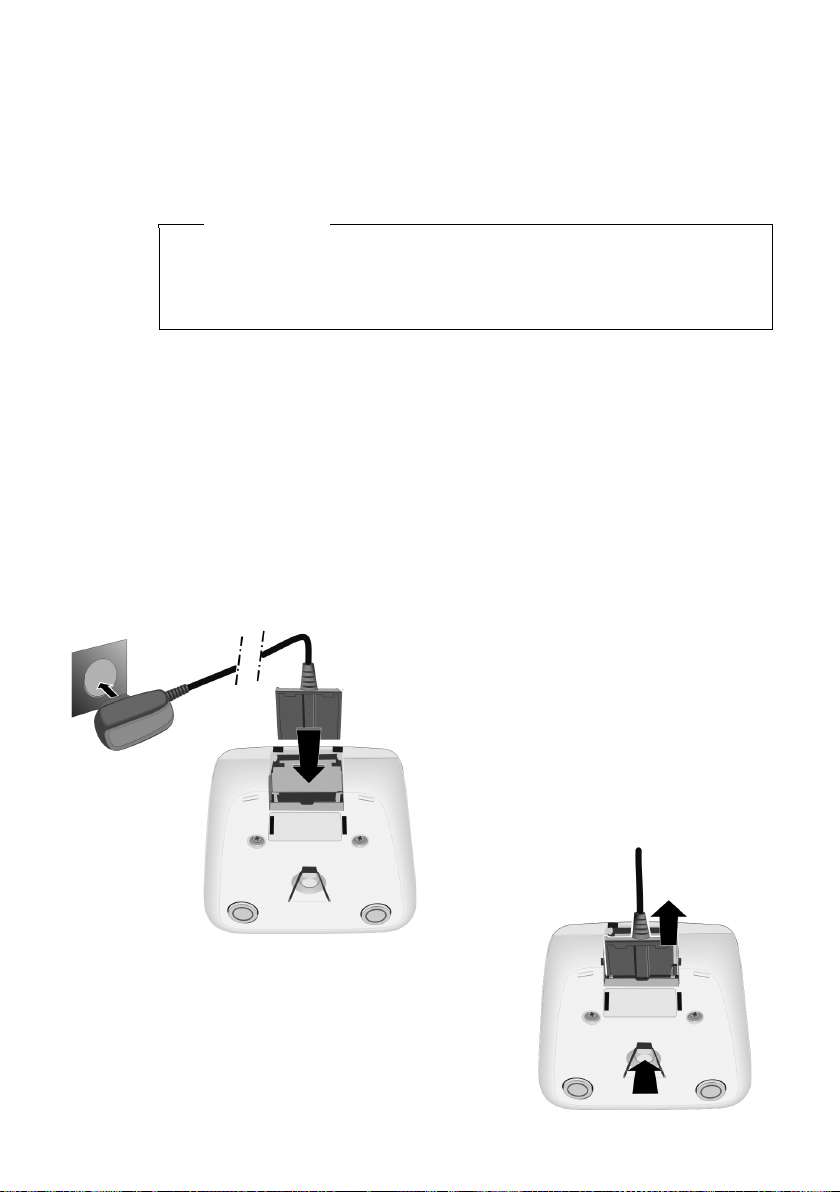
Premières étapes
¤ Brancher l'alimentation à la prise
électrique 2.
¤ Raccorder les languettes de
l'alimentation 1.
Pour retirer le connecteur du chargeur,
appuyer sur le bouton de déverrouillage 1 et
retirer le connecteur 2.
1
2
1
2
Installation du chargeur
Le chargeur est prévu pour fonctionner dans des locaux fermés et secs, dans une
plage de températures comprise entre +41 °F et +113 °F.
¤ Installer le chargeur sur une surface plane et antidérapante ou le monter sur le
¢ p. 53.
mur
Remarque
Tenir compte de la portée de la base.
Celle-ci va jusqu'à 984 pieds en l'absence d'obstacle, et jusqu'à 165 pieds
à l'intérieur d'un bâtiment. La portée diminue lorsque le Mode Eco est activé
¢ p. 34).
(
Les pieds de l'appareil ne laissent en principe pas de trace sur les surfaces. En raison
de la diversité des peintures et vernis utilisés sur les meubles, il est cependant
impossible d'exclure des traces sur la zone de contact.
A noter :
u Ne jamais exposer le téléphone à des sources de chaleur, à la lumière directe du
soleil et à d'autres appareils électriques.
u Protéger le téléphone contre l'humidité, la poussière, les vapeurs et les liquides
corrosifs.
Raccordement du chargeur
8
Page 63

Mise en service du combiné
¤ Placer les batteries en res-
pectant la polarité.
La polarité est indiquée sur
ou dans le compartiment de
batterie.
¤ Insérer d'abord le couver-
cle de la batterie sur le haut
a.
¤ Appuyer ensuite sur le
couvercle b jusqu'à ce
qu'il s'enclenche.
Pour ouvrir de nouveau le couvercle des batteries pour changer les
batteries par exemple, engager
le doigt dans l'enfoncement du
boîtier et tirer le couvercle vers
le haut.
a
b
L’écran est protégé par un film.
Retirez-le !
Insertion des batteries et fermeture du couvercle des batteries
N'utiliser que des piles rechargeables AAA nickel-métal-hydrure (NiMH)
homologuées UL, ne jamais utiliser des piles normales (non rechargeables), qui
peuvent endommager le combiné, représenter un risque pour la santé ou occasionner des blessures. Par exemple, l'enveloppe des piles ou de la batterie peut
se désagréger ou les batteries peuvent exploser. En outre, l'appareil pourrait
être endommagé ou présenter des dysfonctionnements.
Premières étapes
Attention
9
Page 64

Premières étapes
Fixation du clip ceinture
Le combiné présente des encoches latérales permettant de monter le clip ceinture.
¤ Pour installer ce dernier, appuyer
le clip ceinture sur l'arrière du
combiné jusqu'à ce que les ergots
s'encliquettent dans les encoches.
¤ Pour retirer le clip, appuyer forte-
ment avec le pouce droit au centre du clip, insérer l'ongle de
l'index gauche en haut à gauche
entre le clip et le boîtier et retirer
le clip en le tirant vers le haut.
Pose du combiné sur le
chargeur
¤ Poser le combiné sur le chargeur de la base, l'écran vers l'avant.
Pour charger les batteries, laissez le combiné sur le chargeur.
Le combiné doit uniquement être posé sur le chargeur prévu à cet effet.
Remarque
10
Page 65

Inscription du combiné
¤ Appuyer sur la touche sous l'écran
§Inscript.§.
L'écran indique que le combiné
recherche une base sur laquelle il peut
être inscrit.
Inscript.
Un combiné Gigaset C59H peut être inscrit au maximum sur 4 bases. L’inscription
du combiné doit être initiée sur le combiné (1) et sur la base (2).
Une fois l'inscription réussie, le combiné passe en mode veille. Le numéro interne
du combiné est affiché à l'écran, par ex., INT 1. Si ce n'est pas le cas, répétez l'opération.
1) Sur le combiné
Remarque
Si le combiné est déjà inscrit sur au moins une base, lancez la procédure d'inscription comme suit :
Ï
¢
v
Si le combiné est déjà inscrit sur quatre bases, vous devez sélectionner la base
que vous souhaitez.
¢ Enregistrement ¢ Enreg. combiné
Premières étapes
2) Sur la base
Dans un délai de 60 secondes, maintenir enfoncée la touche Inscription/Paging de
la base pendant environ 3 secondes.
Remarque
Consultez le mode d'emploi de votre base pour savoir comment désinscrire vos
combinés.
11
Page 66

Premières étapes
¤ Laisser le combiné sur le chargeur pendant dix
heures.
¤ Retirer le combiné du
chargeur et ne l'y replacer
qu'une fois les batteries
complètement déchargées.
10 h
Premier cycle de charge et décharge de la batterie
Un affichage correct du niveau de charge n'est possible qu'après un premier cycle
complet de charge, puis de décharge.
u Une fois le premier cycle de charge et de décharge effectué, vous pouvez
u Vous devez toujours répéter la procédure de charge et de décharge après le
u Les batteries peuvent chauffer pendant la charge. Ce phénomène n'est pas
u Pour des raisons techniques, la capacité de charge des batteries diminue au
Remarques
reposer le combiné sur le chargeur après chaque communication.
retrait et la réinsertion des batteries du combiné.
dangereux.
bout d'un certain temps.
12
Page 67

Réglage de la date et de l'heure
Date/Heure
Date :
10/14/2009
Heure :
00:00am
am/pm Sauver
¤ Appuyer sur la touche sous l'écran §Dat./
Hre§
pour ouvrir le champ de saisie.
(Si la date et l'heure ont déjà été
entrées, ouvrir le champ de saisie
à l'aide du menu
¢ p. 26.)
Le sous-menu Date/Heure s'affiche.
¤ L'élément actif de saisie clignote.
Saisir le mois, le jour et l'année
(8 chiffres) sur le clavier,
par ex. Q42Q
QOpour le 14.10.2009.
Date/Heure
Date :
01/31/2009
Heure :
00:00am
Précéd. Sauver
INT Dat./Hre
Pour modifier la position de
saisie, par ex. pour apporter
une correction, appuyer à
droite ou à gauche sur la touche de navigation.
¤ Saisir les heures et les minutes (4 chiffres)
sur le clavier, p.ex. QM5
pour 7 h 15 AM.
Le cas échéant, modifier la position de
saisie avec la touche de navigation.
¤ Si nécessaire, appuyer sur la touche
écran AM/PM pour définir le paramètre
de l'heure AM (matin) sur PM (aprèsmidi).
¤
¤ Appuyer en bas de la touche de navigation
pour passer au champ de saisie de l'heure.
Vous devez régler la date et l'heure pour que l'horodatage des appels entrants soit
correct et pour pouvoir utiliser la fonction réveil.
Premières étapes
13
Page 68

Premières étapes
¤ Appuyer sur la touche sous l'écran
§Sauver§ pour enregistrer les entrées.
Enregistré s'affiche à l'écran. Vous
entendez un bip de validation et revenez automatiquement en mode
veille(uniquement lors du premier paramétrage de la date et de l'heure).
am/pm Sauver
Date/Heure
‰
Enregistré
i V
07:15
INT 1 14 Oct
INT Appels
Ecran en mode veille
Lorsque le téléphone est inscrit et que l'heure est réglée, l'affichage en mode veille
est le suivant (exemple).
Affichages
u Liaison radio entre la base et le combiné :
u Niveau de charge des batteries :
14
u INT 1
Votre téléphone est maintenant prêt à fonctionner.
– faible à bonne : ÒÑiÐ
–aucune réception: |
En vert : Mode Eco activé (
– yy{{ (vide à plein)
– y clignote en rouge : la batterie est presque
vide
– xyx{x{ (en charge)
Nom interne du combiné
¢ p. 34)
Page 69

Paramétrage des codes de réglage local
Pour rappeler un appelant depuis la liste des appels (¢p. 31), le code de réglage
do it ê tre en regis tré dan s la zo ne d ans laq uelle se t rou ve vo tre télép hon e (« Co de de
réglage local »). Si votre téléphone se trouve dans une zone « Code de réglage
multiple », les codes supplémentaires de cette zone doivent également être enregistrés.
Code pays local
v ¢Ï ¢ Té lé ph o ni e ¢ Code pays local
~ Saisir le code de réglage local.
§Sauver§ Appuyer sur la touche écran.
a Maintenir la touche enfoncée pour revenir en mode veille lorsque le
message enregistré s'affiche.
Codes suppl.
v ¢Ï ¢ Té lé ph o ni e ¢ Codes suppl.
~ Saisir le code supplémentaire.
§Sauver§ Appuyer sur la touche écran.
a Maintenir la touche enfoncée pour revenir en mode veille lorsque le
message enregistré s'affiche.
Répétez les étapes ci-dessus jusqu'à ce que tous les codes supplémentaires de
votre zone aient été saisis. Il est possible d'enregistrer jusqu'à cinq (5) codes supplémentaires.
Premières étapes
Raccordement du kit piéton
Vous pouvez raccorder un kit oreillette à l'aide d'une prise
jack de 2,5 mm. Vous trouverez des recommandations sur
les kits piéton en vous rendant sur la page relative à
l'appareil sur www.gigaset.com
Le volume du kit piéton correspond au volume paramétré
pour le combiné (
ton, remettez en place le couvercle en plastique pour
bénéficier d'un son optimal en mode Mains-Libres.
Attention
Ne pas charger le combiné sur la base ou le chargeur pendant que le casque
d'écoute est connecté.
.
¢ p. 39). Après avoir utilisé le kit pié-
15
Page 70

Premières étapes
g
g
g
g
Que souhaitez-vous faire ensuite ?
Une fois la mise en route de votre téléphone effectuée, vous pouvez le configurer
en fonction de vos besoins personnels. Utilisez le tableau ci-dessous pour trouver
rapidement les informations que vous cherchez.
Si vous n'êtes pas encore familiarisé avec l'utilisation des appareils et de leurs
menus, comme par ex. les autres téléphones, reportez-vous à la section « Utilisation
du téléphone »
Pour trouver des informations sur... ... allez ici...
Réglage de la mélodie et du volume de la sonnerie p. 39
Réglage du volume de l'écouteur du combiné p. 39
Réglage du Mode Eco p. 34
¢ p. 17.
Transfert des entrées du répertoire des combinés
existants vers d'autres
Si vous avez des doutes quant à l'utilisation de votre téléphone,
reportez-vous à la rubrique de dépannage (
assistance client (
¢ p. 49).
¢ p. 42) ou contactez notre
p. 29
16
Page 71

Utilisation du téléphone
Touche de navigation
Dans ce mode d'emploi, le côté de la touche de navigation sur
lequel vous devez appuyer pour exécuter une commande est
indiqué en noir (en haut, en bas, à droite, à gauche, au centre).
Exemple : v signifie « appuyer à droite sur la touche de
navigation » ou w signifie « appuyer au centre sur la touche de
navigation ».
La touche de navigation remplit différentes fonctions :
En mode veille du combiné
s Ouvrir le répertoire.
v Ouvrir le menu principal.
u Ouvrir la liste de combinés.
t Ouvrir le menu de réglage du volume de conversation (¢ p. 39)
du combiné.
Dans le menu principal
t, s, v ou u
Naviguer jusqu'à la fonction désirée.
Dans les sous-menus et les listes
t / s Faire défiler vers le haut ou vers le bas ligne par ligne.
Dans les champs de saisie
Déplacer le curseur vers le haut t, vers le bas s, vers la droite v ou vers la
gauche u à l'aide de la touche de navigation. Maintenir enfoncée la touchev
ou u pour déplacer le curseur d'un mot sur un autre.
Pendant une communication
s Ouvrir le répertoire.
u Activer le double appel interne.
t Régler le volume d'écoute pour le mode Ecouteur et le mode Mains-
Libres.
Utilisation du téléphone
Fonctions accessibles en appuyant au centre de la touche de navigation
Cette touche remplit différentes fonctions selon la situation.
u En mode veille, elle permet d'ouvrir le menu principal.
u Dans les sous-menus, les champs de sélection et de saisie, elle prend en
charge la fonction des touches écran
§OK§, §Oui§, §Sauver§, §Sélect.§ ou §Modifier§.
Remarque
Ce mode d'emploi explique comment ouvrir le menu principal en appuyant à
droite sur la touche de navigation et comment valider les fonctions en appuyant
sur la touche écran correspondante. Cependant, vous pouvez également utiliser
la touche de navigation, comme indiqué ci-dessus.
17
Page 72

Utilisation du téléphone
Précéd. Sauver
Fonctions en cours des touches écran
Touc hes écran
Options
OK
Û
Précéd.
Sauver
Þ
Touches écran
Les fonctions des touches écran varient selon la situation. Exemple :
Les touches écran importantes sont :
Ouvrir un menu contextuel.
Activer la sélection.
Touche Effacer : supprimer caractère par caractère ou mot par mot de
droite à gauche.
Revenir au niveau de menu précédent ou annuler une opération.
Enregistrer l'entrée.
Ouvrir la liste des numéros bis.
Touches du clavier
c/ Q / *, etc.
Appuyer sur la touche représentée sur le combiné.
~ Saisir des chiffres ou des lettres.
Correction d'erreurs de saisie
18
Vous pouvez corriger les erreurs des champs de saisie en vous positionnant sur
l'entrée incorrecte avec la touche de navigation. Vous pouvez alors :
u effacer le caractère à gauche du curseur à l'aide de la touche écran Ñ (mainte-
nir enfoncée la touche pour effacer le mot),
u insérer un caractère à l'emplacement du curseur,
u remplacer le caractère sélectionné (clignotant), par ex. lors de la saisie de l'heure
et de la date.
Page 73

Navigation par menu
Réglages
ì
Ê
Ì
×
É Ï
Précéd. OK
Réglages
Date/Heure
Réglage écran
Langue
Enregistrement
Tél é ph on ie
Précéd. OK
Les fonctions du téléphone sont proposées dans un menu composé de plusieurs
niveaux.
L'affichage du menu peut être étendu (mode expert
dard). Le mode expert est paramétré par défaut.
Les réglages ou les fonctionnalités disponibles uniquement en mode expert sont
signalés par l'icône
Basculer en mode standard/expert et présentation du menu, voir ¢p. 25.
Menu principal (premier niveau)
¤ Lorsque le combiné est en mode veille, appuyer à droite sur la touche de navi-
gation vpour ouvrir le menu principal.
Les fonctions du menu principal s'affichent sous forme
d'icônes. L'icône de la fonction sélectionnée est indiquée en orange et son nom apparaît en haut de l'écran.
Pour accéder à une fonction, c.-à-d. ouvrir le sous-menu
correspondant (le niveau de menu suivant) :
¤ A l'aide de la touche de navigation p, accéder à la
fonction souhaitée et appuyer sur la touche écran
§OK§.
Appuyer brièvement sur la touche écran §Précéd.§ ou la
touche Raccrocher a pour remettre le combiné en
mode veille.
dans ce mode d'emploi.
•
Utilisation du téléphone
) ou simplifié (mode stan-
•
Sous-menus
Les fonctions des sous-menus sont affichées sous forme
de listes (exemple à droite).
Pour accéder à une fonction :
¤ Sélectionner la fonction avec la touche de navigation
Appuyer brièvement sur la touche écran §Précéd.§ ou la
touche Raccrocher a pour revenir au niveau de
menu précédent ou annuler l'opération.
q et appuyer sur
§OK§.
19
Page 74

Utilisation du téléphone
Retour en mode veille
Vous pouvez revenir en mode veille depuis un endroit quelconque du menu en
procédant comme suit :
¤ Maintenir la touche Raccrocher a enfoncée.
ou :
¤ N'appuyer sur aucune touche : après 2 minutes, l'écran revient automatique-
ment en mode veille.
Les réglages qui n'ont pas été confirmés en appuyant sur les touches écran
§Sauver§ ou §Modifier§ sont effacés.
Un exemple de l'écran en mode veille est illustré à la p. 14.
Activation/désactivation du combiné
a En mode veille, maintenir enfoncée la touche Raccrocher (tonalité de
validation) pour désactiver le combiné.
Pour restaurer la configuration, maintenir à nouveau enfoncée la touche Raccrocher.
Remarque
Au moment de la mise en marche, une animation avec le nom Gigaset s'affiche
pendant quelques secondes.
Verrouillage/déverrouillage du clavier
Le verrouillage du clavier empêche l'utilisation non autorisée ou involontaire du
téléphone.
# En mode veille, maintenir enfoncée la touche Dièse pour activer ou
désactiver le verrouillage du clavier. Vous entendez la tonalité de validation.
Lorsque le clavier est verrouillé, un message apparaît lorsque vous appuyez sur les
touches.
Il se désactive automatiquement lors de la réception d'un appel, après quoi il est
réactivé.
§OK§, §Oui§,
20
Remarque
Lorsque le verrouillage clavier est activé, les numéros d'appel d'urgence ne sont
pas non plus accessibles.
Les numéros d'urgence ne peuvent être composés lorsque le clavier
est verrouillé !
Page 75

Utilisation du téléphone
¤ Appuyer sur la touche de navigation
droite v pour accéder au menu
principal.
¤ A l'aide de cette touche, naviguer
à droite, à gauche, en haut et en
bas p pour sélectionner le sousmenu Réglages.
¤ Appuyer sur la touche écran §OK§
pour valider l'option.
¤ Appuyer en bas de la touche de navi-
gation s jusqu'à ce que la commande de menu Réglage écran
s'affiche à l'écran.
¤ Appuyer sur la touche écran §OK§
pour valider le choix.
Réglages
Date/Heure
Réglage écran
Langue
Enregistrement
Tél ép h on ie
Précéd. OK
Réglages
ì
Ê
Ì
×
É Ï
Précéd. OK
Présentation des instructions dans le manuel d'utilisation
Les instructions sont présentées succinctement.
Exemple :
La représentation :
v ¢Ï ¢ Réglage écran ¢ Grande police (³=activé)
signifie :
21
Page 76

Utilisation du téléphone
La modification est immédiate.
Il est inutile de la valider.
¤ Appuyer en bas de la touche de navi-
gation s jusqu'à ce que la commande de menu Grande police s'affiche à l'écran.
¤ Appuyer sur la touche écran §Modifier§
pour activer ou désactiver la fonction.
Réglage écran
Ecran de veille
Grande police
³
Couleur
Précéd. Modifier
Réglage écran
Ecran de veille
Grande police
´
Couleur
Précéd. Modifier
¤ Appuyer sur la touche §Précéd.§ sous
l'écran pour revenir au niveau précédent du menu
ou
maintenir enfoncée la touche
Raccrocher a pour revenir au
mode veille.
22
Page 77

Té lé ph o ne r
Téléphoner
Si l'écran n'est pas éclairé (¢p. 38), il suffit
d'appuyer une fois sur n'importe quelle touche pour l'allumer. Dans ce ca s, la touche n'a
pas d'autre fonction.
Appels externes
Les appels externes sont les appels à destination du réseau public.
~c Entrer le numéro et appuyer sur
la touche Décrocher.
ou :
c~ Maintenir la touche Décrocher
c enfoncée, puis saisir le
numéro.
Appuyez sur la touche Raccrocher a
pour interrompre la numérotation.
Pendant la communication, la durée de
l'appel est affichée.
Remarque
L'utilisation du répertoire (¢ p. 27), du
journal des appels (
des numéros bis (
ter de répéter la saisie de numéros.
¢ p. 31) et de la liste
¢ p. 30) permet d'évi-
Prise d’appel
Un appel entrant est signalé de trois manières sur le combiné : la sonnerie, une indication à l'écran et le clignotement de la touche
Décrocher c.
Vous pouvez prendre l'appel de différentes
façons :
¤ Appuyer sur la touche Décrocher c.
¤ Appuyer sur la touche Mains-Libres d.
¤ Appuyer sur la touche écran §Accept.§
(selon la base).
Si le combiné est placé sur le chargeur et si la
fonction Décroché auto. est activée
¢ p. 39), il suffit de retirer le combiné du
(
chargeur pour prendre un appel.
Si la sonnerie est dérangeante, appuyez sur
la touche écran
dre l'appel tant qu'il est affiché à l'écran.
Mode Mains-Libres
En mode Mains-Libres, vous ne maintenez
pas le combiné sur l'oreille, mais vous le laissez par exemple devant vous sur la table.
Vous pouvez ainsi permettre à d'autres personnes de participer à la conversation.
§Silence§. Vous pouvez pren-
Fin de la communication
a Appuyer sur la touche Raccro-
cher.
Activation/Désactivation du mode
Mains-Libres
Activation lors de la numérotation
~d Entrer un numéro et appuyer
sur la touche Mains-Libres.
¤ Si vous souhaitez faire écouter la conver-
sation à quelqu'un, vous devez en informer votre correspondant.
23
Page 78

Té lé ph o ne r
Passage du mode Ecouteur au mode
Mains-Libres
d Appuyer sur la touche Mains-
Libres.
Pendant une communication, vous activez
ou désactivez le mode Mains-Libres.
Pour placer le combiné sur le chargeur sans
interrompre la communication en mode
Mains-Libres :
¤ Maintenir la touche Mains-Libres d
enfoncée lors du placement sur la base.
Pour savoir comment régler le volume
d'écoute,
Fonction secret
Vous pouvez désactiver le microphone de
votre combiné pendant une communication
externe.
h Appuyer sur la touche pour
Lorsque le téléphone est en mode secret,
aucune touche ne fonctionne
à l'exception de la touche secret
microphone h et de la touche
Raccrocher a.
¢ p. 39.
désactiver le micro du combiné.
Mic. désact. s'affiche à l'écran.
Appuyer à nouveau sur la touche pour désactiver le mode
secret.
Remarque
Appels internes
Les communications internes avec d'autres
combinés inscrits sur la même base sont gratuites.
Appel d'un combiné en particulier
u Activer l'appel interne.
~ Entrer le numéro du combiné.
ou :
u Activer l'appel interne.
s Sélectionner le combiné.
c Appuyer sur la touche Décro-
cher.
Appel de tous les combinés
(« Appel collectif »)
u Activer l'appel interne.
* Appuyer sur la touche Etoile.
ou sélectionner
Appel général
puis
c appuyer sur la touche Décro-
cher.
Tous les combinés sont appelés.
Fin de la communication
a Appuyer sur la touche Raccro-
cher.
24
Page 79
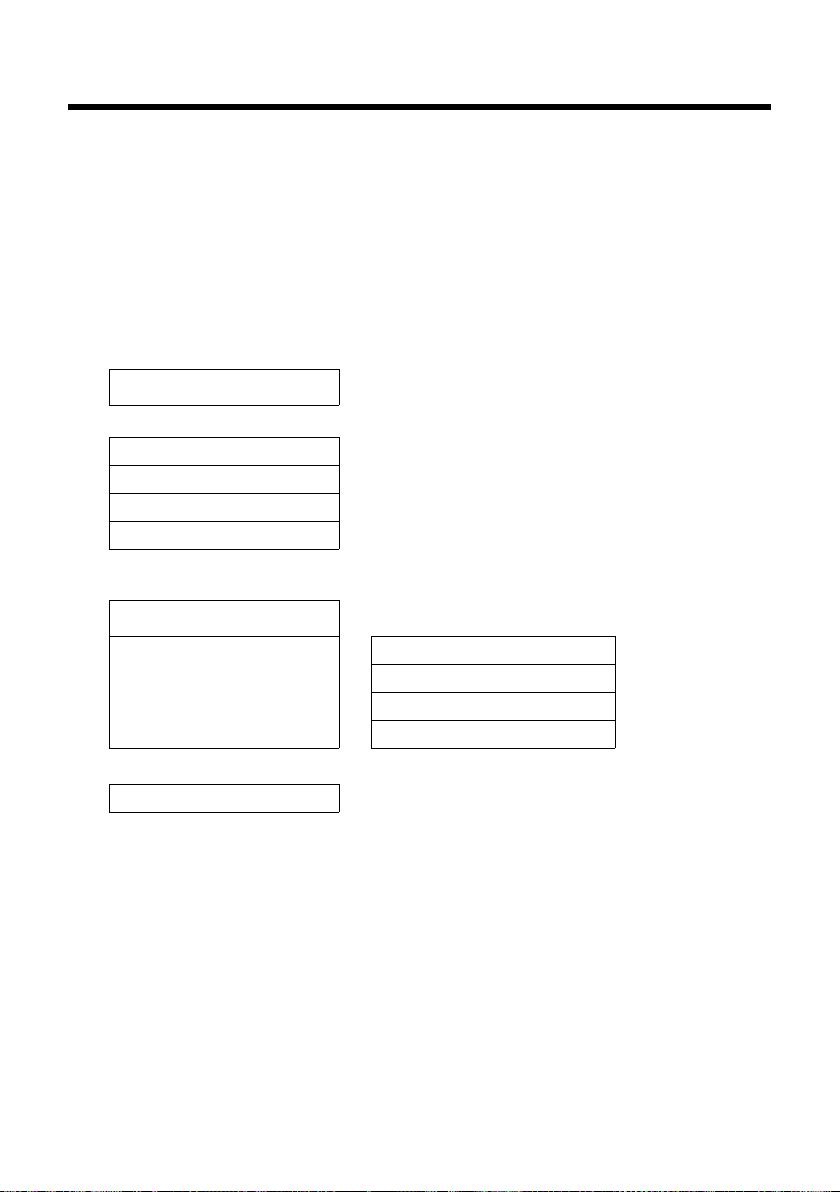
Présentation du menu
Présentation du menu
Paramétrage en mode standard ou mode expert
L'affichage du menu peut être étendu (mode expert •) ou simplifié (mode standard). Le
mode expert est paramétré par défaut. Les réglages ou les fonctionnalités disponibles uniquement en mode expert sont signalés par l'icône
Cette icône n'apparaît pas sur le combiné.
Pour régler ces paramètres :
¢
v
expert)
Ouvrir le menu principal : appuyer sur vlorsque le téléphone est en mode veille.
¢ Vue Menu ¢ sélectionner Simplifiée (mode standard) ou Etendue (mode
Ï
¢ §Sélect.§ (le mode actif est indiqué par Ø)
dans ce mode d'emploi.
•
Réveil/Alarme
¼
Listes des appels
Ê
Tou s ap pel s ¢p. 31
Appels sortants
Appels acceptés
Appels perdus
Messagerie Vocale
Ì
Sons/Audio
ï
Autres fonctions
É
Surveillance Pièce ¢ p. 35
¢p. 34
¢p. 31
¢p. 31
¢p. 31
(menu selon la base)
Volume du combiné ¢p. 39
Ton ali té aver tis. ¢ p. 40
•
Sonneries (comb.)
Mélodie attente (selon la base)
•
¢p. 39
25
Page 80

Présentation du menu
Réglages
Ï
Date/Heure ¢p. 13
Réglage écran Ecran de veille
Grande police
Couleur
Eclairage ¢ p. 38
•
Langue
Enregistrement Enreg. combiné
Téléphonie Décroché auto. ¢p. 39
•
Système Reset combiné ¢ p. 41
•
Vue Menu Simplifiée
¢p. 38
Retirer combiné (selon la base)
Sélect. Base
(sous-menu supplémentaire selon la base)
Code pays local
Codes suppl.
(sous-menu supplémentaire selon la base)
Etendue
¢p. 38
¢p. 38
¢p. 38
¢p. 11
¢p. 11
¢p. 15
¢p. 15
¢p. 25
¢p. 25
26
Page 81

Utilisation du répertoire et des listes
Utilisation du répertoire
et des listes
Types de listes disponibles :
u Répertoire
u Liste des numéros bis
u Journal des appels
u Liste des rendez-vous manqués
u Journal du répondeur ou de la
messagerie externe
Le répertoire que vous créez est propre à
chaque combiné. Vous pouvez toutefois
envoyer les listes/entrées à d'autres
combinés (
Répertoire
Vous pouvez enregistrer 150 entrées au total
dans le répertoire.
Pour accéder rapidement à un numéro
du répertoire (numéro raccourci),
vous pouvez attribuer une touche
au numéro (
Répertoire
Vous pouvez enregistrer dans le répertoire :
u Le prénom, le nom du correspondant et
u Des adresses e-mail
u Des dates anniversaire avec rappel
u Des sonneries VIP avec l'icône VIP.
Vous pouvez ouvrir le répertoire en mode
veille à l'aide de la touche s.
Longueur des entrées
3 numéros :
max. 32 chiffres chacun
Nom et prénom :
max. 16 caractères chacun
Adresse e-mail :
max. 64 caractères
¢ p. 29).
Remarque
¢ p. 37).
jusqu'à trois numéros de téléphone pour
chaque entrée du répertoire
Saisie d'entrées dans le répertoire
s ¢ <Nouvelle entrée>
¤ Renseigner les différentes lignes :
Prénom : / Nom :
Si le prénom ou le nom de famille n'est
pas entré dans ces champs, le numéro de
téléphone est enregistré et s'affiche.
(Vous trouverez des indications sur la saisie de texte et de caractères spéciaux
¢ p. 44.)
Téléph. (Maison) : / Téléph. (Bureau) : /
Téléph. (Mobile) :
Entrer un numéro dans au moins un des
champs.
Lorsque vous faites défiler le répertoire,
les entrées sont marquées par une icône
qui les précède : ä/ k/ l.
E-mail :
Entrer l'adresse e-mail.
Anniversaire :
Sélectionner Act. ou Dés..
Avec le réglage Act. :
entrer Annivers. (date) et Annivers.
(heure), puis sélectionner le mode de
notification : Annivers. (signal)
Groupe VIP :
Marquer une entrée du répertoire
comme VIP (Very Important Person).
Vous pouvez associer chaque entrée à un
des 6 groupes VIP qui se distinguent chacun par la couleur de l'icône Æ, le nom
du groupe VIP et la sonnerie associée.
Vous pourrez alors reconnaître les appels
VIP à leur sonnerie. La couleur de fond de
l'animation de la sonnerie change en
fonction du groupe VIP.
Condition : présentation du numéro de
l'appelant (CID).
§Sauver§ Appuyer sur la touche écran.
¢ p. 30.
27
Page 82

Utilisation du répertoire et des listes
Classement des entrées du
répertoire
En règle générale, les entrées du répertoire
sont classées par ordre alphabétique des
noms de famille. Les espaces et les chiffres
sont prioritaires. Si un prénom est entré dans
le répertoire sans nom de famille, il est classé
par ordre alphabétique avec les noms de
famille.
L'ordre de tri est le suivant :
1. Espace
2. Chiffres (0 – 9)
3. Lettres (alphabétique)
4. Autres caractères
Pour afficher une entrée au début de la liste,
insérer un espace ou un chiffre avant la
première lettre du nom de famille.
Sélection d'une entrée du
répertoire
s Ouvrir le répertoire.
Vous avez le choix entre les possibilités
suivantes :
u Faire défiler la liste à l'aide de la touche
s jusqu'à ce que le nom recherché soit
sélectionné.
u Saisir la première lettre du nom et, le cas
échéant, faire défiler la liste jusqu'à
l'entrée à l'aide de la touche s.
Le nom de famille est recherché dans le
répertoire. Si aucun nom ne correspond,
le prénom est recherché.
Sélection à l'aide du répertoire
s ¢ s(Sélectionner une entrée)
c Appuyer sur la touche Décro-
cher.
(Si plusieurs numéros correspondent, sélectionner le
numéro désiré et appuyer à
nouveau sur la touche décrocher c).
Le numéro est composé.
Gestion des entrées du répertoire
Affichage des entrées
s ¢ s(Sélectionner une entrée)
§Afficher§ Appuyer sur la touche écran.
L'entrée s’affiche.
§Options§ Appuyer sur la touche écran.
Vous pouvez sélectionner les fonctions suivantes à l'aide de la touche q :
Utiliser le No
Modifier ou compléter un numéro enregistré ou enregistrer une nouvelle
entrée ; après l'affichage du numéro,
appuyer surÓ.
Effacer entrée
Supprimer l’entrée sélectionnée.
Copier entrée
vers combiné INT : Envoyer une entrée à
un autre combiné (
¢ p. 29).
Modification d'une entrée
s ¢ s(Sélectionner une entrée)
§Afficher§ §Modifier§
Appuyer successivement sur les
touches écran.
¤ Apporter les modifications et les enregis-
trer.
Utilisation des autres fonctions
s ¢ s(Sélectionner l'entrée)
¢ §Options§ (Ouvrir le menu)
Vous pouvez sélectionner les fonctions suivantes à l'aide de la touche q :
Utiliser le No
Modifier ou compléter un numéro enregistré, puis sélectionner avec c ou
enregistrer une nouvelle entrée ; après
l'affichage du numéro, appuyer sur Ó.
Modifier entrée
Modifier l'entrée sélectionnée.
Effacer entrée
Supprimer l’entrée sélectionnée.
Copier entrée
vers combiné INT : Envoyer une entrée à
un autre combiné (
¢ p. 29).
28
Page 83

Utilisation du répertoire et des listes
Groupes VIP
Pour modifier le nom et la sonnerie des
groupes VIP :
Sélectionner le groupe VIP
¢ §Modifier§
¢ Modifier l'entrée ¢ §Sauver§.
Effacer liste
Supprimer toutes les entrées du répertoire.
Copier liste
vers combiné INT: Envoyer la liste com-
plète à un autre combiné (
Mémoire dispo.
Afficher le nombre d'entrées (
encore disponibles dans le répertoire.
¢ p. 29).
¢ p. 27)
Numérotation à l'aide des touches
Appel abrégé
¤ Maintenir la touche de raccourci enfon-
¢ p. 37).
cée (
Transfert du répertoire à un autre
combiné
Conditions :
u Le combiné destinataire et l'émetteur
sont inscrits sur la même base.
u L'autre combiné et la base peuvent rece-
voir et envoyer des entrées de répertoire.
¢ s(Sélectionner l'entrée)
s
¢ §Options§ (ouvrir le menu) ¢ Copier
entrée / Copier liste
s Sélectionner le numéro interne
affecté au combiné destinataire
et appuyer sur
Vous pouvez copier plusieurs entrées successivement en répondant
Entrée copiée Copier d’autres entrées?.
La réussite de l'opération de transfert est
signalée par un message et par la tonalité de
validation sur le combiné destinataire.
¢ vers combiné INT
§OK§.
§Oui§ à la question
A noter :
u Les entrées avec des numéros identiques
ne sont pas remplacées sur le combiné
destinataire.
u Le transfert s'interrompt si le téléphone
sonne ou si la mémoire du combiné destinataire est pleine.
u L’attribution des groupes VIP et les sons
associés aux entrées ne sont pas transférés.
Copie du numéro affiché dans le
répertoire
Vous pouvez copier dans le répertoire des
numéros qui s'affichent dans une liste,
par exemple le journal des appels ou la liste
des numéros bis.
Si vous disposez du service CID (identification de l'appelant), les 16 premiers caractères du nom transféré sont copiés dans la
ligne Nom.
Un numéro s'affiche :
§Options§ ¢No.vers répertoire
¤ Compléter l'entrée ¢p. 27.
Récupération d'un numéro ou
d'une adresse e-mail dans le
répertoire
Vous pouvez, dans certaines situations,
ouvrir le répertoire, par ex. pour copier un
numéro ou une adresse e-mail. Il n'est pas
nécessaire que le combiné soit en mode
veille.
¤ Ouvrir le répertoire à l'aide de la touche
s ou Ó en fonc tion de l a com mand e
en cours.
q Sélectionner une entrée
¢ p. 28).
(
29
Page 84

Utilisation du répertoire et des listes
ØðÚ
Miller,
François
Dés.
Enregistrement d'une date
anniversaire dans le répertoire
Pour chaque numéro du répertoire, vous
pouvez enregistrer une date anniversaire et
spécifier l'heure à laquelle vous souhaitez
que cette date vous soit rappelée (le paramètre par défaut est : Anniversaire : Dés.).
¢ s (Sélectionner une entrée).
s
§Afficher§ §Modifier§
Appuyer successivement sur les
touches écran.
s Passer à la ligne Anniversaire :.
v Sélectionner Act..
¤ Renseigner les différentes lignes :
Annivers. (date)
Entrer le mois/le jour /l'année (8 chiffres).
Annivers. (heure)
Saisir l'heure /les minutes pour le rappel
(4 chiffres).
Annivers. (signal)
Sélectionner le type de notification.
§Sauver§ Appuyer sur la touche écran.
Remarque
Vous devez préciser l'heure du rappel. Si
vous sélectionnez le rappel visuel ou une
mélodie, l'heure est automatiquement
réglée sur 12:00 am.
Désactivation d'une date anniversaire
s ¢ s (Sélectionner une entrée).
§Afficher§ §Modifier§
Appuyer successivement sur les
touches écran.
s Passer à la ligne Anniversaire :.
v Sélectionner Dés..
§Sauver§ Appuyer sur la touche écran.
30
Rappel d'un anniversaire
Lorsque le combiné est en mode veille, le
rappel est indiqué à l'écran du combiné et
signalé par la sonnerie sélectionnée.
Vous pouvez :
§Dés.§ Appuyer sur la touche écran
pour confirmer le rappel et y
mettre fin.
Lorsque vous êtes en communication, un
rappel est signalé une fois sur le combiné à
l'aide d'une tonalité d'avertissement.
Les anniversaires non confirmés, signalés
lors d'une conversation, sont entrés dans la
liste Alarmes manquées (
¢ p. 32).
Liste des numéros bis
La liste des numéros bis comprend les vingt
derniers numéros composés sur le combiné
(32 chiffres maximum). Si le numéro est
enregistré dans votre répertoire, le nom
associé est affiché.
Répétition manuelle de la
numérotation
c Appuyer brièvement sur la tou-
che.
s Sélectionner une entrée.
c Appuyer de nouveau sur la tou-
che Décrocher. Le numéro est
composé.
Lorsqu'un nom apparaît, vous pouvez
afficher le numéro correspondant à l'aide de
la touche écran
§Afficher§.
Page 85

Utilisation du répertoire et des listes
Tou s ap pels
™ Franço is
10/14/09, 5:40pm
š 9725551234
10/14/09, 5:32pm
™ ...15125551234
10/14/09, 5:07pm
Afficher Options
Gestion de la liste des numéros bis
c Appuyer brièvement sur la tou-
s Sélectionner une entrée.
§Options§ Ouvrir le menu.
Vous pouvez sélectionner les fonctions suivantes à l'aide de la touche q:
No.vers répertoire
Copier l'entrée dans le répertoire (p. 27).
Utiliser le No (comme dans le répertoire,
p. 28)
Effacer entrée (comme dans le répertoire,
p. 28)
Effacer liste (comme dans le répertoire,
p. 29)
Journal des appels
Condition : présentation du numéro de
l'appelant (CID).
Votre téléphone enregistre différents types
d'appels :
u les appels reçus
u les appels sortants
u les appels manqués
Vous pouvez afficher les appels en fonction
du type d'appel ou avoir une vue d'ensemble de tous les appels. Seules les
20 dernières entrées sont affichées.
En mode veille, vous pouvez ouvrir le journal
des appels à l'aide de la touche écran
ou du menu :
¢
v
Ê
che.
§Appels§
Entrée de liste
Les nouveaux messages apparaissent en
haut.
Un exemple d'entrée de liste :
u Type de liste
u Etat de l'entrée
En gras : nouvelle entrée
u Numéro ou nom de l'appelant
u Date et heure de l'appel (selon le réglage,
p. 13)
u Type d'entrée :
–les appels reçus (
–les appels manqués (
– les appels sortants (
Appuyez sur la touche Décrocher c pour
rappeler l'appelant sélectionné.
Appuyez sur la touche écran
afficher des informations supplémentaires,
comme le numéro attribué à un nom. Lorsque le service CID (identification de l'appelant) est activé, l'écran indique le nom de ce
numéro enregistré auprès de votre opérate ur rés eau . Si le n om ne s 'af fic he p as, l' app elant n'a pas demandé la présentation du
numéro ou la présentation du numéro a été
désactivée.
Appuyez sur la touche écran
sélectionner les fonctions suivantes :
No.vers répertoire
Copier le numéro dans le répertoire.
Effacer entrée
Supprimer l’entrée sélectionnée.
Effacer liste
Supprimer toutes les entrées.
›)
™)
š )
§Afficher§ pour
§Options§ pour
31
Page 86

Utilisation du répertoire et des listes
Ã
œ
02 10
08
Messages
Appels : (3 )
Alarmes manquées (1)
Précéd. OK
Lorsque vous quittez le journal des appels,
toutes les entrées reçoivent le statut
« ancienne entrée », c'est-à-dire qu'elles
n'apparaîtront plus en gras à la prochaine
visite du journal.
Affichage de listes avec la
touche Messages
La touche Messages f vous permet
d'appeler les listes suivantes :
u La messagerie externe, si votre opérateur
prend en charge cette fonction et si
l'accès rapide est configuré pour la messagerie externe (
u Liste des appels manqués
u Liste des rendez-vous manqués
¢ p. 32)
(
Dès qu'une nouvelle entrée est insérée dans
l'une des listes, une tonalité d'avertissement
retentit. La touche f clignote (s'éteint une
fois qu'elle est actionnée). En mode veille,
une icône s'affiche à l'écran pour signaler le
nouveau message.
Icone Nouveau message...
... ou sur la messagerie externe
Ã
™
Le nombre de nouvelles entrées s'affiche
sous l'icône correspondante.
... dans la liste des appels manqués
... dans la liste Alarmes manquées
Remarque
Si des appels sont enregistrés dans la
messagerie externe, selon le réglage de
votre combiné, vous recevez un message
(voir le mode d'emploi fourni par votre
opérateur).
¢ p. 33).
En appuyant sur la touche Messages f,
vous pouvez consulter toutes les listes de
messages ainsi que le journal de la messagerie externe.
Les listes comportant de nouveaux messages apparaissent en haut et en gras :
Sélectionnez une liste avec la touche q.
Pour ouvrir, appuyez sur
§OK§.
Liste des rendez-vous
manqués
Les anniversaires non confirmés (¢p. 30)
sont enregistrés dans la liste Alarmes man-
quées dans les cas suivants :
u Vous refusez un anniversaire.
u L'anniversaire est signalé pendant un
appel.
u Le combiné est hors tension au moment
d'un anniversaire.
u Vous ouvrez la liste en appuyant sur la
touche Messages f (
Chaque entrée s'affiche avec
u le numéro ou le nom,
u la date et heure.
L'entrée la plus récente figure au début de la
liste.
Appuyez sur la touche écran
supprimer l'entrée sélectionnée.
Si 10 entrées sont enregistrées dans la liste,
la plus ancienne est effacée lors de la prochaine sonnerie de rendez-vous.
¢ p. 32).
§Effacer§, pour
32
Page 87

Utilisation de la messagerie externe
•
Utilisation de la
messagerie externe
La messagerie externe est le répondeur de
votre opérateur sur le réseau. Vous pouvez
utiliser la messagerie externe après
souscription auprès de votre opérateur.
Définition de la
messagerie externe pour
l'accès rapide
Pour l'accès rapide, vous pouvez appeler
directement soit la messagerie externe, soit
le répondeur intégré (selon la base).
Pour les bases sans répondeur, l'accès
rapide est prédéfini pour la messagerie
externe. Il vous suffit juste d'entrer le
numéro de la messagerie externe.
Pour les bases avec répondeur, le répondeur intégré est prédéfini. Vous pouvez le
remplacer par la messagerie externe.
Configuration de l'accès rapide pour la
messagerie externe et saisie du
numéro de la messagerie externe
Pour les bases avec répondeur :
v ¢Ì ¢ Param Tch 1
Répondeur rés.
Sélectionner et appuyer sur
§Sélect.§ (Ø = sélectionné).
Pour les bases sans répondeur :
Ì
¢
v
Puis :
~ Saisir le numéro de la message-
§Sauver§ Appuyer sur la touche écran.
La configuration choisie pour l'accès rapide
est valable pour tous les combinés
Gigaset C59H.
¢ Répondeur rés.
rie externe.
Appel à la messagerie externe
Maintenir enfoncé. Vous êtes
directement connecté à la messagerie externe.
d Appuyer éventuellement sur la
touche Mains-Libres d. Vous
entendez l'annonce de la messagerie externe.
Consultation des messages
de la messagerie externe
Lorsqu'un message est enregistré sur la messagerie réseau, vous recevez un appel de la
messagerie réseau. Si vous avez souscrit au
service de présentation du numéro, le
numéro de la messagerie réseau s'affiche. Si
vous prenez l'appel, vous entendez les nouveaux messages reçus. Si vous ne le prenez
pas, le numéro de la messagerie externe est
enregistré dans la liste des appels manqués
et la touche Messages clignote (
¢ p. 32).
33
Page 88

ECO DECT
ECO DECT
Grâce à votre Gigaset C59H, vous contribuez
à la sauvegarde de l'environnement.
Diminution de la consommation
électrique
Grâce à son alimentation basse consommation, la base consomme peu d'électricité.
Réduction des émissions (selon la
base)
La puissance d'émission ne peut être
réduite que si votre base prend en charge
cette fonctionnalité.
La puissance d'émission de votre téléphone
diminue automatiquement en fonction de
la distance séparant le combiné de la base.
Vous pouvez également réduire la puissance
d'émission sur le combiné et la base, en
utilisant le Mode Eco. Pour cela, reportezvous au mode d'emploi de votre téléphone.
Réveil/Alarme
Condition : la date et l'heure ont été réglées
au préalable (
Activation/désactivation et
réglage du réveil/de l'alarme
v ¢ Réveil/Alarme
¤ Renseigner les différentes lignes :
Activation :
Sélectionner Act. ou Dés..
Heure :
Saisir une heure de réveil à 4 chiffres.
Sélectionner AM (matin) ou PM (aprèsmidi) à l'aide de la touche écran.
Volu me :
Régler le volume à l'aide des flèches de
droite ou de gauche de la touche de navigation.
Mélodie :
Sélectionner la mélodie de l'alarme.
§Sauver§ Appuyer sur la touche écran.
En mode veille, l'icône ¼et l'heure de réveil
s'affichent.
Le réveil est indiqué à l'écran (
mélodie sélectionnée. Il retentit pendant
60 secondes. Si aucune touche n'est activée,
le réveil est répété deux fois toutes les cinq
minutes puis désactivé.
Lors d'une communication, le réveil est
signalé par un bip court uniquement.
¢ p. 13).
¢ p. 2) avec la
34
Page 89

Utilisation d'un combiné pour la surveillance de pièce
Désactivation/répétition du réveil
après une pause (mode Rappel)
Condition : le réveil/l'alarme retentit.
§Arrêt§ Appuyer sur la touche écran. Le
réveil/l'alarme est désactivé(e).
ou
§Répétition Alarme§
Appuyer sur la touche écran ou
sur une touche quelconque. Le
réveil/l'alarme s'éteint puis est
répété(e) après 5 minutes. Au
bout de la seconde répétition, le
réveil est totalement désactivé.
Utilisation d'un combiné
pour la surveillance de
pièce
Si le mode surveillance de pièce est activé, le
numéro de destination enregistré est appelé
dès qu'un niveau sonore défini est atteint
dans l'environnement immédiat du combiné. Vous pouvez enregistrer un numéro
interne ou externe comme numéro de destination sur votre combiné. Toutes les touches
du combiné sont désactivées, sauf les touches écran et la touche de navigation..
La surveillance de pièce vers un numéro
externe s'interrompt après 90 secondes
environ. Vers un numéro interne (combiné),
elle dure environ 3 minutes (selon la base).
Pendant la surveillance de pièce, toutes les
touches sont verrouillées, sauf la touche Raccrocher. Le haut-parleur du combiné est
désactivé.
En mode surveillance de pièce, les appels
entrants sur le combiné sont signalés sans
sonnerie et uniquement affichés à l'écran.
L'écran et le clavier ne sont pas éclairés et les
tonalités d'avertissement sont désactivées.
Si vous prenez un appel entrant, le mode
surveillance de pièce est interrompu pendant la durée de la communication, mais la
fonction reste activée.
Le mode surveillance de pièce reste activé
même après avoir éteint, puis rallumé le
combiné.
Attention !
u Vérifiez systématiquement le bon
fonctionnement de la surveillance
de pièce avant de l'utiliser. Vous pouvez par exemple tester sa sensibilité
au bruit. Contrôlez la connexion si
vous transférez la surveillance de
pièce vers un numéro externe.
u L’autonomie du combiné est considé-
rablement réduite lorsque la fonction
est activée. Le cas échéant, placez le
combiné sur le chargeur de manière à
éviter que la batterie ne se vide.
u La distance entre le combiné et le
bébé à surveiller doit être comprise
entre 1 et 2 mètres de préférence. Le
microphone doit être dirigé vers la
zone à surveiller.
u La ligne sur laquelle le combiné est
renvoyé ne doit pas être bloquée par
un répondeur activé.
35
Page 90

Utilisation d'un combiné pour la surveillance de pièce
i V
07:15 am
INT 1 Oct 22
Á
Surveill. Pièce
9725551234
Arrêt Options
Activation de la surveillance de
pièce et saisie du numéro de
destination
v ¢ É ¢ Surveillance Pièce
¤ Renseigner les différentes lignes :
Activation :
Sélectionner Act. pour l'activation.
Alarme à :
Sélectionner Interne ou Appel externe.
Numéro externe : sélectionner le
numéro d ans le répertoire (appuyer sur la
touche écran
Numéro interne : appuyer sur la touche
§Modifier§ ¢Sélectionner le combiné ou
Appel général pour appeler tous les
combinés inscrits
ö) ou le saisir directement.
¢ §OK§.
¤ Appuyer sur §Sauver§ pour sauvegarder les
réglages.
En mode veille, le numéro de destination
ou le numéro de destination interne
s'affiche.
Lorsque la surveillance de la pièce est activée, l'écran de veille se présente sous cette
forme :
Modification du numéro de
destination défini
v ¢ É ¢ Surveillance Pièce
¤ Saisir le numéro et l'enregistrer comme
indiqué à la section « Activation de la surveillance de pièce et saisie du numéro de
destination » (
¢ p. 36).
Activation/désactivation de la
surveillance de pièce
Appuyez sur la touche Raccrocher a,
pour mettre fin à la communication pen-
dant la surveillance de pièce.
En mode veille, appuyez sur la touche écran
§Arrêt§ pour désactiver le mode surveillance
de pièce.
Désactivation de la surveillance de
pièce à distance
Conditions : le téléphone doit prendre en
charge la fréquence vocale et la surveillance
de pièce doit renvoyer vers un numéro cible
externe.
¤ Prendre l'appel lancé par la surveillance
de pièce et appuyer sur les touches
9;.
L'appel prendra fin immédiatement et la
fonction surveillance de pièce sera désactivée. Tous les appels de la surveillance de
pièce sont désactivés.
Pour réactiver la surveillance de pièce avec le
même numéro :
¤ Réactiver et enregistrer avec §Sauver§
¢ p. 36).
(
36
Page 91

Réglages du combiné
Réglages du combiné
Votre combiné est préconfiguré. Vous pouvez personnaliser les réglages.
Accès rapide aux numéros et
aux fonctions
Vous pouvez affecter respectivement un
numéro du répertoire aux touches
numérotées Q et 2 à O.
Une fonction est prédéfinie pour la touche
écran de droite et de gauche. Vous pouvez
modifier ce réglage (
Vous pouvez alors composer le numéro ou
exécuter la fonction en appuyant simplement sur la touche correspondante.
Attribution des touches
numérotées (numéro raccourci)
Condition : un numéro n'a pas encore été
attribué à la touche numérotée.
¤ Maintenir enfoncée la touche numérotée
ou
Appuyer brièvement sur la touche
numérotée et appuyer sur la touche
§NumAbr§.
écran
Le répertoire s’ouvre.
¤ Sélectionner une entrée et appuyer
§OK§.
sur
L'entrée est enregistrée sous la touche
numérotée correspondante.
Remarque
Si vous effacez ou modifiez l'entrée dans
le répertoire principal ultérieurement,
cette action ne se répercute pas sur
l'attribution de la touche numérotée.
¢ p. 37).
Composition d'un numéro/
modification de l'attribution
Condition : un numéro est attribué à la tou-
che numérotée.
En mode veille du combiné
¤ Maintenir enfoncée la touche
numérotée :
Le numéro est composé immédiatement.
ou
¤ Appuyer brièvement sur la touche
numérotée :
Appuyer sur la touche écran correspondant au numéro/nom (en abrégé le cas
échéant) pour composer le numéro ou
Appuyer sur la touche écran
attribuer un autre numéro à la touche
numérotée ou supprimer l'attribution.
§Modifier§ pour
Modification de l'attribution d'une
touche
¤ Maintenir enfoncée la touche écran de
gauche ou de droite.
La liste des différentes possibilités d'attributions de touches s'affiche. Sélectionner l'une
des attributions suivantes :
Surveillance Pièce
Attribuer à la touche le menu de réglage
et d'activation de la surveillance de pièce
¢ p. 35).
(
Réveil/Alarme
Attribuer à la touche le menu de réglage
et d'activation du réveil (
Numéros Bis
Afficher la liste des numéros bis.
Autres fonctions...
Vous avez le choix entre d'autres
fonctions :
INT
Passer un appel interne (
¢ p. 34).
¢ p. 24).
¤ Sélectionner une entrée et appuyer
§OK§.
sur
37
Page 92

Réglages du combiné
•
Modification de la langue de
l'écran
Vous avez le choix entre différentes langues
d'affichage pour les textes.
Ï
¢
v
La langue en cours est signalée par Ø.
s Sélectionner la langue et
¢ Langue
appuyer sur
§Sélect.§.
Réglages de l'écran
Choix de l'écran de veille
En mode veille, vous pouvez afficher une
image ou l'horloge numérique en écran de
veille. Celui-ci remplace l'affichage du mode
veille. Selon la taille de l'écran de veille, il
peut recouvrir la date, l'heure et le nom.
L'écran de veille ne s'affiche pas dans certaines situations, par ex. pendant une communication ou lorsque le combiné est retiré.
Si un écran de veille est activé, la commande
de menu Ecran de veille comporte un μ.
Ï
¢
v
¢ Ecran de veille
Le réglage utilisé est affiché.
¢ Réglage écran
¤ Renseigner les différentes lignes :
Activation :
Sélectionner Act. (affichage de l'écran de
veille) ou Dés. (pas d'écran de veille).
Sélection :
Sélectionner l'écran de veille en
appuyant à droite ou à gauche sur la touche de navigation
§Afficher§ Appuyer sur la touche écran.
L'écran de veille s'affiche.
s Sélectionner l'écran de veille et
appuyer sur
§Sauver§ Appuyer sur la touche écran.
Si l'écran de veille recouvre l'affichage,
appuyez brièvement sur a pour afficher
l'écran de veille.
, ou
§OK§.
Réglage de la Grande police
Vous pouvez agrandir la taille de l'écriture et
des icônes dans le journal des appels et le
répertoire pour améliorer la lisibilité.
Lorsque la grande police est activée, l'écran
ne peut afficher qu'une entrée à la fois et
non plusieurs, et les noms sont abrégés le
cas échéant.
Ï
¢
v
¢ Grande police
§Modifier§ Appuyer sur la touche écran
¢ Réglage écran
(³=activé).
Réglage du modèle de couleur
Vous pouvez modifier la couleur du fond
d'écran (plus foncée ou plus claire).
Ï
¢
v
Sélectionner Config. couleur 1 ou Config.
couleur 2 et appuyer sur
¢ Réglage écran ¢ Couleur
§Sélect.§.
Eclairage de l'écran
Il est possible d'activer ou de désactiver
l'éclairage de l'écran selon que le combiné se
trouve ou non sur le chargeur. Lorsque
l'éclairage est désactivé, l'écran reste à demi
éclairé en permanence. Si l'écran n'est pas
éclairé, il suffit d'appuyer une fois sur
n'importe quelle touche pour l'allumer. Dans
ce cas, la touche n'a pas d'autre fonction.
Ï
¢
v
Le réglage utilisé est affiché.
¢ Réglage écran ¢ Eclairage
¤ Renseigner les différentes lignes :
Posé sur la base
Sélectionner Act. ou Dés..
Hors base
Sélectionner Act. ou Dés..
Remarque
Avec le réglage Act., il est possible que
l'autonomie du combiné soit considérablement réduite.
§Sauver§ Appuyer sur la touche écran.
38
Page 93

Réglages du combiné
•
Activation/désactivation
du décroché automatique
Si vous activez cette fonction, vous pouvez
répondre à un appel entrant en prenant simplement le combiné du chargeur sans
appuyer sur la touche Décrocher c.
Ï
¢
v
auto.
§Modifier§ Appuyer sur la touche écran
¢Téléphonie ¢Décroché
(³=activé).
Modification du volume de
l'écouteur ou du volume
du mode Mains-Libres
Vous disposez de cinq niveaux de réglage
pour le mode Mains-Libres et pour le volume
de l’écouteur.
En mode veille :
t Ouvrir le menu Volume du com-
biné.
r Régler le volume de l'écouteur
du combiné.
s Passer à la ligne Mains-Libres :.
r Régler le volume du mode
Mains-Libres.
§Sauver§ Le cas échéant, appuyer sur la
touche écran pour enregistrer le
réglage durablement.
Pour régler le volume au cours d'un appel :
t Appuyer sur la touche de navi-
gation.
r Sélectionner le niveau de
volume.
Le réglage est enregistré automatiquement
après environ 3 secondes ; sinon, appuyer
sur
§Sauver§.
§OK§.
sur la touche écran
Si une autre fonction est attribuée à t:
§Options§ Ouvrir le menu.
Volume Sélectionner puis appuyer
Définissez le réglage (voir ci-dessus).
Remarque
Vous pouvez également régler le volume
de conversation via le menu (
¢ p. 25).
Réglage des sonneries
u Volume :
Cinq niveaux de volume sont disponibles
(1 à 5 ; par ex., niveau 3 = Š) ainsi que
la sonnerie « crescendo » (6 ; le volume
augmente à chaque sonnerie = ‡).
u Sonneries
Vous pouvez sélectionner différentes
sonneries et mélodies dans la liste de
sonneries préinstallées.
Vous pouvez définir des sonneries différentes pour les fonctions suivantes :
u App int.
u Appels ext.
Réglage du volume/de la mélodie
En mode veille :
v ¢ Sons/Audio
¢ Sonneries (comb.) ¢ Volume /
Mélodies
r Régler le volume/la mélodie
pour les appels internes et les
anniversaires.
s Passer à la ligne de champ de
saisie suivante.
r Régler le volume/la mélodie
pour les appels externes.
§Sauver§ Appuyer sur la touche écran
pour enregistrer le réglage.
39
Page 94

Réglages du combiné
•
Activation/Désactivation de la
sonnerie pour les appels masqués
Vous pouvez paramétrer votre combiné
pour que la sonnerie ne retentisse pas
lorsque le numéro de l'appelant ne s'affiche
pas. L'appel n'est indiqué qu'à l'écran.
En mode veille :
¢ Sons/Audio
v
¢ Sonneries (comb.)
¢ Dés.App.anonym.
Appuyer sur §Modifier§ pour activer ou désactiver la fonction (³= activé).
Activation/désactivation de la
sonnerie
Vous pouvez désactiver la sonnerie sur le
combiné avant de répondre à un appel ou
lorsque le combiné est en mode veille. Vous
pouvez désactiver la sonnerie de manière
permanente ou seulement pendant l'appel
en cours. Il n'est pas possible de réactiver la
sonnerie durant un appel externe.
Désactivation de la sonnerie pour tous
les appels
* Maintenir la touche Etoile
enfoncée.
Le symbole ó s'affiche à l'écran.
Réactivation de la sonnerie
* Maintenir la touche Etoile
enfoncée.
Désactivation de la sonnerie pour
l’appel en cours
§Silence§ Appuyer sur la touche écran.
Activation/désactivation du bip
d'appel
Vous pouvez remplacer la sonnerie par un
bip. Une tonalité brève (« Bip ») retentit alors
à la place de la sonnerie lors d'un appel.
* Maintenir la touche Etoile
enfoncée et, dans les trois
secondes qui suivent :
§Bip§ Appuyer sur la touche écran.
Désormais, les appels sont
signalés par un seul bip court.
L'écran affiche ñ.
Activation/désactivation
des tonalités d'avertissement
Votre combiné vous informe par un signal
sonore des différentes activités et des différents états. Vous pouvez activer ou désactiver les tonalités d'avertissement suivantes,
indépendamment les unes des autres :
u Clic clavier : chaque pression sur une tou-
che est confirmée.
u Tonalités de confirmation :
– Tonalité de validation (séquence de
tonalités ascendantes) : à la fin de la
saisie ou du réglage et lors de la réce ption d'une nouvelle entrée dans le
journal des appels.
– To nalité d'erreur (séquence de tonali-
tés descendantes) : en cas de saisie
incorrecte.
– Tonalité de fin de menu : lorsque vous
atteignez la fin d'un menu.
u Tonalité de batterie : la batterie doit être
rechargée.
En mode veille :
¢ Sons/Audio ¢Tonalité avertis.
v
¤ Renseigner les différentes lignes :
Clic clavier :
Sélectionner Act. ou Dés..
Bip confirmation :
Sélectionner Act. ou Dés..
Batterie :
Sélectionner Act. ou Dés..
§Sauver§ Appuyer sur la touche écran.
40
Page 95

Rétablissement des
•
réglages par défaut du
combiné
Vous pouvez annuler les réglages personnalisés.
Lorsque vous effectuez la réinitialisation des
paramètres, les paramètres suivants sont
automatiquement conservés :
u L'inscription du combiné sur la base
u Date et heure
u Les entrées du répertoire et le journal des
appels
Ï
¢
v
§Oui§ Appuyer sur la touche écran.
¢ Système ¢ Reset combiné
Réglages du combiné
41
Page 96

Dépannage
Dépannage
Si vous avez des questions concernant l'utilisation de votre téléphone, vous pouvez
communiquer avec nous en tout temps, à
l'adresse
www.gigaset.com/customercare
Le tableau suivant énumère les problèmes
fréquents et les solutions possibles.
L’écran n'affiche rien.
1. Le combiné n'est pas activé.
¥ Maintenir la touche Raccrocher a
enfoncée.
2. La batterie est vide.
¥ Remplacer ou recharger la batterie
(
¢p. 9).
Toutes les commandes de menu ne sont
pas affichées.
L'affichage du menu est simplifié (mode standard).
¥ Activer l'affichage du menu étendu (mode
expert
Pas de base clignote à l'écran.
1. Le combiné se trouve hors de la zone de portée de la base.
) (¢p. 25).
•
¥ Réduire la distance entre le combiné et la
base.
2. Le Mode Eco est activé, diminuant la portée
de la base.
¥ Désactiver le Mode Eco (¢ p. 34) ou
réduire la distance entre le combiné et
la base.
3. La base n'est pas activée.
¥ Contrôler le bloc secteur de la base.
.
Enregistrez combiné SVP clignote à l'écran.
Le combiné n'est pas encore inscrit sur sa base ou
il a été désinscrit.
¥ Inscrire le combiné (¢p. 11).
Le combiné ne sonne pas.
1. La sonnerie est désactivée.
¥ Activer la sonnerie (¢p. 40).
2. Le téléphone ne sonne que lorsque le numéro
d'appel est communiqué.
¥ Activer la sonnerie pour les appels
masqués (
Votre correspondant n’entend rien.
Vous avez appuyé sur la touche secret micro-
phone h. Le combiné est en « mode secret ».
¢p. 40).
¥ Réactiver le microphone (¢p. 24).
Lors d'une saisie, une tonalité d'erreur retentit
(séquence de tonalités descendantes).
Echec de l'action/saisie erronée
¥ Répéter l'opération.
Observer l'écran et, le cas échéant, vérifier
dans le mode d'emploi.
Déni de responsabilité
Certains pixels de l'écran peuvent rester
activés ou désactivés. Un pixel étant
composé de trois sous-pixels (rouge,
vert, bleu), il est possible de noter une
variation de couleurs au niveau des
pixels.
Ce phénomène est normal et n'est pas
un signe de dysfonctionnement.
42
Page 97

Annexe
!
Annexe
Entretien de votre téléphone
Essuyer la base, le chargeur et le combiné
avec un chiffon humide (pas de solvant ni de
chiffon microfibre) ou un chiffon antistatique.
Ne jamais utiliser de chiffon sec. Il existe un
risque de charge statique.
Contact avec les liquides
Si le combiné a été mis en contact avec des
liquides :
1. L'éteindre immédiatement et retirer le
bloc de batteries.
2. Laisser le liquide s'écouler du combiné.
3. Sécher toutes les parties avec un linge absorbant et placer le téléphone, avec le
clavier vers le bas et le logement des batteries ouvert, dans un endroit chaud et
sec pendant au moins 72 heures (ne pas
placer le combiné dans un micro-onde,
un four, etc.).
4. Attendre que le combiné ait séché pour
le rallumer.
Une fois complètement sec, il est possible
que le combiné puisse fonctionner à nouveau.
Caractéristiques techniques
Technologie : Nickel-Hydrure
métallique (NiMH)
Type : AAA (Micro, HR03)
Tension : 1,2 V
Capacité : 550 - 1000 mAh
Veuillez utiliser uniquement les types de
batteries suivants afin de bénéficier d'une
autonomie, d'une fonctionnalité et d'une
longévité optimales :
u Yuasa AAA 800 mAh
L'appareil est livré avec les piles AAA au nickel-métal-hydrure (NiMH) homologuées.
Autonomie/temps de charge du
combiné
L'autonomie de votre téléphone dépend de
la capacité et de l'ancienneté des batteries,
ainsi que de leur emploi par l'utilisateur. (Les
durées spécifiées sont les durées maximales.)
Capacité (mAh) env.
550 700 800 1000
Autonomie
(heures)*
Autonomie en
communication
(heures)
Autonomie pour
1,5 heure de
communication
quotidienne
(heures)**
Tem ps de c harge
sur le chargeur
(heures)
* sans/avec éclairage de l'écran
** sans éclairage de l'écran
(Eclairage de l'écran
160/ 48185/ 56210/ 64260/
79
10 12 13 17
85 100 115 140
6.5 7.5 8.5 10.5
¢p. 38)
Etant donné les avancées permanentes dans
ce secteur, la liste des batteries recommandées est régulièrement mise à jour.
43
Page 98

Annexe
1)
2)
Caractéristiques générales
Norme DECT Prise en charge
Norme GAP Prise en charge
Nombre de canaux 60 canaux duplex
Plage de fréquences
radio 1 880–1 900 MHz
Mode duplex Multiplexage temporel,
Espacement entre
canaux 1 728 kHz
Débit binaire 1 152 kbit/s
Modulation GFSK
Codage de la voix 32 kbit/s
Puissance d'émission 10 mW, puissance
Portée Jusqu'à 984 pi à l'extérieur
Conditions ambiantes pour le fonctionnement
Mode de numérotation
longueur de trame 10 ms
moyenne par canal
et 165 pi à l'intérieur
+41 °F à +113 °F ;
20 % à 75 % d’humidité
relative
FV (fréquence vocale)/
ND (numérotation
par impulsion)
Edition de texte
Lors de la création d'un texte, les règles suivantes s'appliquent :
u Plusieurs lettres et chiffres sont attribués
à chaque touche entre Q et O.
u Déplacer le curseur avec les touches u
vts. Maintenir enfoncée la tou-
che u ou v pour déplacer le curseur
d'un mot sur l'autre.
u Les caractères sont insérés à l'emplace-
ment du curseur.
u Appuyer sur la touche Etoile
afficher le tableau des caractères spéciaux. Sélectionner le caractère souhaité,
appuyer sur la touche écran
l'insérer à gauche du curseur.
u Insérer les chiffres en maintenant enfon-
cées les touches Q à O.
pour
*
§Insérer§ pour
u Appuyer sur la touche écran Ñ pour
effacer le caractère à gauche du curseur.
Un appui long permet d'effacer le mot à
gauche du curseur.
u Pour les entrées dans le répertoire, la pre-
mière lettre du nom s'écrit automatiquement en majuscule et les lettres suivantes
en minuscules
Rédaction d'un nom
Pour saisir une lettre/un caractère spécial,
appuyez plusieurs fois sur la touche correspondante.
Lorsque vous maintenez une touche enfon-
cée, le chiffre correspondant est inséré.
Ecriture standard
1x 2x 3x 4x 5x 6x 7x 8x 9x 10x
2
3
4
5
L
M
N
O
Q
1) Espace
2) Saut de ligne
Ecriture en majuscules, minuscules ou
chiffres
Appuyez brièvement sur la touche dièse
#, afin de passer du mode « Abc » au
mode « 123 », du mode « 123 » au mode
« abc » et du mode « abc » au mode « Abc »
(majuscule initiale et lettres suivantes en
minuscule). Appuyez sur la touche Dièse
# avant de saisir la lettre.
Vous pouvez voir sur l'écran quel mode
d'édition est activé (majuscules, minuscules,
chiffres).
1
abc2дбавгз
def3лйик
gh i4ïíìî
jkl5
mno6цсутфх
pqr s 7ß
tuv8üúùû
wx y z 9 яэжше
.,?!0
44
Page 99

Avis FCC/ACTA
Homologation d'Industrie
Canada
Le fonctionnement de cet appareil est soumis aux
deux conditions suivantes : 1. cet appareil ne doit
pas causer d'interférences; et 2. cet appareil doit
supporter toutes les interférences reçues, y compris celles susceptibles de perturber son bon fonctionnement.
AVIS : l'étiquette d'Industrie Canada atteste
l'homologation d'un équipement. Cette homologation implique que l'équipement satisfait à certaines exigences des réseaux de
télécommunications,aux conditions d'exploitation, aux prescriptions de sécurité et de protection, conformément aux documents de prescriptions techniques relatives à l'équipement terminal. Industrie Canada ne garantit cependant pas
que l'équipement fonctionnera à la satisfaction de
l'utilisateur.
Avant de procéder à l'installation du présent équipement, les utilisateurs devront s'assurer que la
connexion aux installations de l'entreprise locale
en télécommunications est autorisée. L'équipement doit aussi être installé au moyen d'une
méthode de connexion acceptable. Le client
devra être conscient que la conformité aux conditions susmentionnées peut ne pas empêcher la
détérioration du service dans certaines situations.
Les réparations à l'équipement homologué
devront être coordonnées par un représentant
désigné par le fournisseur. Toute réparation ou
modification effectuée à l'équipement par l'utilisateur, ou toute défectuosité de l'équipement,
peut faire en sorte que l'entreprise en télécommunications demande à l'utilisateur de débrancher
l'équipement.
Pour leur propre sécurité, les utilisateurs devront
s'assurer que les connexions de masse du service
public d'électricité, les lignes téléphoniques et le
réseau métallique interne de canalisation d'eau,
s'il y en a, sont connectés ensemble.
Cette précaution peut s'avérer particulièrement
importante dans les zones rurales.
REMARQUE : les utilisateurs ne doivent pas tenter
d'effectuer de telles connexions eux-mêmes; ils
devraient plutôt communiquer avec les autorités
responsables de l'inspection électrique, ou un
électricien, selon le cas.
Ce produit répond aux devis descriptifs applicables d’Industrie Canada.
L'indice d'équivalence de la sonnerie (IES) constitue une indication du nombre maximal de dispositifs qu'il est permis de connecter à une interface
téléphonique. La terminaison d'une interface
peut consister en toute combinaison de
dispositifs,sous réserve seulement que la somme
de IES de tous les dispositifs ne dépasse pas cinq
IES.
This Class B digital apparatus complies with Canadian ICES-003.
Cet appareil numérique de la classe B est conforme à la norme NMB-003 du Canada.
Avis FCC/ACTA
Avertissement : toute modification apportée à
cet appareil sans l'autorisation expresse de
Gigaset Communications USA LLC incluant l'ajout
d'une antenne externe, peut annuler le droit de
l'utiliser.
Cet appareil est conforme à la partie 68 des règlements de la FCC et aux exigences de l'ACTA. Une
étiquette apposée sous la base indique, entre
autres informations, le code d'identification du
téléphone, au format US:AAAEQ##TXXXX. Ce
code doit être communiqué au fournisseur de services téléphoniques s'il le demande.
La fiche et la prise téléphoniques utilisées pour
connecter cet appareil au réseau téléphonique
doivent être conformes à la partie 68 des règlements de la FCC et aux exigences de l'ACTA. Cet
appareil est livré avec un câble téléphonique et
une fiche modulaire conforme qui est conçue
pour être reliée à une prise téléphonique modulaire conforme. Pour tous les détails, reportezvous aux instructions d'installation.
L'indice IES est utilisé pour déterminer le nombre
d'appareils pouvant être connectés à une même
ligne téléphonique. Si un trop grand nombre
d'appareils sont connectés à une ligne, ils pourraient ne pas sonner lorsque des appels sont
reçus. Dans la plupart des régions, la somme des
indices IES ne doit pas excéder 5. Pour connaître
avec certitude le nombre d'appareils que vous
pouvez connecter sur votre ligne, consultez votre
fournisseur de services téléphoniques. Pour les
appareils homologués après le 23 juillet 2001,
l'indice IES de cet appareil fait partie du code
d'identification du téléphone, au
format US:AAAEQ##TXXXX. Les chiffres représentés par ## forment l'indice IES sans signe décimal
(p. ex., 03 indique un IES de 0,3). Pour les produits
homologués avant le 23 juillet 2001, l'indice IES
est indiqué séparément sur l'étiquette.
Une copie de la déclaration de conformité du
fabricant (SDoC) peut être obtenue sur Internet à
l'adresse www.gigaset.com/docs.
Si cet appareil provoque des anomalies sur le
réseau téléphonique,
téléphoniques vous informera qu'il devra peut-
votre fournisseur de services
45
Page 100

Avis FCC/ACTA
être interrompre temporairement votre service
n'est pas en mesure de vous prévenir suffisamment d'avance, le fournisseur vous avisera dès que
pos sibl e. Si vou s croy ez qu 'il est n éces saire de po rter plainte auprès de la FCC, vous serez informé de
vos droits.
Votre fournisseur de services téléphoniques pourrait modifier ses install ations, son équipement, ses
opérations ou ses procédures, ce qui pourrait altérer le fonctionnement de cet appareil. Si cela se
produit, il vous avisera à l'avance afin de vous permettre d'apporter les modifications nécessaires
pour éviter toute interruption du service. Si vous
éprouvez des problèmes avec cet appareil,
débranchez-le du réseau téléphonique jusqu'à ce
que le problème ait été corrigé ou que vous soyez
certain qu'il fonctionne correctement.
Pour obtenir des services de réparation ou des
informations sur la garantie, composez le 1-866
247-8758. Si cet appareil provoque des anomalies
sur le réseau téléphonique, votre fournisseur de
services téléphoniques pourrait vous demander
de le débrancher jusqu'à ce que le problème soit
résolu. Cet appareil ne peut pas être réparé par
l'utilisateur.
Cet appareil ne peut pas être utilisé sur une ligne
d'appareils publics. Son branchement sur une
ligne partagée peut entraîner des frais
supplémentaires. Pour en savoir davantage, communiquez avec la commission des services
publics de votre région. La confidentialité des
communications n'est pas garantie par cet appareil.
Si un système d'alarme résidentiel est relié à la
ligne téléphonique, vous devez vous assurer que
le téléphone ne l'empêchera pas de fonctionner.
Pour en savoir davantage, consultez votre fournisseur de services téléphoniques ou un technicien.
Cet appareil a été testé et jugé conforme aux limites établies pour les appareils numériques de
classe B conformément à la partie 15 de la
réglementation FCC. Son fonctionnement est
soumis aux deux conditions suivantes : 1. cet
appareil ne doit pas causer d'interférences; et
2. cet appareil doit supporter toutes les interférences reçues, y compris celles susceptibles de
perturber son bon fonctionnement. Ces limites
sont conçues pour assurer une protection
raisonnable contre les interférences dans une installation résidentielle. Certains téléphones sans fil
utilisent des fréquences qui peuvent causer des
interférences nuisibles aux téléviseurs et aux
magnétoscopes installés à proximité. Pour réduire
ce risque, la base du téléphone ne doit pas se trouver près d'un téléviseur ou d'un magnétoscope. Si
des interférences surviennent, éloignez la base du
téléviseur ou du magnétoscope.
. S'il
L'absence d'interférences n'est pas garantie dans
une installation spécifique. Si cet appareil cause
des interférences nuisibles à la réception de
signaux de radio ou de télévision, ce qui peut être
déterminé en l'éteignant puis en le rallumant,
l'utilisateur doit tenter de corriger les interférences comme suit :
1. Réorienter l'antenne de réception.
2. Éloigner la base du récepteur.
3. Brancher le téléphone dans une prise électrique
d'un autre circuit que celui qui alimente le récepteur.
4. Consulter le détaillant ou un technicien radio/
TV.
Avis concernant l'accès direct à un
poste téléphonique
PERMETTRE L'UTILISATION DE CET APPAREIL DE
MANIÈRE TELLE À NE PAS ASSURER UNE
SUPERVISION APPROPRIÉE DES APPELS REÇUS
CONTREVIENT AUX DIRECTIVES DE LA PARTIE 68
DES RÈGLEMENTS DE LA FCC.
Avis aux porteurs de prothèse auditive
Ce système téléphonique est compatible avec les
prothèses auditives comportant un émetteur
externe couplé par induction.
Pannes de courant
Ce téléphone sans fil ne fonctionne pas durant les
pannes de courant. Il est recommandé de prévoir
un téléphone conventionnel pour être en mesure
de faire et de recevoir des appels durant une
panne.
Remarque :
Pour que l'installation du téléphone soit conforme
aux recommandations de la FCC en matière
d'exposition aux radiofréquences, la base doit se
trouver à au moins 20 cm de toute personne se
trouvant dans la même pièce.
Le combiné du téléphone étant conforme aux
recommandations de la FCC, il peut être porté sur
le corps à condition d'utiliser à cette fin un accessoire ne contenant pas de parties métalliques.
Informations à l'intention de votre fournisseur de
services téléphoniques :
Si vous devez faire appel à votre fournisseur en raison de problèmes que vous croyez liés au téléphone, communiquez-lui les informations suivantes.
– Facility interface Code (FIC)
– Service Order Code (SOC)
– Universal Service Order Code (USOC)
Ces codes sont indiqués sur l'étiquette apposée
sous la base.
46
 Loading...