

Page 1

A170/A170A
A270/A270A
You can find the most up-to-date
user guide at
www.gigaset.com/manuals
User guide online on your
smartphone or tablet:
Download the Gigaset Help app
Page 2

Contents
Contents
Overview of the handset . . . . . . . . . . . . . . . . . . . . . . . . . . . . . . . . . . . . . . . . . . . . . . . . . . . . . . . . . . . . . . 4
Overview of the A170A/A270A base . . . . . . . . . . . . . . . . . . . . . . . . . . . . . . . . . . . . . . . . . . . . . . . . . . .
Illustration in the user guide . . . . . . . . . . . . . . . . . . . . . . . . . . . . . . . . . . . . . . . . . . . . . . . . . . . . . . . . . . .
Safety precautions . . . . . . . . . . . . . . . . . . . . . . . . . . . . . . . . . . . . . . . . . . . . . . . . . . . . . . .
Getting started . . . . . . . . . . . . . . . . . . . . . . . . . . . . . . . . . . . . . . . . . . . . . . . . . . . . . . . .
Contents of the package . . . . . . . . . . . . . . . . . . . . . . . . . . . . . . . . . . . . . . . . . . . . . . . . . . . . . .
Connecting the base to power supply and telephone network . . . . . . . . . . . . . . . . . . . . . . . . . . . 9
Connecting the base to the router. . . . . . . . . . . . . . . . . . . . . . . . . . . . . . . . . . . . . . . . . . . . . . . . . . . .
Connecting the charging cradle (if supplied). . . . . . . . . . . . . . . . . . . . . . . . . . . . . . . . . . . . . . . . . .
Setting up the handset for use . . . . . . . . . . . . . . . . . . . . . . . . . . . . . . . . . . . . . . . . . . . . . . . . .
Operating the handset . . . . . . . . . . . . . . . . . . . . . . . . . . . . . . . . . . . . . . . . . . . . . . . . . . . . . . . . . . . . . . .
Making calls . . . . . . . . . . . . . . . . . . . . . . . . . . . . . . . . . . . . . . . . . . . . . . . . . . . . . . . . . .
Making a call . . . . . . . . . . . . . . . . . . . . . . . . . . . . . . . . . . . . . . . . . . . . . . . . . . . . . . . . . . .
Accepting a call. . . . . . . . . . . . . . . . . . . . . . . . . . . . . . . . . . . . . . . . . . . . . . . . . . . . . . . . .
Caller display . . . . . . . . . . . . . . . . . . . . . . . . . . . . . . . . . . . . . . . . . . . . . . . . . . . . . . . . . . .
Handsfree mode (A270/A270A only) . . . . . . . . . . . . . . . . . . . . . . . . . . . . . . . . . . . . . . . . . . . . . . . .
Automatic network provider selection (Preselection). . . . . . . . . . . . . . . . . . . . . . . . . . . . . . . . . . . . 15
Directory . . . . . . . . . . . . . . . . . . . . . . . . . . . . . . . . . . . . . . . . . . . . . . . . . . . . . . . . . . .
Message/call lists . . . . . . . . . . . . . . . . . . . . . . . . . . . . . . . . . . . . . . . . . . . . . . . . . . . . . .
Call list . . . . . . . . . . . . . . . . . . . . . . . . . . . . . . . . . . . . . . . . . . . . . . . . . . . . . . . . . . .
Answer machine list (A170A/A270A only) / network mailbox list. . . . . . . . . . . . . . . . . . . . . . . . . 18
Local answer machine (A170A/A270A only) . . . . . . . . . . . . . . . . . . . . . . . . . . . . . . . . . . . . . . . . . . . 19
Setting up the answer machine . . . . . . . . . . . . . . . . . . . . . . . . . . . . . . . . . . . . . . . . . . . . . . . . . . . . . .
Operation using the handset. . . . . . . . . . . . . . . . . . . . . . . . . . . . . . . . . . . . . . . . . . . . . . . . . . .
Operation when on the move (remote operation). . . . . . . . . . . . . . . . . . . . . . . . . . . . . . . . . . . . . . . 22
Network mailbox . . . . . . . . . . . . . . . . . . . . . . . . . . . . . . . . . . . . . . . . . . . . . . . . . . . . . . . .
Using handsets . . . . . . . . . . . . . . . . . . . . . . . . . . . . . . . . . . . . . . . . . . . . . . . . . . . . . . . .
Locating a handset – "Paging" (A170A/A270A only) . . . . . . . . . . . . . . . . . . . . . . . . . . . . . . . . . . . . . 23
Registering a handset. . . . . . . . . . . . . . . . . . . . . . . . . . . . . . . . . . . . . . . . . . . . . . . . . . . . . . . . .
De-registering the handset . . . . . . . . . . . . . . . . . . . . . . . . . . . . . . . . . . . . . . . . . . . . . . . . . . .
Making internal calls. . . . . . . . . . . . . . . . . . . . . . . . . . . . . . . . . . . . . . . . . . . . . . . . . . . . . .
Additional functions . . . . . . . . . . . . . . . . . . . . . . . . . . . . . . . . . . . . . . . . . . . . . . . . . . . . .
Alarm clock. . . . . . . . . . . . . . . . . . . . . . . . . . . . . . . . . . . . . . . . . . . . . . . . . . . . . . . . . . . . .
ECO DECT . . . . . . . . . . . . . . . . . . . . . . . . . . . . . . . . . . . . . . . . . . . . . . . . . . . . . . . . . . . . . .
Quick dial . . . . . . . . . . . . . . . . . . . . . . . . . . . . . . . . . . . . . . . . . . . . . . . . . . . . . . . . . . . . . .
. . . . . . . . . . . . . 7
. . . . . . . . . . . . . . . 8
. . . . . . . . . . 8
. . . 9
. . . 9
. . . . . . . . 10
12
. . . . . . . . . . . . . . . 13
. . . . . . . . . . . . . . . 13
. . . . . . . . . . . . . . . 13
. . . . . . . . . . . . . . . 14
. . . 14
. . . . . . . . . . . . . . . . . 16
. . . . . . . . . . . . . . 17
. . . . . . . . . . . . . . . . . . . . . 17
. . 19
. . . . . . . . 20
. . . . . . . . . . . . 23
. . . . . . . . . . . . . . 23
. . . . . . . . . 23
. . . . . . . . . 24
. . . . . . . . . . . . . 24
. . . . . . . . . . . . 26
. . . . . . . . . . . . . . . 26
. . . . . . . . . . . . . . . 26
. . . . . . . . . . . . . . . 27
5
6
2
Page 3

Contents
Telephone settings . . . . . . . . . . . . . . . . . . . . . . . . . . . . . . . . . . . . . . . . . . . . . . . . . . . . . . . . . . . . . . . . . . . 28
Call volume. . . . . . . . . . . . . . . . . . . . . . . . . . . . . . . . . . . . . . . . . . . . . . . . . . . . . . . . . . . . . . . . . . . . . . . . . . . . 28
Ringtones . . . . . . . . . . . . . . . . . . . . . . . . . . . . . . . . . . . . . . . . . . . . . . . . . . . . . . . . . . . . . .
Display language . . . . . . . . . . . . . . . . . . . . . . . . . . . . . . . . . . . . . . . . . . . . . . . . . . . . . . . .
Music on hold . . . . . . . . . . . . . . . . . . . . . . . . . . . . . . . . . . . . . . . . . . . . . . . . . . . . . . . . . .
Key 1 . . . . . . . . . . . . . . . . . . . . . . . . . . . . . . . . . . . . . . . . . . . . . . . . . . . . . . . . . . . . . .
System PIN . . . . . . . . . . . . . . . . . . . . . . . . . . . . . . . . . . . . . . . . . . . . . . . . . . . . . . . . . . .
Repeater support (A170A/A270A only) . . . . . . . . . . . . . . . . . . . . . . . . . . . . . . . . . . . . . . . . . . . . . . .
Resetting the system . . . . . . . . . . . . . . . . . . . . . . . . . . . . . . . . . . . . . . . . . . . . . . . . . . . . . . . . .
Operating the base with a PABX/router . . . . . . . . . . . . . . . . . . . . . . . . . . . . . . . . . . . . . . . . . . . . . .
Customer Service & Assistance . . . . . . . . . . . . . . . . . . . . . . . . . . . . . . . . . . . . . . . . . . . . . . . . . . . . . . .
Questions and answers . . . . . . . . . . . . . . . . . . . . . . . . . . . . . . . . . . . . . . . . . . . . . . . . . . . . . . .
Guarantee Certificate - United Kingdom and Ireland . . . . . . . . . . . . . . . . . . . . . . . . . . . . . . . . . . . . 34
Manufacturer warranty (Middle East) . . . . . . . . . . . . . . . . . . . . . . . . . . . . . . . . . . . . . . . . . . . . . . . . .
Manufacturer's advice . . . . . . . . . . . . . . . . . . . . . . . . . . . . . . . . . . . . . . . . . . . . . . . . . . . . . . . . . . . . . . .
Authorisation. . . . . . . . . . . . . . . . . . . . . . . . . . . . . . . . . . . . . . . . . . . . . . . . . . . . . . . . . . .
Environment . . . . . . . . . . . . . . . . . . . . . . . . . . . . . . . . . . . . . . . . . . . . . . . . . . . . . . . . . . .
Care. . . . . . . . . . . . . . . . . . . . . . . . . . . . . . . . . . . . . . . . . . . . . . . . . . . . . . . . . . . . . .
Contact with liquid . . . . . . . . . . . . . . . . . . . . . . . . . . . . . . . . . . . . . . . . . . . . . . . . . . . . . .
Technical details . . . . . . . . . . . . . . . . . . . . . . . . . . . . . . . . . . . . . . . . . . . . . . . . . . . . . . .
Entering letters/characters. . . . . . . . . . . . . . . . . . . . . . . . . . . . . . . . . . . . . . . . . . . . . . . . . . . .
Not all functions described in the user guide are available in all countries or from all
network providers.
. . . . . . . . . . . . . . . 28
. . . . . . . . . . . . . . 29
. . . . . . . . . . . . . . . 29
. . . . . . . . . . . . . . . . . . . . 29
. . . . . . . . . . . . . . . . . 30
. . 30
. . . . . . . . . 31
. . . 32
33
. . . . . . . . . 34
. . 35
36
. . . . . . . . . . . . . . . 36
. . . . . . . . . . . . . . . 37
. . . . . . . . . . . . . . . . . . . . . 37
. . . . . . . . . . . . . . 37
. . . . . . . . . . . . . . 38
. . . . . . . . . 38
3
Page 4
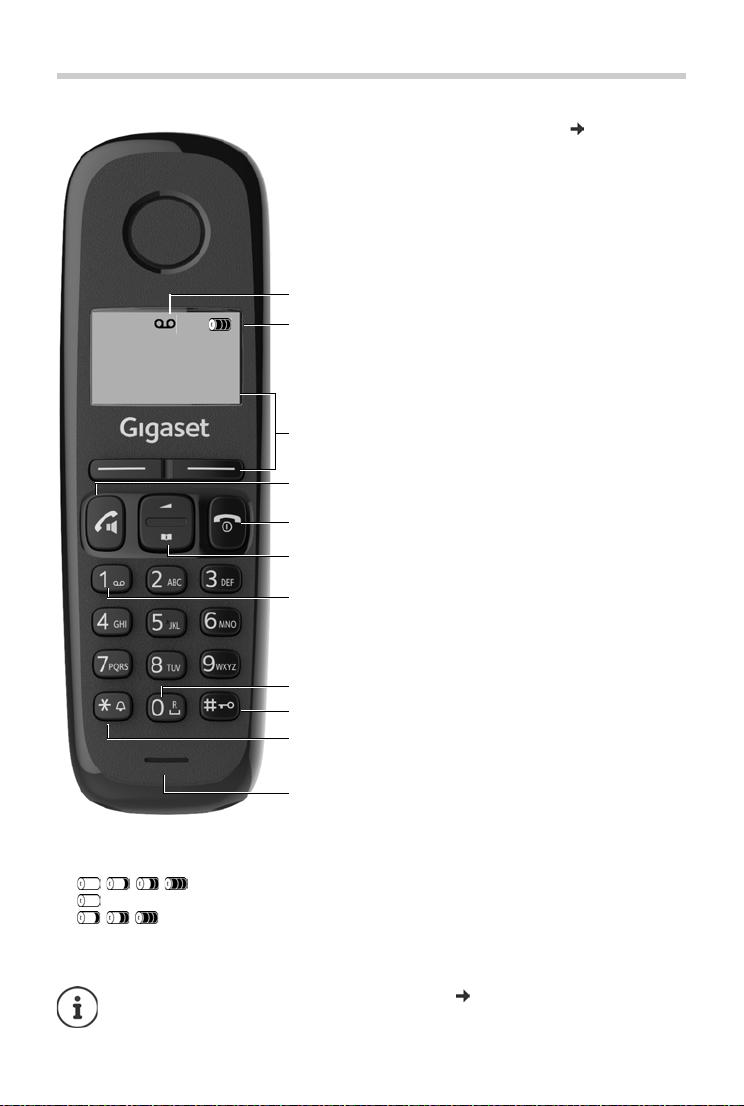
Overview of the handset
1
4
5
6
7
8
9
3
11
10
MENU
INT
11.05.
16:52
1
2
Overview of the handset
1 Answer machine icon (A170A/A270A only)
2 Charge level of the batteries
Flashing: Batteries almost empty
Flashing: Charge process
Empty to fully charged
3 Display keys and functions ( p. 12)
Various functions, depending on the operating
situation
4Talk key / Handsfree key
Handsfree mode (A270/A270A only)
Accept call; select number displayed
Open the redial list
Start dialling
5 End call key and On/Off key
End call; cancel function
Go back one menu level
Return to idle status
Switch the handset on and
off (in idle status)
6 Control key
Navigate through menus and entry fields
Open the directory
Set the call volume
7 Key 1
Playback messages on the
answer machine
(A170A/A270A only) /
network mailbox
8 Key 0/Recall key
Consultation call (flash)
9 Hash key/Lock key
Enable/disable keypad lock
(in idle status)
Toggle between upper/lower
case and digits
(when inputting text)
Insert a dialling pause
10 Star key
Switch the ringtones on/off
Enter special characters
Switch from pulse dialling to
tone dialling (for the existing
connection)
11 Microphone
¥ Press briefly
¥ Press and hold
¥ Press briefly
¥ Press and hold
¥ Press and hold
¥ Press down
¥ Press up
¥ Press and hold
¥ Press and hold
¥ Press and hold
¥ Press briefly
¥ Press and hold
¥ Press and hold
¥ Press briefly
¥ Press briefly
New messages in the call list / network mailbox list ( p. 17) are shown on the display
by message New messages.
4
Page 5

Overview of the A170A/A270A base
C
E
A
D
B
F
Overview of the A170A/A270A base
DBack key
During message playback:
Go to the start of the
current message:
Skip to the previous
message:
E On/Off and Playback/Stop key
Switch the answer
machine on/off:
During message playback:
Play back messages:
AVolume keys (– = quieter; + = louder)
During message playback:
adjust the speech volume
While the phone is ringing:
adjust the ringtone volume
B Delete key
During message playback:
Delete current message.
CForward key
During message playback:
Go to the next message.
Cancel playback:
Lights up: Answer machine switched on,
Flashes: New message; message is being
Flashes very quickly:
F Registration/paging key
Locate a handset
("paging"):
Register the handset:
¤ press once
¤ press twice
¤ Press and hold
¤ Press briefly
¤ Press briefly
no new messages
played or recorded
Memory full
¤ Press briefly
¤ Press briefly
5
Page 6
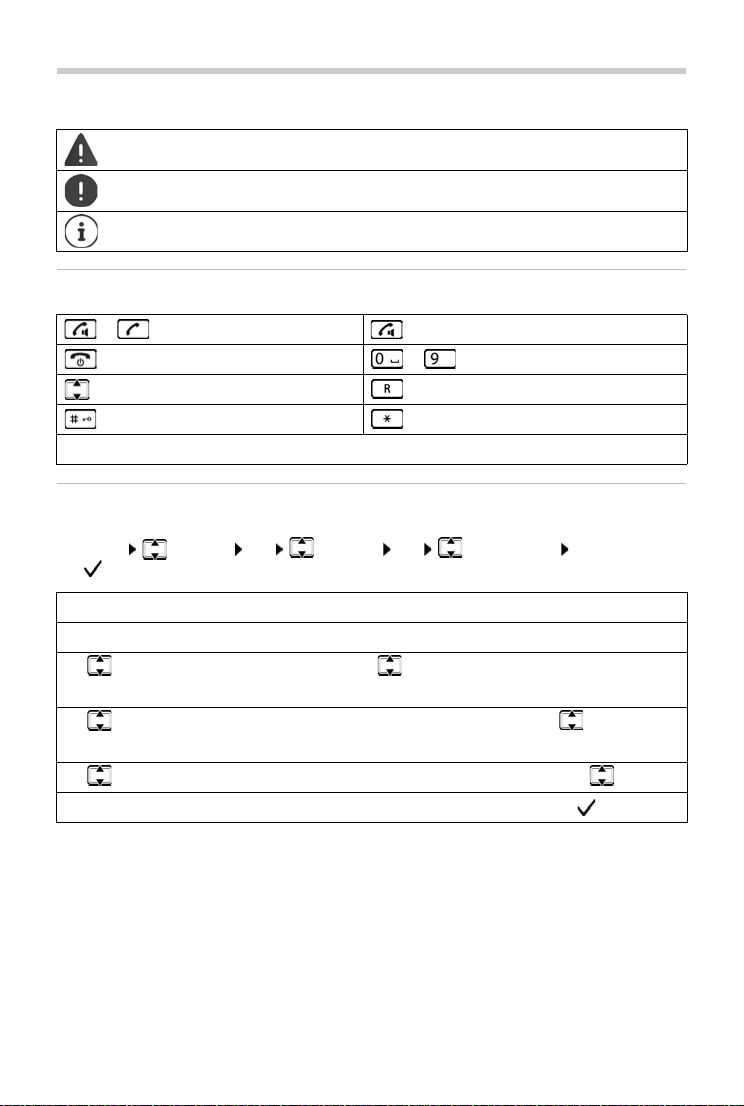
Illustration in the user guide
Illustration in the user guide
Warnings, the non-adherence to which can result in damage to devices or personal
injury.
Important information regarding function and appropriate handling or functions
that could generate costs.
Additional helpful information.
Keys
or Talk key Handsfree key
End call key to Digit/letter keys
Control key Recall key
Hash key Star key
MENU, OK, INT Display keys
Procedures
Example: Switching Auto answer on/off:
¤ MENU Settings OK Handset OK Auto Answer OK
( = enabled)
Step Follow this procedure
¤ MENU Press the display key MENU.
¤ Settings
¤ OK
¤ Handset
¤ OK
¤ Auto Answer Select the Auto Answer entry using the control key .
¤ OK Enable or disable it using OK. Function is enabled .
Use the control key to navigate to entry Settings.
Press OK to confirm. The submenu Settings opens.
Select the Handset entry using the control key .
Press OK to confirm. The submenu Handset opens.
6
Page 7
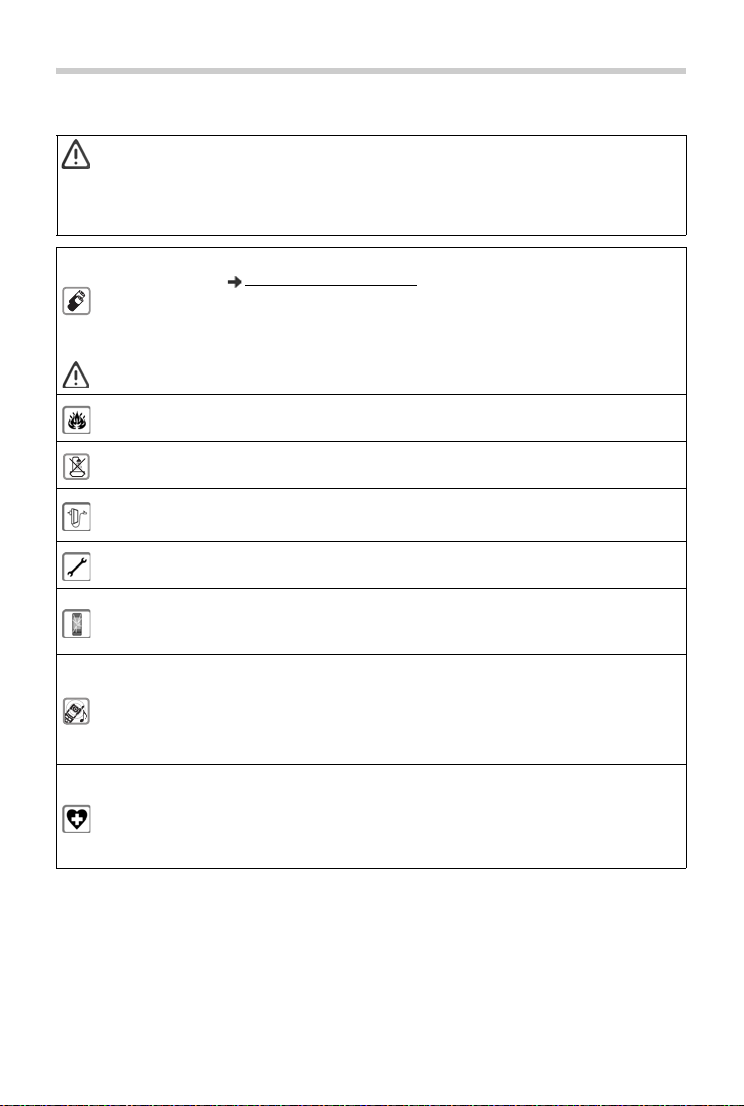
Safety precautions
Read the safety precautions and the user guide before use.
The device cannot be used in the event of a power failure. In case of a power failure
it is also not possible to make emergency calls.
Emergency numbers cannot be dialled if the keypad/display lock is activated!
Use only rechargeable batteries that correspond to the specification (see list of permitted batteries www.gigaset.com/service
rechargeable) battery or other battery types as this could result in significant health
risks and personal injury. Rechargeable batteries, which are noticeably damaged, must
be replaced.
The handset must not be operated if the battery cover is open.
Do not use the devices in environments with a potential explosion hazard
(e.g. paint shops).
The devices are not splashproof. For this reason do not install them in a damp environment such as bathrooms or shower rooms.
Use only the power adapter indicated on the device.
Whilst charging, the power socket must be easily accessible.
Remove faulty devices from use or have them repaired by our Service team, as these
could interfere with other wireless services.
Do not use the device if the display is cracked or broken. Broken glass or plastic can
cause injury to hands and face. Send the device to our Service department to be
repaired.
Do not hold the rear of the handset to your ear when it is ringing or when speaker
mode is activated. Otherwise you risk serious and permanent damage to your hearing.
The phone may cause interference in analogue hearing aids (humming or whistling) or
cause them to overload. If you require assistance, please contact the hearing aid supplier.
Using your telephone may affect nearby medical equipment. Be aware of the technical
conditions in your particular environment, e.g. doctor's surgery. If you use a medical
device (e.g. a pacemaker), please cont act the device manufacturer. They will be able to
advise you regarding the susceptibility of the device to external sources of high frequency energy (for the specifications of your Gigaset product see "Specifications").
Safety precautions
). Never use a conventional (non-
7
Page 8
Getting started
Getting started
Contents of the package
• one base
• one power adapter
• one handset
• one phone cable
• two batteries
• one battery cover
• one user guide
If you have purchased a model with multiple handsets, the package should contain two
batteries, a battery cover and a charging cradle with power adapter for each additional handset.
Pos iti on th e ba se on a le vel, non- sli p sur fa ce at a cen tra l poi nt i n the flat or h ouse . You
can also
fit the base to a wall.
The range of the base is 300 metres outdoors and 50 metres indoors.
The base and the charging cradle are designed for use in enclosed, dry rooms within
a temperature range of +5 °C to +45 °C.
The device's feet do not usually leave any marks on surfaces. However, due to the
multitude of different varnishes and polishes used on furniture, contact marks on the
surfaces cannot be completely ruled out.
Never expose the telephone to heat sources, direct sunlight or other electrical
devices.
Protect your telephone from moisture, dust, corrosive liquids and vapours.
8
Page 9

Getting started
1
2
A170/A270
2
1
A170A/A270A
1
2
1
2
A170/A270
1
A170A/A270A
1
2 2
1
2
3
4
123
4
Connecting the base to power supply and telephone network
¤ Connect the power adapter .
¤ Connect the phone jack and insert the cables into the cable channels.
The power adapter must alw
a power supply.
The answer machine (A170A/A270A only) will not be ready for operation until
approximately 30 seconds after the base has been connected.
ays be connected as the phone does not work without
Connecting the base to the router
You can also operate the telephone on the analogue connection of a router.
¤ Connect the phone jack and connect it to the analogue port of a router .
Any echoes can be reduced by switching on Echo mode ( p. 32).
Connecting the charging cradle (if supplied)
¤ Connect the flat plug of the power
adapter .
¤ Plug the power adapter into the
power socket .
If you have to remove the plug from the
charging cradle again:
release button and disconnect the
plug .
Press the
9
Page 10

Getting started
6.5
h
Setting up the handset for use
The display is protected by a plastic film. Please remove the protective film!
Inserting the batteries
Only use rechargeable batteries, as this could otherwise result in significant health
risks and personal injury. For example, the outer casing of the batteries could be
destroyed or the batteries could explode. The device could also malfunction or be
damaged as a result of using batteries that are not of the recommended type.
¤ Insert the batteries with
the polarity in the correct
direction.
The polarity is indicated in
the battery compartment.
¤ Insert the battery cover
from the top.
¤ Then slide the cover
upwards until it clicks
into place.
To open the battery cover, for
instance to replace the batteries:
¤ Reach into the notch
at the top of the cover
and slide the cover
down-wards.
Charging the batteries
¤ Charge the batteries fully prior to first use in the base or
the charging cradle.
The batteries are fully charged when the battery icon on
the display stops flashing.
Batteries may heat up during charging. This is not dangerous.
After a time, the charging capacity of the batteries will decrease for technical reasons.
Handsets contained in the package have already been registered to the base. If,
however, a handset has not been registered (Register HS or Put into base is displayed),
please register it manually ( p. 23).
Changing the display language
You can change the display language, if the telephone has been set to an incomprehensible
language.
¤ MENU Press the keys slowly in succession . . . the language set
(e. g. English) is displayed
¤ To select a different language: Press the control key until the language required is
selected on the display, e. g. Francais OK ( = selected)
10
Page 11
Getting started
973 SET: [0]
973 SET: [2]
Setting time and date
Set the date/time so that the correct date and time can be assigned to incoming calls, and to
enable the alarm to be used.
¤ MENU Settings OK Date/Time OK Enter the date in 8 digits (day, month
and year) OK Enter the time in 4 digits (hours and minutes) OK (Display: Saved)
Moving the input position to the left or the right:
Press up or down on the control key
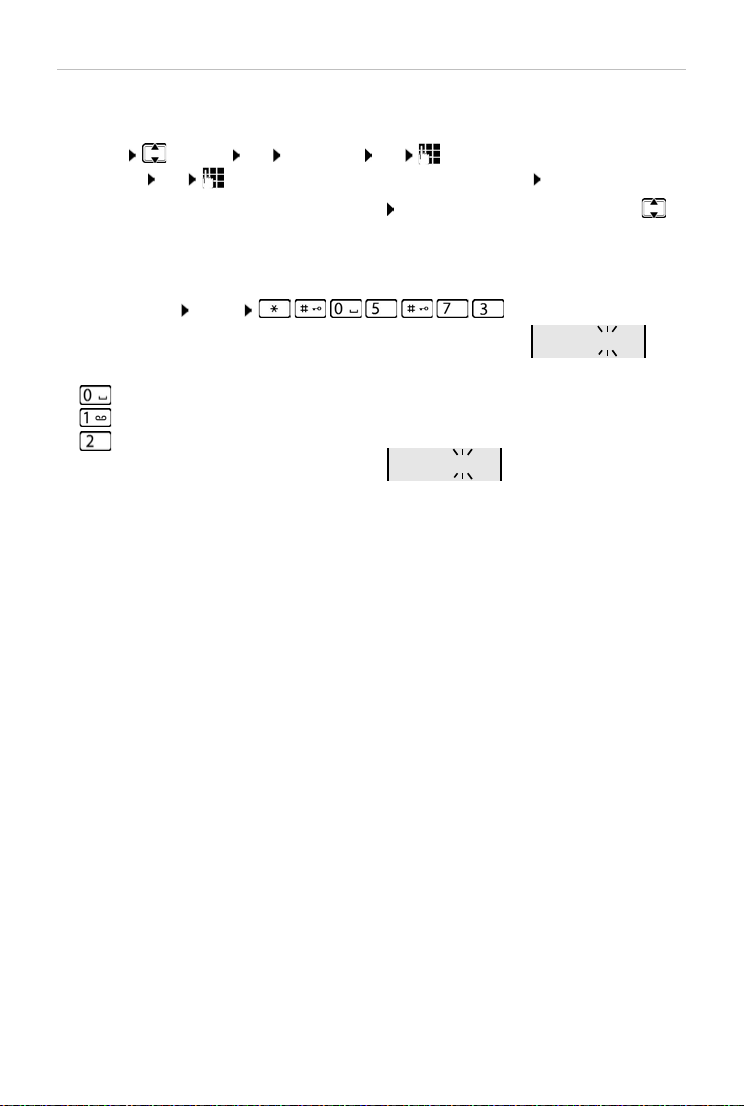
Copying the date and time
If your telephone is sent the date and time in a caller display (for example by your network
operator, a router or a PABX) you can specify whether and when this data should be copied.
¤ Press the keys: MENU
. . . You will see the following displayed; the current setting flashes, e.g.
¤ Press the key to determine when the data is copied:
never or
once, if the date and time are not set in your telephone or
always
. . . You will see your selection (e.g. 2 f
or 'always'):
¤ Press the display key OK.
11
Page 12

Operating the handset
MENU
Operating the handset
Switching the handset on and off
¤ Press and hold the End call key
When you place a switched-off handset into the base or the charging cradle, it switches on
automatically after about 30 seconds.
When the handset is removed from the base/char
Locking/unlocking the keypad
¤ Press and hold the hash key .
Display keys and functions
¤ Press the display key . . . The function shown above it on the display is accessed.
Display Meaning on keypress
INT Call ano
MENU Open the main menu/submenu
OK Confirm menu function / save entry
Display functions accessed from the control key
ther handset internally
Back one menu level
Delete previous character
ging cradle, the display switches off briefly.
Display Meaning on keypress
Use
to scroll up/down and to set the volume
Move the cursor left and right with
Menu navigation
Your phone has many functions, and they are available to you from menus.
Select menu function:
¤ When the telephone is in idle status press the display key MENU . . . the menu is opened.
¤ Use the control key to scroll to the desired function Confirm with OK.
Return to idle status: Press and hold the key .
12
Page 13
Making calls
Making calls
Making a call
¤ Enter the number Press the Talk key . . . The number is dialled
or
¤ Press and hold the Talk key . . . The dial tone can be heard Enter the number
To change the receiver volume during a call: Use
To end call / cancel dialling: Press the End call key
Provide every number automatically with a netw
ork provider prefix: p. 15
Dialling from the directory
¤ Open the directory with Use to scroll to the desired entry.
¤ Press the Talk key
Dialling from the call list
Opening the call list: MENU Messages CallsList 01+02 OK
¤ Select entry
Dialling from the redial list
The list contains the 10 numbers last dialled with the handset.
¤ Press briefly Select entry
to set the volume
Managing entries in the redial list
¤ Press briefly Select entry MENU Select function OK
Possible functions: U
se Number / Copy to Dir. / Delete Entry / Delete List
Accepting a call
¤ Press the Talk key .
Func tion Auto Answer enabled: Simply take the handset out of the base/charging cradle
Enabling function Au
to Answer:
¤ MENU Settings OK Handset OK Auto Answer OK
( = activated)
13
Page 14

Making calls
Caller display
During a call, the caller's number is transferred (CLI = Calling Line Identification) and may be
displayed on the recipient's display (CLIP = CLI presentation). If the caller's number is withheld,
it will not be displayed to the recipient. The call is made anonymously (CLIR = CLI Restriction).
You have authorised your network provider to show the number of the caller (CLIP)
on your display.
The caller has authorised the network provider to send the phone number (CLI).
Caller display for incoming calls
Calling Line Identification
The caller's phone number is displayed. If the caller's number is saved in the directory, the name
is displayed.
No Calling Line Identification
Instead of name and number, the following is displayed:
• External call: No number has been transferred.
• Withheld: Caller has withheld Calling Line Identification.
• Unavailable: Caller has not requested Calling Line Identification.
Handsfree mode (A270/A270A only)
In handsfree mode, you switch on the loudspeaker so that you can hear the caller without
holding the handset to your ear. During a call and when playing back the answer machine
(Gigaset A270A only) you switch handsfree mode on or off by pressing the Handsfree key .
Adjusting the loudspeaker volume:
¤ MENU Audio Settings OK Handset Volume OK Speaker OK
to adjust the loudspeaker volume OK
Use
14
Page 15

Making calls
Example:
Presel. Number 0999
With Preselect 08
Without Presel 081084
Number Selected number
07112345
¥ 07112345
08912345
¥ 0999 08912345
08412345
¥ 08412345
All numbers beginning
with 08, with the exception
of 081 and 084, are dialled
using preselection number
0999.
Automatic network provider selection (Preselection)
You can store a Call-by-Call number (preselection number), which automatically prefixes the
number you dial. If you want to make a call to a different country through a particular network
provider, for example, you can store their number here.
Create a list with prefix numbers or with the first digits of prefix numbers which are preceded by
the
preselection number. If required, create a list of numbers which are treated as exceptions, i.e.
are not preceded by the preselection number.
Entering a preselection number
¤ MENU Settings OK Base OK Preselection OK Presel.
Number OK Enter a number or copy a number from the directory OK
Creating a list of prefix numbers which are dialled with preselection
¤ MENU Settings OK Base OK Preselection OK With
Preselect OK Select list entry (1 – 11) Enter the prefix number or the first
digits of a prefix number with which the preselection number is to be used OK if
necessary, select another list entry and enter further numbers
Creating a list of prefix numbers which are dialled without preselection
¤ MENU Settings OK Base OK Preselection OK Without
Presel OK Select list entry (1 – 11) Enter exceptions for the list With
Preselect OK if necessary select another list entry and enter further numbers
Cancelling preselection for the current call
¤ Press and hold MENU Preselect off OK Enter a number or copy
a number from the directory . . . The number is dialled without preselection.
Deactivating preselection permanently
¤ MENU Settings OK Base OK Preselection OK Presel.
Number OK Delete preselection number with the Display key OK
15
Page 16

Directory
Directory
The local directory is unique to the handset. However, it is possible to send entries to other
handsets ( p. 16).
To open the directory:
Phone numbers (max. 22 digits) with associated na
Saving a number to the directory
Entering letters/characters ( p. 38).
First entry:
¤ New Entry? OK Enter the number OK Enter the name OK
More numbers:
¤ MENU New Entry OK Enter the number OK Enter the name OK
Selecting a directory entry
¤ Open the directory with .
¤ Use to scroll to the entry until the required name is selected.
or
¤ Enter the first character of the name scroll as required with to the entry.
Transferring a directory/directory entry to another handset
The sending and receiving handset must both be registered to the same base.
The other handset and the base are able to send and receive directory entries.
Press down on the control key
mes (max. 14 characters) can be stored.
Transferring a directory entry to another handset
¤ Select entry MENU Send Entry OK Enter the internal number
of the receiving handset OK
Transferring a directory to another handset
¤ MENU Send List OK Enter the internal number of the receiving
handset OK
16
Page 17

Message/call lists
CallsList 01+02
Additional functions
The following functions are available for working with directory entries or whole directories:
Show Number Display the number of the directory entry selected
Show Name Display the name of the directory entry selected
Edit Entry Edit the number or name of the directory entry selected
Use Number Dial numbers
Shortcut Allocate a number from the directory to a key for quick dial ( p. 27)
Delete Entry Delete the selected entry
Delete List Delete the entire directory
¤ if necessary select entry MENU Select function OK
Message/call lists
The telephone saves information about various events in lists:
• Call list: numbers of all incoming or missed calls
• Answer machine list (A170A/A270A only): messages on the answer machine
• Network mailbox list: messages on the network mailbox
An advisory tone sounds as soon as a new en
messages is shown on the display.
If calls are stored in the network mailbox, you receive a message when the setting is
c
onfigured (dependent on the network provider).
try appears on one of the lists. The message New
Call list
Prerequisite: CLIP ( p. 14)
Depending on the list type setting, the call lis
incoming or missed calls.
t contains the numbers of the most recent
Setting the list type
¤ MENU Settings OK Base OK Call list type OK Missed Calls /
All Calls OK ( = selected)
Opening the call list
¤ MENU Messages OK CallsList
Information on the call list is displayed:
CallsList Num
To open the list:
ber of new entries + number of old, read entries
Press the display key OK . . . The most recent incoming call is displayed
¤ if necessary use to select another entry
17
Page 18

Message/call lists
Using other functions
¤ Select entry MENU
Possible functions: Delete Entry / Copy to Dir. / Date/Time / Status / Delete List
Calling back a caller from the call list
¤ MENU Messages CallsList 01+02 OK Select entry
Answer machine list (A170A/A270A only) / network mailbox list
You can use the answer machine list/network mailbox list to play back messages stored on the
answer machines.
Open the answer machine list:
¤ MENU Messages OK Ans.Mach. OK
Answer machine ( p. 19)
Open the network mailbox list:
¤ MENU Messages OK Netw.MBX OK
Network mailbox ( p. 23)
18
Page 19

Local answer machine (A170A/A270A only)
Local answer machine (A170A/A270A only)
Either the handset or the keys on the base are used to personalise settings on and operate the
answer machine ( p. 5).
Setting up the answer machine
The answer machine has been preset with default settings. You can change the settings.
Recording your own announcement
¤ MENU Answer Machine OK Announcements OK Rec announce
OK Speak after OK OK
You hear the ready tone (short tone).
¤ Record the announcement (min. 3 seconds) and confirm with OK
Cancel with or
or:
After the recording, the announcement is played back for you to check.
Recording ends automaticall y if the
is a break in speech for more than 2 seconds.
Playing back the announcement:
¤ MENU Answer Machine OK Announcements OK Play
announce
Deleting the announcement:
OK
¤ MENU Answer Machine OK Announcements OK Del announce
OK
maximum recording time of 170 seconds is reached or there
Changing the settings
¤ MENU Answer Machine OK Select the setting you want to change
Time to Auto Answer
¤ Ring Delay OK Immediately / 10 sec / 18 sec / 30 sec / Auto OK
Auto: the answer machine answers a call:
• after 18 seconds if there are no new messages.
• after 10 seconds if there are new messages.
Select Auto when you want to retrieve messages while you are out. With remote
access (
call costs are incurred if the call is ended immediately.
Recording time:
p. 22) it is apparent after 10 seconds that there are no new messages. No
¤ Message Length OK Maximum / 1 Minute / 2 Minutes / 3 Minutes OK
19
Page 20

Local answer machine (A170A/A270A only)
Ans.Mach.01+02
Call screening during recording:
¤ CallScreening OK Handset (A270 only) / Base OK ( = activated)
Switching off call screening for the current recording:
¤ Press the End call key .
Setting a different language (if available)
You can change the voice prompt language and language of the standard announcement.
¤ MENU Answer Machine OK Language OK Select language OK
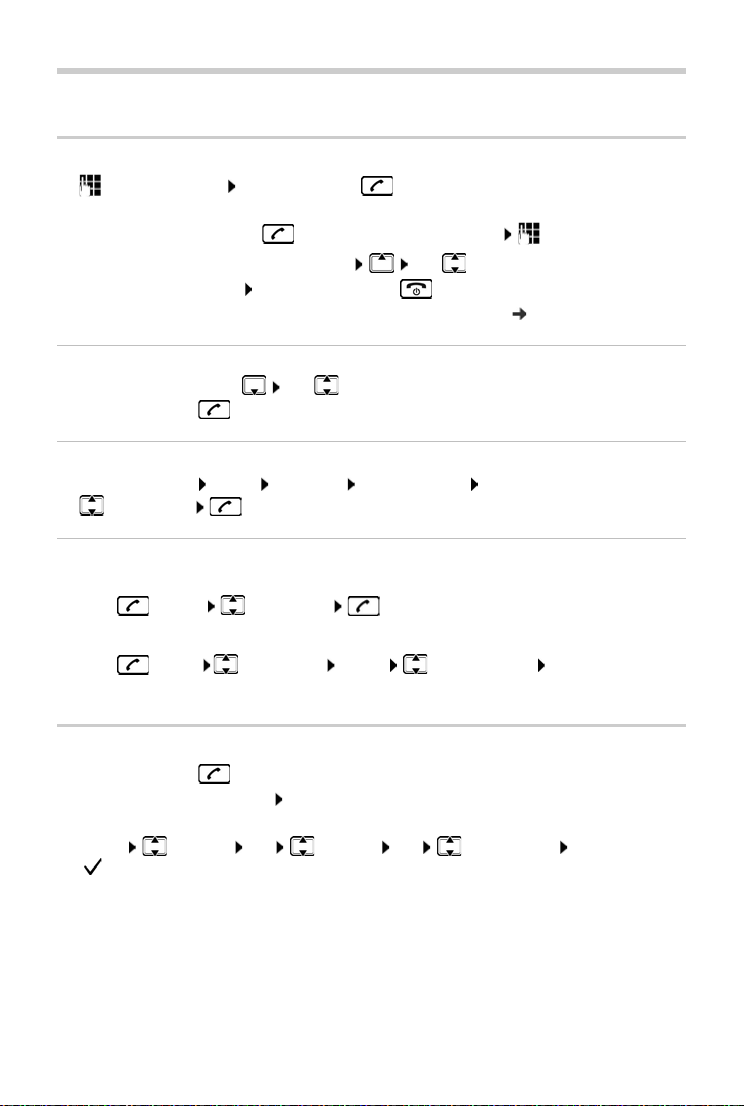
Operation using the handset
Activating/deactivating the answer machine
¤ MENU Answer Machine OK Answer Mach. OK ( = activated)
If the answer machine is switched on, the display shows the icon .
If the memory is full, the display shows Memory full! and the answer machine
switches off automatically. Delete old messages so that it switches on again
automatically.
Playing back messages
¤ Press and hold the key ( Key 1 is allocated to the answer machine p. 29)
or
¤ MENU Answer Machine OK Play Messages OK
¤ If the network mailbox is set up: Answer Mach. OK
or
¤ MENU Messages OK Ans.Mach. OK
The answer machine list is shown as follows:
Number of new messages + number of old entries which have already been played back
If there are new messages, playback starts with the first new message, otherwise with the first
old message.
Gigaset A270A only: The handset loudspeaker switches on automatically.
Switch off the loudspeaker:
Press the Handsfree key
A message consists of two parts:
• an info block, consisting of the number, date, time and
• the content (spoken text).
First the info block is played, then the content. The display shows the caller's number or the
ller's name.
ca
20
Page 21

Local answer machine (A170A/A270A only)
Actions during playback
Stop playback: ¤
Continue playback:
Go to the next message:
During playback of the info block
Go to the start of the previous message:
Skip the information block:
During playback of the content
Go to the start of the current message:
Go to the content of the next message:
Call back a caller: ¤ MENU Dial Number OK
Change volume:
Copy a number to the directory:
Delete a single message:
Delete all old messages:
¤ press again
or
MENU Continue
¤ or
¤ or
¤
¤ or
¤
¤ MENU Handset Volume OK
¤ MENU Copy to Dir. OK
¤ or press the display key
¤ MENU Delete all old OK
Confirm the security prompt
Picking up a call from the answer machine
Even if the answer machine has already answered or is recording a call, you can still take it:
¤ Press the Talk key
or
¤ Remove the handset from the base/charging cradle ( Auto Answer is activated p. 13)
or
¤ MENU Accept OK
Recording stops and you can speak to the caller.
Gigaset A270A only:
If CallScreening via the handset is switched on ( p. 28) and the call can already be
heard through the handset, you can only take the call with MENU Accept
OK. Pressing the Talk/handsfree key only switches handsfree mode on and off.
21
Page 22

Local answer machine (A170A/A270A only)
Operation when on the move (remote operation)
You can check and activate your answer machine from any other telephone (hotel, pay phone
etc.).
The system PIN is not 0000 ( p. 30).
he other telephone has tone dialling (DTMF).
T
Switching on the answer machine
¤ Call the telephone connection and let it ring until the announcement "Please enter your PIN"
(approx. 50 seconds) . . . Use to enter the telephone's system PIN within 10 seconds . . .
The answer machine is switched on, the remaining memory is announced, messages are
played back
Checking the answer machine
The answer machine is activated.
¤ Call the telephone connection . . . press key during the announcement . . . the
announcement is interrupted enter the system PIN
The answer machine is operated using the following keys:
During playback of the info block: Skip to previous message.
During message playback: Go to the start of the current message.
Pause playback. Press again to resume.
After a pause of approx. 60 seconds, the connection is ended.
Go to the next message.
During message playback: Delete current message.
22
Page 23

Network mailbox
Network mailbox
The network mailbox has been requested from the network provider.
Entering the number of the network mailbox
¤ MENU Answer Machine OK Netw. Mailbox Enter the number OK
Playing back messages
From the menu:
From key 1:
From the message list:
¤ MENU Answer Machine OK Play Messages OK
A170A/A270A: Netw. Mailbox OK
¤ Press and hold ( Key 1 is allocated to the answer machine
p. 29)
¤ MENU Messages OK Netw.MBX OK
Using handsets
Locating a handset – "Paging" (A170A/A270A only)
You can locate your handset using the base.
¤ Briefly press the Registration/paging key on the base ( p. 5).
All registered handsets will ring
off.
Exit:
¤ Briefly press the Registration/paging key on the base
or
¤ press or on one handset
at the same time ("paging"), even if the ringtones are switched
Registering a handset
You can register up to four handsets to your base. Handsets supplied with a base are already
registered to that base. Each additional handset must be registered to the base.
Registering by placing the handset in the base
¤ Place the handset in the base . . . The display Registering indicates that the handset has been
automatically registered
This registration procedure can only be carried out on the A170H / A270H handsets.
23
Page 24

Using handsets
Registering through a menu (on A170A/A270A only)
Registration must be initiated both on the base and on the handset. Both must be
carried out within 60 seconds.
On the handset
¤ MENU Settings OK Handset OK Register HS Enter the system
PIN for the base (default setting: 0000) OK The display shows Registering.
On the base
¤ Within 60 seconds after entering the system PIN press and hold the Registration/paging key
( p. 5) (at least 3 seconds).
The registration process takes approximately 1 minute. The handsets are assigned the
lowest free internal number (1-4). If the numbers 1-4 have already been allocated to
other devices, number 4 is overwritten.
De-registering the handset
You can de-register any other registered handset from any registered Gigaset handset.
¤ MENU Settings OK Handset OK De-register HS OK Select
the internal participant to be de-registered.
The handset you are operating is marked with < OK Enter the system PIN for the base
(default setting: 0000) OK . . . Put into base flashes in the display, the handset has been
de-registered
Making internal calls
Making internal calls
Internal calls are cost-free calls to other handsets registered to the same base.
Calling a specific internal participant:
¤ INT if more than two handsets are registered: use to select an internal participant or
use to enter the internal number of a handset
¤ OK or . . . The handset selected is called
Calling all handsets ("group call"):
¤ INT
or
¤ INT Call all
¤ OK or . . . All registered handsets are called. You speak to the first internal participant
to pick up.
24
Page 25

Using handsets
Ending the internal call:
¤ Press the End call key .
Making an internal consultation call / transferring a call
Call an external participant and transfer the call to an internal part icipant or hold a consultation
call with him or her.
¤ INT if necessary, select a handset or Call all OK . . . The internal participant(s) is/are
called, the external participant hears music on hold . . . possible options:
Hold a consultation call:
¤ speak to the internal participant
Return to the external call:
¤ Press the Display key
Transfer the external call when the internal participant has answered:
¤ Announce an external call Press the End call key
Transfer the external call before the internal participant answers:
¤ Press the End call key . . . The external call is forwarded immediately.
Listening in to an external call
You are conducting an external call. An internal participant can listen in to this call and take part
in the conversation (conference).
The Listening in function is activated.
Activating/deactivating internal listening in
¤ MENU Settings OK Base OK Listening in OK ( = activated)
Initiating an internal conference call
You want to join an existing external call.
¤ Press and hold the Talk key . . . All participants hear a signal tone
Ending a conference call:
¤ Press the End call key . . . All participants hear a signal tone
When the first internal participant presses the End call key , the handset which joined the
conference call remains connected to the external participant.
25
Page 26

Additional functions
Additional functions
Alarm clock
Date and time have been set.
Switching the alarm clock on and off
¤ MENU Alarm Clock OK Activation OK ( = activated)
¤ Enter the wake-up time in hours and minutes OK
Alarm clock enabled: the alarm clock icon and wake-up time are displayed instead of the
date.
Deactivating the wake-up call
An alarm is shown on the display and indicated by the selected ringtone melody ( p. 28).
¤ Press any key . . . The alarm call is deactivated for 24 hours
Setting the wake-up time
¤ MENU Alarm Clock OK Wake -up time OK Enter the wake-up time
in hours and minutes OK
ECO DECT
During a call, the wireless power automatically adjusts to the distance between the handset and
the base. The shorter the distance, the lower the wireless power (radiation).
When the phone is in idle status, the wireless power of the handset is switched off. The base
maintains c
These wireless signals are also deactivated with the No R
¤ MENU Settings OK Base OK ECO DECT OK No Radiation
ontact with the handset with only low wireless signals.
adiation setting.
= radiation is deactivated, icon top left on the display)
OK (
All registered handsets must support this feature.
For speedy set-up of connections for incoming calls, the handset keeps switching to
“ready to receive” momentarily. This increases the power consumption and so
reduces the standby and talk times.
26
Page 27

Additional functions
Quick dial
You can assign entries from the directory to keys 2 to 9.
Dialling quick dial numbers
¤ Press and hold the quick dial key to which the required number is assigned
Assigning Shortcut keys
¤ Select entry MENU Shortcut OK
¤ Select key OK
or
¤ Press the key to which the entry is to be saved
27
Page 28

Telephone settings
Telephone settings
Call volume
The receiver volume can be set at 5 levels.
A170H:
¤ MENU Audio Settings OK Handset Volume OK Select volume
( = selected)
A270H:
¤ MENU Audio Settings OK Handset Volume Earpiece / Speaker
OK Select volume ( = selected)
Ringtones
Activating/deactivating the ringtone
¤ MENU Audio Settings OK Ring Tones OK ( = activated)
Ringtone volume (ringer volume)
Adjust the volume of the ringtone on 5 levels or select the Crescendo tone.
Handset:
¤ MENU Audio Settings OK Ringer Volume OK Select volume or
Crescendo ( = selected)
A170A/A270A base:
¤ MENU Settings Base Audio Settings OK Ringer Volume OK
Select volume or Crescendo ( = selected)
Ringtone melody
Set the ringtone melody for external calls, internal calls and/or the alarm.
Handset:
¤ MENU Audio Settings OK Ringer Melody OK External Calls /
Internal Calls
A170A/A270A base:
/ Alarm Clock OK Select required ringtone ( = selected)
¤ MENU Settings Base Audio Settings OK Ringer Melody OK
Select required ringtone ( = selected)
28
Page 29

Telephone settings
Enabling/disabling advisory tones and the battery warning tone
The handset provides acoustic notification of different activities and statuses.
Advisory tone: e.g.: keypress tones, error tone, new message
Battery warning tone: The battery charge status falls below a certain level during a call.
You can activate or deactivate the advisory, battery warning and ringtones separately.
¤ MENU Audio Settings OK AdvisoryTones / Battery Low / Ring Tones OK
( = activated)
Display language
¤ MENU Settings OK Handset OK Language OK Select
language OK
The current language is marked with .
If you accidentally choose a language you do not understand:
¤ MENU Press the keys one after the other Select
language OK
Music on hold
You can choose whether an external caller hears music on hold during an internal consultation
or when a call is being forwarded.
¤ MENU The digit for the current setting flashes:
0 = deactivated; 1 = activated Enter digit OK
Key 1
It is possible to call a network mailbox or the telephone's local answer machine (A170A/A270A)
directly by pressing key .
Settings for fast access are handset-specific. A different answer machine can be
assigned to key on each registered handset.
A170/A270: The network mailbox is automatically linked to the key.
¤ MENU Answer Machine OK Set Key 1 OK Answer Mach. / Net
Mailbox OK ( = selected)
29
Page 30

Telephone settings
System PIN
Changing the system PIN
¤ MENU Settings OK Base OK System PIN OK Enter the
current 4-digit system PIN (default setting: 0000) OK Enter the new 4-digit system
PIN OK
Resetting the system PIN (A170A/A270A only)
Resetting the base to the original PIN 0000:
¤ Unplug the network cable from the base Press and hold the Registration / paging key on
the base At the same time reconnect the network cable to the base Press and hold the
key for at least 5 seconds . . . The base is reset and the system PIN is set to 0000
All handsets are de-registered and must be re-registered. All settings are returned to
default settings.
Repeater support (A170A/A270A only)
You can use a Repeater to increase the range of your base. To do this, you need to activate the
repeater function on the base and register the repeater ( user guide of the repeater).
¤ MENU Settings OK Base OK Additional OK Repeater OK
( = activated)
Repeater support and the mode No Radiation ( p. 26) are mutually exclusive.
30
Page 31

Telephone settings
Resetting the system
Resetting the base
A reset disables the mode No Radiation, resets individual settings and deletes all the lists.
The time and date are not affected. The answer machine (A1
for operation until approximately 15 seconds after the reset.
Resetting the base via the menu
The handsets remain registered. The system PIN is not reset.
70A/A270A only) will not be ready
¤ MENU Settings OK Base OK Base Reset OK Reset? OK
Resetting the base using a key on the base (A170A/A270A only)
All handsets are de-registered. The system PIN is set back to the original code 0000.
¤ Unplug the network cable from the base Press and hold the Registration /paging key
( p. 5) on the base At the same time reconnect the network cable to the base Press
and hold the key for at least 5 seconds
Resetting the handset
You can reset individual settings. Entries in the directory and call list, and the handset’s
registration to the base, are preserved.
¤ MENU Settings OK Handset OK Reset Handset OK Reset?
OK
To cancel the reset:
31
Page 32

Telephone settings
Operating the base with a PABX/router
Operation with a router
When operating on the analogue connection of a router, echoes potentially occurring can be
reduced by enabling Echo mode.
¤ MENU Settings OK Base OK Additional OK Echo mode OK
( = activated)
If there are no problems with echoes, this function should be deactivated.
Operation with a PABX
The following settings are only necessary when your PABX requires them; refer to the PABX user
guide. Enter the digits slowly one after the other.
Changing the dialling mode
¤ MENU The digit for the set dialling mode flashes:
0 = Tone dialling (DTMF); 1 = Pulse dialling (PD) Enter digit OK
Setting the flash time
¤ MENU The digit for the current flash time flashes:
0 = 80 ms; 1 = 100 ms; 2 = 120 ms; 3 = 400 ms; 4 = 250 ms; 5 = 300 ms; 6 = 600 ms;
7 = 800 ms Enter digit OK
Changing pause after line seizure
You can set the length of the pause inserted between pressing the Talk key and sending
the phone number.
¤ MENU The digit for the current pause length
flashes: 1 = 1 sec.; 2 = 3 sec.; 3 = 7 sec. Enter digit OK
Changing pause after recall key
¤ MENU The digit for the current pause length
flashes: 1 = 800 ms; 2 = 1600 ms; 3 = 3200 ms Enter digit OK
32
Page 33

Customer Service & Assistance
Australia - - - - - - - - - - - - - - - - - - - +61 1300 780 878
Austria - - - - - - - - - - - - - - - - - - - - -0043 1 311 3046
Bahrain - - - - - - - - - - - - - - - - - - - - - - - - 31 73 11 173
Belgium - - - - - - - - - - - - - - - - - - - - - - - -07815 6679
Bosnia Herzegovina - - - - - - - - - - - - - - 033 276 649
Brazil
Grandes Capitais e Regiões Metropolitanas:
- - - - - - - - - - - - - - - - - - - - - - - - - - - - - - - - 4003 3020
- - - - - - - - - - - - - - - - - - -(Preço de uma ligação local)
Demais localidades:
- - - - - - - - - - - - - - - - - - - - - - - - - - - - 0800 888 3020
- - - - - - - - - - - - - - - - - - - - - - - - - - - - - - - - - (Gratuito)
Bulgaria - - - - - - - - - - - - - - - - - - - - +359 2 9710666
Canada - - - - - - - - - - - - - - - - - - - - - 1-866 247-8758
China - - - - - - - - - - - 0 21 400 670 6007 (RMB 0.11)
Croatia - - - - - - - - - - - - - - - - - - - - - - - 01 / 2456 555
Czech Republic- - - - - - - - - - - - - - - - - - 233 032 727
Denmark - - - - - - - - - - - - - - - - - - - - +45 43682003
Finl and - - - - - - - - - - - - - - - - - - +358 (0)9725 19734
Fran ce- - - - - - - - - - - - - - - - - - - - - - (0)1 57 32 45 22
Germany- - - - - - - - - - - - - - - - - - - - 02871 / 912 912
Greece - - - - - - - - - - - - - - - - - - - -+30 2111 98 1778
Hong Kong - - - - - - - - - - - - - - - - - - - - - - -2763 0203
- - - - - - - - - - - - - - - - - - - - - - - - - - - - - - - - -2389 7285
Hungary - - - - - - - - - - - - - - - - - - - - - 06(1)267-2109
India - - - - - - - - - - - - - - - - - - - - - -Please refer to your
- - - - - - - - - - - - - - - - - - - - - - - - - - local warranty card
Indonesia - - - - - - - - - - - - - - - - - - - (62-21) 5673813
- - - - - - - - - - - - - - - - - - - - - - - - -(62-21) 888856000
Ireland - - - - - - - - - - - - - - - - - - - - - - - 0818 200 033
Italy - - - - - - - - - - - - - - - - - - - - - - - - -02.600.630.45
(il numero è di tipo “urbano nazionale” e può essere
chiamato da qualunque operatore di rete fissa o
mobile. Il costo della chiamata è inerente al proprio
piano tariffario definito con l’operatore telefonico, ad
esempio in caso di un contratto con tariffa FLAT, non
ci sono costi aggiuntivi per la chiamata a questo
numero, in quanto si tratta di un numero urbano
nazionale).
Jordan - - - - - - - - - - - - - - - - - 00962 6 5625460/1/2
Kuwait - - - - - - - - - - - - +965 -22458737/22458738
Lebanon - - - - - - - - - - - - - - - - - - - - - +9611240259/
- - - - - - - - - - - - - - - - - - - - - - - - - - - - - +9611236110
Luxembourg - - - - - - - - - - - - - - - (+352) 8002 3811
Malaysia - - - - - - - - - - - - - - - - - - - - +603-8076 9696
Malta - - - - - - - - - - - - - - -+39 02360 46111 (0,10 €)
Mexico
- - - - - -01800 999 4442738 (01800 999 GIGASET)
Netherlands - - - - - - - - - - - - - - - - - - 0900-3333102
New Zealand - - - - - - - - - - - - - - - - - - 0800 780 878
Norway- - - - - - - - - - - - - - - - - - - - - - +47 2231 0845
Oman - - - - - - - - - - - - - - +968 70928 Ext. 49/21/75
Polan d - - - - - - - - - - - - - - - - - - - - - - - - 801 140 160
Port ugal - - - - - - - - - - - - - - - - - (+351) 308 804 760
- - - - - - - - - - - - - - - - -(custo de uma chamada local)
Romania- - - - - - - - - - - - - - - - - - -+40 021 204 9130
Russia - - - - - - - - - - - - - - - - - - - - - - -8-800 333 4956
Serbia
- - - - - - - - - - - - - - - - - - - - - - - - 0800 222 111
Si
ngapore- - - - - - - - - - - - - - - - - - - - - - - - 6735 9100
Slovak Republic - - - - - - - - - - - - - - - - 044 5567 988
Slovenija- - - - - - - - - - - - - - - - - - -+386 (1) 5466 511
South Africa - - - - - - - - - - - - - - - - - - - 0800 98 08 42
Spain - - - - - - - - - - - - - - - - - - - - - - - - - -902 103935
Sweden - - - - - - - - - - - - - - - - - - +46 (0)8502 52347
Switzerland - - - - - - - - - - - - - - - - - - - 0848 212 000
Tai wan - - - - - - - - - - - - - - - - - - - - - - - 02 266 24343
Turk ey - - - - - Son kullanıcı için +90 212 888 6346
Bayi için +90 212 888 6347
Ukraine- - - - - - - - - - - - - - - - - - +380-44-451-71-72
United Arab Emirates - - - - - - - - - - - +97144458255
- - - - - - - - - - - - - - - - - - - - - - - - - - - - +97144458254
United Kingdom- - - - - - - - - - - - - - - -020 36953111
USA - - - - - - - - - - - - - - - - - - - - - - - 1-866 247-8758
- - - - - - - - - - - - - - - - - - - - - - - - - - - - - - - - - - -tollfree
Customer Service & Assistance
Do you have any questions? As a Gigaset customer, you can find help quickly in this User Manual and in the
service section of our Gigaset online portal
In our constantly updated online service you can find:
• Extensive information about our products
• FAQ compilations
• Keyword search to help find topics quickly
• Compatibility database: Find out which base stations and handsets can be combined.
• Product comparison: Compare the features of several products with each other.
• Downloads for user manuals and current software updates
• E-mail contact form for customer service
In order to contact our customer service via email, please
portal after selecting your home country.
Our representatives are also available on the telephone hotlines for consultation.
www.gigaset.com/service.
use the email contact form from our Gigaset online
Please have your record of purchase ready when calling.
Replacement or repair services are not offered in countries where our product is not sold by authorised dealers.
33
Page 34

Customer Service & Assistance
Questions and answers
If you have any questions about the use of your telephone, please go to www.gigaset.com/service where help
is available at any time. Also, the following table lists frequently occurring problems and possible solutions.
Problem Nothing on the display.
Cause The handset is not switched on.
Solution Press the End call key for ab
Problem No wireless connection to the base, Ba
Cause The handset is outside the range of the base.
Solution Move the handset closer to the base.
The batteries are empty.
out 5 seconds or place the handset into the base.
Charge or replace the batteries.
se flashes on the display.
Handset is not yet registered.
The base is not switched on.
¥ Register the handset p. 23.
¥ Check the mains plug on the base p. 9.
Problem You cannot hear a ring or dial tone from the fixed line network.
Cause The phone cable supplied has not been used or it has been replaced by a new cable with
Solution
Problem Error tone sounds after system PIN prompt.
Cause You have entered the wrong system PIN.
Solution
e wrong pin connections.
th
¥ Please always use the telephone cable supplied or ensure that the pin connections are
correct when purchasing from a retailer: 3-4 assignment of phone wires / EURO CTR37.
PIN forgotten.
¥ Reset the system PIN to the default setting 0000 p. 30.
All the handsets are de-register
ed. All settings are reset. All lists are deleted.
Guarantee Certificate - United Kingdom and Ireland
Without prejudice to any claim the user (customer) may have in relation to the deal er or retailer, the customer
shall be granted a manufacturer’s Guarantee under the conditions set out below:
• In the case of new devices and their components exhibiting defects resulting from manufacturing and/or
material faults within 24 months of purchase, Gigaset Communications shall, at its own option and free of
charge, either replace the device with another device reflecting the current state of the art, or repair the
said device. In respect of parts subject to wear and tear (including but not limited to, batteries, keypads,
casing), this warranty shall be valid for six months from the date of purchase.
• This Guarantee shall be invalid if the device defect is attr ibuta ble to i mprop er care or use a nd/or failu re to
comply with information contained in the user manuals. In particular clai ms under the Guarantee cannot
be made if:
• The device is opened (this is classed as third party intervention)
• Repairs or other work done by persons not authorised by Gigaset Communications.
• Components on the printed circuit board are manipulated
• The software is manipulated
• Defects or damage caused by dropping, breaking, lightning or ingress of moisture. This also applies if
defects or damage was caused by mechanical, chemical, radio interference or thermal factors (e.g.: microwave, sauna etc.)
• Devices fitted with accessories not authorised by Gigaset Communications
• This Guarantee shall not apply to or extend to services performed by the authorised dealer or the cus-
tomer themselves (e.g. installation, configuration, software downloads). User manuals and any software
supplied on a separate data medium shall be excluded from the Guarantee.
34
Page 35

Customer Service & Assistance
• The purchase receipt, together with the date of purchase, shall be required as evidence for invoking the
Guarantee. Claims under the Guarantee must be submitted within two months of the Guarantee default
becoming evident.
• Ownership of devices or components replaced by and returned to Gigaset Communications shall vest in
Gigaset Communications.
• This Guarantee shall apply to new devices purchased in the European Union. For Products sold in the
United Kingdom and in the Republic of Ireland the Guarantee is issued by: Gigaset Communications UK
Limited, 2 White Friars, Chester, CH1 1NZ.
• Any other claims resulting out of or in connection with the device shall be excluded from this Guarantee.
Nothing in this Guarantee shall attempt to limit or exclude a Customers Statutory Rights, nor the manufacturer’s liability for death or personal injury resulting from its negligence.
• The duration of th e Guarantee shall not be extended by services rendered under the ter ms of the Guaran-
tee.
• Insofar as no Guarantee default exi sts, Gigaset Communications reserves the right to charge the customer
for replacement or repair.
• The above provisions do not imply a change in the burden of proof to the detriment of the customer.
To invoke this Guarantee, please contact the Gigaset Communications helpdesk. This number is also to be
found in the accompanying user guide.
Manufacturer warranty (Middle East)
On the purchase of your new Gigaset product, we guarantee that this equipment is a genuine manufacturer’s
product and extend the following warranty :
We guarantee this product against manufacturing defects for one full year from the date of purchase, unless
ified otherwise.
spec
Adaptors and batteries for cordless phones carry 6 months warranty from the date of purchase.
Gigaset Communications authorized Service Centres will replace or repair, if necessary, any defective part/
par
ts free of charge by presenting this certificate of warranty at the Service Centre mentioned overleaf.
This Certificate of warranty does not apply if the telephone has:
• Been misused, mishandled, willfull damaged, neglected, damaged by lightning, improperly repaired,
tested, altered improperly in any way.
• A defect arising out of any failure to follow instructions either in the manual or product specification.
• In case repairs are c arried out of by unauth orized personnel or una uthorized sourc e warranty will be void.
• A defect arising from using non-Gigaset approved accessories or ancillar y items attached to or in connec-
tion with the telephone.
• If this certificate of warranty is not signed and stamped by the authorised distributor.
• Any other claim resulting out of or in connection with the device shall be excluded from this warranty.
For Southern Africa:
In the event of an after-sales issue/warranty claim please refer back to your point of purchase.
Proof of purchase (receipt) has to be submitted.
Certificate of warranty (Middle East)
The warranty is not valid if it is not signed and stamped by the authorized distributor.
Please fill in the following details and stamp the card to validate the warranty.
All details must be filled in by the dealer and retained by the customer.
This warranty shall apply to products purchased in the Middle East only.
Customer’s Name:
Product / Model:
Dealer’s Name:
Date of Purchase: Invoice / Cash Memo Details:
Dealer’s Stamp
35
Page 36

Manufacturer's advice
Service Centres (Midde East)
UAE
Customer Service Hotline UAE
TEL: 00971-4-4458255 / 00971-4-4458254
Service Collection Point
https://technocare-prodigy.com/Customer
Oman
National Telephone Services Co. LLC
P.O. Box 2786 PC:112, Sultanate of Oman
Tel: +968-709281 Ext. 45/21/75
Fax: +968-791013
E-mail: isonts@omentel.net.om
Qatar
Modern Home,
51-East - Salwa Road,
Al-Maha Complex, Doha
Tel: 00974-4257844 / 00974-4257777
Fax: 00974-4314700
Bahrain
Authorized Service Center,
Bldg: 211, Rd: 339, Block: 321,
Old Place Road, Manama,
Tel: 00973-17311173
E-mail: servicemanager@ashrafs.com.bh
Saudi Arabian Service Centers:
Ahmed Abdulwahed Trading Co.
Jeddah Service Center
Al-Amal Plaza, Hail Street,
Jeddeh, Saudi Arabia,
Tel: 02-6500282 Ext. 209
Riyadh Service Center
Olaya Street
Riyadh, Saudi Arabia,
Tel: 01-4622470 / 4623850
Khobar Service Centre
Al-Khobar Street,
Al-Khobar, Saudi Arabia,
Tel: 03-8944193/03-8952359
Madina Munawara
Al-Ayon Street,
Tel: 00966-4-8387931
Khamis Mushyat
Al-Khalidiya St.,
Tel: 00966-7-2230772
Tabuk
Main Street,
Tel: 00966-4-4219232
Kuwait
Customer Service Hotline Kuwait
Tel: 00965-22458737 / 00965-22458738
Al-Baptain Service Center
Shop #: 247
Qibla, Block 11,
Avenue 11,
Souk al Kabeer,
Faha d Al Salem Street ,
Tel: 00965-2464993
Jordan
SEDR Home & office Electronics
Co - Tronicom
Wasfi Al-Tal St.,
Building No. 80,
2nd floor,
Tel: 00962-6-5625460/1/2
Lebanon
306, Jdeideh Sin el Fil Blvd,
Tel: 00961-1240259 / 00961-1236110
Manufacturer's advice
Authorisation
This device is intended for analogue phone lines in your network, outside the European Economic Area
(with the exception of Switzerland) depend
Country-specific requirements have been taken into consideration.
Hereby, Gigaset Communications GmbH d
A270A is in compliance with Directive 2014/53/EU.
The full text of the EU declaration of conformity is available at the following internet address:
www.gigaset.com/docs.
This declaration could also be available in the "Inter
Declarations of Conformity” files.
Therefore please check all of these files.
36
ing on national type approval.
eclares that the radio equipment type Gigaset A170-A170A / A270-
national Declarations of Conformity" or “European
Page 37

Manufacturer's advice
Environment
Our environmental statement
We at Gigaset Communications GmbH are aware of our social responsibility. That is why we actively take steps
to create a better world. In all areas of our business – from product planning and production to sales and waste
of disposal – following our environmental conscience in everything we do is of utmost importance to us.
Learn more about our earth-friendly products and processes online at
www.gigaset.com.
Environmental management system
Gigaset Communications GmbH is certified pursuant to the international st andards ISO 14001 and
ISO 9001.
ISO 14001 (Environment): C
GmbH.
ISO 9001 (Quality): C
ertified since September 2007 by TÜV SÜD Management Service
ertified since 17/02/1994 by TÜV SÜD Management Service GmbH.
Disposal
Batteries should not be disposed of in general household waste. Obser ve the local waste disposal regulations,
details of which can be obtained from your local authority.
All electrical and electronic products should be disposed
designated collection facilities appointed by the government or the local authorities.
For more detailed information about disposal of your old ap
centre or the original supplier of the product.
This crossed-out wheeled bin symbol on the pro
pean Directive 2012/19/EU.
The correct disposal and separate collection of your old
ative consequences for the environment and human health. I
cling of used electrical and electronic equipment.
of separately from the municipal waste stream via
duct means the product is covered by the Euro-
appliance will help prevent potential neg-
t is a precondition for reuse an d recy-
pliance, please contact your local council refuse
Care
Wipe the device with a damp cloth or an antistatic cloth. Do not use solvents or microfibre cloths.
Never use
a dry cloth; this can cause static.
In rare cases, contact with chemical substances can cause
variety of chemical products available on the market, it was not possible to test all substances.
Impairments in high-gloss finishes can be carefully removed using display polishes for mobile phones.
changes to the device’s exterior. Due to the wide
Contact with liquid
If the device comes into contact with liquid:
1 Disconnect the power supply.
Remove the batteries and leave the battery compartment open.
2
3 Allow the liquid to drain from the device.
4Pat all parts dry.
5 Pla ce th e devi ce in a dry , warm plac e for at least 72 hours ( not in a microwave, oven etc.) with the battery
compartment open and the keypad facing down (if applicable).
6 Do not switch on the device again until it is completely dry.
When it has fully dried out, you will normally be able to use it again.
37
Page 38

Technical details
1) Space
1x 2 x 3x 4x 5x 6x 7x 8x 9x 10x 11x 12x 13x 14x 15x
1£$¥¤
abc2дбавгз
def 3лйик
gh i4пнмо
jkl5
mn o 6 ö ñ ó ò ô õ
pqr s7ß
tuv8üúùû
wx y z 9 ÿ ýæøå
.,?!0+-:¿¡"’ ;_
*/( )<=>%
#@\ &§
1)
Technical details
Batteries
Technology: Nickel metal hydride (NiMH)
Size: AAA (Micro, HR03)
Voltage: 1.2 V
Capacity: 400 - 1000 mAh
General specifications
DECT standard supported
GAP standard supported (A170A/A270A only)
Radio frequency range 1880-1900 MHz
Range Up to 300 m outdoors, up to 50 m indoors
Power supply to base 230 V ~/50 Hz
Transmission power 10 mW average power per channel, 250 mW pulse power
Environmental conditions for operation +5 °C to +45 °C, 20 % to 75 % relative humidity
Power consumption of the base A170/A270 A170A/A270A
In standby mode
– Handset in charging cradle
– Handset away from charging cradle
During a call approx. 1.0 W approx. 1.2 W
approx. 1.0 W
approx. 0.8 W
approx. 1.2 W
approx. 1.0 W
Entering letters/characters
Standard characters
Press the relevant key several times.
Briefly press the Hash key # to switch from
mode “Abc” to “123”, from “123” to “abc” and
from “abc” to “Abc”.
38
Page 39

Index
A
Accepting a call . . . . . . . . . . . . . . . . . . . . . . . . 13
Activating
answer machine
answer machine (remote operation) . . . . . . . 23
internal listening in . . . . . . . . . . . . . . . . . . . 25
Answer . . . . . . . . . . . . . . . . . . . . . . . . . . . . . .13
Answer machine
remote operation
Answer machine list. . . . . . . . . . . . . . . . . . 13, 18
Authorisation . . . . . . . . . . . . . . . . . . . . . . . . . 36
Automatic network provider selection. . . . . . . . 15
B
Base
connecting
connecting to the router . . . . . . . . . . . . . . . . 9
restoring to default setting. . . . . . . . . . . 29, 31
setting . . . . . . . . . . . . . . . . . . . . . . . . . . . . 30
Battery
charging
charging status . . . . . . . . . . . . . . . . . . . . . . . 4
insert . . . . . . . . . . . . . . . . . . . . . . . . . . . . . 10
recommended batteries . . . . . . . . . . . . . . . 38
Broken display. . . . . . . . . . . . . . . . . . . . . . . . . . 7
C
Call
internal
Call list . . . . . . . . . . . . . . . . . . . . . . . . . . . . . . 17
Call screening during recording . . . . . . . . . . . . 20
Calling
external
internal . . . . . . . . . . . . . . . . . . . . . . . . . . . 24
Calls
making an external call
transferring (connecting) . . . . . . . . . . . . . . . 25
Care . . . . . . . . . . . . . . . . . . . . . . . . . . . . . . . .37
Care of the device . . . . . . . . . . . . . . . . . . . . . . 37
Changing ringtone melody . . . . . . . . . . . . . . . 28
Changing the call volume
during a call
Changing the display language . . . . . . . . . . . . 10
Changing the receiver volume . . . . . . . . . . . . . 13
Changing the ringer volume. . . . . . . . . . . . . . . 28
Changing the system PIN . . . . . . . . . . . . . . . . .30
CLI, Calling Line Identification . . . . . . . . . . . . . . 14
CLIP, CLI Presentation. . . . . . . . . . . . . . . . . . . . 14
CLIR, CLI Restriction . . . . . . . . . . . . . . . . . . . . . 14
Connecting. . . . . . . . . . . . . . . . . . . . . . . . . . .25
Consultation call (internal) . . . . . . . . . . . . . . . . 25
Contact with liquid . . . . . . . . . . . . . . . . . . . . . 37
Contents of the package . . . . . . . . . . . . . . . . . . 8
Control key . . . . . . . . . . . . . . . . . . . . . . . . . . . . 4
accessing display functions . . . . . . . . . . . . . 12
. . . . . . . . . . . . . . . . . . . . . 20
. . . . . . . . . . . . . . . . . . . . 22
. . . . . . . . . . . . . . . . . . . . . . . . . . 9
. . . . . . . . . . . . . . . . . . . . . . . . . . . 10
. . . . . . . . . . . . . . . . . . . . . . . . . . . 24
. . . . . . . . . . . . . . . . . . . . . . . . . . . 13
. . . . . . . . . . . . . . . .13
. . . . . . . . . . . . . . . . . . . . . . . . 13
Index
Customer Care . . . . . . . . . . . . . . . . . . . . . . . . 33
Customer Service & Assistance . . . . . . . . . . . . . 33
D
Deactivating
answer machine
internal listening in . . . . . . . . . . . . . . . . . . . 25
Dialling
using quick dial
with the directory . . . . . . . . . . . . . . . . . . . . 16
Dialling mode. . . . . . . . . . . . . . . . . . . . . . . . . 32
Directory
opening
saving the first number . . . . . . . . . . . . . . . . 16
selecting an entry . . . . . . . . . . . . . . . . . . . . 16
sending entry/list to handset . . . . . . . . . . . . 16
Display
anonymous
broken. . . . . . . . . . . . . . . . . . . . . . . . . . . . . 7
changing the display language . . . . . . . . . . 29
external call . . . . . . . . . . . . . . . . . . . . . . . . 14
number (CLIP) . . . . . . . . . . . . . . . . . . . . . . 14
unknown . . . . . . . . . . . . . . . . . . . . . . . . . . 14
Display functions . . . . . . . . . . . . . . . . . . . 12, 13
Display keys . . . . . . . . . . . . . . . . . . . . . . . . . . 13
functions . . . . . . . . . . . . . . . . . . . . . 4, 12, 13
Disposal. . . . . . . . . . . . . . . . . . . . . . . . . . . . . 37
E
Emergency numbers
not possible
Enabling/disabling advisory tones . . . . . . . . . . 29
Enabling/disabling the battery tone . . . . . . . . . 29
End call key . . . . . . . . . . . . . . . . . . . . . . . . . . . 4
Enter special characters . . . . . . . . . . . . . . . . . . . 4
Environment . . . . . . . . . . . . . . . . . . . . . . . . . 37
G
Guarantee Certificate . . . . . . . . . . . . . . . . . . . 34
H
Handset
de-registering
display language . . . . . . . . . . . . . . . . . . . . 29
restoring to default setting . . . . . . . . . . . . . 31
searching for . . . . . . . . . . . . . . . . . . . . . . . 23
setting (personalisation) . . . . . . . . . . . . . . . 28
setting up . . . . . . . . . . . . . . . . . . . . . . . . . 10
switching on/off . . . . . . . . . . . . . . . . . . . . . 11
transferring a call . . . . . . . . . . . . . . . . . . . . 25
using multiple . . . . . . . . . . . . . . . . . . . . . . 24
Handsfree mode . . . . . . . . . . . . . . . . . . . . . . . 14
Hash key . . . . . . . . . . . . . . . . . . . . . . . . . . . . . 4
Hearing aids . . . . . . . . . . . . . . . . . . . . . . . . . . . 7
. . . . . . . . . . . . . . . . . . . . . 20
. . . . . . . . . . . . . . . . . . . . . 17
. . . . . . . . . . . . . . . . . . . . . . . . . . . 16
. . . . . . . . . . . . . . . . . . . . . . . . 14
. . . . . . . . . . . . . . . . . . . . . . . . . 7
. . . . . . . . . . . . . . . . . . . 29, 31
39
Page 40

Index
I
Idle status . . . . . . . . . . . . . . . . . . . . . . . . . . . .12
Insert a dialling pause . . . . . . . . . . . . . . . . . . . . 4
Internal
consultation
consultation call . . . . . . . . . . . . . . . . . . . . . 25
making calls . . . . . . . . . . . . . . . . . . . . . . . . 24
Internal call . . . . . . . . . . . . . . . . . . . . . . . . . . .24
K
Key 1 . . . . . . . . . . . . . . . . . . . . . . . . . . . . . . . . 4
Keys
control key
end call key. . . . . . . . . . . . . . . . . . . . . . . . . . 4
fast access . . . . . . . . . . . . . . . . . . . . . . . . . 17
hash key. . . . . . . . . . . . . . . . . . . . . . . . . . . . 4
key 1 (speed dialling the answer machine). . . 20
key 1 (speed dialling the network mailbox) . . 23
recall key . . . . . . . . . . . . . . . . . . . . . . . . . . . 4
speed dialling the answer machine . . . . . . . . 20
speed dialling the network mailbox . . . . . . . 23
star key. . . . . . . . . . . . . . . . . . . . . . . . . . . . . 4
talk key. . . . . . . . . . . . . . . . . . . . . . . . . . . . . 4
L
Last number redial. . . . . . . . . . . . . . . . . . . . . .13
Liquid. . . . . . . . . . . . . . . . . . . . . . . . . . . . . . . 37
List
answer machine list
caller list . . . . . . . . . . . . . . . . . . . . . . . . . . . 17
entry . . . . . . . . . . . . . . . . . . . . . . . . . . . . . 18
redial list. . . . . . . . . . . . . . . . . . . . . . . . . . .17
Listening in
call participant
Listening in to a call . . . . . . . . . . . . . . . . . . . . . 25
Listening to message on the network mailbox . . 23
Lock/unlock th e keypad . . . . . . . . . . . . . . . . . . . 4
M
Making calls
accepting a call
internal . . . . . . . . . . . . . . . . . . . . . . . . . . . 24
Manufacturer warranty (Middle East). . . . . . . . . 35
Medical equipment . . . . . . . . . . . . . . . . . . . . . . 7
Menu
opening
return to idle status . . . . . . . . . . . . . . . . . . . 12
tree . . . . . . . . . . . . . . . . . . . . . . . . . . . . . .12
Menu guidance . . . . . . . . . . . . . . . . . . . . . . . .12
Message
delete
play back . . . . . . . . . . . . . . . . . . . . . . . . . . 20
Microphone . . . . . . . . . . . . . . . . . . . . . . . . . . . 4
N
Network mailbox
listening to message
. . . . . . . . . . . . . . . . . . . . . . . . 25
. . . . . . . . . . . . . . . . . . . . . . . . . . 4
. . . . . . . . . . . . . . . .13, 18
. . . . . . . . . . . . . . . . . . . . . . 25
. . . . . . . . . . . . . . . . . . . . . . 14
. . . . . . . . . . . . . . . . . . . . . . . . . . . 12
. . . . . . . . . . . . . . . . . . . . . . . . . . . . 21
. . . . . . . . . . . . . . . . . . 23
Network provider selection, automatic . . . . . . . 15
Number
dialling from the directory
displaying caller's number (CLIP) . . . . . . . . . 14
entering. . . . . . . . . . . . . . . . . . . . . . . . . . . 13
O
On/Off button . . . . . . . . . . . . . . . . . . . . . . . . . 4
P
PAB X
setting dialling mode
setting flash time . . . . . . . . . . . . . . . . . . . . 32
Paging . . . . . . . . . . . . . . . . . . . . . . . . . . . . . . 23
Picking up
a call from answer machine
Playing back
messages (answer machine)
messages (network mailbox) . . . . . . . . . . . . 23
Power adapter . . . . . . . . . . . . . . . . . . . . . . . . . 7
Preselection . . . . . . . . . . . . . . . . . . . . . . . . . . 15
R
Recall key. . . . . . . . . . . . . . . . . . . . . . . . . . . . . 4
Remote operation. . . . . . . . . . . . . . . . . . . . . . 22
Returning to default settings
. . . . . . . . . . . . . . . . . . . . . . . . . . . . . 31
base
Ringtone volume . . . . . . . . . . . . . . . . . . . . . . 28
S
Safety precautions . . . . . . . . . . . . . . . . . . . 7, 12
Searching
Sending a directory entry to a handset . . . . . . . 16
Service Centres (Midde East) . . . . . . . . . . . . . . 36
Setting flash time (PABX) . . . . . . . . . . . . . . . . . 32
Setting the default settings
Setting the language. . . . . . . . . . . . . . . . . . . . 10
Setting the wake-up time . . . . . . . . . . . . . . . . 26
Setting up
Special character . . . . . . . . . . . . . . . . . . . . . . 38
Speed dialling
Star key . . . . . . . . . . . . . . . . . . . . . . . . . . . . . . 4
Switch between pulse and tone dialling . . . . . . . 4
Switch between tone and pulse dialling . . . . . . . 4
Switch the ringtone on/off. . . . . . . . . . . 4, 28, 29
T
Tal k ke y . . . . . . . . . . . . . . . . . . . . . . . . . . . . . . 4
U
Upper/lower case and digits . . . . . . . . . . . . . . . 4
. . . . . . . . . . . . . . . . . . . . . . . . . . . 23
handset
in the directory. . . . . . . . . . . . . . . . . . . . . . 16
. . . . . . . . . . . . . . . . . . . . . . . . . . . . . 29
base
handset . . . . . . . . . . . . . . . . . . . . . . . . . . . 31
. . . . . . . . . . . . . . . . . . . . . . . . . . . 10
handset
network mailbox
. . . . . . . . . . . . . . 13
. . . . . . . . . . . . . . . . . 32
. . . . . . . . . . . . . 21
. . . . . . . . . . . . 20
. . . . . . . . . . . . . . . . . 20, 23
All rights reserved. Rights of modification reserved.
40
Page 41

Issued by
Gigaset Communications GmbH
Frankenstr. 2a, D-46395 Bocholt
© Gigaset Communications GmbH 2017
Subject to availability.
All rights reserved. Rights of modification reserved.
www.gigaset.com
Apple, the Apple logo and iPhone are trademarks of Apple Inc., registered in the U.S. and
other countries. App Store is a service mark of Apple Inc.
Google, Android, Google Play and other brands are trademarks of Google Inc.
 Loading...