


Introduction
GIGABYTE M6980X laser gaming mouse is one of most popular choice of GIGABYTE gaming series. The combination of 6000dpi, 1000rps report rate and 30G acceleration provide a very accurate basis for gaming.
GHOST™ Macro Engine of 8KB on-board memory supports 3 gaming profiles stored on the mouse. Having personal macro settings portable with the mouse allow users to load their profiles on any computers.
Equipped for gamer, GIGABYTE M6980X upgrades your level in game play!
Feature
yy 6000DPI Laser Gaming Sensor |
yy |
On-the-fly DPI Switching |
|
yy |
GHOST™ Macro Engine |
yy |
Streamlined ergonomic design |
yy |
Gaming-grade Tracking Capability up to 12000FPS |
yy 7 (+2) customizable buttons, 3profiles |
|
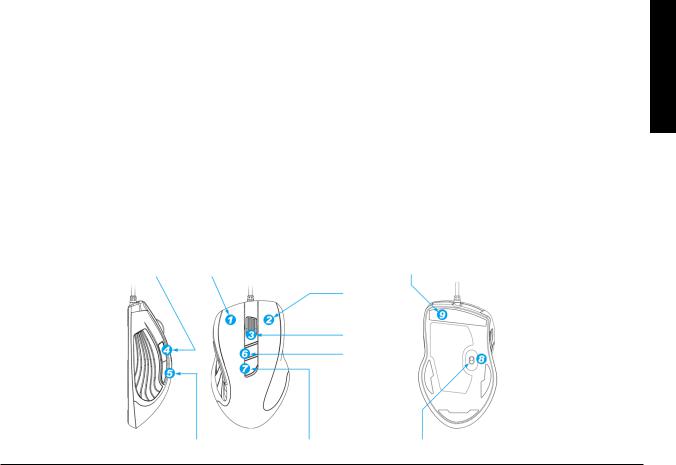
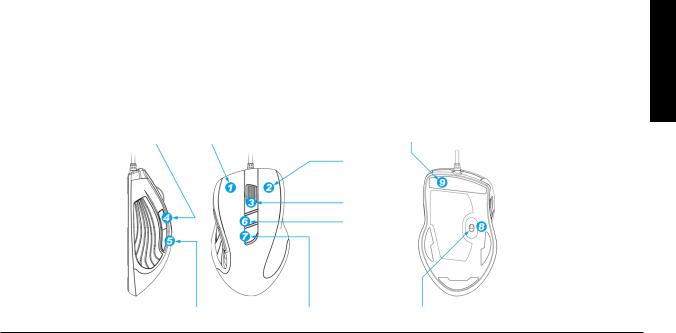
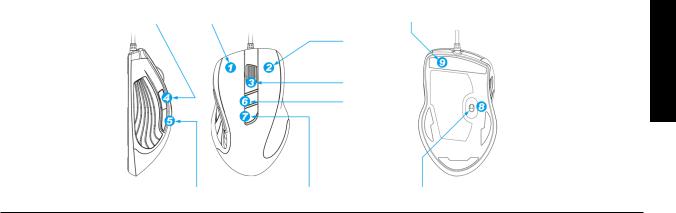
Mouse Instruction
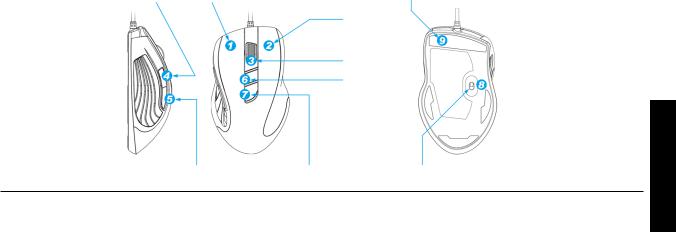
Forward |
Left Click |
Ultra-Durable™ Teflon feet |
|||
|
|
|
|
|
|
|
|
Right Click |
|||
|
|
|
|
||
|
|
Middle Click and |
|||
|
|
4 ways scrolling |
|
||
|
|
On-the-fly DPI |
|
|
|
|
|
adjustment |
|
|
|
|
|
|
|
|
|
Back |
Profile change |
Pro-laser gaming sensor |
ENGLISH
- 1 -
ENGLISH
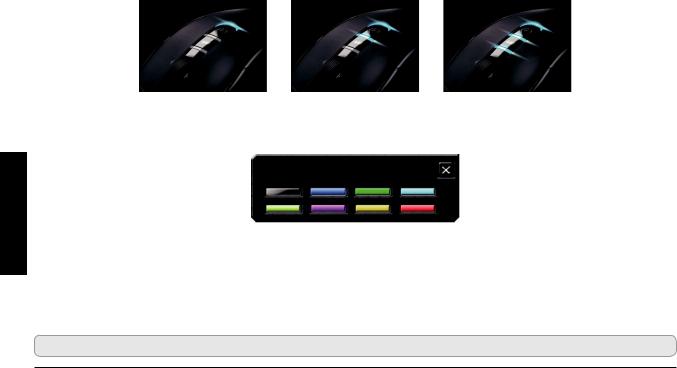
LED display
-DPI indicator
810dpi / 1620dpi / 3240dpi (customizable 400~6000dpi adjustment via GHOST™ Engine)
-Profi le indicator
Red: Profi le1 / Green: Profi le2 / Blue: Profi le3 (customized color lighting via GHOST™ Engine)
Important information
Long period of repetitive motion using an improperly set-up workplace, or incorrect body posture may be associated with physical discomfort and injury to nerves, tendons and muscles.
Please DO NOT directly look into the laser beam.
- 2 -

GHOST™ Macro Engine
GHOST™ Macro Engine supports Windows 98, Windows 2000, Windows XP, and Windows 7. Install the software to assign buttons and set up your personal profi le.
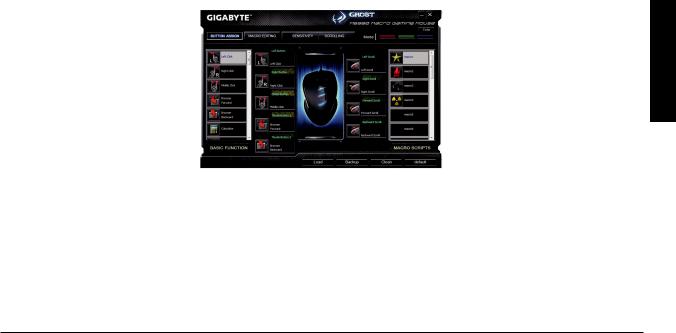
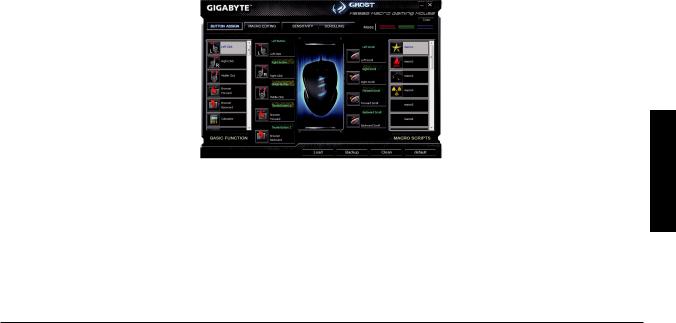
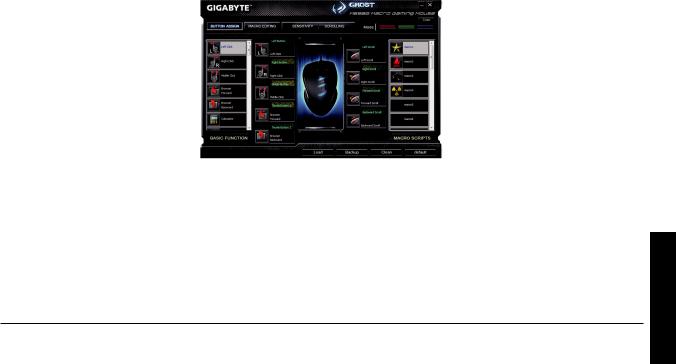
BUTTON ASSIGN
User can assign various functions to buttons from both “BASIC FUNCTION” and “MACRO SCRIPTS”. All you have to do is drag the function icon and simply drop to the button you would like to assign. Remember that you may edit each macro script in the “MACRO EDITING” tab.
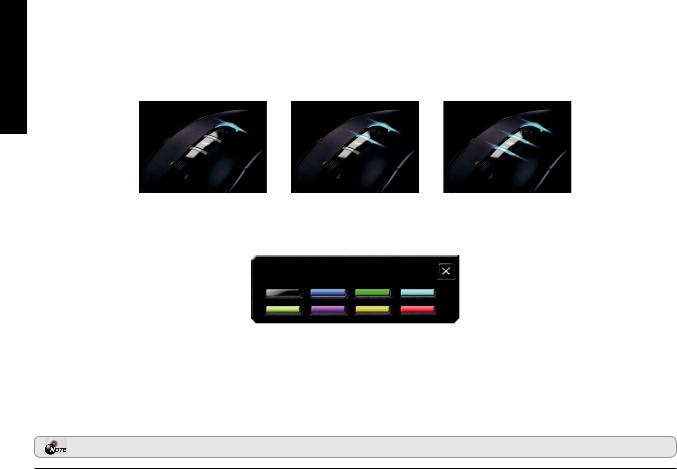
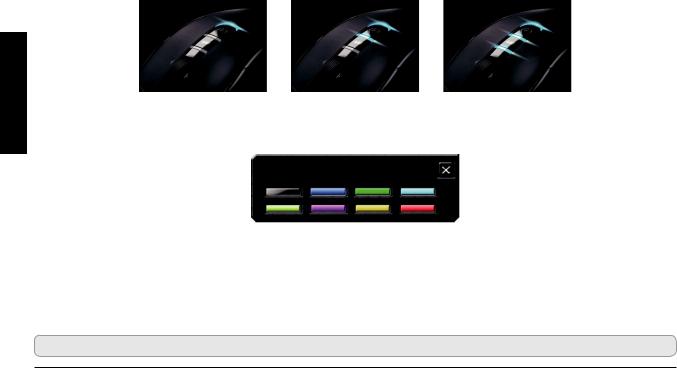
There are three default color LED lights (red/green/blue) on the panel which indicate three different profi les set up by users. Each individual profi le can be assigned various settings to 9 customizable buttons. Moreover, you can also change the color of LED light for each profi le.
(There are 7 colors and a light-off mode to choose from).
ENGLISH
- 3 -
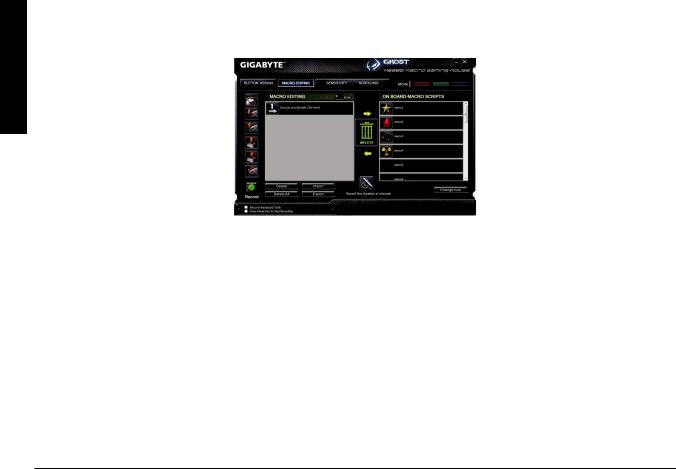
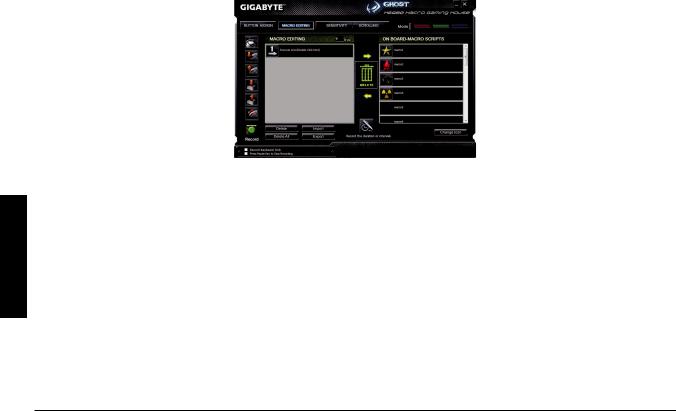
MACRO EDITING
ENGLISH
The macro editing tab allows you easily to record all the commands, including key bindings and the press of mouse button. Each single macro also can be imported and exported onto your hard disk for further usage.
Start with:
Step 1 Click “Record the duration or intervals” if you’d like to record intervals between two commands. Step 2 Double-click “Cycle through selection of action mode” to change the execute mode.
Step 3 Click “Record” to start creating a macro and recording all the keystrokes or mouse commands.
Step 4 Click “Stop” to fi nish recording this macro when a macro is done.
Step 5 You can also insert additional commands on the “Quick-insert bar” left.
Step 6 After recording a macro, you may drag commands of the macro and drop into “On-board script” to store this macro on the mouse.
Step 7 Double-click on the macro scrip to rename this macro. Moreover, you may also change icon of your personal macro through clicking “change icon”.
Step 8 Come back to “Button Assign” tab, the macro you had built would become one application of “Macro scrip” in this tab.
- 4 -

Learn more:
Record the duration or intervals (Time lag)
If this function is marked, it allows you to record the intervals between two commands.
Cycle through selection of action mode
yy Execute once:
To execute a macro once. yy Loop mode:
Re-pressing to stop: Executing a macro continuously, and re-pressing the assigned button to stop the running macro. yy Fire-button mode:
Executing a macro continuously until you release the assigned button.
Export
To export your macro to the PC.
Import
To import a macro to the macro editing in GHOST engine application program.
Re-edit the macro
Dragging the macro script back to macro editing allows you to re-edit this macro.
ENGLISH
- 5 -
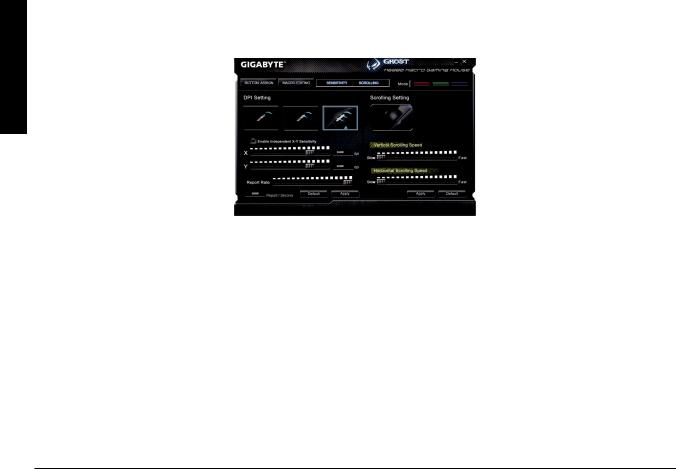
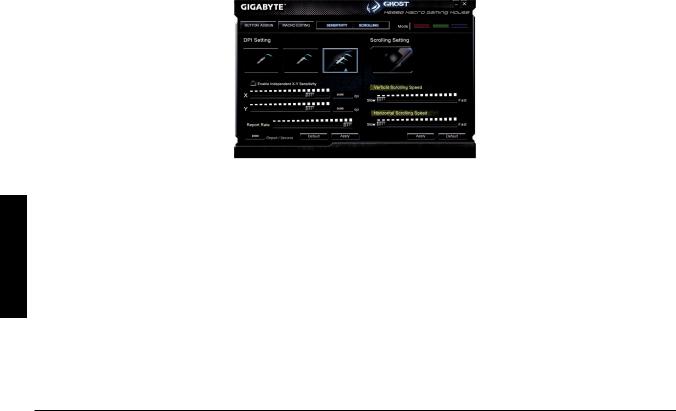
SENSITIVITY/ SCROLLING Tab
ENGLISH
Sensitivity
As default setting, there are three sensitivity stages: 810, 1620, and 3240DPI (dots per inch). You can set up preferred sensitivity value of three sensitivity stages, then you can simply adjust through on-the-fly switch. Check “set X and Y axis separately” option to adjust X-Y sensitivity levels.
Report rate
The report rate determines the time intervals that your PC retrieves data from your mouse. You can set the report rate to 125Hz (8ms), 250Hz (4ms), 500Hz (2ms), or 1000Hz (1ms) by moving the knob on the slider.
Scrolling
You can adjust vertical & horizontal scroll wheel speed by moving the knob on the slider.
- 6 -
M6980X 6000dpi 1000rps 30GGHOST™ 8KB
GIGABYTE M6980X
y |
6000DPI |
y |
DPI |
y |
GHOST™ |
y |
|
y |
12000FPS |
y |
7 (+2) |
|
|
|
|||
|
|
|
|
|
|
|
|
|
|||
|
|
|
|
|
|
|
|
|
|
||
|
|
|
|||
|
|
|
|
|
|
|
|
|
|
|
|
|
|
DPI |
|||
|
|
|
|
|
|
- 1 -
LED
-DPI
810dpi / 1620dpi / 3240dpi ( GHOST™ 400~6000dpi)
1 / 2/ 3 ( GHOST™ )
肌肉的傷害。

- 2 -
GHOST™
GHOST™ Windows 98 Windows 2000 Windows XP Windows 7
GHOST
LED ( / / ) ()
- 3 -
(ms)
123
45
6 GHOST™ Engine
78
- 4 -

錄製時記錄動作間隔時間
y 執行已錄製的巨集一次。
GHOST
- 5 -

/
( Dot Per Inch) DPIM6980 810 1620 3240DPI GHOST™
Engine (400-3000DPI) X Y X Y
GHOST™ Engine 125Hz (8ms) 250Hz (4ms) 500Hz (2ms) 1000Hz (1ms)
GHOST™ Engine
- 6 -
M6980X 6000dpi 1000rps 20GGHOST™ 8KB
GIGABYTE M6980X
y |
6000DPI |
y |
DPI |
y |
GHOST™ |
y |
|
y |
12000FPS |
y |
7 (+2) |
|
|
|
|||
|
|
|
|
|
|
|
|
|
|
|
|
|
|
|
|
|
|
|
|
|
|||
|
|
|
|
||
|
|
|
|
|
|
|
|
|
|
|
|
|
|
DPI |
|||
|
|
|
|
|
|
- 1 -
LED
-DPI
810dpi / 1620dpi / 3240dpi ( GHOST™ 400~6000dpi)
1 / 2 / 3 ( GHOST™ )
肌肉的伤害。

- 2 -
GHOST™
GHOST™ Windows 98 Windows 2000 Windows XP Windows 7
GHOST
LED ( / / ) ()
- 3 -
(ms)
123
45
6 GHOST™ Engine
78
- 4 -

:
y 执行已录制的宏一次。
将您的宏设定汇入到GHOST
- 5 -
/
( Dot Per Inch) DPIM6980X 810 1620 3240DPI
GHOST™ Engine (400-3000DPI) X Y XY
GHOST™ Engine 125Hz (8ms) 250Hz (4ms) 500Hz (2ms) 1000Hz(1ms)
GHOST™ Engine
- 6 -
Einleitung
Die GIGABYTE M6980X Laser Gaming Maus ist eines der beliebtesten Produkte aus der GIGABYTE Gaming Serie. Die Kombination aus 6000 dpi, 1000 rps Abtastrate und 30G Beschleunigung bietet eine akkurate Basis für Gaming.
Die GHOST™ Macro Engine mit 8 KB Onboard-Speicher unterstützt bis zu drei in der Maus gespeicherte Gaming-
Profile. Mit den persönlichen Makro-Einstellungen der Maus mobil zu sein, bedeutet für die Benutzer, dass sie ihre Profile an jedem Computer laden können.
Ausgerüstet für Gamer, erhöht die GIGABYTE M6980X Ihr Level im Gameplay!
Eigenschaften
yy 6000DPI Laser Gaming Sensor |
yy |
Superschnelle DPI Umschaltung |
|
yy |
GHOST™ Macro Engine |
yy |
Strömlinienförmiges ergonomisches Design |
yy |
Gaming-grade Abtastrate bis zu 12000FPS |
yy 7 (+2) Benutzerdefinierte Tasten, 3 Profile |
|
Mausanleitung
Vorwärts |
Linksklick |
Ultra-Durable™ Teflon Füße |
|||
|
|
|
|
|
|
|
|
Rechtsklick |
|||
|
|
|
|
||
|
|
Mittlerer Mausklick |
|||
|
|
und 4-Wege Scrolling |
|
||
|
|
On-the-fly DPI |
|
|
|
|
|
Einstellung |
|
|
|
|
|
|
|
|
|
Zurück |
Profilwechsel |
Pro-Laser Gaming Sensor |
DEUTSCH
- 1 -
LED-Anzeige
-DPI Anzeige
810 dpi / 1620 dpi / 3240 dpi (über GHOST™ Engine einstellbar auf 400~6000 dpi)
-Profi lanzeige
Rot: Profi l 1 / Grün: Profi l 2 / Blau: Profi l 3 (Farbgebung über GHOST™ Engine einstellbar)
DEUTSCH
Wichtige Information
Längere Zeiträume sich wiederholender Bewegungen an einem nicht geeignet eingerichteten Arbeitsplatz oder eine falsche Körperhaltung können mit physischen Beschwerden und Verletzungen von Nerven, Sehnen und Muskeln
Bitte NICHT direkt in den Laserstrahl sehen.
- 2 -
GHOST™ Macro Engine
Die GHOST™ Macro Engine unterstützt Windows 98, Windows 2000, Windows XP und Windows 7. Installieren Sie die
Software, um Tasten zuzuweisen und Ihr persönliches Profi l einzurichten.
TASTEN ZUWEISEN
Sie können den Tasten sowohl mit „BASISFUNKTION“ als auch den „MAKROSKRIPTEN“ verschiedene Funktionen zuweisen. Alles was Sie tun müssen, ist das Ziehen des Funktionssymbols und das einfache Ablegen auf die Taste, zu der sie zugewiesen werden soll. Vergessen Sie nicht, jedes Makroscript eventuell auf der Registerkarte „MAKROBEARBEI-
TUNG“ zu bearbeiten.
Die drei verschiedenen LED-Anzeigen (rot/grün/blau) zeigen die drei vom Benutzer eingerichteten Profile an. Jedem individuellen Profi l können verschiedene Einstellungen für bis zu 9 benutzerdefi nierte Tasten zugewiesen werden. Zusätzlich können Sie auch die Farbe der LED-Leuchten für jedes Profi l ändern.
(Es stehen 7 Farben und ein Licht-aus Modus zur Auswahl).
DEUTSCH
- 3 -
 Loading...