

Page 1

Congratulations on purchasing your versatile Genius Food Prep System! The Genius Food Prep System is perfect for
the fast and safe preparation of all kinds of foods. It delivers perfect cutting results every time and is fast, simple
and completely electricity free. Slicing, chopping, julienne, grating, shredding, grinding – this clever kitchen aid will
help you make delicious dishes in no time!!
Dear Genius customer,
The 9 piece set includes:
1 Multifunctional lid with crank handle
1 Clear bowl (9 cups)
1 Fresh-keeping lid
1 Stainless steel cutting disc storage box
Cutting Discs
1 Purple Disc (thick cut)
1 Red Disc (med cut)
1 Orange Disc (fi ne cut)
1 Dark Green Disc (slices)
1 Teal Disc (wavy slice)
Genius Food Prep System
1
Operating Instructions & Recipe Book
Operating Instructions
Page 2

SAFETY AND WARNING NOTICE
PLEASE READ ALL INSTRUCTIONS BEFORE OP-
ERATING THE MACHINE.
Read the safety and warning notice carefully
and only use the Genius Food Prep System
as described in the operating instructions to
prevent injuries.
Always keep the Genius Food Prep System
and it’s accessories out of children’s reach.
NOT INTENDED FOR USE BY CHILDREN!!!
Protect against impact and pressure.
Check the Genius Food Prep System and ac-
cessories for damage before use. If damaged
do not use the product.
Do not make any alterations or modifi cations
to the Genius Food Prep System or its accessories.
Clean all parts thoroughly before use. (see
Care and Cleaning section of this manual)
ALWAYS place the Genius Food Prep System
on a non-slip surface. Never place on hot surfaces or close to open fl ames.
Before unfolding the legs be sure that the
crank handle and/or discs are removed.
DISCS ARE EXTREMELY SHARP! USE CARE
WHEN PACKING AND UNPACKING!!!!
TIPS FOR USE
You can use the multifunctional lid with or without the 9 cup bowl.
When you do not use the bowl you can grate, shred, cut, slice and grind right on your work surface.
Surface must be smooth, clean and free of dirt in order for suction cups to secure to work surface.
Moisten the suction cups on the legs to help secure Genius Food Prep System to surface.
Height of food to be cut should not be higher than 3 inches.
Always fi ll the left side of the food chamber fi rst.
Apply slight pressure to the handle when cutting. Too much pressure may cause food to move
around or get stuck.
Always turn the crank handle in a CLOCKWISE motion.
INSTRUCTIONS FOR USE
Multifunctional Lid
The multifunctional lid is the core part of the Genius Food Prep System. You can use the lid with or without
the 9 cup bowl. When you do not use the bowl you can grate, shred, chop, slice, and grind right onto your
work surface.
2
Operating Instructions & Recipe Book
Operating Instructions
31
Operating Instructions & Recipe Book
Sweets & desserts
Pre-heat the oven to 350°F.
For the pastry: Sieve the fl our into a bowl and combine
with the baking powder, sugar and vanilla sugar. Make
little fl akes of margarine using two spoons and place
them on top of the mixture in the bowl. Then mix in one
egg after another with a hand whisk. Dust a work surface
with fl our and roll out the pastry until it is approx.
⅛
inch
thick. Use it to line a springform baking tin.
For the topping:
Peel, quarter and core the apples. Then slice the apple
quarters with the dark green disc and cover the pastry
base with apple slices. Separate the eggs and collect the
yolks and whites in separate bowls. Whisk the butter,
sugar and egg yolks with a hand mixer until slightly
frothy. Combine the fl our with the baking powder and
gradually add it to the mixture. Remove the shells of the
nuts, grind them with the orange disc and add them to
the mixture with the cinnamon. Whisk the egg whites
until stiff with a hand mixer and carefully fold into the
mixture. Distribute the topping evenly over the apples
and bake for approx. 60 minutes.
Leave the cake to cool in the tin for at least 10 minutes
after baking.
To make the short crust pastry:
2¼ c. fl our
1 tsp. baking powder
½ c. sugar
1 pack of vanilla sugar
½ c. margarine
2 eggs
For the topping:
1 lb. apples
1 c. plus 2 tbsp. butter
1 c. sugar
4 eggs
1 c. oz. fl our
1 pinch of baking powder
1 tsp. cinnamon
1 c. fresh hazelnuts
Apple and Nut Cake
TIP
Don’t open the oven door too soon or the cake will
collapse.
Page 3
30
Operating Instructions & Recipe Book
Sweets & desserts
Peel the oranges and separate into fi llets. Place half of
one Orange aside. Peel and halve the kiwis. Wash the
strawberries and grapes. Slice the fruit with the dark
green disc. Peel the pineapple. Chop the fl esh into large
pieces and then slice it with the dark green disc. Halve
the papaya, scoop out the stones with a dessert spoon
and then carefully remove the fl esh from the shell. (Be
careful not to damage the shell). Then slice with the dark
green disc. Arrange the fruit slices in the papaya shell.
Squeeze the orange half, stir the juice together with
honey and drizzle on top of the fruit.
Garnish with physalis berries.
4–5 strawberries
2 oz. seedless grapes
⅓ pineapple
2 papayas
4 tbsp. honey
Physalis for the garnish
Papaya fi lled with Exotic Fruit Salad
2 oranges
2 kiwis
3
Operating Instructions & Recipe Book
Operating Instructions
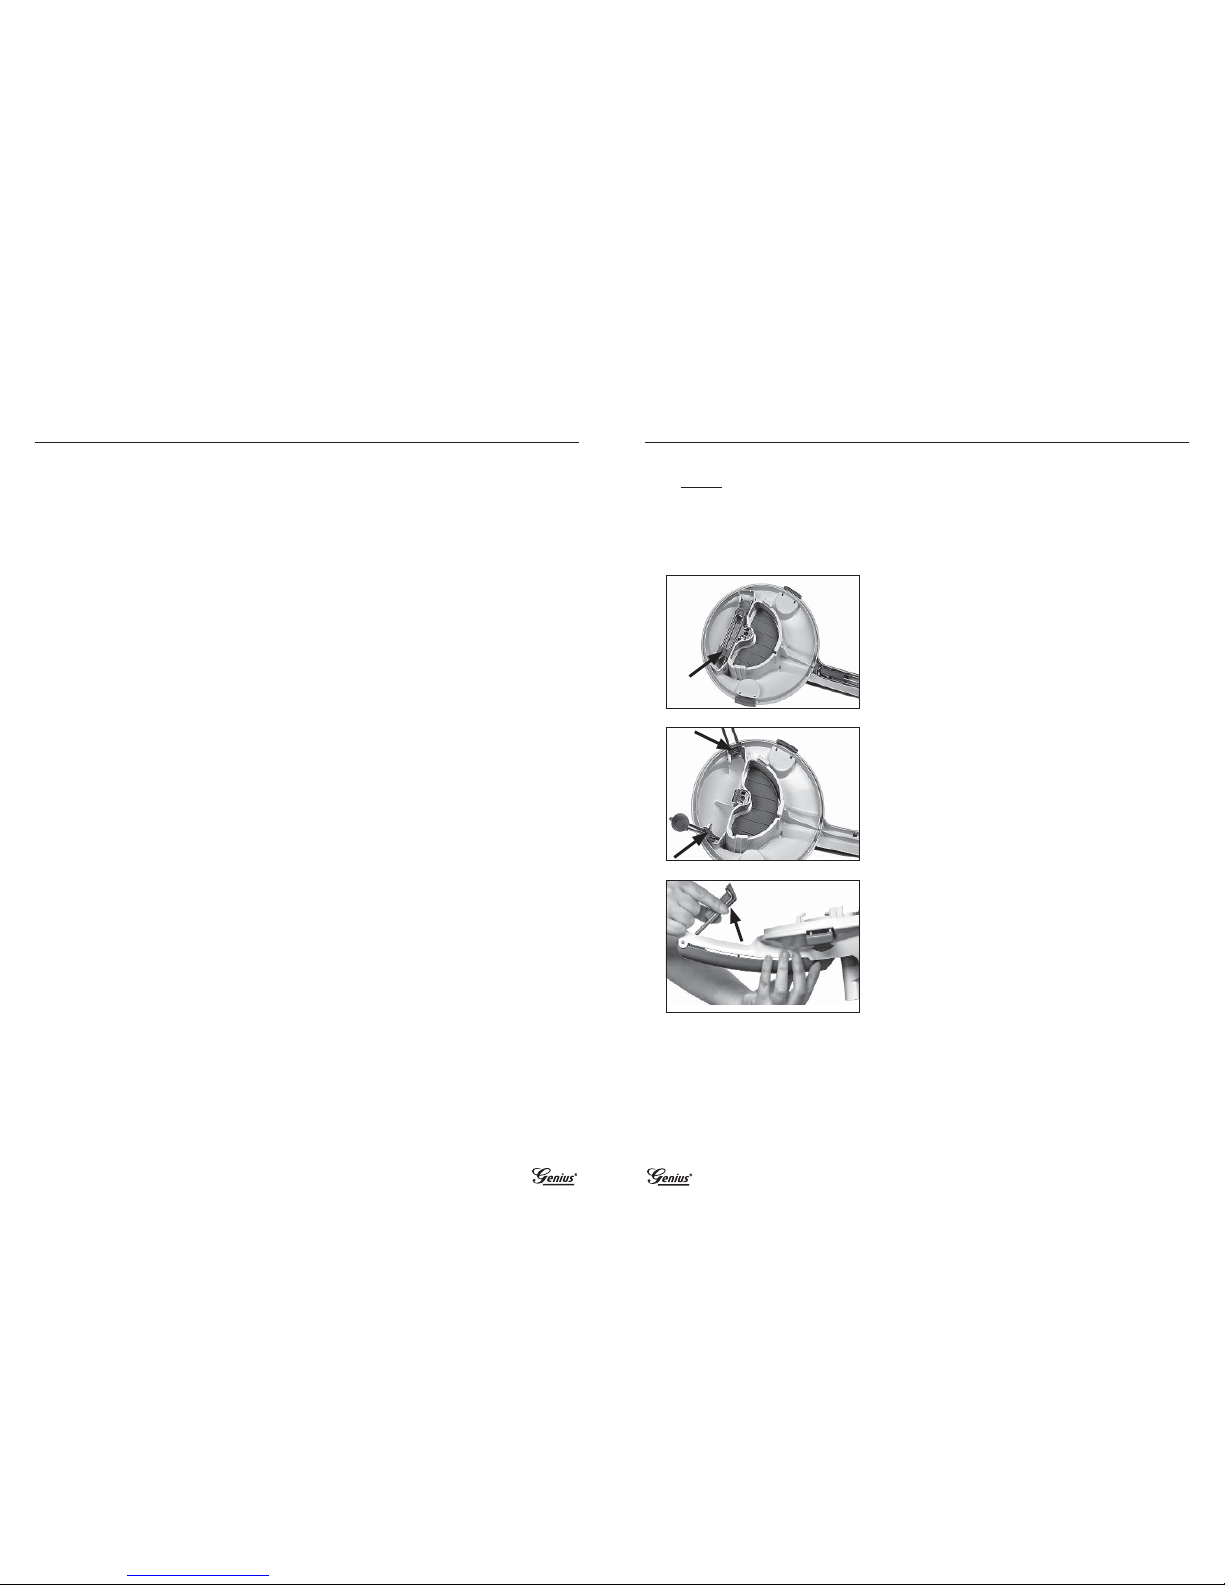
To use without the bowl:
If crank handle and/or discs are inserted at this time, please remove before unfolding legs.
Turn the lid over and locate the 3 legs (2 legs on top and 1
leg in handle). The legs are secured into place with a slide
interlock. To unfold the 2 top legs (do 1 at a time), slide the
interlock out slightly to release leg.
FRONT LEGS: extend one leg as far as possible. Push the interlock down until it clicks into place in the slot. Leg should
be secure and locked into place before using.
Repeat process
on leg 2.
NOTE: If interlock is not locked into place the leg
will move on the work surface and could cause injury.
BACK LEG: (Located in the back of the handle). To unfold the
third leg, grasp the two triangular prongs on each side of the
leg and lift up. Extend the leg back as far a possible until it
is secured in the clips. The height of this leg can be adjusted
to accommodate your work space. When not using the bowl,
the height of this leg is not adjusted.
**All legs will sit at an angle and should be secured in place
before using. The extra wide surfaces of the rubber feet ensure the Genius Food Prep System stands very secure.
Now the multifunctional lid is ready for the cutting discs.
SEE SECTION FOR INSERTING CUTTING DISCS AND CRANK HANDLE ON PAGES 5-7.
PICTURE 2
The multifunctional lid is fi tted with three legs that are folded away on the inside of the lid.
Page 4
4
Operating Instructions & Recipe Book
Operating Instructions
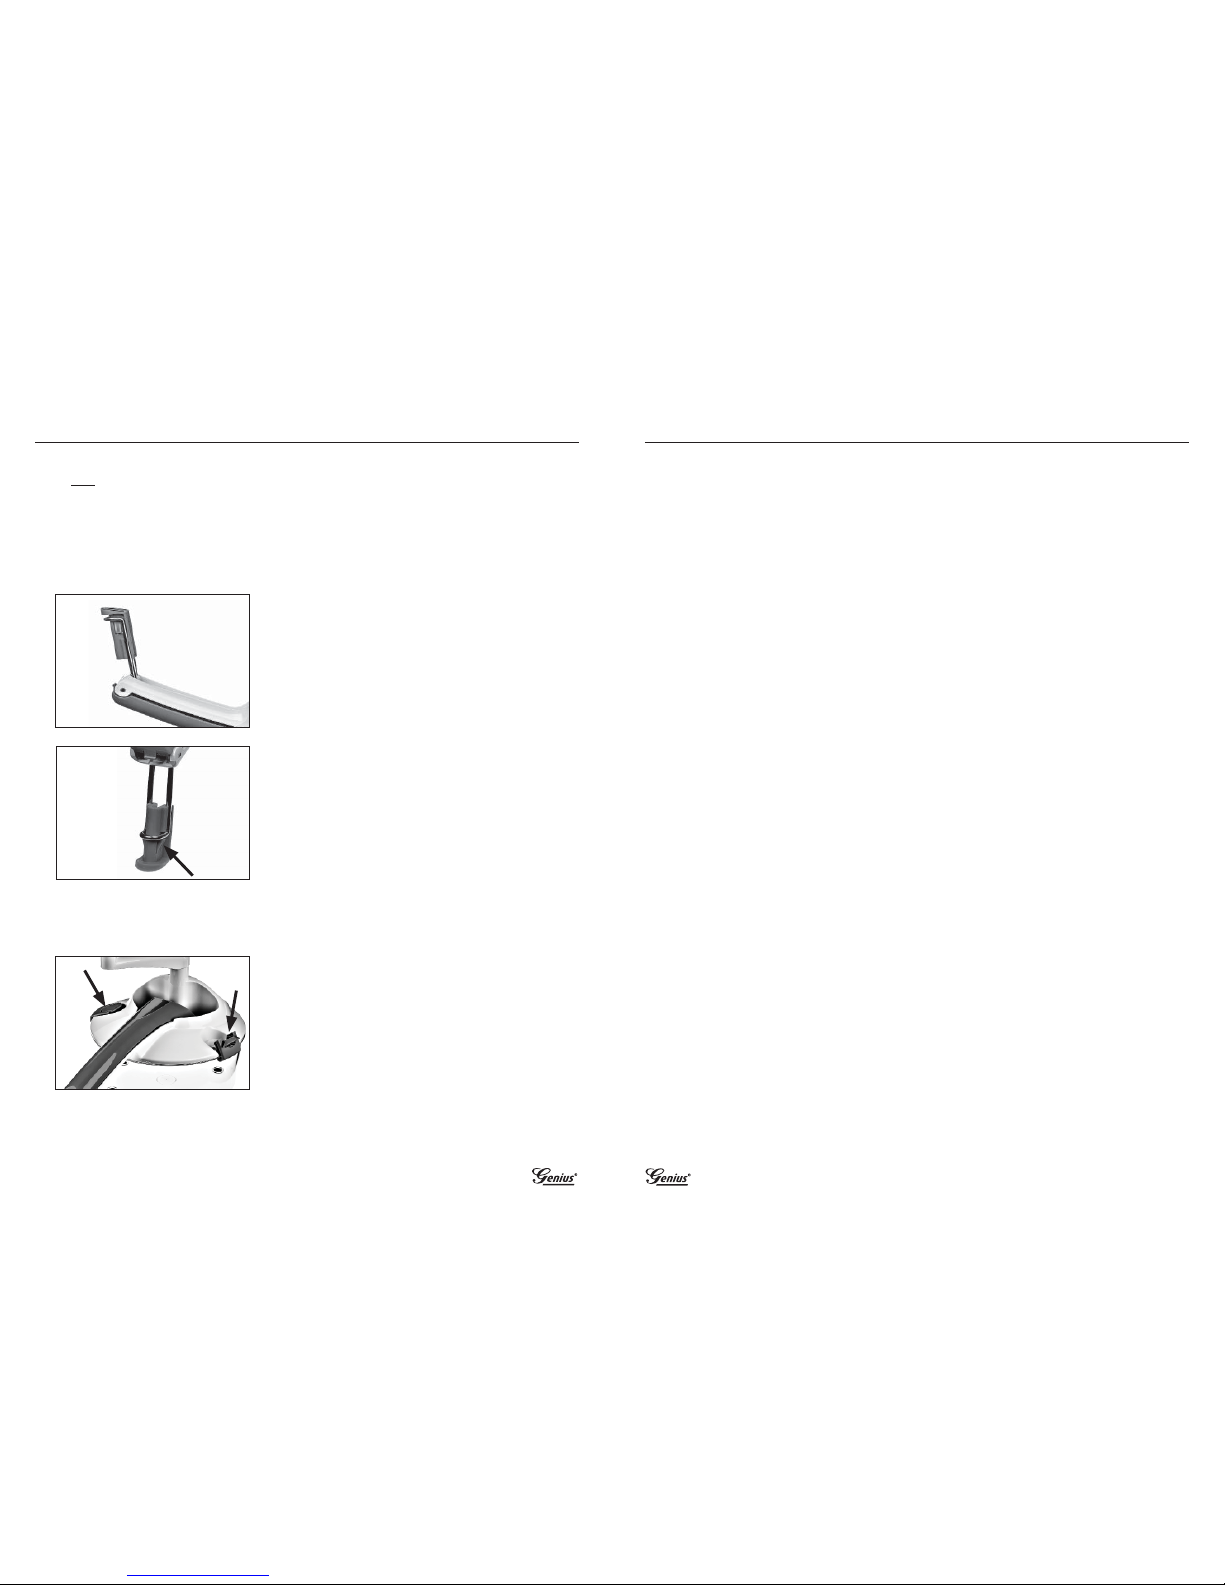
To use with the bowl:
Unfold the leg (located in the handle) by grasping the two
triangular prongs on each side of the leg and lift up. Extend
the leg back as far a possible until it is secured in the clips.
If crank handle and/or discs are inserted at this time, please remove before unfolding legs.
Now the multifunctional lid is ready for the cutting discs.
SEE SECTION FOR INSERTING CUTTING DISCS AND CRANK HANDLE ON PAGE 5-7.
After cutting disc is inserted, position the multifunctional lid
on top of the bowl with clasps open.
Hook the outside edges of the clasps over the edge of the
bowl and then press fi rmly back and down in the direction
of the center of the lid until you hear them “click” in place.
Multifunctional lid should now be securely fastened to the
bowl.
The height of this leg can be adjusted to accommodate your
work space. When using the 9 cup bowl, the leg must be
extended. To do so, squeeze the two triangular prongs together and slide the extension out until it locks in place.
The multifunctional lid is fi tted with three legs that are folded away on the inside of the lid. When using a
bowl, only the leg in the back of the handle is extended. The other 2 legs (located under top) stay folded
and secured (see section on Closing Legs).
29
Operating Instructions & Recipe Book
Sweets & desserts
Pre-heat the oven to 350°F.
Use a hand whisk to create a smooth mixture with the
quark, sugar, a pinch of salt, milk and oil. Chop the
rosemary leaves fi nely and stir them into the mixture.
Then combine the fl our and baking powder and add it.
Use a hand mixer with kneading hooks to create a dough.
Wash, peel and halve the pears. Remove the cores with
a sharp knife and slice them with the dark green disc.
Drizzle lemon juice over the fruit.
Now divide the dough into 6–8 equally sized portions
and roll out into rounds that are around the same
thickness as your fi nger on a fl oured work surface. Brush
with sour cream and place the pear slices on top. Bake in
the oven for 15–20 minutes.
When you have removed them from the oven, drizzle
honey on top of the focaccia and serve hot.
4 oz. low fat curd cheese or
ricotta cheese
3 tbsp. sugar
Salt
4 tbsp. milk
4 tbsp. oil
3 tsp. rosemary leaves
1¾ c. fl our
2 tsp. baking powder
2 pears
4 tbsp. lemon juice
7 oz. sour cream
4–5 tbsp. liquid honey
Sweet Focaccia with Pears
Page 5

28
Operating Instructions & Recipe Book
Main courses
Pre-heat the oven to 350°F.
Peel the onions and the garlic, halve them, remove the
stem ends and grate with the orange disc. Wash the
tomatoes, zucchini and eggplants and remove the tops.
Halve the tomatoes and remove the stems. Cut the
zucchini and eggplants into 2–3 inches long pieces and
slice with the dark green disc.
Put the olive oil in a braising pan or another large pan
with a lid and fry the onions in it. Then add the garlic,
zucchini and eggplant pieces and cook for around 5
minutes, turning frequently. After 3 minutes, add the
tomatoes and season with salt and pepper. Remove the
pan from the heat and set aside. Drain the mozzarella
and chop into large pieces.
For the sauce:
Melt 4 tbsp. butter in a pan, sieve the fl our on top and let
it sweat briefl y. Gradually pour the vegetable stock, milk
and cream into the pan, stirring continuously. Then grate
the parmesan fi nely with the orange disc. Stir half of the
parmesan and all of the mozzarella into the mixture and
bring to the boil.
Season with salt and pepper.
Grease an ovenproof dish that has adequately high sides.
Fill it with layers of sauce, lasagna and vegetables in that
order until all ingredients have been used up. Sprinkle
the remaining parmesan and butter (formed into fl akes
with two spoons) on top.
Cover the lasagna and bake in the oven for 45–50
minutes. Half way through the baking time, remove the
cover of the dish. Meanwhile wash the basil, pluck off
the leaves and tear them into pieces. Leave a few leaves
whole for the garnish. Serve the lasagna straight away
garnished with basil.
2 onions
1 lb. zucchini
2 garlic cloves
½ lb. tomatoes on the vine
1 lb. eggplants
4 tbsp. olive oil
Salt
Black pepper
2 packs of mozzarella, whole
6 tbsp. butter
⅝ c. fl our
3½ c. vegetable broth
1 c. milk
½ c. whipping cream
⅓ c. parmesan
1 pack of lasagna pasta
(9 oz.)
½ bunch of basil
Fat to grease the dish
Vegetable Lasagna
5
Operating Instructions & Recipe Book
Operating Instructions
The cutting discs are extremely sharp! Use care when handling!
Attention!
Closing Legs for storage or use with bowl:
T
wo legs under top of lid:
Pull interlock up and out of se-
cured position so leg can move freely. Do the same on other
leg. Fold one leg in (does not matter which leg goes fi rst)
and then the other leg. The last leg folded needs to be secured. To do so, slide the interlock piece back into the grove
so it locks in place.
NOTE: if legs are not folded and secured the blades will not
be able to be inserted for use.
Leg on handle:
Be sure the adjustable piece is in its shortest
position. (Squeeze prongs on each side and push extension
piece down towards handle). Push leg in towards handle so
that it is resting in the handle itself.
Cutting discs and Crank handle
Your Genius Food Prep System comes with 5 cutting discs that can be used for various applications.
See
suggestions for use
chart on page 7 for some great ideas!
Here are some things to identify about each disc before using the Genius Food Prep System:
Each cutting disc has a SHARP side and a DULL side.
Each cutting disc is labeled with “THIS SIDE UP” on SHARP SIDE.
Each cutting disc is a different color.
Each cutting disc has a raised center pin on the SHARP side.
Always pick up the discs by the edges! Do not hold the stainless steel blade between fi ngers/thumbs
unless you are holding the center pin.
Attention: DISCS ARE SHARP!!
Page 6

6
Operating Instructions & Recipe Book
Operating Instructions
Insertion of cutting discs and crank handle:
Whether you are using the Multifunctional Lid with or without the bowl, you insert the discs the same way.
The underside of the multifunctional lid has 3 outside prongs and 1 center prong that the cutting disc fi ts
into. The unit will function properly only if the disc is inserted correctly (sharp side facing in to lid and resting
on these prongs).
Hold the multifunctional lid horizontally in one hand in front
of you (as shown).
Lay a disc of your choice in the other hand, palm up with
thumb on edge, with “THIS SIDE UP” facing you. (DULL SIDE
of disc is touching your hand, center pin is showing facing
up).
Slide your hand with the disc horizontally towards the multifunctional lid. Slide the disc close to the underside of the
lid. Continue all the way in until the disc is stopped by the
prongs. Disc should not move if inserted correctly. Turn over
lid, if necessary, to view.
NOTE: IF DISC SHAKES OR FALLS OUT BE CAREFUL NOT TO
TOUCH SHARP SIDE WHEN REINSERTING!!
Now insert the crank handle.
NOTE: The crank handle can only be inserted and secured if
the discs are inserted properly.
With disc inserted, take the crank handle and insert the
shaft into the round hole on the top of the lid. The shape of
the end of the shaft matches the shape of the center pin so
you may have to spin the crank handle around until it falls
into place. Crank should rest on the lip of the hole.
If you turn the crank handle the disc should turn with ease.
Now the Genius Food Prep System is ready for cutting!!!
27
Operating Instructions & Recipe Book
Main courses
Separate the eggs and place the egg white aside. Mix
the egg yolk with the mineral water, fl our, baking powder
and a pinch of salt until you have a smooth batter.
Leave to stand for 10 minutes. In the meantime, clean
the mushrooms. Wash the half peppers, remove the
cores and wash them. Slice the mushrooms and peppers
with the dark green disc. Peel the onion, halve it, remove
the stem end and grate fi nely with the red disc.
Wash the parsley, shake it dry and chop coarsely, leaving
a few springs aside for the garnish.
Now whisk the egg whites with a pinch of salt using a
hand whisk until stiff and carefully fold into the batter.
Fry the mushroom, pepper and onion pieces in hot butter
or margarine in a pan. Then remove around ¾ of the
total quantity and add ¼ of the batter. Cook the omelet
on both sides for 2–3 minutes, season to taste with salt
and pepper and serve immediately with a parsley
garnish.
4 eggs
10 tbsp. water
1¼ c. milk
1¾ c. wheat fl our
½ tsp. baking powder
Salt
White pepper
8–10 oz. pkg. mushrooms
½ red pepper
½ yellow pepper
1 onion
6 springs of parsley to garnish
4 tsp. butter/margarine for
frying
Vegetable Omelet
Page 7

26
Operating Instructions & Recipe Book
Main courses
Cook, cool and peel the potatoes on the day before you
want to cook the roast.
On the next day, slice the potatoes with the dark green
disc and fry on both sides until golden brown in 5 tbsp.
oil.
Pre-heat the oven to
350°F.
Meanwhile, season the steaks with salt and pepper.
Heat up 4 tbsp. oil in a pan and sear th
e meat on both
sides. Cover a baking tray with aluminum foil and put the
meat on it. Save the meat juices in the frying pan. Cook
the steaks for 5 minutes in the oven, then wrap in
aluminum foil and leave to stand.
For the sauce:
Peel and quarter the onions, then slice them with the
dark green disc. Sauté the onions in a pan in the
remaining 2 tbsp. oil. Then stir in the tomato puree,
season to taste with red wine and bay leaf. After a short
while add the meat juices and remove the bay leaf again
with a fork. Stir the cornfl our together with a little water,
pour it into the sauce and bring to the boil.
Season the potatoes with salt and pepper.
Arrange the potatoes, steaks and sauce on plates, garnish
with parsley and serve immediately.
2 lbs potatoes
¾ c. oil for frying
4 rump steaks (à 7 oz.)
Salt
Black pepper
3 onions
1 tsp. tomato puree
⅔ c. red wine
1 bay leaf
1 c. beef stock
1 tsp. cornfl our
Parsley to garnish
Onion Roast with Fried Potatoes
7
Operating Instructions & Recipe Book
Operating Instructions
Lift up the lever on the handle. You will see the food chamber and the blades. BLADES ARE SHARP – USE CAUTION!
Place the piece or several pieces into the chamber. If the
amount of food does not fi ll the chamber be sure to place
the pieces on the LEFT SIDE of the chamber.
Filling the food chamber – preparing the food
With the food in the chamber grasp the handle with thumb
extended. Be sure to grasp handle AND lever!
Apply slight pressure. Turn the crank handle with the other
hand always in a CLOCKWISE direction.
When you are preparing your food for cutting, pieces should not be more then 3” high. This allows the
crank handle to move freely.
Suggestions for Use
CUTTING DISC CUTTING RESULTS SUGGESTIONS
PURPLE THICK JULIENNE STICKS, COARSE
CHOPPING
FRENCH FRIES, CHOCOLATE, CABBAGE, MOZZARELLA
CHEESE
RED MEDIUM SHREDDING, MEDIUM JULI-
ENNE STICKS, ICE CRUSHER, COARSE
GRINDER
CUCUMBERS, CARROTS, RADISH, CRACKERS, TURNUPS, POTATOES, CHEDDAR CHEESE
ORANGE FINE GRINDER, THIN SHREDDING,
GRATING
GINGER, GARLIC, POTATOES, CARROTS, GRAHAM
CRACKERS, FETA CHEESE, HARD CHEESE
DARK GREEN SLICING, SHREDDING CABBAGE, POTATOES, BLUE CHEESE, CUCUMBERS,
CARROTS, CELERY, MUSHROOMS, COOKED MEATS,
PEPPERONI, SALAMI
TEAL WAVY SLICES CUCUMBERS, RADISHES, CARROTS, POTATOES
Page 8

8
Operating Instructions & Recipe Book
Operating Instructions
If you aren’t going to serve the foods that you have cut right
away, you can store them in your bowl and keep them fresh
by using the Fresh-Keeping lid. The lid has 6 closure clips
and a silicone seal to lock in the freshness.
CARE AND CLEANING
It is not recommended to put your Genius Food Prep System Blades in the dishwasher. Carefully clean them
by hand using warm, soapy water. Do not use any abrasive sponges or hard brushes. All other parts are
dishwasher safe.
Fresh-Keeping Lid
Limited Manufacturers Warranty
Genius warrants your Genius Food Prep System for defects in materials and/or workmanship under normal
use for one year from date of purchase. Genius will replace your Genius Food Prep System without charge
upon its receipt of proof of the date of purchase. If a replacement is sent, a new limited one year warranty
will be applied to the replacement. This warranty only applies to units purchased in USA. For warranty
replacements or questions concerning warranty in USA, contact customer service at 1-877-767-5905 or
askus@genius-us.com
Made in China
Turn the cover of the stainless steel cutting disc storage box
to the left to open it.
Stainless steel cutting disc storage box
25
Operating Instructions & Recipe Book
Main courses
Pizza Calzone
10 ½ oz. pizza dough (ready
made)
⅓ c. pizza sauce
4 oz. Gouda or mozzarella
2 slices of cooked ham
5 slices salami
10 slices pepperoni sausage
½ bell pepper
2 pepperonis, medium hot
10 black olives without stones
Pre-heat the oven to 425°F.
Prepare the pizza dough in accordance with the pack
instructions and roll out into a pizza shape.
Cover one half of the pizza with sauce, leaving a ½ inch
gap to the edge. Grate the cheese with the orange disc
and place aside. Put an even layer of ⅓ of the grated
cheese on top of the sauce. Cut the pepper in half,
remove the seeds and wash the fl esh. Then thinly slice
the pepper, pepperoni and olives with the dark green
disc and add them to the pizza half with sauce on it. Also
add the salami, sausage and ham.
Sprinkle another third of the grated cheese on top.
Fold the half of the pizza without sauce over the other
and press the edges together fi rmly. Then spread a little
of the pizza sauce on the top side of the calzone and
cover with the rest of the cheese.
Bake the pizza in the oven for 12–15 minutes.
TIP
If you bake the calzone for longer, the cheese will
be darker in color than on a regular pizza. To prevent
this, cook the pizza for 6–7 minutes, then top with the
rest of the cheese and continue cooking.
Page 9

24
Operating Instructions & Recipe Book
Main courses
Potato Pizza
Pre-heat the oven to 350°F and grease a baking tray.
Peel the raw potatoes, wash them and grate them
coarsely with the purple disc. Add cream and eggs to the
potato mixture and stir well. Season to taste with salt
and pepper. Then distribute the mixture evenly on a
greased baking tray and bake for 20 minutes.
For the topping:
Wash the tomatoes, halve them and remove the stem
ends. Slice the tomatoes and mozzarella with the dark
green disc. Peel the onions, quarter them and grate them
coarsely with the red disc.
Cut the gouda into large pieces and grate medium fi nely
with the red disc.
To make the sauce, combine the tomato puree with the
Provencal herbs and spread the mixture evenly over the
baked potato mixture. Wash the spinach, shake it to
remove excess water and pluck off the leaves. Top the
potatoes with spinach and cheese and bake for another
20–30 minutes.
TIP
Put the mozzarella into the freezer briefl y to make
it easier to slice.
1½ lb. potatoes
⅔
c. dairy cream
2 eggs
Salt
Black pepper
For the topping:
4 tomatoes on the vine
5 oz. mozzarella cheese
1–2 onions
5 oz. gouda (in one piece)
4 tbsp. tomato sauce
Provencal herbs
½ lb. leaf spinach
9
Operating Instructions & Recipe Book
Recipes – Contents
Recipes
STARTERS
Tomato and Mozzarella Platter ................................................................. 10
Sweet Carrot Salad ................................................................................... 10
Greek Farmer’s Salad ................................................................................ 11
Cabbage Salad with Bell Peppers ............................................................. 11
ROTO Layered Salad .................................................................................. 12
Classic Layered Salad ................................................................................ 13
Cream of Bell Pepper Soup with Pesto ....................................................14
Minced Meat & Leek Soup ........................................................................ 15
ROTO Soup ................................................................................................ 16
Tomato and Pasta Soup ............................................................................ 17
MAIN COURSES
Chicken & Vegetable Wraps ...................................................................... 18
Vegetable Potato Fritters .......................................................................... 19
Vegetable Stir-Fry .....................................................................................19
Potato & Mince Souffl é ............................................................................. 20
Beef Sate with an Apple Dip ....................................................................21
Mushroom Ragout .................................................................................... 22
Potato Fritters ........................................................................................... 23
Potato Pizza .............................................................................................. 24
Pizza Calzone ............................................................................................ 25
Onion Roast with Fried Potatoes .............................................................. 26
Vegetable Omelet ..................................................................................... 27
Vegetable Lasagna ................................................................................... 28
SWEETS & DESSERTS
Sweet Focaccia with Pears .......................................................................29
Papaya fi lled with Exotic Fruit Salad ........................................................ 30
Apple and Nut Cake .................................................................................. 31
Page 10

10
Operating Instructions & Recipe Book
Starters
Tomato and Mozzarella Platter
8 tomatoes on the vine
9 oz. mozzarella cheese
3–4 stems of fresh basil
Salt
Black pepper
2–4 tbsp. olive oil
2 tbsp. balsamic vinegar
1 fresh white baguette
Wash the tomatoes and dry them carefully. Remove the
stems, then slice the tomatoes fi rst, followed by the
mozzarella, with the dark green disc.
Arrange the slices of tomato and mozzarella on a platter
alternately so that they overlap.
Then wash the basil, dab it dry, pluck the leaves and
distribute them on top of the tomatoes and mozzarella.
Season with pepper and salt and drizzle with oil and
balsamic vinegar.
TIP
Serve with fresh sliced baguette.
Sweet Carrot Salad
9 oz. carrots
2 apples
2 oz. raisins
For the dressing:
Juice of ½ a lime
Juice of ½ an orange
2 tbsp. oil
2 cinnamon sticks (1 tsp. ground
cinnamon)
Approx. 2 oz. walnuts for the
garnish
Peel and halve the carrots, then cut them into fi ne sticks
with the orange disc. Wash the apples, quarter them and
remove the cores. Grate them fi nely with the red disc
and add them to the carrots.
Wash the raisins in hot water and drain. Then add to the
carrots and apples and mix the salad well.
For the dressing:
Grate the cinnamon sticks with the orange disc, combine
with the orange juice, lime juice and oil and stir well.
Pour the dressing over the salad, mix well and serve in
bowls.
Crack open the walnuts and use as a garnish topping.
23
Operating Instructions & Recipe Book
Main courses
Potato Fritters
Peel the onion and remove the root.
Peel, wash and halve the raw potatoes. Grate them
together with the onion using the orange disc. Season to
taste the mixture with pepper and salt and mix well.
Heat up the clarifi ed butter in a pan. Add approx. two
tbsp. potato mixture to the pan, press fl at and cook at a
low heat for 10–15 minutes until golden brown.
1½ lb. potatoes
1 onion
1 tbsp. fl our (or oats if you
prefer)
Salt
Black pepper
Clarifi ed butter for frying
TIP
The fritters taste delicious as a side dish with
mushroom ragout (recipe on page 23).
Page 11

22
Operating Instructions & Recipe Book
Main courses
Wash and halve the mushrooms. Peel and quarter the
onions and garlic, remove the stem ends and slice with
the dark green disc.
Heat up the oil and butter in a big pan. Fry the onion,
mushrooms and garlic slices, season them with a little
salt and cover the pan with a lid. Leave the vegetables to
cook for approx. 5 minutes on a medium heat setting.
Then add the tomato puree. Season with salt, pepper
and paprika and stir well. Add the vegetable stock, close
the lid and simmer the ragout for 15 minutes at medium
heat.
While the ragout is cooking, wash the parsley, shake well
and chop fi nely. Put the bad chives aside and chop the
others into approx. ⅕
inch long pieces. Then whip the
cream with a hand mixer and stir into the ragout with
the herbs and a little lemon juice. Leave to stand briefl y.
TIP
Serve the mushroom ragout with a delicious potato
fritter (Recipe on page 24).
21 oz. fresh assorted mushrooms
2 onions
2 garlic cloves
2 tbsp. oil for frying
2 tbsp. butter for frying
1 tbsp. tomato puree
Salt
Black pepper
Sweet paprika
1 c. vegetable stock
1 bunch of parsley
1 bunch of chives
½ c. dairy cream
Lemon juice
Mushroom Ragout
11
Operating Instructions & Recipe Book
Starters
Cabbage Salad with Bell Peppers
¾ c. fresh white cabbage
1 red pepper
1 c. vegetable stock
2 tbsp. linseed oil
2 tbsp. vinegar
1 tsp. mustard
1 tsp. caraway seeds
White pepper
Salt
Cut the cabbage into large pieces, remove the stem end,
wash it and then cut it with the red disc into mediumsized julienne sticks. Quarter the pepper, remove the
core and wash it. Cut through the quarters again
horizontally, and then use the orange disc to cut them
into fi ne strips. Add to the bowl with the cabbage strips.
Now mix the vegetable stock, oil, vinegar and mustard
together in a small pan, bring to the boil and pour over
the cabbage and pepper. Season with caraway seeds and
salt, then stir everything carefully. Leave the cabbage
salad to marinate for at least 12 hours before serving.
Wash the lettuce, detach the leaves and tear into bitesized pieces.
Wash the cocktail tomatoes and olives and cut them with
the dark green disc.
Quarter the pepper, remove the core and seeds and wash
the fl esh. Cut through the pepper quarters again and
process with the dark green disc. Peel the half cucumber
and cut into two equally sized pieces. Use the purple disc
to create julienne sticks and put all the ingredients in a
salad bowl.
For the dressing:
Peel the onion, halve it, remove the stem end and grate
with the red disc. Add vinegar, oil, oregano, a little salt
and pepper and combine. Pour the dressing over the
salad and mix well. Dice the feta cheese, sprinkle over
the salad and serve straight away.
1 head romaine lettuce
½ lb. cherry tomatoes
5 oz. can pitted black olives
1 green pepper
½ cucumber
7 oz. feta cheese
For the dressing:
1 onion
3 tbsp. wine vinegar
4 tbsp. olive oil
½ tsp. oregano
Salt
Black pepper
Greek Farmer’s Salad
Page 12

12
Operating Instructions & Recipe Book
Starters
ROTO Layered Salad
½ iceberg lettuce
¼ lb. cherry tomatoes
¼ lb. red cabbage
¼ lb. leeks
¼ lb. carrots
½ cucumber
¼ lb. radishes
2 oz. parmesan or hard Gouda
cheese
For the dressing:
½ c. cream (36% fat)
½ c. plain yogurt
1–2 tbsp. milk
Curry powder
Lemon juice
Salt
Parsley to garnish
First wash all the ingredients. Roughly quarter the
iceberg lettuce and red cabbage and remove the stem
ends. Peel the top layer of the leek away and cut the
stem into 2-3 inches long pieces.
Place the ingredients one after another vertically into
the processing inlet and cut into rings with the dark
green disc. Now put the tomatoes into the processing
inlet and process with the dark green disc.
Layer the ingredients one on top of the other in a high
bowl. First the lettuce, then the tomatoes, then the red
cabbage and fi nally the leek.
Peel the carrots. Cut the carrots and cucumber into 2-3
inches long pieces. Cut the carrots, then the cheese, with
the orange disc into fi ne julienne sticks and put a layer
of carrots on top of the leek.
Collect the cheese and place it aside. Cut the cucumber
with the red disc and place the slices on top of the carrot
sticks. Next use the teal disc to cut wavy radish slices
and put them on top of the cucumber layer.
Sprinkle the cheese, you have set aside, on the top as
the fi nal layer.
For the dressing:
Mix the salad cream, yogurt and milk until smooth, then
season with curry powder, lemon juice and salt.
Serve the dressing in an extra jug and garnish the salad
with parsley.
21
Operating Instructions & Recipe Book
Main courses
Cut the beef into thin slices and then into strips. Put
them on wooden skewers by threading them on in a
wavy pattern and place in an ovenproof dish.
For the marinade: peel the garlic cloves, halve them,
remove the stalk end and grate fi nely with the orange
disc. Heat up 2–3 tbsp. oil in a pan, add the garlic,
paprika, pepper and salt and sauté briefl y.
Take the pan off the heat before the garlic starts to brown
and add the remaining 5–6 tbsp. oil. When the marinade
has cooled, pour it over the meat and leave to marinate
for approx. 5 minutes.
Then fry the beef skewers on both sides in the pan.
For the apple dip:
Peel, quarter and core the apples. Peel the horse radish
and cut it into 2–2 ½ inches long pieces. Peel and quarter
the onion, remove the hard root and grate fi nely together
with the quartered apples and the horse radish using the
orange disc. Add the lemon juice and sour cream to the
dip and season with pepper and salt.
Arrange the skewers on a platter and serve with the
apple dip.
14 oz. beef fi llet
2 garlic cloves
8 tbsp. oil for frying
Salt
Black pepper
Sweet paprika
For the apple dip:
1 apple
3 tbsp. fresh horseradish
1 red onion
1 tbsp. sour cream
Juice of 1 lemon
Beef Sate with an Apple Dip
Page 13

20
Operating Instructions & Recipe Book
Main courses
Pre-heat the oven to 350°F.
Peel the onion and garlic, halve them, remove the stem
ends and slice with the orange disc. Add the tomatoes to
a sieve and drain, then dice.
Heat up the oil in a pan and fry the minced meat in it.
Add the tomatoes, onion and garlic and sauté until soft.
Season with oregano, salt and pepper.
While the ingredients are cooking grease an ovenproof
dish with butter. Peel the potatoes and slice them with
the dark green disc. Layer half of them closely together
in the dish and cover with an even layer of the meat
mixture. Cover with the remaining potato slices.
Whisk the crème fraîche, eggs and milk in a separate
bowl. Season to taste with salt and pepper and pour the
mixture over the souffl é. Grate the cheese fi nely with the
orange disc and sprinkle it on top of the souffl é. Bake in
the oven for around one hour.
1 onion
1 clove of garlic
1 oz. dried tomatoes (in oil)
4 tbsp. oil for frying
1 lb. minced meat (beef, pork,
lamb or chicken)
1 tsp. dried oregano
Salt
Black pepper
2 lb. potatoes
2 tsp. butter to grease the dish
5 oz. crème fraîche
5 fl . oz. milk
2 eggs
2½ oz. parmesan
Potato & Mince Souffl é
13
Operating Instructions & Recipe Book
Starters
Parsley to garnish
Hard boil the eggs for approx. 9 minutes, then immerse
them in cold water. While the eggs are cooking, wash the
cucumber and cut it into approx. 2 inches long pieces.
Wash the peppers, quarter them and remove the cores.
Cut the cucumber and pepper quarters into large sticks
with the purple disc.
Then sieve the sweet corn and tuna, rinse briefl y under
cold water and drain.
Wash the lettuce, quarter it and cut it with the dark green
disc. Peel the eggs and slice them one after the other
with the dark green disc.
Layer the ingredients in any order in small glass bowls.
For the dressing:
Mix the cream, yogurt and milk until smooth, then season
with curry powder, lemon juice and salt.
Pour the dressing over the salad.
Dust the bowls with curry powder and garnish with
parsley.
2 eggs
1 cucumber
1 red pepper
1 can of sweet corn (14 fl . oz. )
1 can of tuna (not in oil)
(6½ oz.)
½ iceberg lettuce
(approx. 5 oz.)
For the dressing:
½ c. cream (36% fat)
½ c. plain yogurt
1–2 tbsp. milk
Curry powder
Lemon juice
Salt
Classic Layered Salad
Page 14

14
Operating Instructions & Recipe Book
Starters
3 yellow peppers
3 red peppers
2 onions
1 clove of garlic
3–4 stems of fresh oregano
3–4 tbsp. oil for frying
2½ c. vegetable stock
2 tbsp. green olives
Salt
Black pepper
4 tsp. green pesto (jar)
Oregano to garnish
Wash the peppers, remove the cores and quarter them.
Fill the processing inlet with 3–4 upright pepper quarters
and cut into strips with the dark green disc.
Peel the garlic and onion, halve them, remove the stem
ends and cut fi nely with the red disc. Put the garlic and
onions in a large pan with a little oil and sauté them.
Wash the oregano, pluck off the leaves and place a few
leaves aside.
Add the peppers and oregano to the pan at the end of
the cooking time, cook briefl y and then add the vegetable
stock. Then leave everything to simmer for approx.
20 minutes.
Now puree the soup with a hand blender and season
with salt and pepper.
Slice the olives with the dark green disc and place them
aside. Pour the soup into bowls and add one tsp. pesto
to the center of each.
Then garnish with the olive rings and the oregano leaves
that you placed aside and serve straight away.
Cream of Bell Pepper Soup with Pesto
19
Operating Instructions & Recipe Book
Main courses
½ lb. potatoes or zucchini
½ lb. carrots
5 tbsp. whole meal wheat fl our
3 eggs
1 onion
Salt
Black pepper
Ginger
5 tbsp. oil for frying
Vegetable Potato Fritters
Peel the potatoes or zucchini, quarter them and grate
fi nely with the orange disc. Whisk the eggs in a separate
bowl, add the fl our and whisk again. Add the whisked
egg and fl our mixture to the grated potatoes or zucchini.
Peel the onion, halve it and remove the stem end. Peel
the carrots and cut them into 2-3 inches long pieces.
Grate the onion and carrots fi nely with the orange disc.
Season with salt, pepper and ginger and mix well.
Heat up the oil in a frying pan. Add portions of the
vegetable mixture and press fl at. Cook on both sides
until golden brown and then drain on kitchen roll.
Cook the rice in 3 fl . oz. salted water, then simmer for
approx. 20 minutes until the rice absorbs the water.
Wash the meat, carefully dab dry with kitchen paper and
cut into approx. ½ inch wide, evenly sized strips. Season
with salt, pepper and paprika. Peel the carrots and cut
them into 2-3 inches long pieces. Peel the onion, halve
it and remove the stem end. Wash and halve the
mushrooms. Slice the mushrooms, carrots and onions
halves with the dark green disc. Heat up the oil in a pan
and fry the meat pieces in it. Add the sliced vegetables
and sauté.
Cover with vegetable stock, add the sour cream and
bind with the sauce thickener.
Serve with rice and garnish with parsley.
5 oz. rice
7 oz. meat (pork, chicken
or rump steak)
Salt
Black pepper
Sweet paprika
3 carrots
1 onion
5 oz. mushrooms
5 tbsp. oil for frying
¼ c. vegetable stock
1 tbsp. pale sauce thickener
1 tbsp. sour cream
Parsley to garnish
Vegetable Stir-Fry
Page 15

18
Operating Instructions & Recipe Book
Main courses
3 tomatoes on the vine
½ iceberg lettuce
3 carrots
3½ oz. cream cheese
1 tbsp. horse radish (fresh or
from a jar)
2 tbsp. yogurt
Salt
Black pepper
5 oz. chicken breast fi llet
4 tbsp. oil for frying
4 stems of basil
4 tortillas (ready made)
First wash all the ingredients. Halve the tomatoes and
remove the stem ends. Roughly quarter the lettuce and
cut it and the tomatoes with the dark green disc.
Peel and halve the carrots, then cut them into fi ne
julienne sticks with the orange disc.
To make the cream, peel the fresh horse radish, wash it,
grate it fi nely with the orange disc and mix it with the
cream cheese and yogurt.
Season with salt and pepper.
Then wash the basil stems, pluck off the leaves, tear
them into small pieces and place aside in a bowl. Heat
up the oil in a pan. While it is heating up, cut the chicken
breast fi llet into strips and fry them.
To make the wraps, spread cream cheese on the tortilla,
add chicken and carrots and top with lettuce and tomato
slices. Sprinkle the basil pieces on top.
Now pick up the sides of the wrap and fold them around
2 inches inwards so that the meat and vegetables are
contained in the folds. Then roll up tightly and slice
diagonally through the center.
Chicken & Vegetable Wraps
15
Operating Instructions & Recipe Book
Starters
Minced Meat & Leek Soup
3 tbsp. oil for frying
1 lb. mixed pork and beef mince
Black pepper
Salt
2 onions
2 cloves of garlic
3 leeks
3 c. vegetable stock
9 oz. cheese spread
1 tub of crème fraîche
1 nutmeg (1 tsp., ground)
1 fresh white baguette
Heat up the oil in a large pan. Fry the meat well and
season with salt and pepper.
While the meat is cooking, peel the onions and garlic,
halve them, remove the stem ends and grate with the
red disc.
Cut off the leek root and remove the top layer. Wash the
leeks, cut into approx. 2-3 inches long pieces, insert
vertically into the processing inlet and cut into rings with
the dark green disc. Add the leek, onions and garlic to
the meat and fry for approx. 5 minutes.
Then add the vegetable stock and simmer for 10 minutes.
Stir in the cheese spread and crème fraîche and bring
back to the boil. Grate a little nutmeg with the orange
disc. Season the soup with the ground nutmeg, pepper
and salt.
TIP
Serve with fresh slices of baguette.
Page 16

16
Operating Instructions & Recipe Book
Starters
Wash the zucchini, celery and leeks. Remove the outer
layer of the leeks. Halve the zucchini, leeks and celery
and cut them into
2-3 inches long pieces.
Place the vegetable sticks vertically in the processing
inlet and cut with the dark green d
isc. Peel the potatoes
and carrots, wash them and process them with the dark
green disc.
Wash the mushrooms, remove the stem ends and cut
with the dark green disc. Place aside. Put everything in a
pan with the vegetable stock and bring to the boil. Cover
the pan and simmer for a further 15 minutes.
As the soup simmers, wash the thyme, dry it carefully,
chop it fi nely and add it to the soup.
Add the mushroom slices for the last 3–4 minutes of
cooking time.
Then season the soup with salt and pepper, pour into
soup bowls and serve hot.
½ lb. zucchini
5 oz. leeks
4 carrots
½ lb. potatoes
6¼ c. liters of vegetable stock
3 stalks of thyme
2 oz. fresh mushrooms
2 stalks of celery
Salt
Black pepper
ROTO Soup
17
Operating Instructions & Recipe Book
Starters
Tomato and Pasta Soup
1 onion
2 cloves of garlic
1 leek
1 tbsp. butter
1½ lb. tomatoes on the vine
3¼ c. vegetable stock
5 oz. tagliatelle
1 tsp. salt
8 tsp. basil
Parsley to garnish
Peel the onion and garlic, halve them, remove the stem
ends and grate with the red disc.
Wash the leek, remove the outer layer and cut off the
root. Cut the leek approx. 2-3 inches long pieces, insert
vertically into the processing inlet and cut into rings with
the dark green disc.
Melt the butter in a pan and sauté the leek, onion and
garlic.
Peel the tomatoes and chop into large pieces.
Add the tomato pieces, vegetable stock and pasta to the
pan. Season with salt and basil, then leave to simmer for
approx. 10 minutes.
Fill into soup bowls and garnish with parsley. Serve hot.
 Loading...