

Page 1

Page 2

1
CONTENTS 1
INTRODUCTION 4
Unpacking the Telephone 5
DESCRIPTION and General Description 6
Key Description 8
LCD Description 10
Menu Navigation 12
INSTALLATION and Setting Up 13
Wall Mounting 14
SETTINGS 15
Set Language 15
Set Contrast 15
Night Light Function 16
Set Font Size 16
Hour Format Setting 17
Date Format Setting 17
Ringer Setting 18
Incoming Call Notification Setting 19
VIP Ringer Setting 19
Keypad Tones Setting 20
Call Waiting 21
Flash Time Setting 22
Dialling Mode Setting 23
Setting Date and Time 24
Dialling Talking Setting 25
Caller ID Talking Setting 26
Review the Phonebook and Caller ID List 27
Voice Prompt 28
Receiving Volume and Tone Settings 29
USING THE TELEPHONE and Making a Call 31
Last Number Redial 32
CONTENTS
Page 3

2
Dialling a Number from the Redial List 32
Clear the Redial List 32
Mute Function 33
Hold Function 33
Receiving a Call 34
Hearing Aid Use 34
Flash Signal 34
OPTIONAL ACCESSORIES 35
Shaker 35
Headset and Audio Neck Loop Use 35
CALLER ID 36
View Caller ID List 36
Dial a Number from the Caller ID List 37
Add a Number from the Caller ID List to the Phone book 37
Delete a Number fron the Caller ID List 38
Delete all Numbers fron the Caller ID List 38
Caller ID on Call Waiting 39
PHONE BOOK 40
Create a Phone Book Entry using the Menu 40
Create a Phone Book Entry in Standby Mode 41
View Phone Book Entries 43
Dial a Phone Book Entry 43
Modify a Phone Book Entry 43
Delete a Phone Book Entry 44
Voice Announce a Phonebook Entry 45
Record Voice Announce for a Phonebook Entry 45
Delete Voice Announce for a Phonebook Entry 46
QUICK DIAL 47
Create a Quick Dial Number 47
View/Dial a Quick Dial Number 47
Clear a Quick Dial Number 48
CONTENTS
Page 4

3
ANSWERING MACHINE 49
Switching the Answering Machine On/Off 49
The Outgoing Message 50
Recording an Outgoing Message 50
Checking an Outgoing Message 51
Restore the Outgoing Message 52
Answering Machine Settings 53
Listening to Messages 54
Call Screening 54
Incoming Message Voice Slow 55
Operating the Answering Machine Remotely 55
Remote Code 56
Remote Control 56
Remote Control Commands 57
Recording a Memo 57
Out of Memory 57
TROUBLESHOOTIING 58
SAFETY INFORMATION 59
GUARANTEE 60
RECYCLING DIRECTIVES 62
CONTENTS
Page 5

4
Congratulations on purchasing your Geemarc CL455. This is a
multifunction telephone which offers features such as hands free
use, caller ID*, caller announce, dialling talking, a phone book,
quick dial and an answering machine. It offers amplification,
helpful for those with hearing difficulties. It has a large button,
easy to see and use keypad, to help stop any misdialling. This
telephone is compatible with hearing aids.
It is important that you read the instructions below in order to use
your Geemarc telephone to its full potential. Keep this user guide
in a safe place for future reference.
This guide explains how to use the following telephone:
CL455
*To use the caller display facility, you must subscribe to your network provider’s caller display
service.
INTRODUCTION
Page 6

5
Unpacking the Telephone
When unpacking the telephone, you should find the following in
the box:
• 1 CL455 unit
• 1 CL455 handset with curly cord
• 1 Telephone line cord
• 1 Mains power adaptor
• 1 User Guide
For product support and help visit our website at
www.geemarc.com
Telephone 01707 384438
Or fax 01707 372529
INTRODUCTION
Page 7

6
General Description
1. Handset Knob 13. MEMO
2. Hook Switch 14. Speed Dial Key (M1-M6)
3. Large LCD Screen 15. Additional Amplifier
key/indicator
4. Left Soft Key
16. Speaker Key
5. Up/Down Scroll 17. Message waiting/new call
LED
6. Right Soft Key
18. Headset Key
7. Tone reception Adjustment 19. Microphone
8. Volume reception
Adjustment
20. Store Key
9. Play/Stop 21. R Key
10. Next
22. Redial Key
11. Previous 23. Emergency Speed Dial
(P1-P3)
12. DEL (C)
DESCRIPTION
Page 8

7
1. Headset jack
2. Audio neckloop jack
3. Optional Bed Shaker jack
4.Volume Reset Override Switch (ON/OFF)
5. Power jack
6. Phone Line Cord jack
7. Back Light Switch
8. New Call Indicator Switch
9.Shaker/Strobe/Strobe and Shaker Select Mode
10. Volume controls
DESCRIPTION
Page 9

8
Key Description
Make/Answer/End a call.
Activates the speakerphone if
pressed during a call
Last number redial
Insert a pause when predialing a number
Scroll through the menu
options.
Enter the Caller ID list
Soft keys. They perform the
functions indicated by the text
immediately over it (on the
bottom line of the display)
which changes depending on
context
Press this button to turn the
extra amplification ON or OFF
The nine keys are used as
one-touch speed dial keys
This key is used to store
numbers
This button is used to
disconnect a call and reestablish dial tone or to switch
over to another caller
provided you have requested
these services i.e. call waiting
from your service provider
Press to start or stop the
Message or Memo playing.
DESCRIPTION
Page 10

9
Press to play the next
message
Press once to play the current
message. Press twice to
play the previous message
When playing a message
press this key to delete the
current message.
Press and hold this key to
record a memo
Use them to adjust the
volume of ringer, dialing
talking, Caller ID
announcing and
speakerphone
DESCRIPTION
Page 11

10
LCD Description
In standby mode, the large LCD display will show as below
If you forget to connect the phone line cord, No line will show
on the screen
When you press the Menu soft key, the main menu will be
displayed. Use ▲ or ▼ to scroll through the menu until you find
the desired option. Press the Select soft key to confirm.
On receiving an incoming call, the caller’s phone number and/or
name will be displayed (providing you have subscribed to the
Caller ID service with your network provider).
DESCRIPTION
Page 12
11
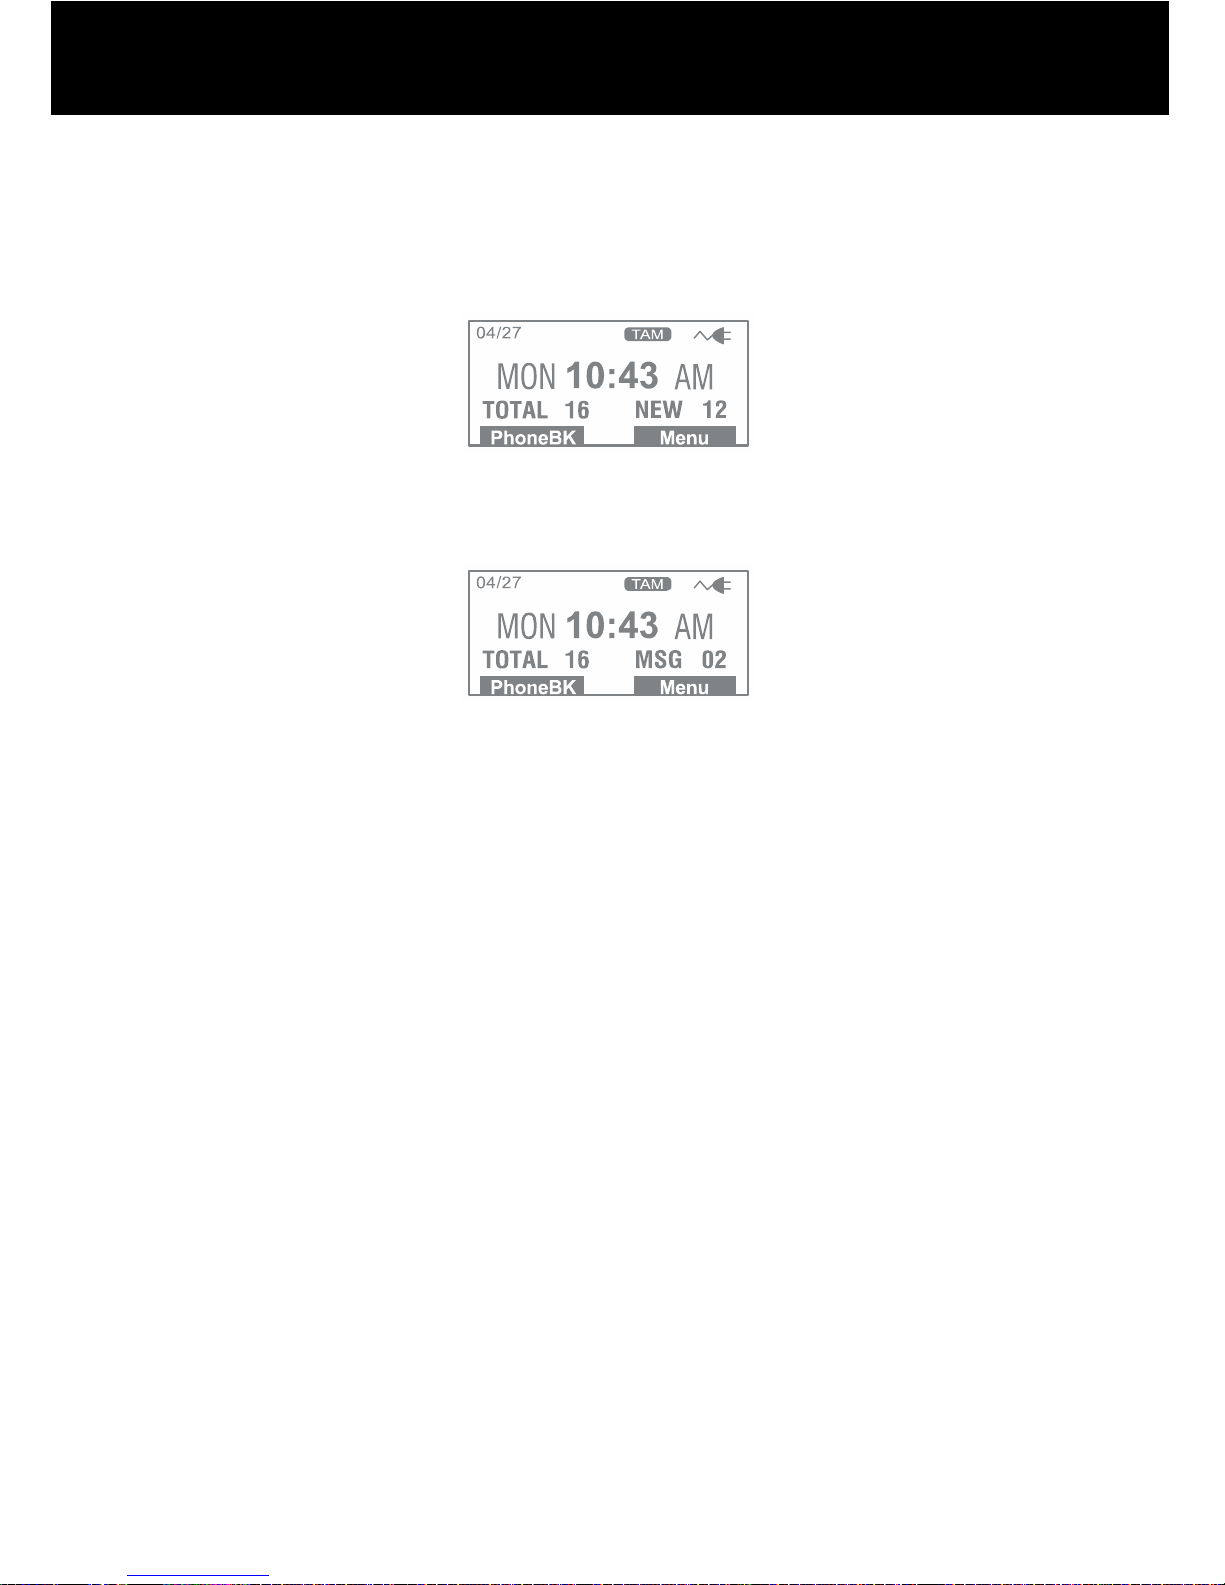
The screen below shows the total calls and new calls needing
reviewing. In this example you have 16 calls in total, which
includes 12 new calls.
The screen below shows that you have 2 new answer machine
messages.
If you subscribe to a Caller ID service -If the caller has exercised
the option to prevent their name and number from being sent,
Private will be shown on the display.
If you subscribe to a Caller ID service – Out of Area will
display when someone calls from an area where the telephone
company is not offering the caller identification services or is not
yet providing number delivery to your area.
DESCRIPTION
Page 13

12
Menu Navigation
To access any menu function you must take the following steps:
1) Press the Menu soft key, the main menu will be displayed.
2) Use ▲ or ▼ to scroll through the menu until you find the
desired option.
3) Press the Select oft key to confirm.
To exit any menu you must take the following step:
1) Press the back or the exit soft key, the phone will return to
the previous screen.
Menu Map
Set Display
Set Language
Set Contrast
Dim:X---x
Hour Format
Date Format
Set Phone
Set Ring
Call Waiting
Set Flash
Dialling Mode
Date and Time
Set Talk
Dialling Talking
CID Talking
Review Talking
Voice Prompt
TAM Setup
TAM ON/OFF
Outgoing Msg
Ring Number
Security ID
ICM Voice Slow
DESCRIPTION
DESCRIPTION
Page 14

13
Setting Up
Connect one end of the curly cord to the handset. The other end
of the curly cord plugs into the jack on the left hand side of the
CL455 unit. Place the handset on the cradle.
Connect the line cord to the socket located at rear of telephone
then connect the plug into the wall socket **.
For the LCD display, backlight and other special features you
must insert the power adapter. Connect the power adaptor to the
jack located at the rear of the telephone then plug the other end
into a 13amp wall socket (*). Please choose a socket near your
telephone to enable you to unplug the mains power quickly in
case of a problem.
(*) Classified “hazardous voltage” according to EN60950 standard
(**) Classified TNV-3 according to EN60950 standard.
INSTALLATION
Page 15

14
Wall Mounting
Turn the handset hanger clockwise and reverse its position (rotate
it 180 degrees - see diagram 1). This will keep the handset from
falling out of the cradle when it is mounted on the wall.
Knock two self-tapping screws (not supplied) into a wall at a
distance of 80 mm from each other and placed in a vertical line.
Place the phone onto the screw-heads and slide down to secure
(see diagram 2).
Diagram 2
INSTALLATION
Diagram 1
Page 16

15
Set Language
Press ‘MENU’ soft key
Press ‘SELECT’ soft key to access ‘SET
DISPLAY’
Press ‘SELECT’ soft key to access ‘LANGUAGE’
Use S and T to select one of the 4 languages available
(English, Francais, Espanol, Deutsch)
Press ‘SELECT’ soft key to confirm
Set Contrast
Your screen has a backlight which automatically switches off after
15 seconds of inactivity. The contrast of the backlight against the
text can be increased or decreased.
Press ‘MENU’ soft key
Press ‘SELECT’ soft key to access ‘SET
DISPLAY’
Use S and T to select ‘SET CONTRAST’
Press ‘SELECT’ soft key
Use S and T to select one of the 8 contrast levels
available
Press ‘SELECT’ soft key to confirm
SETTINGS
Page 17

16
Night Light Function
If you wish to use the LCD back light as a night light, switch the
back light switch to . In doing so the back light will
be switched on constantly.
Set Font size
The text can be displayed on the LCD screen in either a large font
or a small font.
Press ‘MENU’ soft key
Press‘SELECT’soft key to access‘SET DISPLAY’
Use S and T to select ‘DIM:X-Æx’
Press ‘SELECT’ soft key
Use S and T to select either ‘ON’ (large)or ‘OFF’
(small)
Press ‘SELECT’ soft key to confirm
Note: If large font is ‘ON’, when you pre-dial a number – if the
telephone number exceeds 8 digits, the font will be switched to
the smaller size automatically.
SETTINGS
Page 18

17
Hour Format Setting
Press ‘MENU’ soft key
Press ‘SELECT’ soft key to access ‘SET
DISPLAY’
Use S and T to select ‘HOUR FORMAT’
Press ‘SELECT’ soft key
Use S and T to select either ‘12 HOUR CLOCK’or
‘24 HOUR CLOCK’
Press ‘SELECT’ soft key to confirm
Note: If 12 hour clock is selected, AM or PM will be displayed on
the right hand side of the time in standby mode.
Date Format Setting
Press ‘MENU’ soft key
Press ‘SELECT’ soft key to access ‘SET DISPLAY’
Use S and T to select ‘DATE FORMAT’
Press ‘SELECT’ soft key
Use S and T to select either ‘MM/DD’or ‘DD/MM’
Press ‘SELECT’ soft key to confirm
SETTINGS
Page 19

18
Ringer Setting
You can select your own ring tone and adjust both the day volume
and night volume. You can also adjust the volume to off in order
to turn the ringer off.
Press ‘MENU’ soft key
Use S and T to select ‘SET PHONE’
Press ‘SELECT’ soft key
Use S and T to select ‘SET RING’, press ‘SELECT’
‘DAY VOLUME’
will be displayed on the LCD display
(6am-10pm)
Press ‘CHANGE’ soft key to select the desired volume for
the ringer during the day. Each time you press the
‘CHANGE’soft key either ‘LOW’, ‘MEDIUM’, ‘HIGH’
or ‘OFF’ will be displayed and the phone will ring at the
selected volume level
Use T to select ‘NIGHT VOLUME’(10pm to 6am)
Use the volume setting method described above to set the
desired volume for the ringer during the night
Use T to select ‘RING TONE’
Press ‘CHANGE’ soft key to select the desired ring tone.
Each time you press the ‘CHANGE’soft key, the phone
rings with the selected ring tone.
Press ‘SAVE’ soft key to confirm
SETTINGS
Page 20

19
You can also adjust the ringer volume whilst in standby. Simply
use the volume controls VOL+ and VOL- found on the right hand
side of the telephone. The display will show the current level. For
example: ‘RINGER LOW’.
Incoming Call Notification Setting
There is a Shaker/Strobe/Shaker and Strobe select switch on the
right hand side of the telephone. This allows you to choose the
way you wish to be notified of an incoming call. There is the
adjustable ringer, a bright strobe that flashes on receiving a call
and finally a bed shaker. You can choose one of these options
or any combination of the three. If you have purchased the
optional bed shaker, simply plug into the shaker jack and place it
between your mattress and box spring.
VIP Ringer Setting
Any contact saved in the phone book will have the VIP ringer tone
associated with their details automatically.
Press ‘MENU’ soft key
Use S and T to select ‘SET PHONE’
Press ‘SELECT’ soft key
Press ‘SELECT’ soft key to access ‘SET RING’
Use S and T to select ‘VIP TONE’
Press ‘CHANGE’ soft key to select the desired ring
tone. Each time you press the ‘CHANGE’soft key, the
phone rings with the selected ring tone.
Press ‘SAVE’ soft key to confirm
SETTINGS
Page 21

20
Keypad Tones Setting
Press ‘MENU’ soft key
Use S and T to select ‘SET PHONE’
Press ‘SELECT’ soft key
Press ‘SELECT’ soft key to access ‘SET RING’
Use S and T to select ‘KEYPAD TONES’
Press ‘CHANGE’ soft key to set the keypad tones.
You can choose either ‘ON’, ‘OFF’ or ‘Link to
Ringer’
Press ‘SAVE’ soft key to confirm
Note: Link to ringer means the keypad tones will be heard at the
same volume as the ringer volume. Any changes made to the
ringer volume will automatically update the keypad tone volume.
SETTINGS
Page 22

21
Call Waiting
If you subscribe to Call Waiting service from your service provider,
you should activate the Call Waiting function on the telephone.
The telephone will display the name (provided the name and
number are stored in the phonebook) and number of a second
caller while you are having a conversation.
Press ‘MENU’ soft key
Use S and T to select ‘SET PHONE’
Press ‘SELECT’ soft key
Use S and T to select ‘CALL WAITING’
Press ‘SELECT’ soft key
Use S and T to select ‘ON’or‘OFF’ to activate the
call waiting function
Press ‘SELECT’ soft key to confirm
SETTINGS
Page 23

22
Flash Time Setting
You can adjust the flash time setting. There are four options
available. Your telephone works with a flash time for United
Kingdom (R=100ms).
Press ‘MENU’ soft key
Use S and T to select ‘SET PHONE’
Press ‘SELECT’ soft key
Use S and T to select ‘SET FLASH’
Press ‘SELECT’ soft key
Use S and T to select either‘100ms’,‘110ms’,
‘300ms’
or ‘600ms’
Press ‘SELECT’ soft key to confirm
SETTINGS
Page 24

23
Dialling Mode Setting
In the UK, all telephone exchanges now use Tone dialing. If your
telephone does not dial out, it is probably being used from an
older private switch- board (PBX). In this case, the Tone/Pulse
setting must be changed to Pulse.
Press ‘MENU’ soft key
Use S and T to select ‘SET PHONE’
Press ‘SELECT’ soft key
Use S and T to select ‘DIALLING MODE’
Press ‘SELECT’ soft key
Use S and T to select either‘TONE’ or ‘PULSE’
Press ‘SELECT’ soft key to confirm
SETTINGS
Page 25

24
Setting Date and Time
In standby mode, the telephone displays the current date and time.
You need to set the date and time so that when you receive calls
they will appear in the call list with the correct date and time. If
you subscribe to a Caller ID service, the time and date will be set
automatically when you receive your first call.
Press ‘MENU’ soft key
Use S and T to select ‘DATE AND TIME’
Press ‘SELECT’ soft key
Enter the correct time using the numeric keypad
Press ‘SAVE’ soft key
Enter the correct date using the numeric keypad
Press ‘SAVE’ soft key
Use S and T to select the correct weekday e.g. MON,
TUE WED, etc
Press ‘SAVE’ soft key
SETTINGS
Page 26

25
Dialling Talking Setting
This feature allows you to check the number you have entered in standby
mode without looking at the display i.e. the number is announced when
pressed.
Press ‘MENU’ soft key
Use S and T to select ‘SET TALK’
Press ‘SELECT’ soft key
Press ‘SELECT’ soft key to access ‘DIALLING
TALKING’
Use S and T to select either‘ON’ or ‘OFF’to
activate/deactivate the dialling talking function
Press ‘SELECT’ soft key to confirm
SETTINGS
Page 27

26
Caller ID Talking Setting
This feature allows you to check the Caller ID number on
receiving a new call without looking at the display i.e. the
telephone number is announced (provided the number has not
been blocked by the caller). If you have stored the incoming
telephone number in the phone book and recorded the
corresponding name, the name will be announced.
Press ‘MENU’ soft key
Use S and T to select ‘SET TALK’
Press ‘SELECT’ soft key
Use S and T to select ‘CID TALKING’
Use S and T to select either‘ON’ or ‘OFF’to
activate/deactivate the Caller ID talking function
Press ‘SELECT’ soft key to confirm
SETTINGS
Page 28

27
Review the Phonebook and Caller ID List
The telephone can announce numbers stored in the phonebook
and the Caller ID list (except Private and Out of Area calls). If a
name is stored with a telephone number, the name will be
announced.
Press ‘MENU’ soft key
Use S and T to select ‘SET TALK’
Press ‘SELECT’ soft key
Use S and T to select ‘REVIEW TALKING’
Use S and T to select either‘ON’ or ‘OFF’to
activate/deactivate the review talking function
Press ‘SELECT’ soft key to confirm
SETTINGS
Page 29

28
Voice Prompt
You can select the language in which to play the voice prompt.
Press ‘MENU’ soft key
Use S and T to select ‘SET TALK’
Press ‘SELECT’ soft key
Use S and T to select ‘VOICE PROMPT’
Use S and T to select the required language (English,
Deutsch or Francais)
Press ‘SELECT’ soft key to confirm
SETTINGS
Page 30

29
Receiving Volume and Tone Settings
You can alter the receiving volume and tone during a
conversation according to your hearing requirements.
Use the Volume slide control found at the front of the telephone
base to adjust the level. The volume adjustment available is 015dB.
The button on the telephone base provides additional
amplification of 15dB i.e the volume adjustment available is 1530B. When the amplify function is activated, the Amplify LED is lit.
Setting a default for Amplification.
The Amplify ON /OFF ( ) located at the rear allows the
amplification facility to be switched ON or OFF as a default each
time you use the telephone.
AMPLIFY ON/OFF Switch at ON Position ( )
The additional amplification and tone controls are automatically
activated each time you use the telephone. The amplify LED
light will be lit when you use the telephone.
Pressing the Amplify key ( )during a call will turn off the
additional amplification and tone controls. However, you can still
adjust the handset receive volume with the Volume slide bar.
Irrespective of how many times you press the Amplify key ( )
throughout a call, the next time you pick up the handset to make a
new call, these functions will be activated once again.
SETTINGS
Page 31

30
AMPLIFY ON/OFF Switch at OFF Position ( )
The additional amplification and tone controls are turned off each
time you use the telephone. The Amplify LED will be off
whenever you use the telephone.
Pressing the Amplify key ( ) once during a call will enable tone
control and additional amplification. The LED light will turn on to
reflect this change. If you press the Amplify key ( ) once more,
the additional amplification and tone control features will be turned
off once again. The LED light will turn off to reflect this change.
Irrespective of how many times you press the Amplify key ( )
throughout a call, the next time you pick up the handset, these
functions will be turned off once again.
Tone Receiving Adjustment
If the receiver volume has been amplified, the tone control can
also be adjusted. You can adjust and increase the low frequency
or high frequency sounds with the tone slide control on the top of
the unit.
Note: The tone adjustment function will not be affective when the
amplify feature is not being used
SETTINGS
Page 32

31
Making a Call
Pick up the handset.
When you hear the dialling tone, dial the number on the
keypad.
To end the call simply replace the handset in the cradle
Making a Call – Hands Free
Press the button to get a dialling tone then dial the telephone
number on the keypad. The icon appears on the LCD. To
end the call, simply press again. The icon will disappear.
To activate the Hands Free function during the call, press the
button and replace the handset on the cradle at the same time.
To deactivate the Hands Free function during a call, lift the
handset.
Note: When in hands free mode, only one person may talk at a
time. The switch-over between speaker and microphone is
automatic. This is dependent on the sound level of the incoming
call and the microphone respectively. It is therefore essential
that there are no loud noises, e.g. music, in the immediate vicinity
of the telephone, as this will disrupt the hands free function.
Speakerphone Volume Setting
In hands free mode you can adjust the speaker volume by using
the volume controls VOL+or VOL- located on the right side of the
phone.
USING THE TELEPHONE
Page 33

32
Pre-Dialling a Telephone Number
You can enter the desired phone number in standby mode, which
allows you to make corrections before dialling. Follow these steps:
Enter a telephone number (up to 32 digits). Check it. If you make
a mistake while entering a number, press the ‘CLEAR’ soft key
to edit it.
When the number appears correctly, lift the handset or press the
button.
Last Number Redial
Lift the handset or press for hands free use
Press to redial the last number dialled.
Dialling a Number from the Redial List
Press whilst in standby mode
Use S and T to scroll through the redial list to find the
desired number
Lift the handset or press for hands free use
Clear the Redial List
Press whilst in standby mode
Press and hold 0 key . The LCD will display ‘EMPTY
LIST’
to indicate that all the entries in the redial list
have been deleted
USING THE TELEPHONE
Page 34

33
Mute Function
If you wish, you can speak privately to someone else in the room
without your caller overhearing. You will still be able to hear the
caller but they cannot hear you during the mute operation.
To switch on the mute mode during a call press the ‘MUTE’ soft
key (‘MUTE’ will be displayed on the LCD). Your caller will not
be able to hear you anymore. Press ‘UNMUTE’ soft key to
resume the conversation with your caller (‘MUTE’ will no longer
displayed on the LCD).
Hold Function
You can put a call on hold. Do this by simply pressing the
‘HOLD’ soft key during a call. The LCD will display ‘CALL
ON HOLD’
. If you hang up now, the call will not be
disconnected.
To continue the conversation, simply pick up the handset or press
the ‘UNHOLD’ soft key.
USING THE TELEPHONE
Page 35

34
Receiving a Call
When an incoming call is received, the telephone rings and the
incoming call indicator lights up. If you have a voice message,
NEW VOICE MAIL will be shown on the LCD. To delete the
voice message, press S in standby then press and hold 4.
Lift the handset and speak
To end the call simply replace the handset in the cradle
Receiving a call – Hands Free
Press to speak hands free
To end the call press
Hearing Aid Use
This telephone is hearing aid compatible. Select the T mode on
your hearing aid to enable this feature.
Flash Signal
The R button can be used with special services such as Call
Waiting (if provided by your service provider) or transferring
external calls to another extension within a private switchboard.
USING THE TELEPHONE
Page 36

35
Shaker
At the rear of the telephone, there is a 3.5mm shaker jack .
You can connect an optional shaker device. When you are
receiving an incoming call, the shaker will vibrate. (See Incoming
Call Notification Settings)
Headset and Audio Neck Loop Use
Your phone is equipped with both an Audio and Headset jack at
the rear of the telephone. Both the two jacks are amplified,
allowing you to adjust both the tone and volume.
The Audio Neckloop jack allows you to listen through your
Neckloop whist speaking into the handset or the speakerphone
The Headset jack allows you to listen and speak through your
hands free headset. Connect the headset at the rear side of the
base in the 2.5mm jack . Press to get a dial tone
OPTIONAL ACCESSORIES
Page 37

36
The features described in this section are only available if you
subscribe to a Caller ID service from your network provider.
Caller ID means you can see who is calling on your handset
display (provided the number is not withheld, unavailable or is an
international call).
The display shows ‘PRIVATE’ for a witheld number.
The display shows ‘Out of Area’ when someone calls from
an area where the telephone company is not offering caller
identification services or is not yet providing number delivery to
your area.
Whether you take a call or not, the caller’s telephone
number/name together with the date and time of the call are
stored in the Caller ID list. This book stores the last 30 incoming
calls of up to 15 digits.
The New Call LED will flash to notify you of a new call. If you do
not want the New Call LED to be lit to notify you of a new call,
switch the new call indicator switch (found on the right side
of the unit) to Off.
View Caller ID List
Use S and T to scroll through the Caller ID list. The
numbers will be listed in the order they were received.
Scrolling through this list in order to review any new calls
sets the New Call count to zero and the New Call LED
wiill be switched off
CALLER ID
Page 38

37
Dial a Number from the Caller ID List
Use S and T to scroll through the Caller ID list until you
find the desired number
Pick up the handset or press the key, the number is
automatically dialled. (If the number is 10 or 11 digits,
you can add or remove a 1 from in front of the number.
E.g. if the original number in the Caller ID list was 800965-9043, press the * key repeatedly to change it to 1-
800-965-9043 or 965-9043.Or if the number is 1-987-654-
3210, press the key *repeatedly to change it to 987-654-
3210 or 654-3210)
Add a Number from the Caller ID List to the
Phone Book
Use S and T to scroll through the Caller ID list until you
find the number you wish to add to the phone book
Press ‘OPTIONS’ soft key
Use S and T to select ‘STORE’
‘NAME:’ will be displayed
Enter the name you wish using the numeric keypad
Use T if you want change the number
Modify the phone number if it is not correct with the
function ‘CLEAR’
CALLER ID
Page 39

38
Press ‘SAVE’ soft key to confirm
‘RECORD VOICE:’ will be displayed
Select ‘YES’to confirm or ‘NO’to cancel. If you
confirm, you can record the name of the
phonebook entry (up to 6 seconds). You can
also press ‘End’to confirm and end the
recording. Your recording will play back for you
immediately
Delete a Number from the Caller ID List
Use S and T to scroll through the Caller ID list until you
find the number you wish to delete from the Caller ID list
Press ‘OPTIONS’ soft key
Use S and T to select ‘ERASE’
Delete All Numbers from the Caller ID List
Use S and T to enter the Caller ID list
Press ‘OPTIONS’ soft key
Use S and T to select ‘ERASE ALL’
‘ERASE ALL?’
will be displayed
Select ‘YES’ to confirm or ‘NO’ to cancel
By deleting all the numbers in the Caller ID list, the Totall Call
count will be set to zero
CALLER ID
Page 40

39
Caller ID on Call Waiting
When you are using the telephone, if you have subscribed to Call
Waiting with your service provider, the name and number of a
second caller will be displayed.
Press the R key and ‘2’ to answer the second caller.
When you have finished with the second caller, press R and ‘2’
again to resume conversation with the original caller.
CALLER ID
Page 41

40
Telephone numbers can be stored in the phone book. It allows
you to store frequently used numbers so that you can easily make
a call without having to remember or enter the telephone number
The phone book can contain 39 entries. Each phone number
can contain up to 24 digits.
Create a Phone Book Entry using the Menu
Press ‘PHONEBK’ soft key to enter the phone book
Press ‘SELECT’ soft key to choose ‘ADD NEW
NAME’
‘NAME:’
will be displayed
Enter the name you wish using the numeric keypad
Press ‘SAVE’ soft key to confirm
‘NUMBER:’
will be displayed
Enter the number you wish using the numeric keypad (up
to 24 digits)
Press ‘SAVE’ soft key to confirm
‘RECORD VOICE:’
will be displayed
Select ‘YES’to confirm or ‘NO’to cancel. If you
confirm, you can record the name of the
phonebook entry (up to 6 seconds). You can
PHONE BOOK
Page 42

41
also press ‘End’to confirm and end the
recording. Your recording will play back for you
immediately
Repeat if you want to add more entries to the phone book
Create a Phone Book Entry in Standby Mode
Enter a telephone number whilst in standby
Press ‘STORE’ soft key
‘NAME:’
will be displayed
Enter the name you wish using the numeric keypad
Press ‘SAVE’ soft key to confirm
Use T if you want change the number
Modify the phone number if it is not correct with
the function ‘CLEAR’
Press ‘SAVE’ soft key to confirm
‘RECORD VOICE:’
will be displayed
Select ‘YES’to confirm or ‘NO’to cancel. If you
confirm, you can record the name of the
phonebook entry (up to 6 seconds). You can
PHONE BOOK
Page 43

42
also press ‘End’to confirm and end the
recording. Your recording will play back for you
immediately
Repeat if you want to add more entries to the phone book
Note: If you make a mistake while entering a name or number,
press ‘CLEAR’soft key to clear the last character/digit and then
enter the correct character/digit.If a voice prompt is recorded with
a phonebook entry, an icon will be displayed alongside the name.
Insert Pause
Inserting a pause provides a delay of 3 seconds. This is
necessary with some telephone systems.
To insert a dialling pause between numbers when storing a
number, press until ‘P’ appears in the LCD display
Character Map
Key Characters
in order
0 0 .
1 Space _ * , 1
2 Aa Bb Cc ( 2
3 Dd Ee Ff ) 3
4 Gg Hh Ii # 4
5 Jj Kk Ll / 5
6 Mm Nn Oo ‘ 6
7 Pp Qq Rr Ss 7
8 Tt Uu Vv ? 8
9 Ww Xx Yy Zz 9
When entering letters, you can shift between upper and lower
case by pressing * key. If you need to enter the same letter twice
or another letter with the same key, wait a few seconds and the
cursor will move automatically to the next space.
PHONE BOOK
Page 44

43
View Phone Book Entries
Press ‘PHONEBK’ soft key to enter the phone book
Use S and T to scroll through the phone book until you
find the contact you wish to view. If the Review Talking
feature is activated, the number (or name-if recorded) of
the highlighted entry will be announced
Press ‘VIEW’ soft key to view details of that phone
book entry
Dial a Phone Book Entry
Press ‘PHONEBK’ soft key to enter the phone book
Use S and T to scroll through the phone book until you
find the contact you wish to dial
Pick up the handset or press the key, the number is
automatically dialled
Modify a Phone Book Entry
Press ‘PHONEBK’ soft key to enter the phone book
Use S and T to scroll through the phone book until you
find the contact you wish to edit
Press ‘VIEW’ soft key to view details of that phone
book entry
PHONE BOOK
Page 45

44
Press ‘OPTIONS’ soft key
Use S and T to select ‘EDIT’
The curser will start to flash on the right hand side of the
name. Modify name using ‘CLEAR’ soft key to clear
the previous characters and then enter the correct
character(s)
Press Tto edit the telephone number
The curser will start to flash on the right hand side of the
number. Modify number using ‘CLEAR’ soft key to
clear the previous digits and then enter the correct
digit(s). Press ‘SAVE’ soft key to confirm
Delete a Phone Book Entry
Press ‘PHONEBK’ soft key to enter the phone book
Use S and T to scroll through the phone book until you
find the contact you wish to edit
Press ‘VIEW’ soft key to view details of that phone
book entry
Press ‘OPTIONS’ soft key to view details of that phone
book entry
Use S and T to select ‘ERASE’ and press
‘SELECT’
PHONE BOOK
Page 46

45
Voice Announce a Phonebook Entry
Press ‘PHONEBK’ soft key to enter the phone book
Use S and T to scroll through the phone book until you
find the contact you wish to edit
Press ‘VIEW’ soft key to view details of that phone
book entry
Press ‘OPTIONS’ soft key to view details of that phone
book entry
Press ‘PLAY VOICE’ soft key and press
‘SELECT’. The voice prompt for this entry will be
announced. The name will be announced if you have
stored a name. However, if no name has been stored,
only the telephone number will be announced
Record Voice Announce for a Phonebook
Entry
Press ‘PHONEBK’ soft key to enter the phone book
Use S and T to scroll through the phone book until you
find the contact you wish to edit
Press ‘VIEW’ soft key to view details of that phone
book entry
Press ‘OPTIONS’ soft key
PHONE BOOK
Page 47

46
Use S and T to select ‘RECORD VOICE’
Press ‘SELECT’ soft key
Select ‘YES’to confirm or ‘NO’to cancel. If you
confirm, you can record the name of the phonebook entry
(up to 6 seconds). You can also press ‘End’to confirm
and end the recording. Your recording will play back for
you immediately
Delete Voice Announce for a Phonebook
Entry
Press ‘PHONEBK’ soft key to enter the phone book
Use S and T to scroll through the phone book until you
find the contact you wish to edit
Press ‘VIEW’ soft key to view details of that phone
book entry
Press ‘OPTIONS’ soft key
Use S and T to select ‘ERASE VOICE’ and press
‘SELECT’
PHONE BOOK
Page 48

47
This telephone has 9 quick dial memory buttons. Six of these
buttons are speed dials and the other three are emergency dials.
The Emergency buttons are an ideal location to store the doctor
or a close friend’s number in case of a problem. Once a number
has been stored in a memory location, you only need to press one
button to make the call.
Create a Quick Dial Number
Enter the telephone number to be stored (maximum of
32 digits). You can edit the number using the
‘CLEAR’ soft key
Press . The LCD display will show ‘Æ?’
Select the quick dial location to store the telephone
number by pressing the corresponding button.
‘SAVED’ will be displayed
View/Dial a Quick Dial Number
In standby mode, press the required quick dial location.
The telephone number will be displayed
Lift the handset or press to dial the quick dial
telephone number
Note:You can also press and hold one of the speed dial
numbers/emergency numbers for about 1 second to automatically
turn on the speakerphone and dial the required number.
QUICK DIAL
Page 49

48
Clear a Quick Dial Number
Press . The LCD display will show ‘Æ’
Select the quick dial location to be cleared ‘SAVED’
will be displayed. The location will be cleared of the
number. Alternatively, store a new number – this will
automatically erase the previous telephone number
QUICK DIAL
Page 50

49
Switching the Answering Machine On/Off
The answering machine can be switched on and off as follows:
Press ‘MENU’ soft key
Use S and T to select ‘TAM SETUP’
Press ‘SELECT’ soft key
Press ‘SELECT’ soft key to select ‘TAM ON/OFF’
Use S and T to select either‘ON’ or ‘OFF’to
activate/deactivate the answering machine
Press ‘SAVE’ soft key to confirm
When switched to ON position, incoming calls will be answered by
the answering machine after a certain number of rings (see
Answering Machine Settings). When the answering machine
answers an incoming call, the caller will hear your outgoing
message. After a short beep they can then leave a message.
If the Answering Machine is OFF, it will answer a call after 10
rings. This is to allow some features to be accessed remotely.
Your CL455 answering machine can be operated from either:
• the telephone unit
• remotely from any external telephone.
ANSWERING MACHINE
Page 51

50
Outgoing Message
Before you use the answering machine you should record an
outgoing message. The outgoing message is your message to an
incoming caller and may be up to 2 minutes in length.
The default OGM is “Please leave your message after the tone”.
If you prefer, you can record your own OGM.
Recording an Outgoing Message
Press ‘MENU’ soft key
Use S and T to select ‘TAM SETUP’
Press ‘SELECT’ soft key
Use S and T to select ‘OUTGOING MSG’
Press ‘SELECT’ soft key
Use S and T to select ‘RECORD OGM’
Press ‘SELECT’ soft key
‘RECORD OGM?’will be displayed
Select ‘YES’ to confirm or ‘NO’ to cancel
On hearing the tone, record your personal OGM. When you
have finished speaking press the ‘END’ soft key. If you
speak for longer than 2 minutes, recording will stop
automatically. The new OGM will be played after recording
ANSWERING MACHINE
Page 52

51
Checking the Outgoing Message
Press ‘MENU’ soft key
Use S and T to select ‘TAM SETUP’
Press ‘SELECT’ soft key
Use S and T to select ‘OUTGOING MSG’
Press ‘SELECT’ soft key
Press ‘SELECT’ soft key to select ‘PLAY OGM’
The current OGM will be played. During the process the
display will show ‘PLAYING OGM’. You can press
‘EXIT’ soft key to stop and exit or press ‘REPLAY’ soft
key to play it again.
.
ANSWERING MACHINE
Page 53

52
Restore the Outgoing Message
You can delete your personal recorded OGM and restore the
factory default OGM.
Press ‘MENU’ soft key
Use S and T to select ‘TAM SETUP’
Press ‘SELECT’ soft key
Use S and T to select ‘OUTGOING MSG’
Press ‘SELECT’ soft key
STAGE A Use S and T to select ‘ERASE MSG’
Press ‘SELECT’ soft key
‘ERASE RECORDED OGM?’
will be displayed
Select ‘YES’ to confirm or ‘NO’ to cancel
Alternatively, at STAGE A you can select the following so as
you can toggle between the Default Outgoing Message and the
Recorded Outgoing Message
Use S and T to select ‘CHANGE MSG’
Press ‘SELECT’ soft key
Use S and T to either ‘DEFAULT OGM’ or
‘RECORDED OGM’
ANSWERING MACHINE
Page 54

53
Answering Machine Settings
You can select the number of rings before the answering machine
is activated and responds to an incoming call. You can choose
from the following:
3 = calls are answered after three rings
4 = calls are answered after four rings
5 = calls are answered after five rings
6 = calls are answered after six rings
• TS (TOLL SAVER) = activates the toll saver function
In Toll Saver mode incoming calls are answered after five rings
until the first new message has been recorded. Once a message
has been recorded the answering machine will answer after three
rings. This is useful when trying to remotely access the answering
machine. If the answering machine has not answered at the
fourth ring, no messages have been recorded and you can hang
up before you are charged for the call. If the machine answers
after three rings, new messages have been recorded.
Press ‘MENU’ soft key
Use S and T to select ‘TAM SETUP’
Press ‘SELECT’ soft key
Use S and T to select ‘RING NUMBER’
Press ‘SELECT’ soft key
Use S and T to select either‘3 RINGS’,‘4
RINGS’
, ‘5 RINGS’,‘6 RINGS’or‘TOLL
SAVER’
Press ‘SAVE’ soft key
ANSWERING MACHINE
Page 55

54
Listening to Messages
If you have a new message the display will show how many new
messages have been received and new message LED will be lit.
To play the messages, press the key. To play the
messages through the speaker, press whilst on hook. To
play the messages through the receiver, press after lifting
the handset. The telephone will announce, “You have N new
messages” or “You have N old messages”. The messages will
be played one by one. During playback, you can do the following:
Press to delete the current message
Press once to re-play the current message
Press twice to re-play the previous message
Press to play the next message
Press or ‘EXIT’ soft key to stop the playing and exit
To adjust the playback volume use VOL+ or VOL- on the right
side of the telephone. You can also use the amplify function
whilst using the answering machine.
When playback is finished the machine will return to standby
mode. All incoming messages are saved (unless you have erased
any during playback, see above), new messages will then be
recorded after the old ones.
Call Screening
Incoming messages can be heard through the Speakerphone as
they are received. If there is no sound, adjust the volume using
the control on the right hand side of the telephone.If you want to
speak to the caller, lift the handset.
ANSWERING MACHINE
Page 56

55
Incoming Message Voice Slow
If you are struggling to hear or understand the message left by a
caller, you can play it back in a slow mode.
Press ‘MENU’ soft key
Use S and T to select ‘TAM SETUP’
Press ‘SELECT’ soft key
Use S and T to select ‘ICM VOICE SLOW’
Press ‘SELECT’ soft key
Use S and T to select either‘ON’,or‘OFF’
Press ‘SAVE’ soft key
Operating the Answering Machine Remotely
This answering machine can be accessed remotely using the
keys of an ordinary tone dialling telephone.
ANSWERING MACHINE
Page 57

56
Remote Code
A confidential three digit code is required to listen to your
messages from a remote external telephone. The default remote
code is 123. For security reasons it is advisable to change this
code.
Press ‘MENU’ soft key
Use S and T to select ‘TAM SETUP’
Press ‘SELECT’ soft key
Use S and T to select ‘SECURITY ID’
Press ‘SELECT’ soft key
The current remote code will be displayed on the LCD.
Enter the new code that you wish to use
Press ‘SAVE’ soft key
Remote Control
Call the answering machine (using your telephone
number)
While the outgoing message is playing, enter the remote
code
If the remote code is accepted, the system will play the
menu of commands. You can then follow the voice
prompt to operate
When you have finished accessing the machine replace
the handset.
ANSWERING MACHINE
Page 58

57
Remote Control Commands
Command Functions
2
Play new messages
2 twice
Stop playback
0
Erase single message during
playback
1
Review
3
Skip to next message
4
Switch the answering machine
on/off
7
Repeat the menu again
Recording a Memo
You can leave a memo for other answering machine users (up to
3 minutes).
To record the memo, press and hold the key in standby
mode. The display will show ‘RECORDING MEMO’ and start
the recording. The key should be pressed and held down
whilst recording. Release the key to end the recording.
The message can be played by pressing of the answering
machine or via the remote access function using a normal
telephone.
Out of Memory
The total capacity of the answering machine’s memory is
approximately 40-50 minutes. The memory space is shared
between the outgoing message, personal memos, and regular
incoming messages. The answering machine will answer after
10 rings to allow remote playback and deletion of messages, no
new messages will be accepted until the existing messages have
been played and erased.
ANSWERING MACHINE
Page 59

58
No display
• Make sure that the power adaptor is plugged in correctly and
is not damaged
• Check for a power cut in the area
CL455 does not ring
• Make sure that the telephone line cord is plugged in correctly
and is not damaged
• Connect another telephone to the telephone PTT socket or
move your telephone to another socket to track if the failure is
coming from your telephone or your PTT socket
• There may be too many communication devices connected to
a single telephone line e.g. another telephone, modem or
facsimile machine. Contact your network provider for help in
calculating the limit for your home or business line
• Check the Ringer is not switched to OFF
• Check the Volume level of the ringer
No dial tone
• Make sure that the telephone line cord is plugged in correctly
and is not damaged
• Connect another telephone to the telephone PTT socket or
move your telephone to another socket to track if the failure is
coming from your telephone or your PTT socket
• There may be too many communication devices connected to
a single telephone line e.g. another telephone, modem or
facsimile machine. Contact your network provider for help in
calculating the limit for your home or business line
• Check that the dialing mode is set to the correct setting (tone
or pulse)
Interference on the line
• Ensure a filter is fitted to all telephone sockets if you have a
DSL line
No Caller ID information displayed
• Ensure you have requested the Caller ID service from your
network provider
No Amplification
• Check the Amplify key has been pressed and the LED is lit
(red).
TROUBLESHOOTING
Page 60

59
General
Only use the power supply included with the product.
Do not open the unit. Contact the helpline for all repairs.
The phone is capable of amplifying sounds to a loud volume. It is
important to instruct all potential users of its proper operation. It is
advised to adjust the volume control to its minimum level (Low)
when not in use and alert other users that hearing damage can
potentially result from misuse
Cleaning
Clean the telephone with a soft cloth. Never use polishes or
cleaning agents - they could damage the finish or the electrics
inside.
Environmental
Do not expose to direct sunlight.
Always ensure there is a free flow of air over the surfaces of the
telephone.
Do not place any part of your product in water and do not use it in
damp or humid conditions e.g. bathrooms.
Do not expose your product to fire or other hazardous conditions.
Unplug your phone from the telephone socket during
thunderstorms because it could damage your telephone. Your
guarantee does not cover thunderstorm damage.
The telephone is designed for working within a temperature range
of 5°C to 45°C.
SAFETY INFORMATION
Page 61

60
From the moment your Geemarc product is purchased, Geemarc
guarantee it for the period of one year. During this time, all repairs
or replacements (at our discretion) are free of charge. Should you
experience a problem then contact our help line or visit our
website at www.geemarc.com. The guarantee does not cover
accidents, negligence or breakages to any parts. The product
must not be tampered with or taken apart by anyone who is not an
authorized Geemarc representative. The Geemarc guarantee in
no way limits your legal rights.
IMPORTANT: YOUR RECEIPT IS PART OF YOUR
GUARANTEE AND MUST BE RETAINED AND PRODUCED IN
THE EVENT OF A WARRANTY CLAIM.
DECLARATION: Geemarc Telecom SA hereby declares that this
product is in compliance with the essential requirements and other
relevant provisions of the Radio and Telecommunications
Terminal Equipment Directive 1999/5/EEC and in particular article
3 section 1a, 1b and section 2. The telephone does not operate if
the line current is lower than 18 mA.
The declaration of conformity may be consulted at www.geemarc.com
Please note: The guarantee applies to
the United Kin
g
dom onl
y
GUARANTEE
Page 62

61
Electrical connection: The apparatus is designed to operate
from a 230V 50Hz supply only. (Classified as ‘hazardous voltage’
according to EN60950 standard). The apparatus does not
incorporate an integral power on/off switch. To disconnect the
power, either switch off supply at the mains power socket or
unplug the AC adaptor. When installing the apparatus, ensure that
the mains power socket is readily accessible.
Telephone connection: Voltages present on the
telecommunication network are classified TNV-3
(Telecommunication Network Voltage) according to the EN60950
standard.
GUARANTEE
Page 63

62
The WEEE (Waste Electrical and Electronic Equipment) has been
put in place for the products at the end of their useful life are
recycled in the best way.
When this product is finished with, please do not put it in your
domestic waste bin.
Please use one of the following disposal options:
- Remove the batteries and deposit them in an appropriate WEEE
skip. Deposit the product in an appropriate WEEE skip.
- Or, hand the old product to the retailer. If you purchase a new
one, they should accept it.
Thus if you respect these instructions you ensure human health
and environmental protection.
For product support and help visit our website at
www.geemarc.com
Telephone 01707 384438
Or fax 01707 372529
UGCL455_En_v1.1
RECYCLING DIRECTIVES
Page 64

 Loading...