


DECT200
User Guide p2
Notice d’utilisation p38

Index
Description
Handset/ Base 4
LCD screen 6
Characters List 7
Menu 8
Installation
Connection 9
Batteries setting up 9
Batteries use 9
Using the telephone
On/Off setting 11
Key lock 11
Receiving a call 1 2
Making a call 12
Hands free mode 1 3
Last number redial 1 4
Recalling Recent Numbers 1 4
Mute function 1 4
Paging the handset 1 5
Direct call 15
Handset settings
Ringer setting 1 6
Key tone setting 16
Silence mode 1 7
Language setting 1 7
Time/Date setting 18
User name 1 8
Personnal Identification Number 1 9
«One touch» memories ( store & call ) 2 0
Restore factory settings 2 0
Base settings
Base setting access 22
T one Dialling Switch over 2 2
Flash setting 23
Insert pause 2 3
Personnal Identification Number 2 4
Base Melody 2 5
Base V olume 2 5
2

Phone book
Create an entry 2 6
View entries 2 6
Delete an entry 2 7
Clear all entries 2 7
Modify an entry 2 8
Caller Display ( CID )
Dial from CID list 2 9
V oice mail and CID list 30
Waiting call indicator 3 0
Delete entries in CID list 3 1
Clear all entries 3 1
Transfer from CID list to phone book 3 2
Additional handsets /base
Add a new handset 3 3
Release a registered handset 3 3
Make an internal call 3 4
Call transfer between Handsets 3 4
Conference call 3 5
Add an extra base 35
General informations
Guarantee 3 6
Recycling instruction 3 7
3

Description
Handset & Base
4
Direct memories
M1 to M4
Receive and end
call key
Redial key
Flash button and
phone book
Confirm key
Cancel key
Paging button
Key lock
Silence mode key
Scroll key
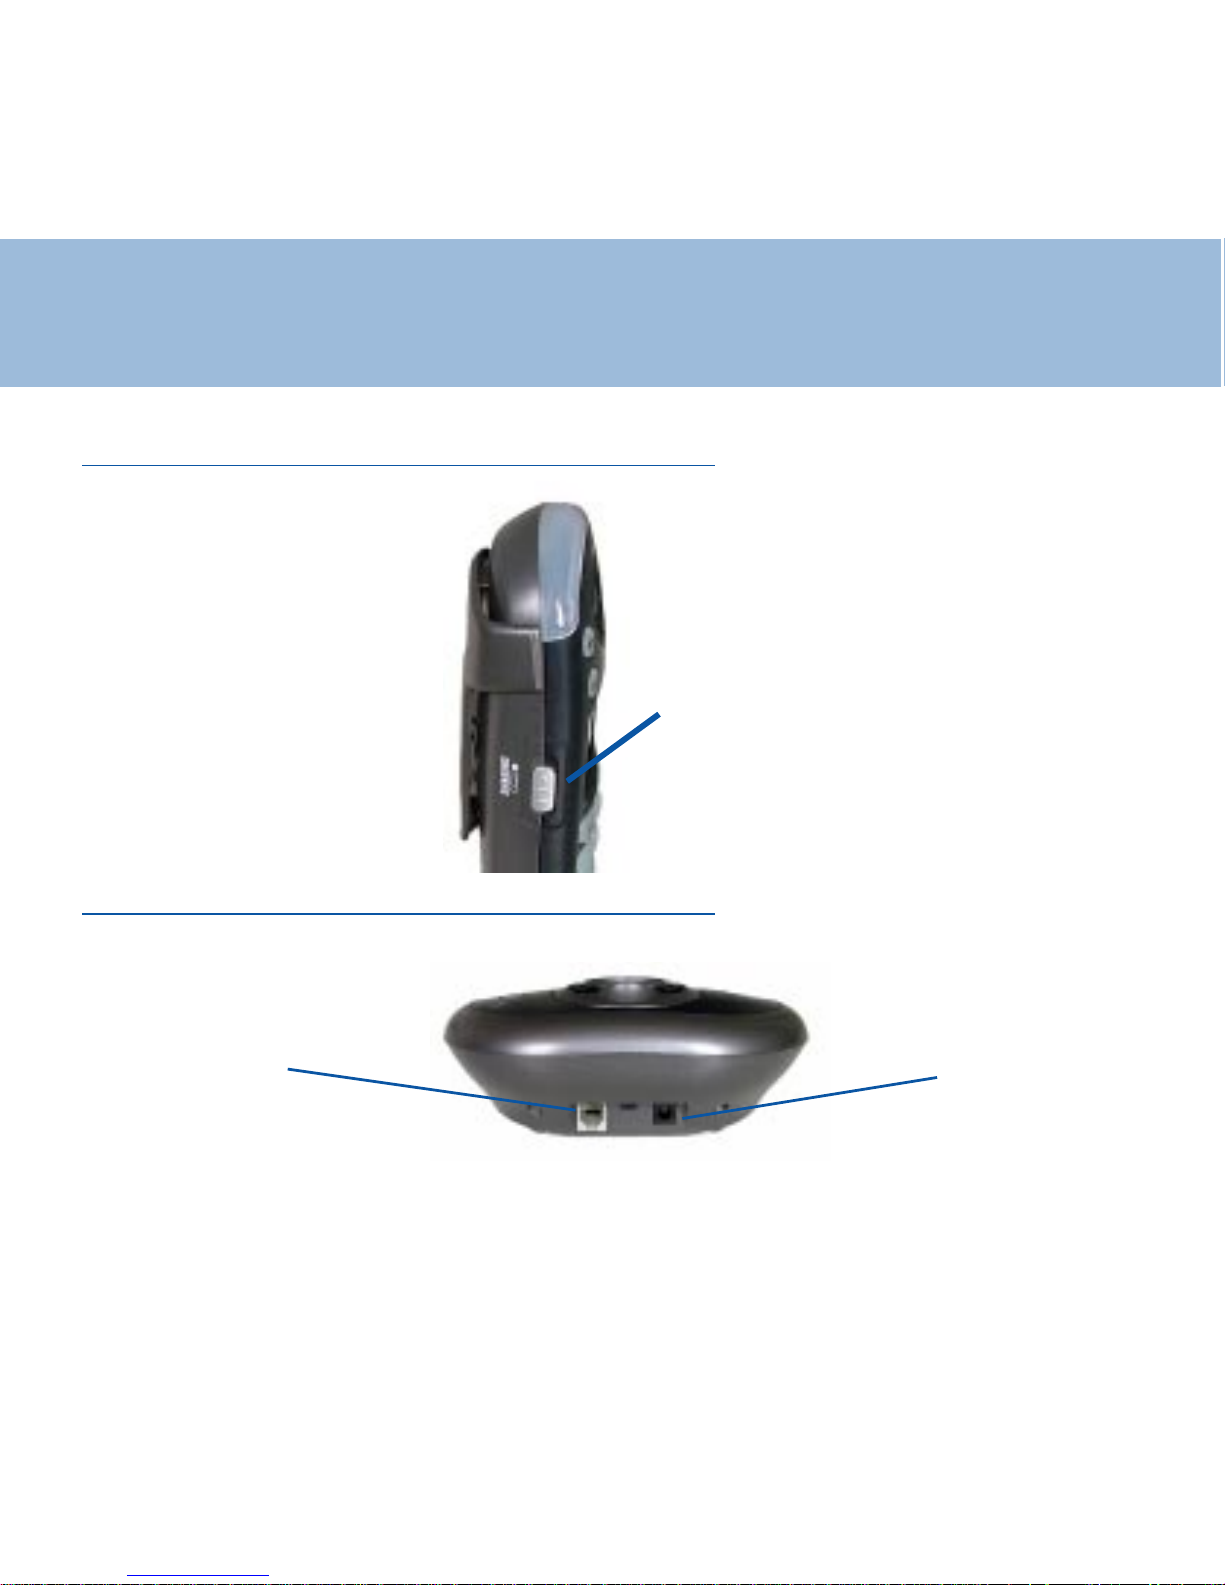
Description
Side
Base
5
Line cord
Power Adaptor socket
Shaker button
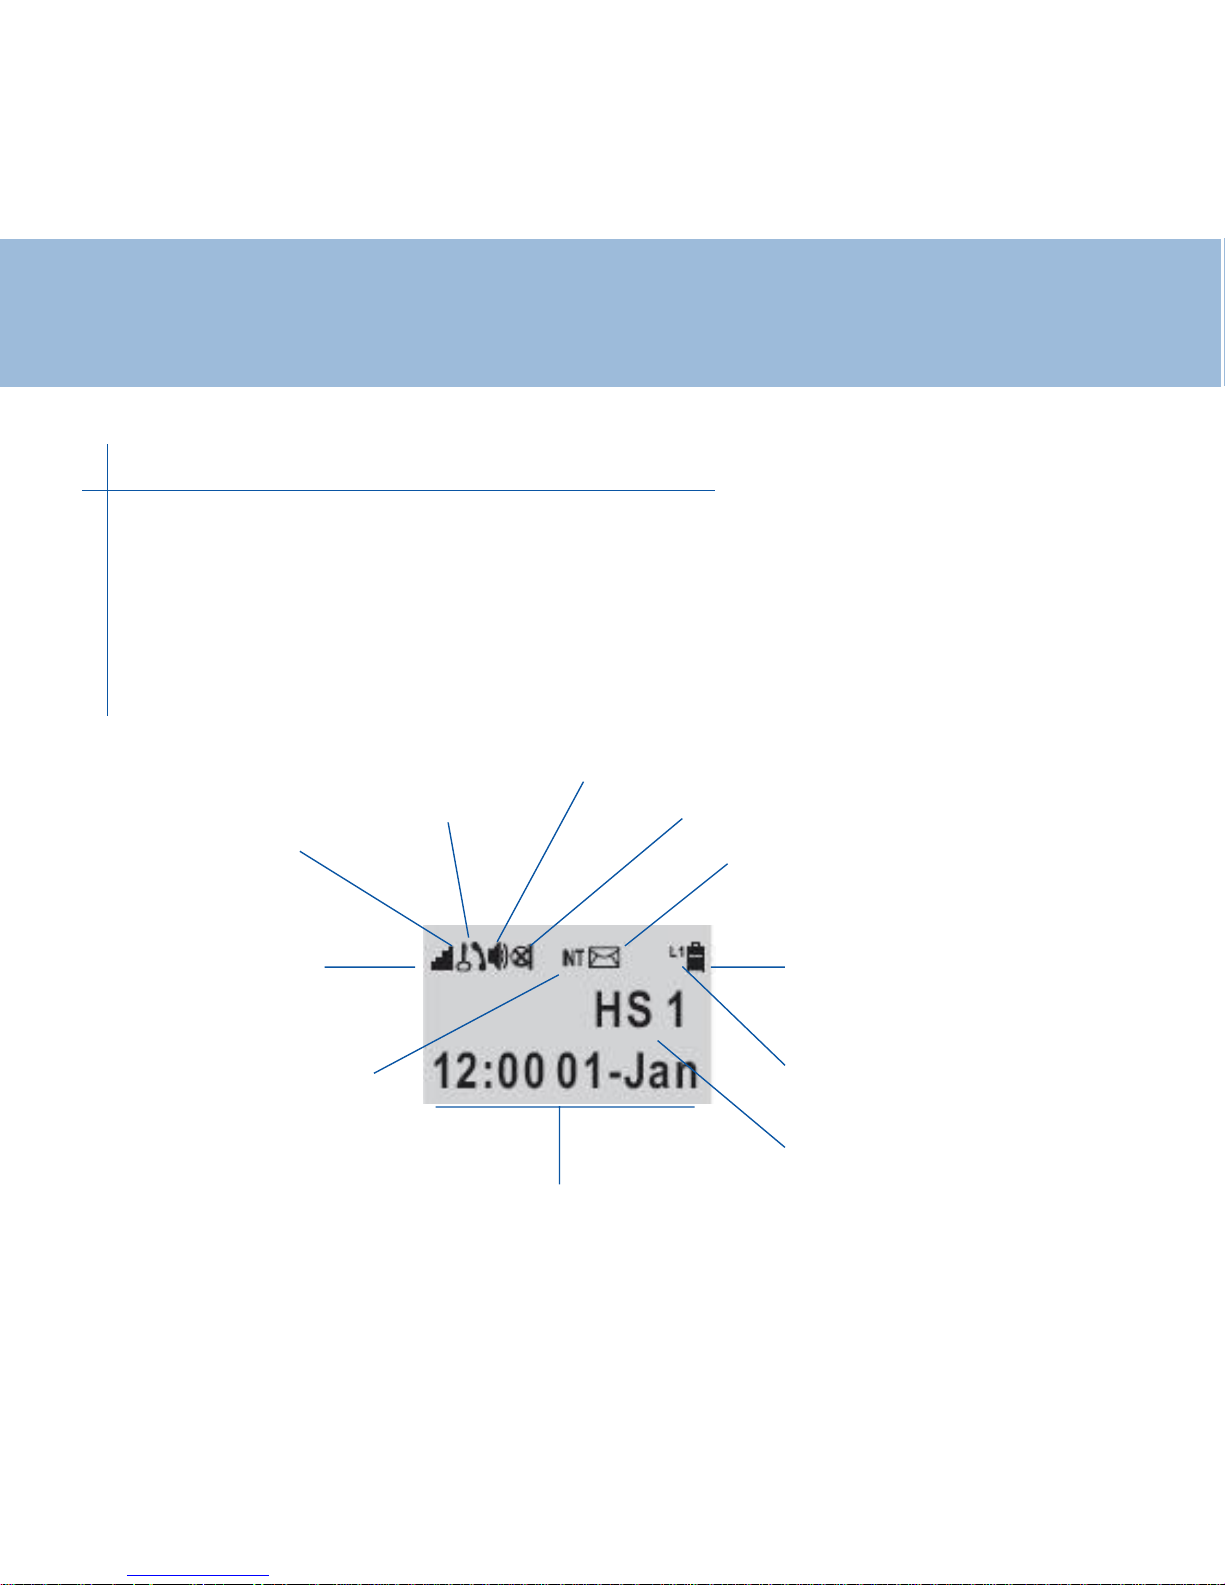
LCD screen
Batteries charging
level
Mute function
new call in absence
Keypad locked
On line
Reception level
On stanby mode handset number, user name ( if you stored
it) , Time & date are shown
Descriptif
Hands free mode
Intercom mode
On Line : L1
Handset N°1
Time / Date
6
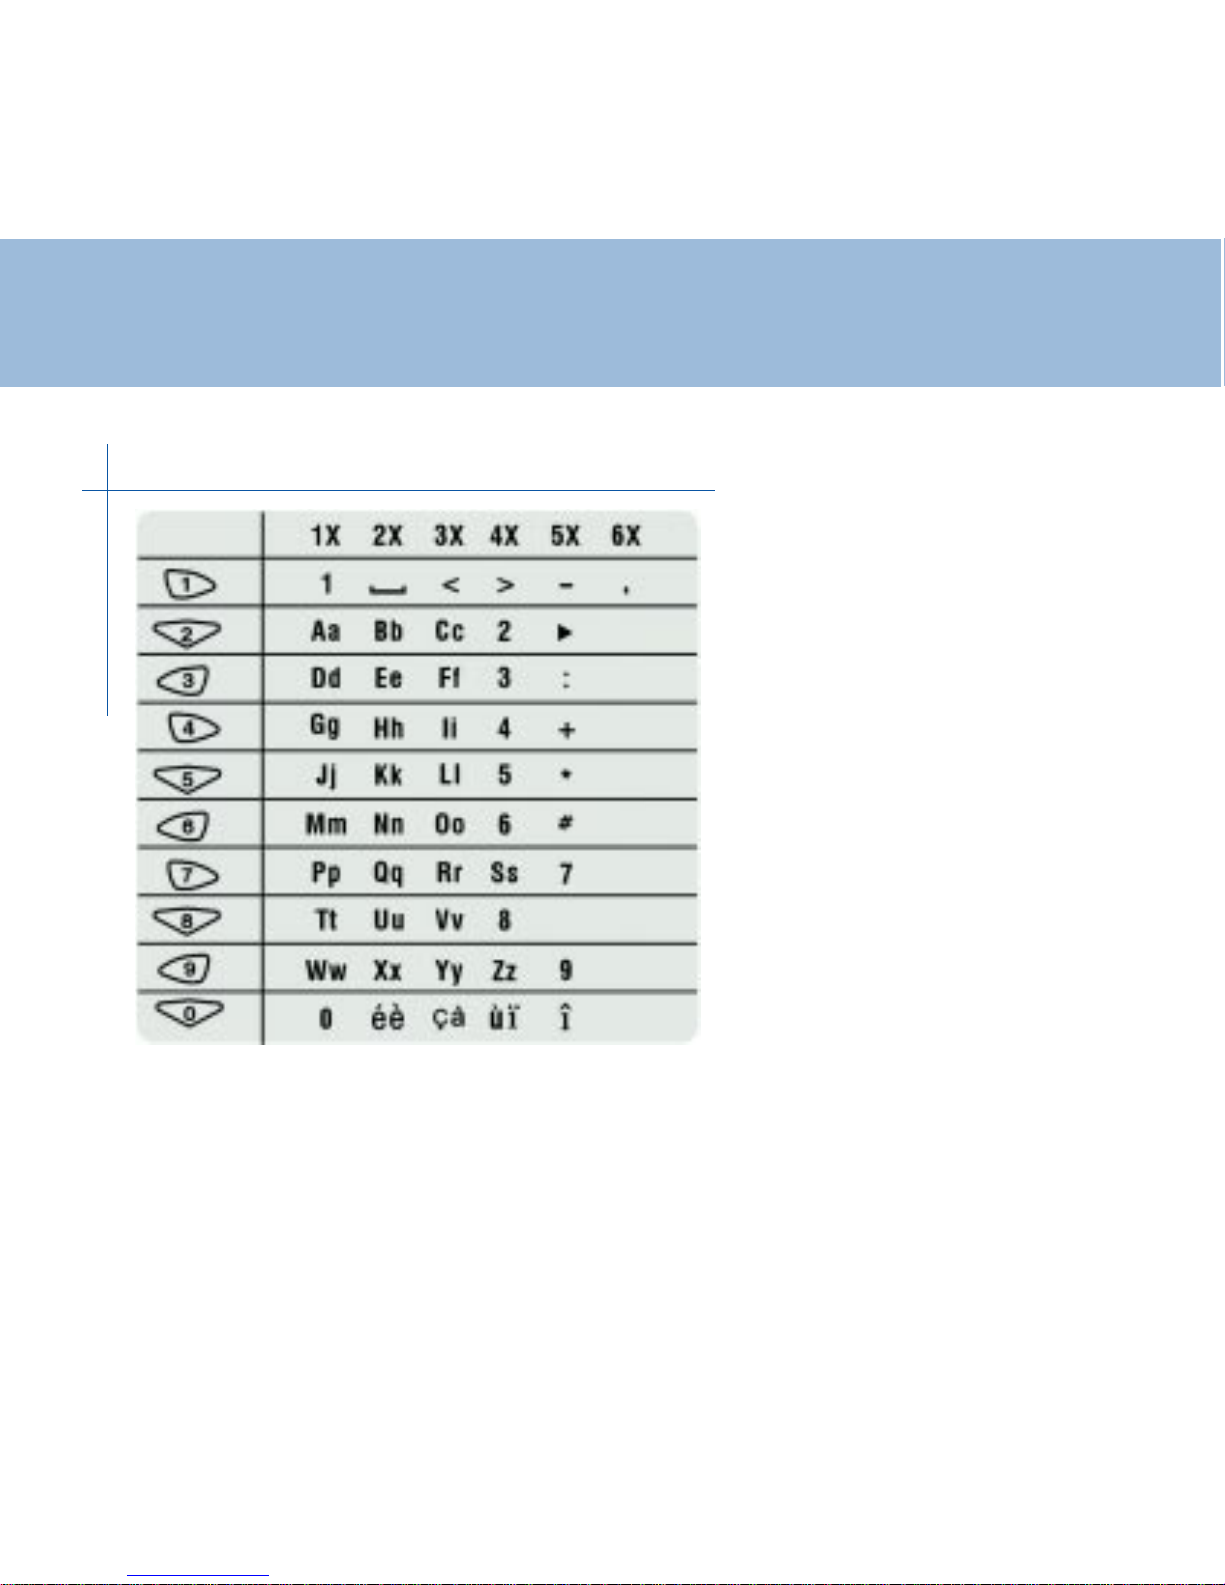
Characters List
When you want to create an
entry ( name, phone number) ,
you will need to use the keypad
It will put on alphanumeric mode
Hereunder is the conformity table
for each key
Use * key to move from
uppercase to lowercase and
“C” key to correct
7

Menu
8
Phone book
Search
Edit
Add
Delete
Delete all
Caller ID
Read
Delete
Delete all
BS setting
Dial mode
Flash time
Pause time
New HS
Remove HS
Changer PIN
Base melody
Base volume
Select base
Base 1
Base 2
Base 3
Base 4
Base auto
HS register
Base 1
Base 2
Base 3
Base 4
Note :
At any time , if you are jammed in the menu , wait for 30secs, It will come back
on "standby" mode
Don't hit any key during this time
HS setting
Melody ext
Melody int
set keytone
User name
Set PIN
Direct call
Language
Set clock
One touch
Set default

Installation
1 - Connection
- Connect the line cord plug to the line socket on the base. Connect the other end
of the line cord to the PTT socket. (**)
- Plug the power cable into the power socket on the base. Plug the adaptor into
the mains supply . (*)
2 - Batteries setting up
Install the rechargeable batteries in the handset. The handset requires three Nickel
Metal Hydride (NiMH) AAA batteries. These are supplied with your telephone.
Check the battery polarity diagrams on the handset when inserting the batteries.
Fit the battery cover by sliding the cover on to the back of the handset until it
snaps shut
3- Batteries use
Place the handset on the base, a short beep will be heard. The Power/Charging
indicator lights up (red). The battery symbol will be displayed on the
handset. Once the handset is fully charged, the display will show a full battery
symbol.
9

10
The telephone has an automatic charging control to avoid excessive charging.
Before the handset can be used, the handset batteries must be charged for a
minimum of 15 hours on the base.
Note :
When batteries get low during a call , there will be a warning tone ( beep), you
will have to place the handset on the base to recharge
(*) Classified "hazardous voltage" according to EN60950 standard
(**) Classified TNV -3 according to EN60950 standard.
Installation
11
1- Handset On/Off
When the handset is placed on the charger it automatically switches ON.
Otherwise press key until it switches ON
To turn the handset off, press key until 'Good Bye' appears. The LCD
display will then switch off .
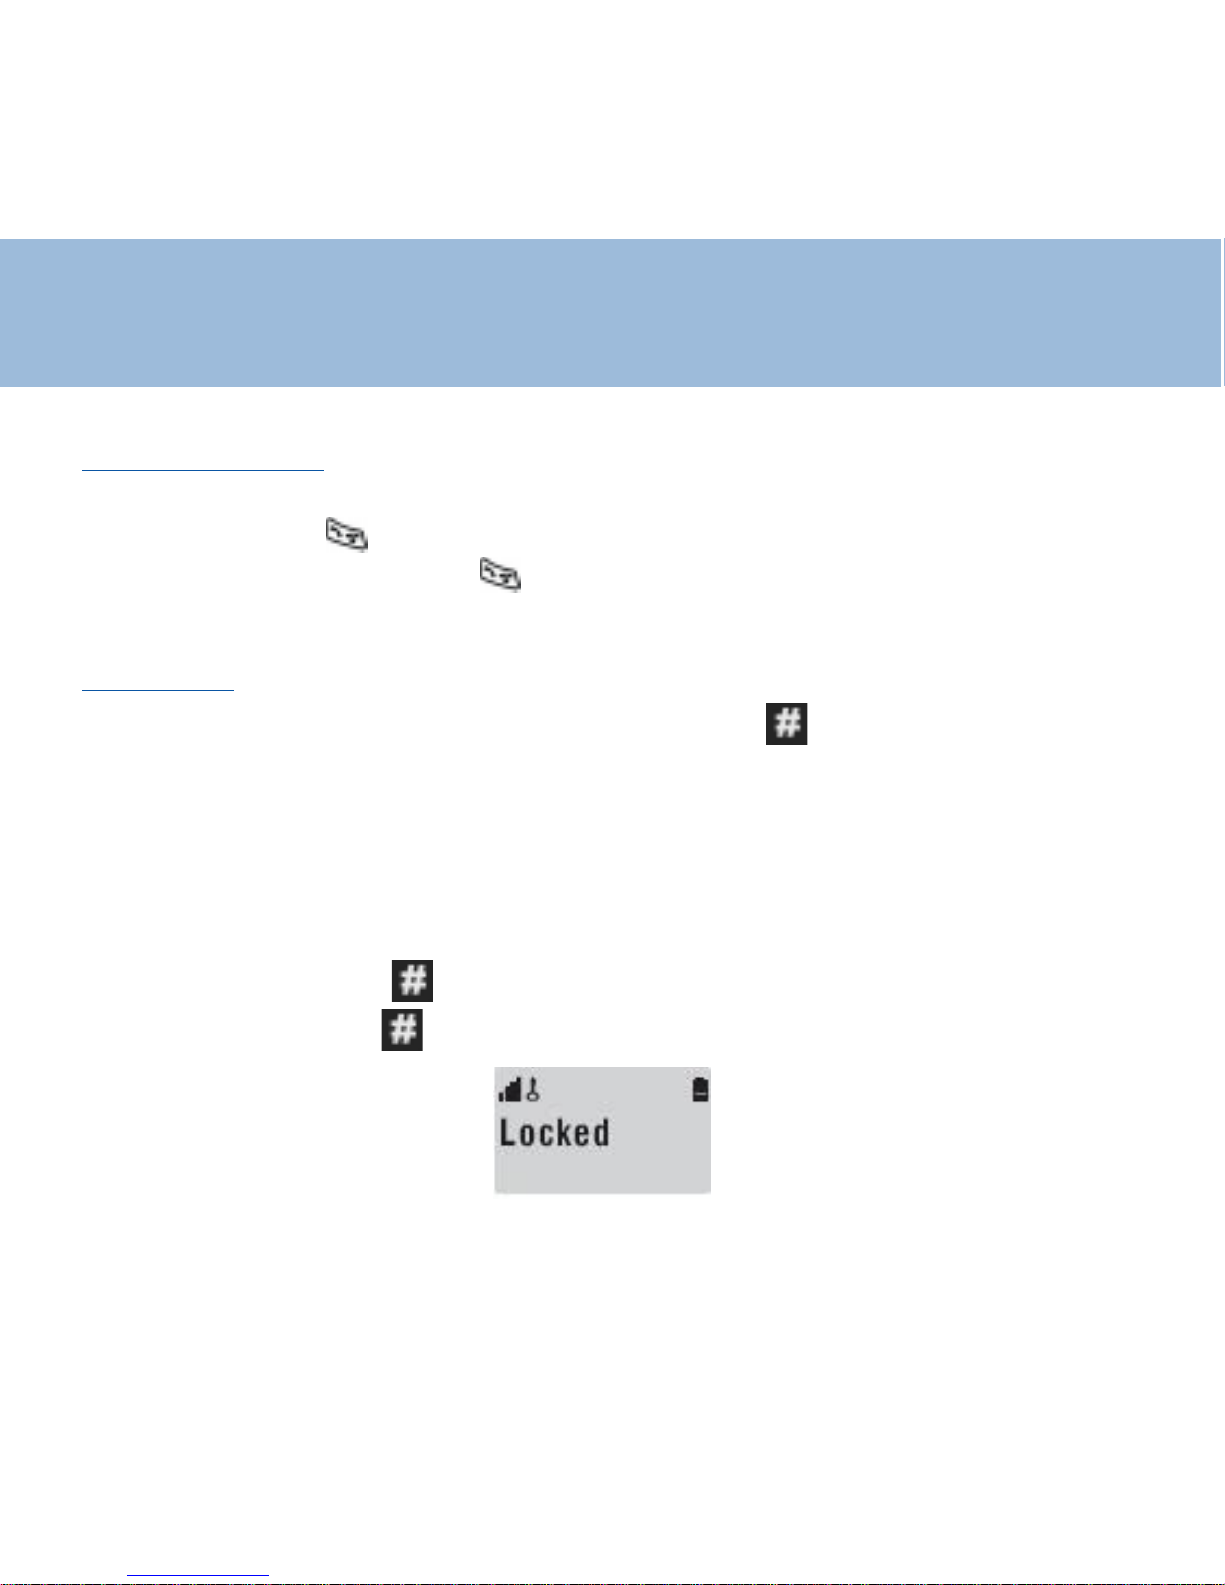
2- Key lock
When this feature is turned on, all buttons except for ,will be locked and will
not function.
Incoming or intercom calls can be answered by using any buttons on the
telephone. However , when you complete the call and hang up, the telephone
returns to lock mode.
This feature is useful to avoid pressing buttons by mistake.
Switch lock On: Press . until "locked" appears in the LCD display
Switch lock Off: Press . until "locked" disappears from the LCD
Using the phone
12
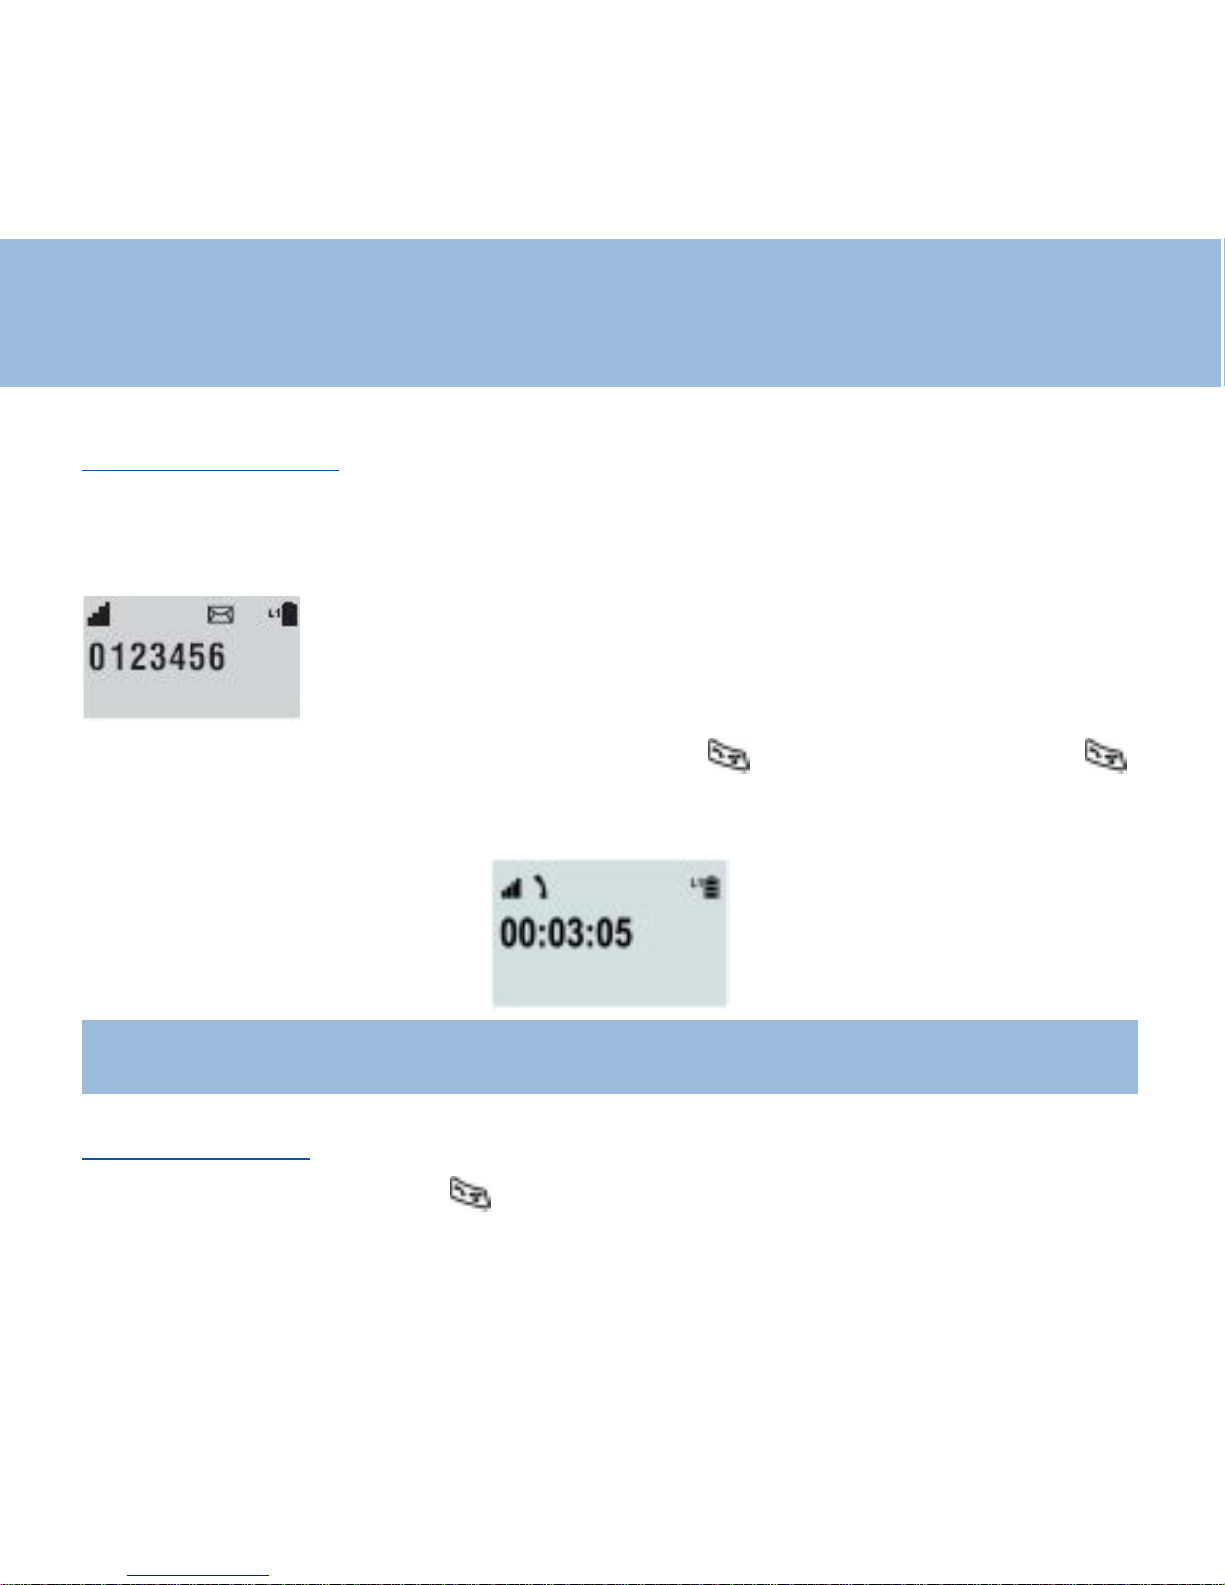
3- Receiving a call
When an incoming call is received the telephone rings and the L1 icon will flash on
the LCD display . If the caller can be identified (due to subscription to a Caller
Display service), the caller's telephone number will be displayed
If the handset is in the base , lift it up and press key otherwise just press
key
During the conversation the LCD screen displays the connection time
Note :
If you have an incoming call with the keypad locked , it is automatically
unlocked
4 - Making a call
Pick up the handset , press key , When you hear dialing tone, dial the
number on the keypad.
Using the phone
13
Using the phone
To end the call simply press again or place the handset on the base
Pre-dialing : Pick up handset. Dial the number on the keypad , press the
number is automatically dialled ,
To end the call simply press again or place the handset on the base
Note:
I
f you make an incorrect entry while pre-dialling the telephone number :
- Press C to clear the last digit and then enter the correct number
- Press C for more than one second to clear all digits entered and return to
standby mode.
T o insert a dialling p ause between numbers when storing a number , press
until P appears in the LCD display
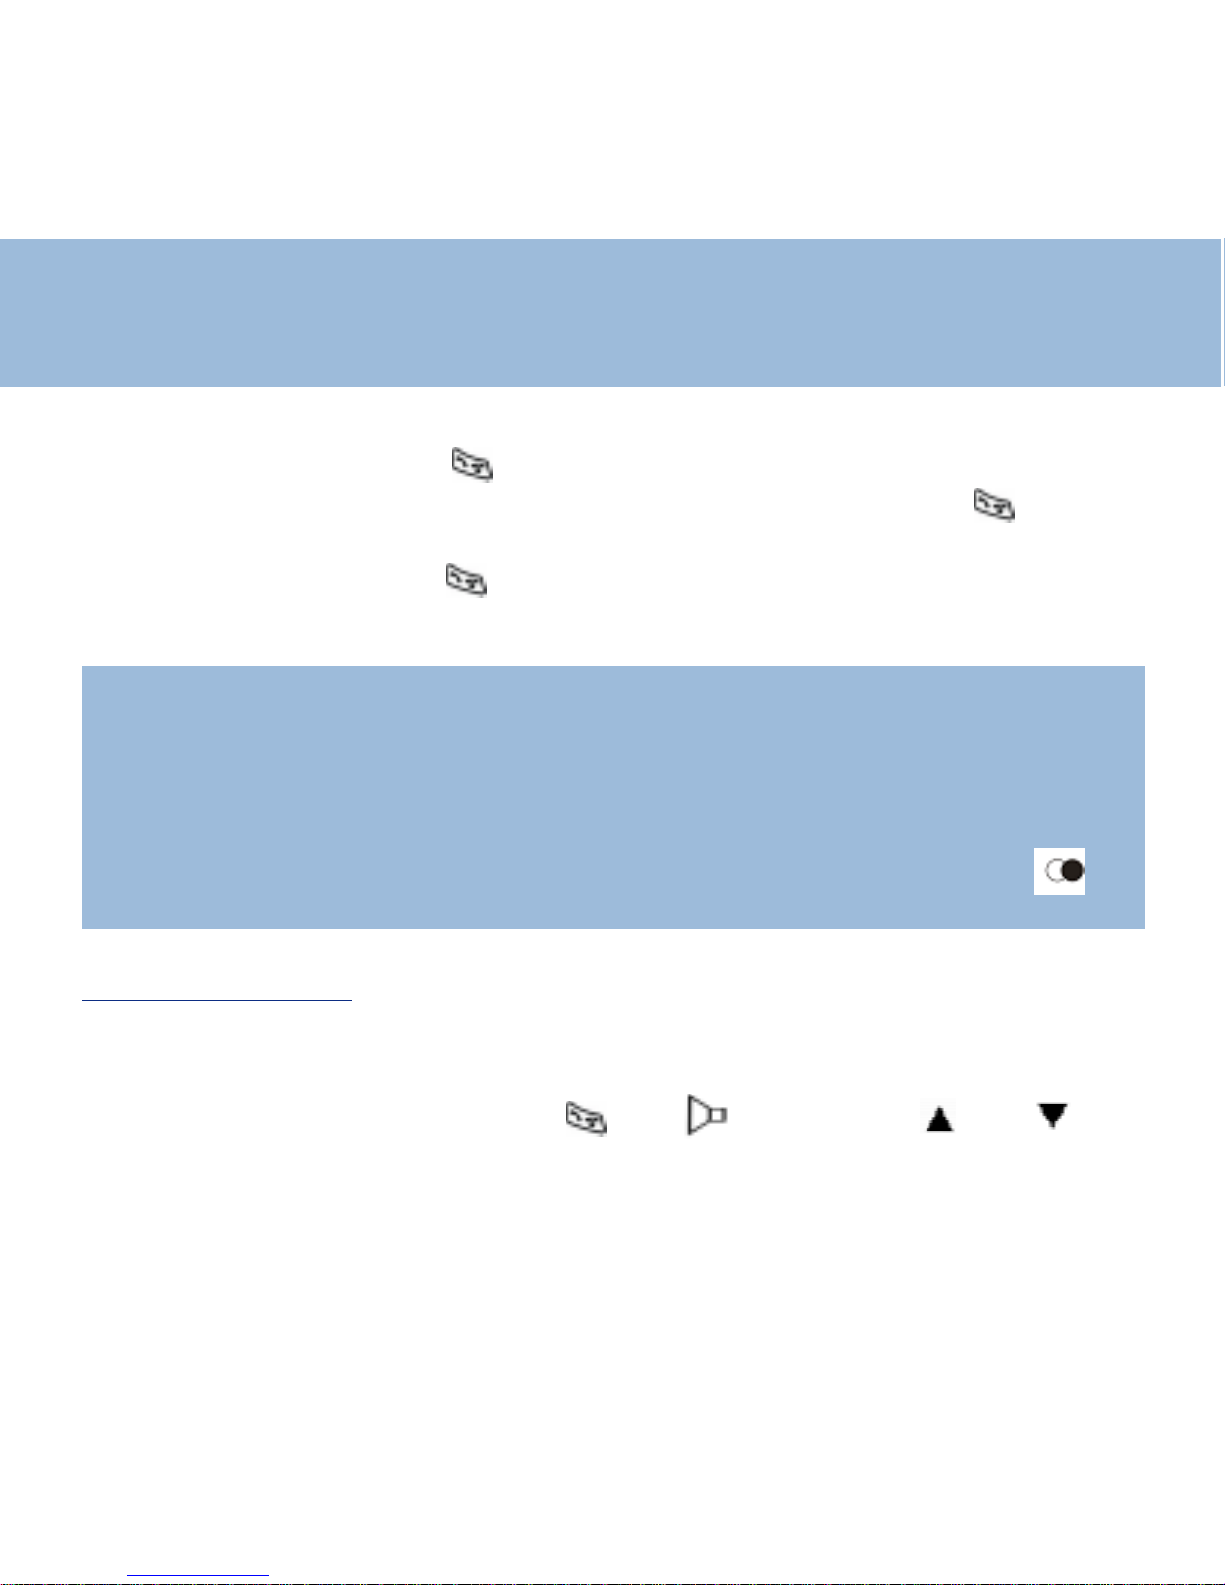
5 - Handsfree mode
This function is used when you don't want to have the handset near your ear or
when you want other people to hear at the same time
When you are in conversation Press until displays , Use and to
adjust the volume 1 to 4
T o release hands free mode , do the same as above
14
Using the phone
6 - Last number redial
To redial the last number dialled :
Pick up handset. Press in standby mode then press to dial the number (
or in first then )
7 - Recalling recent numbers
You can call back any of the last 10 numbers dialled as follows:
Pick up handset, press in standby mode, the last dialled number is
displayed , use each time the same button to see the previous dialled numbers
Press to dial the number
Note : Y ou may clear some digit s or all with C key then edit your new number .
To return to standby mode , Press C for more than 1sec on
8 - Mute function
If you wish, you can speak privately to someone else in the room without your
caller overhearing.
You will still be able to hear the caller but they cannot hear you during the mute
operation.
During a call, press C , the LCD display will show
Press C again to resume the conversation
15
Using the phone
10 - Paging the handset
If you wish to locate the handset : press on the button of the base
All registered handsets will be paged and will ring for about 30 seconds . Press any
button on the located handset to stop paging mode or press again
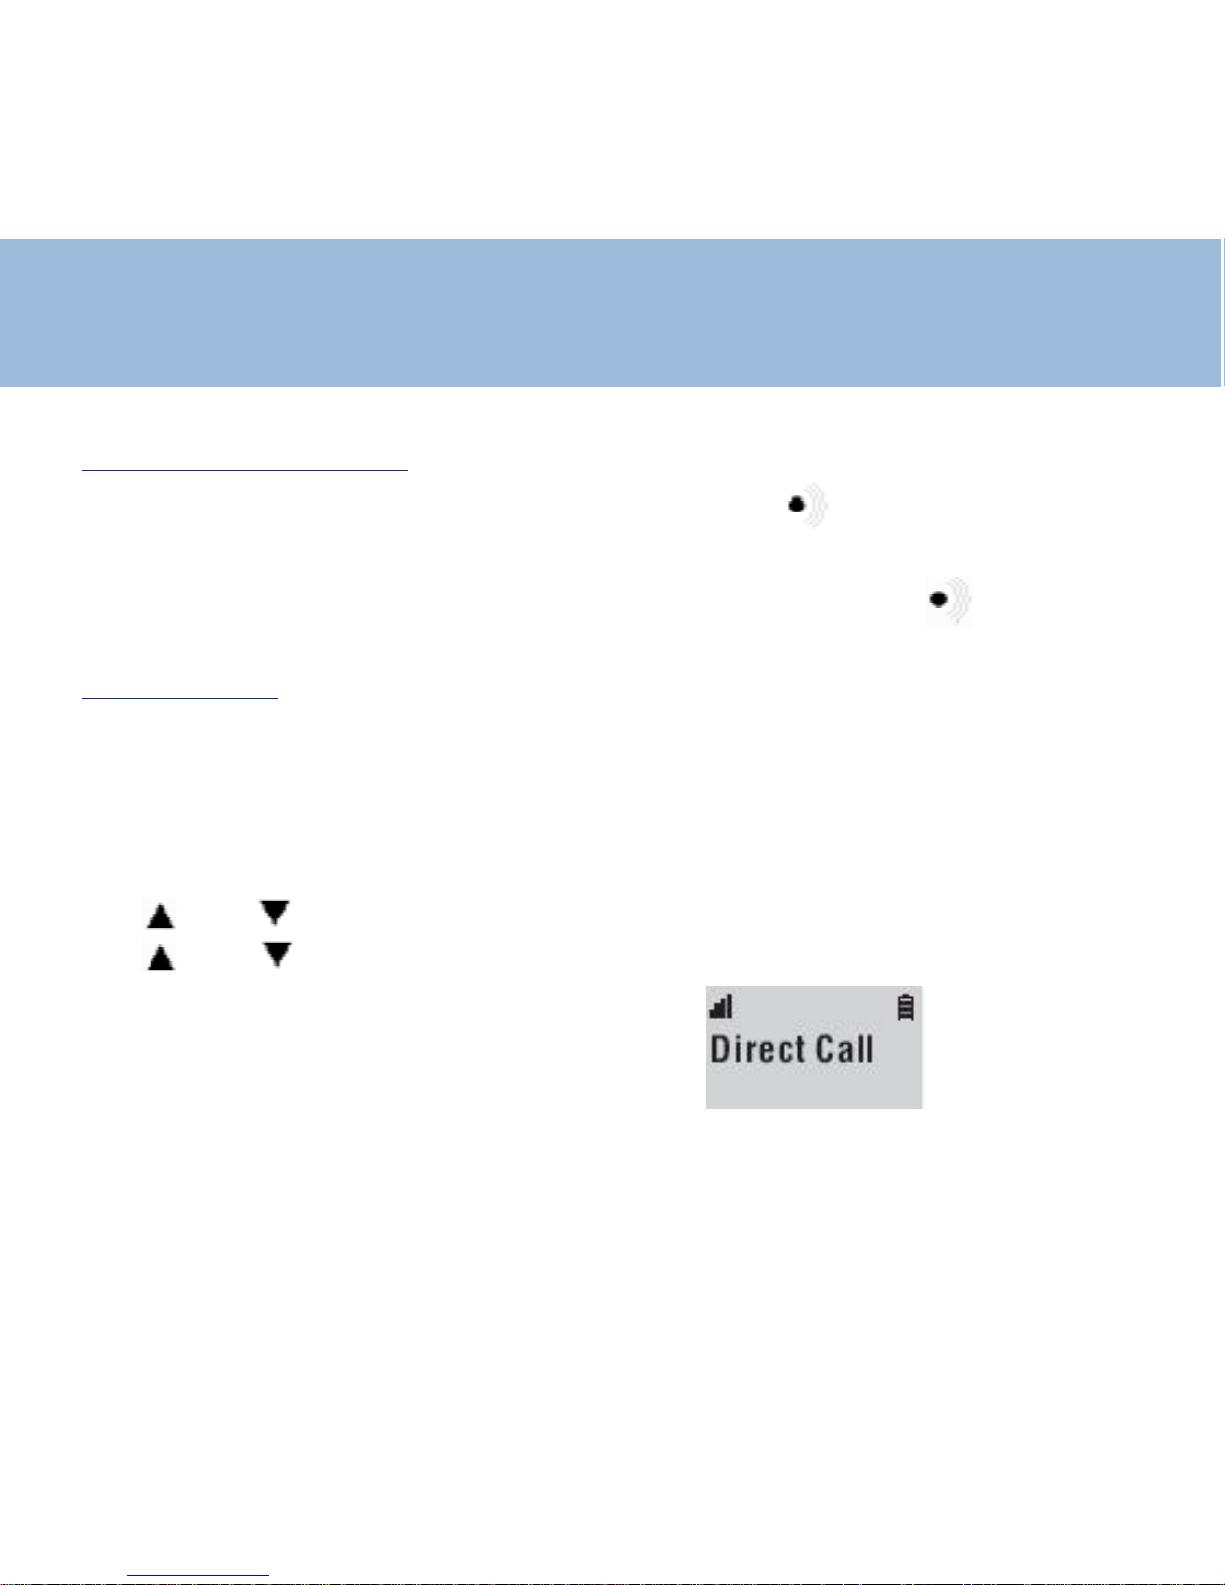
1 1 - Direct call
Y ou may record one number in the memory " Direct call". This number will be able
to be automatically dialled whatever the key pressed.
This function is useful for a young child unable to dial a normal number or a person
alone with a slight handicap
T o validate the function :
Use and to select "HS setting" Press OK
Use and to select "Direct call"
Press OK
Enter your desired number
Press OK to confirm or use C key to modify
The screen display "DIRECT CALL"
To disable the function press twice quickly on "R" key
16
1 - Melodies setting for external/internal calls
There are 2 types of melodies
- 9 for externals calls
- 9 for internals calls
Y ou may select a melody for externals incoming calls and a dif ferent one for
internals calls ( transfer between handsets)
Use and to select "HS setting"
Press OK
Use and to select "Melody Ext" or "Melody Int"
Press OK
Use and to select your melody, thenPress OK
Use and to select the level ( 1 to 4 )
Press OK
Press C to come back to the melody menu or press to return to standby
mode
2 - Key tone setting
On : the keys beep when hit
Off : silence
to activate or de-activate :
Use and to select "HS setting"
Handset Setting

17
Press OK
Use and to select " Key Tone"
Press OK
Use and to choice "On" or "Off"
Press OK
Press twice C or once to return to standby mode
3 - Silence mode
In this mode all sounds of the phone will be disabled ,ringer , key … except the
shaker
T o activate this function
Press key until "Silence" is displayed
To cancel the function press the same key until you see the standby screen again
Note : if the tone key is "off" , the keys will stay mute
4 - Langage setting
You can choose your language , to do this :
Use and to select "HS setting"
Press OK
Use and to select "language"
Handset setting
18
Press OK
Use and to choice your language
Press OK to validate
Press twice C or once to return to standby mode
5- Time/Date setting
The time displayed on the handset can be changed. The time format is 24 hours.
Use and to select "HS setting"
Press OK
Use and to select "Set clock"
Press OK
"Input time" is displayed
From the keypad enter the time ( 0 to 9 keys )
Press OK to validate
You can mofidy the date at the same time ( Day - Month - Year )
6 - User name
The given name will be displayed on the screen on "standby mode"
Use and to select "HS setting"
Press OK
Use and to select "User name"
Handset setting
19
Handset setting
Press OK
Use the keypad to enter the name , see details page 7
Press OK to validate
Press twice C or once to return to standby mode
7 - Personnal Identification Number ( PIN)
The PIN is required for the following options:
- Registering a new handset
- Resetting a handset
- Changing settings found under the base menu
The PIN is pre-set to '1590' ( from factory). This can be changed - this is
recommended for confidentiality .
Use and to select "HS setting"
Press OK
Use and to select "Set PIN"
Press OK
"HS PIN" is displayed
Enter the old code or factory code
Press OK
"New PIN" is dislayed
Enter your new code using the 0 to 9 keys
Press OK to validate
20
Handset setting
"Retype PIN" is displayed
Enter your new code again
Press OK
Press twice C or once to return to standby mode
8 -” One touch” memories
You can store up to 4 numbers in direct memory
Use and to select "HS setting" then press OK
Use and to select "One touch",
Use and to select the memory ( M1 to M4) then press OK
Enter your chosen phone number . If you want to modify a number use the C key
Press OK
"S tored" is displayed
Press twice C to exit or once to return to standby mode
T o call one of these numbers, first press then just press the
corresponding button ( M1 to M4) it will be automatically dialled
9- Restore Factory settings
The factory settings can be restored to the telephone
All parameters you have modified will be restored back to those which have been
set in the factory
21
To restore :
Use and to select "HS setting"
Press OK
Use and to select "Set default"
Press OK
"HS PIN" is displayed
Enter 1590 or your new code if you changed it
Press OK
"Sure ?" is displayed
Press OK if you are ( or C if not )
Press twice C or once to return to standby mode
Handset setting
22
1 - Base setting access
Each time you want access to the base setting , you will have to enter PIN code
Use and to select "BS setting"
Press OK
"Base PIN" is displayed
Enter 1590 or your new code if you changed it
Press OK
Now you are in the base menu
2 - Tone dialing switchover
Your DECT200 has been set to tone dialing at the factory , but if your network
requires pulse dialling, you will have to change the mode
Use and to select "BS setting"
Press OK
"Base PIN" is displayed
Enter 1590 or your new code if you changed it
Press OK
Use and to select "Dial Mode"
Press OK
Use and to choice "Pulse"
Press OK
Press twice C or once to return to standby mode
Base Setting
23
3 - Flash setting
Your telephone flash time is factory set for the UK ( R=100ms)
Don't change this
But sometimes if your phone is connected to a private network it might be
changed , so proceed as below :
Use and to select "BS setting"
Press OK
"Base PIN" is displayed
Enter 1590 or your new code if you changed it
Press OK
Use and to select "Flash Time"
Press OK
Use and to choice 300 or 600ms
Press OK
Press twice C or once to return to standby mode
4 - Insert a pause
-If you need to insert a pause between the digits you dial , you can set the time of
this pause : 2,3 or 4secs
Use and to select "BS setting"
Press OK
"Base PIN" is displayed
Base Setting
24
Enter 1590 or your new code if you changed it
Press OK
Use and to select "Pause Time", then press OK
Use and to choose the time, then press OK
Press twice C or once to return to standby mode
5 - Personnal Identification Number
The base like the handset PIN is pre-set to '1590' ( from factory). This can be
changed - this is recommended for confidentiality .
Use and to select "BS setting"
Press OK
"Base PIN" is displayed
Enter 1590 or your new code if you changed it , then press OK
Use and to select "Set PIN" , then press OK
"HS PIN" is displayed
Enter the old code or factory code, then press OK
"New PIN" is dislayed
Enter your new code using the 0 to 9 keys
Press OK to validate
"Retype PIN" is displayed
Enter your new code again, then press OK
Press twice C or once to return to standby mode
Base Setting

25
6 - Base melody setting
You can change the melody of the base , you have 3 choices
Use and to select "BS setting"
Press OK
"Base PIN" is displayed
Enter 1590 or your new code if you changed it , then press OK
Use and to select "Base Melody" , then press OK
Use and to select your melody1 to 3 , you also can set the ringer OFF ,
choice 0
Press OK
Press twice C or once to return to standby mode
6 - Base volume setting
After you have chosen the melody , you can also adjust the volume
Use and to select "BS setting"
Press OK
"Base PIN" is displayed
Enter 1590 or your new code if you changed it , then press OK
Use and to select "Base Volume" , then press OK
Use and to adjust the volume ( 1 to 4)
Press twice C or once to return to standby mode
Base Setting

26
Phone Book
T elephone numbers and names can be stored in the phone book.
The phone book can contain 50 entries. Each phone number can contain up to 16
digits and names up to 12 characters
1 - Create an entry
Use and to select "Phone book"
Press OK
Use and to select "Add"
Press OK
Enter the name then Press OK
Enter the phone number then Press OK
Press twice C or once to return to standby mode
2 - View entries / make a call
Use and to select "Phone book "
Press OK
Use and to select "Search"
Press OK
Use and to show the stored entries ( name, number)
Press twice C key
OR
Press to dial this number

27
3 - Delete an entry
Use and to select "Phone book"
Press OK
Use and to select "Delete"
Press OK
Use and to select the chosen number
"Sure ?" is displayed , Press OK to confirm
"Deleted" is displayed
Press twice C or once to return to standby mode
4- Clear all entries
Use and to select "Phone book"
Press OK
Use and to select "Delete All"
Press OK
"Sure ?" is displayed , Press OK to confirm
"Erase OK" is displayed , all entries have been removed
Press twice C or once to return to standby mode
Phone Book

28
Phone Book
5 – Modify an entry / assign a melody
Use and to select "Phone book"
Press OK
Use and to select "Edit"
Press OK
Use and to choose the name or number to modify
Press OK
Use C to clear the characters then use the keys to correct the name
Then Press OK to select the number and do the same way to correct it
Press OK
Now you have the possibility to assign a melody to this entry
Use and to select the melody
PressOK
"stored" is displayed
Press twice C or once to return to standby mode
When this person phones you , you will hear this melody and will recognize who is
calling you

29
If you subscribed to the CID service , when people call you , their name and
number will be displayed
The name , phone number , call time & date are stored in the CID list
Whether you take a call or not, the caller's details are stored in the Call list. The
call list stores the last 50 incoming calls. When the call list memory is
full, a new call will take the place of the oldest call. You can display , scroll through
and dial numbers in the list
The will be shown on the handset display if you receive a call in your absence
The icon will stay until ALL calls on the CID list have been reviewed
1 - Dial from the CID list
To show and call a number from the CID list :
Use and to select "Caller ID"
Press OK
Use and to select "Read"
Press OK
Use and to select the callers name you want to call
Press , the number is displayed and automatically dialled
Caller ID

30
Note :
If the display shows PRIV ATE ID for a witheld number, you aren't able to
call
2 -Voice mail and CID list
If you have subscribed to the voice-mail service from your provider you will be able
to receive messages from the caller
The icon is displayed with "Message" at the screen bottom
From the CID list you"ll be able to retrieve this call
T o listen to your messages, call the voice-mail number of your provider
3 -Waiting call indicator
If you have subscribed to this service , during a call you will be warned if
somebody else is calling you too
In this case , you will hear a sound , the Caller Identifier will be displayed ( if
recognized)
Press button then press key 2 to be in conversation with your second
caller . The first caller will be put on hold
Press button then key 1 to return the first caller
Caller ID

31
4 -Delete entries in the CID list
Use and to select "Caller ID"
Press OK
Use and to select "Delete"
Press OK
Use and to select the entry to delete
"Sure ?" is displayed , Press OK to confirm
"Deleted" is displayed
Press twice C or once to return to standby mode
5 - Clear all entries
Use and to select "Caller ID"
Press OK
Use and to select "Delete All"
Press OK
"Sure ?" is displayed , Press OK to confirm
"Erase OK" is displayed
Press twice C or once to return to standby mode
Caller ID

32
Caller ID
6 - T ransfer from CID list to phone book
Use and to select "Caller ID"
Press OK
Use and to select "Read"
Press OK
Use and to select the entry to transfer
Press button , “phone book is displayed , press OK
If only a phone number and no name , "Name" will be displayed
Enter the desired name then press OK , otherwise press directly OK
"Stored" is displayed
Press twice C or once to return to standby mode

33
5 handsets can be registered on the same base
4 bases can be linked for the same network
1 - Register a new handset
Press button ( 8-10secs) on the base until flashes
Use and to select 'HS Register'
Use and to select a base ( default is 1) then press OK
"Searching" : Base number is displayed , then the registering code
"Set PIN" : enter your code, then press OK to confirm
2 - Release a handset
Once the handset is released from the base , you can no longer use the phone
Use and to select "BS setting"
Press OK
"Base PIN" is displayed
Enter 1590 or your new code if you have changed it , then Press OK
Use and to select "Remove HS"
Press OK
example : M23_
M: means the handset N°1 is in use ( can't be released)
Additional Handsets & Bases

34
23 : HS N° 2 & 3 can be released
Enter 2 or 3 to select the HS to remove then press OK
Press twice C or once to return to standby mode
3 - Make an Internal Call
When using several handsets registered to the same base unit, you can make
internal calls and transfer external calls between handsets.
Press OK , "Intercom" is displayed, enter the HS number ( 2, 3 , ….)
The other HS rings , after answering you can speak .
4 - Call Transfer between Handsets
An externall call can be transferred from one handset to another
During a telephone conversation, when you wish to transfer the call. press OK.
Y our external caller will be placed on hold
Enter the handset number you wish to transfer to (1-5)
The paged handset will ring. The calling handset number will be displayed on the
screen
Notes: On transferring a call, you may hang up before the paged handset answers.
The connection between the external caller and the paged handset is complete
once you hang up.
Additional Handsets & Bases

35
Additional Handsets & Bases
If the paged handset does not answer a call within a predetermined time, the call
will be transferred back to your handset.
5 - 3 conference call
When you are in an external conversation and internal mode with an other handset
, if you press for more than 2secs the # key you will be in a 3 way conversation
6 - Add an extra base
A handset can be registered on 4 differents bases
Use and to select 'Select BS '
Press OK
You can select manually or automatically the base
Use and to select an other base ( 2 to 4 ) or "Base auto"
Press OK
Press twice C or once to return to standby mode
Note : If you want to use your handset with more than 1 base you have to register it
on all the bases

36
General Informations
WARRANTY :
From the moment your Geemarc product is purchased, Geemarc guarantee it for
the period of one year . During this time, all repairs or replacements (at our
discretion) are free of charge. Should you experience a problem then contact our
help line or visit our website at www .geemarc.com. The guarantee does not cover
accidents, negligence or breakages to any parts. The product must not be
tampered with or taken apart by anyone who is not an authorized Geemarc
representative. The Geemarc guarantee in no way limits your legal rights.
IMPORT ANT: YOUR RECEIPT IS P A RT OF YOUR GUARANTEE AND MUST BE
RET AINED AND PRODUCED IN THE EVENT OF AW ARRANTY CLAIM.
Please note: The guarantee applies to
the United Kingdom only
DECLARA TION: Geemarc Telecom SA hereby declares that this product is in
compliance with the essential requirements and other relevant provisions of the
Radio and Telecommunications T erminal Equipment Directive 1999/5/EEC and in
particular article 3 section 1a, 1b and section 3. The telephone does not operate if
the line current is lower than 18 mA.

37
General Informations
Electrical connection: The apparatus is designed to operate from a 230V 50Hz
supply only . (Classified as 'hazardous voltage' according to EN60950 standard).
The apparatus does not incorporate an integral power on/off switch. To disconnect
the power , either switch off supply at the mains power socket or unplug the AC
adaptor . When installing the apparatus, ensure that the mains power socket is
readily accessible.
T elephone connection: V oltages present on the telecommunication network are
classified TNV -3 (T elecommunication Network V oltage) according to the EN60950
standard.
Recycling directives
The WEEE (Waste Electrical and Electronic Equipment) has been put in place for
the products at the end of their useful life are recycled in the best way.
When this product is finished with, please do not put it in your domestic waste bin.
Please use one of the following disposal options:
- Remove the batteries and deposit them in an appropriate WEEE skip. Deposit
the product in an appropriate WEEE skip.
- Or , hand the old product to the retailer . If you purchase a new one, they should
accept it.
Thus if you respect these instructions you ensure human health and environmental
protection.

38
Index
Descriptif
Base /Combiné 4 0
Afficheur 4 2
T able des caractères 43
Menu 44
Installation
Raccordements 4 5
Installation du bloc de batterie 4 5
Mise en charge 4 5
Fonctions de base
Marche / arrêt du combiné 4 6
V errouillage / déverrouillage
du clavier 4 6
Répondre à un appel 4 7
Appeler 48
Utilisation en «mains libres» 4 9
Rappel du dernier numéro
composé 4 9
Rappel de l’un des 10 derniers
numéros composés 5 0
Fonction secret 5 0
Localisation du combiné 5 1
Appel direct 5 1
Réglage du combiné
Réglage de la mélodie externe
et interne 5 3
Activation / désactivation
du mode «silence» 5 4
Activation / désactivation du signal
sonnore à l’appui des touches 5 5
Sélection du langage 5 5
Réglage de la date et de l’heure 2 6 5 6
Attribution d’un nom à votre combiné 5 7
Code PIN du combiné 5 7
Mémoires à accès direct 5 8
Réinitialiser les réglages du combiné 5 9
Réglages de la base
Accéder aux réglages de la base 6 0
Réglage du mode de numérotation 6 0
Synchronisation de la touche R 6 1

39
Sélectionner le temps de pause 6 1
Code PIN de la base 6 2
Répertoire
Créer une fiche 6 3
Visualiser les fiches créées 6 3
Effacer une fiche du répertoire 6 4
Effacer toutes les fiches du répertoire 6 5
Modifier une fiche du répertoire,
attribution des sonneries spécifiques 6 6
Appeler un correspondant à partir
du répertoire 6 7
Présentation du Numéro et du Nom
Utilisation du journal des appels reçus 6 8
La messagerie vocale et le journal
des appels 7 0
Le signal d’appel et le journal
des appels 7 1
Effacer des enregistrements dans
le journal des appels reçus 7 2
Effacer tous les enregistrements
du journal des appels reçus 7 2
Rappel d’un numéro du journal
des appels reçus 7 3
Transfert d’une fiche du journal
des appels reçus vers le répertoire 7 4
Multi-combinés
Déclarer un nouveau combiné
sur la base 7 5
Annuler l’enregistrement d’un combiné 7 6
Fonctionnement en multi-combinés 7 8
Transfert d’un appel externe
d’un combiné vers un autre 7 8
Conférence à 3 7 9
Déclarer une nouvelle base 7 9
Déclaration de conformité 8 1
Informations générales
Garantie, recommandations
pour le recyclage 8 2
Sécurité 8 3

40
Base et combiné
Répertoire et Flash
Mémoire à
accès direct
V alidation et transfert
entre combinés
Décrocrochage,
raccrochage
Navigateur
Correction, retour
dans le menu
Activer , désactiver le
mode silence
V errouillage clavier
Témoin charge batteries
Témoin de prise de ligne
Recherche ou enregistrement
de combiné
Descriptif

41
Côté
Prise de ligne
Prise adaptateur
Dessous Base
Descriptif
bouton vibreur

42
Afficheur
Etat de charge de
la batterie
Secret activé
Message vocal reçu
Clavier verrouillé
En ligne
Indication de la
qualité de réception
V otre Geemarc DECT200 possède un afficheur avec différents pictogrammes
qui vous guideront dans l’utilisation du téléphone et des services de votre
opérateur .
En ligne, l’afficheur vous indiquera les informations concernant votre
interlocuteur ou le numéro que vous composez, la durée de conversation ....
En veille, l’afficheur vous indiquera le numéro du combiné, la date et l’heure,
l’état de charge de la batterie ....
Descriptif
Haut-parleur activé
Mode intercom.
entre combinés
activés
Ligne 1 active
Combiné N°1
Heure / Date

43
Table des caractères
La rédaction d’un nom dans le
répertoire nécessite l’utilisation
du clavier en mode
alphanumérique.
Le clavier se met
automatiquement en mode
alphanumérique lorsque cette
fonction est activée.
- Pour saisir une lettre, appuyez
sur la touche correspondante du
clavier autant de fois que
nécessaire.
- Utilisez la touche pour
passer du mode majuscule au
mode minuscule ou pour afficher
le deuxième caractères diponible
avec la touche 0.
- Utisez la touche pour
corriger .

44
Menu
Répertoire
Rechercher
Corriger
Ajouter
Effacer
Efface tout
Journal
Lire
Effacer
Efface tout
Rég base
Mode num
Tps flash
Tps pause
Nouv comb
Supp comb
Changer PIN
Sélect base
Base 1
Base 2
Base 3
Base 4
Base auto
Enreg comb
Base 1
Base 2
Base 3
Base 4
Note :
A tout moment, lorsque vous êtes bloqué dans le menu, vous pouvez en sortir en
laissant votre téléphone au repos pendant 30 secondes environ: il repassera alors
automatiquement en veille. Aucune touche ne devra être actionnée durant ces 30
secondes.
Rég comb
Mélodie ext
Mélodie int
Bip clavier
Ouverture
Nom
Code PIN
App direct
Langue
Rég horloge
Rég défaut

45
Installation
1 - Raccordements
- Branchez le cordon de ligne en dessous de la base.
- Placez le cordon dans la rainure.
- Branchez la fiche téléphonique dans votre prise murale*.
- Branchez le cordon électrique de l’adaptateur secteur** à l’arrière de la base.
- Branchez le bloc secteur dans votre prise murale (230V).
2 - Installation du bloc de batterie
- Ouvrir le couvercle du logement à batterie. Insérer les 3 batteries en respectant la
polarité
- Refermer le couvercle
3 - Mise en charge
- Posez le combiné, écran face à vous, sur la base. L ’indicateur de mise en charge
sur la base s’allume.
- Lorsque la batterie est complètement chargée, le témoin d’état de charge sur
l’afficheur du combiné indique 3 barres.
V otre téléphone est maintenant prêt à fonctionner ...
* Classé TRT-3 selon la norme EN60950.
** Classé «tension dangereuse» selon la norme EN60950.
A TTENTION :
- Votre prise murale (230V) doit être proche de l’appareil et facilement accessible pour pouvoir
débrancher rapidement le bloc secteur en cas de danger.
- Utilisez uniquement le bloc secteur fourni.

46
Fonctions de base
1 - Marche / Arrêt du combiné
- Pour mettre en service le combiné lorsque l’afficheur est éteint, appuyez et
maintenez
la touche .
L ’afficheur indique “Recherche...”, la connexion avec la base s’établie.
Le numéro du combiné, la date et l’heure s’affichent.
- Pour éteindre le combiné, appuyez et maintenez la touche .
L ’afficheur indique “Au revoir” puis s’éteint.
2 - Verrouillage / Déverrouillage du clavier
V ous pouvez verrouiller les touches du combiné afin d’éviter les manipulations
involontaires.
- Pour verrouiller le clavier , appuyez et maintenez la
touche jusqu’à ce que le témoin “Clavier verrouillé” apparaisse et “Bloqué”
s’affiche à l’écran.

47
Fonctions de base
- Pour déverrouiller le clavier , appuyez et maintenez la touche jusqu’à ce que
l’afficheur indique de nouveau le numéro du combiné, la date et l’heure.
3 - Répondre à un appel
V otre téléphone sonne.
Ouvrez le combiné et/ou appuyez sur la touche pour parler à votre
correspondant.
Lorsque la ligne avec votre correspondant est établie, la durée de connection
s’affiche à l’écran.

48
Fonctions de base
4 - Appeler
1ère solution
Appuyez sur la touche .
L ’icône L1 s’affiche.
- Composez le numéro de votre correspondant. (Le numéro de votre correspondant
s’affiche).
- La conversation terminée, appuyez sur la touche .
2ème solution (pré numérotation)
- Composez le numéro de votre correspondant sans décrocher .
La touche permet de corriger et retourner en arrière dans la composition de votre
numéro.
- Appuyez sur la touche ,
L ’icône L1 s’affiche et votre numéro se compose automatiquement.
- La conversation terminée, appuyez sur la touche .

49
5 - Utilisation en “mains libres”
Cette fonction permet après avoir composé le numéro d’appel de communiquer
avec votre correspondant sans avoir le combiné à l’oreille.
V ous êtes en communication et vous désirez passer en “mains libres”:
- Appuyez et maintenez 3 secondes la touche .
Le haut-parleur se met en service, vous êtes en fonctionnement “mains libres”.
L ’icône s’affiche.
- Pour désactiver le mode “mains libres” en cours de conversation, appuyez et
maintenez 3 secondes la touche .
Note : Ne pas relâcher la touche avant que le haut-parleur soit en service ou
hors service, sinon la communication sera coupée
6 - Rappel du dernier numéro composé
Cette fonction permet un accès direct au dernier numéro composé.
- Appuyez sur la touche .
- Appuyez sur la touche , le numéro de votre correspondant se recompose
automatiquement.
- La conversation terminée, appuyez sur la touche .
Fonctions de base

50
Fonctions de base
7 - Rappel de l’un des 10 derniers numéros composés (journal des appels
émis)
V otre téléphone vous facilite le rappel de l’un des 10 derniers numéros composés.
V ous pourrez également, par la suite, intégrer un de ces numéros dans votre
répertoire.
- Appuyez sur la touche , le dernier numéro composé s’af fiche.
- Appuyez de façon répétitive sur la touche pour vous déplacer dans la liste des
numéros émis. Arrêtez vous sur le numéro que vous désirez recomposer.
- Appuyez sur la touche , le numéro de votre correspondant se recompose
automatiquement.
- La conversation terminée, appuyez sur la touche .
8 - Fonction secret
Cette fonction permet de couper ponctuellement le microphone en cours de
communication. V ous avez alors la possibilité de parler à votre entourage sans être
entendu de votre correspondant.
- En conversation, appuyez sur la touche C

51
Fonctions de base
V otre correspondant ne vous entend plus.
L ’icône s’affiche.
- Appuyez à nouveau sur la touche C pour rétablir la conversation.
10 - Localisation du combiné
- Pour localiser votre combiné, appuyez sur la touche
de la base. Le combiné émet un signal sonore.
- Appuyez sur la touche ou pour arrêter la localisation sinon le signal sonore
s’arrêtera de lui-même après environ 30 secs.
1 1 - Appel direct
Vous pouvez enregistrer un numéro dans la mémoire «Appel direct». Ce numéro
pourra ensuite être composé automatiquement quelle que soit la touche appuyée.
Cette fonction peut s’avérer utile pour un enfant seul à la maison et trop petit par
exemple pour composer un numéro. V ous pouvez ainsi enregistrer le numéro de votre
portable en «appel direct». Il sera ainsi facile pour lui de vous joindre.
Cette fonction peut aussi sécuriser une personne seule à la maison avec un handicap
léger.

52
- Utilisez le navigateur pour sélectionner “Rég COMB”.
- Appuyez sur la touche .
- Utilisez le navigateur pour sélectionner “APP Direct”
- Appuyez sur la touche .
- Composez le numéro désiré dans la mémoire “appel direct”.
- Appuyez sur la touche pour confirmer votre choix.
L ’afficheur indique alors que votre téléphone est configuré en appel direct.
- Pour désactiver la fonction, appuyez deux fois rapidement sur la touche .
Fonctions de base

53
1 - Réglage de la mélodie externe et interne
V otre téléphone possède 2 types de mélodie :
- 9 pour les appels extérieurs (chaque mélodie possède 4 niveaux ).
- 9 pour les appels intérieurs (chaque mélodie possède 4 niveaux ).
Vous pouvez attribuer un type de mélodie aux appels externes et un autre aux
appels internes (transfert d’appel entre combinés ou mode intercom. entre combinés).
- Utilisez le navigateur pour sélectionner “Rég COMB”.
- Appuyez sur la touche .
- Utilisez le navigateur pour sélectionner “Mélodie Ext” (mélodie appel
externe) ou “Mélodie Int” (mélodie appel interne).
- Appuyez sur la touche .
- Utilisez le navigateur pour sélectionner une mélodie parmi les 9 proposées.
- Appuyez sur la touche pour confirmer votre choix.
- Utilisez le navigateur pour sélectionner le niveau désiré.
- Appuyez sur la touche pour confirmer votre choix.
La mélodie choisie est émise.
- Appuyez deux fois sur la touche pour sortir.
Réglages du combiné

54
2 - Activation / désactivation du mode “silence”
Le mode “silence” désactive tous les signaux sonores de votre téléphone (“bip” à
l’appui des touches, sonneries ...).
- Pour activer la fonction “silence”, appuyez et maintenez la
touche jusqu’à ce que “Silence” apparaisse à l’écran.
- Pour désactiver la fonction “silence”, appuyez et maintenez la touche jusqu’à
ce que l’écran de veille réaparaisse à nouveau.
Réglages du combiné

55
3 - Activation / désactivation du signal sonore à l’appui des touches
A chaque appui sur une touche de votre clavier un signal sonore est émis.
- Utilisez le navigateur pour sélectionner “Rég COMB”.
- Appuyez sur la touche .
- Utilisez le navigateur pour sélectionner “BIP Clavier”.
- Appuyez sur la touche .
- Utilisez le navigateur et sélectionner “Marche” pour activer la fonction ou
“Arret” pour la désactiver .
- Appuyez sur la touche pour confirmer votre choix.
- Appuyez deux fois sur la touche pour sortir.
4 - Sélection du langage
V ous pouvez choisir le langage de présentation de l’afficheur .
10 langages sont disponibles .
Pour choisir un langage différent du Français, suivez la procédure décrite cidessous:
- Utilisez le navigateur pour sélectionner “Rég COMB”.
- Appuyez sur la touche .
- Utilisez le navigateur pour sélectionner “Langue”.
- Appuyez sur la touche .
Réglages du combiné

56
- Utilisez le navigateur pour sélectionner le langage.
- Appuyez sur la touche pour confirmer votre choix.
- Appuyez deux fois sur la touche pour sortir.
5 - Réglage de la date et de l’heure
- Utilisez le navigateur pour sélectionner “Rég COMB”.
- Appuyez sur la touche .
- Utilisez le navigateur pour sélectionner “Rég. Horloge”.
- Appuyez sur la touche .
L ’afficheur indique “Entrer HEURE”
- Utilisez le clavier numérique (touches de 0 à 9) pour entrer l’heure.
- Appuyez sur la touche pour confirmer .
L ’afficheur indique “Entrer DA TE”
- Utilisez le clavier numérique (touches de 0 à 9) pour entrer la date du jour.
- Appuyez sur la touche pour confirmer .
- Appuyez deux fois sur la touche pour sortir.
Dans l’exemple ci-dessous l’afficheur indique 01h. et 49 mns le 12 décembre.
Réglages du combiné

57
6 - Attribution d’un nom à votre combiné
Le nom attribué sera affiché en mode veille.
Pour choisir un nom différent de “Combiné 1”, suivez la procédure décrite ci-
dessous:
- Utilisez le navigateur pour sélectionner “Rég COMB”.
- Appuyez sur la touche .
- Utilisez le navigateur pour sélectionner “Nom”.
- Appuyez sur la touche .
- L ’afficheur vous invite maintenant à saisir le nom de votre combiné.
Pour saisir une lettre, appuyez sur la touche correspondante du clavier
alphanumérique autant de fois que nécessaire.
V ous pouvez vous aider de la table de caractères P 43.
- Lorsque le nom est saisi, appuyez sur la touche pour valider .
- Appuyez deux fois sur la touche pour sortir.
7 - Code PIN du combiné
Ce code permet de sécuriser la transmission et évite le piratage de votre ligne.
Le code par défaut est 1590.
Pour changer ce code, suivez la procédure décrite ci-dessous:
- Utilisez le navigateur pour sélectionner “Rég COMB”.
- Appuyez sur la touche .
- Utilisez le navigateur pour sélectionner “Code PIN”.
- Appuyez sur la touche .
Réglages du combiné

58
Réglages du combiné
- L ’afficheur indique “Code COMB” et vous invite à saisir l’ancien code (1590 si
code usine, ou le code précédemment attribué)
- Appuyez sur la touche .
- L ’afficheur indique “Nouveau PIN” et vous invite à saisir votre nouveau code PIN.
- Appuyez sur la touche .
- L ’afficheur indique “Confirm PIN” et vous invite à confirmer la saisie de votre
nouveau code PIN.
- Appuyez sur la touche .
- Appuyez deux fois sur la touche pour sortir.
Note :
- PIN : Numéro d’Itenfication Personnel
8 - Mémoires à accès direct
V ous pouvez enregistrer 4 numéros en mémoire directe ( touches M1 à M4 )
- Utilisez le navigateur pour sélectionner “Rég COMB”.
- Appuyez sur la touche .
- Utilisez le navigateur pour sélectionner “MEM directe”.
- Appuyez sur la touche .
- Utilisez le navigateur pour sélectionner la mémoire dans laquelle vous allez
enregistrer votre numéro, validez par
- Entrez votre numéro puis validez par . , vous pouvez corriger en utilisant la
touche C
- “Enregistré” est affiché

59
Réglages du combiné
- Appuyez deux fois sur la touche pour sortir, ou une fois sur pour revenir
en mode standby
Pour appeler un de ces numéros , prenez la ligne ( ) ensuite appuyez
simplement sur le bouton correspondant ( M1 à M4 ) il se composera
automatiquement
9 - Réinitialiser les réglages du combiné
Cette fonction permet de réinitialiser les paramètres suivants (les mémoires seront
vidées ou remises en configuration initiale):
Bis, réglage de la sonnerie externe et interne, réglage du volume de réception,
appels sortants, répertoire.
Pour réinitialiser ces paramètres, suivez la procédure décrite ci-dessous:
- Utilisez le navigateur pour sélectionner “Rég COMB”.
- Appuyez sur la touche .
- Utilisez le navigateur pour sélectionner “Rég Défaut”.
- Appuyez sur la touche .
- L ’afficheur indique “Code COMB” et vous invite à saisir votre code PIN du
combiné (1590 si code usine, ou votre code personnel précedemment attribué)
- Appuyez sur la touche .
- L ’afficheur indique “Confirmer?”.
- Appuyez sur la touche pour confirmer la réinitialisation des paramètres.
- Appuyez deux fois sur la touche pour sortir.

60
Réglages de la base
1 - Accéder aux réglages de la base (Code Base)
Pour accéder aux réglages de la base, suivez la procédure décrite ci-dessous:
- Utilisez le navigateur pour sélectionner “Rég BASE”.
- Appuyez sur la touche .
- L ’afficheur indique “Code Base” et vous invite à saisir le code PIN de la base
(1590 si code usine, ou votre code personnel précédemment attribué).
- Appuyez sur la touche .
V ous êtes maintenant dans le menu de configuration de la base.
2 - Réglage du mode de numérotation
Au moment de sa livraison, votre téléphone est en mode fréquence vocale (FV). Si le
central téléphonique dont vous dépendez fonctionne en mode fréquence décimale
(DC), vos appels n’aboutiront pas. Il vous faut dans ce cas passer en mode décimal.
Pour changer le mode de numérotation, suivez la procédure décrite ci-dessous:
- Entrez dans le menu de réglage de la base “Rég BASE”
- Utilisez le navigateur pour sélectionner “MODE NUM”.
- Appuyez sur la touche .
- Utilisez le navigateur pour sélectionner le mode désiré (DC ou FV).
- Appuyez sur la touche pour confirmer votre choix.
- Appuyez deux fois sur la touche pour sortir.

61
Réglages de la base
3 - Synchronisation de la touche R
V otre téléphone est préréglé pour un fonctionnement du flash en France (R=300mS).
Pour une utilisation standard, ne pas modifier ce réglage.
Derrière certains centraux privés, il peut être nécessaire de régler la
synchronisation de la touche R.
Pour changer la synchronisation, suivez la procédure décrite ci-dessous:
- Entrez dans le menu de réglage de la base “Rég BASE”
- Utilisez le navigateur pour sélectionner “TPS Flash”.
- Appuyez sur la touche .
- L ’afficheur indique les temps de flash disponibles.
Utilisez le navigateur pour sélectionner le flash désiré.
- Appuyez sur la touche pour confirmer votre choix.
- Appuyez deux fois sur la touche pour sortir.
Note :
Les temps de flash disponibles sont : 100mS, 120mS, 300mS et 600mS.
4 - Sélectionner le temps de pause
L ’enregistrement de certains numéros à destination de l’étranger nécessite l’insertion
d’une pause dans la numérotation après l’indicatif du pays.
Pour changer le temps de pause, suivez la procédure décrite ci-dessous:
- Entrez dans le menu de réglage de la base “Rég BASE”
- Utilisez le navigateur pour sélectionner “TPS Pause”.

62
Réglages de la base
- Appuyez sur la touche .
- L’af ficheur indique les temps de p ause disponibles (2, 3 ou 4 secondes).
Utilisez le navigateur pour sélectionner la pause désirée.
- Appuyez sur la touche pour confirmer votre choix.
- Appuyez deux fois sur la touche pour sortir.
5 - Code PIN de la base
Ce code permet de sécuriser la transmission et évite le piratage de votre ligne.
Le code par défaut est 1590.
Pour changer ce code, suivez la procédure décrite ci-dessous:
- Entrez dans le menu de réglage de la base “Rég BASE”.
- L ’afficheur indique “Code Base” et vous invite à saisir votre code PIN.
- Appuyez sur la touche .
- Utilisez le navigateur pour sélectionner “Changer PIN”. V alidez p ar .
- L ’afficheur indique “Nouveau PIN” et vous invite à saisir votre nouveau code PIN.
- Appuyez sur la touche .
- L ’afficheur indique “Confirm PIN” et vous invite à confirmer la saisie de votre
nouveau code PIN. V alidez par .
- Appuyez deux fois sur la touche pour sortir.
Note :
Si plusieurs combinés sont enregistrés sur la base, il est nécessaire de changer le code PIN
sur chacun des combinés afin d’accéder au menu de configuration de la base.

63
Répertoire
V ous disposez de 50 fiches permettant d’enregistrer les noms et les numéros de
vos correspondants habituels.
1 - Créer une fiche
- Utilisez le navigateur pour sélectionner “Répertoire”.
- Appuyez sur la touche .
- Utilisez le navigateur pour sélectionner “Ajouter”.
- Appuyez sur la touche .
- L ’afficheur vous invite maintenant à saisir un nom.
Pour saisir une lettre, appuyez sur la touche correspondante du clavier
alphanumérique autant de fois que nécessaire.
V ous pouvez vous aider de la table de caractères ci-contre.
- Lorsque le nom est saisi, appuyez sur la touche pour confirmer .
- L ’afficheur vous invite maintenant à saisir le numéro à associer au nom.
- Lorsque le numéro est saisi, appuyez sur la touche pour confirmer
l’enregistrement du nom avec son numéro associé dans le répertoire.
L ’afficheur indique “Enregistré!”.
- Appuyez deux fois sur la touche pour sortir.
2 - Visualiser les fiches créées
- Utilisez le navigateur pour sélectionner “Répertoire”.
- Appuyez sur la touche .
- Utilisez le navigateur pour sélectionner “Rechercher”.

64
Répertoire
- Appuyez sur la touche .
La dernière fiche créée apparaît à l’écran.
- Utilisez le navigateur pour vous déplacer dans les fiches.
- Appuyez deux fois sur la touche pour sortir.
Note :
- En veille, vous pouvez entrer directement en mode visualisation de vos fiches en appuyant sur
la touche .
- En mode visualisation et pour un accès rapide au nom recherché, entrez le premier caractère
du nom. Vous êtes alors dirigé directement dans la (les) fiche(s) commençant par cette lettre
3 - Effacer une fiche du répertoire
- Utilisez le navigateur pour sélectionner “Répertoire”.
- Appuyez sur la touche .
- Utilisez le navigateur pour sélectionner “Effacer”.
- Appuyez sur la touche .
La dernière fiche créée apparaît à l’écran.
- Utilisez le navigateur pour vous déplacer dans les fiches et selectionner la
fiche à supprimer

65
Répertoire
- Appuyez sur la touche pour confirmer l’effacement.
- Appuyez deux fois sur la touche pour sortir.
4 - Effacer toutes les fiches du répertoire
- Utilisez le navigateur pour sélectionner “Répertoire”.
- Appuyez sur la touche .
- Utilisez le navigateur pour sélectionner “Efface T out”.
- Appuyez sur la touche .
- Appuyez sur la touche pour confirmer l’effacement.
- Appuyez deux fois sur la touche pour sortir.

66
Répertoire
5 - Modifier une fiche du répertoire / attribution des sonneries spécifiques*
(VIP)
- Utilisez le navigateur pour sélectionner “Répertoire”.
- Appuyez sur la touche .
- Utilisez le navigateur pour sélectionner “Corriger”.
- Appuyez sur la touche .
La dernière fiche créée apparaît à l’écran.
- Utilisez le navigateur pour vous placer sur la fiche à modifier .
- Appuyez sur la touche pour confirmer .
- V ous pouvez maintenant modifier le nom.
Aidez-vous de la table de caractères ci-contre.
- Lorsque le nom est corrigé, appuyez sur la touche .
- L ’afficheur vous invite maintenant à corriger le numéro.
- Lorsque le numéro est corrigé, appuyez sur la touche ,
une sonnerie est diffusée.
A ce stade vous avez deux possibilitées:
1ère
- Appuyez à nouveau sur la touche pour confirmer la correction de fiche.
- Appuyez deux fois sur la touche pour sortir.
2ème* - Utilisez le navigateur pour sélectionner une sonnerie “VIP” qui sera
émise lorsque le correspondant “VIP” vous appelera.

67
Répertoire
- Appuyez sur la touche pour confirmer la sonnerie sélectionnée.
- Appuyez deux fois sur la touche pour sortir.
Note :
- La sonnerie particulière «VIP» est attribuée à un correspondant ou à un groupe de correspondants afin de détecter dès la première sonnerie l’origine de l’appel.
- * Pour accéder à cette fonction, il faut avoir souscrit au service «Présentation du Numéro» ou
«Présentation du Nom» de votre opérateur.
5 - Appeler un correspondant à partir du répertoire
-En veille, appuyez sur la touche .
- Utilisez le navigateur pour vous déplacer dans les fiches et sélectionner la
personne à contacter .
- Appuyez sur la touche , le numéro de votre correspondant se compose
automatiquement.
- La conversation terminée, appuyez sur la touche .

68
Présentation du Numéro et du Nom*
Lorsqu’une personne cherche à vous joindre, son nom et son numéro s’affichent à
l’écran.
Les numéros de vos correspondants sont mémorisés dans le journal des appels
reçus.
50 numéros maximums peuvent être mémorisés.
Notes :
* Ces services sont accessibles seulement par abonnement. Contactez votre opérateur pour
plus de renseignements.
Lorsque la mémoire de votre journal est pleine, tout nouvel appel prendra la place du plus
ancien.
- L’afficheur indique le numéro, la date et l’heure (ou le nom, la date et l’heure) de l’appel.
- L’afficheur indique «Vide» si le journal est vide.
- Si le numéro de l’appel reçu est enregistré dans le répertoire, l’afficheur indiquera le nom que
vous y avez associé à la place du numéro.
1 - Utilisation du journal des appels reçus
Associé au service «Présentation du Numéro*», le journal des appels permet de
mémoriser les appels reçus.
Lorsqu’un ou des nouveaux appels ont été reçus, le voyant journal s’affiche:

69
Présentation du Numéro et du Nom
Pour visualiser les nouveaux appels reçus,
- Utilisez le navigateur pour sélectionner “Journal”.
- Appuyez sur la touche .
- Utilisez le navigateur pour sélectionner “Lire”.
- Appuyez sur la touche .
- Utilisez le navigateur pour vous déplacer dans les enregistrements.
Chaque appel est mémorisé sous la forme d’une fiche avec la date et l’heure et
par ordre d’arrivée.
Si votre correspondant ne souhaite pas communiquer son numéro de téléphone ou
son identité, l’afficheur indique «Privé».

70
Présentation du Numéro et du Nom
Si le numéro de votre correspondant n’est pas connu du central téléphonique
(appel de l’étranger par exemple), l’afficheur indique «Indisponible».
La messagerie vocale* et le journal des appels
La messagerie vocale accueille vos correspondants lorsque vous êtes absent ou
occupé et leur offre la possibilité de déposer un message à votre attention.
V ous êtes informés de la présence d’un message en consultant le journal des
appels.
L ’icône apparait à l’écran.
Cet appel est distingué des autres appels par l’affichage “Message”.
Pour consulter votre messagerie vocale, contactez votre opérateur .

71
Présentation du Numéro et du Nom
Le signal d’appel* et le journal des appels
Par ce service*, vous êtes prévenu de l’arrivée d’un nouvel appel alors que vous
êtes déjà en communication. V ous pouvez ainsi prendre cet appel et passer d’un
correspondant à l’autre.
T out en ét ant en communication avec l’interlocuteur N°1 l’afficheur indique le nom
et le numéro de l’interlocuteur N°2.
Suivez la procédure décrite ci-dessous pour passer d’un interlocuteur à un autre :
- V ous êtes en conversation avec l’interlocuteur N°1.
- V ous êtes averti de l’arrivée d’un second appel par un signal sonore.
- Le nom et/ou le numéro de téléphone de l’interlocuteur N°2 sont alors affichées.
- Appuyez sur les touches puis 2 pour prendre le nouvel appel.
Pendant ce temps, l’interlocuteur N°1 est mis en attente.
- Appuyez sur les touches puis 1 pour reprendre l’interlocuteur N°1.
La ligne avec l’interlocuteur N°2 est coupée.
Note :
* Le signal d’appel est accessible seulement par abonnement. Contactez votre opérateur pour
plus de renseignements.

72
Présentation du Numéro et du Nom
2 - Effacer des enregistrements dans le journal des appels reçus
- Utilisez le navigateur pour sélectionner “Journal”.
- Appuyez sur la touche .
- Utilisez le navigateur pour sélectionner “Effacer”.
- Appuyez sur la touche .
- Utilisez le navigateur pour vous déplacer dans les enregistrements et vous
placer sur la fiche à effacer .
- Appuyez sur la touche .
- Appuyez sur la touche pour confirmer l’effacement.
- Appuyez deux fois sur la touche pour sortir.
3 - Effacer tous les enregistrements du journal des appels reçus
- Utilisez le navigateur pour sélectionner “Journal”.
- Appuyez sur la touche .
- Utilisez le navigateur pour sélectionner “Efface T out”.
- Appuyez sur la touche .

73
Présentation du Numéro et du Nom
Appuyez sur la touche pour confirmer l’effacement de toutes les fiches du
journal.
- Appuyez deux fois sur la touche pour sortir.
4 - Rappel d’un numéro du journal des appels reçus
- Utilisez le navigateur pour sélectionner “Journal”.
- Appuyez sur la touche .
- Utilisez le navigateur pour sélectionner “Lire”.
- Appuyez sur la touche .
- Utilisez le navigateur pour vous déplacer dans les enregistrements et
sélectionner le numéro à rappeler .
- Appuyez sur la touche , le numéro de votre correspondant se compose
automatiquement.
- La conversation terminée, fermez le combiné ou appuyez sur la touche .
Note :
La fonction rappel d’un numéro du journal n’est pas disponible pour un numéro affiché PRIVE ou
INDISPONIBLE.

74
Présentation du Numéro et du Nom
5 - Transfert d’une fiche du journal des appels reçus vers le répertoire
- Utilisez le navigateur pour sélectionner “Journal”.
- Appuyez sur la touche .
- Utilisez le navigateur pour sélectionner “Lire”.
- Appuyez sur la touche .
- Utilisez le navigateur pour vous déplacer dans les enregistrements et
sélectionner la fiche à transférer .
- Appuyez sur la touche .
L ’afficheur indique “Répertoire”.
- Appuyez sur la touche .
- L ’afficheur vous invite maintenant à saisir un nom.
Pour saisir une lettre, appuyez sur la touche correspondante du clavier
alphanumérique autant de fois que nécessaire.
V ous pouvez vous aider de la table de caractères ci-contre.
- Lorsque le nom est saisi, appuyez sur la touche pour confirmer .
L ’afficheur indique “Enregistré!”.
- Appuyez deux fois sur la touche pour sortir.

75
Multi-combinés
V ous pouvez déclarer et utiliser jusqu’à 5 combinés avec votre base.
Chaque combiné peut être déclaré sur 4 bases maximum.
Avec 2 combinés au minimum, vous avez accès aux fonctions suivantes :
- Intercommunication entre combinés.
- Transfert d’appel entre combinés.
- Etablir une conférence à 3.
- Déclarer un nouveau combiné sur la base
Le combiné fourni (N°1) est déjà déclaré par défaut en usine avec votre base.
Seul les combinés supplémentaires (compatible GAP) doivent être déclarés
comme suit avec votre base :
- Appuyez et maintenez (10 secondes environ) la touche (située sur la base)
jusqu’à ce que le voyant sur la base clignote.
- Utilisez le navigateur pour sélectionner “Enreg COMB”.
- Appuyez sur la touche .
L ’afficheur indique le numéro de la base sélectionnée (1 par défaut).
- Utilisez le navigateur si vous désirez sélectionner une autre base.
- Appuyez sur la touche .
L ’afficheur indique le code d’enregistrement.
- Appuyez sur la touche .
- Lafficheur indique “Code” et vous invite à saisir le code PIN de la base à relier
avec ce combiné (code usine : 1590, ou votre code précédemment attribué).

76
Multi-combinés
- Appuyez sur la touche pour confirmer l’enregistrement du combiné.
Note :
Le GAP est un standard international qui permet aux téléphones compatibles avec ce système
de communiquer entre eux.
- Vous pouvez déclarer votre combiné supplémentaire sur une autre base (N°2 par exemple) si
celle-ci est plus proche de votre combiné.
- L’afficheur indique une étoile devant la base sélectionnée ou la base par défaut.
2 - Annuler l’enregistrement d’un combiné
Une fois le combiné retiré, il est impossible de l’utiliser pour téléphoner . Cette
opération permet par exemple d’empêcher une utilisation abusive de celui-ci.
- Utilisez le navigateur pour sélectionner “Reg BASE”.
- Appuyez sur la touche .
L ’afficheur indique “Code Base” et vous invite à saisir le code PIN de la base (code
usine : 1590, ou votre code précédemment attribué).
- Appuyez sur la touche pour confirmer le code.
- Utilisez le navigateur pour sélectionner “Supp Comb”.
- Appuyez sur la touche .

77
Multi-combinés
Dans l’exemple ci- dessous, l’afficheur indique :
M : Confirme que le combiné courant est en mode réglage.
23 : Les numéros (2 et 3 dans cet exemple) correspondent aux numéros des
combinés enregistrés avec la base.
Dans cet exemple le combiné N°1 est en cours d’utilisation (il ne peut donc pas
être retiré).
Il est donc seulement possible de retirer le combiné N°2 ou N°3.
- L’af ficheur vous invite donc à saisir le numéro du combiné à retirer (2 ou 3 dans
notre exemple).
- Appuyez sur la touche pour confirmer .
- Appuyez deux fois sur la touche pour sortir.
Le combiné est maintenant retiré de votre base.
L ’afficheur du combiné retiré indique “Pas de Base” ou “Recherche...”.

78
Multi-combinés
3 - Fonctionnement en multi-combinés
V ous pouvez communiquer gratuitement entre deux combinés enregistrés sur une
mème base.
- Appuyez sur la touche .
L ’afficheur indique “Interphone”
- Saisissez le numéro du combiné que vous désirez appeler (N°3 par exemple).
- Le combiné N°3 sonne.
- Ouvrez le combiné N°3 et/ou appuyez sur la touche pour parler .
- La conversation terminée, fermez le combiné ou appuyez sur la touche .
4 - Transfert d’un appel externe d’un combiné vers un autre
Avant de pouvoir effectuer une opération de ce type il est nécessaire de s’assurer
qu’un deuxième combiné a bien été enregistré sur votre base
.
V ous pouvez transférer une communication externe vers un autre combiné de la
même base.
- En cours de conversation, appuyez sur la touche .

79
Multi-combinés
- Saisissez le numéro du combiné vers lequel vous désirez transférer l’appel (N°4
par exemple).
- Le combiné N°4 sonne.
- Ouvrez le combiné N°4 et/ou appuyez sur la touche pour parler .
- La conversation terminée, fermez le combiné ou appuyez sur la touche .
Note :
Si le combiné N°4 ne répond pas, appuyez à nouveau sur la touche pour reprendre la
communication
.
5 - Conférence à 3
Lorsque vous êtes en conversation externe et en mode interphone avec un
deuxième combiné, appuyez et maintenez la touche # pendant 2 secondes au
moins.
V ous êtes alors en communication à 3.
6 - Déclarer une nouvelle base
Un combiné peut être enregistré sur 4 bases différentes.
- Utilisez le navigateur pour sélectionner “Select BASE”.
- Appuyez sur la touche .
Une étoile précède les bases connectées au combiné.
V ous avez à ce stade la possibilité de choisir votre base automatiquement (dans

Multi-combinés
ce cas, le combiné choisit la base dont le signal de réception est le meilleur pour
votre combiné, correspondant en général à la base la plus proche) ou de choisir la
base manuellement:
1 - choix automatique:
- Utilisez le navigateur pour sélectionner “Base Auto”.
- Appuyez sur la touche .
- Appuyez deux fois sur la touche pour sortir.
2 - Choix manuel:
Utilisez le navigateur pour sélectionner la base désirée.
- Appuyez sur la touche .
- Appuyez deux fois sur la touche pour sortir.
Note :
Pour utiliser votre combiné avec plus d’une base, vous devez enregistrer votre
combiné avec toutes les bases.

Nom : GEEMARC TELECOM
(Fabricant, mandataire ou personne responsable de la mise sur le marché de l’équipement)
Siège social : GEEMARC TELECOM
Adresse : Parc d’activité de l’Etoile
Localité : Grande Synthe Cédex Code Postal : 59760
Identification du produit :
- Nature : Téléphone
- Type : Filaire
- Référence Commerciale : Geemarc CLDECT200
- Autres Informations : DECT
Déclare sous son entière responsabilité que le produit décrit ci-dessus est en conformité avec les
exigences essentielles applicables et en particulier celles de la directive (1999/2/CE):
Article 3.1 a: EN 60950 (2001), EN41003 (1998)
Article 3.1 b: EN 301406 (2003),
EN 301489 (2002)
Article 3.2: TBR 10 (1999)
TBR 22 + A1 (GAP)
EN 301437 (1999)
TBR 38 (1998)
Procédure suivie (Annexes) : Déclaration de conformité directive R & TTE
Date : 01 Septembre 2006
Signature et titre de la personne autorisée :
Directeur technique
Jean-Gérard Briche
Déclaration de conformité

Informations générales
Garantie :
Cet appareil est garanti 1 an pièces et main-d'oeuvre. La date d'achat figurant sur
le ticket de caisse fera foi. Cette garantie s'exerce sous réserve d'une utilisation
normale de l'appareil. Les dommages occasionnés par les surtensions électriques,
la foudre ou par un choc sur l'appareil ne peuvent en aucun cas être couverts par
la garantie. En cas de problème fonctionnel, rapprochez-vous de votre point de
vente.
Recommandations pour le recyclage :
La directive DEEE (Déchet d'Equipement Electrique et Electronique) a été mise en
place dans le but d'assurer la collecte sélective en vue de la valorisation,
réutilisation ou recyclage des produits en fin de vie.
Lorsque votre produit ne fonctionne plus, ne le jetez pas dans votre poubelle
ménagère.
Suivez l'une des procédures décrites ci-dessous:
- Déposez les batteries et votre ancien appareil dans un lieu de collecte approprié.
- Ou rapportez votre ancien appareil au magasin ou vous acheterez le nouveau. Il
devra l'accepter .
Ainsi, si vous respectez ces instructions vous faites un geste pour l'environnement
et vous contribuez à la préservation des ressources naturelles et à la
protection de la santé humaine.

Raccordement électrique :
L ’appareil est prévu pour fonctionner avec un adaptateur secteur 230V 50Hz.
(T ension classée “dangereuse” selon les critères de la norme EN60950). Par
précaution en cas de danger , le bloc alimentation secteur sert de dispositif de
sectionnement de l’alimentation 230V. Il doit être installé à proximité du matériel et
être aisément accessible.
Raccordement téléphonique :
Les tensions présentes sur ce réseau sont classées TRT -3 (Tension de Réseau de
Télécommunication) au sens de la norme EN60950.
Ce produit respecte les exigences de compatibilité électro-magnétique et de
sécurité électrique demandées par la directive européenne RTTE. Par ailleurs, il est
compatible avec les différents réseaux téléphoniques européens (normes TBR21/
37/38). Le fonctionnement de l’appareil n’est pas garanti si le courant de ligne est
inférieur à 18 mA.
UGDECT200 ED01
Informations générales
 Loading...