

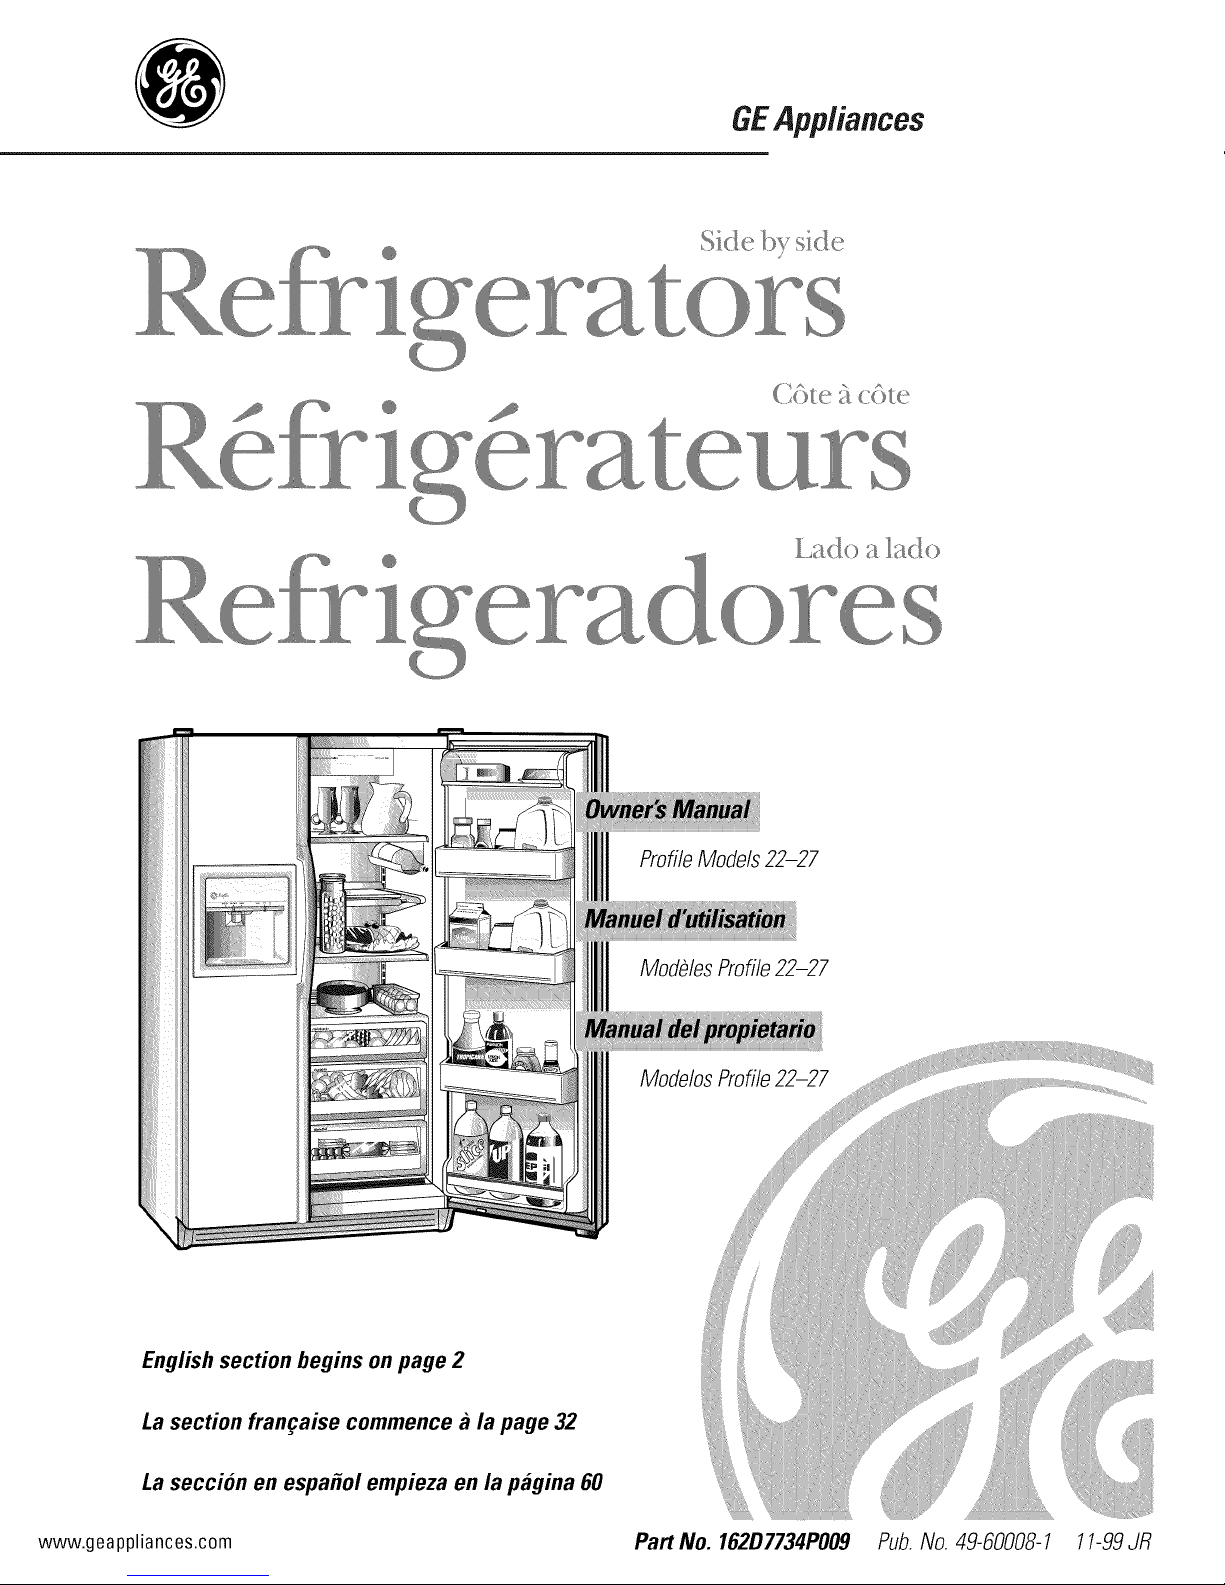
GE TFX25ZPBBAA, TFX25ZPBABB, TFX25PRBAWW, TFX25PRBCWW, TFX25PRBEAA Owner's Manual
...
GEAppliances
@
@
@
Side by side
English section begins on page 2
La section fran_aise commence a la page 32
ProfileModels 22-27
ModblesProfile22-27
ModelosProfile22-27
La seccion en espa_ol empieza en la pagina 60
www.geappliances.com
Part No. 162D7734PO09 Pub.No. 49-60008-1 11-99JR
Safety Information
SafetyPrecautions............ 3
m
w
UseofExtensionCords......... 3
HowtoConnectElectricity..... 4
UseofAdapterPlugs...........
Operating Instructions
,0
Controls ................. 5-8
Features............... 9-I I
IceService ............. 12
IceandWaterDispenser.... IZ 13
CareandCleaning.............
Congratulations!
YouAre Now Part of the GEFamily.
Welcome to the GE fmnily. We're proud of our quali-
_,products and we are committed to pro_dding
dependable service. You'll see it in this ease:m-use
O_mer's Manual and you'll hear it in the fiiendly
voices of our customer service department.
Best of all, you'll experience fllese values each time
you use your refi'igerator. That's important, because
your new refiigerator _dllbe part ofyour fmnily far
many years. And we hope you _dll be part of ours fbr
a long time to come.
We thank you far bu}_ng GE. We appreciate your
purchase, and hope you will continue to rely on us
whenever you need quality appliances fbr your home.
GE& You,A Service Partnership.
IMPORTANT!
Fill out the Consumer Product Registration Card.
Installation Instructions
,0
Preparingto
InstalltheRefrigerator, ..... I7
WaterLineInstallation..... I8-20
TwoEasyWaysToRegisterYourAppliance!
• Through the interne: at _v.geappliances.coln.
• Complete and mail the enclosed Product Registration Card.
,0
Troubleshooting77ps
m
NormalOperatingSounds..... 2I
BeforeYouCallForService.21-24
Customer Service
WarrantyforCanadianCustomers24
WarrantyforU.S.Customers...25
FXRCCartridge
PerformanceDataSheet....... 26
Stateof CaliforniaWater
TreatmentDeviceCertificate...27
m
ProductRegistration ........ 29
ServiceTelephone
Numbers .......... BackCover
2
FORYOURRECORDS
Write themodel and serial numbershere:
#
#
You can find them on a M)el on the wall beside the top drawer
or at the bottoln,just inside the fi'esh fbod COlnpamnent door.
Staple sales slip or cancelled check here.
Proof of the ori_nal purchase date is needed to obtain service
under the wmr'anty.
READTHISMANUAL
Inside you will find many helpfid hint_son how to use and lnaintain
your refiigerator properly.Just a little preventive care on your part
can save you a great deal of time and lnoney over the life of your
refi'igerator.
IFYOUNEEDSERVICE
You'll find ma W answers to common problems in the Before You
CallForServicesection. If you rm4ewour chart of Troubleshooting77ps
first, you may not need to call for service at all.
If you do need service, you can relax kno_4ng help is only a phone
call away. A list of toll4i'ee customer sexs_icenumbers is included in
the back section. Or, in the U.$.,you can al_vlys call the GE Answer
Center ®at 800.626.2000, 24 hours a day, 7days a week. In Canada,
call 1-800-361-3400.
IMPORTANTSAFETYINFORMATION.
READALLINSTRUCTIONSBEFOREUSING.
.4,WARNING!
Use this appliance only for its intended purpose as described in this Owner's Manual
SAFETYPRECAUTIONS
When using electrical appliances, basic safety precautions should be followed, including the following:
{{This refiigerator must be properly installed
and located in accordance with the Installation
Instructions befbre it is used.
Do not allow children to climb, stand or hang
on the shelves in the refrigerator. They could
damage the refrigerator and seriously injure
themselves.
{{Do not touch the cold surfaces in the freezer com-
parUnent when hands are dmnp or wet. Skin m W
stick to these extremely cold surfaces.
{{Do not store or use gasoline or odmr flammable
vapors and liquids in the vicinity of this or any
other appliance.
In refrigerators with autolnatic icelnakers,
avoid contact with the moving parts of the
ejector mechanism, or _dth the heating element
that releases the cubes. Do not place fingers or
hands on the automatic icelnaking mechanism
while the refrigerator is plugged in.
{{Keep fingers out of dm "pinch point" areas; clear-
ances between the doors and between
the doors and cabinet are necessarily small.
Be carefhl closing doors when children are
in the area.
Unplug the refiigerator befbre cleaning and mak-
ing repairs.
NOTE: We strong& recommend that anyservicing beperformed
byaqua/ifiedindividua/.
Turning dm control to dm Oil:or 0position does
not remove power to the light circuit.
{{Do not refreeze frozen foods which hm_e
thawed completely.
DANGER!RISKOFCHILDENTRAPMENT
PROPERDISPOSALOFTHEREFRIGERATOR
Child entrapment and suffocation are not problelns
of the past. Junked or abandoned refrigerators are
still dangerous...even ifthey _411sit far '_just a few
days." Ifyou are getting rid of your old refiigerator,
please fbllow the instructions below to help prevent
accident.s.
Before You ThrowAway Your Old Refrigerator
or Freezer:
Take offdm doors.
Lem_ethe shelves in place so that children may
not easily climb inside.
CFCDisposal
Your old refrigerator has a cooling system that used
CFCs (chlorofluorocarbons). CFCs are believed to
harm stratospheric ozone.
Ifyou are fllro_4ng away your old refiigerator, make
sure the CFC refrigerant is relnoved fbr proper dis-
posal by a qualified servicer. If you intentionally
release this CFC refiigerantyou can be subject to
fines and impdsonment under provisions of envi-
ronmental legislation.
USEOFEXTENSIONCORDS
Because of potential safety hazards under certain conditions, we strongly recommend
against the use of an extension cord.
However, if you must use an extension cord, it is absolutely necessapy that it be a UL-listed (in the United
States) or a CSA-listed (in Canada), 3-,_4regrounding type appliance extension cord having a grounding
type plug and outlet and that the electrical rating of the cord be 15 amperes (minimum) and 120 volts.
3
IMPORTANTSAFETYINFORMATION.
READALLINSTRUCTIONSBEFOREUSING.
WARNING'!
HOWTOCONNECTELECTRICITY
Do not, under any circumstances, cut or remove the third (ground) prong from the power cord. For per-
sonal safety, this appliance must be properly grounded.
The power cord of this appliance is equipped _ith a
3-prong (D'ounding) plug which mates with a stan-
dard 3-prong (grounding) wall outlet to minimize
the possibility, of electric shock hazard frOln this
appliance.
Hm,e file wall outlet and circuit checked by a quali-
fied electrician to make sure the outlet is properly
grounded.
Where a standard 2-prong wall outlet is encoun-
tered, it is your personal responsibility, anti obliga-
tion m have it replaced with a properly grounded S-
prong wall outlet.
The refrigerator should always be plugged into its
o_m indMdual electrical outlet which has a voltage
rating that matches the rating plate.
This provides d_e best perfimnance anti also pre-
vents overloading house wiring circuits which could
cause a fire hazard from overheated wires.
Never unplug your refrigerator by pulling on the
power cord. Always _'ip plug firmly anti pull straight
out from the outlet.
Repair or replace immediately all power cords that
have become frayed or otherwise damaged. Do not
use a cord that shows cracks or abrasion damage
along its length or at either end.
When moving the refrigerator a_ty from the
wall, be carefid not to roll over or dmnage the
power cord.
USEOFADAPTERPLUGS(A pternotper i,e in
Because of potential safety hazards under certain conditions, we strongly recommend against
the use of an adapter plug.
However, if you lnUSt use an adapter, where local
codes permit, a temporaryconnectionulay be made
to a properly _'ounded 2-prong wall outlet by use
ofa UL-listed adapter available at lnOSt local hard-
ware stores.
The larger slot in die adapter must be aligned _4dl
the larger slot in the wall oudet to provide proper
polarity in the connection of the power cord.
When disconnecting the power cord fi'OUlthe
adapter, always hold the adapter in place _4th one
hand while pulling the power cord plug _4th the
other hand. If this is not done, the adapter ground
temdnal is veU likely to break with repeated use.
If the adapter _'ound terminal breaks, DONOTUSE
the refiigerator until a proper ground has been
established.
Attachingthe adaptergroundterminaltoa wall outlet
coverscrewdoesnotgroundtheapplianceunlessthe
coverscrewismetal,andnotinsulated,andthewall out-
let is groundedthroughthehousewiring.Youshouldhave
thecircuit checkedbya qualifiedelectricianto makesure
theoutletisproperlygrounded.
Readandfollow thisSafetyInformationcarefully.
SAVETHESEINSTRUCTIONS
4
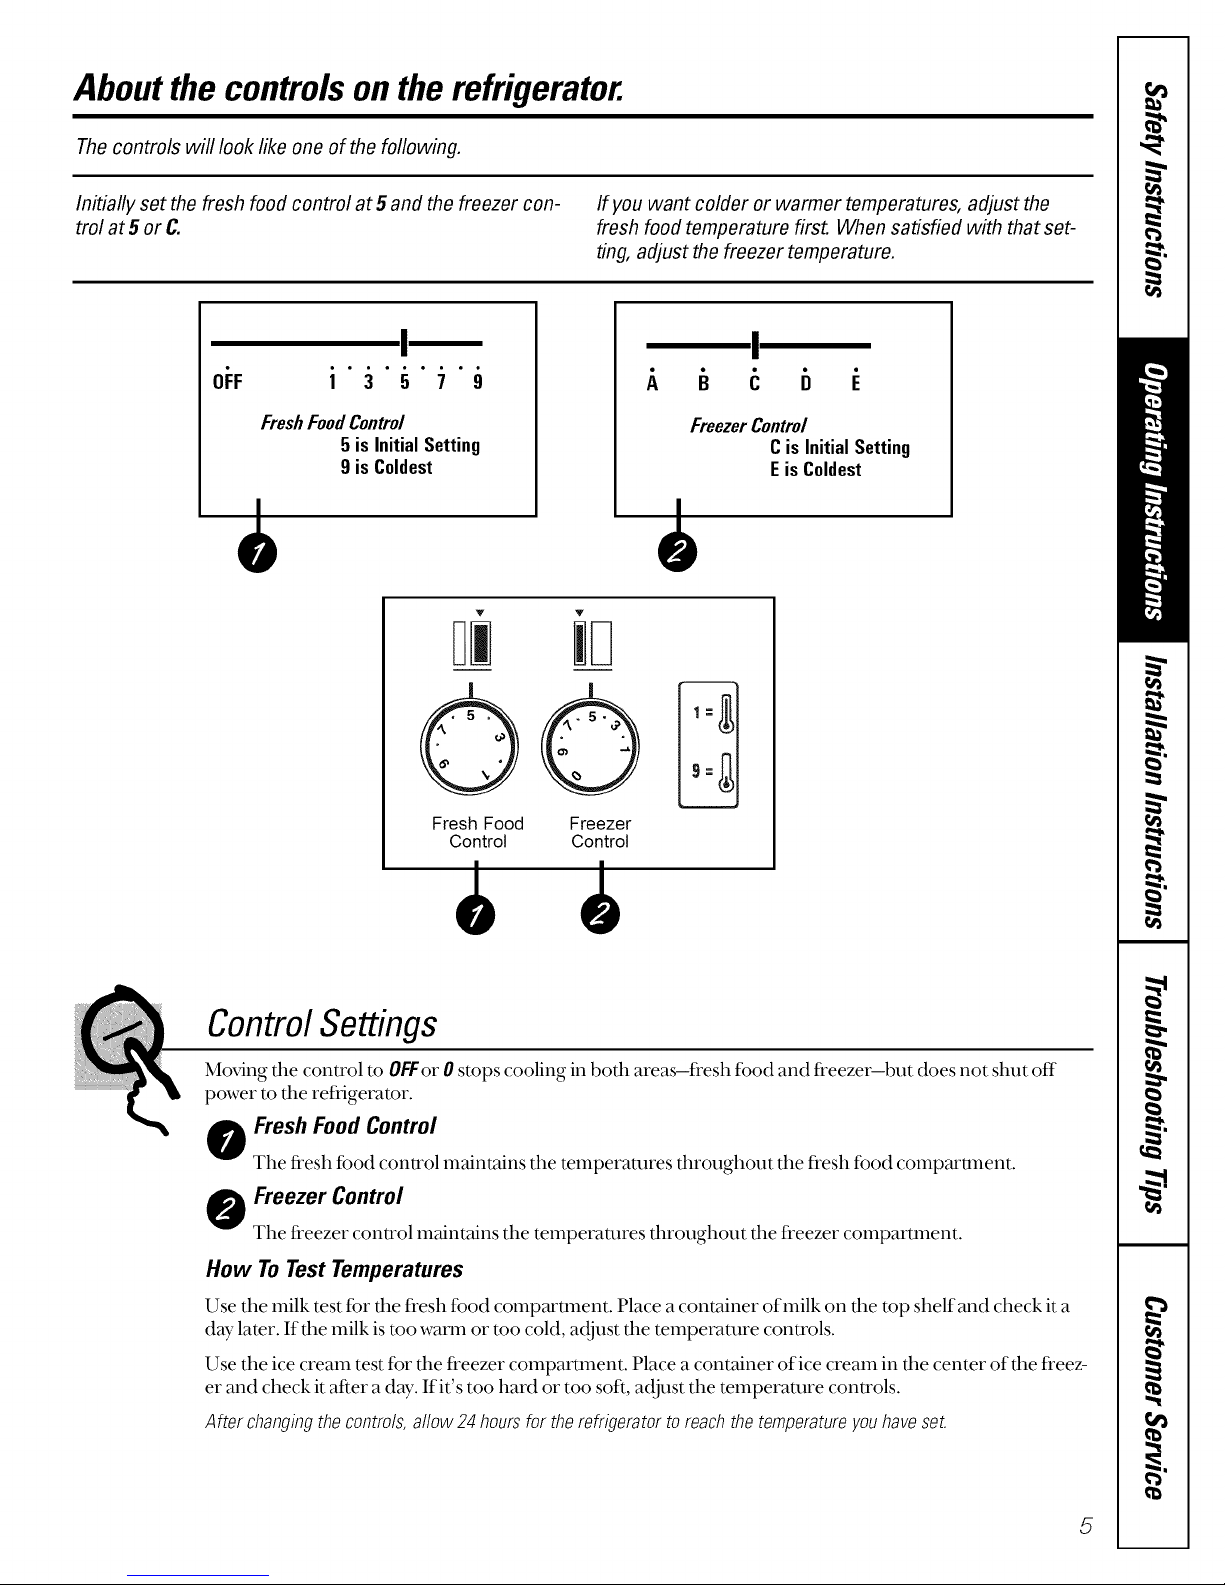
Aboutthe controlsontherefrigerator.
The controls will look like one of the following.
Initially set the fresh food control at 5 and the freezer con-
trol at 5 or C.
Oi:F
FreshFoodControl
• ° ° ° ° . ° ° •
1 3 5 7 9
5 is Initial Setting
9 is Coldest
O0
If you want colder or warmer temperatures, adjust the
fresh food temperature first. When satisfied with that set-
ting, adjust the freezer temperature.
I
FreezerControl
Cis InitialSetting
EisColdest
Fresh Food Freezer
Control Control
Control Settings
Moving die control to OFFor0 stops cooling in bodl areasifi'esh food and fi'eezeribut does not shut off
power m the refiigeramr.
o resh Food Control
The fi'esh food control lnaintains the temperatures throughout the fl'esh food COlnpartment.
Freezer Control
The fi'eezer control maintains the telnperatures throughout the fl'eezer COlnpartment.
How To Test Temperatures
Use the milk test for the fl'esh food COlnpartment. Place a container of milk on the top shelf and check it a
dW later. If the milk is mo waxm or mo cold, a@lst the teznperamre controls.
Use the ice cream test fbr the fl'eezer coznpamnent. Place a container of ice cream in the center of the fl'eez-
er and check it after a dW. If it's too hard or too sofL adjust the teznperamre controls.
After changingthecontrols,allow24 hoursfortherefrigeratortoreachthetemperatureyouhaveset.
5
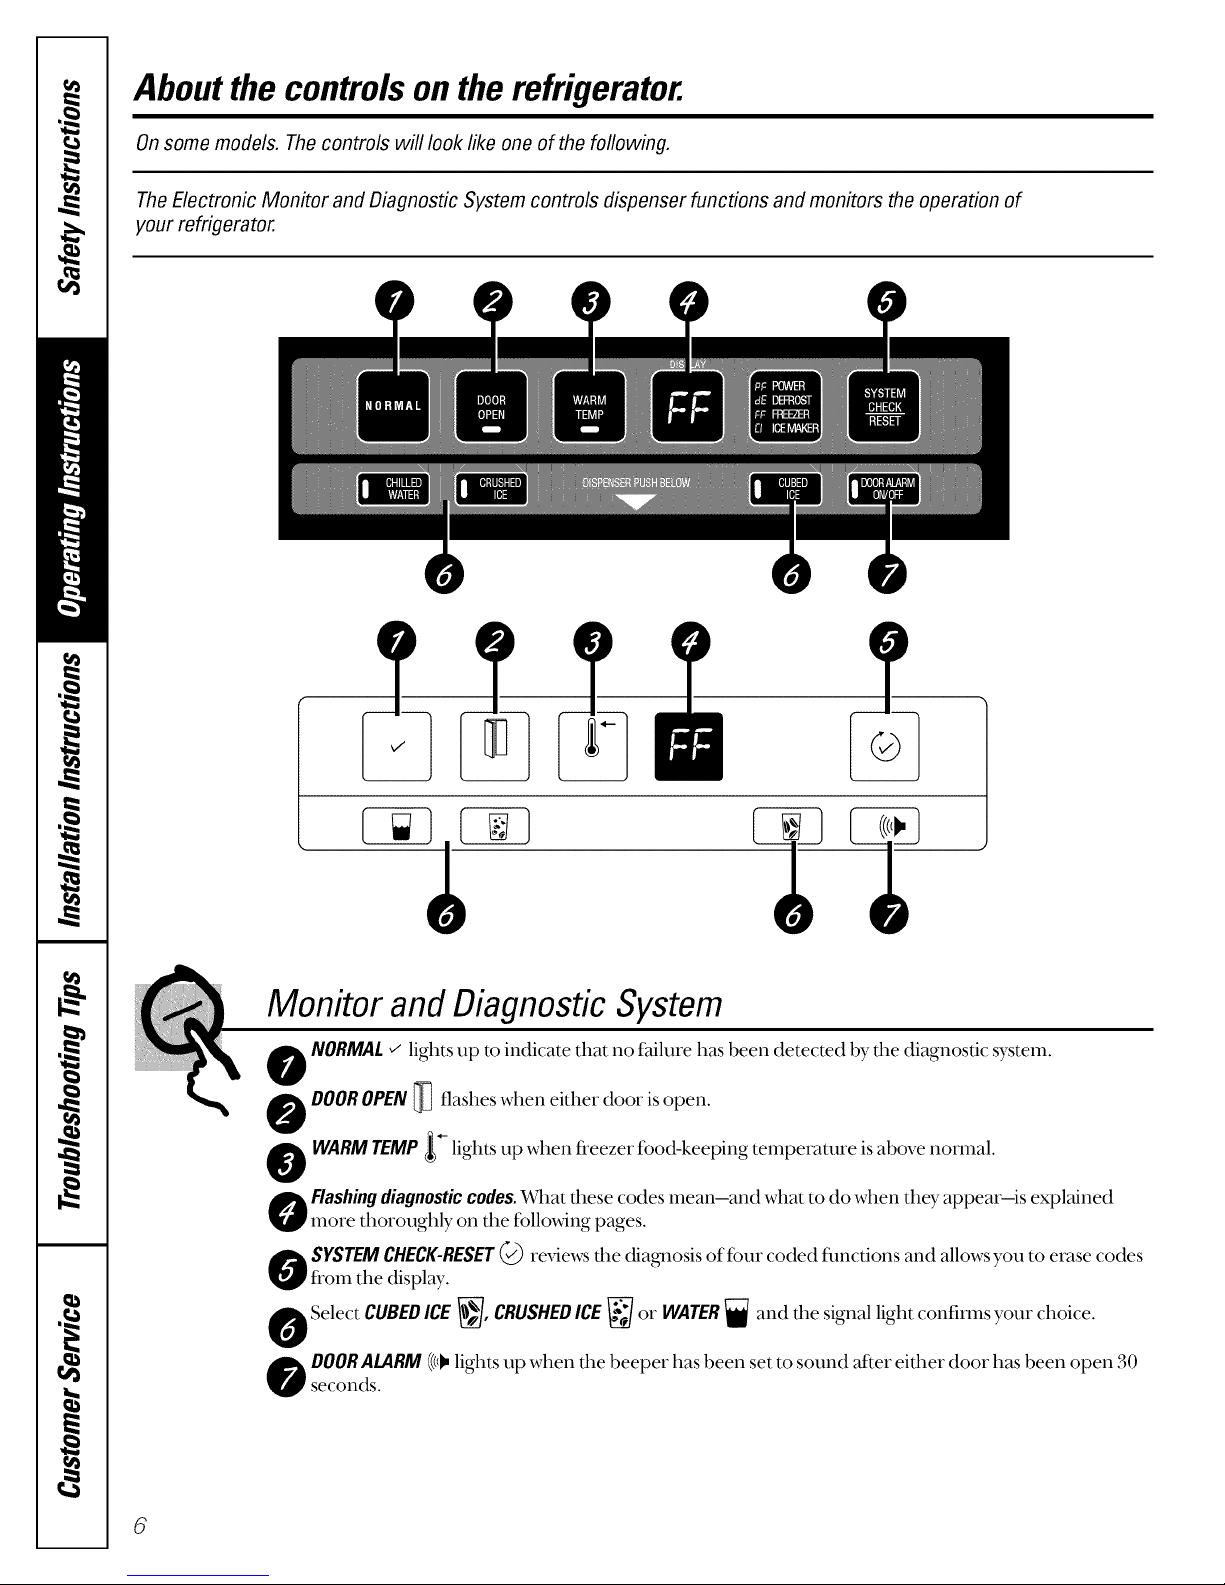
Aboutthe controlsontherefrigerator.
Onsome models. Thecontrols will look like one of the following.
The Electronic Monitor and Diagnostic System controls dispenser functions and monitors the operation of
your refrigerator.
0
0 •
Monitor and Diagnostic System
NORMAL_ lights up to indicate that no f_dlure has been detected by the diagnostic system.
0
DOOROPEN_ flashes when either door is open.
0
@
g"WARMTEMP lights up when fi'eezer food-keeping temperaalre isabove normal.
Oi Flashingdiagnostic codes. X_lat these codes mean-and what to do when they appear-is explained
, more thoroughly on the fbllo_ing pages.
OL SYSTEMCHECK-RESET_ reviews the diagnosis of four coded flmctions and allows you to erase codes
rfl'om the display.
Select CUBEDICE_, CRUSHEDICE_ or WATER_ and the signal light confim_s your choice.
o OORALARM@I'lights up when the beeper has been set to sound after either door has been open 30
seconds.
6
When Your Refrigerator Is First Plugged In
All panel lights come on f_)rfive seconds,
a beep sounds, and light.s go offexcept as
follows:
PFflashes in dm display. Touch SYSTEM
CHECK-RESETtoeraseit.
NORMALgIows.
; WARMTEMPglows until the refrigerator
cools doom. It goes offwhen proper food-
keeping temperature is reached.
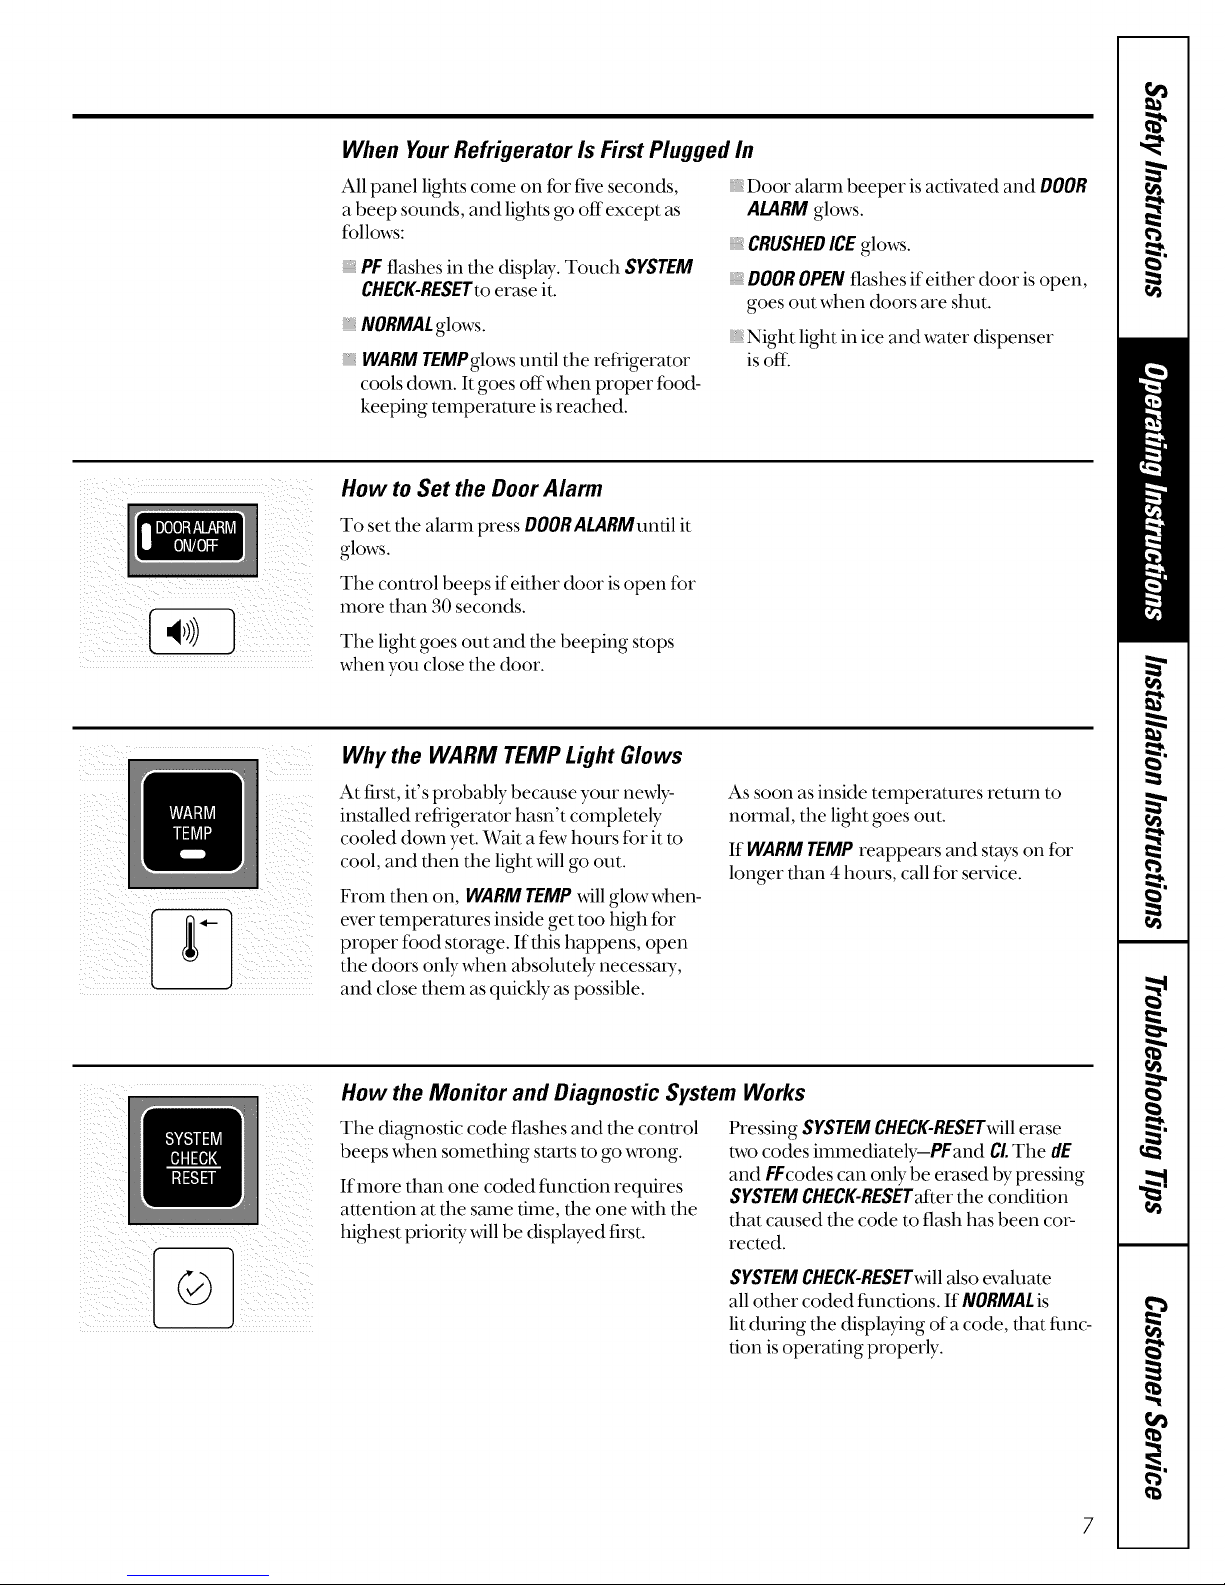
How to Set the Door Alarm
To set the alarm press DOORALARMuntil it
glows.
The control beeps if either door is open for
more than 30 seconds.
The light goes out and the beeping stops
when you close the door.
Why the WARM TEMP Light Glows
Door alarm beeper is activated and DOOR
ALARMglows.
CRUSHEDICEglows.
DOOROPENflashesif either door is open,
goes out when doors are shut.
Night light in ice and water dispenser
is off.
At first, it's probably because your newly-
installed refrigerator hasn't COlnpletely
cooled down yet. _ait a few hours for it m
cool, and then the light will go out.
As soon as inside temperatures return to
normal, the light goes out.
If WARMTEMPreappears and stays on for
longer than 4 hours, call for service.
From then on, WARMTEMPxdll glow when-
ever temperatures inside get too high f_)r
proper food storage. If this happens, open
the doors only when absolutely necessary,
and close them as quickly as possible.
How the Monitor and Diagnostic System Works
The diagnostic code flashes and the control
beeps when something starts to go wrong.
If more than one coded traction requires
attention at the stone time, the one _4th the
highest priority will be displayed first.
Pressing SYSTEMCHECK-RESETwiIIerase
two codes immediateb_PFand CLThe dE
and FFcodes can only be erased by pressing
SYSTEMCHECK-RESET;_terthe condition
that caused the code to flash has been cot:
rected.
SYSTEMCHECK-RESET_iIIalso evaluate
all other coded fimctions. If NORMALis
lit during the displa}_ng of a code, that fimc-
tion is operating properly.
7
Aboutthe controlsontherefrigerator.
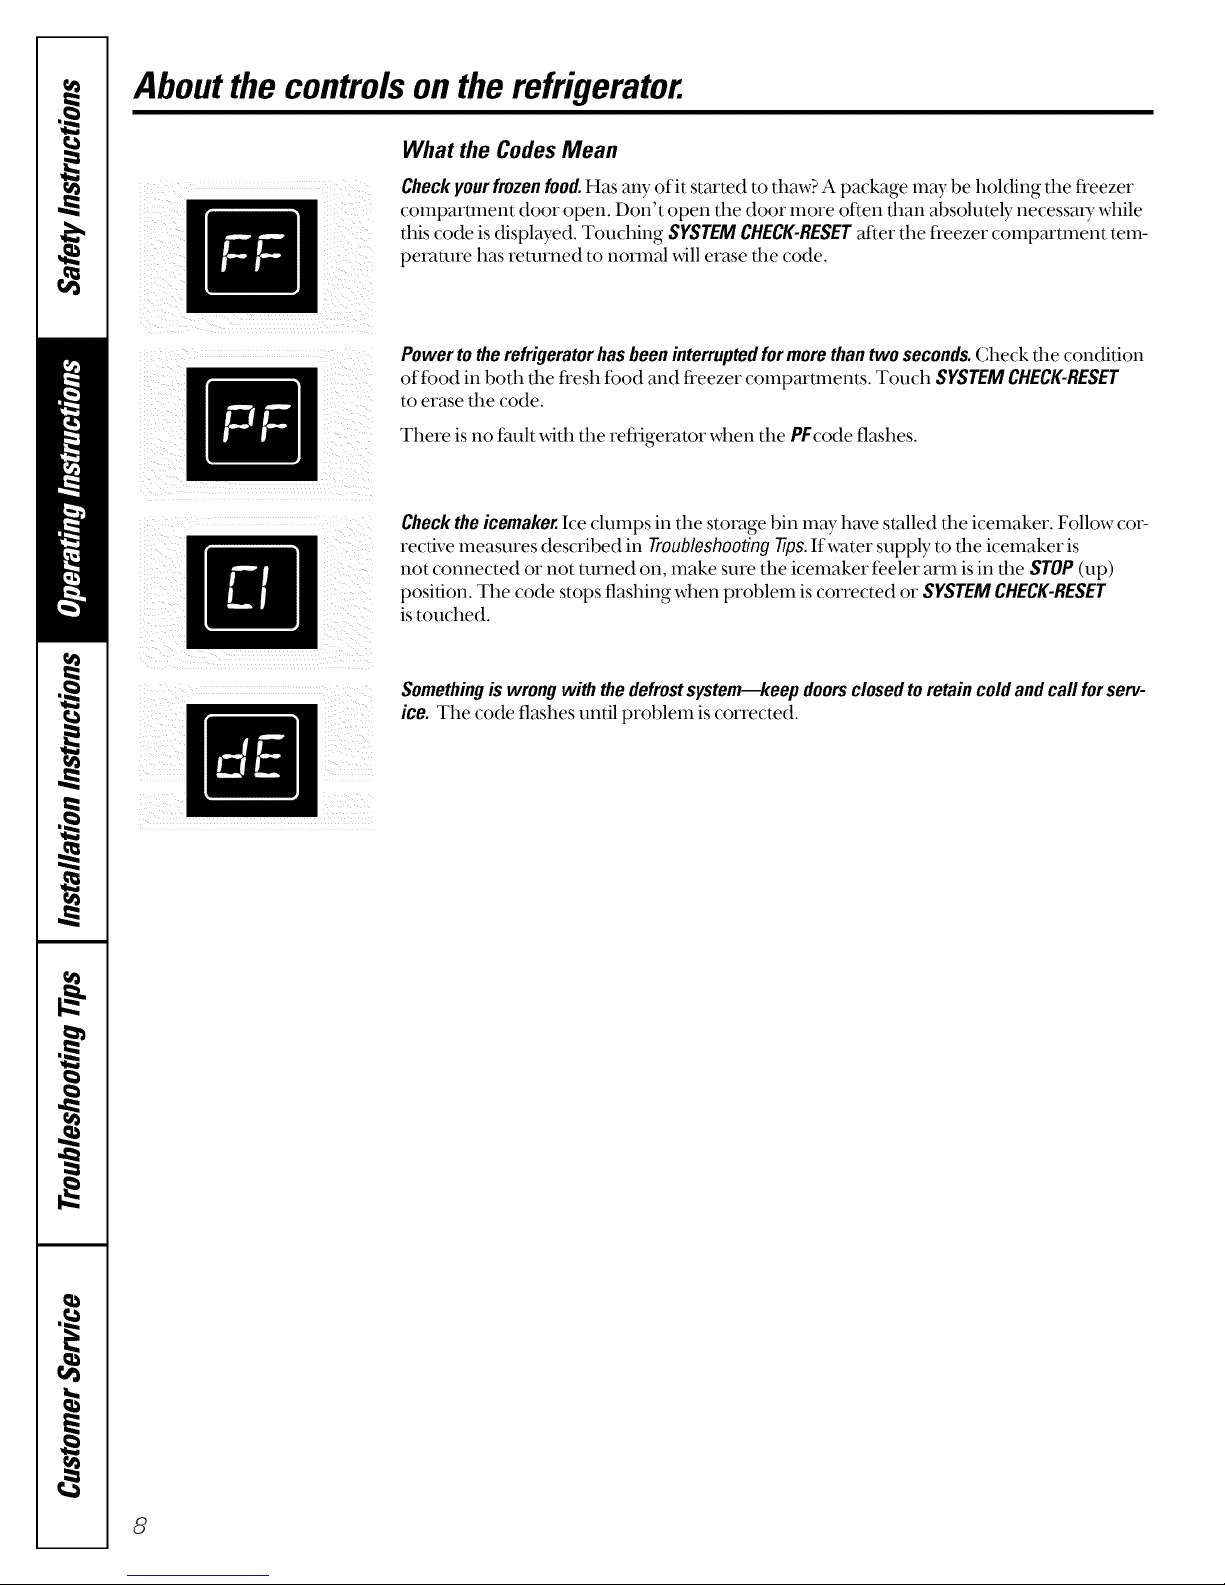
What the Codes Mean
Check your frozen food.Has aW of it started to thaw? A package may be holding the freezer
coznpartment door open. Don't open the door more often than absolutely necessa U while
this code is displayed. Touching SYSTEM CHECK-RESET_dter the freezer coznpartment tezn-
peraulre has reUlrned to normal will erase the code.
Powertotherefrigeratorhasbeeninterruptedformorethantwoseconds.Check the condition
of food in both the fresh food and fi'eezer compartments. Touch SYSTEMCHECK-RESET
to erase the code.
There is no fmllt with the refi{gerator when the PFcode flashes.
Checktheicemaker.Ice clumps in the storage bin may have stalled tim icemaker. Follow co>
rective measures described in 7-rouhleshooting77fls.If water supply to the icemaker is
not connected or not turned on, make sure the icemaker feeler arm is in the STOP (up)
position. The code stops flashing when problem is corrected or SYSTEMCHECK-RESET
is touched.
Somethingiswrong with thedefrostsystem--keep doorsclosedtoretaincoldandcall forserv-
ice. The code flashes until problem is corrected.
8
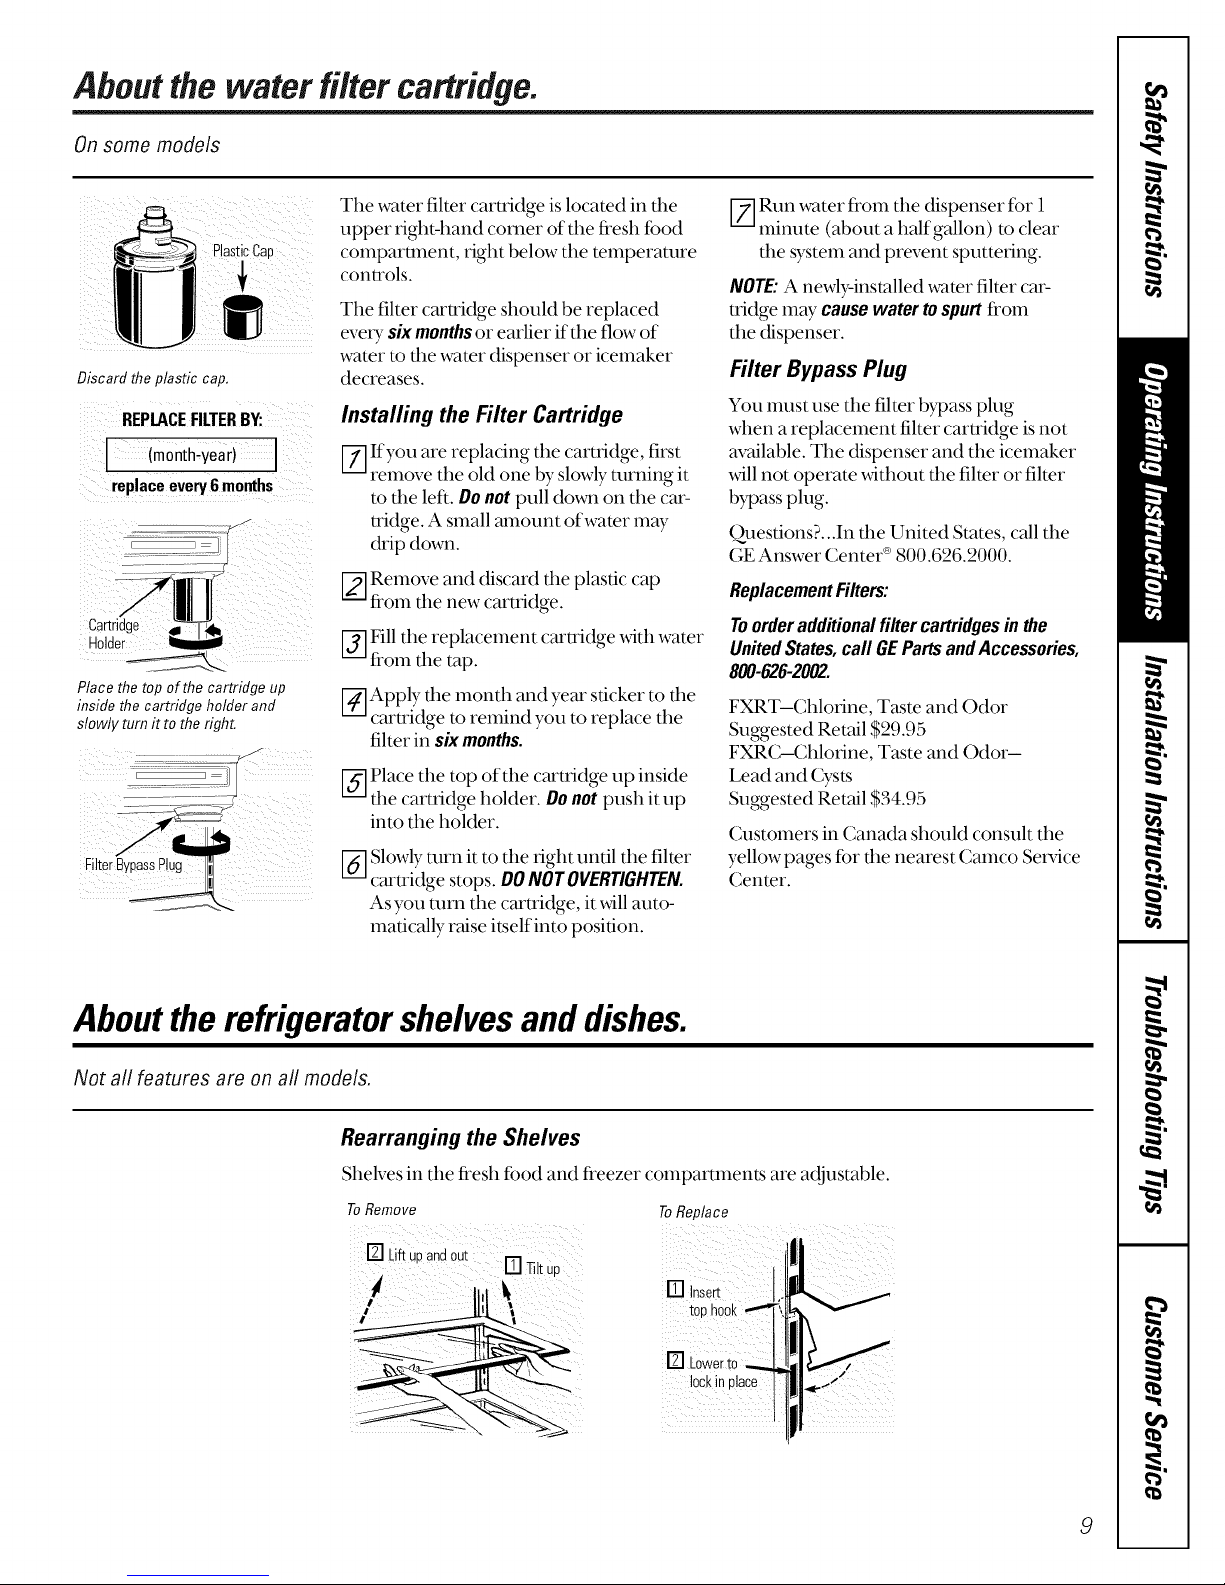
Aboutthe water filter cartridge.
On some models
Discard the plastic cap,
REPLACEFILTERBY:
(month:year)
Cartridge i
Holder
Place the top of the cartridge up
inside the cartridge holder and
slowly turn it to the right.
The water filter cartridge is located in dm
upper right-hand comer of the fresh food
compartment, right below the temperature
controls.
The filter cartridge should be replaced
eveU six months or earlier ifthe flow of
water to the water dispenser or icemaker
decreases.
Installing the Filter Cartridge
[7] Ifyou are replacing the cartridge, first
remove the old one by slowly u;rning it
m the left. Donotpull down on the car-
tridge. A small amount of water in W
(kip down.
[2--]Remove and discard the plastic cap
from the new cartridge.
I-j] Fill the replacement cartridge with water
from the tap.
V_]Apply the month and year sticker to the
cartridge to remind you to replace the
filter in six months.
[_] Place the top of the cartridge up inside
the cartridge holder. Do not push it up
into the holder.
V_]Slowly turn it to the right until the filter
cartridge stops. DONOTOVERTIGHTEN.
As you tuna the cartridge, it will auto-
matically raise it_selfinto position.
[-2] Run water from the dispenser for l
minute (about a half gallon) to clear
tim system and prevent sputtering,
NOTE:A newly-installed water filter car-
tridge may causewater tospurtfrom
the dispenser.
Filter Bypass Plug
You must use the filter b}i)ass plug
when a replacement filter cartridge is not
available. The dispenser and the icelnaker
will not operate without the filter or filter
b_l_assplug.
Questions?...In dm United States, call the
GE Answer Center ®800.626.2000.
Replacement Filters:
Toorderadditionalfiltercartridges& the
UnitedStates,call GEPartsandAccessories,
800-626-2002.
FXRT--Chlorine, Taste and Odor
Suggested Retail $29.95
FXRC--Chlofine, Taste and Odor-
Lead and (;yst_s
Suggested Retail $34.95
Customers in Canada should consult the
yellow pages for the nearest Camco Service
Center.
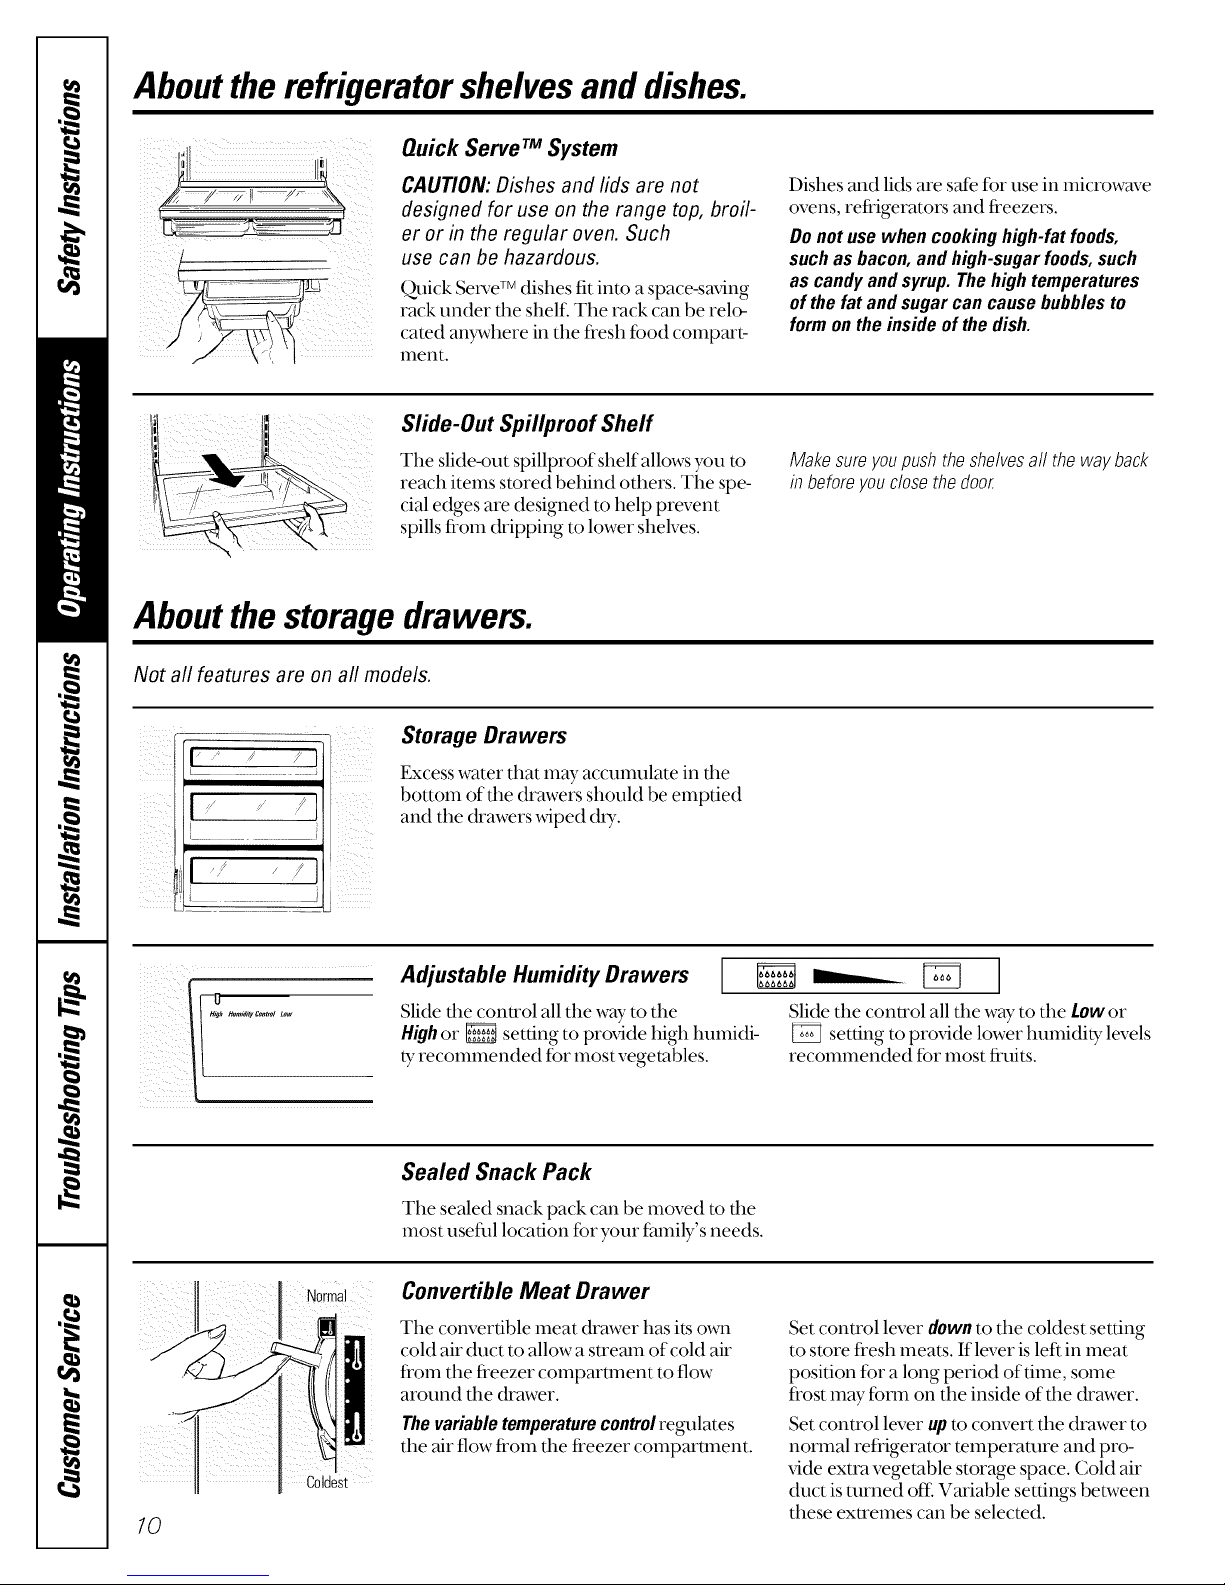
Aboutthe refrigeratorshelvesanddishes.
Not all features are on all models.
Rearranging the Shelves
Shelves in the fresh food and freezer comparunencs are acljustable.
ToRemove
ToReplace
[] Insert _ _
tophook
9
Aboutthe refrigeratorshelvesanddishes.
Quick Serve TM System
CAUTION: Dishes and lids are not
designed for use on the range top, broil-
er or in the regular oven. Such
use can be hazardous.
Q)uick Se[xTeTM dishes fit into a space-sm_ing
rack under the shel£ The rack can be relo-
cated anDvhere in the fi'esh food compart-
ment.
Dishes and lids are sale for use in microwave
ovens, refi'igerators and fi'eezers.
Do notusewhen cookinghigh-fatfoods,
such as bacon,and high-sugarfoods,such
as candyandsyrup. Thehightemperatures
ofthe fatand sugarcan cause bubblesto
formonthe insideofthedish.
IIi
Slide-Out Spillproof Shelf
The slide-out spillproof shelf allows you to
reach items stored behind others. The spe-
cial edges are designed to help prevent
spills fi'om dripping to lower shelves.
Aboutthe storagedrawers.
Not all features are on all models.
Storage Drawers
Excess water that may accumulate in dm
bottom of the drawers should be emptied
and the drawers wiped d U.
Adjustable HumidityDrawers _ _ _2_
Makesureyoupushtheshelvesallthe wayback
in beforeyouclosethedoor.
Slide the control all the way to the Slide the control all the way to the Lowor
Highor _ setting to provide high humidi- _ setting to prox4de lower humidity levels
ty recommended for most vegetables, recommended fbr most fi'uits.
Sealed Snack Pack
The sealed snack pack can be moved to the
most usefld location far your fmnily's needs.
Normal
Coldest
Convertible Meat Drawer
The convertible meat drawer has i_s own
cold air duct to allow a stremn of cold air
fi'om the fi'eezer compartment to flow
around the drawer.
Thevariabletemperaturecontrolregulates
the air flow fi'om the fi'eezer compartnmnt.
10
Set control lever downto the coldest setting
to store fi'esh meats, fflever is left in meat
position for a long period of time, some
fi'ost may fbtm on the inside of the drawer.
Set control lever up m convert the drawer to
normal refi'igerator temperature and pro-
vide extra vegetable storage space. Cold air
duct is turned of£ Variable settings between
these extreznes can be selected.
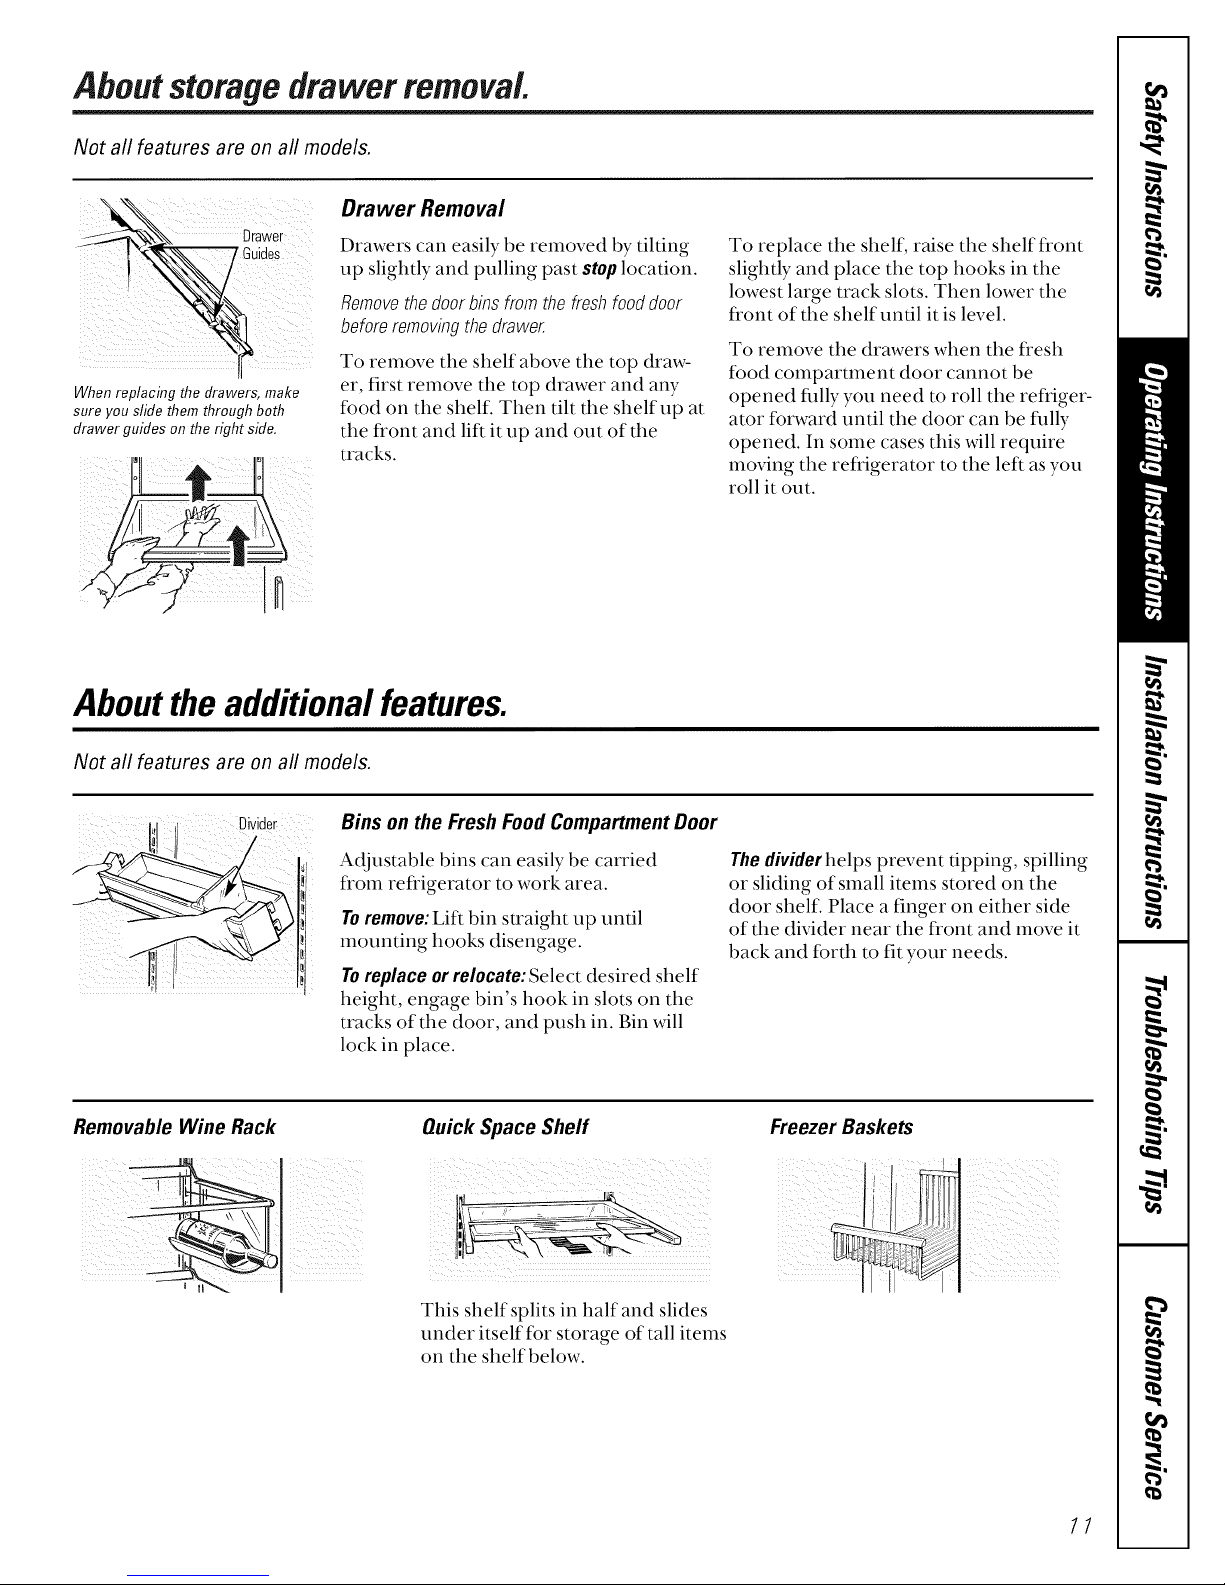
Aboutstorage drawer removal
Not all features are on all models.
Drawers can easily be removed by tilting
up slightly and pulling past stop location.
Removethedoorbinsfromthefreshfooddoor
beforeremovingthedrawer.
It
When replacing the drawers, make
sure you slide them through both
drawer guides on the right side.
To remove the shelf above the top draw-
er, first remove the top drawer and any
food on the shell Then tilt the shelf up at
the fi'ont and lift it up and out of the
tracks.
Aboutthe additionalfeatures.
Not all features are on all models.
i , Divider
li]
Bins on the Fresh Food Compartment Door
Adjustable bins can easily be carried
fi'Oln refi'igerator to work area.
Toremove: Lift bin straight up until
mounting hooks disengage.
Toreplace or relocate: Select desired shelf
height, engage bin's hook in slots on the
tracks of the door, and push in. Bin will
lock in place.
To replace the shelf, raise the shelf fi'ont
slightly and place the top hooks in the
lowest large track slots. Then lower the
fi'ont of the shelf until it is level.
To remove the drawers when the fi'esh
food compartment door cannot be
opened fldly you need to roll the refi'iger-
ator forward until the door can be fldly
opened. In some cases this will require
moving the refi'igerator to the left as you
roll it out.
Thedividerhelps prevent tipping, spilling
or sliding of small items stored on the
door shel£ Place a finger on either side
of the divider near the fi'ont and move it
back and fbrth to fit your needs.
Removable Wine Rack
I
Quick Space Shelf
iii _ i _ _ _ _i _.r_ _iii _i_
, , , _ '_ ...q
This shelf splits in half and slides
under itself for storage of tall items
on the shelf below.
Freezer Baskets
11
Aboutice service.
On some models
Ice Trays
! To release ice cubes, turn the tray upside
down, hold it over a container, and twist
both ends.
Icemaker Accessory Kit
If your refrigerator did not come already equipped with an automatic icemaker, an
icemaker accesso U kit is available at extra cost. Check the back of the refi"igerator for
the specific icemaker kit needed fbr your model.
Water Supply Kit
A kit containing copper tubing, shutoffvalve, fittings and instructions needed to con-
nect the icelnaker to your cold water line is available at extra cost fi"Olnyour dealer or
fi"OlnParts and Accessories, 800-626-2002.
SeethePreparing to install the refrigerator section.
For only one or two ice cubes, leave the
tray right-side up, twist both ends slightly,
and remove as many cubes as you want.
Washice traysin lukewarmwateronly--do not
put themin anautomaticdishwasher.
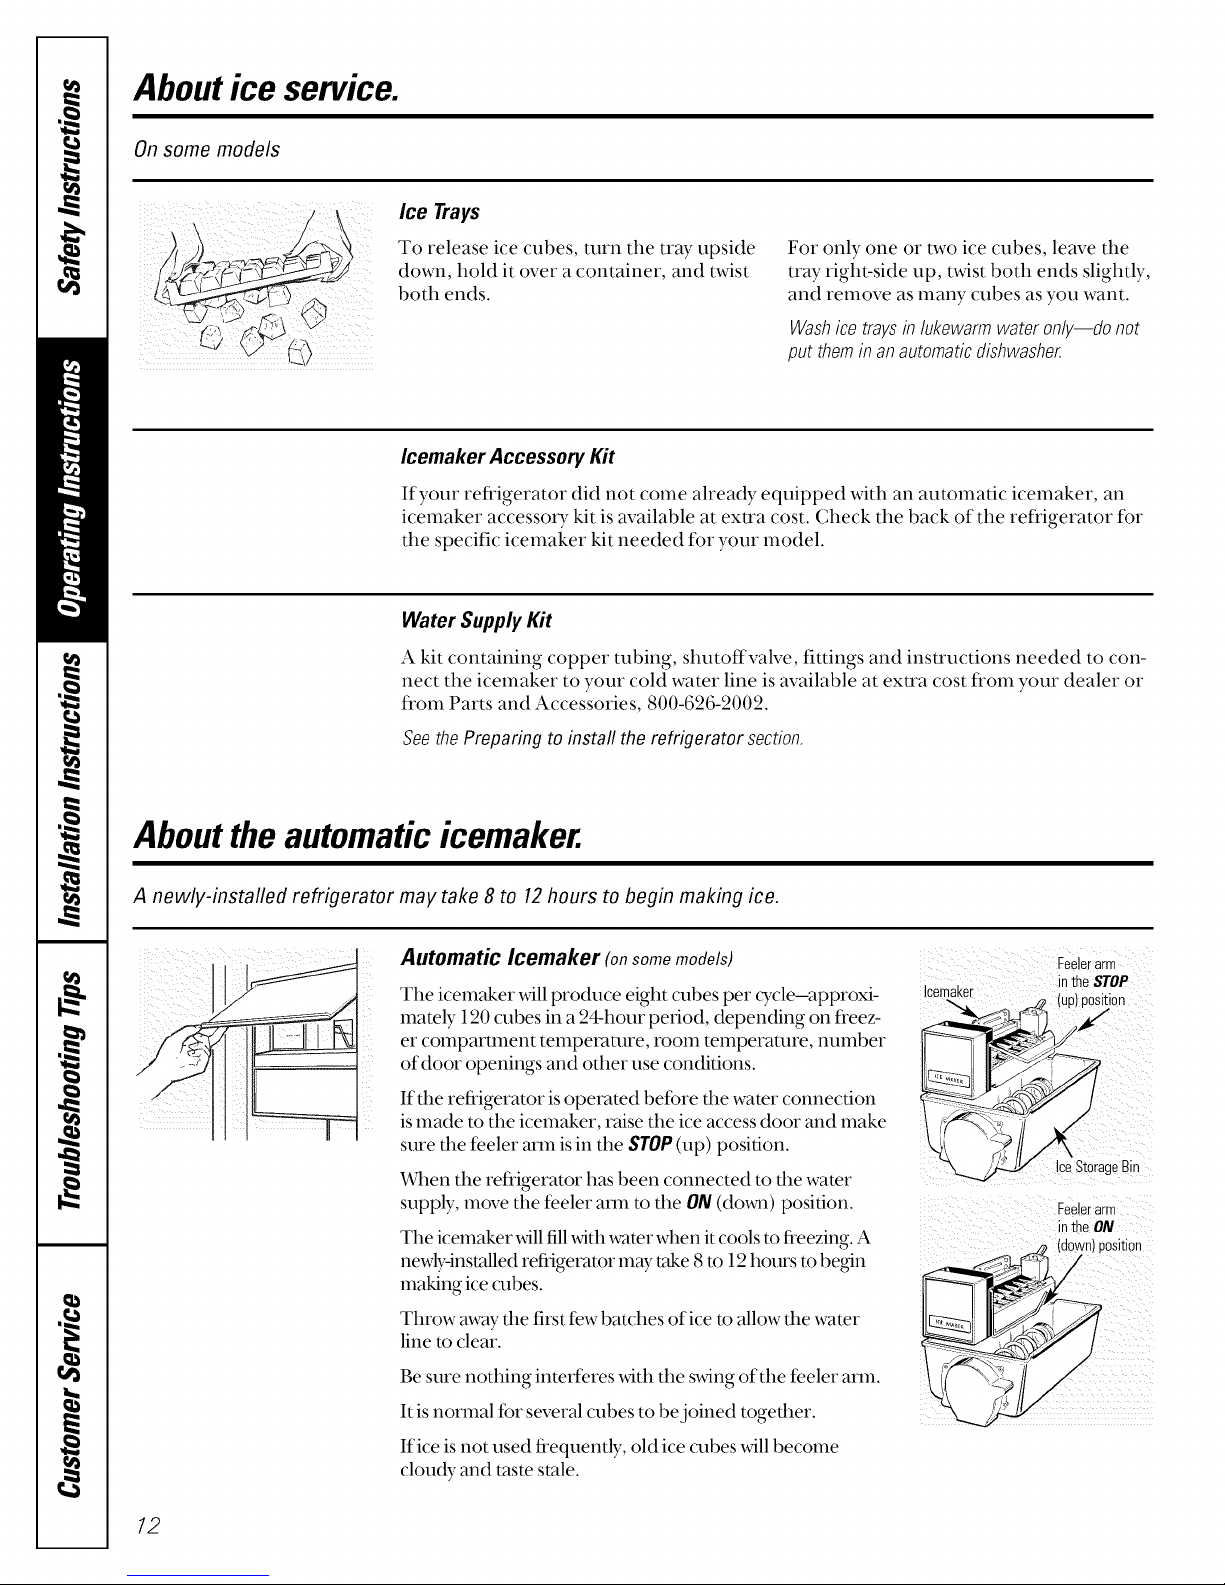
Aboutthe automaticicemaker.
A newly-installed refrigerator may take 8 to 12hours to begin making ice.
Automatic Icemaker (onsomemodels)
The icelnaker _411produce eight cubes per cycle-approxi-
mately 120 cubes in a 24-hour period, depending on freez-
er COlnpamnent temperature, room temperature, number
of door openings and other use conditions.
!: ii
If dm refrigerator is operated before dm water connection
is made to the icemaker, raise the ice access door and make
sure the feeler arm is in the STOP(up) position.
When the refrigerator has been connected to the water
supply, move the feeler ann to the 0N (do_m) position.
The icemaker will fill with water when it cools to freezing. A
newly-installed refiigerator may t_e 8 to 12 hours to begin
making ice cubes.
Throw away tim first few batches of ice to allow tim water
line to clear.
Be sure nothing interferes xdth the swing of the feeler arm.
It is normal far several cubes to bejoined together.
If ice is not used frequently, old ice cubes will become
cloudy and taste stale.
]cema
I
Feelerarm
in the STOP
Y'_a
_ Ic)Storage Bit
Feelerarm
in the ON
(down)position
12
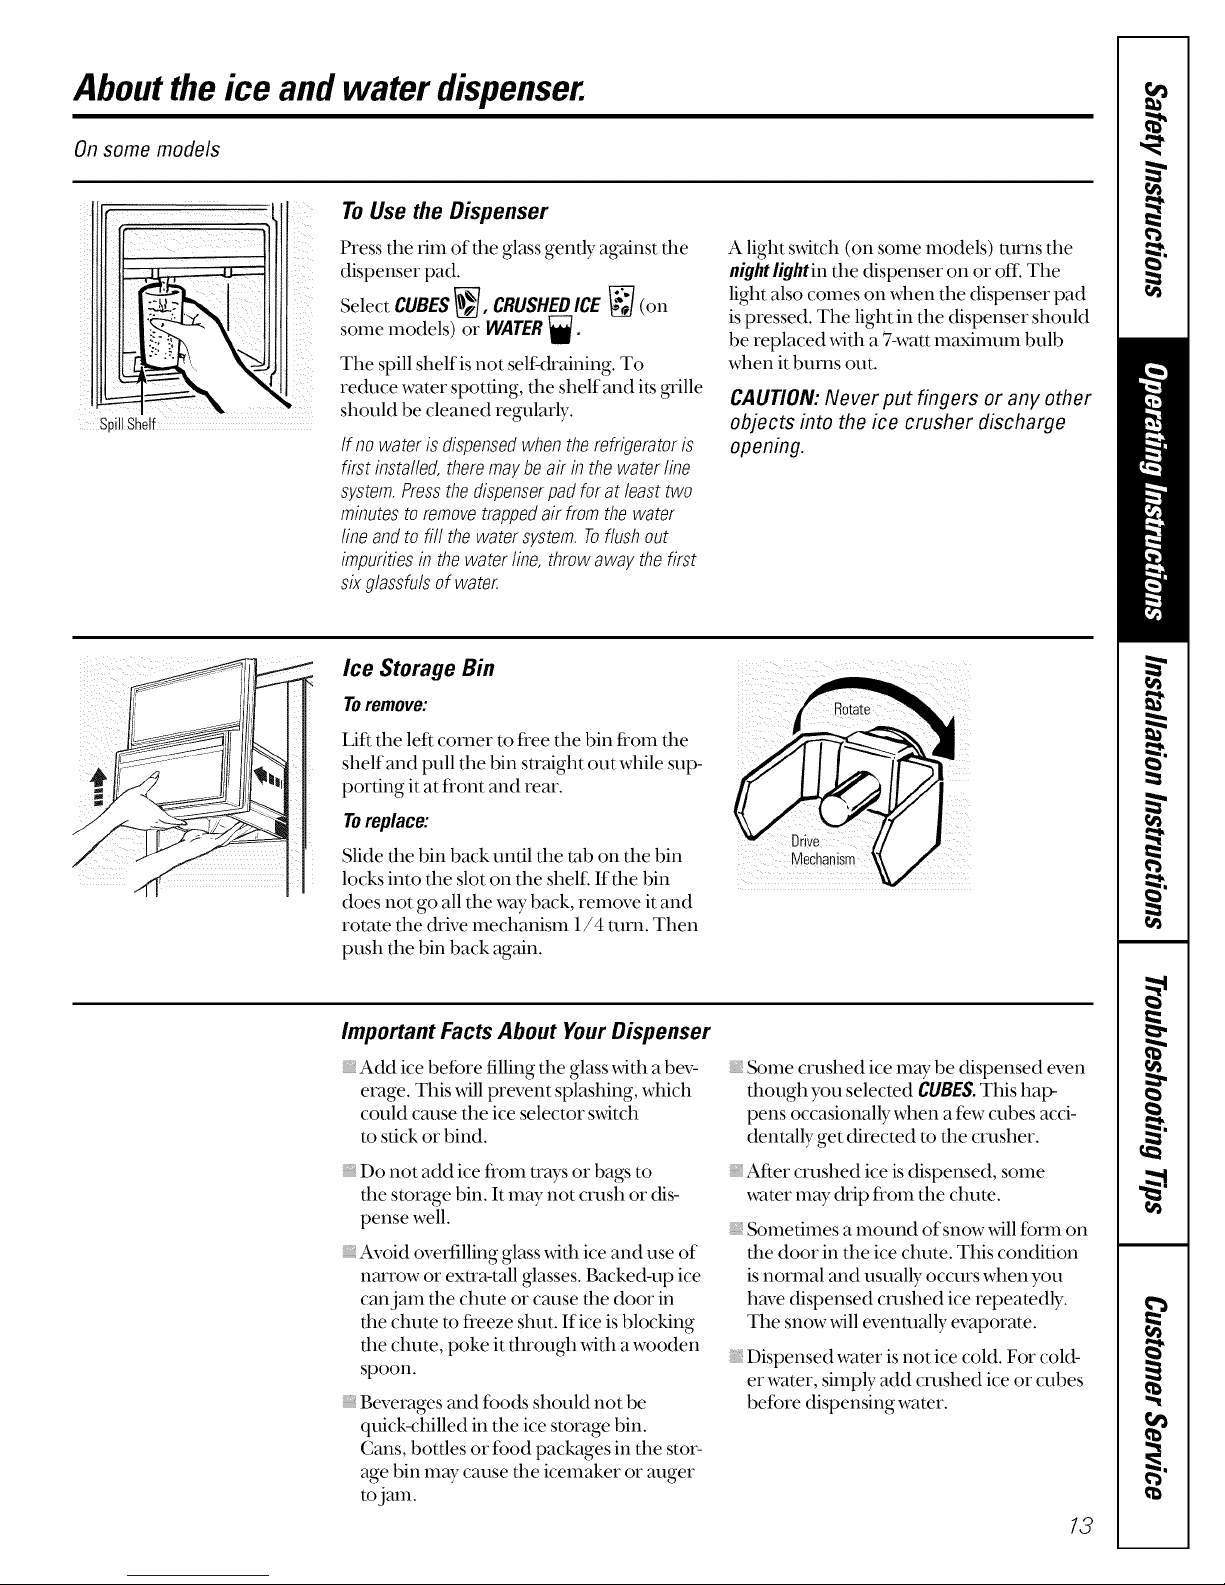
Aboutthe ice and water dispenser.
On some models
pillShelf
f
Press the rim of the glass gently against the
dispenser pad.
Select CUBES_J_, CRUSHEDICE _ (on
some models) or WATER _.
To Use the Dispenser
The spill shelf is not self:&aining. To
re&me water spotting, the shelf and its _'ille
should be cleaned regularly.
If no wateris dispensedwhentherefrigeratoris
first installed,theremaybe air in the waterline
system.Pressthedispenserpadfor at leasttwo
minutesto removetrappedair from thewater
line andtofill the watersystem.Toflushout
impuritiesin the waterline, throwawaythefirst
sixglassfulsof water.
Ice Storage Bin
Toremove:
Lift the left comer to Dee the bin froln dm
shelf and pull the bin straight out while sup-
porting it at fi'ont and rear.
Toreplace:
Slide the bin back until the tab on the bin
locks into the slot on the shelf. If the bin
does not go all the x,_tyback, relnove it and
rotate the drive mechanisln 1/4 ram. Then
push the bin back again.
A light switch (on some models) alms the
nightlightin the dispenser on or off. The
light also comes on when the dispenser pad
is pressed. The light in the dispenser should
be replaced with a 7-watt lnaxilnuln bulb
when it bums out.
CAUTION: Never put fingers or any other
objects into the ice crusher discharge
opening.
Drive
Important Facts About Your Dispenser
Add ice before filling the glass with a bev-
erage. This xdll prevent splashing, which
could cruise the ice selector switch
m stick or bind.
Do not add ice fi'oln trays or bags to
the storage bin. It lnay not crash or dis-
pense well.
Avoid oveKilling glass wifl_ ice and use of
narrow or extra-tall glasses. Backed-up ice
canjam the chute or cruise the door in
the chute m fi'eeze shut. If ice is blocking
the chute, poke it through with a wooden
spoon.
Beverages and foods should not be
quick-chilled in the ice storage bin.
Cans, bottles or food packages in the stor-
age bin may cause the icelnaker or tuner
to jan1.
Solne crushed ice may be dispensed even
though you selected CUBES.This hal>
pens occasionally when a few cubes acci-
dentally get directed m the crusher.
After crushed ice is dispensed, solne
water lnay (kip ffoln the chute.
Solneumes a mound of snow will form on
the door in the ice chute. This condition
is normal and usually occurs when you
have dispensed crashed ice repeatedly.
The snow will eventually evaporate.
Dispensed water is not ice cold. For cold-
er water, silnply add crashed ice or cubes
befbre dispensing water.
13
Careand cleaningof the refrigerator.
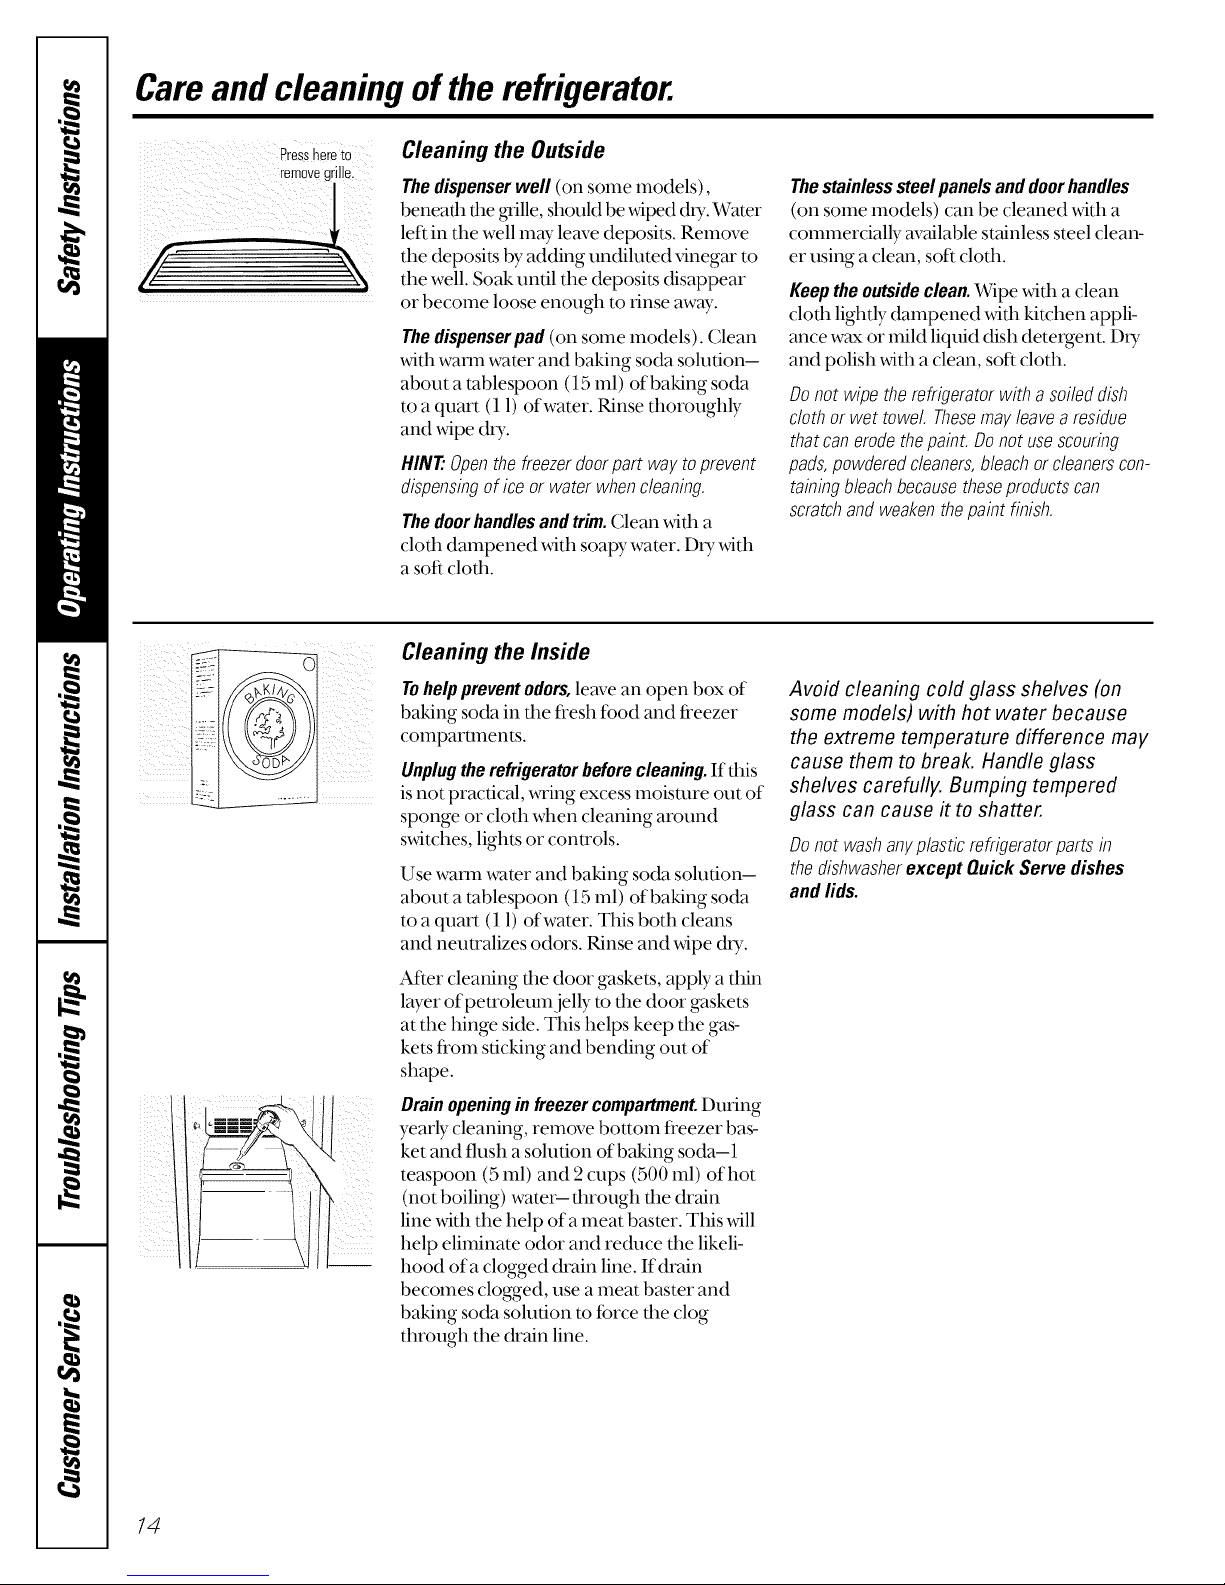
Press here I0
removegrille,
Cleaning the Outside
Thedispenser well (on some models),
beneafll file _ille, shouM be _4ped (hy. Water
left in tile well may leave deposits. Relnove
tile deposit.s by adding undiluted vinegar to
tile well. Soak until tile deposit.s disappear
or become loose enough to rinse away.
Thedispenser pad (on some models). Clean
widl waml water and baking soda solution-
about a tablespoon (15 llll) of baking soda
to a quart (11) of water. Rinse thoroughly
anti wipe dU.
HINT'.Openthefreezerdoorpart way toprevent
dispensingof iceor water whencleaning.
Thedoorhandlesandtrim.Clean widl a
cloth dampened _4th soapy water. Dry _4th
a sof_cloth.
Cleaning the Inside
Tohelp prevent odors, lemTean open box of
baking soda in die fresh fbod and freezer
compartments.
Unplug the refrigerator before cleaning. If dlis
is not practical, wring excess lnoismre out of
sponge or cloth when cleaning around
s_4tches, lights or controls.
Use waxm water and baking soda solution-
about a tablespoon (15 ml) of baking soda
to a quart (11) of water. This both cleans
and neutralizes odors. Rinse and wipe (hy.
Thestainlesssteelpanelsanddoorhandles
(on some models) can be cleaned xdth a
coznznercially available stainless steel clean-
er using a clean, soft cloth.
Keep theoutsideclean.Wipe _4dl a clean
clodl lightly dampened _4dl kitdlen appli-
ance wax or miM liquid dish detergent. DU
anti polish _dth a clean, soft cloth.
Donotwipe therefrigeratorwith a soileddish
clothorwet towel Thesemayleavea residue
thatcanerodethepaint.Donot usescouring
pads,powderedcleaners,bleachor cleanerscon-
tainingbleachbecausetheseproductscan
scratchandweakenthepaintfinish.
Avoid cleaning cold glass shelves (on
some models) with hot water because
the extreme temperature difference may
cause them to break. Handle glass
shelves carefully. Bumping tempered
glass can cause it to shatter.
Donotwashanyplasticrefrigeratorparts in
thedishwasherexcept QuickServedishes
and lids.
14
After cleaning die door gaskets, apply a thin
layer of petroleum jelly to die door gaskets
at the hinge side. This helps keep the gas-
kets frOln sticking and bending out of
shape.
Drainopening& freezercompartmentDuring
yearly cleaning, reznove bottom freezer bas-
ket and flush a solution of baking soda-1
teaspoon (5 ml) and 2 cups (500 ml) of hot
(not boiling) water-- through the drain
line _@h tile help of a meat baster. This will
help eliminate odor anti re&me the likeli-
hood of a clogged drain line. If drain
becomes clogged, use a meat baster anti
baking soda solution m farce tile clog
through tile (kain line.
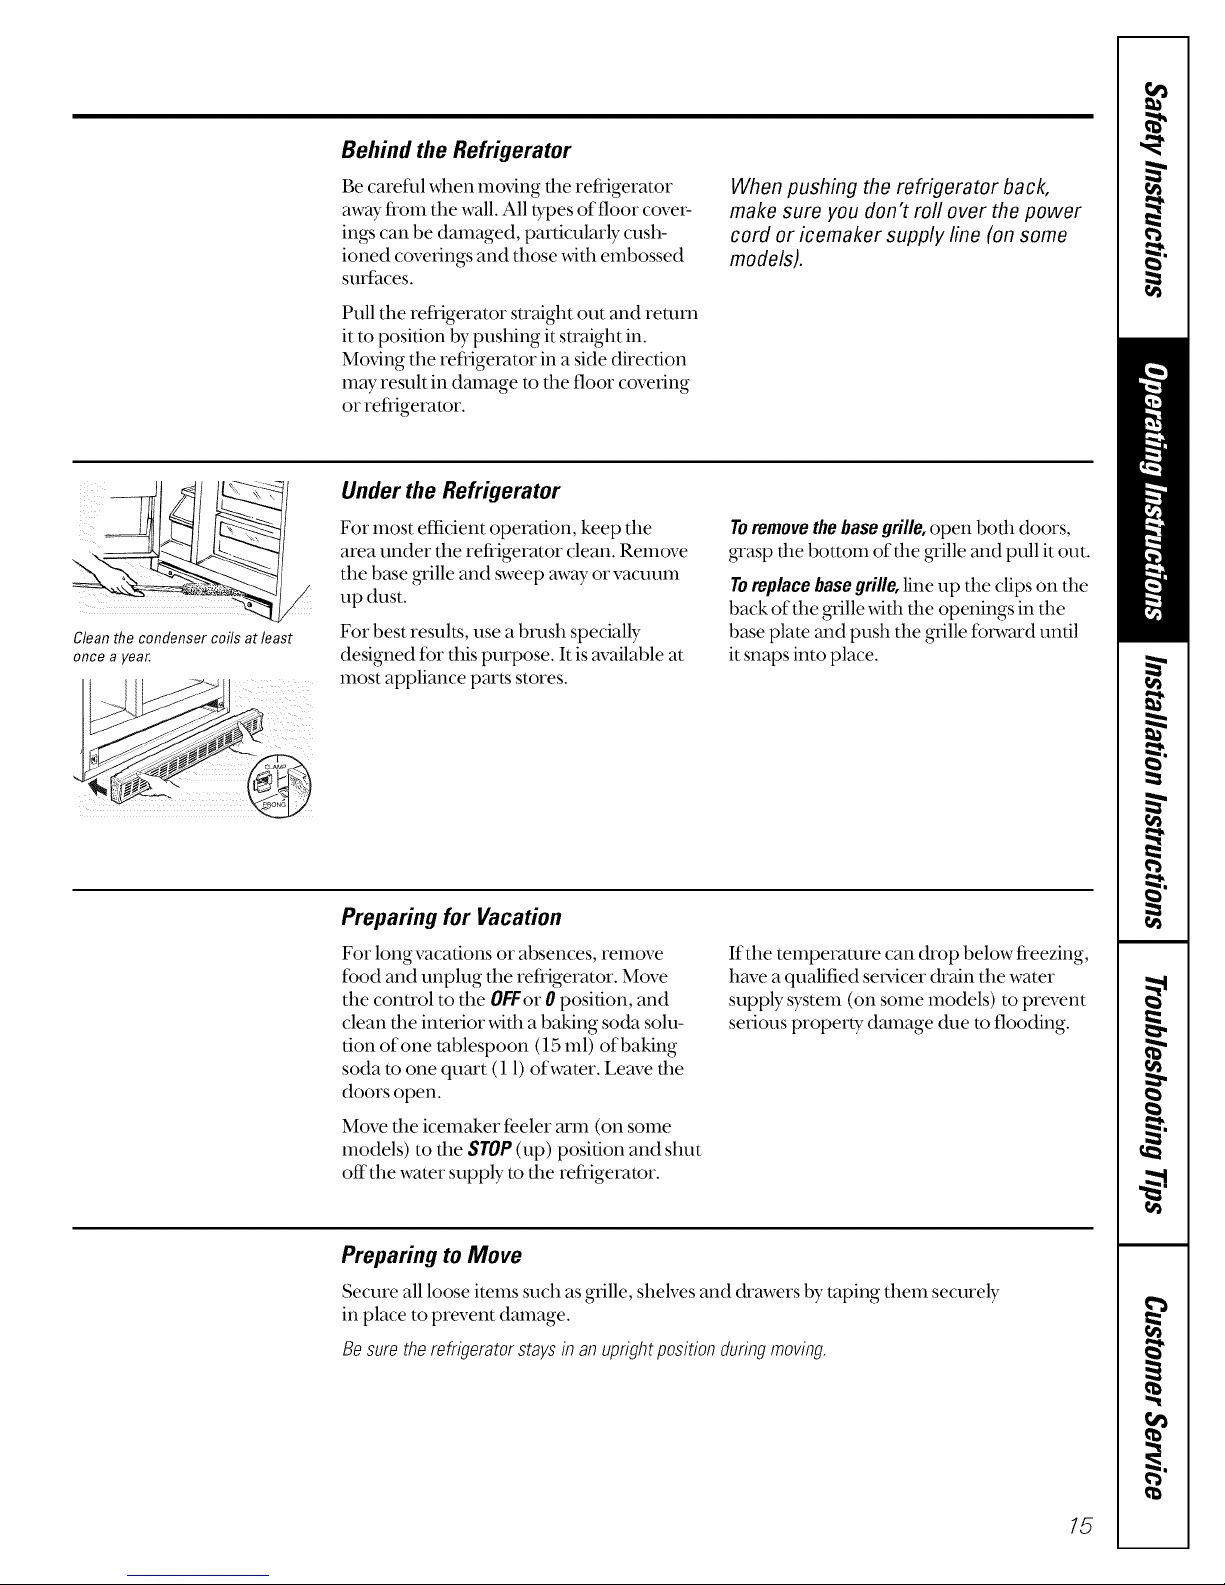
Behind the Refrigerator
Clean the condenser coils at least
once a year.
Be careflll when lnoving the refrigerator
away frOln the wall. All types of floor covet:
ings can be damaged, particularly cush-
ioned coverings and those _ith embossed
surfaces.
Pull tile refrigerator straight out and remm
it to position by pushing it straight in.
Moving the refiigerator in a side direction
may result in damage to tile floor covering
or refiigerator.
Under the Refrigerator
For most efficient operation, keep tile
area under tile refrigerator clean. Remove
the base _'ille and sweep away or vacuum
tip dust.
For best resuks, use a brash specially
designed for this purpose. It is available at
most appliance part.s stores.
When pushing the refrigerator back,
make sure you don't rot over the power
cord or icemaker supply line (on some
models).
Toremovethebasegrille,open bodl doors,
_'asp die bottom of die _'ille and pull it out.
Toreplace base grille, line up the clips on the
back of the grille wkh dm openings in the
base plate and push the grille fol_vard until
it snaps into place.
Preparing for Vacation
For long vacations or absences, reInove
food and unplug the refrigerator. Move
the control to the OFFer 0 position, and
clean the interior _4th a baking soda solu-
tion of one tablespoon (15 inl) of baking
soda to one quart (1 l) of water. Leave tile
doors open.
Move dm icemaker feeler arm (on soule
models) to dm STOP(tip) position and shut
offthe water supply to tile refiigerator.
Preparing to Move
Secure all loose items such as grille, shelves and drawers by taping them securely
in place to prevent damage.
Besuretherefrigeratorstays in anuprightpositionduringmoving.
If tile teInperamre can drop below freezing,
have a qualified servicer (kain tile water
supply systeIn (on some models) to prevent
serious property, damage (hie to flooding.
15
Replacingthe light bulbs.
Turning the control to the OFFor 0 position does not remove power to the light circuit.
Fresh Food Compartment--Upper Light
F_] Unplug the refl'igerator.
[_-]Pull offthe temperaulre control knobs.
_] Pull bottom of the light shield down and
fbtward, then rotate the top up and off_
After replacingwithanappliancebulbof the
sameor lowerwattage,reinstallthelight shield
andplug therefrigeratorbackin.
FreshFood Compartment--Two Lower Lights(onsome models)
Theselightsare locatedbehindthetop drawer.
F_] Unplug the refi'igerator and remove the
top drawer and cover.
[_9-]Grasp the bottom edge of the shield
and pull fbtward and up to fl'ee its bot-
tom edge.
After replacingwithanappliancebulbof the
sameor lowerwattage,replacetheshield,draw-
er andcoverandplug therefrigerator
backin.
Freezer Compartment
F_] Unplug the refrigerator.
[_-]Remove the shelf_just below light shield.
(The shelf will be easier to remove ifit is
emptied first.)
_] Pull tim light shield toward you to reach
the bulb."
After replacingwithanappliancebulbof the
sameor lowerwattage,reinstall theshield
andshelfandplugtherefrigeratorbackin.
16
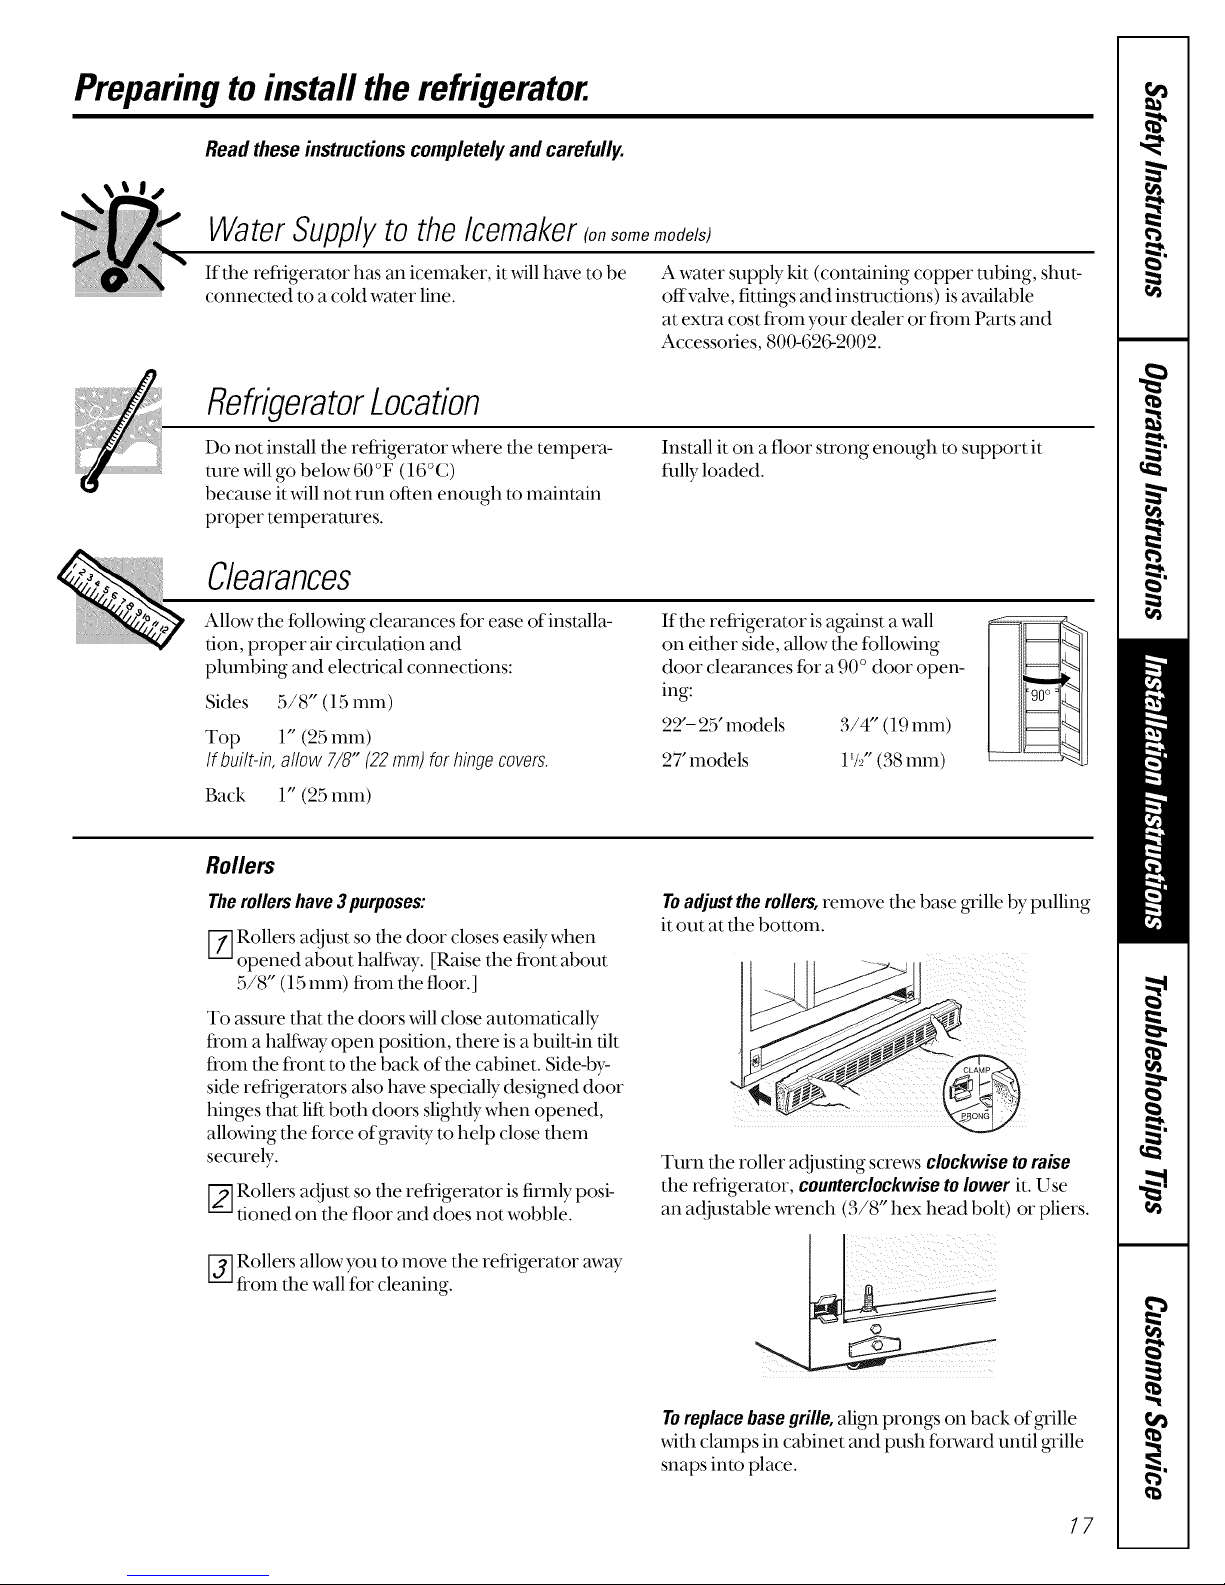
Preparingto installthe refrigerator.
Read these instructions completely and carefully.
Water Supply to the Icemaker(o,so,,o,,oUols
If tim refiigerator has an icemaker, it will have to be
connected to acoM water line.
RefrigeratorLocation
Do not install tim refrigerator where tim telnpem-
rare will go below 60 °F (16°C)
because it will not nm often enough to lnainmin
proper telnperatures.
Clearances
Allow the following clearances for ease ofinstalla-
tion, proper air circulation and
plumbing and electrical connections:
Sides 5/8" (15 mln)
Top 1" (25 UlUl)
If built-in,allow 7/8" (22ram)forhingecovers.
Back l" (25 111111)
A water supply kit (containing copper ulbing, shut-
offvake, fittings and instructions) is available
at extra cost from your dealer or from Part_s and
Accessories, 800-626-2002.
Install it on a floor strong enough to support it
fldly loaded.
If tim refrigerator is against a wall
on either side, allow tim following
door clearances far a 90 ° door open-
ing:
22'- 25' models 3/4" (l 9 UlUl)
27' lnodels 1 I/2" (38 lnUl)
Rollers
Themilershave3purposes:
V-_]Rollers a(tjust so file door closes easily when
opened about halfivay. [Raise the front about
5/8" (15 mm) from the floor.]
To assure that the doors will close automatically
from a halfivay open position, there is a built-in tilt
from the front to the back of the cabinet. Side-by-
side refrigerators also have specially designed door
hinges that lift both doors slightly when opened,
allowing the force of gravity to help close theln
securely.
[_-]Rollers a(tjust so file refiigerator is firmly posi-
tioned on the floor and does not wobble.
V_]Rollers allow you to move the refrigerator away
from file wall fbr cleaning.
Toadjust the milers, remove the base _'ille by pulling
it out at the bottom.
Turn tim roller adjusting screws clockwisetoraise
the refiigerator, counterclockwiseto lower it. Use
an adjustable _Ten(:h (3/8" hex head bolt) or pliers.
Toreplacebasegrille,align prongs on back of _'ille
with clamps in cabinet and push fbtward until _'ille
snaps into place.
17
Installingthe water line.
Read these instructions completely and carefully.
BeforeYouBegin
When connecting a GEReverse Osmosis Water System to your refrigerator, the only
approved installation is with a GERVKIT.
If the water supply to the refrigerator is from a Reverse Osmosis Water Filtration System
AND the refrigerator also has a water filter, use the refrigerator's filter bypass plug. Using
the refrigerator's water filtration cartridge in conjunction with the RO filter can result in hol-
low ice cubes and slower water flow from the water dispenser.
This water line installation is not warranted by the refrigerator or icemaker manufacturer.
Follow these instructions carefully to minimize the risk of expensive water damage.
Water hammer (water banging in the pipes) in house plumbing can cause damage
to refrigerator parts and lead to water leakage or flooding. Call a qualified plumber
to correct water hammer before installing the water supply line to the refrigerator.
Toprevent burns and product damage, do not hook up the water line to the
hot water line.
If you use your refrigerator before connecting the water line, make sure the
icemaker feeler arm is kept in the STOP (up) position.
Do not instafl the icemaker tubing in areas where temperatures fail below freezing.
When using any electrical device (such as a power drill) during installation, be sure
the device is insulated or wired in a manner to prevent the hazard of electric shock.
All installations must be in accordance with local plumbing code requirements.
What YouWill Need
Todetermine how much copper tubing you need:
Measure the distance from the water valve on the back of the refrigerator to the
water supply pipe. Then add 8 feet (244 cm). Be sure there is sufficient extra tubing
[about 8 feet (244 cm) coiled into 3 turns of about 10inches (25 cm) diameter] to allow
the refrigerator to move out from the wall after instaflation.
A watersupplykit (containing copper tubing, shutoffvalve and fittings listed below) is reTail-
able at extra cost fi'om your dealer or fi'om Parts and Accessories, 800-626-2002.
Cold watersupply. The water pressure must be between 20 and 120 p.s.i. (1.4-8.2 bar) on
models _dthout a water filter and between 40 and 120 p.s.i. (2.8-8.2 bar) on models _dth
a water filter.
Powerdrill.
Coppertubing,1/4" outer diameter to connect the refiigerator to the water supply. Be sure
both ends of the robing are cut square.
Do not use plastic tubing or plastic fittings because the water supply line is under
pressure at all times. Certain types of plastic tubing may become brittle with age and
crack, resulting in water leakage.
Two1/4"outerdiametercompressionnutsand2 ferrules(sleeves) to connect d_ecopper
tubing to the shutoffvalve and the refiigerator water valve.
If your existing water line has a flared fitting at tim end, you xdll need an adapter(mTailableat
plumbing supply stores) to connect the water line to the refiigerator ORyou can cut offthe
flared fitting,_dth a tube cutter and then use a compression fitting.
Shutoff valve to connect to the cold water line. The shutoffvalve should have a water inlet
,_dfl_a minimum inside diameter of 5/32" at tim point of connection to tim COLD WATER
18
LINE.Saddle-bq)e shutoffvalves are included in many water supply kits. Befiore purchasing,
make sure a saddle-bq)e valve complies,_dfll your local plumbing codes.
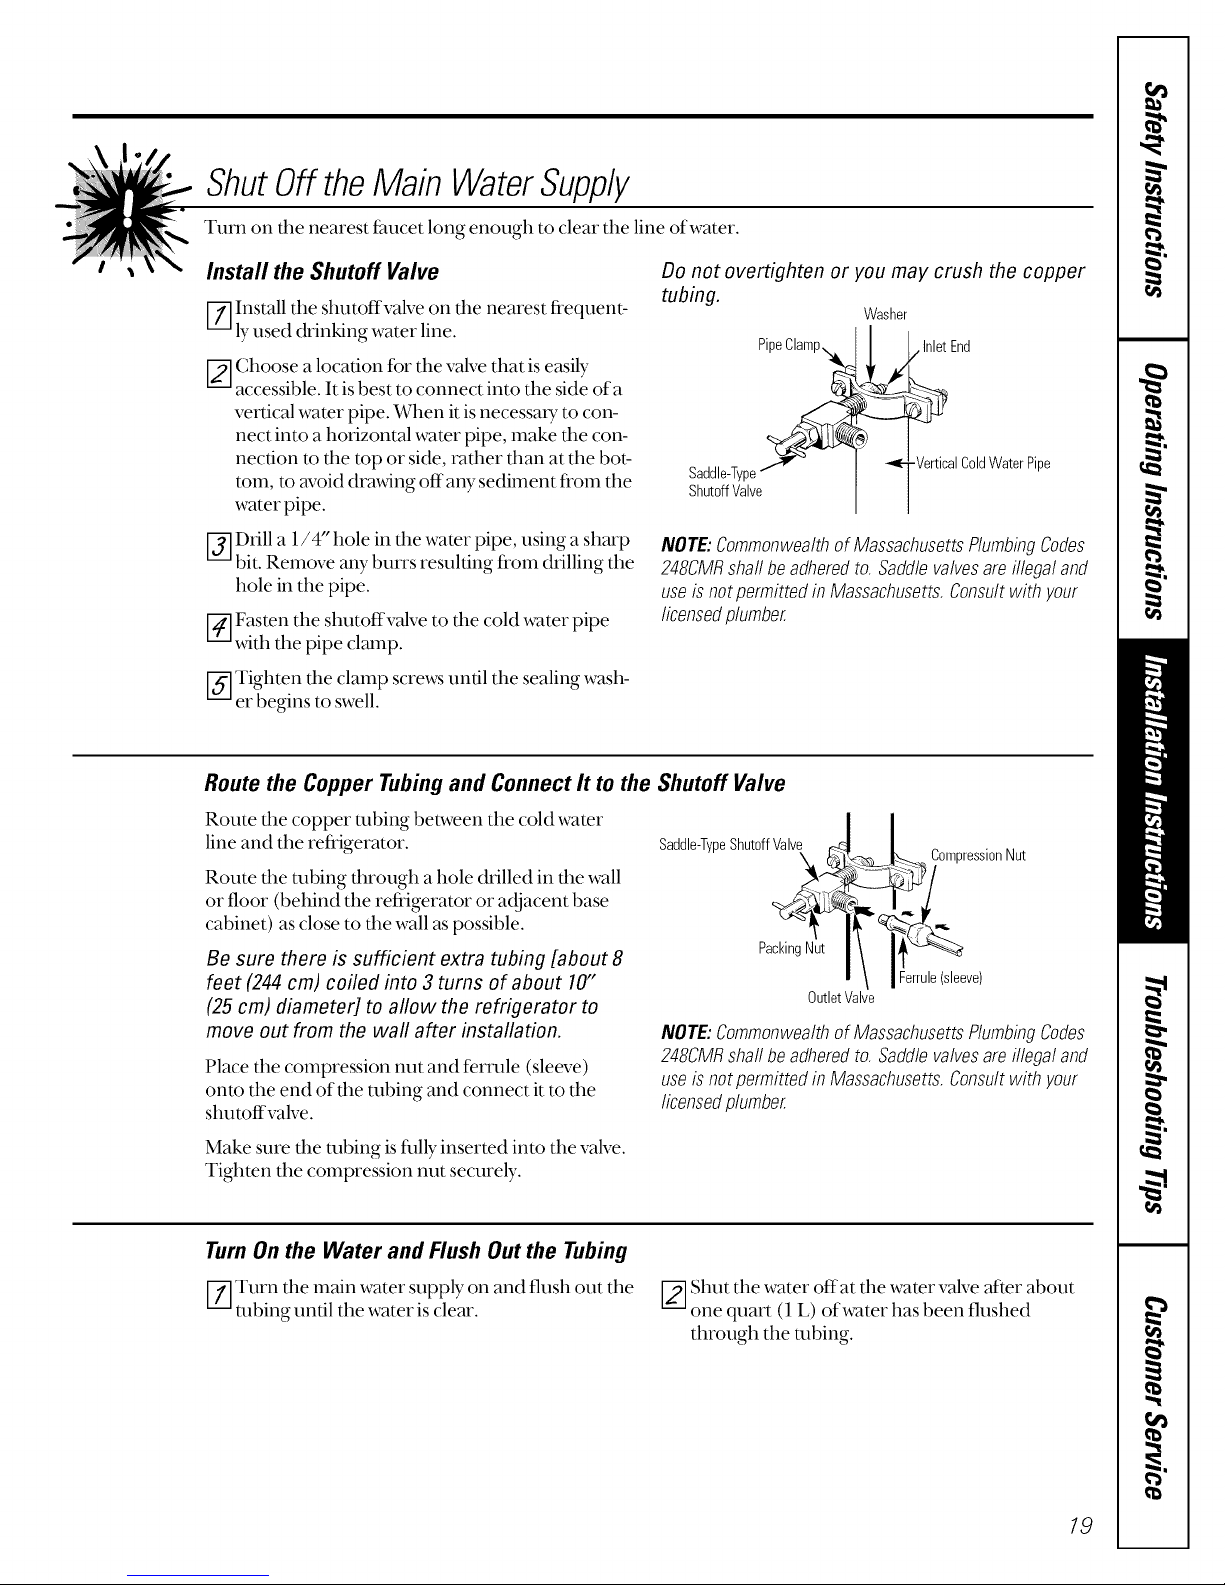
ShutOff theMain WaterSupply
Tuna on file nearest fmlcet long enough to clear tile line of water.
Install the Shutoff Valve
Do not overtighten or you may crush the copper
tubing.
V-_Install tile shutoffvalve on file nearest fi'equent-
ly used drinking water line.
Pi ,InletEnd
[2--]Choose a location for tile valve that is easily
accessible. It is best to connect into the side of a
vertical water pipe. When it is necessa U to con-
nect into a horizontal water pipe, lnake tile con-
nection m tile mp or side, rather than at the bot-
mill, m avoid dra,_ing off aW sedinlent fi'Olil tile
Saddle-Type -VerticalColdWaterPipe
ShutoffValve
water pipe.
V_ Drill a 1/4" hole in file water pipe, using a sharp
bit. ReInove any brat's resulting fi'om dx'{llingthe
hole in the pipe.
V_ Fasten tile shutoffvalve to die cold water pipe
NOTE:CommonwealthofMassachusettsPlumbingCodes
248CMRshallbeadheredto.Saddlevalvesareillegaland
useis notpermittedin Massachusetts.Consultwithyour
licensedplumber.
with the pipe clmnp.
_-] Tighten file clamp screws until tile sealing wash-
er begins to swell.
Route the Copper Tubing and Connect It to the Shutoff Valve
Route file copper tubing between tile cold water
line and the refl'igerator.
Route file robing fllrough a hole drilled in file wall
or floor (behind the refi'igerator or ac_acent base
cabinet) as close to file wall as possible.
Be sure there is sufficient extra tubing [about 8
Saddle-TypeShutoffValve
PackingNut
feet (244 cm) coiled into 3 turns of about 10"
(25 cm) diameter] to allow the refrigerator to
move out from the wall after installation.
Place tile compression nut and fernile (sleeve)
onto the end of the robing and connect it to the
shutoffvalve.
NOTE:CommonwealthofMassachusettsPlumbingCodes
248CMRshallbeadheredto.Saddlevalvesareillegaland
useis notpermittedin Massachusetts.Consultwithyour
licensedplumber.
Washer
CompressionNut
Ferrule(sleeve)
OutletValve
Make sure file uibing is flilly inserted into tile valve.
Tighten the compression nut securely.
Turn On the Water and Flush Out the Tubing
V-_Turn tile nlain water supply on and flush out tile
uibing until tile water is clear.
[_-] Slnit tile water offat file water valve after about
one quart (1 L) of water has been flushed
through the uibing.
19
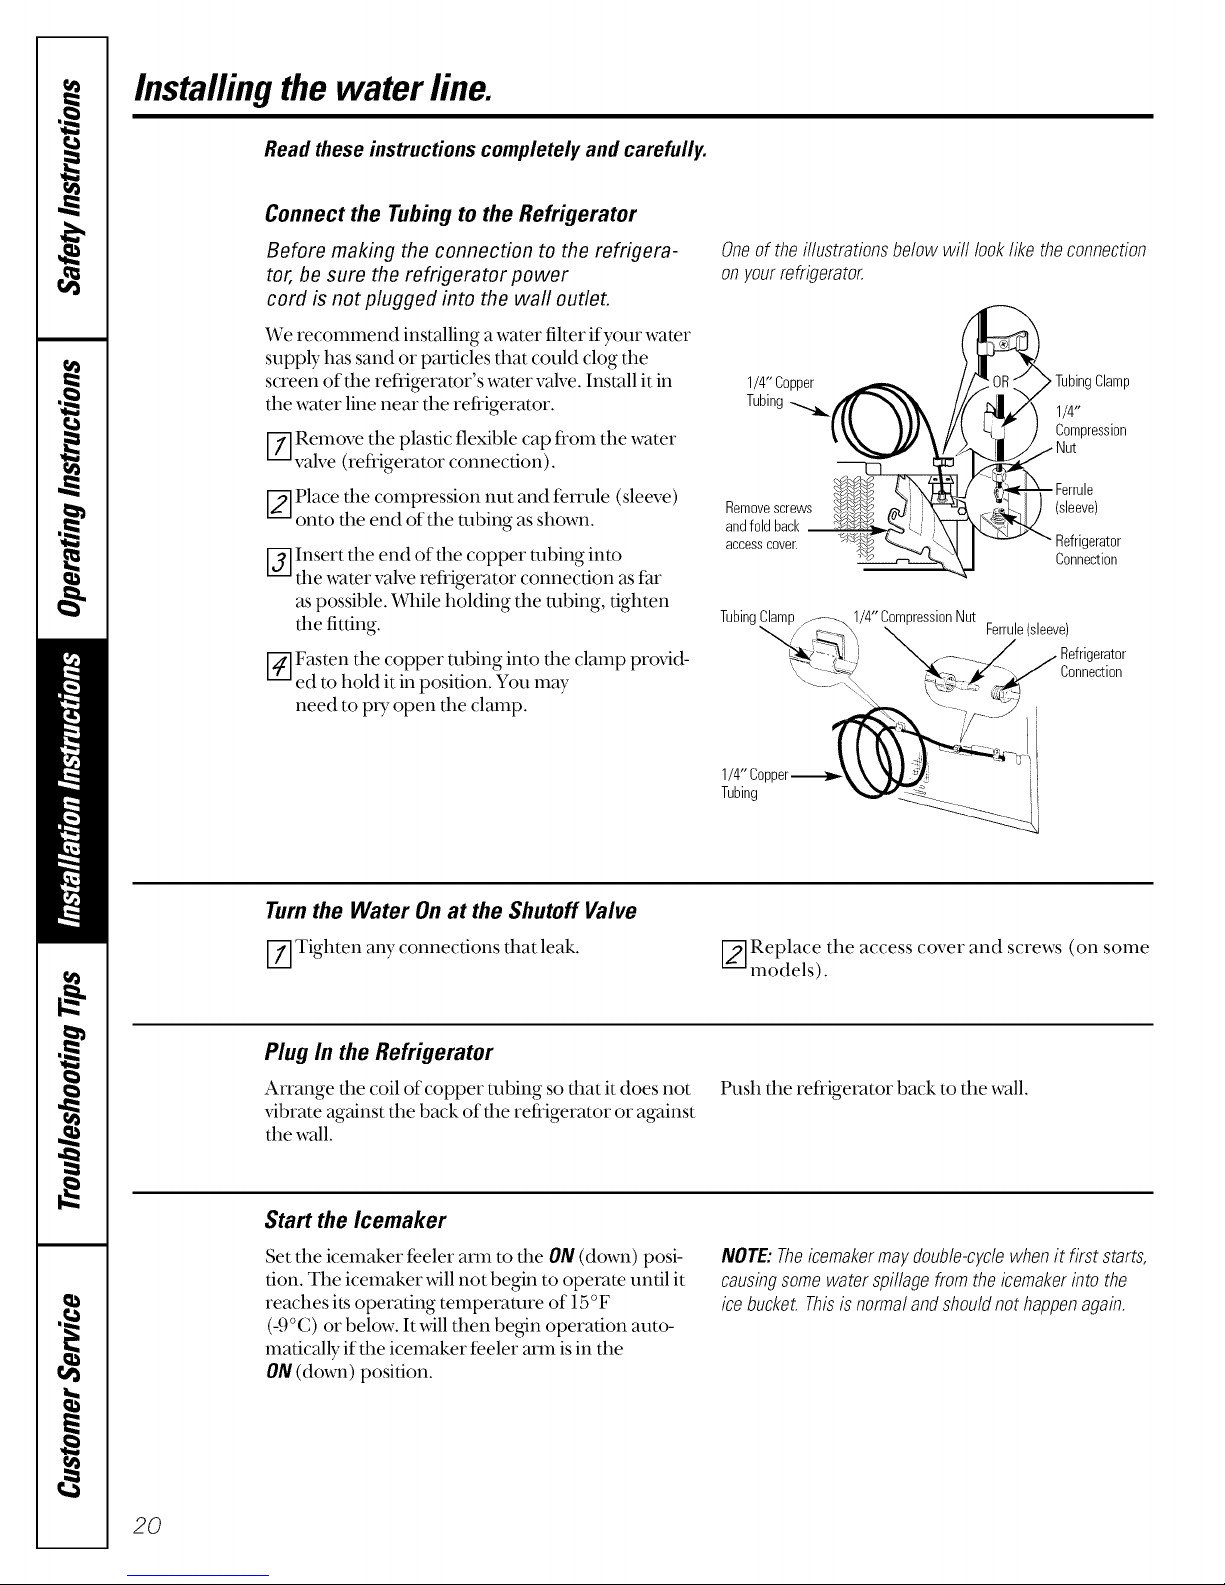
Installingthe water line.
Read these instructions completely and carefully.
Connect the Tubing to the Refrigerator
Before making the connection to the refrigera-
tor, be sure the refrigerator power
cord is not plugged into the wall outlet.
We recommend installing a water filter if your water
supply has sand or particles that could clog the
screen of the refiigeramr's water valve. Install it in
the water line near the refrigerator.
Oneof the illustrationsbelowwill looklike theconnection
onyourrefrigerator.
1/4" Copper
Tubing
TubingClamp
V-_Remove the plastic flexible cap from the water
valve (refrigerator connection).
[_-]Place tim compression nut and fetr'ule (sleeve)
onto the end of the robing as shown.
V_ Insert the end of tim copper ulbing into
file water valve refrigerator conne_:tion as fro.
as possible. _Vbile holding the ulbing, tighten
tim fitting.
V_ Fasten the copper robing into tim clamp provid-
ed to hold it in position. You m W
need to PU open the clmnp.
Turn the Water On at the Shutoff Valve
V-_Tighten any connections that leak.
lPression
Removescrews (sleeve)
andfold back
accesscoveE igerator
TubingClamp_--.. 1/4"CompressionNut .....
",,,,,,,,,,_{ _ _ _ I-erru,e is,eeve_
_'-'}), ) _f----_. //. Refrigerator
-_-'-_-_/ _'_,--_, jC* "-,,/ Connection
Tubing __
Connection
[_-]Replace the access cover and screws (on some
models).
Plug In the Refrigerator
Atr'ange the coil of copper robing so that it does not
vibrate against the back of the refrigerator or against
the wall.
Start the Icemaker
Set the icemaker feeler ann to d_e ON (down) posi-
tion. The icelnaker will not begin to operate until it
reaches i_soperating telnperamre of 15°F
(O°C) or below. It will then be_n operation auto-
matically if the icemaker feeler arm is in the
ON (down) position.
20
Push the refrigerator back to the wall.
NOTE:Theicemakermaydouble-cyclewhenit first starts,
causingsomewaterspillagefromtheicemakerinto the
icebucket.Thisisnormalandshouldnot happenagain.
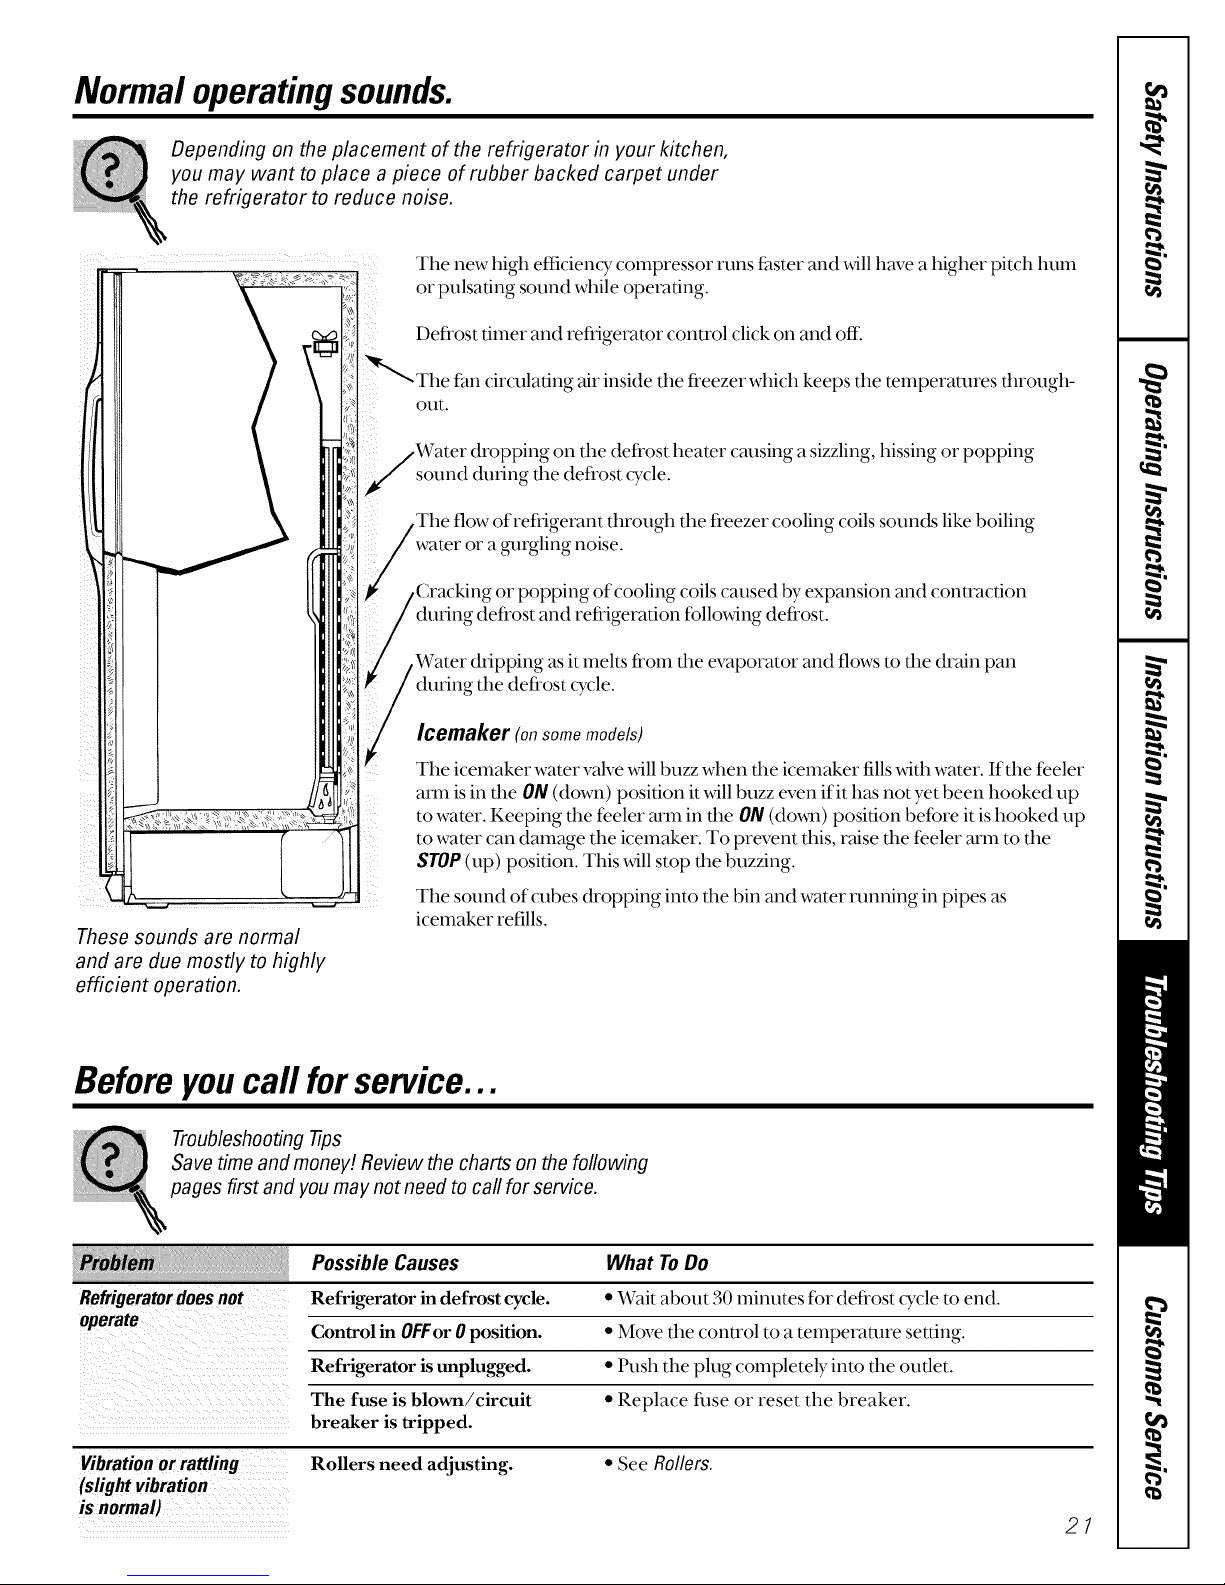
Normal operatingsounds.
Depending on the placement of the refrigerator in your kitchen,
I you may want to place a piece of rubber backed carpet under
the refrigerator to reduce noise.
The new high efficiency compressor runs faster and will have a higher pitch hum
or pulsating sound while operating.
Defrost timer and refligerator control click on and off_
out.
sound dudng the defrost (¢,cle.
The flow ofrefligerant through the freezer cooling coils sounds like boiling
during defrost and refrigeration following defi'ost.
,Water dripping as it melts from tim evaporator and flows to tim drain pan
during the defrost (3_cle.
fan circulating air inside the freezer which keeps the temperatures through-
on the defrost heater causing a sizzling, hissing or popping
or a gurgling noise.
or popping of cooling coils caused by expansion and contraction
Icemaker (onsomemodels)
The icemaker water valve will buzz when dm icemaker fills with water. If the feeler
axm is in tim O/V (down) position it will buzz even if it has not yet been hooked up
to water. Keeping dm feeler arm in dm ON (dovm) position before it is hooked up
to water can damage the icemaker. To prevent this, raise dm feeler arm to the
STOP (up) position. This will stop dm buzzing.
The sound of cubes dropping into dm bin and water nmning in pipes as
icemaker refills.
These sounds are normal
and are due mostly to highly
efficient operation.
Beforeyoucall forservice...
Troubleshooting -tips
Save time and money! Review the charts on the following
pages first and you may not need to call for service.
Possible Causes
Refrigeratordoesnot
operate
Refrigerator in defrost cycle.
Control in OFFor 0 position.
Refrigerator is tmplugged.
The fuse is blown/circuit
breaker is tripped.
What ToDo
*Wait about 30 minutes for defrost cycle to end.
*Move the control to a telnperature setting.
"Push the plug COlnpletely into the outlet.
*Replace fllse or reset the breaker.
Vibration or rattling Rollers need adjusting.
(slight vibration
is normal)
• See Rollers.
21
Beforeyoucall forservice...
Possible Causes What ToDo
Motor operates for
long periods or cycles
on and offfrequently.
(Modern refrigerators Often occurs when large "This is nomlal.
with more storage
space and a larger placed in refrigerator.
freezer require more Door left open. * Check to see if package is holding door open.
operating time. They
start and stop often Hot weather or frequent * This is nom_al.
tomaintain even door openings.
temperatures.) Temperature controls * See About the controls.
Fresh food or freezer Temperature control not set • See About the controls.
compartment too warm cold enough.
Frost or ice crystals Door left open. * Check to see if package is holding door open.
on frozen food
(frost within package
is normal) door openings.
Normal when refrigerator
is first plugged in.
amounts of food are
set at the coldest setting.
Grille and condenser "See Care and cleaning.
need cleaning.
Warm weather or frequent • Set the temperature control one step colder.
door openings. See About the controls.
Door left open. • Check to see if package is holding door open.
Too frequent or too long
*Wait 24 hours for the refrigerator to completely
cool clown.
Divider between fresh Automatic energy saver • This helps prevent condensation on the outside.
food and freezer system circulates warm
compartments feels warm liquid around front edge
of freezer compartment.
Automatic icemaker Icemaker feeler arm in • Move the feeler am1 to the ON (olD,m) position.
does not work the STOP (up) position. * Cubes may have fllsecl to the side of the lnold. Move the
(onsome models) feeler ann to the STOP (up) position, then relnove
these cubes.
Water supply turned off or • See Installing the water line.
not connected.
Freezer compartment • Wait 24 hours for the refrigerator to completely
too warm. cool clown.
Piled up cubes in the storage bin • Level cubes by hand.
cause the icemaker to shut off
Ice cubes have Ice storage bin needs cleaning. • Elnpb_ and wash |)in. Discard old cubes.
odor/taste
Small or hollow cubes Water filter clogged. "Replace filter cartridge with new cartridge or with plug.
Food transmitting odor/taste • Wrap foocls well.
to ice cubes.
Interior of refrigerator * See Careandcleaning.
needs cleaning.
Poor-tasting incoming water. • Install a water filter.
Door not closing Door gasket on hinge side * Apply petroleum jelly on lime of gasket.
properly sticking or folding over.
Orange glow in Defrost heater is on. * This is hernial.
the freezer
22
Possible Causes
What To Do
Slowice cubefreezing
Cubedispenser does not Icemaker turned off or • Turn on iceznaker or water supply.
work (on some models) water supply turned off.
Door left open.
Temperature control not set
cold enough.
Ice cubes are frozen to • Relnove cubes and lnove the feeler ann to the
icemaker feeler arm. ON (down) position.
Irreg'ular ice clumps in
storage container.
*Check to see if package is holding door open.
, SeeAboutthe controls.
• Break up widl fingertip pressure and discard
relnaining chunps.
• Freezer may be too warlll. Adjust the freezer control
m a colder setting, one position at a time, until
chnnps do not fbrln.
Water has poor taste/odor Water dispenser has not been *Dispense water until all water in systezn is replenished.
(onsomemodels) used for a long time.
Waterdispenserdoes Water supply line turned " SeeInstallingthe water line.
notwork(onsomemodels) off or not connected.
Water filter clogged. • Replace filter cartridge or relnove filter and install plug.
Air may be trapped in the *Press the dispenser pad for at least two minutes.
water system.
Water spurting from Newly-installed filter cartridge. *Run water fl'oln the dispenser fbr 1 lninute (about a
dispenser(onsomemodels) half gallon).
Water is not dispensed Water in reservoir is • Call fbr se_@e.
buticemakeris working frozen.
(onsomemodels)
No water or ice cube Supply line or shutoff • Call a plumber.
production(onsome valve is clogged.
models)
Water filter clogged. *Replace filter cartridge or relnove filter and install plug.
Refrigerator has odor Foods transmitting • Foods with sn'ong odors should be tightly _'appe(1.
odor to refrigerator. *Keep an open box of baking soda in the refrigerator;
replace eveU three months.
Interior needs cleaning. *See Careandcleaning.
Defrost water drainage * See Careandcleaning.
system needs cleaning.
Moisture forms on Not unusual during • Wipe sm_%e (hy.
outsideofrefrigerator periods of high humidity.
Moisturecollectsinside
(inhumidweather,air
Too frequent or too
long door openings.
carriesmoistureinto
refrigeratorwhendoors
areopened)
Interior light does No power at outlet.
* Replace filse or reset the breaker.
not work
Light bulb burned out. • See Replacing the light bulbs.
Wateronkitchenflooror
onbottomoffreezer
Drain in the bottom of • See Care and cleaning.
the freezer clogged.
Cubes jammed in chute. * Poke ice through with a wooden spoon. 2,_9
Beforeyoucall forservice...
Possible Causes What ToDo
Hotair frombottom
ofrefrigerator
Your refrigerator is warranted to be free of defects in material and workmanship.
What is covered How Long Warranted Parts Labour
Compressor Ten (10) Years Ten (10) Years Ten (10) Years
Sealed System (including Five (5) Years Five (5) Years Five (5) Years
evaporator, condenser
tubing and refrigerant)
All Other Parts One (1) Year One (1) Year One (1) Year
Normal air flow cooling
motor. In the refrigeration
process, it is normal that
heat be expelled in the
area under the refrigerator.
Some floor coverings will
discolor at these normal
and safe temperatures.
CONSUMER WARRANTY
(for customers in Canada)
(From Date of Sale) Repair or Replace
*Your floor covering supplier should be consulted if you
object m this discoloration.
at Camco's Option
TERMS AND CONDITIONS:
This warranty applies only for single
family domestic use in Canada when the
Refrigerator has been properly installed
according to the instructions supplied by
Camco and is connected to an adequate
and proper utility service.
Damage due to abuse, accident, commercial
use, and alteration or defacing of the serial
plate cancels all obligations of this warranty.
WHAT IS NOT COVERED:
• Service trips to your home to teach you how
to use the product.
• Damage to finish after delivery.
• Improper installation--proper installation
includes adequate air circulation to the
refrigeration system, adequate electrical,
plumbing and other connecting facilities.
• Replacement of house fuses or resetting of
circuit breakers.
Service during this warranty must be performed
by an Authorized Camco Service Agent.
Neither Camco nor the Dealer is liable for any
claims or damages resulting from any failure
of the Refrigerator or from service delays
beyond their reasonable control.
To obtain warranty service, purchaser must
present the original bill of sale. Components
repaired or replaced are warranted through the
remainder of the original warranty period only.
• Replacement of light bulbs.
• Damage to product caused by accident, fire,
floods or acts of God.
Loss of food due to spoilage.
Proper use and care of product as listed
in the owner's manual, proper setting of con-
trols.
WARRANTOR IS NOT RESPONSIBLE
FOR CONSEQUENTIAL DAMAGES.
This warranty is in addition to any statutory
warranty.
IMPORTANT
Keep this warranty and your bill of sale as proof of original purchase and purchase date.
Camco Service is available coast to coast.
If further help is needed concerning this warranty, contact:
24
Manager, Consumer Relations, Camco Inc.,
Suite 310, 1 Factory Lane, Moncton, N.B. ElC 9M3
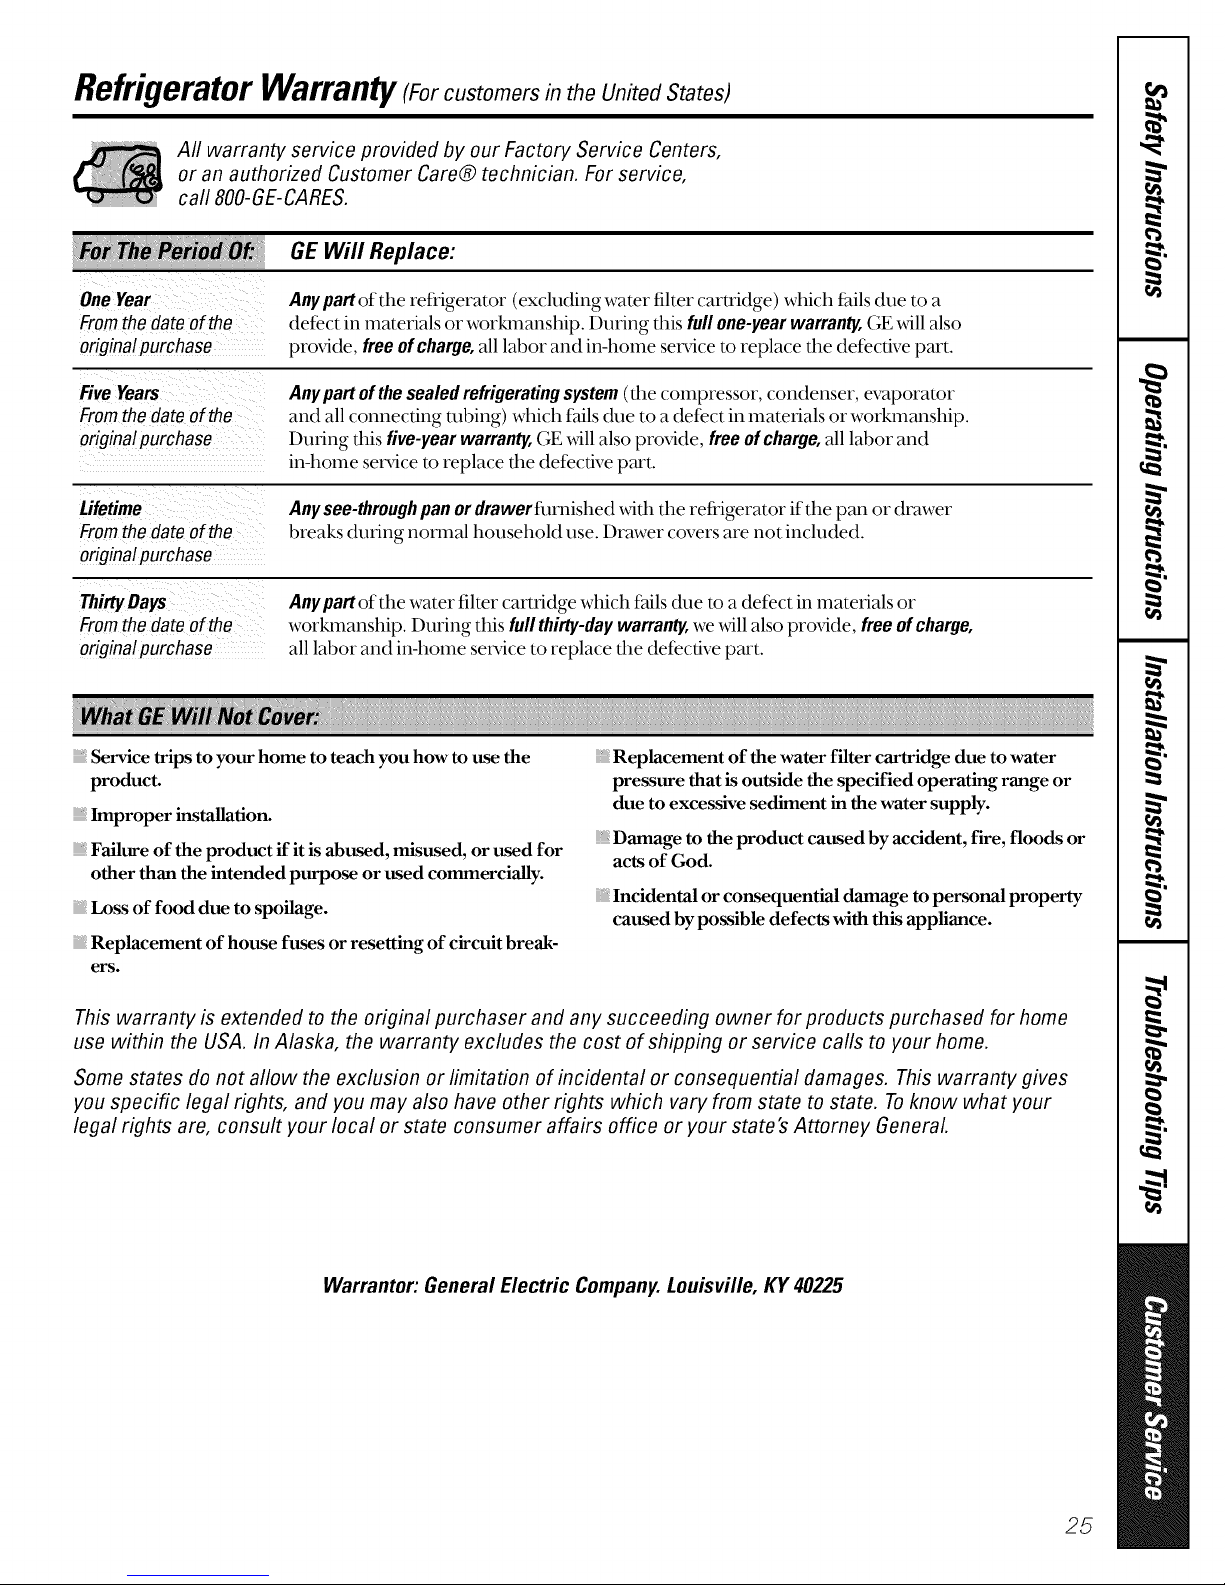
RefrigeratorWarranty(ForcustomersintheUnitedStates)
Aft warranty service provided by our Factory Service Centers,
or an authorized Customer Care® technician. For service,
call 800-GE-CARES.
GE Will Replace:
One Year Any part of the refrigerator (excluding water filter carwidge) which fidls due to a
Fromthe date of the defect in materials or worl_nanship. During this full one-yearwarranty,GE _4ll also
originalpurchase provide, freeof charge,all labor and in-heine service to replace the defective part.
FiveYears
Fromthe date of the
originalpurchase
Anypartofthe sealedrefrigeratingsystem(d_e compressor, condenser, evaporator
and all connecting robing) which fails (hie to a defect in materials or worklnanship.
During this five-year warranty,GE _,_411also provide, free of charge, all labor and
in-heine set_ice m replace the (tefective part.
Lifetime
Fromthe date of the
Any see-threugh pan or drawer flunished with the refrigerator if the pan or drawer
breaks during nomml household use. Drawer covers are not included.
originalpurchase
ThirtyDays
Fromthe date of the
originalpurchase
Service trips to your home to teach you how to use the
product.
Improper installation.
Failure of the product if it is abused, misused, or used for
other than the intended purpose or used commercially.
Loss of food due to spoilage.
Replacement of house fuses or resetting of circuit break-
ers.
Any part of the water filter cartridge which fails (hie to a (tefect in materials or
worklnanship. During this full thirty-day warranty,we _411also provide, free of charge,
all labor and in-heine service to replace the defective part.
Replacement of the water filter cartridge due to water
pressure that is outside the specified operating range or
due to excessive sediment in the water supply.
Damage to the product caused by accident, fire, floods or
acts of God.
Incidental or consequential damage to personal property
caused by possible defects with this appliance.
This warranty is extended to the original purchaser and any succeeding owner for products purchased for home
use within the USA. In Alaska, the warranty excludes the cost of shipping or service calls to your home.
Some states do not allow the exclusion or limitation of incidental or consequential damages. This warranty gives
you specific legal rights, and you may also have other rights which vary from state to state. To know what your
legal rights are, consult your local or state consumer affairs office or your state's Attorney General
Warrantor: General Electric Company. Louisville, KY 40225
25
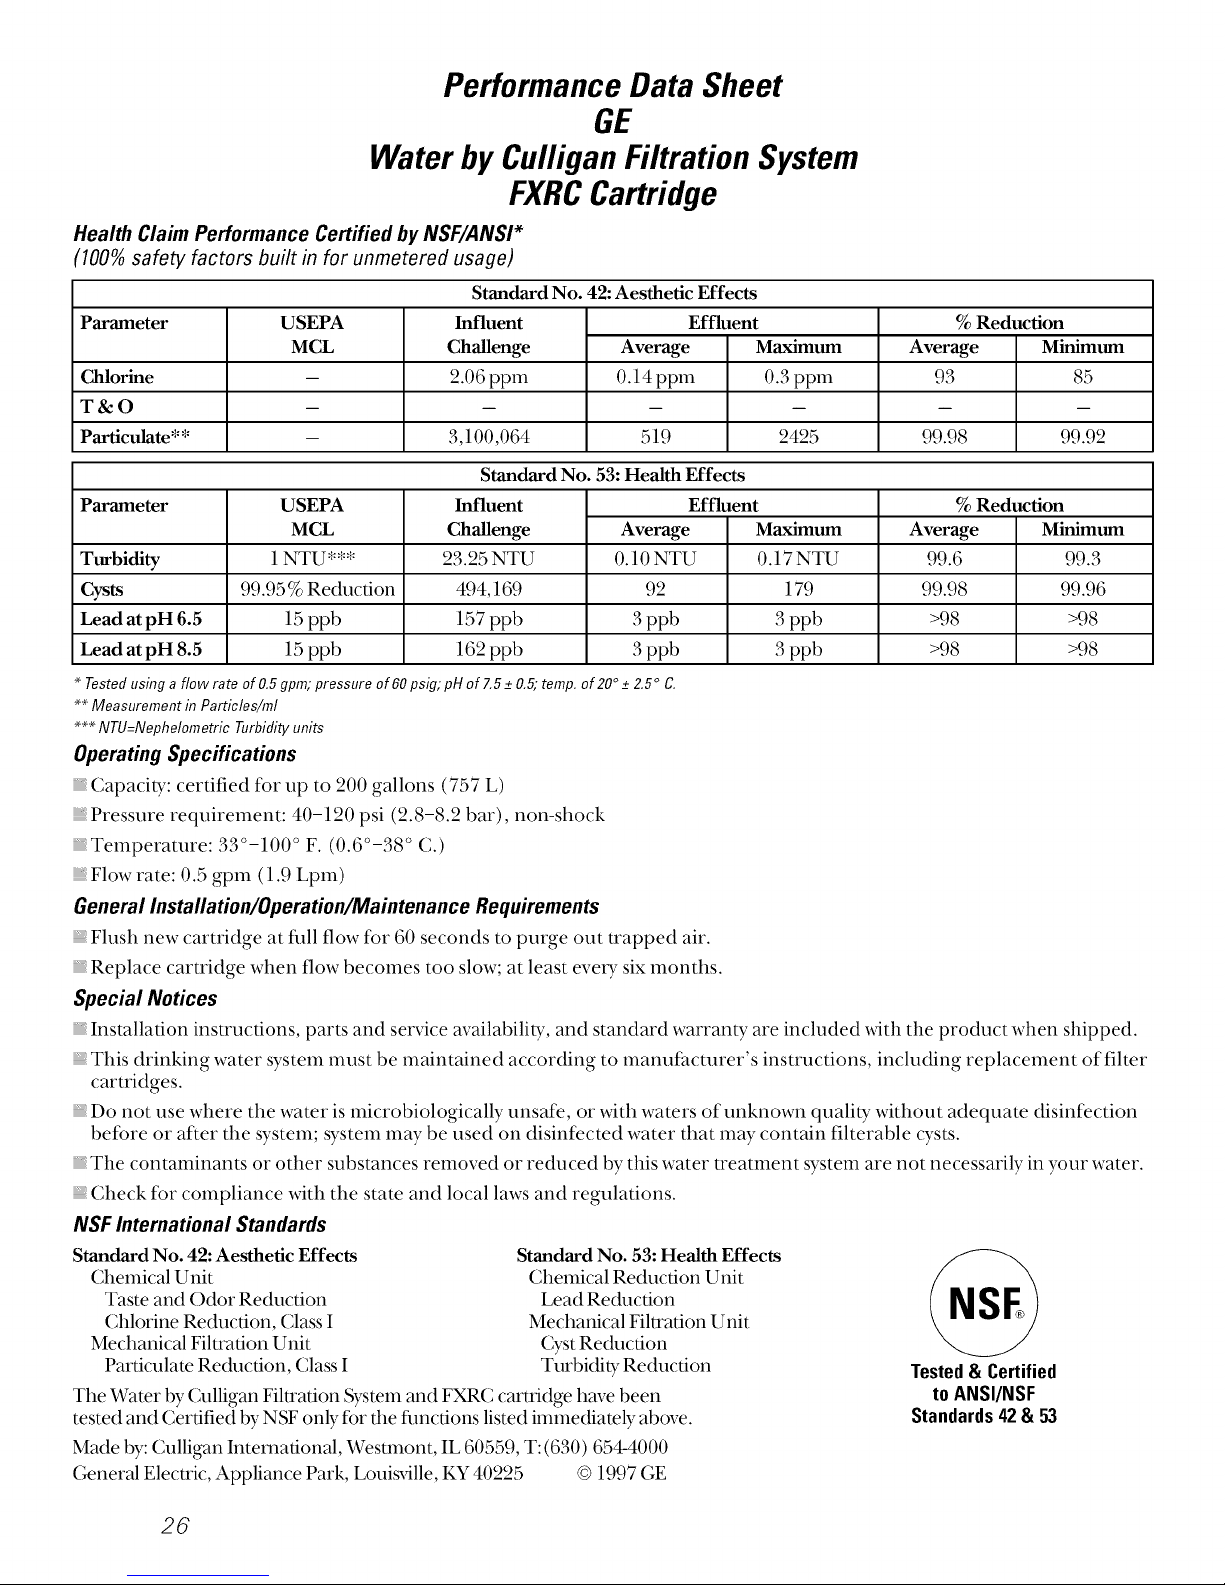
Performance Data Sheet
GE
Water by Culligan Filtration System
FXRCCartridge
Health Claim Performance Certified by NSF/ANSI*
qO0% safety factors built in for unmetered usage)
Standard No. 42: Aesthetic Effects
Parameter USEPA Influent Effluent
MCL
Chlorine
T&O
Particulate**
Parameter
USEPA
MCL
T_bi_
Cys_
_ad_pH6.5
_ad_pH8.5
Tested using a flow rate of 0.5 gpm; pressure of 60 psig; pH of Z 5 +_0.5; temp. of 20 ° +_Z5 ° C.
._.x.Measurement in Particles/m/
___NTU=Nephe/ometricTurbidityunits
1NTU***
99.95 % Reduction
15 ppb
15 ppb
Challenge
2.06 ppm
3,100,064
Standard No. 53: Health Effects
Influent Effluent
Challenge
23.25 NTU
494,169
157 ppb
162 ppb
Average
O.14 ppm
Average
0.10 NTU
3ppb
3ppb
519
92
Maximum
0.3 ppm
2425
Maximum
0.17NTU
179
3 ppb
3 ppb
Operating Specifications
Capacity: certified for up to 200 gallons (757 L)
Pressure requirement: 40-120 psi (2.8-8.2 bar), non-shock
_Telnperamre: 33°-100 ° F. (0.6°-38 ° C.)
_Flow rate: 0.5 gpm (1.9 Lpm)
General Installation/Operation/Maintenance Requirements
Flush new caru'idge at fill flow for 60 seconds to purge out trapped air.
Replace cartridge when flow becomes too slow; at least eve U six months.
Special Notices
Installation instructions, parts and service availability, and standard warranty are included _dth tile product when shipped.
This drinking water systeln must be maintained according to lnanufilcmrer's instructions, including replacement of filter
cartridges.
Do not use where the water is lnicrobiologically unsafe, or with waters of unknown quali W without adequate disinfection
before or after tile systenl; systenl nlay be used on disinfected water that may contain filterable cysts.
The contaminants or other substances removed or reduced by this water treamlent system are not necessarily in your water.
Check for compliance with tile state and local laws and regulations.
NSF International Standards
Standard No. 42: Aesthetic Effects
Chemical Unit
Taste and Odor Reduction
Chlorine Reduction, Class I
Mechanical Fihration Unit
Particulate Re&ration, Class I
Standard No. 53: Health Effects
Chemical Reduction Unit
Lead Re(hmtion
Mechanical Fihration Unit
Cyst Re&lction
Turbidity Reduction
Tile Water by Culligan Fihration Sys[enl and FXRC cartridge have been
tested and Certified by NSF only for tile fimctions listed immediately above.
Made by: Culligan International, Westlnont, IL 60559, T: (630) 654-4000
General Electric, Appliance Park, Louisville, KY 40225 © 1997 GE
% Reduction
Average Minimum
93 85
99.98 99.92
% Reduction
Average
99.6
99.98
>98
>98
Tested & Certified
to ANSI/NSF
Standards 42 & 53
Minimum
99.3
99.96
>98
>98
26
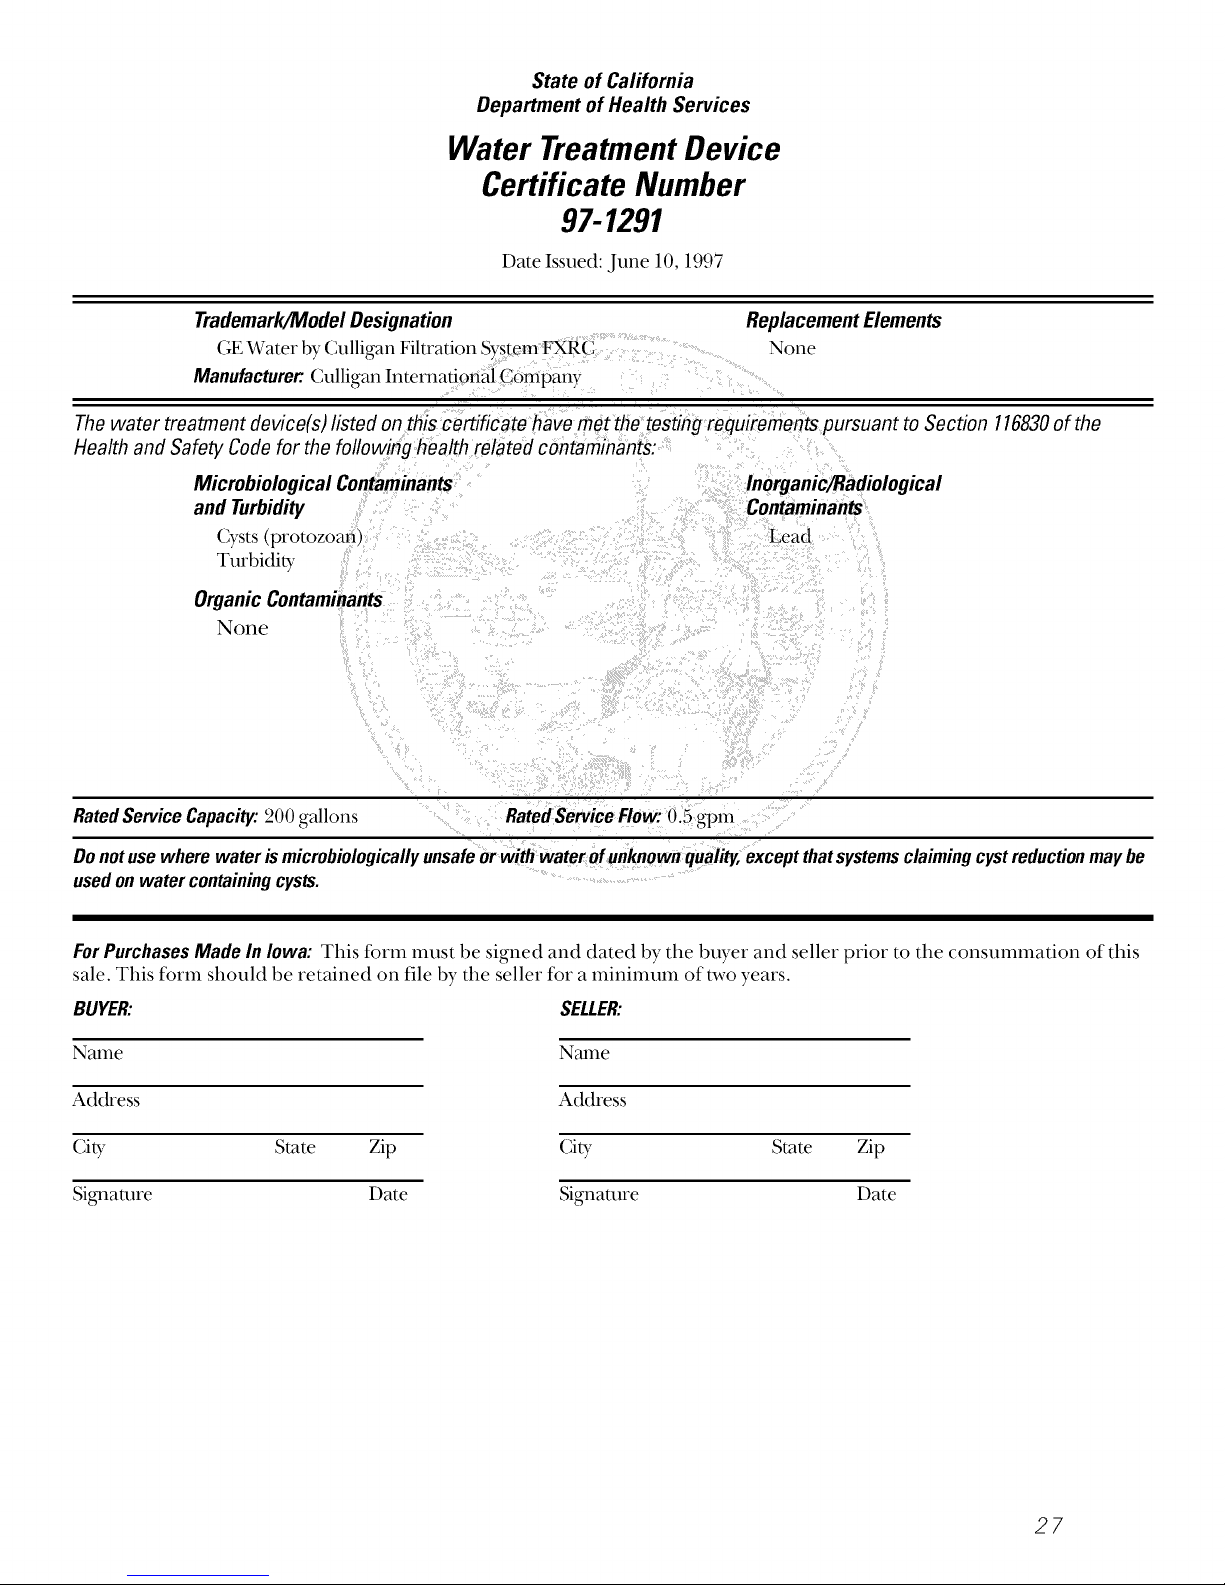
State of California
Department of Health Services
Water Treatment Device
Certificate Number
97-1291
Date Issued: June 10, 1997
TrademarlgModel Designation
GE Water by (;ulligan Filtration System FXRC
Manufacturer: Culligan International Company
The water treatment device(s) listed on this certificate have met the testing requirements pursuant to Section 116830of the
Health and Safety Code for the following health related contaminants:
Microbiological Contaminants
and Turbidity
Cysts(protozoan,
Turbi(li b,
Organic Contaminants
None
RatedServiceCapacity:200 gallons RatedServiceFlow: 0.5 gpm
Donotusewhere water ismicrobiologicallyunsafeor with water ofunknownquality,exceptthatsystemsclaimingcystreductionmaybe
usedonwatercontainingcysts.
Replacement Elements
None
Inorganic/Radiological
Contaminants
Lead
ForPurchases Made In Iowa: This form nmst be signed and dated by the buyer and seller prior to the consunnnation of this
sale. This form should be retained on file by the seller for a nlininmm of two years.
BUYER: SELLER:
Name Name
Ad&ess Address
City State Zip City
Signature Date Signature
State Zip
Date
27
 Loading...