

GE LGB116, LGB126, LGB146, LGB156 Use and Care Manual
H’uM’I
7q.4Q’’jq3
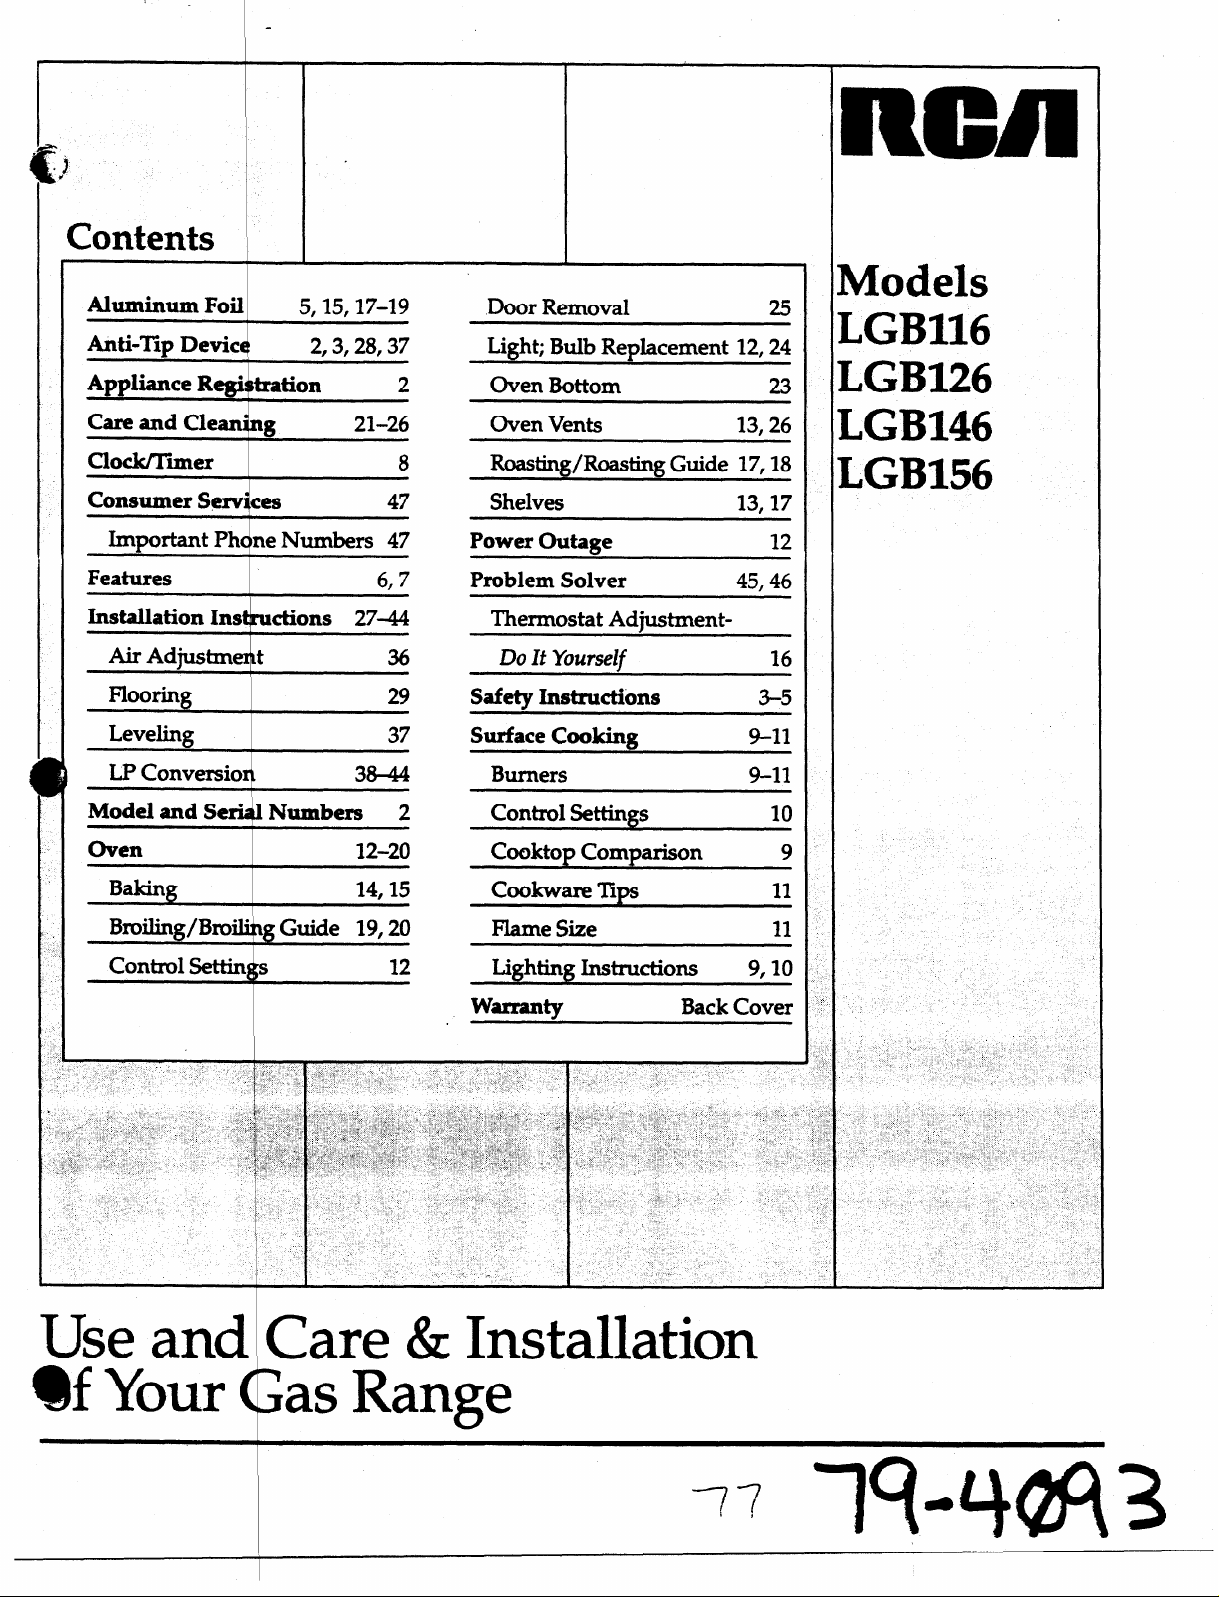
Contents
I
I
I
Aluminum Foil ‘
I
Anti-Txp Devic
I
Appliance Regi@ration
I
Care and Cleanimz
Clock/Timer
Consumer Services
Important Ph&e Numbers 47
Features
Installation Instructions 27-44
Air Adiustme&
Levelimz
LP Conversion
Model and Seriih Numbers 2
5,15,17-19
1
I
,
~
I 6.7
2,3,28,37
~ 37
I
1
Door Removal
Light; Bulb Replacement 12,24
2 Oven Bottom
21-26
8 Roasting/Roasting Guide 17,18
47
36 DoIt Yourself
38-44 Burners
Oven Vents 13,26
Shelves 13,17
Power OutaEe
Problem Solver 45,46
Thermostat Adjustment-
Safety Instructions
Surface CookinjZ
Control WtiIUZs 10
251
231
12
16
3-5
9-11
9-11
I
Models
LGB116
I
LGB126
LGB146
LGB156
Oven
Baking
Control Settixds
I
12-20
14,15
12 Lighting hStlWtiOIIS
Cooktov Comparison
cookware Tips 11
Flame Size 11
w~tv Back Cover
Use and Care & Installation
@f Your as Range
4
9
9,10
77
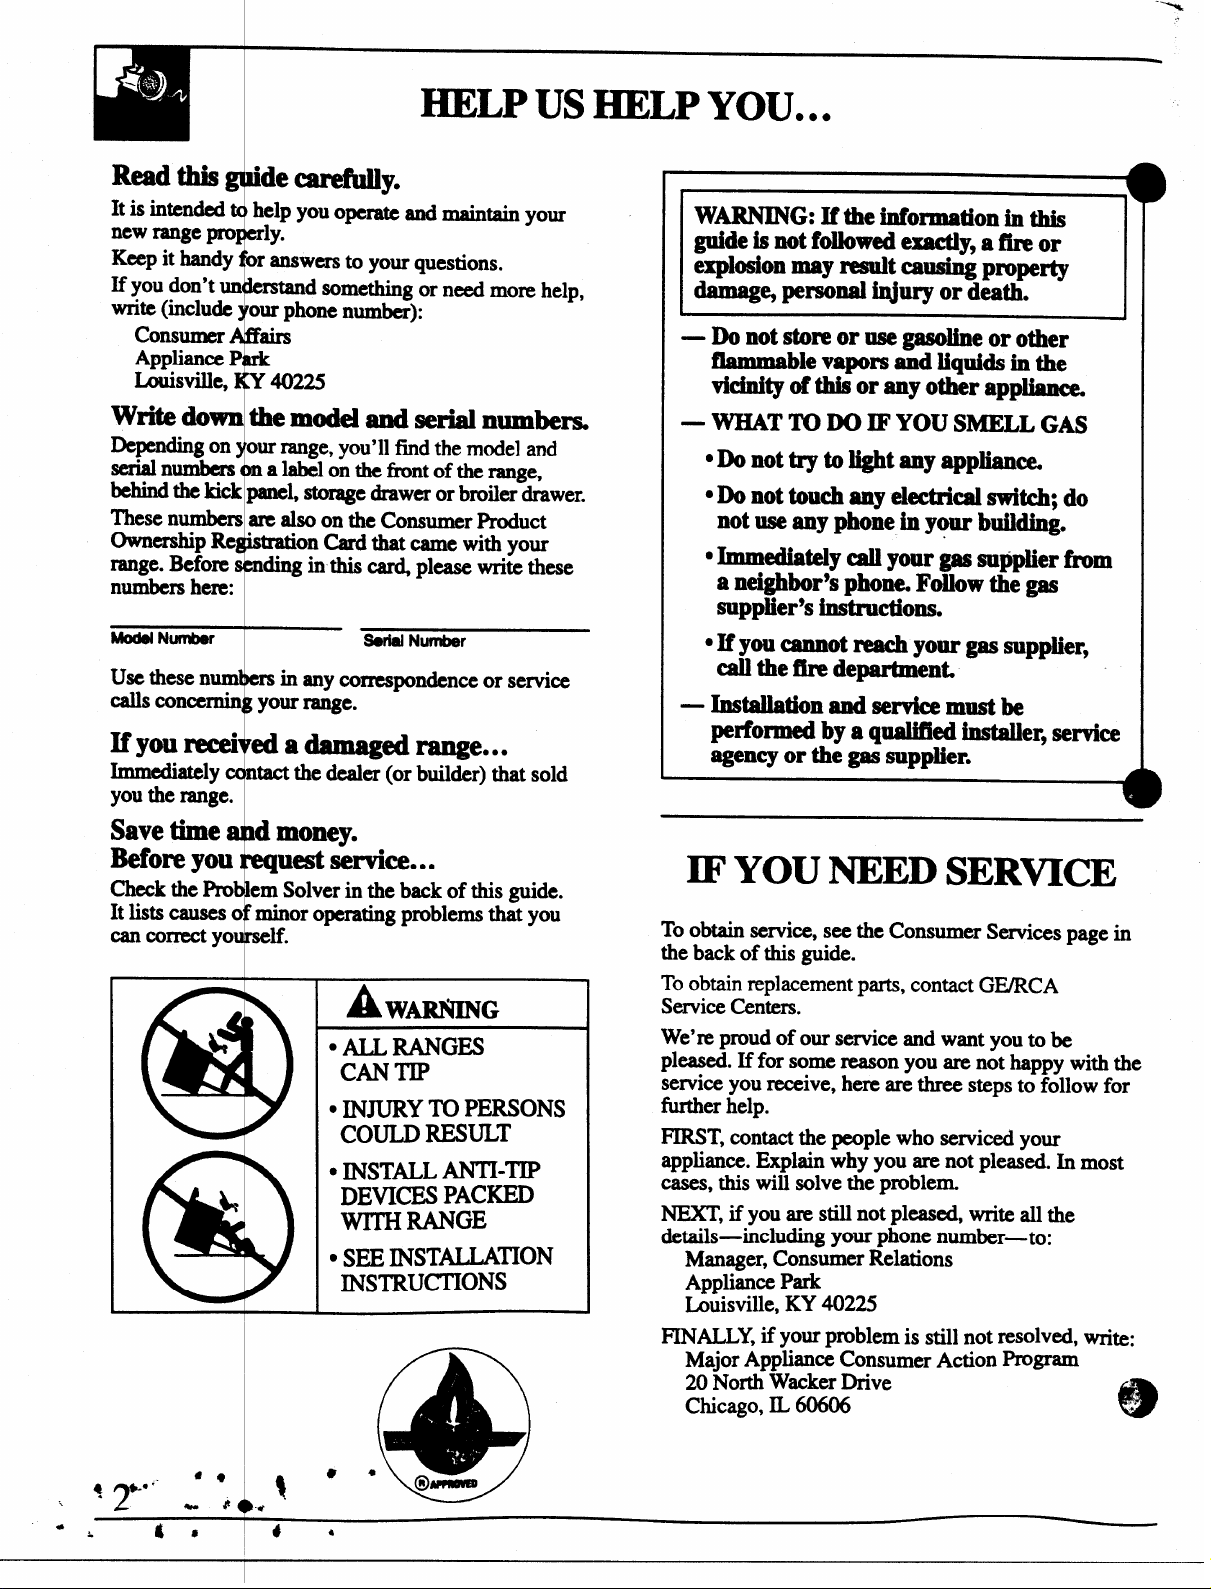
HELP US HELP YOU...
----%
.
Read this “decamfkdly.
It is intended help you operate and maintain your
newrangepro ly.
Keep it handy r answers to your questions.
If you don’t un
write (include our phone number):
Consumer airs
Appliance P
Louisville, 402M
Write down the model and serial numbers.
Depending on our range, you’ll find the model and
serial numbers a label on the front of the range,
behind the kick panel, storage drawer or broiler drawer.
These numbm are also on the Consumer Product
Ownemhip Re
range. Before
numbers here:
Model Number
Use thesen
calls concernin your range.
tand something or need more help,
i
●
“onCard that came with your
ding in this ~ please write these
I
Seriel Number
in any correspondence or service
T
Ifyourecei edadamaged range...
Immediately ntact the dealer (or builder) that sold
you the range.
W~G: If the information in this
guide is not fblhed exwtly, a fire or
explosion IMY lWSUltax p~prty
-% PW’SOd iI@II’Yor death.
— Do not store or use gasoline or other
flammable vapors and liquids in the
vicinity of this or any other appliance.
WHAT TO DO IF YOU SMELL GAS
—
● Do not try to light any ilppliamm
● ~ not touch my ektdcd switch; do
not use any phone in your building.
● Immediately cali your gas supplier horn
a neighbor’s phone. Follow the gas
supplier’sinstructions.
● If you ~t mad your PS fq@@
call the fire department
—Instahtion andservkemustbe
performed by a qualified instaUer,service
agency or the gas suppMer.
1
b
b
Save time d money.
Before you
Check the Pro em Solver in the back of this guide.
It lists causes o minor operating problems that you
can correct yo M.
#
W
Uestservice.
ii
L
&
DEVICES PACKED
WITH lMNGE
● SEE INSTAILA”ON
INSTRU~ONS
● ●
IF YOU NEED SERWCE
To obtain seMce, see the Consumer Services page in
the back of this guide.
To obtain replacement parts, contact GE/RCA
Service Centers.
We’re proud of our service and want you to be
pleased. If for some reason you are not happy with the
service you receive, here are three steps to follow for
tier help.
FIRST, contact the people who serviced your
appliance. Explain why you are not pleased. In most
cases, this will solve the problem,
NEXT, if you are still not pleased, write all the
details-including
Manager, Consumer Relations
Appliance Park
Louisville, KY 4022S
FINALLY, if
Major Appliance Consumer Action Program
20 North Wacker Drive
Chicago, IL 60606
yourphone number-to:
yOUXproblem is still not resolved, wri~:
e
.
-.
*
RT~ SAFETY INSTRUCTIONS
Read allMmxtions before using this applianc~
“1
F
~~RTANT S@ETY NOTICE
y
“TheCalifO
to cause cancer, b“
potential expos
of
Gas appliances
four of thesesub
substances can be
standing pilot
modelhasthesefea~
iccording to local, s
defects or other reproductive
to such substances.
cause minor exposure to
~ namelybenzene, carbon
● “mizedby venting with an
contain mercury. Ifyour
llres, they must be recycled
Me and fderal codes.
enYou Get Yurl&qge
● Be sure all packing materialsare removedfrom
the range before operating it to prevent fue or
smoke damage should the packing material ignite.
● Be sure your range is correctly adjusted by a
qualMedservice technician or
type
of gas (natural or LP) that is to be used.
Yourrange can be converted for use with either
type of gas. Seethe Installation Instructions.
W~ING: Theseadjustments must be made
by a qualified service technician in accordance
with the manufacturer’s instructions and all codes
and requirements of the authority having
jurisdiction. Failureto follow these instructions
could result in serious injury or property damage.
The qualiiled agency performing
assumes responsibility
● After prolonged use of a range, high floor
temperatures may result and many floor
coverings will not withstand this kind of use.
Never install the range over vinyl tile or linoleum
that cannot withstand such type of use. Never
install it directly over interior kitchen carpeting.
for the conversion.
installer for the
this work
7
dill
ve the installer ow you the location of the
ran= gas cut-off V&e &d how to shut it off
if X&xG&ry.
● &ve yourrange ●
Fded by a q
Withthe Installation Instructions. Any
and service should perfbrmed only by qualifixl
gm range installers r service technicians.
cord with this appli ce.
therangeou
andout of drafty I tions to mevent Mot
outage (onstan”
air circulation.
i
talkd and properly
“ ed installer,in accordance
adjustment
?
ofkitchentraffi cpath
i
pilot rnd=els)and”poor
7
Using Your Range
A WARNING-
~ ranges can tip and injury
could resulk To prevent accidental
tipping of the r&ge, attach it to the ~
wall and floor by installing the AntiTIp device supplied.
To check if the device is installed and
engaged properly, carefilly tip the
range forward. The Anti-’IIpdevice should
engage and prevent the range from tipping over.
If you pull tlmange out *m the wiil for any,
reason, make sure the device is properly engaged
when you push the range back against the wall.
If it is not, there is a possible risk of the range
tipping over and causing injury if you or a child
stan~ sit or lean on an open door.
Please refer to the Anti-Tip device information
in this guide. Failure to take this precaution could
result in tipping of the range and injury.
● DOnot leave children alone or unattended
where a range is hot or in operation.
Theycould be seriously burned.
(continued nextpage)
*
bl
62)
&
m
3
1
●
u
,,
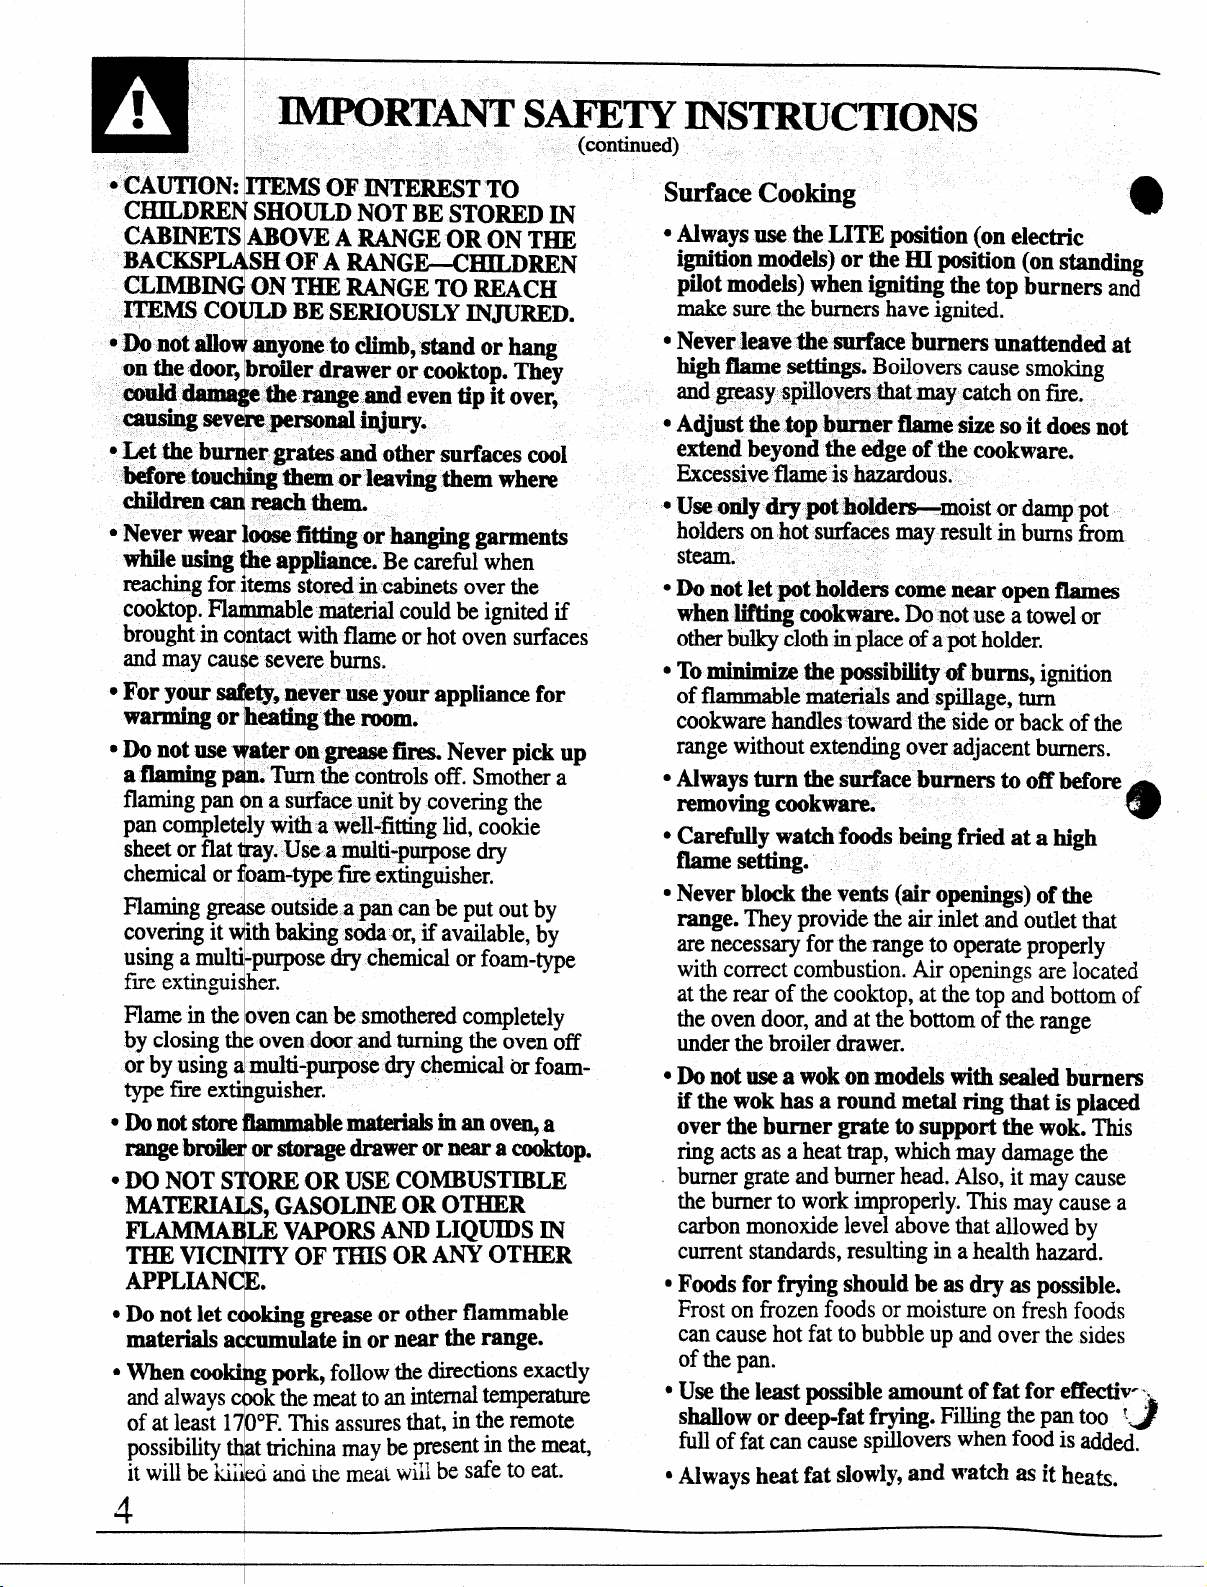
● CAUTION ~MS OF INTEREST TO
cmLmEN
CABINETS
BACKSPLA
CLIMBING
ITEMS Col
*Do not *OR
on the door,
IMl?ORT~ SAFETY INSTRUCTIONS
‘sHouLD NoT BE sToRED IN
ABOVE A RANGE OR ON THE
SH OF A RANGE-CHILDREN
ON THE RANGE TO REACH
‘
JLD BE SERIOUSLYINJURJ3D.
~anyone to climb, stand or hang
broiler drawer or cooktop. They
e the range and even tip it over,
cmlsing Sev
.Lettieh
er grates and other surfaces cool
them or leaving them where
chikhen
reachingfor:
co&top. FlaI
brought in cc
cFor your
tans stored in cabinets over the
nmable material could be ignited if
ntact with flame or hot oven surfaces
&, never use your appliance for
waning or heating the room.
•~n~tuseq
aflamingp
flaming pan z
pan completely with a well-fitting lid, cookie
sheet or flat tray. Use a multi-purpose dry
chemical or foam-type f~
rateron grease fires.
an. Turnthecontrols off. Smother a
m a surface unit by covering the
extinguisher.
Never pick up
Flaming grease outside a pan can be put out by
covering it with biking
using a multi
-purpose dry chemical or foam-type
soda or, if available, by
be smothered completely
and turning the oven off
se dry chemical or foa.rn-
s Do notstore Mematdalsinanovqa
orstoragedrawerorneara cooktop.
E CO~UST~LE
MATE
FL
, GASOLm OR OTHER
LE VAPORS AND LIQUIDS IN
S OR ANY OTHER
or other fiammable
materials ac
● men c~~
andalwaysa
of at least 17()”F.
possibilitytha
it will be kiii
cumulate in or near the range.
Ilgpork, follow the directions exactly
30
k the meat to an
T’hk assures that, intheremote
internal temperature
t trichina maybe present in the meat,
eciami tie meat wiii be safe to eat.
(continued)
Surhce Cooking
● Always use the LITE position (on electric
ignition models) or the III position (on Wmmg
pilot models) when igniting the top burners and
makesurethe burners have ignited.
● Never leave the surface burners unattended at
highflame settings. Boilovers cause smoking
and greasy spillovers that may catch on f~e.
s Adjust thelop burner flame size so it does not
extend beyond the edge of the cookware.
Excessiveflameis hazardous.
cWe only dry
holders on hot surfaces may result in burns fiorn
steam.
● Do not let potholders come near open flames
whenlifting cookware. Do not use a towel or
otherbulky cloth in place of a pot holder.
● To
Mdmize the possibility of burns, ignition
of flammable materials and spillage, turn
cookware handles toward the side or back of the
range without extending over adjacent burners.
● Always turn the surface burners to off before
removing cookware.
● Carefully watchfoods beiig fried at a high
flame setting.
QNeverblock the vents (air openings) of the
range. Theyprovide the air inlet and outlet that
are necessary for the range to operate properly
with correct combustion. Air openings are located
at the rear of the cooktop, at the top and bottom of
the oven door, and at the bottom of the range
under the broiler drawer.
cDo notusea wokon models with sealed burners
wok has a round metal ring that is placed
if the
over the
ring acts as a heat trap, which may damage the
. burner grate and burner head.
the burner to work improperly. This may cause a
carbon monoxide level above that allowed by
current standards, resulting in a health hazard.
s Foods for frying should be as dry as
Frost on frozen
can cause hot fat to bubble up and over the sides
of the pan.
. Use the
shallow or deep-fat frying. Filling the pm too ~~
full of fat can cause spillovers when fOOdis added.
● Always heat fat S1OW1YS~d watch M it hea~,
pot Adders-moist or damp pot
burner grate to support the wok. This
Also, it may cause
possible.
foods or moisture on fresh foods
kast possible amount of fat for effectiv-’.
@
@
,
4-
T!!
“If a combination foils or fats will be used
c
in
frying, stirtoge er before heating or as fats
melt slow~y.
. Usea
cNevertry to move pan of hotfag especiallya
.
sWhen using glass o&ware, make sure it is
● Keep ali plastics a~ay from the top burners.
● Do not leave plas c
@
GDonot leave any i ms on the cooktop.
cToavoid the possi ility of a b- always be
● -n
● If range is located ear a yindow, do not hang
cWhen a pilot goes ut (on standingpilotmodels),
● Myou smell gas, d you have already made sure
w
Baking, Broiling d Roasting
deep fat the
preventoverheatingfat beyond the smokingpoint.
deepfktfryer.Wai untilthefat is cool.
uw proper P se
unstable or easily pped. SeIect cookware having
fiat bottoms Iarge e ough to properly contain food
and avoid boilover and spillovers and large
enough to cover b
cleaningtime and p vent hazardousaccumulations
of food, since hea spattering or spillovers left
on range can ignite Use pans with handles that
can be
designed for top-of range cooking.
itemsonthecook ptheymaymelt if le
Thehot air
items and Willin
containers, which
certain that the co trols for all burners are at
the off position an all grates are cool before
attempting to rem ve them.
thefan off. The f , if operating, may spread
the flames.
long curtains that c &i blow over the top burners
andcreateafire d.
you will detect a f
to relight the pilot.
make sure burner c ntrols are in the off position,
and follow instructi ns in this book to relight.
pilotsare lit (ons
easily grasp d and remain COOL
oo-closeto the ven.
-4
totherangeand
ever use an open
i
ometerwheneverpossibleto
?
I
Avoid pans that are
er grate. This will both save
!
1
.
e
,
{
Vent appearance and location vary
1
horn th vent may ignite flammable
e pressure in closed
y cause them to burst.
4
“f
are under the ho@ turn ~
—.-
4-
● t odor of gas as your signal
en relighting the piIot,
}
“ g pilot models),turnoff the
aqualifiedservicetechnician.
!iiiM
to hxate a leak.
● Do not use the oven for a storage area.
Items stored in
QPlace the oven shelves in the desired position
while the oven is cod.
● Stand away from the range when opening the
door of a hot oven. Thehot air and steam that
escapes can cause bums to hands, face and eyes.
● “
Pullingoutthe shelftotheshelf-stopis a
conveniencein lifting heavy foods. It is also a
precaution against burns from touching hot
surfaces of the door or oven walls. The lowest
position “R” is not designed to slide.
● Do not heat unopenedfoodcontainers.Pmsure
couldbuildup and the container
causing an injury.
● Do not use ahunim.m foil anywhere in the owm
except as described in this guide.
result in a f~e hazard or damage to the range.
● When using cooking or roasting bags in the
oven, follow the manufacturer’s directions.
● Use only glass cookware that is recommended
for use in gas ovens.
● Always remove the broiler pan from range as
soon as you finish broiling. Greaseleft
can catch fue if oven is used without removing
the grease from the broiler pan.
● When broiling, if meat is too close to the flame,
the fat may ignite. Trimexcess fat to prevent
excessive flare-ups.
● Make sure the broiler pan is in place correctly
to reduce the possibility of grease fins.
. u YOUshodd have
p@ turn off oven con~ol, and keep broiler
drawer and oven door closed to contain fmeuntil
.-
burns out.
it
Cl-g
●Ckxmonlypartslistedin thisUseand CareGuide.
● Keep range clean and free of accumulations of
grease or spillovers, which may ignite.
● Be careful when you clean the cooktop because
the area over the pilot (onstandingpilot modeh)
will be hot.
SAW THESE
INSTRUCTIONS
the oven can ignite.
could burs~
Misuse could
in the pan
a grease fin in the broiler
Your Range
,,
● Keep the oven free from grease buildup.
F
I
u
@-+
,,..
@
II
-p
IR-R .
I
“--P
...
+!’--0
I
Settled Burnem
Burnar~
Standard Twin Bmem
DnpPan
8
[~\ ‘u”’’”
Your range isequippedwithoneofthewo types of surface burrtem shown above,
6
I
‘:.3 Q (,Z,
{&\ ...r
Dnp Pan
J
—_— _
Feature Index
(Not all models have all features. Appearance of features varies.)
Explained
on page
1 Clock
andTimer (on some models)
2 Oven Vent
3 Surface Bme~ Drip Pam (on some models) and Grates
4 Surface B@ner Control Knobs
5
OvenControlKnob
6 Oven Shelf Supports
Shelf positions for cooking are suggested in the Baking and Roasting sections.
7 Broiler Dqwer
8 Broiler Pap and Grid
9 Model and Serial Numbers
(located
on fkonttie of range, behind broiler drawer)
10 Lif’k-off men Door
11 Anti-Tip Device
(Located ri$ht rear at bottom. See Installation Instructions.)
12 Oven Bottom
13 Oven Shelves
(number of shelves varies)
8
4,5, 13,26
4,5,9-11,21,26
4, 10, 11,24
12, 14, 16,
17, 19,24
5, 13,14, 17
4,5, 19,20,24
5,17,19,20,24
2
19,20,25
2,3,28,37
23,26
.
5,13-15,17,26
14 Oven Intex$orLight (on some models)
15 Oven Ii@@ On/W Switch
(on some models)
16 Cooktop
Vents
Air
12,24
12
23,26
4,5,13,26
7
—
Follow the
cbck and
Y
ons below if your range has the
r shown at the right.
Youhave the qhoice of having the timershow the
timecounting own or the time of day. In either case,
the timer will ignal at the end of the timer period to
you that the time is up.
alert
f
;EzEl[g
SH TIME
(Appearance IIMy
VW)
,,~,
..
.
.
To Set the (10ck
NOTE: When you first plug in the range or after a
powerfailure, he entire Clock/Timer display will
light up.
1. PresstheCI+OCKpad.
2. Press and ~ld the UP or DOWN pad and the time
of day will hange 10minutes at a time. To change
the time by ingle minutes, give the pads short taps.
3. Press the C~K pad to start the clock.
!
To Change pr Cancel the Timer Setting
When the time! is counting down, use the UP and
DOWN pad to Ichange the remainin
the TIMER 01’+VOFFpad to stop the timer. The timer
cannot be canc~lled unless you have fully completed
“set timer” ins@wtions above.
g time, or press
To Set the Timer
1. PresstheTIMERON/OFF pad.
2. Use the UP and DOWN pads to set the timer.
Short taps on the UP or DOWN pad change the
timer’s setting one minute at a time. Pressing and
continuing to hold the UP pad increases the setting
ten minutes at a time.
3. Once you have set your timer, press the TXMER
ON/OFF pad to start timing.
As the timer counts dowq a signal will indicate when
one minute is left. After this signal, the display will
count down in seconds.
signal will sound. Press the TIMER ON/OFF pad to
stop the signal.
Whentime runs OUGa final
To Display #he Clock While the Timer Is Operating
Pressing the C\OCK pad while the timer is operating
will not interf~e with the timer’s operation; the
display will ch ge to show the clock, but the timer
will continuercount down and will
time is up. Pn+s the TIMER ON/OFF pad again to
change the display back to show the timer.
still signal when
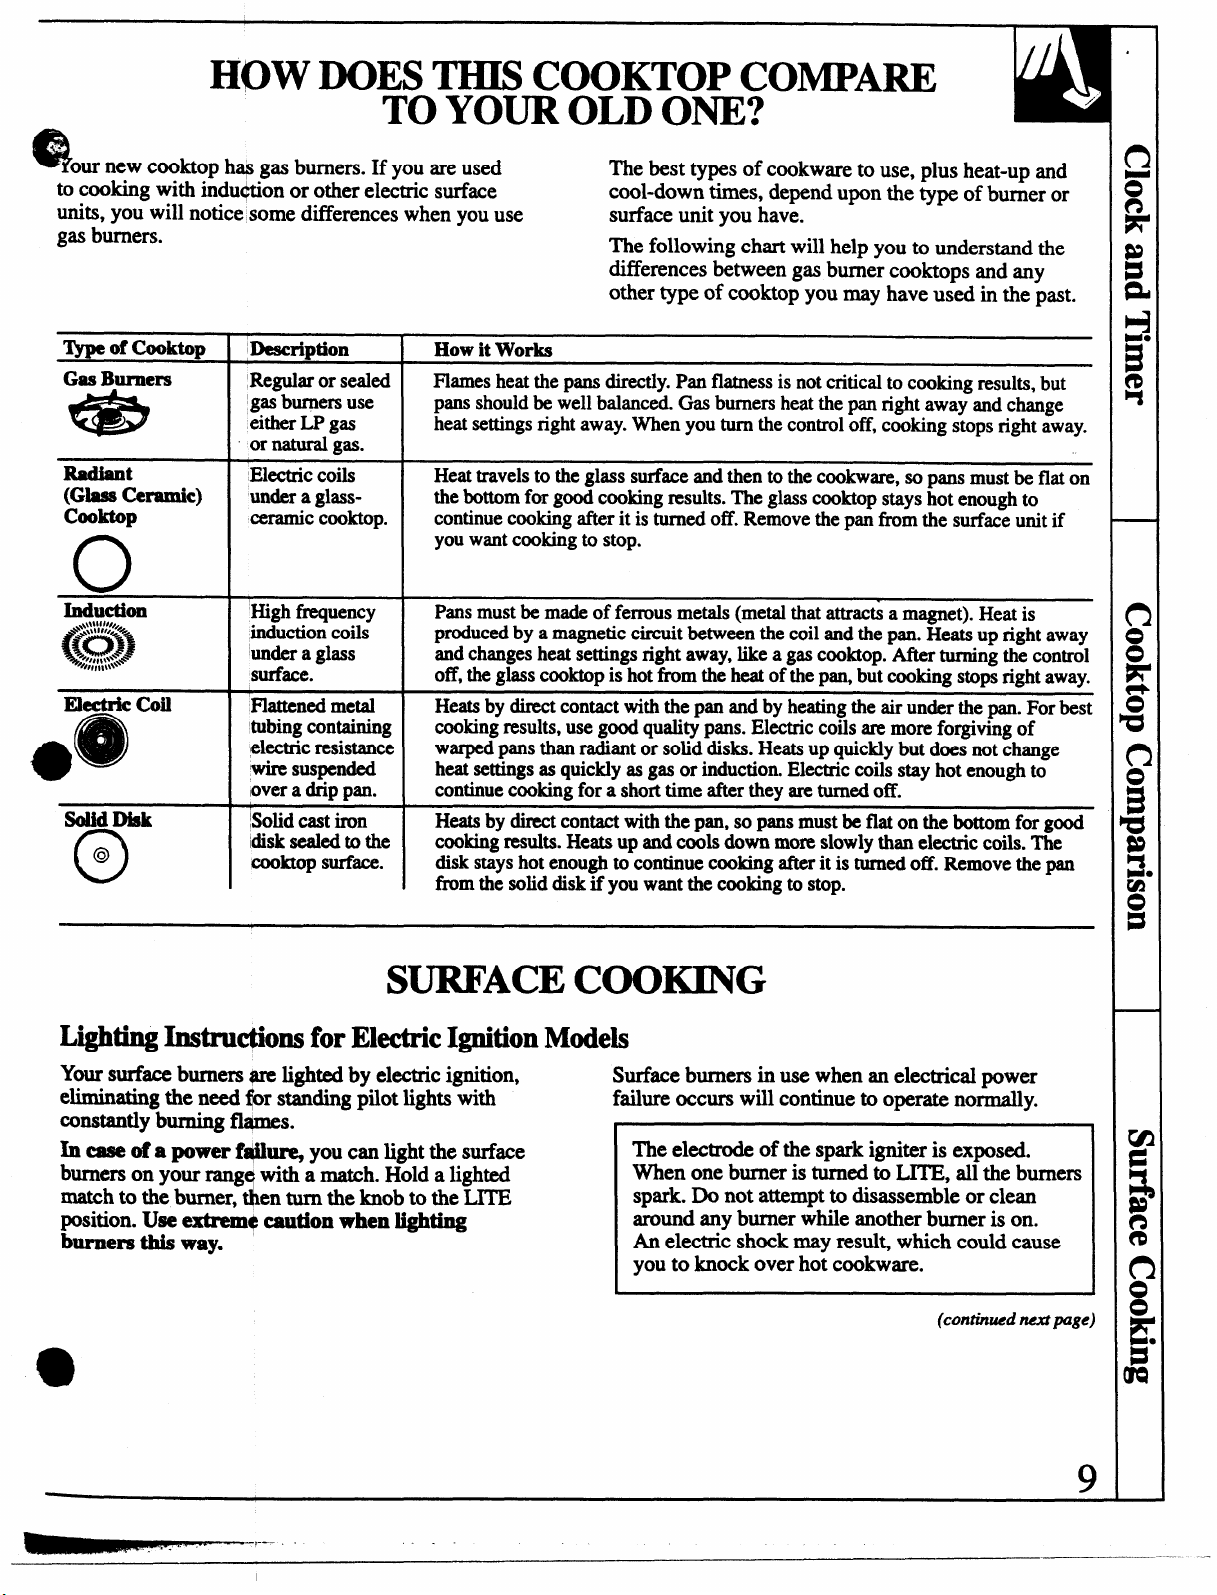
HOW DOES THIS COOKTOP COMPARE
TO YOUR OLD ONE?
Q our new
to cooking with indu+tion or other electric surface
units, you will notice some differences when you use
gas burners.
3jrpeof Cooktop
Gas Burners
*
Radiant
Wuabuml$’mtmic)
cooktop hap gas burners. If you are used
,)lescription How itWorks
Regularorsealed Flamesheatthe pansdirectly.Pan flatnessis not criticaltocookingresults,but
gasburnersuse pans shouldbewellbalanced.Gasburnersheatthepan rightaway andchange
eitherLP gas
or natural
Electriccoils
undera glassCeramicCooktop.
gas.
heatsettingsrightaway.Whenyou turn thecontroloff,cookingstopsright away.
Heattravelsto the glass surfaceand then tothe cookware,so pans mustbe flat on
thebottomfor goodcookingresults.‘I’heglass cooktopstayshot enoughto
continuecookingafterit is turnedoff. Removethe panfrom the surfaceunitif
youwantcookingto stop.
n
I I
Ektric coil
*e
SolidDisk
@
o
Highfrequency
inductioncoils
‘imdera glass
surface.
Flattened metal
‘tubingcontaining
electricresistance
wiresuspended
lovera drippan.
Solidcastiron
disk sealedto the cookingresults.Heatsup andcools downmoreslowlythanelectriccoils.The
Cooktopsurface.
--
Pans
producedby a magneticcircuitbetweenthecoil andthe pan. Heatsup right away
andchangesheat settingsrightaway,likea gascooktop.Afterturningthe control
off,theglasscooktopis hot fromthe heatofthe pan,but cookingstopsright away.
Heatsby directcontactwiththepan andby heatingtheair underthe pan.For best
cookingresults,use goodqualitypans.Electriccoilsaremoreforgivingof
warpedpansthan radiantor solid disks.Heatsup quicklybut does notchange
heatsettingsasquicklyas gas or induction.Electriccoilsstay hot enoughto
continuecookingfora shorttime aftertheyareturnedoff.
Heatsbydirectcontactwiththe pan, so pansmustbe flat on the bottomfor good
disk stayshotenoughto continuecookingafterit is turnedoff. Removethepan
fim thesoliddiskif you wantthe cookingto stop.
The best types of cookware to use, plus heat-up and
cool-down times, depend upon the type of burner or
surface unit you have.
The following chart will help you to understand the
differences between gas burner cooktops and any
other type of cooktop you may have used in the past.
mustbe madeofferrousmetals(metalthatattracti a magnet).Heatis
SURFACECOOKING
Lighting Instru@ons for Electric Ignition Models
Ym surface burners @mlighted by electric ignition,
eliminating the need $r standing pilot lights with
constantly burning fl@nes.
In ease of a power f#l~
burners on your rangwitha match. Hold a lighted
match to the burner, en turn the knob to the LITE
position. Use extrem+ caution when lighting
burners this way.
a
you can light the surface
,___
.-
Surface burners in use when an electrical power
failure occurs will continue to operate normally.
The electrode of the spark igniter is exposed.
When one burner is turned to LITE, all the burners
spark. Do not attempt to disassemble or clean
around any burner while another burner is on.
An electric shock may resul~ which could cause
you to knock over hot cookware.
(contbwd next page)
—
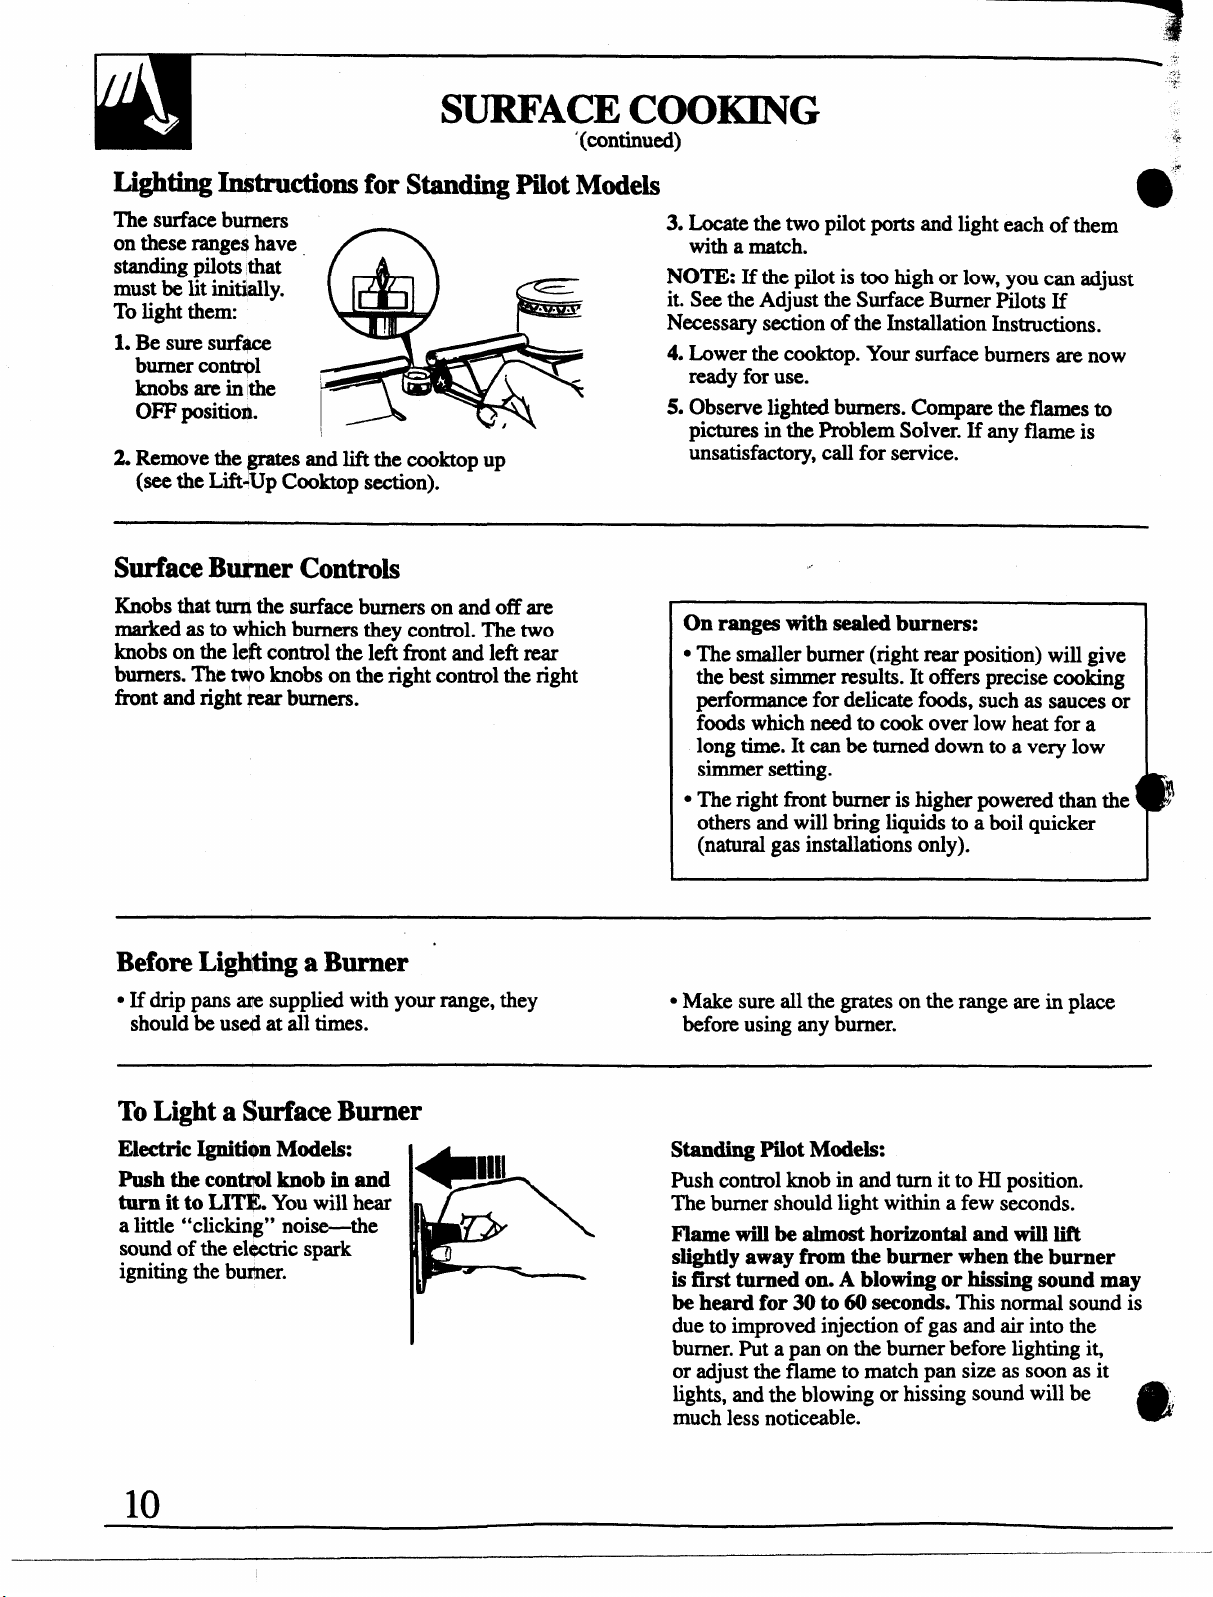
Lighting In@ructions for Standing Pilot Models
—.—
The surface butners
on these ranges have
standingpilots that
must be lit initially.
To light thenx
1. Be sure sud+ce
burner contrpl
knobs are in the
OFF positio~.
2. Remove the-s and lift the cooktop up
(see the Lift+Up Cooktop section).
Surface Burner Controls
3. Locatethetwopilot ports and light each of them
with a match.
NOTE: If the pilot is too high
it. See the Adjust the Surface Burner Pilots If
Necessary section of the Installation Instructions.
4. Lower the cooktop. Your surface burners are now
ready for use.
5. Observe lighted burners. Compare the flames to
pictures in the Problem Solver. If any flame is
unsatisfactory, call for service.
or low, you can adjust
m
e
Knobs that turIIthe surface burners on and off are
marked as to w~ch burners they control. The two
knobs on the left control the left tint and left rear
burners. The NO knobs on the right control the right
Ihmt and right rear burners.
Before Lighting a Burner
● If drip pans ~ supplied with your range, they
should be used at all times.
To Light a Surface Burner
Electric Ignition Models:
Push the control knob in and
turn it to LX~ You will hear
a little “clicking” noise-the
sound of the ehtctric spark
igniting the bu~er.
On ranges with sealed burners:
. The smaller burner (right rear position) will give
the best simmer results. It offers precise cooking
petiormance for delicate foods, such as sauces or
foods which need to cook over low heat for a
long time. It can be turned down to a very low
simmer setting.
● The right fi-ontburner is higher powered than the !
others and will bring liquids to a boil quicker
(natural gas installations only).
● Make sure all the grates on the range are in place
before using any burner.
Standing Pilot Models:
Push control knob in and turn it to HI position.
The burner should light within a few seconds.
Flame will be almost horizontal and will lift
slightly away from the burner when the burner
is first turned on. A blowing or hissing sound may
be heard for 30 to 60 seconds. This normal sound is
due to improved injection of gas and air into the
burner. Put a pan on the burner before lighting it,
or adjust the flame to match pan size as soon as it
lights, and the blowing or hissing sound will be ,
much less noticeable.
A
a
10

brL@t@aBurner
~.
. After the burner ignites, turn the knob to adjust the
flame size.
. Check to be sure the burner you turned on is the one
YOU want to use.
How to Select Flame Size
“Do not operate a burner for an extended period of
time without cookware on the grate. The finish on the
gratemay
● Be sure the burners and grates are cool before you
chipwithoutcookwareto absorb the heat.
place your hand, apot holder, cleaning cloths or
other materials on them.
Watch the flame, not the knob, as you reduce heat.
The flame size on a gas burner should match the
cookware you are using.
FOR SAFE HANDLING OF COOKWARE NEVER
LETTHEFLAME~
THE COOKWARE.
UP THE SIDES OF
Top-of-Range Cookware
Al~um:
recommended because it heats quickly and evenly.
Most foods brown evenly in an aluminum skillet.
se saucepans with tight-fitting lids when cooking
“thminimum amoumtsof water.
*
Cast-Irom If heated slowly, most skillets will give
satisfactory results.
EMmelware: Under some conditions, the enamel of
some COOkwaremay mek Follow
manufacturer’s recommen&tions for cooking methods.
Medium-weight cookware is
COOkWIUW
Any flame larger than the
bottom of the &okware is
wasted and only serves to
heat the handle.
Glass: There are two types of glass cookware-those
for oven use only and those for top-of-range cooking
(saucepans, coffee and teapots). Glass conducts heat
very slowly.
Heatproof Glass Ceramic: Canbe
surface or oven cooking. It conducts heat very slowly
and cools very slowly. Check cookware manufacturer’s
directions to be sure it can be used on gas ranges.
Stainless Steel: This metal alone has poor heating
properties and is usually combined with copper,
aluminum or other metals for improved heat
distribution. Combination metal skillets usually work
satisfactorily if they are used with medium heat as the
manufacturer recommends.
.:..
used for either
Stove Top Gfis (on models with sealed burners)
Do not use stove top grills
on your sealed gas burners.
If you use the stove top
grill on the sealed gas
burner it will cause
incomplete combustion and
can result in exposure to
carbon ~noxide leve~
above allowable current
Stanti. This can be
kardous to your health.
9
Wok COohg (on models with seaIed burners)
We recommend that you
use only a flat-bottomed wok.
They are available at your load
retail store.
Do not use woks that have
support rings. Use of these
types of woks, with or
without the ring in place,
can be dangerous. Placing
the ring over the burner grate may cause the burner
to work improperly resulting in carbon monoxide
levels above allowable cument standards. This could
be dangerous to your health. Do not try to use such
woks without the ring. You could be seriously burned
if the wok tipped over.
11
Before Using Your Oven
Be sure you understand how to set the controls properly. Practice removing
and replacing the shelves while the oven is cool. Read the information and
tips on the following pages. Keep this guide handy where you can refer to
i~ especially during the first weeks of using your new range.
Lighting Instructions for Electric Ignition Models
- “---1
The oven burner and broil burner are lighted by
electric ignition.
To
lightthe burner, turnthe OVEN CONTROL
knob to the desired temperature. The burner should
light within 30-90 seconds. After the oven reaches the
selected temperature, the oven burner cycle~ff
completely, then on with a full flame-to maintain the
sekcted temperature.
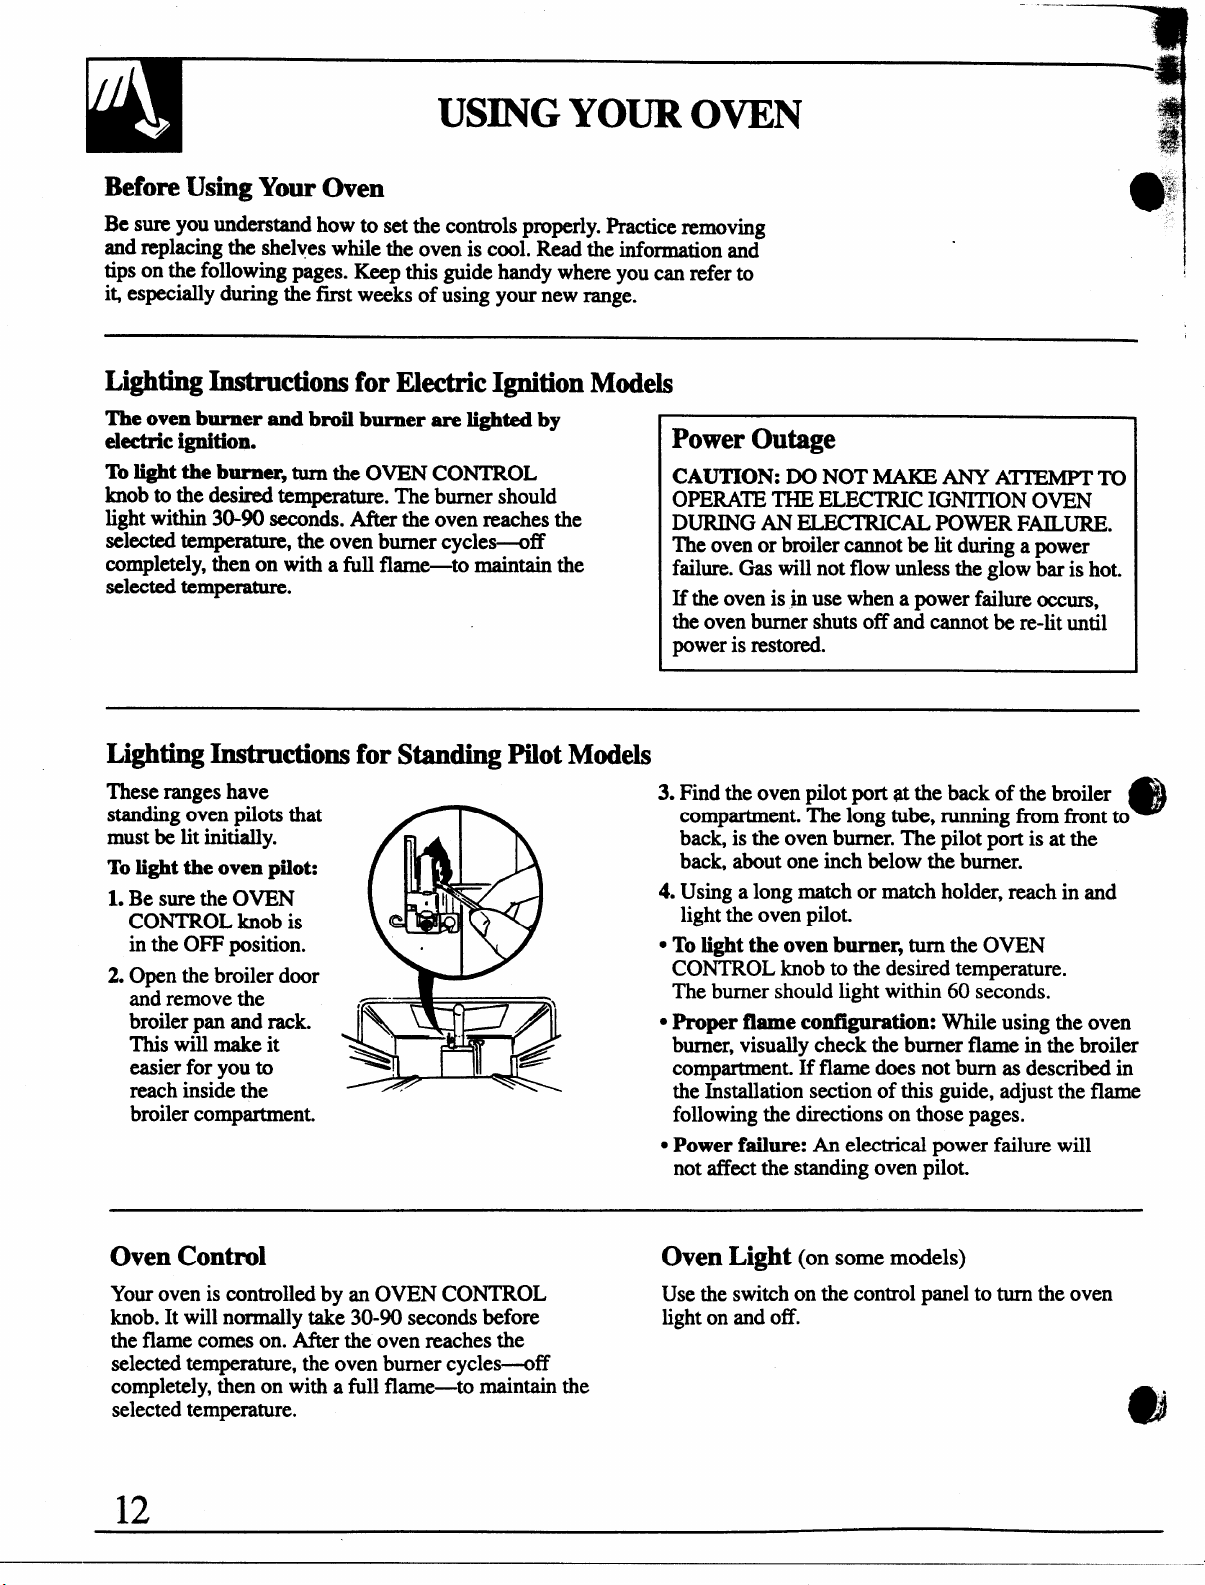
Ligh ●hng Instructions for Standing Pilot Models
Theserangeshave
standing oven pilots that
must be lit initially.
Tolight the oven pilot:
1. Be sure the OVEN
CONTROL knob is
in the OFF position.
2. Open the broiler door
and remove the
broiler pan and rack.
This will make it
easier for you to
reach inside the
broiler compartment.
1
Power Outage
CAUTION: DO NOT MAKE ANY A~ TO
OPERATE THE ELECTRIC IGNITION OVEN
DURING AN ELECTRICAL POWER FmURE.
The oven or broiler cannot be lit during a power
failure. Gas will not flow unless the glow bar is hot.
If the oven is in use when a power failure occurs,
the oven burner shuts off and cannot be re-lit until
power is restored.
3. Find the oven pilot port at the back of the broiler
compartment. The long tube, running from front to
back, is the oven burner. The pilot port is at the
back, about one inch below the burner.
4. Using a long match or match holder, reach in and
light the oven pilot.
● To light the oven burner, turnthe OVEN
CONTROL knob to the desired temperature.
The burner should light within 60 seconds.
● Proper flame configuration: While using the oven
burner, visually check the burner flame in the broiler
compartment. If flame does not bum as described in
the Installation section of this guide, adjust the flame
following the directions on those pages.
● Power failure: An electrical power failure will
not affect the standing oven pilot.
e
Oven Control
Your oven is controlled by an OVEN CONTROL
knob. It will normally take 30-90 seconds before
the flame comes on. After the oven reaches the
selected temperature, the oven burner cycles-off
completely, then on with a full flame-to maintain the
selected temperature.
12
Oven Light
(on some models)
Use the switch on the control panel to turn the oven
light on and off.
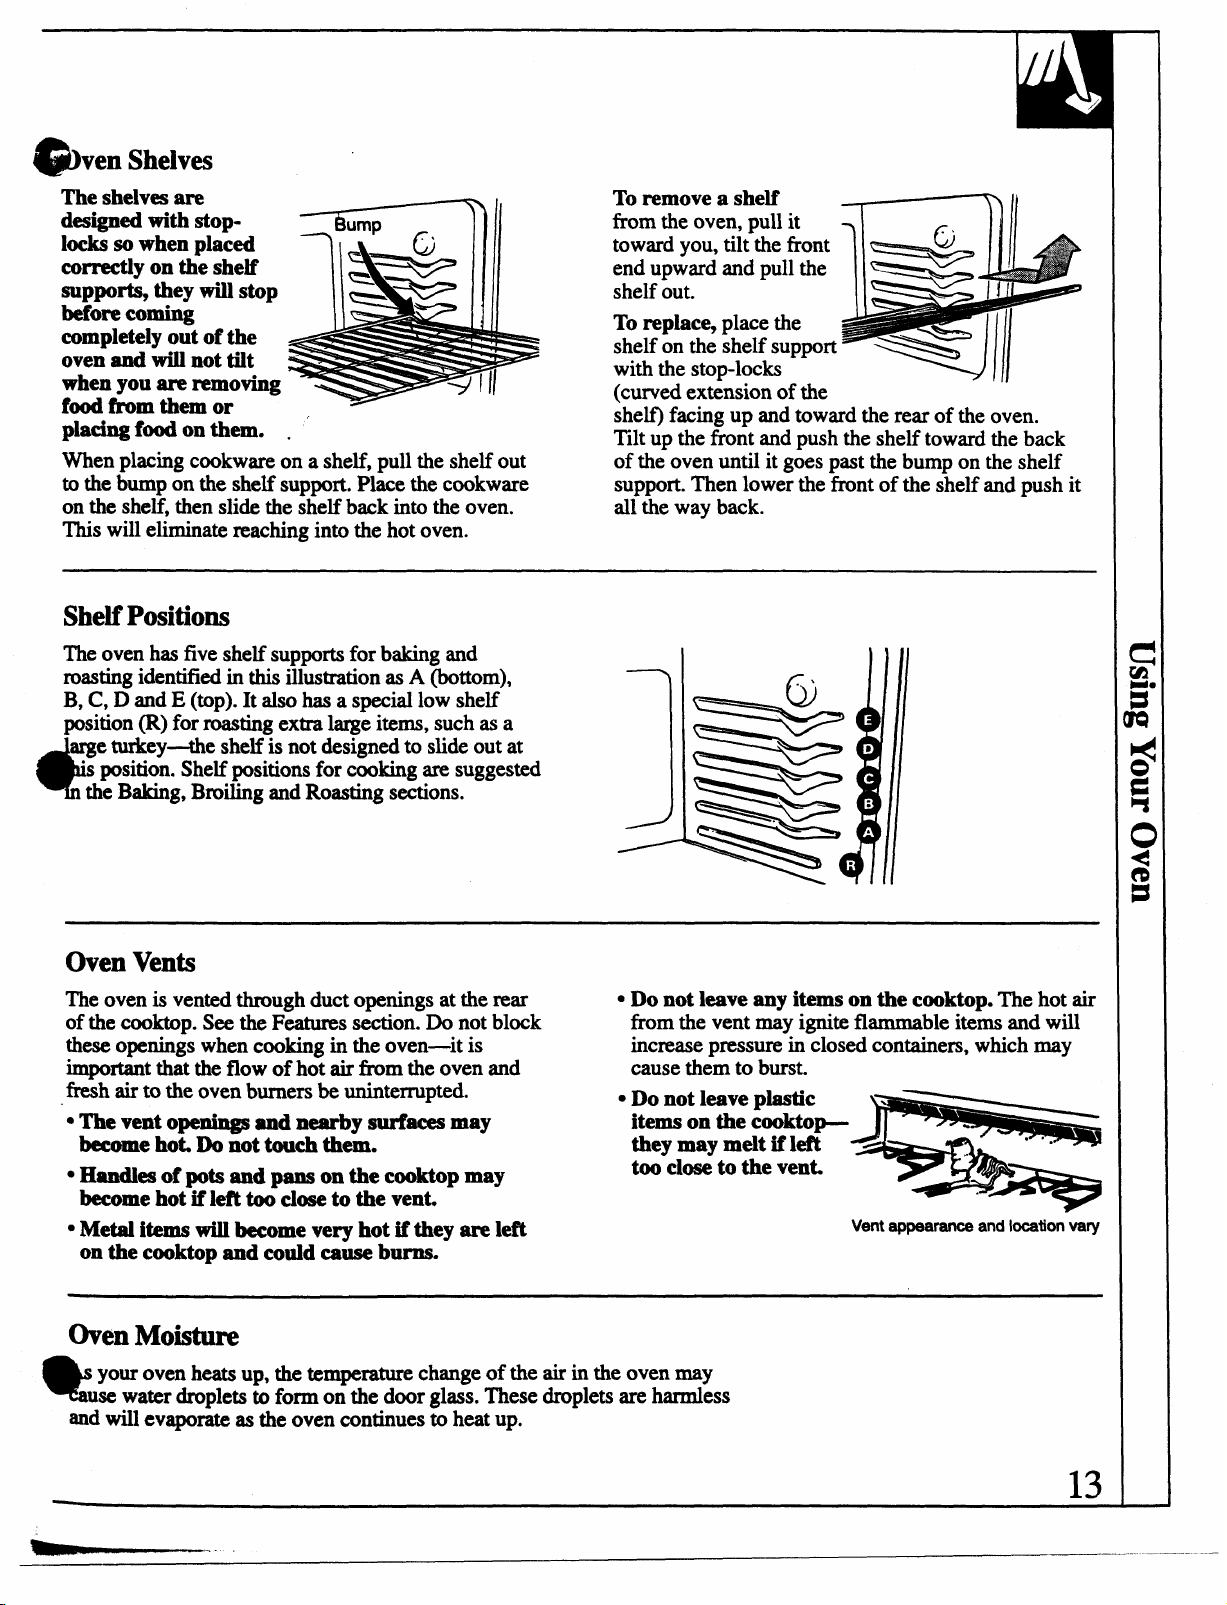
ven Shelves
41ib
The shelves are
designed with
locks so when placed
correctly on the shelf
supports, they will stop
before coming
completely out of the
oven and will not tilt
when you are removing
food from them or
placing f-on them. .
When placing cookware on a shelf, pull the shelf out
to the bump on the shelf support. Place the cookware
on the shelf, then slide the shelf back into the oven.
This will eliminate reaching into the hot oven.
StOp-
Shelf Positions
Theovenhasfiveshelfsupportsfor baking and
roasting identifiedin this illustrationas
B, C, D and E (top). It also has a special low shelf
position(R) forroastingextralargeiterns,suchas a
e turkey-the
“sposition. Shelf positions for cooking are suggested
the Baking, Broiling and Roasting sections.
d?
shelf is not designed to slide out at
A (bottom),
To remove a shelf
from the oven, pull it
toward you, tilt the front
end upward and pull the
shelf out.
To replace, place the
shelf on the shelf support
with the stop-locks
(tuned extension of the
shelf) facing up and toward the rear of the oven.
‘Illt u~ the front and push the shelf toward the back
of th~ oven until it gas past the bump on the shelf
support. Then lower the front of the shelf and push it
all the way back.
j
Oven Vents
The oven is vented through duct openings at the rear
of the cooktop. See the Features section. Do not block
these openings when cooking in the oven—it is
important that the flow of hot air fkom the oven and
fresh air to the oven burners be uninterrupted.
● The vent openings and nearby-aces may
becomehot,Donottouchthem.
. Handlesof pots
become hot if left too close to the vent,
● Metal items will become very hot if they are left
on the cooktop and could cause burro
and pans on the cooktop may
● Do not leave any items on the cooktop. The hot air
s Do not leave plastic
Oven Moisture
your oven heats up, the temperature change of the air in the oven may
use water droplets to form on the door glass. These droplets are harmless
Qf
ad will evaporate as the oven continues to heat up.
from the vent may ignite flammable items and will
increase pressure in closed containers, which may
cause them to burst.
itemsonthe cooktoptheymay melt if left
too closeto the vent
Vent appearanceand location vary
13
BAKING
Your oven tempera- is controlled very accurately
using an oven control system. It is reco~ndd that
you operatethe ovenfor a number of weeks to
becomefamiliar withyournew oven’s perfo~m.
How to Set Your Range for Btig
-----qi
If youthinkan adjustmentis necessary,seethe
Adjus
the Oven Thermostat section. It gives easy Do It
Yourse~hs~ctions on how to adjust the thermostat.
~
~
.%:~
.j,
J!
@
*!
.
e
To avoid possible burns, place the shelves in the
correct position before you turn the oven on.
1. Close the oven door. ‘Ibrn the OVEN CONTROL
knob to desired tempe-.
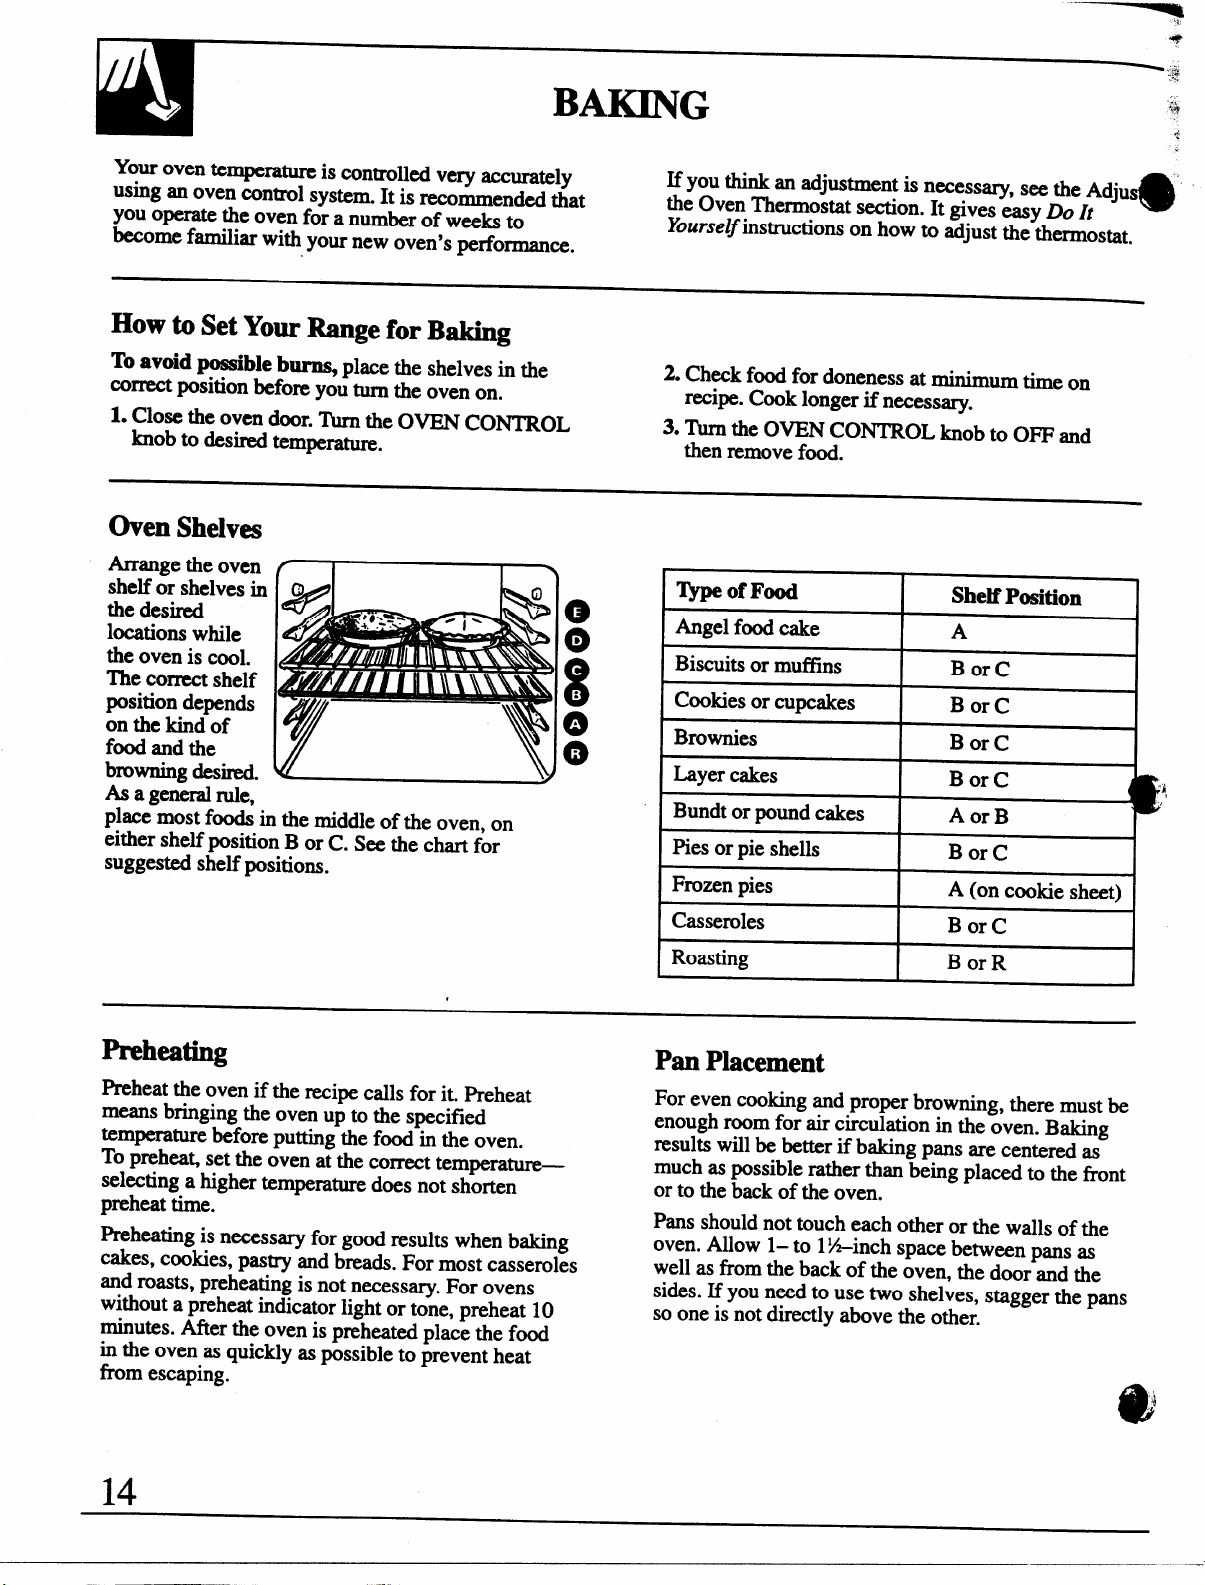
Oven Shelves
Ammge the oven
shelf or shelves in
the desired
locations while
the oven is cool.
The correct shelf
position depends
on the kind of
fd and the
browning desired.
As a generalrule,
place most foods in the middle of the oven, on
either shelf position B or C. See the chart for
suggested shelf positions.
,
O
0
2. Check food for doneness at min.imu time on
recipe. Cook longer if necessary.
3. Thrn the OVEN CONTROL knob to OFF and
then remove f~.
ljpe of Food
Angel food cake
Biscuits or muffins
.
.
Cookies or cupcakes
Brownies
Layer cakes
Bundt or pound cakes
Pies or pie shells
Frozen pies
Casseroles
Roasting
Shelf Position
A
Bor C
Bor C
Bor C
Bor C
Aor B
Bor C
A (on cookie sheet)
Bor C
Bor R
Preheating
Preheat the oven if the recipe calls for it. Preheat
means bringing the oven up to the specified
temperature before putting the food in the oven.
TOprehea~ set the oven at the correct tempem~—
selecting a higher temperature does not shorten
preheat time.
Preheating is necessary for good results when baking
cakes, cookies, pastry and breads. For most casseroles
and roasts, preheating is not necessary. For ovens
without a preheat indicator light or tone, preheat 10
minutes. After the oven is preheated place the food
in
the oven as quickly as possible to prevent heat
horn escaping.
Pan Placement
For even cooking and proper browning, there must be
enough room for air circulation in the oven. Baking
results will be better if baking pans are centered as
much as possible rather than being placed to the tint
or to the back of the oven.
Pans should not touch each other or the walls of the
oven. Allow 1– to 1%-inch space betw~n pans as
well as from the back of the oven, the door and the
sides. If you need to use two shelves, stagger the pans
so one is not directly above the other.
@!hkingGuicks
When using prepar
instructions for best aking results.
baking mixes, follow package recipe or
7
cookies
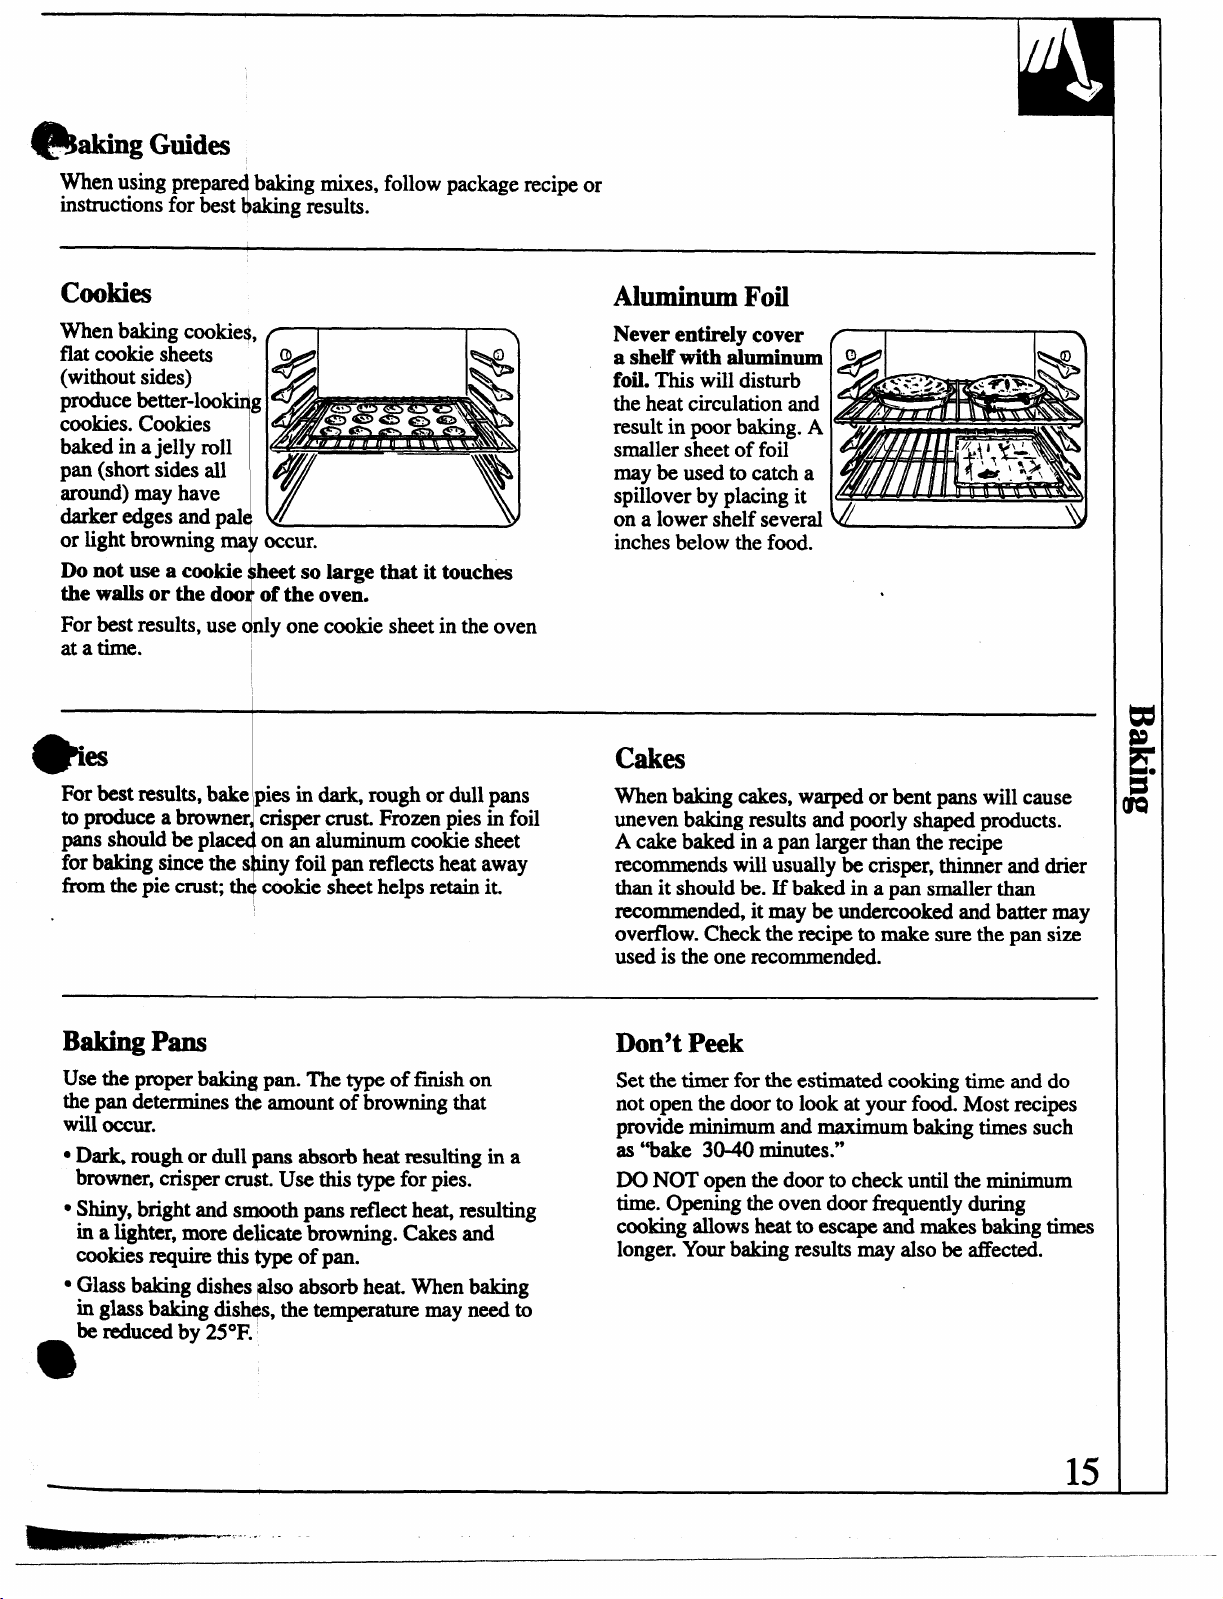
When baking cookies,
flat cookie sheets
(without sides)
produce better-loo~g
cookies. Cookies
baked in ajelly roll
pan (short sides all
around) may have
darker edges and pal
or light browning ma occur.
Do not use a cookie beet so large that it touches
the walls or the doo of the oven.
For best results, use c@lyone cookie sheet in the oven
at a time. I
‘es
*
For best results, bake pies in dark, rough or dull pans
to produce a browner crisper crust. Frozen pies in foil
paIISshould be pkc
for baking since thes
from the pie crust; th cookie sheet helps retain it.
.
I
!
~
on an aluminum cookie sheet
●
y foil pan reflects heat away
+
Aluminum Fofi
Never entirely cover
a shelf with aluminum
foil. This will disturb
the heat circulation and
result in poor baking. A
smaller sheet of foil
may be used to catch a
spillover by placing it
on a lower shelf several
inches below the food.
●
cakes
When baking cakes, warped or bent pans will cause
uneven baking results and poorly shaped products.
A cake baked in a pan larger than the recipe
recommends will usually be crisper, thinner and drier
than it should be. If baked in a pan smaller than
recommended, it maybe undercooked and batter may
overflow. Check the recipe to make sure the pan size
used is the one recommended.
Baking Pans
Use the proper baking pan. The type of finish on
the pan determines the amount of browning that
will occur.
QDark rough or dull ~ans absorb heat resulting in a
browner, crisper cru$t. Use this type for pies.
● Shiny, bright and smooth pans reflect heat, resulting
in
a lighter, more de~cate browning. Cakes and
cookies require this type of pan.
● Glass baking dishes @o absorb heat. When baking
in glass baking dishqs, the temperature may need to
be l&dUCedby 25”F.
e
------. -
Don’t Peek
Set the timer for the estimated cooking time and do
not open the door to look at your food. Most recipes
provide minimum and maximum baking times such
as “bake 3040 minutes.”
DO NOT open the door to check until the minimum
time. Opening the oven door fiquently during
cooking allows heat to escape and makes baking times
longer. Your baking results may also be affected.
15
 Loading...