


GE JT952WF8WW, JT952CF8CC, JT952BF8BB, JT912WF8WW, JT912WF7WW Owner’s Manual
...
ge.com
Safety Instructions ......... 2-4
©
Opera6ng Instructions
Clock and Timer . ........... 12
Control Lockout ............ 12
Controls .................... 5
Convection .............. 15-17
Oven .................. l 0, l l
Probe .................. 14, 1 7
Sabbath Feature ............. 9
Self-Cleaning Oven ....... 20, 21
Special Features ............ 6-8
Thermostat ................ 19
Timed Baking
and Roasting ............ 13, 18
Care and Cleaning
Broiler Pan and Grid ......... 24
Cleaning Oven Door . ........ 23
Control Panel .............. 25
Lift-Off Oven Door .......... 23
Light Bulb ................. 22
Oven Floor . ............... 23
Probe ..................... 24
Removing Packaging Tape .... 22
Shelves .................... 24
Stainless Steel Surfaces ....... 25
JT912-30" Single }Dtll Oven
JT952-30" Double Wall (kJen
Troubleshooting Tips ..... 26-28
Consumer Support
Consumer Support . . .Back Cover
Product Registration ...... 29, 30
_'arranty .................. 31
Writethemodelandserial
numbershere:
Model #
Serial #
You can find them on a label
on the fl'ont of the oven behind
the oven door on single oven
models, or the fl'ont of the lower
oven behind the oven door on
double oven models.
49-80333 11-05JR
iMPORTANTSAFETYiNFORMATiON.
READALLiNSTRUCTiONSBEFOREUSING.
WARNING!
For your safe_, the information in this manual must be followed to minimize the risk of fire or
explosion, electric shock, or to prevent property damage, personal injury, or loss of life.
IMPORTANTSAFETYNOTICE
The California Safe Drinking Water and ToxicEnforcement Act requires the Governor of California
to publish a list of substances known to the state to cause cancer, birth defects or other reproductive
harm, and requires businesses to warn customers of potential exposure to such substances.
The fiberglass insulation in self-clean ovens gives off a very small amount of carbon monoxide during
the cleaning cycle. Exposure can be minimized by venting with an open window or using a ventilation
fan or hood.
SAFETYPRECAUTIONS
When using electrical appliances, basic safety precautions should be followed, including the
foliowing:
_?{:;Use this appliance only fbr its intended
purpose as described m this )wner s
Manual.
_i_Be sure _our appliance is properly
installed and grounded by a qualified
mchnician in accordance wifl_ the
provided installation insuucuons.
Ji:,:Do not attempt to repair or replace any
part of your oven unless it is specifically
recommended in this manual. All other
servicing should be refexTed to a qualified
mchnician.
_?{:_Have the installer show you the location
of the cfivuit breaker or fl]se. Mark it fox
easy reference.
_?{:_Before performing any service, disconnect
the oxen power supply at the household
distribution panel by xemoving the flxse or
sx_,itching off the circuit breaken
Ji:,:Do not leaxe children alone----_'hildren
should not be left alone or unatmnded ira
an area where an appliance is in use. They
should never be allowed to sit or stand on
any part of the appliance.
_{;_Do not allow anyone to climb, stand or
hang on the doon They could damag> dxe
oven, or cause severe personal injm>
_i_Be sure the oxen is securely installed in
a cabinet flint is fil3nlv attached to file
house stx'HctHI'e. Never a]low arryone to
climb, sit, stand or hang on the oven doon
Ji:,:Ne_er leave the o_en door open when you
are not watching the oxen.
_:;Always kee I) combustible wall cox_ring,
curtains or drapes a sad distance flom
yOrXI" oxen,
_?{:_AlwWs kee I) dish towels, dishcloths, pot
holders and oflmr linens a sad distance
flom your ox>n.
ji:,iAlwWs kee I) wooden and plasuc umnsils
and canned food a sad distance away
flom your oven.
ji:,iTeach children not m p]W with the
controls or any other part of flxe ox>n.
_?{:_i,arge scratches or impacts m glass doors
can lead to broken or shatmxed glass.
2
WARNING!
SAFETYPRECAUTIONS
ge.com
{7_:Do not store flanm/able materials in
an oxen.
_i:,iCAUTION: Iten/s of interest to
children should not be stored in cabinets
aboxe an oxen; children clin/bing on tile
oxen to reach items could be seiionsly
ii_jnred.
_{::Never wear loose-fitting or hanging
garments while using file appliance. Be
careflll when reaching for items stored in
cabinets over file ox.en. Flamn/able mamfial
could be ignimd if brougtlt in contact with
hot surfaces or heating elements and mac
cause se\.ere 1)nT/ls.
_7{;:Use only di T pot holders--moist or damp
pot holders on hot sni/aaces may result in
b/nils flom steam. Do not let pot holders
touch hot heating elen/ents. Do not use a
towel or other bnlkv cloth.
i_i:i_For _our safety, nexer use your appliance
tbr wam/ing or heating tile room.
E:,:Do not let cooking grease or other
flammable materials accnnnllate in or
near tile oxen.
E:,IDo not use water on grease fires. Nexer pick
up a flaming pan. T/llrl tile controls off'.
Flame in the ox.en can be smodlered
completely by closing tile oven door and
turning tile oven off or by using a mnlti-
pnq)ose dU chemical or foam-type fii.e
extinguisher
_{;_Do not touch tile heating elements or tile
inmrior surPace of tile ox.en. These surPaces
may be hot enough to 1)nn_ e',.en thougtl
thev ai.e dark in colon Dining and after
use, do not much, or let clothing or oilier
flammable mamrials contact any interior
ai.ea of tile ox.en; allow snfficient tin/e for
cooling first.
Potentially hot surPaces inchlde oven \.ent
openings, snrPaces near tile openings,
crevices around the oven dooi, the edg.es
of the window and metal tIin/ parts abox.e
tile door.
REMEMBER:The inside surPace of tile o_en
may be hot when tile door is opened.
_;:Nexer lemejars or cans of/Cat diippings in
or Ileal vonr o_en.
_{;_Do not store or use combustible mamlials,
gasoline or other flammable vapors and
liquids in the vicinity of this or anv other
appliance.
_{;_Stand away flom tile oxen when opening
tile oxen door. Hot air or steam which
escapes can cause bums to hands, face
and/or eyes.
E:,IDo not heat unopened food containers.
Pressure could build up and tile container
could burst, cansing an iiIjn U.
_? Kee I) tile oven xent unobstructed.
'_!{i;Kee I) tile oxen flee fion/grease buildup.
q_{::Place the oxen shelf in tile desired position
while tile oxen is cool. If shelxes mnst be
handled when hot, do not let pot holder
contact tile heating elen/ents.
;f; When using cooking or roasting bags in the
oxen, follow tile mannfltctnrer's directions.
E:,IPulling out the shelf to file stop-lock is a
comenience in lifting heax T foods. It is also
a precantion against bnrlls fiom tonching
hot surfaces of tile door or oxen walls.
_{;_Do not use tile oxen to di T newspapers.
If oxerheated, they can catch on fire.
_{;;Do not use the oxen for a storage area.
Iten/s stored in an oxen can ignite.
E:,:Do not leme paper products, cooking
utensils or fbod in tile oxen when not
in use.
_{;:After broiling, always take tile broiler pan
out of tile oxen and clean it. ieftoxer
grease in tile 1)roller pan can catch fire
next tin/e you use the pan.
_{;:Clean only parts listed in this Owner's
Manual.
_;:Do not use aluminnn_ foil to line oxen
bottoms, except as sugg.ested in this n/annal.
In/proper installation of aluminnn/foil may
resuh in a risk of electric shock or fire.
3
IMPORTANTSAFETYINFORMATION.
READALLINSTRUCTIONSBEFOREUSING.
COOKMEATANDPOULTRYTHOROUGHLY.,.
Cookmeatandpoultry thoroughly--meat to at least anINTERNALtemperatureof 160°Fandpoultry
toat least an INTERNALtemperatureof 180%-Cookingto thesetemperaturesusuallyprotectsagainst
foodbomeillness.
SELF-CLEANINGOVEN
;fi:,iDo not clean the door g'asket. Tile door
gasket is essential tbr a good seal. Care
should be token not to rub, damag_ or
mow tile gasket.
_:_Do not use oven cleaners. No comme_via]
ox>n cleaner or oxen liner promctive
coating of aW kind should be used in or
around any part of the oxen. Residue flom
oxen cleaners will damage the inside of the
oxen when tile self-clean cycle is used.
_i:,:Be%re self-cleaning d_e oxen, remove die
broiler pan, giid and other cookware.
_?{:_Be snie tO wipe up excess spillage before
stardng tile self-cleaning operation.
;_i:,:If the self-cleaning mode malflmcuons,
um_ file oxen off and disconnect tile power
supply. Have it serviced by a qualified
mchnician.
READANDFOLLOWTHISSAFETYINFORMAtiONCAREFULLY.
SAVETHESEINSTRUCTIONS
4
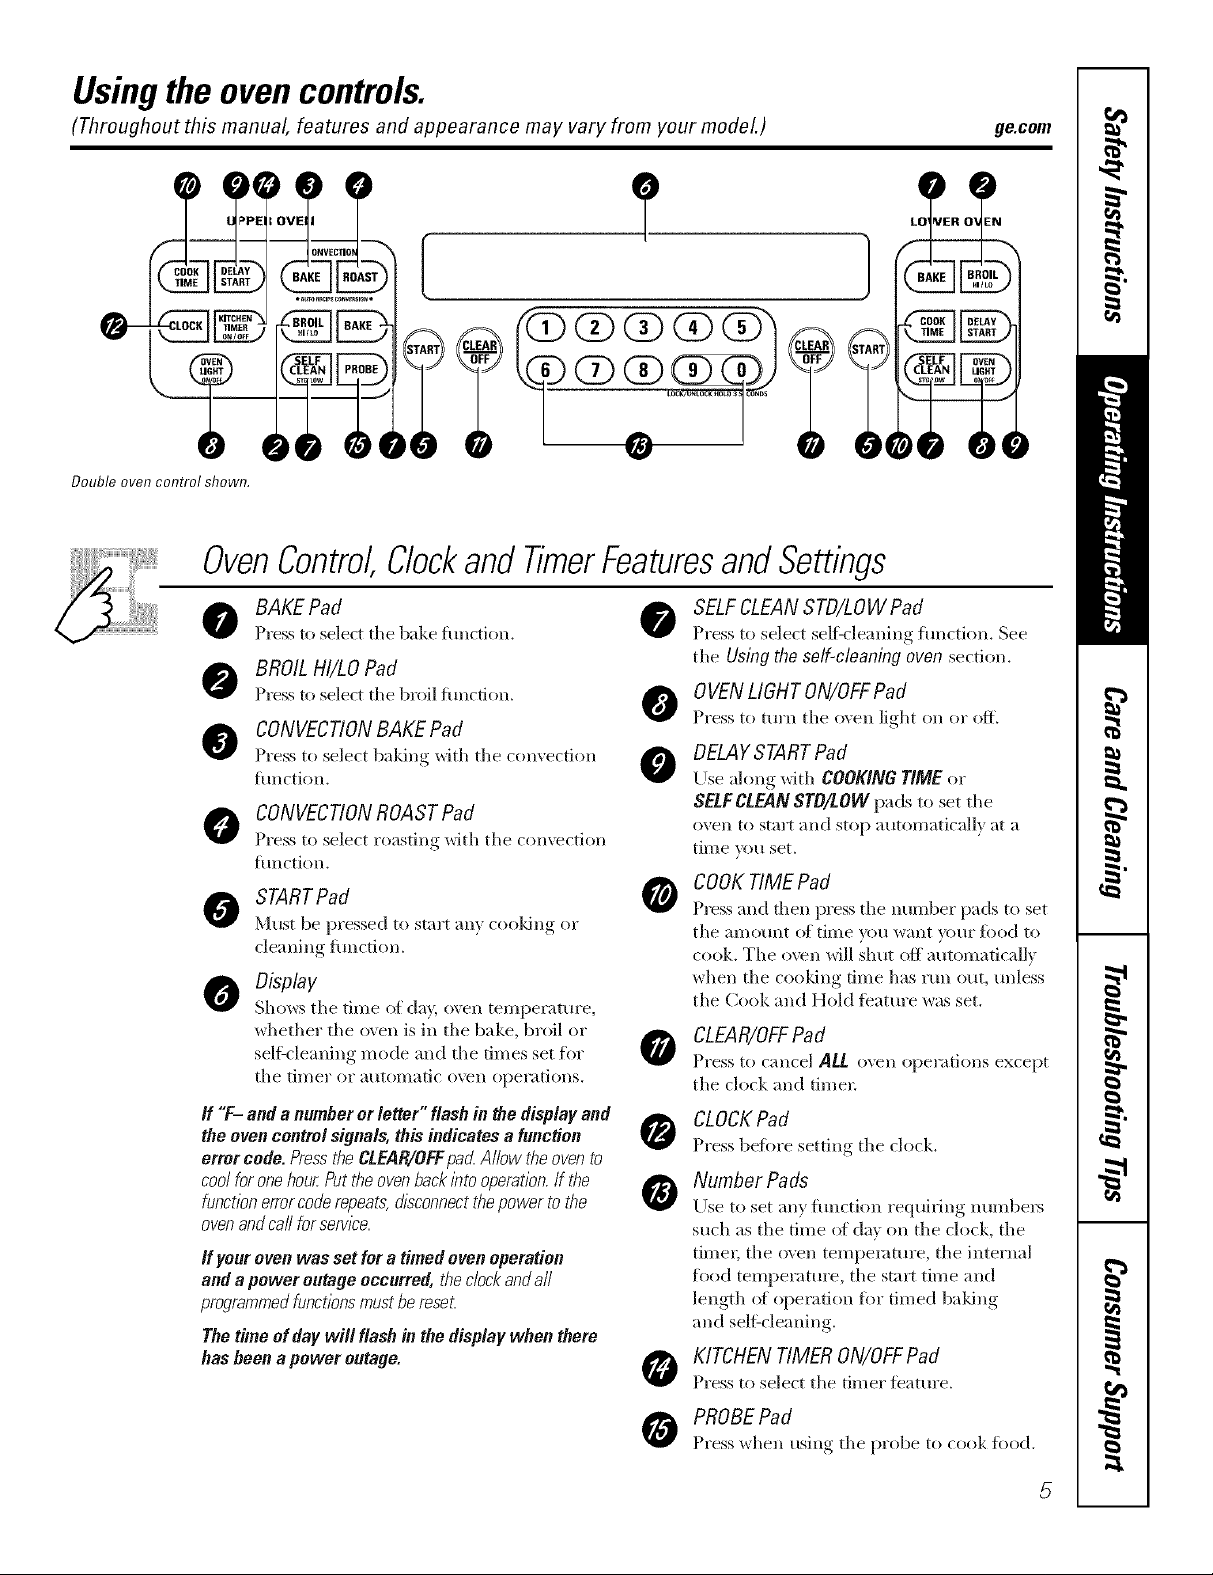
Usingthe ovencontrols.
(Throughout this manual, features and appearance may vary from your modeL)
Doubleovencontrolshown.
OvenControlClockand TimerFeaturesandSettings
]
OVEN
LIGHT
ge.com
BAKE Pad
Pl'ess to select tile bake function.
BROIL HI/LO Pad
}5"essto select file b_'oil fun(fion.
CONVECTIONBAKEPad
Press to select b'ddw, with tile convection
function.
CONVECTIONROASTPad
PIess to select l'oasting with tile convection
function.
STARTPad 0
Must be pl'essed to start an> cooldng or
cleaning function.
Display
Shows tile time of day, oxen temperatm'e,
whether tile oven is ill tile bake, broil o_"
self'cleaning mode and tile times set for
tile til/lel" oF atltoi/latic oven opel';ttions.
ff "T- anda numberorletter"flashin thedisplayand
the ovencontrolsignals,thisindicatesa function
error code.PresstheCLEAR/OFFpad.Allow theovento
coolforonehou_Puttheovenback/btooperation./fthe
functionerrorcoderepents,disconnectthepowertothe
ovenandcallforsefvl_e,
If your oven was set for a timed oven operation
and a power outage occurred, thedock andall
programmedfunctionsmust be reset
Thetimeof daywill flashin thedisplaywhen there
hasbeena poweroutage.
SELFCLEANSTD/LOWPad
Press to select selfkleaning function. See
tile Using the self-cleaning oven section.
OVENLIGHT ON/OFFPad
Press to turn tile oven light on or off.
DELAYSTARTPad
[!se along *dth COOKING TIME or
SELFCLEAN STO/LOW pads to set tile
oven to stm't and stop automaticall} at a
time _ou set.
COOKTIME Pad
Press and then press tile numbel" pads to set
tile alllOtlnt of [illle yell want V(}[lI" _k)t)d to
cook. The oven will shut off automatically
when the cooldng time has run out, unless
the Cook and Hold ibature was set.
CLEAR/OFFPad
Press to cancel ALL oxen operations except
tile clock and timer
CLOCKPad
Press befiwe setting tile clock.
Number Pads
0
Use to set any flmction requiting numbel_
such as the time of day on tile clock, tile
timeI; tile oven tempenlture, tile internal
fl)od temperature, tile staiqt time and
length of operation %r timed baldric
and seli_cleaning.
KITCHEN TIMER ON/OFFPad
Pl'ess to select tile timer ib;fftll'e,
PROBEPad
}q'esswhen usino,_ tile pl'obe to cook fbod.
5
Special features of your oven control.
Your new touch pad control has additional features that you may choose to use. The following are the features
and how you may activate them.
The special feature modes can only be activated while the display is showing the time of day. Theyremain in
the control's memory until the steps are repeated.
When the display shows your choice, press the STARTpad. The special features will remain in memory after
a power failure, except for the Sabbath feature, which will have to be reset.
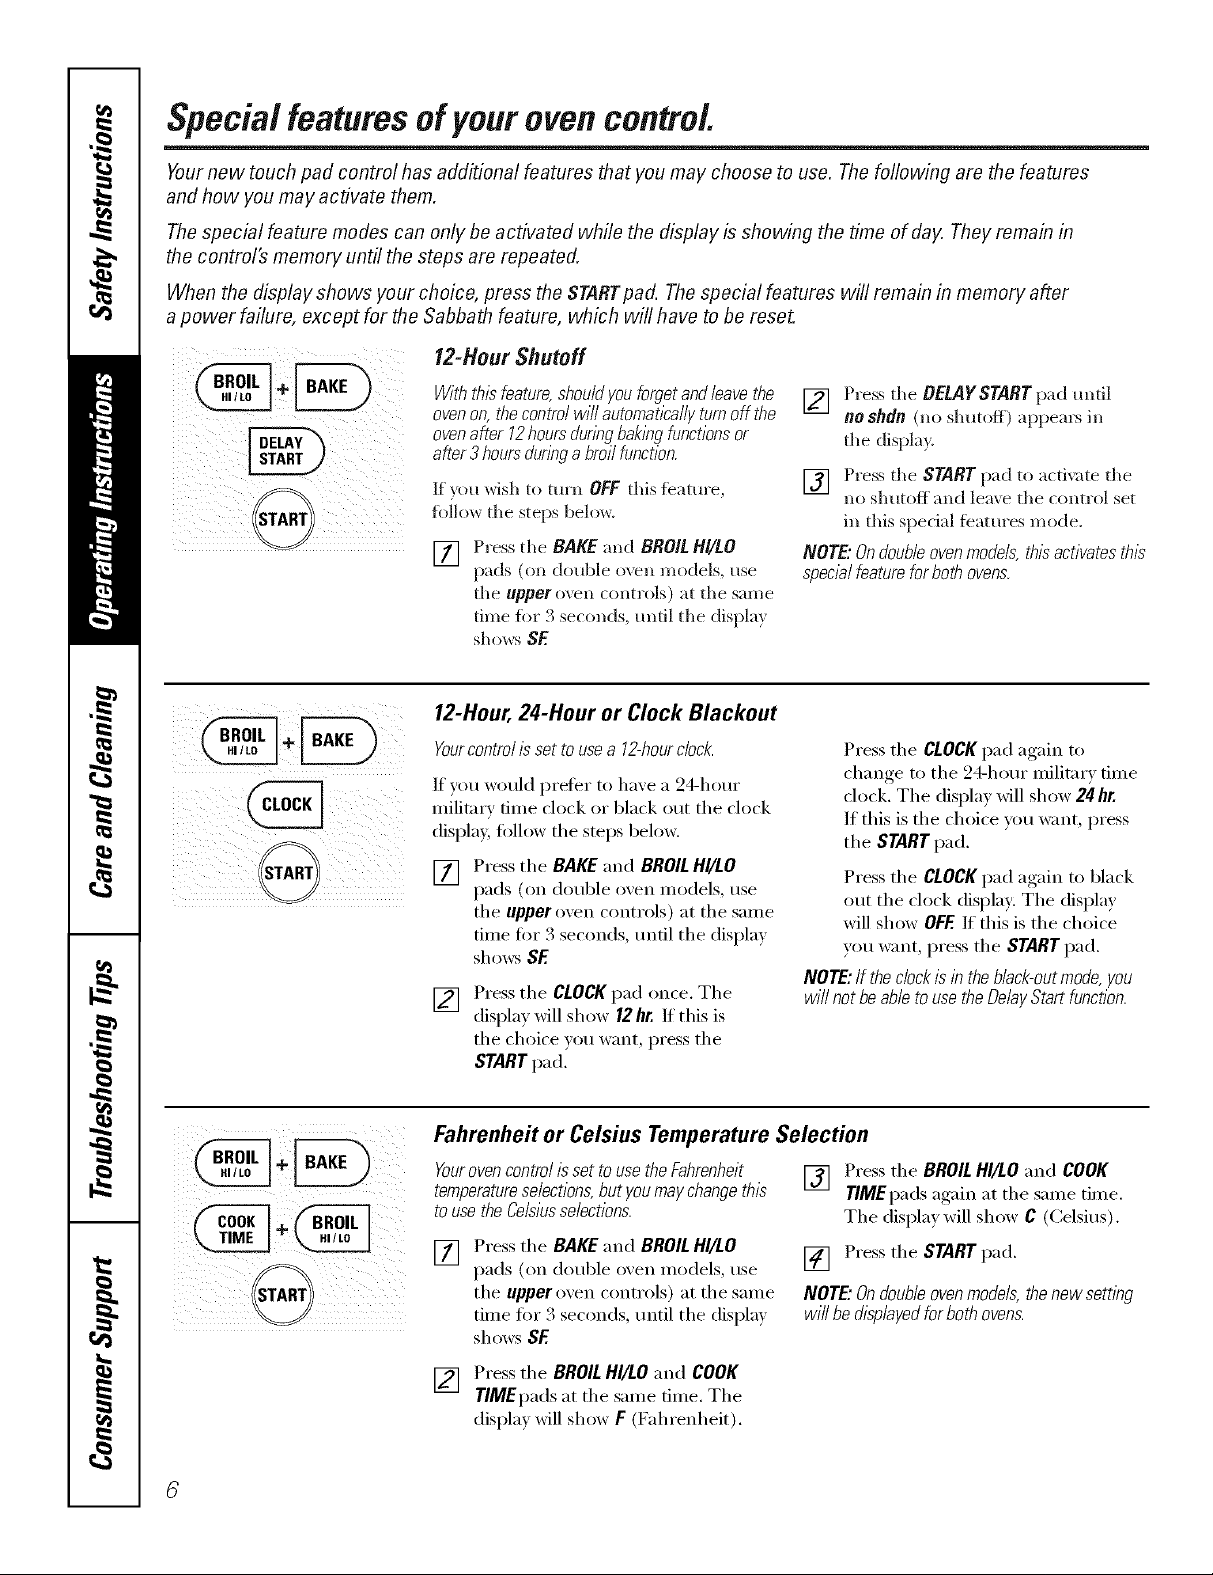
12-Hour Shutoff
VViththisfeatura,shouldyouforgetandleavethe
ovenon,thecontrolwillautomat/2allyturnoffthe
ovenafter12hoursdunngbak/bgfunctionsor
after3 hoursdunbga broilfunction.
If )ou wish to turn OFF this feature,
fi)lh)w the steps below.
[] Press tile BAKE and BROIL HI/LO
pads (on double oven models, use
tile upper o_,ell controls) at tile same
• • Q •
tm_e fl)r ._ seconds, until tile displa}
sho_s SE
12-Hour, 24-Hour or Clock Blackout
Yourcontrolissetto usea 12-hourclock.
If you would prefer to have a 24-hour
military time clock or black out the clock
display, fi)llow the steps beh)w.
Press the BAKE and BROILHI/LO
[]
I
pads (on double oven Inodels, use
the upper oven controls) at the same
time fi)r 3 seconds, tmfil the display
shows SE
Press the CLOCKpad once. The
[]
display will show 12hr. If this is
the choice )ou want, press the
STARTpad.
[] Press tile BELAYSTART pad tmtil
no shdn (no shutoff) appem5 in
tile display.
[] Press tile START pad to activate tile
no shutoff and lem'e tile control set
in this special _eatures mode.
NOTE"Onfloub/eovenmodels, this activates this
specialfeature forboth ovens.
Press the CLOCKpad again to
change to the 24-hour military time
clock. The display will show 24 hr.
If this is the choice you want, press
the START pad.
Press the CLOCKpad again to black
out the clock display: The display
will show OFF.If this is the choice
you want, press the START pad.
NOTE:If the dock is in the b/ack-outmode, you
wi// not be able touse the Delay Start function.
ii i
Fahrenheit or Celsius Temperature Selection
Yourovencontrol is set touse the Fahranheit
temperatureselections,but youmay changethis
touse the Celsiusselections.
Press the BAKE and BROILHI/LO
[]
pads (on double oven Inodels, use
the upper o_en controls) at the same
time fl)r 3 seconds, tmtil the (lispla._
shows SE
[] Press the BROILHI/LOand COOK
TIMEpads at the same time. The
display will show F (Fahrenheit).
[] Press the BROIL HI/LO and COOK
T/MEpads again at the same time.
The displa)will show C (Celsius).
[] Press the START pad,
NOTE"Ondoubleovenmodels,thenewsett/bg
wi//bedisplayedforbothovens.

Tonesat the End of a Timed Cycle
At theend ofa timedcycle,3short beepswill
sound followedbyonebeepevery 6 seconds until
the CLEAR/OFFpadis pressecLThiscontlbuous
6-secondbeepmay be cancelecL
To cancel the G-second beep:
[]
pads (onPress the BAKEdoubleandovenmodels useBROILHI/LO
tile uppero\'en rontrols) ;it tile s;m_e
time lk)r 3 seronds, until the display
shows SF.
Tone Volume
_.C_
(continuous beep). Press the
KITCHEN TIMER ON/OFFpad
again. The display shows BEER
(This cancels the one beep every
6 seconds.)
[] Press the START pad.
NOTE: Ondouble ovenmodels,thiscancels the
end-of-cycletoneforboth ovens.
Thisfeatureallows youto adjust the tone
volumesto a moreacceptable volume. Thereare
three possible volumelevels.
[] (on doublePress the BAKEandBROIL.eI_ models, useHI/LOpadSthe
upper oven rontrols) at the same
time for 3 seronds, until the display
shows SF.
[] ThePresSdisplaywill show 2 BEEP.This istlle OVENLIGHT ON/OFFpad.
the middle \'olt/me level.
Press the OVEN LIGHT ON/OFFpad
again. The display will show 3 BEEP.
This is the loudest \'olt/me level.
Auto Recipe TM Conversion (on somemodels)
Whenus/bgconvectionbake, the Auto RecipeTM
Conversionfeaturewill automab_a/// convert
entered regularbaklbgtemperaturesto
convectionbaklbgtemperatures.
Thisfeatureis activatedso the d/spla/
will show the actual converted(reduced)
temperature,Forexample,if /ou enter a regular
recipe temperatureof 350°Fand press the
STARTpad, the d/splay will show CON
and theconvertedtemperatureof 325°£
NOTE: Th/sfeaturedoes not convertconvection
bakecook/bgOknes,only regularbak/bg
temperatures.
Press the OVEN LIGHTON/OFFpnd
again. The display will show I BEEP.
This is the quietest \'oltune level.
For earh time the level is changed,
a tone will sound to p_>vide an
indiration of the volmHe le\'el.
[] (/Choose fl_e desiredsoundBEEP' 2BEEP, 3BEEP). levd
[] desired level shown,press the START pad to arfi\'nte the
NOTE:On doubleovenmodels, thisactivates this
special feature for both ovens.
Todeactivate the feature:
[] padsPressthe BAKE:u_Cl(o_doubleove_ models,BROIL i'll/LOuse
the upper oven controls) at the
same time ik_r 3 seconds, until the
displ:_,' shows SE
[]
The dispE_ythegONVECTIONwillt'_'essBAKEpa_l.showCON ON. Press
the gONVEgTION BAKE pad :_g:_in.
The dispE_y will show CON OFF.
Press the START pad.
[]
T(>reartix;_te the tb:_ture, repeat steps 1-3
above but press the STARTpad whe_
CON ONis in the displa>
Special featuresofyourovencontrol
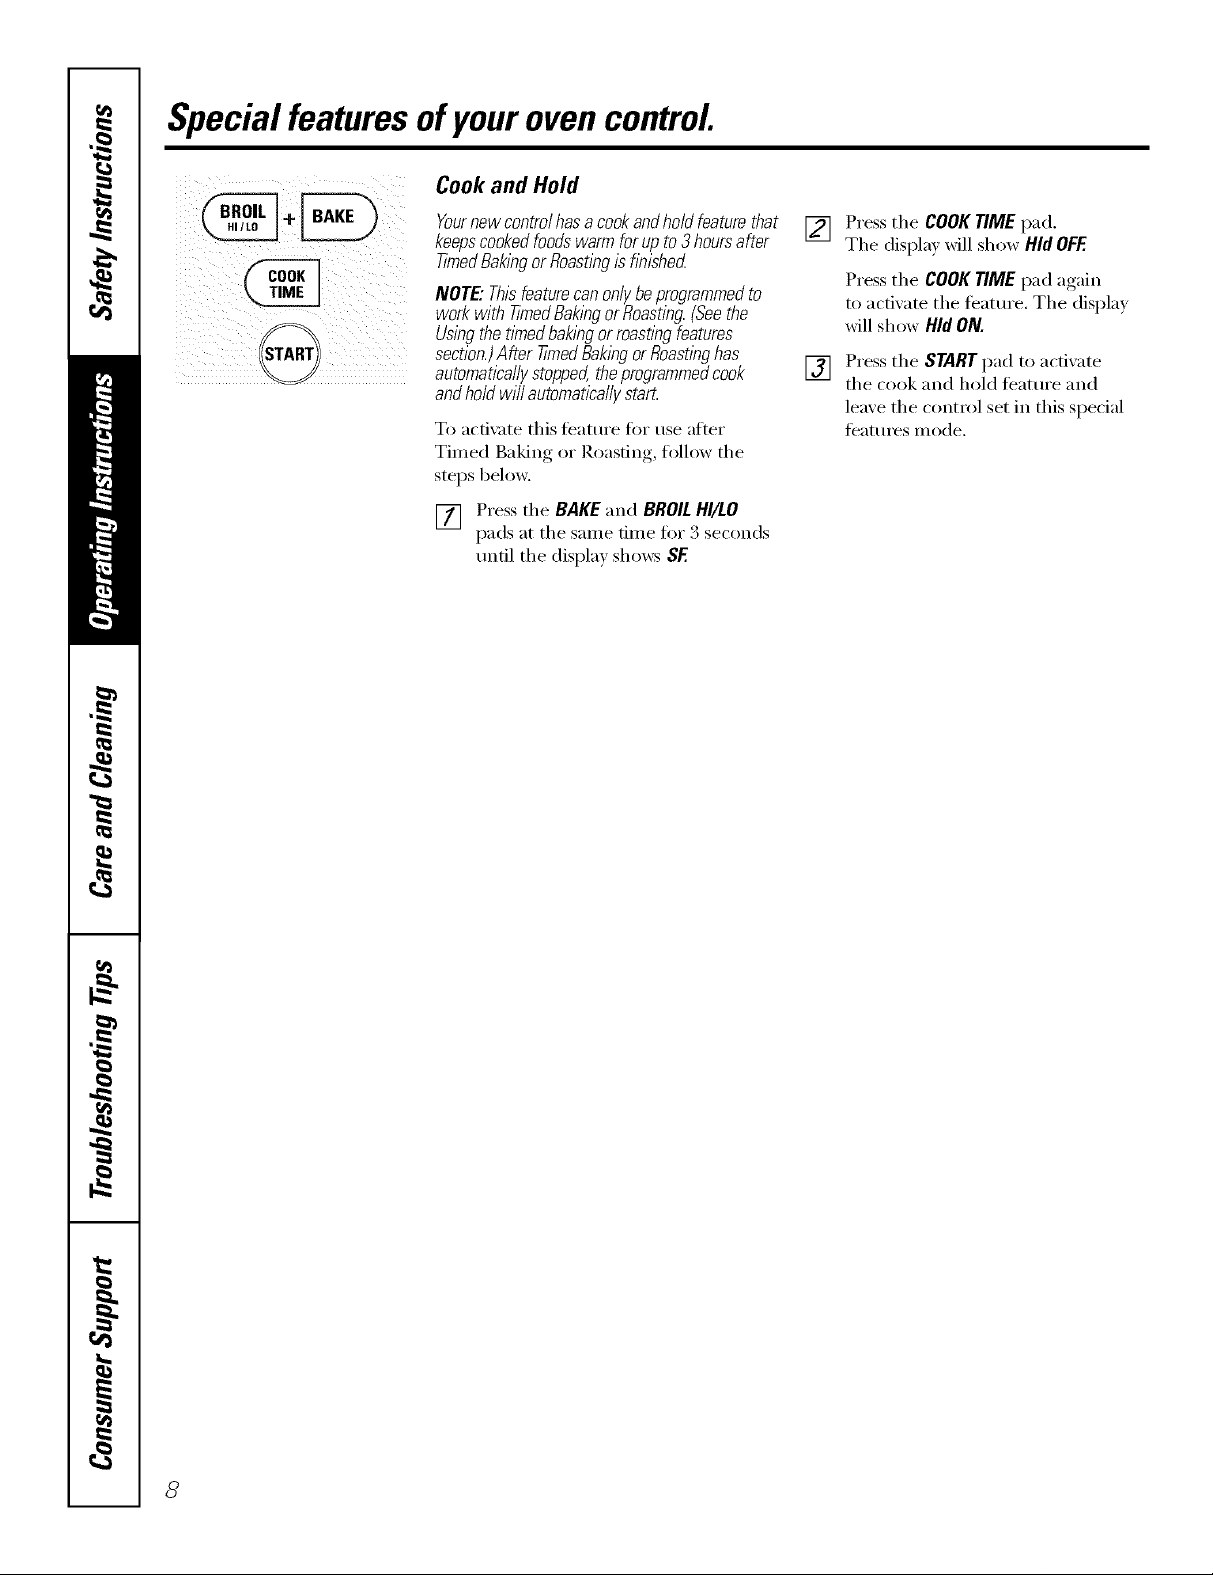
Cook and Hold
Yournewcontrolhasacookandholdfeaturethat
keepscookedfoodswarmforupto3hoursafter
tinnedBakingor Roastingis hnished
NOTE."Thisfeature can onlybeprogrammed to
work with tinnedBakingor Roasting.(See the
Usingthe tlYnedbaking or roasting features
section.)After timed Bakingor Roastinghas
automaticallystopped, the progremmedcook
andhold will automatically start.
To acfi_ Ke this teatm'e ti)r use after
Timed Baking or Roasting, follow the
steps below.
[] Press the BAKEand BROILHI/LO
pads at the sanle finle fi)r 3 seconds
until the display shows SE
[] Press the COOKTIMEpad,
The displa_ xd}l show Hid OFF.
Press the COOK TIMEpad again
to actixate the teatm'e. The displa_
will show Hid ON.
[] Press the START pad to activate
the cook and hold teatm'e and
leave the control set in this special
teatm'es mode.
Usingthe SabbathFeature.
(Designedforuseon theJewish SabbathandHolidays.)(onsomemodels) ge.com
TheSabbathfeature can be usedfor baking/roastingonlg Itcannotbe usedfor convection,broiling, self-cleaningor
DelayStart cooking.
NOTE:Theovenlight comesonautomatically(on somemodels)when thedoor is openedandgoes off whenthe door is closed.
Thebulbmaybe removed.Seethe OvenLightReplacementsection.Onmodelswith alight switch onthe controlpanel, the oven
lightmaybe tumedon andleft on,
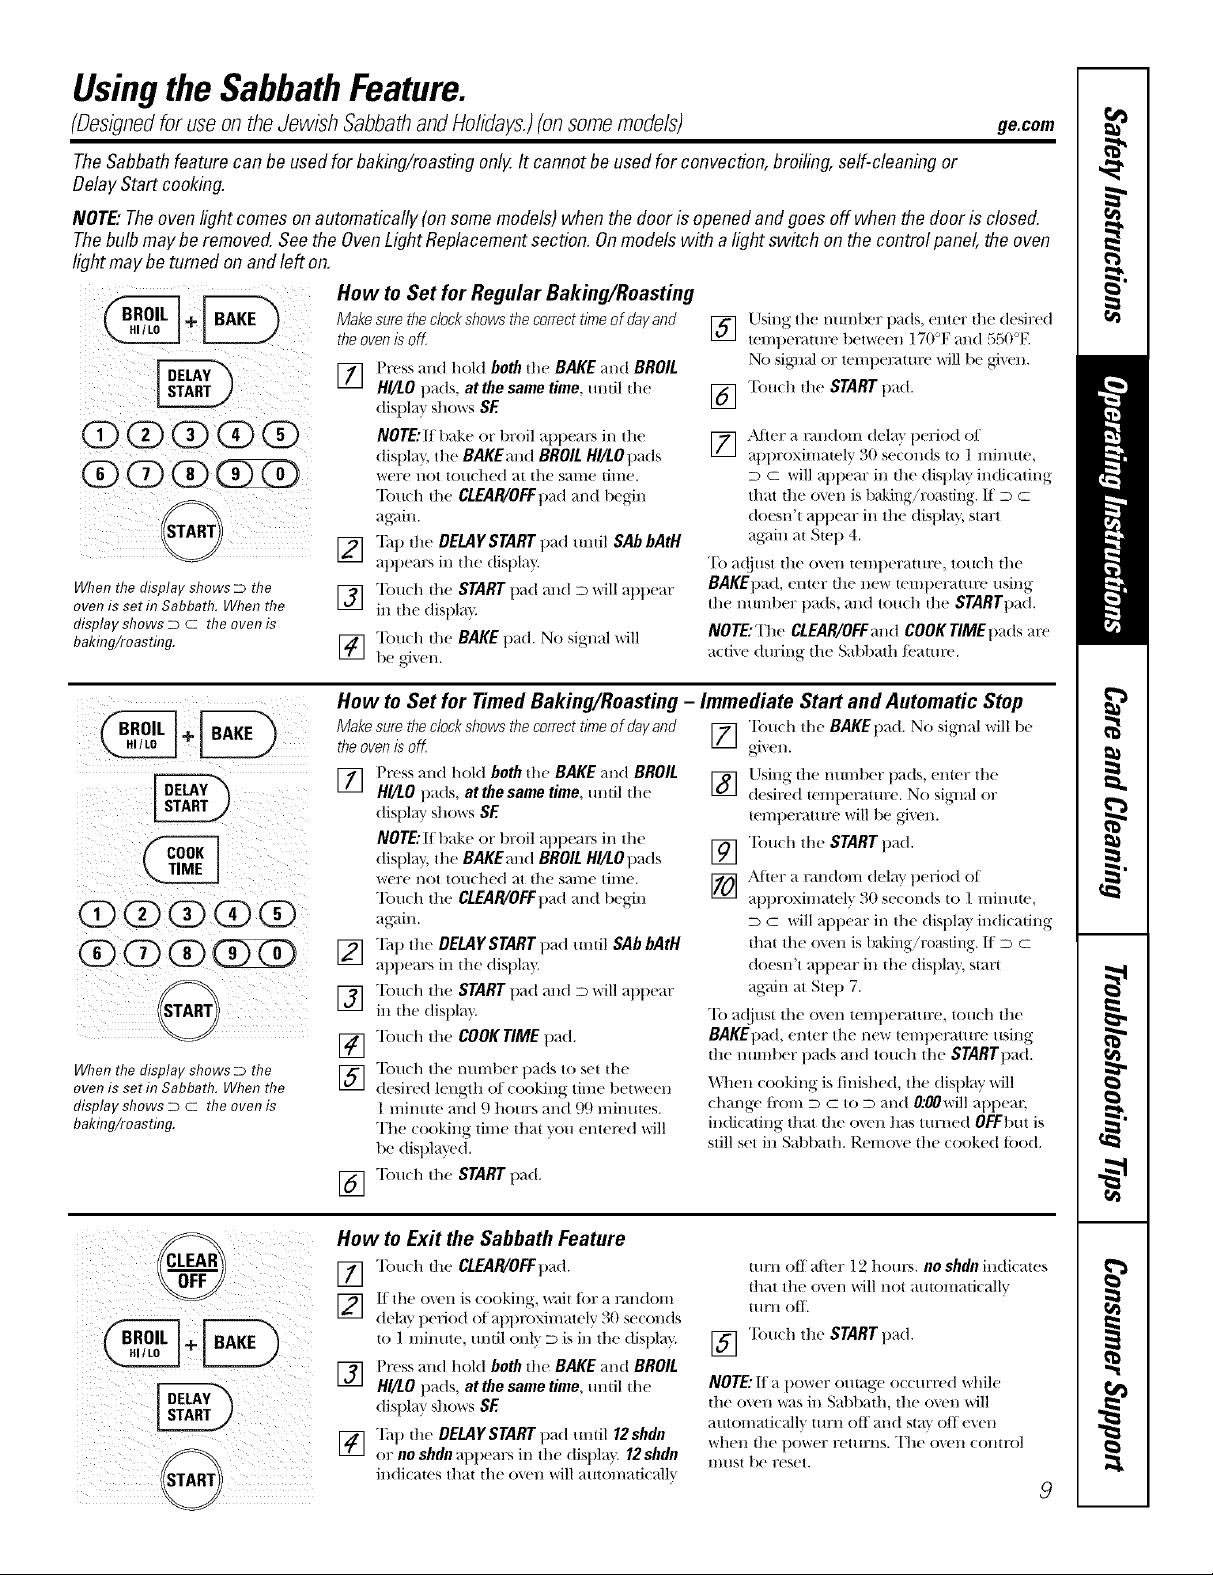
How to Set for Regular Baking/Roasting
ODO 0 (i) @
@ @@
When the display shows D the
oven is setin Sabbath. When the
display shows D C the oven is
bakhTg/roasting.
Make sure the clock shows the correct timeof dayand
the ovenis off
VTI Press and hold both th( BAKE and BROIL
Ill
HI/LO t)_ds, at the same time, until the
disl)l m shows SE
NOTE: If bake or broil al)pears ill the
dist)h % the BAKEand BROIL HI/LOt)ads
were Hot touched at the same time.
Touch tile CLEAPJOFFt)ad and 1)egin
[_] "].q) the DELAYSTART t_(t mltil SAb bAtH
al)l)em:s in the dist)la" _
] Touch the START pad and D will at)l)ear
in the (tist)la)
] ]buch the BAKE pad. No signal will
1)e _Jvel/.
Llsing the nmnlxw t)ads, enter dm (lesired
] temt)el_dmre t)erween 170'q; mid 550°E
No sig_l_d or tel//t)el_dtllre will be gJx+ell.
] Tou(h the START t)ad.
[_ ?dter a random dela} t)eriod oI
at)l)1 oxim_tely 30 se((mds to 1 minute,
D C will appear in the dist)lay indi(_ting
that the oven is baking/roasting. If D C
doesn't _q)l)em: in the dist)lay, start
ag_dn al Step 4.
To a(!just the oven teml)erature , touch il/e
BAKEpad, emer die new teml)eramre using
the numt)er pads, alld touch the SrARrt)ad.
NOTE: The CLEAR/OFFm ld COOKTIME l)ads are
a(tive during th(' Sabbath/('atm'e.
When the display shows D the
oven is setin Sabbath. When the
display shows D C the oven is
bakhTg/roasting.
How to Set for Timed Baking/Roasting - Immediate Start and Automatic Stop
Make sure the clock shows the correct timeof dayand [] "lbu(h the BAKE t)ad. No signal will 1)e
the ovenis off. given.
] I'ress and hold both the BAKE and BROIL
HI/LO pads, at thesame time, mltil die
display shows SE
NOTE:Ill)ake or broil al)t)e;u_ ill the
dist)h% r,the BAKEand BROIL H//LOt)a(ls
were I/Or touched at the same time.
Touch the CLEAR/OEEt)ad mad begin
ag_ain.
I_] "lht) the DEMYSTART pad mltil SAb bAtH
al)l)ears ill the dist)l @
] "Ibuch the START pad and D will at)t)ear
in the dist)lay.
[_] "lbuch tlle COOKTIME pad.
] "Ibu(h the ntmfl)er t)ads to set the
desired length of cooking time t)etweell
1 minute and 9 hours mid 99 minutes.
The cooking thne that you entered will
be disl)layed.
Tollch the STARTpad.
[]
Using the ntmg)er pads, enter the
[]
desired tenq)er_mn:e. No sig,m_dor
tel//l)e)7_tttllTe will 1)e gixen.
"lbuch the STARTt)ad.
[]
Af{er a rm/(ton/delay t)eriod of
[]
_q)l)roxhnatel'_ 30 seconds to 1 mintlte,
D C will al)t)ear in tile (tisl)la } indicating
that tile o\en is baking/roastiIlg. II D c
doesn't appear in the dist)lm', start
again at Step 7.
To a(!iust tile oven teml)eramre, touch the
BAKEI)ad, enter tile new teml)eramre using
tile tmmber pads and touch tile STARTpad.
When cooking is finished, the (lisl)h ff will
change fi'om D c to D and 0;00 will al)l)ear
ill(li(atillg that the o_.ell tills ttlrl/e(t OFFbut is
still set in Sat)bad/. Remo\e the cooked tood.
How to Exit the Sabbath Feature
] "lbu(h dw CLEAR/OFFp_d.
] lI the ox eH is cooking, wail tbr a rm/dom
dela} period of _q)l)roxinlately 30 se(onds
to 1 mira,e, m/til onh_ D is in the display.
[_] I)ress and hold both the BAKE and BROIL
iJi
HI/LO t)_l(ts, at thesame time, tmtil the
disl)l @ S] _( )_rs SE
I_ "]hp die OELAYSTART p_,d umil 12shdn
i/i
or no shdn ap1)em:sill the dist)la _, 12shdn
in(li(_tes that the oxell will m.omaticalh
turn off _fft(r 12 hours, no shdn indicates
that the oxen '+*,rillnot at_tomaticallv
Hlrll ( )_[['.
] "lbu(h the START pad.
NOTE:II a t)ower outage occurred while
tile oven x+_s in Sabbath, the ovcn will
;+Hltolnaticallv ttlrll ott }tl/d st}iv oil evell
whell the t)ower rettlrl/s. "I]le ovell ( OlltI'ol
IlIIIS[ be reset.
9
Usingthe oven.
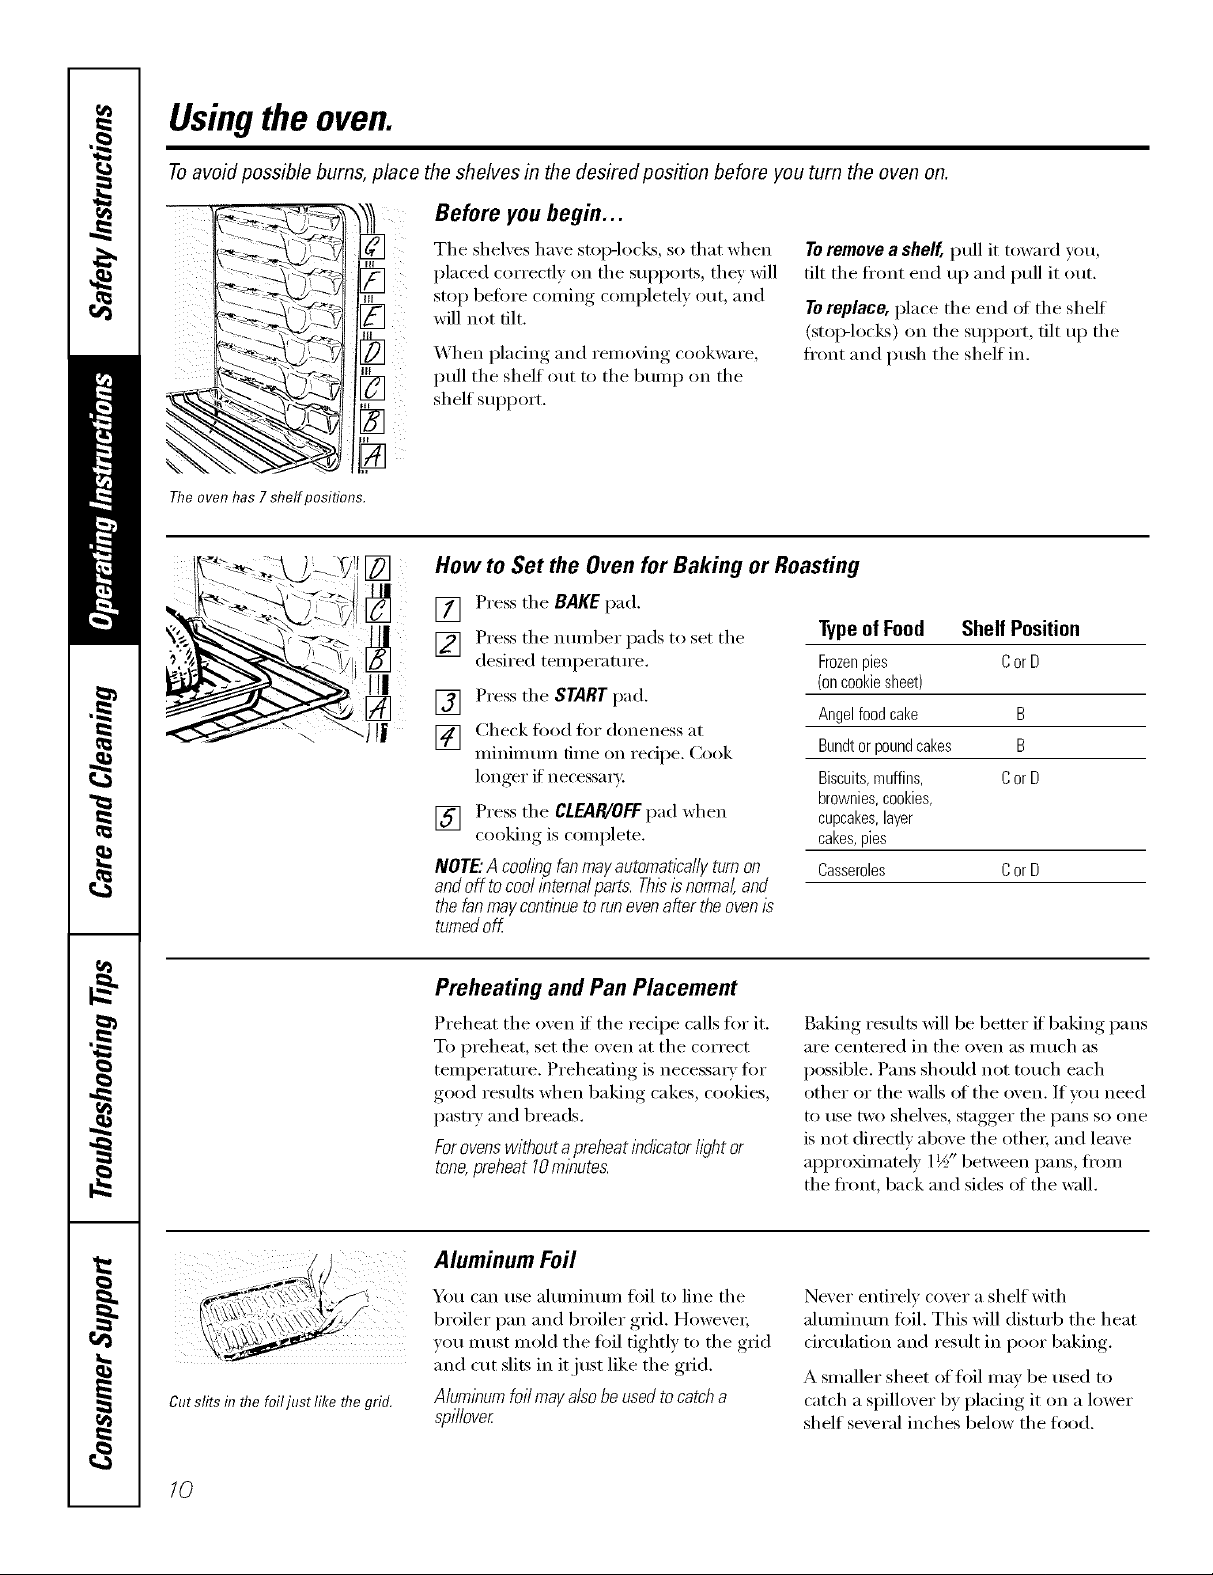
Toavoid possible bums, place the shelves in the desired position before you turn the oven on.
Before you begin...
_ g in
The oven has7 shelf positions.
The sheb:es have stop-locks, so that when
placed correctly on the supports, they will
stop before coming completely out, and
will not tilt.
_Ahen I)lacin°-, and removing, cookware,
pull the shelf out to the bump on the
shelf support.
Toremove a shelf, pull it toward you,
tilt the fl'ont end up and pull it out.
Toreplace, place the end (ff the shelf
(stoi>locks) on the support, tilt up the
ti'ont and push the shelf in.
How to Set the Oven for Baking or Roasting
[] Press the BAKEpad.
] Press the nt/IllbeI" pads to set the
desired temperatm'e.
[] Press the STARTpad.
[] Check food for doneness at
minimmn time on recipe. Cook
longer if necessary,:
[] Press the CLEAP,/OEEpad when
cooking is complete.
NOTE'.Acooh)_gfanmayautomatl?allyturnon
andoff tocoolinternalparts.Thisisnormal,and
thefanmayconfl))ueto runevenaftertheovenis
turnedoff
Typeof Food Shelf Position
Frozenpies Cor D
(oncookiesheet)
Angelfoodcake B
Bundtorpoundcakes B
Biscuits,muffins, Cor D
brownies,cookies,
cupcakes,layer
cakes,pies
Casseroles Cor D
ii:il(
Cut slits in flTefoiljust like flTegrid.
10
Preheating and Pan Placement
Preheat the oven if the recipe calls fl)r it.
To preheat, set the oven at the correct
temperatm'e. Preheating is necessacv fl:,r
good results when baking cakes, cookies,
past_ T and 1)reads.
Forovenswithout a preheat i))dlcatorl/)ht or
tone,preheat 10ml)_utes.
Aluminum Foil
You can use ahmfinum foil to line the
broiler pan and broiler grid. However;
you must mold the fifil tightly to the grid
and cut slits in it just like the grid.
Aluminum foil mayalso be usedtocatcha
spillover
Baking results will be better if baking pans
are centered in tile oven _lS I//tlch _lS
possible. Pans should not touch each
other or the walls of the oven. If you need
to use two shelves, stagger the pans so one
is not directly above the othe_; and leave
approMmately 1½" between pans, fl'om
the fl'ont, back and sides ot the wall.
Never entirely cover a shelf with
ahmfinum toil. This Mll distm4) the heat
drculafion and result in poor baking.
A smaller sheet offlfil may be used to
catch a spillover by placing it on a lower
shelf several inches below the toed.
 Loading...