

Page 1
MicrowaveCookingCenter
Safewinstructions...................2-7
OperatingInstrudions,~ps
Aluminum Foil. .................. 7,23,26-28,30
Features..... ..................................................8, g
LowerOven................. ..........................2O.33
Baking... ..
Broiling. ...............................................28, 2g
ElectronicControls. ................................. 1I
Fan...,. ...... 10,20,21,24,26,28,31,32
Roasting.... .........................................26,27
Self-CleaningOven..... .....................30-33
Shelves... ...............
TimedBaking....................................23,24
MicrowaveOven..... ............................14-lg
CookingbyTemperature... ....................18
CookingbyTime...................................... 17
DefrostingbyTime.................................. 16
DoubleDutyTMShelf.............................. .. Ig
ElectronicControls.. ................................ 10
HoldTmer ....................t.................... 14, 15
Probe.. ........................................................ 18
.,.,.... ....................................2l-24
20,21,26,28-30,32
Problem solver ......................38,39
ThermostatAdjustment-
DOIt Yourself............................................25
Morequestions?...call
GEAnswerCenter@800.626.2000
CareandCleaning................34-37
BroilerPanand Rack....................... ...........37
DoubleDutyTMShelf... .................................35
LowerOvenDoor........................................36
LowerOvenLight....................................... 37
LowerOvenShelves... ...............................36
MicrowaveOven.... .
MicrowaveOvenLamp..... ........................35
Probe..... ......
.. .................................................34
...... ...............................34
Consumer Services...................43
Important PhoneNumbers.. ......................43
Modeland SerialNumbers..........................2
Removalof PackagingTape. .......................2
Warranty...................... ..................BackCover
GEAppliances
Theelectrical output of themicrowave oven
in this cooking center IS800 watts
~
Models:
164D2966P127-I
JKP64
JKP65
JKP66
Page 2
~LP US~LP YOU...
Beforeusingyour cookingcenter,read
thisguidecarefully.
Itisintendedto helpyouoperateandmaintainyour
newcookingcenterproperly.
Keepithandyfor answersto yourquestions.
Ifyoudon’tunders~d somethingorneedmorehelp,cdl:
GE AnswerCenter”
800.626.2000
24hours a day,7daysa week
Howto RemovePackagingTape.
Toassureno damageisdoneto thefinishofthe
product,thesafestwayto removetheadhesiveleft
frompackagingtapeonnewappliancesis an
applicationofa householdIiquiddishwashing
detergent,mineraloilorcookingoil.Applywitha
softclothandallowto soak.Wipedryand thenapply
anappliancepolish to thoroughlycleanandprotect
thesurface.
NOTE: Theplastictapemustberemovedfromthe
chrometrimonovenparts.Itcannotbe removedif
itis bakedon.
Writedownthemodelandserialnumbers.
You’IIfindthemon a labelinsidetheupperoven
onthe leftside.
ThesenumbersarealsoontheConsumerProduct
OwnershipRegistrationCardthatcamewithyour
cookingcenter.Beforesendingin thiscard,please
writethesenumbershere:
Besureyourcookingcenteris registered.
It is importantthatwe,themanufacturer,knowthe
locationofyourcookingcentershoulda needoccur
foradjustments.
Yoursupplierisresponsibleforregisteringyou as
theowner,
Pleasecheckwithyoursupplierto be surehehas
doneso;alsosendin yourConsumerProduct
OwnershipRegistrationCard.Ifyoumove,or if you
arenottheoriginalpurchaserpleasewriteto us,
statingmodeland serialnumbers.This appliance
must beregistered.Pleasebe certain that it is.
Write to:
GEAppliances
RangeProductService
AppliancePark
Louisville,KY40225
Ifyou receiveda damagedcooking
center...
Immediatelycontactthedealer (orbuilder)thatsold
youthecookingcenter.
Savetime andmoney.
Beforeyourequestservice...
ChecktheProblemSolverinthebackofthis&uide.
It listscausesof minoroperatingproblemsthatyou
cancorrectyourself.
ModelNumber
Usethesenumbersin anycorrespondenceor service
callsconcerningyour cookingcenter.
SerialNumber
PRECAU~ONS TOAVOm POSS~LE EXPOSURE
TO EXCESS~ MCROWAm ENERGY
(a) Do NotAttempt to operatethisovenwiththe
dooropensinceopen-dooroperationcanresult
inharmfulexposuretomicrowaveenergy.It is
importantnotto defeator tamperwiththe safety
interlocks.
(b) Do Not Placeanyobjectbetweentheovenfront
faceandthedooror allowsoilor cleanerresidue
to accumulateon sealingsurfaces.
2
(c)Do Not Operate theovenif itisdamaged.It is
particularlyimportantthattheovendoorclose
properlyandthatthereisno damagetothe:
(1)door(bent)
(2)hingesandlatches(brokenorloosened)
(3)doorsealsandsealingsurfaces.
(d) The OvenShouldNotbe adjustedorrepairedby
anyoneexceptproperlyqualifiedservicepersonnel.
Page 3
IMPORTANTSAFETYNOTICE
● TheCaliforniaSafeDrinkingWaterand
ToxicEnforcementAct
of
Californiatopublisha list ofsubstancesknown
requirestheGovernor
tothestatetocausebirthdefectsorother
reproductiveharm,andrequiresbusinessesto
warncustomersofpotentialexposuretosuch
substances.
Q
Thefiberglassinsulationinself”c}eanovens
givesoffa verysmallamountofcarbon
monoxideduringthecleaningcycle.
canbeminimizedbyventingwithanopen
windowor usingaventilationfanorhood.
Whenusingelectricalappliancesbasicsafety
precautionsshouldbefollowed,including
thefollowing:
Exposure
WARNING—TOreducetheriskofburns,
electricshock,fire,injurytopersonsorexposureto
excessivemicrowaveenergy:
● Usethisapplianceoniyforitsintendeduseas
describedin thisguide.
chemicalsorvaporsinthisappliance.
Thiscookingcenterisspecificallydesignedto
heatorcookfood,andis notintendedfor
laboratoryorindustrialuse.
● Besureyourappiianceisproperly
installedandgroundedbyaqualified
technician
InstallationInstructions.
inaccordancewiththeprovided
Donotusecorrosive
● Makesurechildrenarecloselysupervised?
whenusingthisappiiance.
● Thisapp~ancemustbeconnectedtoa
grounded,meti~c, permanentwiringsystem,
oranequipmentgroundingconductorshould
bemnwiththecircuitconductorsandconnected
totheequipmentgroundingterminalorleadon
theappliance.
● Thisappiianceshouldbeservicedonlyby
qualifiedservicepersonnel.
Contactthenearest
authorizedservicefacilityforexamination,repair
oradjustment.Donotrepairorreplaceanypartof
thisapplianceunlessspecificallyrecommendedin
thisguide.Allotherservicingshouldbereferred
toa quditiedtechnician.
● Beforeperforminganyservice,DISCONNECT
THECOO~G CENTERPOWERSUPPLY
ATTHE HOUSEHOLDDISTR~UTION
PANEL
SWITCHNGOFFTHECIRCUITBREA~R.
Donotcoverorblockanyopeningsonthe
~
BYREMOVINGTHEFUSEOR
appliance.
*DonotstorethisappEanceoutdoors.
notusethisproductnearwater—forexample,
Do
ina wetbasement,ornearaswimmingpool.
● Donotoperatethisapplianceifitisnotworking
properly,or ifithasbeendamagedordropped.
{continued next page)
● Havetheinstaflershowyouthelocation
ofthecircuitbreakerorfuse.Markitfor
easyreference.
● Foryoursafety,neveruseyourappliancefor
warmingorheatingtheroom.
cBesurethecookingcenterissecurelyinstalled
ina cabinetthatisfirmly attachedtothehouse
structure.
orhangontheovendoor,
Neverallowanyonetoclimb,sit,stand
3
Page 4
v
●
u
~ORTANT SA~~ ~STRUCTIONS
(coatinued)
~ Donotleavechtidrendon~hildren should
notbeleftaloneorunattendedinareawhere
applianceisinuse.Theyshoddneverbeallowed
tositorstandonanypartoftheappliance.
4Donotallowanyoneto ebb, stand or hang on
thedoor.Theycoulddamagethecookingcenter,
● CAUTION:ITEMSOF~TERESTTO
CHILDRENSHOULDNOTBESTOREDIN
CAB~ETSABOVEACOOK~G CENTER—
CH~DRENCLIMBINGON~E COOK~G
CENTERTOREACH~MS COULDBE
SERIOUSLYINWRED.
e
Teachchildrennot to playwiththecontroh
or anyotherpart ofthecookingcenter.
4Neverleavetheovendooropenwhenyouare
notwatchingtheoven,
*Neverwearloosefittingor
whileusingthisappliance.
reachingforitemsstoredovertheoven.
Flammablematerialcouldbeignitedifbrought
incontactwithhotheatingelementsandmay
causesevereburns.
hanginggarments
Becarefulwhen
● Donotleavepaperproducts,cookingutensils,
orfoodintheovenwhennotinuse.
● Donotstoreorusecombustiblematerials,
gasolineorotherflammablevaporsandliquids
inthevicinityofthisor anyotherappliance.
4Donotletcookinggreaseorother
flammablematerialsaccumulateinor
nearthecookingcenter.
4Donotusewaterongreasefires.
Smotherfireorflame or use a multi-
purposedry chemicalor foam-type
extinguisher.
Flame in the oven can be smotheredcompletely
by closingthe ovendoorand turningtheoven
orbyusinga multi-purposedrychemicalor
off
foam-typeextinguisher,
● Donottouchtheheatingelementsor the
interiorsurfaceoftheoven.
behotenoughtoburneventhoughtheyaredark
incolor.Duringandafteruse,donottouch,or let
clothingorotherflammablematerialscontactany
interiorareaoftheoven;allowsufficienttimefor
coolingfirst.
Thesesurfacesmay
● Useonlydrypotholde~moist or
damppotholdersonhotsurfacesmay
resultinburnsfromsteam,Donotlet
potholderstouchhotheatingelements,Donot
usea towelorotherbulkycloth,Suchclothscan
catchfire on ahot heatingelement.
● Alwayskeepdishtowel%dishcloths,pot
holders,andotherhens a safedistancefrom
yourcookingcenter.
*Alwayskeepwoodenspoonsandplastic
utensilsandcannedfooda safedistanceaway
fromyourcookingcenter.
● Alwayskeepcombustiblewallcoverings,
curtainsordrapesasafedistancefrom
yourcookingcenter.
4Donotstoreflammablematerialinanovenor
nearthecookJngcenter.
Potentiallyhotsurfacesincludetheoven
ventopenings,surfacesneartheopenings,
crevicesaroundtheovendoor,andtheedgesof
thedoorwindow,
Remember:Theinsidesurfaceoftheovenmay
behotwhenthedoorisopened,
Whencookingpork,followthedirections
4
exactlyandalwayscookthemeattoaninternal
temperatureofatleast170°F.Thisassuresthat,
intheremotepossibilitythattrichinamaybe
presentinthemeat,itwillbekilledandthemeat
willbesafetoeat.
4
Page 5
.:. .
.,-
,.
MicrowaveOven:
o Readandfollowthespecific“Precautionsto
AvoidPossibleExposuretoExcessiveMcrowave
Energy”section.
● Toreduce theriskoffireintheovencavity:
—Donotovercookfood.Carefullyattendappiiance
ifpaper,plasticorothercombustiblematerials
areplacedinsidetheoventofacilitatecooking.
—Removewiretwist-tiesandmetalhandles
frompaperorplasticcontainersbeforeplacing
themintheoven.
—Donotuseyourmicrowaveoventodry
newspapers.
—Donotuserecycledpaperproducts.
Recycledpapertowels,napkinsandwaxpaper
cancontainmetalfleckswhichmaycause
arcingorignite.Paperproductscontaining
nylonornylonfilamentsshouldbeavoided,
astheymayalsoignite.
—Donotpoppopcorninyourmicrowaveoven
unlessina specialmicrowavepopcornaccessory
orunlessyouusepopcornlabeledforusein
microwaveovens.
—Do notovercookpotatoes.Theycould
dehydrateandcatchfire,causingdamageto
youroven.
—Donotoperatetheovenwhileemptytoavoid
damagetotheovenandthedanger
accidenttheovenshouldrunemptya minuteor
two,noharmisdone,However,tryto avoid
operatingtheovenemptyatailtimes—itsaves
energyandprolongsthelifeoftheoven.
offire.Ifby
oSomeproductssuchaswholeeggsand
sealedcontaine~for
jars-will explodeandshouldnotbeheatedin
thisoven.Suchuseofthemicrowaveovencould
resultininjury.
● Seethedoorsurfacecleaninginstructions
theCareandCleaningsectionofthisguide.
in
example,closedglass
QAvoidheatingbabyfoodinglassjars,evenwith”
thelidoff,
cooked.Stirfoodtodistributetheheatevenly,Be
carefultopreventscaldingwhenwarming
formulaorbreastmilk.Thecontainermayfeel
coolerthanthemilkreailyis.Alwaystestthemilk
beforefeedingthebaby.
● Donotboileggsinamicrowaveoven.Pressure
willbuildupinsidetheeggyolkandwillcauseit
toburst,possiblyresultingininjury,
.,,
-
Makesureallinfantfoodisthoroughly
● Foodswithunbrokenouter‘~skin”
.,”-
.,
suchaspotatoes,sausages,tomatoes,
apples,chickenliversandother
giblets,andeggyolksshouldbepiercedto allow
steamtoescapeduringcooking.
*Donotdefrostfrozenbeveragesin narrow-
neckedbottles(especially carbonatedbeverages).
ifthecontaineris opened,pressurecanbuild
Even
up.Thiscancausethecontainertoburst,possibly
resultingininjury,
(continued next page)
—Donotusetheovenforstoragepurposes.
Donotleavepaperproducts,cookingutensilsor
foodintheovenwhennotinuse.
—Mmaterialsinsidethe ovenshould
keepovendoorclosed,turnovenoff,and
disconnectthepowercord,orshutoffpower
atthefuseorcircuitbreakerpanel.
ignite,
.
‘5
—
Page 6
v
●
u
WORTANT SAFETY~STRUCTIONS
(condnued)
● Usefoilonlyasdirectedinthisguide.TV
dinnersmaybemicrowavedinfoiltraysless
than3/4inchhigh;removethetopfoilcoverand
returnthetraytothebox.Whenusingmetalinthe
microwaveoven,keepmetal(otherthanthemetal
shelflatleastoneinchawayfromsidesofoven.
@Cookware may becomehotbecauseofheat
transferredfromtheheatedfood.
Potholdersmay
beneededtohandlethecookware,
● Theovenfloorcanbecometoohottotouch.Be
careful
*Foods
touchingthefloorduringandaftercooking.
cookedinliquids(suchaspasta)
maytendtoboilovermorerapidlythanfoods
containinglessmoisture,Shouldthisoccur,refer
totheCareandCleaningsectionforinstructions
onhowtocleantheinsideoftheoven.
~Donotuseathermometerinfoodyouare
microwavingunlessthethermometerisdesigned
orrecommendedforuseinthemicrowaveoven.
*When cooking pork, followthedirections
exactlyandalwayscookthemeattoaninternal
temperatureofatleast170°F.Thisassuresthat,in
theremotepossibilitythattrichinamaybepresent
inthemeat,itwillbekilledandthemeatwillbe
safetoeat.
● Remove the temperature probe from the
oven when
leavetheprobeinsidetheovenwithoutinserting
itinfoodorliquid,andturnonmicrowaveenergy,
itcancreateelectricalarcingintheoven,and
damageovenwalls.
notusingittocookwith.Ifyou
● PlasticCookwar~Plasticcookwaredesigned
formicrowavecookingisveryuseful,butshould
beusedcarefully,Evenmicrowave-safeplastic
maynotbeastolerantofovercookingconditions
asareglassorceramicmaterialsandmaysoften
orcharif subjectedtoshortperiodsof
overcooking.Inlongerexposurestoovercooking,
thefoodandcookwarecouldignite,Forthese
reasons:
1)Usemicrowave-safeplasticsonlyand
usetheminstrictcompliancewiththecookware
manufacturer’srecomtne~ldations.2)Donot
subjectemptycookwaretomicrowaving.3)Do
notpermitchildrento useplasticcookware
withoutcompletesupervision,
.
Notallplasticwrapissuitableforuse
inmicrowaveovens.
Checkthepackagefor
properuse.
● “Boilable”cookingpouchesandtightlyclosed
plasticbagsshouldbeslit,piercedorventedas
directedonthepackage.
couldburstduringorimmediatelyaftercooking,
possiblyresultingininjury.Also,plasticstorage
containersshouldbeatleastpartiallyuncovered
becausetheyformatightseal.Whencooking
withcontainerstightlycoveredwithplasticwrap,
removecoveringcarefullyanddirectsteamaway
fromhandsandface.
● Spontaneousboiling—Undercertain
m
specialcircumstances,liquidsmaystart
toboilduringorshortlyafterremoval
fromthemicrowave
splashingliquid,stirtheliquidbrieflybefore
removingthecontainerfromthemicrowaveoven.
Iftheyarenot,plastic
oven,Topreventburnsfrom
● Hot foodsandsteamcancause
‘. ,
-.:..,-
.= burns.Be
*
containersofhotfood.including
carefulwhenopeningany
popcornbags,cookingpouchesandboxes~To
preventpossibleinjury,directsteamawayfrom
handsandface.
6
● UseoftheDOUBLEDUTYTMshelfaccessory.
—Removetheshelffromtheovenwhennotinuse,
—Donotstoreorcookwiththeshelfonthefloor
oftheoven.Productdamagemayresult.
—Usepotholderswhenhandlingtheshelfand
cookware,Theymaybehot.
—Donotusea microwavebrowningdishonthe
shelf,Theshelfcouldoverheat,
Page 7
Self-CleaningLowerOven:
● Standawayfromthecookingcenterwhen
openingtheovendoor.Thehotairorsteam
whichescapescancauseburnstohands,face
andoreyes.
● Donotheatunopenedfoodcontainen+
Pressure
couldbuildupandthecontainercould
burst,causinganinjury.
● Keeptheovenventductunobstructed.
● Neverleavejars orcansoffatdrippingsinor
nearyouroven.
● Placetheovenshe~inthedesiredposition
whiletheoveniscoo},Iftheshelvesmustbe
handledwhenhot,donotletpotholdercontact
theheatingelements.
● Pullingouttheshetitotheshelflockisa
convenienceinliftingheavyfoods.Itisalso
aprecautionagtinstburnsfromtouchinghot
surfacesofthedoororovenwalls.
● Donotstoreanythinginyouroven.Theseitems
maycatchonfire,andplasticitemsmaymelt.
Alwayskeeptheovenclearandfreeofitemsthat
mayburn.
QDonotfinethe ovenbottomwithaluminum
foii.~ notuseahnninumfoilexceptas
suggestedinthisguide.
● Donotdeantheovendoorgasket.Thedoor
gasketisessentialforagoodseal.Careshouldbe
takennottorub,damageormovethegasket.
● Donotuseovencleaners,Nocommercialoven
cleanerorovenlinerprotectivecoatingofany
kindshouldbeusedinoraroundanypartofthe
oven.Residuefromovencleanerswilldamage
theinsideoftheovenwhentheself-cleaning
cycleisused.
4cl-
onlypa~ listedin thisUseand
CareGtide.
*BesumtowipeUpexcessspillagebefore
startingthese~-cleaningcycle.
eWhenusingcookingorroastingbagsinthe
oven,followthemanufacturer’sdirections.
*Donotuseyouroventodrynewspapers,
Ifoverheated,theycancatchfire.
*Afterbroiling,alwaystakethebroilerpanout
oftheovenandcleanit.Leftovergreaseinthe
broilerpancancatchfirethenexttimeyouuse
thepan.
*Listen
sometimeduringthecleaningcycle,Ifnot,
callforservicebeforeself-cleaningagain+
D
Donotleavepaperproducts9cookingutensils
forfan—afannoiseshouldbeheard
orfoodintheovenwhennotinuse.
oNeverleavetheovendooropenwhenyouare
notwatchingthecookingcenter.
oKeepthecookingcentercleanandfreeof
accumulationsofgreaseorspillovers,which
mayignite.
*Beforese~-cleaningtheoven,removethebroiler
panandothercookware.
● iftheself-cleaningmodemalfunctions,turnthe
ovenoffanddisconnectthepowersupply.Haveit
servicedbya qualifiedtechnician.
SAW ~SE
~STRUCTIONS
7
Page 8
FEATURESOF YOURCOOmG CENTER
‘-
8
Page 9

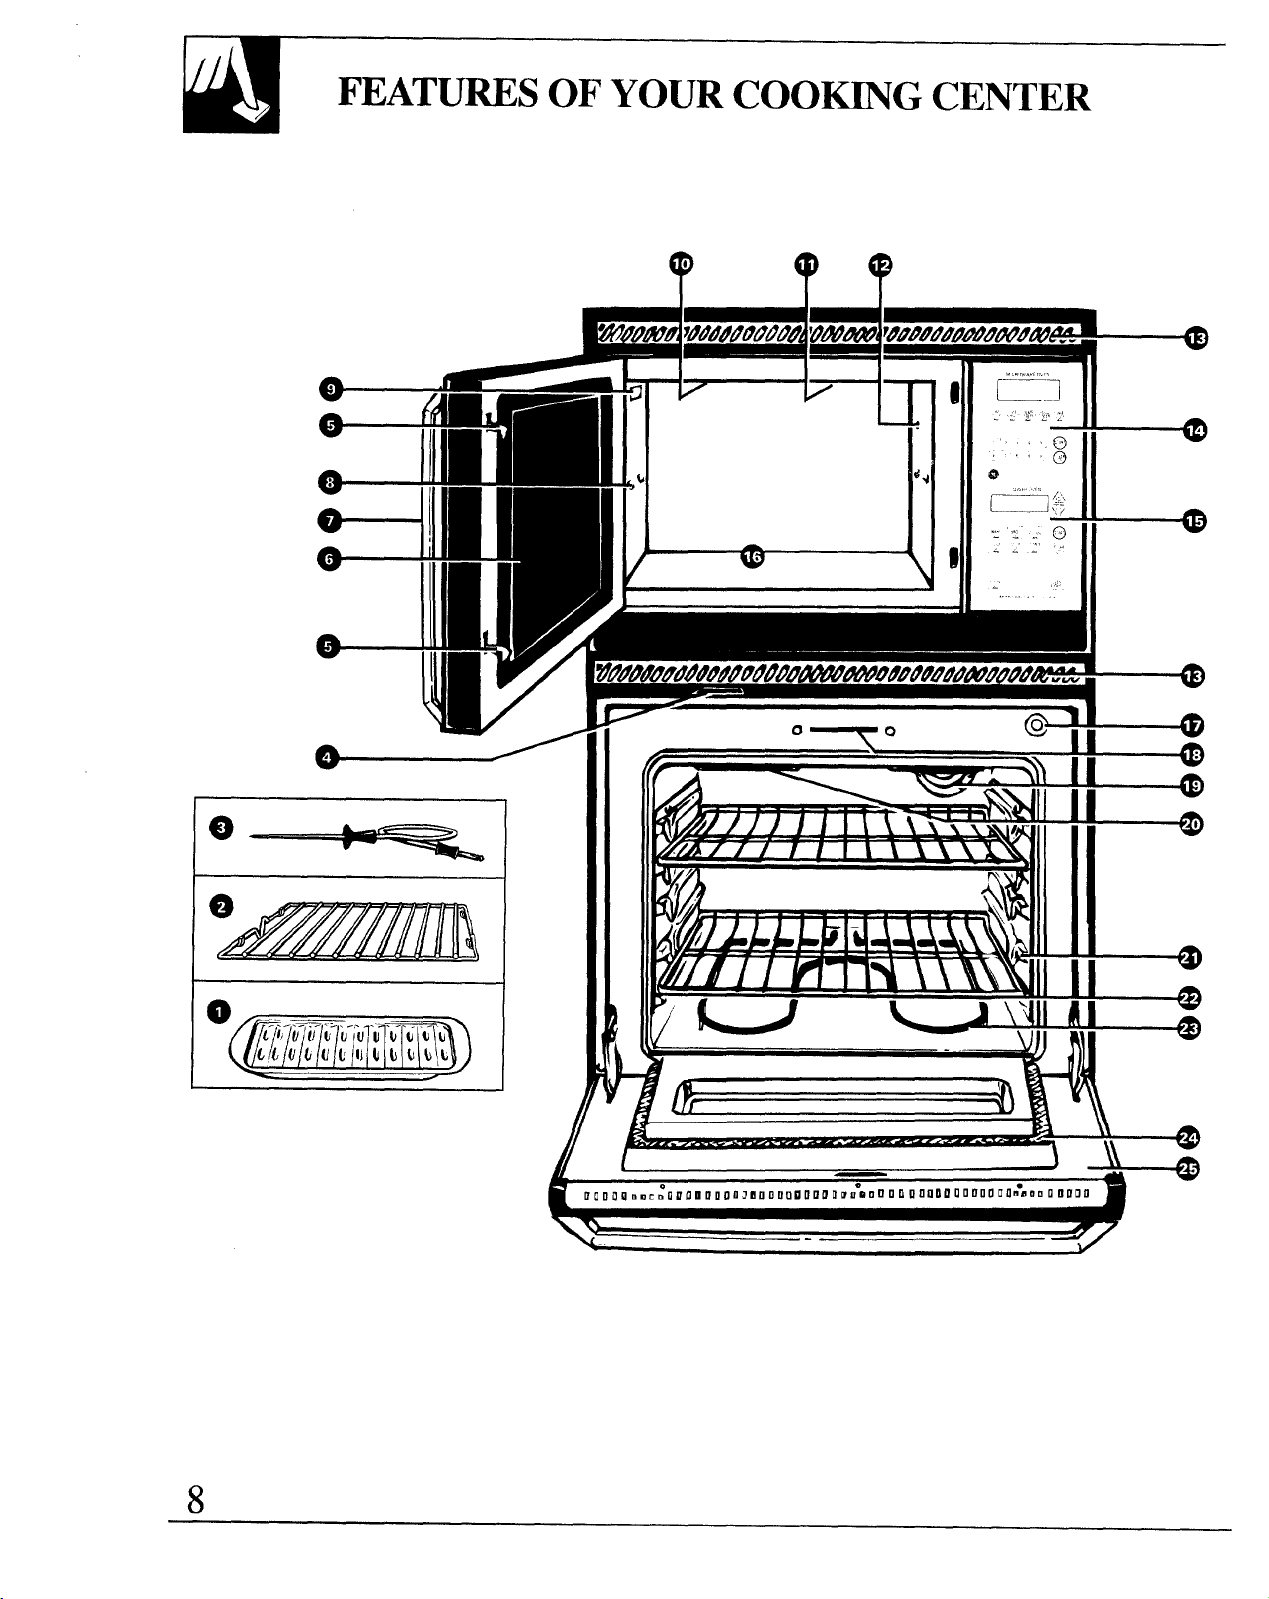
Features
Explained
on Page
1 Broiler Pan and Rack—LowerOven
Foruseinthelowerovenonly.Do notcleaninthe self-cleaningoven.
2 DoubleDutyTMShelf—MicrowaveOven
Foruseinthemicrowaveovenonly.
3 Temperature Probe—MicrowaveOven
Foruseinthemicrowaveovenonly.
4 Oven Vent—LowerOven
5 Inside Door Latches—MicrowaveOven
6 Windowwith Metil Shield
Allowscookingtobe viewed whilekeepingmicrowavesconfinedintheoven.
7 MicrowaveDoorHandle
Pullthehandleto open.Thedoormustbe securelylatchedfortheoven to operate.
8 ShelfSupports For the DoubleDutyTMShelf
9 Modeland Serial Numbers
10 Light—MicrowaveOven
11 Vent—MicrowaveOven
12 Receptaclefor the Temperature Probe
13 Oven Grille
7,26,28,
29,37
19,35
18
37
2
34
34
19
2
35
3
18
7,30,35,37
14 MicrowaveOven Controls
15 Lower Oven Controls
16 MicrowaveOven Floor
17 Automatic Oven Light Switch—LowerOven
18 Automatic Oven Door Latch—LowerOven
Usedfor self-cleaningonly.
19 Light—LowerOven
20 BroilElement—LowerOven
21 Oven Shelf Suppork—LowerOven
Shelfpositionsforcookingaresuggestedin the Baking,Roastingand Broilingsections.
22 Oven Shelveswith Stop-Lock~Lower Oven
Easilyremovedor repositionedonthe shelfsupports.
23 BakeElement—LowerOven
Maybegentlyliftedfor wipingtheovenfloor.
24 Oven Door Gasket
Donotclean.
25 Lift-Off Oven Door with Broil Stop
Position-LowerOven
Easilyremovedforcleaning.
10,12,13,34
11-13,34
6,34
20
31,32
20,37
30
20,21,26,
28-30,32,33
20,21,26,
28-30,32,36
30
7,36
i,7,28,30,36
9
Page 10
FEATURESOF YOUR
~CROWAW OWN CONTROLPANEL
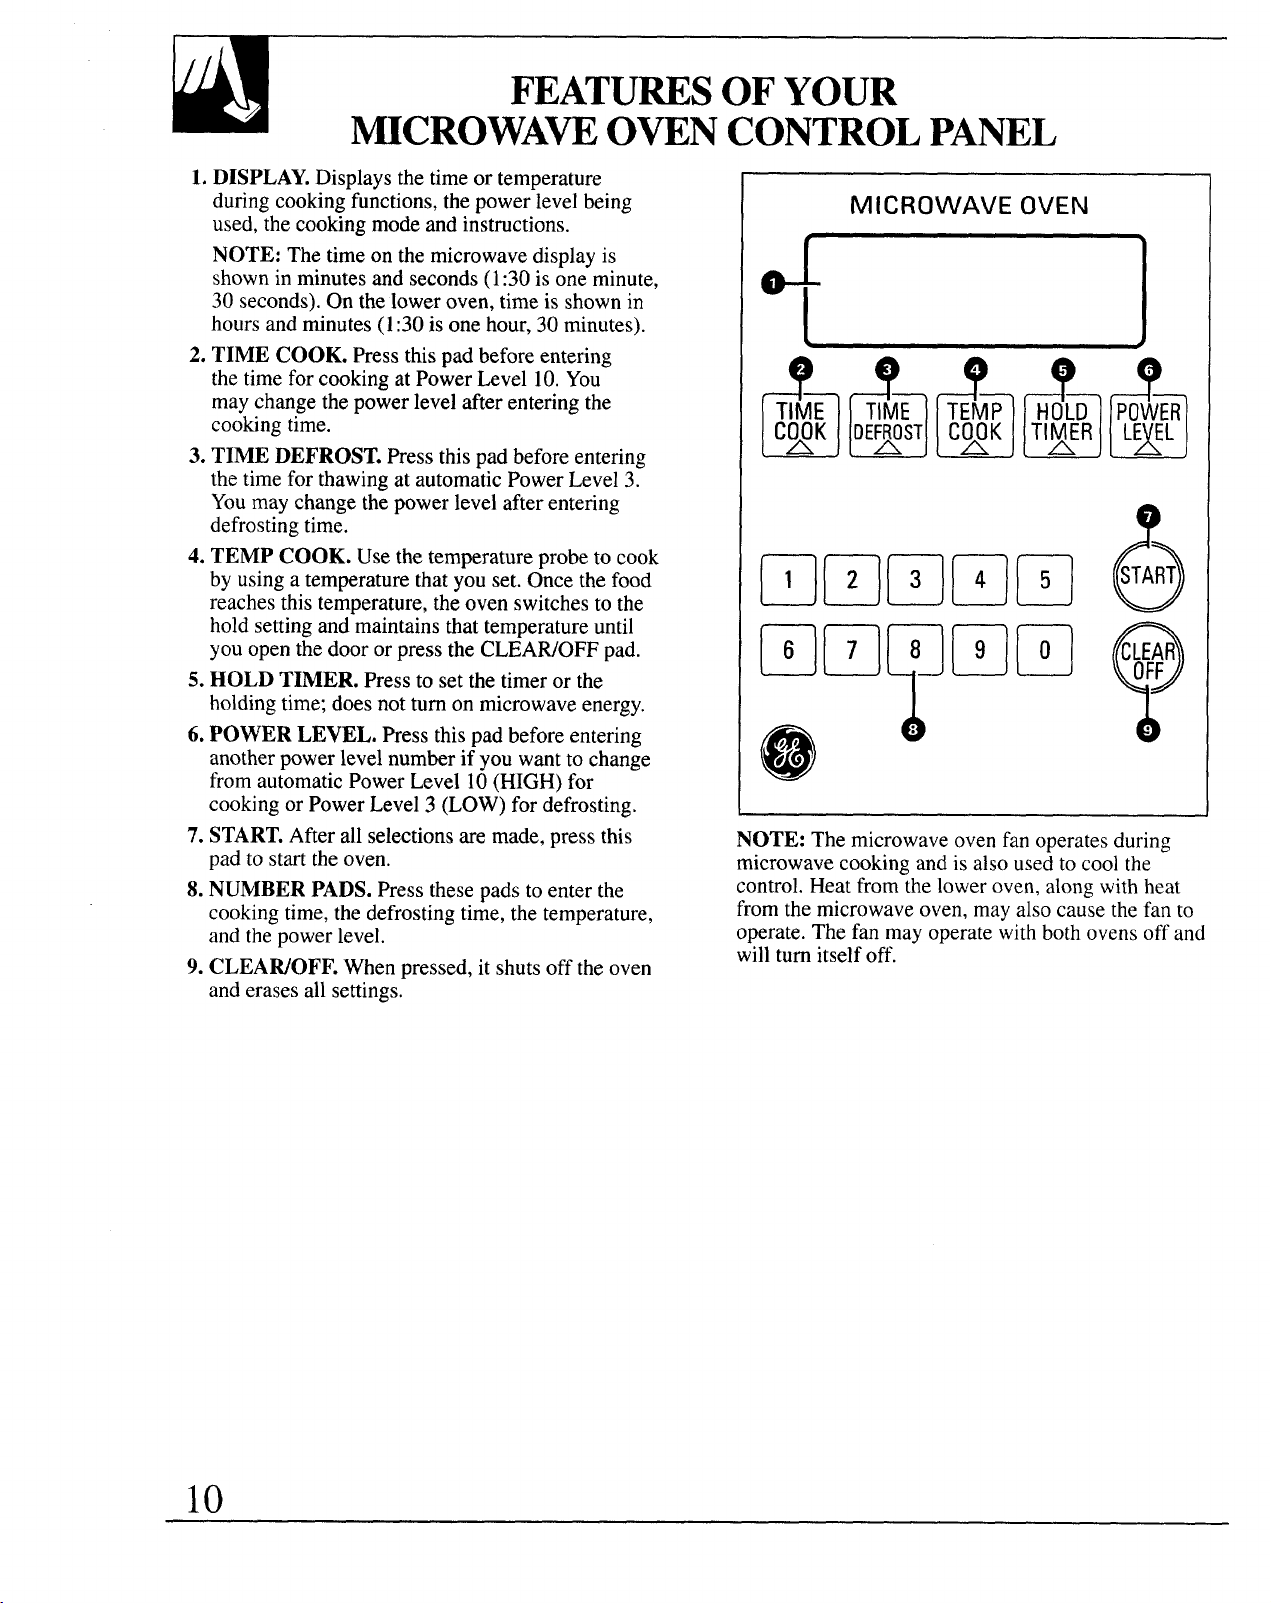
1.DISPLAY. Displaysthetimeortemperature
duringcookingfunctions,thepowerlevelbeing
used,thecookingmodeandinstructions.
NOTE: Thetimeonthemicrowavedisplayis
shownin minutesandseconds(1:30 is oneminute,
30seconds).Ontheloweroven,timeisshownin
hoursandminutes(1:30is onehour,30minutes).
2. TIME COOK. Pressthis padbeforeentering
thetimeforcookingatPowerLevel10.You
maychangethepowerlevelafterenteringthe
cookingtime.
3. TIME DEFROST.Pressthis pad beforeentering
thetimeforthawingat automaticPowerLevel3.
Youmaychangethepowerlevelafterentering
defrostingtime.
4. TEMP COOK. Usethetemperatureprobeto cook
byusinga temperaturethatyouset.Oncethefood
reachesthistemperature,theovenswitchestothe
holdsettingandmaintainsthattemperatureuntil
youopenthedoororpresstheCLEAWOFFpad.
5.HOLD TIMER. Pressto setthetimerorthe
holdingtime;does notturnon microwaveenergy.
6.POWER LEVEL. Pressthispadbeforeentering
anotherpowerlevelnumberif youwant to change
fromautomaticPowerLevel10(HIGH)for
cookingorPowerLevel3 (LOW)fordefrosting.
7. START.Afterallselectionsare made,pressthis
padto starttheoven.
8.NUMBERPADS.Pressthesepadstoenterthe
cookingtime,thedefrostingtime,thetemperature,
andthepowerlevel.
9. CLEAWOFF.Whenpressed, it shutsofftheoven
anderasesall settings.
MICROWAVE OVEN
r
NOTE: The microwaveovenfanoperatesduring
microwavecookingandisalsousedtocoolthe
control.Heatfromtheloweroven,alongwithheat
fromthemicrowaveoven,mayalsocausethefan to
operate.Thefanmayoperatewithbothovensoffand
willturnitselfoff.
10
Page 11
FEATURESOF YOUR
LOWER OVENCONTROLPANEL
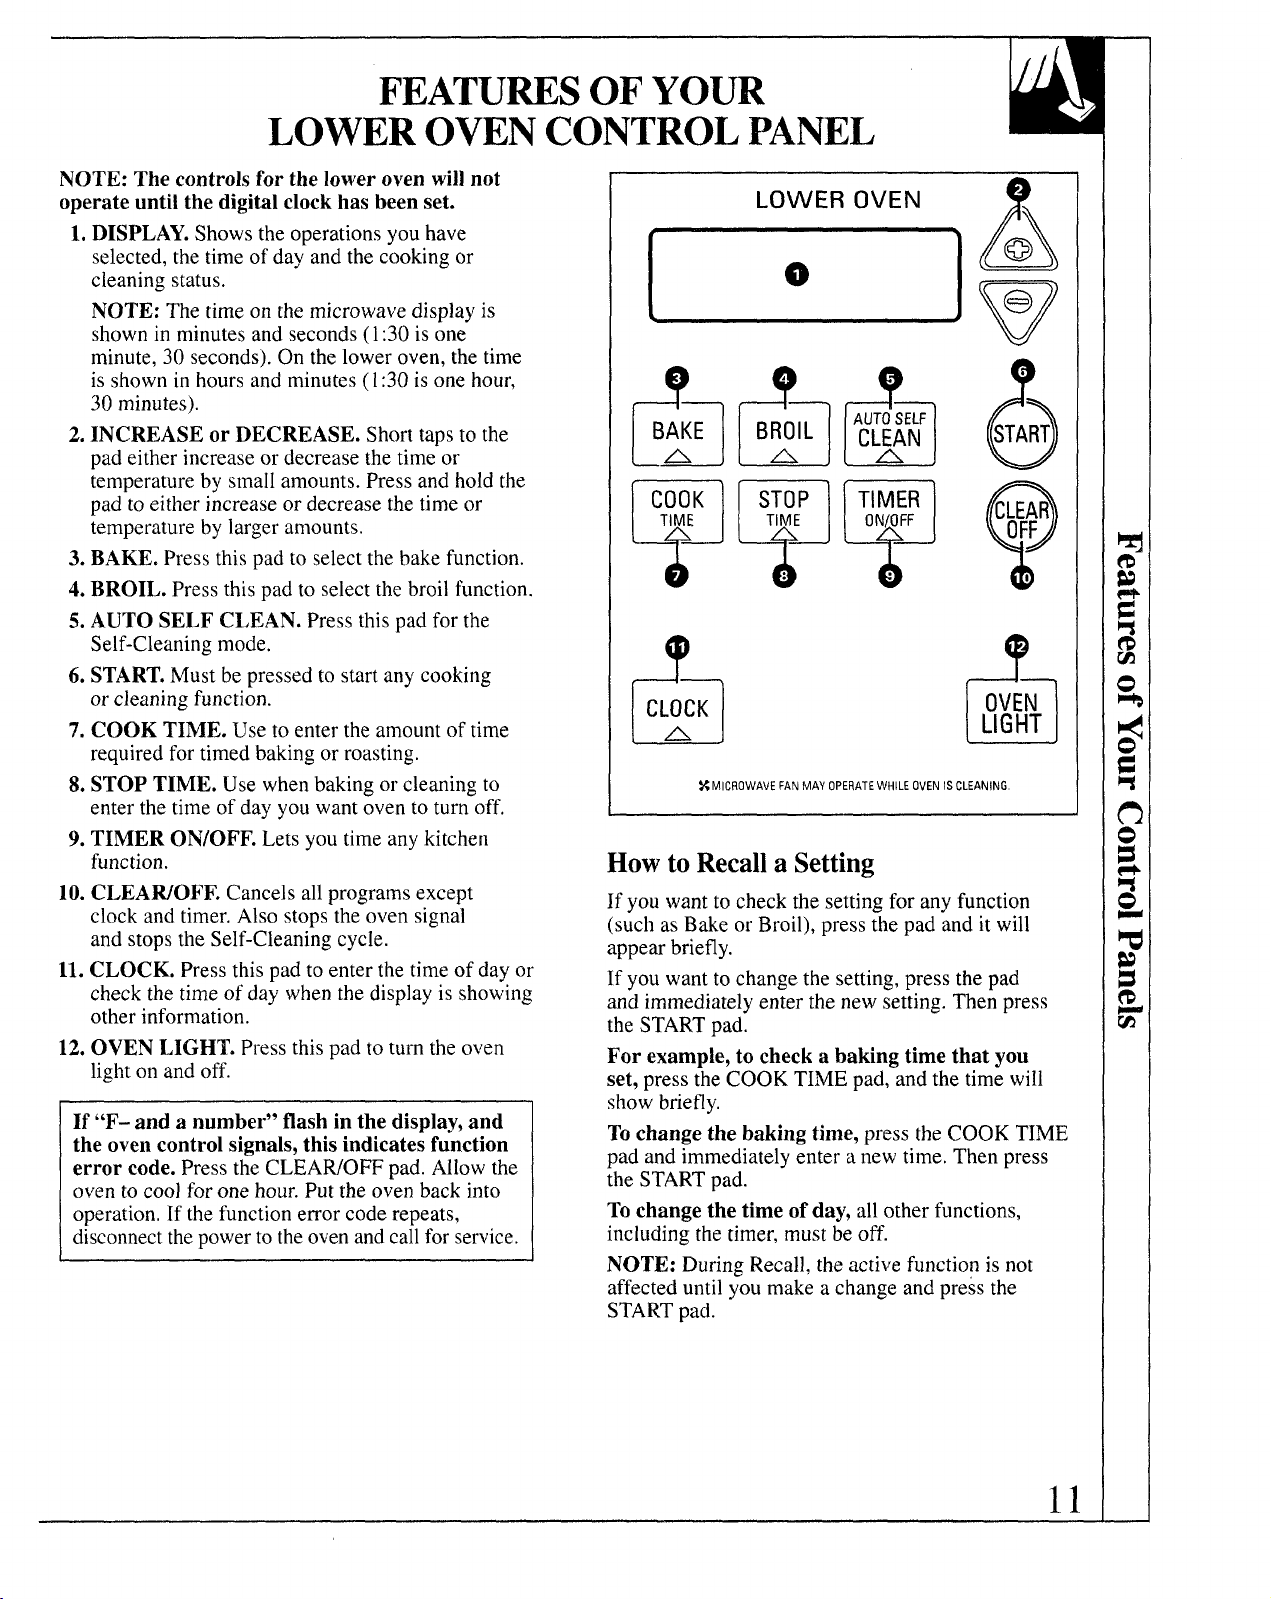
NOTE: The controlsfor the lower ovenwillnot
operate until the digitalclockhas been set.
1.DISPLAY.Showstheoperationsyouhave
selected,thetimeofdayandthecookingor
cleaningstatus.
NOTE: Thetimeon themicrowavedisplayis
shownin minutesandseconds(1:30isone
minute,30seconds).Ontheloweroven,thetime
is shownin hoursandminutes(1:30isonehour,
30minutes).
2.INCREASE or DECREASE. Shorttaps to the
padeitherincreaseor decreasethetime-or
temperatureby stnallamounts.Pressandholdthe
padtoeitherincreaseordecreasethetimeor
temperaturebylargeramounts.
3. BAKE.Pressthispadto selectthebake function.
4.BROIL. Pressthispadto selectthebroilfunction.
5.AUTO SELF CLEAN.Pressthispadforthe
Self-Cleaningmode.
6. START.Mustbepressedto startanycooking
orcleaningfunction.
7. COOK TIME. Usetoentertheamountoftime
requiredfortimedbakingorroasting.
8. STOP TIME. Usewhenbakingorcleaningto
enterthetimeofdayyouwantovento turnoff.
9. TIMER ON/OFF.Letsyoutimeanykitchen
function.
10.CLEAWOFF.Cancelsallprogramsexcept
clockandtimer.Alsostopsthe ovensignal
andstopstheSeIf-Cleaningcycle.
11. CLOCK. Pressthispadto enterthetime of dayor
checkthetimeofdaywhenthedisplayisshowing
otherinformation.
12.OVENLIGHT. Pressthispadtoturntheoven
lighton andoff.
If “F- and a number” flash in the display,and
the oven control signals,this indicatesfunction
error code.PresstheCLEAWOFFpad.Allowthe
oventocoolforonehour.Puttheovenbackinto
operation,If thefunctionerrorcoderepeats,
disconnectthepowertotheovenandcall forservice.
L
LOWER OVEN
Q
CLOCK
A
u
%MIcflOwAVE FANMAYOpERATEWHILEOVENISCLEANING
Howto Recalla Setting
If youwanttocheckthe settingfor anyfunction
(suchasBakeorBroil), pressthepadandit will
appearbriefly.
If youwantto changethesetting,pressthepad
andimmediatelyenterthenewsetting.Thenpress
theSTARTpad.
For example,to checka baking time that you
set, presstheCOOKTIMEpad,andthetimewill
showbriefly.
Tochangethe baking time, presstheCOOKTIME
padandimmediatelyenteranewtime.Thenpress
theSTARTpad.
Tochangethe time ofday,allotherfunctions,
includingthetimer, mustbeoff.
NOTE: DuringRecall,theactivefunctionisnot
affecteduntilyoumakea changeandpressthe
STARTpad.
OVEN
LIGHT
11
Page 12

/
Clock
CLOCKAm TMER
NOTE: Theclockmust be set beforethe contro~sfor
the lower ovenwillwork.
Whenpowerisfirstconnectedto yourcookingcenter
orafterapowerfailureof anykind,thedigitqldisplay
on boththemicrowaveandlowerovencontrolpanels
showslighted8’sand 18’splusallovenfunctionsfor
about15seconds.
Howto Set the Clock
Quick Set-Clock
1.PresstheCLOCKpad,
2. PresstheINCREASEor DECREASEpadto
enterthetime.
3. PresstheSTARTpad.
1.PresstheCLOCKpad,
CLOCK
A
m
Then,alllightsgooffand“RESET’appearsin the
upperdisplay,and“PF’ (forPowerFailure)appearsin
thelowerovendisplay.
PresstheCLEAWOFFpadon themicrowavecontrol
panelandthe microwaveovenis readytouse.
Beforeusing the lower oven,the electronicdigital
clockmust beset.
2. PresstheINCREASEor DECREASE
padto setthetimeofday.
a
a
@
v
3. PresstheSTARTpad.Thisentersthe
timeandstartstheclock.
START
o
Timer
Youmayprogramthetimerfortimecookingor
otherhouseholdactivitiesfor upto 11hoursand
59minutes.
Howto Setthe Timer
1.Pressthe’TIMERON/OFFpad.
TIMER
O~FF
n
2.PresstheINCREASEor
DECREASEpadto setthetimeof
@
a
e
v
day.If youmakea mistake,press
theTIMERON/OFFpadtwice and
beginagain.
Thetimercountsdowninminutes,1minuteata time,
untilthelastminuteisreached.Thesecondswillnot
bedisplayeduntilthelastminuteisreached.
Whenthetimerreaches“ :0,” “TIMER”flashesin
thedisplay,
3. PresstheSTARTpad.
START
o
4. Whentimeisup,theovencontrolsignalsuntilyou
presstheTIMERON/OFFpad.Displaythenshows
thetimeofday.
NOTE: Theminutetimerisindependentof all the
otherfunctionsandit doesnotcontroltheoven.
TheCLEAWOFFpaddoesnotaffectthetimer.
AfterpushingtheSTARTpad,
theflashingcolon tellsyouthe
timeriscountingdown,although
thedisplaydoesnotchangeuntil
1minutehaspassed.
12
Page 13
INCREASEor DECREASEPad Speed
Youcanchangetheresponsespeedof
thesepadsin 10increments.
Whiletheovenis offandthetimeof day
showsin thedisplay,pressandholdboth
theINCREASEandDECREASEpadsat
thesametimefor2 or 3 seconds.The
speedlevelsrangefromLOto HI; LOis
theslowestspeedandHIisthefastest.
A
v
@
e
PowerFailure
If “PF” appears in the display,youhadapower
failure.Whenthepowerwentout,thecurrenttime
wasstoredinthecontrol’smemory.Then,whenthe
powerwasrestored,thetimeofdaywascontinued.
For example,aftera 5-minutepowerinterruption,
yourclockwillbe 5 minutesslow,
Toreset the clock,presstheCLOCKpad.Enterthe
correcttimeofdayby pressingtheINCREASEor
DECREASEpad.
Tocheckthe time ofday whenthe display is
showingother information, simplypressthe
CLOCKpad.Thetimeof day showsfor as longas
yourfingeris onthepad,plus3 additionalseconds.
UsetheINCREASEor DECREASEpadto
changetheresponserateofthesepads. Press
theSTARTpadto storethe newspeedandreturn
tothe timeofday display.
If youhave several clocksin your kitchen,you may
wishto blank the time of day on your oven.
If so,pressandholdtheCLOCKpad,thenpressthe
STOPTIMEpad.Althoughyoucannotseeit,the
clockmaintainsthecorrecttimeof day.Itwill
reappearforthedurationofanyfunctionthatdisplays
a StartTimeand StopTime.
PressingtheCLOCKpadwillmakethetimeof
dayreappear.
NOTE: Thetimeofdaycannotbe changedduringa
lowerovencookingoperation.
QuestionsandAnswers
Q. When I camehome,the displayshowed“PF’
instead of the time.What happened?
A. Yourhomehad abriefpowerfailurewhileyou
weregone.Nothingis wrongwithyourclock—
just resetit.
Q. When changingthe timeof day, if I press the
CLOCK pad and then discoverthat the time
shownis right, do I have to reset the clock?
A. No.Theoriginaltimeofdaywillreappearina
coupleof minutes.
Q. Can I changethe clockwhileI’m cookingfood
in the loweroven?
A.No,Theclockcannotbechangedduringany
programthatuses the oventimerorthedisplay.
Youmusteither stopthoseprogramsor waituntil
theyarefinishedbeforechangingthetime.
Q. Can I check the timeof day whilethe display is
showingtimer function?
A. Yes.SimplypresstheCLOCKpad andthetimeof
dayshowsfor as longas yourfingeris on thepad,
plus3 additionalseconds.
13
Page 14
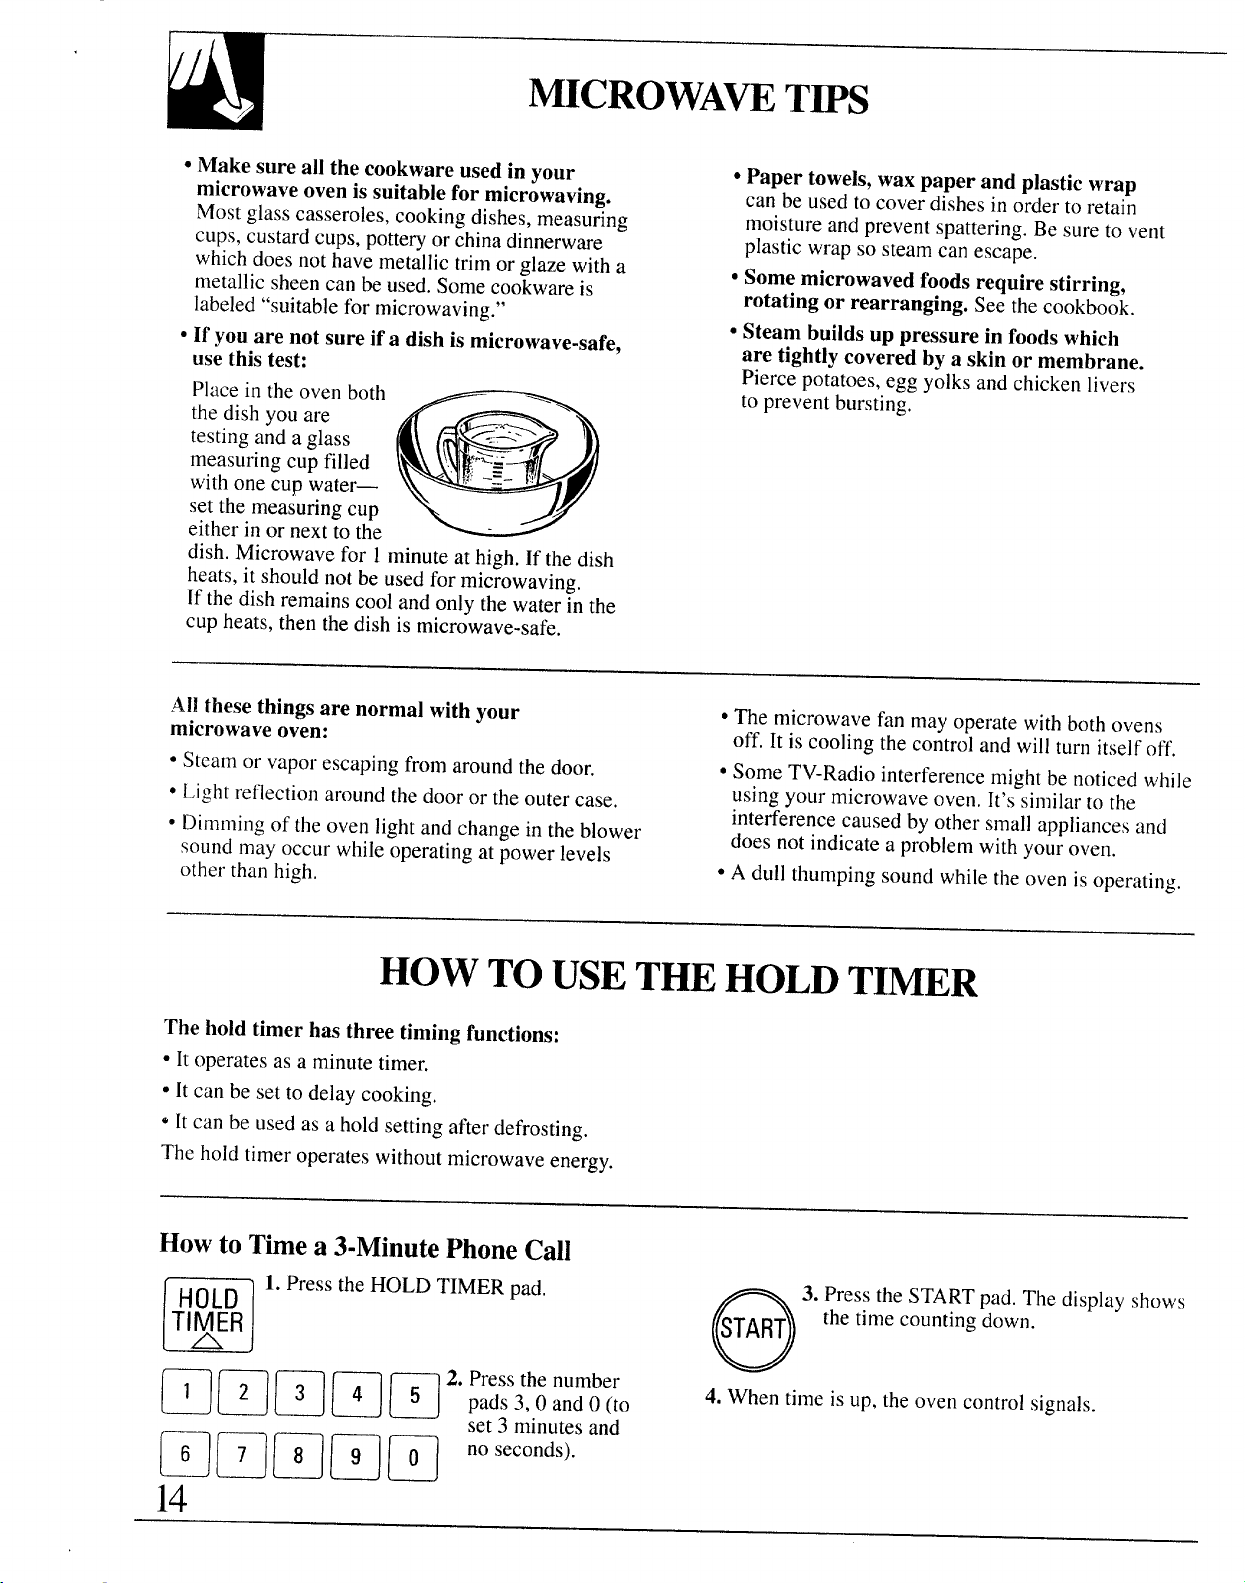
● Make sure all the cookwareused in your
microwaveovenissuitable for microwaving.
Mostglasscasseroles,cookingdishes,measuring
cups,custardcups,potteryorchinadinnerware
whichdoesnothavemetallictrimorglazewitha
metallicsheencanbeused.Somecookwareis
labeled“suitablefor microwaving.”
● If youare not sure ifa dish ismicrowave-safe,
usethis test:
Placein theovenboth
thedishyouare
testinganda glass
measuringcupfilled
withonecupwater—
setthemeasuringcup
eitherinor nexttothe
dish.Microwave”for-l minuteat high.If thedish
heats,it shouldnot beusedformicrowaving.
If thedishremainscoolandonlythewaterinthe
cupheats,thenthe dish ismicrowave-safe,
● Paper towels,waxpaper and plastic wrap
canbeusedtocoverdishesinorderto retain
moistureandpreventspattering.Besureto vent
plasticwrapso steamcanescape.
● Somemicrowavedfoodsrequire stirring,
rotating or rearranging. Seethecookbook.
● Steam buildsup pressure in foodswhich
are tightlycoveredby a skin or membrane.
Piercepotatoes,eggyolksandchickenlivers
topreventbursting,
Allthese thingsare normal with your
microwaveoven:
● Steamor vaporescapingfromaroundthedoor.
*Lightreflectionaroundthedooror theoutercase.
*Dimmingof theovenlightandchangein theblower
soundmayoccurwhileoperatingatpowerlevels
otherthanhigh.
HOW TO USETHE HOLD TMR
The hold timer has three timingfunctions:
● Itoperatesasa minutetimer,
● It canbe settodelaycooking.
@It canbe usedas a holdsettingafterdefrosting.
Theholdtimeroperateswithoutmicrowaveenergy.
Howto Timea 3-MinutePhoneCall
1.PresstheHOLDTIMERpad.
HOLD
Tl~ER
D
● Themicrowavefanmayoperatewithbothovens
off.It iscoolingthecontrolandwillturn itselfoff.
● SomeTV-Radiointerferencemight be noticedwhile
usingyourmicrowaveoven.It’ssin]ilartothe
interferencecausedbyothersmallappliancesand
doesnotindicateaproblemwithyouroven.
● A dullthumpingsoundwhiletheovenisoperating.
3. PresstheSTARTpad.Thedisplay shows
START
thetimecountingdown.
o
mmE(71~12*p:~9j]o
~~~~~
14
4. Whentimeisup,theovencontrolsignals.
flOSeCOnds)
Page 15

Usinga HoldingTime
Theholdtimercan alsobeusedto programa “holdtime”between
microwavecookingfunctions.Thetimecanrangefrom 1secondto 99
minutesand99seconds.
ProgrammingDelayedCooking
Todelaycookingupto 99minutesand99seconds,
presstheTIMECOOKor theTEMPCOOKpadand
entertheCookTimeorthetemperature.Pressthe
HOLDTIMERpadandenterthenumberofminutes
todelaycooking.PresstheSTARTpad.Thetimerwill
countdowntozeroandthencookingwillbegin.
Howto TimeDefrost,Hold andTimeCook
Let’ssayyouwanttodefrostafrozencasserolefor
15minutes,holdfor 10minutesandthenTimeCook
for25 minutes.Here’showtodo it:
1.Takecasserolefromfreezerandplaceinoven.
[ml
2. PresstheTIMEDEFROSTpad.
m
4. Setthe standingorHoldTimeby
HOLD
TIMER
n
-
(
5. Pressthe 1,0, 0 andOpadsto holdforten minutes.
TIME ~
C~K
pressingtheHOLDTIMERpad.
)
6. PresstheTIMECOOKpad.
NOTE: WhendelayingtheTempCookfunction,
be suretheprobeis in thefoodbeforepressingthe
STARTpad.
7.Pressthe2,5,0 andOpadsto set25 minutesof
cookingtime.
=8. PresstheSTARTpad.
START
u
Aseach function is automatically performed,
theovendisplayshowsinstructionsenteredand
thefunction.
9.Whentimeis up,theovencontrolsignalsandthe
ovenautomaticallyshutsoff.
NOTE: Foodsthatspoileasilysuchas milk,eggs,
fish,stuffings,poultryandporkshouldnotbeallowed
to sitfor morethanonehourafterdefrosting.Room
temperaturepromotesthegrowthofharmfulbacteria.
Besurethattheovenlightisoffbecauseheatfromthe
bulbwillspeedharmfulbacteriagrowth.
Defrostingis automatically set on Power
Level3, butcanbe changedbypressingthe
‘OWERLEVELpad andthedesiredDowerlevel.
n
/
QuestionsandAnswers
Q. What willhappen if I accidentallyreverse my
defrost, hold and cookinstructions?
A. Theovenwillautomaticallyrearrangeyour
program.Defrostingwillalwayscomefirst,then
hold, andthenthecookingfunction.
Q. Can I defrost and hold only?
A. Yes.Sometimesyoumayonlywanttodefrost
a food,holdit,andcookit later.Allyouneed
to do isprogramin TimeDefrostandamount
oftime.ThenprogramHoldandtheamountof
time.Besureto putthethaweddish inthe
refrigeratorpromptly.
15
Page 16

DEFROSTINGBYT~E
The Time Defrostsetting is designedfor speedy
thawing offrozen food and is one of fh~great
advantages ofa microwaveoven.
Power Level3 is automaticallyset for defrosting,
butyoumaychangethisformore flexibility,
Tobecomebetteracquaintedwiththedefrost
function,defrostfrozenstrawberriesbyfollowingthe
stepsbelow.
1.Placethepackageof frozenstrawbeties in the
ovenandclosethe door.
2. PresstheTIMEDEFROSTpad.
TIME
DE~OST
n
3. Selectonehalfof thetotaldefrostingtime
recommended.Forexample,press 4, 0 and
Oto set4 minutes.
DefrostingTips
● Foodsfrozenin
paperorplastic
4. PresstheSTARTpad.Whenthecycleis
START
completed,theovencontrolsignalsand
theovenautomaticallyshutsoff.
o
5. Turnthepackageover,closethedoorandrepeat
steps2and3 to settheremaininghalfofthe
defrostingtime.PresstheSTARTpad.
6. Whentheovencontrolsignals,openthedoor,
removethepackageandseparatethestrawberries
tofinishdefrosting.
Tochangethe power levelafter setting the
defrostingtime, pressthePOWERLEVELpad,
thenpressthedesirednumberfora newpower
~
● Forevendefrosting,
somefoodsneedto
bebrokenupor
separatedpartof the
“’’’E:’- :,,,S,,
● Family-size,pre-packagedfrozendinnerscanbe
defrostedandmicrowaved.Ifthefoodisinafoil
container,transferit to a microwave-safedish,
QuestionsandAnswers
Q. WhenI press the STARTpad, I hear a dull,
thumping noise.What isit?
A. Thissoundis normal.It is lettingyouknowthe
ovenisusinga powerlevellowerfhan 10(HIGH),
Q. Can I defrostsmallitemsin a hurry?
A. Yes,buttheywillneedmorefrequentattention
thanusual,Raisethepowerlevelafterenteringthe
timebypressingthedesiredpowerlevelpad.
PowerLevel7 cutsthetotaldefrostingtimein
halt PowerLevel10cutsthetotal defrostingtime
toapproximately1/3.Duringeither,rotate or stir
foodfrequently.
16
Page 17

The time cookingfeature allowsyou to selectthe
cookingtime.
Theovenshutsoff automatically.
Power Level10 (High)is recommendedfor most
cooking,butyoumaychangethisformoreflexibility.
Tobecomebetter acquaintedwithtimecooking,make
a cupofcoffeeby followingthedirectionsbelow.
1.Filla cup2/3fullof water,
add 1teaspoonofinstant
coffeeand stirtodissolve.
Usea cupthathasno
metaldecorationandis
microwave-safe.Place
thecupinthe ovenand - ‘ z
closethedoor.
2.PresstheTIMECOOKpad.
TIME
C~K
L
3. Selectyourcooktime.Press1,2 andOto set
1minuteand20 seconds.
BecauseautomaticPower Level10(High)
is recommendedfor this cup of coffee,thereis no
needtochangethepowerlevel.
4. PresstheSTARTpad.
START
n
5.Whentimeis up,theovencontrolsignals.
Theoventhenshutsoff.
6. Openthedoor.
If you interrupt TimeCook to checkthe food,
simplyclosethedoorandpresstheSTARTpadto
resumecooking.Ifthereis nottimeremainingonthe
timeryoumustresetthe timertoresumecoo~ing.
Tochangethe power levelafter setting the
CookTime,pressthePOWERLEVELpad,then
pressthedesirednumberforthenewpowerlevel.
HowtoUse theTimeCookIIFeature
The Time Cook II feature lets you settwo time
cookingfunctionswithin oneprogram. Thisis ideal
whenyouwanttochangepowerlevelsduringyour
cookingoperations.Here’showto doit.
1.Placefoodinovenin microwave-safecontainerand
closethedoor.
2. PresstheTIMECOOKpad.
TIME
C~K
n
4. PresstheTIMECOOKpadagain.
5. Setyoursecondcooktime.
6. PresstheSTARTpad.
START
o
7.Whentimeis up,theovencontrolsignals.
Theoventhenshutsoff.
8. Openthedoor.
If youinterrupt TimeCook to checkthe food,
simplyclosethedoorandpresstheSTARTpadto
resumecooking.If thereis nottimeremainingon the
timeryoumustresetthetimertoresumecooking.
Tochangethe power levelafter settingthe
CookTime, pressthePOWERLEVELpad,then
pressthedesirednumberfor thenewpowerlevel.
17
Page 18

Internaltemperatureisthebesttestof donenessformanyfoods.TEMP
COOKtakestheguessworkoutof cookingbecausetheovenautomatically
switchestotheHoldsettingafterreachingthepresetfoodtemperatureand
maintainsthattemperatureuntilyoueitheropenthe dooror pressthe
CLEAWOFFpad.
TheTemperatureProbe
Thetemperatureprobeis a food
thermometerthatgaugesthe
internaltemperatureof yourfood;
it mustbeusedwhenusingthe
TempCookormicrowaveoven
TempCookfunction.A temperature
probehasbeenprovidedforusein
yournewmicrowaveoven.
Howto TempCooka RolledBeef Rib Roastto Medium
1.Insertthetemperatureprobeintotheroastand
attachthecableendoftheprobesecurelyinto
thereceptaclein theovenwall.Close thedoor.
2.PresstheTEMPCOOKpad.
Temperatureprobesprovidedwith
otherproducts,suchasthose used
forovens,aredesignedto
withstandhightemperatures.
Useofprobesotherthantheone
providedwiththis productmay
resultindamageto theprobe.
START
o
;;y[
A
n
3. Press 1,5 andOto set 150°F.
4. PressthePOWERLEVELpad,
PfE~f~ press5to setmediumpower.
m
6. When150°F.is reached,theovencontrolsignals
and‘bHOL&’willbeinthedisplay.Theovenwill
thenholdthetemperature.
7.PresstheCLEAWOFFpadto stopthecycle.
8.Removetheprobeandtheroastfromtheoven.
Cable
Sensor
End
I
5. PresstheSTARTpad.If theinternal
temperatureof theroastis lessthan
80°F.,thedisplaywillshow“COOU’;if
theroast’sinternaltemperatureis 80°F.
or above,thedisplayshows the
temperaturecountingup.
CookingTips
● Use alowerpowerlevel;it willheatfoodmore
evenlythoughrequiringmoretime.
● Cover foodslooselyformoisturecontrolandquick,
evenheating.
QuestionsandAnswers
Q. After I followedthe steps and pressed the
STARTpad “ERROR” flashed on the display
and the ovencontrol signaled.What’s wrong?
A. “ERROR”flashesifyouset thetemperature
eitherbelow80°F.orabove199°F.Theoven
displaywillshowyou,betweentheflashingof
“ERROR,”whatincorrectentrywasmade.Toreenter,presstheCLEAWOFFpad andbeginagain.
18
● Besurefrozenfoodhas beencompletelydefrosted
beforeinsertingprobe.Theprobemaybreakoffif
youattemptto pushit intofrozenfoods,
Q. Why did “PRObE” flash after I pressed the
STARTpad?
A. “PRObE’willflashifyoudon’tseatthecableend
of theprobesecurelyintothereceptaclein the
ovenwallor ifyoupresstheTEMPCOOKpad
andforgetto usetheprobe.
Q. Can I leavemy probe in the ovenif it’s not
inserted in the food?
A. No,if it touchestheovenwall,damagemay
occurtotheprobeandoven.
Page 19

HOW TOUSET~ DO~LE DUTY” SHELF
● Usethe shelfonlywhencookingfoodon
2 levels.Foodmicrowavesbestwhenplaced
directlyontheovenfloor.
● Donotstoreorcookwiththeshelfonthefloor
oftheoven.Productdamagemayresult.
● Usepotholderswhenhandlingthemetalshelf
andcontainers.Theymaybehot.
● Do notstorea microwavebrowningdishonthe
metalshelf.
—
PositioningtheShelf
TopositiontheDoubleDutyTM
shelf,tipthebackslightlyandfit
theshelfsupportguidesontothe
supportguideslocatedoneach
sideoftheovenintherear.
Next,lowerthefrontuntiltheshelf
supportguidesfitontothesupport
guideslocatedateachsideofthe
oveninthefront.
/
Yourshelfaccessoryis designedfor use in the
microwaveovenonly;do nouse itintheloweroven.
Donotusea browningdishwiththeshelf.Arcing
couldoccur.
The wire shelfis specificallydesignedfor added
heating and reheating capacity.Morethanonefood
maybeheatedorreheatedandreadyto serveatthe
sametime.
Do not use the ovenshelfto cookbatters and
doughfoodsand alsouncookedfoodswhich need
to be prepared from scratch.
Pop popcorn on the microwaveovenfloor only.
Popcornplacedon theovenshelfwillnotpop
properly.Usea specialmicrowavepopcornaccessory
orpopcornlabeledforuseinmicrowaveovens.
Whenproperlypositioned,the
shelfshouldfitsnuglyin place,be
levelandnottouchthebackwall
oftheoven.
If arcing occurs when using the
shelfto cookmorethanonefood
atthe sametime,turntheovenoff.
Make surethe shelfis positioned
right-side-upondl fourshelfsupports
andnottouchingovenwalls.
Toprevent arcing, removethe
shelfwhenyouarenotusingit.
Howto Heator ReheatSeveralDifferent~pes of FoodTogether
When heating severaldifferent typesoffood
together,it is importantto rememberthatfoods
absorbmicrowaveenergyatdifferentrates.Rates
canbe affectedbythe sizeofthefoodanditsstarting
temperature.
Becauseofthe varying rates, youmayneedto start
reheatinglargerormoredensefoodsafewminutes
aheadof time,thenaddsmallerorlessdensefoods.
Alternately,if oneofthefoodsyouareheatingseems
underheatedbuttheothersareheatedsatisfactorily,let
theunderheatedfoodcontinuecooking.
Heat or reheat
different typesof
foodat High (10).
Todetermineheating
times,addtimesfor
allfoodstogether.
Afterhalfofthetime,
stirorrearrangefoods
(donotreversepositions).Checkfoods(floor
especially)after3/4ofthetotaltimeandremove
anywhichare done.Continuecookingothers.
19
Page 20

US~G YOURLOWER OWN
BeforeUsingYourOven
1.Lookatthecontrols.Besureyouunderstand
howtosetthemproperly.
2.Checktheoveninterior.Lookattheshelves.
Takeapracticerun atremovingandreplacing
themproperlyto givesure,sturdysupport.
3. Readovertheinformationandtipsthatfollow.
4. Keepthisguidehandysoyoucanrefertoit,
especiallyduringthefirstweeksof usingyour
newoven,
Oven Shelves
Theshelvesare designedwith
stop-lockssothat whenplaced
correctlyonthe shelfsupports,
theywillstopbeforecoming
completelyoutfrom the oven,and
willnot tiltwhenremovingfood
from or placing foodon them.
Whenplacingcookwareon a shelf,
pulltheshelfouttothebumponthe
shelfsupport.Placethecookware
ontheshelf,thenslidetheshelf
backintotheoven.Thiswill
eliminatereachingintothehotoven.
Toremovea shelffrom the oven,
pulltheshelftowardyou,tiltthe
frontendupwardandpullthe
shelfout.
Toreplace,placetheshelfonthe
shelfsupportwiththestop-locks
(curvedextensionoftheshel~facing
upandtowardtherearoftheoven.
Tiltupthefrontand pushtheshelf
towardthe backoftheovenuntilit
goespastthebumpontheshelf
support.Thenlowerthefrontofthe
shelfandpushitallthewayback.
NOTE:
● Youmaynoticea “burning”or“oily”smellthefirstfew
timesyouturnyourovenon. Thisisnormalina new
ovenandwilldisappearina shorttime.Tospeedthe
process,setaself-cleancycleforaminimumof3 hours.
SeetheOperatingtheSelf-CleaningOvensection.
● A fan mayautomaticallyturnonandofftocool
internalparts.Thisisnormal,andtheFanmay
continueto runevenaftertheovenis turnedoff.
ShelfPositions
Theovenhasfourshelfsupportsidentifiedin this
illustrationas A (bottom),B, C andD (top).
Shelfpositionsfor cookingaresuggestedin the
Baking,RoastingandBroilingsections.
OvenLight
Whenusingtheselfcleancycle, if the ovenlightis on
itwillturnoffautomatically.Youwillnotbeableto
turntheovenlightonduringthe cleancycle.
UsetheOVENLIGHTpadonthelower
OVEN ovencontrol
LIGHT whenthedoor1sclosed.
m
NOTE: Theovenlightwillturnoff
automaticallyandcannotbe turnedon
duringthe self-cleanfunction.
panel to turnthelighton
20
OvenVentDuct
Theovenisventedthrougha ductthat’slocatedon
theleftsideof theovenjust abovethedoor.Moisture
andvaporsfromtheovenareventedthroughit when
ovenisinuse,Nevercovertheholeintheduct.Todo
sopreventsit fromfunctioningproperlyduring
cookingandself-cleaning.
Page 21

BA~G
Youroventemperatureiscontrolledveryaccurately
usinganovencontrolsystem.Itisrecommendedthat
youoperatetheovenfora numberof weeks to
becomefamiliarwithyour newoven’sperformance.
Howto SetYourOvenfor Baking
Toavoidpossibleburns, placetheshelvesinthe
correctpositionbeforeyouturntheovenon.
1.PresstheBAKEpad.
2. PresstheINCREASEorDECREASEpad.Thelast
temperatureusedwillappearinthedisplay.Continue
pressinguntilthedesiredtemperatureisdisplayed.
3. PresstheSTARTpad.Whentheovenstartstoheat,
the words“BA~’ and“TEMP’andthechanging
temperature,startingat 10O°F.,willbedisplayed.
Whentheovenreachesthetemperatureyouset,atone
willsoundanda“PrE’(preheating)flashesinthe
display.Thedisplaythenshowsthesettemperature
continuously.
If youthinkanadjustmentisnecessary,seetheAdjust
theOvenThermostatsection.ItlistseasyDoIt
Yourse~instructionson howto adjustthethermostat.
NOTE: Whenthe ovenishot,thefrontof the
cookingcentergets hottoo.
4. PresstheCLEAWOFFpadwhenbakingisfinished
andthenremovethefoodfromtheoven.
NOTE:
● Youmaysetthetimertothedesiredcookingtime.
SeetheOvenControl,ClockandTimersection.
● A fan mayautomaticallyturnonandoffto cool
internalparts,Thisis normal,andthefanmay
continueto runevenaftertheovenis turnedoff.
[ Tochangethe oventemperature during
the bakecycle,pressthe-BAKEpadandthenthe
INCREASEorDECREASEpadtogetthenew
temperature.
I
OvenShelves
Arrangetheoven
shelforshelvesin
thedesiredlocations
whiletheovenis
coo].Thecorrect
shelfposition
dependson thekind
of foodandthe
browningdesired.
Asa generalrule,
place mostfoodsinthemiddleof theoven,oneither
shelfpositionsB orC. Seethechartforsuggested
shelfpositions.
w
Preheating
Preheatingis necessaryfor goodresultswhenbaking
cakes,cookies,pastryandbreads.Formostcasseroles
androasts,preheatingis notnecessary.Forovens
withouta preheatindicatorlight or tone,preheat10
minutes.Aftertheovenis preheated,placethefoodin
theovenasquicklyaspossibleto preventheatfrom
escaping.
\y
I ~Pe ofFood
Angelfoodcake
I Biscuitsormuffins
Cookiesor cupcakes
! Brownies
I Layercakes
Bundtorpoundcakes
I Piesor pieshells
I Frozenpies
Casseroles
Roasting
Reheattheovenif therecipecallsforit.Preheatmeans
bringingtheoven up to the specifiedtemperature
beforeputtingthefoodintheoven.Topreheat,setthe
ovenatthecorrecttemperature—selectingahigher
temperaturedoesnotshortenpreheattime.
I Shelf
] Bor C
! Bor C
I Bor C
I
I Bor C
I A (oncookiesheet) ]
I
Position I
A
Bor C
Aor B
Bor C
Aor B
(contit?uednext page]
21
I
I
I
I
I
1
I
Page 22

BA~G
(continued)
BakingPans
Usetheproperbakingpan.Thetypeoffinishonthe
pandeterminestheamountofbrowningthatwilloccur.
● Dark,roughor dullpansabsorbheatresultingina
browner,crispercrust.Usethistypeforpies.
● Shiny,brightandsmooth pansreflectheat,resulting
ina lighter,moredelicatebrowning.Cakesand
cookiesrequirethistypeof pan.
● Glassbakingdishesalsoabsorbheat.Whenbaking
inglassbakingdishes,thetemperaturemayneedto
bereduced25°F.
● If youare usingdarknon-stickpans,you mayfind
PanPlacement
Forevencookingandproperbrowning,theremustbe
enoughroomforaircirculationin theoven.Baking
resultswillbe betterifbakingpansarecenteredas
muchaspossibleratherthanbeingplacedto thefront
or to thebackoftheoven.
Pansshouldnottoucheachotheror thewallsof the
oven.Allow1-to 1‘k-inchspacebetweenpansas
wellasfromthebackof theoven,thedoorandthe
sides.If youneedtousetwoshelves,staggerthepans
sooneis notdirectlyabovetheother.
thatyouneedtoreducetheoventemperature25°F.
topreventoverbrowning.
BakingGuides
Whenusingpreparedbakingmixes,followpackagerecipeorinstructions
forthebestbakingresults.
Cookies
Whenbakingcookies,flatcookiesheets(without
sides)producebetter-lookingcookies.Cookiesbaked
in ajellyrollpan (shortsidesallaround)mayhave
darkeredgesand paleor lightbrowningmayoccur.
Do notuseacookiesheetsolargethatittouchesthe
wallsorthedooroftheoven.Neverentirelycovera
shelfwitha largecookiesheet.
Forbestresults,useonlyonecookiesheetin theoven
ata time,
Pies
Forbestresults,bakepiesindark,roughordullpans
to produceabrowner,crispercrust.Frozenpiesin foil
pansshouldbeplacedon an aluminumcookiesheet A cakebakedin a pan largerthantherecipe
forbakingsincetheshinyfoilpanreflectsheataway
fromthepiecrust;thecookiesheethelpsretainit.
Cakes
Whenbakingcakes,warpedorbentpans willcause
unevenbakingresultsandpoorlyshapedproducts.
recommendswillusuallybecrisper,thinneranddrier
thanit shouldbe.If baked in a pansmallerthan
recommended,it maybe undercookedandbattermay
overflow.Checktherecipeto makesurethepansize
usedistheonerecommended.
Page 23

AluminumFoil
Don’tPeek
Neverentirelycover
a shelfwith
aluminumfoil.This
willdisturbtheheat
circulationandresult
inpoorbaking.A
smallersheetof foil
maybeusedto catch
a spilloverby
~lacingitona lower
~helfs~veralinchesbelowthefood.
TMED BA~NG
Howto TimeBake
Theovencontrolallowsyouto turntheovenon
or offautomaticallyat specifictimesthatyouset.
Examplesof ImmediateStart(oventurnson nowand
yousetitto turnoffautomatically)andDelayStart
andStop(settingtheoventoturnonautomatically
ata latertimeandturnoffat a presetStopTimewill
bedescribed).
Setthetimerfortheestimatedcookingtimeanddo
notopenthedoortolookat yourfood.Mostrecipes
provideminimumandmaximumbakingtimessuch
as “bake30-40minutes.”
DONOTopenthedoortocheckuntiltheminimum
time.Openingtheovendoor frequentlyduringcooking
allowsheattoescapeandmakesbakingtimes longer.
Yourbakingresultsmayalsobeaffected.
NOTE: Beforebeginning,makesuretheovenclock
showsthecorrect timeof day.
Toset the clock,firstpresstheCLOCKpad.
Pressthenumberpadsuntilthecorrect timeof day
isdisplayed.PresstheSTARTpad.
Howto SetImmediateStartand AutomaticStop
Toavoid possibleburns, placetheshelvesinthe
correctpositionbeforeyouturntheovenon.
Theovenwillturnonimmediatelyandcookfor a
selectedlengthoftime.At theendof CookTime,
theovenwillturnoffautomatically.
1.PresstheCOOKTIMEpad.
COOK
TIME
A
m
2.PresstheINCREASEor DECREASEpaduntilthe
desiredlengthof bakingtimeis displayed.
BAKE
A
n
4. PresstheINCREASEorDECREASEpaduntil
thedesiredtemperatureisdisplayedinthelower
leftdisplay.
Thewords“TIMEBAKE’and“COOKTIME’
willbedisplayedalongwiththeoventemperature
yousetandthecooktimethatyouentered.
NOTE: Ifyourreciperequires
preheating,youmayneedto add
additionaltimetothe lengthof the
CookTime.
3. PresstheBAKEpad.
5.PresstheSTARTpad.Thedisplay showsthetime
ofday,theoventemperaturethatyousetandthe
CookTimethatyouenteredcountingdown.
6.Theovenwillcontinueto cookfortheprogrammed
amountoftime,thenshutoffautomatically.
7. PresstheCLEAWOFFpadto turnthe
C~:+R
o
NOTE: Foodsthatspoileasilysuchas milk,eggs.
fish,stuffings,poultryandporkshouldnotbe allowed
to sitfor morethanonehourbeforeor aftercooking.
Roomtemperaturepromotesthegrowthofharmful
bacteria.Besurethattheovenlightisoffbecauseheat
fromthebulbwillspeedharmfulbacteriagrowth.
ovenoffandto clearthedisplayif
necessary.Removethefoodfromthe
oven. Remember,foods thatare leftin
theovencontinuecookingafterthe
controlsareoff.
23
Page 24

TMD BA~G
(continued)
Howto SetDelayS@rtandAutomaticStop
Quick Reminder
1.PresstheCOOKTIMEpad.
2. PresstheINCREASEor DECREASEpadto
setthelengthofbakingtime.
3. PresstheSTOPTIMEpad.
4.PresstheINCREASEor DECREASEpaduntil
thedesiredStopTimeappearsin thedisplay.
5,PresstheBAKEpad.
6. PresstheINCREASEor DECREASEpadto
selecttheoventemperature.
7. PresstheSTARTpad.
Toavoidpossibleburns, placethe shelvesin the
correctpositionbeforeyouprogramtheoven.
Youcan settheovencontroltodelay-starttheoven,
cookfora specificlengthof timeandthenturnoff
automatically.
1.PresstheCOOKTIMEpad.
COOK
TIME
A
m
2.Press theINCREASEor DECREASEpaduntilthe
desiredlengthofbakingtimeappearsinthedisplay.
STOP
TIME
A
n
4. ChangetheStopTimebypressingtheINCREASE
or DECREASEpaduntilthedesiredStopTime
appearsin thedisplay.
NOTE: Ifyourreciperequires
preheating,youmayneedto add
additionaltimetothe lengthof the
CookTime.
3.Pressthe STOPTIMEpad.“SET
STOPTIME’ andtheearliestStop
Timeyoucansetappearinthedisplay.
Thecontrolautomaticallysetsthe
StopTimebyaddingtheCookTime
to thetimeofday.Forexample,the
timeofdayis 2:00andthecooktime
is 3 hours.Adding3hourstothetime
ofdayequals5:00.In theexample,
“5:00’and“STOPTIME’ appearin
thelowerrightdisplay.
5. PresstheBAKEpad
BAKE
A
n
6. PresstheINCREASEor
DECREASEpaduntilthedesired
@
a
NOTE: Ifyouenteredan impossibleStopTime
andCookTimecombination(onethatrequiresan
earlierstarttimethanthecurrenttimeof day)then
“ErrSTARTTIME’and“STOPTIME”flashonthe
display.PresstheCOOKTIMEpad andenterthe
correctCookTime.
7.Pressthe STARTpad.Theovenwillturnon
automatically.Theovenwillcookforthe
programmedtimeandshutoffautomatically.
C~~+R
o
NOTE:
● Foodsthatspoileasilysuchasmilk,eggs,fish,
stuffings,poultryandporkshouldnotbeallowedto
sitformorethanonehourbeforeor aftercooking.
Roomtemperaturepromotesthegrowthofharmful
bacteria.Besurethattheovenlightisoffbecause
heatfromthebulb willspeedharmfulbacteriagrowth.
● A fanmayautomaticallyturnonandofftocool
internalparts.Thisisnormal,andthefanmay
continueto runaftertheovenisturnedoff.
● Thelowtemperaturezoneofthisoven(between
150°F.and200°F.)isavailableto keephotcooked
foodswarm,Foodskeptin theovenlongerthan2
hoursattheselow temperaturesmayspoil.
temperatureis displayed.
8.Pressthe CLEAWOFFpadtoturn
theovenoffandto clearthedisplay
if necessary.Removethefoodfrom
theoven.
24
Page 25

ADJUSTTHE OVENTHE~OSTAT
DOIT YOURSELF!
Youmayfind that your newovencooksdifferently
than the oneit replaced. Werecommendthatyou
useyournewovenfora fewweeksto becomemore
Pdmiliarwithit, followingthetimesgivenin your
recipesasa guide.
If you think your newoven istoo hot or too cold,
you can adjust the thermostat yourself.If youthink
it istoohot,adjustthethermostatto makeitcooler.If
youthinkitistoocool,adjustthethermostatto make
ithotter.
Wedo not recommendthe use of inexpensive
thermometers, suchasthosefoundingrocerystores,
tocheckthetemperaturesettingofyournew oven.
Thesethermometersmayvary20–40 degrees.
/
T
ToAdjust the Thermostat:
1.PresstheBAKEpad.
BAKE
A
n
2. Selectanoventemperaturebetween500°F.and550°F.
3. Immediately,before“ON”appears,pressandhold
theBAKEpadforabout4 seconds.Thetime
displaywillchangeto theovenadjustmentdisplay.
4.The oventemperaturecanbe
adjustedupto (+) 35°F.hotteror(–)
@
A
@
v
START
o
35°F,cooler.Pressthe INCREASE
padto increasethetemperaturein 5
degreeincrements.pressthe
DECREASEpadto decreasethe
temperaturein
5. Whenyouhavemadetheadjustment,
presstheSTARTpadtogobackto
thetimeofdaydisplay.Useyour
ovenasyouwouldnormally.
5 degreeincrements.
NOTE:
● Thisadjustmentwillnotaffectthe Broilingor Self-
Cleaningtemperatures.It willberetainedinmemory
afterapowerfailure.
● PressingtheCLEAR/OFFpador anyfunctionpad
whilein theadjustthermostatmodewillcancelthe
modeand anychangesmadeto thethermostatwill
notbesaved.
25
Page 26

ROAST~G
Roastingiscookingbydryheat.Tendermeator
poultrycanberoasteduncoveredinyouroven.
Roastingtemperatures,whichshouldbelowand
steady,keepspatteringto a minimum.
Roastingis reallyabakingprocedureusedfor
meats.Therefore,theovencontrolsaresetfor Baking
orTimedBaking.(Youmayhearaslightclicking
sound,indicatingtheovenisworkingproperly.)
TimedBakingwillturntheovenon automatically.
1.PlacetheshelfinA or B uosition.No~reheatin~
isnecessary,
2. Checkthe weight
ofthemeat.Placeit
fat side up (orfor
poultrybreastside
up)on aroasting
rackin a shallow
pan.Themeltingfat
willbastethemeat.
a
@
panasclose
--
3. PresstheBA= pad.
4.PresstheINCREASEor DECREASE
paduntilthedesiredtemperature
isdisplayed.
Selecta
to thesizeofthemeataspossible.(Thebroilerpan
withrackis a goodpanforthis,)
BAKE
n
A
. .
In-~
<k~’.v”
~<<’T<y I
‘%+1
A\) ‘*A
Mostmeatscontinuetocookafterbeingremoved
fromtheoven.Theinternaltemperaturewillrise5 to
10degreesF.duringtherecommendedstandingtime
of 10to 20minutes.Thisallowsroaststo firmupand
makesthemeasier to carve.Tocompensateforthis
risein temperatureyoumaywanttoremovetheroast
sooner(at5 to 10degreeslessthanshowninthe
RoastingGuide).
Rememberthatfoodwillcontinueto cookin the
hotovenandthereforeshouldberemovedwhenthe
desiredintemd temperaturehasbeenreached.
5.Pressthe STARTDad.Whentheovenstartsto heat.
thewords“BA~’” and“TEMP’andthechanging’
oventemperature,startingat 100°F.,willbe
displayed.Whentheovenreachesthetemperature
youset,a tonewillsound,
~ 6.
fil FAA rOaStingisfinished.
“--, . . .
PresstheCLEAWOFFpadwhen
OFF
u
NOTE: Afanmayautomaticallyturnonandoffto
coolinternalparts:Thisisnormal,andthefanmay
continuetorunevenaftertheoven is turnedoff.
Tochnge tie oventemperatureduring roasting,
presstheBAKEpad andthentheINCREASEor
DECREASEpadto getthenewtemperature.
@
v
UseofAluminumFoil
Youcanusealuminumfoiltolinethebroilerpan.
Thismakesclean-upeasierwhenusingthepanfor
marinating,cookingwithfruits,cookingheavily
curedmeatsor bastingfoodduringcooking.Press
thefoiltightlyaroundthe insideof thepan.
26
Page 27

QuestionsandAnswers
Q. Is it necessary to checkfor donenesswith a
meat thermometer?
A. Checkingthefinishedinternaltemperatureat
thecompletionof cookingtimeisrecommended.
TemperaturesareshownintheRoastingGuide.
Forroastsover8 lbs.,checkwiththermometer
at half-hourintervalsafterhalfthecookingtime
haspassed.
Q. Why ismy roast crumbling when I try to
carve it?
A. Roastsareeasierto sliceif allowedto cool 10to
20minutesafterremovingthemfromtheoven.
Besureto cutacrossthegrainofthe meat.
ROAST~G GU~E
FrozenRoasts
Frozenroastsofbeef,pork,lamb, etc.,canbe started
withoutthawing,but allow10to 25 minutesper
poundadditionaltime(10minutesperpoundfor
roastsunder5 pounds,moretimeforlargerroasts).
Q. Do I need to preheat my oveneach timeI cook
a roast or poultry?
A. It is notnecessarytopreheatyouroven. Preheat
onlyforverysmallroasts, whichcookina short
lengthof time.
Q. When buyinga roast, are there any specialtips
that would help me cookit more
evenly?
A. Yes.Buya roastas eveninthicknessaspossible,
or buyrolledroasts.
Q. Can I seal
roasting a turkey?
the sides of my foil “tent” when
A. Sealingthefoilwillsteamthemeat.Leavingit
unsealedallowstheairtocirculateandbrown
themeat.
Make surepoultryis thawedbeforeroasting.
Unthawedpoultryoftendoesnotcookevenly.
Somecommercialfrozenpoultrycanbecooked
successfullywithoutthawing.Followthedirections
givenonthepackagelabel.
Oven
TvDe
Temperature
Doneness
Meat
Tendercuts;rib,highquality
sirlointip,rumportopround*
Lamblegorbone-inshoulder*
Vealshoulder,legorloin*
Porkloin,riborshoulder*
Ham,precooked
325°
325°
325°
325°
325°
Rare:
Medium:
Done:
Well
Rare:
Medium:
Well Done:
Well Done:
Well Done:
To Warm:
Poultry
ChickenorDuck
Chickenpieces
Turkey
*Forboneless rolled roasts over 6 inches thick, add 5 to 10 minutes per pound to times given above.
YTheU. S. Department of Agriculture says “Rare beef is popular, but you should know that cooking it to only 140°F.means
some food poisoning organisms may survive.” (Source: Safe Food Book. Your Kitchen Guide. USDA Rev.June 1985.)
325°
350°
325°
Well Done:
Well Done:
Well Done:
Approximate Roasting Time
in Minutes per Pound
—
3 to 5 Ibs. 6 to 8 Ibs.
24-33 18-22
35-39 22-29
4045
21-25
25-30
30-35
3545
3545
17–20minutesperpound (anyweight)
lbs.
3 to 5
30-35
20-23
24-28
28-33
3040
3040
Over5 Ibs.
3540 30-35
3540
to 15lbs.
10
18-25
Over15Ibs.
15-20
Internal
Temperature‘F.
140°–1500t
1500–160°
170°–1850
140°–1500t
150°–160°
170°–1850
1700–180°
170°–180°
115°–1200
185°–1900
185°–1900
In thigh:
185°–1900
27
Page 28

Broilingiscookingfoodbyintenseradiantheatfrom Turnthefoodusingtongsonlyonceduringthe
theupperbroilelementintheoven.Mostfishandtender broiling.Timethe foodsforthefirstsideaccording
cutsof meatcanbebroiled.Followthesedirectionsto totheBroilingGuide.Turnthefood,thenusethe
keepspatteringandsmokingto a minimum. timesgivenforthesecondsideas a guideto the
preferreddoneness.
1. Ifthemeat hasfat or gristlearoundtheedge,cut
verticalslashesthroughbothabout2inchesapart.
If desired,thefatmaybe trimmed,leavinglayer
about1/8inchthick.
2. Placethemeaton thebroilerrackin thebroilerpan.
Alwaysusetherackso thefatdripsintothe broiler
pan;otherwisethe juicesmaybecomehotenough
to catchonfire.
3. Positionshelfon therecommendedshelf position
assuggestedintheBroilingGuide.Mostbroiling
isdoneonC position,but if your cookingcenter is
connectedto208volk,youmay wishtousea
higherposition.
4.Leave the door open to
the broilstop position. The
doorstaysopenbyitself,yet
thepropertemperatureis -. . .. ,:; ‘“
maintainedin theoven.
/ “ .
&
.. ...
,.,.
BROIL
A
n
6. Tappingthe BROILpadalternatesbetweenLO
Broil(450°F.)andHI Broil(550°F.).
7. PresstheSTARTpad.
8.WhenbroilingisfinishedpresstheCLEAWOFF
pad.Servethefoodimmediately,andleavethe
panoutsidetheovento coolduringthemealfor
easiestcleaning.
NOTE: Boththe lowerovenandthemicrowavefans
mayoperateduringlong-termbroil.Thisis normal,
andthefansmaycontinuetorun evenaftertheoven
is turnedoff.
5. PresstheBROILpad.Preheating
Useof AluminumFoil
You canusealuminumfoilto lineyourbroilerpanandbroilerrack.However,
youmustmoldthefoiltightlytotherackandcutslitsinitjust liketherack.
Withouttheslits,thefoilwillpreventfatandmeatjuicesfromdrainingintothe
broilerpan.Thejuicescouldbecomehotenoughtocatchonfire.If youdo not
cuttheslits,youarefrying,notbroiling.
theelementsisnotnecessary.
(SeetheCommentscolumnin
theBroilingGuide.)
QuestionsandAnswers
Q. Do I need to grease my broiler rack to prevent
meat from sticking?
A. No.Thebroilerrackis designedtoreflectbroiler
heat,thuskeepingthesurfacecoolenoughto
preventmeatfromstickingto thesurface.
However,sprayingthebroilerracklightlywitha
vegetablecookingspraybeforecookingwillmake
clean-upeasier.
Q. When broiling,is it necessaryto alwaysusea
rack in the pan?
A. Yes.Usingtheracksuspendsthemeatoverthe
pan.Asthemeatcooks,thejuicesfallintothepan,
thuskeepingthemeatdrier.Juicesareprotectedby
therackand staycooler,thus preventingexcessive
spatterandsmoking.
28
Q. Should I salt the meat beforebroiling?
A. No.Sak drawsoutthejuices andallowsthemto
evaporate.Alwayssaltaftercooking.Piercing
meatwithaforkalsoallowsjuicestoescape.
Turnmeatwithtongsinsteadof a fork.
Q. Why are my meats not turning out as brown as
they should?
A. In someareas,thepower(voltage)to theovenmay
be low.In thesecases,preheatthebroil elementfor
10minutesbefore placingbroiler pan withfoodin
theoven.Checkto seeif youareusingthe
recommendedshelfposition.Broilfor thelongest
periodof timeindicatedintheBroilingGuide.
Turnthefoodonlyonceduringbroiling.Youmay
needtomovethefoodto a highershelfposition.
Page 29

● Alwaysusethebroilerpanandrackthatcomeswith
youroven.
It is designedto minimizesmokingand
spatteringby trappingjuicesintheshieldedlower
partofthe pan.
● The oven door should be open to the broil
stop position.
● For steaksandchops,slashfatevenlyaroundthe
outsideedgesof themeat.Toslash,cutcrosswise
throughtheouterfatsurfacejustto theedgeof the
meat.Use tongsto turn meatoverto prevent
piercingthemeatandlosingjuices.
● If desired,marinatemeatsorchickenbeforebroiling,
orbrushwithbarbecuesaucelast5 to 10minutesonly.
● Whenarrangingfoodon thepan,do notletfatty
edges hangoverthesidesbecausethedrippingfat
willsoiltheoven.
● Thebroilerdoesnotneedto bepreheated.However,
forverythinfoods,orto increasebrowning,preheat
if desired.
● UseLO Broiltocookfoodssuchaspoultryorthick
porkchopsthoroughlywithoutoverbrowningthem.
● Frozensteakscanbe broiledby positioningtheoven
shelfatnextlowestshelfpositionandincreasing
cookingtimegivenin thisguide1Xtimesperside.
● If your cookingcenter is connectedto 208volts,
raresteaksmaybebroiledby preheatingthebroiler
andpositioningtheovenshelfonepositionhigher.
Quantity an~or
Food
Bacon
Ground Beef
WellDone
Beef Steaks
Rare
Medium
WellDone
Rare
Medium
Well Done
Chicken 1whole
Bakery Products
Bread(Toast)or
ToasterPastries
EnglishMuffins
Lobster Tails 24
Fish
Ham Slices
(precooked)
Pork Chops
WellDone
Chops
Lamb
Medium Well Done
Medium
Well Done
Wieners and
similarprecooked
sausages,
bratwurst
Thickness
1/2lb. (about8
thin slices)
1lb. (4patties)
1/2to 3/4 inch thick
1inch thick
(1 to 1Y2lbs.)
1k inchthick
(2to2Xlbs.)
(2 to 2Xlbs.),
split lengthwise
2 to 4 slices
1pkg. (2)
2 (s~lit)
(6to 8 oz.each)
l-lb. fillets 1/4to
1/2inch thick
1inch thick
2 (1/2 inch thick)
2 (1 inch thick),
about 1 lb.
2(1 inch thick),
about 10 to 12oz.
2(1 Xinch thick),
about 1 lb.
l-lb. pkg. (10)
Shelf
Position
c
First Side
Time, Minutes
c
c
c
c
c
c
c
A
Cor D
Cor D 34
B
c
B
c
B
c
c
c
B
c 6
4%
10
6
8
12
10
15
25
35
1%-2
13-16
<
J
8
10
13
10
12
14
17
Second Side
Time, Minutes
4fi
7
5
6
11
7-8
14-16
2&25
10-15 Reducetime about5 to 10minutesper
1/2
Do not
turn over.
5
8 Increase time 5 to 10minutesper side
10
13
9
Comments
Arrange in single layer.
Space evenly. Up to 8 patties
take about same time.
Steaks less than 1inch thick cook
through before browning. Pan
frying is recommended.
Slash fat.
side for cut-up chicken. Brush each
side with melted butter.
Broil skin-side-down first.
Space evenly. Place English
muffins cut-side-up and brush
with butter, if desired.
Cut through back of shell. Spread
open. Brush with melted butter before
broilingand after hdf of broilinglime.
Handle and turn very carefully.
Brush with lemon butter before
and during cooking, if desired.
Preheat broiler to increase browning.
for 1Xinch thick or home cured ham.
Slash fat.
Slash fat.
10
12
12-14
1-2 If desired, split sausages in
half lengthwise; cut into 5- to
6-inch pieces.
29
Page 30

OPEMT~G Tm SELF-CLEA~G OVEN
Beforea CleanCycle
NormalCleaningTime:3hours
1.Removethebroilerpan,broilerrack,allcookware
andanyaluminumFoilfromtheoven—theycan’t
withstandthehighcleaningtemperatures.
NOTE: Theovenshelvesmay becleanedin
the self-cleaningoven.However,theywilldarken,
losetheirlusterandbecomehardtoslide.Wipe the
shelfsupportswithcookingoilafterself-cleaning
to makeshelvesslidemoreeasily.
WiDeu~heavvsoilontheovenbottom.IfYou
2.
us; soa~,rins; thoroughlybeforeself-clefiing
to preventstaining.
Oven
vent
gtille
.Oven
light
Oven
front
frame
m
Openings Ovendoor
in door
gasket
!
3. Cleanspattersorsoilontheovenfrontframeand
theovendooroutsidethegasketwitha dampened
cloth,Theovenfrontframeandtheovendoor
outsidethegasketdo notgetcleanedby theselfcleancycle.On theseareas,usedetergentandhot
waterora soap-filledsteelwoolpad.Rinsewell
witha vinegarandwatersolution.Thiswillhelp
preventa brownresiduefromformingwhenthe
ovenisheated.Bufftheseareaswithadry cloth.
Donotcleanthegasket.
Cleanthetop,sidesandoutsidefrontof theoven
doorwithsoapandwater.Alsousesoapandwater
to cleanundertheovenventgrille.Donot use
abrasives or ovencleaners.
Makesuretheovenlightbulbcoverisinplace.
Do not rub or cleanthe door gasket—
thefiberglassmaterialofthegaskethasan
extremelylowresistanceto abrasion.Anintact
andwell-fittingovendoorgasketis essentialfor
energy-efficientovenoperationandgoodbaking
results.If you noticethegasketbecomingworn,
frayedor damagedin anywayor if it hasbecome
displacedon thedoor,you shouldhaveitreplaced.
Donot let water run downthrough openings in
the top of the door.Tohelppreventwaterfrom
gettingin theseslotswhencleaning,openthedoor
asfar as it willgo.
4.Closetheovendoorandmakesure theoven
light is off. If theovenlightisnotturned off,
thelifeof thebulbwillbeshortenedor it may
bumoutimmediately.Thedoorlatches
automaticallyafterthecleancycleisset.
Do not use commercialovencleanersor oven
protectors in or near the self-cleaningoven.
Acombinationof anyoftheseproductsplusthe
highclean-cycletemperaturemaydamagethe
porcelainfinishofthe oven.
Important
Theovendoormustbe closedandallcontrolsmust
be setcorrectlyforthecleancycletoworkproperly,
30
Page 31

Howto SetOvenfor Cleaning
Quick Reminder:
1.PresstheAUTOSELFCLEANpad.
2.Pressthe INCREASEor DECREASEpaduntil
thedesiredCleanTimeappears.
3. PresstheSTARTpad.
If theovenistoohotandyou starttoset a cleancycle,
theword“OFF’ willappearin thedisplay.Allow
additionaltimeforcoolingbeforeyoutryto
setthecycle,
1.FollowdirectionsintheBeforeaClean
Cyclesection.
AUTOSELF
CL~AN
2. Afterclosingthedoor,pressthe
AUTOSELFCLEANpad.
E
3. PresstheINCREASEor DECREASE
paduntilthedesiredCleanTimeis
@
A
@
v
displayedin thelowerleftdisplay.
CleanTimeisnormally3hours.
YoucanchangetheCleanTimeto
anytimebetween2 and4 hours,
dependingon theamountofsoilin
youroven,
4. PresstheSTARTpad.
START
o
ThelowerrightdisplayshowsthecalculatedStop
Time.“LOCKED”flashesin thedisplay whilethe
doorlocksautomatically,thenitappearssteadily.It
willnotbepossibleto opentheovendooruntilthe
temperaturedropsbelowthelocktemperatureandthe
LOCKlightgoesoff.
5. WhentheLOCKlightisoff,openthedoor.
NOTE: Boththelowerovenfan andthemicrowave
fan mayoperateduringtheself-cleanfunctionand
continueto operateuntiltheoventemperaturehas
cooled.Thisisnormal,andthefansmaycontinue
to runevenaftertheovenis turnedoff.
ToStopa CleanCycle
1.PresstheCLEAWOFFpad.
C~~$R
o
2. WhentheLOCKlightgoesoffandtheovenhas
cooledbelowthelockingtemperature,openthe
door.
31
Page 32

OPEMT~G Tm SELF-CLEAMG OVEN
AfterSelf-Cleaning
(continued)
Youmaynoticesomewhiteashintheoven.Justwipe
itup witha dampclothaftertheovencools.
If whitespotsremain,removethem witha soap-filled
steelwoolpad.Besuretorinsethoroughlywitha
vinegarandwatermixture.These depositsareusually
a saltresiduethatcannotberemovedbythecleancycle.
Howto SetDelayStartof Cleaning
Quick Reminder:
1.PresstheAUTOSELFCLEANpad.
2. PresstheINCREASEor DECREASEpaduntil
thedesiredCleanTimeappears.
3. PresstheSTOPTIMEpad.
4. PresstheINCREASEor DECREASEpaduntil
thedesiredStopTimeappearsinthedisplay.
5.PresstheSTARTpad.
DelayStartis settingthe oventimerto startthe clean
cycle automaticallyata latertimethanthepresent
timeofday.
NOTE: Beforebeginning,makesuretheovenclock
showsthecorrecttimeof day.
1.FollowthedirectionsintheBeforea Clean
Cycle section.
AUTOSELF
CL&AN
2. PresstheAUTOSELFCLEANpad.
n
3. PresstheINCREASEorDECREASE
padto enterthedesiredCleanTime.
a
A
If theovenis notcleanafteronecleancycle,
repeatthecycle.
If theshelveshavebecomehardto slide,wipethe
shelfsupportswithcookingoil.
NOTE: Nofunctionscanbeprogrammedbeforethe
doorautomaticallyunlocks.
5. PresstheINCREASEor DECREASE
padto changetheStopTimetoa
@
A
@
v
START
o
ThelowerleftdisplayshowstheCleanTimeand
thelowerrightdisplayshowstheStopTime.
“LOCKED’flashesin thedisplay whilethedoor
locks automatically,thenit appears steadily.Itwill
notbepossibleto opentheovendooruntilthe
temperaturedropsbelowthelocktemperatureand
thelocklightgoesoff.
7.Whenthelocklightis off,openthedoor.
NOTE: Boththelowerovenfanandthemicrowave
fanmayoperateduringtheself-cleanfunctionand
continueto operateuntiltheoventemperaturehas
cooled.Thisisnormal,andthefansmaycontinueto
runevenaftertheovenis turnedoff.
latertimeofdayif desired.
For example:Ifyouset StopTime
at 11:00,ovenwillstartcleancycle
at 8:00andendat 11:00.Thedoor
latchesautomatically.
6. PresstheSTARTpad.
STOP
TIME
A
n
32
4. PresstheSTOPTIMEpad.
TheearliestStopTimewillbe the
CleanTimeselectedplusthetime
ofdav.For exam~le:If theClean
Time”is3 hoursaid thetimeofdayis
6:00,the StopTimethatappearson
thedisplaywillbe9:00.
Page 33

QuestionsandAnswers
Q. If my ovenclockis not set to the correct time of
day,can I stillself-cleanmy oven?
A. If theclockisnot setto thecorrecttimeof day
youwillnotbe abletoseta delaycleanto end ata
specifictime.
Q. Can I use commercialovencleaners on any part
of my self-cleaningoven?
A. No cleanersorcoatingsshouldbeusedaround
anypartof thisoven.Ifyoudo usethemanddo
notthoroughlyrinsetheovenwithwater,wipingit
absolutelycleanafterwards,theresiduecanscar
theovensurfaceanddamagemetalpartsthe next
timetheovenisautomaticallycleaned.
Q. What should I do ifexcessivesmokingoccurs
during cleaning?
A.This iscausedbyexcessivesoil.Turntheovenoff.
Openthewindowstorid theroomof smoke.Wait
untiltheovenhascooledandtheword“LOCK’is
offin thedisplay.Wipeuptheexcesssoilandreset
thecleancycle.
Q. Is the “crackling” or “popping”sound I hear
during cleaningnormal?
A. Yes.Thisis thesoundofthemetalheating
andcoolingduringboththecookingand
cleaningfunctions.
Q. Shouldthere be any odor during the cleaning?
A. Yes,therewillbean odorduringthefirstfew
cleanings.Failureto wipeoutexcessivesoilmight
alsocauseastrongodorwhencleaning.
Q. What causesthe hair-like lineson the enameled
surface ofmy oven?
A. Thisisanormalcondition,resultingfromheating
andcoolingduringcleaning.Theselinesdo not
affecthowyourovenperforms.
Q. Why doI haveash left in my oven
after cleaning?
A. Sometypesof soilwillleave a depositwhich
is ash.Itcan beremovedwitha dampsponge
orcloth.
Q. My ovenshelvesdo not slideeasily.What is
the matter?
A. Aftermanycleanings,theovenshelveswilllose
theirlusterandbecomehardto slide.Tomakethe
shelvesslidemoreeasily,wipe the shelfsupports
withcookingoil.
Q. My ovenshelveshavebecomegray after the
self-cleancycle.Is this normal?
A. Yes.Aftertheself-cleancycle,theshelveswill
losesomelusteranddiscolorto a deepgraycolor.
33
Page 34

Propercareandcleaningareimportantsoyourcookingcenterwillgive
youefficientandsatisfactoryservice.Followthesedirectionscarefullyin
caringfor itto helpassuresafeandpropermaintenance.
BESUREELECTRICPOWERISOFFBEFORECLEANINGANY
PARTOFTHECOOKINGCENTER.
ControlPanel
It’s a goodidea to wipethe control panel after each
use,Cleanwithmildsoapandwaterorvinegarand
water,rinsewithcleanwaterandpolish dry witha
softcloth.
Donot use abrasive cleansers, strong liquid
cleaners, plasticscouring pads or ovencleansers
on the control panel—theywilldamagethefinish.
A50/50solutionofvinegarandhotwaterworkswell.
MicrowaveOven
Outside
*Cleantheoutsideofthe microwaveovenwith
soapandadampcloth,thenrinsewitha damp
clothanddry.Wipethewindowcleanwitha damp
cloth.Chromeisbestwiped witha dampclothand
thenwithadrytowel.
Inside
*Keepthemicrowaveovencleanandsweet-
smelling.Openingtheovendoora fewminutesafter
cookinghelpsairouttheinsideof themicrowave.
Anoccasionalthoroughwipingwitha solutionof
bakingsodaandwaterkeepstheinside fresh.
● Spillsandspattersareeasyto removefromwalls
andfloor.That’sbecausethere’slittleheatexcept
inthefood,or sometimesin thecookware.Some
spatterswipeup witha papertowel,somemay
requirea dampcloth.Removegreasyspatterswith
a sudsycloth,thenrinseanddry.
Wipeup spatters on the windowon the inside
ofthe door daily.Whenthewindowis soiled,wash
itwitha dampcloth. Rinsethoroughlyanddry.
Wipemetal and plasticparts on the insideofthe
door frequently. Usea dampclothtoremoveall soil.
Donotuseabrasives,suchascleaningpowdersor
steelandplasticpads,Theymaymarthesurface.
Door Surface
● Whencleaningsurfacesofdoorandoventhat
cometogetheronclosingthedoor,useonlymild,
non-abrasivesoapsor detergentsappliedwitha
spongeor softcloth.
If youuse a Brown ‘NSear Dish:
● UseBonAmi@brandcleanser.Highheatgenerated
onthe bottomofthe Brown‘NSearDishcan
causestainstobakeontotheovenfloorif grease
ispresent.ThesemayberemovedwithBonAmi”
brandcleanser.Afterusingthiscleanser,rinseand
drythoroughly,followinginstructions.
DO NOT USE A COMMERCIALOVEN
CLEANERON ANY PARTOF YOUR
MICROWAVEOVEN.
ProbeMicrowaveOven
Thetemperatureprobemaybe cleanedwithsoapand
waterora soap-filledscouringpad.Coolthe
temperatureprobebeforecleaning.Scourstubborn
spotswiti a soap-filledscouringpad,rinseanddry.
Donot immerse the temperature probe in water.
Donot store the temperature probe in the oven.
34
Page 35

DoubleDuty ShelPh’MicrowaveOven
Cleanthe shelfwithmildsoapandwateror
inthe dishwasher.
Donot cleanin the self-cleaningoven.
MicrowaveOven Lamp
Toreplacethe microwaveovenlamp, first
disconnectthe powerat the mainfuseor the
circuit breaker panel.
1.Removethegrillabovethemicrowaveoven, To
doso, openthemicrowaveovendoor,thenremove
the2 screwsfromthebottomofthegrill.
3. Removethetapearoundthebaseofthelight.The
tapeisthereto preventthelightfromloosening
duringshipmentanddoorclosings.Removingthe
tapemightbedifficult.
4. Unscrewthebulbcarefully.Usea clothtoprotect
yourhandsin casetheglassbreaks.
NOTE: Thelightis not’standard.Replaceitwitha
similar125-volt,20-wattbulb,whichisavailable
fromyourGEsupplier.
5. Screwthereplacementbulbintothesocketand
replacethelightcoverandgrill. Reconnectthe
powertothecookingcenter.
2. Removethelightcoverby removingthe2 screws.
OvenHeatingElemenh
Donot cleanthe bake elementor the broilelement.
Anysoilwillburnoffwhentheelementsareheated.
Thebakeelementcanbe liftedgentlyto cleanthe
ovenfloor.If spillovers,residue-ora~haccumulate
aroundthebakeelementgentlywipearoundthe
elementwithwarmwater.
BroilElement
BakeElement
(continued next page)
35
Page 36

CAm Am CLEAN~G
Lift-OffOvenDoorLowerOven
The ovendoor isremovable,
butit isheavy.Youmayneed
helpremovingandreplacing
thedoor.Do notliftthedoorby
thehandle.Thiscancausethe
glasstobreakor cancause
damagetothedoor.
Toremovethe door,openit a
fewinchesto the specialstop
positionthat willholdthedoor
open.Graspfirmlyoneachside
andliftthedoorstraightupand
offthehinges.
NOTE:
● Be carefulnottoplacehandsbetweenthehingeand
theovendoorframeas thehingecouldsnapback
andpinchfingers.
● Whileworkingin theovenarea,coverthehinges
withtowelsoremptypapertowelrollsto prevent
pinchedfingersandchippingtheporcelainenamel
ontheframe.
Toreplacethe door,makesurethe hingesareinthe
specialstopposition.Positiontheslots in thebottom
ofthedoorsquarelyoverthehinges.Thenlowerthe
doorslowlyandevenlyoverbothhingesat thesame
time.Ifhingessnapbackagainsttheovenframe,pull
thembackout.
(continued)
TO CLEANTHE DOOR:
Insideof the door:
● Becausetheareainsidethegasketiscleanedduring
theselfcleancycle,youdonotneedto cleanthisby
hand. Any soapleftonthelinercausesadditional
stainswhentheovenis heated.
● Theareaoutsidethegasketcan becleanedwitha
soap-filledscouringpad.
● Do notrub orcleanthedoorgasket—thefiberglass
materialofthegaskethasanextremelylow
resistanceto abrasion.Anintact andwell-fitting
ovendoorgasketisessentialforenergy-efficient
ovenoperationandgoodbakingresults,If you
noticethegasket becomingworn,frayedor damaged
in anywayor if it hasbecome displacedonthedoor,
youshouldhaveitreplaced.
NOTE: Thegasketisdesignedwithagap atthe
bottomto allowforproperaircirculation.
Inside Gasket
Gasket
Outside Gasket
OvenShelvesLowerOven
Cleantheshelveswitha mildabrasive cleanser.
.4ftercleaning,rinsethe shelveswithcleanwaterand
drywithacleancloth.
Toremoveheavy,burned-on soil,usesoapymetal
pads.Afterscrubbing,washwithsoapywater,rinse
anddry.
Outside ofthe door:
● Use soapandwatertothoroughlycleanthetop,
sidesandfrontof theovendoor.Rinsewell.You
mayalsousea glasscleanertocleantheglassonthe
outsideofthedoor.
● Spillageofmarinades,fruitjuices,tomatosauces
andbastingmaterialscontainingacidsmaycause
discolorationandshouldbewipedupimmediately.
Whensurfaceis cool,cleanandrinse.
● Do notuseovencleaners,cleansingpowdersor
harshabrasiveson the outsideofthedoor.
The ovenshelvesmay be cleanedin selfcleaning
oven.However,theywilldarken,losetheirlusterand
becomehardto slide.Wipetheshelfsupportswith
cookingoilafterself-cleaningtomakeshelvesslide
moreeasily.
36
Page 37

BroilerPanand RackLowerOven
After broiling,removethebroilerpan fromthe
oven. Removetherackfromthepan.Carefullypour
outgreasefromthepan intoa propercontainer.Wash
andrinsethebroilerpanandrack inhotwaterwitha
soap-filledor plasticscouringpad,
If foodhas burned on, sprinkletherackwith
detergentwhilehotandcover withwetpaper
towelsor a dishcloth.Soakingthepanwillremove
burned-onfoods.
Boththebroilerpanandrackmaybecleanedwitha
commercialovencleaner,
LightReplacementLowerOven
CAUTION: Beforereplacingyourovenlightbulb,
disconnecttheelectricpowerforyourovenatthe
mainfuseorcircuitbreakerpanel.
Besureto letthe lightcoverandbulbcool completely
beforeremovingorreplacingthem.Wheninuse,light
bulbscan becomewarmenoughtobreakiftouched
witha moistclothor towel,Whencleaning,avoid
touchingwarmlightswithcleaningclothsif thelight
coverisremoved.
Theovenlight(bulb)iscoveredwitharemovableglass
coverwhichisheldinplacewithawire.Removethe
ovendoor,if desired,to reachthecovereasily.
Boththebroilerpanandrackcanalsobecleanedin
thedishwasher.
Donotstoreasoiledbroilerpanandrackanywherein
thecookingcenter.
Do not clean the broiler pan or rack in the
seti-cleaningoven.
Toremove:
● Holdyourhandunder
thecoversoit doesn’t
fallwhenreleased.With
fingersof thesame
hand,firmlypushback
thewire coverholder.
Liftoffthecover.
DONOT WMOVE
ANYSCWWS.
● Replacebulbwith40-watthomeappliancebulb.
Toreplacecover:
● Placeit intothegrooveof thelightreceptacle.Pull
thewireforwardtothecenterofcoveruntilit snaps
in place.Wheninplace,thewireholdsthecover
firmly.Becertain thewireis inthedepressionin the
centerof thecover.
● Connectelectricpowerto theoven.
pb
QQ
‘w ‘>
/{
1’
Wi~~over Holder
I
I
I
GlassWindow
Tocleantheoutsideoftheovenwindow,useaglass
cleaner.Rinseandpolish witha dry cloth.
Do not allowthe water or cleaner to run
down insideopeningsin the top of the oven door
whilecleaning.
PaintedSufiaces
Paintedsurfacesincludethecontrolpanel andgrill.
Cleantheseareaswithsoapandwateroravinegar
andwatersolution.Donot use commercialoven
cleaners,cleansingpowders, steelwoolor harsh
abrasives on any painted surface.
I
37
Page 38

●
r
o
A
Q~STIONS?
USE THIS PROBLEM SOLVER
PROBLEM
“P-ANDA NUMBEK’
FLASH~ THEDISPLAY
LOWEROVENWWL
NOTOPERATE
LOWEROVENLIGHT
DOESNOTWORK
LOWEROVENCONTROLS
W~L NOTWORK
LOWEROVENCONTROL
PANEL GOESBLANK
ORBL~KS
POSSIBLE CAUSE
● Thisis afunctionerrorcode.PresstheCLEAWOFFpad.Allowtheoven
tocoolonehour.Placetheovenbackintooperation.If thefunctionerror
occursagain,disconnectallpowerto theovenandcdl for service.
~Difficultymaybeinthe maindistributionpanelof yourhouseby a blown
ovencircuitfuse,atrippedovencircuitbreaker,themainfuseorthemain
circuitbreaker,dependingonnatureof thepowersupply.If acircuitbreakeris
involved,resetit.If thecontrolboxusesfuses,theovenfuse(acartridge-type)
shouldbechangedBUTONLYBYSOMEONEFAMILIARWITH
ELECTRICALCIRCUITS.If afterdoingoneoftheseprocedures,thefuse
blowsorcircuitbreakertripsagain,call for service.
NOTE: Apartmenttenantsor condominiumownersshouldrequesttheir
buildingmanagementtoperformthischeckbeforecallingfor service.
*The ovencontrolsarenotproperlyset.
● me dooris stilllocked.Lettheovencoolto a safetemperature.
*Lightbulbis looseoris burnedout.
● TheOVENLIGHTpadisdefective.
9Theovenis in the Self-Cleanfunction.
*Clocknotset.PresstheCLOCKpad andenterthetime.PresstheSTARTpad.
● If itcannotbe resetbypressingpads,electricalservicetoyourresidencehas
causedinterferencesignalsonthemainpowerline.Disconnectyourcooking
centeratthemainfuseor circuitbreakerpanel.Waitoneminuteandreconnect
power.Resetthe clock.
CONTROLPANELON
MCROWAVEOVEN
~L NOTOPERATE
FOODSOVERCOOKED
ORUNDERCOOKED
IN MICROWAVEOVEN
“PROBE’APPEARS~
THEMICROWAVEDISPLAl
*The STARTpadnotpressed.
● Thedoornotsecurelyclosed.
● Anotherfunctionwaspressed.PresstheCLEAWOFFpadto cancel.
● NumbersnotenteredafterpressingtheTIMECOOKpad.
● FinishedtemperaturenotenteredafterpressingtheTEMPCOOKpad.
● Probeis stillpIuggedintotheovenreceptacle,Removeit.
● TheCLE~OFF padpressedaccidentally.
● Not enoughtimesetwhenusingTimeCook functionbecausestming
temperaturesof foodsvariedwidely.
● Varyingdensityandamountof foodswillsometimesrequiremorecookingtime.
● Probenotinsertedproperlyintomeatordish.Checkthecookbookor
TemperatureCookingsectionofthisguide.
~Incorrectpowerlevelentered.
● Dishnotrotated,turnedorstirredascalledforin recipe.
● Toomanydishesinthe ovenatthesametime.
● Foodnotthoroughlydefrosted.
● Improperuseof covering.Checkthecookbookandthisguidefor instructions.
“Theprobenotinsertedproperlyintothemicrowaveovenreceptacleor food.
● Theprobenotused,althoughtheTEMPCOOKpadhasbeenpressed.
38
Page 39

●
●
m
PROBLEM
“ERROR’APPEARSTNTHE
MICROWAVEDISPLAY
“BURNING’OR“OILY”
ODOREMITTINGFROM
LOWEROVENWHEN
TURNEDON
LOWEROVEN
TEMPERATURETOOHOT
ORTOOCOLD
FOODDOESNOT
BROILPROPERLY
IN LOWEROVEN
FOODDOESNOTROAST
ORBAKEPROPERLY
IN LOWEROVEN
POSSIBLE CAUSE
● WhenusingtheTempCookfunction,youhaveenteredatemperatureof less
than80°F.ormorethan 199°F.
● Thisis normalin anewovenandwilldisappearin time.
Tospeedtheprocess,seta self-cleancyclefor a minimumof3 hours.
SeetheOperatingtheSelf-CleaningOvensection.
● Theoventhermostatneeds adjustment.SeetheAdjustthe OvenThermostat—
ItYourse~section.
Do
● BROILandSTARTpadsnotpressed.
● Thedoornotleftopento thebroilstop~sition asrecommended.
● Impropershelfpositionisbeingused.SeetheBroilingsection.
● Necessarypreheatingwasnotdone.
● Foodisbeingcookedona hotpan.
● Cookwareisnotsuitedforbroiling.
● Lowvoltage.SeetheBroilingsection.
● Aluminumfoilusedon thebroilerrackhasnotbeenfhtedproperlyandslit.
● BAKEandSTARTpadsarenotpressed.
● Shelfpositionisincorrect.Seethe BakingorRoastingsections.
● Roastingpanistoosmall.
● Impropercookwareis beingused.
● Theoventhermostatneedsadjustment.SeetheAdjusttheOvenThermostat—
ItYourse~section.
Do
LOWEROVENWILL
NOTSELF-CLEAN
● Oventoohottoaccept cleaninginstructions.
● Excessivespills,spattersandsoildepositsarenotbeingcleanedup
priortoself-cleaning.
● TheCLEANandSTARTpadsarenotpressed.
● Thedooris opened.Closesecurely,
LOWEROVENDOOR
● Theovenhasnotcooledto asafetemperature.
WILLNOTUNLOCK
STRONG ODOR
IN LOWEROVEN
FANNOISEWHENUSING
THELOWEROVEN
● An odorfromtheinsulationaroundtheinsideof theovenisnormalfor
thefwstfewtimestheovenis used.Thisis temporary.
“Afan may automaticallyturnon andoffto coolinternalparts.Thisis normal,
andthefan maycontinueto runevenaftertheovenis turnedoff.
If youneed more help..call, toll free:
GE AnswerCenter@
800.626.2000
consumer information service
39
Page 40

WYOU~ED SERVICE...
Toobtainservice,seetheConsumerServicespagein
thebackofthisguide.
We’reproudof ourservice andwantyoutobe
pleased.Iffor somereasonyouarenothappy withthe
serviceyoureceive,herearethreestepsto follow for
furtherhelp.
FIRST,contactthepeoplewhoservicedyour
appliance.Explainwhyyouarenotpleased.Inmost
cases,thiswillsolvetheproblem.
NEXT,ifyou arestillnotpleased,writeallthe
details—includingyourphonenumber—to:
Manager,ConsumerRelations
GEAppliances
AppliancePark
Louisville,KY40225
FINALLY,if yourproblemisstillnotresolved,write:
MajorApplianceConsumerActionProgram
20NorthWackerDrive
Chicago,IL60606
m
—-
Page 41

NOTES
41
Page 42

NOTES
42
Page 43

We’llBeThere
With the purchase ofyour new GE appliance, receive the assurance that ifyou ever need
information or assistance horn GE, we’llbe there. All you have to do iscall—toll-free!
GEAnswerCentep
Whatever your question about any GE major appliance, GE Answer Center@
information service is available to help. Your call—and your question-will be
answered promptly and courteously. And you can call any time. GE Answer
Center@ service is open 24 hours a day, 7 days a week.
I}HomeRepairSemite
80MEXARES(80M2-2737)
A GE consumer service professional will provide expert repair service,
scheduled at a time that’s convenient for you. Many GE Consumer Service
company-operated locations offer you service today or tomorrow, or at your con-
venience (7:00 a.m. to 7:00 p.m. weekdays, 9:00 a.m. to 2:00
Ourfactory-trainedtechniciansknowyourapplianceinsideand out–somost
repairscanbehandledinjustonevisit,
p.m.Saturdays).
forCustomemWti SpecialNeeds...
80~6262000
Upon request, GE will provide Consumers with impaired hearing or speech who have
Braille controls for a variety of GE access to a TDD or a conventional teletypewriter may
appliances, and a brochure to
assist in planning a barrier-free
kitchen for persons with limited
mobility. To obtain these items,
free of charge, call 800.626.2000.
call 800-TDD-GWC (800-833-4322) to request
information or service.
SewiceContracts
80&62&2224
You can have the secure feeling that GE Consumer Service will still be there
after your warranty expires. Purchase a GE contract while your warranty is still
in effect and you’ll receive a substantial discount. With a multiple-year contract,
you’re assured of future service at today’s prices.
PatisandAccessories
Individuds qutified to service their own appliances
can have parts or accessories sent directly to their
home. The GE parts system provides access to over
47,000
fully warranted. VIS.4, MasterCard and Discover cards improper servicingmaycauseunsafeoperation.
are accepted.
parts.. and all GE Genuine Renewal Parts are
User maintenance instructions contained in this guide
cover procedures intended to be performed
Otherservicinggener~y shodd be referred toqutified
service
personnel.Cautionmustbe exercised,since
byanyuser.
Page 44

YOURGEMICROWAVE
COOKINGCENTER
WARRANTY
Staplesalesslip orcancelledcheck
here.Proofoforiginalpurchasedate
is neededto obtainservice
underwarranty.
WHATISCOVERED
.
WHATISNOTCOVERED
FULLONE-YEARWARRANTY
For one year from date of original
purchase, we
charge,partsandservicelaborin
yourhometo repairorreplace
anypati of themicrowave
cookingcenterthatfailsbecause
ofa manufacturingdefect,
LIMITEDADDITIONAL
FOUR-YEARWARRANTY
Forthe second through fifth year
from date of original purchase, we
will provide, free of charge, a
replacement
themagnetrontubefailsbecause
ofa manufacturingdefect.Youpay
forthesewicetriptoyourhome
andservicelaborcharges.
● Servicetripstoyourhometo teach
youhowto usetheproduct.
ReadyourUseandCarematerial.
Ifyouthenhaveanyquestions
aboutoperatingtheproduct,
pleasecontactyourdealerorour
ConsumerAffairsofficeatthe
addressbelow,orcall,tollfree:
GEAnswerCenteP
800.626.2000
consumerinformationservice
● Improperinstallation.
Ifyouhaveaninstallationproblem,
contactyourdealeror installer.
Youare responsibleforproviding
adequateelectrical,gas, exhausting
andotherconnectingfacilitiesas
describedinthe Installation
Instructionsprovidedwiththe
product,
willprovide,freeof
magnetrontubeif
***********************
This warranty is extended to the
original purchaser and any
succeeding
purchasedforordinaryhomeusein
the48 mainlandstates,Hawaiiand
Washington,D.C.InAlaskathe
warrantyisthesameexceptthatitis
LIMITEDbecauseyoumustpayto
shiptheproducttotheserviceshop
orforthesewicetechnician’stravel
coststoyourhome.
Allwarrantyservicewillbe provided
byour
or by our authorized Customer
Car@servicersduringnormal
workinghours.
Shouldyourapplianceneedservice,
duringwarrantyperiodorbeyond,
call800-GE-CARES(800-432-2737).
● Replacementof housefusesor
resettingof circuitbreakers.
● Failureofthe productifit is used
forotherthanitsintendedpurpose
orusedcommercially.
. Damageto productcaused
byaccident,fire,floodsor acts
ofGod.
WARRANTORIS
RESPONSIBLEFOR
CONSEQUENTIALDAMAGES.
ownerfor products
Facto~ Service Centers
NOT
Somestates donotallowtheexclusionorlimitationofincidentalorconsequentialdamages,sotheabovelimitationorexclusion
maynot
G
Recycled Paper
Pah No.164D2966PI27-1
Pub
No. 49-8606-1
5.95 CG
applytoyou.Thiswarrantygivesyouspecificlegalrights,andyoumayalsohaveotherrightswhichvaryfromstatetostate.
Toknowwhatyourlegalrightsarein yourstate,consultyourlocalor stateconsumeraffairsofficeoryourstate’sAttorneyGeneral.
Warrantor:GeneralElectricCompany
IffurtherhelpIsneededconcerningthiswarranty,write:
Manager<onsumer Affairs,GEAppliances,Louisville,KY40225
JKP64
.-----
JKP55
JKP66
PrintedinLaFayette,GA
 Loading...