

Page 1
GEAppliances.com
Safety Instructions ............. 2,3
Operating Instructions
Controls ........................... 4-6
Care and Cleaning
Air Filter .............................. 6
Outdoor Coils ......................... 6
Installation Instructions ...... 7-1o
Troubleshooting Tips ............ 11
Normal Operating Sounds ............ 11
AER05
AEH06*
AEH08*
0_
0_
0
Consumer Support
Consumer Support .......... Back Cover
Ownership Registration for
Customers in Canada only ........ 13, 14
Warranty for Customers
in Canada ........................... 16
Warranty for Customers
in the U.SA ........................... 15
*ENERGY STAR ® labeled product
ENERGYSTAR
As an ENERGYSTAR®partner, GEhas
determined that this product meets
the ENERGYSTAR®guidelines for
energy efficiency.
Climotiseur
Lo section fran_aise commence _ la page 17
Acondicionodor
deoire
Lo secci6n en espahol empieza en la pdgina 33
0_
Write the model and serial numbers here:
Model #
Serial #
Find these numbers on a label on the sideof
the air conditioner.
In Canada, contact us at:
www.GEAppliances.ca
49-7684 12-10 GE
Page 2
IMPORTANT SAFETYINFORMATION.
READ ALL INSTRUCTIONS BEFORE USING.
WARNING!
Foryour safety, the information in this manual must be followed to minimize the risk of fire, electric
shock or personal injury.
SAFETYPRECAUTIONS
Use this appliance only for its intended
purpose as described in this Owner's
Manual.
This air conditioner must be properly
installed in accordance with the Installation
Instructions before it is used.
Never unplug your air conditioner by pulling
on the power cord. Always grip plug firmly
and pull straight out from the receptacle.
Replace immediately all electric service
cords that have become frayed or otherwise
damaged. A damaged power supply cord
must be replaced with a new power supply
cord obtained from the manufacturer and
not repaired. Do not use a cord that shows
cracks or abrasion damage along its length
or at either the plug or connector end.
Turn the unit OFF and unplug your air
conditioner before cleaning.
GEdoes not support any servicing of the
air conditioner. We strongly recommend
that you do not attempt to service the air
conditioner yourself.
For your safety...do not store or use
combustible materials, gasoline or other
flammable vapors or liquids in the vicinity
of this or any other appliance.
Allair conditioners contain refrigerants,
which under federal law must be removed
prior to product disposal. If you are getting
rid of an old product with refrigerants, check
with the company handling disposal about
what to do.
If the receptacle does not match the plug,
the receptacle must be changed out by u
qualified electrician.
These R410A air conditioning systems
require contractors and technicians to
use tools, equipment and safety standards
approved for use with this refrigerant.
DO NOT use equipment certified for
R22 refrigerant only.
HOW TO CONNECT ELECTRICITY
Do not, under any circumstances, cut or remove
the third (ground) prong from the power cord.
For personal safety, this appliance must be
properly grounded.
DO NOT use an adapter plug with this appliance.
The power cord of this appliance is equipped
with o 3-prong (grounding) plug which mutes
with u standard 3-prong (grounding) wall outlet
to minimize the possibility of electric
shock hazard from this appliance.
Power cord includes a current interrupter device.
A test and reset button is provided on the plug
case. The device should be tested on o periodic
basis by first pressing the TESTbutton and
then the RESETbutton while plugged into the
outlet. If the TESTbutton does not trip or if the
RESETbutton will not stay engaged, discontinue
use of the air conditioner and contact o qualified
2
service technician.
Have the wall outlet and circuit checked by
a qualified electrician to make sure the outlet
is properly grounded.
Where a 2-prong wall outlet is encountered,
it is your personal responsibility and obligation to
have it replaced with o properly grounded
3-prong wall outlet.
The air conditioner should always be plugged
into its own individual electrical outlet which has
o voltage rating that matches the rating plate.
This provides the best performance and also
prevents overloading house wiring circuits which
could cause o fire hazard from overheated wires.
See the Installation Instructions, Electrical
Requirements section for specific electrical
connection requirements.
Page 3
GEAppliances.com
WARNING!
USEOF EXTENSION CORDS
RISK OF FIRE. Could couse serious injury or
death.
• DO NOT use an extension cord with this
Window Air Conditioner.
• DO NOT use surge protectors or multi-outlet
adaptors with this Window Air Conditioner.
READAND FOLLOWTHISSAFETYINFORMATIONCAREFULLY.
SAVE THESE INSTRUCTIONS
Page 4
About the controlson theair conditioner.
Features and appearance will vary.
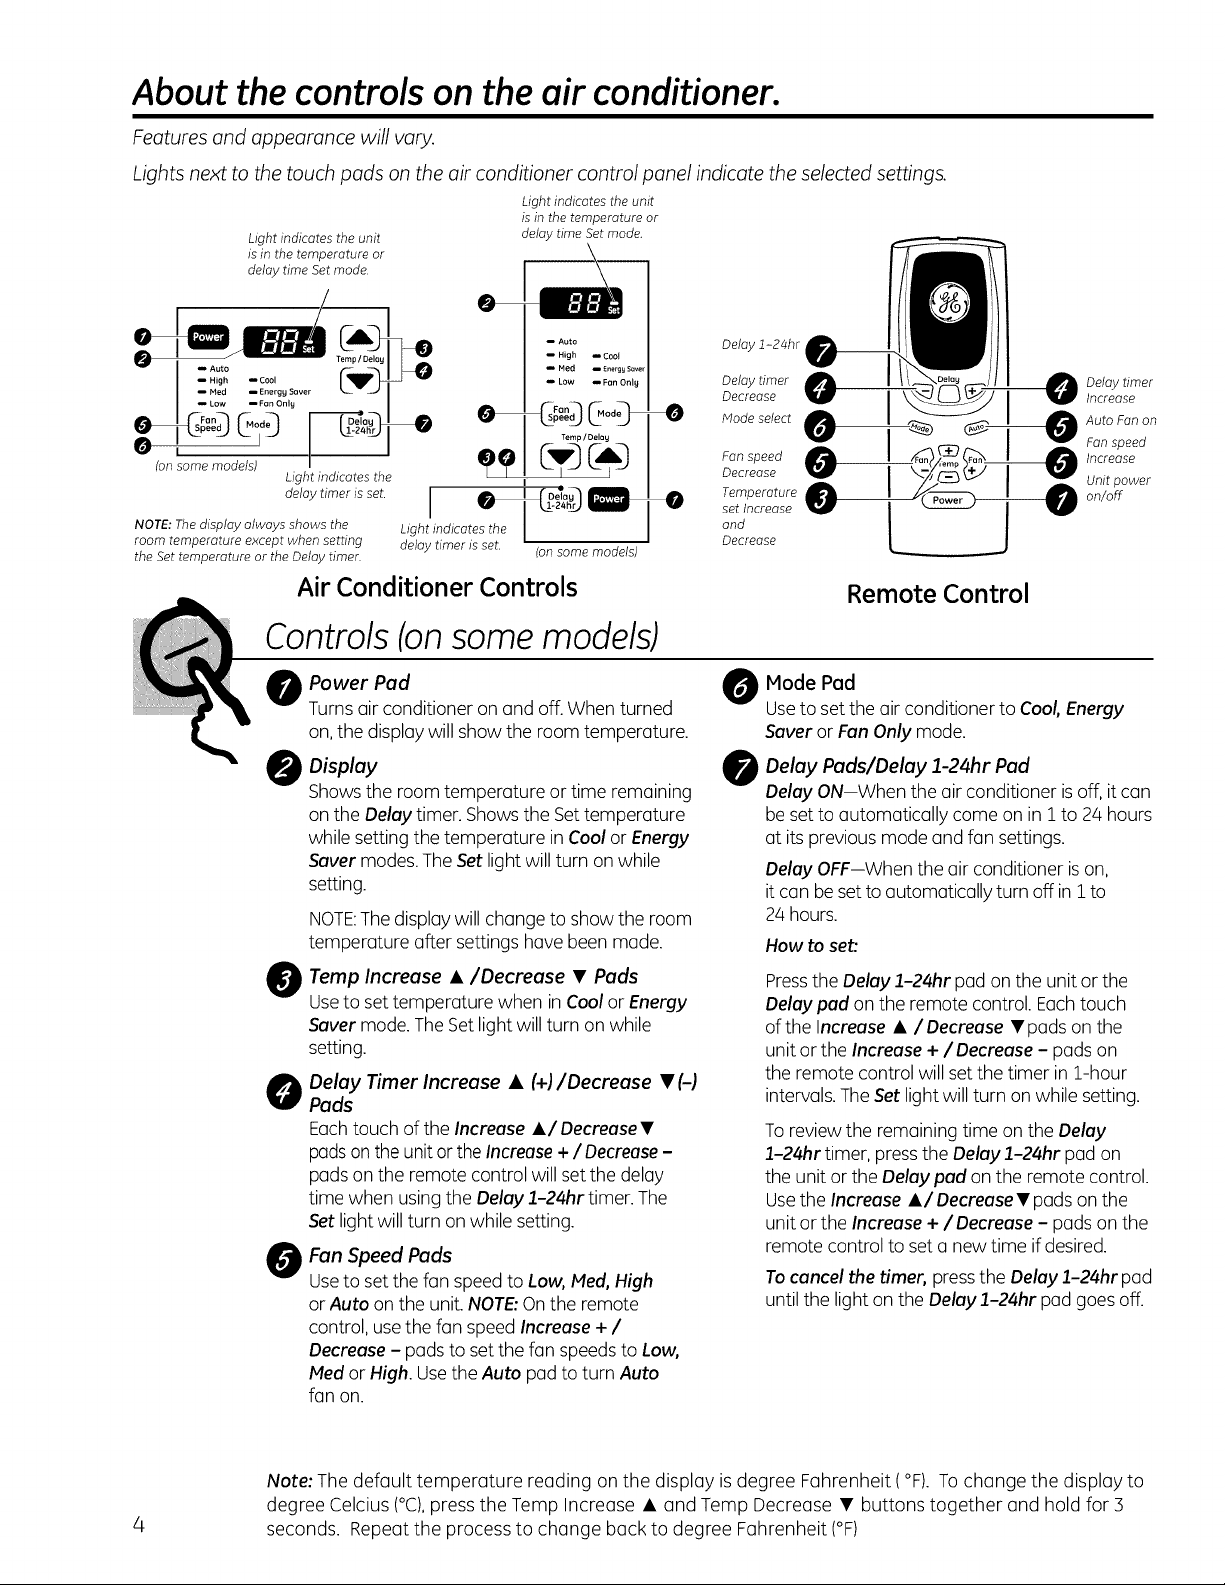
Lights next to the touch pads on the air conditioner control panel indicate the selected settings.
Light indicates the unit
is in the temperature or
Light indicates the unit delay time Set mode.
is in the temperature or
delay time Set mode.
High m Cool
I Ned I Energy Saver
! LOW I Fan Only
_onsomemodels -- _
NOTE: The display always shows the
room temperature except when setting
the Set temperature or the Delay timer.
Light indicates the
delay timer is set.
Light indicates the [
delay timer Jsset. (on some models)
Air Conditioner Controls
Controls (onsome models)
Power Pad
Turns air conditioner on and off.When turned
on,the display will showthe room temperature.
Display
Showsthe room temperature or time remaining
onthe Delay timer. Showsthe Settemperature
while setting the temperature inCool orEnergy
Saver modes.The Setlight will turn onwhile
setting.
NOTE:Thedisplay will change to show the room
temperature after settings have been made.
Auto
High m Coot
Pied _ Energy Saver
LOW J Fun Only
0 Mode select
Temp/Delay
1
0
Delay 1-24hr
Delay timer @
Decrease
Fan speed 0
Decreose
Temperature 0
set IncFeose
and
Decreose
Delay timer
Increase
Auto Fan on
Fan speed
Increase
I
Unit power
on/off
Remote Control
Mode Pad
0
Useto set the air conditioner to Cool, Energy
Saver or Fan Onlymode.
Delay Pads/Delay 2-24hr Pad
0
Delay ON--When the air conditioner is off,it can
be set to automatically come onin 1 to 24 hours
at its previous mode and fan settings.
Delay OFF--Whenthe air conditioner ison,
it can beset to automatically turn offin 1to
24 hours.
How to set:
O emp Increase •/Decrease • Pads
Useto set temperature when in Cool or Energy
Saver mode. The Setlight will turn onwhile
setting.
Pressthe Delay 2-24hr pad on the unit or the
Delay pad on the remote control. Eachtouch
of the Increase • /Decrease • pads on the
unit or the Increase +/Decrease - pads on
the remote control will set the timer in1-hour
Delay Timer Increase • (4-1/Decrease • (-)
Pads
Eachtouch of the Increase •/Decrease •
pads on the unit or the Increase +/Decrease -
pads on the remote control willset the delay
time when using the Delay 2-24hr timer. The
Set light willturn on while setting.
intervals.TheSet light will turn onwhile setting.
Toreviewthe remaining time on the Delay
2-24hr timer, pressthe Delay 2-24hr pad on
the unit or the Delay pad on the remote control.
Usethe Increase •/Decrease • pads on the
unit or the Increase +/Decrease - pads on the
remote control to set a new time if desired.
O an Speed Pads
Useto set the fan speed to Low, Med, High
or Auto on the unit. NOTE:On the remote
To cancel the timer, press the Delay 1-24hr pad
until the light on the Delay 1-24hr pad goes off.
control, use the fan speed Increase + /
Decrease - pads to set the fan speeds to Low,
Med or High. Use the Auto pad to turn Auto
fanon.
Note: The default temperature reading on the display is degree Fahrenheit (°F). Tochange the display to
degree Celcius (°C),press the Temp Increase • and Temp Decrease • buttons together and hold for 3
4
seconds. Repeat the process to change back to degree Fahrenheit (°F)
Page 5
Features and appearance will vary.
GEAppliances.com
High Low
Cool _ Cool
Low
Fan
OFF
MODE
MODE CONTROL
O
Controls (on some models)
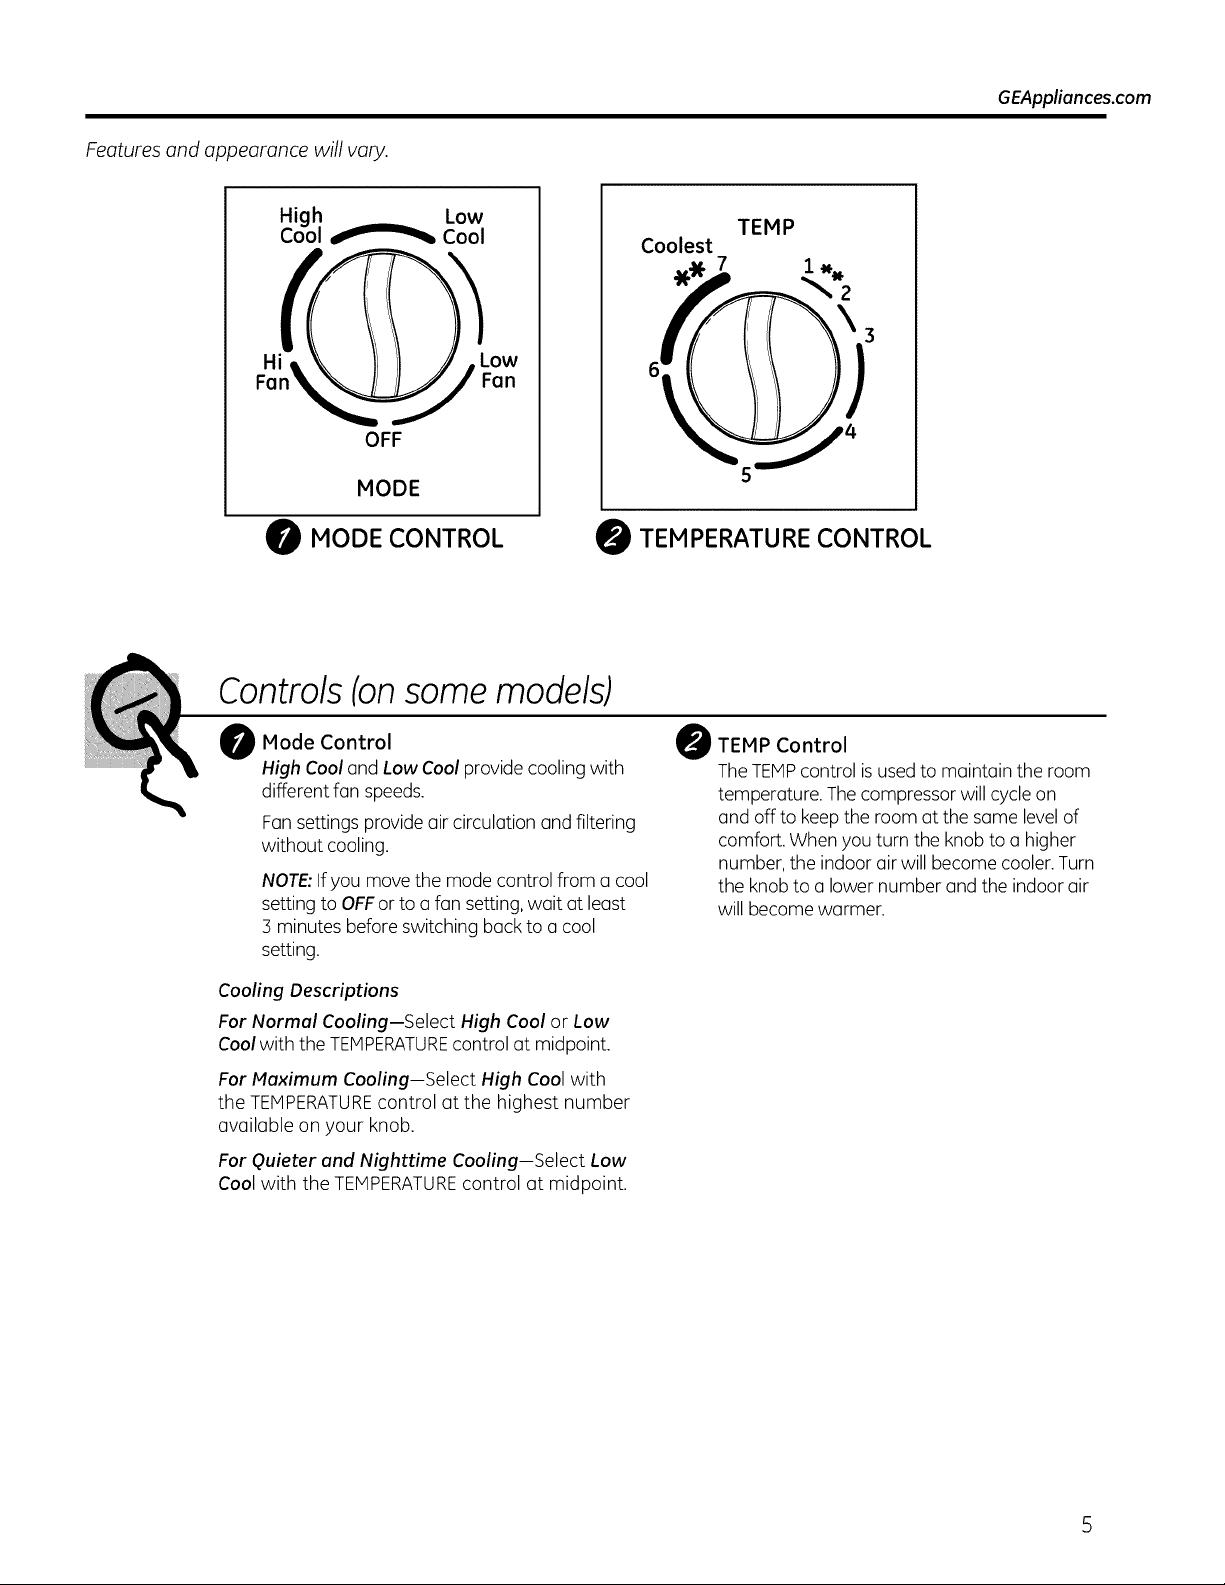
Mode Control
0
High Cool and Low Cool provide coolingwith
different fan speeds.
Fansettings provide air circulation and filtering
without cooling.
NOTE:Ifyou move the mode control from a cool
setting to OFFor to afan setting,wait at least
3 minutes before switching back to a cool
setting.
Coolest
TEM PERATURE CONTROL
O
O TEMP Control
TEMP
7
5
TheTEMPcontrol is usedto maintain the room
temperature. Thecompressor will cycleon
and off to keep the room at the same levelof
comfort. When you turn the knob to a higher
number, the indoor air will become cooler.Turn
the knob to a lower number and the indoor air
will become warmer.
2
Cooling Descriptions
For Normal Cooling-Select High Cool or Low
Cool with the TEMPERATURE control at midpoint.
For Maximum Cooling--Select High Cool with
the TEMPERATUREcontrol at the highest number
available on your knob.
For Quieter and Nighttime Cooling-Select Low
Cool with the TEMPERATUREcontrol at midpoint.
Page 6
About thecontrols on theair conditioner.
Do Not Operate in Freezing Outdoor
Conditions
Thiscool-only air conditioner was not designed for
freezing outdoor conditions. It must not be used in
Remote Control
Toensure proper operation, aim the remote
control at the signal receiver on the air
conditioner.
Hake sure nothing is between the air conditioner
and the remote control that could block the
signal.
Cool Mode
Usethe Cool mode ot Low, Med, High orAuto Fan
Speedfor cooling. Usethe Temperature Increase •
/Decrease • podsto set the desired temperature
between 64°Fand 86°Fin Z%increments.
An electronicthermostat isusedto rnointoin the room
temperature. Thecompressorwill cycleonund off
to keep the room at the set levelof comfort.Setthe
thermostat at o lower number and the indoor airwill
become cooler.Setthe thermostat at o higher number
and the indoor air will become wormer.
NOTE:Ifthe air conditioner isoffandisthen turnedon
while setto o Coolsetting or if turnedfrom o fan setting
freezing outdoor conditions.
Theremote control signal has o range of
up to 20 feet.
Make sure batteries ore fresh and installed
correctly as indicated on the remote control.
Remotecontains o magnet allowing it to attach
to metal surfaces.
to o Cool setting,it may takeapproximately 3 minutes
for the compressorto start and coolingto begin.
Cooling Descriptions
For Normal Cooling-Select the Cool mode and
High orF/edfan with o middle settemperature.
For Maximum Cooling--Select the Cool mode
and High fan with o lower set temperature.
For Quieter and Nighttime Cooling-Select the
Coolmode and Lowfan with o middle set
temperature.
Energy Saver Mode
Controlsthe fan.
ON--The fan will cycleon and off with the
compressor.This resultsin wider variations of room
temperature and humidity. Normally usedwhen the
room is unoccupied. NOTE:Thefan may continue to
run for o short time after the compressor cyclesoff.
Fan Only Mode
Usethe FanOnly Node at Low,Ned or High fan
speedto provide air circulation and filtering without
cooling. Sincefan-only settings do not provide
cooling, o Settemperature cannot be entered. The
room temperature will appear
in the display.
Auto Fan Speed
Setto Auto fan speedfor the fan speedto
automatically set to the speed needed to provide
optimum comfort settings with the set temperature.
If the room needsmore cooling, the fan speed
will automatically increase.If the room needs less
cooling, the fan speedwill automatically decrease.
OFF--Thefan runsoilthe time, while the compressor
cycles on and off.
NOTE:Auto FanSpeedcannot be used when inthe
Fan Only Mode.
NOTE:Auto FanSpeedcannot be used when inthe
Fan Only Mode.
Power Outage Recovery Feature
Inthe case of o power outage or interruption, the
6
unit will automatically restart in the settings lost
used offer the power is restored. Ifthe Delay 1-24hr
feature was set,it will resumecountdown. Youmay
need to set o new time if desired.
Page 7
Additional important information.
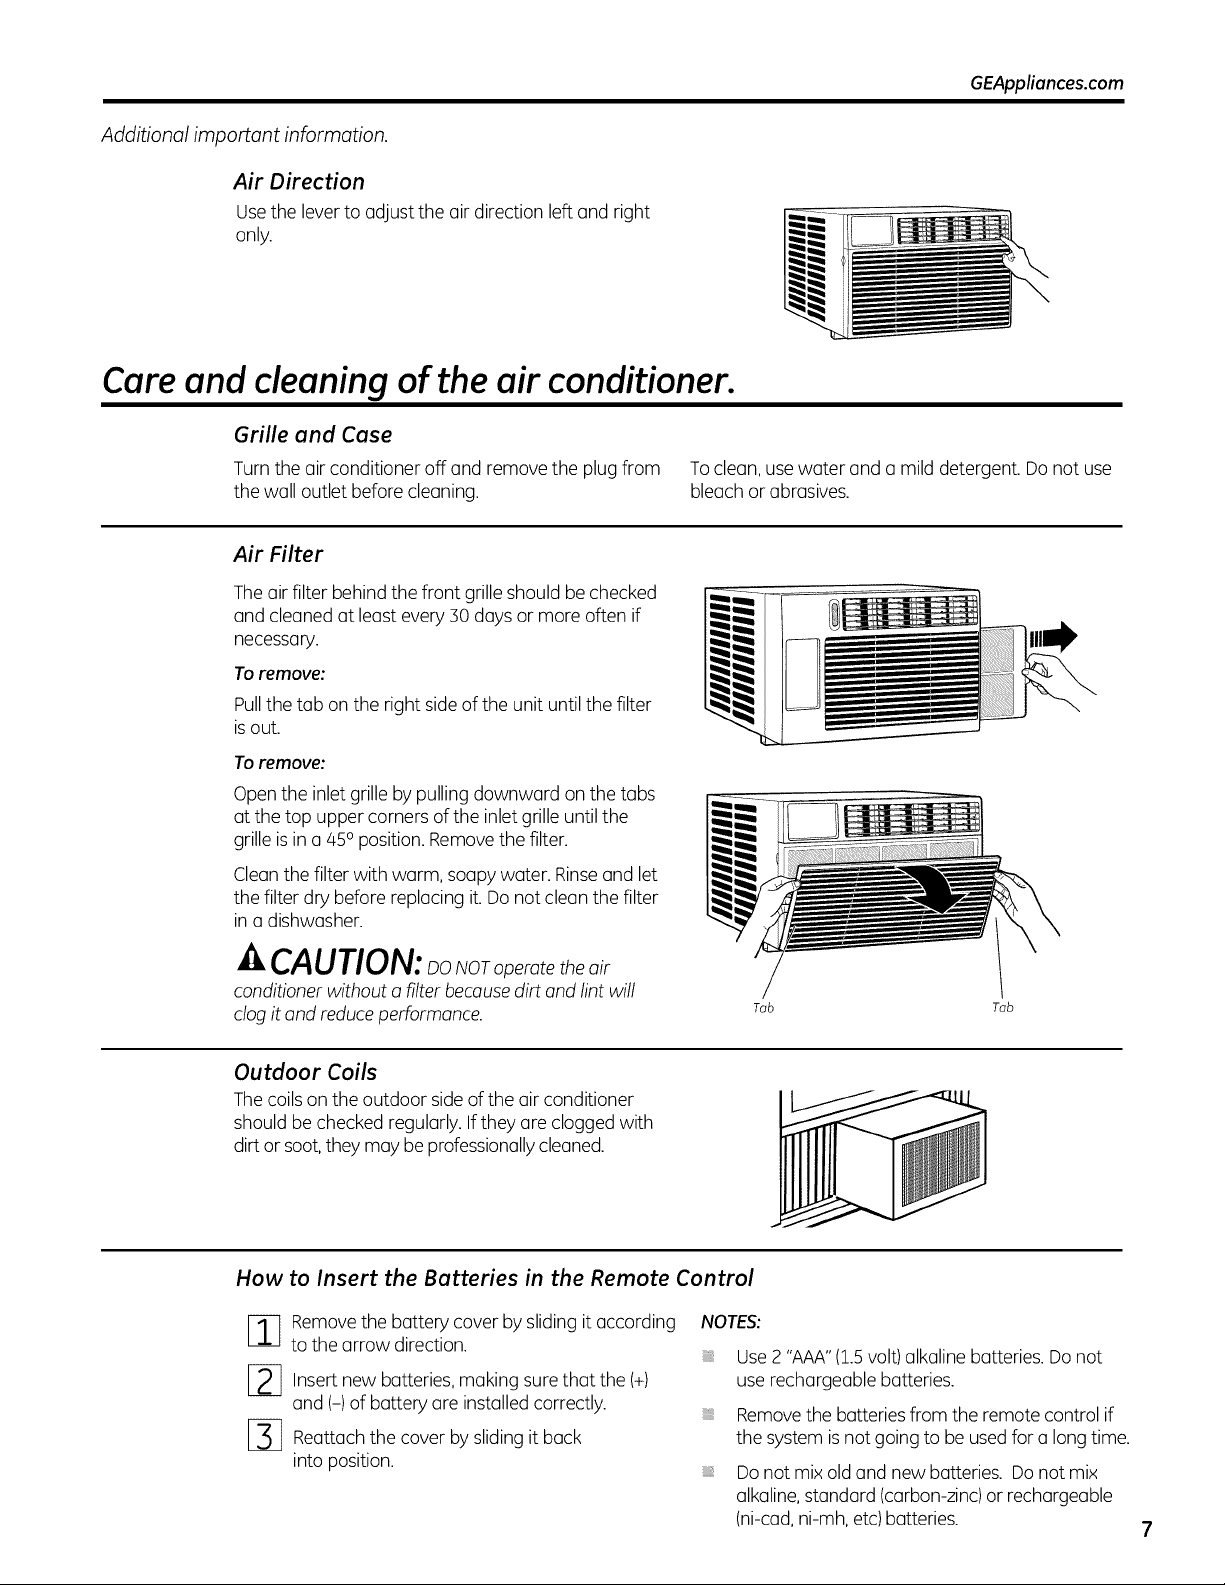
Air Direction
Usethe lever to adjust the air direction left and right
only.
Care and cleaning of the air conditioner.
Grille and Case
Turn the air conditioner off and remove the plug from To cleon, use water and a mild detergent. Do not use
the wall outlet before cleaning, bleach or abrasives.
Air Filter
Theair filter behind the front grille should bechecked
and cleaned at least every :30daysor more often if
necessary.
Toremove:
Pullthe tab onthe right sideofthe unit until the filter
isout.
Toremove:
Openthe inlet grille by pullingdownward onthe tubs
at the top upper corners of the inlet grille untilthe
grille isina 450position. Removethe filter.
Cleonthe filter with worm, soapy water. Rinseand let
the filter dry before replacing it. Do not cleon the filter
in a dishwasher.
GEAppliances.com
CAUTION: Noro eratetheair
conditioner without o filterbecause dirt and lint will
clog it and reduce performance.
Outdoor Coils
The coils on the outdoor side of the air conditioner
should be checked regularly. Ifthey are clogged with
dirt or soot, they may be professionally cleaned.
How to Insert the Batteries in the Remote Control
Removethe battery cover by sliding it according
to the arrow direction.
Insert new batteries, making sure that the (+)
and (-)of battery ore installed correctly.
Reattachthe cover by sliding it back
into position.
NOTES:
Tab
Use2 "AAA"(1.5volt) alkaline batteries.Donot
userechargeable batteries.
Removethe batteriesfrom the remote control if
the system isnot going to be usedfor a longtime.
Donot mix old and new batteries. Do not mix
alkaline,standard (carbon-zinc)or rechargeable
(ni-cad,ni-mh, etc)batteries.
Tab
Page 8
Installation
Air Conditioner
Instructions
I-_ Ouestions? Call 800.GE.CARES (800.432.2737) or Visit our Website at: GEAppliances.com
I
In Canada, call 1.800.561.3344 or visit www.GEAppliances.ca I
BEFORE YOU BEGIN
Read these instructions completely
and carefully.
• IMPORTANT - Savetheseinstructions
forlocalinspector'suse
• IMPORTANT - Observeallgoverning
codes and ordinances
• Note to Installer- Be sure to leave these
instructions with the Consumer.
• Note to Consumer - Keep these instructions for
future reference.
• Skill level- Installation of this appliance requires
basic mechanical skills.
• Completion time - Approximately 1 hour
• We recommend that two people install this
product.
• Proper installation is the responsibility of the
installer.
Product failure due to improper installation is not
covered under the Warranty.
You MUST use all supplied ports and use proper
installation procedures as described in these
instructions when installing this air conditioner.
CAUTION:
Do not, under any circumstances, cut or remove
the third (ground) prong from the power cord.
Do not change the plug on the power cord
of this air conditioner.
Aluminum house wiring may present special
problems--consult a qualified electrician.
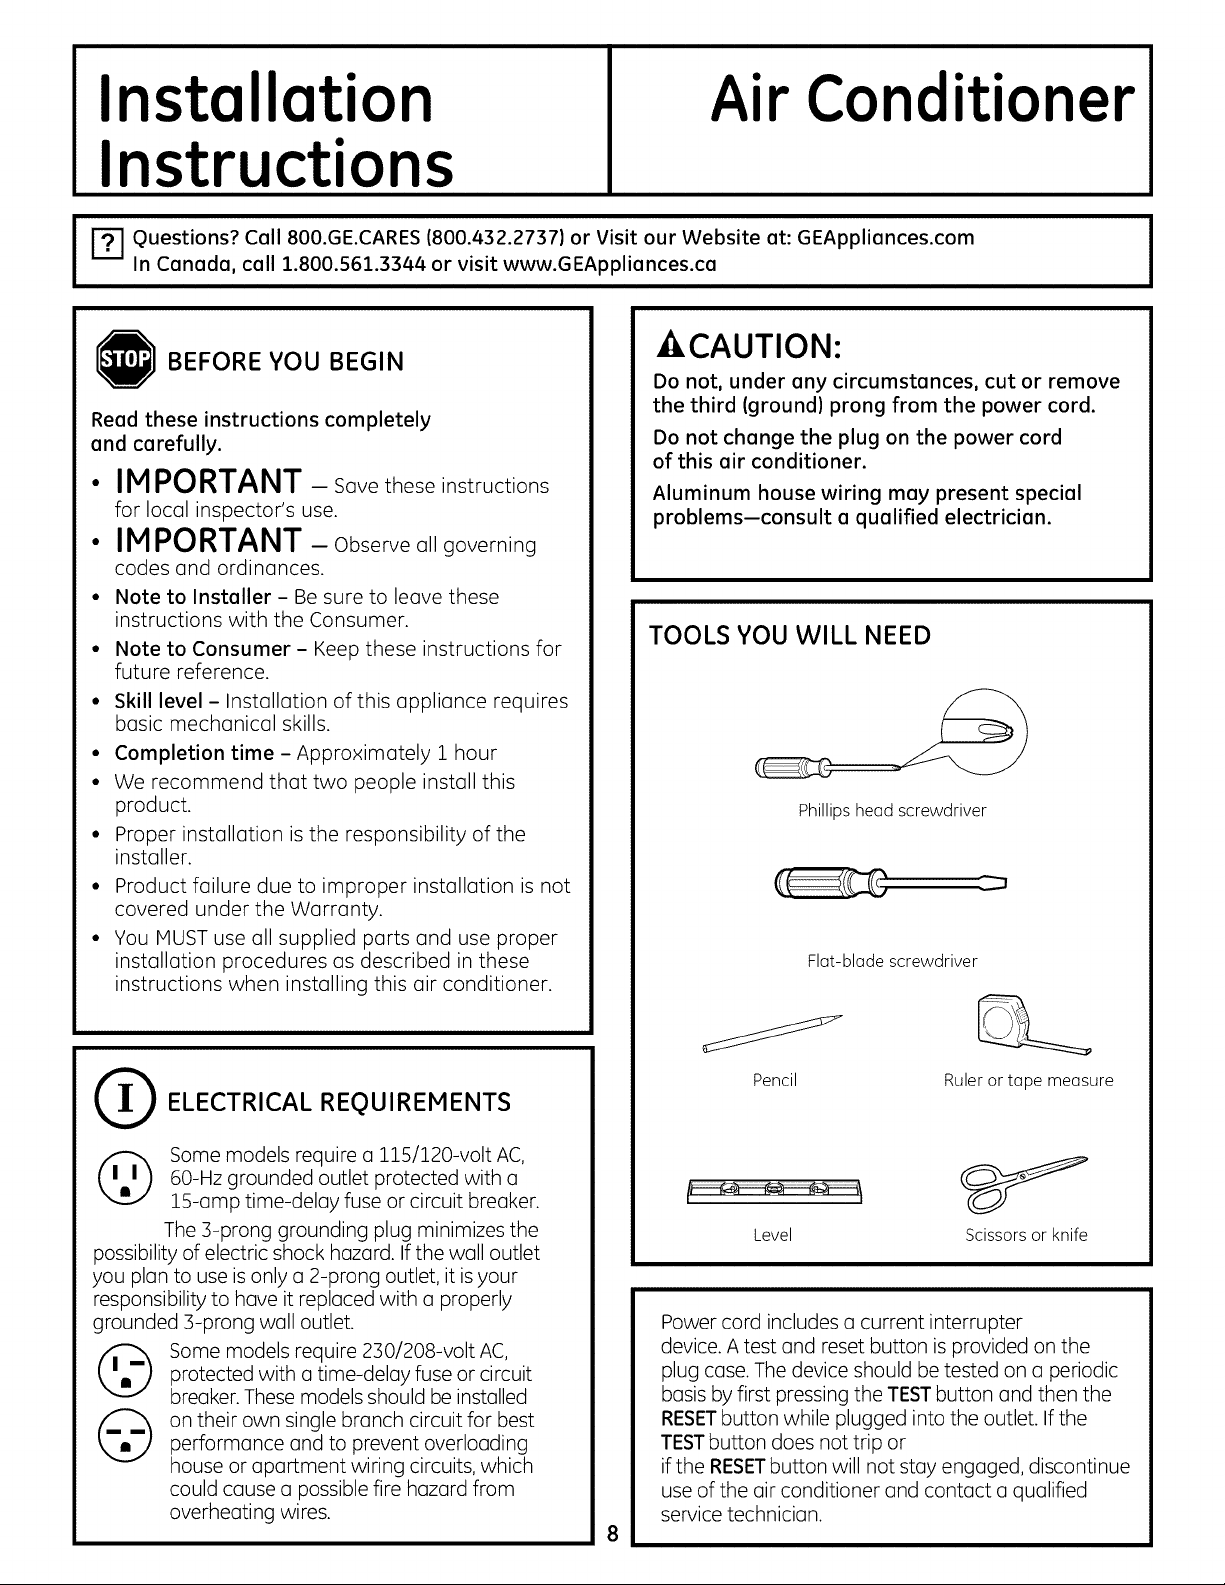
TOOLS YOU WILL NEED
Phillips head screwdriver
Fiat-blade screwdriver
Q ELECTRICAL REQUIREMENTS
(_ ome models require a 115/120-volt AC,
possibility of electric shock hazard. If the wall outlet
you plan to use is only o 2-prong outlet, it isyour
responsibility to hove it replaced with o properly
grounded 3-prong wall outlet.
©
60-Hz grounded outlet protected with a
15-amp time-delay fuse or circuit breaker.
The 3-prong grounding plug minimizes the
Some models require 230/208-volt AC,
protected with a time-delay fuse or circuit
breaker. These models should be installed
on their own single branch circuit for best
performance and to prevent overloading
house or apartment wiring circuits, which
could cause a possible fire hazard from
overheating wires.
Pencil Ruler or tope measure
Level Scissors or knife
Power cord includes a current interrupter
device. A test and reset button is provided on the
plug case. The device should be tested on a periodic
basis by first pressing the TESTbutton and then the
RESETbutton while plugged into the outlet. If the
TESTbutton does not trip or
if the RESETbutton will not stay engaged, discontinue
use of the air conditioner and contact o qualified
service technician.
Page 9
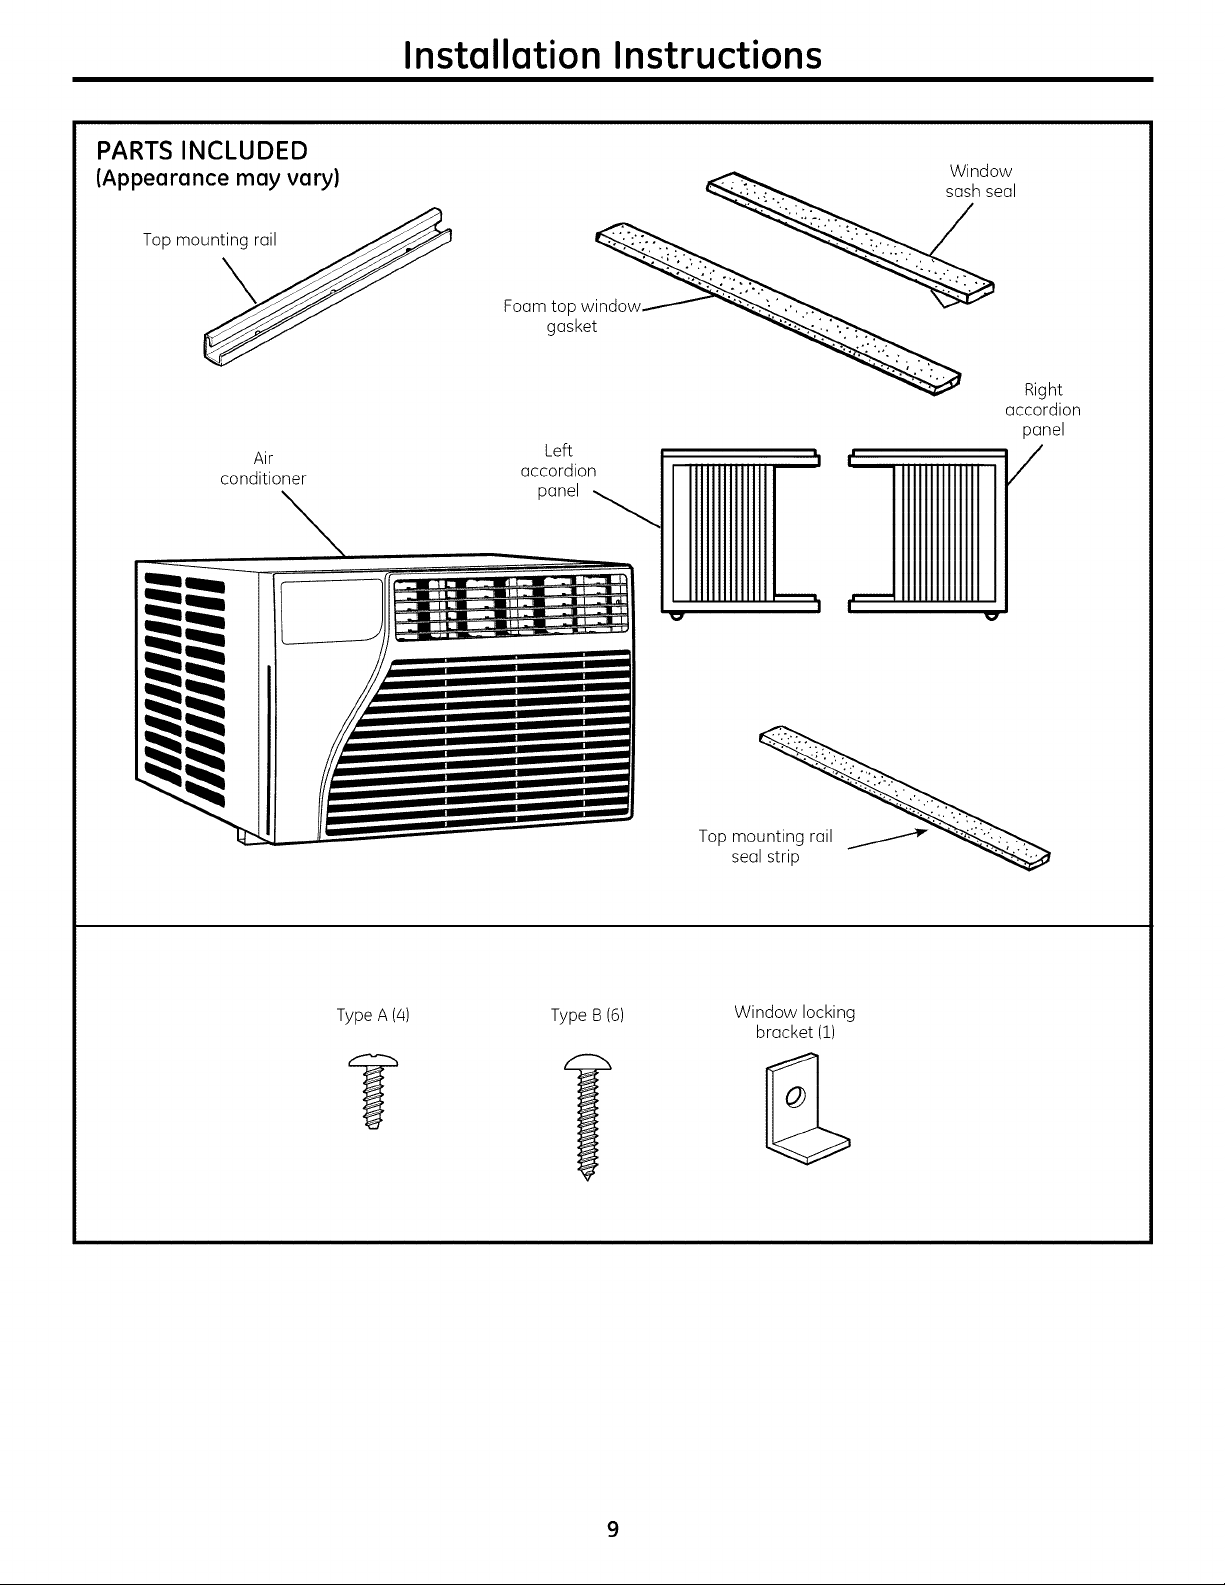
PARTS INCLUDED
(Appearance may vary)
Top mo_
Air
conditioner
Installation Instructions
_e Window
FOamgO_
Left
accordion
panel _
al
Right
accordion
panel
/
Type A (/4) Type B (6)
Top mo '_
seal strip
Window locking
bracket (1)
Page 10
Instollotion Instructions
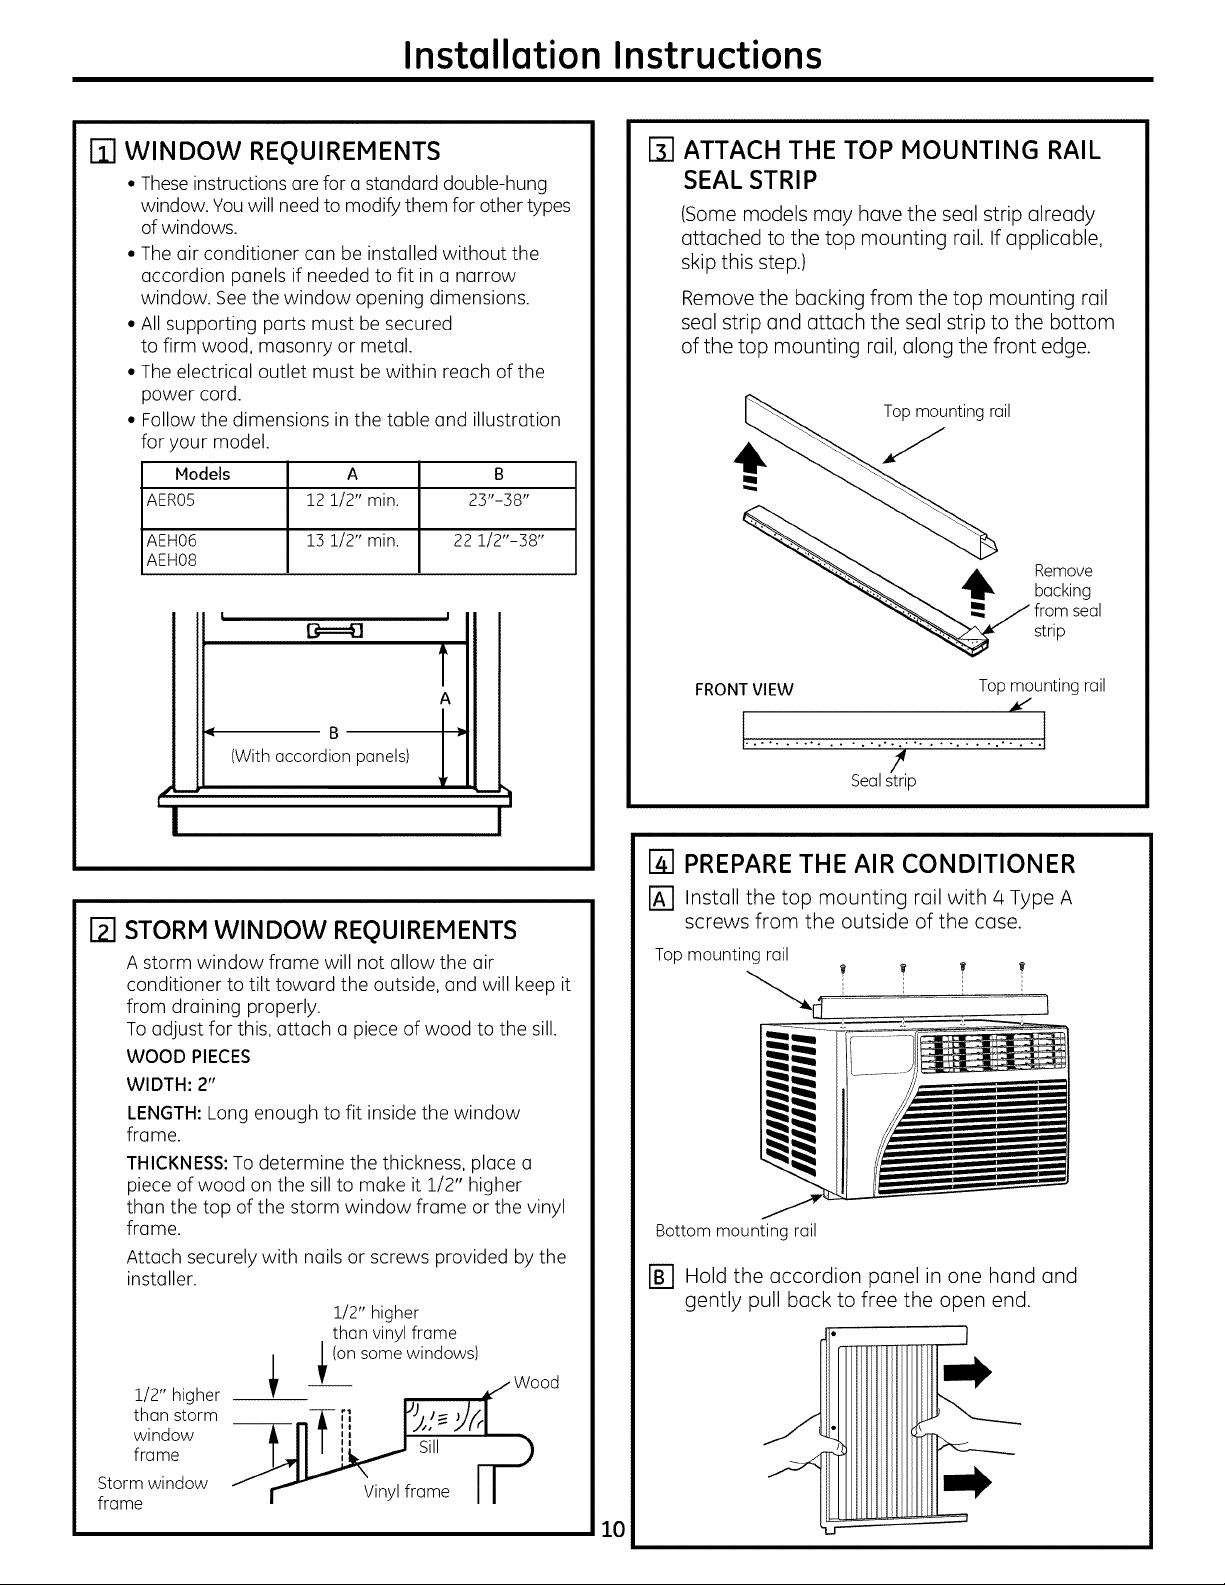
[] WINDOW REQUIREMENTS
• Theseinstructions are for a standard double-hung
window. You will need to modify them for other types
of windows.
• The air conditioner can be installed without the
accordion panels if needed to fit in a narrow
window. See the window opening dimensions.
• All supporting parts must besecured
to firm wood, masonry or metal.
• The electrical outlet must bewithin reach of the
power cord.
• Follow the dimensions in the table and illustration
for your model.
Models A B
AER05 12 1/2" min. 23"-38"
AEH06 13 1/2" min. 22 1/2"-38"
AEH08
! I
[i_=4]
r31ATTACH THE TOP MOUNTING RAIL
SEAL STRIP
(Some models may have the seal strip already
attached to the top mounting rail. Ifapplicable,
skip this step.)
Remove the backing from the top mounting rail
seal strip and attach the seal strip to the bottom
of the top mounting rail, along the front edge.
Topmountingrail
Remove
backing
from seal
strip
FRONTVIEW Topmountingrail
(Withaccordion panels)
t_
I I
I-}'1STORM WINDOW REQUIREMENTS
A storm window frame will not allow the air
conditioner to tilt toward the outside, and will keep it
from draining properly.
To adjust for this, attach a piece of wood to the sill.
WOOD PIECES
WIDTH: 2"
LENGTH:Long enough to fit inside the window
frame.
THICKNESS: To determine the thickness place a
piece of wood on the sill to make it 1/2" higher
than the top of the storm window frame or the vinyl
frame
Attach securely with nails or screws provided by the
installer.
1/2" higher
than vinyl frame
.,-., . ..... , , . ..'...'....... , ,- . ..
I
Sealstrip
I_1 PREPARE THE AIR CONDITIONER
I_] Install the top mounting rail with 4 Type A
screws from the outside of the case.
Topmounting rail
Bottom mountingrail
r_ Hold the accordion panel in one hand and
gently pull back to free the open end.
1/2" higher
than storm
window
frame
Storm window
frame
; ; (°n s°me wind°ws),/,, Wood
_-n-i[ ,, #,-Jf l
- r r Vinylframe I I
10
Page 11
Installation Instructions
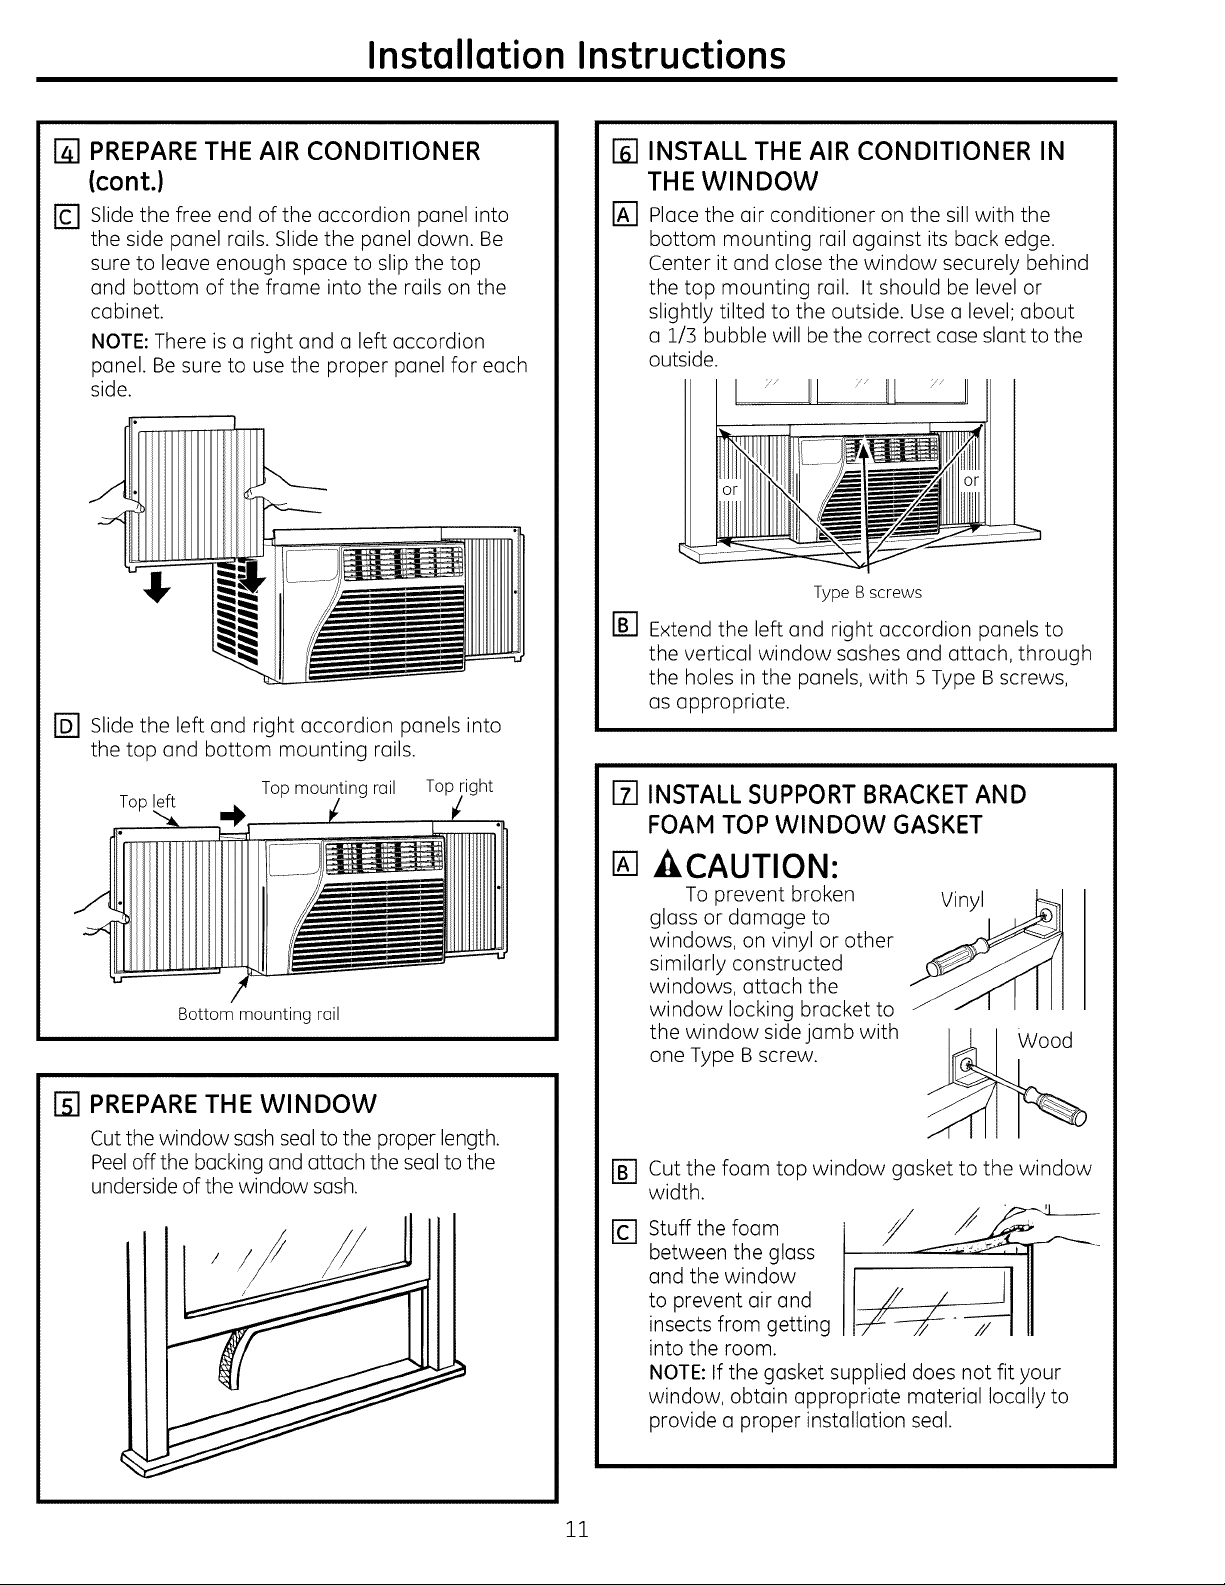
[] PREPARETHE AIR CONDITIONER
(cont.)
r_ Slide the free end of the accordion panel into
the side panel rails. Slide the panel down. Be
sure to leave enough space to slip the top
and bottom of the frame into the rails on the
cabinet.
NOTE: There is a right and a left accordion
panel. Be sure to use the proper panel for each
side.
r_ Slide the left and right accordion panels into
the top and bottom mounting rails.
INSTALL THE AIR CONDITIONER IN
B]
THE WINDOW
B]
Place the air conditioner on the sill with the
bottom mounting rail against its back edge.
Center it and close the window securely behind
the top mounting rail. It should be level or
slightly tilted to the outside. Use u level; about
a 1/3 bubble will be the correct case slant to the
outside.
/I
Type B screws
[]
Extend the left and right accordion panels to
the vertical window sashes and attach, through
the holes in the panels, with 5 Type B screws,
as appropriate.
Top left
Bottom mounting rail
Top mounting rail Top ight
I-sl PREPARE THE WINDOW
Cut the window sash seal to the proper length.
Peel off the backing and attach the seal to the
underside of the window sash.
[] INSTALL SUPPORT BRACKET AND
FOAM TOP WINDOW GASKET
%
-4,CAUTION:
To prevent broken
glass or damage to
windows, on vinyl or other
similarly constructed
windows, attach the
window locking bracket to
the window side jamb with
one Type B screw.
Cut the foam top window gasket to the window
width.
Stuff the foam
between the glass
and the window
to prevent air and
insects from getting
into the room.
NOTE: If the gasket supplied does not fit your
window, obtain appropriate material locally to
provide a proper installation seal.
Vinyl
Wood
11
Page 12
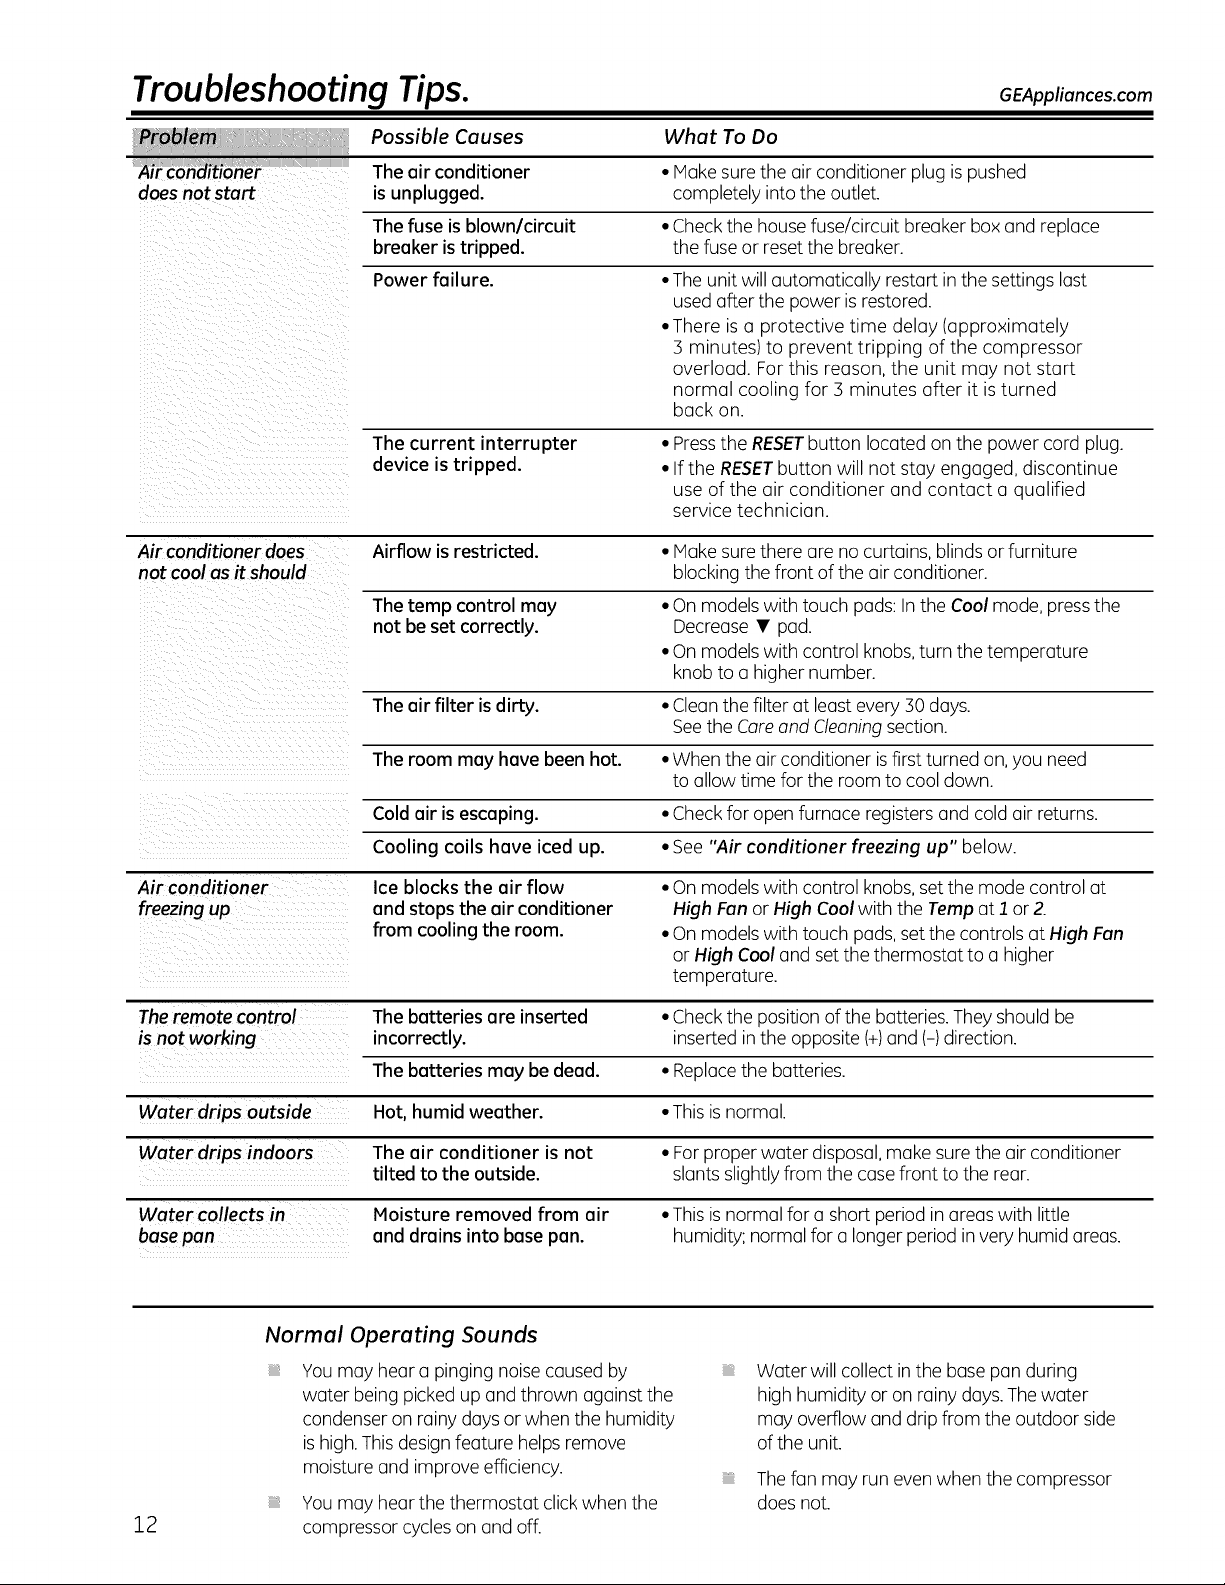
Troubleshooting Tips. GEAppliances.com
Possible Causes What To Do
Theair conditioner • Hake surethe air conditioner plug ispushed
does not start is unplugged, completely into the outlet.
Thefuse is blown/circuit • Checkthe house fuse/circuit breaker box and replace
breaker is tripped, the fuseor resetthe breaker.
Power failure. • The unit will automatically restart in the settings lost
used after the power is restored.
• There isa protective time delay (approximately
3 minutes) to prevent tripping of the compressor
overload. For this reason, the unit may not start
normal cooling for 3 minutes after it is turned
buck on.
The current interrupter • Pressthe RESETbutton located on the power cord plug.
device is tripped. • If the RESETbutton will not stay engaged, discontinue
use of the air conditioner and contact u qualified
service technician.
Air conditioner does Airflow is restricted. • Hake surethere are no curtains, blinds or furniture
not cool as it should blocking the front of the air conditioner.
Thetamp control may • Onmodelswith touch pods: Inthe Cool mode,pressthe
not be set correctly. Decrease • pad.
• Onmodelswith control knobs,turn the temperature
knob to u higher number.
The air filter isdirty. • Cleanthe filter at leastevery 30 days.
Seethe Careand Cleaningsection.
The room may have been hot. • When the air conditioner isfirst turned on,you need
to allow time for the room to cool down.
Cold air is escaping. • Checkfor open furnace registersand cold air returns.
Cooling coils have iced up. • See"Air conditioner freezing up" below.
Air conditioner
freezing up
Theremote control The batteries are inserted • Checkthe position of the batteries. They should be
is not working incorrectly, inserted inthe opposite (+)and (-)direction.
Water drips outside Hot, humid weather. • Thisisnormal.
basepan and drains into base pan. humidity; normal for a longer period in very humid areas.
Ice blocks the air flow
ond stops the oir conditioner
from cooling the room.
The batteries may bedead. • Replacethe batteries.
The air conditioner is not • Forproper water disposal, make sure the air conditioner
tilted to the outside, slants slightlyfrom the case front to the rear.
Moisture removed from air • Thisisnormal for a short period in areaswith little
• Onmodelswith control knobs,set the mode control at
High Fan or High Cool with the Tempat 1 or 2.
• Onmodelswith touch pads, set the controls at High Fan
or High Cool and set the thermostat to a higher
temperature.
Normal Operating Sounds
iiiiiiiiii[_iii
12
Youmay hear a pinging noisecaused by
water being picked up and thrown against the
condenser on rainy days or when the humidity
is high.This designfeature helpsremove
moisture and improve efficiency.
Youmay hear the thermostat clickwhen the
compressor cycles on and off.
Water will collect in the base pan during
high humidity or on rainy days.Thewater
may overflow and drip from the outdoor side
of the unit.
Thefan may run even when the compressor
does not.
Page 13
Notes
13
Page 14
Notes
14
Page 15
GEAir Conditioner-One-Vear Limited Warranty. (Forcustomers in theU.S.AJ
Staple your receipt here.
Proof of the original purchase date is
needed to make a warranty claim.
We Will Replace:
Onevear Replacement unit for any product which fails due to a defect in materials or workmanship.
Fromthe date of the I The replacement unit iswarranted for the remainder ofyour product's original one-year
originalpurchase I warranty period.
Properly pack your unit. We recommend using the
original carton and packing materials.
Return the product to the retail location where it
was purchased.
Customer instruction. Thisowner's manual provides
information regarding operating instructions and
user controls.
Improper installation, delivery or maintenance. If you
have an installation problem, or if the air conditioner is
of improper cooling capacity, contact your dealer or
installer. You are responsible for providing adequate
electrical, plumbing and other connecting facilities.
Failure of the product resulting from modifications to
the product or due to unreasonable use, including failure
to provide reasonable and necessary maintenance.
EXCLUSION OF IMPLIED WARRANTIES--Your sole and exclusive remedy is product replacement
as provided in this Limited Warranty. Any implied warranties, including the implied warranties of
merchantability or fitness for a particular purpose, are limited to one year or the shortest period
allowed by law.
Include in the package a copy of the sales receipt or
other evidence of date of original purchase. Also print
your name and address and a description of the defect.
Replacement of house fuses or resetting of circuit
breakers.
Failure due to corrosion on models not corrosion-
protected.
Damage to the product caused by improper power
supply voltage, accident, fire, floods or acts of God.
Incidental or consequential damage caused by possible
defects with this air conditioner.
Damage caused after delivery.
This warranty is extended to the original purchaser and any succeeding owner for products purchased for
home use within the USA.
Some states do not allow the exclusion or limitation of incidental or consequential damages. This warranty
gives you specific legal rights, and you may also have other rights which vary from state to state. To know
what your legal rights are, consult your local or state consumer affairs office or your state's Attorney General
Exclusion of implied warranties: Except where prohibited or restricted by law, there are no warranties,
whether express, oral or statutory which extend beyond the description on the face hereof, including
specifically the implied warranties of merchantability or fitness for a particular purpose.
Warrantor: General Electric Company. Louisville, KV 40225
Z5
Page 16

6EAir Conditioner-One-Vear Limited Warranty. (Forcustomers in Canada)
Staple your receipt here.
Proof of the original purchase date is
needed to make a warranty claim.
wi,
One Year I Replacement unit for any product which fails clueto a defect in materials or workmanship.
Fromthe date of the I The replacement unit iswarranted for the remainder ofyour product's originalone-year
originalpUrehase I warranV period.
Properly pack your unit. We recommend using the
original carton and packing materials.
Return the product to the retail location where it
was purchased.
Customer instruction. Thisowner's manual provides
information regarding operating instructions and
user controls.
Improper installation, delivery or maintenance. If you
have an installation problem, or if the air conditioner is
of improper cooling capacity, contact your dealer or
installer. You are responsible for providing adequate
electrical, plumbing and other connecting facilities.
Failure of the product resulting from modifications to
the product or due to unreasonable use, including failure
to provide reasonable and necessary maintenance.
EXCLUSION OF IMPLIED WARRANTIES--Your sole and exclusive remedy is product replacement
as provided in this Limited Warranty. Any implied warranties, including the implied warranties of
merchantability or fitness for a particular purpose, are limited to one year or the shortest period
allowed by law.
Include in the package a copy of the sales receipt or
other evidence of date of original purchase. Also print
your name and address and a description of the defect.
Replacement of house fuses or resetting of circuit
breakers.
Failure due to corrosion on models not corrosion-
protected.
Damage to the product caused by improper power
supply voltage, accident, fire, floods or acts of God.
Incidental or consequential damage caused by possible
defects with this air conditioner.
Damage caused after delivery.
This warranty is extended to the original purchaser and any succeeding owner for products purchased in Canada
for home use within Canada.
Some provinces do not allow the exclusion or limitation of incidental or consequential damages, so the above
exclusion may not apply to you. This warranty gives you specific legal rights, and you may also have other rights
which vary from province to province. To know what your legal rights are inyour province, consult your local or
provincial consumer affairs o_ce.
Exclusion of implied warranties: Except where prohibited or restricted by law, there are no warranties,
whether express, oral or statutory which extend beyond the description on the face hereof, including
specifically the implied warranties of merchantability or fitness for a particular purpose.
Warrantor: Mabe Canada Inc.,
Burlington, Ontario
16
Page 17

Consignes de s_curit_ ............. 18,19
Consignesd'utilisation
Commandes .......................... 20-22
Entretien et nettoyage
Filtre 6 air ................................ 22
Serpentins ext6rieurs ..................... 22
Instructions de montage .......... 23-26
Conseils de d_pannage .............. 27
Bruits normaux de fonctionnement ........ 27
Assistance _ la clientele
Assistance 6 la clientele ................... 32
Garantie .................................. 31
Enregistrement du titre
de propri6t6 ........................... 29, 30
AER05
AEH06*
AEH08*
* Produits homologu6s ENERGYSTAR®
ENERGYSTAR
Entant que partenaire d'ENERGYSTAR®,GEa
d@ermin# que ce produit @ait conforme aux
exigences d'efficacit6 6nerg@ique d'ENERGY
STAR®.
Inscrivez ici les num_ros de module et de s_rie :
Num_ro de module :
Num_ro de S_rie :
Vous trouverez ces num@os sur 1'6tiquette
appos6e sur le c6t6 du climatiseur.
Au Canada, visitez-nous au :
www.electromenagersge.ca
17
Page 18

IMPORTANTES CONSIGNES DE S 'CURIT '.
VEUILLEZ LIRE TOUTES LES CONSIGNES AVANT UTILISATION.
VERTISSEMENT !
Pour votre sdcuritd, les informotions contenues dons ce manuel doivent _tre suivies ofin de minimiser
les risques d'incendie, de chocs dlectriques ou de blessures corporelles.
CONSIGNESDESECURITE
N'utilisez cet appareil qu'aux fins pr6vues
d6crites dans le manuel d'utilisation.
Ce climatiseur doit @trecorrectement
install6 conform6ment aux Instructions
d'lnstallation avant toute utilisation.
Ne d6branchezjamais votre climatiseur en
tirant sur le cordon d'alimentation. Prenez
toujours fermement la fiche en main et tirez
pour la sortir de la prise.
Remplacez imm6diatement tout cordon
61ectrique us6 ou endommag6. Un
cordon d'alimentation endommag6 doit
6tre remplac6 par un nouveau cordon
d'alimentation obtenu du fabricant. Ne
r6parez pas lecordon endommag6. N'utilisez
pas un cordon fissur6 ou pr6sentant des
dommages dus aux frottements soit sur
sa Iongueur ou aux extr6mit6s du c6t6
de la fiche ou du raccord.
Eteignez votre climatiseur et d6branchez-le
avant de le nettoyer.
GE n'offre pas de service d'entretien pour les
climatiseurs. Nous vous recommandons de
ne pas essayer d'effectuer I'entretien
de votre climatiseur vous-m6me.
Pour votre s6curit6, ne stockez pas et
n'utilisez pas de mat@iaux combustibles,
d'essence ou d'autres vapeurs et liquides
inflammables dans les parages de cet
appareil ou de tout autre appareil.
Tousles climatiseurs contiennent des
fluides frigorig_nes qui, conform6ment, 6 la
16gislation f6d6rale doivent @treretir6s avant
la mise au rebut de I'appareil. Si vous mettez
au rebus un ancien appareil contenant des
fluides frigorig6nes, v6rifiez la proc6dure 6
suivre aupr6s de la compagnie responsable
de 1'61imination.
Si la prise de courant est d'un format
diff6rent de la fiche, cette prise doit @tre
chang6e par un 61ectricien qualifi6.
Ces syst@mes de climatisation R/-d_OA
n6cessitent que les entrepreneurs et
techniciens adoptent des outils, du mat6riel
et des normes de s6curit6 approuv6s pour
utilisation avec ce r6frig6rant. N'utilisez pas
de mat@iel certifi6 pour le r6frig6rant R22
uniquement.
18
BRANCHEMENTS 4LLECTRIQUES
Ne coupez pos ou n'enlevez pos, sous oucun
pr_texte, Io troisi_me broche de mise 8 Io terre
du cordon d'olimentotion. Pour des raisons
de s_curit_, cet opporeil doit _tre correctement
mis 8 Io terre.
N'utilisez PASd'adaptateur avec cet appareil.
Le cordon d'alimentation de cet appareil
est 6quip6 d'une fiche 6 trois broches (pour une
mise 6 la terre) qui s'adapte 6 la prise
de courant standard 6 3 broches (pour une mise
6 la terre) pour minimiser les risques
de chocs 61ectriques par cet appareil.
Le cordon d'alimentation est 6quip6 d'un
dispositif d'interruption du courant. Un bouton
d'essai et de r6enclenchement est fourni
sur le battier de la prise. Vous devez tester le
m6canisme r6guli_rement en appuyant d'abord
sur le bouton TEST(essai) puis sur le bouton
RESET(r6enclenchement)Iorsque I'appareil est
branch6. Si le bouton TEST(essai)ne bascule
pas ou si le bouton RESET(r6enclenchement)
ne reste pas enclench6, cessez d'utiliser votre
climatiseur
et appelez un technicien de service qualifi6.
Faites v6rifier la prise murale et le circuit
61ectrique par un 61ectricien qualifi6 pour
s'assurer que le syst_me est correctement
mis 6 la terre.
Dans le cas d'une prise biphas6e,
I'installateur a la responsabilit6 et I'obligation
de la remplacer par une prise triphas6e
correctement mise 6 la terre.
Le climatiseur doit toujours 6tre branch6
6 sa propre prise 61ectrique d'une tension
nominale correspondant 6 celle indiqu6e
sur sa plaque signal6tique.
Ceci permet d'obtenir un meilleur rendement
du climatiseur et 6vite de surcharger les circuits
61ectriques du domicile qui risque d'occasionner
un incendie en surchauffant.
Consultez les Consignes d'lnstallations, dans
la section Exigences Electriques pour les
exigences de branchements 61ectriques
particuliers.
Page 19

www.electromenagersge.co
VERTISSEMENT !
UTILISATION DE RALLONGE5
RISQUED'INCENDIE. Peut occasionner des
blessures graves ou la mort.
• NE PASutiliser de rallonge avec ce climatiseur.
• NE PASutiliser de parasurtenseur ou
d'adaptateur h prises multiples avec ce
climatiseur.
LISEZET5UIVEZ 501GNEUSEMENTCESCONSIGNESDE
J J
5ECURITE.
CONSERVEZ CES INSTRUCTIONS
19
Page 20

A propos des commandes du climatiseur.
LesfonctionsetI'aspectpeuventvarier.
Lest_moinslumineux_c&t_destouches_efT1eurementsurletableaudecommandesduclimatiseurindiquentlesr_glagessdectionn_s.
Le t6moin indique que I'appareil
Le t6moin indique que
I'appareil est en mode
Programmotion de la
temp@ature ou du d61ai.
J High m Cool
i Hed J Energg Saver
(sur
certains
Low
Le 1.6r'aoinlumineux _.,11_ull
minuterie est _ -
___ S_} Aut° J Fan Onlg
programm@e.I
NOTE : L'6cran affiche toujours la Le temoin lumineux
temp6raturede lapi@cesaufIorsque indiquequela minuterie
vousprogrammezla temp@atureou la estprogramm@e
minuterie.
Commandes du Climatiseur
est en mode Programmation de
la temp@ature ou du d61aL
TT
(sur certaJns modules)
O
D_lai1-24hr
R@ductiondu d_lai
S_lectiondu mode
R_ductionde
lavitessedu
ventilateur
Augmentation
et R_ductionde
la temperature
programm@
T l commande
Augmentation
du d@lai
Harche
automatiquedu
ventilateur
Augmentationde la
vitessedu ventilateur
Hiseen marche
Commandes(surterrains modules)
Touche d'alimentation
0
Net leclimatiseuren positiondemarche
oud'arr@t.L'@cranaffichelatemp@rature
dela pi@ceIorsqueI'appareilestmisenmarche.
O ffichage
Affichelatemp@raturedela pi@ceouletempsrestant
avantla miseen marcheouI'arr@tdeI'appareil.
Affichelatemp@atureder@glageIors
dela programmationdelatemp@aturepourles
modesCool(reffoidissement)ouEnergySaver
(economied'energie).Let@moinlumineuxSet
(programme)s'allumeIorsdur_glage.
REMAROUE:L'@cranafficheralatemp@rature
delapi@ce6 lafindesr@glages.
O ouches Temp Increase (Augmentation
temperature) •/ Decrease(R_duction
de la temperature) •
Sontutilis@spourprogrammerlatemp@aturedans
lesmodesCoolouEnergySaver.Let@moinlumineux
Sets'allumeIorsdur@glage.
TouchesDelayTimerIncrease(Augmentationdu
d_lai)• (+)/ Decrease(Diminutiondu d_lai)• (-)
Chaqueloisquevouseffleurezlestouches
IncreaseA/ Decrease• surI'appareilou
lestouchesIncrease+/ Decrease- dela
t@l@commande,vousprogrammezladur@
dud_laiIorsde I'utilisationde laminuterieDelay
1-24hr(d@laide1-24h).Let@moinlumineuxSet
s'allumeIorsdur@glage.
O ouches de vitesse du ventilateur
Sontutilis@spourr@glerlavitesseduventilateur
deI'appareilsurLow(faible),Mad(moyenne),
High(elev@)ouAuto (automatique).REMARQUE:
Surlat@l@commande,utilisezlestouchesIncrease
+/ Decrease- pourr@glerlavitesseduventilateur
surLow,Med,ouHigh. UtilisezlatoucheAutopour
allumer leventilateur enmode Auto.
Touche Mode
O
Estutilis@epourprogrammerleclimatiseursurles
modesCool,EnergySaverou FanOnly(ventilateur
uniquement).
Touches de D_lai/ D_lai de I _24heures
O
DelayON(d_laideraiseenmarche)-Lorsque
leclimatiseurest@teint,ilpeut@treprogramm@pour
d@marrerautomatiquementdansund@lai
de 16 24heures6sesr@glagespr@c@dents(mode,
vitesseduventilateur).
DelayOFF(d_laid'arr_t)-Lorsqueleclimatiseurest
enfonctionnement,ilpeut@treprogramm@pour
s'arr@terautomatiquementdansund@laide 16 24
heures.
Commentleprogrammer:
AppuyezsurlatoucheDelay1-24hr(D@laide 1
6 24heures)de I'appareilou Delaypad (Touches
de D61ai)delat@l@commande.Chaqueloisquevous
effleurezlestouchesIncrease• / Decrease• sur
I'appareiloulestouchesIncrease+/ Decrease- de
lat@l@commande,vousprogrammezladur@du
d@laiparintervallede I heure.Let@moinlumineux
Sets'allumeIorsdur_glage.
PourconnaTtreletempsrestantsurla minuterie
Delay1-24hr,appuyezsurlatoucheDelay1-24hr
deI'appareilouDelaypad (Touchesde D61ai)de
lat_l_commande.UtilisezlestouchesIncrease• /
Decrease• surI'appareilou lestouchesIncrease+
/ Decrease- dela t_l_commandepourprogrammer
un nouveaud_laisin_cessaire.
Pourannularla minuterie,appuyezsurlatouche
Delay_-24hrjusqu'6cequelevoyant lumineuxsurla
toucheDelay1-24hrs'_teigne.
ON/OFF
20
Remarque :La lecture de temp6rature par d6faut s'affiche en degr6 Fahrenheit (°F).Pour modifier
I'affichage en degr6 Celcius (°C),appuyez simultan6ment sur les boutons d'augmentation •ou
d'abaissement •de la temp6rature et maintenez-les enfonc6s pendant 3 secondes. R6p6tez la m6thode
pour effectuer un retour @I'affichage des degr6s Fahrenheit (°F).
Page 21

Les caract_ristiques et I'apporence peuvent varlet.
www.electromenagersge.ca
High Low
Cool _ Cool
Low
Fan
OFF
MODE
MODE DE COMMANDE
O O
Coolest
7
COMMANDE DE TEMPI_RATURE
Commondes (sur certoins modules)
O ode de commande
Lesintensit#sHigh Cool (tr_sfroid)et Low Cool
(froid)offrent desvitesses de ventilation vari6es.
Lesr6glages du ventilateur offrent une
circulation et une filtration sans refroidissement
de I'air.
REMARQUE : Sivous d6placez le mode de
commande du r6glage de la climatisation
de la position <<Arr@t>>(OFF)ou du mode de
r6glage du ventilateur, attendre au mains trois
(3)minutes avant de retourner au mode de
climatisation.
Commande de temperature (TEMP)
O
La commande de temp@ature (TEMP)est
utilis6e pour maintenant la temp6rature de la
piece.Le compresseur s'arr@teraetred6marrera
pour maintenir le m@meniveaude temp@ature
de confort. Lorsquevoustournez le bouton vers
un chiffre plus 61ev6,I'airde lapiece deviendra
plusfroid.Tournezlebouton vers un chiffre plus
baset I'air de la piece deviendra plus chaud.
TEMP
2
5
Description des modes de climatisation
Pour un refroidissement (Normal cooling)
- S61ectionnezHigh Cool ou Low Cool en
positionnant la commande TEIViPERATUREau
centre.
Pour un refroidissement maximal - S61ectionnez
High Cool en positionnant la commande
TEIViPERATUREau chiffre le plus 61ev6disponible
sur votre bouton.
Pour un refroidissement plus silencieux ou
durant la Nuit - S61ectionnezLow Cool en
positionnant la commande TEIViPERATUREau
centre.
21
Page 22

A propos des commandes du climatiseur.
t_e faites pas fonctionner votre appareil
orsq.ue les teml_ratures ext_rieures sont
en dessous de O°C (32 °F).
T_l_commande
iiiiiii_
Pour vous assurer d'un fonctionnement correct, pointez
la t616commandevers ler6cepteur de signal
du climatiseur.
iiiiiii_
Assurez-vousqu'aucun obstacle pouvant bloquer
le signal nese trouve entre le climatiseur et la
t616commande.
Node Cool (refroidissement)
UtilisezlemodeCool(refroidissement)avecla vitesse
du ventilateursurLow(faible),Ned (moyenne),
High(elev_e)ouAuto (automatique)pour refroidir.
AppuyezsurlestouchesTemperatureIncrease
(augmentationde latemperature)• / Decrease
(diminutiondelatemperature)• pour programmer la
temperaturesouhait_eentre18°Cet 30°C(64
et86°F)parincrementsde0,5°C(1°F).
Unthermostat_lectroniquepermetde maintenirla
temperaturede lapiece.Lecompresseursemeten
marcheets'arrCte(_intervallesr_gulierspourmaintenir
latemperaturede lapiece(_unniveaudeconfortchoisi.
R_glezlethermostat(_unevaleurplusbasseet I'air
ambiantserefroidira.R_glezlethermostat (_unevaleur
plus_lev_eet I'airambiantse r_chauffera.
Ceclimatiseurfroid seuln'estpasconCupour
fonctionneravec destemperaturesext_rieuresen
dessousde0 °C(32°F).IInedoit pasCtreutilis_Iorsque
lestemperaturesext_rieuressont endessousdeO°C
(32°F).
Le rayon d'action de la t616commande s'6tendjusqu'a
6,4 m (20 pieds).
Assurez-vousque les pilessont r6centes et
correctement install6es dans lat616commande.
La t616commande renferme un aimant permettant de
la fixer surdes surfaces m6talliques.
REMARQUE:Sileclimatiseurdteintestallumdalorsqu'il
estprogrammdsurunrdglageCoolousivouspassez
d'unmode Ventilation_unmodedeRefroidissement,il
faudraenviron 3 minutespourquale compresseurse
remetteen morcheetrecommence_ refroidir.
Descriptions du Refroidissement
Pour un RefroidissementNormal - S_lectionnez
le modeCoolaveclavitesseduventilateursurNed
ou High et un r6glage(_unetemp6rature moyenne.
Pour un RefroidissementNaximal - S61ectionnez
le modeCoolaveclavitesseduventilateursurHigh
et un r6glage(_unetemp6rature plusbasse.
Pour un Refroidissementplus Silencieuxou Durant
la Nuit -- S61ectionnezlemodeCoolavec lavitessedu
ventilateursur Lowet un r6glage6 unetemp6rature
moyenne.
22
Node Energy Saver leconomied'_nergie)
Contr61eleventilateur
ON(active)--Le ventilateurse met en marcheet s'arr¢te
en m¢metemps quelecompresseur.Cecipermetune
c_lUsgrandevariation de latemp6ratureet du taux
'humidit6dans la piece.Esten g6n6ralutilis6Iorsquela
pieceest inoccup6e.
Mode Fan Only (ventilateur uniquement)
UtilisezlemodeFanOnlyavecunevitessede ventilateur
r6gl6esurLow,Ned ou High pour fairecirculerI'airet
lefiltrer sansle refroidir.Etantdonn6 quelemodeFan
Onlynepermetpasde refroidissement,le r6glagedela
temp6raturen'affiche pas.Latemp6rature de la piece
s'affiche(_1'6cran.
Auto Fan Speed (vitesse du ventilateur auto)
R6glezla vitessedu ventilateursurauto pour que
la vitessedu ventilateurser6gleautomatiquement(_la
vitessen6cessaire(_I'obtentiondesr6glagesapportant
un niveaudeconfort optimal c)latemp6rature
programm6e.
Fonction de conservation des r6glages aprgs une coupure de courant
Encasde panneou d'interruptiondecourant,I'appareil 624heures)6tait utilis6e,I'appareilreprendsoncompte
red6marreautomatiquement apr6sr6tablissement 6 rebours.Vousaurez peut-6tre besoindeprogrammer
de I'alimentation61ectriqueet conservelesderniers une nouvelleheure.
r6glagesutilis6s.Silafonction Delay1-24hr (D61aide i
REMARQUE:Leventilateurpeut continuer_ fonctionner
quelquesinstantsapr_squalecompresseursesoitorr_t_.
OFF(d6sactiv6)--Leventilateurfonctionneencontinu,
alorsquelecompresseurse met en marcheet s'arr¢te(_
intervallesr6guliers.
REMARQUE:Lavitessedeventilateurauto nepeutCtre
utilis_eIorsqueleclimatiseurestsur le modeFanOnly.
Sila piecedemandeun refroidissementsuppl6mentaire,
la vitessedu ventilateuraugmenteautomatiquement.Si
la piecedemande mains
de refroidissement,lavitessedu ventilateurdiminue
automatiquement.
RENARQUE: Lo dtessedeventiloteurautonepeut _tre
utilis_eIorsqueleclimotiseurestsurle modeFanOnly.
Page 23

A propos des commandes du climatiseur.
Information suppl@mentaire importante.
Direction de I'Air
utilisez le levier pour r6gler la direction de Fairversla
gauche ou vers la droite seulement.
Entretien et nettoyage du climatiseur.
Grille et BoTtier
Eteignezet d_branchezleclimatiseuravanttout Pourle nettoyer,utilisezdeI'eauet und_tergentdoux.
nettoyage. N'utilisezpas d'eaude Javeloudenettoyantsabrasifs.
Filtre _ Air
Lefiltre 0 air derriere la grille frontale doit
_tre v@ifi6 et nettoy6 au bout de 30jours de
fonctionnement ou plus souvent si n6cessaire.
Pour retirer :
TirezI'onglet sur lec6t6 droit deI'appareiljusqu'(3ce
que lefiltre soit sorti.
Pour retirer :
Ouvrez la grille d'entr_e en tirant vers le bassur les
languettes des coins sup@ieursde la grille d'entr@
jusqu'6 ce que la grille soit dans une position 6 45
degr6s. Retirezlefiltre.
Nettoyezle filtre avecdeI'eausavonneuse tilde.
Rincezlefiltre et laissez-les6cher avant de le remettre
dans le climatiseur. Nenettoyez pasvotre filtre au
lave-vaisselle.
MISE EN GARDE: NEfaites
fonctionner le climatiseur sanslefiltresouspeinede le
boucher avecdelapoussi_reet de la charpie et de
r_duire sone_cacit_
Serpentins E×t_rieurs
Lesserpentins situ6s du c6t6 ext@ieur du climatiseur
doivent _tre r6guli@ement v@ifi6s.S'ilssont obstru6s
par des poussi@esou dela suie, il est possiblede les
faire nettoyer par desprofessionnels.
Comment InsUrer les Piles dons la T_l_commande
REPIARQUES:
Retirezlecouvercle du Iogement des piles
en lefaisant glisser dans lesens indiqu6 par
lafl_che.
Ins@ezlesnouvelles pilesenvousassurant
que lesp61es(+)et (-) de la pile sont orient6s
dans la bonne direction.
Remettez le couvercle en le faisant glisser.
Utilisez2 pilesalcalinesAAAd'l,5 Volt. N'utilisez
pasde piles rechargeables.
Retirezles pilesde lat616commandesi vous
pr6voyezde nepas utiliservotre climatiseur
pendant un certain temps.
Ne m61angezpasdespilesneuves avec des
pilesus6es.Nem61angezpas ensemble lespiles
alcalines,standard (carbone-zinc)ou rechargeables
(ni-cad,ni-mh, etc).
Languette
Lenguette
23
Page 24

I Instructions
de montage
ClimatiseurJ
-?1 Questions? Composez le 1.800.561.3344 ou visitez notre site web 6 •www.electromenagersge.ca
-4,MISE EN GARDE :
AVANT DE COMMENCER
Ne coupez pas ou n'enlevez pas, sous aucun
Lisez ces instructions enti_rement et attentivement.
• IMPORTANT -Conservezces instructions
pourlqnspecteur61ectriquelocal.
• IMPORTANT - mespecteztouslescodes et
r6glementsen vigueur.
• Remarque pour l°installateur- Assurez-vousde
remettreces instructionsau client.
• Remarque pour leclient- Conservezces
instructions pour toute r6f@ence future.
• Niveau de comp6tence - L'installation de cet
appare.ildemande des connaissancesde base en
mecanque.
• D61aid'ex6cution- EnvironI heure
• Nous recommandons que l'installationde ce
produitsoiteffectu6epar deux personnes.
• L'installateurestresponsablede l'installation
correcte de I'appareil.
• La panne de I'appareil due a une mauvaise
installation n'est pas couverte par la garantie.
• Vous DEVEZutiliser toutes les pi_ces fournies et
suivre la proc6dure d'installation du climatiseur
d6crite dans cette notice.
pr6texte, la troisi@me broche de mise 6 la terre
du cordon d'alimentation.
Ne changez pas la fiche du cordon d'alimentation
du climatiseur.
Un c6blage en aluminium du domicile peut
occasionner des probl@mes particuliers--
consultez un 61ectricien qualifi6.
OUTILLAGE NI CESSAIRES
Tournevis cruciforme Phillips
Tournevis _]t_te plate
I
(_ EXIGENCES I_LECTRIQUES
Certains mod@lesn6cessitent une prise mise _ laterre de 115/120 Volts AC,60 Hz,prot6g6e par
un fusible _]action diff6r6e ou par un disjoncteur.
La fiche triphas6e avec terre r6duit lerisque de choc
61ectrique.Si la prise murale que vous envisagez d'utiliser
est biphas6e, vous avez la responsabilit6 et I'obligation de
la remplacer par une prise triphas6e correctement mise _]
la terre.
Certains modules n6cessitent une prise mise _ la
terre de 230/208 VoltsAC,prot6g6e par un
fusible _ action diff6r6e ou par un disjoncteur.
Cesmod61esdoivent @re install6s sur leur
propre circuit d6riv6 pour 6viter de surcharger
lescircuits 61ectriques du domicile qui peut
occasionner un risque d'incendie par surchauffe
des c6bles.
Crayon
Niveau
Lecordon d'alimentation est 6quip6 d'un dispositif
d'interruption du courant. Un bouton d'essai et de
r6enclenchement est fourni sur le boi'tierde la prise.Vous
devez tester le m6canisme r6guli@ement en appuyant
d'abord sur le bouton TEST(essai)puis sur le bouton
RESET(r6enclenchement)Iorsque I'appareil est branch&
Si le bouton TEST(essai)ne bascule pas ou si le bouton
RESET(r6enclenchement) ne reste pas enclench6, cessez
d'utiliser votre climatiseur et appelez un technicien de
service qualifi&
24
R_gle ou m@tre
Ciseaux ou couteau
Page 25

Instructions de montage
PII_CES INCLUES
(L'aspect peut varier) Joint d'6tanch6it6 de la
Rail de mon_ _guillotine
suJoiinluard_a_tt_ panneauen
accord6on
droit
Climatiseur accord6on
'_ gauche _
Panneau en
/
TypeA (/4) Type B (6)
Bande d_
du rail de montage J
superleur
Ferrure de verrouillage de
la fen@tre(1)
25
Page 26

Instructions de montege
INSTRUCTION RELATIVE
.a,LA FENf:TRE
• Cesinstructionssontvalablespourunefen_trestandardc_
guillotinechdeuxch@ssismobiles.Vousdevrezmodifierles
instructionspourlesautrestypesdefen@tres.
• Leclimatiseurpeut@treinstallesanslespanneauxen
accordeonssilafen@treestetroite.Rderez-vousaux
dimensionsde lafen@treindiqu@sdamslecroquis@droite.
• Toutelaferruredemontagedoit @tresolidementfix@au
bois,@la ma_onnerieou au m@tal.
• Laprised'alimentationelectriquedoitsetrouver@port@
ducordond'alimentation.
• Suivezlesdimensionsindiqu@spourvotremo@ledamsle
tableauet surlecroquis.
ModUles A B
AER05 121/2pomin. 23po-38po
AEH06 131/2 pomin. 221/2 po-38 po
AEH08
I
13==4]
FIXATION DE LA BANDE
%
D'I_TANCHI_ITI_ DU RAIL
DE MONTAGE SUPI_RIEUR
(Damscertainsmo@les,labanded'_tancheitepeutdejch_tre
fix@surle railde montagesuperieur.Lecas@cheant,ignorez
cette@tape.)
Retirezla pelliculedelabanded'etancheiteduraildemontage
sup@ieuretapposezcettebanded'etancheitesurlebasdu
raildemontagesuperieur,lelongdubordavant.
Raildemontagesup@ieur
Retirezla
pelliculede
la bande
d'@tanch@it@
VUEFRONTALE Raildemontagesup@ieur
I...................................1
,_ B
(Aveclespanneaux
en accord@on)
11
[] INSTRUCTIONS RELATIVE
.a,LA CONTRE-FENF:TRE
Lecadredelacontre-fen@treemp@chele climatiseur
de penchervers I'ext@ieur,et doncdesedrainer
correctement.Pourreglerce probleme,fixezunmorceau
de boisaurebordde lafen@tre.
MORCEAU DE BOIS
LARGEUR: 2po
LONGUEUR: Suffisammentlong pour seIogerc_I'interieur
du cadredelafen@tre.
I_PAISSEUR:PourdeterminerI'epaisseur,placezun
morceaude boissur lerebord de lafen@trede fagon@ce
que le morceaude boissoit½ po pluselevequeledessus
du cadredelacontre-fen@treou du cadreenvinyle.
Fixezsolidement@I'aidedevis oudeclousfournis par
I'installateur.
½ po plus @lev@que
le cadreenvinyle (sur
/
½ po plus @lev@_ ,,,,,-Bois
que lecadredela
_ certainesfen_tres)
-'- rl I))j_ j)/I
contre-fen tre_-- :: lY'.--Y/,I
Bande d'@anch6it6
[] PRI_PARATION DU CLIMATISEUR
Installez le rail de montage sup@ieur avec
4 vis de type A de I'ext@ieur du boTtier.
Railde montage
sup@ieur "_
L "--
Railde montage inf@ieur
[] Maintenez le panneau en accordion dams une
main et tirez doucement pour lib_rer I'extr_mit_
ouverte.
Cadrede la
contre-fen@treo r- Cadreenvinyle
__L_ Reb°rd )
II
26
Page 27

Instructions de montage
r41 PRI_PARATION DU CLIMATISEUR
(suite)
[_] Faites glisser I'extr6mit6 libre du panneau en
accord6on dans les rails de panneau lat6ral.
Faites glisser le panneau vers le bas. Assurez-
vous de laisser suffisamment d'espace pour
glisser le haut et le bas du cadre dans les rails
de I'enceinte.
NOTE :11y a un panneau en accord6on gauche
et un panneau en accord6on droit. Assurez-
vous d'utiliser le panneau appropri6 pour
chaque c6t&
INSTALLATION DU CLIMATISEUR
DANS LA FENi:TRE
Placezle climatiseur sur lerebord avec le rail
de montage inf6rieur contre le rebord arri6re.
Centrez-le et fermez la fen6tre derri6re le rail
de montage sup6rieur. IIdolt 6tre de niveau ou
16g6rement pench6 vers I'ext6rieur. Utilisez un
niveau, environ 1/3 de bulle donnera la pente
correcte vers I'ext6rieur.
Visdetype B
[]
Etirezles panneaux en accord6on gauche et
droitjusqu'aux cadres verticaux de la fen6tre
et fixez-les a I'aide de 5 vis de type B au travers
des trous dans lespanneaux.
r_ Faites glisser les panneaux en accord6on
gauche et droit dans les rails de montage
inf6rieur et sup6rieur, partie
Railde montage sup@ieure
Partie sup@ieure sup@ieur droite
gauche
Railde montage inf@ieur
I-_ PRI_PARATION DE LA FEN£=TRE
D6coupez lejoint de la fen@tre a guillotine a
la Iongueur ad6quate. D6collez la pellicule
protectrice et collez lejoint sur ledessous du cadre
de la fen@tre.
[]
INSTALLATION D'UNE FERRURE DE SUPPORT
ET DU JOINT D'I_TANCHI_ITI_ SUPI_RIEUR EN
MOUSSE DE LA FENf:TRE
B]
-AMISE EN GARDE :
Pour preventez la verre
brisez dans les fen@res, Vinyle
attachez une ferrure de
verrouillage de la fen@tre
a la c6t@de la fen@re a I'aide
d'une vis de type B.
D@coupezlejoint d'@tanch@it@sup@bur
en mousse a la largeur de la fen@tre,
Ins@ez la mousse
©
entre la vitre et
la fen@trepour
emp@cherFair
et les insectes
de p@n@rerdans
la pi@ce.
NOTE: Si lejoint d'@anch6it@fourni ne s'adapte pas
a votre fen@tre,procurez-vous Iocalement I'article
appropri@afin d'obtenir
une @tanch@it@ad@quatede I'installation.
Bois
27
Page 28

Avant d'appeler le service.., www.electromenagersge.ca
Causespossibles Quafaire
Leclimatiseur • Assurez-vousquelaficheduclimatiseursoitbienbranchee
matins enmarche est d_branch_, donsla prisemurale.
Lefusiblea saute/ • V@ifiezla boTte5 fusible/_disjoncteurset remplacezlefusible
le disjoncteurestouvert, ou rebranchezledisjoncteur.
IIy a unepennedecourant. • S'ilseproduitunepannedecourant,debranchezleclimatiseur
enlemettantenpositionOFF(arr_t).Quandlecourantrevient,
attendez3minutesavantderemettreenmarcheleclimatiseur,
pour@iterdedeclencherlasurchargeducompresseur.
Lem_canismed'interruption • AppuyezsurleboutonRESET(remiseenmarche)situesurlafiche
decourant est d_clanch_, du cordonelectrique.
• SileboutonRESETnerestepasenfonce,arr_tezleclimatiseur
d'airet appelezuntechnicienqualifi_.
Leclimatiseurnerefroidit Lacirculationd'air estbloqu_e. • Assurez-vousqu'iln'ya pasderideau,destoreoudemeuble
pasautant qu'il ledevrait qui bloqueledevantduclimatiseur.
Lecontr61edetemperature • EnmodeCool(frais)appuyezsur latoucheDecrease• pad.
n'est pasbienr_gl_.
Lefiltre _ air est sale. • Nettoyezlefiltreuumainstousles30jours.Consulterlasection
• Surlesmo@lesdotesdeboutonsdecommandes,tournez
leboutondetemp@aturesurunevaleurplus_lev_e.
InstructionsdefonctionnemenL
Lachambre_tait chaude. • Apresavoirmisenmarcheleclimatiseur,attendez
que lachambreserefroidisse.
L'airfroid s'_chappe • V@ifiezlesgrilles_ registredeplancheretlesreprisesd'airfroid.
dela chambre.
Lesserpentinssont gelds. • Consultez"Ledimatiseur d'airg_le"ci-dessous.
Leclimatiseur Laglacebloquela circulation • Surlesmo@lesdotesdeboutonsdecommunde,reglezlemode
g_le d'oir et emp_cheleclimotiseur sur HighFen(vitessedu ventilateur_levee)ouHighCool(fort
de refroidirlachombre, reffoidissement)uvecla temp@aturer_gleesur1ou2.
• Surlesmo@lesdotesdetouches5effleurement,reglezles
commandessurHighFen(vitesseduventilateur_lev@)ou HighCool
(fortrefroidissement)et r_glezlethermostatsurunetemp@atureplus
_lev_e.
Lat_l_commande Lespilesne sontpas ins_r_es • V@ifiezla positiondespiles.Ellesdoiventins@@sdefa¢on
nefonctionnepas correctement. 5 cequelesp61es(+)et(-)dela pilesoientorientesdansdes
directionsoppos_es.
Lespilessont peut-_tre • Remplacerlespiles.
d_charg_es.
DeI'eaucoule_ I'ext_rieur IIfait tr_s chaudet humide. • C'estnormal.
DeI'eaucoule_ I'int_rieur Leclimatiseurn'estpas • Pourobtenirunebonne@acuationdeI'eau,assurez-vous
inclin_versI'e×t_rieur. queleclimatiseursoitI_gerementinclinedeI'avant
L'eaus'amasseclans L'humidit_estextraitede • C'estnormalpendantunep@iodecourtedansdesregions
leplateaudufond I'air de lachambreet passe peuhumides;normalpendantdesp@iodesplusIongues
dansleplateaudufond. dunsdesr_gionstreshumides.
du battierversI'ar@re.
Bruits normaux de fonctionnement
Vouspouvezentendreun cliquetisdO_ deI'eauqui
estabsorbeeetest projeteecontrelecondensateurles
joursde pluieoOquandily a beaucoupd'humidite.Cette
caract@istiquediminueI'humiditeetam_liore
lerendement.
28_
Vouspouvezentendreleclaquementduthermostatquand
lecompresseursemetenmarcheets'arrCte.
DeI'eaus'amassedansleplateaudubaspendantles
periodesdegrandehumiditeous'ilpleut.Cetteeaupeut
deborderetcoulerdeI'appareilduc6teexterieur.
Leventilateurpeuttournerm¢mequandlecompresseur
nefonctionnepas.
Page 29

Notes.
29
Page 30

Notes.
30
Page 31

Climatiseur GE--Garantie Limit e D'un An. elec omenoge ,geco
Agrafez votre facture ici.
Une preuve de la date d'achat initial est ndcessaire
pour faire une rdclamation sous garantie.
i 'i_,,_ii"_"_iill _,_'_ 'i '_ _: i i_'_i=i i i_
Nous remplacerons •
1
un An I
A partir de !adate I
dVchatinitial I
Emballez correctement votre appareil. Nous vous
recommandons d'utiliser le carton et le materiel
d'emballage d'origine.
Ramenez le produit au magasin o5 vous I'avez achet_.
La formation du client. Ce manuel d'utilisation donne les
informations n_cessaires sur le fonctionnement et les
commandes.
Une installation, livraison ou maintenance d_fectueuse.
Encas de probl_me d'installation, ou si votre climatiseur
n°apas la bonne capacit6 de refroidissement, contactez
votre revendeur ou votre installateur. Vous6tes
responsable de la provision d'un syst_me _lectrique,
d'une plomberie et d'autres connexions appropri_s.
Une panne du produit r_sultant de modifications
apport6es au produit ou due 6 une utilisation
d(_raisonnable,y compris tout manquement 6 un
entretien r(_gulieret n(_cessaire.
Un appareil de remplacement pour tout produit quis'ov_re d6fectueux en raison cl'und6fout
de mot6riou ou de fabrication. L'opporeilde remplocement est goronti pour le reste de Io
dur6e de Iogorontie d'origine ct'unon.
Ajoutez une copie de votre facture ou route autre preuve
de la date d'achat d'origine 6 votre emballage. Inscrivez
(_galement votre nomet votre adresse ainsi qu'une
description du d_faut.
Le remplacement des fusibles ou le r_enclenchement du
disjoncteur du domicile.
Lespannes provoqu_es par la corrosionsur lesmodules
n'_tant pas proteges contre la corrosion.
Lesdommages au produit causespar une mauvaise
tension d'alimentation, un accident, un incendie, une
inondation ou une catastrophe naturelle.
Tout dommage fortuit ou indirect caus_ par d'_ventuels
d_fauts du climatiseur.
Lesdommages causas apr_s la livraison.
EXCLUSION DES GARANTIES TACITES--Votre recours exclusif est I'_chonge du produit suivont les
modolit_s de Io Garontie Limit_e. "routes goronties tocites, y compris les goronties de voleurs
morchondes ou d'od_quotion 6 des fins porticuli_res, sont limit_es 6 une dur_e d'un on ou 6 Io dur_e Io
plus courte autoris_e par la Ioi.
Cette garantie est valable pour le premier propri@taire et tout autre propri@taire du produit s'il achet@au Canada pour
utilisation domestique dons Canada.
Dons certaines provinces, il est interdit d'exclure ou de limiter les dommages directs ou indirects. II est alors possible
que les limitations ou exclusions ci-dessus ne s'appliquent pas dons votre cos.Lo pr@sentegarontie vous conf@re
des droits juridiques sp@cifiques.Vous pouvez b@n@ficierd'autres droits, qui varient d'une province _ I'autre. Pour
connaFtre les droits dont vous b@n@ficiezdons votre province, communiquez avec le bureau des relations avec les
consommateurs de votre r@gion.
Exclusion des gerenties recites: Sauf si elles sont interdites ou restreintes par la Ioi, il n'y a pas de garantie
qu'elle soit expresse, verbale ou statutaire, qui s'@tende au-del5 de la pr@sente description, en particulier
aucune garantie implicite de qualit@ marchande ou de convenance _ un besoin particulier.
Garant : Mabe Canada Inc.,
Burlington, Ontario
31
Page 32

Assistance d la clientele.
Site Internet GE www.electromenagersge.ca
Pour toute question ou pour un besoin d'assistance au sujet de votre appareil m6nager, consultez le site
Internet ci-dessus, accessible 24 heures parjour, chaque jour de I'ann6e! A partir du site, vous pouvez
t616charger les manuels d'utilisation.
Sur demande, GEpeut fournir une brochure sur I'am6nagement d'une cuisine pour les personnes
I _ 1 Studiodeconceptionr_aliste www.electromenagersge.ca
6 mobilit6 r6duite.
Ecrivez: Directeur, Relations avec les consommateurs, Mabe Canada, Inc.
Bureau 310, 1 Factory Lane
14oncton, N.B. E1C9145
Pi_ces et accessoires
Ceux qui d6sirent r6parer eux-m_mes leurs 61ectrom6nagers peuvent recevoir pi_ces et accessoires
directement (_la maison (cartes VISA, MasterCard et Discover accept6es).
Les procedures expliqu_es duns le present manuel peuvent _tre ex_cut_es par n'importe quel utilisuteur.
GE n'offre pus de services de r_purution pour ce produit. Nous vous recommundons fortement de ne pus
tenter de r_purer vous-mEme le produit.
Voustrouverez dans lespagesjaunes de votre annuaire le num6ro du Centre de service 14abele plus proche.
Autrement, appelez-nous au 1.800.561.33/4/4.
www.electromenagersge.ca
Contoctez-nous www.electromenagersge.ca
Si vous n'_tes pas satisfait du service apr_s-vente dont vous avez b6n6fici6 :
Premi_rement, communiquez avec les gens qui ont r6par6 votre appareil.
Ensuite, si vous n'_tes toujours pas satisfait envoyez tousles d6tails-num6ro de t616phone compris-au
Directeur, Relations avec les consommateurs, Mabe Canada, Inc.
Bureau 310, 1 Factory Lane
14oncton, N.B. E1C9143
32
Page 33

Instrucciones de seguridad ......... 34,3s
Instrucciones de operaci6n
Controle .................................. 36-38
Cuidado y limpieza
Bobinas para exteriores ...................... 38
Filtro de aire .................................. 38
Instrucciones de instalaci6n ....... 39-42
Solucionar problemas ................... 43
Sonidos de operaci6n normales .............. 43
Servicio al consumidor
Garantia...................................... 44
Apoyo al consumidor ......................... 47
AER05
AEH06*
AEH08*
Producto etiquetado *ENERGYSTAR®
ENERGYSTAR
Como socio de ENERGYSTAR®,
GEha confirmado que este
producto cumple las directrices
de ENERGYSTAR®relativas al
rendimiento energ6tico.
Escriba losn_meros de modelo
y serie aqui:
# de Modelo
# de Serie
Puede encontrar estos nOmeros
en una etiqueta en el costado
del acondicionador de aire.
33
Page 34

INFORHACION IHPORTANTE DESEGURIDAD.
LEATODASLASINSTRUCCIONESANTESDE USAR.
AiADVERTENCIA!
Par su seguridad, se debe seguir la informaci6n en este manual para minimizar el riesgo de incendios,
descargas el_ctricas o lesiones personales.
PRECAUCIONES DE SEGURIDAD
Use este electrodom6stico solamente para
el prop6sito determinado segOn se describe
en el Manual del propietario.
Este acondicionador de aire debe instalarse
correctamente de acuerdo con las
Instrucciones de instalaci6n antes de su usa.
Nunca desenchufe su acondicionador de
aire tirando del cable el6ctrico. Siempre
agarre firmemente el enchufe y tire de
61directamente hacia afuera.
Reemplace inmediatamente todos los
cables el6ctricos que se hayan pelado o que
se hayan dahado de alguna otra manera.
Un cable de corriente dahado no debe
repararse, sino que debe ser sustituido par
uno nuevo que se adquiera del fabricante.
No use un cable el6ctrico que muestre
evidencias de deterioro, o dahos de
abrasi6n en su superficie en alguno de sus
extremos.
Apague la unidad y desenchufe su
acondicionador de aire antes de limpiar.
GE no est6 no apoya que se le proporcione
ning0n servicio al acondicionador de aire.
Vehementemente recomendamos que
usted no intente proporcionar servicio al
acondicionador de aire usted mismo.
Par su seguridad...no almacene ni use
materiales combustibles, gasolina u
otros vapores o liquidos inflamables
en la proximidad de 6ste o alg0n otro
electrodom6stico.
Todoslos acondicionadores de aire
contiene refrigerantes,los quepar Ley
Federaldeben ser removidos antes de
desecharlos.Siusted planea deshacersede
alg0n producto que contenga refrigerantes,
p6ngase encontacto con lacompahia que
seencarga de recoger su basura para que
le indiquen qu6 hacer.
Si el recept6culo no coincide con el enchufe,
un electricista calificado debe reemplazar el
recept6culo.
Estos sistemas de acondicionadores de
aire R410A requieren que los contratistas
y t6cnicos usen herramientas, equipos y
est6ndares de seguridad aprobados para
su usa con este refrigerante. NO use
equipamiento certificado s61opara
refrigerante R22.
34
C()MO CONECTAR LA ELECTRICIDAD
Bajo ninguna circunstancia, carte o remueva la
tercera pOa (t:ierra)del cable eldctrico. En pos
de la seguridad personal, este electrodomdstico
debe siempre conectarse a tierra.
NO use un enchufe adaptador con este
electrodom_stico.
El cable el#ctrico de este electrodom6stico est6
equipado con un enchufe de tres p0as (tierra)
que combina con un tomacorriente est6ndar
de tres tomas de pared para minimizar la
posibilidad de una descarga el6ctrica.
El cable de alimentaci6n incluye un
dispositivo para interrupci6n de corriente.
Se incluye un bot6n de prueba y de reinicio
en el dispositivo. El dispositivo debe ponerse
a prueba peri6dicamente: primero se presiona
el bot6n de TEST(prueba) y luego RESET
(reinicio) mientras se encuentra enchufado al
tomacorriente. Si el bot6n TESTno se dispara
o si el bot6n RESETno queda enganchado,
deje de utilizar el acondicionador de aire y
comuniquese con un t6cnico calificado.
Pida a un t#cnico que inspeccione el
tomacorriente y el circuito para cerciorarse
de que el tomacorriente est6 conectado a
tierra de la manera apropiada.
Donde exista un tomacorriente de dos
tomas, es su responsabilidad y obligaci6n
personal hacer que dicho tomacorriente
sea reemplazado par uno de tres tomas
con conexi6n a tierra.
Elacondicionador de aire deberia siempreestar
conectado a un tomacorriente individual con su
circuito de voltaje correspondiente.
Esto proporciona el mayor rendimiento y
adem6s evita que loscircuitos del resto de
la casa se sobrecarguen, Io cual podria causar
incendios par el sobrecalentamiento del
cableado.
Vet las Instrucciones de instalaci6n, en la
secci6n Requisitos Eldctricos para los requisitos
especificos de conexi6n.
Page 35

ZkiADVERTENCIA!
USO DE PROLONGADORES
RIESGO DE INCENDIO. Podria ocasionar
lesiones graves o la muerte.
• NO use un prolongador con este
Acondicionador de Aire de Ventana.
• NO use protectores contra picos de tensi6n ni
adaptadores pare mOItiples tomacorrientes con
este Acondicionodor de Aire de Ventono.
LEAVSIGAESTASINSTRUCCIONESDESEGURIDAD
CUIDADOSAIENTE.
GEAppliances.com
GUARDEESTASINSTRUCCIONES
35
Page 36

Acerca de los controles enel acondicionador de aire.
I_asluces al lado de los teclas de toque en elpanel de control delacondicionador de aim indicardn los ajustes seleccionados.
Los funciones y el aspecto pueden variar.
La luz indica que la unidad est6 en
el modo de Ajuste de temperatura
La luz indica que la unidad est6 en o de Tiempo de retardo.
elmodo de Ajuste de temperatura
o de Tiempo de retardo.
m Auto
High _ Cool
m High m Cool I LOW I Fen Only
Low m Fan Onlg
_ a
.9 0o}e
(en algunos modelos) La Ibz indica que el O0 !
NOTA: Lapantalla muestra siempre I Ir_ I kl-2_hr) _
la temperatura ambiente, excepto al La luz indica que el I
configurar la temperatura Definida o el temporizador de retdrdo
Sincronizador de retardo, est6 configurado. (en algunos modelos)
temporizador de retardo ......................
est5 configurado. _DeTau_ _
!
Controles del acondicionador de aire
Controles(enalgunosmodelog
O ecla de Power (Encendidol
Apaga y prende el acondicionador de aire.
AIencenderse, la pantalla mostrar6 la temperatura
ambiente.
Pantalla
O
Muestra la temperatura ambiente o el tiempo
restante en elSincronizador de retardo. Muestra la
temperatura Definicla al configurar la temperatura
en los modos Cool (Fdo) o de Energy Saver
(Ahorro de energial. Lo luz de Ajuste se encender6
durante la configuraci6n.
NOTA: la pantalla cambiar6 para mostrar la
temperatura ambiente una vez que se haya
realizado la configuraci6n.
Teclas de Temp Aumento •/Reducci6n •
@
Usado pora ajustar Iotemperatura cuando
se encuentre en el modo Cool (Frio) o Energy
Saver (Ahorro de energia). La luz de Ajuste se
encender6 durante la configuraci6n.
Teclas de Sincronizador de retardo Aumento
O
• (+J/ Reducci6n •(-I
Cada vez que toque las teclas Aumento •/
Reducci6n • de la unidad o lasteclas Aumento +
/ReducciBn - en el control remoto definir6
el tiempo de retardo al utilizar el Delay 1-24hr
timer (Sincronizador deretardo 1-24 hL La luz de
Ajuste seencender6 durante la configuraci6n.
Teclas de Fan Speed (Velocidad del ventiladod
0
Usadoparo ajustar Iovelocidaddelventilador
a LowtBajol,Ned (Medial,High (Alto)o Auto
(Autom6tica)en la unidad.NOTA:enel control
remoto,utilicelosteclosAumento +/Reducci6n
- velocidudde ventiludor puruujustar Iovelocidod
delventiludor enLow(Bajo),Ned (Nedio)o High
(Alto).UtiliceIotecloAuto puruuctivur elventiludor
1-24h de retardo
Reducci6nde_ Aumento de
sincronizador de _ sincronizador de
retardo _ retardo
Selecci6ndemodo i Encendidoautom_tico
Reducci6nde_ Aumento de velocidad
velocidaddel __ delventilador
ventilador _ I Encendido/apagado
Aumentoy _ I dela unidad
reducci6nde ajuste
[de temperatura
delventilador
Control remoto
autom6tico.
Tecla de MODO
0
Usodo para ajustar elacondicionodor de oire
al modo Cool (Frio), Energy Saver (Ahorro de
energia) o Fan Only (Solo ventilador).
Teclas de Delay (Retardo)/ Delay 1-24hr
0
(Retardo 1-24h)
Delay ON (ENCENDIDO Retardo)--Cua ndo
el ucondicionudor de uire est6 upugudo,
puede ujusturse puru que se enciendo
uutom6ticumente dentro de 1 o 24 horus en el
modo y configuruci6n de ventilodor anterior.
Delay OFF (APAGADORetardo)--Cuando el
acondicionador de aire est6 encendido, puede
c_justarsepara que se apague autom6ticamente
entro de i a 24 horas.
C6mo realizar el ajuste:
Pulse la tecla Delay 1-24hr (Retardo 1-24h) en
la unidad o Delay pad (Retardo)del control
remoto. Cada toque de los teclas Aumento• /
Reducci6n • en la unidad o los teclas Aumento
+/Reducci6n - en el control remoto definir6 el
temporizador en intervalos de i hora. La luz de
Ajuste se encender6 durante la conficjuraci6n.
Para revisar el tiempo restante en el Sincronizador
de retardo 1-24 h, pulse la tecla de Delay
1-24hr (Retardo 1-24h) en la unidad o Delay pad
(Retardo) en del control remoto. Utilice los teclas
Aumento •/Reducci6n • en la unidad o las
teclas Aumento +/Reducci6n - enel control
remoto para definir un nuevo tiempo, si Iodesea.
Para cancelar el sincronizador, pulse Iatecla
Delay 1-24hr (Retardo 1-24h) hasta que la luz
de dicho control se apague.
36
Nota: La temperatura por defecto que figura en la pantalla est6 en grados Fahrenheit (°F).Para modificar
la pantalla a grados Celsius (°C),mantenga presionados los botones Temp Increase (Incremento de Tem-
peratura) • Temp Decrease (Disminuci6n de Temperatura) • al mismo tiempo y durante 3 segundos.
Repita el proceso para volver a modificar la pantalla a grados Fahrenheit (°F).
Page 37

Los funciones y la apariencia podrdn variar.
GEAppliances.com
High Low
Cool _ Cool
Low
Fan
OFF
MODE
CONTROL DE MODe
O O
Coolest
CONTROL DE TEMPERATURA
Controles(enalgunos modelos)
Control de Mode
0
High Cool (FrioAlto)y Low Cool (FrioBujo)
brindan refrigeraci6n con diferentes velocidades
del ventilador.
Losajustes del ventilador brindan circulaci6n de
aire y filtrado sin refrigeraci6n.
NOTA: Simueve el control de modo de un
ajuste de refrigeraci6n a OFF (Apugud o a un
ajuste del ventilador, espere por los menos 3
minutos antes de volver a activar un ajuste de
refrigeraci6n.
TEMP
7
2
5
O ontrol de TEMPERATURA
Elcontrol de TEMPERATURAse usapara
mantener latemperatura del ambiente. El
compresor realizar6 el ciclo de encendido y
apagado para mantener la habitaci6n al mismo
niveldeconfort. AI girar la perilla a un nOmero
m6s alto, el aire interior comenzar6 a serm6s
frio. AIgirar la perilla aun nOmerom6s bajo,el
aire interior comenzar6 a serm6s c61ido.
Descripciones de Refrigeruci6n
Pure unu Refrigeruci6n NormuI--Seleccione
High Cool (Frio Alto) o Low Cool (Frio Bujo) con el
control de TEMPERATURAen el punto intermedio.
Pure unu Refrigeruci6n M6ximu--Seleccione High
Cool (Frio Alto) con el control de TEMPERATURAen
el nOmero m6s alto disponible en la perilla.
Pore unu Refrigeruci6n H6s Suuve y Nocturnu--
Seleccione Low Cool (Frio Bujo) con el control de
TEMPERATURA en el punto intermedio.
37
Page 38

Acerca de los controles en el acondJcJonadorde aJre.
No use en las condiciones e×ternasdebajo
elpunto de congelaci6n
Control remoto
Para garantizar una operaci6n apropiada, oriente
el control remoto hacia el receptor de seBaldel
acondicionador de aire.
Cerci6resede que no haya nada entre el
acondicionador de aire y el control remoto que
pueda bloquear la se_al.
Modo Cool [Frio]
Useel modo Cool (Frio)aLow (Bajo),Mad (MedioL
High (Alto) o Auto Fan SpeediVelocidad de
ventilador autom6tica) paraenfriar. Uselasteclas
de Temperature iTemperatura) Aumento • 1+)
/Reducci6n • (-) paraajustar ala ternperatura
deseada entre 64°Fy 86°F en incrernentos de I°F.
Seusa unterrnostato electr6nico para rnantener
la ternperatura arnbiente. Elcornpresor hat6
ciclo entre apagado y encendido para rnantener
la habitaci6n ala ternperatura deseada.Ajusteel
terrnostato a un n0rnero rnenor y el aire interno
seenfriar6 rn6s.SiIoajusta a un n0rnero mayor,
la ternperatura del aire interno se calentar6 rn6s.
NOTA:si elacondicionador de aire est6 apagado y
seenciendemientras est6configuradoenun ajuste
Esteacondicionador de aire no esdiseflado para
usarentemperaturas externas debajo el punto de
congelaci6n. No useen las condiciones externas
debajo el punto de congelaci6n.
Elreceptor de seBaltiene un rango m6ximo de
20 pies.
Cerci6resedeque las bater[as seanfrescas y
se instalen correctamente segOnseindica en el
control remoto.
Elcontrol remoto cuenta con un im6n que
permite adherirlo a superficies met2icas.
Cool {Frio)
osi secambia deun ajuste deventilador a uno
de Cool (Frio),puede qua pasen aproximadamente
unos 3 minutos basra qua el compresorarranque y
comienceel enfriamiento.
Descripciones de enfriamiento
Paraenfriamiento normaI-Seleccione el rnodo
Cool(Frio)y ventilador High (Alto)oMad (Medio)
con una ternperatura de ajuste media.
Pare enfriamiento m4ximo--Seleccione el rnodo
Cool (Frio)y ventilador High (Alto)con una
ternperatura de ajuste rnenor.
Pare enfriamiento silencioso y enfriamiento
nocturno-Seleccione el rnodo Cool (Frio)y ventilador
Low (Bejo)con una ternperatura de ajuste media.
Energy Saver Mode [Modo de ahorro de energia]
Controla el ventilador.
ON(ENCENDIDO)--EIventilador har6 un ciclo
de encendido y apagado con el compresor. Este
resulta en variaciones mayores en latemperatura
de la habitaci6n yen la humedad. Normalmente
usado cuando la habitaci6n no est6 ocupada.
Modo de Fan Only (Solo ventiladofl
Useel modo Fen only (Soloventiladofl a velocidad
Low (Baja),Med (Media)o High (Alta)para
proporcionar circulaci6n de aire y filtraci6n sin
enfriarniento. Debido a que losnivelesde ventilador
Onicarnenteno proporcionan enfriarniento, no
Velocidad de ventilador autom6tica
Indique la opci6n en Velocidaddeventilador
autom6tica paradefinir autom6ticamente la
velocidad necesaria para proporcionar una
configuraci6n de comodidad 6ptima con la
temperatura elegida.
Sila habitaci6n necesita m6senfriamiento,
la velocidad del ventilador aumentar6
NOTA:puede que el ventilador siga funcionando
durante un corto tiempo despu_s de desactivarse el
ciclo del compresor.
OFF(APAGADOI--EIventilador funciona todo el
tiernpo, rnientras que el cornpresor pasa por los
ciclos de encendido y apagado.
sepuede introducir una temperatura Definida.
Aparecer6 en pantalla la temperatura ambiente.
NOTA:la Velocidad de ventilador autom6tica
no puede utilizarse en el modo Fan only {Solo
ventiladofl.
autom6ticamente. Sila habitaci6n necesita
menos enfriamiento, la velocidad delventilador
descender6 autom6ticamente.
NOTA:la Velocidad de ventilador autom6tica
no puede utilizarse en el modo Fan only (Solo
ventiladofl.
38
Funci6n de recuperaci6n de p_rdida de energia
Encaso de la p@didade la energ[a o interrupci6n, la
unidad reiniciar6 autom6ticamente en las funciones
de la 01timavezque fue usado una
vez la energ[a sea restablecida. Sila funci6n del
Delay 1-24hr (Retardo 1-24h)estaba definido,
continuar6 la cuenta regresiva.Esposibleque usted
necesiteajustar un tiempo nuevo si as[Io desea.
Page 39

Acerca de los controles en el acondJcJonadorde aJre.
Informaci6n importante adicionale.
Direcci6n del aire
Usela palanca para ajustar ladirecci6n delaire hacia
la izquierday la derecha solamente.
Cuidado y limpieza del acondicionador de aire.
Rejilla y caja
Apague el acondicionador de aire y retire el enchufe
del tomacorriente de la pared antes
de limpiar.
Filtro de aire
Elfiltro de aire detr6s de la rejillafrontal debe
inspeccionarsey limpiarse por Iomenos cada :30dias
o m6s a menudo si fuese necesario.
Para retirarlo:
Empujela leng0eta del lado derecho dela unidad
hasta haber retirado el filtro.
Para retirarlo:
Abra la rejilla de entrada empujando hacia abajo
lasleng0etas en las esquinassuperiores de la rejilla
de entrada, hasta que la rejillase encuentre enuna
posici6n de 45°. Retireel filtro.
Limpieelfiltro con agua tibia yjab6n. Enju6gueloy
permita que sesequeantes de colocarlo otra vezen
su lugar. No lave el filtro en un lavavajillas.
Para limpiar, useagua y un detergente suave.
No use cloro o materiales abrasivos.
PRECAUCION: .oopEREel
acondicionador de aire sin el filtro debido a que la
suciedad y las pelusas Io obstruir6n y reducir6n su
rendimiento.
Bobinas para e×teriores
Sedeben inspeccionar con frecuencia las bobinas
en el lado exterior del acondicionador de aire. Si
lasmismas est6n obstruidas con suciedad uhollin,
podrian limpiarse profesionalmente.
C6mo insertar las pilas en el control remoto
r-_-] Retirela cubierta de la pila desliz6ndola
de acuerdo con la direcci6n de la flecha.
-2-J Insertepilas nuevas cercior6ndose deque
lospolos positivos (+)y negativos (-)est6n
orientados correctamente.
13] Coloquela cubierta otra vez desliz6ndola
en su lugar.
Leng_etas
Leng_etas
NOTAS:
Use 2 pilasalcalinas"AAA"de 1,5voltios.
No use pilas recargables.
Retire laspilasdel control remoto si no va
a usar elsistema por un per[odoprolongado.
No mezcle baterias nuevas y viejas. No mezcle
bater[as alcalinas, est6ndar (carbono-cinc)
orecargables (ni-cad,ni-mh,etc. 39
Page 40

Acondicionador
JInstrucciones
de instalaci6n
J l-?l _Preguntas? Llame 800.GE.CARES(800.432.2737)o visite nuestra p6gina en la red en: GEAppliances.com I
de aire
ANTES DE INICIAR
Lea estas instrucciones completa y
cuidadosamente.
• IMPORTANTE - Guarde estas
instrucdonespara usa delinspectorlocal.
• IMPORTANTE -Observetodoslos
c6digosy 6rdenes de ley.
• Nota alinstalador- Aseg0rese de dejarestas
instrucdonescon elconsumidor.
• Nota alconsumidor - Conserve estas
instruccionespara referendafutura.
• Nivelde destreza- Lo instalaci6nde este
aparato requierede destrezasmec6nicas
b6sicas.
• Tiempo de ejecuci6n - Aprox.1 hora
• Recomendamos dos personas para
lainstalaci6nde esteproducto.
• Lo instalaci6napropiada es la responsabilidad
delinstalador.
• La falladelproducto debido a una instalaci6n
inadecuada no est6cubierta
par lagarantia.
• Cuando instale este acondicionador
de aire, DEBE usar todas los piezas
suministradas y usar procedimientos adecuados
de instalaci6n.
PRECAUCION:
Bajo ninguna circunstancia corte o remueva
la tercera p_a (conexi6n a tierra) del cable
el_ctrico.
No cambie el enchufe en el cable el@ctrico
de este acondicionador de aire.
Los cables caseros de aluminio podrian
presentar problemas especiales. Consulte
a un t@cnico electricista calificado.
REQUISITOS ELI:!CTRICOS
Algunos modelos requieren tomacorrientes de
@
El enchufe de tres p0as con conexi6n a tierra
minimiza la posibilidad de descargas el6ctricas. Si
el tomacorriente de la pared que usted planea usar
solamente tiene 2 tomas, es su responsabilidad hacer
que un t6cnico Io reemplace par uno de tres tomas
con conexi6n a tierra.
©
@
@
Elcable de alimentaci6n incluyeun dispositivo para
interrupci6n de corriente.Seincluye
un bot6n de prueba y dereinicioen el
dispositivo.Eldispositivodebe ponersea
pruebaperi6dicamente: primero sepresiona
el bot6n de TEST (prueba)y luego RESET(reinicio)
mientras seencuentra enchufado al tomacorriente. Siel
bot6nTESTno sedispara
o si el bot6n RESETno queda enganchado,
dejede utilizar el acondicionador deairey comuniquese
con un t6cnicocalificado.
115/120 voltios de corriente alterna y 60 Hz
conectados a tierra, protegidos con un fusible
de dilataci6n de tiempo de 15 amperios
o un cortacircuitos.
Algunos modelos requieren 230/208 voltios,
de corriente alterna, protegidos par un fusible
de dilataci6n de tiempo
o un cortacircuitos. Estos modelos deberian
instalarse en un ramal exclusivo del circuito
para un rendimiento m6s notable y para
prevenir sobrecargas en los circuitos de
cableados de su casa o apartamento,
Iocual podria representar un riesgo
de incendio par el sobrecalentamiento de los
alambres.
4O
Page 41

Instrucciones de instalaci6n
HERRAMIENTAS QUE NECESITAR_,
Un destornillador de estrella
PARTES INCLUIDAS
(Apariencia puede variar)
Rielde mon_'
Acondicionador
de aire
Tijeras o cuchilla
e_PeUJlU_i_ Panel de
Panel de derecho
izquierdo
Un destornillador
con hoja plana
Nivel
L6piz
Una regla o cinta m6trica
Sello de la banda
tana
acorde6n
Tipo A (4)
acorde6n _ /
dBe?_ide?_
superior
Soporte de cierre de
Tipo B (6) laventana (1)
41
Page 42

Instrucciones de instalaci6n
ri]
REQUISITOS PARA LA VENTANA
• Estasinstrucciones sonpara una
ventana est6ndar de dos pliegues.
Usted necesitar6 modificar el proceso para otros
tipos de ventanas.
• Elacondicionador de aire puede instalarse sin los
panelesde acorde6n para ajustarse a unaventana
m6s estrecha. Ver lasdimensiones de la abertura de
laventana.
• Todaslaspartes de apoyo deben quedar totalmente
aseguradas a algQn metal, mamposteria o a la
madera.
• Eltomacorrienteel6ctricodebeestaralalcancedelcable
el6ctricodelacondicionadorde aire.
• Sigalasdimensionesde latabla y lailustraci6nseg0nsu
modelo.
Models
AER05
AEH06 I 13 1/2" min. 22 1/2"-38"
AEH08
.i B
(conpaneles de acorde6n)
A
12 1/2" min.
I
I
13==4]
A
--1
I_1 PEGUE LA BANDA DE SELLADO
DEL RIEL DE MONTAJE SUPERIOR
(Esposible queen algunos modelos la banda de
selladoya seencuentre sobre el riel de montaje. Si
corresponde, saltee este paso.)
Retire la parte posterior de la banda de sellado del riel
de montaje superior y pegue la banda de sellado al
fondo del rielde montaje superior a Io largo el borde
delantero.
Rieldemontajesuperior
la parte
_ etire
Rieldemontajesuperior
VISTA FRONTAL j
°.,,, . ,.,, • , , , ,,,,,o o, , ,., ° , •,,. ° ,,
posterior
dela banda
desellado
I
Bandadesellado
I
[_] REQUISITOS DE UNA VENTANA
DE TORM ENTAS
Unmarco de ventana de tormentas no permitir6 que
el acondicionador de aire seincline hacia elexteriory
evitara que drene apropiadamente.Parasolucionares_e
problema,adhiera un pedazode madera a el umbral.
PEDAZOSDE MADERA
ANCHO: 2"
LONGITUD: Lo suficientemente largo como para
ajustar en el interior del marco de laventana.
GRUESO:Paradeterminar el grueso, coloque un pedazo
de madera en el umbral para hacerla 1/2" m6s alta que
la parte superior del marco de laventana de tormentas
odel marco vinilo.
P6guelo firmemente con clavos o con tornillos
proporcionados por el instalador.
1/2" m6s alto
que el marco
de ventana de __
tormentas
Marcode
ventana de
tormentas
Fn- [i B / e #/'r_ ivtadera
T JLj umbra'rT--)
"r_____, Marcovinilo II
1/2" mas alto queel marco
vinilo(enalgunasventanas)
F4]PREPARE EL ACONDICIONADOR
DE AIRE
[_ Instaleelrielde montaje superior con 4 tornillos tipo A
desdela parte exterior de la caja.
Riel de _ it ,_ i_
montaje_"--....._.......................
superior i._ l
Riel de
montaje
inferior
FB1Sostengaelpaneldeacorde6nconunamano
ysuavementeretirehaciaatrasparaliberar
elextremoabierto.
42
Page 43

Instrucciones de instalaci6n
[]
PREPARE EL ACONDICIONADOR DE
AIRE (cont.)
©
Deslice el extremo libre del panel de acorde6n
sobre los rieles del panel lateral. Deslice el
panel hacia abajo. AsegQrese de dejar espacio
suficiente para deslizar la parte superior e
inferior de la estructura sobre los rieles en el
gabinete.
NOTA:Hay un panel con forma de acorde6n
derecho y uno izquierdo. Aseg0rese de usar el
panel apropiado para cada lado.
INSTALE EL ACONDICIONADOR
DE AIRE EN LA VENTANA
%
Coloque el acondicionador de aire en
el umbral con el riel de montaje inferior contra
su extremo posterior. C6ntrelo y cierre la
ventana firmemente detr6s del riel de montaje
superior. Debe estar nivelado o ligeramente
inclinado hacia el exterior. Use un nivel; una
inclinaci6n de 1/3 de burbuja set6 la correcta
hacia el exterior.
Tornilk tipo B
1_] Extienda los paneles de acorde6n izquierdo y
derecho hacia las bandas de la ventana vertical y
pegue, a trav6s de los huecos de los paneles,con
5 tornillos tipo B segQncorresponda.
FDI Deslice los paneles de acorde6n izquierdo y
derecho en los rieles de montaje superior e
inferior. Superior
Rieldemontajesuperior derecha
Superiorizquierda
Rielde montaje inferior
PREPARE LA VENTANA
B1
Corteelsellode la banda de laventana a
la Iongitud apropiada. Despeguela parte posterior
y pegue el selloa la parte inferiorde la bandade la
ventana.
'' [
r?l
INSTALE UN SOPORTE DE CIERRE V LA
JUNTA DE ESPUMA SUPERIOR
DE LA VENTANA
%
PRECAUCI6N:
Enventanasconstruidas
devinilo de similar
construcci6n,conecteel
soportedecierrede la
ventanaa el marco de la
ventanacon unotornillotipo
Bpara prevenirdano
a laventanay vidro
quebrado.
[] Cortelajunta deespuma
superior
dela ventanaalancho
[] de la ventana.
Rellenela espumaentre
elvidrio y la ventana
paraevitarqueairee
insectos
seintroduzcanen lahabitaci6n.
NOTA:Silajunta provistanoesadecuadapara su
ventana,obtenga elmaterialapropiadoIocalmente
43
pararealizarunaadecuadainstalaci6ndesellado.
Vinilo
Page 44

Solucionar problemas.
: : Causas posibles Ou6hacer
Elacon ]ado_ deaire _ Elacondicionadordeaire • Cerci6resedequeelacondicionadordeaireest6
noenciende est6desconectodo, enchufadototalmenteeneltomacorriente.
Elfusiblesedispor6 / • Inspeccionelosfusibles/ cajadeinterruptoresdela casa
elcortocircuitossedispor6, y reemplacecualquierfusibleo reajusteelinterruptor.
Interrupci6nenel
suministroel_ctrico.
Eldispositivode interrupci6n • Presioneelbot6nRESETubicadoenel cabledealimentaci6n.
decorriente sehaoctivodo. • Sielbot6nRESETnosemantieneensulugar,no utilicemcis
Elacondicianadardeaire Elflujo deoire est_restringido. • Cerci6resedequenoexisteningunacortina,persianao
noenfriacomadeberia mueblebloqueandoelfrentedelacondicionadordeaire.
Elcontrol detemperoturo no • Enlosmodelosconteclado:EnelmodoCool(Ffio),presionelatecla
est_ajustodoopropiodomente. Reducci6nT.
Elfiltro deoire est(_sucio. • Limpieelfiltrocada30dfasporIo menos.Verlasecci6n
Lohobitoci6npodriohober • Cuandoelacondicionadordeaireseenciende,usted
estodocoliente, necesitadarletiempoparaqueenfri6la habitaci6n.
Eloire frio seest_escopondo. • Cerci6resedequelosregistrosdelacalefacci6nnoest6n
Losbobinosdeenfriamiento •Ver "Acondicionadordeairecongelgndose"mcisadelante.
secongeloron.
Elacondicionadordeaire
seest6congelando
a unatemperaturem6salto.
Elcontrolremoto Losboteriosest6ninsertodos • Inspeccionela posici6ndelosbaterfas.Debenestar
nofunciona incorrectomente, insertadasenla posici6nindicada,(+)y(-).
Hayaguagoteandoafuera Tiempoh_medoy coliente. • Estoesnormal.
Hayaguagoteandoenel Elocondicionodordeoire • Paradrenarelaguaapropiadamente,cercbresedeque
interiordela habitaci6n no est6inclinodohocioofuero, elacondicionadorde aireest6inclinadoligeramente
Seacumulaagua en
la bandeja
Elhielobloqueoelflujo
deoire hocioelocondicionodor
deoire evitondoque seenfrie
Iohobitoci6n.
Losboteriosest(inogotodos. • Reemplacelasbaterbs.
Lahumedadremovidadel aire
ysedrena hastala bandeja.
• Launidadsereiniciardautomdticamenteconlaconfiguraci6n
utilizadaporOltimavezluegodereestablecerlaelectricidad.
• Existeunretrasodetiempoporprotecci6n(deaproximadamente
] minutos)paraevitarladesconexi6nporsobrecargadelcompresor.
Porestaraz6n,esposiblequelaunidadnocomiencea enfriarde
formanormalhastatranscurridos] minutosdesdequevolvi6a
encenderse.
elacondicionadorde aireycomunfqueseconuntecnicocalificado.
• Enlosmodeloscon botones,girelatemperaturaa unn0meromayor.
deCuidadoy limpieza.
abiertosyse encuentranretornandoelairefrb.
• Enmodelosconlosbotonesdecontrol,coloqueelcontrol
demodoenHighFan(VentiladorAlto_6 HighCool(FrioAlto_con
latemperaturaen16 Z
• Enlosmodelosconteclasdetoque,coloqueloscontrolesen
HighFan(VentiladorAlto)6 HighCool(FrioAlto)yajusteeltermostato
desdeelfrentehaciaatrcis.
• Estoesnormalporuncortoperfodoendreasconpoca
humedad;normalporunperbdodetiempom6spostergado
en6reasm6shOmedas.
44
Sonidos de operaci6n normales
QuizSsescuche un sonido metSlicocausado por
el agua tomacta y tiracta contra el condensador
en los dias Iluviososo cuanctolahumedacl
esalto. Estacaracteristica de disefloayuda a
remover la humedad y mejora la eficiencia.
Quiz6sescuche queeltermostato hace clic
cuando el compresor hace ciclo entre encendido
y apagado.
Elagua seacumula enla bandeja durante dias
Iluviososo con mucha humedad. Elagua podria
derramarse y gotear desdeellado externo de
la unidad.
Elventilador podria funcionar aun sielcompresor
no Iohace.
Page 45

6arantia desu acondicionador deaire-garantia limitada de un afio.
Grape aqui su recibo.
Serequiere facilitar prueba de la fecha de compra
original para hacer un reclamo de garantia.
Nosotros reemplazaremos:
Unafio
A partirde la fecha
de la compra original
Empaque su unidadapropiadamente. Recomendamos
usar el cart6n original y los materiales de empaquetado.
Regrese el producto al local de ventas donde usted
Io compr6.
Instrucciones al cliente. El Manual del propietario
proporciona informaci6n acerca de las instrucciones de
operaci6n y de los controles del usuario.
Instalaci6n inapropiada. Siusted tiene unproblema
durante la instalaci6n, osi su acondicionador de
aire no tiene la capacidad de enfriamiento que usted
necesita, p6ngase en contacto con nuestro distribuidor
o instalador. Usted esresponsable de proporcionar las
facilidades de conexi6n el_ctrica necesarias.
Fallo del producto resultante de modificaciones al
producto o debido ausa irrazonable incluyendo no
proporcionar mantenimiento razonable y necesario.
Unidad de reemplazo para cualquier producto que falle debido a defectos en losmateriales oen
el proceso de fabricaci6n. La unidad de intercambio est6 garantizada para el resto delperbdo
de un aho de garantia originaldelproducto.
Incluya en el paquete una copia del recibo deventa
u otra evidencia de la fecha original de la compra.
Adem6s imprima su nombre y direcci6n y una
descripci6n del defecto.
Reemplazo de fusibles dela casa o reajuste delsistema
de circuitos.
Fallo debido a la corrosi6n en modelos que no estan
protegidos contra la corrosi6n.
Daho al producto causado por voltaje inapropiado hacia
el equipo, accidentes, incendios, inundaciones oactos
de la naturaleza defuerza mayor.
Dahosincidentales oconsecuenciales causados par
defectos posibles con este acondicionador de aire.
Causar dahos despu_s de la entrega.
EXCLUSION DE GARANTiAS IMPLiCITAS--Su (Jnico y exclusivo derecho es el cambio del producto, tal y
como se indica en esta Garantia limitada. Cualquier garantia implicita, incluyendo las garantias
implicitas de comerciabilidad o adecuaci6n para un fin determinado, est6n limitadas a un afio o el
periodo de tiempo m6s breve permitido por la ley.
Esta garantia se extiende al comprador original y cualquier compmdor posterior de productos comprados para usa
residencial dentro de Estados Unidos.
Algunos estados no permiten la exclusi6n o los limitaciones de dahos incidentales o consecuenciales. Esta gamntla
do derechos legales espedficos, y usted podfia tenet otros derechos que vafiardn de estado a estado. Pare saber
cudles son sus derechos legales, consulte a la oficina de asuntos del consumidor local o la oficina del Attorney General
en
su Iocalidad.
Exclusi6n de garantias implicadas: Excepto donde estd prohibido o restringido par la ley, no hay garantias,
expresas, orales o estatutarias que extiendan mds alld de la descripci6n espedfica, incluyendo espedficamente
los garantias implicadas de mercantibilidad o propiedad para un prop6sito particular.
Garante: General Electric Company. Louisville, KY 40225
Page 46

Notas.
46
Page 47

Apoyo al consumidor.
_Tienealguna pregunta sobre su electrodom6stico? iPruebela p6gina Web de GEAppliances,cualquier
I_l P6gina WebdeGEAppliances GEAppliances.com
I i Piezasy accesorios GEAppliances.com
d[a del a_o! Para mayor conveniencia y servicio m6sr6pido,ya puede descargar losManuales de los
Propietarios,pedir piezasoinclusohacer una cita en I[neapara que vengan a realizaruna reparaci6n.
RealLifeDesign Studio (Estudiodedise_opara la vida real)
GEAppliances.com
GEapoya el concepto de Diseflo Universal-productos, serviciosy ambientes que pueden usar gente de todas
lasedades,tama_os y capacidades. Reconocemos la necesidad de dise_ar para una gran gama de habilidades
y dificultades fisicas y mentales. Param6s detalles cobre las aplicaciones deGEDise_oUniversal,incluyendo
ideas de dise_o para la cocina para personas con discapacidades, mire nuestra p6gina Web hoy mismo. Para
personas con dificultades auditivas, favor de Ilamar al 800.TDD.GEAC(800.833.4322).
Aquellosindividuos con la calificaci6n necesaria para reparar sus propios electrodom6sticos pueden
pedir que se les manden las piezas o accesorios directamente a sus hogares (aceptamos lastarjetas
VISA,MasterCardy Discover).Haga su pedido en I[neahoy, 24 horas cada d[ao Ilamar portel6fono
a1800.626.2002durante horas normales de oficina.
Los instrucciones descritas en este manual cubren los procedimientos a seguir par cualquier usuario.
GE no est_ no apoya que se le proporcione ning_n servicio al acondicionador de aire. Vehementemente
recomendamos que usted no intente proporcionar servicio al acondicionador de aire usted mismo.
Sino est6 satisfecho con el servicioque recibe de GE,p6ngase en contacto con nosotros en nuestra p6gina
I P6ngase en contacto con nosotros GEAppliances.com
Web indicando todos losdetallesas[como su nOmerode tel6fono o escr[banosa:
General Manager, Customer Relations
GEAppliances,Appliance Park
Louisville,KV/40225
47
Page 48

ConsumerSupport.
Have a question or need assistancewith your appliance?Trythe GEAppliancesWebsite 24 hours a day,
I_l GEAppliances Website IntheU.S.A.:GEAppliances.com
any day of the year! Forgreater convenience and faster service,you can now download Owner's Manuals,
or evenorder parts on-line. InCanada: www.GEAppliances.ca
Real Life Design Studio In the U.S.A.:GEAppliances.com
GEsupports the Universal Designconcept-products, servicesand environments that can beused by
people of all ages,sizesand capabilities. We recognizethe need to designfor awide range of physical
and mental abilities and impairments. For details of GE'sUniversal Designapplications, including kitchen design
ideasfor people with disabilities,check out our Website today. Forthe hearing impaired, please call 800.TDD.
GEAC(800.833./4322).
In Canada, contact: Manager, Consumer Relations,MabeCanada Inc.
Suite310, 1 Factory Lane
Moncton, N.B.E1C91v13
Parts and Accessories
Individuals qualified to service their own appliances can have parts or accessoriessent directly to their homes
(VISA,MasterCard and Discovercards are accepted).Order on-line today, 24 hours everyday or
by phone at 800.626.2002 during normal business hours.
Instructions contained in this manual cover procedures to be performed by any user. GE does not support
any servicing of the air conditioner. We strongly recommend that you do not attempt to service the air
conditioner yourself.
Customers in Canada should consult theyellow pagesfor the nearest Mabe servicecenter,
or call 1.800.561.33/44.
Contact Us
If you are not satisfied with the serviceyou receivefrom GE,contact us on our Website with all the details
including your phone number, or write to: General Manager,Customer Relations
GEAppliances,Appliance Park
Louisville,K¥/40225
In Canada: www.GEAppliances.ca, or write to: Director, Consumer Relations, Mabe Canada Inc.
Suite 310, 1 Factory Lane
Moncton, N.B. E1C91v13
In the U.S.A.: GEAppliances.com
In the U.S.A.: GEAppliances.com
Printed in China
 Loading...