

Page 1

your Gateway Windows network
installationguide
802.11g wireless series USB Adapter model WGU-210
Customizing
Troubleshooting
Page 2

Page 3

Contents
1 Windows XP. . . . . . . . . . . . . . . . . . . . . . . . . . . . . . . . . . . 1
Step 1: Installing the hardware and software . . . . . . . . . . 2
Connecting the USB adapter . . . . . . . . . . . . . . . . . . 2
Installing the USB adapter driver . . . . . . . . . . . . . . . 3
Step 2: Configuring the USB adapter . . . . . . . . . . . . . . . . 6
Naming the computers and the workgroup . . . . . . . 6
Step 3: Configuring the TCP/IP protocol . . . . . . . . . . . . 13
Terms you should know . . . . . . . . . . . . . . . . . . . . . 13
Setting up a DHCP IP address for each computer . 13
Turning the wireless emitter off . . . . . . . . . . . . . . . . . . . 16
Where to go from here . . . . . . . . . . . . . . . . . . . . . . . . . . 17
Creating your wireless Ethernet network . . . . . . . . 17
Using your wireless Ethernet network . . . . . . . . . . 17
Troubleshooting your wireless Ethernet network . . 17
2 Windows 2000 . . . . . . . . . . . . . . . . . . . . . . . . . . . . . . . . 19
Step 1: Installing the hardware and software . . . . . . . . . 20
Installing the Gateway Wireless Monitor . . . . . . . . 20
Connecting the USB adapter . . . . . . . . . . . . . . . . . 22
Installing the USB adapter driver . . . . . . . . . . . . . . 23
Step 2: Configuring the USB adapter . . . . . . . . . . . . . . . 26
Naming the computers and the workgroup . . . . . . 26
Step 3: Configuring the TCP/IP protocol . . . . . . . . . . . . 28
Terms you should know . . . . . . . . . . . . . . . . . . . . . 28
Setting up a DHCP IP address for each computer . 28
Turning the wireless emitter off . . . . . . . . . . . . . . . . . . . 31
Where to go from here . . . . . . . . . . . . . . . . . . . . . . . . . . 32
Creating your wireless Ethernet network . . . . . . . . 32
Using your wireless Ethernet network . . . . . . . . . . 32
Troubleshooting your wireless Ethernet network . . 32
Technical Support . . . . . . . . . . . . . . . . . . . . . . . . . . . . . 33
Automated troubleshooting system . . . . . . . . . . . . 34
Telephone numbers . . . . . . . . . . . . . . . . . . . . . . . . 34
www.gateway.com
i
Page 4

ii
www.gateway.com
Page 5

Windows XP
This chapter describes how to connect a
Gateway wireless Ethernet USB adapter
to your Windows XP computer and
configure Windows XP for a wireless
Ethernet network. Complete these tasks
in sequence:
■ “Step 1: Installing the hardware
and software” on page 2.
■ “Step 2: Configuring the USB
adapter” on page 6.
■ “Step 3: Configuring the TCP/IP
protocol” on page 13.
If you need to install and configure the
USB adapter for “Windows 2000” on
page 19
1
1
Page 6

Chapter 1: Windows XP
Step 1: Installing the hardware and software
Connecting the USB adapter
Use the following instructions to connect the USB adapter to
your computer.
To connect the USB adapter to your computer:
Connect the USB cable to the USB adapter.
1
2
www.gateway.com
Page 7
Step 1: Installing the hardware and software
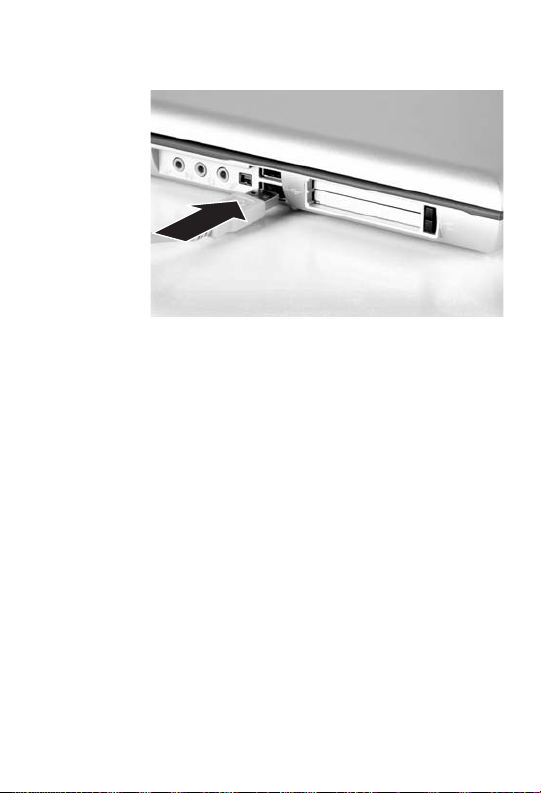
2 Connect the other end of the USB cable to a USB port
in your computer.
If this is the first time you have connected this
USB adapter to your computer, the Found New
Hardware Wizard opens. To complete the USB adapter
installation, go to “Installing the USB adapter driver”
on page 3.
Installing the USB adapter driver
Use the following instructions to install the USB adapter driver
for Windows XP.
www.gateway.com
3
Page 8
Chapter 1: Windows XP
To install the USB adapter driver
1
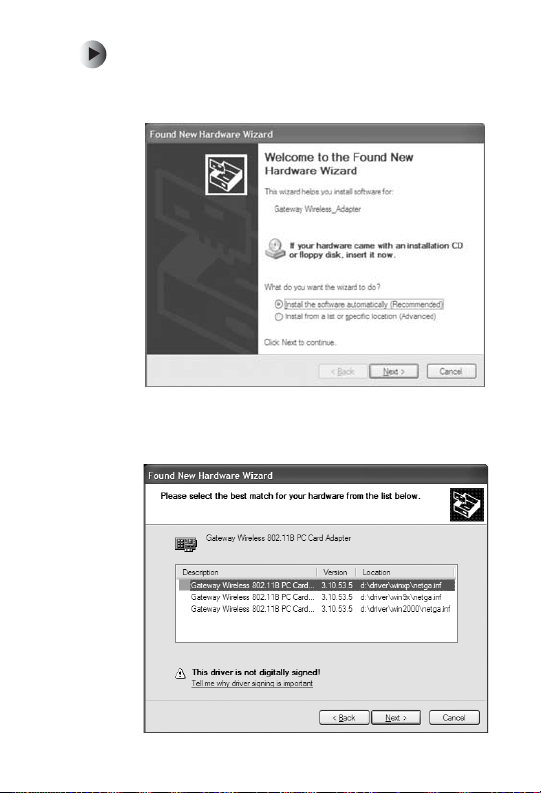
When the Found New Hardware Wizard opens, insert
the installation CD in the CD drive.
2 Click Install the software automatically (Recommended),
then click
recommended drivers to install.
4
Next. The wizard displays a list of
www.gateway.com
Page 9
Step 1: Installing the hardware and software
3 Click the Gateway Wireless 802.11G USB adapter located
d:\driver\winxp folder on the installation CD,
in the
then click
Next.
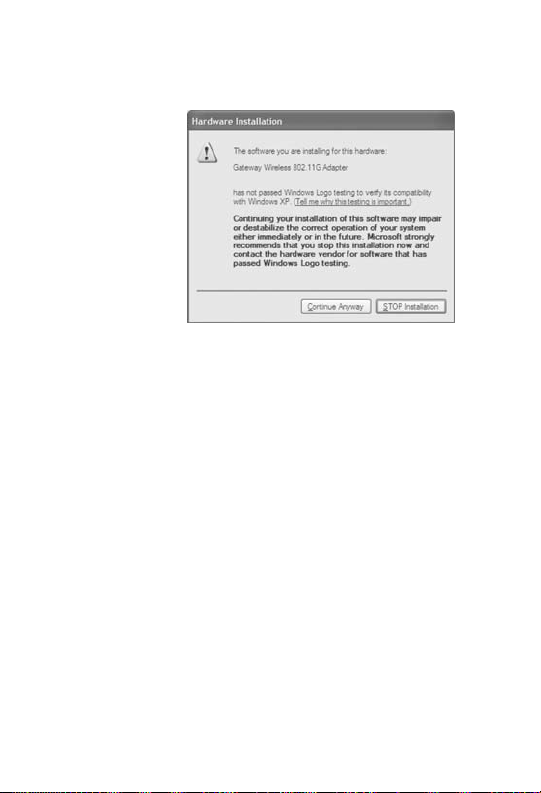
4 When a message tells you that the driver has not
passed Windows Logo testing, click
The device driver files are copied to the hard drive.
Continue Anyway.
5 Click Finish to complete the installation.
www.gateway.com
5
Page 10

Chapter 1: Windows XP
Step 2: Configuring the USB adapter
Naming the computers and the workgroup
The first time you use networking in your computer, you need
to use the Windows XP Network Setup Wizard to name each
computer and the workgroup and to select other network
settings in Windows XP.
Important
6
The network setup procedure uses the
Windows XP Network Setup Wizard. The example
screens show the screens that typically appear in
the course of using the wizard. If your network
situation differs from that used in this example, you
may encounter additional screens or screens with
different selections. Make sure that you read each
screen in the wizard and make your selections
based on your particular network situation.
www.gateway.com
Page 11
Step 2: Configuring the USB adapter
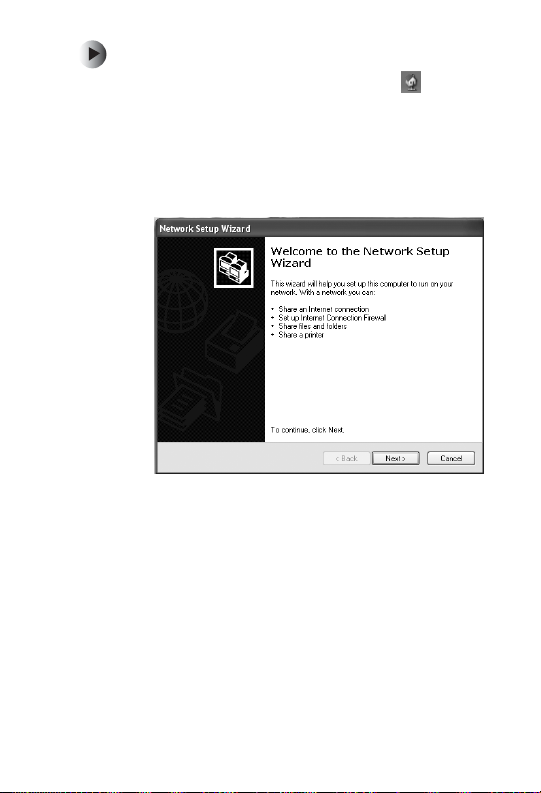
To run the Windows XP Network Setup Wizard:
Click the Network Setup Wizard icon on the
1
Windows XP taskbar. The Network Setup Wizard
opens.
- OR -
Start, All Programs, Accessories, Communications,
Click
then click
Wizard opens.
Network Setup Wizard. The Network Setup
2 Click Next to continue through the wizard.
www.gateway.com
7
Page 12
Chapter 1: Windows XP
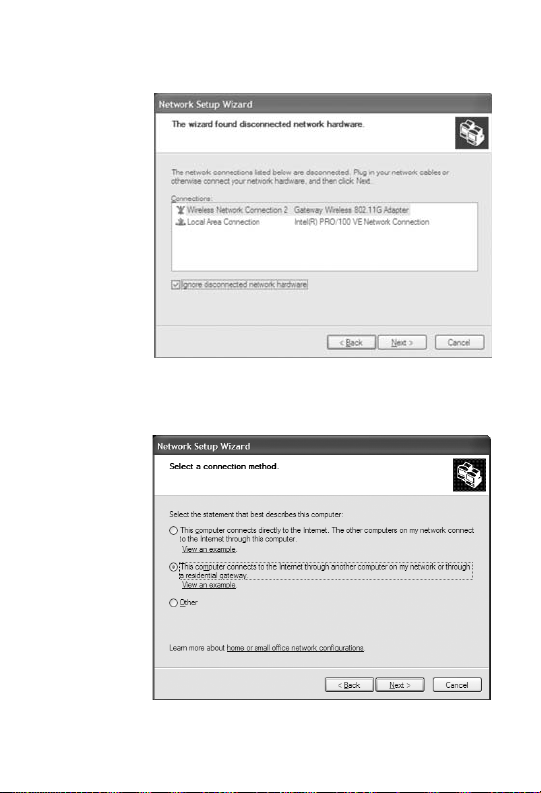
3 Click Next. The wizard found disconnected network
hardware screen opens.
4 Click to select the Ignore disc onnected net work hardware
check box, then click
method screen opens.
8
www.gateway.com
Next. The Select a connection
Page 13
Step 2: Configuring the USB adapter
5 Click This computer connects to the Internet through another
computer on my network or through a residential gateway,
then click
Next.
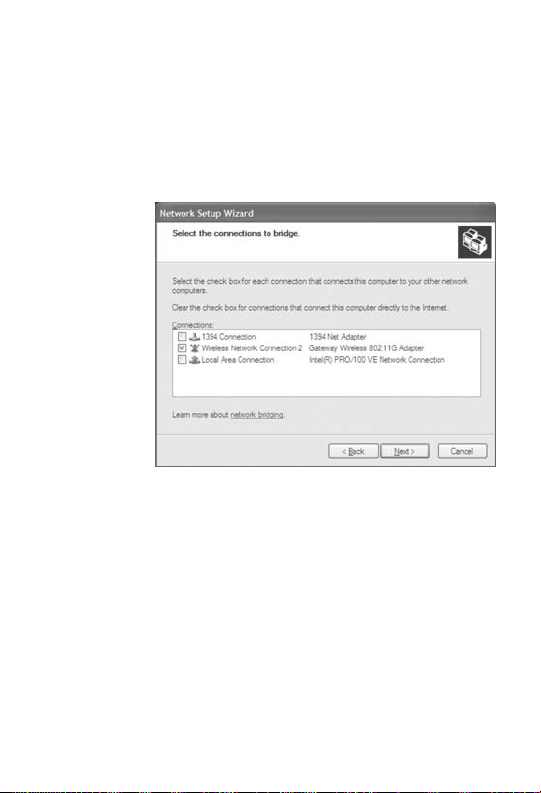
6 If the Your computer has multiple connections screen
opens, click
then click
Let me choose the connections to my network,
Next.
7 On the Select the connections to bridge screen, click to
select the
Wireless Network Connection check box.
www.gateway.com
9
Page 14
Chapter 1: Windows XP
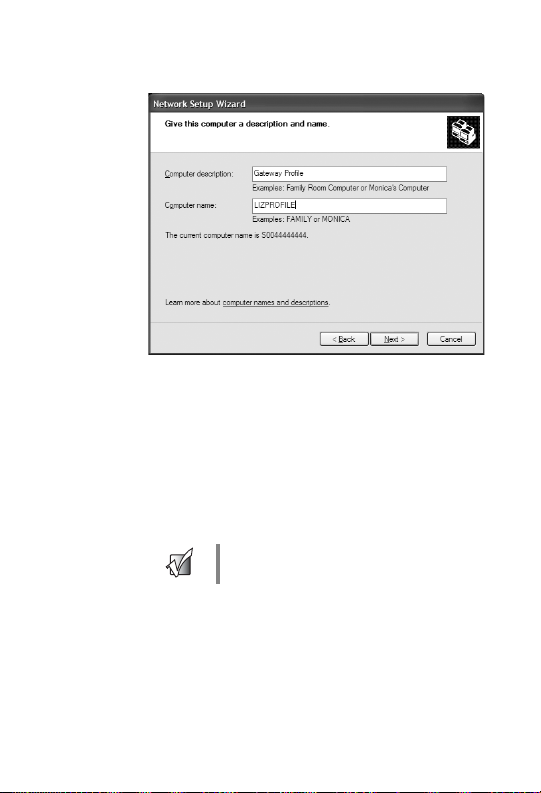
8 Click Next. The Give this computer a description and
9 Type a description of the computer in the Computer
10 Type a unique computer name in the Computer name
name screen opens.
description box.
box. This name identifies the computer to other users
on the network. Use a computer name of up to 15
characters with no blank spaces. Each computer name
must be unique on your network. All-numeric
computer names are not allowed. Names must
contain some letters.
Important
10
You must give each computer on the network a
unique Computer Name and the same Workgroup
Name.
www.gateway.com
Page 15
Step 2: Configuring the USB adapter
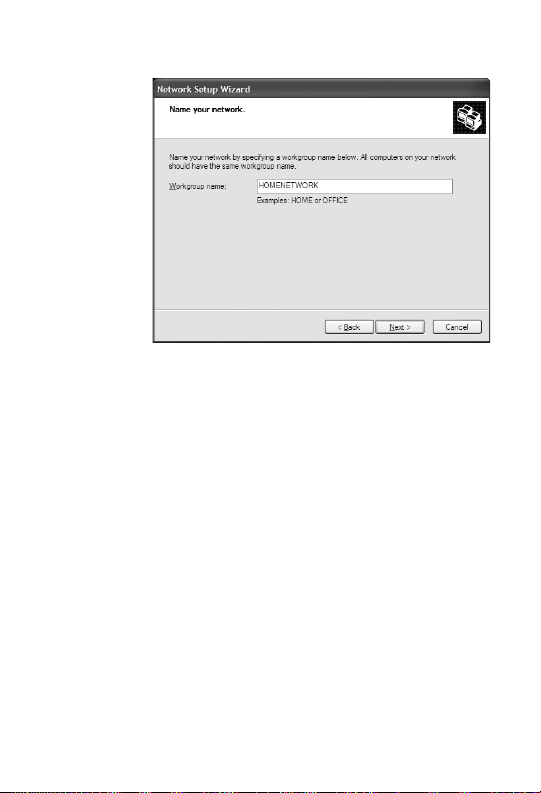
11 Click Next. The Name your network screen opens.
12 Type a na me for your w orkgr oup in the Workgroup
name box. Use a workgroup name of up to 15
characters with no blank spaces. The workgroup name
must be the same for all computers in your network
workgroup, and the name must be different than any
computer name on your network.
13 Click Next. The Ready to apply network settings screen
opens.
www.gateway.com
11
Page 16

Chapter 1: Windows XP
14 Click Next to apply the network settings. The You ’ re
15 If you are setting up an Ethernet network on other
16 Click Next.
17 Click Finish. After you name each computer and assign
almost done screen opens.
computers, you may want to use the Network Setup
Wizard to do so. Click a method for installing and
configuring the network on your other computers or
Just finish the wizard; I don’t need to run the wizard on
click
other computers.
it to your workgroup, go to “Step 3: Configuring the
TCP/IP protocol” on page 13.
Help and
Support
12
For more information about using the Network
Setup Wizard in Windows XP, click Start, then
click Help and Suppor t.
Type the keyword Network Setup Wizard in the
HelpSpot Search box ,
then click the arrow.
www.gateway.com
Page 17

Step 3: Configuring the TCP/IP protocol
Step 3: Configuring the TCP/IP protocol
A networking protocol is a language computers use to talk to each
other. One of several available protocols must be set up on each
computer you plan to use on your network. We recommend
you use the Transmission Control Protocol/Internet Protocol
(TCP/IP), which is widely accepted and compatible for local
area networks (LANs), as well as for Internet communications.
When networking is set up in Windows XP, TCP/IP is
automatically installed as the default protocol.
Terms you should know
DHCP - Dynamic Host Configuration Protocol (DHCP) lets a
router automatically assign an IP address to a computer on the
network.
IP Address - Internet Protocol (IP) address is a number that
uniquely identifies a computer on the network.
Setting up a DHCP IP address for each computer
In order to use the TCP/IP protocol on each computer, you
must either set the protocol to
server or make the IP address settings manually. If you use a
wireless access point router that can act as the DHCP server,
you can select
an IP address automatically using DHCP is one of the most
common methods for setting up wireless network devices.
If your network configuration requires a static IP address (one
that does not change), you must set the IP address manually.
This means that you need to enter an IP address and a subnet
mask. For more information about setting the IP address
manually, see the Setting Up Your Wireless Windows Network
guide included on the installation CD that came with your
network device.
If you are connecting to a home Ethernet network, have a cable
or DSL modem, and a wireless access point router that
automatically assigns IP addresses to computers on the
network, follow the instructions in “To set up a DHCP IP
address:” on page 14.
Obtain an IP address from a DHCP server. Obtaining
Obtain an IP address from a DHCP
www.gateway.com
13
Page 18

Chapter 1: Windows XP
To set up a DHCP IP address:
1
2 Click/Double-click Network Connections. The Network
3 Right-click Wireless Network Connection, then click
4 Click to select the Internet Protocol (TCP/IP) check box in
5 Click Properties. The Internet Protocol (TCP/IP) Properties
Click Start, then click Control Panel. The Control Panel
window opens. If your Control Panel is in Category
View, click
Network and Internet Connections window opens.
Connections window opens.
Properties. The Wireless Network Connection Properties
dialog box opens.
the
not see TCP/IP, drag the scroll bar to see more choices.
dialog box opens.
Network and In ternet Conne ctions. The
This connection uses the following items list. If you do
14
www.gateway.com
Page 19

Step 3: Configuring the TCP/IP protocol
6 Click the General tab.
7 Click Obtain an IP address automatically.
8 Click OK to close the Internet Protocol (TCP/IP)
Properties dialog box.
9 Click OK to close the Wireless Network Connection
Properties dialog box.
10 Click X to close the Network Connections window.
11 Repeat this procedure for every computer on your
network.
12 After you set up the IP addresses on all your
computers, go to “Where to go from here” on pag e 17.
www.gateway.com
15
Page 20

Chapter 1: Windows XP
Turning the wireless emitter off
Warning
Radio frequency wireless communication can
interfere with equipment on commercial aircraft.
Current aviation regulations require wireless
devices to be turned off while traveling in an
airplane. IEEE 802.11a, IEEE 802.11b, and IEEE
802.11g communication devices are examples of
devices that provide wireless communication.
You can turn off the wireless emitter to conserve the battery
charge on your notebook computer or to make a computer
unavailable on the network. There are times, such as when you
are flying in an aircraft, when you should turn off your wireless
emitter. For more safety and regulatory information, see
“Safety, Regulatory, and Legal Information” on page 35.
To turn the wireless emitter off:
■ Click the remove hardware icon in the taskbar, the
USB adapter name, then click
- OR -
Turn off your computer.
Important
If the remove hardware icon does not appear on
the taskbar in Windows XP, click the show hidden
icons button.
Stop.
16
www.gateway.com
Page 21

Where to go from here
Where to go from here
Creating your wireless Ethernet network
Now that you have configured your wireless Ethernet network,
you are ready to create a wireless network. Go to the creating a
wireless access point network or creating a peer-to-peer wireless
network section in the Setting Up Your Wireless Windows
Network guide included on the installation CD that came with
your network device.
Using your wireless Ethernet network
After you create and configure your wireless Ethernet network
and you know how to turn your wireless emitter on and off,
you are ready to use the network. Go to the sharing your
resources section in the Setting Up Your Wireless Windows
Network guide included on the installation CD that came with
your network device.
Troubleshooting your wireless Ethernet network
If you cannot get your wireless Ethernet network to work, go to
the troubleshooting section in the Setting Up Your Wireless
Windows Network guide included on the installation CD that
came with your network device.
www.gateway.com
17
Page 22

Chapter 1: Windows XP
18
www.gateway.com
Page 23

Windows 2000
This chapter describes how to connect a
Gateway wireless USB adapter to your
Windows 2000 computer and configure
your computer for a wireless Ethernet
network. Complete these tasks in
sequence:
■ “Step 1: Installing the hardware
and software” on page 20.
■ “Step 2: Configuring the USB
adapter” on page 26.
■ “Step 3: Configuring the TCP/IP
protocol” on page 28.
If you need to install and configure the
USB adapter for Windows XP, see
“Windows XP” on page 1.
2
19
Page 24

Chapter 2: Windows 2000
Step 1: Installing the hardware and software
Installing the Gateway Wireless Monitor
Use the following instructions to install the Gateway Wireless
Monitor program.
To install the Gateway Wireless Monitor:
Insert the CD that came with your PC Card into your
1
computer’s CD or DVD drive. If the program starts
automatically, go to Step 5.
- OR -
If the program does not start automatically, go to
Step 2.
2 Click Start, then click Run. The Run dialog box opens.
3 In the Open text box, typ e d:\app\setup.exe (where d
is the drive letter of your CD or DVD drive).
4 Click OK. The Gateway Wireless Monitor wizard starts.
20
www.gateway.com
Page 25

Step 1: Installing the hardware and software
5 Click Next. The License Agreement screen opens.
6 Click Yes to accept the License Agreement. The Choose
Destination Location screen opens.
7 Click Next. The wizard installs the program on your
computer.
www.gateway.com
21
Page 26

Chapter 2: Windows 2000
Connecting the USB adapter
Use the following instructions to connect the USB adapter to
your computer.
To connect the USB adapter to your computer:
Connect the USB cord to the USB adapter.
1
2 Connect the other end of the USB cable to a USB port
in your computer.
3 If this is the first time you have connected this
USB adapter to your computer, the Add New
Hardware Wizard opens. To complete the USB adapter
installation, go to “Installing the USB adapter driver”
on page 23.
22
www.gateway.com
Page 27

Step 1: Installing the hardware and software
Installing the USB adapter driver
The following instructions tell you how to install the USB
adapter driver using the Add New Hardware Wizard.
Important
The instructions for installing the wireless device
driver use the Add New Hardware Wizard. The
example screens show the screens that typically
appear in the course of using the wizard. If your
operating system situation differs from that used in
this example, you may encounter additional
screens or screens with different selections. Make
sure that you read each screen in the wizard and
make your selections based on your particular
network situation.
To install the USB adapter driver
When the Add New Hardware Wizard opens, insert
1
the installation CD into the CD drive.
www.gateway.com
23
Page 28

Chapter 2: Windows 2000
2 Click Next. The search for new drivers screen opens.
3 Click to select the CD-ROM drive and Specify a location
check boxes. Make sure that all other check boxes are
cleared.
4 Click Browse. The Browse for Folder dialog box opens.
5 Navigate to the Driver folder located on the
installation CD. Click to highlight the
located under the Driver folder on the installation CD.
24
www.gateway.com
Win2000 folder
Page 29

Step 1: Installing the hardware and software
6 Click OK. The Add New Wizard locates the USB
adapter driver.
7 Click Next. The device driver files are copied to the
hard drive.
8 Click OK to restart your computer and complete the
driver installation.
www.gateway.com
25
Page 30

Chapter 2: Windows 2000
Step 2: Configuring the USB adapter
Naming the computers and the workgroup
The first time you use networking on your computer, you need
to give each computer a unique name and assign each
computer to the same workgroup.
To identify a Windows 2000 computer on the network:
Click Start, Settings, then click Control Panel. The
1
Control Panel window opens.
2 Double-click the System icon. The System Identification
dialog box opens.
3 Click the Network Identification tab.
4 Click Properties. The Identification Changes dialog box
opens.
26
www.gateway.com
Page 31

Step 2: Configuring the USB adapter
5 Type a unique computer name in the Computer name
box. This name identifies the computer to other users
on the network. Use a computer name of up to 15
characters with no blank spaces. Each computer name
must be unique on your network. All-numeric
computer names are not allowed. Names must
contain some letters.
Important
You must give each computer on the network a
unique Computer Name and the same Workgroup
Name.
6 Type a name for yo ur wor kgrou p in th e Workgroup
box. Use a workgroup name of up to 15 characters
with no blank spaces. The workgroup name must be
the same for all computers in your network
workgroup, and the name must be different than any
computer name on your network.
7 Click OK to close the Identification Changes dialog box.
8 Click OK to close the System Identification dialog box.
9 After you name each computer and assign it to your
workgroup, go to “Step 3: Configuring the TCP/IP
protocol” on page 28.
www.gateway.com
27
Page 32

Chapter 2: Windows 2000
Step 3: Configuring the TCP/IP protocol
A networking protocol is a language computers use to talk to each
other. One of several available protocols must be set up on each
computer you plan to use on your network. We recommend
you use the Transmission Control Protocol/Internet Protocol
(TCP/IP), which is widely accepted and compatible for local
area networks (LANs), as well as for Internet communications.
When networking is set up in Windows, TCP/IP should
automatically be installed as the default protocol. If it is not
installed, see the Windows help.
Terms you should know
DHCP - Dynamic Host Configuration Protocol (DHCP) lets a
router automatically assign an IP address to a computer on the
network.
IP Address - Internet Protocol (IP) address is a number that
uniquely identifies a computer on the network.
Setting up a DHCP IP address for each computer
In order to use the TCP/IP protocol on each computer, you
must either set the protocol to
server or make the IP address settings manually. If you use a
wireless access point router that can act as the DHCP server,
you can select
an IP address automatically using DHCP is one of the most
common methods for setting up wireless network devices.
If your network configuration requires a static IP address (one
that does not change), you must set the IP address manually.
This means that you need to enter an IP address and a subnet
mask. For more information about setting the IP address
manually, see the Setting Up Your Windows Network guide
included on the installation CD that came with your network
device.
If you are connecting to a home Ethernet network, have a cable
or DSL modem, and a wireless access point router that
automatically assigns IP addresses to computers on the
network, follow the instructions in “To set up a DHCP IP
address for Windows 2000:” on page 29.
28
Obtain an IP address from a DHCP server. Obtaining
www.gateway.com
Obtain an IP address from a DHCP
Page 33

Step 3: Configuring the TCP/IP protocol
To set up a DHCP IP address for Windows 2000:
Click Start, Settings, then click Network and Dial-up
1
Connections. The Network and Dial-up Connections
window opens. This window has an icon for each
networking connection available on your computer.
For example, if you have both wired and wireless
Ethernet hardware installed on your computer, there
will be at least two icons, one for your wired Ethernet
hardware and one for your wireless Ethernet
hardware.
2 Right-click the Local Area Connection icon for the
wireless Ethernet hardware, then click
Local Area Connection Properties dialog box opens.
Properties. The
3 Click to select the Internet Protocol (TCP/IP) check box in
Components checked are used by this connection list. If
the
you do not see TCP/IP, drag the scroll bar to see more
choices.
www.gateway.com
29
Page 34

Chapter 2: Windows 2000
4 Click Properties. The Internet Protocol (TCP/IP) Properties
dialog box opens.
5 Click Obtain an IP address automatically.
6 Click OK to close the Internet Protocol (TCP/IP)
Properties dialog box.
7 Click OK to close the Local Area Connection Properties
dialog box.
8 Click X to close the Network and Dial-up Connections
window.
9 Repeat this procedure for every computer on your
network.
10 After you set up the IP addresses on all your
computers, go to “Where to go from here” on pag e 32.
30
www.gateway.com
Page 35

Turning the wireless emitter off
Turning the wireless emitter off
Warning
Radio frequency wireless communication can
interfere with equipment on commercial aircraft.
Current aviation regulations require wireless
devices to be turned off while traveling in an
airplane. IEEE 802.11a, IEEE 802.11b, and IEEE
802.11g communication devices are examples of
devices that provide wireless communication.
You can turn off the wireless emitter to conserve the battery
charge on your notebook computer or to make a computer
unavailable on the network. There are times, such as when you
are flying in an aircraft, when you should turn off your wireless
emitter. For more safety and regulatory information, see
“Safety, Regulatory, and Legal Information” on page 35.
To turn the wireless emitter off:
■ Click the remove hardware icon in the taskbar, the
USB adapter name, then click
- OR -
Turn off your computer.
Stop.
www.gateway.com
31
Page 36

Chapter 2: Windows 2000
Where to go from here
Creating your wireless Ethernet network
Now that you have configured your wireless Ethernet network,
you are ready to create a wireless network. Go to the creating a
wireless access point network or creating a peer-to-peer wireless
network section in the Setting Up Your Wireless Windows
Network guide included on the installation CD that came with
your network device.
Using your wireless Ethernet network
After you create and configure your wireless Ethernet network
and you know how to turn your wireless emitter on and off,
you are ready to use the network. Go to the sharing your
resources section in the Setting Up Your Wireless Windows
Network guide included on the installation CD that came with
your network device.
Troubleshooting your wireless Ethernet network
If you cannot get your wireless Ethernet network to work, go to
the troubleshooting section in the Setting Up Your Wireless
Windows Network guide included on the installation CD that
came with your network device.
32
www.gateway.com
Page 37

Getting Help
Technical Support
Gateway offers a wide range of customer
service, technical support, and
information services. Use the following
information to contact Gateway for
help.
A
33
Page 38

Appendix A: Getting Help
Automated troubleshooting system
Service description How to reach
Use an automated menu system and your telephone
keypad to find answers to common problems.
800-846-2118 (US)
877-709-2945 (Canada)
Telephone numbers
You can access the following services through your telephone
to get answers to your questions:
Resource Service description How to reach
Fax on
demand
support
Gateway’s
fee-based
software
tutorial
service
Gateway
Technical
Support
Sales,
accounting,
and
warrant y
Order a c atalog o f documents on
common problems, then order
documents by document numbers.
The documents will be faxed to you.
Get tutorial assistance for software
issues billed by the minute.
Talk to a Gateway Technical Support
representative about a non-tutorial
technical support question.)
TDD Technical Support (for hearing
impaired) is available:
Weekdays 6:00 a.m. - 8:00 p.m.
Central Ti me
Weekends 6:00 a.m. - 5:00 p.m.
Central Ti me
Get information about available
systems, pricing, orders, billing
statements, warranty service, or other
non-technical issues.
800-846-4526 (US)
877-709-2951 (Canada)
800-229-1103 (charged
to your credit card)
900-555-4695 (charged
to your telephone bill)
800-846-2301 (US)
800-846-3609 (Canada
and Puerto Rico)
605-232-2191
(all other countries)
800-846-1778 (TDD)
800-846-2000 (US)
888-888-2037 (Canada)
34
Page 39

Safety,
Regulatory, and
Legal Information
Regulatory compliance
statements
Wireless Guidance
The WGU-210 802.11g wireless LAN
(low power Radio Frequency, RF,
transmitting device) operates in the
2400 - 2483.5 MHz band. The following
section is a general overview of
considerations while operating the
wireless LAN.
Limitations, cautions, and concerns are
listed below and in the specific country
sections (or country group sections). This
wireless device is only qualified for use
in the countries identified by the Radio
Approval Marks on the device rating
label. If the country you will be using the
wireless device in is not listed, please
B
35
Page 40

Appendix B: Safety, Regulatory, and Legal Information
contact that countries local Radio Approval agency for
requirements prior to operation. Wireless devices are closely
regulated and use may not be allowed.
The power output of the WGU-210 wireless LAN device is well
below the RF exposure limits as known at this time. Because
this wireless device emits less energy than is allowed in radio
frequency safety standards and recommendations, Gateway
believes these devices are safe for use. Regardless of the power
levels, care should be taken to minimize human contact during
normal operation.
Measurements have been performed to show that the RF
exposure is below what is considered safe limits; however, care
sh ould b e take n to ma ke sur e that the us er o r b yst anders k eep
the transmitter away from their bodies when the wireless
device is transmitting. The transmitting antenna should be
installed and used in a manner to maintain 20 cm (8 inches)
from user’s or bystanders’ bodies.
This wireless device is intended to b e us ed ind oors. In som e
areas, use of this device outdoors is prohibited.
36
Page 41

Some circumstances require restrictions on using wireless
devices. Examples of common restrictions are listed below:
Warnin g
Warnin g
Warnin g
Warnin g
Warnin g
Radio frequency wireless communication can
interfere with equipment on commercial aircraft.
Current aviation regulations require wireless devices
to be turned off while traveling in an airplane.
IEEE 802.11b and IEEE 802.11g (also known as
wireless Ethernet or Wifi) communication devices are
examples of devices that provide wireless
communication. For more information about turning
off the wireless device, see “Turning the wireless
emitter off” on page 16 and “Turning the wireless
emitter off” on page 31.
In environments where the risk of interference to other
devices or services is harmful or perceived as
harmful, the option to use a wireless device may be
restricted or eliminated. Airports, hospitals, and
oxygen or flammable gas laden atmospheres are
limited examples where use of wireless devices may
be restricted or eliminated. When in environments
where you are uncertain of the sanction to use
wireless devices, ask the applicable authority for
authorization prior to use or turning on the wireless
device.
Every country has different restrictions on the use of
wireless devices. Since your system is equipped with
a wireless device, when traveling between countries
with your system, check with the local Radio Approval
authorities prior to any move or trip for any restrictions
on the use of a wireless device in the destination
country.
Do not operate the wireless device unless all covers
and shields are in place and the system is fully
assembled.
Wireless devices are not user serviceable. Do not
modify them in any way. Modification to a wireless
device will void the authorization to use it. Contact
Gateway for service.
37
Page 42

Appendix B: Safety, Regulatory, and Legal Information
Warnin g
Warnin g
Only use drivers approved for the country in which the
device will be used. Install the Gateway device drivers
included with your product, or contact
Gateway Technical Support for additional information.
In order to comply with FCC requirements this
transmitter must not be operated (or co-located) in
conjunction with any other transmitter or antenna.
United States of America
Federal Communications Commission (FCC)
Intentional emitter per FCC Part 15
The power output of the WGU-210 wireless LAN device is well
below the RF exposure limits as known at this time. Because
this wireless device emits less energy than is allowed in radio
frequency safety standards and recommendations, Gateway
believes these devices are safe for use. Regardless of the power
levels, care should be taken to minimize human contact during
normal operation.
Measurements have been performed to show that the RF
exposure is below what is considered safe limits; however, care
should be taken to make sure the user or bystanders keep the
transmitter away from their bodies when the wireless device is
transmitting. The transmitting antenna should be installed
and used in a manner to maintain 20 cm (8 inches) from user’s
or bystanders’ bodies.
This wireless device is intended to b e us ed ind oors. In som e
areas, use of this device outdoors is prohibited.
Operation of this device is subject to the following two
conditions: (1) This device may not cause harmful interference,
and (2) this device must accept any interference received,
including interference that may cause undesired operation of
the device.
Warnin g
Wireless devices are not user serviceable. Do not
modify them in any way. Modification to a wireless
device will void the authorization to use it. Contact
Gateway for service.
38
Page 43

Unintentional emitter per FCC Part 15
This device has been tested and found to comply with the
limits for a Class B digital device, pursuant to Part 15 of the
FCC rules. These limits are designed to provide reasonable
protection against harmful interference in a residential
installation. This equipment generates, uses, and can radiate
radio frequency energy and, if not installed and used in
accordance with the instructions, may cause harmful
interference to radio or television reception. However, there is
no guarantee that interference will not occur in a particular
installation. If this equipment does cause interference to radio
and television reception, which can be determined by turning
the equipment off and on, the user is encouraged to try to
correct the interference by one or more of the following
measures:
■ Reorient or relocate the receiving antenna
■ Increase the separation between the equipment and receiver
■ Connect the equipment into an outlet on a circuit different
from that to which the receiver is connected
■ Consult the dealer or an experienced radio/TV technician for
help.
Compliance Accessories: These accessories are required to be
used in order to ensure compliance with FCC rules: The USB
cable that came with the WGU-210.
39
Page 44

Appendix B: Safety, Regulatory, and Legal Information
FCC declaration of conformity
Responsible party:
Gateway Companies, Inc.
610 Gateway Drive, North Sioux City, SD 57049
(605) 232-2000 Fax: (605) 232-2023
Product:
■ Gateway WGU-210
This device complies with Part 15 of the FCC Rules. Operation
of this product is subject to the following two conditions: (1)
this device may not cause harmful interference, and (2) this
device must accept any interference received, including
interference that may cause undesired operation.
Warnin g
Changes or modifications not expressly approved by
Gateway could void the FCC compliance and negate
your authority to operate the product.
California Proposition 65 Warning
Warnin g
40
This product contains chemicals, including lead,
known to the State of California to cause cancer
and/or birth defects or reproductive harm.
Page 45

Notices
Copyright © 2003 Gateway, Inc.
All Rights Reserved
14303 Gateway Place
Poway, CA 92064 USA
All Rights Reserved
This publication is protected by copyright and all rights are reserved. No par t
of it may be reproduced or transmitted by any means or in any form, without
prior consent in writing from Gateway.
The information in this manual has been carefully checked and is believed
to be accurate. However, changes are made periodically. These changes
are incorporated in newer publication editions. Gateway may improve
and/or change products described in this publication at any time. Due to
continuing system improvements, Gateway is not responsible for inaccurate
information which may appear in this manual. For the latest product
updates, consult the Gateway Web site at www.gateway.com
will Gateway be liable for direct, indirect, special, exemplary, incidental, or
consequential damages resulting from any defect or omission in this
manual, even if advised of the possibility of such damages.
In the interest of continued product development, Gateway reserves the
right to make improvements in this manual and the products it describes at
any time, without notices or obligation.
Trademark Acknowledgments
1-800-GATEWAY, ActiveCPR, ALR, AnyKey, black-and-white spot design, CrystalScan,
Destination, DestiVu, EZ Pad, EZ Point, Field Mouse, Gateway 2000, Gateway Country,
gateway.net, Gateway stylized logo, Perfect Scholar, Solo, TelePath, Vivitron, stylized “G”
design, and “You’ve got a friend in the business” slogan are registered trademarks and
black-and-white spotted box logo, GATEWAY, Gateway Astro, Gateway@Work, Gateway
Connected touch pad, Gateway Connected music player, Gateway Cyber:)Ware,
Gateway Education:)Ware, Gateway Flex Case, Gateway Gaming:)Ware, Gateway
GoBack, Gateway Gold, Gateway Learning:)Ware, Gateway Magazine, Gateway Micro
Server, Gateway Money:)Ware, Gateway Music:)Ware, Gateway Networking Solutions,
Gateway Online Network (O.N.) solution, Gateway Photo:)Ware, Gateway Professional
PCs, Gateway Profile, Gateway Solo, green stylized GATEWAY, green stylized Gateway
logo, Gateway Teacher:)Ware, Gateway Video:)Ware, HelpSpot, InforManager, Just click
it!, Learn@Gateway, Kids BackPack, SERVE-TO-ORDER, Server Watchdog, the Spotted
G Gateway Logo and the Spotted G Logo, SpotShop, Spotshop.com, and Your:)Ware are
trademarks of Gateway, Inc. Intel, Intel Inside logo, and Pentium are registered
trademarks and MMX is a trademark of Intel Corporation. Microsoft, MS, MS-DOS, and
Windows are trademarks or registered trademarks of Microsoft Corporation. All other
product names mentioned herein are used for identification purposes only, and may be
the trademarks or registered trademarks of their respective companies.
. In no event
41
Page 46

Appendix B: Safety, Regulatory, and Legal Information
42
Page 47

Page 48

MAN 802.11G USB ADP INST R0 10/03
 Loading...