

Page 1
User Guide
VX755 Monitor
Page 2

Page 3

Contents
VX755 Monitor. . . . . . . . . . . . . . . . . . . . . . . . . . . . . . . . . . . . . . . . . . . . . . . . . . . . . . . . . . . . . 1
Setting up the monitor . . . . . . . . . . . . . . . . . . . . . . . . . . . . . . . . . . . . . . . . . . . . . . . . . . . . . . 2
Adjusting settings . . . . . . . . . . . . . . . . . . . . . . . . . . . . . . . . . . . . . . . . . . . . . . . . . . . . . . . . . . 5
On-screen display menu options . . . . . . . . . . . . . . . . . . . . . . . . . . . . . . . . . . . . . . . . . . . 6
Video modes . . . . . . . . . . . . . . . . . . . . . . . . . . . . . . . . . . . . . . . . . . . . . . . . . . . . . . . . . . 7
Maintenance . . . . . . . . . . . . . . . . . . . . . . . . . . . . . . . . . . . . . . . . . . . . . . . . . . . . . . . . . . . . . . 8
Troubleshooting . . . . . . . . . . . . . . . . . . . . . . . . . . . . . . . . . . . . . . . . . . . . . . . . . . . . . . . . . . . 9
Specifications . . . . . . . . . . . . . . . . . . . . . . . . . . . . . . . . . . . . . . . . . . . . . . . . . . . . . . . . . . . . 11
Safety, Regulatory, and Legal Information . . . . . . . . . . . . . . . . . . . . . . . . . . . . . . . 13
www.gateway.com
i
Page 4

ii
www.gateway.com
Page 5

Gateway
VX755 Monitor
• Setting up the monitor
• Adjusting the settings
• Maintenance
• Troubleshooting
• Specifications
1
Page 6
Setting up the monitor
Read all instructions before using the monitor and save them for later use. Follow all
warnings and instructions marked on the product.
To set up the monitor:
■ Attach the base
■ Connect the video and power cables
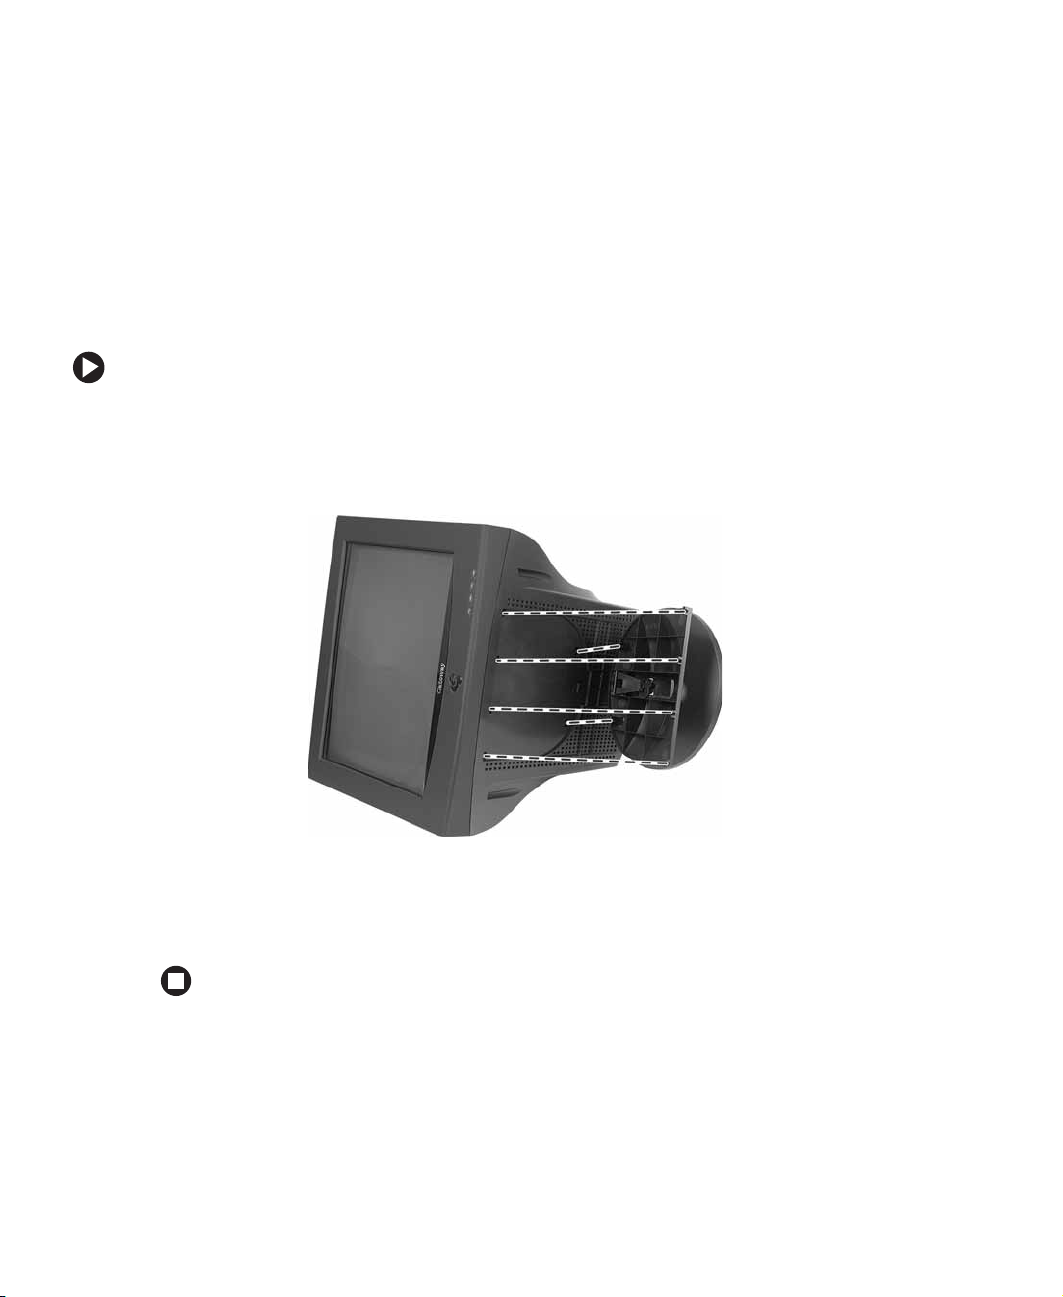
To attach the base:
1 Carefully set the monitor on its side.
2 Hold the base with the tab facing the back of the monitor and align the hooks on
the base with the corresponding slots on the bottom of the monitor.
3 Slide the base toward the front of the monitor so all hooks are securely in place. A
retaining latch built into the base clicks into place when the base is correctly attached.
4 Carefully set the monitor upright and place it on a sturdy, level surface.
2
www.gateway.com
Page 7
To connect the video and power cables:
1 Position the monitor and your computer so you can easily get at the back panel of
each. Make sure that all power cables can reach a correctly grounded electrical outlet.
Caution The openings in the monitor cabinet are for ventilation. Do not block
or cover the se o pen in gs. Do not insert anything into thes e o pen ing s .
If you put the monitor in a bookcase or some other enclosed space,
make sure to leave at least 6 inches (15 cm) around it for ventilation.
2 Connect the video cable to the matching (blue) video port on the back of your
computer.
3 Tighten the screws on the video cable connector to keep it from coming loose.
Tightening the screws also prevents radio and TVinterference.
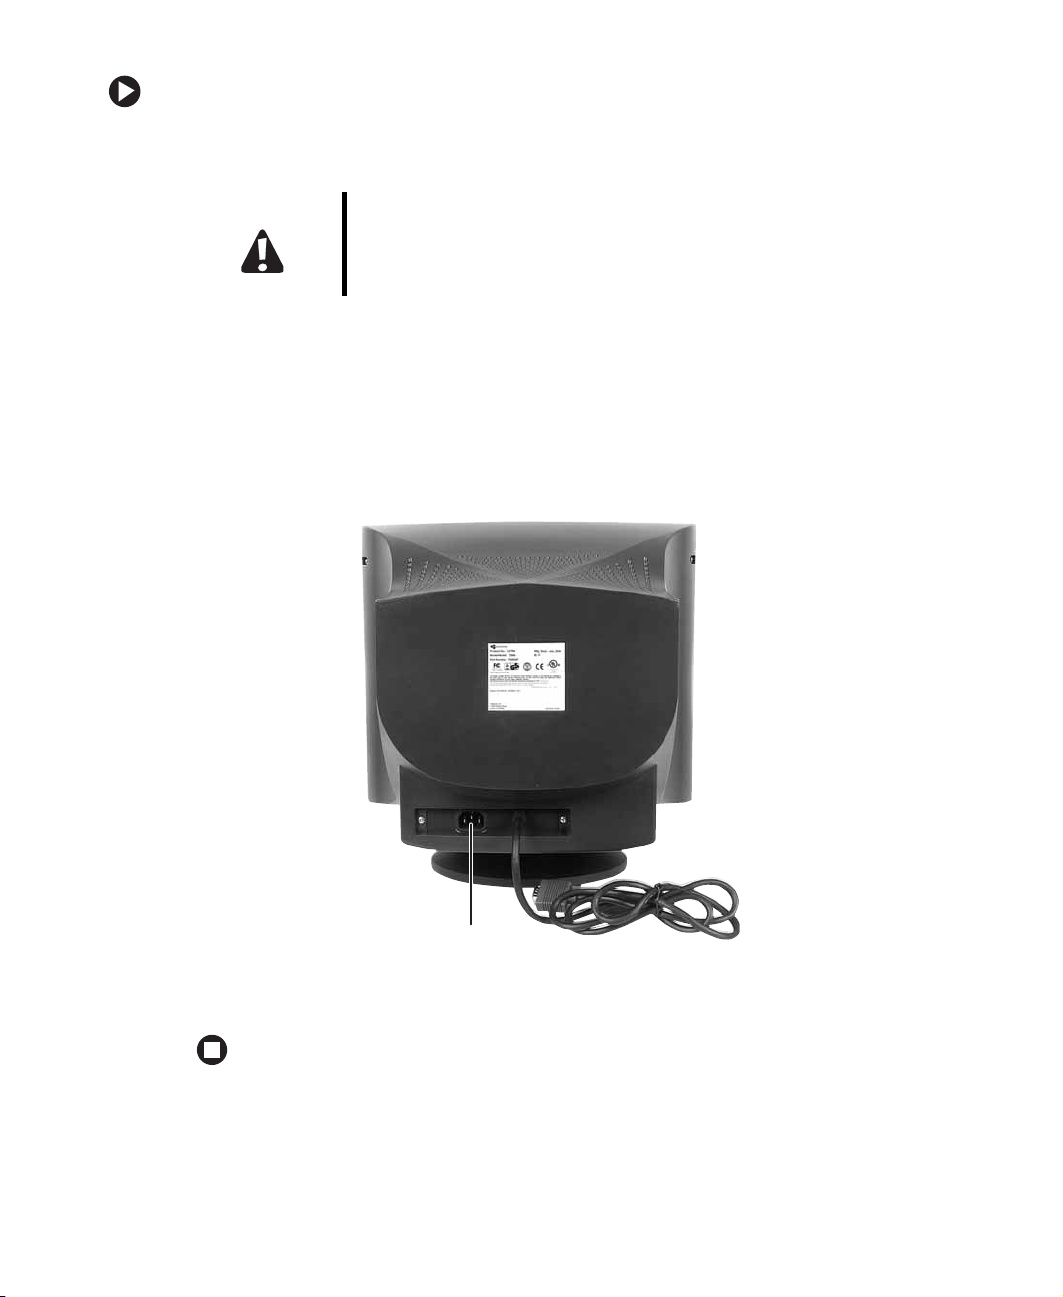
4 Connect the power cable that came with the monitor to the AC power connector on
the back of the monitor. Only use the power cable that came with the monitor.
AC power
connector
5 Plug the other end of the power cable into a correctly grounded electrical outlet.
www.gateway.com
3
Page 8
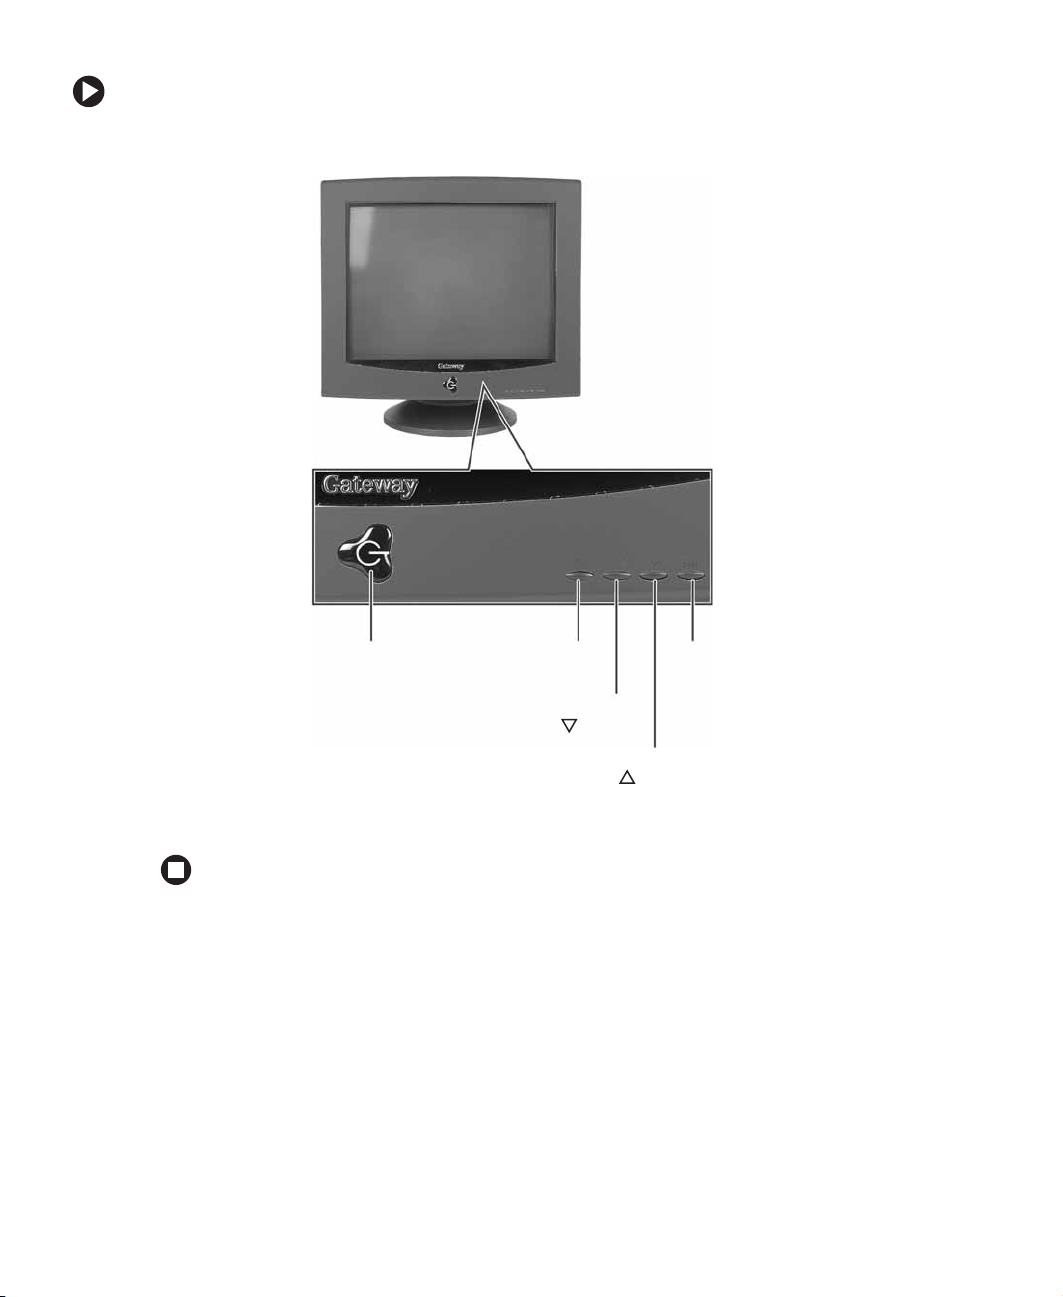
To turn on the monitor:
1 Press the power button on the front of the monitor.
Power
button
2 Turn on your computer.
MENU
button
Brightness/
button
Contrast/
EXIT
button
button
4
www.gateway.com
Page 9

Adjusting settings
Power button. Turns the monitor on and off.
Power indicator. Turns blue when the monitor is operating normally, then flashes when
the monitor is in energy saving mode.
MENU button. Enters the on-screen display (OSD) menu o r selects a n OSD menu o ption.
Brightness/ button. OSD inactive: Adjusts the brightness.
OSD active: Navigates and adjusts the OSD menu options.
Contrast/ button. OSD inactive: Adjusts the contrast.
OSD active: Navigates and adjusts the selected OSD menu option.
Exit. Exits the OSD menu or sub-menu.
To adjust monitor settings:
1 Press the MENU button. The OSD menu opens.
EXIT
R
CONTRAST
H: 64.1 KHz
V: 60.0 Hz
OSD
42
MORE
2 Press the or buttons to highlight an OSD menu option, then press the MENU
button to select the option.
3 Press the or buttons to change an OSD menu option.
4 Press the EXIT button to save changes. Press the or buttons to highlight a
different OSD menu option.
- ORIf you have finished making all adjustments, press the
settings and exit the OSD.
www.gateway.com
EXIT button twice to save your
5
Page 10

On-screen display menu options
Icon Description
CONTRAST. Adjusts the level of white between the lightest and darkest portions of an image.
BRIGHTNESS. Adjusts the amount of light in the darkest portion of the picture.
H. POSITION. Controls the horizontal position of the display image.
H. SIZE. Controls the horizontal size of the display image.
V. POSITION. Controls the vertical position of the display image.
V. SI ZE . Controls the vertical size of the display image.
ROTATION. Rota tes the displ ay image.
PINCUSHION. Curves the sides of the display image inward or outward.
TRAPEZOID. Increases or decreases the trapezoid distortion of the display image.
6
MORE
OSD
R
PARALLELOGRAM. Slants the display image to the left or right.
PIN BALANCE. Curves the display image to the left or right.
ADVANCED SELECT. Opens a sub men u that contai ns me nu o ptions to ad just th e t op and bottom
corners of the display and horizontal and vertical moire.
COLOR. Adjusts color balance. Select from two preset factor y options (9300°K and 6500°K) or
USER. USER lets you adjust the red, green, and blue colors separately.
OSD ADJUSTMENT. Opens a submenu that contains menu options that let you change the
position of the OSD menu on the screen and the length of time the OSD menu is visible.
RESET. Resets the monitor settings to the factory default settings.
www.gateway.com
Page 11

Icon Description
LANGUAGE. Changes the display language for the OSD.
EXIT
EXIT. Displays current settings and exits the OSD menu.
DEGAUSS. Demagnetizes the scree n.
Video modes
The monitor supports several video mode s from 720 × 400 to 1280 × 1024. Recommended
video mode is 800 × 600 @ 85 Hz.
Factory preset video modes include:
Mode Resolution HF VF
1 720 × 400 31.47 70
2 640 × 480 31.47 60
3 640 × 480 43.27 85
4 800 × 600 46.87 75
5 800 × 600 37.88 60
6 800 × 600 53.67 85
7 800 × 600 63.90 100
8 1024 × 768 48.36 60
9 1024 × 768 60.02 75
10 1024 × 768 68.67 85
F - Horizontal frequency (KHz)
H
V
F - Vertical frequency (Hz)
www.gateway.com
7
Page 12

Maintenance
Warning When the monitor is turned off, a small amount of electrical current
still flows through the monitor. To avoid electrical shock, always
unplug all power cables and modem cables from the wall outlets
before cleaning the system.
Caution
To keep the monitor in optimal working order:
■
Do not block the ventilation holes.
■
Do not expose the monitor to rain or use near water.
■
Keep the monitor away from radiators or heat vents.
■
Keep the monitor out of direct sunlight.
■
Keep the monitor away from any equipment that generates a
magnetic field.
■
Use a screen saver to avoid permanent image burn-in. For more
information about screen sa vers, see the documentation that c ame
with your computer.
Caution Clean the monitor using a soft cloth lightly moi stened with water . Wipe
the cabinet, glass panel, and controls.
Do not use any type of abrasive pad or glass cleaner. You will
permanently scratch the glass panel.
8
www.gateway.com
Page 13

Troubleshooting
No picture
■ Make sure that the monitor is turned on.
■ Make sure that the power cord is connected correctly to both the back of the monitor
and the wall outlet.
■ Make sure that the video cable is connected securely to the back of your computer.
■ If the power indicator is blinking:
■ Make sure that your computer is turned on.
■ Move the mouse or press any key on the keyboard to bring the monitor out of
energy saving mode.
■ Restart your computer with the monitor turned on.
■ Make sure that the video cable is not damage d.
■ Check the end of the video cable for any pins that might be bent or pushed in.
Picture is scrambled
If the picture is scrambled or does not look rig ht, use the Reset option in the OSD to return
the monitor to its factory default settings.
Display colors are wrong
■ Restart your computer with the monitor turned on.
■ Make sure that the video cable is connected securely to the back of your computer.
■ Make sure that the video cable is not damage d.
■ Check the end of the video cable for any pins that might be bent or pushed in.
Picture is fuzzy
Adjust the contrast and brightness controls to improve the display image.
Picture bounces, jit ters, or has w av es
Make sure that:
■ Non-shielded speakers are not placed too close to the moni tor.
■ The monitor is not positioned too close to another monitor, power transformer or
adapter, electric fan, fluorescent light, metal shelf, or laser printer.
If none of these suggestions solves the problem, try plugging the monitor into another
outlet, preferably one on a different circuit.
www.gateway.com
9
Page 14

Picture has shadows or “ghosts”
■ Remove any extension cables or switchboxes.
■ Make sure that the video cable is connected securely to the back of your computer.
■ Make sure that the video cable is not damage d.
■ Check the end of the video cable for any pins that might be bent or pushed in.
Color is not uniform
Make sure that:
■ the monitor warms up for at least 30 minutes before making a final judgment about
color uniformity.
■ Non-shielded speakers are not placed too close to the monitor.
■ The monitor is not positioned too close to another monitor, power transformer or
adapter, electric fan, fluorescent light, metal shelf, or laser printer.
■ You demagnetize the screen using the Degauss option in the OSD.
Image is not size d or cente red corr ectly
Use the size and position controls in the OSD to adjust the image.
Image cannot be adjusted full screen
Some video modes used by the monitor produce images that cannot be adjusted all the
way out to the bezel edge (the edge where the screen glass and monitor casing meet).
This condition does not indicate that the monitor is defective.
10
www.gateway.com
Page 15

Specifications
Specifications are subject to change without obligation or notification.
CRT
Synchroniza tion range
Resolution
Dot rate
Power supply
Input signal
Display analog input
Weight
Dimensions (W×H×D)
Operating conditions
Storage conditions
Flat 17inch diagonal (16.0 inches viewable),
anti-reflective/anti-glare, 90° deflection, 0.25 mm dot pitch
Horizontal frequency: 30-70 KHz
Vertical frequ ency: 50-1 60 Hz
Maximum: 1280 × 1024 @ 60 Hz
Recommended: 800× 600 @ 85 Hz
110 MHz
Input voltage: AC 100-240 V @ 50/60Hz
Consumption: 68W (at 1152 x 864 resolution)
Video: Analog 0.7 Vp-p/75 Ohms
Sync: Separate sync, TTL level
Unlimited colors
Net: 40.7 lbs (18.5 kg)
Gross: 46.2 lbs (21. 0 kg)
15.98 ×16.02 × 16.42 inches
(406 × 407 × 417 mm)
Temperature: 41°F to 104°F (5°C to 40°C)
Humidity: 20% ~ 80%
Temperature: -4°F to 140°F (-20°C to 60°C)
Humidity: 10% ~ 90%
www.gateway.com
11
Page 16

12
www.gateway.com
Page 17

Gateway
Safety , Regulatory , and L egal
Information
• Safety information
• Regulatory statements
•Notices
13
Page 18

Important safety information
Y our Gateway system is designed and tested to meet the latest standards for safety of information technology
equipment. However, to ensure safe use of this product, it is important that the safety instructions marked on the
product and in the documentation are followed.
Warning Alw a ys f ollo w the se instructio ns to help guard agai nst perso nal injury
and damage to your Gateway system.
Setting up your system
■
Read and follow all instructions mar ked on the p roduct and in t he documentation before you operate your
system. Retain all safety and operating instructions for future use.
■
Do not use this product near water or a heat source such as a radiator .
■
Set up the system on a stable work surface.
■
The product should only be operated from the type of power source indicated on the rating label.
■
If your product has a voltage selector switch, make sure that the switch is in the proper position for your area.
The voltage selector switch is set at the factory to the correct voltage.
■
Openings in the monitor case are provided for ventilation. Do not block or cover these openings. Make sure
you provide adequate space, at least 6 inches (15 cm), around the system for ventilation when you set up your
work area. Never insert objects of any kind into the monitor ventilation openin gs.
■
Some products are equipped with a three-wire power cord to make sure that the product is properly grou nded
when in use. The plug on this c ord will only fit into a gr ounding-type outlet. This is a safety feature. If you are
unable to insert the plug into an o utlet, contact a n electrician t o install the appropriate outlet.
■
If you use an extension cord with this system, make sure that the total ampere rating on the produc ts plugged
into the extension cord does not exceed the extension cord ampere r ating.
■
If your system is fitted with a TV Tuner, cable, or satellite receiver card, make sure that the antenna or cable
system is electrically grounded to provide some protection against voltage surges and buildup of static charges.
14
www.gateway.com
Page 19

Care during use
■
Do not walk on the power cord or allow anything to rest on it.
■
Do not spill anything on the system. The best way to avoid spill s is to avoid eating and drinking near yo ur
system.
■
Do not expose the monitor to rain or use near water . I f the monitor does get exposed to moisture, unp lug it
and allow it to dry for 24 hours. Call Gateway Technical Support for advice on whether the monitor is safe to
turn back on.
■
When the monitor is turned off, a small amount of electric al current still flows thr ough the monitor . T o avo id
electrical shock, always unplug all power cables and modem cables from the wall outlets before cleaning the
system.
■
Unplug the system from the wall outlet and refer servic ing to qualified personn el if:
■
The power cord or p lug is da maged.
■
Liquid has been spilled into the system.
■
The system does not operate properly when the operating instructions are followed.
■
The system was dropped or the cabinet is damaged.
■
The system performance changes.
Warning To prevent electric shock, never remove the cover. No user
serviceable parts inside. Refer servicing to qualified service
personnel.
Replacement parts and accessories
Use only replacement parts and accessories recommended by Gateway.
Warning Do not use Gateway products in areas classified as hazardous
locations. Such areas include patient care areas of medical and
dental facilities, oxygen-laden environments, or industrial facilities.
www.gateway.com
15
Page 20

Regulatory complianc e statements
United States of America
Federal C ommunications C ommission (FC C) Unintenti onal emitter per FCC Part15
This device has been tested and found to comply with the limits for a Class B digital device, pursuant to Part 15
of the FCC rules. These limits are designed to pr ovide reasonable pro tection against harmful interferenc e in a
residential installati on. This equipment generat es, uses, and can radiate radio frequency energy and, if not
installed and used in accordance with the instructions, may cause harmful interference to radio or television
reception. However, there is no guarantee that interference will not occur in a parti cular installation. If this
equipment does cause interference to radio and television reception, which can be determined by turning the
equipment off and on, the user is encouraged to try to correct the interference by one or more of the following
measures:
■
Reorient or relocate the receiving an tenna
■
Increase the separation between the equipment and receiver
■
Connect the equipment to an outlet on a different circuit from that to which the receiver is connected
■
Consult the dealer or an experienced radio/TV technician for help.
Compliance Accessories: The accessories associated with this equipment are: shielded video cable. These
accessories are required to be used in order to ensure compliance with FCC rules.
FCC declarat ion of conformity
Responsible party:
Gateway , Inc.
14350 Myford Road
Irvine, CA 92606 USA
This device complies with Part 15 of the FCC Rules. Operation of this device is subject to the following two
conditions: (1) this device may not cause har mful interference, and (2 ) this device must accept any interf erence
received, including interference that may cause undesired operation.
Caution Changes or modifications not expressly approved by Gateway could
void the FCC compliance and negate your authority to operate the
product.
California Proposition65 Warning
Warning This product contains chemicals, including lead, known to the State
of California to cause cancer, birth defects or reproductive harm.
16
www.gateway.com
Page 21

Canada
Industry Canada (IC) Unin tentional emit ter per IC ES-003
This digital apparatus does not exceed the Class B limits for radio noise emissions from digital apparatus as set
out in the radio interference regulations of Industry Canada.
Le présent appareil numérique n’émet pas de bruits radioélectriques dépassant les limites applicables aux
appareils numériques de Classe B prescrites dans le règlement sur le brouill age radioélectr ique édicté par Industrie
Canada.
EP A ENERGY ST AR
As an ENERGY STAR® Partner, Gateway has de termined that this product meets the ENERGY
STAR guidelines for energy efficiency when used with a computer equipped with a Display Power
Management System.
ENERGY STAR
www.gateway.com
17
Page 22

Notices
Copyright © 2004 Gateway , Inc.
All Rights Reserved
14350 Myford Road
Irvine, CA 92606 USA
All Rights Rese rved
This publication is protected by copyright and all rights are reserved. No part of it may be reproduced or transmitted by any
means or in any form, without prior consent in writing from Gateway.
The information in this manual has been carefully checked and is belie ved t o be accurate. Howe ver , changes are made
periodically . These changes are incorporated in newer publ ication editions. Gatewa y may improv e and/or change products
described in this publication at any time. Due to continuing system improvements, Gatewa y is not responsible f or inaccurate
information which may appear in this manual. For the latest product updates, consult the Gate way W eb site at
www.gateway.com
damages resulting from any defect or omission in this manual, ev en if advised of the possibility of such damages.
In the interest of continued product development, Gate way reserves the right to make improv ements in this manual and the
products it describes at any time, without notices or obligation.
Trad emark Acknowledg ments
Gateway and the Black-and-White Spot Design are trademarks or registered trademarks of Gatewa y, Inc. in the U.S. and
other countries. SpotShop, Spotshop.com, and Your:)Ware are trademarks of Gateway, Inc. Intel, Intel Inside logo, and
Pentium are registered trademarks and MMX is a trademark of Intel Corporation. Microsoft, MS, MS-DOS, and Windows are
trademarks or registered trademarks of Microsoft Corporation. All other product names mentioned herein are used for
identification purposes only , and may be the trademarks or registered trademarks of their respective companies.
. In no event will Gatew ay be liable f or direct, indirect, special, ex emplary , incidental, or consequential
18
www.gateway.com
Page 23

Page 24

MAN PROVIEW VX755 USR GDE R2 12/04
 Loading...