

Page 1
Media Center
User Guide
Page 2

Notices
© 2005 Gateway, Inc. All rights reserved. Gateway, the Gateway stylized logo, and the black-andwhite spot design are trademarks or registered trademarks of Gateway, Inc. in the United States and
other countries. All other brands and product names are trademarks or registered trademarks of their
respective companies.
2
Page 3
Planning your Media Center setup 4
Getting ready to set up
Media Center resources 6
Setting up Media Center hardware 8
Setting up optional computer connections 11
Turning on and setting up software 14
Learning about the remote control 17
Using Media Center 18
Media Center FAQs 22
Getting more information 25
Note: Your computer may vary from the following illustrations.
3
Page 4
Planning your Media C enter c omputer setup
Locate connections
You’ve probably already decided where you want to set
up and use your Media Center computer, but before
you start connecting computer components, take a few
minutes to make sure that all of these connections are
available in the location you’ve selected.
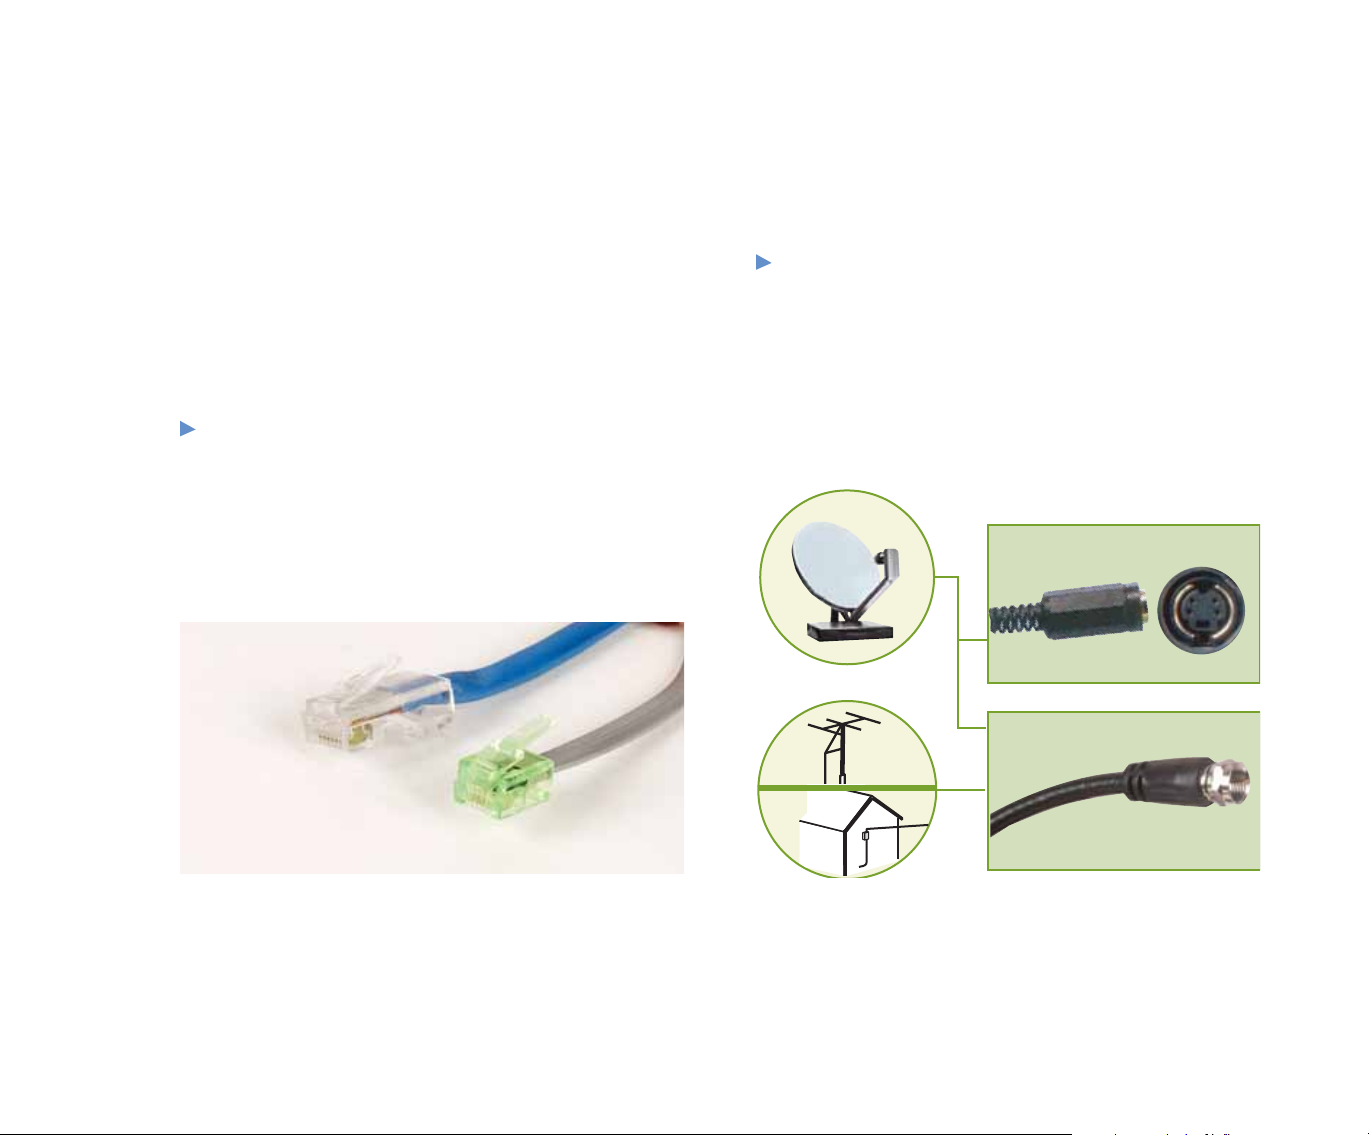
Internet connection—Your computer needs an
Internet connection to update the program guide
and to access the Internet. Make sure that you have
access to a dial-up or broadband Internet connection
before starting your Media Center software
setup. Contact your Internet service provider for
more information about setting up your Internet
connection.
Video source—Make sure that you have access
to a video source before setting up your Media
Center computer. Your computer can receive video
input through coaxial and S-Video cables. The
video source is usually an antenna, a direct cable
TV connection, a cable box, or a satellite receiver.
Cable boxes and satellite receivers are also called
set-top boxes
.
4
Page 5
Identify Media Center
computer components
Remove the computer components from the packaging
and lay them out for easy access during the setup
process.
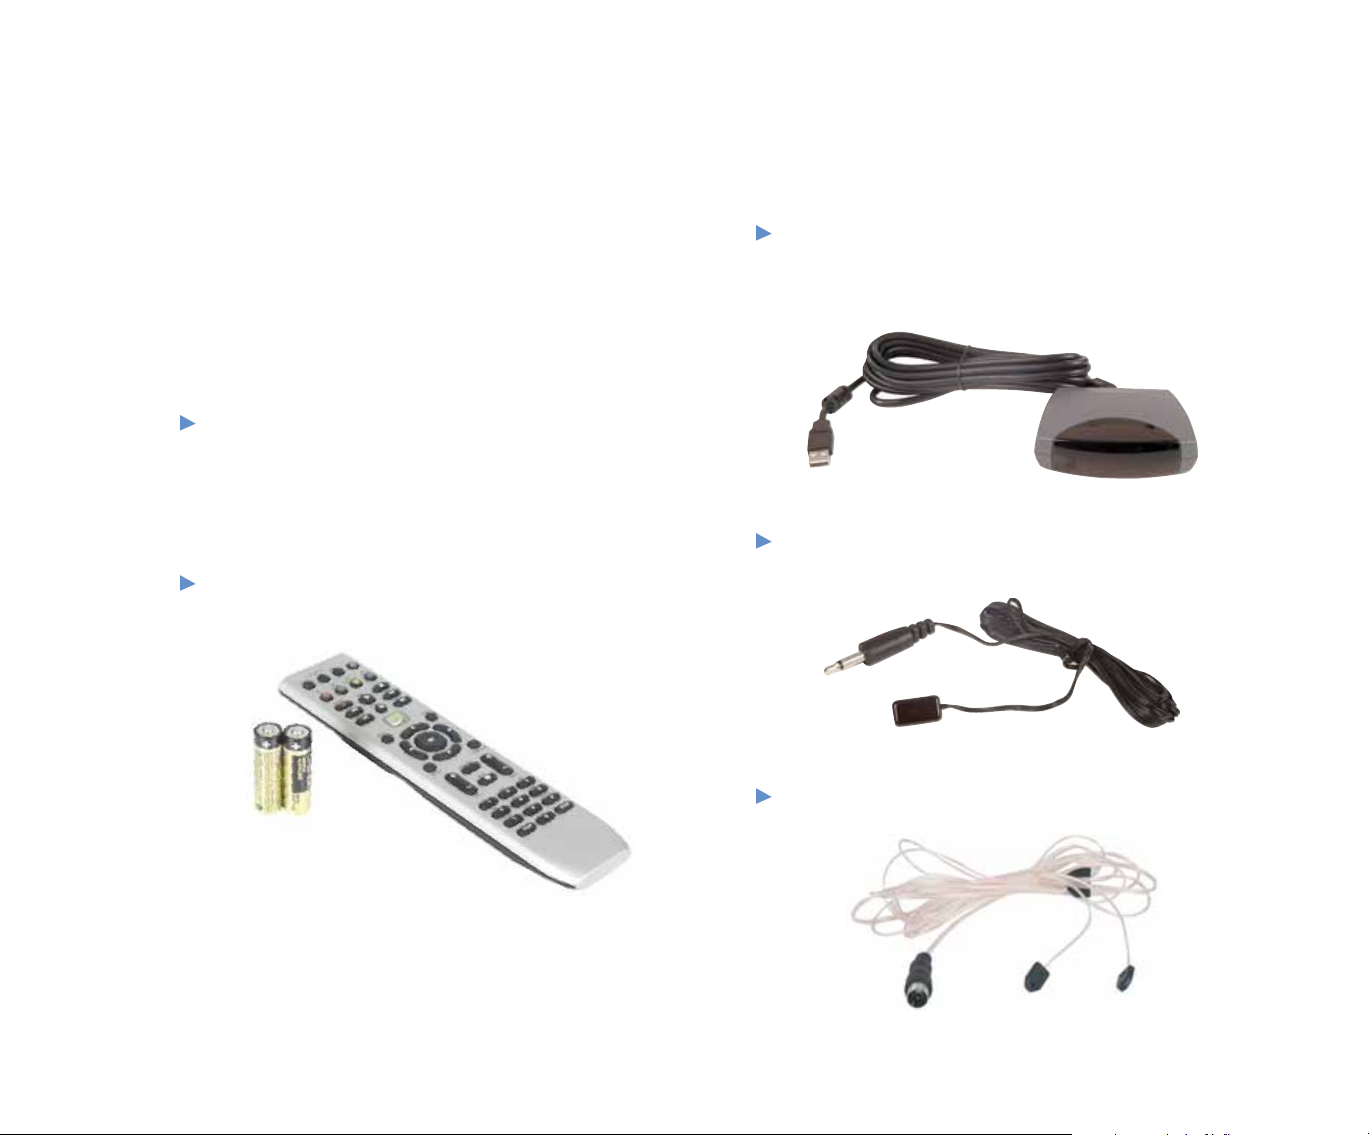
Remote Control—Lets you remotely control the
Media Center Guide, TV, videos, DVDs, music,
pictures, recorded TV programs, volume levels,
and more. The remote control included with your
Media Center may look different than the one shown
below.
Batteries—Two AA batteries for the wireless remote
control.
Remote sensor (Infrared “IR” receiver)—
Receives and sends signals to and from the remote
control. The sensor included with your Media Center
may look different than this.
Infrared (IR) control cable—Sends input from the
remote sensor to a set-top box to change channels.
FM antenna—Receives FM radio signals. (optional)
5
Page 6
Getting ready to set up Media Cen ter resourc es
Now that you’ve located an Internet connection and
a video source and have identified the computer
components, use the step-by-step instructions in this
guide to help set up your Media Center computer and
software. Also, use the other documents and information
resources described here to help you set up and use the
Media Center computer and software.
Documentation
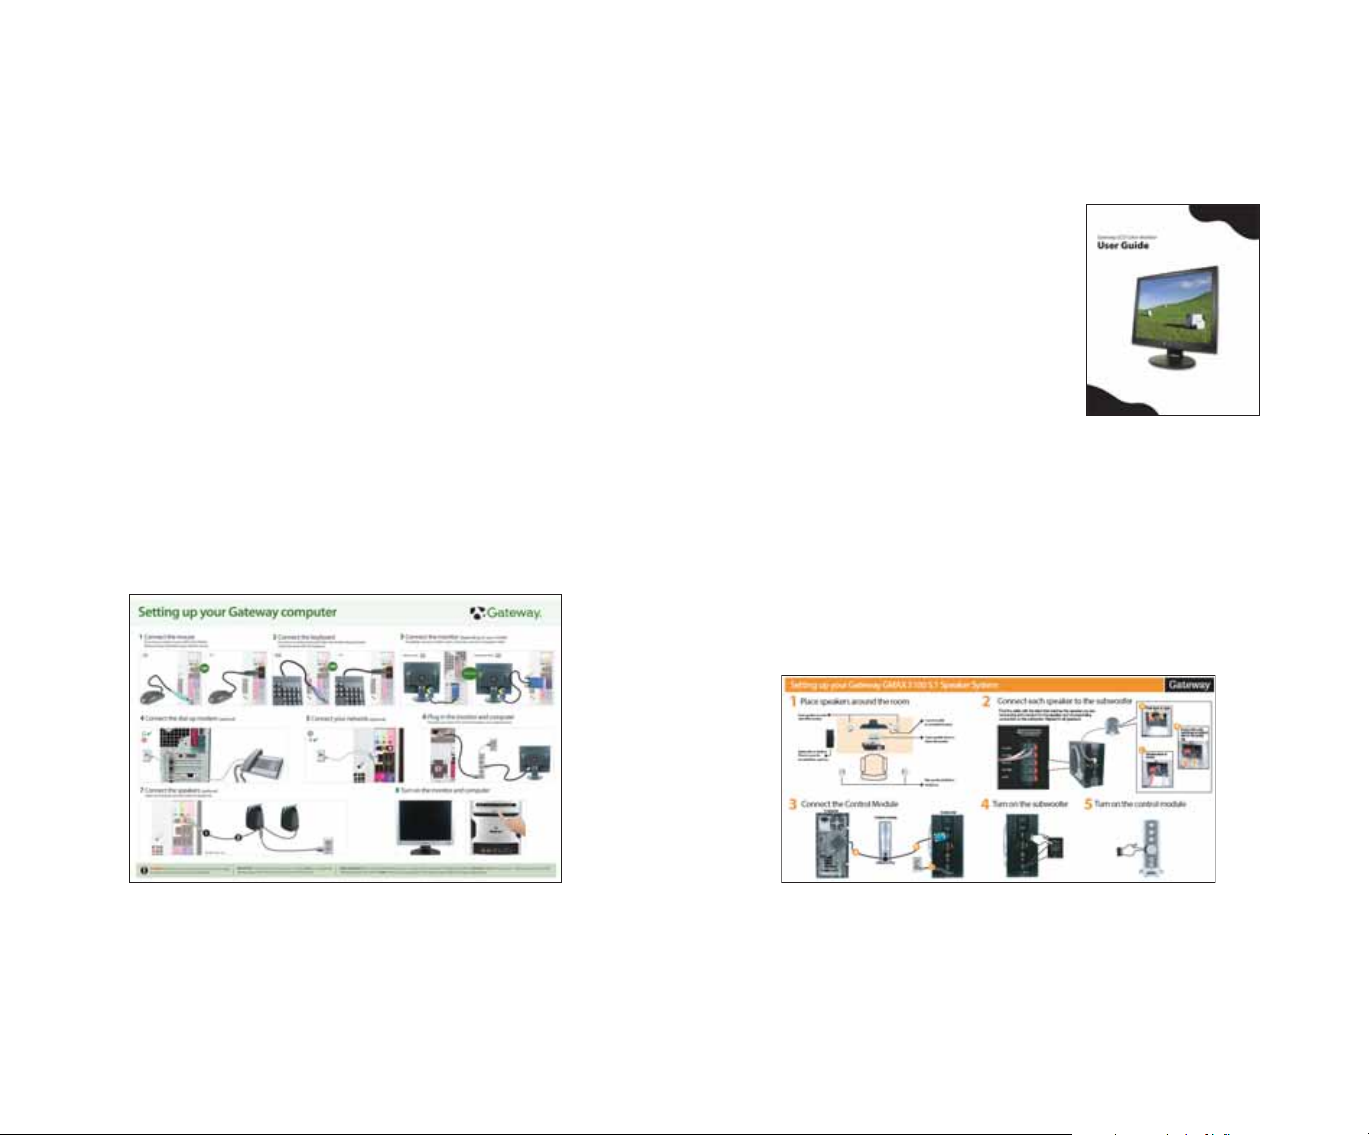
Setup Poster
The setup poster helps you set up your
computer and other devices.
Monitor Guide
The monitor or display device
guide provides information about
using and adjusting your display
device settings.
Sound System Setup Poster
(Optional) The sound system setup poster helps you connect
your audio system. If you purchased a sound system with your
Media Center computer, follow the setup poster instructions. If
you are connecting your Media Center computer to an existing
sound system, see “Connecting the Media Center to an existing
home stereo or home theater” on page 13.
6
Page 7
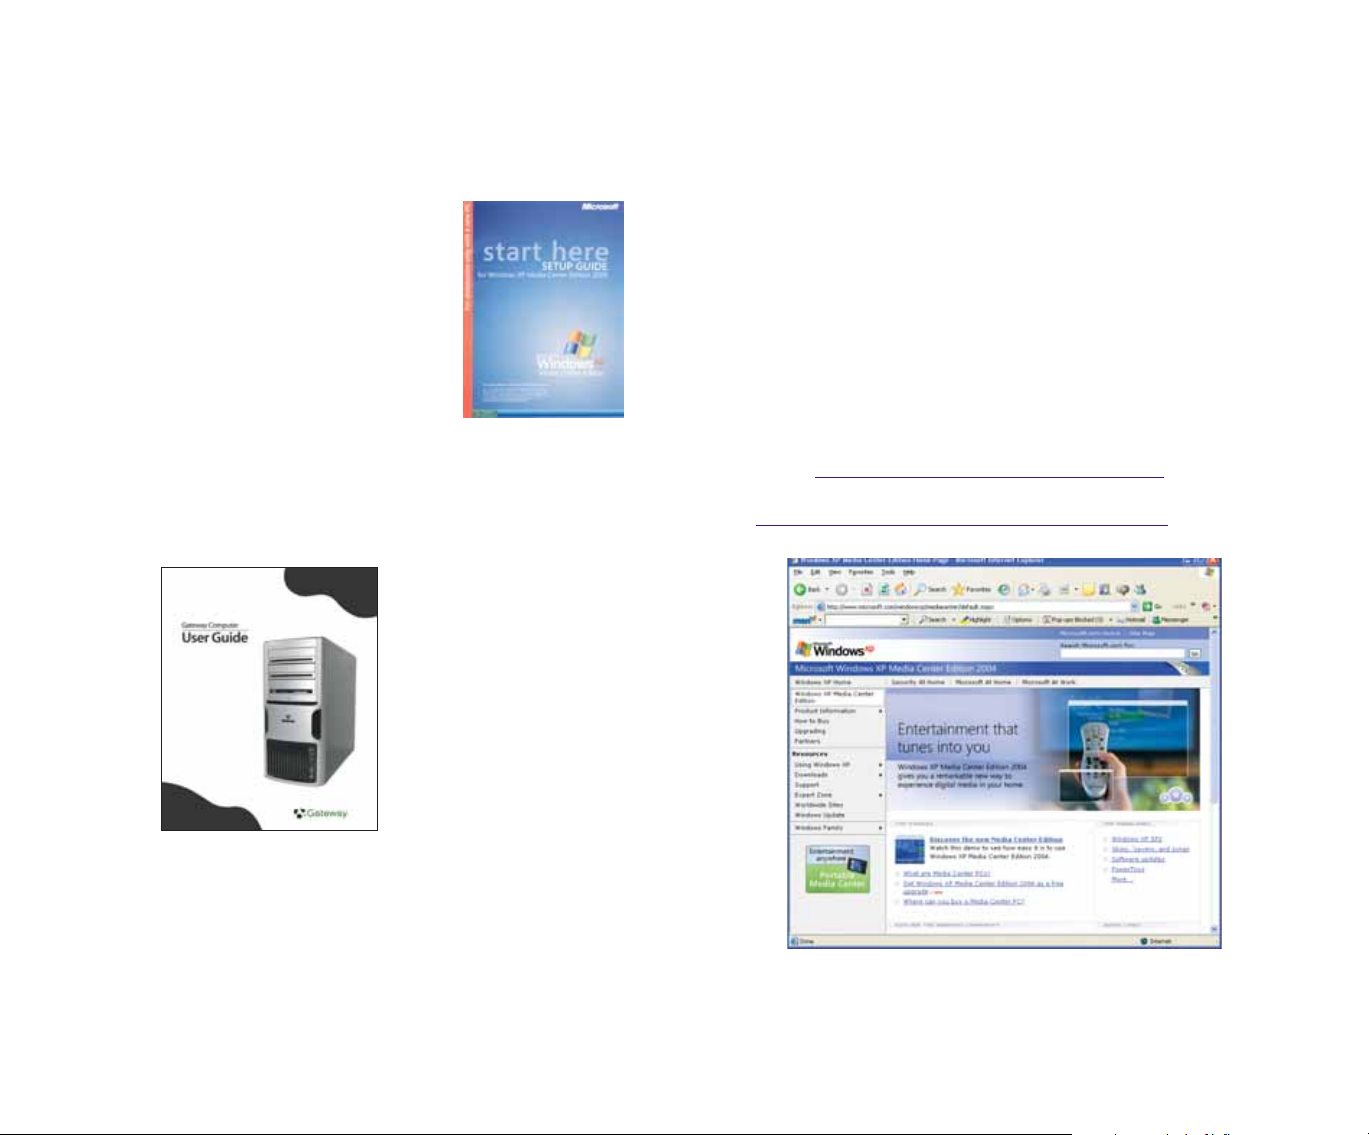
Windows XP Media Center
Edition Guide
The
Microsoft Windows XP Media
Center Edition
information about configuring
the Media Center software, tips
about using the Media Center, and
troubleshooting information.
guide provides
Computer Guide
Your Gateway computer
user guide provides
instructions for using your
Media Center computer and
troubleshooting information
to solve problems.
Windows Update
Remember to keep the Windows operating system
updated by installing updates as they become available.
When an update is available, Windows will automatically
prompt you to install them.
Web site
You can get the latest FAQs, information, and tips and
tricks about making the most of your Media Center
experience by going to the Microsoft Media Center Web
site at microsoft.com/windowsxp/mediacenter/ and the
Gateway Support Web site at
support.gateway.com/windowsxp/mediacenter/.
7
Page 8
Setting up Media Cent er hardware
Now that you’re familiar with the components, connect
them to your Media Center computer.
Set up the computer
Before setting up the Media Center hardware,
•
make sure that you have:
• Set up your computer
• Set up your display device
• Set up the sound system (optional)
If you use a TV as the Media Center display device
instead of a display device provided by Gateway,
see
Connecting a TV
on page 11.
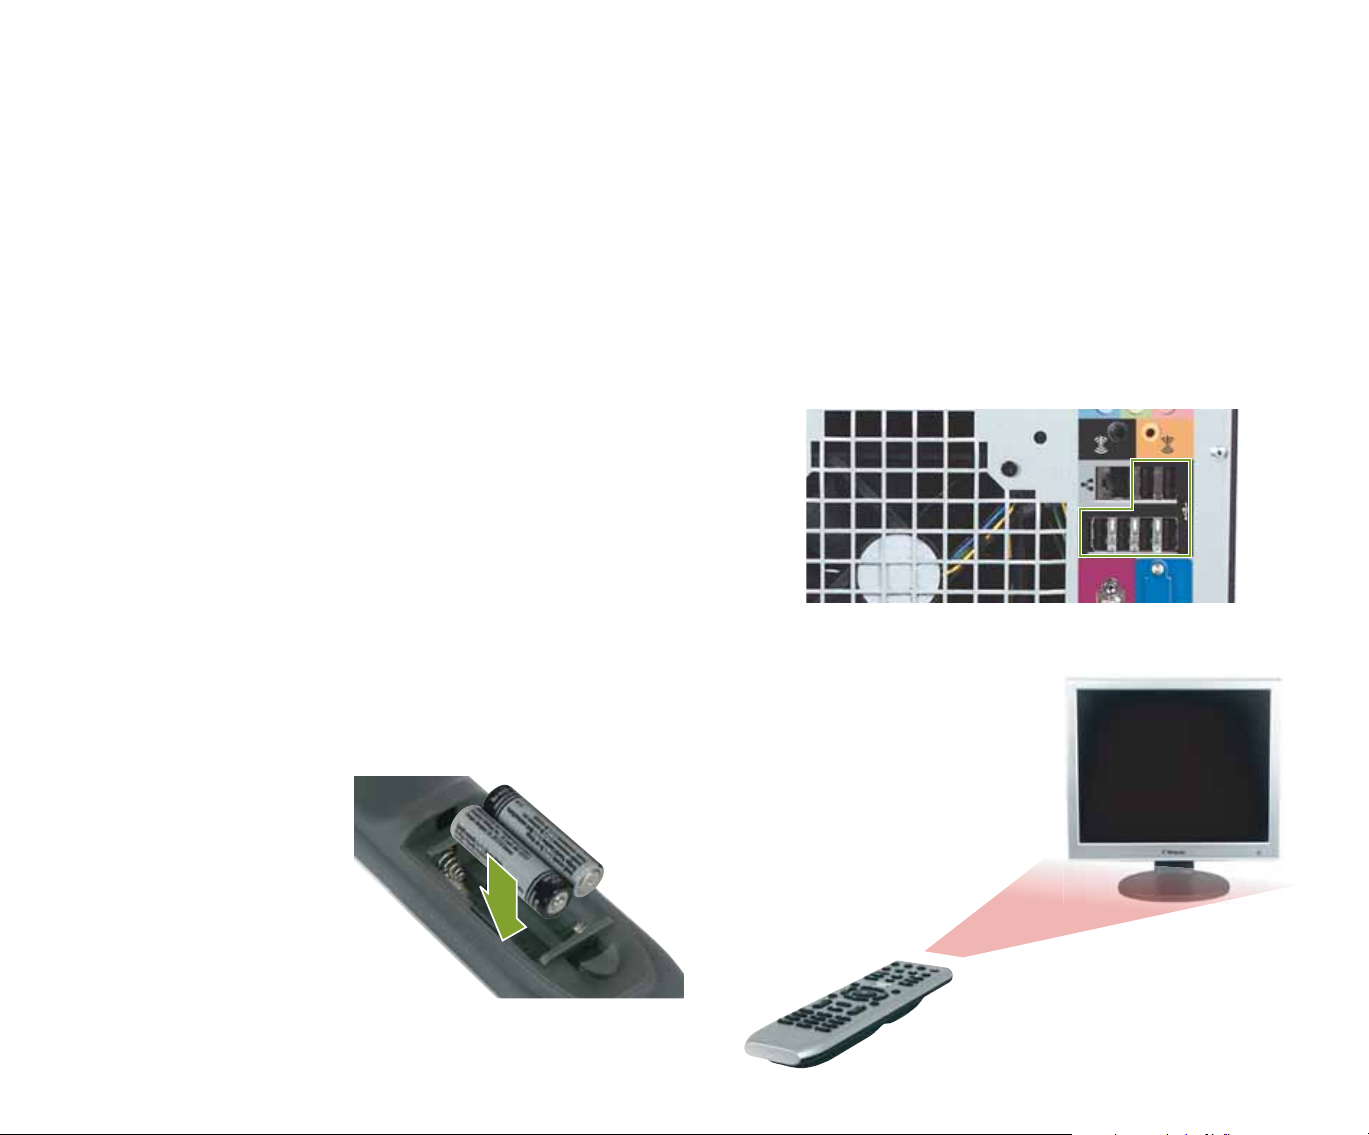
Install the remote
control batteries
Insert two AA batteries into the remote control.
•
Match the
+ and – on
the batteries
with the + and –
symbols inside the
battery compartment.
Connect the remote sensor
Connect the remote sensor to any USB port on
your computer. If your remote sensor does not
1
have the USB cable already attached to it, attach
the USB cable to the USB port on the back of the
sensor.
Note: Your computer’s ports may vary.
Position the remote sensor
so the remote control has
2
a direct, unobstructed view
of the sensor. The remote
control has a range of 23
feet and can be used up
to about 22° from the
centerline of the
sensor.
8
Page 9
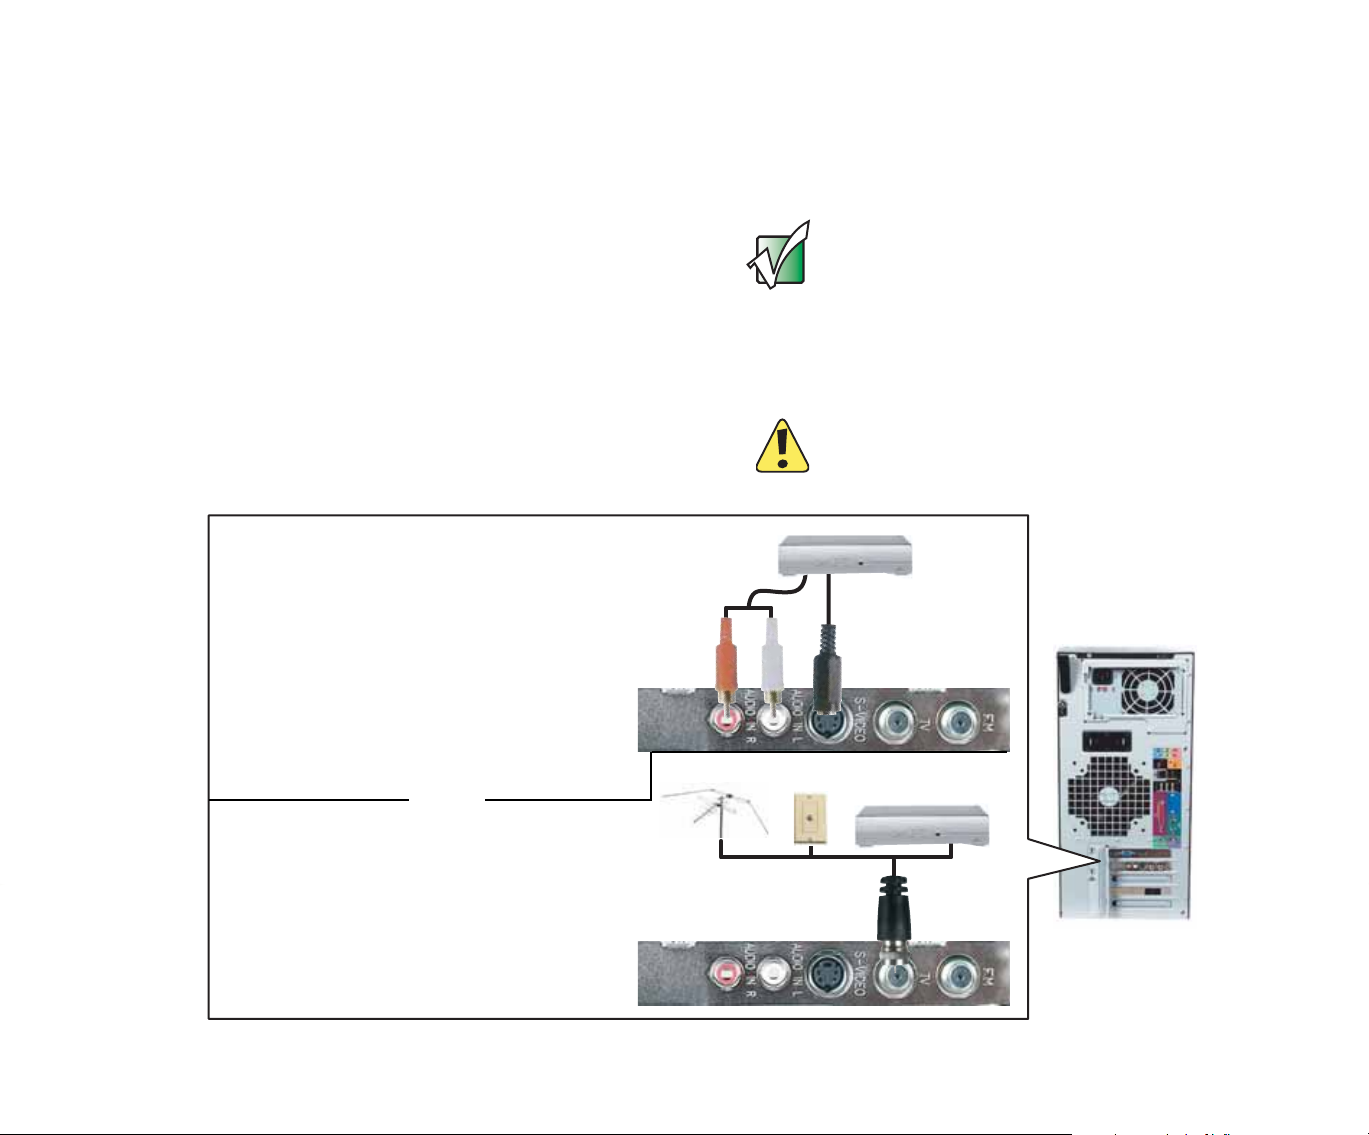
Connect the video and audio source
Your Media Center computer has connectors for S-Video
or coaxial (TV) cables. Select the connector that your video
source supports:
• S-Video—S-Video signals provide the sharpest picture.
If you use S-Video, you also need to connect the audio
using RCA stereo cables.
• Coaxial (TV)—The video and audio signals are both
carried on one cable. The coaxial cable is the way to
connect a direct cable or an antenna video source to
the Media Center.
Note: Your computer’s ports may vary.
The quality of the video coming into the Media Center computer
determines the quality of the video output to the Media Center display
device. A direct cable connection, cable set-top box, or satellite set-top
box usually provides a better quality signal than an antenna. Use the
highest quality video source available for best results.
The quality of cable used to connect the video source to the Media
Center computer has an affect on the video output quality from the
computer. Use high quality video cables to connect the video source to
the computer.
If the video devices connected to your computer are not grounded
correctly, your computer could be damaged. For more information
about correct grounding, see your Gateway computer user guide.
Connect an S-Video cable (not included) from
a video source (such as a cable set-top box,
1
a satellite set-top box, or other video device)
to the S-Video In jack on the back of your
computer.
Connect an RCA cable (not included) from
the Audio Out jacks on the video device to
2
the audio In RCA jacks on the back of your
computer.
- OR -
Connect a coaxial cable (not included)
•
from a video device (such as a direct cable
connection, a cable set-top box, a satellite
set-top box, or an antenna) to the Coaxial In
(TV) port on the back of your computer.
S-Video
Coaxial (TV)
9
Page 10

Connect the IR control cable
If your Media Center configuration uses a set-top box for
the video source to the Media Center computer, connect
the infrared (IR) control cable to the remote sensor and
attach the IR control to the set-top box IR sensor window.
The IR control cable sends input from the remote sensor
to your set-top box to change channels.
Plug the IR control cable into any 1/8-inch jack
on the back of the remote sensor. (The sensor
1
included with your computer may look different.)
Locate the IR sensor on the set-top box by
shining a flashlight through the set-top box IR
2
sensor window. Look for a 1/2- to 3/8-inch metallic
rectangle with a 1/8-inch dark circle in the middle.
This is the IR sensor.
Remove the adhesive paper from the back of
the IR control.
3
Place the sticky side of the IR control on the
set-top box sensor window. Make sure that the
4
infrared control is placed directly in front of the
IR sensor that you located in Step 2.
10
The Media Center IR control cable sends infrared signals to your
set-top box or satellite receiver. However, some set-top boxes are
set to receive radio frequency (RF) signals from the remote control.
Before using the Media Center remote control, make sure that the
set-top box is set to accept infrared signals. See your set-top box
guide for information about remote settings.
Page 11

Setting up optional computer connections
Connecting a TV
You can use a TV as a display device. However, some
older TVs provide a lower quality display than computer
monitors or flat-panel TVs that are optimized for the
Media Center.
The Media Center computer provides display outputs
from a VGA (monitor) port or an S-Video port. Select the
highest quality port that your TV supports:
• VGA—Best. If your TV has a VGA port, use this.
• S-Video—Good. S-Video display quality is usually
good for TV images. The display quality for the
Media Center computer functions, however, is not as
good as VGA output. S-Video display output is not
optimized for computer video display.
If you did not purchase a display device when you
purchased your Media Center computer and your video
display does not provide the image quality that you
expected, contact a Gateway sales representative to
help you select a display device that is optimized for your
Media Center computer. See “Contacting Gateway” on
page 27 for Gateway contact information.
By default, if your display device was purchased with the Media Center
computer, the computer uses a screen resolution of 1024 × 768 for
computer monitors and 800 × 600 for the Gateway 42-inch Plasma TV.
Many TVs cannot display this high resolution and may shift, scramble,
or scroll the picture. For a better picture on a TV display, you may need
to lower the Media Center screen resolution to 800 × 600 or 640 × 480.
See Windows Help & Support for more information about changing the
screen resolution.
Many TVs use
frame with two passes of alternating scan lines. The TV screen fi rst
displays the video image odd lines one at a time, sequentially from
top to bottom, then it fi lls in the other half of the video image with the
even lines. Because most TVs use this interlaced method to display the
picture on the screen, a standard interlaced analog television will most
likely fl icker when displaying thin lines and small text. An interlaced
video display device will produce a lower quality display, especially
when viewing and using the Media Center computer functions.
Progressive scan
sequential scan lines. A progressive scan TV displays the entire
picture, drawn sequentially from top to bottom, without the odd/even
interlacing. This results in a fuller, sharper picture, and better display
quality for viewing and using the Media Center computer functions. The
progressive scan picture is also brighter and easier on your eyes.
interlaced video
video displays a video frame with one pass of
. Interlaced video displays a video
11
Page 12

Connect a VGA cable (not included) or S-Video
cable (not included) to the VGA port or S-Video
1
jack on the back of your computer.
OR
Connect the other end of the cable to the VGA port
or S-Video jack on the back of your TV.
2
OR
Turn the TV on and select the TV In video source.
For more information about selecting the TV In
3
video source, see your TV’s documentation.
12
Page 13

Connecting the computer to
an existing home stereo or
home theater
Your Media Center computer includes audio jacks that
support a 7.1 Surround Sound audio system. The sound
system setup varies, depending on your sound system’s
audio inputs. Use your computer and sound system’s
setup posters and other documentation to connect your
computer to the sound system.
Analog audio jacks. See your
computer and sound system’s
documentation for connection
instructions.
Note: Your computer’s jacks may vary.
13
Page 14

Turning on y our system and setting up software
After the computer components are connected, you’re
ready to turn on the power and complete the Media
Center set up.
Press the power button on the front of the monitor
or TV, then press the power button on the front of
1
the Media Center computer. Make sure that your
sound system (optional) is turned on.
Follow the Windows setup screens.
2
Turn on any peripheral devices, such as printers or
scanners, and follow the on-screen instructions to
3
complete the device setup.
14
Page 15

The Media Center setup wizard requires Internet access to complete
the Media Center software confi guration. Before starting the
Media Center setup wizard in step 4, make sure that your Internet
connection is set up. Contact your Internet service provider for more
information about setting up your Internet connection.
Before starting the Media Center setup wizard, check for Windows
Updates to make sure that Media Center has the most recent
software releases and security updates installed. For more
information, see “Windows Update” on page 7.
After you complete the initial Windows setup, press
the Start button on the remote to start the
4
Media Center setup wizard.
Follow the setup screens to configure the
Media Center software for your specific
5
requirements.
15
Page 16

Configuring your speakers
After you have connected your sound system and set
up Media Center, select speaker setup options on your
computer.
Turn on your Media Center computer.
1
Click Start, Control Panel, Sounds, Speech,
and Audio Devices, then click Sounds and
2
Audio Devices. The
Properties
Click the Volume tab, then click the Advanced
button in the Speaker Settings section. The
3
Advanced Audio Properties
dialog box opens.
Sounds and Audio Devices
dialog box opens.
Click the Speakers tab, click the arrow button
to open the Speaker setup list, then click the
4
speaker setup that most closely matches your
sound system type.
Click OK to save your speaker setup.
5
16
Page 17

Learning about the remote c ontrol
The Media Center remote control lets you take full
control of your Media Center experience. You can quickly
start the Media Center by pressing the Start button.
(The remote control included
with your Media Center may
look different.)
Shortcut buttons
give you direct access to
Media Center features.
Media Center Start button
starts the Media Center software.
Audio/Video (A/V) control buttons
control volume levels, volume mute,
channel selections, and the DVD menu.
Numeric keypad/
Data entry buttons
let you enter numbers
and characters from the
remote control.
Power control button
puts the Media Center computer in
Standby mode (reduced power).
Transport buttons
let you replay recorded (buffered) TV
and radio programs and play the CD
and DVD player.
Navigation buttons
let you move the cursor around the Guide and
menus, make selections, navigate back to the
previous screen, change the screen
display aspect ratio, and get more
information. Press the OK button to
make a selection.
17
Page 18

Using Media C enter
Use the Media Center remote control to watch TV,
videos, and DVDs, to listen to music, and to view
pictures. Use the Media Center Guide to view TV
program schedules, search for programs by genre, set
up program recordings, and more.
Press the Start button on the remote control.
The Media Center software starts.
1
Use the remote control
navigation buttons to select
2
a Media Center menu option,
then press OK.
18
- OR Press one of the menu
shortcut buttons on the
remote control to select a
Media Center menu.
Page 19

Manually updating the Media
Center Program Guide
When you use the Media Center setup wizard, the
Media Center Program Guide is set up to download
program information from your cable or satellite service
provider. However, on occasion, you may need to update
the Program Guide manually to refresh the program
listings.
Before starting the Media Center, make sure that
you are connected to the Internet.
1
The Media Center requires Internet access to update the
Media Center Program Guide. Make sure that you connect
to the Internet before continuing the manual Program Guide
update instructions.
Press the Start button on the remote control.
The Media Center software starts.
2
Navigate to Settings, then press OK. The
Settings menu opens.
3
Navigate to TV, then press OK.
4
Navigate to Guide, then press OK.
5
Navigate to Get guide data, then press OK. The
Guide Data
6
Select Yes, then press OK. The Media Center
downloads Program Guide updates.
7
dialog box opens.
19
Page 20

Burning recorded video to a
DVD with Nero Express
After you have recorded a program, you may want
to save the program to a DVD for viewing on another
computer that has a DVD player. You can use Nero
Express to copy the recorded program to a DVD.
TV programs that have been recorded with Media Center can be
recorded to DVD using Nero Express, then replayed on another
Media Center computer or on a non-Media Center computer that has
a DVD player and DVD decoder software (such as WinDVD) installed.
The non-Media Center computer must also have Windows XP with
Service Pack (SP) 1, Windows Media Player 9, and the Windows
patch Q810243 Update.
Your Media Center computer also includes software that lets you
create video DVDs that you can play on your home DVD player. See
“Burning recorded video to DVD using Media Center” on page 21 for
more information.
Insert a blank, writable DVD-R disc into your
recordable DVD drive. You cannot use a DVD-RAM
1
disc with Nero Express.
If a
CD Drive
dialog box opens, click Cancel.
2
Click Start,
All Programs,
3
Burn a CD or
Data DVD, Nero
Programs,
then click Nero
Express. Nero
Express opens.
Move your pointer over Data, then click Data Disc.
The
4
5
6
7
Disc Content
Click the Add button to open the
Folders
where the files you want to add to the writable
DVD are located. The TV program recordings
are usually located in the \Shared Documents\
Recorded TV folder. If you do not see the folder
you want, browse through the folders in the
Location pane.
Click the file you want to record (hold down the
CTRL or SHIFT key when you click to select multiple
files) in the
then click Add.
After you have added all of your files, click
Finished. The
Click Next, then click Burn.
dialog box, then click the drive or folder
window opens.
Select Files and
Select Files and Folders
Disc Content
window opens.
dialog box,
8
20
Page 21

Burning recorded video to a
DVD with Media Center
If you save a recorded program to a DVD using Media
Center, you can play the DVD on your home DVD player
or on another computer that has a DVD drive.
TV programs that have been recorded with the Media Center can be
recorded to DVD and replayed on another Media Center computer
or on a non-Media Center computer that has a DVD player and DVD
decoder software (such as WinDVD) installed. The non-Media Center
computer must also have Windows XP with Service Pack (SP) 1,
Windows Media Player 9, and the Windows patch Q810243 Update.
Insert a blank, writable DVD-R or DVD-RW disc
into your recordable DVD drive.
1
Press the Start button on the remote
control. The Media Center software starts.
2
Click More Programs.
3
Click Create CD/DVD.
4
Click Video DVD, then click OK.
5
Follow the on-screen prompts to finish burning
the DVD. For more information, click the Media
6
Center’s Help icon.
21
Page 22

Media Cen ter FA Qs
Following are Media Center Frequently Asked Questions
(FAQs). To view other Media Center FAQs that are not
covered in this section, go to the Gateway support Web
Site at
support.gateway.com/windowsxp/mediacenter/faqs/.
Q: Why does the Media Center video display look bad on
my TV?
A: Many factors, such as the display type, quality of the
video source, type of connection used, quality of video
cables, display device screen resolution, size of TV, age
of the TV, or the type of TV (interlaced or progressive
scan), can affect the video quality significantly:
• Display type—The Media Center is best viewed
on display devices that were offered with the Media
Center computer when you purchased it from
Gateway. Other types of display devices, including
retail TVs, may provide lower quality video. If you did
not order a display device when you purchased your
Media Center computer, a progressive scan display
device with a VGA input is the best choice.
• Quality of video source—The quality of the video
signal coming into the Media Center computer has
an affect on the video quality. The video displayed
from the Media Center is only as good as the source
video signal. Cable, digital cable, and satellite usually
provide better quality than an antenna.
• Type of connection used—You can connect
the Media Center computer video output to a TV.
However, the connection type has an affect on the
video quality. The Media Center has two video
outputs:
VGA—If your TV includes a VGA port, connect the
VGA cable from the Media Center computer’s VGA
(monitor) port to the TV’s VGA In port for the best
quality. Many TVs do not have a VGA port.
S-Video—If your TV does not have a VGA port,
but includes an S-Video port, connect the S-Video
cable from the Media Center computer’s S-Video
Out port to the TV’s S-Video In port. S-Video display
quality is usually good for TV images. The display
quality for the Media Center computer functions,
however, is not as good as VGA output. S-Video
display output is not optimized for computer
video display.
• Quality of video cables—Poor quality or the
incorrect type of video cables can cause problems
and affect the video quality. Gateway recommends
using high-quality video cables that can be
purchased from the Gateway Accessory Store.
Note: Cable connections must be made correctly for
optimal video quality. A poor cable connection can
lower video quality.
22
Page 23

• Screen resolution—By default, if your display device
was purchased with the Media Center computer, the
computer uses a screen resolution of 1024 × 768 for
computer monitors and 800 × 600 for the Gateway
42-inch Plasma TV. Many TVs cannot display this
high of a resolution and may shift, scramble, or scroll
the picture. For a better picture on a TV display,
you may need to lower the Media Center screen
resolution to 800 × 600 or 640 × 480. See Windows
Help & Support for more information about changing
the screen resolution.
• Size of display device—Small computer monitors
for standard computer applications are generally
not optimized for motion video playback. Although
they offer excellent resolutions and refresh rates,
they are designed to make static white backgrounds
with black text look readable. Some small display
devices do not make colorful motion video look its
best. Generally, video will look better on a larger
display device.
• Age of the TV—Newer TVs usually have more
advanced features, produce a better quality picture,
and support higher screen resolutions. The Media
Center video display will likely be better on a newer
model TV.
• Type of TV (interlaced or progressive scan)
Many TVs use
displays a video frame with two passes of alternating
scan lines. The TV screen first displays the video
image odd lines one at a time, sequentially from top
to bottom, then it fills in the other half of the video
image with the even lines. Because most TVs use
this interlaced method to display the picture on the
screen, a standard interlaced analog TV will most
likely flicker when displaying thin lines and small
text. An interlaced video display device will produce
a lower quality display, especially when viewing and
using the Media Center computer functions.
Progressive scan video
one pass of sequential scan lines. A progressive
scan TV displays the entire picture, drawn
sequentially from top to bottom, without the odd/even
interlacing. This results in a fuller, sharper picture and
better display quality for viewing and using the Media
Center computer functions. The progressive scan
picture is also brighter and easier on your eyes.
Q: How do I configure my Media Center to output to
a TV?
A: Your Media Center computer detects whether you
are using a VGA or an S-Video display device and
automatically changes the display settings for the type
of display device you are using. For more information,
review the FAQ topic at:
support.gateway.com/windowsxp/mediacenter/faqs/
interlaced video
displays a video frame with
. Interlaced video
23
Page 24

Q: What display settings can I change to get better TV or
DVD image quality?
A: Adjust the display device brightness, contrast, hue,
and saturation. For more information review the FAQ
topic at:
support.gateway.com/windowsxp/mediacenter/faqs/
Q: Can I burn programs that were recorded with my
Media Center computer to a DVD?
A: Yes. The Media Center saves recorded programs in
the .DVR-MS format. You can burn a .DVR-MS file to a
DVD with DVD recording (burning) software, such as
Nero Express, and with the Media Center itself.
Q: Can I play recorded programs on other computers?
A: Yes, a .DVR-MS file recorded to DVD can be replayed
on another Media Center computer or on a non-Media
Center computer that has a DVD player and DVD
decoder software (such as WinDVD). The non-Media
Center computer must also have Windows XP with
Service Pack (SP) 1, Windows Media Player 9, and the
Windows patch Q810243 Update.
Q: Can I play recorded programs on my home DVD
player?
Q: Why do I get this “Download Error” message when the
Media Center tries to update the Program Guide?
A: You must be connected to the Internet to update the
Program Guide. Make sure that your Internet account is
set up and connected to the Media Center computer. For
information about manually updating the Program Guide,
see “Manually updating the Media Center Program
Guide” on page 19.
24
A: Yes. DVDs recorded with the Media Center can be
played on a home DVD player. DVDs recorded with Nero
Express cannot be played on a home DVD player.
Page 25

Getting more information
The Media Center is easy to use when you follow the on-screen menus. However, if you need additional help or
information about using the Media Center features, help is available at your fingertips.
In the
Media Center
activate the Media Center tool bar. The tool bar
1
appears at the top of the window.
window, move the mouse to
Click the Help icon to view or search for
information in the Media Center online help.
2
25
Page 26

Using Help and Support
Your Media Center computer also includes Help
and Support, an easily accessible collection of help
information, troubleshooters, and automated support.
Use Help and Support to answer questions about
Windows and to help you quickly discover and use the
many features of your Gateway Media Center computer.
To start Help and Support, click Start, then click
Help and Support. Help and Support opens.
1
Click a topic link.
2
- OR Type a word or phrase (keyword) in the Search box
located at the top of any Help and Support screen,
then click the arrow button to start the search.
The search results appear below the search box.
26
Page 27

Contacting Gateway
For Gateway contact information, see your computer’s
Note: Your computer may vary from the illustration.
User Guide
or the system label.
O
n
l
i
n
e
T
e
s
c
u
h
p
p
S
u
o
p
r
t
p
:
o
T
r
e
t
c
P
h
h
o
S
u
n
p
e
:
p
(
o
U
r
.
t
S
H
.
)
o
(
C
u
a
r
s
n
:
a
d
a
)
9
0
0
4
3
9
4
Online support:
Tech Support Phone: (U.S.)
Tech Support Hours:
(Canada)
9004394
27
Page 28

MAN MEDIA CENTER SETUP GDE R2 8/05
 Loading...