

Page 1
Page 2

Page 3

Contents
1Getting Help. . . . . . . . . . . . . . . . . . . . . . . . . . . . . . . . . . . . . . . . . . . . . . . 1
Gateway Web site . . . . . . . . . . . . . . . . . . . . . . . . . . . . . . . . . . . . . . . . . . . . 3
Using eSupport . . . . . . . . . . . . . . . . . . . . . . . . . . . . . . . . . . . . . . . . . . . 4
Help and Support . . . . . . . . . . . . . . . . . . . . . . . . . . . . . . . . . . . . . . . . . . . . . 5
Searching for a topic . . . . . . . . . . . . . . . . . . . . . . . . . . . . . . . . . . . . . . . 6
Using Your Computer guide . . . . . . . . . . . . . . . . . . . . . . . . . . . . . . . . . . . . . 6
Online help . . . . . . . . . . . . . . . . . . . . . . . . . . . . . . . . . . . . . . . . . . . . . . . . . . 7
2 Checking Out Your Gateway Notebook . . . . . . . . . . . . . . . . . . . . 9
Front . . . . . . . . . . . . . . . . . . . . . . . . . . . . . . . . . . . . . . . . . . . . . . . . . . . . . . 10
Left side . . . . . . . . . . . . . . . . . . . . . . . . . . . . . . . . . . . . . . . . . . . . . . . . . . . 11
Right side . . . . . . . . . . . . . . . . . . . . . . . . . . . . . . . . . . . . . . . . . . . . . . . . . . 12
Back . . . . . . . . . . . . . . . . . . . . . . . . . . . . . . . . . . . . . . . . . . . . . . . . . . . . . . 13
Bottom . . . . . . . . . . . . . . . . . . . . . . . . . . . . . . . . . . . . . . . . . . . . . . . . . . . . 15
Keyboard area . . . . . . . . . . . . . . . . . . . . . . . . . . . . . . . . . . . . . . . . . . . . . . 16
Identifying your model . . . . . . . . . . . . . . . . . . . . . . . . . . . . . . . . . . . . . . . . 17
Gateway model and serial number . . . . . . . . . . . . . . . . . . . . . . . . . . . 17
Microsoft Certificate of Authenticity . . . . . . . . . . . . . . . . . . . . . . . . . . . 17
Finding your specifications . . . . . . . . . . . . . . . . . . . . . . . . . . . . . . . . . . . . . 18
Accessories . . . . . . . . . . . . . . . . . . . . . . . . . . . . . . . . . . . . . . . . . . . . . . . . 19
3Getting Started . . . . . . . . . . . . . . . . . . . . . . . . . . . . . . . . . . . . . . . . . . . 21
Installing the battery . . . . . . . . . . . . . . . . . . . . . . . . . . . . . . . . . . . . . . . . . . 22
Connecting the AC adapter . . . . . . . . . . . . . . . . . . . . . . . . . . . . . . . . . . . . 23
Protecting from power source problems . . . . . . . . . . . . . . . . . . . . . . . 25
Starting your notebook . . . . . . . . . . . . . . . . . . . . . . . . . . . . . . . . . . . . . . . . 26
Waking up your notebook . . . . . . . . . . . . . . . . . . . . . . . . . . . . . . . . . . 27
Turning off your notebook . . . . . . . . . . . . . . . . . . . . . . . . . . . . . . . . . . . . . 27
Restarting (rebooting) your notebook . . . . . . . . . . . . . . . . . . . . . . . . . . . . 28
Status indicators . . . . . . . . . . . . . . . . . . . . . . . . . . . . . . . . . . . . . . . . . . . . . 29
Using the keyboard . . . . . . . . . . . . . . . . . . . . . . . . . . . . . . . . . . . . . . . . . . 30
Key types . . . . . . . . . . . . . . . . . . . . . . . . . . . . . . . . . . . . . . . . . . . . . . . 31
System key combinations . . . . . . . . . . . . . . . . . . . . . . . . . . . . . . . . . . 32
Multi-function buttons . . . . . . . . . . . . . . . . . . . . . . . . . . . . . . . . . . . . . . . . . 34
Using the EZ Pad touchpad . . . . . . . . . . . . . . . . . . . . . . . . . . . . . . . . . . . . 36
Using the touchpad . . . . . . . . . . . . . . . . . . . . . . . . . . . . . . . . . . . . . . . 37
Adjusting the volume . . . . . . . . . . . . . . . . . . . . . . . . . . . . . . . . . . . . . . . . . 39
www.gateway.com
i
Page 4

4 Using Drives and Ports . . . . . . . . . . . . . . . . . . . . . . . . . . . . . . . . . . .41
Using the DVD drive . . . . . . . . . . . . . . . . . . . . . . . . . . . . . . . . . . . . . . . . . .42
Identifying drive types . . . . . . . . . . . . . . . . . . . . . . . . . . . . . . . . . . . . . .42
Inserting a CD or DVD . . . . . . . . . . . . . . . . . . . . . . . . . . . . . . . . . . . . .43
Playing a CD . . . . . . . . . . . . . . . . . . . . . . . . . . . . . . . . . . . . . . . . . . . . .44
Playing a DVD . . . . . . . . . . . . . . . . . . . . . . . . . . . . . . . . . . . . . . . . . . . .44
Creating CDs and DVDs . . . . . . . . . . . . . . . . . . . . . . . . . . . . . . . . . . . .45
Using the memory card reader . . . . . . . . . . . . . . . . . . . . . . . . . . . . . . . . . .45
Memory card types . . . . . . . . . . . . . . . . . . . . . . . . . . . . . . . . . . . . . . . .46
Inserting a memory card . . . . . . . . . . . . . . . . . . . . . . . . . . . . . . . . . . . .46
Adding and removing a PC Card . . . . . . . . . . . . . . . . . . . . . . . . . . . . . . . .47
Viewing the display on a projector or monitor . . . . . . . . . . . . . . . . . . . . . .49
Viewing the display on a television . . . . . . . . . . . . . . . . . . . . . . . . . . . . . . .51
5 Managing Power . . . . . . . . . . . . . . . . . . . . . . . . . . . . . . . . . . . . . . . . . .55
Monitoring the battery charge . . . . . . . . . . . . . . . . . . . . . . . . . . . . . . . . . . .56
Recharging the battery . . . . . . . . . . . . . . . . . . . . . . . . . . . . . . . . . . . . . . . .57
Recalibrating the battery . . . . . . . . . . . . . . . . . . . . . . . . . . . . . . . . . . . . . . .57
Changing batteries . . . . . . . . . . . . . . . . . . . . . . . . . . . . . . . . . . . . . . . . . . . .59
Replacing the battery . . . . . . . . . . . . . . . . . . . . . . . . . . . . . . . . . . . . . .59
Extending battery life . . . . . . . . . . . . . . . . . . . . . . . . . . . . . . . . . . . . . . . . . .61
Conserving battery power . . . . . . . . . . . . . . . . . . . . . . . . . . . . . . . . . . .61
Using alternate power sources . . . . . . . . . . . . . . . . . . . . . . . . . . . . . . .62
Changing power modes . . . . . . . . . . . . . . . . . . . . . . . . . . . . . . . . . . . .62
6 Upgrading Your Notebook . . . . . . . . . . . . . . . . . . . . . . . . . . . . . . . .65
Preventing static electricity discharge . . . . . . . . . . . . . . . . . . . . . . . . . . . . .66
Adding or replacing memory . . . . . . . . . . . . . . . . . . . . . . . . . . . . . . . . . . . .68
Replacing the hard drive kit . . . . . . . . . . . . . . . . . . . . . . . . . . . . . . . . . . . .70
7 Maintaining Your Notebook . . . . . . . . . . . . . . . . . . . . . . . . . . . . . . .73
Caring for your notebook . . . . . . . . . . . . . . . . . . . . . . . . . . . . . . . . . . . . . . .74
Cleaning your notebook . . . . . . . . . . . . . . . . . . . . . . . . . . . . . . . . . . . . . . . .75
Cleaning the exterior . . . . . . . . . . . . . . . . . . . . . . . . . . . . . . . . . . . . . . .75
Cleaning the keyboard . . . . . . . . . . . . . . . . . . . . . . . . . . . . . . . . . . . . .75
Cleaning the notebook screen . . . . . . . . . . . . . . . . . . . . . . . . . . . . . . .76
Cleaning CDs or DVDs . . . . . . . . . . . . . . . . . . . . . . . . . . . . . . . . . . . . .76
Protecting your computer from viruses . . . . . . . . . . . . . . . . . . . . . . . . . . . .77
Updating Windows . . . . . . . . . . . . . . . . . . . . . . . . . . . . . . . . . . . . . . . . . . . .80
Restoring your system . . . . . . . . . . . . . . . . . . . . . . . . . . . . . . . . . . . . . . . . .80
ii
www.gateway.com
Page 5

8 Troubleshooting. . . . . . . . . . . . . . . . . . . . . . . . . . . . . . . . . . . . . . . . . . 81
Safety guidelines . . . . . . . . . . . . . . . . . . . . . . . . . . . . . . . . . . . . . . . . . . . . 82
First steps . . . . . . . . . . . . . . . . . . . . . . . . . . . . . . . . . . . . . . . . . . . . . . . . . . 83
Troubleshooting . . . . . . . . . . . . . . . . . . . . . . . . . . . . . . . . . . . . . . . . . . . . . 84
Audio . . . . . . . . . . . . . . . . . . . . . . . . . . . . . . . . . . . . . . . . . . . . . . . . . . 84
Battery . . . . . . . . . . . . . . . . . . . . . . . . . . . . . . . . . . . . . . . . . . . . . . . . . 84
CD drives . . . . . . . . . . . . . . . . . . . . . . . . . . . . . . . . . . . . . . . . . . . . . . . 84
Device installation . . . . . . . . . . . . . . . . . . . . . . . . . . . . . . . . . . . . . . . . 84
Display . . . . . . . . . . . . . . . . . . . . . . . . . . . . . . . . . . . . . . . . . . . . . . . . . 85
DVD drives . . . . . . . . . . . . . . . . . . . . . . . . . . . . . . . . . . . . . . . . . . . . . . 86
File management . . . . . . . . . . . . . . . . . . . . . . . . . . . . . . . . . . . . . . . . . 88
Hard drive . . . . . . . . . . . . . . . . . . . . . . . . . . . . . . . . . . . . . . . . . . . . . . 89
Internet . . . . . . . . . . . . . . . . . . . . . . . . . . . . . . . . . . . . . . . . . . . . . . . . . 90
Keyboard . . . . . . . . . . . . . . . . . . . . . . . . . . . . . . . . . . . . . . . . . . . . . . . 91
Memory . . . . . . . . . . . . . . . . . . . . . . . . . . . . . . . . . . . . . . . . . . . . . . . . 92
Memory card reader . . . . . . . . . . . . . . . . . . . . . . . . . . . . . . . . . . . . . . 92
Modem (dial-up) . . . . . . . . . . . . . . . . . . . . . . . . . . . . . . . . . . . . . . . . . . 93
Mouse . . . . . . . . . . . . . . . . . . . . . . . . . . . . . . . . . . . . . . . . . . . . . . . . . . 97
Networks . . . . . . . . . . . . . . . . . . . . . . . . . . . . . . . . . . . . . . . . . . . . . . . 97
Passwords . . . . . . . . . . . . . . . . . . . . . . . . . . . . . . . . . . . . . . . . . . . . . . 97
PC Cards . . . . . . . . . . . . . . . . . . . . . . . . . . . . . . . . . . . . . . . . . . . . . . . 98
Power . . . . . . . . . . . . . . . . . . . . . . . . . . . . . . . . . . . . . . . . . . . . . . . . . . 98
Printer . . . . . . . . . . . . . . . . . . . . . . . . . . . . . . . . . . . . . . . . . . . . . . . . . . 99
Sound . . . . . . . . . . . . . . . . . . . . . . . . . . . . . . . . . . . . . . . . . . . . . . . . . 100
Status indicators . . . . . . . . . . . . . . . . . . . . . . . . . . . . . . . . . . . . . . . . 101
Video . . . . . . . . . . . . . . . . . . . . . . . . . . . . . . . . . . . . . . . . . . . . . . . . . 101
Telephone support . . . . . . . . . . . . . . . . . . . . . . . . . . . . . . . . . . . . . . . . . . 102
Before calling Gateway Customer Care . . . . . . . . . . . . . . . . . . . . . . 102
Telephone numbers . . . . . . . . . . . . . . . . . . . . . . . . . . . . . . . . . . . . . . 103
9 Networking Your Notebook . . . . . . . . . . . . . . . . . . . . . . . . . . . . . . 105
Introduction to networking . . . . . . . . . . . . . . . . . . . . . . . . . . . . . . . . . . . . 106
Using a network . . . . . . . . . . . . . . . . . . . . . . . . . . . . . . . . . . . . . . . . . 106
Using a wireless network . . . . . . . . . . . . . . . . . . . . . . . . . . . . . . . . . . 107
Creating an wireless network . . . . . . . . . . . . . . . . . . . . . . . . . . . . . . . . . . 111
Making sure your broadband connection works . . . . . . . . . . . . . . . . 111
Naming the computers and the workgroup . . . . . . . . . . . . . . . . . . . . 111
Configuring the TCP/IP protocol . . . . . . . . . . . . . . . . . . . . . . . . . . . . 112
Setting up a wireless network . . . . . . . . . . . . . . . . . . . . . . . . . . . . . . 115
Testing your network . . . . . . . . . . . . . . . . . . . . . . . . . . . . . . . . . . . . . . . . 124
Sharing your resources . . . . . . . . . . . . . . . . . . . . . . . . . . . . . . . . . . . . . . 125
Sharing an Internet connection . . . . . . . . . . . . . . . . . . . . . . . . . . . . . 125
www.gateway.com
iii
Page 6

Sharing drives and printers . . . . . . . . . . . . . . . . . . . . . . . . . . . . . . . . .128
Using the network . . . . . . . . . . . . . . . . . . . . . . . . . . . . . . . . . . . . . . . .131
Connecting to hotspots . . . . . . . . . . . . . . . . . . . . . . . . . . . . . . . . . . . .134
Troubleshooting your wireless network . . . . . . . . . . . . . . . . . . . . . . . . . . .135
A Safety, Regulatory, and Legal Information . . . . . . . . . . . . . . .139
Index . . . . . . . . . . . . . . . . . . . . . . . . . . . . . . . . . . . . . . . . . . . . . . . . . . . . . . . 151
iv
www.gateway.com
Page 7

Chapter 1
(FUUJOH)FMQ
■ Using the Gateway W eb site
■ Using Help and Support
■ Using Y our Computer guide
■ Using online help
1
Page 8

Thank y ou for purchasing our
notebook!
You’ve made an excellent decision choosing Gateway. We’re sure that
you’ll be pleased with the outstanding quality, reliability, and
performance of your new notebook. Each and every Gateway notebook
uses the latest technology and passes through the most strin gent qual ity
control tests to ensure that you are provided with the best product
possible.
Your new Gateway notebook is designed to provide an exceptional
balance of performance and portability. Your notebook uses the latest
chipset and mobile processor technologies to manage the processor speed
and power consumption for a greater battery life experience. This design
provides you with maximum performance when plugged into AC power
balanced with optimized battery life when on battery power.
Please read this manual carefully to familiarize yourself with our range
of services and support. We’ve highlighted some basic care and safety
information to help you keep your notebook in good operating
condition.
Gateway stands behind our value proposition to our customers — to
provide best-of-class service and support in addition to high-quality,
brand-name components at affordable prices. If you ever have a problem,
our knowledgeable, dedicated customer service department will provide
you with fast, considerate service.
We sincerely hope that you will receive the utmost satisfaction and
enjoyment from your new Gateway notebook for years to come.
Thanks again, from all of us at Gateway.
2
www.gateway.com
Page 9
Gatewa y W eb site
Gateway’s online support is available 24 hours per day, 7 days per week
and provides the most current drivers, product specifications, tutorials,
and personalized information about your notebook. Visit the Gateway
eSupport Web site at support.gateway.com
.
www.gateway.com
3
Page 10

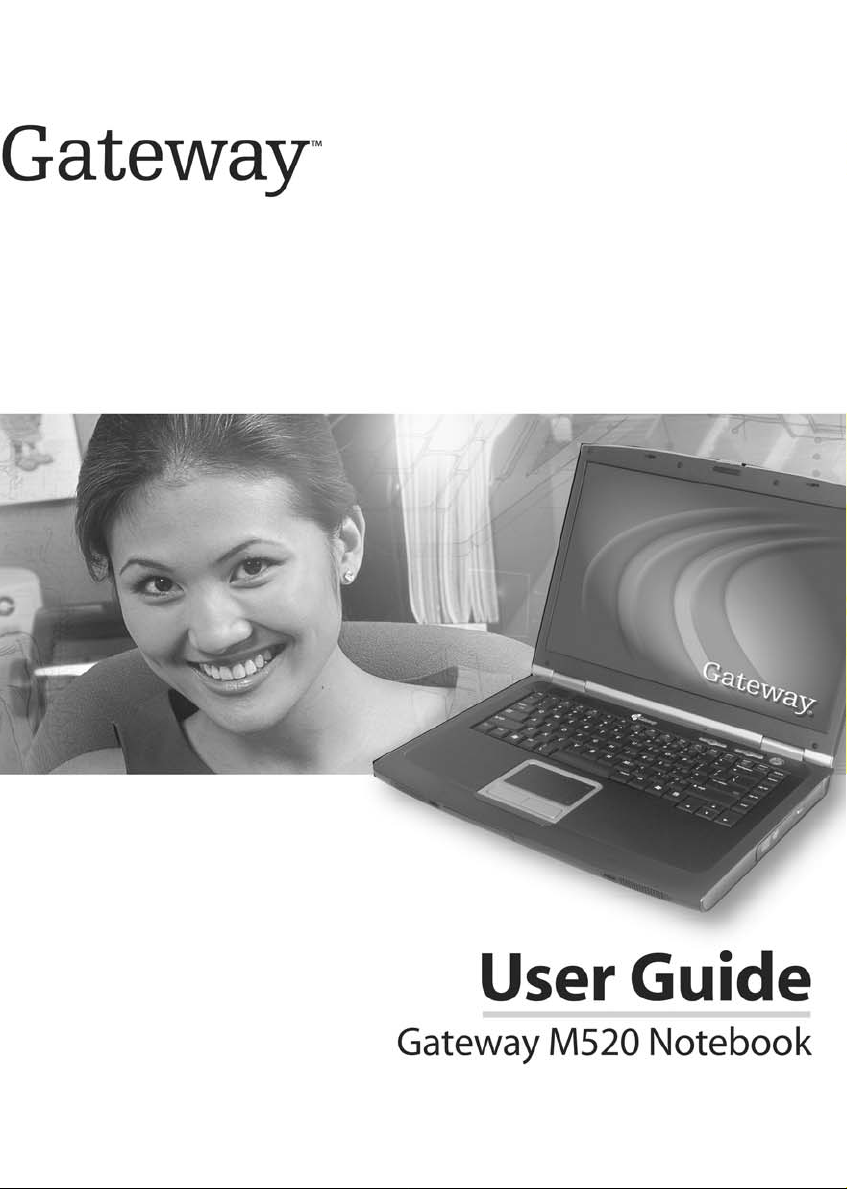
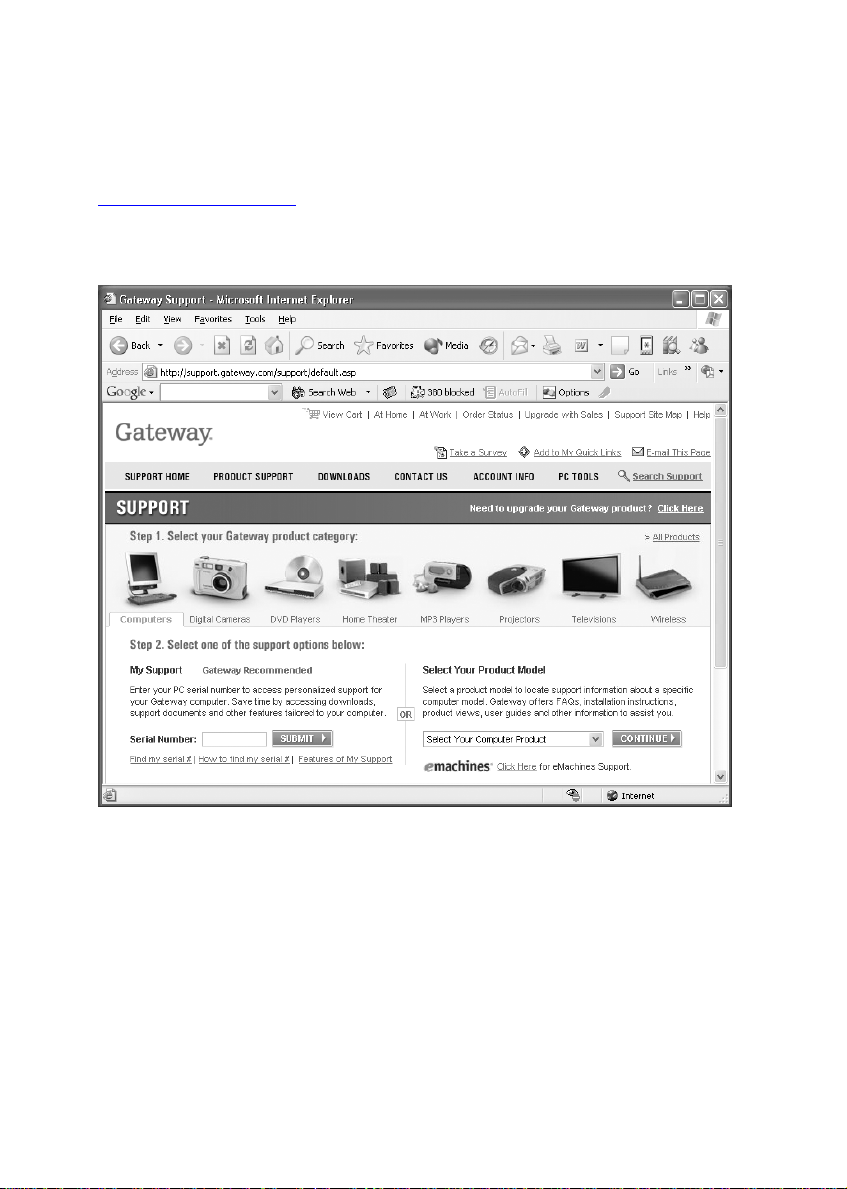
Using eSupport
The eSupport site is divided into six major areas:
■ Support H ome
■ Product Support
■ Downloads
■ Contact Us
■ PC Tools
Support Home
Click Support Home, then click All Support Documents to access product
documentation, specifications, and guides. You can also browse through
the reference area to locate an article spec ific to the question you have.
Click
Support Home, then click General Tutorials to access an extensive
library of how-to articles and videos on topics, such as making audio CDs
and installing a hard drive.
Product Support
Click Product Support to view a list of all the products that Gateway
supports.
Downloads
Click Downloads, then click My Downloads to get the latest software
updates for BIOS and driver upgrades. By entering your serial number you
get drivers specific to your notebook. Click
a step-by-step wizard to locate your drivers.
All Downloads to walk through
Contact Us
Click Contact Us to access links to customer care with a live technician,
including chat and e-mail. Click
numbers for both sales and support. For more information, see
“Telephone support” on page 102.
Call Us to get a list of Gateway telephone
PC T ools
Click PC Tools to access utilities to help you manage your notebook.
4
www.gateway.com
Page 11
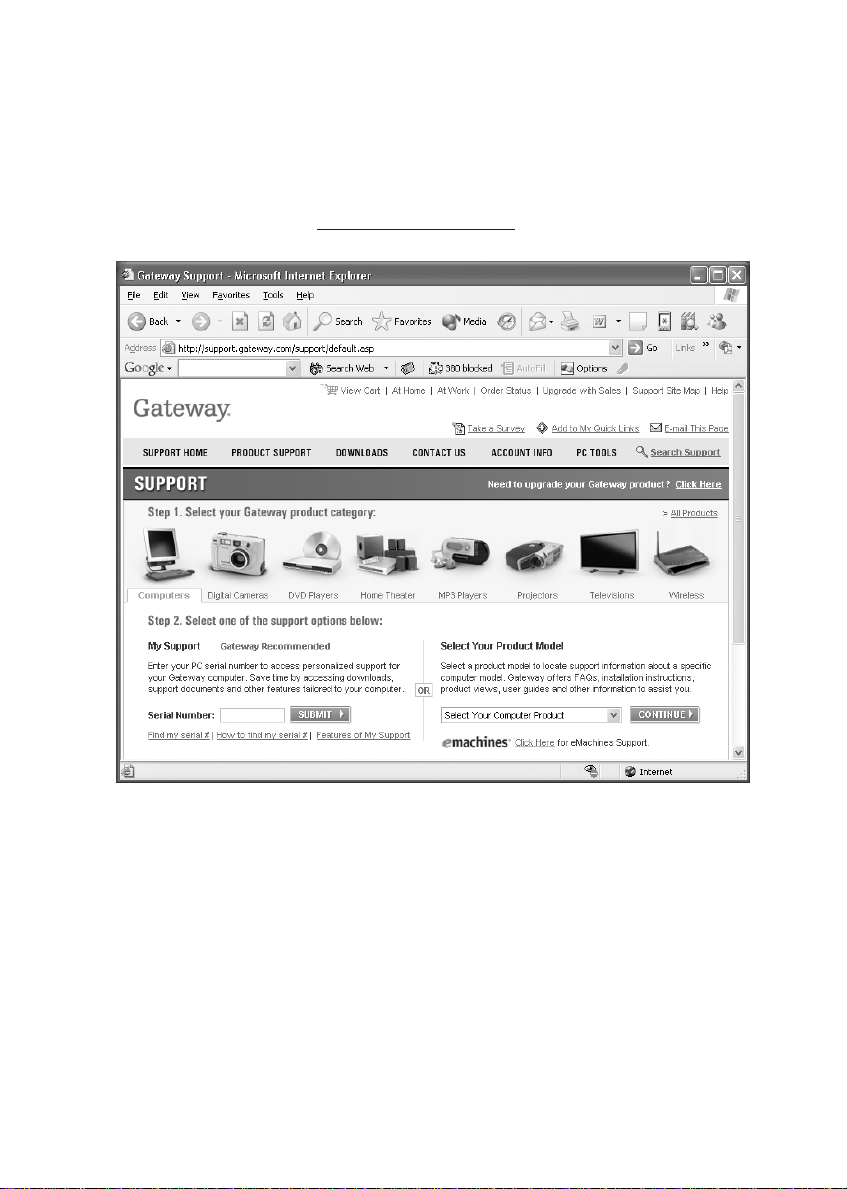
Help and Support
Your notebook includes Help and Support, an easily accessible collection
of help information, troubleshooters, and aut omated supp ort. Use He lp
and Support to answer questions about W indows and to help you quickly
discover and use the many features of your Gateway notebook.
To start Help and Support:
■ Click Start, then click Help and Support. Help and Support opens.
You can find help information by clicking a link, performing a search,
or browsing the index.
www.gateway.com
5
Page 12

Searching for a topic
To search for a topic in Help and Support, type a word o r phrase
(keyword) in the
screen, then click the arrow button.
For each search, you receive the following search result types:
■ Suggested Topics - These topics are located in Help and Support and
are relevant to your search to pic.
■ Full-text Search Matches - These topics are located in Help and
Support and contain the words you entered in the
■ Microsoft Knowledge Base - These topics are located on the Microsoft
Web site and contain the words you entered in the
must be connected to the Internet to search for and access these
topics.
To view a list of your search results, click the results header for the type
of results you want to view.
Search box located at the top of any Help and Support
Search box.
Search box. You
To view a topic, clic k the top ic name in the
Search Results list.
Using Your Computer guide
In addition to this Using Your Notebook guide, the Using Yo ur Computer
guide has been included on your hard drive. This guide includes
information on using Windows, using the Internet, sending a fax, and
changing power-setting settings as well as other topics.
To access the Using Your Computer guide:
Click Start, All Programs, then click Gateway Documentation.
6
www.gateway.com
Page 13
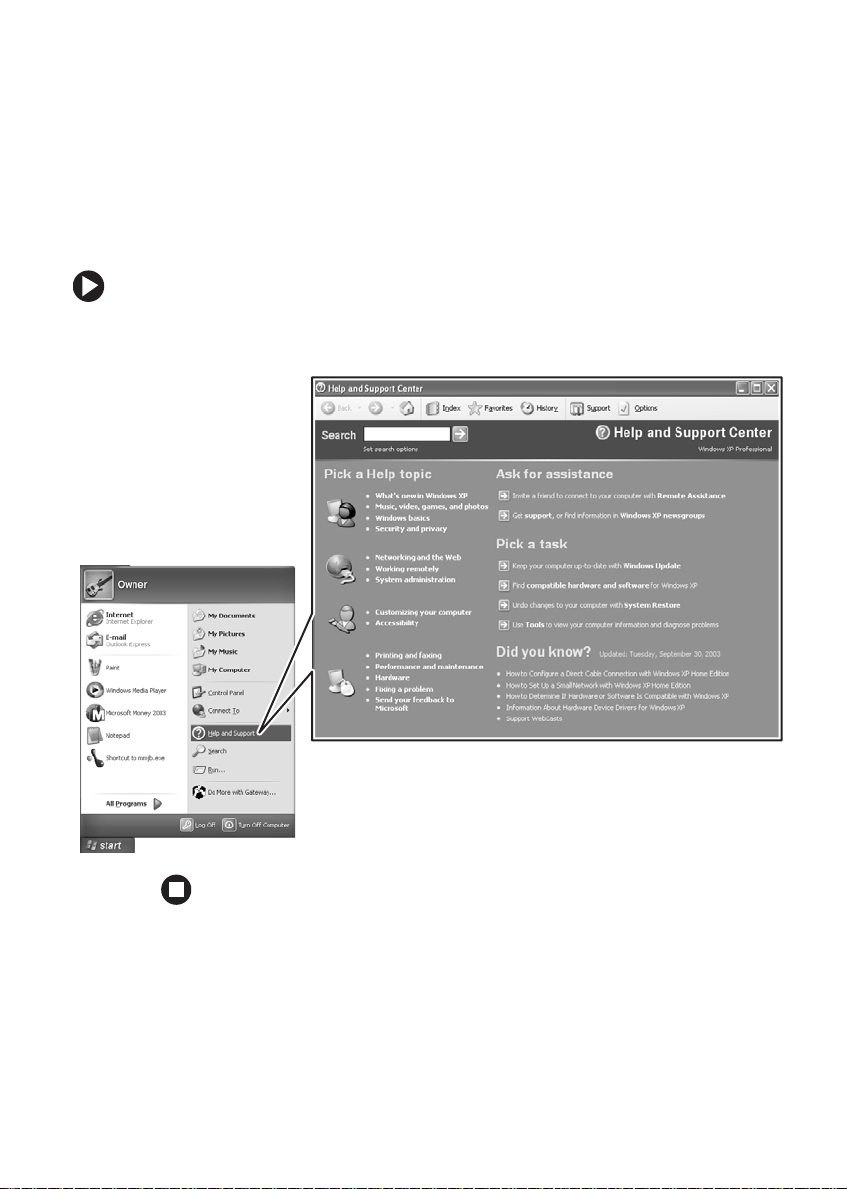
Online help
Many programs provide information online so you can research a topic
or learn how to perform a task while you are using the program. You
can access most online help information by selecting a topic from a
menu or by clicking a
You can search for information by viewi ng the help contents , checking
the index, searching for a topic or keyword, or browsing through the
online help.
Help button.
Help
www.gateway.com
7
Page 14

8
www.gateway.com
Page 15
Chapter 2
$IFDLJOH0VU:PVS
(BUFXBZ /PUFCPPL
■ Identifying features
■ Locating your notebook’ s model and
serial number
■ Locating the Microsoft Certificate of
Authenticity
■ Locating the specifications for your
notebook
■ Purchasing accessorie s
9
Page 16
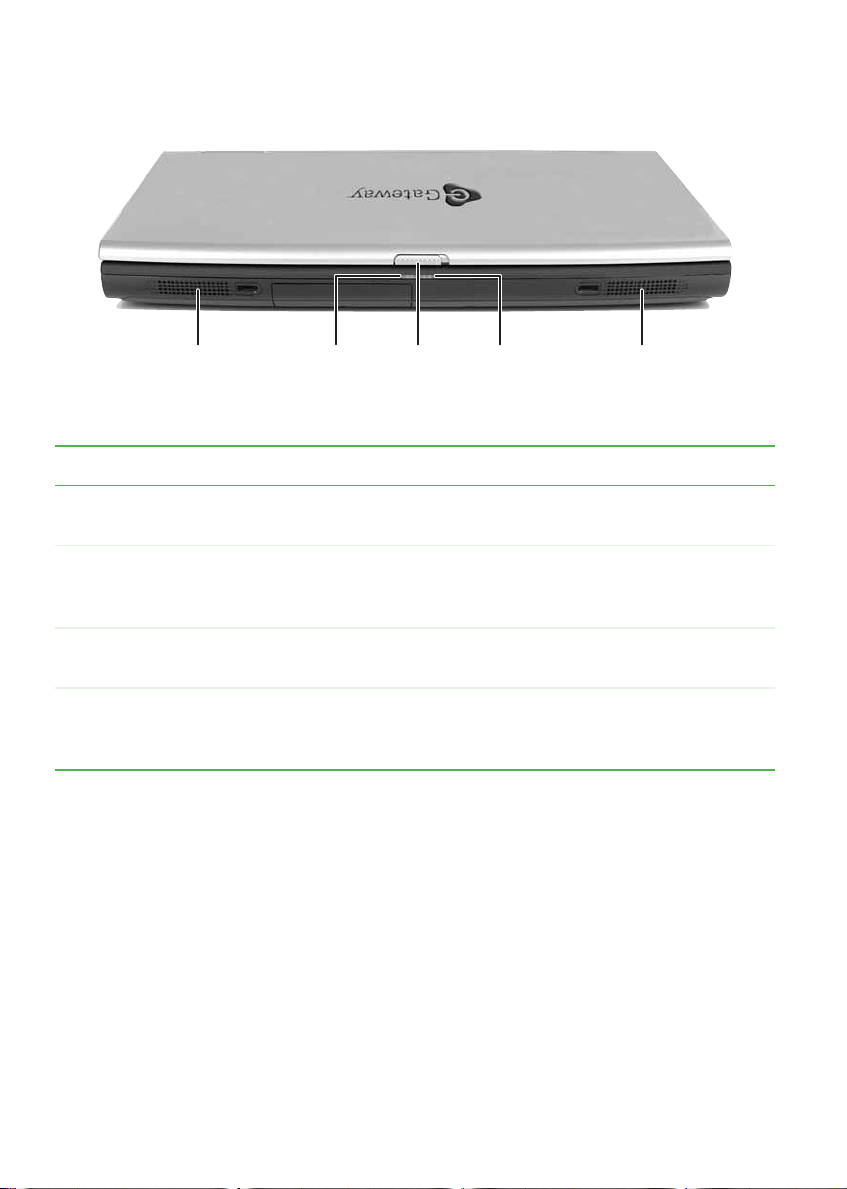
Front
Speaker SpeakerPower
indicator
LCD panel
release
latch
Battery
charge
indicator
Component Description
Speakers Provide audio output when he adphones or ampli fied spea kers are
not plugged in.
■
Power indicator
LCD panel release
latch
Battery charge
indicator
LED on - notebook is on.
■
LED blinking - notebook is in Standby mode.
■
LED off - not ebook is off .
Open the LCD panel by sliding the release latch.
■
LED on - battery is charging.
■
LED blinking - battery charge is very low.
■
LED off - bat tery is fu lly char ged.
10
www.gateway.com
Page 17
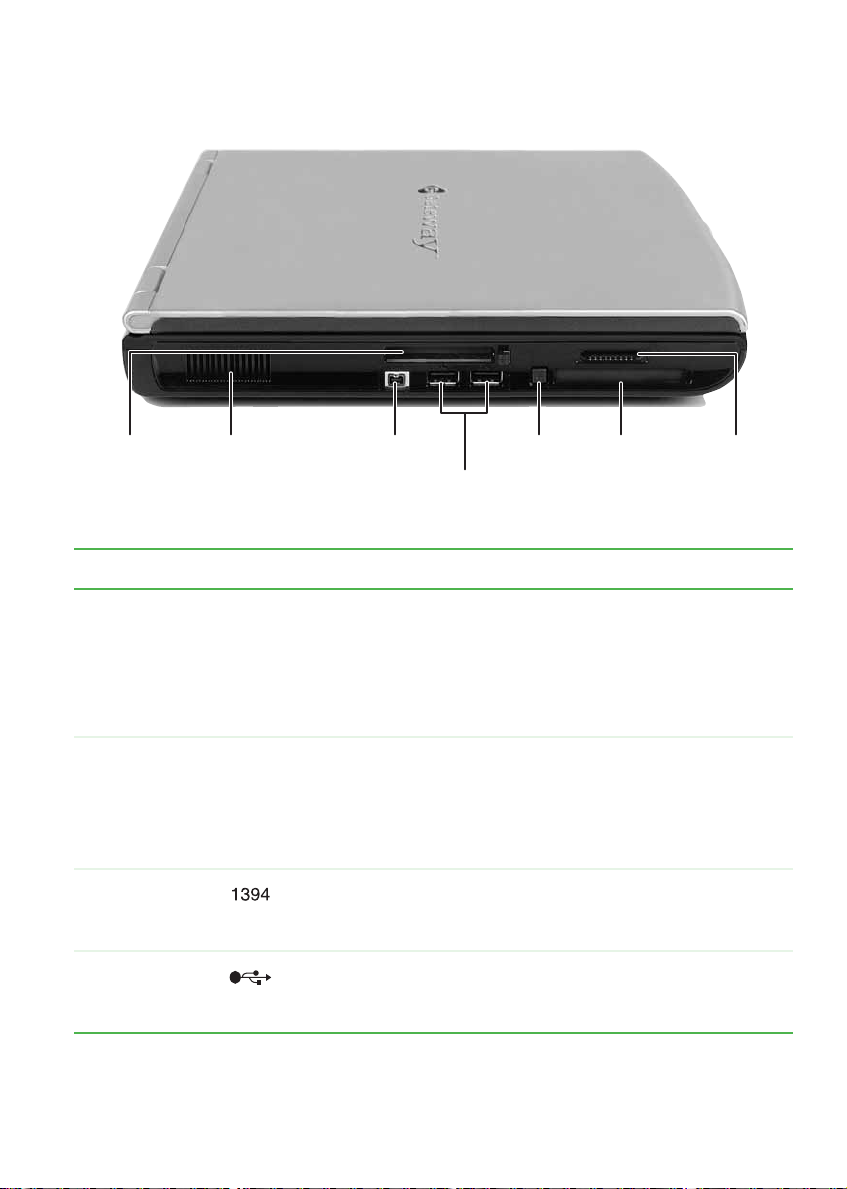
Left side
Memory
card
reader
Ventilation
fan
IEEE 1394
port
USB
ports
PC Card
eject button
PC Card
slot
Memory
card
reader
Component Icon Description
Memory card
reader
(optional)
Ventilation fan Helps cool internal components.
IEEE 1394 port
(optional)
USB ports Plug USB devices (such as a diskette drive, flash drive,
Insert a memory card from a digital camera, MP3 player, PDA,
or cellular telephone into the optional memory card reader.
For more information, see “Using the memory card reader”
on page 45. The memory card reader supports
CompactFlash
MultiMediaCard™, and Secure Digital™ cards.
Caution: Do not block or insert objects into these slots. If
these slots are blocked, your notebook may overheat
resulting in unexpected shutdown or permanent damage to
the notebook.
Plug an IEEE 1394 (also known as Firewire
device (such as a digital camcorder) into this optional 4-pin
IEEE 1394 port.
printer, scanner, camera, keyboard, or mouse) into these
ports.
®
, IBM Microdrive™, Memory Stick®,
®
or i.Link®)
www.gateway.com
11
Page 18
Component Icon Description
PC Card eject
button
PC Card slot Insert one Typ e II PC Card into this slot. For mo re information,
Press the eject button to rem ove a PC Card from the PC Card
slot. For more information, see “Adding and removing a
PC Card” on page47.
see “Adding and removing a PC Card” on page 47.
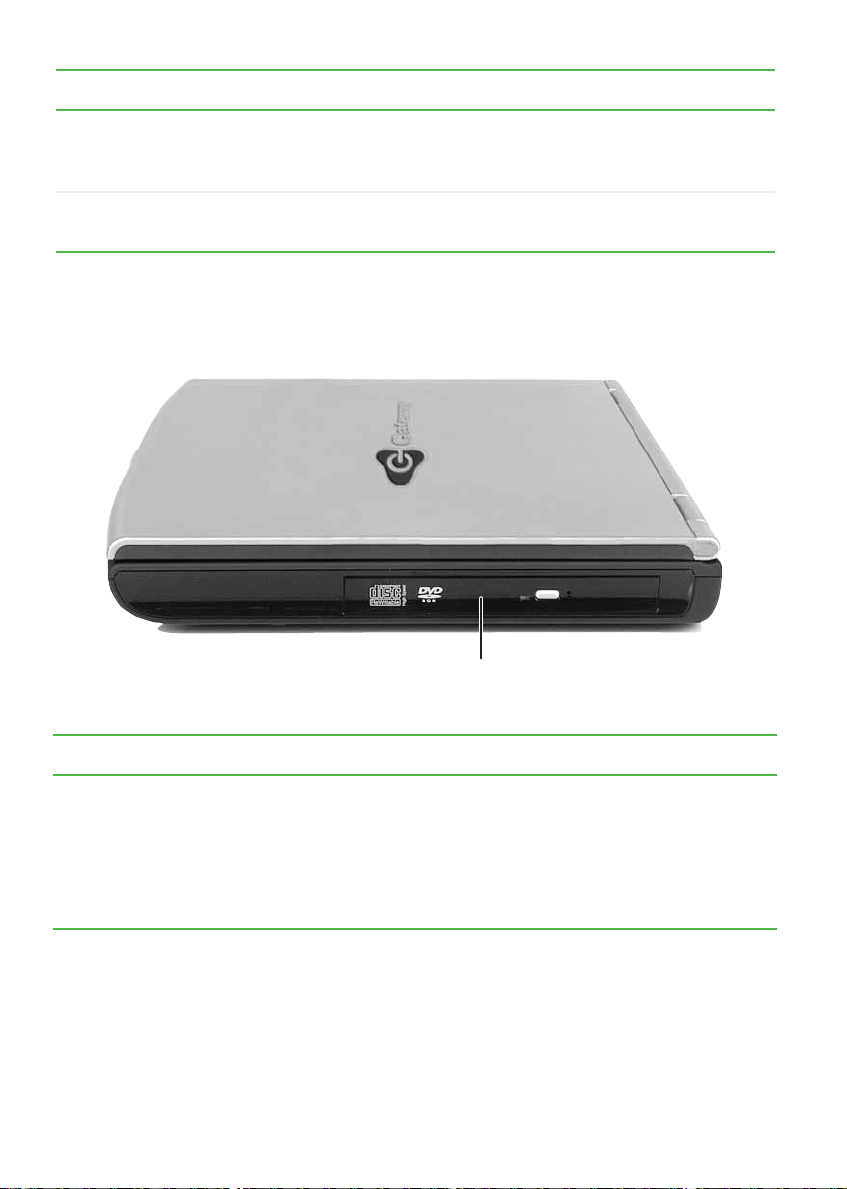
Right side
DVD/CD-RW or
DVD-RW drive
Component Description
DVD/CD-RW
or DVD-RW
drive
Insert CDs or DVDs into this drive. For more information, see “Using
the DVD drive” on page 42.
This drive may be a combination DVD/CD-RW or DVD-RW drive. To
determine the type of drive in the notebook, examine the drive tray’s
plastic cover and compare the logo to those listed in “Identifying drive
types” on page 42.
12
www.gateway.com
Page 19
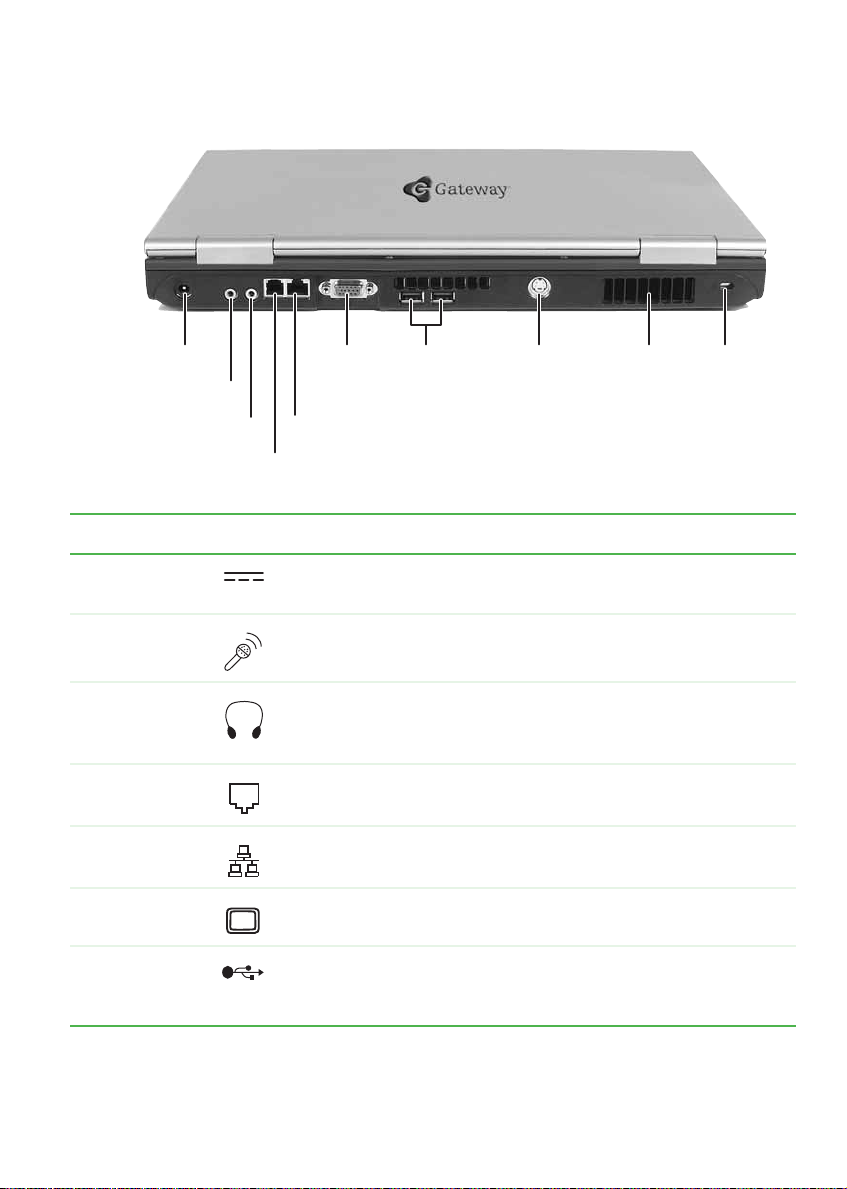
Back
Power connector
Microphone jack
Headphone jack
Modem jack
Monitor
port
Ethernet j ack
USB
ports
S-Video
out jack
Ventilation
fan
Component Icon Description
Power
connector
Microphone
jack
Headphone
jack
Modem jack Plug a modem cable into this jack.
Ethernet jack Plug a 10/100 Ethernet network cable into this jack.
Monitor port Plug an analog VGA monitor into this port.
Plug the AC adapter cable into this connector.
Plug a microphone into this jack.
Plug amplified speakers or headphones into this jack. The
built-in speakers a re turned of f when speakers or he adphon es
are plugged into this jack.
Kensington
lock slot
USB ports Plug USB devices (such as a diskett e drive, flash drive, prin ter ,
scanner, camera, keyboard, or mouse) into these ports.
www.gateway.com
13
Page 20

Component Icon Description
S-Video out
jack (optional)
Ventilation fan Helps cool internal components.
Kensington™
lock slot
Plug a standard S-Video cable into this jack. For more
information, see “Viewing the display on a television” on
page 51.
Caution: Do not block or in sert objects into thes e slots. If these
slots are blocked, your notebook may overheat resulting in
unexpected shutdown or permanent damage to the notebook.
Secure your notebook to an object by connecting a Ken sington
cable lock to this slot.
14
www.gateway.com
Page 21
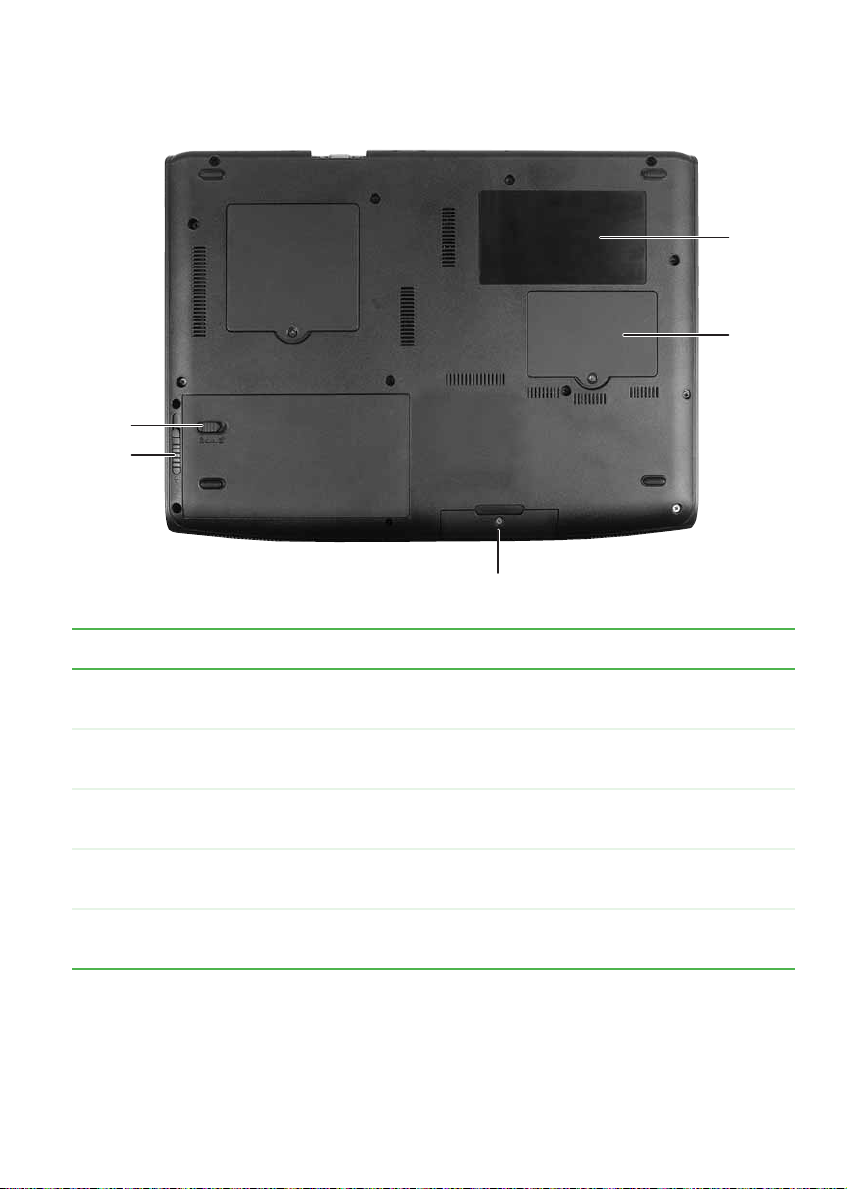
Bottom
Battery
lock
Battery
latch
Component Description
System
label
Memory
bay
Hard drive bay
Battery lock Slide to unlock the battery. For more information, see “Changing
batteries” on page 59.
Battery latch Slide to release the battery. For more information, see “Changing
batteries” on page 59.
Hard drive bay The hard drive is located in this bay. For more information, see
“Replacing the hard drive kit” on page 70.
Memory bay Install a mem ory modul e into this ba y. For more informati on, see
“Adding or replacing memory” on page 68.
System label Includes the product model number. For more information, see
“Identifying your model” on page 17.
www.gateway.com
15
Page 22
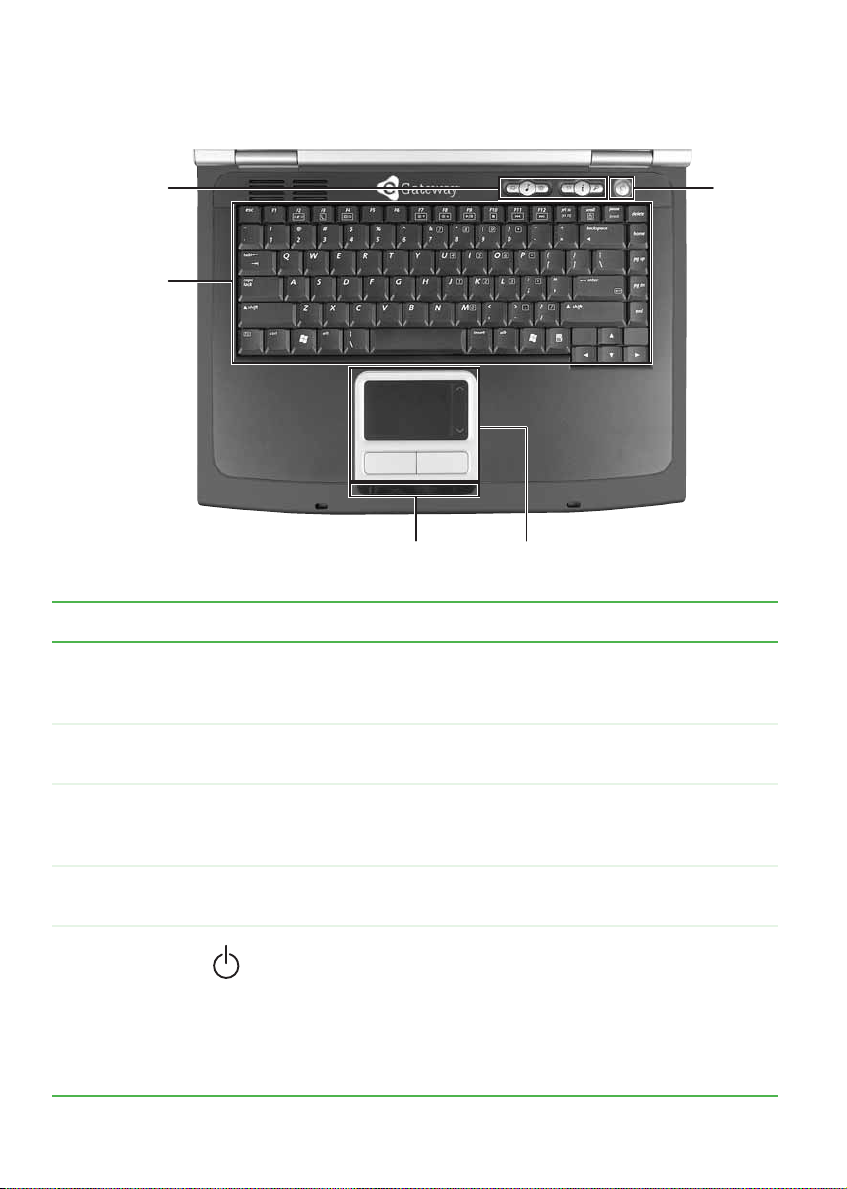
Ke yboard area
Multi-function
buttons
Keyboard
Status indicators
Touchpad
Power
button
Component Icon Description
Multi-function
buttons
Keyboard Provides all the featur es of a full-sized, 86-key ke yb oard . For
Press these buttons to open programs assigned to them or
control the volume. For more information, see “Multi-function
buttons” on page 34.
more information, see “Using the keyboard” on page 30.
Status
indicators
T ouchpad Provides all the functi onality of a mouse. For more i nformation,
Power button Press to turn the power on or off. You can also configure the
16
Inform you when a drive is in use or when a button has been
pressed that affects how the keyboard is used. For more
informatio n, see “Status indicators” on page 29.
see “Using the EZ Pad touchpad” on page 36.
power button for Standby/Resume mode. For more
information on configuring the power button mode, see
“Changing P ower-sa ving Sett ings” in Using Your Comput er
which has been included on your hard drive. To access this
guide, click Start, All Programs, then click Gateway
Documentation.
www.gateway.com
Page 23
Identifying your model
Important The labels shown in this section are for
informational purposes only. Label information
varies by model, features ordered, and location.
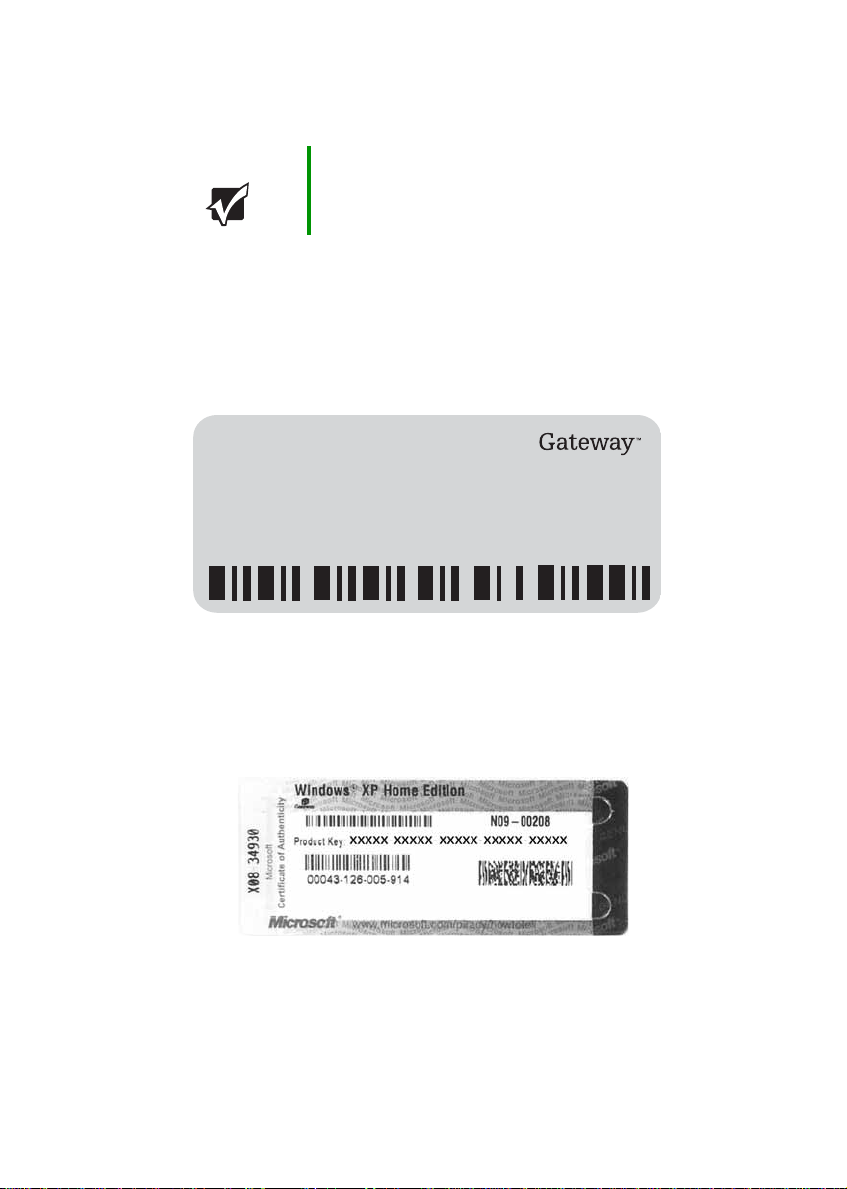
Gatewa y model and serial number
The label on the bottom of your notebook contains information that
identifies your notebook model and its features. Gateway Customer Care
will need this information if you call for assistance.
Website: www.gateway.com
Online Support: www.gateway.com/support
Tech Support Phone:
Hours:
Model:
S/No:
Microsoft Certificate of Authenticity
The Microsoft Certificate of Authenticity label found on the bottom of
your notebook includes the product key code for your operating system.
www.gateway.com
17
Page 24
Finding y our specifications
For more information about your notebook, such as memory size,
memory type, and hard drive size, visit Gateway’s eSupport page at
support.gateway.com
Gateway documentation and detailed specifications. For more
information, see “Using eSupport” on page 4.
. The eSupport page also has links to additional
18
www.gateway.com
Page 25

Accessories
T o order accessories, visit the Accessory Store at accessories.gateway.com.
Batteries and automobile/airplane power adapters
If you run your notebook on battery power for extended periods, you
may want to buy an additional battery so you can swap batteries when
necessary. See “Changing batteries” on page 59 for m ore information
about using an additional battery.
With an automobile/airplane power adapter, you can save battery power
by plugging your notebook into an automobile cigarette lighter or an
airplane in-flight power receptacle.
Carrying cases
Gateway has large-capacity c arrying cases if you need addi tional space
for accessories or supplies.
Memory
Large programs, such as multimedia game s or graphics pr ograms, use a
lot of memory . If your programs are running more slowly than you think
they should, try adding more memory. See “Adding or replacing
memory” on page 68 for more information.
Printers
You can attach almost any type of printer to your notebook. The most
common types are inkjet and laser printers, which print in color or black
and white.
Inkjet printers and cartridges are relatively inexpensive, but they are
slower than laser printers. Using an inkjet color printer, you can print
pictures, banners, and greeting cards, as well as documents.
Laser printers and cartridges are more expensive, but they print much
faster than inkjet printers. Laser printers are better than inkjet printers
when you are printing large documents.
USB flash drive
Use a USB flash drive for storing files or transferring files to another
computer.
www.gateway.com
19
Page 26

20
www.gateway.com
Page 27
Chapter 3
(FUUJOH4UBSUFE
■ Installing the battery
■ Connecting the AC adapter
■ T urning your notebook on and off
■ Using the status indicators, keyboard,
and the EZ Pad touchpad
■ Adjusting the volume
21
Page 28
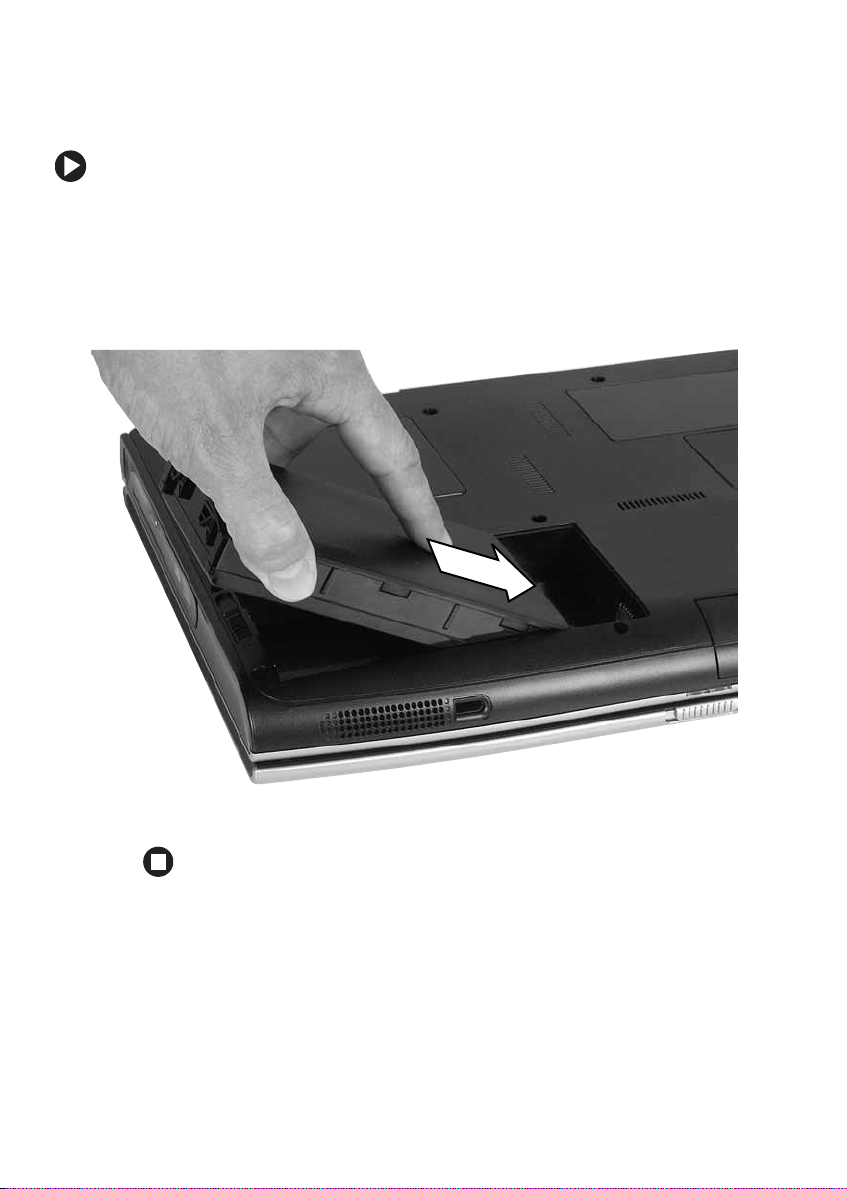
Installing the battery
To install the battery:
1 Close the LCD panel.
2 Turn your notebook over so the bottom is facing up.
3 Hold the battery label-side down and slide it into the open battery
compartment until the battery clicks into place.
4 Slide the battery lock to the locked position.
22
www.gateway.com
Page 29
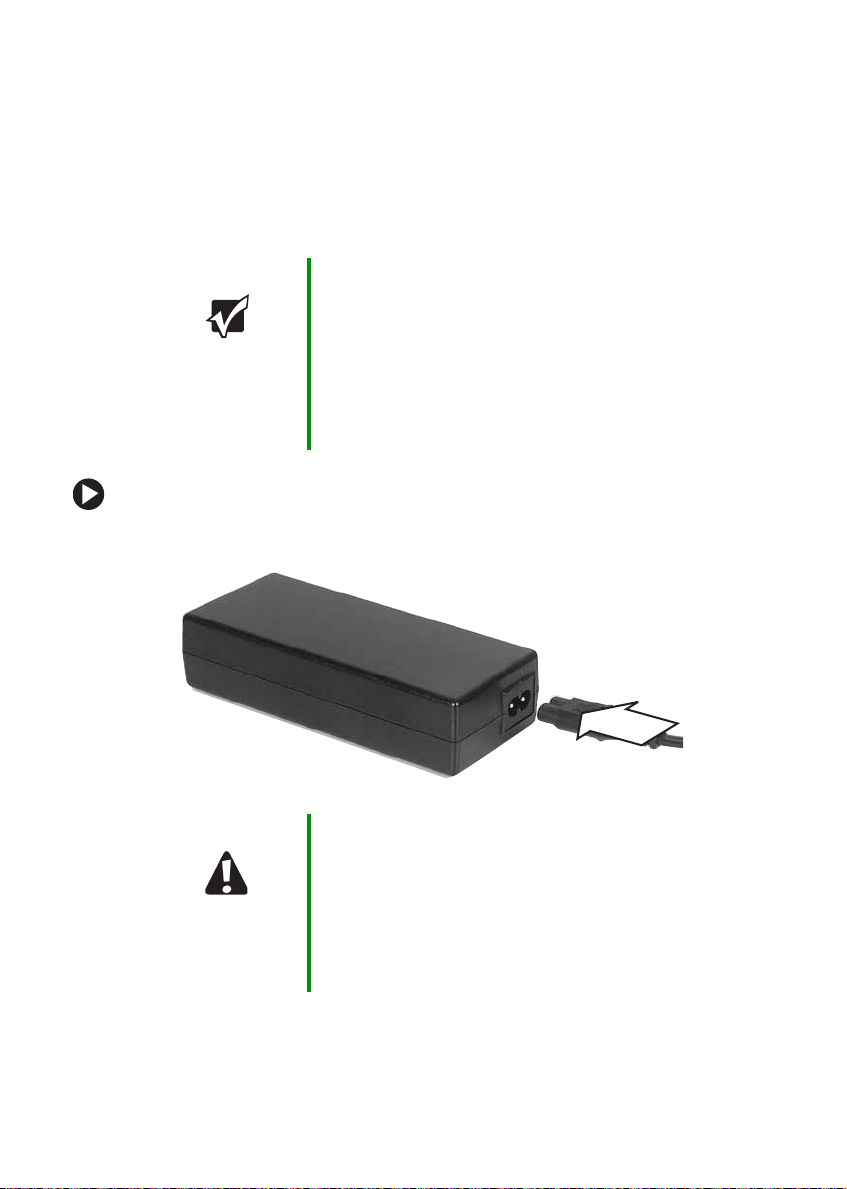
Connecting the A Cadapter
You can run your notebook using an AC adapter or your notebook’s
battery . The battery was shipped to you partially charged. You should use
the AC adapter right away to fully charge the battery. Allow three hours
for the battery to fully charge.
Important If the battery is not fully charged before you use
your notebook on battery power for the first time,
the battery life may be much shorter than you
expect. If the battery life seems short even after
being charged for threehours, the battery may
need to be recalibrated. For information on
recalibrating the battery, see “Recalibrating the
battery” on page 57.
To connect the AC adapter:
1 Connect the power cord to the AC adapter.
Caution Make sure that you use the AC adapter that came
with your notebook or one of the same type
purchased from Gateway.
Replace the power cord if it becomes damaged.
The replacement cord must be of the same type
and voltage rating as the original cord or your
notebook may be damaged.
www.gateway.com
23
Page 30
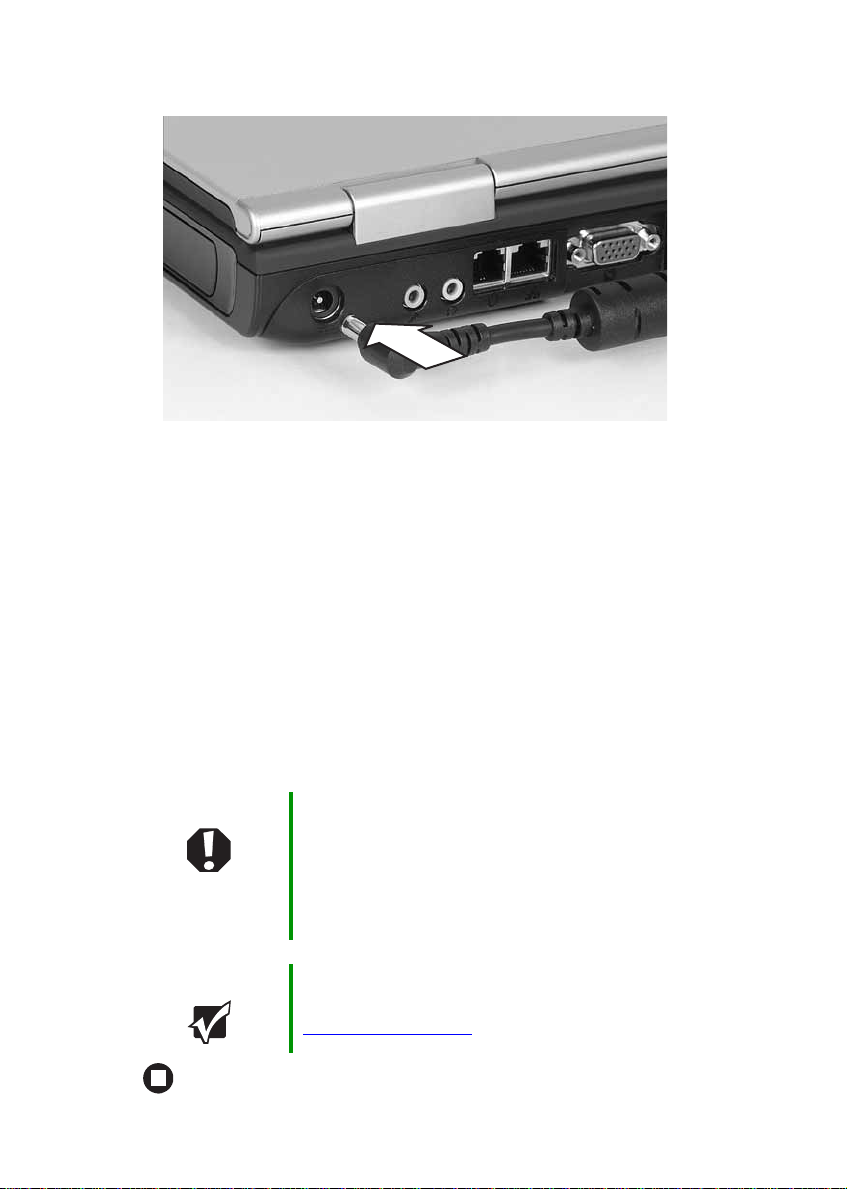
2 Connect the AC adapter to your notebook’s power connector.
3 Plug the power cord into a wall outlet.
The battery charge indicator turns on (see “Front” on p age 10 for
the location of the battery charge indicator).
If the battery charge indicator does not turn on, complete the
following steps until it turns on:
a Unplug the adapter from your notebook, then plug it back in.
b Press FN+F1 to toggle the status lights on and off.
4 When you finish using your notebook fo r the first time, turn off your
notebook and leave your notebook connected to AC power until the
battery charge indicator turns off.
Warning D o not attempt to disassemble the AC adapter . The
AC adapter has no user-replaceable or
user-serviceable pa rts i nside . The ACadapter has
dangerous voltages that can cause serious injury
or death. Contact Gateway about returning
defective AC adapters.
Important If the battery charge indicator does no t turn off af ter
three hours, contact Gateway Customer Care at
.
24
support.gateway.com
www.gateway.com
Page 31

Protecting from pow er source pr oblems
During a power surge, the voltage level of electricity coming into your
notebook can increase to far above normal levels and cause data loss or
system damage. Protect your notebook and peripheral devices by
connecting them to a surge protec tor, which absorbs voltage surges and
prevents them from reaching your notebook.
Warning High voltages can enter your notebook through
both the power cord and the modem connection.
To protect your notebook and avoid electrical
shock, use a surge protector. If you have a
telephone modem, use a surge protector that has
a modem jack. If you have a cable modem, use a
surge protector that has an antenna/ cable TV jack.
During an electrical storm, unplug both the surge
protector and the modem.
www.gateway.com
25
Page 32

Starting your notebook
To start your notebook:
1 Slide the latch on the front of your notebook, then lift the LCD
panel.
2 Press the power button located above the keyboard.
The power button is preset to On/Off mode. However, you can also
set it to function in Standby/Resume mode.
Tips & Tricks For more information about changing the power
button mode, see “Changing Power-saving
Settings” in Using Your Computer which has been
included on your hard drive. To access this guide,
click Start, All Programs, then click Gateway
Documentation.
3 If you are starting your notebook for the first time, follow the
on-screen instructions to set up your notebook.
26
www.gateway.com
Page 33

W aking up your noteboo k
When you have not used your notebook for several minutes or if you
close the LCD panel without turning off your notebook, it may enter a
power-saving mode called Standby. While in Standby , the power indicator
flashes.
If your notebook is in Standby mode, press the power button to “wake”
it up.
Tips & Tricks For more information about changing the power
button mode, see “Changing Power-saving
Settings” in Using Your Computer which has been
included on your hard drive. To access this guide,
click Start, All Programs, then click Gateway
Documentation.
T urning off your notebook
To turn off your notebook:
1 Click Start, then click T urn Off Compute r . The Turn Off Computer dialog
box opens.
2 Click Tu r n O f f . Windows shuts down and turns off your notebook.
Important If for some reason you cannot use the Turn Off
Computer option in Windows to turn off your
notebook, press and hold the power button for
about five seconds, then release it.
www.gateway.com
27
Page 34

Restarting (rebooting) your notebook
If your notebook does not respond to keyboard or touchpad input, you
may have to close programs that are not respon ding. If closing
unresponsive programs does not restore your notebook to normal
operation, you may have to restart (reboot) your notebook.
To close unresponsive programs and restart your notebook:
1 Press CTRL+ALT+DEL. The Wi nd ow s S ec uri ty dialog box opens.
2 Click 7DVN0DQDJHU. The Windows Task Manager dialog box opens.
3 Click the program that is not responding.
4 Click End Task.
5 Click Xin the top-right corner of the Windows Task Manager dialog
box.
6 If your notebook does not respond, turn it off, wait ten seconds, then
turn it on again.
28
Important If your no tebook d oes not tur n off immedi ately,
complete the following steps until the notebook
turns off:
1 Press and hold the power button for about
five seconds, then release it.
2 Unplug the power cord and remove the battery
for more than 10 seconds.
As a part of the regular startup process, a program to check the disk
status runs automatically. When the checks are finished, Windows
starts.
www.gateway.com
Page 35

Status indicato rs
A
Status indicators inform you when a drive is being used or when a button
has been pressed that affects how the keyboard is used.
Hard driveAC power
Num lockWireless network
Caps lock
Indicator Icon Description
AC power
Wireless Ethernet
(optional)
Caps lock
Num lock
Hard drive
■
LED on - AC power is connected.
■
LED off - AC po wer is no t connect ed.
■
LED on - wireless network is turned on.
■
LED off - wireless network is turned off.
■
LED on - caps lock is turned on.
■
LED off - caps lock is turned off.
■
LED on - Nume ric keypad is turned on.
■
1
LED off - Numeric keypad is turned off.
■
LED blinking - The hard drive is in use.
■
LED off - The hard driv e is not i n use.
Important If none of the indicators are on, you may need to
press FN+F1 to toggle the status lights on and off.
www.gateway.com
29
Page 36

Using the ke yboard
Your no tebook features a full-size keyboard that functions the same as a
desktop computer keyboard. Many of the keys have been assigned
alternate functions, including shortcut keys for Windows, function keys
for specific system operations, and th e Num Lock keys for the n umeric
keypad.
You can attach an external keyboard to the notebook using a USB port.
You do not need to shut down the notebook to connect a USB keyboard.
Function key s/System keys
FN key Windows
key
Numeric
keypad
Application
key
Navigation ke ys
Arrow keys
30
www.gateway.com
Page 37

Key types
The keyboard has several different types of keys. Some keys perform
specific actions when pressed alone and other actions when pressed in
combination with an other key.
Key type Icon Description
Function keys Press these keys labeled F1 to F12 to perform actions
in program s. Fo r e x am pl e, p res si n g
Each program uses different function keys for different
purposes. See the program documentation to find out
more about the function key actions.
F1 may open help.
System keys Press these color ed keys in combina tion with the
to perform specific actions. For more information, see
“System key combinations” on page 32.
Navigation keys Press these keys to move the cursor to the beginning
of a line, to the end of a l ine, up the pag e, down the page,
to the beginning of a document, or to the end of a
document.
FN key
FN key Press the FN key in combinati on w ith a colo red sy stem
key to perform a specific action.
Windows key Press this key to open the Windows Start menu. This
key can also be used in combination with other keys to
open utilities like
F (Search utility), R(Run utility), and
E (Explorer utility).
Numeric keypad Use these keys to type numbers when the numeric
keypad is turned on. Press
the numeric keypad.
Application key Press this key for quick access to shortcut menus and
help assistants in Windows.
Arrow keys Press these keys to move the cursor up , down , right, or
left.
FN+NUM LOCK to turn on
www.gateway.com
31
Page 38

System k ey combinations
When you press the FN key and a system key at the same time, your
notebook performs the action identified by the colored text or icon on
the key.
Press and hold F
N, then
press this system key...
To...
Toggle the status indicators on or off. For more
information, see “Status indicators” on page 29.
Turn the optional wireless network on or off. For more
information, see “Networking Your Notebook” on
page 105.
Warning: Radio frequency wir eless communication can
interfere with equipment on c ommer cial ai rcraft. Curre nt
aviation regulations require wireless devices to be turned
off while traveling in an airplane. 802.11G (also known
as wireless Ethernet o r Wifi) comm unication device s are
examples of devices that provide wireless
communication.
Important: Your notebook came to you with the optiona l
wireless network turn off.
Enter Standby mode. Press the power button to leave
Standby mode. For more information, see “Changing
Power-saving Settings” in Using Your Computer which
has been included on your hard drive. To access this
guide, click Start, All Programs, then click Gateway
Documentation.
32
Toggle the notebook display in the following order:
■
The LCD
■
An external monitor or projector (a monitor or projector
must be plugged into the monitor port on your
notebook)
■
Both displays at the same time
■
S-Video (optional)
For more information, see “Viewing the display on a
projector or monitor” on page 49.
www.gateway.com
Page 39

Press and hold FN, then
press this system key...
To...
Decrease the brightness of the display.
Increase the brightness of the display.
Play or Pause the CD or DVD.
Stop playing the CD or DVD.
Skip back one CD or DVD song or track.
Skip ahead one CD or DVD song or track.
Turn on Num Lock so you can use th e numeric keypad.
Press this key combination again to turn off Num Lock.
The Num Lock status indicator appears when this
function is turned on.
www.gateway.com
33
Page 40

Multi-function buttons
Press the multi-function buttons to open the programs associated with
them.
Music player
Vol u me d o w n
Button Icon Press to...
Volume down Turn the volume down.
Vol u me u p
Press the V olum e Up and Volume Down buttons at the same
time to mute or un-mute the sound.
E-mail
Internet
Search
Music player Open your default music player.
Volume up Turn the volu me up.
Press the V olum e Up and Volume Down buttons at the same
time to mute or un-mute the sound.
E-mail Open your default e-mail program.
34
www.gateway.com
Page 41

Button Icon Press to...
Internet Open your default Web browser.
Search Open the Search Res ults window . For mo re in form ati on , see
“Searching for files” in Usi ng Your Computer which has been
included on yo ur hard dr ive. To access this gu ide, c lick Start,
All Programs, then click Gateway Documentation.
www.gateway.com
35
Page 42

Using the EZPad touchpad
The EZ Pad™ consists of a touchpad, two buttons, and a scroll zone.
Touchpad
Left button Right button
When you move your finger on the touchpad, the pointer (arrow) on the
screen moves in the same direction.
Scroll
zone
36
www.gateway.com
Page 43

Y ou can use the EZ -Pad left and right buttons below the touchpad to select
objects.
Tips & Tricks For instructions on how to adjust the double-click
speed, pointer speed, right-hand or left-hand
configuration, and other touchpad settings, see
“Changing the mouse or touchpad settings” in
Using Your Computer which has b een included on
your hard drive. To access this guide, click Start,
All Programs, then click Gateway
Documentation.
Using the touchpad
To... Do this...
Move the pointer on
the screen.
Select an object on
the screen.
Start a program or
open a file or folder.
Move your finger
around on the
touchpad. If you run
out of space and
need to move the
pointer farther, lift
your finger , move it to
the middle of the
touchpad, then
continue moving your
finger.
Position t he pointer
over the ob ject.
Quickly press a nd
release th e left
button once. This
action is called
clicking.
Position t he pointer
over the ob ject.
Press the left button
twice in rap id
succession. T his
action is called
double-clicking.
www.gateway.com
37
Page 44

To... Do this...
Access a shortcut
menu or find more
information about
an object on the
screen.
Move an object on
the screen.
Position t he pointer
over the ob ject.
Quickly press a nd
release th e right
button once. This
action is called
right-clicking.
Position t he pointer
over the ob ject.
Press the left button
and hold it down,
then use the
touchpad to move
(drag) the object to
the appropriate part
of the scre en.
Release the button to
drop the object
where you want it.
38
www.gateway.com
Page 45

Adjusting the v olume
You can use the volume controls to adjust the overall volume and the
volume of specific sound devices in your notebook.
To adjust the overall volume level using hardware controls:
■ If you are using external speakers, turn the knob on the front of the
speakers.
-ORUse the mute and volume control buttons on the keyboard. For more
information, see “Multi-function buttons” on page 34.
Tips & Tricks For instructions on how to adjust the volume in
Windows, see “Adjus ting the V olume” in Usin g Your
Computer which has been included on your hard
drive. To access this guide, click Start,
All Programs, then click Gateway
Documentation.
www.gateway.com
39
Page 46

40
www.gateway.com
Page 47

Chapter 4
6TJOH%SJWFTBOE1PSUT
■ Using DVD drives
■ Using the media card reader
■ Using a PC Card
■ Viewing the display on a monitor ,
projector, or television
41
Page 48

Using the D VD drive
Y ou can use your notebook to enjoy a wide variety of multimedia features.
Identifying drive types
Your Gateway notebook may contain one of the follo wing drive types.
Look on the front of the drive for one or mo re of the following logos:
If your drive has this logo... This is your drive type... Use your drive for...
Combination
DVD/CD-RW drive
DVD-RW Drive
Tips & Tricks For more information, see “Creating CDs and
DVDs” on page 45.
Installing programs,
playing audio CDs,
playing DVDs, accessing
data, and record ing music
and data to CD-R or
CD-RW discs.
You cannot us e th is dr i ve
to create DVDs.
Installing programs,
playing audio CDs,
playing DVDs, accessing
data, recording mus ic and
data to CD-R or CD-RW
discs, and recording v ideo
and data to DVD-RAM,
DVD-R, or DVD-RW discs.
42
www.gateway.com
Page 49

Inserting a CD or DVD
Activity
indicator
Important Some music CDs have copy protection software.
You may not be able to play these CDs on your
notebook.
Eject
button
Manual
eject hole
To insert a CD or DVD:
1 Press the eject button on the DVD drive. After the tray opens slightly ,
pull the disc tray completely open.
2 Place the disc in the tray with the label facing up, then press down
carefully on the disc unt il it snaps into place.
Important When you place a single-sided disc in the tray,
make sure that the la bel side is facing u p. If the disc
has two playable side s, place the di sc so the name
of the side you want to play is facing up.
3 Push the tray in until it is closed.
www.gateway.com
43
Page 50

Playing a CD
Use the music program or Windows Media Playe r on your computer to:
■ Play music CDs
■ Create MP3 music files from your music CDs
■ Edit music track information
■ Use your music files to b uild a music librar y
■ Listen to Internet Radio
Tips & Tricks For more information about playing CDs, see
“Playing CDs” in Using Your Computer which has
been included on your hard drive. To access this
guide, click Start, All Programs, then click
Gateway Doc umentatio n.
Playing a DVD
A Digital V ersa tile Disc (DVD) is similar to a standard CD but has greater
data capacity. Because of this increased capacity, full-length movies,
several albums of music, or several gigabytes of data can fit on a single
disc. You can play DVDs with the DVD program or Windows Media
Player.
44
Tips & Tricks For more information about playing DVDs, see
“Playing DVDs” in Using Your Computer wh ich has
been included on your hard drive. To access this
guide, click Start, All Programs, then click
Gateway Doc umentatio n.
www.gateway.com
Page 51

Creating CDs and DVDs
Y ou can use the CD and DVD burning program on your c omputer to copy
tracks from a musi c CD to your ha rd d rive, cop y or crea te da ta C Ds a nd
DVDs, create music CDs, create vid eo DVDs, and more.
Tips & Tricks For more information about creating CDs and
DVDs, see “Creating CDs and DVDs” in Using Y our
Computer which has been included on your hard
drive. To access this guide, click Start,
All Programs, then click Gateway
Documentation.
Using the memory card reader
You c an use memory cards to transfer pictures from a digital camera to
your notebook. You can also use the memory card reader to transfer data
between your notebook and a device that uses memory cards, such as a
PDA, MP3 player, or cellular phone.
Left slot eject
Left slot
button
Right slot
www.gateway.com
45
Page 52

Memory card types
The memory card reader supports the following card types.
Card Type Slot
CompactFlash
®
left
IBM Microdrive
Memory Stick
MultiMediaCard
Secure Digital
Each slot is assigned a different drive letter (for example, the E: and F:
drives) so data can be transferred from on e media type to another.
™ left
®
right
™ right
™ right
Inserting a memory card
To use a memory card:
1 Remove the protector from the memory card slot.
2 Insert the memory card into the memory card slot with the label
facing up and the arrow on the label pointing towards th e notebook.
3 To access a file on the memory card, click Start, then click My
Computer
then double-click the file name.
. Double-click the drive letter (for example, the E: drive),
46
www.gateway.com
Page 53

To remove a memory card:
1 If you are removing a CompactFlash card or IBM Microdrive, release
the eject button by pressing the eject button once, then eject the
card by pressing the eject button again.
-ORIf you are removing a MemoryStick, MemoryStick Pro, SecureDigital,
or MultiMediaCard, push the memory card into the notebook. The
memory card pops out slightly.
Important Do not use the remove hardware icon in the
taskbar to remove the memory card.
2 Pull the memory card out of the notebook.
3 Insert the protector into the memory card slot.
Adding and remo ving a PCCard
Your notebook has a PC Card slot (also known as a PCMCIA card slot).
This slot accepts one Type II card.
You do not need to restart your notebook when changing most cards
because your notebook supports hot-swapping. Hot-swappi ng m eans that
you can insert a PC Card while your notebook is running. If your PC Card
does not work after hot-swapping, see the PC Card manufacturer’s
documentation for further information.
www.gateway.com
47
Page 54

To insert a PC Card:
■ Push the card firmly into the PC Card slot label-side up until the
outer edge of the card is flush with the side of your notebook.
To remove a PC Card:
1 Click the remove hardware icon in the taskbar, the PC Card
name, then click
-ORTurn off your notebook.
Important If the remove hardware icon does not appear on
48
Stop.
the taskbar, click the show hidden
icons button.
www.gateway.com
Page 55

2 Release the eject button by pressing the PC Card eject button once.
3 Eject the PC Card by pressing the eject button again.
Viewing the display on a projector or monitor
You can use your notebook for giving presentations by connecting an
external monitor or projector to your monitor (VGA) port. Y our notebook
supports simultaneous LCD and CRT display. Simultaneous display lets
you control the presentation from your notebook and at the same time
face your audience.
To use a projector or external monitor:
1 Turn off your notebook.
2 Plug the projector or monitor cable into the VGA port on your
notebook. For the location of the VGA port, see “Back” on page 13.
3 Turn on your notebook.
www.gateway.com
49
Page 56

4 Plug the projector’s or monitor’ s power cord into an AC power source
and turn it on. Windows recogni z es the new hardware and searches
for its driver. You may need to install the driver from the disc
supplied by the manufacturer or download the driver from the
manufacturer’s Web site.
5 After the driver is installed, right-click any empty space on the
desktop, then click
opens.
Properties. The Display Properties dialog box
6 Click the Settings tab.
7 Right-click the second monitor icon (labeled 2), then click Attached.
8 Click Apply.
9 Adjust properties such as Scre en Resolu tion or Color Quality if
necessary.
10 Click OK.
50
www.gateway.com
Page 57

Important Press FN+F4 to switch between viewing the
display on the LCD panel and viewing the display
on the projector or monitor.
Important If an external monitor or projec tor is connected and
you close the LCD panel, your notebook turns off
the LCD panel, but does not enter Standby mode.
Viewing the display on a television
The optional S-Video out jack on your notebook lets you view your
notebook display on a television screen using a standard S-Video cable.
Important To turn on external video by default, connect the
television (or other external video device) before
starting yo ur noteb ook.
Important Audio is not transmitted through the S-Video jack.
Use the built-in speakers, a set of headphones or
external powered s peakers, or connect your
notebook to a stereo system to hear sound while
playing a DVD. DVD playback to a VCR will be
scrambled by copyright protection software.
To view your notebook display on a television:
1 With your notebook off, connect one end of a standard S-Video cable
to the S-Video jack. For the location of the S-Video jack, see “Back”
on page 13.
2 Connect the other end of the cable to the Video in jack on your
television or VCR.
3 Turn on the television or VCR.
www.gateway.com
51
Page 58

4 Start your notebook.
5 Press FN+F4 several times until the notebook display is shown on
your television.
To modify television settings:
1 Click Start, then click Control Panel. The Control Panel window opens.
If your Control Panel is in Category View, click
Themes
.
Appearance and
2 Click/Double-click the Display icon. The Display Pr operties dialog box
opens.
3 Click the Settings tab.
4 Click Advanced. The Multiple Monitors and RADEON IGP 320M
Properties dialog box opens.
52
www.gateway.com
Page 59

5 Click the Displays tab.
Enable TV
TV
6 Click the Enable TV button if it is not already enabled.
7 Click TV to make any adjustments to the TV settings.
8 Click Apply.
9 Click OK to close the Multiple Monitors and RADEON IGP 320M
Properties dialog box.
10 Click OK to close the Display Properties dialog box.
11 Click X to close the Control Panel window.
www.gateway.com
53
Page 60

54
www.gateway.com
Page 61

Chapter 5
.BOBHJOH1PXFS
■ Checking and recharging the battery
■ Recalibrating the battery
■ Changing batteries
■ Extending the life of the battery
55
Page 62

Monitoring the battery charge
Your new G ateway notebook is designed to provide an exceptional
balance of performance and portability. Your notebook uses the latest
chipset and mobile processor technologies to manage the processor speed
and power consumption for a greater battery life experience. This design
provides you with maximum performance when plugged into AC power
balanced with optimized battery life when on battery power.
Closely monitor the battery charge. When the battery charge gets low,
change the battery or connect to AC power immediately to prevent losing
any unsaved work.
To monitor the ba ttery ch arge:
■ Double-click the power cord icon or battery icon in the
taskbar. The Power Meter dialog box opens.
Important If the power cord or battery icon does not appear
on the taskbar, click the show hidden
icons button. If the icon still does not appear,
make sure that Always show ic on on the taskbar
is checked on the Power Options Properties
Advance tab.
For more information, see “Changing advanced
settings” in Using Your Computer which has been
included on your hard drive. To access this guide,
click Start, All Programs, then click Gateway
Documentation.
■ Look at the battery charge indicator:
■ LED off - battery is fully charged.
■ LED on - battery is charging.
■ LED blinking - battery charge is very low.
Important This LED only lights up when the notebook is
connected to AC power. For the location of the
battery charge indicator, see “Front” on page 10.
■ Wait for a Low Battery warning message to appear.
56
www.gateway.com
Page 63

If your battery charge indicator displays what looks like an inaccurate
charge, you may need to recalibrate the battery. For more information,
see “Recalibrating the battery” on page 57.
Recharging the battery
The battery recharges while it is installed and your notebook is connected
to AC power. Whil e the battery is recharging, the battery charge indicator
turns on and the battery icon in the taskbar has a lightning bolt .
Important If the power cord or battery icon does not appear
on the taskbar, click the show hidden
icons button. If the icon still does not appear,
make sure that Always show ic on on the taskbar
is checked on the Power Options Properties
Advance tab.
For more information, see “Changing advanced
settings” in Using Your Computer which has been
included on your hard drive. To access this guide,
click Start, All Programs, then click Gateway
Documentation.
Recalibrating the ba ttery
If your notebook unexpectedly goes into Standby mode while you are
using it but the battery charge is not low, you may need to recalibrate
your battery. You should also recalibrate the battery periodically to
maintain the accuracy of the battery gauge.
To recalibrate the battery:
1 Close all open files and programs.
2 Connect your notebook to AC power and allow the battery to
completely charge.
3 Disconnect the AC power and restart your notebook.
www.gateway.com
57
Page 64

4 Completely discharge the battery by doing the following:
a From the desktop, right-click on the power icon, then select
Adjust Power Properties.
b Click the Power Schemes tab.
c Click the arrow button to open the Power Schemes list, then c lick
Always On.
d Click the Alarms tab.
e Click to deselect the Low battery alarm and Critical battery alarm
checkboxes. Let the battery drain until your notebook
automatically turns off.
Important Do not use your notebook during the recalibration
process. Do not connect the AC adapter to your
notebook during this process, or you will interrupt
the recalibration process and will have to start
again.
5 After the battery is completely drained, reconnect your notebook to
AC power.
6 Charge the battery completely until the yellow battery status
indicator goes out.
7 When you are ready to use your notebook again, do the following:
a From the desktop, right-click on the power icon, then select
Adjust Power Properties.
b Click the Power Schemes tab.
c Click the arrow button to open the Power Schemes list, then c lick
the power scheme you want.
d Click the Alarms tab.
e Click to select the Low battery alarm and Critical battery alarm
checkboxes.
58
www.gateway.com
Page 65

Changing batter ies
If your notebook is connected to AC power, you can change the battery
while the notebook is turned on.
Warning Danger of explosion if battery is incorrectly
replaced.
Replace only with a battery specifically
manufactured for yo ur Gateway notebo ok. Discard
used batteries according to the manufacturer’s
instructions.
The batter y us ed i n thi s d e vi ce ma y pre se n t a f ir e
or chemical burn hazard if mishandled. Do not
disassemble, heat above 212°F (100°C), or
incinerate. Dispose of used battery promptly. Keep
away from children.
Replacing the battery
To replace the battery:
1 If your notebook is on and is connected to AC power, go to Step 2.
-ORIf your notebook is on and is not connected to AC power, save your
work and turn off your notebook.
2 Close the LCD panel.
3 Turn your notebook over so the bottom is facing up.
www.gateway.com
59
Page 66

4 Slide the battery lock to the unlock position.
5 Slide the battery release latch, then lift the battery out of the bay.
6 Place a recharged battery into the bay and press down until it snaps
into place.
7 Slide the battery lock to the lock position.
60
www.gateway.com
Page 67

8 Turn your notebook over.
9 Open the LCD panel and press the power button.
Extending battery life
Conserving battery pow er
To conserve power while using the battery to power your notebook:
■ Dim the display as low as is comfortable.
■ Remove PC Cards and IBM Microdrive cards when you do not need
them. Many PC Cards an d Microdrive cards use a sm all amount of
power while inserted, even if they are not being used.
■ Modify the power management settings for maximum power
savings.
Tips & Tricks For more information about using power
management settings, see “Changing
Power-saving Settings” in Using Your Computer
which has been included on your hard drive. To
access this guide, click Start, All Programs, then
click Gateway Documentation.
■ Close the LCD panel to turn off the display while you are not using
your notebook. The display stays off until you open the panel again.
■ Use Hibernate mode for maximum power savings while your
notebook is not in use.
Tips & Tricks For more information ab out using Hib ernate mode,
see “Activating and using Hibernate mode” in
Using Your Computer which has b een included on
your hard drive. To access this guide, click Start,
All Programs, then click Gateway
Documentation.
www.gateway.com
61
Page 68

■ Use the DVD drive only when necessar y. These drives use a large
amount of power.
■ Recharge the battery often, take an extra battery, and fully recharge
the batteries before traveling. For more information, see “Recharging
the battery” on page 57 and “Changing batteries” on page 59.
Using alternate po wer sources
To extend battery life, use alternate power sources whenever possible.
■ If traveling internationally , ta ke electrical adapters. Save the battery
for times when you cannot use a power adapter . If you plan on taking
your AC power adapter, also take a single-plug surge protector.
■ If you will have access to an EmPower™ in-flight power receptacle
or an automobile cigarette lighter , use an airplane/automobile power
adapter or power inverter. Save the battery for times when you
cannot use a power ada pter.
■ To find AC power outlets in airports, look for them next to support
pillars, in large areas such as boarding gates, and under banks of
telephones.
Changing power modes
You can use the following power modes to lengthen the life of your
notebook’s battery:
■ Standby - while your notebook is in Standby, it switches to a low
power state where devices, such as the display and drives, turn off.
■ Hibernate - (also called save to disk) writes all current memory (RAM)
information to the hard drive, then turns your notebook c ompletely
off. The next time you turn on your notebook, it reads the memory
information from the hard drive and opens the p rograms and
documents that were open when you activated Hibernate mode.
Using power saving modes
Always save your work before using Standby mode. In Standby mode,
your notebook reduces or turns off the power to most devices except
memory. However, the information in memory is not saved to the hard
drive. If power is interrupted, the information is lost.
62
www.gateway.com
Page 69

When in Hibernate mode, your notebook saves all memory information
to the hard drive, then turns the power completely off.
If your notebook is... ...and you want to... ...then
On Enter Standby mode Press FN+F3.
On Enter Hibernate
mode (must be
activated)
In Standby or
Hibernate m ode
Exit Standby or
Hibernate mode
Click Start, then click
Turn Off Computer. Press and hold
SHIFT, then click Hibernate.
Press the power button.
www.gateway.com
63
Page 70

64
www.gateway.com
Page 71

Chapter 6
6QHSBEJOH:PVS/PUFCPPL
■ Adding and replacing memory
■ Replacing the hard drive
65
Page 72

Pre venting static electricity discharge
Important Before installing memory or replacing the hard
drive, you should read and understand the
information in this section.
The components inside your notebook are extremely sensitive to static
electricity, also known as electrostatic discharge (ESD).
Warning To avoid exposure to dang erous electrical voltages
and moving parts, turn off your notebook and
unplug the power cord and modem and network
cables before opening the case.
Caution ESD can permanently damage electrostatic
discharge-sensitive components in you r notebook .
Prevent ESD damage by follo wing ESD gui delines
every time you install memory or replace the hard
drive.
Before installing memory or replacing the hard drive, follow these
guidelines:
■ Turn off your notebook.
■ Wear a grounding wrist strap (available at most electronics stores)
and attach it to a bare metal part of your workbench or other
grounded connection.
Warning To prevent risk of electric shock, do not insert any
object into the vent holes of the notebook.
■ Touch a bare metal surface on yo ur workbench or other grounded
object.
■ Unplug the power cord and the modem and network cables.
66
www.gateway.com
Page 73

■ Remove the battery. For more information, see “Changing batteries ”
on page 59.
■ Disconnect all periph eral devices and remove an y PC Cards.
Before working with computer components, follow these guidelines:
■ Avoid static-causing surfaces such as carpeted floors, plastic, and
packing foam .
■ Remove components from their antistatic bags only when you are
ready to use them. Do not lay components on the outside of
antistatic bags because only the inside of the bags provide
electrostatic protection.
■ Always hold components by their edges. Avoid touching the edge
connectors. Never slide components over any surface.
www.gateway.com
67
Page 74

Adding or replacing memory
Your notebook uses memory modules called SO-DIMMs (Small Outline
Dual Inline Memory Modules). The modules are available in various
capacities and any module c an be placed in the slot. U se only memory
modules designed for your Gateway notebook for upgrading your
memory.
To add or replace memory modules:
1 Follow the instructions under “Preventing static electricity
discharge” on page 6 6.
2 Turn off your notebook, disconnect the AC adapter and modem and
network cables.
3 Turn your notebook over so the bottom is facing up.
4 Remove the battery. For more information, see “Changing batteries ”
on page 59.
5 Remove the memory bay cover scre w, then remove the memory bay
cover. For the location of the memory bay, see “Bottom ” on pa ge 15.
6 If you are removing a modu le, gently press outward on the clip at
each end of the memory module until the module tilts upward.
68
www.gateway.com
Page 75

7 Pull the memory module out of the slot.
8 Hold the new or replacement module at a 30-degree angle and press
it into the empty memory slot. This module is keyed so it can only
be inserted in one direction. If the module does not fit, make sure
that the notch in the module lines up with the tab in the memory
bay.
Important Use only memory modules designed for your
Gateway notebook.
9 Gently push the module down until it clicks in place.
10 Replace the memory bay cov er and replace the cover screw.
11 Insert the battery, then turn your notebook over.
12 Connect the power adapter and modem and network cables, then
turn on your notebook.
www.gateway.com
69
Page 76

Replacing the hard drive kit
If you would like more hard drive capacity, you can replace your original
drive with a higher -capacity drive.
To replace the hard drive kit:
1 Back up any data you want to transfer to the new hard drive. For
more information, see “Backing up files” in Using Yo ur Computer
which has been included on your hard drive. To access this guide,
Start, All Programs, then click Gatewa y Document ation.
click
2 Follow the instructions under “Preventing static electricity
discharge” on page 6 6.
3 Tu rn off your notebook, disconnect the AC adapter and modem and
network cables.
4 Turn your notebook over so the bottom is facing up.
5 Remove the battery.
6 Remove the hard drive kit screw. For the location of the hard drive
bay, see “Bottom” on page 15.
7 Slide the old hard drive kit out of your notebook.
70
www.gateway.com
Page 77

8 If your new hard drive already includes the hard drive kit bracket,
go to Step 13.
-ORIf you need to move the hard drive kit bracket from your old hard
drive kit to your new hard drive, go to Step 9.
9 Remove the screws that secure the hard drive to the hard drive kit
bracket.
10 Remove the bracket from the old drive.
11 Insert the new drive into the bracket so the screw holes line up.
12 Replace the two screws that secure the bracket to the drive.
13 Slide the new hard drive kit into your notebook.
14 Replace the screw that secures the hard drive kit to your notebook.
15 Insert the battery and turn your notebook over.
16 Connect the power adapter and modem and network cables, then
turn on your notebook.
17 For instructions on installing Windows, your drivers, and your
applications, see the instructions that were included with the Restore
DVD.
www.gateway.com
71
Page 78

72
www.gateway.com
Page 79

Chapter 7
.BJOUBJOJOH:PVS/PUFCPPL
■ Caring for your notebook
■ Cleaning your notebook
■ Protecting from virus es
■ Updating Windows
■ Restoring your system
73
Page 80

Caring for y our notebook
To extend the life of your notebook:
■ Be careful not to bump or drop your notebook, and do not put an y
objects on top of it. The case, although strong, is not made to support
extra weight.
■ When transporting your notebook, we recommend that you put it
in a carrying ca se.
■ Keep your notebook away from magnetic fields. Magnetic fields can
erase data on hard drives.
■ Never turn off your notebook when the hard drive light is on because
data on the hard drive could be lost or corru pted.
■ Avoid subjecting your notebook to extreme temperature changes.
The case (and LCD panel) can become brittle and easy to break in
cold temperatures and can melt or warp in high temperatures.
Damage due to either extreme is not covered by your warranty. As
a general rule, your notebook is safest at temperatures that are
comfortable for you.
■ Keep all liquids away from your notebook. When spilled onto
computer components, almost any liquid can result in extremely
expensive repairs that are not covered under your warranty.
■ Avoid dusty or dirty work environments. Dust and dirt can clog the
internal mechanisms.
■ Do not block the ventilation fan slots. If these slots are blocked, your
notebook may overheat resulting in unexpe cted shutdown or
permanent damage to the notebook.
■ When storing your notebook for an extended period of time, unplug
AC power and remove the battery after discharging it partway.
74
www.gateway.com
Page 81

Cleaning your notebook
Keeping your notebook clean and the vents free from dust helps keep
your notebook performing at its best. You may want to gather these items
and put together a notebook cleaning kit:
■ A soft, lint-free cloth
■ An aerosol can of air that has a narrow, straw-like extension
■ Cotton sw abs
■ A DVD drive cleaning kit
Cleaning the exterior
Warning When you shut down your notebook, the power
turns off, but some electrical current still flows
through your notebook. To avoid possible injury
from electrical shock, unplug the power cord and
modem cable from the wall outlets.
Always turn off your notebook and other peripherals before cleaning any
components. Also, remove the battery befor e cleaning a ny components.
Use a damp, lint-free cloth to clean your notebook and other parts of
your system. Do not use household abrasive or solvent cleaners because
they can damage the finish on components.
Your notebook is cooled by air circulated through the vents on the case,
so keep the vents free of dust. With your notebook turned off and
unplugged, brush the dust away from the vents with a damp cloth. Be
careful not to drip any water into the vents. Do not attempt to clean dust
from the inside of your notebook.
Cleaning the keyboard
You should clean the keyboard occasionally by using an aerosol can of
air with a narrow, straw-like extension to remove dust and lint trapped
under the keys.
www.gateway.com
75
Page 82

If you spill liquid on the keyboard, turn off your notebook and turn the
notebook upside down. Let the liquid drain, then let the keyboard dry
before trying to use it again. If the keyboard does not work after it dries,
you may need to replace it.
Cleaning the notebook screen
To clean a notebook LCD screen, use a soft cloth and water to clean the
LCD screen. Squirt a little water on the cloth (never directly on the
screen), and wipe the screen with the cloth.
Caution A notebook LCD screen is made of specially
coated glass and can be scratche d or dama ged by
abrasive or ammonia-based glass cleaners.
Cleaning CDs or DVDs
Wipe from the center to the edge, not around in a circ le, using a product
made especially for th e purpose.
76
www.gateway.com
Page 83

Protecting y our computer from viruses
A virus is a program that attaches itself to a file on a computer, then
spreads from one computer to another . V iruses can damage data or cause
your computer to malfunction. Some viruses go undetected for a period
of time because they are ac tivated on a certain date.
Protect your computer from a virus by:
■ Registeri ng your co py of Nort on AntiVir us and subs cribing to the
virus definition update service. You received a free limited time
subscription to the Norton AntiVirus service when you purchased
your notebook.
■ Using the Norton
that are attached to e-mail messages or downloaded from the
Internet.
■ Checking all programs for viruses before installing them.
■ Disabling macros on suspicious Microsoft Word and Excel files.
These programs will warn you if a document that you are opening
contains a macro th at might have a virus.
■ Periodically updating the Norton AntiVirus program to protect
against the latest viruses.
®
AntiVirus program to check files and programs
Help and
Support
For more information about protecting your
computer against viruses, click Start, then click
Help and Support.
Type the keyword viruses in the Search box
, then click the arrow.
www.gateway.com
77
Page 84

To scan for viruses:
1 Click Start, All Programs, Norton AntiVirus, then click Norton
AntiVirus 2004
Scan for
viruses
. Norton AntiVirus opens.
2 Click Sc an for Viruses.
Scan
3 Click the type of scan you want to make in the Scan for Viruses area,
then under Actions, click
78
Scan.
www.gateway.com
Page 85

To remove a virus:
1 If Norton AntiVirus finds a virus, follow all on-screen instructions
to remove the virus.
2 Turn off your computer and leave it off for at least 30 seconds.
3 Turn on your computer and rescan for the virus.
To update Norton AntiVirus:
Important Y ou receiv ed a free limit ed time subscri ption to the
Norton AntiVirus service when you purchased your
notebook. To update Norton AntiVirus af ter the free
subscription period, you must extend your
subscription.
1 Make sure that you are connected to the Internet.
2 Click Start, All Programs, Norton AntiVirus, then click LiveUpdate -
Norton AntiVirus
. The LiveUpdate wizard opens.
3 Follow the on-screen instructions to update your Norton AntiVirus
program with the latest virus protection files.
4 When the program has finished, click Finish.
www.gateway.com
79
Page 86

Updating Windo ws
Windows Update is the online extension of Windows that helps you to
keep your computer up-to-date. Use W indows Updat e to choose updates
for your computer’s operating system, software, and hardware. New
content is added to the site regularly, so you can always get the most
recent updates and fixes to protect your computer and keep it running
smoothly. Windows Update scan s your co mpu ter and provid es you with
a tailored selection of updates that apply only to the software and
hardware on your computer.
To run Windows Update:
1 Connect to the Internet.
2 Click Start, All Programs, then click Windows Update.
3 Click Scan for Available Updates.
Help and
Support
For more information about Windows Update in
Windows XP, click Start, then click Help and
Support.
Type the keyword Windows Update in the
HelpSpot Search box , then
click the arrow.
Restoring your sy stem
If you need to restore your computer to its original configuration, use
the Restore DVD that was shipped with your computer . The Restore DVD
contains a copy of all programs that were preinstalled on your computer.
Instructions for using the Restore DVD are included with the DVD.
80
www.gateway.com
Page 87

Chapter 8
5 SPVCMFTIPPUJOH
■ T roubleshootin g typical hardware and
software problems
■ Getting telephone support
■ Using automated troubleshooting
systems
81
Page 88

Safety guidelines
While troubleshooting your notebook, follow these safety guidelines:
■ Never remove the memory bay cover or hard d rive while your
notebook is turned on, while the battery is installed, and while the
modem cable, network cable, and AC power ad apter are connect ed
to your notebook.
■ Make sure that you are correctly grounded before accessing internal
components. For more information about preventing damage from
static electricity, see “Preventing static electricity discharge” on
page 66.
■ After you complete any maintenance tasks where you remove the
memory bay cover or hard drive kit, make sure that you replace the
cover or hard drive kit, reinstall any screws, then replace the battery
before you start your notebook.
Warning Do not try to troubleshoot your problem if power
cords or plugs are damaged, if your notebo ok was
dropped, or if the case was damaged. Instead,
unplug your notebook and contact a qualified
computer technician.
82
www.gateway.com
Page 89

First steps
If you have problems with your notebook, try these things first:
■ Make sure that the AC power adapter is connected to your notebook
and an AC outlet and that the AC outlet is supplying power.
■ If you use a power strip or surge protector, make sure that it is turned
on.
■ If a peripheral device (such as a keyboard or mouse) does not work,
make sure that all connec tions are secure.
■ Make sure that your hard drive is not full.
■ If an error message appears on the screen, write down the exact
message. The message may help Gateway Customer Care in
diagnosing and fixing the problem.
■ If you added or removed peripheral de vices, review t he installation
procedures you performed and make sure that you followed each
instruction.
■ If an error occurs in a program, see the program’s printed
documentation or the online help.
Help and
Support
For more information about troubleshooting, click
Start, then click Help and Support.
Type the keyword troubleshooting in the Search
box , then click the arrow.
www.gateway.com
83
Page 90

Troubleshooting
Troubleshooting topics are listed in alphabet ical order.
Audio
Audio troubleshooting is covered under “So und” on page 100.
Battery
Battery troubleshooting is covered unde r “Power” on page 98.
CD drives
CD drive troubleshooting is covered unde r “DVD drives” on page 86.
Device installation
You have compu ter pr oblems after a dding a new de vice
Sometimes a new devi ce, such as a PC Card, can cause a system resource
(IRQ) conflict. Check IRQ usage to determine if there is an IRQ conflict.
84
To check IRQ usage:
1 Click Start, then click Control Panel. The Control Panel window
opens. If your Control Panel is in Category View, click
Performance and Maintenance.
2 Click/Double-click System, click the Hardware tab, then click
Device Manager. The Device Manag er window opens.
3 Click View, then click Resources by type. Double-click Interrupt
request (IRQ)
displayed.
. All IRQs and their hardware assignments are
www.gateway.com
Page 91

Help and
Support
For more information about IRQs , click Start, then
click Help and Support.
Type the keyword IRQs in the Search box
, then click the arrow.
To free IRQ resources for the new device:
1 In the Device Manager window, ch eck the device list for a
resource conflict. A resource confl ict appears as a black
exclamation point in a yellow circle.
2 Remove the device you are trying to install, then determine
which one of the existing devices or ports you can disable.
3 Right-click the device or port you want to disable, then click
Disable. The device or port is disabled.
Display
The screen is too dark
Adjust the brightness using the system keys. For more information, see
“System key combinations” on page 32.
The screen resolution is not correct
Change the screen resolution from the Display Properties dialog box.
Tips & Tricks For instructions on ch anging the s creen resolutio n,
see “Adjusting the sc reen resoluti on” in Usin g Y our
Computer which has been included on your hard
drive. To access this guide, click Start,
All Programs, then click Gateway
Documentation.
The text on the display is dim or difficult to read
■ Adjust the brightness and contrast using the system keys. For more
information, see “System key comb inations” on page 32.
■ Change the display settings.
www.gateway.com
85
Page 92

Tips & Tricks For instru ctions on chang ing the d isplay s etting s,
see “Adjusting the scre en and desktop settings” in
Using Your Computer which has b een included on
your hard drive. To access this guide, click Start,
All Programs, then click Gateway
Documentation.
■ Move your notebook away from sources of electrical interference,
such as televisions, unshielded speakers, microwaves, fluorescent
lights, and metal beams or shelves.
The display has pixels that are always dark or too bright
This condition is normal and inherent in the TFT tec hnology used in
active-matrix LCD screens. Gateway’s inspection standards keep these to
a minimum. If you feel these pixels are unacceptably numerous or dense
on your display, contact Gateway Customer Care to identify whether a
repair or replacement is justified based on the number of pixels affected.
DVD drives
Your notebook does not rec ognize a disc
■ The disc may not be seated correctly in the tray. When you place a
disc on the tray, make sure that you press the disc firmly onto the
spindle so the retainers hold the disc in place.
■ Make sure that the disc label is facing up, then try again.
■ Try a different disc. Occasionally discs are flawed and cannot be read
by the drive.
■ Some music CDs have copy protection software. Y ou may not be able
to play these CDs on your notebook.
■ Your notebook may be experiencing some temporary memory
problems. Shut down and restart you r notebook.
■ Clean the disc. For more information, see “Cleaning CD s or DVD s ”
on page 76.
An audio CD does not pr oduce s ound
■ Make sure that the CD label is facing up, then try again.
■ Some music CDs have copy protection software. Y ou may not be able
to play these CDs on your notebook.
86
www.gateway.com
Page 93

■ Make sure that the volume control on your notebook is turned up.
For more information, see “Multi-function buttons” on page 34.
■ Make sure that the Windows volume control is turned up.
Tips & Tricks For instructions on how to adjust the volume con trol
in Windows, see “Adjusting the volume” in Using
Your Computer which has been included on your
hard drive. To access this guide, click Start,
All Programs, then click Gateway
Documentation.
■ Make sure that Mute controls are turned off. For more information
about the mute setting, see “Multi-function buttons” on page 34.
■ Make sure that headphones are not plugged into the headphone
jack. For the location of the headphone jack, see “Back” on page 13.
■ If you are using powered speakers, make sure that they are plugged
in and turned on.
■ Clean the disc. For more information, see “Cleaning CD s or DVD s ”
on page 76.
■ Your notebook may be experiencing some temporary memory
problems. Shut down and restart you r notebook.
■ Reinstall the audio device drivers. For more information, see
“Downloads” on pag e 4.
A DVD movie will not play
■ Make sure that the label or side you want to play is facing up, then
try again.
■ Shut down and restart your notebook.
■ Clean the DVD. For more information, see “Cleaning CDs or DVDs”
on page 76.
■ DVD discs and drives contain regiona l cod es that help control DVD
title exports and help reduce illegal disc distribution. To be able to
play a DVD, the disc’s regional code and your DVD drive’s regional
code must match.
www.gateway.com
87
Page 94

The regional code on your DVD drive is determined by your
notebook’s delivery address. The regional code for the United States
and Canada is 1. The regional code for Mexico is 4. Your DVD drive’s
regional code must match the regional code of the disc. The regional
code for the disc is on the disc, disc documentation , or packaging.
If the DVD movie does not play, the disc’s regional code and your
DVD drive’s regional code may not match.
■ Make sure that a DVD playe r program has been ins talled on your
notebook.
Tips & Tricks For instructions on playing a DVD, see “Playing a
DVD” on page 44.
A DVD does no t produ ce s ound on a TV
Audio is not transmitted through the S-Video jack. Use the built-in
speakers, a set of headphones or external powered speakers, or co nnect
your notebook to a stereo system to hear sound while playing a DVD.
File management
A file was accidentally deleted
If a file was de leted at a DOS prom pt or in Windows while holding down
HIFT key, the file cannot be restored.
the S
To restore deleted files:
1 Double-click the Recycl e Bin icon.
2 Right-click the file you want to restore, then click Restore. The
file is restored to the place where it was originally deleted from.
If the Recycle Bin was emptied before you tried to restore a file,
the file cannot be restored.
88
www.gateway.com
Page 95

Help and
Support
For more information ab out restoring deleted fi le s,
click Start, then click Help and Support.
Type the keyword System Restore in the Search
box , then click the arrow.
Hard drive
You see an “Insufficien t disk spac e ” error message
■ Delete unnecessary files from the hard drive using Disk Cleanup.
Tips & Tricks For instructions on del eting u nnece ssary files, see
“Using Disk Cleanup” in Using Your Computer
which has been included on your hard drive. To
access this guide, click Start, All Programs, then
click Gateway Documentation.
■ Empty the Recycle Bin by right-clicking the Recycle Bin icon, the n
clicking
Empty Recycle Bin.
Caution All delete d files w ill be los t when you e mpty the
Recycle Bin.
■ Save your files to another drive. If the hard drive is full, copy any
files not regularly used to backup media, then delete them from the
hard drive.
Help and
Support
For more information about file management, click
Start, then click Help and Support.
Type the keyword file management in the
Search box , then click the
arrow.
You see a “Data err or” messag e
This may be the result of a defective area on the hard drive. To fix hard
drive problems, run the Error checking p rogram.
www.gateway.com
89
Page 96

Tips & Tricks For instructions on fix ing ha rd dri ve pro ble ms , s ee
“Checking the hard drive for errors” in Using Your
Computer which has been included on your hard
drive. To access this guide, click Start,
All Programs, then click Gateway
Documentation.
The hard driv e canno t be acc essed , or y ou see a “ Gener al fa ilure
reading driv e C” e rror messag e
■ Make sure that the hard drive is installed correctly. Remove it, firmly
reinsert it, then restart your notebook. For more information, see
“Replacing the hard drive kit” on page 70.
■ If your notebook has been subjected to static electricity or physical
shock, you may need to reinstall the operating system.
Internet
You cannot connect to the Internet
■ If you are using a dial-up modem, make sure that the modem cable
is plugged into the modem jack and not the Ethernet network jack.
See “Back” on page 13 to make sure that the connec tio ns h ave bee n
made correctly.
-ORIf you are using a cable or DSL modem, make sure that the modem
cable is plugged into the Ethernet network jack and not the modem
jack. See “Back” on page 13 to make sure that the connections have
been made correctly.
■ Make sure that you do not have a problem with your modem. For
more information, see “Modem (dial-up)” on page 93.
■ Make sure that your account with your Internet service provider (ISP)
is set up correctly. Contact your ISP technical support for help.
Help and
Support
90
For more information about troubleshooting
Internet connections, click Start, then click Help
and Support.
Type t he keyword tr oubleshooting co nnections
in the Search box , then
click the arrow.
www.gateway.com
Page 97

You see an “Unable to locat e host” mes sage an d are un able t o bro wse
the Internet
This problem can occur when you have typ ed a URL (Web address)
incorrectly , you have lost your Internet connection, or your ISP is having
technical difficul ties.
Double-check the URL or try a different URL. If the error message still
appears, disconnect from the ISP connection and close your browser,
then reconnect and open the browser. If you still get the error, your ISP
may be having technical difficulties.
Connecting to a Web site takes too long
Many factors can affect Internet performance:
■ The condition of the telephone lines in your residence or at your
local telephone service
■ The condition of the Internet computers to which you connect and
the number of users accessing those computers
■ The complexity of graphics and multimedia on Web pages
■ Having multiple Web browsers open, performing multiple
downloads, and having mu ltiple programs open on y our notebook
People are sending you e-mail messages, but you have not received
any mail
■ Click the receive button in your e-mail program.
■ Make sure that your account with your Internet service provider (ISP)
is set up correctly. Contact your ISP for technical support.
Keyboard
The external k eyboard d oes not wo rk
■ Make sure that the keyboard cable is plugged in correctly.
■ Remove all extension cables and switchboxes.
■ Clean the keyboard b y using an aerosol can o f air with a narrow,
straw-like extension to remove dust and lint trapped under the keys.
■ Try a keyboard that you know works to make sure that the keyboard
port works.
www.gateway.com
91
Page 98

■ If you spilled liquid in the keyboard, turn off your notebook and
unplug the keyboard. Clean the keyboard and turn it upside down
to drain it. Let the keyboard dry before using it again. If the keyboard
does not work after it dries, you may need to replace it.
A keyboard character keeps repeating or you see a “Keyboard stuck”
or “Key failure” error message
■ Make sure that nothing is resting on the keyboard.
■ Make sure that a key is not stuck. Press each key to loosen a key that
might be stuck, then restart your notebook.
You are pressing a letter key and a number appears on the screen
■ The numeric keypad is turned o n. See “System key combinations”
on page 32 for instructions on turning off your numeric keypad.
Memory
You see a “Memory err or” message
■ Make sure that the memory module is inserted correctly in the
memory bay slot. For more information, see “Adding or replacing
memory” on page 68.
■ Use a third -party diagnost ic program to help de termine i f the
memory module is failing.
You see a “Not enough memory” error message
Close all programs, then restart your notebook.
Help and
Support
For more information about troubleshooting
memory errors, click Start, then click Help and
Support.
Type the keyword memory error in the Search
box , then click the arrow.
Memory card reader
Drive letters for the memory card slots do not appear in the My
Computer window
■ Reboot your notebook.
92
www.gateway.com
Page 99

Modem (dial-up)
Your modem does not dial or does not connect
■ Make sure that the modem cable is plugged into the modem jack
and not the Ethernet network jack. See “Back” on page 13 to make
sure that the connections have been made correctly.
■ Make sure that your notebook is connected to the telephone line
and the telephone line has a dial tone.
■ Make sure that the modem cable is less than 6 feet (1.8 meters) long.
■ Remove any line splitters or surge protectors from your telephone
line, then check for a dial tone by plugging a working telephone into
the telephone wall jack.
■ If you have additional telephone services such as call waiting, call
messaging, or voice mail, make sure that all messages are cleared and
call waiting is disabled before using the modem. Contact your
telephone service to get the correct code to temporarily disable the
service. Also make sure that the modem dialing properties are set
appropriately.
To check the dialing properties:
1 Click Start, then click Control Panel. The Control Panel window
opens. If your Control Panel is in Category View, click
and Other Hardware
.
Printers
2 Click/Double-click the Phone and Modem Options icon, then clic k
Dialing Rules tab.
the
3 Click the location from which you are dialing, then click Edit.
4 Make sure that all setti ngs are correct.
Help and
Support
For more information about di aling propertie s, click
Start, then click Help and Support.
Type the keyword dialing in the Search box
, then click the arrow.
www.gateway.com
93
Page 100

■ Disconnect any ans werin g m ach ine, fax mach ine, or print er that is
on the same line as the modem. Do not connect these devices to
the same telephone line as the modem.
■ Make sure that you are not using a digital, rollover, or PBX line.
These lines do not work with your modem.
■ Check for line noise (scratchy, crackling, or popping sounds). Line
noise is a common problem that can cause the modem to connect
at a slower rate, abort downloads, or even disconnect. The faster the
modem, the less line noise it can tolerate and still work correctly.
Listen to the line using your telephone. Dial a single number (such
as 1). When the dial tone stops, listen for line noise. Wiggle the
modem cable to see if that makes a difference. Make sure that the
connectors are free from corrosion and all screws in the wall or
telephone wall jack are secure.
Y ou can also call your telephone service and have the telephone line
checked for noise or low line levels.
■ Try another telephone line (either a different telephone number in
your house or a telephone line at a different location). If you can
connect on this line, call your telephone service.
■ Try connecting with the modem at a lower connection speed. If
reducing the connect speed lets you connect, call your telephone
service. The telephone line may be too noisy.
You cannot connect to the Internet
■ The ISP may be having technical difficulties. Contact your ISP for
technical support.
■ See if the modem works with a different communications program.
The problem may be with just one program.
■ Review the troubleshooting information under “Internet” on
page 90.
Your 56K modem does not connect at 56K
Current FCC regulations restrict actual data transfer rates over public
telephone lines to 53K. Other factors, such as line noise, telephone service
provider equipment, or ISP limitations, may lower the speed even further.
94
www.gateway.com
 Loading...