

Page 1

Gateway M500 Notebook
user'sguide
Customizing
Troubleshooting
Page 2

Page 3

Contents
1Getting Started. . . . . . . . . . . . . . . . . . . . . . . . . . . . . . . . . . . . . . . . . . . . . . . . . . . 1
Connecting and starting your notebook . . . . . . . . . . . . . . . . . . . . . . . . . . . . . . . . . . 2
Care and maintenance . . . . . . . . . . . . . . . . . . . . . . . . . . . . . . . . . . . . . . . . . . . . . . . 5
Taking care of your notebook . . . . . . . . . . . . . . . . . . . . . . . . . . . . . . . . . . . . . . . 5
Taking care of your AC adapter . . . . . . . . . . . . . . . . . . . . . . . . . . . . . . . . . . . . . 5
Taking care of your battery . . . . . . . . . . . . . . . . . . . . . . . . . . . . . . . . . . . . . . . . . 6
Cleaning and servicing . . . . . . . . . . . . . . . . . . . . . . . . . . . . . . . . . . . . . . . . . . . . 6
2 Getting Familiar with Your Notebook . . . . . . . . . . . . . . . . . . . . . . . . . . . . 7
Top . . . . . . . . . . . . . . . . . . . . . . . . . . . . . . . . . . . . . . . . . . . . . . . . . . . . . . . . . . . . . . . 8
Front . . . . . . . . . . . . . . . . . . . . . . . . . . . . . . . . . . . . . . . . . . . . . . . . . . . . . . . . . . . . 10
Left . . . . . . . . . . . . . . . . . . . . . . . . . . . . . . . . . . . . . . . . . . . . . . . . . . . . . . . . . . . . . 11
Right . . . . . . . . . . . . . . . . . . . . . . . . . . . . . . . . . . . . . . . . . . . . . . . . . . . . . . . . . . . . 12
Back . . . . . . . . . . . . . . . . . . . . . . . . . . . . . . . . . . . . . . . . . . . . . . . . . . . . . . . . . . . . . 13
Bottom . . . . . . . . . . . . . . . . . . . . . . . . . . . . . . . . . . . . . . . . . . . . . . . . . . . . . . . . . . . 15
Features . . . . . . . . . . . . . . . . . . . . . . . . . . . . . . . . . . . . . . . . . . . . . . . . . . . . . . . . . . 16
LCD panel . . . . . . . . . . . . . . . . . . . . . . . . . . . . . . . . . . . . . . . . . . . . . . . . . . . . . . . . 18
Status indicators . . . . . . . . . . . . . . . . . . . . . . . . . . . . . . . . . . . . . . . . . . . . . . . . . . . 19
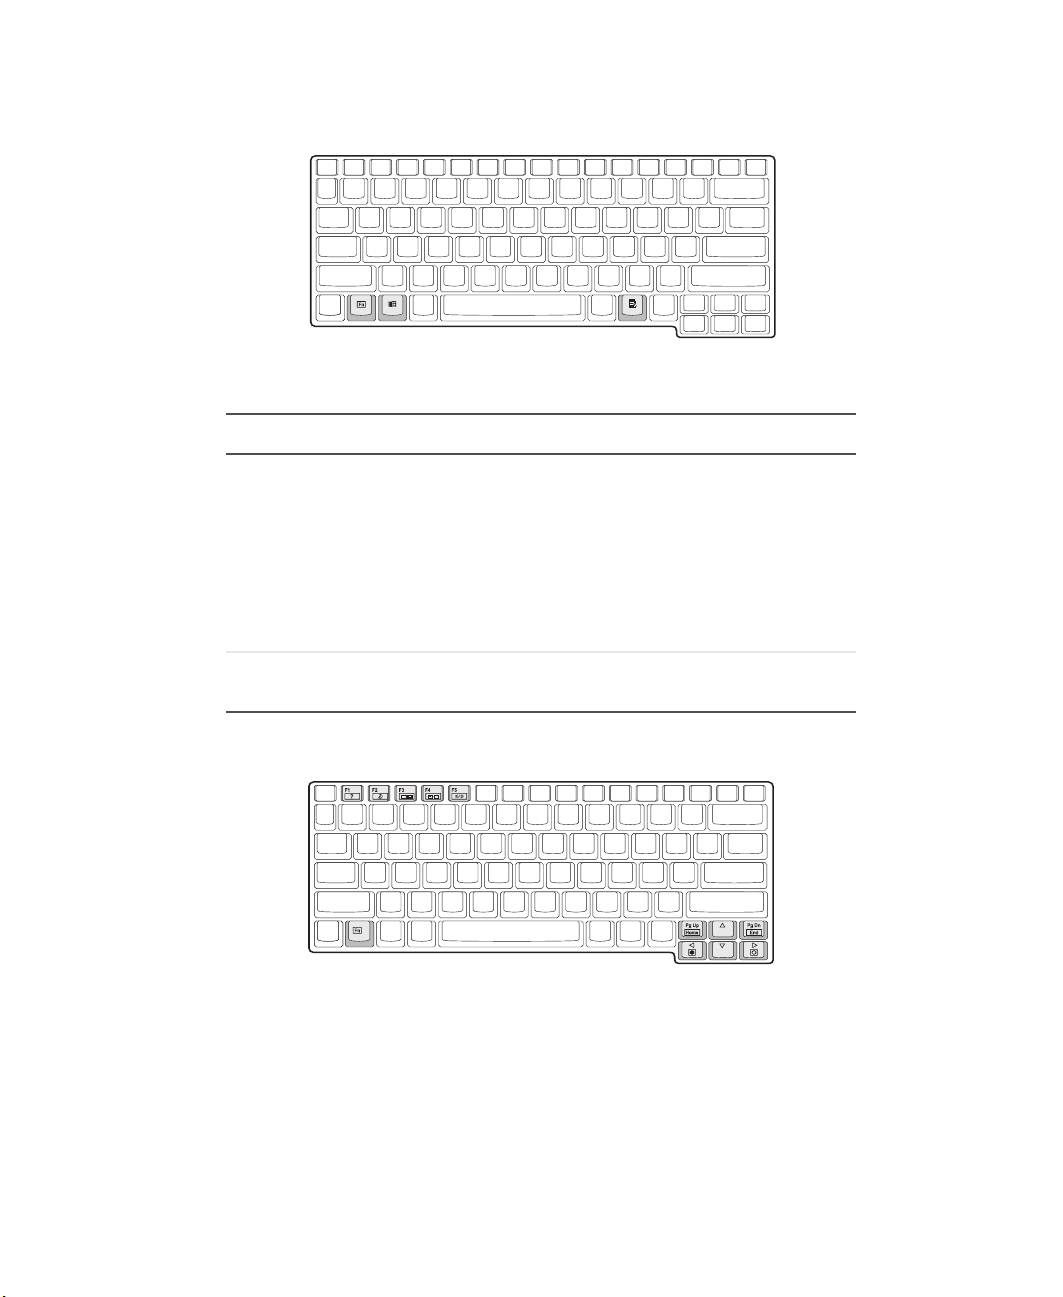
Keyboard . . . . . . . . . . . . . . . . . . . . . . . . . . . . . . . . . . . . . . . . . . . . . . . . . . . . . . . . . 21
Special keys . . . . . . . . . . . . . . . . . . . . . . . . . . . . . . . . . . . . . . . . . . . . . . . . . . . 21
Keyboard ergonomics . . . . . . . . . . . . . . . . . . . . . . . . . . . . . . . . . . . . . . . . . . . . 25
Touchpad . . . . . . . . . . . . . . . . . . . . . . . . . . . . . . . . . . . . . . . . . . . . . . . . . . . . . . . . . 26
Touchpad basics . . . . . . . . . . . . . . . . . . . . . . . . . . . . . . . . . . . . . . . . . . . . . . . . 27
Multi-function buttons . . . . . . . . . . . . . . . . . . . . . . . . . . . . . . . . . . . . . . . . . . . . . . . 29
Storage . . . . . . . . . . . . . . . . . . . . . . . . . . . . . . . . . . . . . . . . . . . . . . . . . . . . . . . . . . 31
Hard drive . . . . . . . . . . . . . . . . . . . . . . . . . . . . . . . . . . . . . . . . . . . . . . . . . . . . . 31
Optical drive . . . . . . . . . . . . . . . . . . . . . . . . . . . . . . . . . . . . . . . . . . . . . . . . . . . 31
Connectivity options . . . . . . . . . . . . . . . . . . . . . . . . . . . . . . . . . . . . . . . . . . . . . . . . 34
Ethernet and LAN . . . . . . . . . . . . . . . . . . . . . . . . . . . . . . . . . . . . . . . . . . . . . . . 34
Fax/data modem . . . . . . . . . . . . . . . . . . . . . . . . . . . . . . . . . . . . . . . . . . . . . . . . 35
Wireless communication . . . . . . . . . . . . . . . . . . . . . . . . . . . . . . . . . . . . . . . . . . 36
Fast infrared . . . . . . . . . . . . . . . . . . . . . . . . . . . . . . . . . . . . . . . . . . . . . . . . . . . 37
Audio . . . . . . . . . . . . . . . . . . . . . . . . . . . . . . . . . . . . . . . . . . . . . . . . . . . . . . . . . . . . 38
AV control panel . . . . . . . . . . . . . . . . . . . . . . . . . . . . . . . . . . . . . . . . . . . . . . . . 39
Securing your notebook . . . . . . . . . . . . . . . . . . . . . . . . . . . . . . . . . . . . . . . . . . . . . 43
Security slot . . . . . . . . . . . . . . . . . . . . . . . . . . . . . . . . . . . . . . . . . . . . . . . . . . . . 43
Passwords . . . . . . . . . . . . . . . . . . . . . . . . . . . . . . . . . . . . . . . . . . . . . . . . . . . . . 44
i
Page 4

3 Managing Power. . . . . . . . . . . . . . . . . . . . . . . . . . . . . . . . . . . . . . . . . . . . . . . . .45
Using the battery . . . . . . . . . . . . . . . . . . . . . . . . . . . . . . . . . . . . . . . . . . . . . . . . . . .46
Using the battery for the first time . . . . . . . . . . . . . . . . . . . . . . . . . . . . . . . . . . .46
Installing the battery . . . . . . . . . . . . . . . . . . . . . . . . . . . . . . . . . . . . . . . . . . . . . .47
Removing the battery . . . . . . . . . . . . . . . . . . . . . . . . . . . . . . . . . . . . . . . . . . . . .48
Recharging the battery . . . . . . . . . . . . . . . . . . . . . . . . . . . . . . . . . . . . . . . . . . . .49
Checking the charge level . . . . . . . . . . . . . . . . . . . . . . . . . . . . . . . . . . . . . . . . .49
Optimizing battery life . . . . . . . . . . . . . . . . . . . . . . . . . . . . . . . . . . . . . . . . . . . .50
Battery-low warning . . . . . . . . . . . . . . . . . . . . . . . . . . . . . . . . . . . . . . . . . . . . . .50
Power management . . . . . . . . . . . . . . . . . . . . . . . . . . . . . . . . . . . . . . . . . . . . . . . . .52
Advanced Configuration and Power Interface . . . . . . . . . . . . . . . . . . . . . . . . . .52
4 Using Peripheral Devices and Options . . . . . . . . . . . . . . . . . . . . . . . . . .53
External monitor . . . . . . . . . . . . . . . . . . . . . . . . . . . . . . . . . . . . . . . . . . . . . . . . . . . .54
Using simultaneous display . . . . . . . . . . . . . . . . . . . . . . . . . . . . . . . . . . . . . . . .54
S-Video . . . . . . . . . . . . . . . . . . . . . . . . . . . . . . . . . . . . . . . . . . . . . . . . . . . . . . . . . . .55
External keyboard . . . . . . . . . . . . . . . . . . . . . . . . . . . . . . . . . . . . . . . . . . . . . . . . . . .56
External pointing device . . . . . . . . . . . . . . . . . . . . . . . . . . . . . . . . . . . . . . . . . . . . . .57
Printer . . . . . . . . . . . . . . . . . . . . . . . . . . . . . . . . . . . . . . . . . . . . . . . . . . . . . . . . . . . .58
Audio devices . . . . . . . . . . . . . . . . . . . . . . . . . . . . . . . . . . . . . . . . . . . . . . . . . . . . . .59
PC Card . . . . . . . . . . . . . . . . . . . . . . . . . . . . . . . . . . . . . . . . . . . . . . . . . . . . . . . . . .60
PC Card slot . . . . . . . . . . . . . . . . . . . . . . . . . . . . . . . . . . . . . . . . . . . . . . . . . . . .60
USB devices . . . . . . . . . . . . . . . . . . . . . . . . . . . . . . . . . . . . . . . . . . . . . . . . . . . . . . .62
IEEE 1394 devices . . . . . . . . . . . . . . . . . . . . . . . . . . . . . . . . . . . . . . . . . . . . . . . . . .63
Miscellaneous options . . . . . . . . . . . . . . . . . . . . . . . . . . . . . . . . . . . . . . . . . . . . . . .64
Additional AC adapters and batteries . . . . . . . . . . . . . . . . . . . . . . . . . . . . . . . .64
Battery . . . . . . . . . . . . . . . . . . . . . . . . . . . . . . . . . . . . . . . . . . . . . . . . . . . . . . . .64
AC adapter . . . . . . . . . . . . . . . . . . . . . . . . . . . . . . . . . . . . . . . . . . . . . . . . . . . . .64
Key component upgrades . . . . . . . . . . . . . . . . . . . . . . . . . . . . . . . . . . . . . . . . . . . . .65
Memory upgrade . . . . . . . . . . . . . . . . . . . . . . . . . . . . . . . . . . . . . . . . . . . . . . . .65
Hard drive upgrade . . . . . . . . . . . . . . . . . . . . . . . . . . . . . . . . . . . . . . . . . . . . . .65
5 Moving with Your Notebook . . . . . . . . . . . . . . . . . . . . . . . . . . . . . . . . . . . . .67
Disconnecting from peripheral devices . . . . . . . . . . . . . . . . . . . . . . . . . . . . . . . . . .68
Moving around . . . . . . . . . . . . . . . . . . . . . . . . . . . . . . . . . . . . . . . . . . . . . . . . . . . . .69
Preparing your notebook . . . . . . . . . . . . . . . . . . . . . . . . . . . . . . . . . . . . . . . . . .69
What to bring to short meetings . . . . . . . . . . . . . . . . . . . . . . . . . . . . . . . . . . . .69
What to bring to long meetings . . . . . . . . . . . . . . . . . . . . . . . . . . . . . . . . . . . . .69
Taking the notebook home . . . . . . . . . . . . . . . . . . . . . . . . . . . . . . . . . . . . . . . . . . . .70
Preparing your notebook . . . . . . . . . . . . . . . . . . . . . . . . . . . . . . . . . . . . . . . . . .70
What to bring with you . . . . . . . . . . . . . . . . . . . . . . . . . . . . . . . . . . . . . . . . . . . .70
Special considerations . . . . . . . . . . . . . . . . . . . . . . . . . . . . . . . . . . . . . . . . . . . .71
ii
Page 5

Setting up a home office . . . . . . . . . . . . . . . . . . . . . . . . . . . . . . . . . . . . . . . . . . 71
Traveling with your notebook . . . . . . . . . . . . . . . . . . . . . . . . . . . . . . . . . . . . . . . . . 72
Preparing your notebook . . . . . . . . . . . . . . . . . . . . . . . . . . . . . . . . . . . . . . . . . 72
What to bring with you . . . . . . . . . . . . . . . . . . . . . . . . . . . . . . . . . . . . . . . . . . . 72
Special considerations . . . . . . . . . . . . . . . . . . . . . . . . . . . . . . . . . . . . . . . . . . . 72
Traveling internationally with your notebook . . . . . . . . . . . . . . . . . . . . . . . . . . . . . . 73
Preparing your notebook . . . . . . . . . . . . . . . . . . . . . . . . . . . . . . . . . . . . . . . . . 73
What to bring with you . . . . . . . . . . . . . . . . . . . . . . . . . . . . . . . . . . . . . . . . . . . 73
Special considerations . . . . . . . . . . . . . . . . . . . . . . . . . . . . . . . . . . . . . . . . . . . 73
6 Using Installed Programs and Utilities . . . . . . . . . . . . . . . . . . . . . . . . . . 75
System software . . . . . . . . . . . . . . . . . . . . . . . . . . . . . . . . . . . . . . . . . . . . . . . . . . . 76
Launch Manager . . . . . . . . . . . . . . . . . . . . . . . . . . . . . . . . . . . . . . . . . . . . . . . . . . . 76
BIOS Setup utility . . . . . . . . . . . . . . . . . . . . . . . . . . . . . . . . . . . . . . . . . . . . . . . . . . 77
Setting a password . . . . . . . . . . . . . . . . . . . . . . . . . . . . . . . . . . . . . . . . . . . . . . 77
7 Troubleshooting . . . . . . . . . . . . . . . . . . . . . . . . . . . . . . . . . . . . . . . . . . . . . . . . 81
Frequently-asked questions . . . . . . . . . . . . . . . . . . . . . . . . . . . . . . . . . . . . . . . . . . 82
Error messages . . . . . . . . . . . . . . . . . . . . . . . . . . . . . . . . . . . . . . . . . . . . . . . . . . . . 85
Telephone support . . . . . . . . . . . . . . . . . . . . . . . . . . . . . . . . . . . . . . . . . . . . . . . . . . 87
Before calling Gateway Technical Support . . . . . . . . . . . . . . . . . . . . . . . . . . . 87
Telephone numbers . . . . . . . . . . . . . . . . . . . . . . . . . . . . . . . . . . . . . . . . . . . . . 88
Tutoring and training . . . . . . . . . . . . . . . . . . . . . . . . . . . . . . . . . . . . . . . . . . . . . . . . 89
Self-help . . . . . . . . . . . . . . . . . . . . . . . . . . . . . . . . . . . . . . . . . . . . . . . . . . . . . . 89
Tutoring . . . . . . . . . . . . . . . . . . . . . . . . . . . . . . . . . . . . . . . . . . . . . . . . . . . . . . . 89
Training . . . . . . . . . . . . . . . . . . . . . . . . . . . . . . . . . . . . . . . . . . . . . . . . . . . . . . . 90
A Specifications. . . . . . . . . . . . . . . . . . . . . . . . . . . . . . . . . . . . . . . . . . . . . . . . . . . 91
Microprocessor . . . . . . . . . . . . . . . . . . . . . . . . . . . . . . . . . . . . . . . . . . . . . . . . . 92
Memory . . . . . . . . . . . . . . . . . . . . . . . . . . . . . . . . . . . . . . . . . . . . . . . . . . . . . . . 92
Data storage . . . . . . . . . . . . . . . . . . . . . . . . . . . . . . . . . . . . . . . . . . . . . . . . . . . 92
Display and video . . . . . . . . . . . . . . . . . . . . . . . . . . . . . . . . . . . . . . . . . . . . . . . 92
Audio . . . . . . . . . . . . . . . . . . . . . . . . . . . . . . . . . . . . . . . . . . . . . . . . . . . . . . . . . 93
Keyboard and pointing device . . . . . . . . . . . . . . . . . . . . . . . . . . . . . . . . . . . . . 93
I/O ports . . . . . . . . . . . . . . . . . . . . . . . . . . . . . . . . . . . . . . . . . . . . . . . . . . . . . . 93
Weight and dimensions . . . . . . . . . . . . . . . . . . . . . . . . . . . . . . . . . . . . . . . . . . 93
Environment . . . . . . . . . . . . . . . . . . . . . . . . . . . . . . . . . . . . . . . . . . . . . . . . . . . 94
Operating System . . . . . . . . . . . . . . . . . . . . . . . . . . . . . . . . . . . . . . . . . . . . . . . 94
Power . . . . . . . . . . . . . . . . . . . . . . . . . . . . . . . . . . . . . . . . . . . . . . . . . . . . . . . . 94
iii
Page 6

B Safety, Regulatory, and Legal Information. . . . . . . . . . . . . . . . . . . . . . .95
Index. . . . . . . . . . . . . . . . . . . . . . . . . . . . . . . . . . . . . . . . . . . . . . . . . . . . . . . . . . . . . . 105
iv
Page 7

Getting Started
Read this chapter to learn how to:
■ Connect and start your notebook
■ Care for your notebook
1
1
Page 8
Chapter 1: Getting Started
Connecting and starting your notebook
To connect and start your notebook:
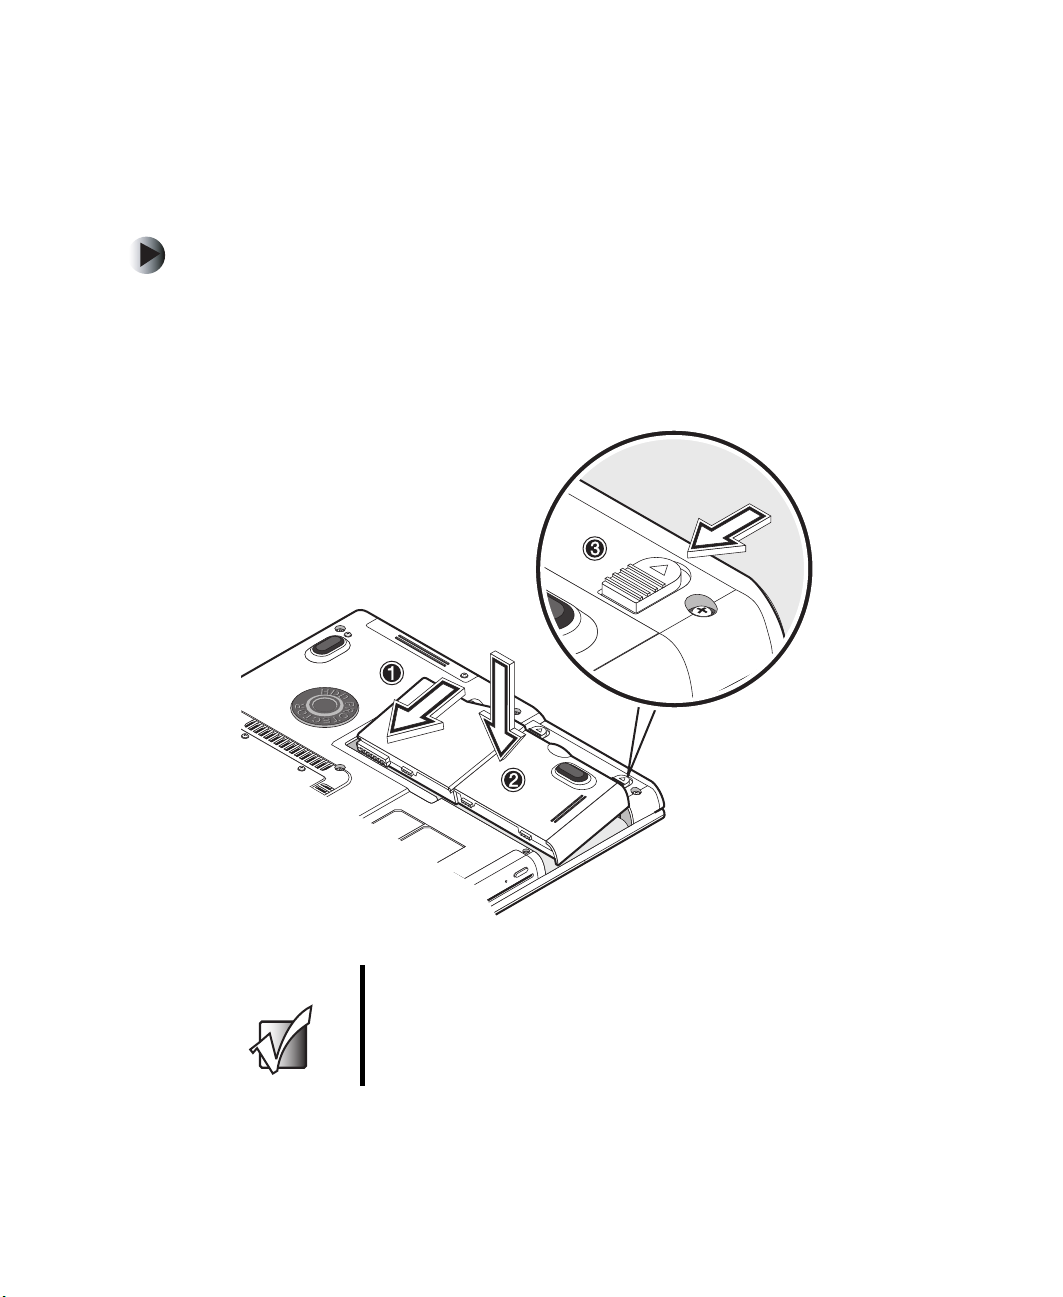
1 Turn your notebook over so the bottom is facing up.
2 Insert the battery at an angle (1), press gently on the battery (2) until it
clicks into place. Then slide the battery lock latch into the locked
position 3).
Important When using a battery for the first time, fully recharge the
battery, then disconnect the adapter to use up the battery
charge before recharging again. Perform this action twice
to condition the battery.
2
www.gateway.com
Page 9
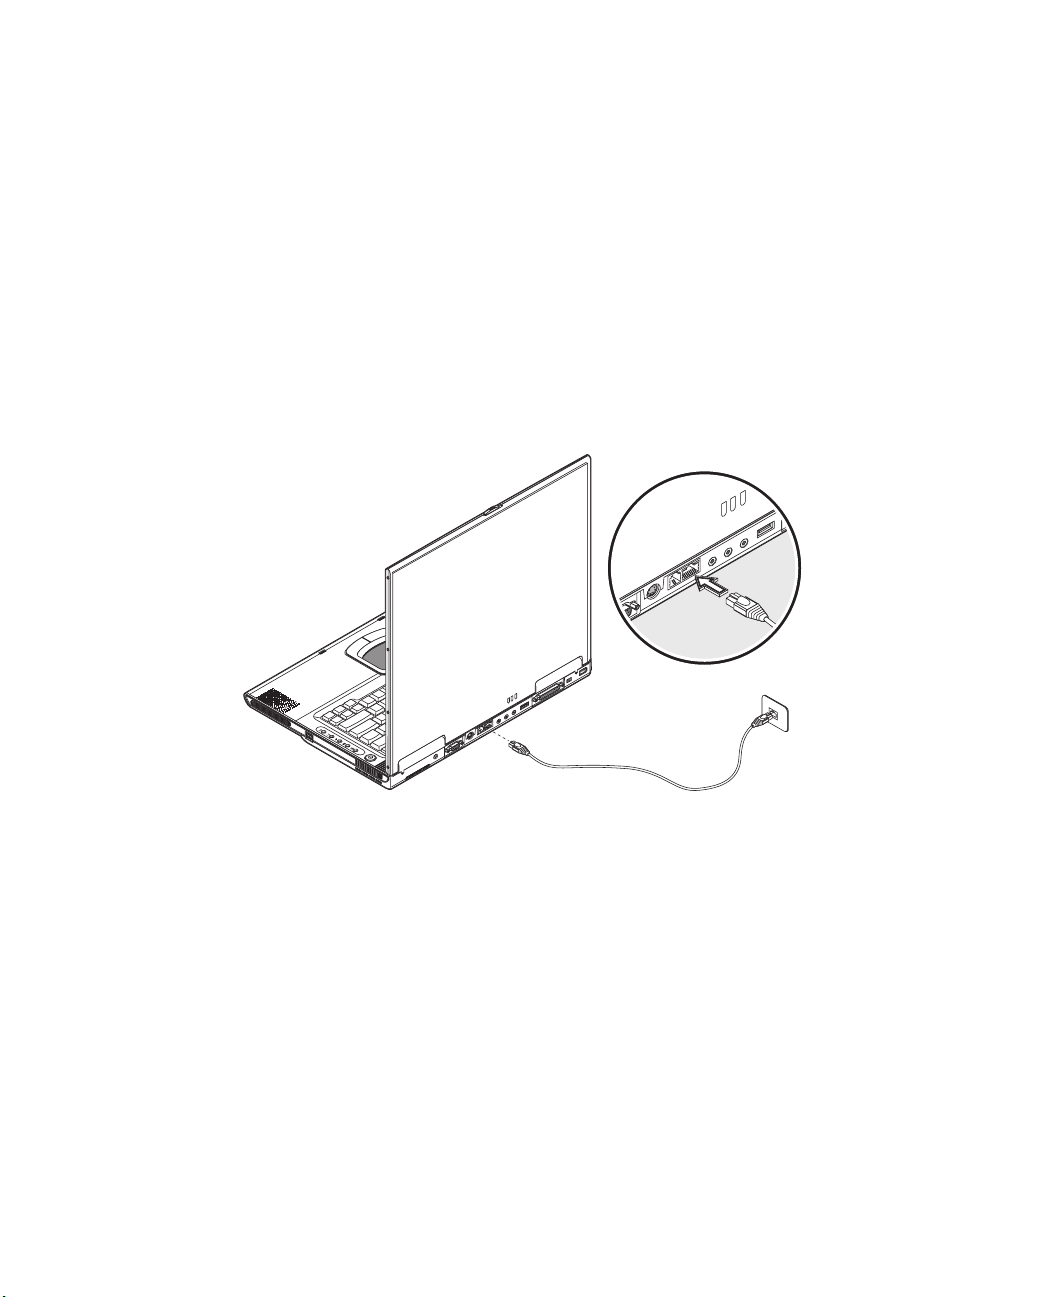
Connecting and starting y our notebook
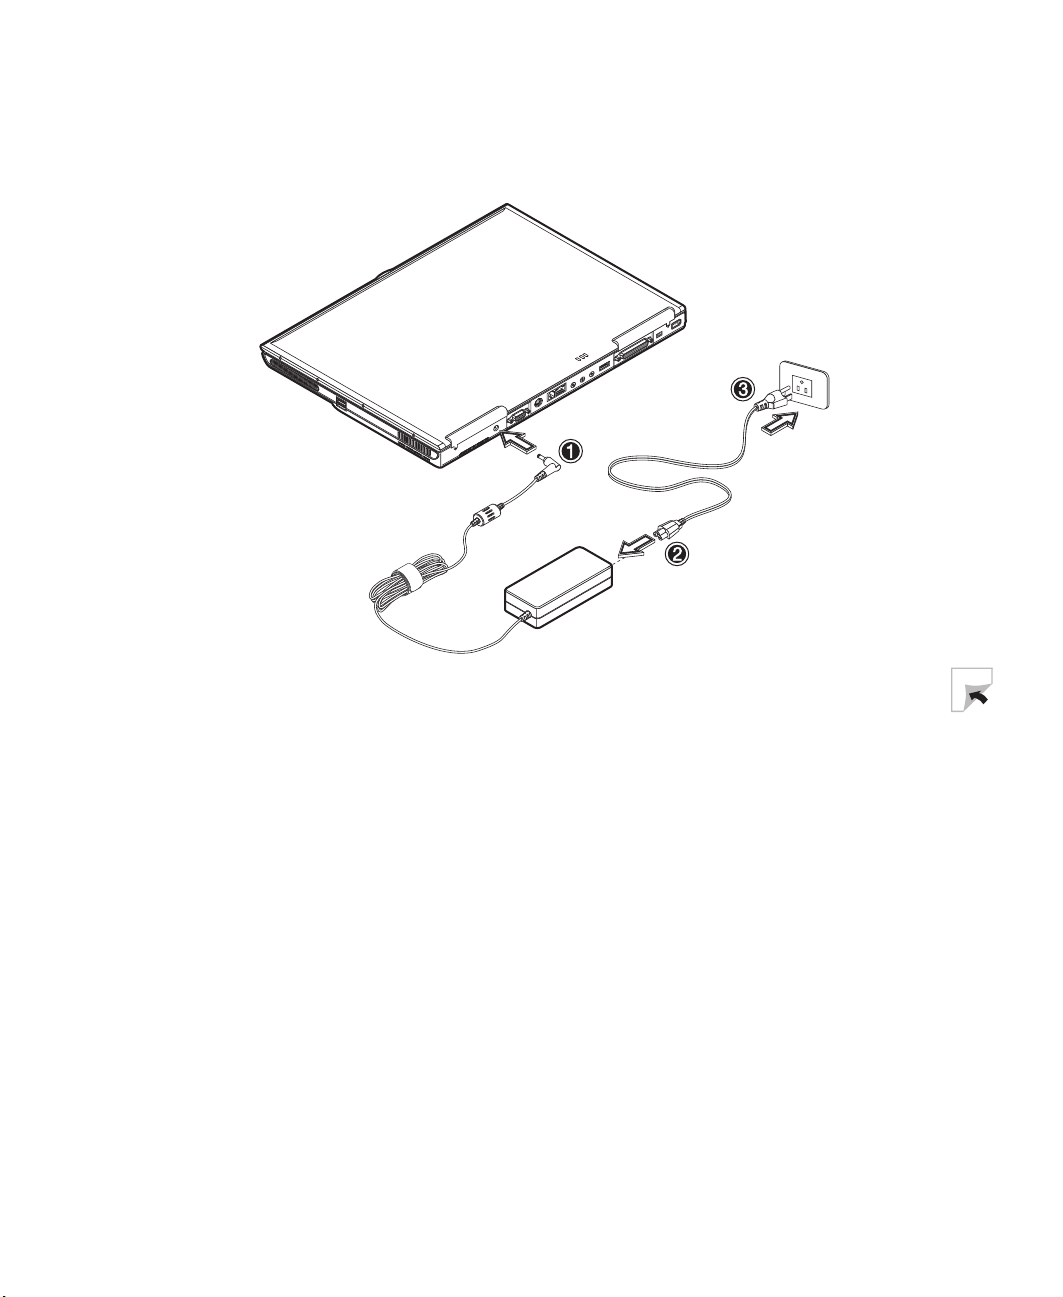
3 Connect one end of the AC adapter to the power connector on the back
of your notebook and the other end to a correctly grounded electrical
outlet.
www.gateway.com
3
Page 10
Chapter 1: Getting Started
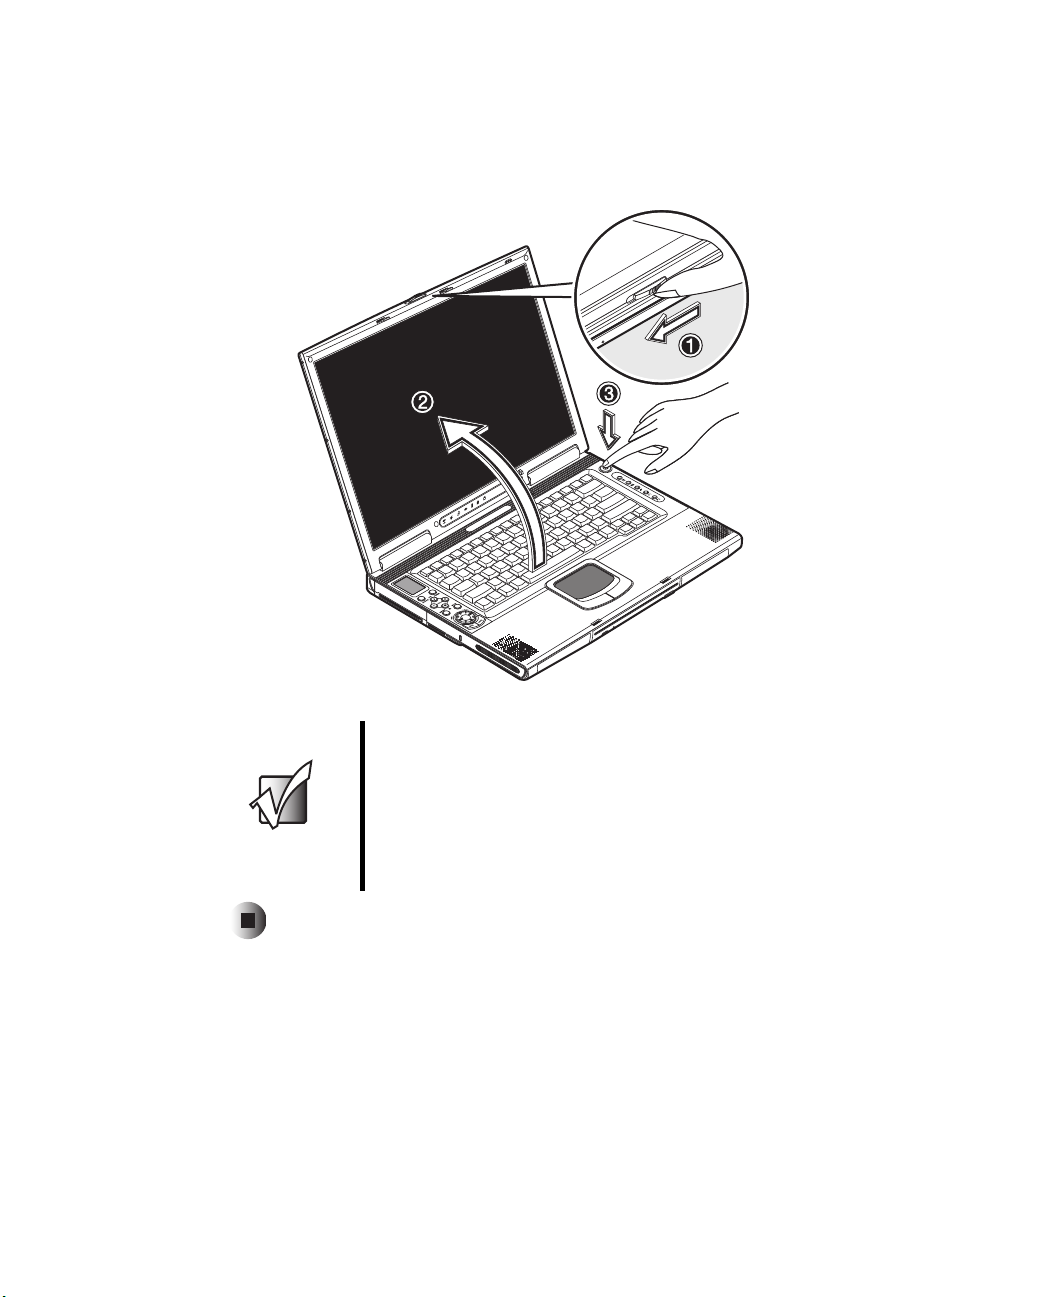
4 Slide the cover release latch to the left (1) to open the LCD panel (2). Press
the power button (3) to turn on the power. The POST (power-on self-test)
routine executes and Windows begins loading.
Important T o turn off y our notebook, we recommend that y ou use the
Windows Turn Off option to shut down your notebook. If
you are unab le to shut down y our notebook normally, press
and hold the power button for more t han four s econd s to
turn off your notebook. If you tur n off your notebook and
want to turn it on again, wait at least two seconds before
turning it on.
4
www.gateway.com
Page 11

Care and maintenance
T aking care of y our notebook
■ Do not expose your notebook to direct sunlight. Do not place it near
sources of heat, such as a radiator.
■ Do not expose your notebook to temperatures below 32ºF (0ºC) or above
122ºF (50ºC).
■ Do not subject your notebook to magnetic fields.
■ Do not expose your notebook to rain or moisture.
■ Do not spill water or any liquid on your notebook.
■ Do not subject your notebook to heavy shock and vibration.
■ Do not expose your notebook to dust and dirt.
■ Never place objects on top of your notebook.
■ Never place your notebook on uneven surfaces.
Care and maintenance
T akin g care of your A C adapter
■ Do not connect the adapter to any other device.
■ Do not step on the power cord or place heavy objects on top of it. Carefully
route the power cord and any cables away from all potential traffic.
■ When unplugging the power cord, do not pull on the cord itself. Instead,
pull on the plug.
■ The total ampere ratings of the equipment plugged into an extension cord
should not exceed the ampere rating of the cord.
www.gateway.com
5
Page 12

Chapter 1: Getting Started
T aking care of y our battery
■ Use only batteries of the same kind as replacements. Turn off your
notebook before removing or replacing batteries.
■ Do not tamper with batteries. Keep them away from children.
■ Dispose of used batteries according to local regulations. Recycle if at all
possible.
Cleaning and servicing
To clean your notebook:
1 Turn off your notebook, then remove the battery.
2 Disconnect the AC adapter.
3 Use a soft cloth moistened with water. Do not use liquid or aerosol cleaners.
Contact Gateway if any of the following occurs:
■ Your notebook has been dropped or the case has been damaged.
■ Liquid has been spilled into your notebook.
■ Power cords or plugs are damaged.
6
www.gateway.com
Page 13

Getting Familiar
with Your
Notebook
Read this chapter to learn about:
■ Components, ports, and jacks
■ Features of your notebook
2
7
Page 14
Chapter 2: Getting Familiar wi th Your Notebook
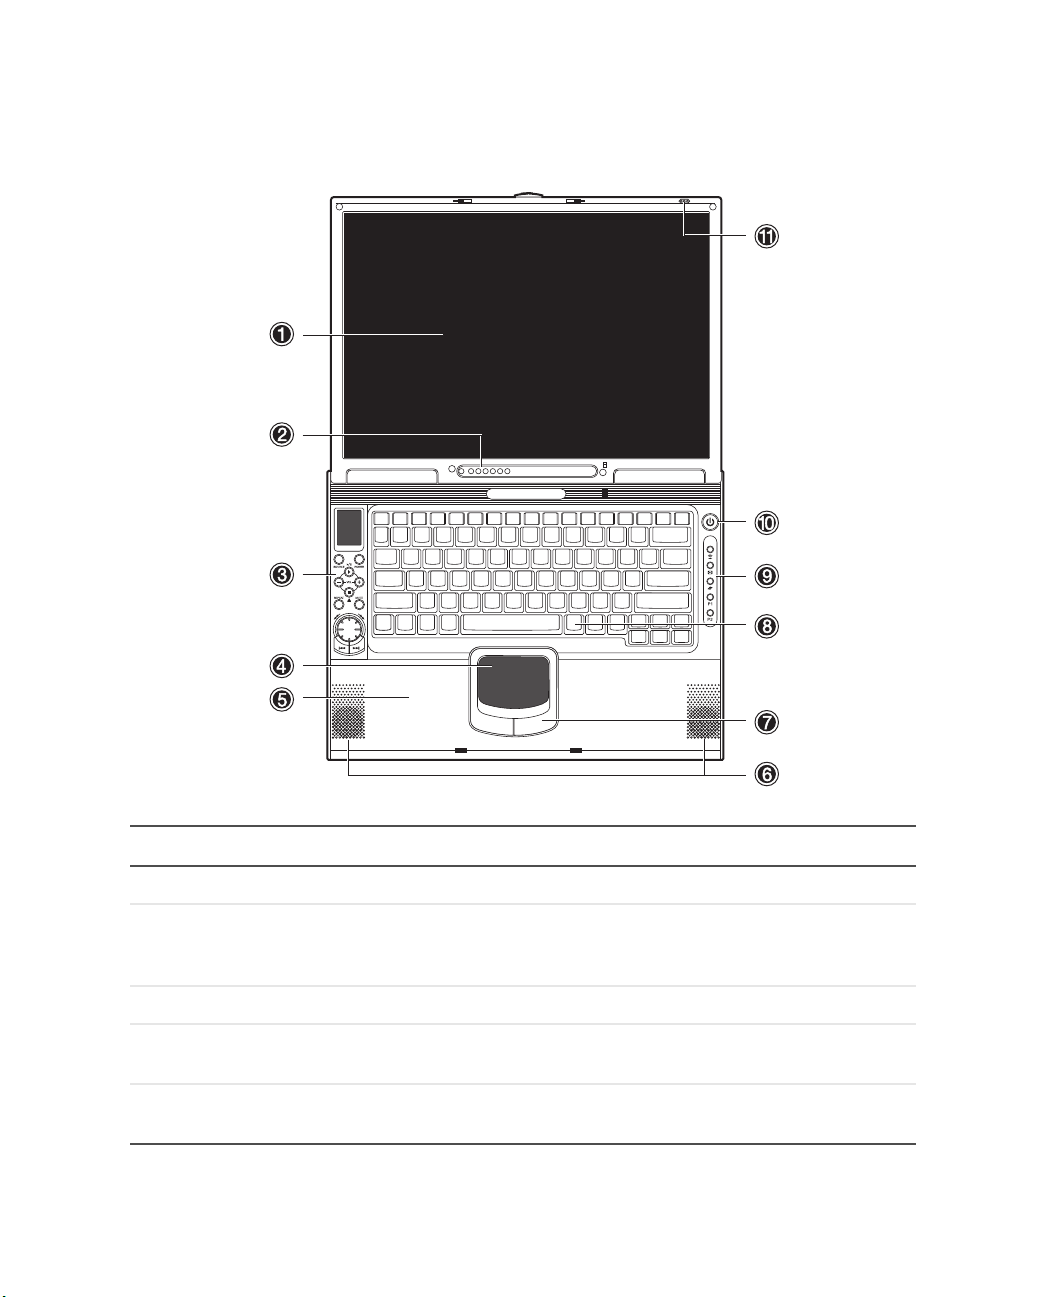
Top
# Item Icon Description
1 LCD panel Displays notebook output.
2 Status indicators LEDs (light-emitting diodes) that turn on and
off to show the status of you r notebook and its
functions and components.
3 AV control panel Control buttons for playing audio/video media.
4 Touchpad Touch-sensitive pointing device which
functions like a mouse.
5 Palm rest Comfortable support area for your ha nds when
you use your notebook.
8
www.gateway.com
Page 15
# Item Icon Description
6 Speakers Output sound.
Top
7 Touchpad buttons
(left and right)
8 Keyboard Inputs data into your notebook.
9 Multi-function buttons Buttons for ope ning frequently use d programs.
10 Power button Turns on your notebook power.
11 Microphone Inputs sounds and voices into your notebook.
The left and right buttons function like the left
and right mouse butto ns.
See “Multi-function buttons” on page 29 for
more details.
www.gateway.com
9
Page 16
Chapter 2: Getting Familiar wi th Your Notebook
Front
# Item Description
1 Battery bay Insert the battery into this bay.
2 Eject button Press to eject the CD or DVD.
3 DVD/CD-RW drive
indicator
4 DVD/CD-RW drive Inser t CDs or DVDs into th is drive.
5 IR sensor Sends and receives data for an IR (infrared)
6 Subwoofer The subwoofer is located in this bay.
7 Cover release latch Slide the release latch to the left to open your
This LED lights up when the DVD/CD-RW drive is
in use.
device, such as an IR p rinter.
notebook.
10
www.gateway.com
Page 17
Left
# Item Icon Description
1 Hard drive bay The hard drive is located in this bay.
2 PC Card slot Inser t one Type II 16-bit PC Card or 32-bit
CardBus PC Card into this slot.
3 PC Card eject butto n Press to remove the PC Card from the PC card
slot.
4 SD memory card slot Insert an SD (Secured Digital) memory card
into this s lot.
Left
5 Kensington™ lock slot Secure your notebook to an object by
connecting a K ensing ton cabl e lock t o this slot.
www.gateway.com
11
Page 18

Chapter 2: Getting Familiar wi th Your Notebook
Right
# Item Icon Description
1 USB ports Plug USB (Universal Serial Bus ) devices (such
2 Ventilation fan Helps cool internal components. Do not block
as a USB Iom ega™ Zip™ drive, pr inter,
scanner, camera, keyboard, or mouse) into
these ports.
or insert objects into these slots.
12
www.gateway.com
Page 19
Back
# Item Icon Description
1 Power connector Plug the AC adapter cable into this connector.
2 External monitor port Plug an external VGA monitor into this port.
3 S-Video jack Plug an S-Video device (such as a television)
into this jack.
4 Modem jack Plug a modem cable into this jack.
5 Network jack Plug a 10/100 Ethernet network cab le into thi s
jack.
Back
6 Microphone jack Plug a microphone into this jack.
7 Line-in jack Plug an audio device (such as a stereo) into
this jack.
8 Headphone jack Plug amplified speakers or headphones into
this jack. The built-in speakers are turned off
when speakers or headphones are plugged
into this jack.
9 USB port Plug a USB (Universal Serial Bus) device
(such as a USB Iomega™ Zip™ driv e, printer ,
scanner, camera, keyboard, or mouse) into
this port.
10 Parallel port Plug a parallel device (such as a printer) into
this port.
www.gateway.com
13
Page 20

Chapter 2: Getting Familiar wi th Your Notebook
# Item Icon Description
11 IEEE 1394 port (4-pin) Plug an IEEE 1394® (also known as FireWire®
12 IEEE 1394 port (6-pin) Plug an IEEE 1394 (also kno wn as FireWire or
®
or iLink
camera) into this 4-pin IEEE 1394 port.
iLink) device (such as a digital video camera)
into this 6-pin IEEE 1394 port.
) device (such as a digital video
14
www.gateway.com
Page 21

Bottom
# Item Icon Description
1 Battery lock latch Slide to unlock the battery.
Bottom
2 Battery release latch Slide to remove the battery.
3 Battery bay Insert the battery into this bay.
4 Hard drive bay The hard drive is located in this bay.
5 Hard drive protector Protects the hard driv e from acci dental bu mps
and vibrations.
6 Memory bay The memory modules are located in this bay.
www.gateway.com
15
Page 22

Chapter 2: Getting Familiar wi th Your Notebook
Features
This notebook was designed with the user in mind. Here are just a few of its
many features:
Performance
■ Mobile Intel® Pentium™ 4 Processor - M with Enhanced Intel®
SpeedStep™ technology
■ 512K on-die L2 cache
■ 15.2” 15:10 SXGA (1280x854) widescreen TFT LCD panel
■ nVidia® GeForce4 Go™ high-performance graphics chipset with 32MB
frame buffer
■ Onboard memory upgradeable to 1024 MB with 2 DDR-266 SoDIMM
■ High-capacity, Enhanced-IDE hard drive
■ Lithium-Ion battery
■ Power management system
■ Dual-display capability
16
■ Simultaneous LCD and CRT display
■ LCD panel supports resolution up to 1280x854
■ VGA monitor supports resolution up to 2048x1536
■ Embedded TV encoder supports resolution up to 1024x768
Multimedia
■ AV control panel
■ Playback MP3 through SD, HDD, or Audio CD with system off
■ Audio Codec support stereo 18-bit ADC/20-bit DAC
■ AC’97 2.2 compliant stereo audio
■ Headphone jack
■ Enhanced audio system with 2 speakers and a subwoofer
■ Built-in microphone
■ Slot-loading DVD/CD-RW drive
■ S-Video output jack
www.gateway.com
Page 23

Connectivity
■ High-speed fax/data software modem
■ Onboard PCI 10/100 Mbps LAN support
■ Fast infrared wireless communication
■ 3 USB (Universal Serial Bus) ports (2.0)
■ 2 IEEE 1394 ports (one unpowered 4-pin port and one powered 6-pin port)
■ 802.11b wireless LAN
Human-centric design and er gonomics
■ Sleek, smooth, and stylish design
■ Full-sized keyboard
■ Ergonomically-centered touchpad pointing device
■ Multi-function buttons
Expansion
■ Upgradeable memory
Features
www.gateway.com
17
Page 24

Chapter 2: Getting Familiar wi th Your Notebook
LCD panel
The graphics display offers excellent viewing, display quality, and
desktop-performance graphics. Your notebook supports a widescreen Thin-Film
Transistor (TFT) liquid crystal display (LCD) displaying up to 16.7 million colors
at 1280 × 854 Super eXtended Graphics Array (SXGA) resolution.
Simultaneous displa y
Your notebook’s crisp display and multimedia capabilities are great for giving
presentations. If you prefer, you can also connect an external monitor when
giving presentations. This notebook supports simultaneous LCD and CRT
display. Simultaneous display allows you to control the presentation from your
notebook and at the same time face your audience. You can also connect other
output display devices such as LCD projection panels for large-audience
presentations.
Power mana gement
The power management system incorporates an “automatic LCD dim” feature
that automatically dims the LCD when your notebook is powered by a battery
to conserve battery power. See “Managing Power” on page 45 for more
information on power management features.
Opening and closing the LCD panel
To open the display, slide the cover release latch to the left and lift up the LCD
panel, then tilt it to a comfortable viewing position. See “Connecting and
starting your notebook” on page 2. Your notebook employs a microswitch that
turns off the LCD panel (enters Standby mode) to conserve power when you
close the LCD panel, and turns it back on when you open the LCD panel.
Important If an external monitor is connected, your notebook turns
off the LCD panel (but does not enter Standb y mode) when
you close the LCD panel.
To close the LCD panel, fold it down gently until the cover release latch clicks
into place.
Warning T o avoid damaging the LCD panel, do not slam it when you
close it. Also, do not place any object o n top of your
notebook when the LCD panel is closed.
18
www.gateway.com
Page 25
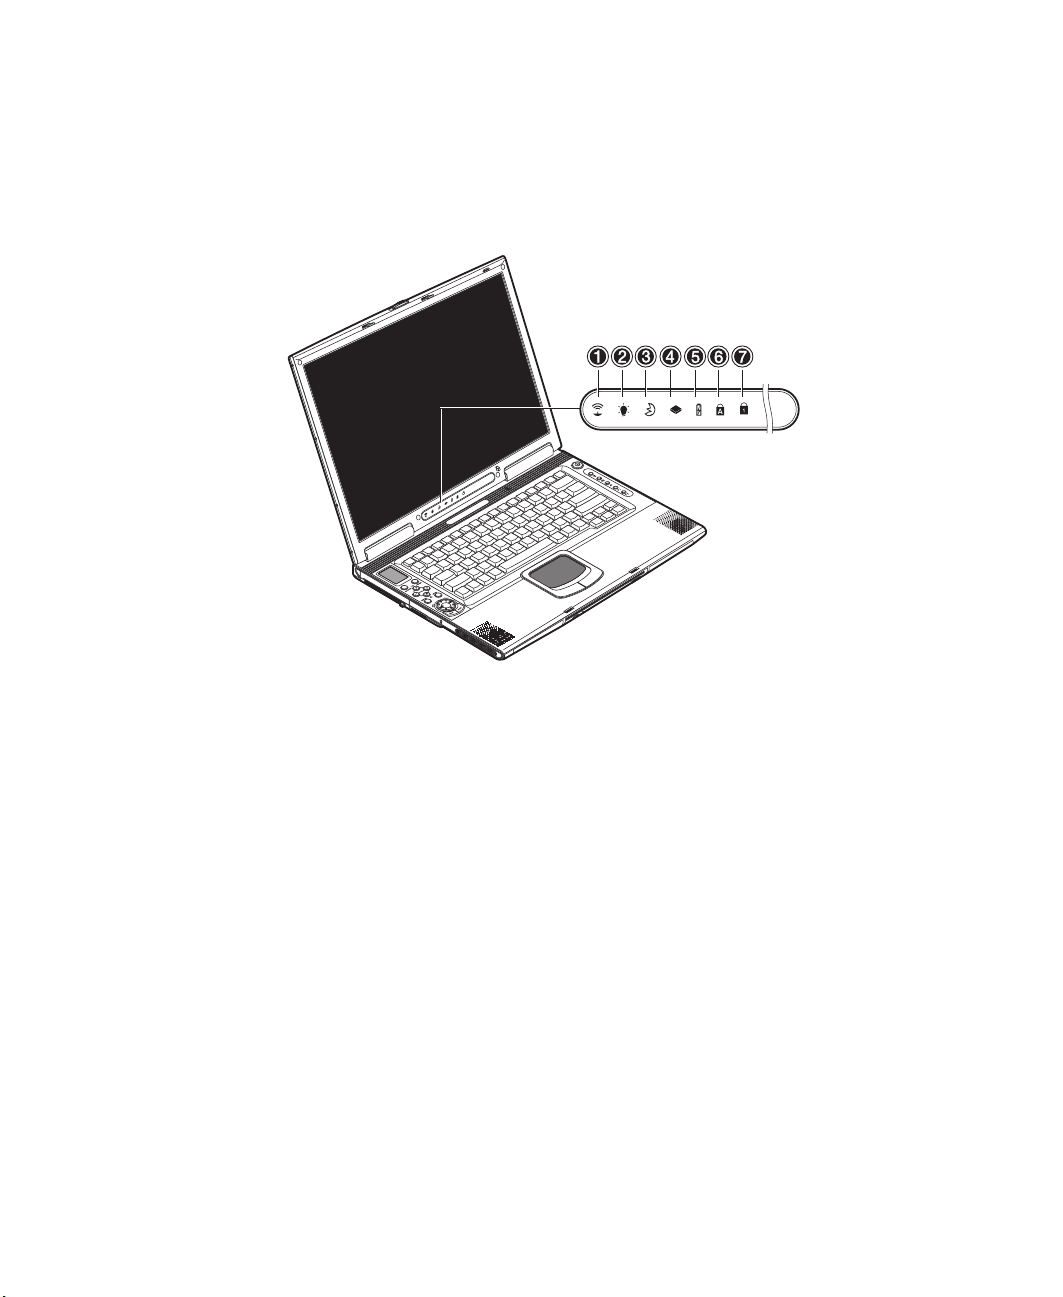
Status indicators
Your notebook has seven easy-to-read status indicators (LEDs) under the LCD
panel.
Status indicators
The Power and Standby indicators are visible even when you close the LCD
panel so you can see the status of your notebook while the cover is closed.
www.gateway.com
19
Page 26
Chapter 2: Getting Familiar wi th Your Notebook
# Item Icon Description
1 Wireless
communication
2 Power Lights when your notebook is on.
3 Standby Blinks when notebook enters Hibernation
4 Media activity Lights when the hard drive or DVD/CD-RW
5 Battery charge Lights when the battery is being charged.
6 Caps Lock Lights when Caps Lock is activated.
7Num lock
FN+F11)
(
Lights when the W ireless LA N capabili ties are
enabled.
Blinks when a batter y-low co ndition oc curs.
mode.
drive is acti ve.
Lights when Numeric Lock is activated.
20
www.gateway.com
Page 27
Keyboard
The keyboard has full-sized keys with an embedded keypad, separate cursor
keys, two Windows keys, and twelve function keys.
Special keys
Lock keys
The keyboard has three lock keys which you can toggle on and off.
Keyboard
Lock Description
Caps Lock When Caps Lock is on, all alphabetic characters typed
are in uppercase.
Num Lock
FN+F11)
(
Scroll Lock
(Fn+F12)
When Num Lock is on, the embedded keypad is in
numeric mode. The keys function as a calculator
(complete with the arithmetic operators +, -, *, and /). U se
this mode wh en you need t o do a lot of numeric d ata
entry. A better solution would be to connect an external
keyboard. See “External keyboard” on page 56.
When Scroll Lock is on, the screen moves one line up
or down when yo u pre ss ↑ or ↓ respec tively. Scroll L ock
does not work with some programs.
www.gateway.com
21
Page 28
Chapter 2: Getting Familiar wi th Your Notebook
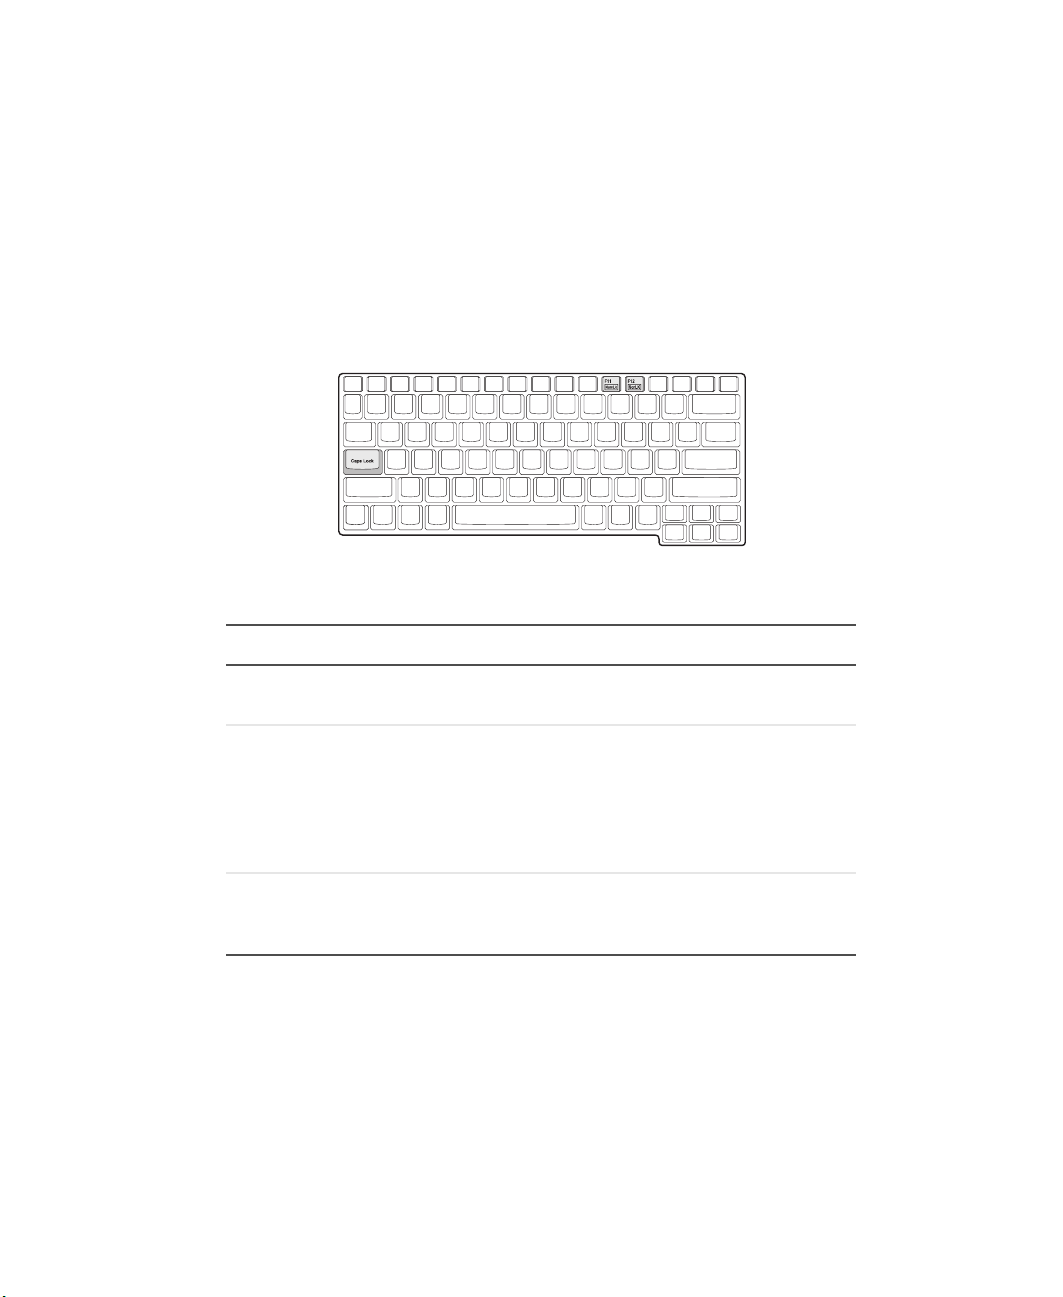
Embedded numer ic keypad
The embedded numeric keypad functions like a desktop numeric keypad. It is
indicated by small characters located on the upper-right corner of the key caps.
To simplify the keyboard legend, cursor-control key symbols are not printed
on the keys
Desired Access Num Lock On Num Lock Off
Number keys on
embedded keypad
Cursor-control keys
on embedded keypad
Main keyboa rd key s Hold
Important If an external ke yboa rd is connecte d to yo ur notebook , the
Num Lock feature automatically shifts from the internal
keyboard to the external keyboard.
T ype numbers in a normal
manner.
SHIFT while using
Hold
cursor-control keys.
FN while typin g
letters on the embedded
keypad.
Hold FN while
using
cursor-control
keys.
Type the letters in
a normal manner.
22
www.gateway.com
Page 29
Windows keys
The keyboard has two keys that perform Windows-specific functions.
Key Description
Keyboard
Windows logo
key
Applicat ion key Opens the p rogram’s context menu (s ame as a
Start button. Combinations with th is k e y perform special
functions. Below are a few examples:
+ TAB (Activates next taskbar button)
á
+ E (Opens My Computer)
á
+ F (Finds a file)
á
+ M (Minimizes All)
á
SHIFT +
+ R (Displays Run dialog box)
á
right-click).
+ M (Undoes Minimize All)
á
Hotkeys
Your notebook employs hotkeys or key combinations to access most of your
notebook’s controls like screen contrast and brightness and the BIOS Setup
utility.
www.gateway.com
23
Page 30
Chapter 2: Getting Familiar wi th Your Notebook
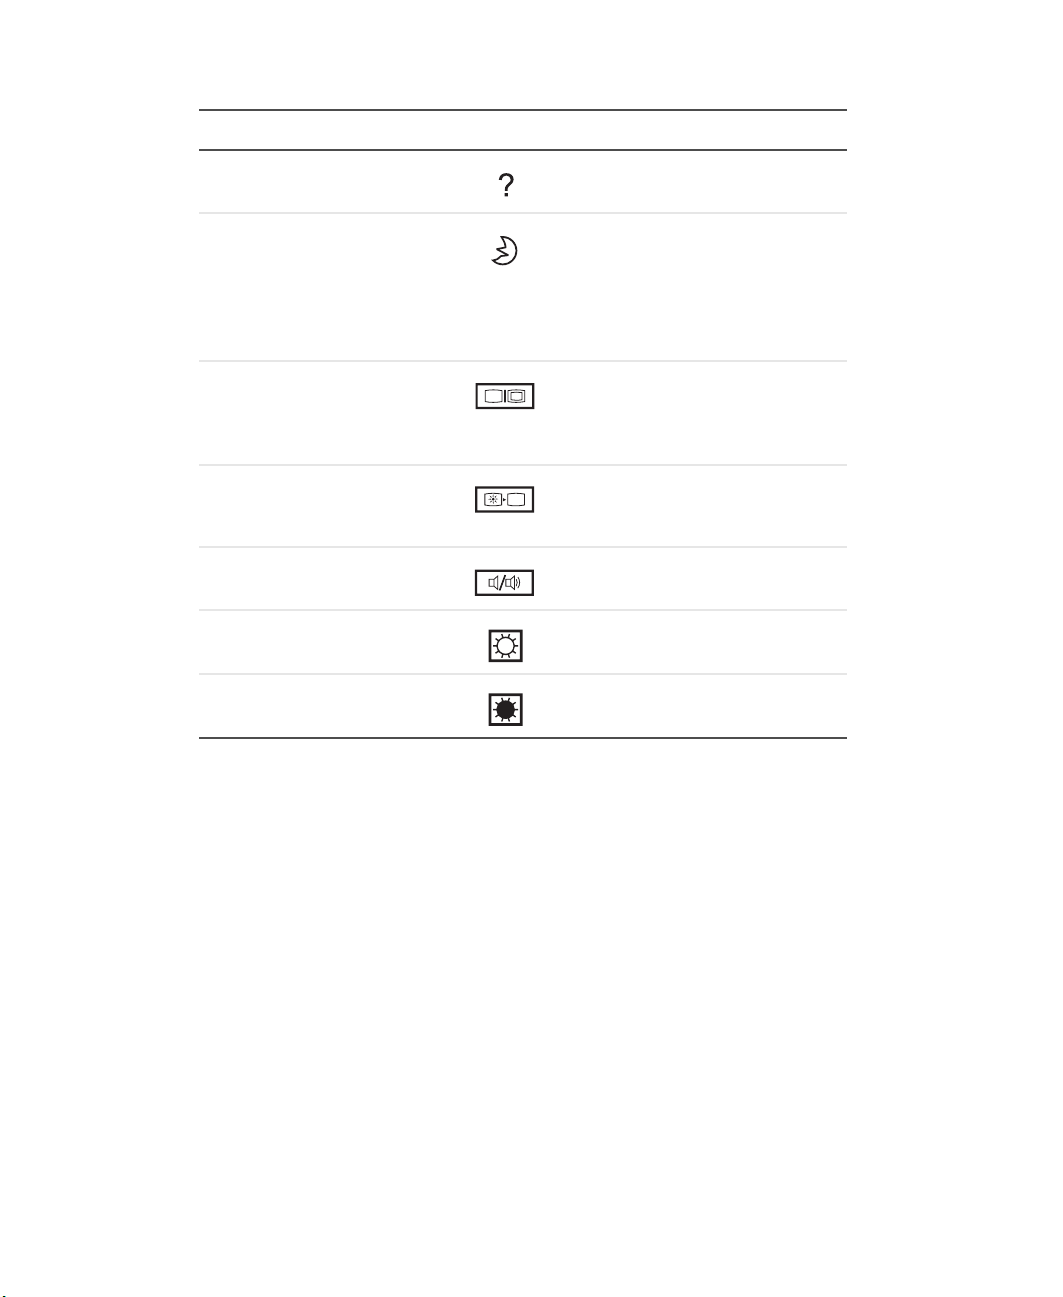
Hot Key Function Icon Description
N+F1
F
FN+F2
FN+F3
FN+F4
FN+F5
Hotkey help Displays a list o f the hotkeys an d
their functions.
Standby Puts your notebook in
StandbyStand by mode, which
can be defined through the
advanced section of the Power
Management Properties in the
Windows Cont rol Panel.
Display toggle Switches display output between
the LCD panel, an external
monitor (if connected), or bot h the
LCD panel and external monitor.
Screen blank T u rns the LCD panel b acklight o ff
to save power. Press any key to
return.
Speaker on/off Turns the speakers on and off
(mutes the sound).
FN+ ↑ Brightness up Increases the screen brightness.
FN+ ↓ Brightness
down
Decreases the scree n brightness.
Activating hotkeys
When activating hotkeys, press and hold the FN key before pressing the other
key in the hotkey combination.
24
www.gateway.com
Page 31

Keyboar d ergonomics
Located below the keyboard, the wide and curved palm rest is ergonomically
designed to provide you with a comfortable place to rest your hands while you
type.
Keyboard
www.gateway.com
25
Page 32

Chapter 2: Getting Familiar wi th Your Notebook
Touchpad
The built-in touchpad is a pointing device that senses movement on its surface.
This means the cursor responds as you move your finger on the surface of the
touchpad. The central location on the palm rest provides optimum comfort and
support.
26
www.gateway.com
Page 33

T ouc hpad basics
Important Keep y our fing ers dry and c lean when using t he touch pad.
Also keep the touchpad dry and clean. The touchpad is
sensitive to finger movements. Therefore, the lighter the
touch, the better the response. Tapping too hard will not
increase the touchpad’s responsiveness.
To use the touchpad:
Touchpad
■ Move your finger across the touchpad to move the cursor.
■ Press the left (1) and right (2) buttons located on the edge of the touchpad
to make selections and run functions. These two buttons are similar to the
left and right buttons on a mouse. Tapping on the touchpad produces
similar results.
www.gateway.com
27
Page 34

Chapter 2: Getting Familiar wi th Your Notebook
Function Left Button Right Button Tap
Execute Click twice quickly. Tap twice (at the
Select Click once. Tap o nce.
same speed as
double-clicking the
mouse button).
Drag Click and hold, th en
use your finger to
drag the curs or on
the touchpad.
Access context
menu
Tap twice (at the
same speed as
double-clicking the
mouse button) and
hold your finger to
the touchpad on the
second tap to drag
the cursor.
Click once.
28
www.gateway.com
Page 35

Multi-function b uttons
Multi-function buttons
Located at the top of the keyboard are five multi-function buttons used to open
frequently used programs or functions.
www.gateway.com
29
Page 36

Chapter 2: Getting Familiar wi th Your Notebook
# Item Icon Description
1 Wireless
communication
2 E-mail Press this to open the e-mail program.
3 Internet browser Press this button to open your Internet
4 P1 This button is user-programmable. For more
5 P2 This button is user-programmable. For more
Press this button to turn the Wireless LAN
function on and off. F or mo re information, see
“Wireless communication” on page 36.
browser.
information about programming buttons, see
“Launch Manager” on page 76.
information about programming buttons, see
“Launch Manager” on page 76.
30
www.gateway.com
Page 37

Storage
This notebook supplies you with the following media storage:
■ High-capacity Enhanced-IDE hard drive
■ Slot-loading DVD/CD-RW drive
■ Secure Digital (SD) slot
Hard d rive
The high-capacity hard drive is the answer to your storage needs. This is where
your programs and data are stored.
Optical drive
A high-speed optical drive (DVD/CD-RW drive) gives you portable multimedia
access and at the same time lets you burn your data onto a recordable CD.
Inserting the disc
This notebook features a slot-loading optical drive. To insert a disc into the
optical drive, gently push the disc into the slot and the drive will lock the disc
in place and pull it inside.
Storage
www.gateway.com
31
Page 38

Chapter 2: Getting Familiar wi th Your Notebook
Ejecting the dis c
To eject the disc from the slot, press the eject button and wait for the drive to
eject the disc.
32
www.gateway.com
Page 39

Playing D VD movies
To play DVD movies in your notebook, insert the DVD into the drive and the
DVD movie will automatically play after a few seconds.
Important When you open the DVD player for the first time, the
program asks you to input the region code. DVDs are
divided into 6 regions. Once your DVD drive is set to a
region code, it will play DVDs of that region only. You can
set the region code a maximu m of fi ve times (inclu ding the
first time), after which the last region code set will remain
permanent. Recovering y our hard driv e doe s not reset the
number of ti mes the regi on code ha s been set. Refer to
the table below for DVD movie region code information.
Region code Country or region
1 U.S.A., Canada
2 Europe, Middle East, South Africa, Japan
3 Southeast Asia, Taiwan, Korea (South)
4 Mexico, Latin Amer ica, Austra lia, New Zea land
Storage
5 Former U.S.S.R., parts of Africa, India
6 People's Republic of China
Important To change the region code, insert a DVD movie of a
different region into the D VD driv e. Ref er to the online hel p
for more information.
www.gateway.com
33
Page 40
Chapter 2: Getting Familiar wi th Your Notebook
Connectivity options
Your notebook has built-in features for connecting to a network and
communicating with other computers.
Ethernet and LAN
The built-in network feature allows you to connect your notebook to an
Ethernet-based (10/100 Mbps) network.
To use the network feature, connect an Ethernet cable from the network jack
on the back of your notebook to a network jack or hub on your network.
34
www.gateway.com
Page 41

Fax/data modem
Your notebook has a built-in fax/data modem.
Warning This modem port is not compatible with digital phone lines.
Plugging this modem into a dig ital phone line will damage
the modem.
To use the fax/data modem jack, connect a telephone cable from the modem
jack to a telephone jack.
Connectivity options
Warning To reduce the risk of fire, use only No. 26 AWG or larger
telecommunications line cord.
www.gateway.com
35
Page 42

Chapter 2: Getting Familiar wi th Your Notebook
Wireless communication
This notebook has a wireless communication feature built-in. This feature
allows you to communicate with other wireless communication devices.
You can manually turn off your wireless communication feature.
Warning Radio frequency wireless communication can interfere
with equipment on commercial aircraft. Current aviation
regulations require w irel ess devices to be turned off while
traveling in an airplane. IEEE 802.11B (also known as
wireless Ethernet or Wifi) communication devices are
examples of devices that provide wireless commun icati on.
36
www.gateway.com
Page 43

Fast infrared
Your notebook’s fast infrared (FIR) port allows you to do wireless data transfer
with other IR-aware computers and peripheral devices such as PDAs (personal
digital assistants), mobile phones, and infrared printers. The infrared port can
transfer data at speeds of up to 4 Mb/s at a distance of up to one meter.
Connectivity options
To use FIR, position two IR-aware devices so their IR ports are no more than
one meter apart and offset no more than 15 degrees.
When the two devices are in position, begin the data transfer as you normally
would. See your file transfer software for details.
www.gateway.com
37
Page 44

Chapter 2: Getting Familiar wi th Your Notebook
Audio
Your notebook includes 16-bit high-fidelity stereo audio. The speakers, located
near the keyboard, direct sound towards you to further enhance sound output.
There are audio ports on the back of your notebook. See “Back” on page 13 for
the location of these ports. Also see “Audio devices” on page 59 for more
information on connecting external audio devices. Your notebook has a
subwoofer on the front. See “Front” on page 10 for the location of the
subwoofer.
38
www.gateway.com
Page 45

A V control panel
The AV control panel is a special feature of your notebook. Through this AV
control panel, you can play most of your audio/video CD, DVD, MP3, and SD
media.
.
Audio
# Item Icon Description
1 LCD display Liquid-cr ystal di splay (LCD) displays curr ent
media status.
2 Power button Turns the AV control panel on or off.
3 Source butt on Selects the playback so urce (DVD/CD-RW,
hard drive, or SD memory card).
4 Play/pause button Plays and pauses the media playback.
5 Volume down button T urns down the volume of the speakers during
playback.
6 Volume up button Turns up the volume of the speakers during
playback.
7 Stop/Eject button Stops playback or ejects the CD or DVD.
www.gateway.com
39
Page 46

Chapter 2: Getting Familiar wi th Your Notebook
# Item Icon Description
8 Repeat button Selects the options: no repeat, repeat the
9 Mute button Mutes the sound coming out of the speake rs.
currently playing track, or repeat all tracks
during playback.
10 Fast r ewind/ f ast f orwa rd
dial
11 Previous track button Lets you jump to the previous track on the
12 Next track button Lets you jump to the ne xt tr ac k on the pla ylists .
Use this dial to fast rewind or fast forward the
track currentl y playing.
playlists.
Unders tanding t he A V contr ol panel LCD panel
The AV control panel LCD panel displays all the information pertaining to the
audio/video media that is being played in your notebook.
40
www.gateway.com
Page 47

# Item Description
1 Hard drive Indicates a file on the hard
drive is playing .
2 CD Indicates a CD is playing.
3 Video Indicates a DVD or vid eo CD
is playing.
4 Track number Displays which track is
playing.
5 Elapsed time Displays the amount of time
the track has been playing.
6 Volume/Mute Displays the volume level
and indicates if the sound
has been muted.
7 SD memory card Indicates a file on the SD
memory ca rd is playing.
8 CD playback indicator Indicates that a CD is
playing.
Audio
9 MP-3 playbac k indicator Indicates that an MP-3 file is
playing.
10 Playback progress indicator Shows the progress of the of
the payback.
11 Repeat indicator Indicates if the media being
play ed is repeat none, rep eat
one track, or repeat all
tracks.
www.gateway.com
41
Page 48

Chapter 2: Getting Familiar wi th Your Notebook
Adjusting the volume
Press the minus (-) button on the AV control panel to decrease the volume on
the speaker, press the plus (+) button to increase the volume.
42
www.gateway.com
Page 49

Securing your notebo ok
Securing your notebook
Security features include hardware and software locks — a security slot and
password.
Security slot
A security slot located on the left side of your notebook lets you connect a
Kensington-compatible notebook security lock.
Wrap a notebook security lock cable around an immovable object such as a
table or locked drawer handle. Insert the lock into the slot on your notebook
and turn the key to secure the lock. Some keyless models are also available.
www.gateway.com
43
Page 50

Chapter 2: Getting Familiar wi th Your Notebook
Passwords
Passwords protect your notebook from unauthorized access. When set, no one
can access your notebook without entering the correct password.
There are three types of passwords you can set:
■ Setup Password secures your notebook against unauthorized entry to and
use of the BIOS Setup utility.
■ Power-on Password secures your notebook against unauthorized use.
■ Hard Drive Password protects your data by preventing unauthorized access
to your hard drive.
Important Do not forget your Setup and Hard Drive password! If you
forget your password, contact Gateway.
Setting a passwor d
You can set the password using the BIOS Setup utility. See “BIOS Setup utility”
on page 77.
44
www.gateway.com
Page 51

Managing P ower
Read this chapter to learn how to:
■ Install and remove the battery
■ Recharge the battery
■ Manage power usage
3
45
Page 52

Chapter 3: Managing Powe r
Using the battery
Your notebook’s battery lets you use your notebook without having to plug it
into an electrical outlet. The battery recharges when the AC adapter is plugged
into your notebook and an electrical outlet.
The battery has the following characteristics:
■ Employs current battery technology standards
The computer uses a Lithium-Ion (Li-Ion) battery which does not have the
memory effect problem of Nickel Cadmium (NiCd) batteries. Li-Ion
batteries consistently provide the longest battery life.
■ Battery-low warning
When the battery charge level becomes low, the status indicator on your
notebook flashes at regular intervals. This tells you that the battery power
is critically low (and you should save your work). You can correct this
situation by recharging the battery.
Whenever possible, use the AC adapter. The battery will come in handy when
you travel or during a power failure. We recommend that you have an extra,
fully-charged battery available as backup.
Using the battery for the first time
To use the battery for the first time:
1 Plug the AC adapter into the notebook and an electrical outlet, and let
the battery fully recharge.
2 Disconnect the AC adapter and run the notebook on the battery until the
charge is used up before recharging again.
You only need to do this once or twice with a new battery or with a battery
that's been stored without being used for a long time. If the computer is
to be stored for more than two weeks, we suggest you remove the battery.
Battery power from a fully charged battery depletes in roughly a day with
the computer in Standby mode or a month in Hibernation mode or when
power is off.
46
www.gateway.com
Page 53

Warning Do not expose batteri es to temp eratures belo w 32°F (0°C)
or above 140°F (60°C). This may adversely affect the
battery.
Installing the battery
To install a battery:
■ Insert the battery at an angle (1), press gently on the battery (2) until it
clicks into place, then slide the battery lock latch into the locked position
(3).
Using the battery
www.gateway.com
47
Page 54

Chapter 3: Managing Powe r
Removing th e battery
Important Before removing the battery, make sure that you have an
To remove the battery:
■ Slide the battery lock latch into the unlocked position (1), slide and hold
the battery release latch (2), then lift the battery by using the built-in slot
in the battery (3) and pull the battery out of the bay (4).
AC adapter conne cted to the computer . Otherwis e, turn off
the computer.
48
www.gateway.com
Page 55

Recharging the battery
To charge the battery:
■ Install the battery, then plug the AC adapter into your notebook and an
electrical outlet.
Charging modes
The adapter has two charging modes:
■ Rapid mode
Your notebook uses rapid charging when power is turned off and the AC
adapter is connected to your notebook and an electrical outlet. In rapid
mode, a fully depleted battery gets 95% charged in approximately 1.5
hours.
■ Charge-in-use mode
When your notebook is in use with the AC adapter plugged in, the
computer also charges the battery, if installed. This mode will take longer
to fully charge a battery than rapid mode. In charge-in-use mode, a fully
depleted battery gets 95% charged in approximately 4 hours.
Using the battery
Tips & Tricks We suggest that you connect the AC adapter at the end
of your day to recharge over night. This ensures a fully
charged battery for use the next day.
Checking the char ge level
The Windows battery meter indicates the current charge level. Rest your cursor
on the battery meter (or AC plug) icon on the taskbar to see the current charge
level of your battery.
www.gateway.com
49
Page 56

Chapter 3: Managing Powe r
Optimizing battery life
Optimizing battery life prolongs the charge/recharge cycle and improves
recharge efficiency. Follow these suggestions to optimize and maximize battery
power:
■ Purchase an extra battery.
■ Use the AC adapter whenever possible so the battery is reserved for
on-the-go computing.
■ Keep the battery in the your notebook when you are using the AC adapter.
The constant trickle charge maintains the battery level to eliminate the
battery self-discharge effect. The charge-in-use function also charges the
battery.
■ Eject the PC card from the card slot when it is not in use because the PC
card uses power even when the card is not in use.
■ Store the battery in a cool, dry place. The recommended storage
temperature for batteries ranges from 50° to 86°F (10° to 30°C). The higher
the storage temperature, the faster the battery self-discharges.
■ The batteries can be recharged about 400 times when used as directed.
Excessive recharging decreases battery life.
■ Take care of your battery and AC adapter. See “Care and maintenance” on
page 5.
Battery-low warning
You never have to worry about battery power as long as you are using the AC
adapter. However, when you operate the computer on battery power, pay extra
attention to the power indicator on the LCD panel.
During a battery-low condition, the power indicator flashes at regular intervals
until battery power is depleted.
Caution Connect the AC adapter to your notebook as soon as
possible. Data is lost w hen notebook po wer is cut off during
Standby mode.
50
www.gateway.com
Page 57

Using the battery
The following table shows the recommended course of action to take when you
encounter a battery-low condition.
Situation Recommended Action
AC adapter and
electr ical outl et
available
An extra
fully-charged
battery available
AC adapter or
electr ical outl et not
available
1 Connect the AC adapter to the computer.
2 Save all necessary files.
3 Resume work.
Turn off the computer if you wan t to re ch arge the
battery rapidly.
1 Save all necessary files.
2 Close the program.
3 Shut down Windows and turn off you notebook.
4 Replace the battery.
5 Tur n on th e computer and resume work.
1 Save all necessary files.
2 Close the program.
3 Shut down W indows and tu rn off your
notebook.
www.gateway.com
51
Page 58

Chapter 3: Managing Powe r
P ower management
Your notebook has a built-in power management unit that monitors system
activity. System activity refers to any activity involving one or more of the
following devices: keyboard, mouse, hard drive, a peripheral device connected
to the parallel port, and video memory. If no activity is detected for a period
of time (called an inactivity timeout), your notebook stops some or all of these
devices in order to conserve energy.
Your notebook employs a power management scheme that supports ACPI
(Advanced Configuration and Power Interface) which allows for maximum
power conservation and maximum performance at the same time. Windows
handles all power-saving chores for your computer.
Adva nced Configuration and P ower Interface
Advanced Configuration and Power Interface (ACPI) is a power management
specification jointly developed by Compaq/Intel/Microsoft/Phoenix/Toshiba.
ACPI enables Windows to control the amount of power given to each device
attached to your notebook. With ACPI, Windows can turn off peripheral devices
when they are not in use to save power.
52
Tips & Tricks We rec ommend you enable po wer management to prolong
your batter y life. See th e Windows hel p for more detai ls.
www.gateway.com
Page 59

Using Peripheral
Devices and
Options
Read this chapter to learn how to:
■ Connect peripheral devices
■ Use hardware options
■ Upgrade your notebook
4
53
Page 60

Chapter 4: Using Peripher al Devices and Options
External monitor
You can connect an external monitor to the CRT port. Read the monitor manual
for additional instructions.
Important If an external monitor is not connec ted, closi ng the displ ay
cover puts your notebook into Standby mode.
Using simultaneous displa y
Your notebook takes advantage of Windows multi-display capability, allowing
you to use your notebook for presentation purposes. So whatever is displayed
in your notebook will likewise be displayed on the other external display.
To use simultaneous display, you can choose to connect other display devices
to your notebook through the monitor port.
54
www.gateway.com
Page 61

S-Video
The S-Video jack allows you to output to a television or display devices that
support S-Video input.
S-Video
www.gateway.com
55
Page 62

Chapter 4: Using Peripher al Devices and Options
External keyboar d
This notebook has a keyboard with full-sized keys and an embedded keypad.
If you feel more comfortable using a desktop keyboard, you can connect a USB
external keyboard.
To connect an external keyboard, plug the external keyboard into the USB port.
56
www.gateway.com
Page 63

External pointing device
This notebook accepts a USB mouse or a similar pointing device.
External pointin g device
www.gateway.com
57
Page 64

Chapter 4: Using Peripher al Devices and Options
Printer
You can connect a printer to your notebook’s parallel or USB port. See your
printer manual for operating instructions.
58
www.gateway.com
Page 65

A udio devices
Audio devices connect to the audio ports on the back of your notebook. You
can plug an external microphone into the microphone jack, an audio line-in
device into the line-in jack, and amplified speakers or headphones into the
microphone jack. See “Back” on page 13 for information about port location.
Audio devices
The subwoofer is located on the front of your notebook. See “Front” on page
10 for the location of the subwoofer. The subwoofer carries low-frequency
sound to give a bass boost and create a rumbling effect for certain special effects
sounds, such as explosions and trains.
www.gateway.com
59
Page 66

Chapter 4: Using Peripher al Devices and Options
PC Card
Your notebook has a built-in CardBus PC Card slot that can accommodate one
type II PC Card. Contact Gateway for PC Card options available that you can
purchase for your notebook.
PC Card slot
The type II CardBus PC Card slot found on the left side of your notebook accepts
credit-card-sized cards that enhance the usability and expandability of your
notebook.
PC Cards (formerly PCMCIA) are add-on cards for notebooks, giving you
expansion possibilities long afforded by desktop PCs. Popular type II cards
include flash memory, SRAM, and SCSI cards. CardBus improves on the 16-bit
PC card technology by expanding the data path to 32 bits.
Important Refer to y our card’ s manu al for det ails on how t o install and
use the card and its functions.
60
www.gateway.com
Page 67

Inserting a card
Insert the card into the slot and make the correct connections (for example, a
network cable), if necessary. See your card manual for details.
PC Card
Ejecting a card
Before ejecting a PC Card:
■ Exit the program using the card
■ Left-click the PC Card icon on the taskbar and stop the card operation
Press the slot eject button once to pop it out, then press it again to eject the
PC Card.
www.gateway.com
61
Page 68

Chapter 4: Using Peripher al Devices and Options
USB devices
Your notebook has three USB (Universal Serial Bus) (2.0) ports that allow you
to connect peripheral devices. Common USB devices include a mouse,
keyboard, or digital camera.
62
www.gateway.com
Page 69
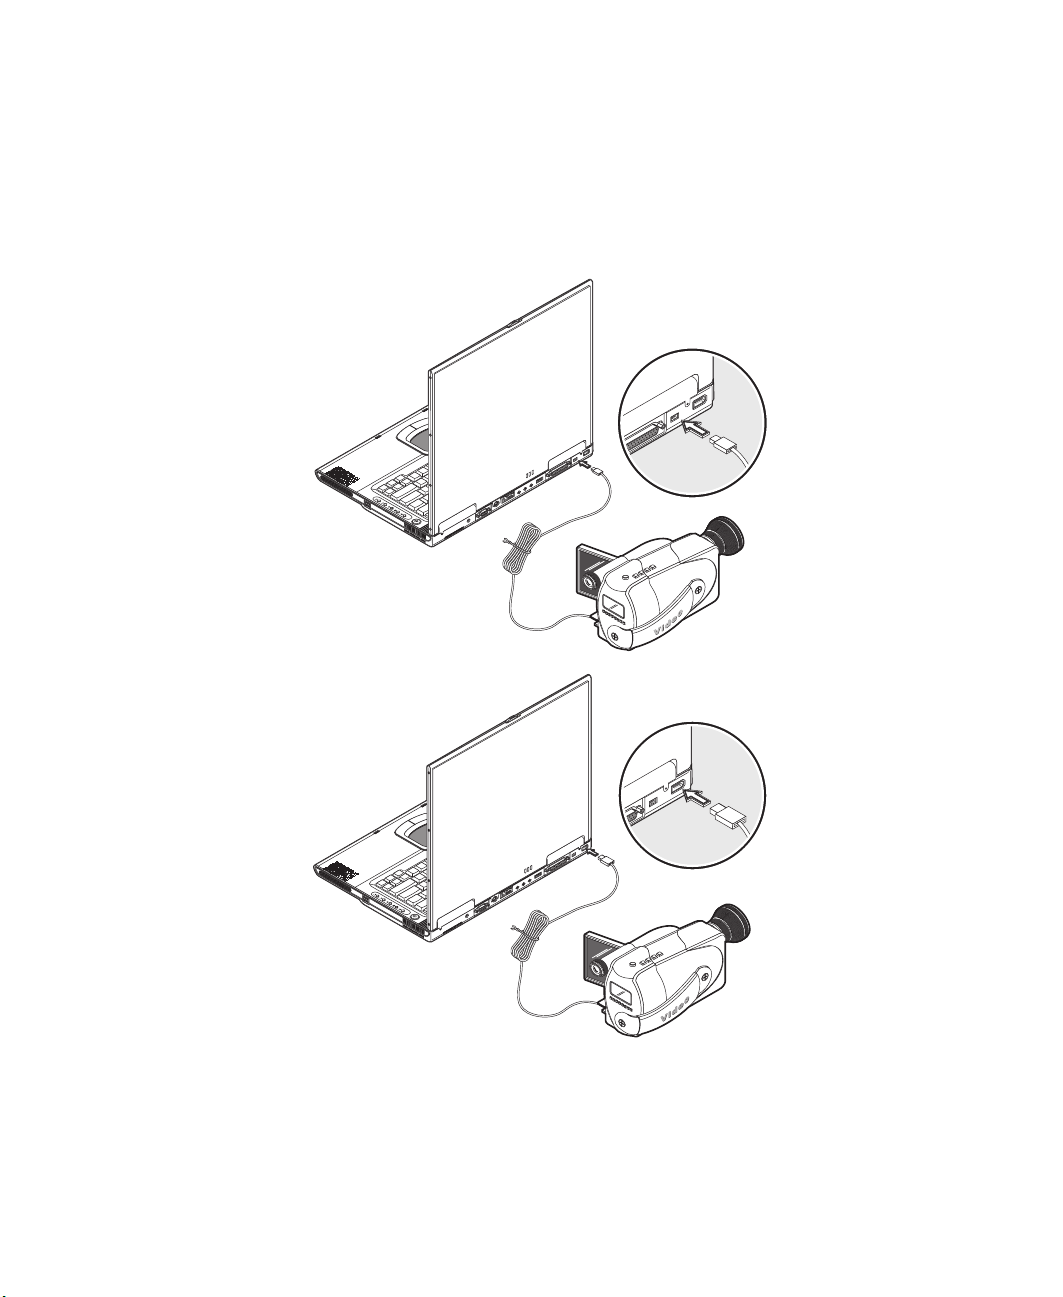
IEEE 1394 devices
Your notebook's fast IEEE 1394 ports allow you to connect IEEE 1394 supported
devices like a digital video camera or optical drive. Your notebook comes with
two IEEE 1394 ports: a 4-pin port and 6-pin port.
IEEE 1394 devices
See your peripheral device's documentation for details.
www.gateway.com
63
Page 70

Chapter 4: Using Peripher al Devices and Options
Miscellaneous options
Additional AC adap ters and batteries
You can order an AC adapter and spare batteries from Gateway.
Battery
It is a good practice to have a spare battery around, especially when you travel.
The Li-Ion battery, coupled with the power management features of your
notebook, supplies you with more power on-the-go.
AC adapter
The compact AC adapter charges your battery and supplies power to your
notebook. You can order a spare AC adapter so you do not need to carry it from
the office to your home or destination.
64
www.gateway.com
Page 71

Key component u pgrades
Ke y component upgrades
Your notebook delivers superior power and performance. However, some users
and the programs they use may demand more. This notebook allows you to
upgrade key components when you need increased performance.
Important Contact Gatewa y if you decide to pe rform a key compo nent
upgrade.
Memory upgrade
This notebook comes with two DDR-266 SoDIMM (Small Outline Dual Inline
Memory Module) sockets that accept 128/256/512 MB Synchronous Dynamic
Random Access Memory (SDRAM) module. Contact Gateway if you need to add
more memory.
Hard drive upgrade
It is possible to upgrade your hard drive with a higher capacity drive when you
need more storage space. Your notebook uses a 9.5 mm, 2.5-inch Enhanced-IDE
hard drive. Contact Gateway if you need to upgrade your hard drive.
www.gateway.com
65
Page 72

Chapter 4: Using Peripher al Devices and Options
66
www.gateway.com
Page 73

Moving with Your
Notebook
Read this chapter to learn about:
■ Moving your notebook
■ Traveling with your notebook
5
67
Page 74

Chapter 5: Moving with Your Note book
Disconnecting from peripheral devices
To disconnect your notebook from peripheral devices:
1 Save your work in progress.
2 Shut down Windows and turn off your notebook.
3 Disconnect the cord from the AC adapter.
4 Disconnect the keyboard, pointing device, printer, external monitor, and
other external devices.
5 Disconnect the Kensington lock if you are using one to secure your
notebook.
68
www.gateway.com
Page 75

Moving ar ound
Follow these tips when you are taking your notebook to a meeting.
Preparing your notebo ok
Before moving your notebook, close and latch the LCD panel to place it in
Standby mode. You can now safely take your notebook anywhere you go within
the building.
To bring your notebook out of Standby mode, open the display.
What to bring to short meetings
A fully charged battery runs your notebook for three hours under most
circumstances. If your meeting is shorter than that, you probably do not need
to bring anything with you other than your notebook.
What to bring to long meetings
Moving around
If your meeting will last longer than 3 hours or if your battery is not fully
charged, you may want to bring the AC adapter with you to plug in your
notebook in the meeting room.
If the meeting room does not have an electrical outlet, reduce the drain on
the battery by putting your notebook in Standby mode. Press F
the LCD panel whenever you are not actively using your notebook. Tap any
key or open the LCD panel to resume.
www.gateway.com
N+F2 or close
69
Page 76

Chapter 5: Moving with Your Note book
T aking the notebook home
Follow these tips when you are moving your notebook from one location to
another, for example from your office to your home.
Preparing your notebo ok
To prepare your notebook for transport:
1 Remove all media from the drives. Failure to remove the media can damage
the drive.
2 Shut down Windows and turn off your notebook.
3 Pack your notebook in a protective case that can prevent your notebook
from sliding around and cushion it if it should fall.
Warning Avoid pac king items n ext to th e top cov er of your no tebook.
Pressure against the top cover could damage the screen.
What to bring with you
Unless you already have some items at home, bring the AC adapter and power
cord with you.
70
www.gateway.com
Page 77

Taking the notebook h ome
Special considerations
Follow these guidelines to protect your notebook while traveling to and from
work:
■ Minimize the effect of temperature changes by keeping your notebook with
you.
■ If you need to stop for an extended period of time and cannot bring your
notebook with you, leave your notebook in the trunk of the car to avoid
exposing your notebook to excessive heat.
■ Changes in temperature and humidity can cause condensation. Allow your
notebook to return to room temperature, and inspect the screen for
condensation before turning on your notebook. If the temperature change
is greater than 18°F (10°C), allow your notebook to come to room
temperature slowly. If possible, leave your notebook for 30 minutes in an
environment with a temperature between outside and room temperature.
Setting up a home office
If you frequently work on your notebook at home, it may be worthwhile to
purchase a second AC adapter for use at home. With a second AC adapter, you
can avoid transporting the extra weight to and from home.
If you use your notebook at home for significant periods of time, you might
also want to add an external keyboard, monitor, or mouse.
www.gateway.com
71
Page 78

Chapter 5: Moving with Your Note book
T ra veling with your notebook
Follow these tips when you are traveling locally with your notebook.
Preparing your notebo ok
Prepare your notebook as if you were taking it home. Be sure the battery in
your notebook is charged. Airport security may require you to turn on your
notebook when bringing it into the gate area.
What to bring with you
Bring the following items with you:
■ AC adapter
■ Spare, fully charged batteries
■ Additional printer driver files if you plan to use another printer
Special considerations
In addition to the guidelines for taking your notebook home, follow these
guidelines to protect your notebook while traveling:
■ Always take your notebook as carry-on luggage.
■ If possible, have your notebook inspected by hand. Your notebook can
safely pass through security X-ray machines, but never expose your
notebook to a metal detector.
■ Avoid exposing diskettes to hand-held metal detectors.
72
www.gateway.com
Page 79

Traveling international ly with your notebook
T ra veling internationally with y our
notebook
Follow these tips when you are traveling from country to country
Preparing your notebo ok
Prepare your notebook as you would normally prepare it for traveling.
What to bring with you
Bring the following items with you.
■ AC adapter
■ Power cords that are appropriate to the country to which you are traveling
■ Spare, fully charged batteries
■ Additional printer driver files if you plan to use another printer
Special considerations
Follow the same special considerations as when traveling with your notebook.
In addition, these tips are useful when traveling internationally.
■ When traveling in another country, check that the local AC voltage and
the AC adapter power cord specifications are compatible. If not, purchase
a power cord that is compatible with the local AC voltage (power rating).
Do not use converter kits sold for appliances to power your notebook.
■ If you are using the modem, check if the modem and connector are
compatible with the telecommunication system of the country you are
traveling in.
www.gateway.com
73
Page 80

Chapter 5: Moving with Your Note book
74
www.gateway.com
Page 81

Using Installed
Programs and
Utilities
Read this chapter to learn how to:
■ Access programs in Windows
■ Program the multi-function buttons
■ Use the BIOS Setup utility
6
75
Page 82

Chapter 6: Using Install ed Programs and Util ities
System software
Your notebook comes preloaded with the following software:
■ Windows XP operating system
■ DMI (Desktop Management Interface)-compliant hardware BIOS Setup
utility
■ System utilities, drivers, and programs
Important To a ccess Windows programs, c lick Start, then click the
program fol der. Cli ck the program icon to open the selected
program. To learn about the software and utility, use the
online help provided by the software.
Launch Manager
Launch Manager allows you to program the four multi-function buttons and
the wireless button located above the keyboard. See “Multi-function buttons”
on page 29 for the location of these keys.
You can access the Launch Manager by clicking
clicking
76
Launch Manager to start the program.
www.gateway.com
Start, Programs, and then
Page 83

BIOS Setup utility
The BIOS Setup utility is a hardware configuration program built into your
notebook’s BIOS (basic input/output system).
Your notebook is already correctly configured and optimized, and you do not
need to run this utility. You can use the BIOS Setup utility to create passwords
to limit access to your notebook.
To open the BIOS Setup utility, press F2 during startup.
BIOS Setup utility
Use the navigation keys displayed at the bottom of the BIOS Setup utility screen
to move through the BIOS menus and make selections. Press F1 to get more
help about options.
Setting a passwor d
Important Do not forget your password. If you forget your password,
you ma y ha v e to ret urn you r no tebook to Gate w ay to reset
it.
www.gateway.com
77
Page 84

Chapter 6: Using Install ed Programs and Util ities
To set a password:
1 Use the up arrow and down arrow keys to highlight a password parameter
(Setup, Power-on, or Hard Disk) and press the Enter key. The password box
opens.
2 Type a password. The password can consist of as many as eight
alphanumeric characters (A-Z, a-z, 0-9).
Important Be very careful when typing your password because the
characters do not appear on the screen.
3 Press Enter. The retype password box opens.
4 Retype the password to verify your first entry and press Enter.
78
After setting the password, your notebook automatically sets the chosen
password parameter to Present.
5 Press ESC to return to the main menu.
6 Press Esc. The following dialog box appears.
7 Select Ye s and press Enter to save the password and exit the BIOS Setup
utility.
www.gateway.com
Page 85

Removing a passw ord
To remove a password, use the up or down arrow key to highlight a password
parameter and press the left or right arrow key to select None.
Changing a password
To change a password, you have to first remove the password and then follow
the instructions in “Setting a password” on page 77.
BIOS Setup utility
www.gateway.com
79
Page 86

Chapter 6: Using Install ed Programs and Util ities
80
www.gateway.com
Page 87

Troubleshooting
Read this chapter to learn how to troubleshoot common
problems.
Warning Do not attempt to open and service your
notebook by yourself. Contact Gateway for
assistance.
7
81
Page 88

Chapter 7: Troubleshoo ting
Frequently-asked questions
This is a list of possible situations that may arise during the use of your
notebook, and it gives easy answers and solutions to these questions.
I press the power button, but the notebook does not start or boot-up.
Look at the Power indicator:
■ If it is not lit, your notebook is not getting power. Check the following:
■ If you are running on battery power, it may be low and unable to
power your notebook. Connect the AC adapter to recharge the battery.
■ Make sure the AC adapter is plugged in correctly to your notebook
and to the power outlet.
■ If it is lit, check the Standby indicator is lit. if the Standby indicator is lit,
your notebook is in Standby mode. Press any key or tap on the touchpad
to resume.
Nothing appears on the screen.
Your notebook’s power management system automatically blanks the screen to
save power. Press any key to turn the display back on.
If pressing a key does not turn the display back on, two things might be the
cause:
■ The brightness level might be too low. Press FN+
the brightness level.
■ The display device might be set to an external monitor. Press the display
toggle hotkey F
N+F3 to toggle the display back to your notebook.
and FN+ → to adjust
←
Image is not full-screen.
Make sure the resolution is set to a resolution your system supports. Right-click
your Windows desktop, then click
dialog box. Click the
appropriate resolution. Resolutions lower than the specified resolution are not
full-screen on your notebook or on an external monitor.
82
Settings tab to make sure the resolution is set to the
www.gateway.com
Properties to open the Display Properties
Page 89

Frequently-asked ques tions
No audio from the notebook.
Check the following:
■ The volume may be muted. In Windows, look at the volume control icon
on the taskbar. If it is crossed-out, click the icon and deselect the Mute
option.
■ The speakers may be turned off. Press FN+F5 to turn the speakers on (this
hotkey also turns the speakers off).
■ The volume level may be too low. In Windows, look at the volume control
icon on the taskbar. Click the icon and adjust the level.
If headphones or external speakers are connected to the headphone jack on
the back of your notebook, the internal speakers automatically turn off.
External microphone does not work.
Check the following:
■ Make sure that the external microphone is connected to the microphone
jack on the left side of your notebook.
■ If you cannot hear playback, the speakers may be muted.
The keyboard does not respond.
Try attaching an external keyboard to the USB connector on the back of your
notebook. If it works, contact Gateway because the internal keyboard cable may
be loose.
www.gateway.com
83
Page 90

Chapter 7: Troubleshoo ting
The printer does not work.
Check the following:
■ Make sure that the printer is connected to a power outlet and it is turned
on.
■ Make sure the printer cable is connected securely to your notebook’s USB
or parallel port and the corresponding port on the printer.
I want to set up my location to use the internal modem.
To set up your location:
1 Open the Windows Control Panel and double-click the Modems icon.
2 Click Dialing Properties and begin setting up your location.
Refer to the Windows on-line help.
Why can’t I charge my battery to 100% charged when it is 99-95%
charged?
To preserve the life of the battery, the system only lets you charge the battery
when its capacity falls below 95%. However, it is recommended that you bring
an extra battery and let the battery in the system use up its power before
charging it.
84
www.gateway.com
Page 91

Error messa ges
If you receive an error message, note the message and take the corrective action.
The following table lists the error messages in alphabetical order together with
the recommended course of action.
Error Messages Corrective Action
CMOS Battery Bad Contact Gateway.
Error messages
CMOS Checksum
Error
Equipment
Configuration Error
Hard Disk 0 Error Contact Gateway.
Hard Disk 0 Extended
Type Error
I/O Parity Error Contact gateway.
Keyboard Error or No
Keyboard Connected
Keyboard Interface
Error
Memory Size
Mismatch
Missing operating
system
Contact Gateway.
Press F2 (during startup) to open the BIOS
Setup utili ty, then pres s Esc to exit and
reconfigure your notebook.
Contact Gateway.
Contact Gateway.
Contact Gateway.
Press F2 (during startup) to enter the BIOS
Setup utili ty, then pres s Esc to exit and
reconfigure your notebook.
Follow these steps:
1Press F2 (during startup) to enter the BIOS
Setup utility.
2 Exit the BIOS Setup utility (saving the
changes).
Pointing Device Error Cont act Gateway.
Pointing Device
Interface Error
Protected Mode Test
Fail
Contact Gateway.
Contact Gateway.
www.gateway.com
85
Page 92

Chapter 7: Troubleshoo ting
Error Messages Corrective Action
RAM BIOS Bad Contact Gateway.
RAM Parity Error Contact Gateway.
Real-Time Clock Error Press
Video RAM BIOS Bad Contact Gateway.
F2 (during startup) to reconfigure your
notebook.
86
www.gateway.com
Page 93

Telephone suppor t
T elephone support
Before calling Gate way T echnical Supp ort
If you have a technical problem with your notebook, follow these
recommendations before contacting Gateway Technical Support:
■ Make sure that your notebook is connected correctly to a grounded
AC outlet that is supplying power. If you use a surge protector, make sure
that it is turned on.
■ If a peripheral device, such as a keyboard or mouse, does not appear to
work, make sure that all cables are plugged in securely.
■ If you have recently installed hardware or software, make sure that you
have installed it according to the instructions provided with it. If you did
not purchase the hardware or software from Gateway, see the
manufacturer’s documentation and technical support resources.
■ If you have “how to” questions about using a program, see:
■ Online Help
■ Printed documentation
■ The Microsoft Windows documentation
■ The software publisher’s Web site
■ See the troubleshooting section of this chapter.
Warning To avoid bodily injury, do not attempt to troubleshoot your
notebook problem if:
■
Power cords or plugs are damaged
■
Liquid has been spilled into your notebook
■
Your notebook was dropped
■
The case was damaged
Instead, unplug your notebook and contact a qualified
computer technician.
■ Have your customer ID, serial number, and order number available, along
with a detailed description of your problem, including the exact text of
any error messages, and the steps you have taken.
■ Make sure that your notebook is nearby at the time of your call. The
technician may have you follow troubleshooting steps.
www.gateway.com
87
Page 94

Chapter 7: Troubleshoo ting
T elephone n umbers
Gateway offers a wide range of customer service, technical support, and
information services.
Automated troub leshooting system
Service description How to reach
Use an automated m enu system and y our telephone
keypad to find answers to common problems.
800-846-2118 (US)
877-709-2945 (Canada)
T elephone numbers
You can access the following services through your telephone to get answers
to your questions:
Resource Service description How to reach
Fax on demand
support
Gateway’s
fee-based
software tutorial
service
Gateway
Technical Support
Order a catalog of documents on common
problems , then ord er docum ents b y document
numbers. The doc um ents w il l be faxed to you.
Get tutor ial assista nce for software is sues
billed by the m inute.
Talk t o a Gateway Te chnical Sup port
representative about a non-tutorial technical
support question. (See “Before calling
Gatewa y T echnical Support” on page 87 before
calling.)
TDD Technical Support (for hearing impaired)
is avai labl e:
Weekdays 6:00 a.m. - 8:00 p.m. Central Time
Weekends 6:00 a.m. - 5:00 p.m. Central Time
800-846-4526 (US)
877-709-2951 (Canada)
800-229-1103 (charged to
your credit card)
900-555-4695 (charged to
your telephone bill)
800-846-2301 (US)
800-846-3609 (Canada
and Puerto Rico)
605-232-2191
(all other countries)
800-846-1778 (TDD)
America Online Get support for your America Online ISP
account
CompuServe Get support for your CompuServe ISP accou nt 800-848-8990 (US)
Sales,
accounting, and
warranty
88
Get information about available systems,
pricing, orders, billing statements, warranty
service, or other non-technical issues.
www.gateway.com
800-827-6364 (US)
888-265-4357 (Canada)
800-846-2000 (US)
888-888-2037 (Canada)
Page 95

Tutoring and training
Tutoring and training
Gateway's Technical Support professionals cannot provide hardware and
software training or tutorial services. Instead, Gateway recommends the
following tutoring and training resources.
Self-help
If you have how-to questions about using your Gateway-supplied hardware or
software, see the following resources:
■ The printed or online documentation that came with your hardware or
software. In many cases, additional product information and online
documentation for Gateway-supplied hardware can be found in our Web
site's Documentation Library
■ This user's guide
■ The software publisher's Web site
Help and
Support
For more how-to information about Windows XP, click
Start, then click Help and Support.
Type the keyword practice in the HelpSpot Search box
, then click the arrow.
Tutoring
For help on using hard w a r e or software tha t c a m e with your Gat e way notebook,
contact Gateway's fee-based tutorial hotline:
■ 800-229-1103 (rate charged per minute; charged to a major credit card)
■ 900-555-4695 (rate charged per minute; charged to your telephone bill)
www.gateway.com
89
Page 96

Chapter 7: Troubleshoo ting
Training
Gateway provides the following in-person and computerized training:
Resource Service description For more information
In-Store T r aining at
Gateway stores
Gateway Learning
Libraries
Online Training
from
Learn@Gateway
Our friendly and knowledgeable software
trainers can teach you how to use the
Internet and the most popular software
programs, including Microsoft Word, Excel,
and PowerPoint.
A variety of courses and tutorials are
available on CD. Select from several
easy-to-use learning libraries.
More than 450 online courses are av ail ab le
from Learn@Gateway. All yo u ha v e to d o is
go online and log in. You select the subject
matter, and the learning format (self-paced
tutorials or virtual classrooms), all from the
comfort of your notebook.
www.gateway.com/country
www.gateway.com/training
www.learnatgateway.com/
90
www.gateway.com
Page 97

Specifications
Read this chapter to learn about specifications for your
notebook.
A
91
Page 98

Appendix A:
Microprocessor
■ Mobile Intel
®
Pentium™ 4 Processor-M with Enhanced Intel® SpeedStep™
technology
Memory
■ Onboard memory upgradeable to 1024 MB with 2 DDR-266 SoDIMM
■ 512K on-die L2 cache
Data storage
■ One high-capacity, Enhanced-IDE hard drive
■ Slot-loading DVD/CD-RW drive
■ Secure Digital (SD) slot
Display and video
■ 15.2” 15:10 SXGA (Super eXtended Graphic Array) widescreen TFT LCD
panel
■ 1280 × 854 (SXGA) resolution, 16.7 million colors
■ nVidia
frame buffer
®
GeForce4 Go™ high-performance graphics chipset with 32MB
92
■ Simultaneous LCD and CRT display
■ Dual display support
■ LCD panel supports resolution up to 1280 × 854
■ VGA monitor supports resolution up to 2048 × 1536
■ Embedded TV encoder supports resolution up to 1024 × 768
www.gateway.com
Page 99

Audio
■ Built-in speaker and microphone
■ Sound Blaster Pro- and Windows Sound System-compatible
■ Built-in subwoofer
■ Separate audio ports for line-in/microphone, and line-out/headphones
Keybo ard and pointing de vice
■ 84-/85-/88-key Windows keyboard
■ Ergonomically-centered touchpad pointing device
I/O ports
■ One Type II CardBus PC Card slot
■ One RJ-11 phone jack (V.90)
■ One RJ-45 network jack (Ethernet 10/100)
■ One power connector
■ One external monitor port (DDC 2.0)
■ One line-out jack (headphone or external speaker) (3.5 mm mini-jack)
■ One audio line-in/ microphone jack (3.5 mm mini-jack)
■ Three USB ports (2.0)
■ Two IEEE 1394 port – One 4-pin (unpowered) and one 6-pin (powered)
■ Wireless LAN
Weight and dimensions
■ 6.7 lbs (3 kg)
■ 13.43 × 9.53 × 1.29 in. (341 × 242 × 31.2 mm)
www.gateway.com
93
Page 100

Appendix A:
Environment
■ Temperature
■ Operating: 5°C ~ 35°C
■ Non-operating: -10°C ~ 65°C
■ Humidity (non-condensing)
■ Operating: 20% ~ 80% RH
■ Non-operating: 20% ~ 80% RH
Operating System
■ Windows XP Home edition
Power
■ Battery
■ 59.2-WattHour Li-Ion battery
94
■ 1.5-hour rapid charge/4-hour charge-in-use
■ AC adapter
■ 70-Watt
■ Auto sensing 100~240Vac, 50~60Hz
Options
■ 128/256/512 MB DDR 266 SoDIMM memory upgrade module
■ Additional AC adapter
www.gateway.com
 Loading...