

Page 1

Page 2

Page 3

Contents
Section A Networking Basics . . . . . . . . . . . . . . . . . . . . . . . . . . . . . . . . . . . . . . 1
1 Learning the Basics . . . . . . . . . . . . . . . . . . . . . . . . . . . . . . . . . . . . . . . . . . . . . 3
Selecting a network connection . . . . . . . . . . . . . . . . . . . . . . . . . . . . . . . . . . . . . . . . 4
Wired Ethernet network . . . . . . . . . . . . . . . . . . . . . . . . . . . . . . . . . . . . . . . . . . . 4
Wireless Ethernet network . . . . . . . . . . . . . . . . . . . . . . . . . . . . . . . . . . . . . . . . . 4
Using a wired Ethernet network . . . . . . . . . . . . . . . . . . . . . . . . . . . . . . . . . . . . . . . . 5
Ethernet, Fast Ethernet, or Gigabit Ethernet . . . . . . . . . . . . . . . . . . . . . . . . . . . 5
Example wired Ethernet network . . . . . . . . . . . . . . . . . . . . . . . . . . . . . . . . . . . . 6
Equipment you need for a wired Ethernet network . . . . . . . . . . . . . . . . . . . . . . 7
Setting up a wired Ethernet network . . . . . . . . . . . . . . . . . . . . . . . . . . . . . . . . . 8
Using a wireless Ethernet network . . . . . . . . . . . . . . . . . . . . . . . . . . . . . . . . . . . . . . 9
Wireless Ethernet speed and frequency . . . . . . . . . . . . . . . . . . . . . . . . . . . . . 10
Example access point wireless Ethernet network . . . . . . . . . . . . . . . . . . . . . . 11
Equipment you need for an access point wireless Ethernet network . . . . . . . 12
Setting up an access point wireless Ethernet network . . . . . . . . . . . . . . . . . . 13
Example peer-to-peer wireless Ethernet network . . . . . . . . . . . . . . . . . . . . . . 14
Equipment you need for a peer-to-peer wireless Ethernet network . . . . . . . . 15
Setting up a peer-to-peer wireless Ethernet network . . . . . . . . . . . . . . . . . . . . 15
For more information . . . . . . . . . . . . . . . . . . . . . . . . . . . . . . . . . . . . . . . . . . . . . . . . 16
Section B Wired Ethernet Networking . . . . . . . . . . . . . . . . . . . . . . . . . . . . . 17
2 Creating a Wired Ethernet Network . . . . . . . . . . . . . . . . . . . . . . . . . . . . . 19
Determining if your computer has wired Ethernet already installed . . . . . . . . . . . . 20
Installing Ethernet cards and drivers . . . . . . . . . . . . . . . . . . . . . . . . . . . . . . . . . . . 20
Setting up the hardware . . . . . . . . . . . . . . . . . . . . . . . . . . . . . . . . . . . . . . . . . . . . . 21
Setting up a peer-to-peer wired Ethernet network . . . . . . . . . . . . . . . . . . . . . . 22
Setting up a network using a hub or switch . . . . . . . . . . . . . . . . . . . . . . . . . . . 23
Setting up a network using a router and optional hub or switch . . . . . . . . . . . 25
Where to go from here . . . . . . . . . . . . . . . . . . . . . . . . . . . . . . . . . . . . . . . . . . . . . . 27
3 Configuring Windows for a Wired Network . . . . . . . . . . . . . . . . . . . . . 29
Naming the computers and the workgroup . . . . . . . . . . . . . . . . . . . . . . . . . . . . . . . 30
Naming the computers and the workgroup in Windows XP . . . . . . . . . . . . . . 30
Naming the computers and the workgroup in Windows 2000 . . . . . . . . . . . . . 38
Configuring the TCP/IP protocol . . . . . . . . . . . . . . . . . . . . . . . . . . . . . . . . . . . . . . . 40
Terms you should know . . . . . . . . . . . . . . . . . . . . . . . . . . . . . . . . . . . . . . . . . . 40
Entering the IP address and subnet mask on each computer . . . . . . . . . . . . 40
i
Page 4

Configuring your router . . . . . . . . . . . . . . . . . . . . . . . . . . . . . . . . . . . . . . . . . . . . . . .47
Where to go from here . . . . . . . . . . . . . . . . . . . . . . . . . . . . . . . . . . . . . . . . . . . . . . .48
Section C Wireless Ethernet Networking. . . . . . . . . . . . . . . . . . . . . . . . . . .49
4 Configuring Windows for a Wireless Network . . . . . . . . . . . . . . . . . . .51
Installing the wireless Ethernet driver . . . . . . . . . . . . . . . . . . . . . . . . . . . . . . . . . . .52
Naming the computers and the workgroup . . . . . . . . . . . . . . . . . . . . . . . . . . . . . . .54
Naming the computers and the workgroup in Windows XP . . . . . . . . . . . . . . .54
Naming the computers and the workgroup in Windows 2000 . . . . . . . . . . . . . .61
Configuring the TCP/IP protocol . . . . . . . . . . . . . . . . . . . . . . . . . . . . . . . . . . . . . . . .63
Terms you should know . . . . . . . . . . . . . . . . . . . . . . . . . . . . . . . . . . . . . . . . . . .63
Entering the IP address and subnet mask on each computer . . . . . . . . . . . . .63
Where to go from here . . . . . . . . . . . . . . . . . . . . . . . . . . . . . . . . . . . . . . . . . . . . . . .70
5 Creating a Wireless Access Point Network . . . . . . . . . . . . . . . . . . . . . .71
Setting up your access point . . . . . . . . . . . . . . . . . . . . . . . . . . . . . . . . . . . . . . . . . .72
Mounting the access point . . . . . . . . . . . . . . . . . . . . . . . . . . . . . . . . . . . . . . . . .72
Configuring the access point . . . . . . . . . . . . . . . . . . . . . . . . . . . . . . . . . . . . . . . 72
Connecting to an access point network in Windows XP . . . . . . . . . . . . . . . . . . . . .75
Connecting to an access point network . . . . . . . . . . . . . . . . . . . . . . . . . . . . . . .75
Configuring computer settings for an access point . . . . . . . . . . . . . . . . . . . . . .77
Adding an access point . . . . . . . . . . . . . . . . . . . . . . . . . . . . . . . . . . . . . . . . . . .79
Connecting to an access point network in Windows 2000 . . . . . . . . . . . . . . . . . . .81
Using the Broadcom Wireless Configuration Utility . . . . . . . . . . . . . . . . . . . . . .82
Using Intel PROSet . . . . . . . . . . . . . . . . . . . . . . . . . . . . . . . . . . . . . . . . . . . . . .86
Using the ORiNOCO Client Manager . . . . . . . . . . . . . . . . . . . . . . . . . . . . . . . .92
Where to go from here . . . . . . . . . . . . . . . . . . . . . . . . . . . . . . . . . . . . . . . . . . . . . . .97
6 Creating a Peer-to-Peer Wireless Network. . . . . . . . . . . . . . . . . . . . . . .99
Connecting to a peer-to-peer wireless Ethernet network in Windows XP . . . . . . .100
Creating a peer-to-peer wireless Ethernet network in Windows XP . . . . . . . .100
Connecting to a peer-to-peer wireless network . . . . . . . . . . . . . . . . . . . . . . . .104
Configuring computer settings for a peer-to-peer network . . . . . . . . . . . . . . .105
Connecting to a peer-to-peer wireless Ethernet network in Windows 2000 . . . . .107
Using the Broadcom Wireless Configuration Utility . . . . . . . . . . . . . . . . . . . . .108
Using Intel PROSet . . . . . . . . . . . . . . . . . . . . . . . . . . . . . . . . . . . . . . . . . . . . .112
Using the ORiNOCO Client Manager . . . . . . . . . . . . . . . . . . . . . . . . . . . . . . .118
Where to go from here . . . . . . . . . . . . . . . . . . . . . . . . . . . . . . . . . . . . . . . . . . . . . .123
7 Turning Your Wireless Emitter On or Off . . . . . . . . . . . . . . . . . . . . . . .125
Turning your wireless emitter on or off in Windows XP . . . . . . . . . . . . . . . . . . . . .126
ii
Page 5

Turning your wireless emitter on or off in Windows 2000 . . . . . . . . . . . . . . . . . . 126
Using the Broadcom Wireless Configuration Utility . . . . . . . . . . . . . . . . . . . . 126
Using Intel PROSet . . . . . . . . . . . . . . . . . . . . . . . . . . . . . . . . . . . . . . . . . . . . . 127
Using the ORiNOCO Client Manager . . . . . . . . . . . . . . . . . . . . . . . . . . . . . . . 128
Where to go from here . . . . . . . . . . . . . . . . . . . . . . . . . . . . . . . . . . . . . . . . . . . . . 128
Section D Using Your Ethernet Network . . . . . . . . . . . . . . . . . . . . . . . . . 129
8 Sharing Your Resources . . . . . . . . . . . . . . . . . . . . . . . . . . . . . . . . . . . . . . . 131
Sharing an Internet connection . . . . . . . . . . . . . . . . . . . . . . . . . . . . . . . . . . . . . . . 132
Sharing drives and printers . . . . . . . . . . . . . . . . . . . . . . . . . . . . . . . . . . . . . . . . . . 138
Sharing drives or folders . . . . . . . . . . . . . . . . . . . . . . . . . . . . . . . . . . . . . . . . . 139
Un-sharing drives, folders, and files . . . . . . . . . . . . . . . . . . . . . . . . . . . . . . . . 141
Sharing printers . . . . . . . . . . . . . . . . . . . . . . . . . . . . . . . . . . . . . . . . . . . . . . . . 141
Using the network . . . . . . . . . . . . . . . . . . . . . . . . . . . . . . . . . . . . . . . . . . . . . . . . . 142
Viewing shared drives and folders . . . . . . . . . . . . . . . . . . . . . . . . . . . . . . . . . 142
Mapping a Network Drive . . . . . . . . . . . . . . . . . . . . . . . . . . . . . . . . . . . . . . . . 143
Opening files across the network . . . . . . . . . . . . . . . . . . . . . . . . . . . . . . . . . . 143
Copying files across the network . . . . . . . . . . . . . . . . . . . . . . . . . . . . . . . . . . 144
Printing files across the network . . . . . . . . . . . . . . . . . . . . . . . . . . . . . . . . . . . 144
9 Troubleshooting Your Ethernet Network . . . . . . . . . . . . . . . . . . . . . . . 145
Wired Ethernet Network . . . . . . . . . . . . . . . . . . . . . . . . . . . . . . . . . . . . . . . . . . . . 146
Wireless Ethernet Network . . . . . . . . . . . . . . . . . . . . . . . . . . . . . . . . . . . . . . . . . . 147
Technical Support . . . . . . . . . . . . . . . . . . . . . . . . . . . . . . . . . . . . . . . . . . . . . . . . . 151
Safety, Regulatory, and Legal Information . . . . . . . . . . . . . . . . . . . . . . . . . . . . . . 151
iii
Page 6

iv
Page 7

Networking
Basics
Read the following chapter to learn the benefits of using a
wired and wireless Ethernet network and the types of wired
and wireless Ethernet networks.
■ “Learning the Basics” on page 3
A
1
Page 8

2
www.gateway.com
Page 9

Learning the
Basics
Connecting your home, small office, or home office
computers lets you share drives, printers, and a single
Internet connection among the connected computers.
Read this chapter to learn about:
■ “Selecting a network connection” on page 4
■ “Using a wired Ethernet network” on page 5
■ “Using a wireless Ethernet network” on page 9
1
3
Page 10

Networking Basics
Selecting a network connection
The biggest decision you need to make when creating your network is what
type of connection you will use. Gateway supports both wired and wireless
Ethernet networks. Use the following criteria as a guide when selecting a
network connection.
Wired Ethernet network
Create a wired Ethernet network if:
■ You are building a new home or your existing home already has Ethernet
cable installed in each room that has a device you want to connect
■ You are creating a network in an office or business where network speed
is more important than moving about with your computer
■ Your computer has an Ethernet jack for connecting to the network
For more information, see “Wired Ethernet Networking” on page 17.
Wireless Ethernet network
Create a wireless Ethernet (IEEE 802.11a, IEEE 802.11b, or IEEE 802.11g)
network if:
■ You are looking for an alternative to installing cable for connectivity
■ The ability to move about with your computer is as important as network
speed
■ Your computer has wireless Ethernet for networking
For more information, see “Wireless Ethernet Networking” on page 49.
Help and
Support
4
For more information about selecting network connections
in Windows XP, click Start, then click Help and Support.
Type the keyword networks or network types in the
HelpSpot Search box , then click
the arrow.
www.gateway.com
Page 11

Learning the Basics
Using a wired Ethernet network
A wired Ethernet network consists of two or more computers connected
together through an Ethernet cable. This connection type is commonly used
in offices around the world and can be used to build computer networks in
the home.
Ethernet, Fast Ethernet, or Gigabit Ethernet
Ethernet is available at three different speeds. Standard Ethernet runs at
10 Mbps, Fast Ethernet runs at 100 Mbps, and Gigabit Ethernet runs at
1000 Mbps. Most home networks are built using Standard or Fast Ethernet
components. Business networks are typically built using Fast or Gigabit Ethernet
components.
To create a wired Ethernet network, you or your electrician must:
■ Install special Ethernet cables in your home or office
Important Check local code requirements before installing Ethernet
cable or other wiring in your home or office. Your
municipality may require you to obtain a permit and hire
a licensed installer.
■ Install an Ethernet card in each of your desktop computers (if your
computers do not already have built-in Ethernet jacks)
■ Install an Ethernet PC Card in each of your notebooks (if your notebooks
do not already have built-in Ethernet jacks)
■ Install an Ethernet router, switch, or hub
Tips & Tricks If you are connecting just two computers (known as a
peer-to-peer wired Ethernet network), you can eliminate
the router, switch, or hub and use a special crossover
cable.
www.gateway.com
5
Page 12
Networking Basics
Example wired Ethernet network
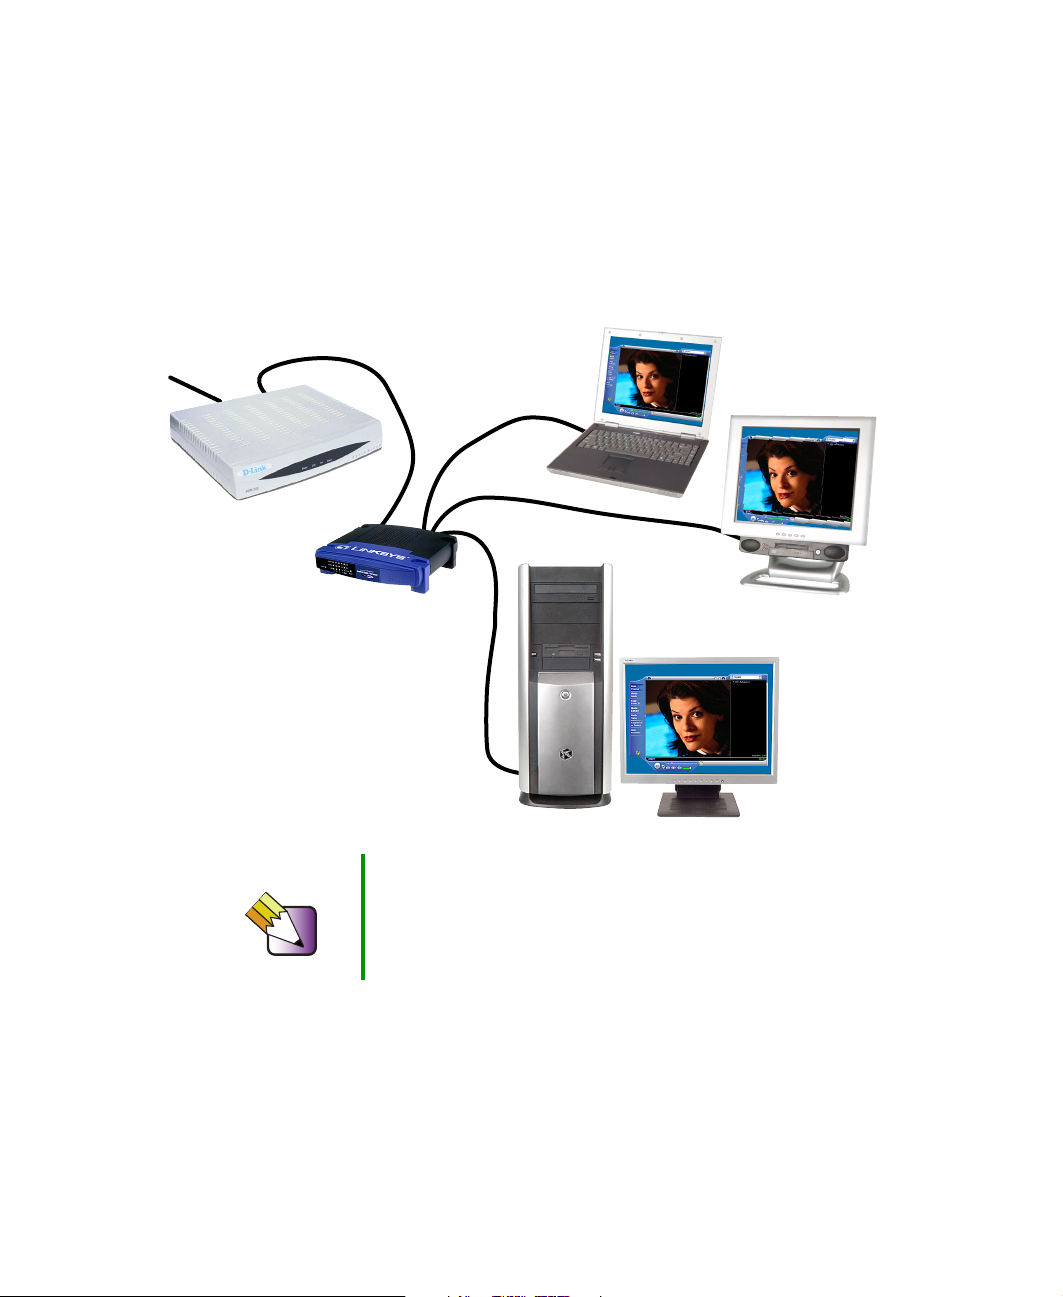
The following is an example of a wired Ethernet network. The network is made
up of a router, a cable or DSL modem, your computers, and cables connecting
each of these components. The router is the central control point for the
network. Attached to the router are all of your computers or Ethernet-ready
devices. Also connected to the router is a cable or DSL modem that provides
access to the Internet.
Cable/DSL modem
Router,
switch,
or hub
Tips & Tricks To add the ability to access a wireless Ethernet network
to your wired Ethernet network, connect an access point
to the router, switch, or hub. For more information about
accessing a wireless Ethernet, see “Using a wireless
Ethernet network” on page 9.
6
www.gateway.com
Page 13

Learning the Basics
Equipment you need for a wired Ethernet network
For a wired Ethernet network you need:
■ An Ethernet jack on each desktop computer, notebook, and tablet PC.
- OR -
An Ethernet card (also called network interface cards or NICs) installed in
each desktop computer.
- OR -
An Ethernet PC Card installed in each notebook.
■ An Ethernet router. Select a router that gives you the following features:
■ A jack for connecting to a cable or DSL modem.
■ The ability to assign IP addresses to your network computers
dynamically. This prevents intruders from seeing the computers over
the Internet.
■ A built-in firewall to protect the computers on your network from
intruders trying to access your data over the Internet.
■ Built-in switching (with enough ports for all computers and devices
on the network) so you will not have to purchase a hub or switch.
■ If you did not purchase a router that includes built-in switching or if the
router does not have enough ports to attach all your computers, an
Ethernet hub or switch with enough ports for all computers and devices
in the network.
■ Ethernet cable going from each computer to the router, hub, or switch.
Important For best results, all Ethernet components should be either
standard Ethernet (10 Mbps), Fast Ethernet (100 Mbps or
10/100), or Gigabit Ethernet (1000 Mbps or 10/100/1000).
A mixture of components rated at different speeds will
result in your network running at the speed of the slowest
rated component.
www.gateway.com
7
Page 14

Networking Basics
Setting up a wired Ethernet network
To set up a wired Ethernet network, read the following chapters:
■ “Creating a Wired Ethernet Network” on page 19
■ “Configuring Windows for a Wired Network” on page 29
■ “Sharing Your Resources” on page 131
8
www.gateway.com
Page 15

Learning the Basics
Using a wireless Ethernet network
A wireless Ethernet network is ideal for creating a home or office network or
adding mobility to an existing wired Ethernet network. A wireless Ethernet
network allows you the freedom to move about your home or office with your
notebook or tablet PC. For example, you can take your notebook or tablet PC
from your home office to your patio without having an Ethernet jack available.
Warning Radio frequency wireless communication can interfere
with equipment on commercial aircraft. Current aviation
regulations require wireless devices to be turned off while
traveling in an airplane. IEEE 802.11a, IEEE 802.11b, and
IEEE 802.11g communication devices are examples of
devices that provide wireless communication. For
information, see “Turning Your Wireless Emitter On or Off”
on page 125.
Important If your computer came equipped with an internal radio
frequency wireless device, see “Safety, Regulatory, and
Legal Information” in your user’s guide for general wireless
regulatory and safety guidelines. To find out if your
computer has an internal wireless device, check the device
manager. For more information, see “To determine which
wireless adapter is installed in your computer:” on page 52.
www.gateway.com
9
Page 16

Networking Basics
Wireless Ethernet speed and frequency
Wireless Ethernet is available at two different speeds and at two different
frequencies. The following table compares the various wireless Ethernet
network types.
Network Type Speed Frequency Advantages Disadvantages
IEEE 802.11a 54 Mbps 5 GHz Less possible
interference than
IEEE 802.11b and
IEEE 802.11g
■
IEEE 802.11b 11 Mbps 2.4 GHz
Large number of
access points already
exist in airports,
college campuses, and
businesses
■
Compatible with
IEEE 802.11g
networks
■
Longer range (100 to
150 feet) than
IEEE 802.11a
■
IEEE 802.11g 54 Mbps 2.4 GHz
Compatible with
IEEE 802.11b
networks
■
Longer range (100 to
150 feet) than
IEEE 802.11a
■
Shorter range (25 to
75 feet) than
IEEE 802.11b and
IEEE 802.11g
■
Not compatible with
IEEE 802.11b or
IEEE 802.11g
networks
■
Possible interference
from cordless phones
and microwaves
■
Not compatible with
IEEE 802.11a
networks
■
Possible interference
from cordless phones
and microwaves
■
Not compatible with
IEEE 802.11a
networks
Important The speed of a wireless network is related to signal
strength. Signal strength is affected by the distance
between your wireless network devices, by radio
interference, and by interference from natural obstructions
such as walls, floors, and doors.
The two most common ways to set up a wireless Ethernet network are access
point and peer-to-peer.
10
www.gateway.com
Page 17
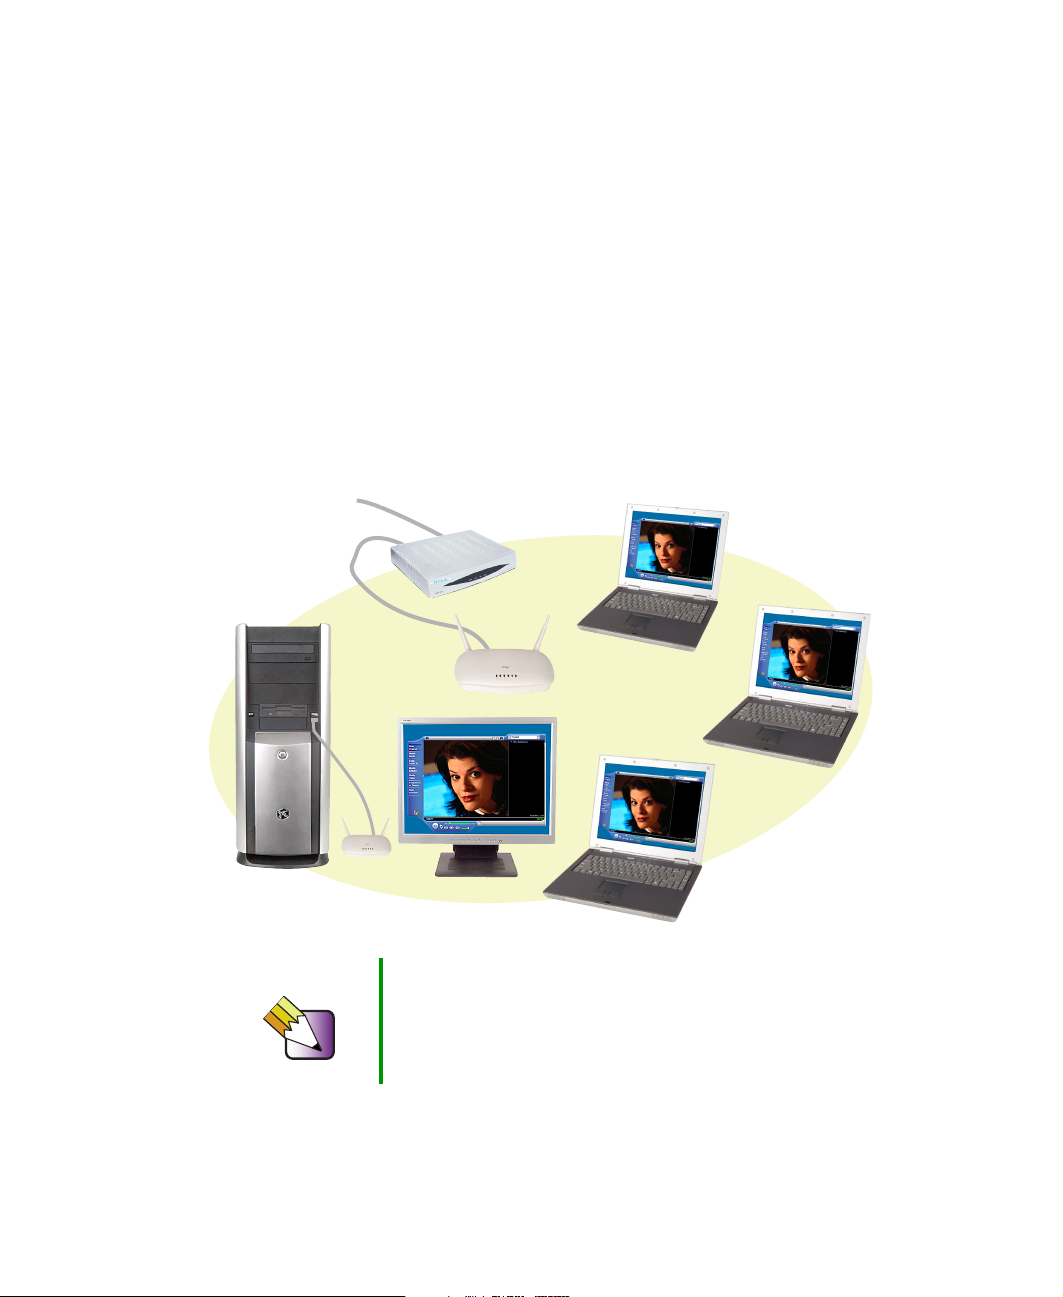
Example access point wireless Ethernet network
By using an access point, you can join a wireless Ethernet network and access
a wired Ethernet network. The following example shows how an access point
also lets you access the Internet.
The following is an example of an access point wireless Ethernet network. The
network is made up of an access point, a cable or DSL modem, and your
computers. The access point is the central control point for the network.
Attached to the access point is the cable or DSL modem that provides access
to the Internet. Each of the computers or Ethernet-ready devices communicate
with the access point using radio waves. If your computer does not have built-in
wireless Ethernet capabilities, you need to add a wireless PCI card (desktop),
PC card (notebook), or USB adapter.
Cable/DSL modem
Learning the Basics
Access point
USB wireless
adapter
Tips & Tricks If you want to access a wired Ethernet network from your
wireless Ethernet computers, connect an access point to
the router, switch, or hub. For more information about
accessing a wired Ethernet, see “Using a wired Ethernet
network” on page 5.
www.gateway.com
11
Page 18

Networking Basics
Equipment you need for an access point wireless Ethernet network
For an access point wireless Ethernet network you need:
■ A wireless Ethernet PCI card installed in each desktop computer
- OR -
A wireless Ethernet USB adapter attached to each desktop or notebook
computer
- OR -
A notebook or tablet PC with wireless Ethernet built-in
- OR -
A wireless Ethernet PC Card installed in each notebook that does not have
wireless Ethernet built-in
■ A wireless Ethernet access point to connect your wireless Ethernet network
to the Internet or a wired Ethernet network
12
Important IEEE 802.11b and IEEE 802.11g use the same radio
frequency. IEEE 802.11a uses a different radio frequency
than IEEE 802.11b and IEEE 802.11g. All wireless
Ethernet components must use the same frequency. A
combination of IEEE 802.11a and IEEE 802.11b or
IEEE 802.11a and IEEE 802.11g components will
not work. Some wireless devices can broadcast and
receive signals on both frequencies.
A mixture of IEEE 802.11b and IEEE 802.11g components
will result in your network running at the speed of the
slower IEEE 802.11b components.
www.gateway.com
Page 19

Learning the Basics
Setting up an access point wireless Ethernet network
To set up an access point wireless Ethernet network, read the following chapters:
■ “Configuring Windows for a Wireless Network” on page 51
■ “Creating a Wireless Access Point Network” on page 71
■ “Turning Your Wireless Emitter On or Off” on page 125
■ “Sharing Your Resources” on page 131
www.gateway.com
13
Page 20
Networking Basics
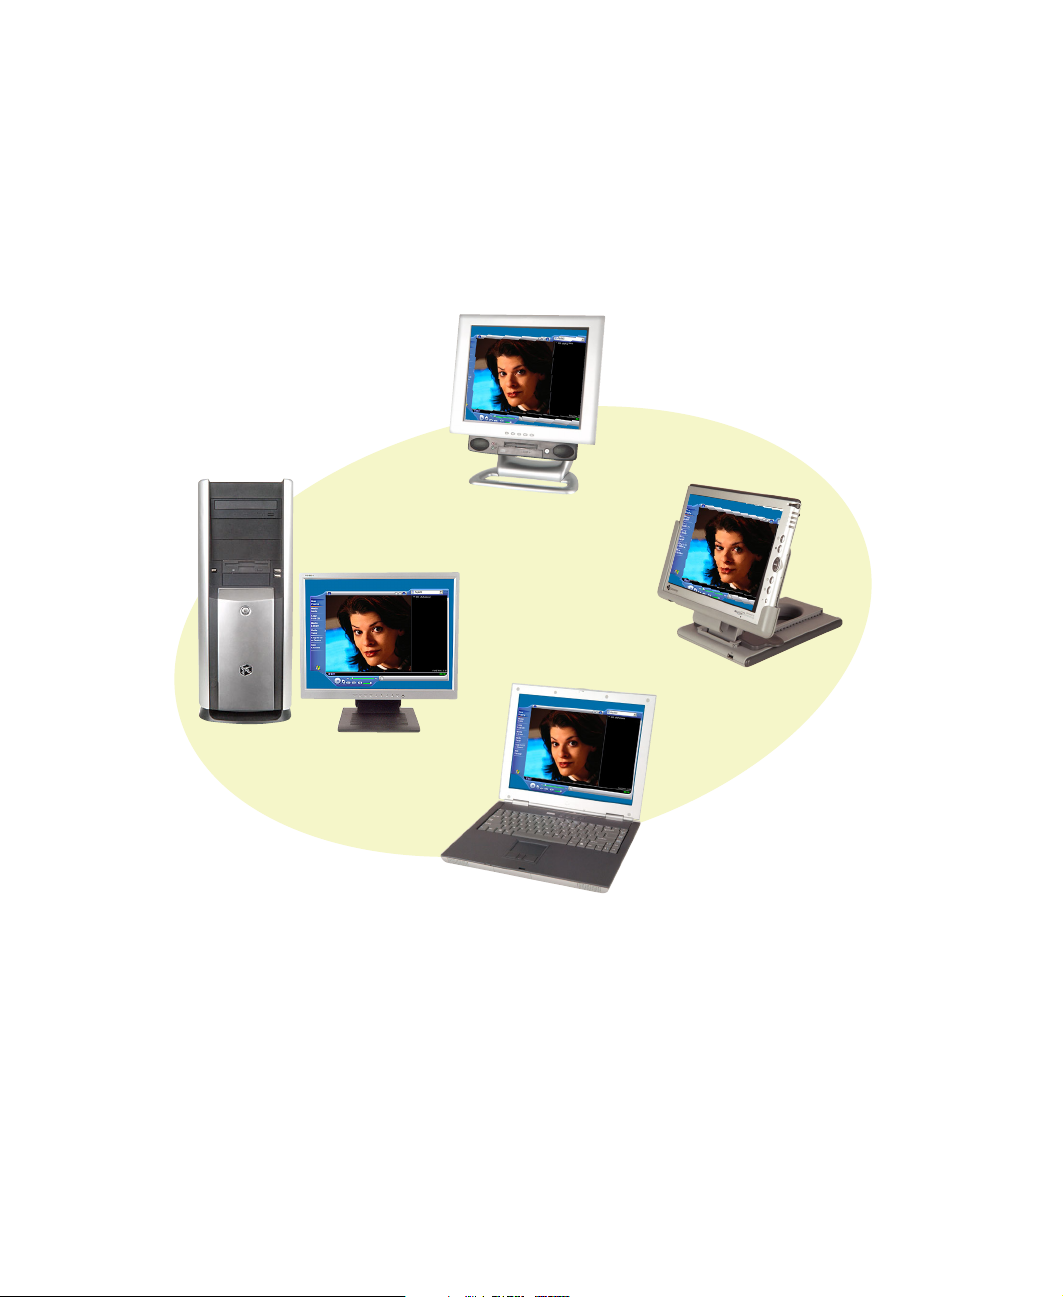
Example peer-to-peer wireless Ethernet network
Use a peer-to-peer (also known as ad hoc) wireless Ethernet network if you are
setting up or joining a temporary computer-to-computer network. This type of
network does not include access into a wired network or the Internet. You can
create this type of network to quickly move files from one computer to another.
14
www.gateway.com
Page 21

Learning the Basics
Equipment you need for a peer-to-peer wireless Ethernet network
For a peer-to-peer wireless Ethernet network you need:
■ A wireless Ethernet PCI card installed in each desktop computer
- OR -
A wireless Ethernet USB adapter attached to each desktop or notebook
computer
- OR -
A notebook or tablet PC with wireless Ethernet built-in
- OR -
A wireless Ethernet PC Card installed in each notebook that does not have
wireless Ethernet built-in
Setting up a peer-to-peer wireless Ethernet network
To set up a peer-to-peer wireless Ethernet network, read the following chapters:
■ “Configuring Windows for a Wireless Network” on page 51
■ “Creating a Peer-to-Peer Wireless Network” on page 99
■ “Turning Your Wireless Emitter On or Off” on page 125
■ “Sharing Your Resources” on page 131
www.gateway.com
15
Page 22

Networking Basics
For more information
For more information about purchasing equipment for your home or office
Ethernet network, discuss your particular needs with your Gateway store
representative. In addition, several books and Internet sites are dedicated to
networking. See these sources for more information about networking your
home or office with wired or wireless Ethernet.
Help and
Support
For more information about networking in Windows XP,
click Start, then click Help and Support.
Type the keyword networking in the HelpSpot Search
box , then click the arrow.
16
www.gateway.com
Page 23

Wired Ethernet
Networking
Read the following chapters to learn how to set up and use
a wired Ethernet network.
■ “Creating a Wired Ethernet Network” on page 19
■ “Configuring Windows for a Wired Network” on
page 29
B
17
Page 24

18
www.gateway.com
Page 25

Creating a Wired
Ethernet Network
This chapter describes how to set up the hardware for a
wired Ethernet network. Read this chapter to learn about:
■ “Determining if your computer has wired Ethernet
already installed” on page 20
■ “Installing Ethernet cards and drivers” on page 20
■ “Setting up a peer-to-peer wired Ethernet network” on
page 22
■ “Setting up a network using a hub or switch” on
page 23
■ “Setting up a network using a router and optional hub
or switch” on page 25
2
19
Page 26

Wired Ethernet Networking
Determining if your computer has wired Ethernet already installed
Many Gateway computers are shipped with wired Ethernet built in.
To determine if wired Ethernet is already installed on your computer:
1 In Windows XP, click Start, then click Control Panel. The Control Panel
window opens. If your Control Panel is in Category View, click
and Maintenance
-OR-
.
Performance
In Windows 2000, click
Panel window opens.
Start, Settings, then click Control Panel. The Control
2 Click/Double-click System, click the Hardware tab, then click Device
Manager
. The Device Manager window opens.
3 Click the plus (+) in front of Network adapters. The wired Ethernet card
installed in your computer is listed. If one is not listed, you must install
one.
Installing Ethernet cards and drivers
If you have decided to use wired Ethernet for your network and your computers
do not have wired Ethernet already installed, you need to install the necessary
cards and drivers in your computers. To order Ethernet PCI or PC cards, visit
the Accessories Store at accessories.gateway.com
Use the documentation that comes with your Ethernet cards for instructions
on installing the card.
.
20
www.gateway.com
Page 27

Creating a Wired Ethernet Network
Setting up the hardware
If you are setting up a:
■ Peer-to-peer network using two computers, see “Setting up a peer-to-peer
wired Ethernet network” on page 22.
■ Network using a hub (with no shared access to the Internet), see “Setting
up a network using a hub or switch” on page 23.
■ Network using a hub and a router (with shared access to the Internet), see
“Setting up a network using a router and optional hub or switch” on
page 25.
We recommend, and describe, the use of category 5, unshielded, twisted-pair
cable (approximately 1/4” in diameter with a thin outer-jacket, containing eight
color-coded wires), and equipment compatible with this type of cable. This type
of cable is equipped with RJ-45 connectors (like a large telephone jack
connector, but with eight pins) on each end.
Important Category 5 cables are available in two different types;
straight-through cables, used to connect computers to a
hub, and crossover cables, used to connect two computers
or two hubs.
To determine which type of cable you have, hold both ends
of the cable with the connectors facing away from you and
with the spring clip on the bottom. For straight-through
cable, the wires on both connectors are attached to copper
pins in the same order (same colors, left to right). For a
crossover cable, the wires on each connector are attached
to the copper pins in a different order (different colors, left
to right).
www.gateway.com
21
Page 28

Wired Ethernet Networking
Setting up a peer-to-peer wired Ethernet network
Setting up a peer-to-peer network requires only two computers, with wired
Ethernet available on each computer, and a single crossover cable. Use this type
of network if you are setting up a temporary network to transfer files from one
computer to another.
To set up a peer-to-peer network:
■ Connect the ends of a network crossover cable to the network ports on
both of the computers.
22
Crossover cable
www.gateway.com
Page 29
Creating a Wired Ethernet Network
Setting up a network using a hub or switch
If you are setting up a network with more than two computers and your network
does not access the Internet, you need a hub or switch. A hub or switch has
ports that allow four, eight, or more computers to be connected to the same
network. The hub or switch allows the computers to communicate on the
network. In addition to a hub or switch, you need a straight-through cable for
each computer you want to connect to the network.
To set up a network with a hub or switch:
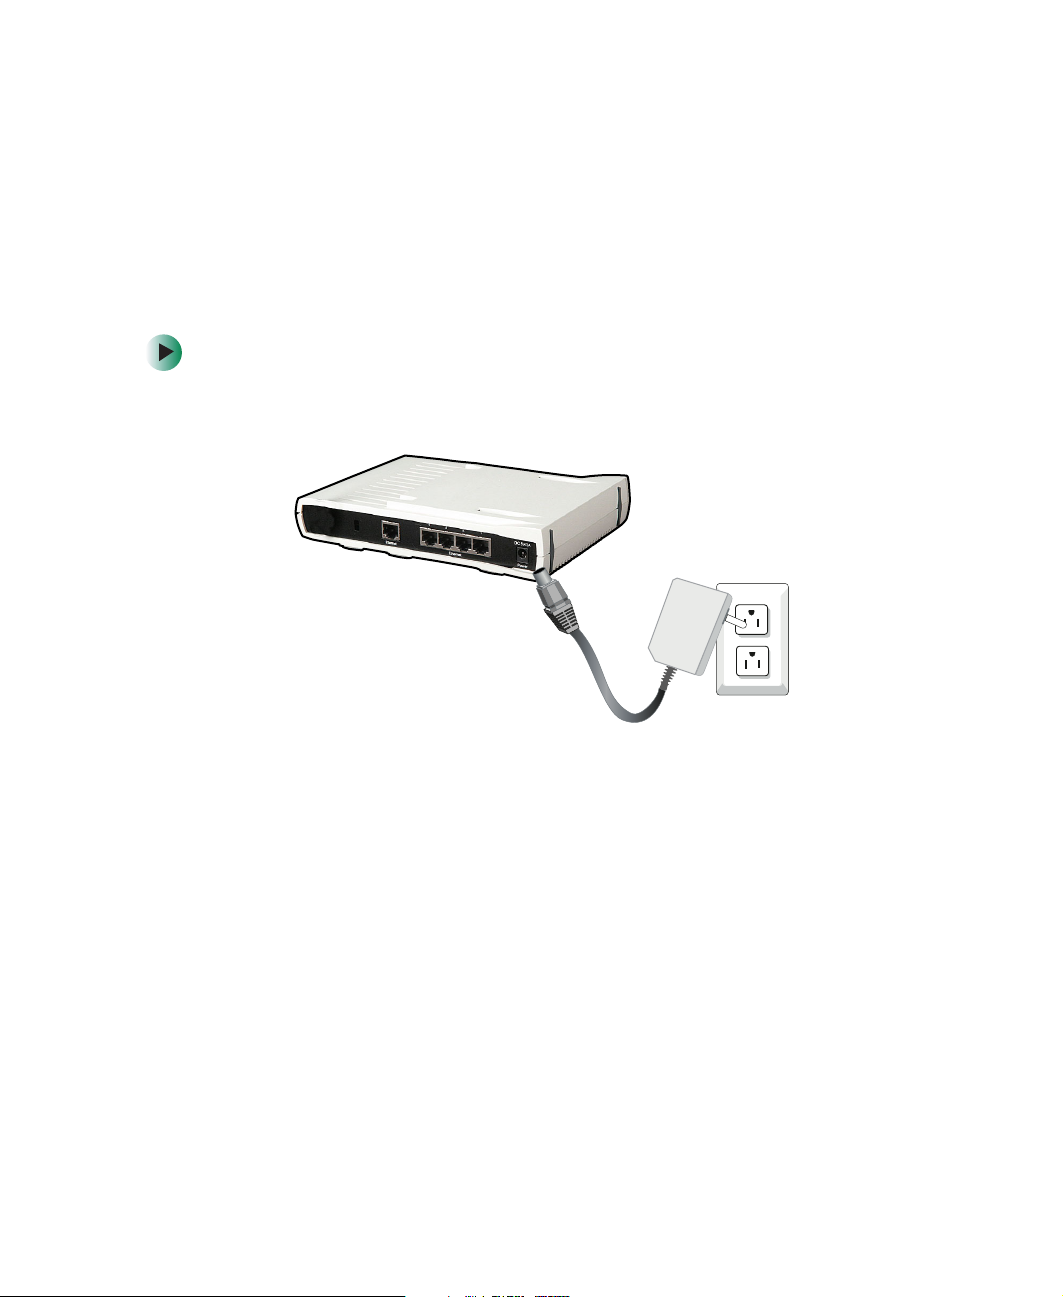
1 Plug one end of the power adapter into the AC connector on the hub or
switch and the other end into a grounded, 110V electrical outlet.
Hub or
switch
2 Turn on your computer.
Power adapter
www.gateway.com
23
Page 30

Wired Ethernet Networking
3 Plug one end of a straight-through network cable into any numbered port
on the hub or switch (except the uplink port), then plug the other end
into the network jack on the computer. Green indicators on the front of
the hub or switch should light to indicate a good connection.
Hub or switch
24
4 Repeat Step 2 through Step 3 for each computer on the network.
www.gateway.com
Page 31

Creating a Wired Ethernet Network
Setting up a network using a router and optional hub or switch
If you are setting up a network for more than two computers and you will be
connecting your network to a high-speed Broadband Internet connection (cable
or DSL modem), we recommend the use of a router. A router lets you access
the Internet connection from any network computer. The router can assign IP
addresses to the computers on the network and can provide firewall protection
for your network as well.
In addition to a router, you need a straight-through cable for each computer
you want to connect to the network. If your router does not have built-in
switching, or if you have more computers than your router has ports, you need
a hub or switch and a straight-through cable to connect the hub or switch to
the router.
WAN port - connect to
DSL or cable modem for
Internet connection
Uplink
port
Hub or
switch
Router
www.gateway.com
25
Page 32

Wired Ethernet Networking
To set up a network using a router and optional hub or switch:
1 If you are using a hub or switch, plug one end of the power adapter into
the AC connector on the hub or switch and the other end into a grounded,
110V electrical outlet.
-OR-
If you are not using a hub, go to Step 2.
2 Plug one end of the power adapter into the AC connector on the router
and the other end into a grounded, 110V electrical outlet.
3 If you are using a hub or switch, plug one end of a straight-through
network cable into the uplink port on the hub or switch (identified by a
label or a switch). Plug the other end of the cable into the uplink port on
the router. If the router has only a single port, use the LAN port and set
the switch on the back of the router to crossover (X).
4 Turn on your computers.
5 If you are using a hub or switch, plug one end of a straight-through
network cable into any numbered port on the hub or switch (except the
uplink port). Plug the other end of the cable into the network connector
on the computer. As each computer is connected to the hub or switch, the
corresponding green indicator should light on the front of the hub or
switch, indicating a good connection.
26
-OR-
If you are not using a hub or switch, plug one end of a straight-through
network cable into any numbered port on the router (except the WAN
port). The WAN port is used to connect the router to the DSL or cable
modem, and is identified by a label or a switch. Plug the other end of the
cable into the network connector on the computer. As each computer is
connected to the router, the corresponding green indicator should light
on the front of the router, indicating a good connection.
6 Repeat Step 5 for each computer on the network.
7 For an Internet connection, plug a straight-through cable into the WAN
port on the router and the other end into the Ethernet jack on the DSL
or cable modem.
www.gateway.com
Page 33

Creating a Wired Ethernet Network
Where to go from here
Configuring your wired Ethernet network
Now that your wired Ethernet network has been set up, you are ready to
configure the network and router. Go to “Configuring Windows for a Wired
Network” on page 29.
www.gateway.com
27
Page 34

Wired Ethernet Networking
28
www.gateway.com
Page 35

Configuring
Windows for a
Wired Network
This chapter describes how to configure Windows XP or
Windows 2000 for a wired Ethernet network. Read this
chapter to learn about:
■ “Naming the computers and the workgroup” on
page 30
■ “Configuring the TCP/IP protocol” on page 40
■ “Configuring your router” on page 47
3
29
Page 36

Wired Ethernet Networking
Naming the computers and the workgroup
Each computer on your network must have a unique name and be identified
as part of a workgroup. This must be done individually on each computer.
To name your computers in Windows XP, go to “Naming the computers and
the workgroup in Windows XP” on page 30.
To name your computers in Windows 2000, go to “Naming the computers and
the workgroup in Windows 2000” on page 38.
Naming the computers and the workgroup in
Windows XP
Use the Windows XP Network Setup Wizard to name each computer and
workgroup as well as select other network settings in Windows XP.
Important The network setup procedure uses the Windows XP
Network Setup Wizard. The example screens show those
screens that typically appear in the course of using the
wizard. If your network situation differs from that used in
this example, you may encounter additional screens or
screens with different selections. Make sure that you read
each screen in the wizard and make your selections based
on your particular network situation.
30
www.gateway.com
Page 37

Configuring Windows for a Wired Network
To run the Windows XP Network Setup Wizard:
1 Make sure the hardware is connected and turned on as described in
“Creating a Wired Ethernet Network” on page 19.
2 Click the Network Setup Wizard icon on the Windows XP taskbar. The
Network Setup Wizard opens.
-OR-
Click
Start, All Programs, Accessories, Communications, then click Network
Setup Wizard
. The Network Setup Wizard opens.
3 Click Next to continue through the wizard.
www.gateway.com
31
Page 38

Wired Ethernet Networking
4 Click Next. The Select a connection method screen opens.
Important If The wizard found disconnected network hardware
screen opens instead of the Select a connection method
screen, make sure that one end of the Ethernet cable is
connected to your computer and the other end is
connected to a router, switch, hub, or computer that is
turned on, then click Next.
The wizard found disconnected network hardware screen
will open if your computer also has wireless Ethernet
networking built-in. If your computer has wireless Ethernet
networking built-in, and your computer is connected to a
router, switch, hub, or computer that is turned on, click
Ignore disconnected network hardware, then click Next.
32
www.gateway.com
Page 39

Configuring Windows for a Wired Network
5 Click the method that the computer uses to access the Internet.
If you are connecting to a wired Ethernet network, and you are accessing
the Internet through a router (as in the example in “Setting up a network
using a router and optional hub or switch” on page 25), click
connects to the Internet through another computer on my network or through a
residential gateway
-OR-
If you are connecting to a wired Ethernet network, and you are not
accessing the Internet (as in the example in “Setting up a peer-to-peer wired
Ethernet network” on page 22), click
computer belongs to a network that does not have an Internet connection
.
Other, then click Next. Click This
This computer
6 Click Next. If your computer has both wired and wireless Ethernet
capabilities, the Your computer has multiple connections screen opens.
.
www.gateway.com
33
Page 40

Wired Ethernet Networking
7 If your computer has both wired and wireless Ethernet capabilities, click
Let me choose the connections to my network, then click Next. The Select the
connections to bridge screen opens.
34
www.gateway.com
Page 41

Configuring Windows for a Wired Network
8 Click to select the Local Area Connection check box, then click Next. The
Give this computer a description and name screen opens.
9 Type a description of the computer in the Computer description box.
10 Type a unique computer name in the Computer name box. This name
identifies the computer to other users on the network. Use a computer
name of up to 15 characters with no blank spaces. Each computer name
must be unique on your network. All-numeric computer names are not
allowed. Names must contain some letters.
www.gateway.com
35
Page 42

Wired Ethernet Networking
11 Click Next. The Name your network screen opens.
12 Type a name for your workgroup in the Workgroup box. Use a workgroup
name of up to 15 characters with no blank spaces. The workgroup name
must be the same for all computers in your network workgroup, and the
name must be different than any computer name on your network.
13 Click Next. The Ready to apply network settings screen opens.
36
www.gateway.com
Page 43

Configuring Windows for a Wired Network
14 Click Next to apply the network settings. The You ’ re alm os t d on e screen
opens.
15 If you are setting up an Ethernet network on other computers, you may
want to use the Network Setup Wizard to do so. Click a method for
installing and configuring the network on your other computers, then click
Next.
16 Click Finish. Go to “Configuring the TCP/IP protocol” on page 40.
Important You must give each computer on the network a unique
Computer Name and the same Workgroup Name.
Help and
Support
For more information about using the Network Setup
Wizard in Windows XP, click Start, then click Help and
Support.
Type the keyword Network Setup Wizard in the
HelpSpot Search box , then click
the arrow.
www.gateway.com
37
Page 44

Wired Ethernet Networking
Naming the computers and the workgroup in
Windows 2000
The first time you use networking on your computer, you need to give each
computer a unique name and assign each computer to the same workgroup.
If you are naming the computer and workgroup in Windows XP, see “Naming
the computers and the workgroup in Windows XP” on page 30.
To identify this computer on the network:
1 Click Start, Settings, then click Control Panel. The Control Panel window
opens.
2 Double-click the System icon. The System Identification dialog box opens.
3 Click the Network Identification tab.
4 Click Properties. The Identification Changes dialog box opens.
38
5 Type a unique computer name in the Computer name box. This name
identifies the computer to other users on the network. Use a computer
name of up to 15 characters with no blank spaces. Each computer name
must be unique on your network. All-numeric computer names are not
allowed. Names must contain some letters.
www.gateway.com
Page 45

Configuring Windows for a Wired Network
6 Type a name for your workgroup in the Workgroup box. Use a workgroup
name of up to 15 characters with no blank spaces. The workgroup name
must be the same for all computers in your network workgroup, and the
name must be different than any computer name on your network.
7 Click OK to close the Identification Changes dialog box.
8 Click OK to close the System Identification dialog box. Go to “Configuring
the TCP/IP protocol” on page 40.
Important You must give each computer on the network a unique
Computer Name and the same Workgroup Name.
www.gateway.com
39
Page 46

Wired Ethernet Networking
Configuring the TCP/IP protocol
A networking protocol is a language computers use to talk to each other. One of
several available protocols must be set up on each computer you plan to use
on your network. We recommend you use the Transmission Control
Protocol/Internet Protocol (TCP/IP), which is widely accepted and compatible
for local area networks (LANs), as well as for Internet communications.
When networking is set up in Windows XP or Windows 2000, TCP/IP is
automatically installed as the default protocol.
Terms you should know
DHCP - Dynamic Host Configuration Protocol (DHCP) lets a router temporarily
assign an IP address to a computer on the network.
IP Address - Internet Protocol (IP) address is a number that uniquely identifies
a computer on the network.
Subnet Mask - This number identifies what subnetwork the computer is located
on. This number will be the same on all computers on a home network.
Entering the IP address and subnet mask on each computer
In order to use the TCP/IP protocol on each computer, you must either set the
protocol to “Obtain an IP address from a DHCP server” or make the IP address
settings manually. If you use a router that can act as the Dynamic Host
Configuration Protocol (DHCP) server, you can select “Obtain an IP address
from a DHCP server.” Or if you require a static IP address (one that does not
change), you must set the IP address manually. This means that you need to
enter an IP address and a subnet mask.
If you are using Windows XP, go to “Entering the IP address and subnet mask
in Windows XP” on page 41.
If you are using Windows 2000, go to “Entering the IP address and subnet mask
in Windows 2000” on page 44.
40
www.gateway.com
Page 47

Configuring Windows for a Wired Network
Entering the IP address and subnet mask in Windows XP
To enter the IP address and the subnet mask:
1 Click Start, then click Control Panel. The Control Panel window opens. If your
Control Panel is in Category View, click
The Network and Internet Connections window opens.
Network and Internet Connections.
2 Click/Double-click Network Connections. The Network Connections window
opens.
3 Right-click Local Area Connection, then click Properties. The Local Area
Connection Properties dialog box opens.
4 Click to select the Internet Protocol (TCP/IP) check box in the This connection
uses the following items
see more choices.
list. If you do not see TCP/IP, drag the scroll bar to
5 Click Properties. The Internet Protocol (TCP/IP) Properties dialog box opens.
www.gateway.com
41
Page 48

Wired Ethernet Networking
6 Click the General tab.
42
www.gateway.com
Page 49

Configuring Windows for a Wired Network
7 If you are connecting to an office Ethernet network and are required to
type a static IP address and subnet mask, ask your network system
administrator for the correct values.
- OR -
If you are connecting to a home Ethernet network, have a cable or DSL
modem, and a router that automatically assigns IP addresses to computers
on the network, click
- OR -
If you are connecting to a home Ethernet network, have a cable or DSL
modem, and do not have a router, use the IP address and subnet mask
provided by your cable or DSL provider as the address for your computer.
Each computer connected to your network will need a unique, static IP
address.
- OR -
If you are connecting to a home Ethernet network, do not have a cable
or DSL modem, and do not have a router, click
then type the following values.
Obtain an IP address automatically.
Use the following IP address,
a Type the IP address in the IP address box. Use the value 192.168.0.N
where N is any number between 1 and 254. We suggest 1 for the first
computer on your network, 2 for the next, and so on. The number
must be unique on your network.
b Type the subnet mask in the Subnet mask box. Use the value
255.255.255.0 for all computers.
8 Click OK to close the Internet Protocol (TCP/IP) Properties dialog box.
9 Click OK to close the Local Area Connection Properties dialog box.
10 Click X to close the Network Connections window.
11 Repeat this procedure for every computer on your network.
12 After you enter the IP address on all your computers, go to “Configuring
your router” on page 47.
www.gateway.com
43
Page 50

Wired Ethernet Networking
Entering the IP address and subnet mask in Windows 2000
To enter the IP address and the subnet mask:
1 Click Start, Settings, then click Network and Dial-up Connections. The Network
and Dial-up Connections window opens. This window has an icon for each
networking connection available on your computer. For example, if you
have both wired and wireless Ethernet hardware installed on your
computer, there will be two icons, one for your wired Ethernet hardware
and one for your wireless Ethernet hardware.
2 Right-click the Local Area Connection icon for the wired Ethernet hardware,
then click
Properties. The Local Area Connection Properties dialog box opens.
44
3 Click to select the Internet Protocol (TCP/IP) check box in the Components
checked are used by this connection
scroll bar to see more choices.
www.gateway.com
list. If you do not see TCP/IP, drag the
Page 51

Configuring Windows for a Wired Network
4 Click Properties. The Internet Protocol (TCP/IP) Properties dialog box opens.
www.gateway.com
45
Page 52

Wired Ethernet Networking
5 If you are connecting to an office Ethernet network and are required to
type a static IP address and subnet mask, ask your network system
administrator for the correct values.
- OR -
If you are connecting to a home Ethernet network, have a cable or DSL
modem, and a router that automatically assigns IP addresses to computers
on the network, click
- OR -
If you are connecting to a home Ethernet network, have a cable or DSL
modem, and do not have a router, use the IP address and subnet mask
provided by your cable or DSL provider as the address for your computer.
Each computer connected to your network will need a unique, static IP
address.
- OR -
If you are connecting to a home Ethernet network, do not have a cable
or DSL modem, and do not have a router, click
then type the following values.
Obtain an IP address automatically.
Use the following IP address,
a Type the IP address in the IP address box. Use the value 192.168.0.N
where N is any number between 1 and 254. We suggest 1 for the first
computer on your network, 2 for the next, and so on. The number
must be unique on your network.
b Type the subnet mask in the Subnet mask box. Use the value
255.255.255.0 for all computers.
6 Click OK to close the Internet Protocol (TCP/IP) Properties dialog box.
7 Click OK to close the Local Area Connection Properties dialog box.
8 Click X to close the Network and Dial-up Connections window.
9 Repeat this procedure for every computer on your network.
10 After you enter the IP address on all your computers, go to “Configuring
your router” on page 47.
46
www.gateway.com
Page 53

Configuring Windows for a Wired Network
Configuring your router
After you have set up the TCP/IP protocol on your computers, you can configure
your router using your Web browser. For these instructions, we assume that you
are using the router to connect your network to a high-speed Broadband
Internet connection through an Internet service provider (ISP) and that you
are configuring it as a DHCP server.
Important The following configuration information applies to Linksys®
EtherFast Cable/DSL routers. For any other brand or
model of router, see the manufacturer’s documentation,
which may accompany the router or be available from the
manufacturer’s Web site.
To configure the Linksys EtherFast Cable/DSL router:
1 From one of the computers connected to the network, open your Web
browser, type
NTER.
E
2 When prompted for a username and password, leave the username box
empty and type
opens.
http://192.168.1.1 in the browser’s address box, then press
admin in the password box, then click OK. The Setup page
3 Enter the following values in the appropriate fields:
■ Router Name and Domain Name - Check with your ISP to see if entries
are required in these fields and, if so, what entries are required.
Normally, leaving the fields blank will work.
■ LAN IP Address - We recommend that you accept the defaults.
■ WAN IP Address - If your ISP assigns you a different IP address each
time you log on, click
requires a fixed IP address, click
values provided by your ISP.
Obtain an IP Address Automatically. If your ISP
Specify an IP Address, then enter the
4 When you are finished entering information on the Setup page, click Apply.
5 Click the DHCP tab on the top of the screen.
6 Click the Enable checkbox, then click Apply.
www.gateway.com
47
Page 54

Wired Ethernet Networking
7 Press the reset button on your cable or DSL modem, then restart the
computer.
Where to go from here
Using your wired Ethernet network
Now that your wired Ethernet network has been created and configured, you
are ready to use the network. Go to “Sharing Your Resources” on page 131.
Adding a wireless access point to your wired Ethernet network
If you are also setting up wireless Ethernet networking on your computer, or
adding a wireless access point to your wired Ethernet network, go to “Wireless
Ethernet Networking” on page 49.
Troubleshooting your wired Ethernet network
If you cannot get your wired Ethernet network to work, go to “Troubleshooting
Your Ethernet Network” on page 145.
48
www.gateway.com
Page 55

Wireless
Ethernet
Networking
Read the following chapters to learn how to set up and use
a wireless Ethernet network:
■ “Configuring Windows for a Wireless Network” on
page 51
■ “Creating a Wireless Access Point Network” on page 71
-OR-
“Creating a Peer-to-Peer Wireless Network” on page 99
■ “Turning Your Wireless Emitter On or Off” on
page 125
C
49
Page 56

50
www.gateway.com
Page 57

Configuring
Windows for a
Wireless Network
This chapter describes how to configure Windows XP or
Windows 2000 for a wireless Ethernet network. Read this
chapter to learn about:
■ “Installing the wireless Ethernet driver” on page 52
■ “Naming the computers and the workgroup” on
page 54
■ “Configuring the TCP/IP protocol” on page 63
4
51
Page 58

Wireless Ethernet Networking
Installing the wireless Ethernet driver
If your Gateway computer has built-in wireless Ethernet, the first time you start
your computer, it automatically installs the wireless Ethernet driver. You may
need to install the driver if you reinstall Windows.
Important The Broadcom Wireless LAN driver is used with Gateway
computers that have a built-in Broadcom wireless Ethernet
adapter.
The Intel Calexico Wireless LAN driver is used with
Gateway computers that have a built-in Intel Calexico
wireless Ethernet adapter.
The Agere ORiNOCO Ethernet driver is used with
Gateway computers that have a built-in Agere ORiNOCO
wireless Ethernet adapter.
If your computer has a different built-in wireless Ethernet
adapter, see your user’s guide for the procedure to install
your driver.
To determine which wireless adapter is installed in your computer:
1 In Windows XP, click Start, then click Control Panel. The Control Panel
window opens. If your Control Panel is in Category View, click
and Maintenance
-OR-
In Windows 2000, click
Panel window opens.
.
Start, Settings, then click Control Panel. The Control
2 Click/Double-click System, click the Hardware tab, then click Device
Manager
. The Device Manager window opens.
3 Click the plus (+) in front of Network adapters. The type of wireless Ethernet
adapter installed in your computer is listed.
52
www.gateway.com
Performance
Page 59

Configuring Windows for a Wireless Network
To see if the wireless Ethernet driver is installed:
1 Locate the wireless adapter in the Device Manager window by following the
steps in “To determine which wireless adapter is installed in your
computer:” on page 52.
2 Right-click the wireless adapter, then click Properties.
3 Click the Driver tab. The driver is listed.
You may need to install the driver if it was not installed on your computer or
if you reinstall Windows.
To install the wireless Ethernet driver:
1 Insert the red Drivers and Applications CD into your CD or DVD drive.
2 If this is the first time you have inserted the CD, accept the End User
License Agreement (EULA) by clicking
Continue. The Gateway Driver and Application Recovery program starts and
Drivers and Applications Recovery tab appears.
the
Yes, I accept it, then clicking
3 Click Broadcom Wireless LAN PC Card.
-OR-
Click
Intel Calexico Wireless LAN PC Card.
-OR-
Click
ORiNOCO Wireless LAN PC Card.
4 Click Install.
5 Follow any additional on-screen instructions.
www.gateway.com
53
Page 60

Wireless Ethernet Networking
Naming the computers and the workgroup
Each computer on your network must have a unique name and be identified
as part of a workgroup. This must be done individually on each computer.
If you are naming the computers and workgroup in Windows XP, see “Naming
the computers and the workgroup in Windows XP” on page 54.
If you are naming the computers and workgroup in Windows 2000, see
“Naming the computers and the workgroup in Windows 2000” on page 61.
Naming the computers and the workgroup in
Windows XP
Use the Windows XP Network Setup Wizard to name each computer and
workgroup as well as select other network settings in Windows XP.
Important The network setup procedure uses the Windows XP
Network Setup Wizard. The example screens show those
screens that typically appear in the course of using the
wizard. If your network situation differs from that used in
this example, you may encounter additional screens or
screens with different selections. Make sure that you read
each screen in the wizard and make your selections based
on your particular network situation.
54
www.gateway.com
Page 61

Configuring Windows for a Wireless Network
To run the Windows XP Network Setup Wizard:
1 Click the Network Setup Wizard icon on the Windows XP taskbar. The
Network Setup Wizard opens.
-OR-
Click
Start, All Programs, Accessories, Communications, then click Network
Setup Wizard
. The Network Setup Wizard opens.
2 Click Next to continue through the wizard.
www.gateway.com
55
Page 62

Wireless Ethernet Networking
3 Click Next. The The wizard found disconnected network hardware screen opens.
4 Click to select the Ignore disconnected network hardware check box, then
Next. The Select a connection method screen opens.
click
56
www.gateway.com
Page 63

Configuring Windows for a Wireless Network
5 Click the method that the computer uses to access the Internet.
If you are connecting to a wireless Ethernet network, and you are accessing
the Internet through a router or wireless access point router (as in the
example on page 11), click
another computer on my network or through a residential gateway
-OR-
If you are connecting to a wireless Ethernet network, and you are not
accessing the Internet (as in the example on page 14), click
Next. Click This computer belongs to a network that does not have an Internet
connection
.
This computer connects to the Internet through
.
Other, then click
6 Click Next. If your computer has both wired and wireless Ethernet
capabilities, the Your computer has multiple connections screen opens.
www.gateway.com
57
Page 64

Wireless Ethernet Networking
7 If your computer has both wired and wireless Ethernet capabilities, click
Let me choose the connections to my network, then click Next. The Select the
connections to bridge screen opens.
8 Click to select the Wireless Network Connection check box, then click Next.
The Give this computer a description and name screen opens.
58
9 Type a description of the computer in the Computer description box.
www.gateway.com
Page 65

Configuring Windows for a Wireless Network
10 Type a unique computer name in the Computer name box. This name
identifies the computer to other users on the network. Use a computer
name of up to 15 characters with no blank spaces. Each computer name
must be unique on your network. All-numeric computer names are not
allowed. Names must contain some letters.
11 Click Next. The Name your network screen opens.
12 Type a name for your workgroup in the Workgroup box. Use a workgroup
name of up to 15 characters with no blank spaces. The workgroup name
must be the same for all computers in your network workgroup, and the
name must be different than any computer name on your network.
13 Click Next. The Ready to apply network settings screen opens.
www.gateway.com
59
Page 66

Wireless Ethernet Networking
14 Click Next to apply the network settings. The You ’ re alm os t d on e screen
opens.
15 If you are setting up an Ethernet network on other computers, you may
want to use the Network Setup Wizard to do so. Click a method for
installing and configuring the network on your other computers, then click
Next.
16 Click Finish. Go to “Configuring the TCP/IP protocol” on page 63.
Important You must give each computer on the network a unique
Computer Name and the same Workgroup Name.
Help and
Support
60
For more information about using the Network Setup
Wizard in Windows XP, click Start, then click Help and
Support.
Type the keyword Network Setup Wizard in the
HelpSpot Search box , then click
the arrow.
www.gateway.com
Page 67

Configuring Windows for a Wireless Network
Naming the computers and the workgroup in
Windows 2000
The first time you use networking on your computer, you need to give each
computer a unique name and assign each computer to the same workgroup.
If you are naming the computer and workgroup in Windows XP, see “Naming
the computers and the workgroup in Windows XP” on page 54.
To identify this computer on the network:
1 Click Start, Settings, then click Control Panel. The Control Panel window
opens.
2 Double-click the System icon. The System Identification dialog box opens.
3 Click the Network Identification tab.
4 Click Properties. The Identification Changes dialog box opens.
5 Type a unique computer name in the Computer name box. This name
identifies the computer to other users on the network. Use a computer
name of up to 15 characters with no blank spaces. Each computer name
must be unique on your network. All-numeric computer names are not
allowed. Names must contain some letters.
www.gateway.com
61
Page 68

Wireless Ethernet Networking
6 Type a name for your workgroup in the Workgroup box. Use a workgroup
name of up to 15 characters with no blank spaces. The workgroup name
must be the same for all computers in your network workgroup, and the
name must be different than any computer name on your network.
7 Click OK to close the Identification Changes dialog box.
8 Click OK to close the System Identification dialog box.
9 Click OK to close the System Identification dialog box. Go to “Configuring
the TCP/IP protocol” on page 63.
Important You must give each computer on the network a unique
Computer Name and the same Workgroup Name.
62
www.gateway.com
Page 69

Configuring Windows for a Wireless Network
Configuring the TCP/IP protocol
A networking protocol is a language computers use to talk to each other. One of
several available protocols must be set up on each computer you plan to use
on your network. We recommend you use the Transmission Control
Protocol/Internet Protocol (TCP/IP), which is widely accepted and compatible
for local area networks (LANs), as well as for Internet communications.
When networking is set up in Windows XP or Windows 2000, TCP/IP is
automatically installed as the default protocol.
Terms you should know
DHCP - Dynamic Host Configuration Protocol (DHCP) enables a router to
temporarily assign an IP address to a computer on the network.
IP Address - Internet Protocol (IP) address is a number that uniquely identifies
a computer on the network.
Subnet Mask - This number identifies what subnetwork the computer is located
on. This number will be the same on all computers on a home network.
Entering the IP address and subnet mask on each computer
In order to use the TCP/IP protocol on each computer, you must either set the
protocol to “Obtain an IP address from a DHCP server” or make the IP address
settings manually. If you use a wireless access point router that can act as the
Dynamic Host Configuration Protocol (DHCP) server, you can select “Obtain
an IP address from a DHCP server.” Or if you require a static IP address (one
that does not change), you must set the IP address manually. This means that
you need to enter an IP address and a subnet mask.
If you are using Windows XP, go to “Entering the IP address and subnet mask
in Windows XP” on page 64.
If you are using Windows 2000, go to “Entering the IP address and subnet mask
in Windows 2000” on page 67.
www.gateway.com
63
Page 70

Wireless Ethernet Networking
Entering the IP address and subnet mask in Windows XP
To enter the IP address and the subnet mask:
1 Click Start, then click Control Panel. The Control Panel window opens. If your
Control Panel is in Category View, click
The Network and Internet Connections window opens.
Network and Internet Connections.
2 Click/Double-click Network Connections. The Network Connections window
opens.
3 Right-click Local Area Connection, then click Properties. The Local Area
Connection Properties dialog box opens.
64
4 Click to select the Internet Protocol (TCP/IP) check box in the This connection
uses the following items
see more choices.
list. If you do not see TCP/IP, drag the scroll bar to
5 Click Properties. The Internet Protocol (TCP/IP) Properties dialog box opens.
www.gateway.com
Page 71

6 Click the General tab.
Configuring Windows for a Wireless Network
www.gateway.com
65
Page 72

Wireless Ethernet Networking
7 If you are connecting to an office Ethernet network and are required to
type a static IP address and subnet mask, ask your network system
administrator for the correct values.
- OR -
If you are connecting to a home Ethernet network, have a cable or DSL
modem, and a wireless access point router that automatically assigns IP
addresses to computers on the network, click
automatically
- OR -
If you are connecting to a home Ethernet network, have a cable or DSL
modem, and do not have a wireless access point router, use the IP address
and subnet mask provided by your cable or DSL provider as the address
for your computer. Each computer connected to your network will need
a unique, static IP address.
- OR -
If you are connecting to a home Ethernet network, do not have a cable
or DSL modem, and do not have a wireless access point router, click
the following IP address
Obtain an IP address
.
Use
, then type the following values.
a Type the IP address in the IP address box. Use the value 192.168.0.N
where N is any number between 1 and 254. We suggest 1 for the first
computer on your network, 2 for the next, and so on. The number
must be unique on your network.
b Type the subnet mask in the Subnet mask box. Use the value
255.255.255.0 for all computers.
8 Click OK to close the Internet Protocol (TCP/IP) Properties dialog box.
9 Click OK to close the Local Area Connection Properties dialog box.
10 Click X to close the Network Connections window.
11 Repeat this procedure for every computer on your network.
12 After you enter the IP addresses on all your computers, go to “Where to
go from here” on page 70.
66
www.gateway.com
Page 73

Configuring Windows for a Wireless Network
Entering the IP address and subnet mask in Windows 2000
To enter the IP address and the subnet mask:
1 Click Start, Settings, then click Network and Dial-up Connections. The Network
and Dial-up Connections window opens. This window has an icon for each
networking connection available on your computer. For example, if you
have both wired and wireless Ethernet hardware installed on your
computer, there will be two icons, one for your wired Ethernet hardware
and one for your wireless Ethernet hardware.
2 Right-click the Local Area Connection icon for the wireless Ethernet
hardware, then click
box opens.
Properties. The Local Area Connection Properties dialog
3 Click to select the Internet Protocol (TCP/IP) check box in the Components
checked are used by this connection
scroll bar to see more choices.
www.gateway.com
list. If you do not see TCP/IP, drag the
67
Page 74

Wireless Ethernet Networking
4 Click Properties. The Internet Protocol (TCP/IP) Properties dialog box opens.
68
www.gateway.com
Page 75

Configuring Windows for a Wireless Network
5 If you are connecting to an office Ethernet network and are required to
type a static IP address and subnet mask, ask your network system
administrator for the correct values.
- OR -
If you are connecting to a home Ethernet network, have a cable or DSL
modem, and a wireless access point router that automatically assigns IP
addresses to computers on the network, click
automatically
- OR -
If you are connecting to a home Ethernet network, have a cable or DSL
modem, and do not have a wireless access point router, use the IP address
and subnet mask provided by your cable or DSL provider as the address
for your computer. Each computer connected to your network will need
a unique, static IP address.
- OR -
If you are connecting to a home Ethernet network, do not have a cable
or DSL modem, and do not have a wireless access point router, click
the following IP address
.
, then type the following values.
Obtain an IP address
Use
a Type the IP address in the IP address box. Use the value 192.168.0.N
where N is any number between 1 and 254. We suggest 1 for the first
computer on your network, 2 for the next, and so on. The number
must be unique on your network.
b Type the subnet mask in the Subnet mask box. Use the value
255.255.255.0 for all computers.
6 Click OK to close the Internet Protocol (TCP/IP) Properties dialog box.
7 Click OK to close the Local Area Connection Properties dialog box.
8 Click X to close the Network and Dial-up Connections window.
9 Repeat this procedure for every computer on your network.
10 After you enter the IP addresses on all your computers, go to “Where to
go from here” on page 70.
www.gateway.com
69
Page 76

Wireless Ethernet Networking
Where to go from here
Creating a wireless Ethernet network
Now that your wireless Ethernet network has been configured, you are ready
to create a wireless network. Go to “Creating a Wireless Access Point Network”
on page 71 or “Creating a Peer-to-Peer Wireless Network” on page 99.
70
www.gateway.com
Page 77

Creating a
Wireless Access
Point Network
This chapter describes how to create an access point
wireless Ethernet network. Read this chapter to learn about:
■ “Setting up your access point” on page 72
■ “Connecting to an access point network in
Windows XP” on page 75
■ “Connecting to an access point network in
Windows 2000” on page 81
5
71
Page 78

Wireless Ethernet Networking
Setting up your access point
See the instructions that came with your access point or wireless access point
router for initial setup. How you set up your access point varies depending on
the features of the access point and your networking situation.
Mounting the access point
When selecting a place to mount your access point, consider the following
guidelines:
■ Mount your access point as high as possible (to avoid interference from
natural obstacles and appliances).
■ Mount your access point in a location so you can run an Ethernet cable
from the access point to either your wired Ethernet network or your cable
or DSL modem.
Configuring the access point
Important The following configuration information applies to the
Linksys wireless access point router with 4-port switch. For
any other brand or model of access point, see the
manufacturer’s documentation, which may accompany the
access point or be available from the manufacturer’s Web
site.
To configure the Linksys wireless access point router with 4-port switch:
1 If you are connecting any wired devices to your wireless access point router,
follow the instructions in “Setting up a network using a router and optional
hub or switch” on page 25, then go to Step 7.
-OR-
If you are not connecting any wired devices to your wireless access point
router, go to Step 2.
2 Plug one end of a straight-through cable into the WAN port on the wireless
access point router and the other end into the DSL or cable modem.
72
www.gateway.com
Page 79

Creating a Wireless Access Point Network
3 Plug one end of the power adapter into the AC connector on the wireless
access point router and the other end into a grounded, 110V electrical
outlet.
4 Turn on the DSL or cable modem.
5 Press the reset button on the wireless access point router.
6 Temporarily connect a computer to the wireless access point router using
a straight-through cable and turn the computer on.
7 From one of the computers connected to your wireless access point router,
open your Web browser.
8 In the browser’s Address box, type http://192.168.1.1, then press ENTER.
9 When prompted for a username and password, leave the username box
empty and type admin in the password box, then click
opens.
OK. The setup page
10 Enter the following values in the appropriate fields:
■ Host Name and Domain Name - Check with your ISP to see if entries
are required in these fields and, if so, what entries are required.
■ Enable/Disable wireless - Click Enable to turn on the wireless functions
of your access point router.
■ SSID - Type a unique name for your wireless access point.
■ Allow Broadcast SSID to associate - Clicking Yes allows you to
automatically see the SSID in the
“Connecting to an access point network” on page 75). Clicking
means that you will need to manually add the access point (see
“Adding an access point” on page 79). Clicking
network more secure because intruders will not be able to connect to
your network without knowing the name of your access point.
■ Channel - In the United States, you can specify any channel between
1 and 11.
■ WEP - To use WEP encryption, select Mandatory. If you use WEP
encryption, all computers on your network must use the same WEP
encryption. See the documentation for your access point on how to
use WEP encryption.
www.gateway.com
Available Networks list (see
No
No makes your wireless
73
Page 80

Wireless Ethernet Networking
■ WAN Connection Type - If your ISP assigns you a different IP address
each time you log on, click
ISP requires a fixed IP address, click
provided by your ISP.
11 Click Apply, then click Continue to save the settings.
12 If you temporarily connected a computer to the access point router in
Step 6, disconnect it.
13 Reset the power on your cable or DSL modem.
14 Restart all of your computers on the network.
To connect to an access point in Windows XP, see “Connecting to an access
point network in Windows XP” on page 75.
To connect to an access point in Windows 2000, see “Connecting to an access
point network in Windows 2000” on page 81.
Obtain an IP Address Automatically. If your
Static IP, then enter the values
74
www.gateway.com
Page 81

Creating a Wireless Access Point Network
Connecting to an access point
network in Windows XP
After you have set up your wireless access point, you need to set up the network
connection on your computers.
Connecting to an access point network
To connect to an access point wireless Ethernet network in Windows XP:
1 Click Start, then click Control Panel. The Control Panel window opens. If your
Control Panel is in Category View, click
The Network and Internet Connections window opens.
2 Click/Double-click Network Connections. The Network Connections window
opens.
3 Right-click Wireless Network Connection, then click View Available Wireless
Networks
. The Connect to Wireless Network dialog box opens.
Network and Internet Connections.
www.gateway.com
75
Page 82

Wireless Ethernet Networking
4 Click the network you created in the Available networks list, then click
Connect. If you are unable to connect to the network in the Available
networks
page 77.
-OR-
list, see “Configuring computer settings for an access point” on
If the network you created does not appear in the
see “Adding an access point” on page 79.
Help and
Support
For more information about connecting to a wireless
network in Windows XP, click Start, then click Help and
Support.
Type the keyword connecting to wireless network in the
HelpSpot Search box , then click
the arrow.
Available networks list,
76
www.gateway.com
Page 83

Creating a Wireless Access Point Network
Configuring computer settings for an access point
If you are unable to connect to an access point in the Available networks list,
the most likely cause is that the access point is using WEP security. You need
to configure your network settings to use the same WEP security settings as
those used by the access point.
To configure computer settings for an access point wireless Ethernet
network in Windows XP:
1 With the Connect to Wireless Network dialog box open, click the network
you want to configure your computer for, then click
Network Connection Properties dialog box opens.
2 Click the Wireless Networks tab.
Advanced. The Wireless
www.gateway.com
77
Page 84

Wireless Ethernet Networking
3 Click to select the access point network in the Available networks box, then
Configure. The Wireless Network Properties dialog box opens. The name
click
of the network already appears in the
Network name (SSID) box.
78
4 Set the Wireless network key (WEP) settings to match those set on the
access point.
5 Make sure that the This is a computer-to-computer (ad hoc) network; wireless
access points are not used
check box is not selected.
6 Click OK to close the Wireless Network Properties dialog box.
7 Now that you have completed setting up your access point network in
Windows XP, go to “Using Your Ethernet Network” on page 129.
Help and
Support
For more information about configuring a wireless network
in Windows XP, click Start, then click Help and Support.
Type the keyword wireless network in the HelpSpot
Search box , then click the arrow.
www.gateway.com
Page 85

Creating a Wireless Access Point Network
Adding an access point
If an access point does not appear in the Available networks list, and you know
the access point is turned on, you need to add it manually. This typically
happens when you set the access point’s
No. For more information, see “Configuring the access point” on page 72.
To manually add an access point wireless Ethernet network in Windows XP:
1 With the Connect to Wireless Network dialog box open, click Advanced. The
Wireless Network Connection Properties dialog box opens.
2 Click the Wireless Networks tab.
Allow Broadcast SSID to associate to
www.gateway.com
79
Page 86

Wireless Ethernet Networking
3 Click Add. The Wireless Network Properties dialog box opens.
80
4 Type the name of the network in the Network name (SSID) box.
5 Set the Wireless network key (WEP) settings to match those set on the
access point.
6 Make sure that the This is a computer-to-computer (ad hoc) network; wireless
access points are not used
check box is not selected.
7 Click OK to close the Wireless Network Properties dialog box.
8 Now that you have completed setting up your access point network in
Windows XP, go to “Where to go from here” on page 97.
Help and
Support
For more information about configuring a wireless network
in Windows XP, click Start, then click Help and Support.
Type the keyword wireless network in the HelpSpot
Search box , then click the arrow.
www.gateway.com
Page 87

Creating a Wireless Access Point Network
Connecting to an access point
network in Windows 2000
If you use the Broadcom mini PCI card, connecting to an access point network
in Windows 2000 is similar to connecting to an access point network in
Windows XP. For more information, see “Using the Broadcom Wireless
Configuration Utility” on page 82.
If you use the Intel or Agere ORiNOCO mini PCI card, you cannot connect to
an access point network using Windows 2000 without first creating a profile
in a client manager program. If your Gateway computer has built in wireless
networking using the Intel mini PCI card, see “Using Intel PROSet” on page 86.
If your Gateway computer has built in wireless networking using the Agere
ORiNOCO mini PCI card, see “Using the ORiNOCO Client Manager” on
page 92.
If your Windows 2000 computer does not use the Broadcom Wireless
Configuration Utility, Intel client manager, or Agere client manager, see the
documentation that came with your wireless networking solution.
If you do not know which card you have, see “To determine which wireless
adapter is installed in your computer:” on page 52.
www.gateway.com
81
Page 88

Wireless Ethernet Networking
Using the Broadcom Wireless Configuration Utility
Connecting to an access point network using the Broadcom Wireless Configuration Utility
To connect to an access point wireless Ethernet network using the Broadcom
Wireless Configuration Utility:
1 Double-click the Broadcom Wireless Configuration Utility icon on the
taskbar. The Connect to Wireless Network dialog box opens.
82
2 Click the network you created in the Available networks list, then click
Connect. If you are unable to connect to the network in the Available
networks
the Broadcom Wireless Configuration Utility” on page 83.
-OR-
If the network you created does not appear in the
see “Adding an access point using the Broadcom Wireless Configuration
Utility” on page 84.
list, see “Configuring computer settings for an access point using
Available networks list,
www.gateway.com
Page 89

Creating a Wireless Access Point Network
Configuring computer settings for an access point using the Broadcom Wireless Configuration Utility
To configure an access point network using the Broadcom Wireless
Configuration Utility:
1 With the access point highlighted in the Connect to Wireless Network dialog
box, click
Advanced. The Broadcom Wireless Configuration Utility opens.
2 Click to select the access point in the Available networks box, then click
Configure. The Wireless Network Properties dialog box opens.
3 Set the Wireless network key (WEP) settings to match those set on the
access point.
4 Make sure that the This is a computer-to-computer (ad hoc) network; wireless
access points are not used
check box is not selected.
5 Click OK to close the Wireless Network Properties dialog box.
www.gateway.com
83
Page 90

Wireless Ethernet Networking
6 After you have completed setting up your access point network in
Windows 2000, go to “Where to go from here” on page 97.
Adding an access point using the Broadcom Wireless Configuration Utility
If an access point does not appear in the Available networks list, and you know
the access point is turned on, you need to add it manually. This typically
happens when you set the access point’s
No. For more information, see “Configuring the access point” on page 72.
Allow Broadcast SSID to associate to
To manually add an access point wireless Ethernet network using the
Broadcom Wireless Configuration Utility:
1 With the Connect to Wireless Network dialog box open, click Advanced. The
Broadcom Wireless Configuration Utility opens.
2 Click Add. The Wireless Network Properties dialog box opens.
84
3 Type the name of the network in the Network name (SSID) box.
www.gateway.com
Page 91

Creating a Wireless Access Point Network
4 Set the Wireless network key (WEP) settings to match those set on the
access point.
5 Make sure that the This is a computer-to-computer (ad hoc) network; wireless
access points are not used
check box is not selected.
6 Click OK to close the Wireless Network Properties dialog box.
7 After you have completed setting up your access point network in
Windows 2000, go to “Where to go from here” on page 97.
www.gateway.com
85
Page 92

Wireless Ethernet Networking
Using Intel PROSet
Configuring computer settings for an access point using Intel PROSet
To configure an access point network using Intel PROSet:
1 Click Start, Programs, Intel Network Adapters, then click Intel PROSet. The
Intel PROSet window opens.
2 In the left pane, click PRO/Wireless LAN 2100 3B Mini PCI Adapter.
86
www.gateway.com
Page 93

3 Click the Networks tab.
Creating a Wireless Access Point Network
www.gateway.com
87
Page 94

Wireless Ethernet Networking
4 Click Add to add a new profile. The Profile Wizard opens to the General
Settings screen.
5 Type the name of the profile you are creating in the Profile Name box. For
example, if you will be using your computer on two different networks,
such as at home and at work, you may want to name one profile
and the other one
Home
Work.
88
6 Type the name of the network in the Network Name (SSID) box. This is the
SSID of the access point you are connecting to.
7 Click Infrastructure - Connect to an Access Point.
www.gateway.com
Page 95

Creating a Wireless Access Point Network
8 Click Next. The Security Settings screen opens.
9 Set the Wireless network key (WEP) settings to match those set on the
access point.
10 Click Finish.
11 Now that your Intel PROSet profile is set up, go to “Connecting to an access
point network using Intel PROSet” on page 90.
www.gateway.com
89
Page 96

Wireless Ethernet Networking
Connecting to an access point network using Intel PROSet
To connect to a wireless Ethernet network using Intel PROSet:
1 Click Start, Programs, Intel Network Adapters, then click Intel PROSet. The
Intel PROSet window opens.
2 In the left pane, click PRO/Wireless LAN 2100 3B Mini PCI Adapter.
90
www.gateway.com
Page 97

3 Click the Networks tab.
Creating a Wireless Access Point Network
4 Click to highlight the profile for the network you created, then click
Connect.
5 After you have completed setting up your access point network in
Windows 2000, go to “Where to go from here” on page 97.
www.gateway.com
91
Page 98

Wireless Ethernet Networking
Using the ORiNOCO Client Manager
Configuring computer settings for an access point using the ORiNOCO Client Manager
To configure an access point network using the ORiNOCO Client Manager:
1 Click Start, Programs, ORiNOCO, then click Client Manager. The ORiNOCO
Client Manager window opens.
92
www.gateway.com
Page 99

Creating a Wireless Access Point Network
2 Click Actions, then click Add/Edit Configuration Profile. The Add/Edit
Configuration Profile dialog box opens.
3 Click Add to add a new profile. The Edit Configuration wizard opens to the
Select Profile screen.
www.gateway.com
93
Page 100

Wireless Ethernet Networking
4 Type the name of the profile you are creating in the Profile Name box. When
you create the first profile, you should rename the Default profile to the
name of your profile. For example, if you will be using your computer on
two different networks, such as at home and at work, you may want to
name one profile
5 Click the arrow to open the Network Type list, then click Access Point.
6 Click Next. The Identify Your Network screen opens.
Home and the other one Work.
94
7 Type the name of the network in the Network Name box. This is the SSID
of the access point you are connecting to.
-OR-
Type Any to connect to the first access point available.
-OR-
Click
Scan to scan for all access points that are within range of your
computer. Click to select a network name from the list that appears, then
OK.
click
www.gateway.com
 Loading...