

Page 1
Gateway M275 Notebook
user'sguide
Customizing
Troubleshooting
Page 2

Page 3

Contents
1 Checking Out Your Gateway M275. . . . . . . . . . . . . . . . . . . . . . . . . . . . . . . 1
Front . . . . . . . . . . . . . . . . . . . . . . . . . . . . . . . . . . . . . . . . . . . . . . . . . . . . . . . . . . . . . 2
Left Side . . . . . . . . . . . . . . . . . . . . . . . . . . . . . . . . . . . . . . . . . . . . . . . . . . . . . . . . . . 3
Right Side . . . . . . . . . . . . . . . . . . . . . . . . . . . . . . . . . . . . . . . . . . . . . . . . . . . . . . . . . 5
Back . . . . . . . . . . . . . . . . . . . . . . . . . . . . . . . . . . . . . . . . . . . . . . . . . . . . . . . . . . . . . . 6
Bottom . . . . . . . . . . . . . . . . . . . . . . . . . . . . . . . . . . . . . . . . . . . . . . . . . . . . . . . . . . . . 7
Keyboard area . . . . . . . . . . . . . . . . . . . . . . . . . . . . . . . . . . . . . . . . . . . . . . . . . . . . . . 8
Identifying your model . . . . . . . . . . . . . . . . . . . . . . . . . . . . . . . . . . . . . . . . . . . . . . . 10
Gateway model number . . . . . . . . . . . . . . . . . . . . . . . . . . . . . . . . . . . . . . . . . . 10
Gateway serial number . . . . . . . . . . . . . . . . . . . . . . . . . . . . . . . . . . . . . . . . . . . 11
Internal wireless label . . . . . . . . . . . . . . . . . . . . . . . . . . . . . . . . . . . . . . . . . . . . 11
Microsoft Certificate of Authenticity . . . . . . . . . . . . . . . . . . . . . . . . . . . . . . . . . 11
Finding your specifications . . . . . . . . . . . . . . . . . . . . . . . . . . . . . . . . . . . . . . . . . . . 12
Accessories . . . . . . . . . . . . . . . . . . . . . . . . . . . . . . . . . . . . . . . . . . . . . . . . . . . . . . . 13
2Getting Started. . . . . . . . . . . . . . . . . . . . . . . . . . . . . . . . . . . . . . . . . . . . . . . . . . 15
Safety instructions . . . . . . . . . . . . . . . . . . . . . . . . . . . . . . . . . . . . . . . . . . . . . . . . . . 16
General tips . . . . . . . . . . . . . . . . . . . . . . . . . . . . . . . . . . . . . . . . . . . . . . . . . . . . 16
Using the battery . . . . . . . . . . . . . . . . . . . . . . . . . . . . . . . . . . . . . . . . . . . . . . . . 17
Using the AC adapter . . . . . . . . . . . . . . . . . . . . . . . . . . . . . . . . . . . . . . . . . . . . 17
Basic safety precautions . . . . . . . . . . . . . . . . . . . . . . . . . . . . . . . . . . . . . . . . . . 18
Connecting the AC adapter . . . . . . . . . . . . . . . . . . . . . . . . . . . . . . . . . . . . . . . . . . . 19
Protecting from power source problems . . . . . . . . . . . . . . . . . . . . . . . . . . . . . . 20
Starting your convertible tablet PC . . . . . . . . . . . . . . . . . . . . . . . . . . . . . . . . . . . . . 22
Waking up your convertible tablet PC . . . . . . . . . . . . . . . . . . . . . . . . . . . . . . . 23
Turning off your convertible tablet PC . . . . . . . . . . . . . . . . . . . . . . . . . . . . . . . . . . 23
Restarting (rebooting) your convertible tablet PC . . . . . . . . . . . . . . . . . . . . . . . . . . 24
Status indicators . . . . . . . . . . . . . . . . . . . . . . . . . . . . . . . . . . . . . . . . . . . . . . . . . . . 25
LED status indicators . . . . . . . . . . . . . . . . . . . . . . . . . . . . . . . . . . . . . . . . . . . . 25
Keyboard status indicators . . . . . . . . . . . . . . . . . . . . . . . . . . . . . . . . . . . . . . . . 27
Using the keyboard . . . . . . . . . . . . . . . . . . . . . . . . . . . . . . . . . . . . . . . . . . . . . . . . . 28
Key types . . . . . . . . . . . . . . . . . . . . . . . . . . . . . . . . . . . . . . . . . . . . . . . . . . . . . 29
System key combinations . . . . . . . . . . . . . . . . . . . . . . . . . . . . . . . . . . . . . . . . . 30
Buttons . . . . . . . . . . . . . . . . . . . . . . . . . . . . . . . . . . . . . . . . . . . . . . . . . . . . . . . . . . . 32
Tablet control buttons . . . . . . . . . . . . . . . . . . . . . . . . . . . . . . . . . . . . . . . . . . . . 32
Multi-function buttons . . . . . . . . . . . . . . . . . . . . . . . . . . . . . . . . . . . . . . . . . . . . 34
Using the EZ Pad touchpad . . . . . . . . . . . . . . . . . . . . . . . . . . . . . . . . . . . . . . . . . . 35
Using the touchpad . . . . . . . . . . . . . . . . . . . . . . . . . . . . . . . . . . . . . . . . . . . . . . 36
Using the display . . . . . . . . . . . . . . . . . . . . . . . . . . . . . . . . . . . . . . . . . . . . . . . . . . . 38
i
Page 4

Converting the display from notebook to tablet mode . . . . . . . . . . . . . . . . . . .39
Using the pen . . . . . . . . . . . . . . . . . . . . . . . . . . . . . . . . . . . . . . . . . . . . . . . . . . . . . .41
Storing and removing the pen . . . . . . . . . . . . . . . . . . . . . . . . . . . . . . . . . . . . . .41
Calibration . . . . . . . . . . . . . . . . . . . . . . . . . . . . . . . . . . . . . . . . . . . . . . . . . . . . .42
Gestures . . . . . . . . . . . . . . . . . . . . . . . . . . . . . . . . . . . . . . . . . . . . . . . . . . . . . . .43
Pen button . . . . . . . . . . . . . . . . . . . . . . . . . . . . . . . . . . . . . . . . . . . . . . . . . . . . .44
Tips . . . . . . . . . . . . . . . . . . . . . . . . . . . . . . . . . . . . . . . . . . . . . . . . . . . . . . . . . . .44
Tablet Input Panel (TIP) . . . . . . . . . . . . . . . . . . . . . . . . . . . . . . . . . . . . . . . . . . .44
Using speech recognition . . . . . . . . . . . . . . . . . . . . . . . . . . . . . . . . . . . . . . . . . . . . .46
Connecting the modem . . . . . . . . . . . . . . . . . . . . . . . . . . . . . . . . . . . . . . . . . . . . . .47
Connecting to a wired Ethernet network . . . . . . . . . . . . . . . . . . . . . . . . . . . . . . . . .48
Broadband Internet connections . . . . . . . . . . . . . . . . . . . . . . . . . . . . . . . . . . . .49
Installing a printer, scanner, or other peripheral device . . . . . . . . . . . . . . . . . . . . .49
3Getting Help. . . . . . . . . . . . . . . . . . . . . . . . . . . . . . . . . . . . . . . . . . . . . . . . . . . . .51
Help and Support . . . . . . . . . . . . . . . . . . . . . . . . . . . . . . . . . . . . . . . . . . . . . . . . . . .52
Searching for a topic . . . . . . . . . . . . . . . . . . . . . . . . . . . . . . . . . . . . . . . . . . . . .52
Do More With Gateway . . . . . . . . . . . . . . . . . . . . . . . . . . . . . . . . . . . . . . . . . . . . . .53
Online help . . . . . . . . . . . . . . . . . . . . . . . . . . . . . . . . . . . . . . . . . . . . . . . . . . . . . . . .54
Gateway Web site . . . . . . . . . . . . . . . . . . . . . . . . . . . . . . . . . . . . . . . . . . . . . . . . . .55
Using eSupport . . . . . . . . . . . . . . . . . . . . . . . . . . . . . . . . . . . . . . . . . . . . . . . . . .55
4 Windows Basics . . . . . . . . . . . . . . . . . . . . . . . . . . . . . . . . . . . . . . . . . . . . . . . . .57
About Windows XP tablet PC Edition . . . . . . . . . . . . . . . . . . . . . . . . . . . . . . . . . . . .58
About the Windows environment . . . . . . . . . . . . . . . . . . . . . . . . . . . . . . . . . . . . . . .59
Using the desktop . . . . . . . . . . . . . . . . . . . . . . . . . . . . . . . . . . . . . . . . . . . . . . . . . . .60
Using the Start menu . . . . . . . . . . . . . . . . . . . . . . . . . . . . . . . . . . . . . . . . . . . . .60
Adding icons to the desktop . . . . . . . . . . . . . . . . . . . . . . . . . . . . . . . . . . . . . . .61
Identifying window items . . . . . . . . . . . . . . . . . . . . . . . . . . . . . . . . . . . . . . . . . . . . . .62
Working with files and folders . . . . . . . . . . . . . . . . . . . . . . . . . . . . . . . . . . . . . . . . .64
Viewing drives . . . . . . . . . . . . . . . . . . . . . . . . . . . . . . . . . . . . . . . . . . . . . . . . . .64
Creating folders . . . . . . . . . . . . . . . . . . . . . . . . . . . . . . . . . . . . . . . . . . . . . . . . .65
Copying and moving files and folders . . . . . . . . . . . . . . . . . . . . . . . . . . . . . . . .66
Deleting files and folders . . . . . . . . . . . . . . . . . . . . . . . . . . . . . . . . . . . . . . . . . .68
Browsing for files and folders . . . . . . . . . . . . . . . . . . . . . . . . . . . . . . . . . . . . . .70
Searching for files . . . . . . . . . . . . . . . . . . . . . . . . . . . . . . . . . . . . . . . . . . . . . . . . . . .71
Using the Windows Search utility . . . . . . . . . . . . . . . . . . . . . . . . . . . . . . . . . . .72
Working with documents . . . . . . . . . . . . . . . . . . . . . . . . . . . . . . . . . . . . . . . . . . . . .74
Creating a new document . . . . . . . . . . . . . . . . . . . . . . . . . . . . . . . . . . . . . . . . .74
Saving a document . . . . . . . . . . . . . . . . . . . . . . . . . . . . . . . . . . . . . . . . . . . . . .75
Opening a document . . . . . . . . . . . . . . . . . . . . . . . . . . . . . . . . . . . . . . . . . . . . .76
Printing a document . . . . . . . . . . . . . . . . . . . . . . . . . . . . . . . . . . . . . . . . . . . . . .77
Keyboard shortcuts . . . . . . . . . . . . . . . . . . . . . . . . . . . . . . . . . . . . . . . . . . . . . . . . . .78
ii
Page 5

5 Using the Internet . . . . . . . . . . . . . . . . . . . . . . . . . . . . . . . . . . . . . . . . . . . . . . . 79
Learning about the Internet . . . . . . . . . . . . . . . . . . . . . . . . . . . . . . . . . . . . . . . . . . . 80
Setting up an Internet account . . . . . . . . . . . . . . . . . . . . . . . . . . . . . . . . . . . . . . . . 81
Accessing your Internet account . . . . . . . . . . . . . . . . . . . . . . . . . . . . . . . . . . . 82
Using the World Wide Web . . . . . . . . . . . . . . . . . . . . . . . . . . . . . . . . . . . . . . . . . . . 83
Connecting to a Web site . . . . . . . . . . . . . . . . . . . . . . . . . . . . . . . . . . . . . . . . . 84
Downloading files . . . . . . . . . . . . . . . . . . . . . . . . . . . . . . . . . . . . . . . . . . . . . . . 85
Using e-mail . . . . . . . . . . . . . . . . . . . . . . . . . . . . . . . . . . . . . . . . . . . . . . . . . . . . . . . 86
Sending e-mail . . . . . . . . . . . . . . . . . . . . . . . . . . . . . . . . . . . . . . . . . . . . . . . . . 86
Checking your e-mail . . . . . . . . . . . . . . . . . . . . . . . . . . . . . . . . . . . . . . . . . . . . 87
6 Sending and Receiving Faxes . . . . . . . . . . . . . . . . . . . . . . . . . . . . . . . . . . 89
Installing and configuring Fax . . . . . . . . . . . . . . . . . . . . . . . . . . . . . . . . . . . . . . . . . 90
Installing Fax . . . . . . . . . . . . . . . . . . . . . . . . . . . . . . . . . . . . . . . . . . . . . . . . . . . 90
Configuring Fax . . . . . . . . . . . . . . . . . . . . . . . . . . . . . . . . . . . . . . . . . . . . . . . . . 91
Sending a simple fax . . . . . . . . . . . . . . . . . . . . . . . . . . . . . . . . . . . . . . . . . . . . . . . . 93
Setting up your cover page template . . . . . . . . . . . . . . . . . . . . . . . . . . . . . . . . . . . 95
Faxing from programs . . . . . . . . . . . . . . . . . . . . . . . . . . . . . . . . . . . . . . . . . . . . . . . 96
Faxing a scanned document . . . . . . . . . . . . . . . . . . . . . . . . . . . . . . . . . . . . . . . . . . 96
Receiving and viewing a fax . . . . . . . . . . . . . . . . . . . . . . . . . . . . . . . . . . . . . . . . . . 97
Canceling a fax . . . . . . . . . . . . . . . . . . . . . . . . . . . . . . . . . . . . . . . . . . . . . . . . . . . . 97
Automatically retry sending a fax . . . . . . . . . . . . . . . . . . . . . . . . . . . . . . . . . . . . . . 98
Automatically cancelling a fax . . . . . . . . . . . . . . . . . . . . . . . . . . . . . . . . . . . . . . . . . 99
7 Using Multimedia . . . . . . . . . . . . . . . . . . . . . . . . . . . . . . . . . . . . . . . . . . . . . . 101
Adjusting the volume . . . . . . . . . . . . . . . . . . . . . . . . . . . . . . . . . . . . . . . . . . . . . . . 102
Recording and playing audio . . . . . . . . . . . . . . . . . . . . . . . . . . . . . . . . . . . . . . . . . 105
Playing audio and video files with the Windows Media Player . . . . . . . . . . . . . . . 107
Using S/PDIF digital audio . . . . . . . . . . . . . . . . . . . . . . . . . . . . . . . . . . . . . . . . . . 108
Changing modules . . . . . . . . . . . . . . . . . . . . . . . . . . . . . . . . . . . . . . . . . . . . . . . . . 110
Using the DVD or DVD/CD-RW drive . . . . . . . . . . . . . . . . . . . . . . . . . . . . . . . . . . 112
Identifying drive types . . . . . . . . . . . . . . . . . . . . . . . . . . . . . . . . . . . . . . . . . . . 112
Inserting a CD or DVD . . . . . . . . . . . . . . . . . . . . . . . . . . . . . . . . . . . . . . . . . . 113
Listening to CDs . . . . . . . . . . . . . . . . . . . . . . . . . . . . . . . . . . . . . . . . . . . . . . . . . . 114
Listening to CDs . . . . . . . . . . . . . . . . . . . . . . . . . . . . . . . . . . . . . . . . . . . . . . . 114
Using MUSICMATCH . . . . . . . . . . . . . . . . . . . . . . . . . . . . . . . . . . . . . . . . . . . . . . 116
Playing CDs . . . . . . . . . . . . . . . . . . . . . . . . . . . . . . . . . . . . . . . . . . . . . . . . . . 116
Creating MP3 music files . . . . . . . . . . . . . . . . . . . . . . . . . . . . . . . . . . . . . . . . 118
Editing track information . . . . . . . . . . . . . . . . . . . . . . . . . . . . . . . . . . . . . . . . . 120
Building a music library . . . . . . . . . . . . . . . . . . . . . . . . . . . . . . . . . . . . . . . . . . 121
Changing the music library display settings . . . . . . . . . . . . . . . . . . . . . . . . . . 122
Listening to Internet radio . . . . . . . . . . . . . . . . . . . . . . . . . . . . . . . . . . . . . . . . 123
iii
Page 6

Using advanced features . . . . . . . . . . . . . . . . . . . . . . . . . . . . . . . . . . . . . . . . .123
Playing a DVD . . . . . . . . . . . . . . . . . . . . . . . . . . . . . . . . . . . . . . . . . . . . . . . . . . . .124
Creating CDs using Nero Express . . . . . . . . . . . . . . . . . . . . . . . . . . . . . . . . . . . . .125
Creating a data CD . . . . . . . . . . . . . . . . . . . . . . . . . . . . . . . . . . . . . . . . . . . . .126
Copying a CD . . . . . . . . . . . . . . . . . . . . . . . . . . . . . . . . . . . . . . . . . . . . . . . . . .130
Copying music tracks . . . . . . . . . . . . . . . . . . . . . . . . . . . . . . . . . . . . . . . . . . . .133
Creating a music CD . . . . . . . . . . . . . . . . . . . . . . . . . . . . . . . . . . . . . . . . . . . .136
Advanced features . . . . . . . . . . . . . . . . . . . . . . . . . . . . . . . . . . . . . . . . . . . . . .140
Using the optional diskette drive . . . . . . . . . . . . . . . . . . . . . . . . . . . . . . . . . . . . . .140
Using the memory card reader . . . . . . . . . . . . . . . . . . . . . . . . . . . . . . . . . . . . . . . .142
Memory card types . . . . . . . . . . . . . . . . . . . . . . . . . . . . . . . . . . . . . . . . . . . . . .142
Using a memory card . . . . . . . . . . . . . . . . . . . . . . . . . . . . . . . . . . . . . . . . . . . .143
Connecting a digital camera . . . . . . . . . . . . . . . . . . . . . . . . . . . . . . . . . . . . . . . . . .144
Connecting a digital video camera . . . . . . . . . . . . . . . . . . . . . . . . . . . . . . . . . . . . .146
Editing videos . . . . . . . . . . . . . . . . . . . . . . . . . . . . . . . . . . . . . . . . . . . . . . . . . . . . .147
Viewing the display on a projector or monitor . . . . . . . . . . . . . . . . . . . . . . . . . . . .148
Viewing the display on a television . . . . . . . . . . . . . . . . . . . . . . . . . . . . . . . . . . . .150
Changing from one display to another . . . . . . . . . . . . . . . . . . . . . . . . . . . . . .153
8 Managing Power . . . . . . . . . . . . . . . . . . . . . . . . . . . . . . . . . . . . . . . . . . . . . . . .155
Monitoring the battery charge . . . . . . . . . . . . . . . . . . . . . . . . . . . . . . . . . . . . . . . . .156
Recharging the battery . . . . . . . . . . . . . . . . . . . . . . . . . . . . . . . . . . . . . . . . . . . . . .157
Recalibrating the battery . . . . . . . . . . . . . . . . . . . . . . . . . . . . . . . . . . . . . . . . . . . . .158
Changing batteries . . . . . . . . . . . . . . . . . . . . . . . . . . . . . . . . . . . . . . . . . . . . . . . . .159
Replacing the battery . . . . . . . . . . . . . . . . . . . . . . . . . . . . . . . . . . . . . . . . . . . .160
Extending battery life . . . . . . . . . . . . . . . . . . . . . . . . . . . . . . . . . . . . . . . . . . . . . . .162
Conserving battery power . . . . . . . . . . . . . . . . . . . . . . . . . . . . . . . . . . . . . . . .162
Using alternate power sources . . . . . . . . . . . . . . . . . . . . . . . . . . . . . . . . . . . .163
Changing power modes . . . . . . . . . . . . . . . . . . . . . . . . . . . . . . . . . . . . . . . . . .163
Changing power settings . . . . . . . . . . . . . . . . . . . . . . . . . . . . . . . . . . . . . . . . . . . .165
Changing the power scheme . . . . . . . . . . . . . . . . . . . . . . . . . . . . . . . . . . . . . .166
Changing alarm options . . . . . . . . . . . . . . . . . . . . . . . . . . . . . . . . . . . . . . . . . .167
Changing advanced settings . . . . . . . . . . . . . . . . . . . . . . . . . . . . . . . . . . . . . .168
Turning on the Power on Lid Lift feature . . . . . . . . . . . . . . . . . . . . . . . . . . . . .169
Activating and using Hibernate mode . . . . . . . . . . . . . . . . . . . . . . . . . . . . . . .170
9 Traveling With Your Gateway M275 . . . . . . . . . . . . . . . . . . . . . . . . . . . . .173
Packing your convertible tablet PC . . . . . . . . . . . . . . . . . . . . . . . . . . . . . . . . . . . .174
Traveling by air . . . . . . . . . . . . . . . . . . . . . . . . . . . . . . . . . . . . . . . . . . . . . . . . . . . .174
Modem . . . . . . . . . . . . . . . . . . . . . . . . . . . . . . . . . . . . . . . . . . . . . . . . . . . . . . . . . .175
Radio frequency wireless connections . . . . . . . . . . . . . . . . . . . . . . . . . . . . . . . . . .175
Files . . . . . . . . . . . . . . . . . . . . . . . . . . . . . . . . . . . . . . . . . . . . . . . . . . . . . . . . . . . . .176
Security . . . . . . . . . . . . . . . . . . . . . . . . . . . . . . . . . . . . . . . . . . . . . . . . . . . . . . . . . .176
iv
Page 7

Power . . . . . . . . . . . . . . . . . . . . . . . . . . . . . . . . . . . . . . . . . . . . . . . . . . . . . . . . . . . 177
Additional tips . . . . . . . . . . . . . . . . . . . . . . . . . . . . . . . . . . . . . . . . . . . . . . . . . . . . 178
10 Customizing Your Gateway M275 . . . . . . . . . . . . . . . . . . . . . . . . . . . . . . 179
Using the display . . . . . . . . . . . . . . . . . . . . . . . . . . . . . . . . . . . . . . . . . . . . . . . . . . 180
Changing display orientation . . . . . . . . . . . . . . . . . . . . . . . . . . . . . . . . . . . . . 180
Adjusting brightness . . . . . . . . . . . . . . . . . . . . . . . . . . . . . . . . . . . . . . . . . . . . 180
Adjusting the screen and desktop settings . . . . . . . . . . . . . . . . . . . . . . . . . . . . . . 182
Adjusting the color depth . . . . . . . . . . . . . . . . . . . . . . . . . . . . . . . . . . . . . . . . 182
Adjusting the screen resolution . . . . . . . . . . . . . . . . . . . . . . . . . . . . . . . . . . . 184
Changing the colors on your Windows desktop . . . . . . . . . . . . . . . . . . . . . . . 185
Changing the desktop background . . . . . . . . . . . . . . . . . . . . . . . . . . . . . . . . . 186
Selecting a screen saver . . . . . . . . . . . . . . . . . . . . . . . . . . . . . . . . . . . . . . . . 188
Adjusting tablet and pen settings . . . . . . . . . . . . . . . . . . . . . . . . . . . . . . . . . . . . . 189
Programming the buttons . . . . . . . . . . . . . . . . . . . . . . . . . . . . . . . . . . . . . . . . . . . 190
Adjusting the Tablet PC Input Panel Settings . . . . . . . . . . . . . . . . . . . . . . . . . . . 191
Changing the touchpad settings . . . . . . . . . . . . . . . . . . . . . . . . . . . . . . . . . . . . . . 192
Adding and modifying user accounts . . . . . . . . . . . . . . . . . . . . . . . . . . . . . . . . . . 194
11 Networking Your Gateway M275 . . . . . . . . . . . . . . . . . . . . . . . . . . . . . . . 197
Benefits of networking . . . . . . . . . . . . . . . . . . . . . . . . . . . . . . . . . . . . . . . . . . . . . . 198
Sharing a single Internet connection . . . . . . . . . . . . . . . . . . . . . . . . . . . . . . . 198
Sharing drives . . . . . . . . . . . . . . . . . . . . . . . . . . . . . . . . . . . . . . . . . . . . . . . . . 198
Sharing peripheral devices . . . . . . . . . . . . . . . . . . . . . . . . . . . . . . . . . . . . . . . 199
Streaming audio and video files . . . . . . . . . . . . . . . . . . . . . . . . . . . . . . . . . . . 199
Playing multi-player games . . . . . . . . . . . . . . . . . . . . . . . . . . . . . . . . . . . . . . . 199
Selecting a network connection . . . . . . . . . . . . . . . . . . . . . . . . . . . . . . . . . . . . . . 200
Wired Ethernet network . . . . . . . . . . . . . . . . . . . . . . . . . . . . . . . . . . . . . . . . . 200
Wireless Ethernet network . . . . . . . . . . . . . . . . . . . . . . . . . . . . . . . . . . . . . . . 200
Using a wired Ethernet network . . . . . . . . . . . . . . . . . . . . . . . . . . . . . . . . . . . . . . 201
Ethernet, Fast Ethernet, or Gigabit Ethernet . . . . . . . . . . . . . . . . . . . . . . . . . 201
Example wired Ethernet network . . . . . . . . . . . . . . . . . . . . . . . . . . . . . . . . . . 202
Equipment you need for a wired Ethernet network . . . . . . . . . . . . . . . . . . . . 203
Using a wireless Ethernet network . . . . . . . . . . . . . . . . . . . . . . . . . . . . . . . . . . . . 204
Wireless Ethernet speed and frequency . . . . . . . . . . . . . . . . . . . . . . . . . . . . 205
Example access point wireless Ethernet network . . . . . . . . . . . . . . . . . . . . . 206
Equipment you need fo r an access point wireles s Ethernet network . . . . . . 20 7
Example peer-to-peer wireless Ethernet network . . . . . . . . . . . . . . . . . . . . . 208
Equipment you need fo r a peer-to-peer wireless Ethernet network . . . . . . . 20 9
For more information . . . . . . . . . . . . . . . . . . . . . . . . . . . . . . . . . . . . . . . . . . . 209
Using your convertible tablet PC on a network . . . . . . . . . . . . . . . . . . . . . . . . . . 210
Installing and configu ring your convert ible tablet PC for Ether net networking 210
Turning your wireless Ethernet emitter on or off . . . . . . . . . . . . . . . . . . . . . . 210
v
Page 8

12 Moving From Your Old Computer . . . . . . . . . . . . . . . . . . . . . . . . . . . . . .213
Using the Files and Settings Transfer Wizard . . . . . . . . . . . . . . . . . . . . . . . . . . . .214
Transferring files . . . . . . . . . . . . . . . . . . . . . . . . . . . . . . . . . . . . . . . . . . . . . . . . . . .214
Finding your files . . . . . . . . . . . . . . . . . . . . . . . . . . . . . . . . . . . . . . . . . . . . . . .214
Transferring Internet settings . . . . . . . . . . . . . . . . . . . . . . . . . . . . . . . . . . . . . . . . .216
Setting up your ISP . . . . . . . . . . . . . . . . . . . . . . . . . . . . . . . . . . . . . . . . . . . . .216
Transferring your e-mail and address book . . . . . . . . . . . . . . . . . . . . . . . . . . .217
Transferring your Internet shortcuts . . . . . . . . . . . . . . . . . . . . . . . . . . . . . . . . .217
Installing your old printer or scanner . . . . . . . . . . . . . . . . . . . . . . . . . . . . . . . . . . .217
Installing a USB printer or scanner . . . . . . . . . . . . . . . . . . . . . . . . . . . . . . . . .218
Installing a parallel port printer . . . . . . . . . . . . . . . . . . . . . . . . . . . . . . . . . . . .218
Installing your old programs . . . . . . . . . . . . . . . . . . . . . . . . . . . . . . . . . . . . . . . . . .219
13 Maintaining Your Gateway M275. . . . . . . . . . . . . . . . . . . . . . . . . . . . . . . .221
Caring for your convertible tablet PC . . . . . . . . . . . . . . . . . . . . . . . . . . . . . . . . . . .222
Display screen . . . . . . . . . . . . . . . . . . . . . . . . . . . . . . . . . . . . . . . . . . . . . . . . .222
Pen . . . . . . . . . . . . . . . . . . . . . . . . . . . . . . . . . . . . . . . . . . . . . . . . . . . . . . . . . .223
Replacing the pen point . . . . . . . . . . . . . . . . . . . . . . . . . . . . . . . . . . . . . . . . . .224
Maintenance schedule . . . . . . . . . . . . . . . . . . . . . . . . . . . . . . . . . . . . . . . . . . .225
Protecting your convertible tablet PC from viruses . . . . . . . . . . . . . . . . . . . . . . . .226
Managing hard drive space . . . . . . . . . . . . . . . . . . . . . . . . . . . . . . . . . . . . . . . . . .229
Checking hard drive space . . . . . . . . . . . . . . . . . . . . . . . . . . . . . . . . . . . . . . .229
Using Disk Cleanup . . . . . . . . . . . . . . . . . . . . . . . . . . . . . . . . . . . . . . . . . . . . .230
Checking the hard drive for errors . . . . . . . . . . . . . . . . . . . . . . . . . . . . . . . . . .231
Defragmenting the hard drive . . . . . . . . . . . . . . . . . . . . . . . . . . . . . . . . . . . . .233
Backing up files . . . . . . . . . . . . . . . . . . . . . . . . . . . . . . . . . . . . . . . . . . . . . . . .235
Using the Scheduled Task Wizard . . . . . . . . . . . . . . . . . . . . . . . . . . . . . . . . .235
Cleaning your convertible tablet PC . . . . . . . . . . . . . . . . . . . . . . . . . . . . . . . . . . . .237
Cleaning the exterior . . . . . . . . . . . . . . . . . . . . . . . . . . . . . . . . . . . . . . . . . . . .237
Cleaning the keyboard . . . . . . . . . . . . . . . . . . . . . . . . . . . . . . . . . . . . . . . . . . .238
Cleaning the convertible tablet PC screen . . . . . . . . . . . . . . . . . . . . . . . . . . .238
Cleaning the mouse . . . . . . . . . . . . . . . . . . . . . . . . . . . . . . . . . . . . . . . . . . . . .238
14 Restoring Software . . . . . . . . . . . . . . . . . . . . . . . . . . . . . . . . . . . . . . . . . . . . .241
Using the Gateway Windows XP Pro Tablet PC DVD . . . . . . . . . . . . . . . . . . . . . .242
Reinstalling device drivers . . . . . . . . . . . . . . . . . . . . . . . . . . . . . . . . . . . . . . . . . . .243
Updating device drivers . . . . . . . . . . . . . . . . . . . . . . . . . . . . . . . . . . . . . . . . . . . . .245
Reinstalling programs . . . . . . . . . . . . . . . . . . . . . . . . . . . . . . . . . . . . . . . . . . . . . . .246
Reinstalling Windows . . . . . . . . . . . . . . . . . . . . . . . . . . . . . . . . . . . . . . . . . . . . . . .248
15 Upgrading Your Gateway M275. . . . . . . . . . . . . . . . . . . . . . . . . . . . . . . . .251
Adding and removing a PC Card . . . . . . . . . . . . . . . . . . . . . . . . . . . . . . . . . . . . . .252
vi
Page 9

Preventing static electricity discharge . . . . . . . . . . . . . . . . . . . . . . . . . . . . . . . . . . 254
Adding or replacing memory . . . . . . . . . . . . . . . . . . . . . . . . . . . . . . . . . . . . . . . . . 255
Adding or replacing memory in the memory bay . . . . . . . . . . . . . . . . . . . . . . 256
Replacing memory under the keyboard . . . . . . . . . . . . . . . . . . . . . . . . . . . . . 259
Replacing the hard drive kit . . . . . . . . . . . . . . . . . . . . . . . . . . . . . . . . . . . . . . . . . 267
16 Using the Gateway M275 Port Replicator . . . . . . . . . . . . . . . . . . . . . 271
Front . . . . . . . . . . . . . . . . . . . . . . . . . . . . . . . . . . . . . . . . . . . . . . . . . . . . . . . . . . . 272
Left side . . . . . . . . . . . . . . . . . . . . . . . . . . . . . . . . . . . . . . . . . . . . . . . . . . . . . . . . . 273
Back . . . . . . . . . . . . . . . . . . . . . . . . . . . . . . . . . . . . . . . . . . . . . . . . . . . . . . . . . . . . 274
Connecting to the port replicator . . . . . . . . . . . . . . . . . . . . . . . . . . . . . . . . . . . . . . 276
Attaching to the port replicator . . . . . . . . . . . . . . . . . . . . . . . . . . . . . . . . . . . . 276
Disconnecting from the port replicator . . . . . . . . . . . . . . . . . . . . . . . . . . . . . . 277
Securing your port replicator . . . . . . . . . . . . . . . . . . . . . . . . . . . . . . . . . . . . . . . . . 278
17 Troubleshooting . . . . . . . . . . . . . . . . . . . . . . . . . . . . . . . . . . . . . . . . . . . . . . . 279
Safety guidelines . . . . . . . . . . . . . . . . . . . . . . . . . . . . . . . . . . . . . . . . . . . . . . . . . . 280
First steps . . . . . . . . . . . . . . . . . . . . . . . . . . . . . . . . . . . . . . . . . . . . . . . . . . . . . . . 281
Software support tools . . . . . . . . . . . . . . . . . . . . . . . . . . . . . . . . . . . . . . . . . . . . . . 281
Troubleshooting . . . . . . . . . . . . . . . . . . . . . . . . . . . . . . . . . . . . . . . . . . . . . . . . . . . 282
Audio . . . . . . . . . . . . . . . . . . . . . . . . . . . . . . . . . . . . . . . . . . . . . . . . . . . . . . . . 282
Battery . . . . . . . . . . . . . . . . . . . . . . . . . . . . . . . . . . . . . . . . . . . . . . . . . . . . . . . 282
Device installation . . . . . . . . . . . . . . . . . . . . . . . . . . . . . . . . . . . . . . . . . . . . . . 282
Diskette drive (external) . . . . . . . . . . . . . . . . . . . . . . . . . . . . . . . . . . . . . . . . . 283
Display . . . . . . . . . . . . . . . . . . . . . . . . . . . . . . . . . . . . . . . . . . . . . . . . . . . . . . . 284
DVD or DVD/CD-RW drives . . . . . . . . . . . . . . . . . . . . . . . . . . . . . . . . . . . . . . 285
File management . . . . . . . . . . . . . . . . . . . . . . . . . . . . . . . . . . . . . . . . . . . . . . 287
Hard drive . . . . . . . . . . . . . . . . . . . . . . . . . . . . . . . . . . . . . . . . . . . . . . . . . . . . 288
Interface/Ports . . . . . . . . . . . . . . . . . . . . . . . . . . . . . . . . . . . . . . . . . . . . . . . . . 289
Internet . . . . . . . . . . . . . . . . . . . . . . . . . . . . . . . . . . . . . . . . . . . . . . . . . . . . . . 289
Keyboard . . . . . . . . . . . . . . . . . . . . . . . . . . . . . . . . . . . . . . . . . . . . . . . . . . . . . 291
Memory . . . . . . . . . . . . . . . . . . . . . . . . . . . . . . . . . . . . . . . . . . . . . . . . . . . . . . 291
Memory card reader . . . . . . . . . . . . . . . . . . . . . . . . . . . . . . . . . . . . . . . . . . . . 292
Modem (dial-up) . . . . . . . . . . . . . . . . . . . . . . . . . . . . . . . . . . . . . . . . . . . . . . . 292
Mouse . . . . . . . . . . . . . . . . . . . . . . . . . . . . . . . . . . . . . . . . . . . . . . . . . . . . . . . 296
Networks . . . . . . . . . . . . . . . . . . . . . . . . . . . . . . . . . . . . . . . . . . . . . . . . . . . . . 297
Operating system . . . . . . . . . . . . . . . . . . . . . . . . . . . . . . . . . . . . . . . . . . . . . . 297
Passwords . . . . . . . . . . . . . . . . . . . . . . . . . . . . . . . . . . . . . . . . . . . . . . . . . . . . 298
PC Cards . . . . . . . . . . . . . . . . . . . . . . . . . . . . . . . . . . . . . . . . . . . . . . . . . . . . . 298
Pen . . . . . . . . . . . . . . . . . . . . . . . . . . . . . . . . . . . . . . . . . . . . . . . . . . . . . . . . . 298
Power . . . . . . . . . . . . . . . . . . . . . . . . . . . . . . . . . . . . . . . . . . . . . . . . . . . . . . . 299
Printer . . . . . . . . . . . . . . . . . . . . . . . . . . . . . . . . . . . . . . . . . . . . . . . . . . . . . . . 300
Sound . . . . . . . . . . . . . . . . . . . . . . . . . . . . . . . . . . . . . . . . . . . . . . . . . . . . . . . 302
vii
Page 10

Touchpad . . . . . . . . . . . . . . . . . . . . . . . . . . . . . . . . . . . . . . . . . . . . . . . . . . . . .303
Video . . . . . . . . . . . . . . . . . . . . . . . . . . . . . . . . . . . . . . . . . . . . . . . . . . . . . . . .303
Telephone support . . . . . . . . . . . . . . . . . . . . . . . . . . . . . . . . . . . . . . . . . . . . . . . . .304
Before calling Gateway Technical Support . . . . . . . . . . . . . . . . . . . . . . . . . . .304
Telephone numbers . . . . . . . . . . . . . . . . . . . . . . . . . . . . . . . . . . . . . . . . . . . . .305
Tutoring and training . . . . . . . . . . . . . . . . . . . . . . . . . . . . . . . . . . . . . . . . . . . . . . . .306
Self-help . . . . . . . . . . . . . . . . . . . . . . . . . . . . . . . . . . . . . . . . . . . . . . . . . . . . . .306
Tutoring . . . . . . . . . . . . . . . . . . . . . . . . . . . . . . . . . . . . . . . . . . . . . . . . . . . . . .306
Training . . . . . . . . . . . . . . . . . . . . . . . . . . . . . . . . . . . . . . . . . . . . . . . . . . . . . . .307
A Safety, Regulatory, and Legal Information. . . . . . . . . . . . . . . . . . . . . .309
Index. . . . . . . . . . . . . . . . . . . . . . . . . . . . . . . . . . . . . . . . . . . . . . . . . . . . . . . . . . . . . . 321
viii
Page 11

Checking Out
Your
Gateway M 275
This chapter introduces you to the basic features of your
convertible tablet PC. Read this chapter to learn:
■ How to identify the features of your Gateway
convertible tablet PC
■ How to locate your convertible tablet PC’s model and
serial number
■ How to locate the Microsoft Certificate of Authenticity
■ How to locate the specifications for your convertible
tablet PC
■ What accessories are available for your convertible
tablet PC
1
Tips & Tricks Y ou can down load an electron ic copy of this
guide from
support.gateway.com/support/manlib/
.
1
Page 12

Chapter 1: Checking Out Yo ur Gateway M275
Front
Modular bay
Component Icon Description
Modular bay Use this bay for a DVD drive or combination
LCD panel release latch Open the LCD panel by pressing the release latch.
LCD panel
release latch
DVD/CD-RW drive. For more information, see “Changing
modules” on page 110.
To determine the type of drive in the modular bay,
examine the drive tray’s plastic cover and compare the
logo to those listed in “Identifying drive types” on
page 112.
Important: Your convertible tablet PC may have come
with a DVD or DVD/CD-RW drive. To order a different
module, contact Gateway.
2
www.gateway.com
Page 13

Left Side
Left Side
Kensington
lock slot
PC Card
slot
Memory card
reader
IEEE 1394 port
Microphone jack
Headphone jack
Power
switch
Speaker
Component Icon Description
Kensington™ lock slot Secure your convertible tablet PC to an object by
connecting a Kensington cable lock to this slot.
PC Card slot Insert one Type II PC Card into this slot. For more
information, see “Adding and removing a PC Card” on
page 252.
Memory card reader Insert a memory c ard from a digital camera, MP3 player,
PDA, or cellular telephone int o the memory ca rd reader.
For more information, see “Using the memory card
reader” on page 142.
®
IEEE 1394 port Plug an IEEE 1394 (also known as Firewire
device (such as a digital camcorder, Iomega™ Zip™
drive, or MP3 player) i nto thi s 4 -pi n IEEE1394 port. For
more information, see “Connecting a digital video
camera” on page 146.
or i.Link®)
Microphone jack Plug a micropho ne into this j ack. The built-in microphone
is turned off when a mic rophone is plugged into this jack .
For the location of your built-in microphone, see
“Keyboard area” on page8.
www.gateway.com
3
Page 14
Chapter 1: Checking Out Yo ur Gateway M275
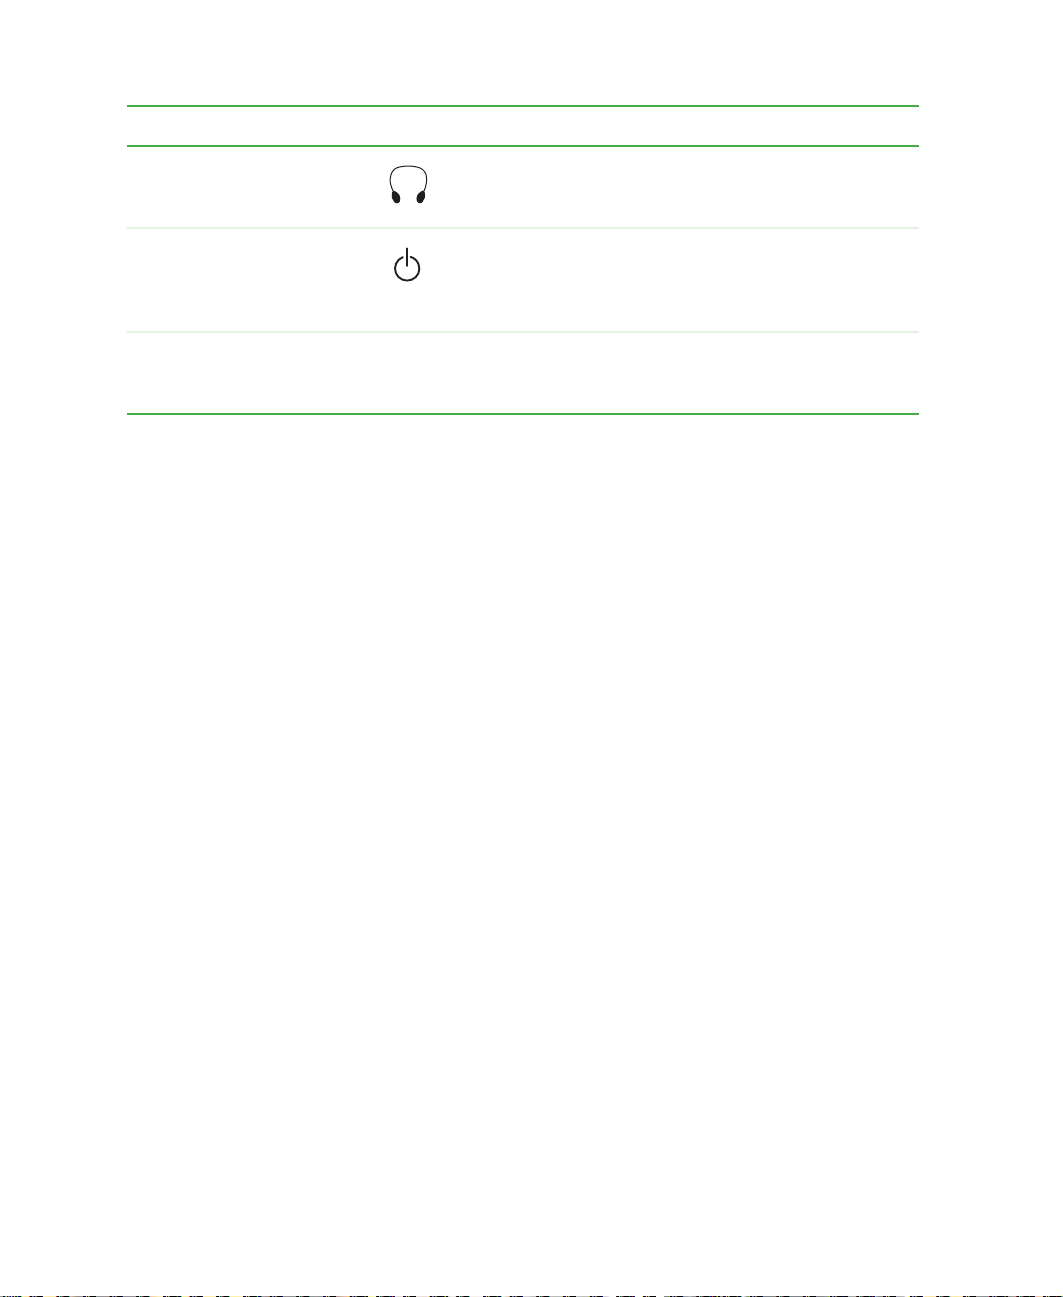
Component Icon Description
Headphone jack Plug amplified speakers or headphones into this jack.
The built-in speakers are turned off when speakers or
headphones are plugged into this jack.
Power switch Slide to turn the power on or of f. You can also configure
the power switch for Standby/Resume mode. For more
information on configuring the power switch mode, see
“Changing power settings” on page 165.
Speaker Provides audio output when headphones or amplified
speakers are not pl ugged into y our convertib le tablet PC
or port replicator.
4
www.gateway.com
Page 15
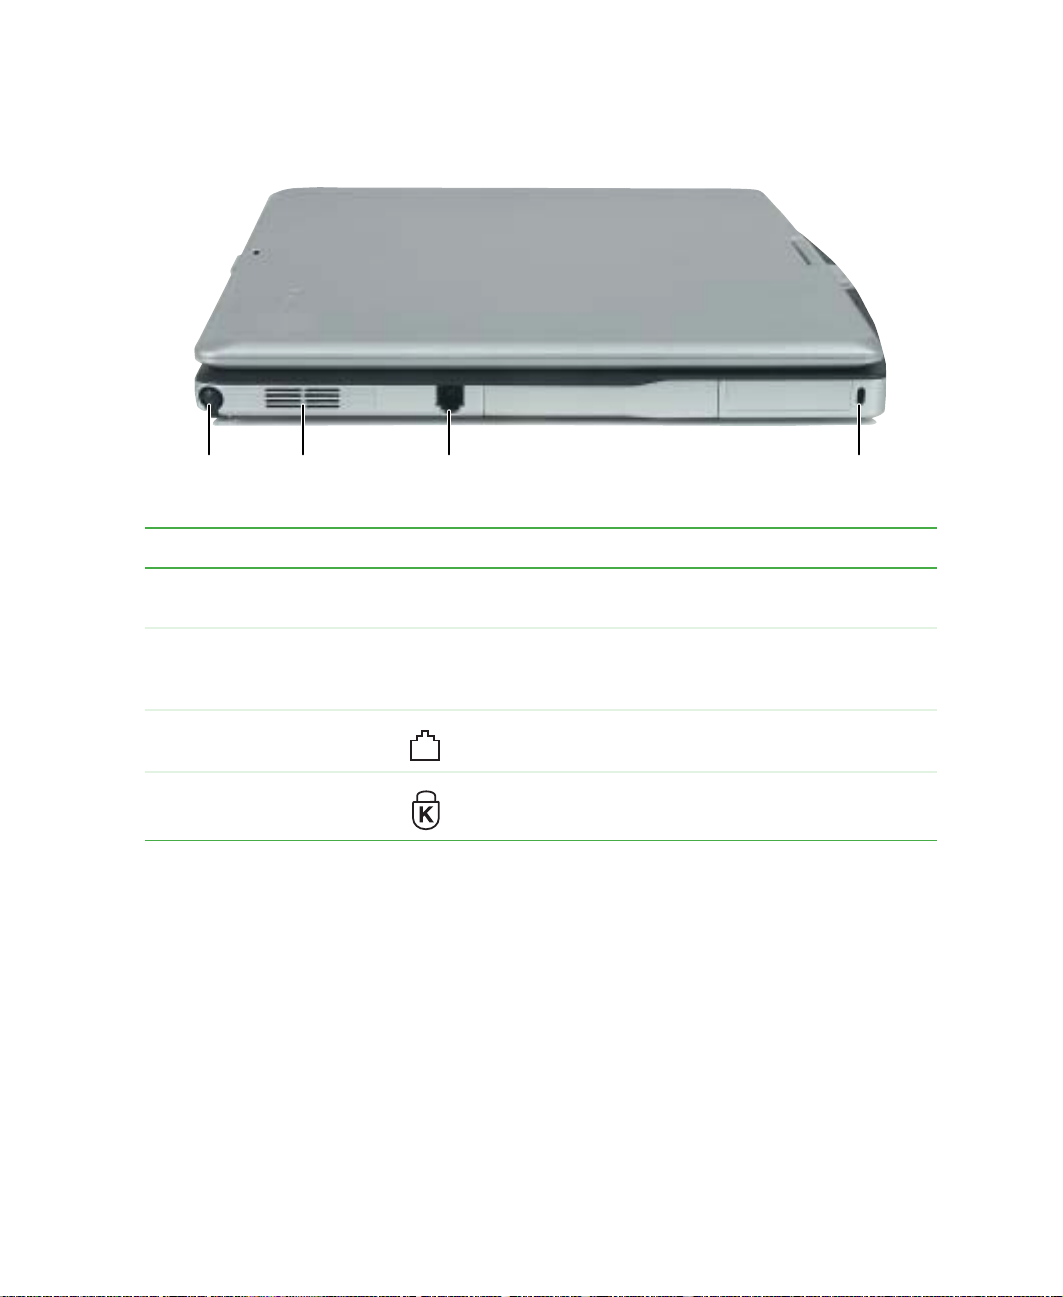
Right Side
Right Side
Pen Speaker Modem jack Kensington
Component Icon Description
Pen Write, tap, and input directly on your convertible
tablet PC’s display using the cordless pen.
Speaker Provides audio output when headphones or amplified
speakers are not pl ugged into y our convertib le tablet PC
or port replicator.
Modem jack Plug a modem cable i nto this jac k. For more inform ation,
see “Connecting the modem” on page 47.
Kensington™ lock slot Secure your convertible tablet PC to an object by
connecting a Kensington cable lock to this slot.
lock slot
www.gateway.com
5
Page 16
Chapter 1: Checking Out Yo ur Gateway M275
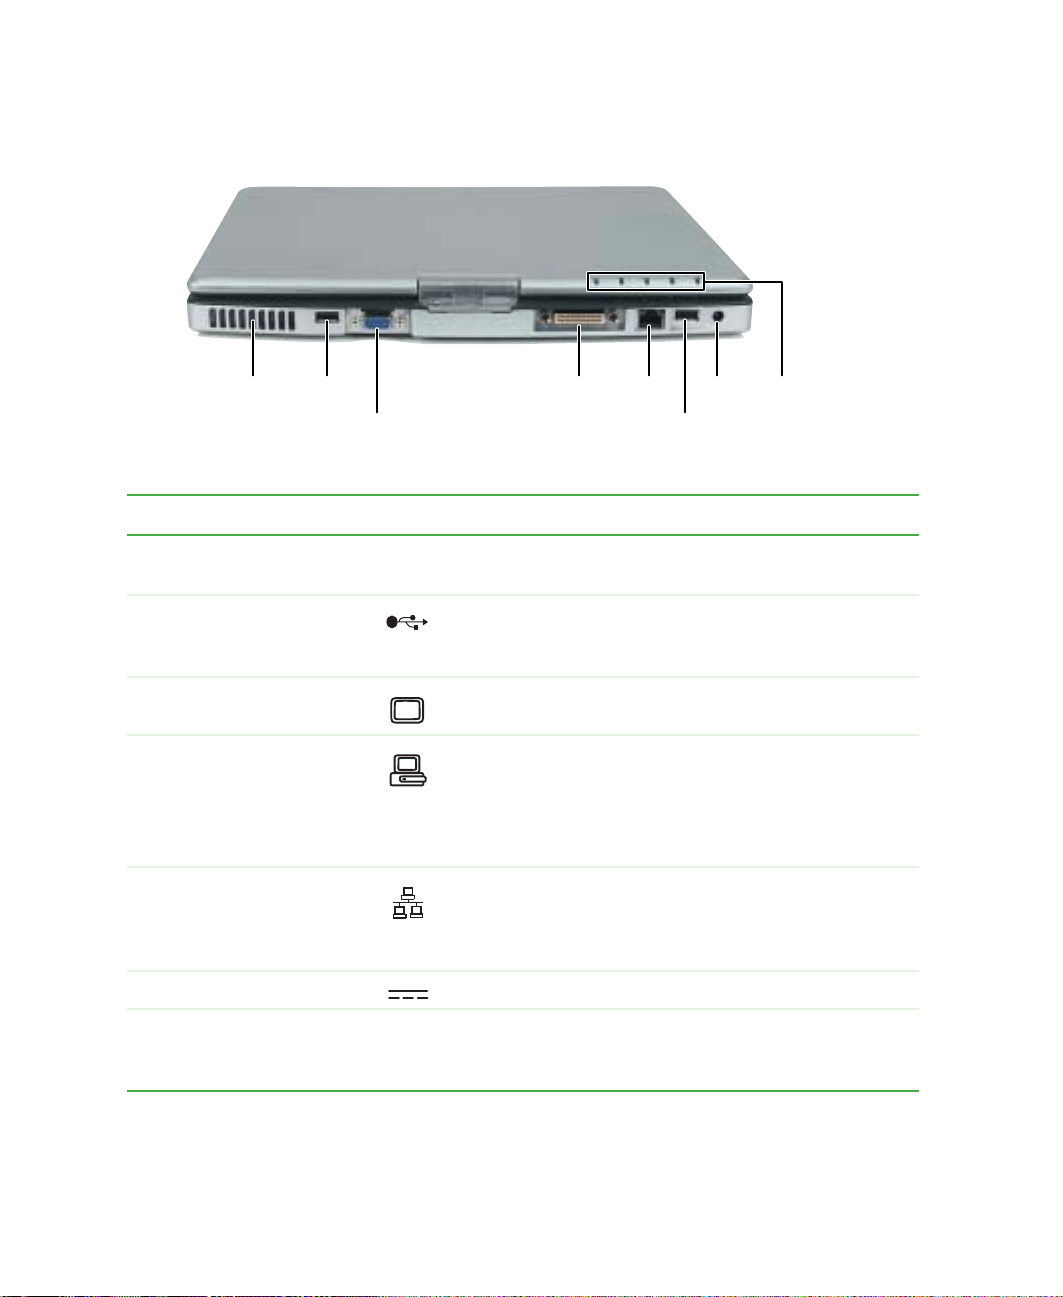
Back
Ventilation
fan
USB
port
Monitor
port
Docking
port
Ethernet
jack
Power
connector
USB
port
Status
indicators
Component Icon Description
Ventilation fan Helps cool internal components. Do not block or insert
objects into these slo ts.
USB ports Plug USB (Universal Serial Bus) devices (such as a
diskette drive, flash drive, Iomega™ Zi p™ drive, printer,
scanner, camera, keyboard, or mouse) into these ports.
Monitor port Plug an analog VGA monitor into this port.
Docking port Connect the port replicator to this port.
Warning! Power is passed through this port. This
docking connection is certified to UL 1950 for use only
with port replicators designed for your Gateway
convertible tablet PC.
Ethernet jack Plug a 10/100 Ethernet network cable into this jack. For
more information, see “Connecting to a wired Ethernet
network” on page 48 and “Networking Your
Gateway M275” on page 197.
Power connector Plug the AC adapter cable into this connector.
Status indicators Inform you of the power s tatus o r when a drive is in use.
For more information, see “LED status indicators” on
page 25.
6
www.gateway.com
Page 17
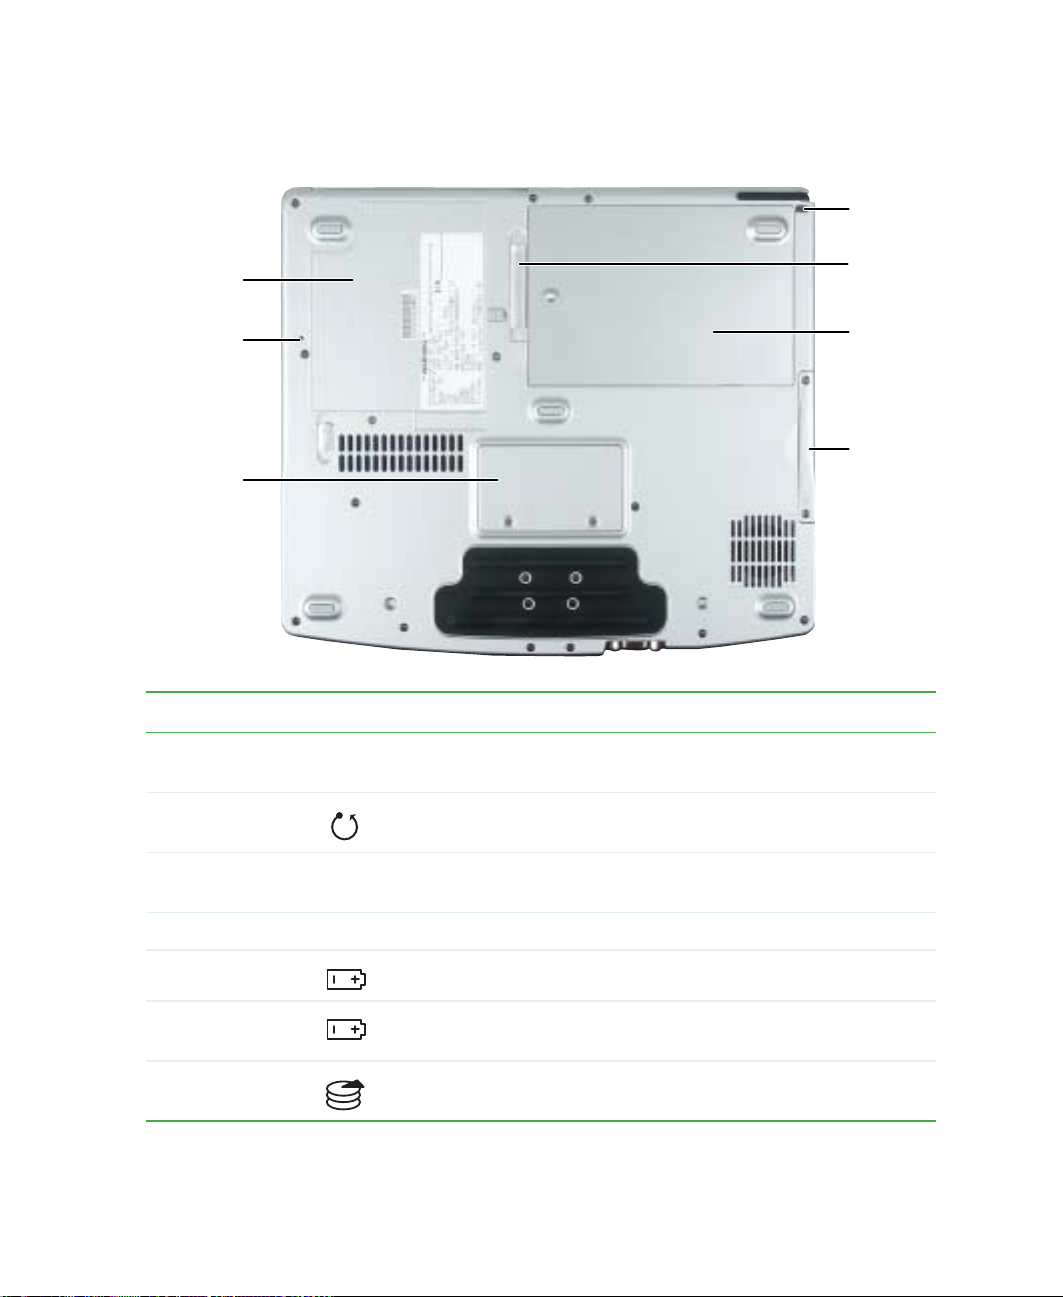
Bottom
System
label
Bottom
Pen
latch
Battery
latch
Reset
hole
Memory
bay cover
Battery
bay
Hard
drive bay
Component Icon Description
System label Includes the product model number. For more information, see
“Identifying your model” on page 10.
Reset hole Insert a straightened paper clip into this hole to manually restart
your convertible tablet PC.
Memory bay
cover
Open this cover to install a me mory m od ule. For more information,
see “Adding or replacing memory” on page 255.
Pen latch Slide to release the pen.
Battery latch Slide to release the battery.
Battery bay Insert the battery in to this bay . For more information , see “Changing
batteries” on page 159.
Hard drive bay The hard drive is located in this bay. For more information, see
“Replacing the hard drive kit” on page 267.
www.gateway.com
7
Page 18
Chapter 1: Checking Out Yo ur Gateway M275
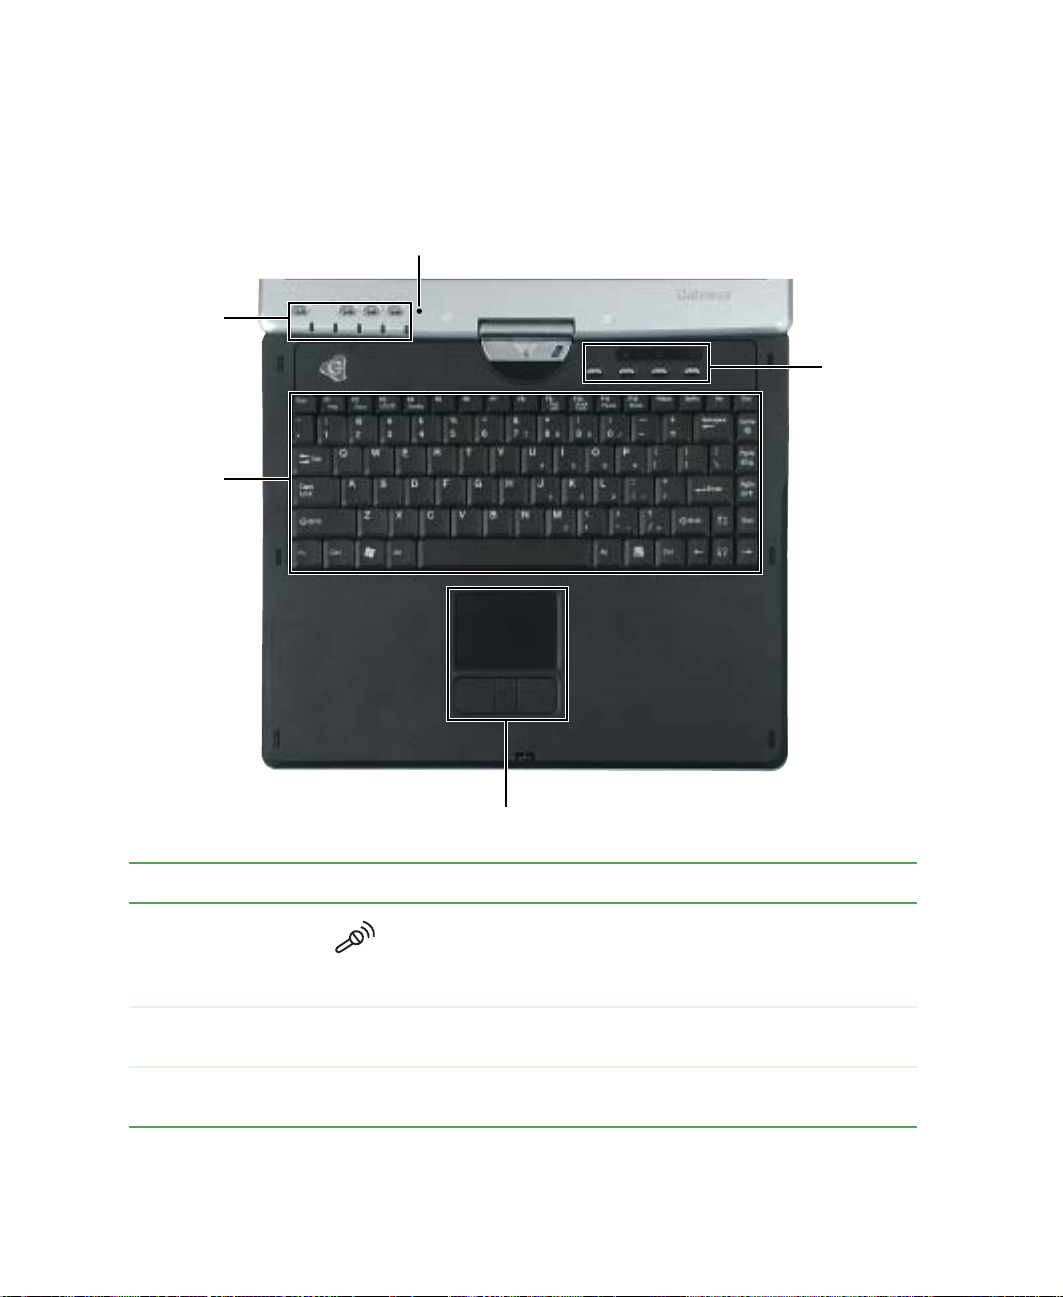
Keyboard area
For information on using your keyboard, see “Using the keyboard” on page 28.
Microphone
LCD panel
multi-function
buttons/status
indicators
Keyboard
Keyboard
multi-function
buttons/status
indicators
Touchpad
Component Icon Description
Microphone Record audio through th is microphone. The built -in microphone
is turned off while an external microphone is connected. For
the location of your mic rophone jack , see “Left Si de” on page 3
and “Back” on page 274.
LED status
indicators
Tabl et contro l
buttons
8
Inform you of the power status or when a drive is in use. For
more information, see “LED status indicators ” on pag e 25.
See “Tablet control buttons” on page 32 for a description of
each button.
www.gateway.com
Page 19

Keyboard area
Component Icon Description
Keyboard Provides all the features of a full-sized 86-key keyboard. For
more information, see “Using the keyboard” on page 28.
T ou chpad Provides all the function ality of a mouse. For more informa tion,
see “Using the EZ Pad touchpad” on page 35.
Keyboard
Multi-function
buttons
Keyboard Status
indicators
Press these buttons to open programs assigned to them.
These buttons are se t to open your defaul t e-mail program, you r
default Web browser, online help, and the My Computer
window. For more information, see “Multi-function buttons” on
page 34.
Inform you when a button has been pressed that affects how
the keyboa rd is used . For more informat ion, see “Keyboard
status indicators” on page 27.
www.gateway.com
9
Page 20
Chapter 1: Checking Out Yo ur Gateway M275
Identifying your model
Important The labels shown in this section are for informational
purposes only . Label information varie s by model, featur es
ordered, and location.
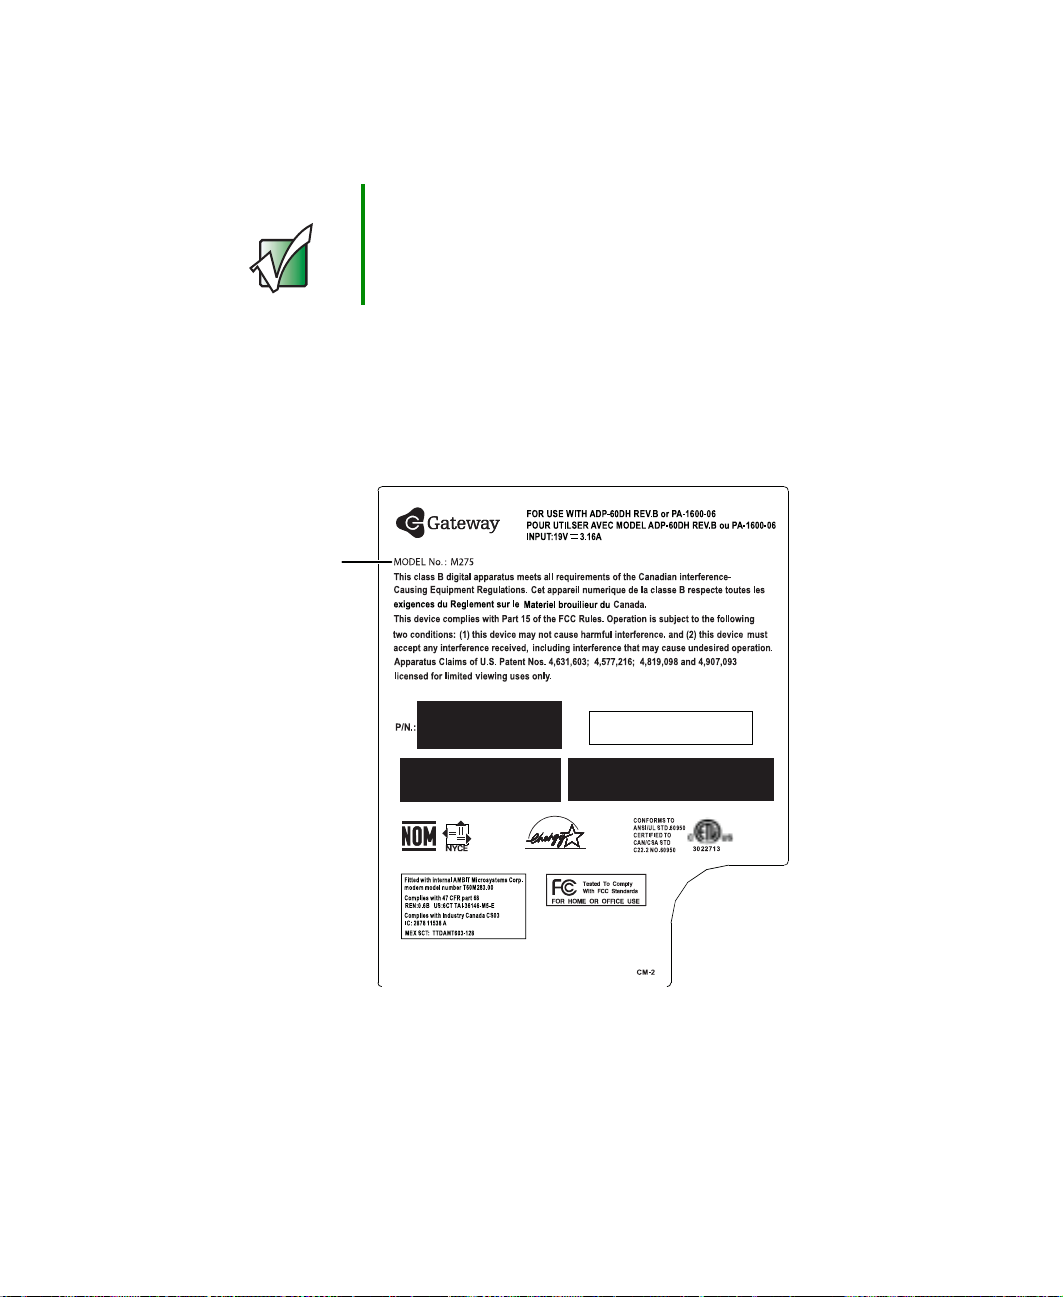
Gateway model number
The label on the bottom of your convertible tablet PC contains information
that identifies your convertible tablet PC model and its features. Gateway
Technical Support will need this information if you call for assistance.
Gateway
model
number
10
www.gateway.com
Page 21
Identifying your mo del
Gateway serial number
You ca n locate the Gateway serial number:
■ Printed on a white sticker on the bottom or back of your convertible
tablet PC.
■ Printed on the customer invoice that came with your c onvertible tablet PC.
The invoice also contains your customer ID number.
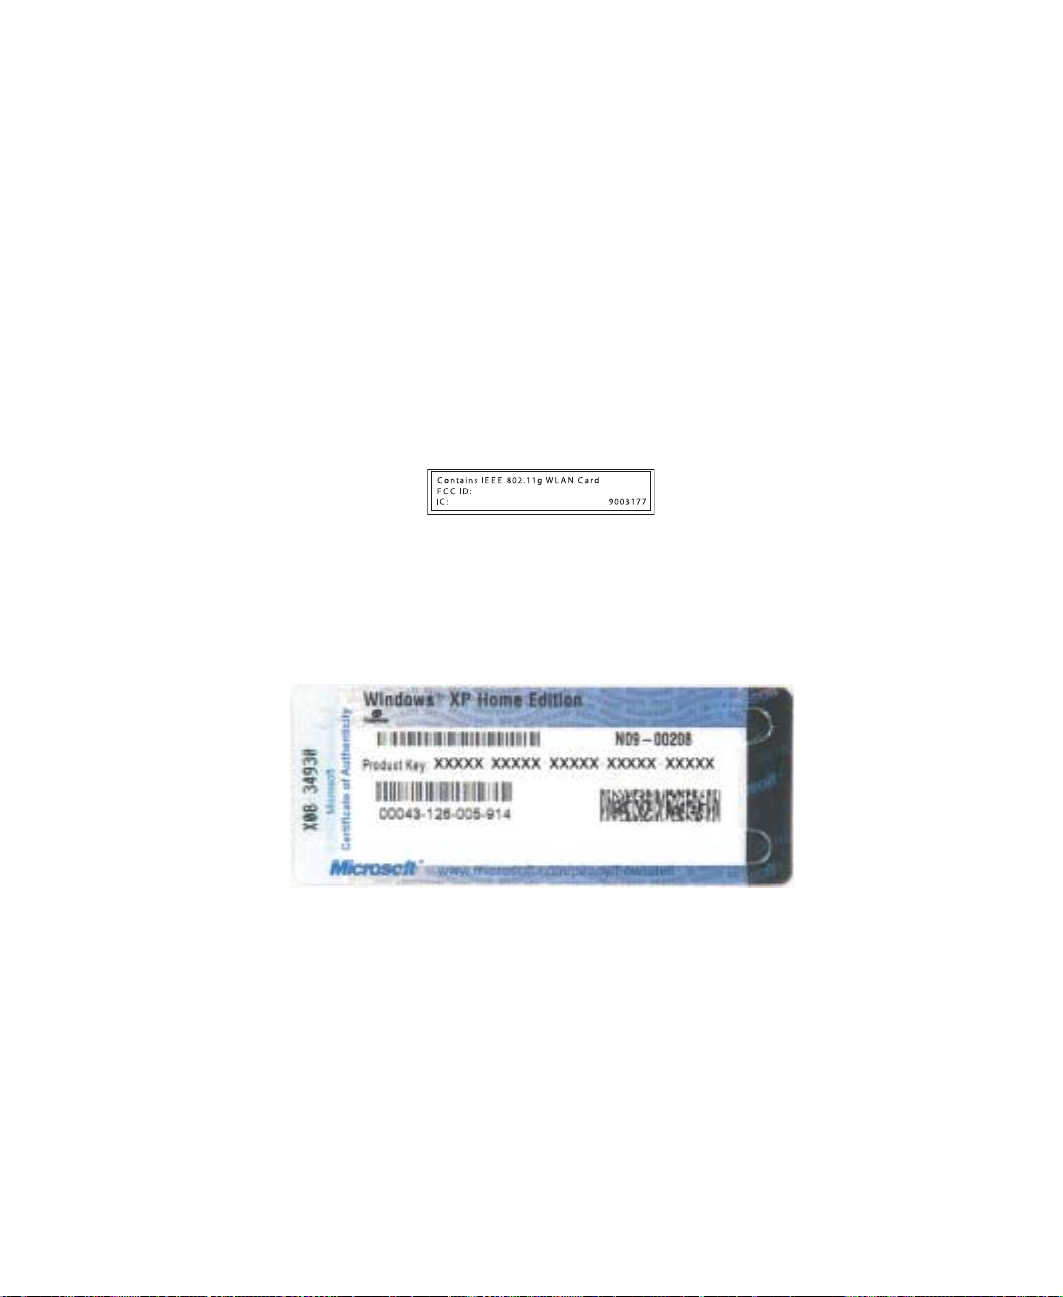
Internal wireless label
A label similar to the following indicates your convertible tablet PC contains
a wireless communications device. The label is affixed to the main system label.
Microsoft Certificate of Authenticity
The Microsoft Certificate of Authenticity label found on the bottom of your
convertible tablet PC includes the product key code for your operating system.
www.gateway.com
11
Page 22

Chapter 1: Checking Out Yo ur Gateway M275
Finding your specifications
For more information about your convertible tablet PC, such as memory size,
memory type, and hard drive size, visit Gateway’s eSupport page at
support.gateway.com
documentation and detailed specifications. For more information, see “Using
eSupport” on page 55.
. The eSupport page also has links to additional Gateway
12
www.gateway.com
Page 23

Accessories
Gateway offers accessories that can help you make the most of using your
convertible tablet PC. To order accessories, visit the Accessory Store at
accessories.gateway.com
Batteries and automobile/airplane power adapte rs
If you run your convertible tablet PC on battery power for extended periods,
you may want to buy an additional battery so you can swap batteries when
necessary. S ee “Replacing the battery” on page 160 for more information about
using an additional battery in your convertible tablet PC.
With an automobile/airplane power adapter, you can save battery power by
plugging your convertible tablet PC into an automobile cigarette lighter or an
airplane in-flight power receptacle.
Carrying cases
Gateway has large-capacity carrying cases if you need additional space for
accessories or supplies.
Drives
Use a diskette drive or USB flash drive for storing files or transferring files to
another computer. See “Using the optional diskette drive” on page 1 40.
.
Accessories
Memory
Large programs, such as multimedia games or graphics programs, use a lot of
memory . If your programs a re running more slo wly than you think they sho uld,
try adding more memory. See “Adding or replacing memory” on page 255 for
more information.
Peripheral devices
Y ou can atta ch devices (such as a keyboard, mouse, printer, monitor, or diskette
drive) to your convertible tablet PC.
Port replicators
Although you can attach devices directly to your convertible tablet PC, a port
replicator lets you make all of those connections at one time. When you travel
with your convertible tablet PC, you merely disconnect from the port rep licator
instead of unplugging all the devices.
www.gateway.com
13
Page 24

Chapter 1: Checking Out Yo ur Gateway M275
A port replicator also provides addition al ports and other expansion features
not included with your convertible tablet PC. See “Using the Gateway M275
Port Replicator” on page 271 for more information about using a port replicator
with your convertible tablet PC.
Printers
You can attach almost any type of printer to your convertible tablet PC. The
most common types are inkjet and laser printers, which print in color or black
and white. See “Installing a printer, scanner, or other peripheral device” on
page 49 for more information about attaching a printer to your convertible
tablet PC.
Inkjet printers and cartridges are relatively inexpensive, but they are slower than
laser printers. Using an inkjet color printer, you can print pictures, banners,
and greeting cards, as well as documents.
Laser printers and cartridges are more expensive, but they print much faster
than inkjet printers. Laser printers are better than inkjet printers when you are
printing large documents.
14
www.gateway.com
Page 25

Getting Started
This chapter provides basic information about your
Gateway convertible tablet PC. Read this chapter to find
out how to:
■ Connect the AC adapter
■ Start and turn off your convertible tablet PC
■ Identify the status indicators
■ Use the keyboard
■ Use the EZ Pad touchpad
■ Use the display
■ Use the pen
■ Connect the modem
■ Connect to an Ethernet network
■ Install peripheral devices
2
15
Page 26

Chapter 2: Getting Started
Safety instructions
Certain precautions should be observed to further reduce the risk of personal
injury or damage to your convertible tablet PC.
General tips
■ When setting up your convertible tablet PC for work, place it on a level
surface.
■ Before you clean your convertible tablet PC, turn if off, unplug it from its
power source, and remove the battery. For more information, see “Cleaning
your convertible tablet PC” on page 237.
■ Do not push objects into air vents or openings of your convertible
tablet PC. Doing so can cause fire or electric shock by shorting out interior
components.
■ When you disconnect a cable, pull on its connector, not on the cable itself.
As you pull out the connector, keep it evenly a ligned to avoid bending
any connector pins. Al so, before you connect a cab le make sure both
connectors are correctly oriented and aligned.
16
■ Use of mobile phones can interfere with the sound system. Your
convertible tablet PC operation is not impaired but we recommend that a
distance of 12 inches (30 cm) be maintained between your convertible
tablet PC and the mobile phone.
■ When you move your convertible tablet PC between environments with
very different humidity or temperature ranges, condensation may form on
or within your convertible tablet PC. To avoid damaging your convertible
tablet PC, allow sufficient time for the moisture to evaporate before using
your convertible tablet PC.
■ When traveling, do not check your convertible tablet PC as baggage. You
can put your convertible tablet PC through an X-ray security machine, but
never put your convertible tablet PC through a metal detector. If you have
your convertible tablet PC checked by hand, be sure to have a charged
battery available in case you are asked to turn on your convertible
tablet PC. For more information, see “Traveling W ith Y our Gateway M275”
on page 173.
■ When traveling, do not place your convertible tablet PC in overhead
storage compartments where it could slide around. For more information,
see “Traveling With Your Gateway M275” on page 173.
www.gateway.com
Page 27

■ Do not drop your convertible tablet PC or subject it to other physical
shocks.
■ To completely turn off all convertible tablet PC power, turn your
convertible tablet PC off, remove the battery, and disconnect the AC
adapter from the electrical outlet.
■ The bottom of your convertible tablet PC can become warm with use. This
is normal.
■ Do not apply heavy pressure to your convertible tablet PC or subjec t it to
strong impact. Excessive pressure or impact can cause damage to
convertible tablet PC components, break the display scr een, or otherwise
cause malfunct ions.
■ Some PC Cards can become hot with prolon ged use. Overheating of a
PC Card can result in errors or instability in the card’s operation. Be careful
when you remove a PC Card that has been used for extended periods.
Using the battery
■ Do not carry a battery in your pocket, purse, or other container where
metal objects (such as car keys) could short-circuit the battery terminals.
The resulting excessive current flow can cause extremely high temperatures
and may result in he at damage.
Safety instructio ns
■ Protect your convertible tablet PC, battery, and hard drive from
environmental hazards such as dirt, dust, food, liquids, temperature
extremes, and overexposure to sunlight.
■ Replace only with a Gateway convertible tablet PC battery to avoid risk of
fire or explosion. For more information, see “Changing b atteries” on
page 159.
■ Dispose of used batteries according to the manufacturer’ s in structions. Do
not dispose of batteries in a fire. They may explode. For more information,
see “Changing batteries” on page 159.
Using the AC adapter
■ Place the adapter in a ven tilated area, such as a d esktop or on the floor,
when you use it to run your convertible tablet PC or to charge the battery .
Do not cover the adapter with papers or other items that will reduce
cooling, and do not use the adapter while it is inside a carrying c ase.
www.gateway.com
17
Page 28

Chapter 2: Getting Started
■ Make sure that nothing rests on your adapter’s power cable and that the
cable is not located where it can be tripped over or stepped on.
■ Use only the adapter and power cord approved for use with this convertible
tablet PC. Use of another type of adapter may create a risk of fire or
explosion.
■ If you use an extension cable with your adapter, ensure that the total
ampere rating of the products plugged in to the extension cable does not
exceed the ampere rating of the extension cable.
Basic safety precautions
When using your conv ertible tablet PC and peri pheral devices, basic s afety
precautions should always be followed to reduce the risk of fire, electric shock,
and injury to persons, including the following:
■ Do not use this product near water. For example, do not use it near a
bathtub or kitchen sink.
■ Avoid using the wired modem or LAN during an electrical storm. There
may be a remote risk of electric shock from lightning.
■ The cable used with the modem should be manufactured with a minimum
wire size of 26 American wire gauge (AWG) and an FCC-compliant RJ-11
modular plug.
18
■ To help avoid the potential hazard of electric shock, do not connect or
disconnect any cables or perform maintenance or reconfiguration of this
product during an electrical storm.
Warning When working with peripheral devices or replacing
memory modules, always follow installation instructions
closely. Except for replacing memory or the hard drive, do
not attempt to service your convertib le tab letPC yourself.
(See “Using eSupport” on page 55 and “Telephone
support” o n page 304 for service information.)
www.gateway.com
Page 29
Connecting the AC adapt er
Connecting the AC adapter
Y ou can run your convertible tablet PC using an AC adapter or your convertible
tablet PC’s ba ttery. The battery was shipp ed to you partially charged. Y ou should
use the AC adapter right away to fully charge the battery. Allow 24 hours for
the battery to fully charge.
Important If the battery is not fully charged before you use your
convertible tablet PC on battery power for the first time , the
battery life may be much shorter than you expect. If the
battery life seems short even after being charged for
24 hours, the battery may need to be recalibrated. For
more information, see “Recalibrating the battery” on
page 158.
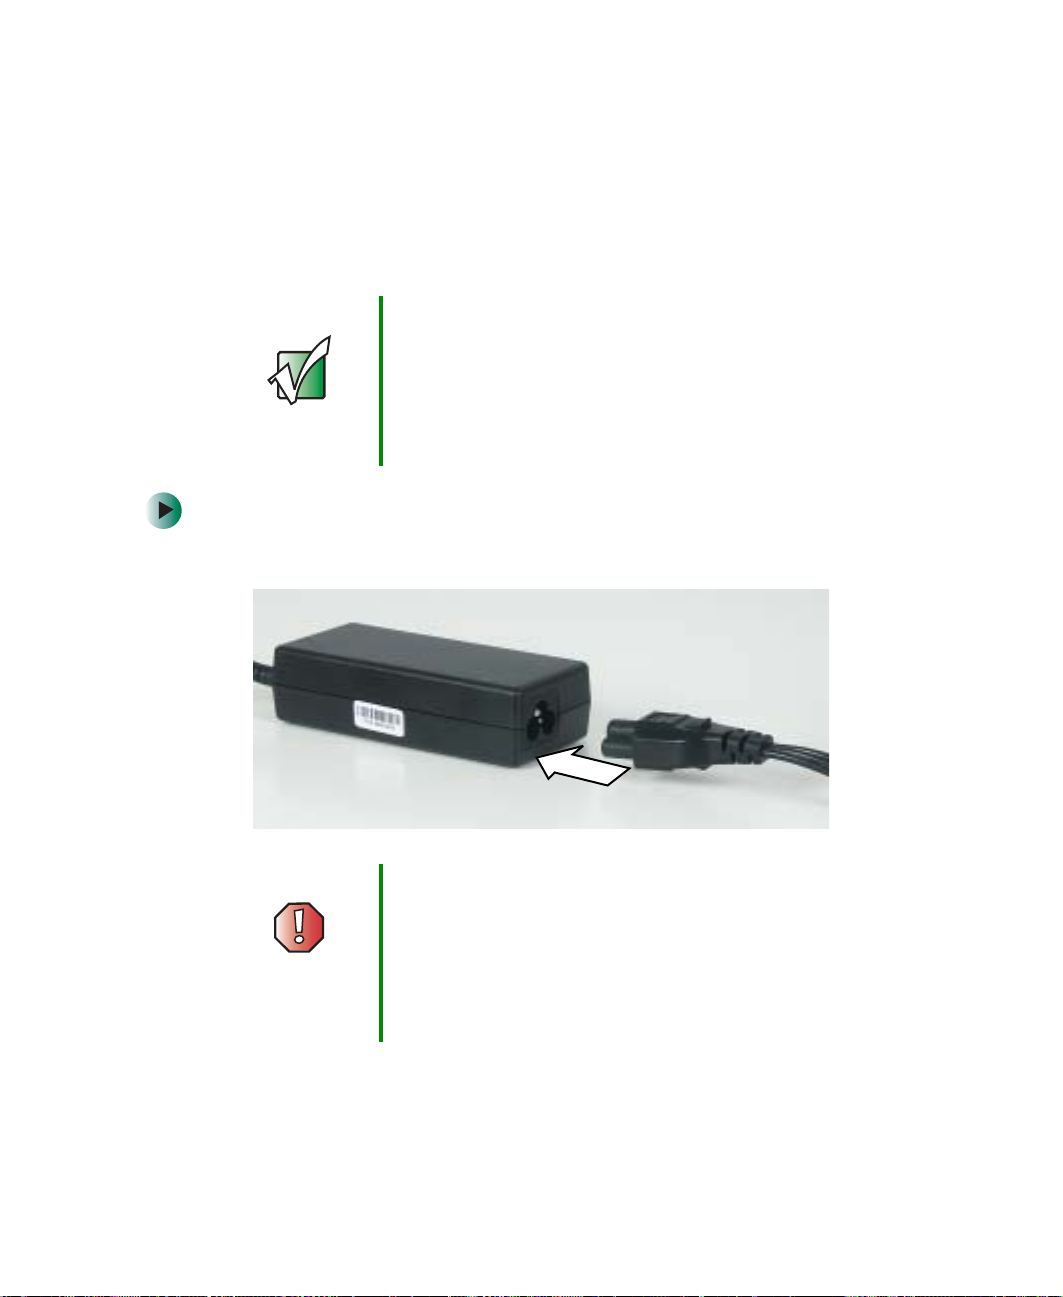
To connect the AC adapter:
1 Connect the power cord to the AC adapter.
Warning Make sure that you use the AC adapter that came with
your convertible tablet PC or one of the same type
purchased from Gateway.
Replace the power cord if it becomes damaged. The
replacement cord must be of the same type and voltage
rating as the original cord or your convertible tablet PC
may be damaged.
www.gateway.com
19
Page 30
Chapter 2: Getting Started
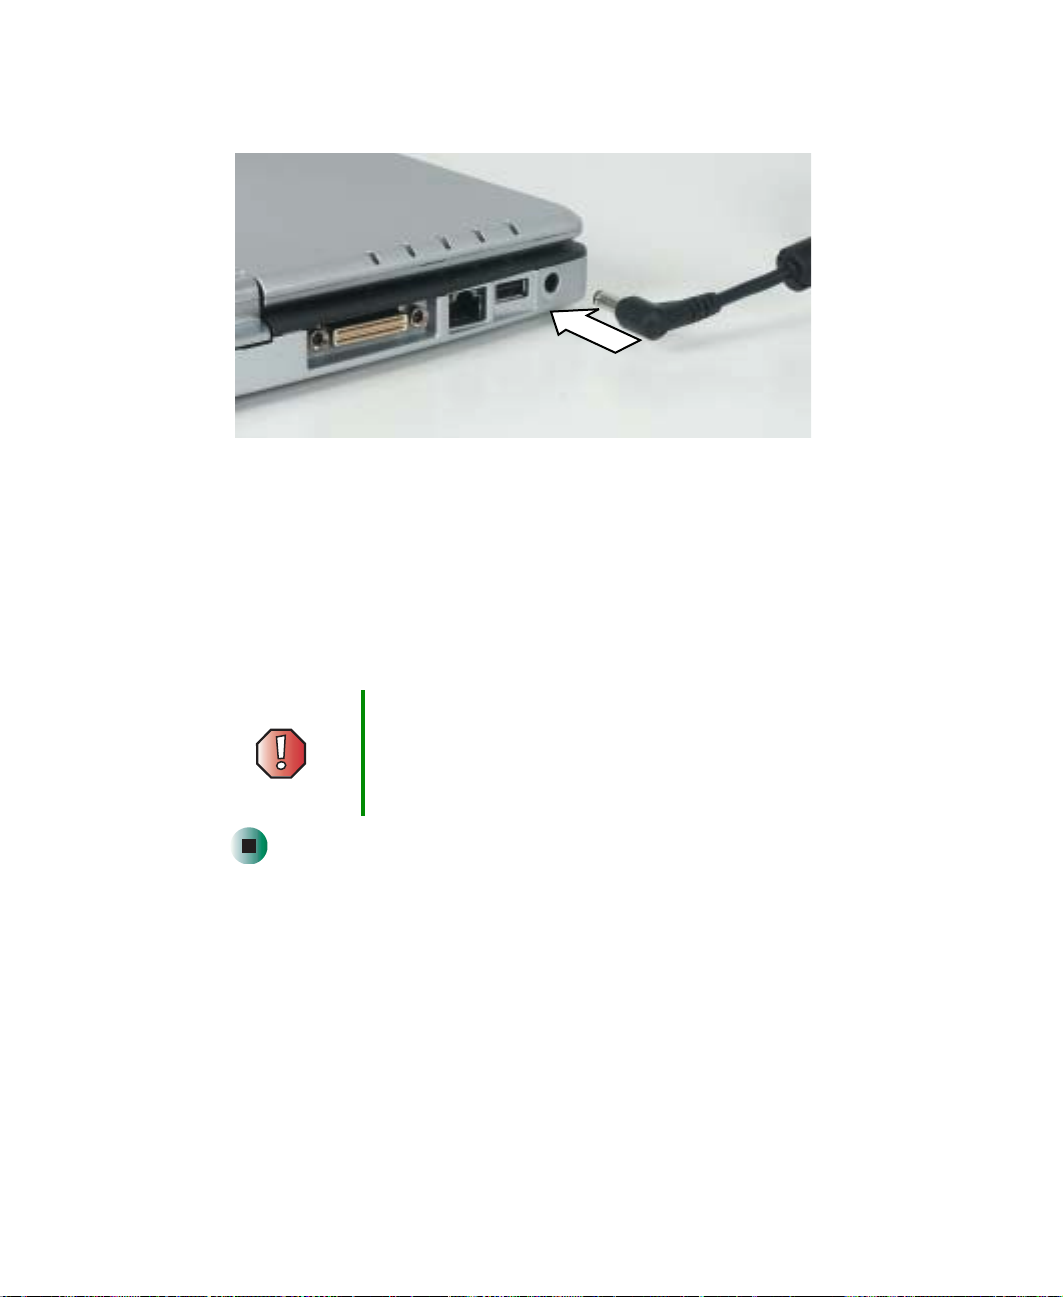
2 Connect the AC adapter to your convertible tablet PC’s power connector.
3 Plug the power cord into a wall outlet.
The battery charge indicator turns on (see “LED status indicators” on
page 25 for the location of the battery charge indicator). If the battery
charge indicator does not turn on, unplug the adapter from your
convertible tablet PC, then plug it back in.
4 When you finish using your convertible tablet PC for the first time, turn
it off and leave it connected to AC power for at least 24 hours .
Warning Do not attempt to disassemble the AC adapter. The
AC adapter has no user-replaceable or user-serviceable
parts inside. The AC adapter has dangerous voltages tha t
can cause serious i njury or de ath. Con tact Gatew ay about
returning defective AC adapters.
Protecting from power source problems
During a power surge, the voltage level of electricity coming into your
convertible tablet PC can increase to far above normal levels and cause data
loss or system damage. Protect your convertible tablet PC and peripheral devices
by connecting them to a surge protector, which absorbs voltage surges and
prevents them from reaching your convertible tablet PC.
20
www.gateway.com
Page 31

Connecting the AC adapt er
Warning High voltages can enter yo ur convertible tablet PC through
both the power cord and the modem connection. Protect
your convertible tablet PC by using a surge protector. If
you have a telephone modem, use a surge protector that
has a modem jack. If you have a cable modem, use a
surge protector that ha s an anten na/cable T V jack. During
an electrical storm, unplug both the surge protector and
the modem.
www.gateway.com
21
Page 32

Chapter 2: Getting Started
Starting your convertible tablet PC
To start your convertible tablet PC:
1 Press the latch on the front of your convertible tablet PC, then lift the LCD
panel.
2 Slide the power switch located on the left side of your convertible tablet PC.
-OROpen the LCD panel.
22
The power switch is preset to On/Off mode. However, you can also set it
to function in Standby/Resume mode. For instructions on changing the
power switch mode, see “Changing power settings” on page 165.
Important The Power on Lid Lift feature turns on your convertible
tablet PC whenever you open the LCD panel. Your
convertible tablet PC was shipped to you with the Power
on Lid Lift feature turned off. For more information, see
“Turning on the Power on Lid Lift feature” on page 169.
www.gateway.com
Page 33

Turning off your conve rtible tablet PC
3 If you are starting your convertible tablet PC for the first time, follow the
on-screen instructions to set up your convertible tablet PC.
W aking up your convertible tablet PC
When you do not use your convertible tablet PC for several minutes, or if you
close the LCD panel without turning your convertible tablet PC off, it may enter
a power-saving mod e called Standby. While in Standby, the power indicator
flashes.
If your convertible tablet PC is in Standby mode, open the L CD panel or slide
the power switch to “wake” it up. For more information on turning on the Power
on Lid Lift feature, see “Turning on the Power on Lid Lift feature” on page 169.
For more information on changing power-saving settings, see “Changing p ower
settings” on page 165.
T urning off your convertible
tablet PC
To turn off your c onvertible tablet PC:
1 Click/Tap Start, then click/tap Turn Off Computer. The Tu r n Of f C o mp u t e r
dialog box opens.
2 Click/Tap Turn Off. Windows shuts down and turns off your convertible
tablet PC.
Important If for some reason you cannot use the Turn Off Computer
option in Windows to turn off your convertible tablet PC,
slide and hold the power switch for about five seconds,
then release it.
www.gateway.com
23
Page 34

Chapter 2: Getting Started
Restarting (rebooting) your
convertible tablet PC
If your convertible tablet PC does not respond to keyboard or touchpad input,
you may have to close programs that are not responding. If closing
unresponsive programs does not restore your convertible tablet PC to normal
operation, you may have to restart (reboot) your convertible tablet PC.
To close unresponsive programs and restart your convertible tablet PC:
1 Press the Windows Security button. A window opens that lets you close a
program that is not responding. For more information, see “T a blet control
buttons” on page 32.
-ORPress C
is not responding.
TRL+ALT+DEL. A window opens that lets you close a program that
2 Click/Tap the program that is not responding.
3 Click/Tap End Task.
4 If your convertible tablet PC does not respond, turn it off, wait ten seconds
and turn it on again.
Important If your convertible t abletPC does not tu rn of f immedia tel y,
complete the following steps until your convertible
tablet PC turns off:
1 Slide and hold the power switc h for about fiveseconds,
then release it.
2 Insert a straightened paper clip into the reset hole on
the bottom of your convertible tablet PC.
3 Unplug the power cord and re move the batt ery for more
than 10 seconds.
As a part of the regular startup process, a program to check the disk status
runs automatically. When the checks are finished, Windows starts.
24
www.gateway.com
Page 35

Status indicators
LED status indicators
LED status indicators inform you when a drive is being used or indicate the
power status of your convertible tablet PC.
Memory card reader
Disc drive
Hard drive
Battery charge
Power
Status indicators
Indicator Icon Description
Hard drive The hard dri ve is in use.
Disc drive The DVD or DVD/CD-RW drive is in use.
Memory card
reader
The memory card reader is in use.
www.gateway.com
25
Page 36

Chapter 2: Getting Started
Indicator Icon Description
Battery charge The LED shows the battery activity and status.
Power The LED shows your conv ertible t ablet PC’s power status.
■
LED blue - battery is fully charged.
■
LED purple - battery is charging .
■
LED blinkin g red - batt ery charge is very lo w.
■
LED solid red - battery is malfunctioning.
This LED only lights up when your convertible tablet PC is
connected to AC power or the battery charge is very low.
■
LED on - convertible tablet PC is on.
■
LED blinking - convertible tablet PC is in Standby mode.
■
LED off - conv ertible tablet PC is off .
26
www.gateway.com
Page 37

Keyboard status indicators
Keyboard status indicators inform you when a button has been pressed that
affects how the keyboard is used.
Pad lock
Scroll lock
Caps lock
Status indicators
Indicator Icon Description
Caps Lock Caps Lock is turned on.
Scroll Lock Scroll Lock is turned on. For more information, see “System key
combinations” on page30.
Pad Lock Numeric keypad is turned on.
1
www.gateway.com
27
Page 38

Chapter 2: Getting Started
Using the keyboard
Your convertible tablet PC features a full-size keyboard that functions the same
as a desktop computer keyboard. Many of the keys have been assigned alternate
functions, including shortcut keys for Windows and function keys for specific
system operations.
You can attach an external keyboard to your convertible tablet PC using a USB
port. You do not need to shut down your convertible tablet PC to connect a
USB keyboard.
Function keys/
System keys
Navigation keys/
Volume keys
28
FN key
Windows
key
Numeric
keypad
www.gateway.com
Application
Arrow keys/LCD
key
brightness keys
Page 39

Using the keyboard
Key types
The keyboard has several different types of keys. Some keys per form specific
actions when pressed alone and other actions when pressed in combination
with another key.
Key type Icon Description
Function key s Press these keys labeled F1 to F12 to perform actions in
programs. For example, pressing
Each program uses diff erent function keys for di fferent purposes .
See the program documentation to find out more about the
function key actions.
F1 may open help.
System keys Press these co lored keys i n combinat ion with th e
perform specific act ions. For m ore informati on, see “Syste m key
combinations” on page30.
Navigation keys Press these keys to move the cursor to the beginning of a line,
to the end of a line, up the p age, down the page , to the beginning
of a document, or to the end of a document.
Volume keys Press these colored key s in combinat ion with t he
increase or decrease the volume or to turn off all sound.
FN key to
FN key to
FN key Press th e FN key in combination with a colored system key (such
STATUS, STANDBY, or PAUSE) to pe rform a s pecific a ction.
as
Windows key Press this key to open the Windows Start menu. This key ca n
also be used in combination with other keys to open utilities like
F (Search utility), R (Run utility), and E (Explorer utility).
Numeric keypad Use these keys to type numbers when the numeric keypad is
turned on.
Application key Press this key for quick access to shortcut menus and help
assistants in Windows.
Arrow keys Press these keys to move the cursor up, down , right, o r left.
LCD bright ness
keys
Press these colored k eys in combin ation wit h the
control the screen brightness.
FN key to
www.gateway.com
29
Page 40

Chapter 2: Getting Started
System key combinations
When you press the FN key and a system key at the same time, your convertible
tablet PC performs the action identified by the colored text or icon on the key.
Press and hold F
N, then
press this system key...
To...
Display the power status box in the upper-left corner of your
display . The box show s the battery charge l evel, the BIOS version,
and whether the AC adapter is being used. Press the key
combination again to close this box.
Toggle your convertible tabletPC’s display between the LCD, an
external monitor, or both displays at the same time. A monitor
must be plugged into the monitor port on your convertible
tablet PC.
Enter Standby mode. Slide the power switch to leave Standby
mode. For more information, see “Changing power modes” on
page 163.
Turn the wireless Et hernet emitte r on or o ff. Fo r more in formation,
see “Turning y our wireless Etherne t emitter on or off ” on page 210.
Increase the LCD panel brightness above the normal brightest
setting for 255 seconds. Use this feature in bright lighting
situatio ns, such as outside i n bright su nlight.
Press a second time to decrease the brightness belo w the normal
dimmest setting. Use this feature in dim lighting situations.
Press a third time to return the display to the normal brightness
setting.
Important: Using this feature will affect battery performance.
For more information, see “XtraBright/XtraDim” on page 181.
30
Turn on PadLock so you can us e the nu meric keypa d. Press this
key combination again to turn off Pad Lock. The Pad Lock status
indicator appears when this function is turned on.
www.gateway.com
Page 41

Using the keyboard
Press and hold FN, then
press this system key...
Home
To...
Pause the text scrolling in a DOS screen. Press this key
combination again to continue scrolling. The Scroll Lock status
indicator appears when this function is turned on. (This function
is only available in some programs.)
Pause execution of a DOS program. (This function is only
available in some programs.)
Stop the currently running DOS program. (This function is only
available in some programs.)
Increase the brightness of the display. This key combination
overrides the XtraBright/XtraDim setting. For more information,
see “Adjusting brightness” on page180.
Decrease the brightness of the display.This key combination
overrides the XtraBright/XtraDim setting. For more information,
see “Adjusting brightness” on page180.
Mute the sound. Press the key combination again to restore the
sound. For more information, see “Adjusting the volume” on
page 102.
PgUp
PgDn
Increase the volume. For more information, see “Adjusting the
volume” on page102.
Decrease the volume. For more information, see “Adjusting the
volume” on page102.
www.gateway.com
31
Page 42

Chapter 2: Getting Started
Buttons
T ablet control buttons
Press the tablet control buttons to control the convertible tablet PC while it is
in tablet mode. The buttons have dimples so that y ou can press them with your
pen.
Screen
rotation
Tablet input
panel
XtraBright/
XtraDim
Windows
security
Button Icon Press to...
Screen rotation Rotate the display orientation. For more information,
see “Changing display orientation” on page 180.
Tablet input panel Open the tablet input panel. For more information,
see “Tablet Input Panel (TIP)” on page 44.
32
www.gateway.com
Page 43

Button Icon Press to...
XtraBright/XtraDim Increase the LCD panel brightness above the n ormal
brightest setting for 255 seconds. Use this feature in
bright lighting situations, such as outside in bright
sunlight.
Press a seco nd time to decrease t he bright ness
below the normal dimmest setting. Use this feature
in dim lighting situations.
Press a third time to return the display to the normal
brightness setting.
Important: Using this feature will affect battery
performance.
For more information, see “XtraBright/XtraDim” on
page 181.
Windows security Open the Windows Task Manager. Also is used for
domain authentication or logon screen.
Buttons
www.gateway.com
33
Page 44

Chapter 2: Getting Started
Multi-function buttons
Press the multi-function buttons to open the programs associated with
them.The buttons have dimples so that you can press them with your pen.
Help
Internet
E-mail
Button Icon Press to...
My Computer
E-mail Open your default e-mail program.
Internet Open your default Web browser.
Help Open online help.
My Computer Open the My Computer window.
34
www.gateway.com
Page 45

Using the EZ Pad touchpad
Using the EZ Pad touchpad
The EZ Pad™ consists of a touchpad, two buttons, and a rocker switch.
Left touchpad
button
Rocker switch
When you move your finger on the touchpad, the pointer (arrow) on the screen
moves in the sam e directi on.
www.gateway.com
Right touchpad
button
Touchpad
35
Page 46

Chapter 2: Getting Started
You can use the EZ-Pad left and right buttons below the touchpad to select
objects.
You can assign a function to the rocker switch between the touchpad buttons.
This function can be to scroll up or down, maximize or minimize the active
window, or open and close the Start menu. For more information about
programming the rocker switch, see “Changing the touchpad settings” on
page 192.
Using the touchpad
To ... Do this...
Move the pointer
on the scre en.
Select an object
on the scre en.
Start a program
or open a file or
folder.
Move your finger around on the
touchpad. If you r un out of s pace
and need to move the pointer
farther, lift your finger, move it to
the middle of the touchpad, then
continue moving your finger.
Position the pointe r over the object.
Quickly press and release the left
button once. This action is called
clicking.
Position the pointe r over the object.
Press the left button twice in rapid
succession. This actio n is called
double-clicking.
36
www.gateway.com
Page 47

To ... Do this...
Using the EZ Pad touchpad
Access a shor tcut
menu or find
more information
about an object
on the scre en.
Move an object
on the scre en.
Position the pointe r over the object.
Quickly press and release the righ t
button once. This action is called
right-clicking.
Position the pointe r over the object.
Press the left button and hold it
down, then use the touchpad to
move (drag) the object to the
appropriat e part of the scree n.
Release the button to drop the
object where you want it.
For instructions on how to adjust the double-click speed, pointer speed,
right-hand or left-hand configuration, and other touchpad settings, see
“Changing the touchpad settings” on page 192.
www.gateway.com
37
Page 48

Chapter 2: Getting Started
Using the display
Your convertible tablet PC’s screen combines the eye-soothing readability of a
liquid-crystal display with the responsiveness of a pen controller. The screen
provides a hard, smooth writing surface, minimizes glare, and increases
readability.
■ Unlike other touchscreens and PDAs, your convertible tablet PC’s display
responds only to your convertible tablet PC’s pen. Your convertible
tablet PC will not respond to a PDA pen or the touch of a fingertip.
■ Steady your hand on the display surface while writing. The pressure of your
hand or fingers will not affect any open programs.
■ Switching from AC to battery power dims the display slightly to save
battery power.
Important If you prefer maximum brightness while on batter y power,
use the XtraBright/XtraDim button. For more information,
see “Tablet control buttons” on page32.
38
www.gateway.com
Page 49

Converting the display from notebook to tablet mode
To conver t the display from notebook mode to tablet mode:
1 Open the LCD panel to the normal viewing position.
2 Locate the rotation direction arrow on the LCD panel hinge.
Rotation direction arrow
Using the display
3 Rotate the LCD panel in the direction of the rotation direction arrow until
the panel is backwards. The panel soft-locks into the final po sition.
www.gateway.com
39
Page 50

Chapter 2: Getting Started
4 Close the LCD pan el onto the keyboard. There is a click when the LCD
panel latch locks.
40
www.gateway.com
Page 51

Using the pen
Y our convertible tablet PC’s pen is the only device that can write, tap, and input
directly on your convertible tablet PC’s display.
Warning A finger-tap or PDA stylu s has no effe ct on your convertibl e
tablet PC’s display , and ink pens an d other pointed objec ts
could damage the surface. Always use the pen that came
with your convertible tablet PC. You can order extra pens
from Gateway.
Warning Do not sharply strike the display. Although the display is
durable, it can break.
The pen can do everything a mouse does. Just think “tap” instead of “click”.
With a mouse: With a pen:
Point and c lick Point and ta p
Using the pen
Double-click Double-tap
Click-and-drag Tap-and-drag
Right-click Button-tap
(press the pen button whil e tappin g or press an d hold with the pen)
Storing and removing the pen
To store the pen in y our convertible tablet PC:
1 Locate the pen holder on the right side of your convertible tablet PC. For
more information, see “Right Side” on page 5.
2 Slide the pen into the holder with the pocket clip down until the pen clicks
into place.
www.gateway.com
41
Page 52

Chapter 2: Getting Started
To remove the pen from our convertible tablet PC:
1 Locate the pen latch on the bottom of your convertible tablet PC. For more
information, see “Bottom” on page 7 .
2 Slide the pen latch until the pen is release from the pen holder.
Calibration
The first time you use your convertible tablet PC, you should calibrate your pen
for both portrait and landscape orientations. Calibration ensures the accuracy
of the pen and adjusts the screen’s performance for different users.
If the on-screen pointer does not seem to line up with the tip of the pen—for
example, because someone else has used your convertible tablet PC and
adjusted it for their own use—recalibrate it to your tapping patterns.
Recalibrate if you write with the opposite hand from the previous
user—right-handed writer to left-handed writer.
42
www.gateway.com
Page 53

To open the calibration program:
■ Double-click/Double-tap (Tablet and Pen Settings) in the taskbar, then
click/tap
Calibrate. Follow the on-screen instructions.
Gestures
A gesture is a shape you draw with your convertible tablet PC pen to send a
command to your convertible tablet PC. In Input Panel, you can also use
gestures to control the insertion point in the active program. When you use
these gestures, you get the same result as pressing the corresponding key on a
standard keyboard.
■ Open the Tablet Input Panel by waving the pen back and forth over the
screen.
■ Backspace by drawing a right-to-left line on the display surface.
■ In most text input programs, you can erase text by scratching it out.
Windows interprets a scratchout as a delete command.
Using the pen
■ To erase, draw a short, wide “Z.”
■ Y ou will find more information about ge stures and gesture symbols, as well
as handwriting tips, in the
Help section of the TIP’s Tools menu. For more
information, see “Tablet Inpu t Panel (TI P)” on pag e 44.
www.gateway.com
43
Page 54

Chapter 2: Getting Started
Pen button
The pen button serves the same function as the right button on a mouse. Press
it and tap (button-tap) to open right-click menus when they are available.
Tips
■ Hold the pen the same way you hold a writing pen, and steady your writing
hand by resting it on the display surface.
■ Line up the pointer before you tap, in cases where the pointer and pen
point are out of alignment. The screen reads the position of the pointer,
not the tap.
■ Store the pen in the Gateway convertible tablet PC’s pen holder . Store extra
pens in a drawer to avoid prolonged pressu re on the pen tip.
■ The pen has internal electronics, so keep it dry and avoid contact with
liquids.
■ Your convertible tablet PC responds to most Penabled™ EMR pens
manufactured by Wacom
®
.
T ablet Input Panel (TIP)
Tap (the Keyboard icon) near the Start butto n to open the T ablet Input Panel
(TIP). Use the TIP to enter data by hand, soft keyboard, or voice into a word
processing program or a text-entry form.
■ Access the TIP keyboard and writing pad by clicking/tapping the tabs near
the bottom of the window.
■ To set up speech options, click/tap Tools, then click/tap Speech.
44
www.gateway.com
Page 55

TIP tips
Using the pen
■ Open a program for your input (for example, a word processing program
or a Web form) before using the writing pad or soft keyboard.
■ T o adjust writing pad and keyboard settings, click/tap Tools, then click/tap
Options.
■ For security and accuracy when entering masked text (such as passwords),
use your convertible tablet PC Input Panel’s soft keyboard instead of the
writing pad.
www.gateway.com
45
Page 56

Chapter 2: Getting Started
Using speech recognition
The Gateway convertible tablet PC is designed to accept and interpret the
human voice, both for dictation (speech recognition) and for
keyboar d-equival ent voic e command s.
■ Set up speech recognition through your conv ertible tablet PC Input Panel’ s
Tools menu.
■ Learn more about voice commands in the Accessibility section of the Help
and Support Center.
■ Use the built-in microphone or an external microphone.
■ To modify the speech recognition function, see “Adjusting the Tablet PC
Input Panel Settings” on page 191.
46
www.gateway.com
Page 57

Connecting the modem
Your convertible tablet PC has a built-in 56K modem that you can use to
connect to a standard telephone line.
Important To reduce the risk of fire, use only No. 26 AWG or larger
telecommunications line cord.
To connect the modem:
1 Insert one end of the modem cable into the modem jack on the right
side of your convertible tablet PC.
Connecting the modem
2 Insert the oth er end of the modem cable into a telephone wa ll jack. The
modem will not work with digital or PBX telephone lines.
3 Start your convertible tablet PC, then start your communications program.
www.gateway.com
47
Page 58

Chapter 2: Getting Started
Connecting to a wired Ethernet network
Your convertible tablet PC has a network jack that you can use to connect to
a 10/100 wired Ethernet network.
Important Y our conv ertible table t PC may be equipped with a bui lt-in
wireless E thernet e mitter or you may hav e a wireles s
Ethernet PC Card. For information about connecting to a
wired or wireless Ethernet networ k , see “Networking Your
Gateway M275” on page 197. For information about
installing a wireless Ethernet PC Card, see “Adding and
removing a PC Card” on page 252.
To connect to a wired Ethernet network:
1 Insert one end of the network cable into the network jack on the back
of your convertible tablet PC.
48
2 Insert the other end of the network cable into a network jack. Ask your
network administrator to help you select the correct network jack.
www.gateway.com
Page 59

Installing a printer, scanner, or other peri pheral device
Broadband Internet connections
You can use your convertible tablet PC’s Ethernet jack for more than just
networking. Many broadband Internet co nnections, such as c able modems and
DSL modems, connect to your convertible tablet PC’s Ethernet jack. For more
information, see “Using the Internet” on page 79 and “Networking Your
Gateway M275” on page 197.
Installing a printer , scanner , or
other peripheral device
Important Before you install a printer, scanner, or other peripheral
device, see the device documentation and installation
instructions.
Your convertible tablet PC or port replicator has one or more of the following
ports: IEEE 1394 (also known as Firewire
serial, and parallel. You use these ports to connect peripheral devices such as
printers, scanners, and digital cameras to your convertible tablet PC. For more
information about port locations, see “Checking Out Your Gateway M275” on
page 1 and “Using the Gateway M275 Port Replicator” on page 271.
IEEE 1394 and USB ports support plug-and-play and hot-swapping, which means
that your convertible tablet PC will usually recognize such a device whenever
you plug it into the appropriate po rt. When you use an IEEE 1394 or USB device
for the first time, your convertible tablet PC will prompt you to install any
software the device needs. After doing this, you can disconnect and reconnect
the device at any time .
Parallel and serial por t devices are not plug-an d-play. See the device
documentation for detailed information and installation instructions.
Help and
Support
For more information about installing peripheral devices,
click/tap Start, then click/tap Help and Support.
Type the keyword installing devices in the Search box
®
or i.Link®), Universal Serial Bus (USB),
, then click/tap the arrow.
www.gateway.com
49
Page 60

Chapter 2: Getting Started
50
www.gateway.com
Page 61

Getting Help
This chapter tells you about additional information
resources available to help you use your convertible
tablet PC. Read this chap ter to learn how to access:
■ Help and Support
■ Do More With Gateway
■ Online help
■ Gateway Web site
3
51
Page 62

Chapter 3: Getting Help
Help and Support
Your convertible tablet PC includes Help and Support, an easi ly accessible
collection of help information, troubleshooters, instructional videos, and
automated support. Use Help and Suppor t to answer questions about W i ndows.
To start Help and Support:
■ Click/Tap Start, then click/tap Help and Support. Help and Support opens.
You can find help information by clicking/tapping a l ink, p erf ormi ng a se a r c h,
or browsing the index.
Searching for a topic
To search for a topic in Help and Support, type a word or phrase (keyword) in
Search box located at the top of any Help an d Support screen, then click/tap
the
the arrow button.
For each search, you receive the following search result types:
■ Suggested Topics - These topics are located in Help and Support and are
relevant to your search topic.
■ Full-text Search Matches - These topics are located in Help and Support
and contain the words you entered in the
■ Microsoft Knowledge Base - These topics are located on the Microsoft Web
site and contain the words you entered in the
connected to the Internet to search for and access these topics.
To view a list of your search results, click/tap the results header for the type of
results you want to view.
To view a topic, click/tap the topic name in the
52
www.gateway.com
Search box.
Search box. You must be
Search Results list.
Page 63

Do More With Gateway
Do More With Gateway
Your convertible tablet PC may include Do Mor e With Gateway, a tool that
provides additional information about using your Gateway convertible
tablet PC for digital music, digital photography, digital video, gaming, and
other programs. To access Do More With Gateway , click/tap
Do More With Gateway. Click/Tap the topics listed on the left-side of the page to
learn more about the software already installed on your convertible tablet PC
as well as partnerships and special offers available through Gateway.
Start, then click/tap
www.gateway.com
53
Page 64

Chapter 3: Getting Help
Online help
Many programs provide information online so you can research a topic or learn
how to perform a task while you are using the program. You can access most
online help information by selecting a topic from a
clicking/tapping a
You can search for information by viewing the help contents, checking the
index, searching for a topic or keyword, or browsing through the online help.
Help menu or by
Help button.
54
www.gateway.com
Page 65

Gateway Web site
Gateway’s online support is available 24 hours per day, 7 days per week and
provides the most current drivers, product specifications, tutorials, and
personalized information about your convertible tablet PC. Visit the Gateway
eSupport Web site at support.gateway.com
connecting to the Internet, see “Using the Internet” on page 79.
. For more information about
Gateway Web site
Using eSupport
The eSupport site is divided into five major areas:
■ Support Home
■ Downloads
■ Contact Us
■ Account Info
■ PC Tools
Each of these areas is represented by a menu across the top of the Web page.
www.gateway.com
55
Page 66

Chapter 3: Getting Help
Support Home
To get specific information about your convertible tablet PC, type your serial
number into the My Support box, then click/tap
my serial number for me
on page 12.
Continue, or click/tap Look up
. For more information, see “Finding your specifications”
Click/Tap
documentation, specifications, and guides. By entering your serial number, you
get specific documents related to your convertible tablet PC. You can also
browse through the reference area to locate an article specific to the question
you have.
Click/Tap
library of how-to articles and videos on topics such as making audio CDs and
installing a hard drive.
Support Home, then click/tap All Support Documents to access product
Support Home, then click/tap General Tutorials to access an extensive
Downloads
Click/Tap Downloads, then click/tap My Downloads to get the latest software
updates for BIOS and driver upgrades. By entering your serial number you get
drivers specific to your convertible tablet PC. Click/Tap
through a step-by-step wizard to locate your drivers.
All Downloads to walk
Contact Us
Click/Tap Contact Us to access links to technical support with a live technician,
including chat and e-mail. Click/Tap
numbers for both sales and support. For more information, see “Telephone
numbers” on page 305.
Call Us to get a list of Gateway telephone
Account Info
Click/Tap Account Info to access support for non-technical issues, like the status
of your order or changing your a ccount address.
PC T ools
Click/Tap PC Tools to access utilities to help you manage your convertible
tablet PC.
56
www.gateway.com
Page 67

Windows Basics
Read this chapter to learn how to:
■ Use the Windows desktop
■ Manage files and folders
■ Wo r k w i t h d ocu m e n ts
■ Use shortcuts
4
57
Page 68

Chapter 4: Windows Bas ics
About Windows XP tablet PC
Edition
The Microsoft Windows XP tablet PC Edition operating system is a fully
functioning version of Windows XP Professional with added pen-based
computing features:
■ Tablet and Pen Setting s — set properties for the pen, tablet buttons, and
display screen
■ tablet PC Input Panel (TIP) — use its writing pad, soft keyboard, and voice
recognition for entering data
■ Windows® Journal — hand-write documents, then turn them into text or
image files
■ Sticky Notes — make a quick note with your pen or voice and drop it into
another program
■ Document annotation — insert handwritten notes into Word documents
and other programs
■ Enhanced speech and voice recognition — say what you are thinking, and your
tablet will understand
■ Inkball — practice and master pen input with this game of strategy
■ MicroSoft OneNote — capture, organize, and reuse your notes on notebook
computers, desktop computers, or Tablet PCs.
The Wh at’s New in Wi ndows XP link in the Help and Support Center and the
Windows XP Start Here booklet that shipped with your convertible tablet PC can
help you learn more about using Windows XP tablet PC Edition.
58
www.gateway.com
Page 69

About the Windows environment
About the Windows environment
After your convertible tablet PC starts, the first screen you see is the Windows
desktop. The desktop is like the top of a real desk. Think of the desktop as your
personalized work space where you open pro grams and perform other tasks.
Your desktop may be different from this example, depending on how your
convertible tablet PC is set up.
Help and
Support
For more information about the Windows XP desktop,
click/tap Start, then click/tap Help and Support.
Type the keyword Windows desktop in the Search box
, then click/tap the arrow.
www.gateway.com
59
Page 70

Chapter 4: Windows Bas ics
Using the desktop
The desktop contains the taskbar, the Start button, and the Recycle Bin icon.
Desktop elements Description
The taskbar is the bar at the bottom of the computer display containing the
Start button on the left and a clock o n the right. Oth er buttons on th e taskbar
represent programs that are running.
Click/Tap a program’s button on the taskbar to open the program’s window.
The Start button provides access to programs, files, help for Windows and
other programs, and computer tools and utilities.
Click/Tap the Start button, then open a file or program by clicking/tapping
an item on the menu that opens.
The Recycl e Bin is where files, folders, and programs that you discarded
are stored. Y ou must empt y the Recycle Bin to permanen tly delete them from
your convertible tablet PC. For instructions on how to use the Recycle Bin,
see “Deleting files and folders” on page 68.
Using the Start menu
You can st art prog rams, ope n file s, cust omize your system, get help, search for
files and folders, and more using the Start menu.
To use the Start menu:
1 Click/Tap the Start button on the lower left of the Windows desktop. The
Start menu opens showing you the first level of menu items.
2 Click/Tap All Programs to see all programs and files in the Start menu.
When you move the mouse pointer over any menu item that has an arrow
next to it, another menu, called a submenu, opens and reveals related files,
programs, or commands.
60
www.gateway.com
Page 71

3 Cli ck/Tap a file or pro gram to ope n it.
Using the desktop
Help and
Support
For more information about the Windows XP Start menu,
click/tap Start, then click/tap Help and Support.
Type the keyword Windows Start menu in the Search
box , then click/tap the arrow.
Adding icons to the desktop
You may want to add an icon (shortcut) to the desktop for a program that you
use frequently.
To add icons to the des ktop:
1 Click/Tap Start, then click/tap All Programs.
www.gateway.com
61
Page 72

Chapter 4: Windows Bas ics
2 Right-click (press the right touchpad button) the program that you want
to add to the desktop.
-ORButton-tap (press the pen button) the program that you want to add to
the desktop.
3 Click/Tap Send To, then click/tap Desktop (create shortcut). A shortcut icon
for that program appears on the desktop.
Help and
Support
For more information about des ktop ic ons, cli ck/tap Start,
then click/tap Help and Support.
Type the keyword desktop icons in the Search box
, then click/tap the arrow.
Identifying window items
When you double-click/double-tap the icon for a drive, folder , file, or program,
a window opens on the desktop. This example shows the Local Disk (C: )
window , which opens after you double-click/double- tap the
in the My Computer window.
Titl e ba r
Menu bar
Local Disk (C:) icon
Close
Maximize
Minimize
62
www.gateway.com
Page 73

Identifying window ite ms
Every program window looks a little different because each has its own menus,
icons, and controls. Most windows include these items:
Window item Description
The title bar is the horizontal bar at the top
of a window that shows the window title.
Clicking/T app ing the minimize butt on reduces
the active windo w to a but ton on the taskbar.
Clicking/Tapping the program button in the
taskbar opens the window again.
Clicking/Tapping the maximize button
expands the active window to fit the entire
computer display. Clicking/Tapping the
maximize button again restores the window
to its former si ze.
Clicking/Tapping the close button cl ose s th e
active window or program.
Clicking/Tapping an item on the menu bar
starts an action such as Print or Save.
Help and
Support
For more information about windows, click/tap Start, then
click/tap Help and Support.
Type the keyword window in the Search box
, then click/tap the arrow.
www.gateway.com
63
Page 74

Chapter 4: Windows Bas ics
Working with files and folders
You ca n organize your files and pr ograms to suit your preferen ces much like
you would store information in a file cabinet. Y ou can store these files in folders
and copy, move, and delete the information just as you would reorganize and
throw away information in a file cabinet.
Viewing drives
Drives are like file cabinets because they hold files and folders. A convertible
tablet PC almost always has more than one drive. Each drive has a letter , usually
Local Disk (C:) for the hard drive and 3½ F loppy ( A:) for the optional diskette
drive. You will also have more drives such as a DVD or DVD/CD-RW drive.
To view the drives on your convertible tablet PC:
■ Click/Tap Start, then click/tap My Computer on the Start menu.
64
Drives
www.gateway.com
Page 75

Working with files and folders
To see the files and folders on a drive:
■ Double-click/Double-tap the drive icon. If you do not see the c ontents of
a drive after you double-click/double-tap its icon, click/tap
contents of this drive
.
Show the
Help and
Support
For more information about files and folders, click/tap
Start, then click/tap Help and Support.
Type the keyword files and folders in the Search box
, then click/tap the arrow.
Creating folders
Folders are much like the folders in a file cabinet. They can contain files and
other folders.
Files are much like paper documents—letters, spreadsheets, and pictures—that
you keep on your convertible tablet PC. In fact, all information on a convertible
tablet PC is stored in files.
Folders
Files
www.gateway.com
65
Page 76

Chapter 4: Windows Bas ics
To create a folder:
1 Click/Tap Start, then click/tap My Computer on the Start menu.
2 Double-click/Double-tap the drive where you want to put the new folder.
Typically, Local Disk (C:) is your hard drive and 3½ Floppy(A:) is your
optional diskette drive. If you do not see the contents of the drive, click/tap
Show the contents of this drive.
3 If you want to create a new folder inside an existing folder,
double-click/double-tap the existing folder. If you do not see the contents
of the folder, click/tap
of this folder
4 Click/Tap File, New, then click/tap Folder. The new folder is created.
5 Type a name for the folder, then press ENTER. The new folder name appears
by the folder icon.
Show the contents of this drive or Show the contents
.
Help and
Support
For information about renaming folders, see “Keyboard shortcuts” on page 78 .
For more information about creating files and folders,
click/tap Start, then click/tap Help and Support.
Type the keyword creating files and folders in the
Search box , then click/tap the
arrow.
Copying and moving files and folders
The skills you need to copy and move files are called copying, cutting, and pasting.
When you copy and paste a file or folder, you place a copy of the file or folder
on the Windows clipboard, which temporarily stores it. Then, when you decide
what folder you want the copy to go in (the destination folder), you paste it there.
When you cut and paste a file or folder, you remove the file or folder from its
original location and place the file or folder on the Windows clipboard. When
you decide where you want the file or folder to go, you paste it there.
66
www.gateway.com
Page 77

Working with files and folders
Important The clipbo ard store s whatever you cut o r copy unti l you
cut or copy again. Then the clipboard contains the new
information only. Therefore, you can paste copies of a file
or folder into more than one place, but as soon as you co py
or cut a different file or folder, the original file or folder is
deleted from the clipboard.
To copy a file or folder to another folder:
1 Locate the file or folder you want to copy. For more information, see
“Viewing drives” on page 64 and “Searching for files” on page 71 .
2 Right-click (press the right touchpad button) the file or folder that you
want to copy. A pop-up menu opens on the desktop.
-ORButton-tap (press the pen button) the file or folder that you want to copy.
A pop-up menu opens on the desktop.
3 Click/Tap Copy on the pop-up menu.
4 Open the destination folder.
5 With the pointer inside the destination folder, right-click/button-tap.
6 Click/Tap Paste. A copy of the file or folder appears in the new location.
To move a file or folder to another folder:
1 Locate the file or folder you want to move. For more information, see
“Viewing drives” on page 64 and “Searching for files” on page 71 .
2 Right-click (press the right touchpad button) the file or folder that you
want to move. A pop-up menu opens on the desktop.
-ORButton-tap (press the pen button) the file or folder that you want to mo ve.
A pop-up menu opens on the desktop.
3 Click/Tap Cut on the pop-up menu.
4 Open the destination folder.
www.gateway.com
67
Page 78

Chapter 4: Windows Bas ics
5 With the pointer inside the destination folder, right-click/button-tap.
6 Click/Tap Paste. The file or folder you moved appears in its new location
and is removed from its old location.
Help and
Support
For more information about copying files and folders or
moving files and folders, click/tap Start, then click/ta p Help
and Support.
Type the keyword copying files and folders or moving
files and folders in the Search box
, then click/tap the arrow.
Deleting files and folders
When you throw away paper files and folders, you take them from the file
cabinet and put them in a trash can. Eventually the trash can is emptied.
In Windows, you throw away files and folders by first moving them to the
Windows trash can, called the Recycle Bin, where they remain until you decide
to empty the bin.
You can recover any file in the Recycle Bin as long as the bin has not been
emptied.
To delete files or folders:
1 In My Computer or Windows Explorer, click/tap the files or folders that
you want to delete. For instructions on how to select multiple files and
folders, see “Keyboard shortcuts” on page 78.
68
If you cannot find the file you want to delete, see “Searching for files” on
page 71.
2 Click/Tap File, then click/tap Delete. Windows moves the files and folders
to the Recycle Bin.
www.gateway.com
Page 79

Working with files and folders
Help and
Support
For more information about deleting files and folders,
click/tap Start, then click/tap Help and Support.
Type the keyword deleting file s and folders in the
Search box , then click/tap the
arrow.
To recov er files or folders from the Recycle Bin:
1 Double-click/Double-tap the Recycle Bin icon. The Recycle Bin window
opens and lists the files and folders you have thrown away since you last
emptied it.
2 Click/Tap the files or folders that you want to restore. For instructions on
how to select multiple files and folders, see “Keyboard shortcuts” on
page 78.
3 Click/Tap File, then click/tap Restore. Wi ndows returns the deleted files or
folders to their original locations.
To empty the Recycle Bin:
Caution Emptying the Recycle Bin permanently erases any files or
folders in the bin. These files cannot be restored.
1 Double-click/Double-tap the Recycle Bin icon on the desktop. The Recycle
Bin window opens.
2 Click/Tap File, then click/tap Empty Recycle Bin. Windows asks you if you
are sure that you want to empty the bin.
3 Click/Tap Yes. Windows permanently deletes all files in the Recycle Bin.
Help and
Support
For more information about emptying the Recycle Bin,
click/tap Start, then click/tap Help and Support.
Type the keyword emptying Recycle Bin in the Search
box , then click/tap the arrow.
www.gateway.com
69
Page 80

Chapter 4: Windows Bas ics
Browsing for files and folders
A file or folder that you need is rarely right on top of your Windows desktop.
It is usually on a drive inside a folder that may be inside yet another folder,
and so on.
Windows drives, folders, and files are organized in the same way as a real file
cabinet in that they may have many levels (usually many more levels than a
file cabinet, in fact). So you usually will have to search th rough levels of folders
to find the file or folder that you need. This is called browsing.
To browse for a file:
1 Click/Tap Start, then click/tap My Computer. The My Computer window
opens.
2 Double-click/Double-tap the drive or folder that you think contains the
file or folder that you want to find. If you do not see the contents of a
folder, click/tap
folder
.
Show the contents of this drive or Show the contents of this
70
www.gateway.com
Page 81

Searching for files
3 Continue double-clicking/double-tapping folders and their subfo lders until
you find the file or folder you want.
Help and
Support
For more information about browsing for files and folders,
click/tap Start, then click/tap Help and Support.
Type the keyword files and folders in the Search box
, then click/tap the arrow.
Searching for files
If you are looking for a particular file or folder or a set of files or folders that
have characteristics in common, but you do not remember where they are
stored on your hard drive, you can use the Search utility to search by:
■ Name or part of a name
■ Creation date
■ Modification date
■ File type
■ Text contained in the file
■ Time period in which it was created or modified
You can also combine sea rch criteria to refine s earches.
Files and folders found using this utility can be opened, copied, cut, renamed,
or deleted directly from the list in the results window.
www.gateway.com
71
Page 82

Chapter 4: Windows Bas ics
Using the Windows Search utility
To find files and folders using the Search utility:
1 Click/Tap Start, then click/tap Search. The Search Results window opens.
Click/Tap
All files and folders.
72
2 If you want to search by file or folder name, type in all or part of the file
or folder name in the name box in the left pane of the window.
■ If you type all of the name, Search will list all files and folders of that
name.
■ If you type part of the name, Search will list all of the file and folder
names containing the letters you typed.
www.gateway.com
Page 83

Searching for files
3 Click/Tap Search. When the search is completed, Windows lists the files
and folders whose names contain the text that you searched for.
4 Open a file, folder, or program by double-clicking/double-tapping the
name in the list.
Help and
Support
For more information abo ut search ing for fil es and fol ders,
click/tap Start, then click/tap Help and Support.
Type the keyword searching in the Search box
, then click/tap the arrow.
Using advanced search opt ions
Search can find files meeting more criteria than file name. You can narrow your
search by selecting the search options that you want. You can search by the:
■ Date the file was created or modified.
■ Size of the file.
■ Type of file, such as a program or a text document.
www.gateway.com
73
Page 84

Chapter 4: Windows Bas ics
Working with documents
Computer documents include word processing files, spreadsheet files, or other
similar files. The basic methods of creating, saving, opening, and printing a
document apply to most of these types of files.
The following examples show how to create, save, open, and print a document
using Microsoft
as WordPerfect, Microsoft Word, and Microsoft Excel.
For more information about using a program, click/tap
®
WordPad. Similar procedures apply to o ther programs such
Help on its menu bar.
Creating a new document
To create a new doc ument:
1 Click/Tap Start, All Programs, Accessories, then click/tap WordPad. Microsoft
WordPad starts and a blank document opens.
74
2 Begin co mposing your document . Use the menus and t oolbar buttons at
the top of the window to format the document.
www.gateway.com
Page 85

Working with documents
Saving a document
After you create a document, you need to save it if you want to use it later.
To save a document:
1 Click/Tap File, then click/tap Save. The Save As dialog box opens.
Save in
list
File
name
2 Click/Tap the arrow button to open t he Save in list, then click/tap t he folder
where you want to save the file. If you do not see the folder you want,
browse through the folders listed below the Save in list.
3 Type a new file name in the File name box.
4 Click/Tap Save.
Help and
Support
For more information about saving documents, click/tap
Start, then click/tap Help and Support.
Type the keyword saving in the Search box
, then click/tap the arrow.
www.gateway.com
75
Page 86

Chapter 4: Windows Bas ics
Opening a document
To view, revise, or print an existing document, first you need to open it. Open
the document in the program that it was created in.
To open a document:
1 Start the program.
2 Click/Tap File, then click/tap Open.
3 Click/Tap the arrow button to open the Look in list, then click/tap the folder
you want to open. If you do not see the folder you want, browse through
the folders listed below the Look in list.
Look in
list
76
4 Double-click/Double-tap the document file name. The document opens.
Help and
Support
For more information about opening documents, click/tap
Start, then click/tap Help and Support.
Type the keyword opening files in the Search box
, then click/tap the arrow.
www.gateway.com
Page 87

Working with documents
Printing a document
To print a document, you must have a printer connected to your convertible
tablet PC or have access to a network printer. For more information about
installing or using your printer, see the printer documentation.
To print a document:
1 Make sure that the printer is turned on and loaded with paper.
2 Start the program and open the document.
3 Click/Tap File, then click/tap Print. The Print dialog box opens.
4 Set the print options, then click/tap OK. The document prints.
Help and
Support
For more information about printing documents, click/tap
Start, then click/tap Help and Support.
Type the keyword printing in the Search box
, then click/tap the arrow.
www.gateway.com
77
Page 88

Chapter 4: Windows Bas ics
Keyboard shortcuts
The following table shows a few shortcuts that you can use in Windows and
almost all programs that run in Windows. For more information about
shortcuts, see your Windows or program documentation.
To ... Do this...
Copy a file, folder, text, or graphic Click the item, then press CTRL + C.
Cut a file, folder, text, or graphic Click the item, then press
Paste a file, folder, text, or graphic Click inside the folder or window where you want to paste
the object, then press
Select multiple items in a list or window Click the first item, press and hold down the
then click each of the remaining items.
Select multiple adja cen t item s in a lis t
or window
Permanently delete a file or folder Click the file or folder, then press
Rename a file or folder Click the file or folder, press F2, type the new name, then
Close the active window or program Press
Switch to a differe nt file, fo lder, or
running pro gram
Help and
Support
For more information abou t Wi ndo w s key boa rd s hort cut s,
click/tap Start, then click/tap Help and Support.
Type the keyword Windows keyboard shortcuts in the
Search box , then click/tap the
arrow.
Click the first item in the list, press and hold down the
SHIFT key, then click the last item in the list.
file or folder is permanently deleted. The file or folder is
not stored in the Recycle Bin.
press
ENTER.
ALT + F4.
ALT +TAB.
Press
CTRL + X.
CTRL + V.
CTRL key,
SHIFT + DELETE. The
78
www.gateway.com
Page 89

Using the
Internet
This chapter provides information about the Internet and
the Wor ld Wide Web. Read this chapter to learn how to:
5
■ Set up and access an Internet account using
America Online
■
Connect to a Web site using a browser
■ Download files from the Internet
■ Send and receive e-mail using America Online
®
79
Page 90

Chapter 5: Using the Inter net
Learning about the Internet
The Internet is a worldwide network of computers linked together to provide
information to people everywhere. The two most popular services on the
Internet are e-mail and the World Wide Web. You can access this network by
connecting your convertible tablet PC to a telephone, DSL (Digital Subscriber
Line), or cable line and signing up with an Internet service provider (ISP).
Cable and DSL modems, a connection known as broadband, use your TV cable
or special telephone lines to connect to your ISP and access the Internet. Cable
and DSL modems connect to your convertible tablet PC through an Ethernet
jack and provide a faster conn ection sp eed tha n a sta ndard teleph one modem .
Important For the location of your modem and Ethernet jacks, see
“Right Side” on page 5, “Back” on page 6, and “Back” on
page 274.
Internet Servers
store information so other
computers can access it
from the Internet.
Your computer
connects to the
Internet through
an ISP.
80
ISP Servers
let you connect to
the Internet and
access your e-m ail
messages.
www.gateway.com
Page 91

Setting up an Internet acc ount
If you want to access the Internet you need:
■ A modem – a device that connects your convertible tablet PC to other
computers or servers using a telephone, DSL, or cable line.
■ An I nternet service provider – a company that provides access to the
Internet through an ISP server. When you connect to an ISP, th e ISP server
lets you access the Internet and yo ur e-mail messages.
■ A Web browser – a program that displays information from the World
Wide Web .
■ An e-mail program – a program that lets you create, send, and receive
e-mail messages over the Internet.
Setting up an Internet account
Before you can view the information on the World Wide Web, you need to
set up an Internet account with an Internet service provider (ISP). If you have
chosen America Online as an ISP, follow these instructions to set up and
connect to your account. To set up a different ISP service or to transfer an
existing account to this convertible tablet PC, contact the ISP directly.
If you set up an account with America Online, an Internet e-mail address is
created for you. After completing the setup, you are ready to access the Internet.
To set up an Internet acc ount with America Online:
1 Click/Tap Start, All Programs, then click/tap America Online.
2 Follow the on-screen instructions. After setting up your account, you can
connect to the Internet and access your e-mail services.
www.gateway.com
81
Page 92

Chapter 5: Using the Inter net
Accessing your Internet account
To connect to y our America Online Internet account:
1 Click/Tap Start, All Programs, then click/tap America Online.
2 Complete the member name and password information, then click/tap
Connect. Your convertible tablet PC dials the Internet account telephone
number. After co nnecting, the Welcome window op ens.
If you are using a service other than America Online, chec k with your ISP for
the correct procedure for conn ecting.
To disconnect from your America Online Internet account:
■ Click/Tap X in the top-right corner of the America Online window. Your
convertible tablet PC disconnects from the Internet.
Important Make sure that your convertible tablet PC disconnects
correctly from your Interne t acc ount. I f you d o not have a n
“unlimited hours” I SP account, you may have to pay for the
time that you are connected, even if you are not at your
convertible tablet PC.
If you are using a service other than America Online, chec k with your ISP for
the correct procedure for disconnecting.
Help and
Support
82
For general information about using Internet accounts,
click/tap Start, then click/tap Help and Support.
Type the keyword ISP in the Search box
, then click/tap the arrow.
www.gateway.com
Page 93

Using the World Wide Web
Using the World Wide Web
The Wo rld Wide Web is a multimedia window to the Internet that gives you
access to millions of information sources.
Information on the Web comes to you on We b pag e s , w hich are electron ic
documents that you view us ing a Web page display program called a browser.
You can use any of the commercially available Web browsers, like Microsoft
Internet Explorer (which comes installed on your new convertible tablet PC),
Netscape Navigator, or the browser built into America Online.
W eb page s can c ontain text , animat ions, mus ic, an d other multimedia featur es.
A group of related Web pages is called a Web site. You can access Web sites to
shop, track investments, read the news, dow nload programs, and much mo re.
You can explore a Web site or visit other Web sites by clicking/tapping areas
on a Web page called links or hype rlinks. A link may be c olored or underlined
text, a picture, or an animated ima ge. You can identify a link by movi ng the
mouse pointer over it. If the pointer changes to a hand, the item is a link.
To learn more about using the Web browser, click/tap
Link
Web
page
Linked Web
page
Help in the menu bar.
www.gateway.com
83
Page 94

Chapter 5: Using the Inter net
Connecting to a Web site
After you set up an account with an Internet service provider (ISP) such as
America Online, you can access the many information sources on the World
Wide Web .
To connect to a Web site:
1 Connect to your Internet account. After your convertible tablet PC
connects, a default opening pa ge or welcome screen opens.
2 To go to a different Web site, type the address (called a URL for “Universal
Resource Locator”) in the browser address bar (for example
www.gateway.com), then click/tap
- OR On the current Web page, click/tap a link to a Web site.
The Web browser locates the server computer on the Internet, downloads
(transfers) data to your convertible tablet PC, and displays the page on the
site that you requested.
GO on the browser address bar.
Help and
Support
Sometimes Web pages display slowly. The speed that a We b page displays on
your screen depends on the complexity of the Web page and other Internet
conditions. Additionally , the speed of your connection will determine how fast
We b pages display.
84
For more information about connecting to a Web site,
click/tap Start, then click/tap Help and Support.
Type t he keyword connecting to Web site in the Search
box , then click/tap the arrow.
www.gateway.com
Page 95

Using the World Wide Web
Downloading files
Downloading is the process of transferring files from a computer on the Internet
to your convertible tablet PC.
To protect your convertible tablet PC against viruses, make sure that you scan
the files you download. For more information, see “Protecting your convertible
tablet PC from viruses” on page 226 .
To download files or programs from a Web site:
1 Connect to your Internet account.
2 In the address bar, type the address of the Web site that contains the file
or program you want to download, then click/tap
address bar.
- OR Click/Tap a link on a Web page to navigate to the Web site containing the
file that you want to download.
3 Create or locate th e folder where you want to store the file on your
convertible tablet PC. For more information, see “Working with
documents” on pa ge 74.
GO on the browser
4 Click/Tap the link on the Web page for the file that you want to download.
5 Follow the on-screen instructions for saving the file in the folder that you
want. A copy of the file is downloaded to your convertible tablet PC. The
time that it takes to transfer the file to your convertible tab let PC depends
on file size and Internet conditions.
6 Open the folder that yo u created.
7 Install or view the downloa ded file by dou ble-clicking/double-tapping it.
If applicable, follow the instructions provided on the Web site to run or
install the program.
Help and
Support
For more information about downloading files, click/tap
Start, then click/tap Help and Support.
Type the keyword downloading files in the Search box
, then click/tap the arrow.
www.gateway.com
85
Page 96

Chapter 5: Using the Inter net
Using e-mail
E-mail (electronic mail) lets you send messages to anyone who has an Internet
connection and e-mail address. E-mail is usually a free service of your Internet
account.
The Internet never closes, so you can send e-mail messages at any time. Your
e-mail messages arrive at most e-mail addresses in minutes.
An e-mail address co nsists of a user name, the @ symbol, and the Internet domain
name of the Internet service provider (ISP) or company that “hosts” that user.
Your e-mail address is assigned when you sign up for an account with an ISP.
For example, a person with an account with America Online might have an
e-mail address that is similar to this one:
jdoe@aol.com
User name I nternet do main name
Sending e-mail
To send e-mail using America Online:
1 Connect to your America Online account.
2 Click/Tap Write.
3 Type the e-mail address of the recipi ent you want to send e-mail to in the
Send To box.
4 Type the subject of your e-mail in the Subject box.
5 Type the e-mail message.
6 When finish ed, click/tap Send Now. Your e-mail is sent over the Internet
to the e-mail address you specified.
86
www.gateway.com
Page 97

Checking your e-mail
To check your e-mail using America Online:
1 Connect to your America Online account.
2 Click/Tap Read.
3 Double-click/Double-tap the message you want to read.
For more information about managing and organizing your e-mail messages,
see the online help in your e-mail program.
Using e-mail
Help and
Support
For general information about us ing e-mail, click/tap Start,
then click/tap Help and Support.
Type the keyword e-mail in the Search box
, then click/tap the arrow.
www.gateway.com
87
Page 98

Chapter 5: Using the Inter net
88
www.gateway.com
Page 99

Sending and
Receiving Faxes
Microsoft Fax lets you send and receive faxes using the
modem. Read this chapt er to learn how to:
■ Install and configure Fax
■ Create and se nd a new fax
■ Set up a fax cover page template
■ Fax a document you scanne d or created in another
program
■ Receive, view, and print a fax
6
Help and
Support
For more information about sending and
receiving fa xes, click /tap Start, then
click/tap Help and Support.
Type the keyword Fax in the Search box
, then click/tap the
arrow.
89
Page 100

Chapter 6: Sending and Rec eiving Faxes
Installing and configuring Fax
Important Your modem cable must be installed before you ca n se nd
and receive faxes. You cannot use your standard
telephone modem to connec t to the Inte rnet while sending
and receiving faxes.
Installing Fax
Microsoft Fax lets you send and receive faxes using your modem. When
Windows XP was originally installed on your convertible tablet PC, Fax was not
installed. You need to install Fax from your Gate way Windows XP Pro Tablet PC
DVD.
To install Fax:
1 Insert the Gateway Windows XP Pro Tablet PC DVD in your DVD or
DVD/CD-RW drive.
90
2 If the Welcome to Microsoft Windows XP dialog box opens, click/tap Install
optional Windows components
-ORIf the W elcome to Micr osoft W indows XP dialog box does not open, click/tap
Start, then click/tap Control Panel. The Control Panel window opens.
Click/Double-click/Tap/Double-tap
Remove Programs dialog box opens. Click/Tap
Components
. The Windows Components Wizard opens.
. The Windows Components Wizard opens.
Add and Remove Programs. The Add or
Add/Remove Windows
3 Click/Tap Fax Services, then click/tap Next.
4 Click/Tap Finish to exit the Windows Components Wizard.
5 Click/Tap Exit to close the Welcome to Microsoft Windows XP dialog box.
-ORClick/Tap
Close to close the Add or Remove Programs dialog box.
www.gateway.com
 Loading...