

Page 1

GATEWAY COMPUTER
USERGUIDE
®
Page 2

Page 3

Contents
Chapter 1: Getting Help . . . . . . . . . . . . . . . . . . . . . . . . . . . . . . . . . . . . . . . . . . 1
Thank you for purchasing our computer! . . . . . . . . . . . . . . . . . . . . . . . . . . . . . . . . . . . . 2
Using the Gateway Web site . . . . . . . . . . . . . . . . . . . . . . . . . . . . . . . . . . . . . . . . . . . . . . . . 2
Using Help and Support . . . . . . . . . . . . . . . . . . . . . . . . . . . . . . . . . . . . . . . . . . . . . . . . . . . . 2
Contacting Gateway . . . . . . . . . . . . . . . . . . . . . . . . . . . . . . . . . . . . . . . . . . . . . . . . . . . . . . . . 3
Getting help for Windows Media Center . . . . . . . . . . . . . . . . . . . . . . . . . . . . . . . . . . . . . . 3
Using online help . . . . . . . . . . . . . . . . . . . . . . . . . . . . . . . . . . . . . . . . . . . . . . . . . . . . . . . . . . 3
Chapter 2: Using Windows . . . . . . . . . . . . . . . . . . . . . . . . . . . . . . . . . . . . . . . . 5
Using the Windows desktop . . . . . . . . . . . . . . . . . . . . . . . . . . . . . . . . . . . . . . . . . . . . . . . . 6
Using the Start menu . . . . . . . . . . . . . . . . . . . . . . . . . . . . . . . . . . . . . . . . . . . . . . . . 7
Adding icons to the desktop . . . . . . . . . . . . . . . . . . . . . . . . . . . . . . . . . . . . . . . . . . 8
Identifying window items . . . . . . . . . . . . . . . . . . . . . . . . . . . . . . . . . . . . . . . . . . . . 8
Working with files and folders . . . . . . . . . . . . . . . . . . . . . . . . . . . . . . . . . . . . . . . . . . . . . . 9
Viewing drives . . . . . . . . . . . . . . . . . . . . . . . . . . . . . . . . . . . . . . . . . . . . . . . . . . . . . . 9
Creating folders . . . . . . . . . . . . . . . . . . . . . . . . . . . . . . . . . . . . . . . . . . . . . . . . . . . . 10
Copying and moving files and folders . . . . . . . . . . . . . . . . . . . . . . . . . . . . . . . .10
Deleting files and folders . . . . . . . . . . . . . . . . . . . . . . . . . . . . . . . . . . . . . . . . . . .11
Searching for files . . . . . . . . . . . . . . . . . . . . . . . . . . . . . . . . . . . . . . . . . . . . . . . . . . . . . . . .12
Using the Windows Search . . . . . . . . . . . . . . . . . . . . . . . . . . . . . . . . . . . . . . . . . . 12
Browsing for files and folders . . . . . . . . . . . . . . . . . . . . . . . . . . . . . . . . . . . . . . .13
Working with documents . . . . . . . . . . . . . . . . . . . . . . . . . . . . . . . . . . . . . . . . . . . . . . . . . . 13
Creating a new document . . . . . . . . . . . . . . . . . . . . . . . . . . . . . . . . . . . . . . . . . .14
Saving a document . . . . . . . . . . . . . . . . . . . . . . . . . . . . . . . . . . . . . . . . . . . . . . . . . 14
Opening a document . . . . . . . . . . . . . . . . . . . . . . . . . . . . . . . . . . . . . . . . . . . . . . . 14
Printing a document . . . . . . . . . . . . . . . . . . . . . . . . . . . . . . . . . . . . . . . . . . . . . . . . 15
Shortcuts . . . . . . . . . . . . . . . . . . . . . . . . . . . . . . . . . . . . . . . . . . . . . . . . . . . . . . . . . . . . . . . . 16
Chapter 3: Using the Internet and Faxing. . . . . . . . . . . . . . . . . . . . . . . . . . . 17
Learning about the Internet . . . . . . . . . . . . . . . . . . . . . . . . . . . . . . . . . . . . . . . . . . . . . . . . 18
Setting up an Internet account . . . . . . . . . . . . . . . . . . . . . . . . . . . . . . . . . . . . . . . . . . . . .18
Accessing your Internet account . . . . . . . . . . . . . . . . . . . . . . . . . . . . . . . . . . . . . 19
Using the World Wide Web . . . . . . . . . . . . . . . . . . . . . . . . . . . . . . . . . . . . . . . . . . . . . . . . .19
Connecting to a Web site . . . . . . . . . . . . . . . . . . . . . . . . . . . . . . . . . . . . . . . . . . . .19
Downloading files . . . . . . . . . . . . . . . . . . . . . . . . . . . . . . . . . . . . . . . . . . . . . . . . . .20
Using e-mail . . . . . . . . . . . . . . . . . . . . . . . . . . . . . . . . . . . . . . . . . . . . . . . . . . . . . . . . . . . . . .20
Sending e-mail . . . . . . . . . . . . . . . . . . . . . . . . . . . . . . . . . . . . . . . . . . . . . . . . . . . . .20
Checking your e-mail . . . . . . . . . . . . . . . . . . . . . . . . . . . . . . . . . . . . . . . . . . . . . . .21
Using Windows Fax and Scan . . . . . . . . . . . . . . . . . . . . . . . . . . . . . . . . . . . . . . . . . . . . . . 21
Sending a fax . . . . . . . . . . . . . . . . . . . . . . . . . . . . . . . . . . . . . . . . . . . . . . . . . . . . . . 21
Faxing a scanned document or from programs . . . . . . . . . . . . . . . . . . . . . . . 25
Canceling a fax . . . . . . . . . . . . . . . . . . . . . . . . . . . . . . . . . . . . . . . . . . . . . . . . . . . .25
Receiving and viewing a fax . . . . . . . . . . . . . . . . . . . . . . . . . . . . . . . . . . . . . . . . 26
Chapter 4: Playing and Creating Media Files . . . . . . . . . . . . . . . . . . . . . . . . 27
Playing music and movies . . . . . . . . . . . . . . . . . . . . . . . . . . . . . . . . . . . . . . . . . . . . . . . . .28
Playing audio and video files . . . . . . . . . . . . . . . . . . . . . . . . . . . . . . . . . . . . . . .28
i
Page 4

Contents
Playing optical discs . . . . . . . . . . . . . . . . . . . . . . . . . . . . . . . . . . . . . . . . . . . . . . . .29
Creating audio files and music li braries . . . . . . . . . . . . . . . . . . . . . . . . . . . . . . . . . . . . . .31
Creating music files . . . . . . . . . . . . . . . . . . . . . . . . . . . . . . . . . . . . . . . . . . . . . . . . .31
Building a music library . . . . . . . . . . . . . . . . . . . . . . . . . . . . . . . . . . . . . . . . . . . . .33
Editing track information . . . . . . . . . . . . . . . . . . . . . . . . . . . . . . . . . . . . . . . . . . . .33
Creating music CDs and video DVDs . . . . . . . . . . . . . . . . . . . . . . . . . . . . . . . . . . . . . . . . .34
Creating a music CD . . . . . . . . . . . . . . . . . . . . . . . . . . . . . . . . . . . . . . . . . . . . . . . .34
Creating a video DVD . . . . . . . . . . . . . . . . . . . . . . . . . . . . . . . . . . . . . . . . . . . . . . .35
Creating and copying data discs . . . . . . . . . . . . . . . . . . . . . . . . . . . . . . . . . . . . . . . . . . . .37
Creating a data disc . . . . . . . . . . . . . . . . . . . . . . . . . . . . . . . . . . . . . . . . . . . . . . . .37
Using Windows Media Center . . . . . . . . . . . . . . . . . . . . . . . . . . . . . . . . . . . . . . . . . . . . . .38
Starting Windows Media Center . . . . . . . . . . . . . . . . . . . . . . . . . . . . . . . . . . . . . .38
Using the Media Center remote control . . . . . . . . . . . . . . . . . . . . . . . . . . . . . . .40
Chapter 5: Networking Your Computer . . . . . . . . . . . . . . . . . . . . . . . . . . . . .41
Introduction to Networking . . . . . . . . . . . . . . . . . . . . . . . . . . . . . . . . . . . . . . . . . . . . . . . .42
Networking terms you should know . . . . . . . . . . . . . . . . . . . . . . . . . . . . . . . . . .42
Ethernet networking . . . . . . . . . . . . . . . . . . . . . . . . . . . . . . . . . . . . . . . . . . . . . . . . . . . . . .42
Wired Ethernet networking . . . . . . . . . . . . . . . . . . . . . . . . . . . . . . . . . . . . . . . . . .42
Wireless Ethernet networking . . . . . . . . . . . . . . . . . . . . . . . . . . . . . . . . . . . . . . . .45
Establishing your Ethernet network connection . . . . . . . . . . . . . . . . . . . . . . . .47
Testing your network . . . . . . . . . . . . . . . . . . . . . . . . . . . . . . . . . . . . . . . . . . . . . . .50
Adding a printer to your network . . . . . . . . . . . . . . . . . . . . . . . . . . . . . . . . . . . .50
Sharing resources . . . . . . . . . . . . . . . . . . . . . . . . . . . . . . . . . . . . . . . . . . . . . . . . . .50
Using the network . . . . . . . . . . . . . . . . . . . . . . . . . . . . . . . . . . . . . . . . . . . . . . . . . .52
Bluetooth networking . . . . . . . . . . . . . . . . . . . . . . . . . . . . . . . . . . . . . . . . . . . . . . . . . . . . .53
Chapter 6: Protecting your computer. . . . . . . . . . . . . . . . . . . . . . . . . . . . . . .55
Hardware security . . . . . . . . . . . . . . . . . . . . . . . . . . . . . . . . . . . . . . . . . . . . . . . . . . . . . . . .56
Kensington lock slot . . . . . . . . . . . . . . . . . . . . . . . . . . . . . . . . . . . . . . . . . . . . . . . .56
Data security . . . . . . . . . . . . . . . . . . . . . . . . . . . . . . . . . . . . . . . . . . . . . . . . . . . . . . . . . . . . .56
Startup and hard drive password . . . . . . . . . . . . . . . . . . . . . . . . . . . . . . . . . . . .56
Windows user accounts . . . . . . . . . . . . . . . . . . . . . . . . . . . . . . . . . . . . . . . . . . . . .56
Protecting your computer from viruses . . . . . . . . . . . . . . . . . . . . . . . . . . . . . . .57
Using Norton Internet Security . . . . . . . . . . . . . . . . . . . . . . . . . . . . . . . . . . . . . . .57
Using Windows Security Center . . . . . . . . . . . . . . . . . . . . . . . . . . . . . . . . . . . . . .59
Security updates . . . . . . . . . . . . . . . . . . . . . . . . . . . . . . . . . . . . . . . . . . . . . . . . . . . . . . . . . .60
Windows Update . . . . . . . . . . . . . . . . . . . . . . . . . . . . . . . . . . . . . . . . . . . . . . . . . . .60
BigFix . . . . . . . . . . . . . . . . . . . . . . . . . . . . . . . . . . . . . . . . . . . . . . . . . . . . . . . . . . . . .61
Chapter 7: Customizing W indows . . . . . . . . . . . . . . . . . . . . . . . . . . . . . . . . . .63
Changing screen settings . . . . . . . . . . . . . . . . . . . . . . . . . . . . . . . . . . . . . . . . . . . . . . . . . .64
Changing color depth and screen resolution . . . . . . . . . . . . . . . . . . . . . . . . . .64
Changing the appearance of windows and backgrounds . . . . . . . . . . . . . . .65
Selecting a screen saver . . . . . . . . . . . . . . . . . . . . . . . . . . . . . . . . . . . . . . . . . . . . .66
Changing gadgets . . . . . . . . . . . . . . . . . . . . . . . . . . . . . . . . . . . . . . . . . . . . . . . . . .67
Setting up multiple monitors . . . . . . . . . . . . . . . . . . . . . . . . . . . . . . . . . . . . . . . .69
ii
Page 5

www.gateway.com
Changing system sounds . . . . . . . . . . . . . . . . . . . . . . . . . . . . . . . . . . . . . . . . . . . . . . . . . .70
Changing mouse settings . . . . . . . . . . . . . . . . . . . . . . . . . . . . . . . . . . . . . . . . . . . . . . . . . . 71
Adding and modifying user accounts . . . . . . . . . . . . . . . . . . . . . . . . . . . . . . . . . . . . . . . 71
Changing power-saving settings . . . . . . . . . . . . . . . . . . . . . . . . . . . . . . . . . . . . . . . . . . . 73
Changing the power plan . . . . . . . . . . . . . . . . . . . . . . . . . . . . . . . . . . . . . . . . . . . 73
Changing accessibility settings . . . . . . . . . . . . . . . . . . . . . . . . . . . . . . . . . . . . . . . . . . . . .74
Using the Ease of Access Center . . . . . . . . . . . . . . . . . . . . . . . . . . . . . . . . . . . . . 75
Using voice recognition . . . . . . . . . . . . . . . . . . . . . . . . . . . . . . . . . . . . . . . . . . . . .76
Setting up parental controls . . . . . . . . . . . . . . . . . . . . . . . . . . . . . . . . . . . . . . . . . . . . . . . 76
Filtering Internet access . . . . . . . . . . . . . . . . . . . . . . . . . . . . . . . . . . . . . . . . . . . .77
Scheduling computer and Internet use . . . . . . . . . . . . . . . . . . . . . . . . . . . . . . .78
Restricting game access . . . . . . . . . . . . . . . . . . . . . . . . . . . . . . . . . . . . . . . . . . . . 78
Restricting specific programs . . . . . . . . . . . . . . . . . . . . . . . . . . . . . . . . . . . . . . . . 80
Creating activity reports . . . . . . . . . . . . . . . . . . . . . . . . . . . . . . . . . . . . . . . . . . . . 80
Notices . . . . . . . . . . . . . . . . . . . . . . . . . . . . . . . . . . . . . . . . . . . . . . . . . . . . . . . . . . . . . . . . . .81
iii
Page 6

Contents
iv
Page 7

CHAPTER 1
• Using the Gateway Web site
• Using Help and Support
• Using online help
Getting Help
1
Page 8
CHAPTER 1: Getting Help
Thank y ou f or purc hasing our computer!
Y ou have made an excellent decision choosing Gat eway. We are sure that you will be pleased with
the outstanding quality, reliability, and performance of your new computer. Each and every
Gateway computer uses the latest technology and passes through the most stringent quality
control tests t o ensure that you are pro vided with the best pr oduct possible . Please read th is manual
carefully to familiarize yourself with your computer’s software features.
Gateway stands behind our value commitment to our customers—to provide best-of-class service
and support in addition to high-quality, brand-name components at affordable prices. If you ever
have a problem, our knowledgeable , dedicated cust omer service department will prov ide you wit h
fast, considerate service.
We sincerely hope that you will receive the utmost satisfaction and enjoyment from your new
Ga teway c om pu te r for ye a rs to co m e.
Thanks again, from all of us at Gateway.
Using t he Gate wa y Web sit e
Gatew a y’ s online support i s a vailable 24 hours a day , 7days a week and pro v ide s t he most c u rr ent
drivers, product specifications, tutorials, and personalized information about your computer. Visit
the Gateway Support Web site at www.gateway.com
.
Using Help and Suppor t
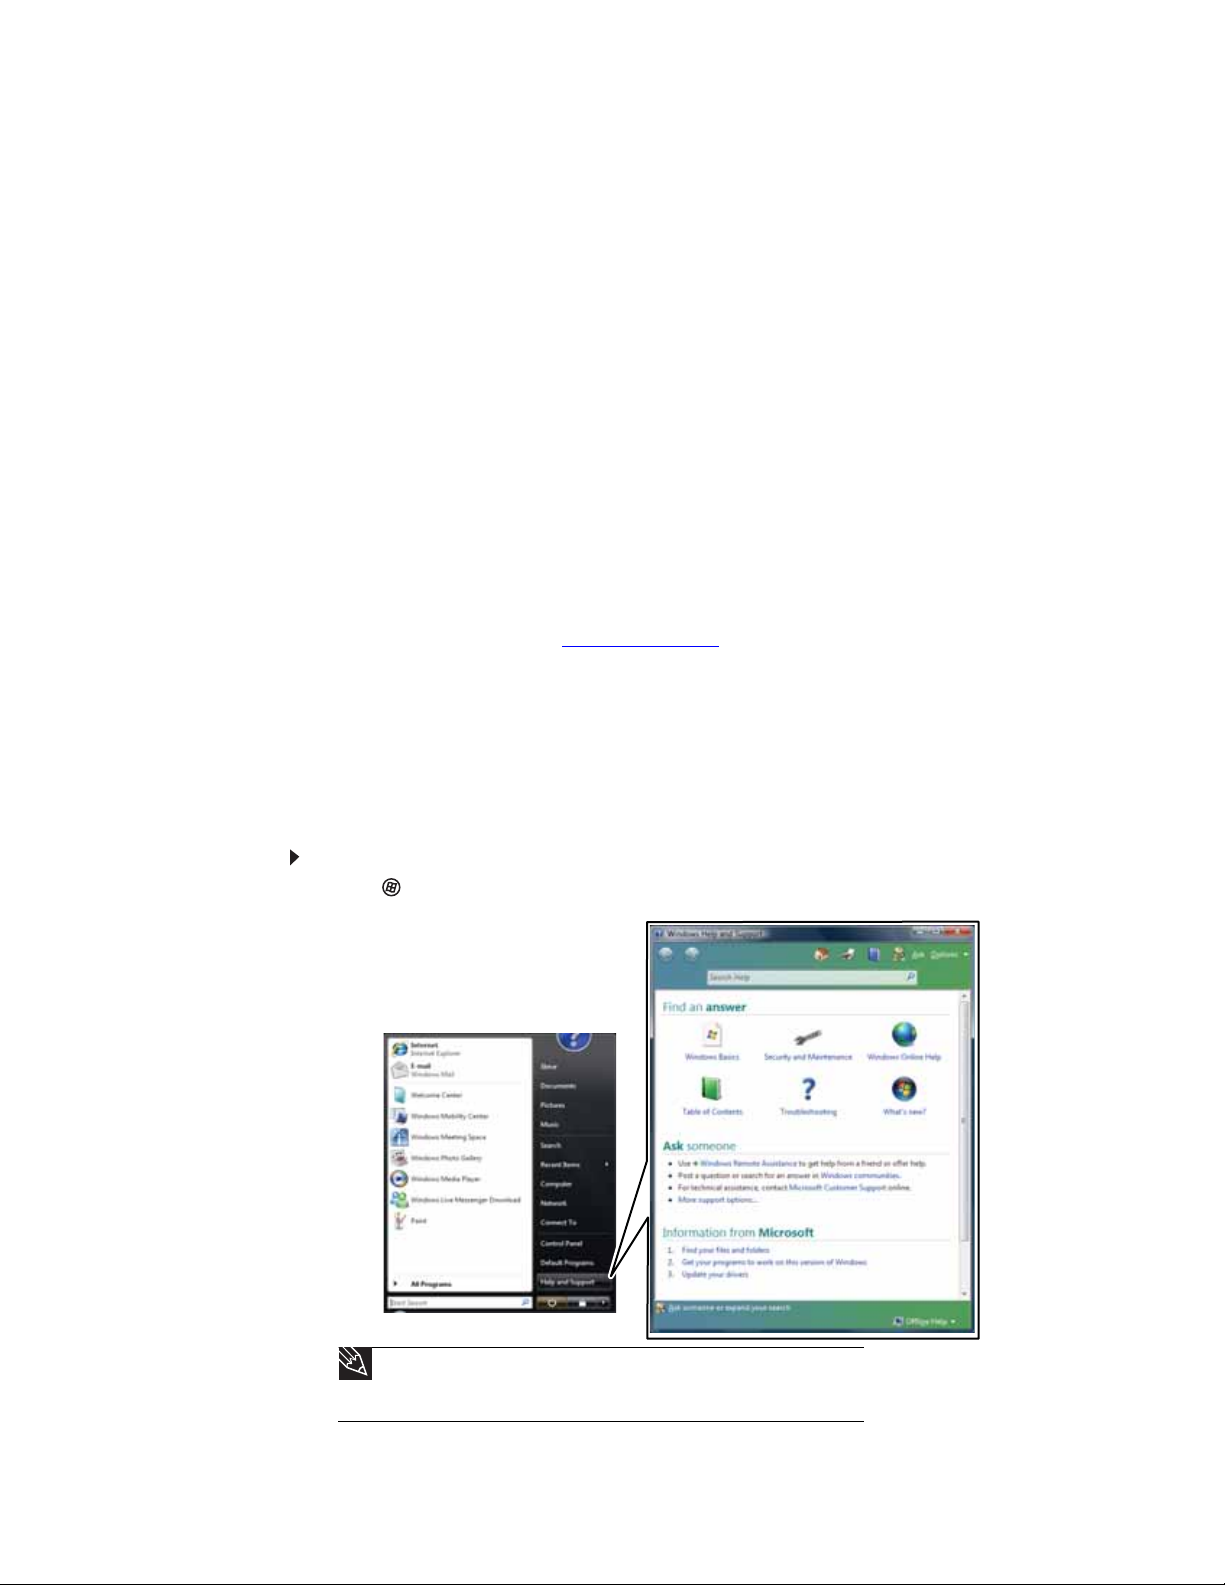
Your comp uter includes Help and Support, an easily accessible collection of help information,
troubleshooters, and automated support. Use Help and Support to answer questions about
Windows and to help you quickly discover and use the many features of your Gateway computer.
To search for a topic in Help and Support:
1 Click (Start), then click Help and Support. Help and Support opens.
2
Tip
You can find help information by clicking a general topic under Find an
answer, selecting an option under Ask someone, or picking a category from
Inform atio n from Mic ros oft. You can also search for a topic.
Page 9

www.gateway.com
2 Type a word or phrase in the Search Help box located at the top of any Help and Su pport
screen, then p ress E
For each search, you receive a list of suggested topics. To find the answer, click the result
that most closely matches your question. Additional results may be available if the first list
does not address your question.
NTER.
Contac ting Gate w ay
The label on your computer contains information that identifies your computer model and serial number.
Gateway Customer Care will need this information if you call for help.
Get ting help fo r Window s Media Cent er
If your computer is running Windows Media Center, you can access help for information on how
to use i t.
To access Media Center help:
1 Click (Start), then click Help and Support. Help and Support opens.
2 In the Help and Supp o r t window, type Windows Media Center in th e Sea rch Help box,
then press ENTER. The Media Center Help win dow open s.
-ORIf you are connected to the Internet, click Windows Online Help, then type Windows
Media Center in the Search Help For box.
Using online help
If you are connected to the Internet, many programs provide information online so you can
research a topic or learn how to perform a task while you are using the program. You can access
most online help inf or mation by selecting a topic f r om a Help menu or by clicking the Help button
on the menu bar and selecting Online Support from the li st.
Available information depends on the particular Help site to which you are taken. Many provide
FAQs (Frequently Asked Questions) , a Search feature, articles about their software, tutorials, and
forums where problems and solutions are discussed.
3
Page 10

CHAPTER 1: Getting Help
4
Page 11

CHAPTER 2
Using Windo ws
• Using the W indows desktop
• Working with f iles and f olders
• Searching f or file s
• Working wit h documents
• Shortcuts
5
Page 12
CHAPTER 2: Using Windows
Using t he Window s deskt op
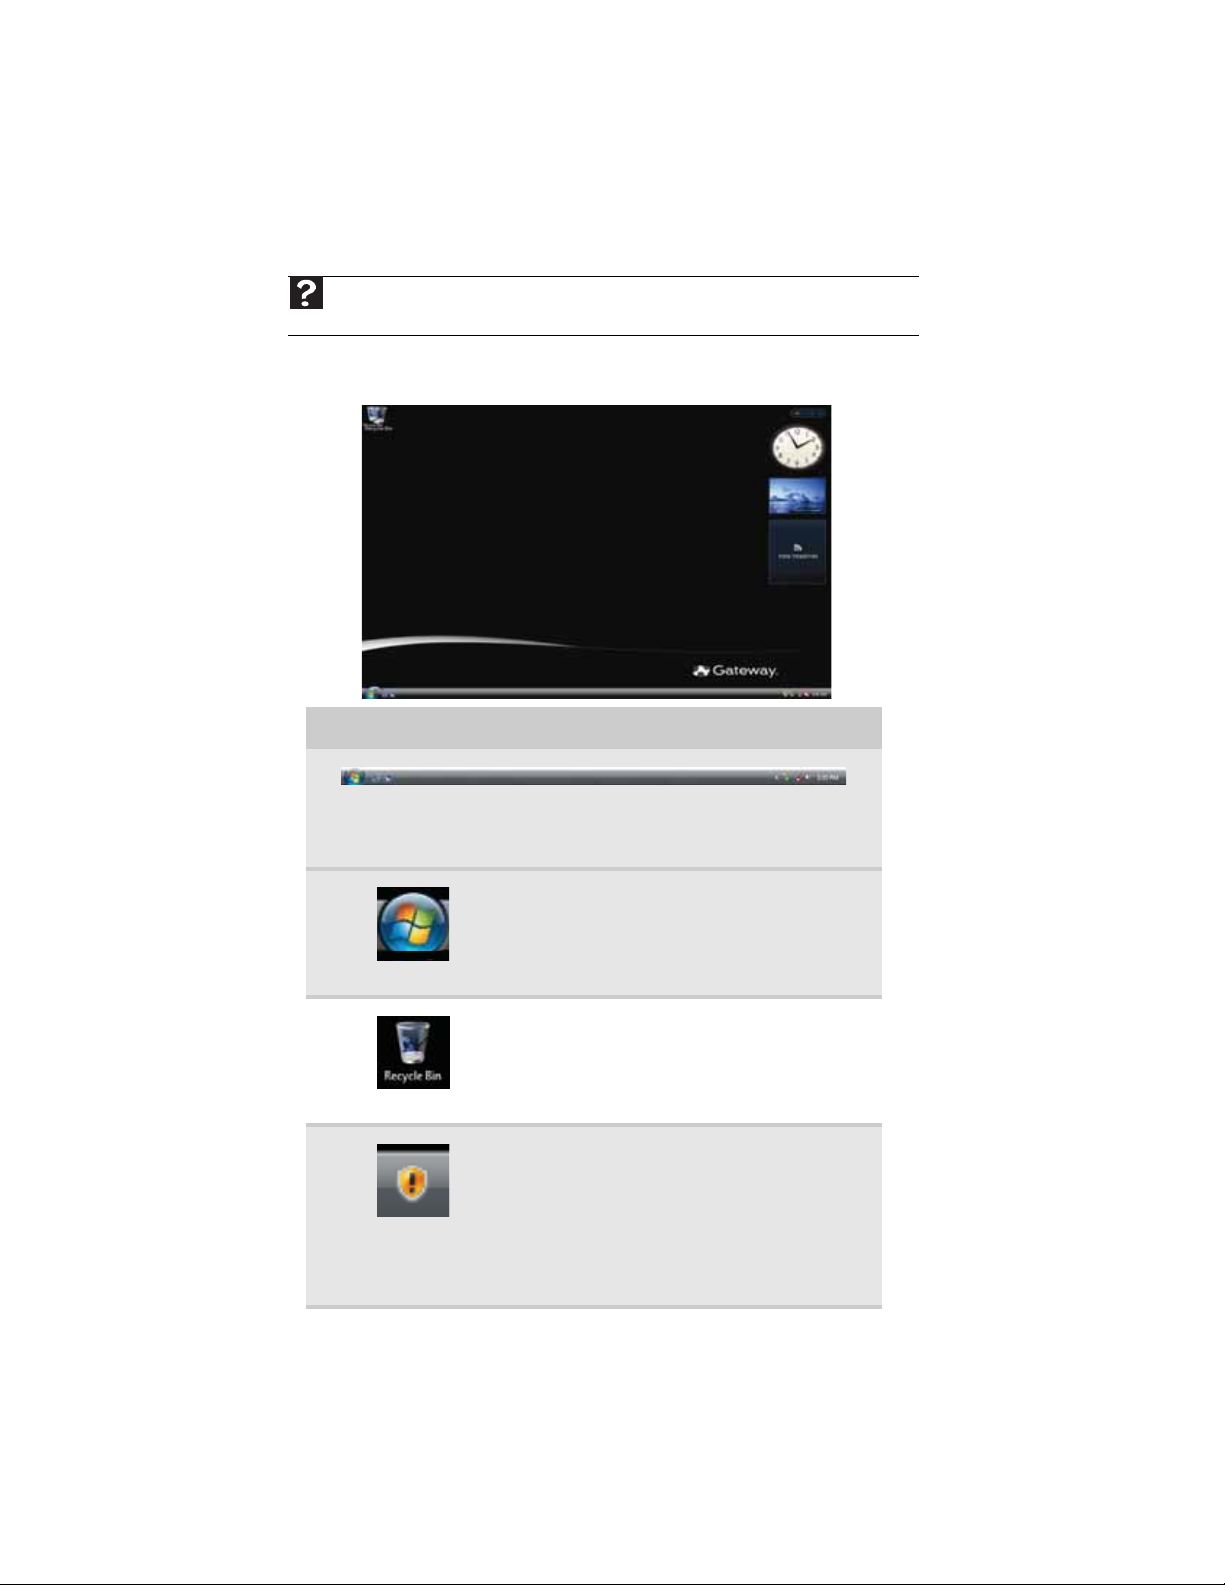
After your computer starts, the first screen you see is the Windows desktop. The desktop is like
the top of a real desk. Think of the desktop as your personalized work space where you open
.
programs and perform other tasks.
Help
For more information about the Windows desktop, click Start, then click Help and Support.
Type Wi n dow s de sk to p in the Sea rch Help box, then press E
Your desktop may be different from this example, depending on how your computer is set up.
The desktop contains the taskbar, the Start button, an d the Recycle Bin icon.
NTER.
Desktop elements Description
The taskbar is the bar at the bottom of the computer display containing the
Start button on the left and a clock on the right. Other buttons on the taskbar
represent programs that are running.
Click a program’s button on the tas kbar to open th e program’s window.
The Start button provides access t o pr o g r am s,
files, help for Windows and other programs,
and computer tools and utilities.
Click the Start button, then open a file or
program by clicking an item on t he menu that
opens.
The Re cycl e Bi n is where files, folders, and
programs that you discarded are stored. You
must empty the Recycle Bin to permanently
delete them from your computer. For
instructions on how to use the Recycle Bin, see
“Deleting files and folders” on page11.
The Windo ws Sec urity C ente r icon may appe ar
on the taskbar near the clock. The icon
changes appea rance to not ify you when the
security settings on your computer are set
below the recommended value or when
updates are a vailable. Double-click t his ic on to
open the Wi ndows Se curity Ce nter. For more
informatio n, see “Modifying security settings”
on page 59.
6
Page 13

Using the Start menu
Help
For more information about the Windows Start menu, click Start, the n click Help and
Support. Type Windows Start menu in the Search Help box, then press E
You can start programs, open files, customize your system, get help, search for files and folders,
and more using the Start menu.
To u s e t he S t a rt m e nu :
Shortcut
Start➧ All Programs➧
1 Click (Start) on the lower left of the Windows desktop. The Start menu opens, showing
you the first level of menu items.
www.gateway.com
NTER.
2 Click All Programs to see all programs, files, and folders in the Start menu. If you click an
item with a folder icon, the prog rams, files , and subfolders appear.
3 Click a file or program to open it.
7
Page 14
Adding icons to the de sktop
Help
For more information about the desktop icons, c lic k Start, then click Help and Support. Type
desktop icons in the Search Help box, then press E
You may want to add an icon (shortcut) to the desktop for a program that you use frequently.
To add ic ons to the des ktop:
Shortcut
Start➧ All Programs ➧ right-clickprogram ➧ Send To ➧ De sk top (crea te shor tcut)
1 Click (Start), then click All Programs.
2 Right-click (press the right mouse button) the program that you want to add to the desktop.
3 Click Send To, then click Desktop (create shortcut). A shortcut icon for that program
appears on the desktop.
Identifying windo w it ems
Help
For more information about windows, click Start, then click Help and Sup port. Type
window in the Search Help box, then press E
CHAPTER 2: Using Windows
NTER.
NTER.
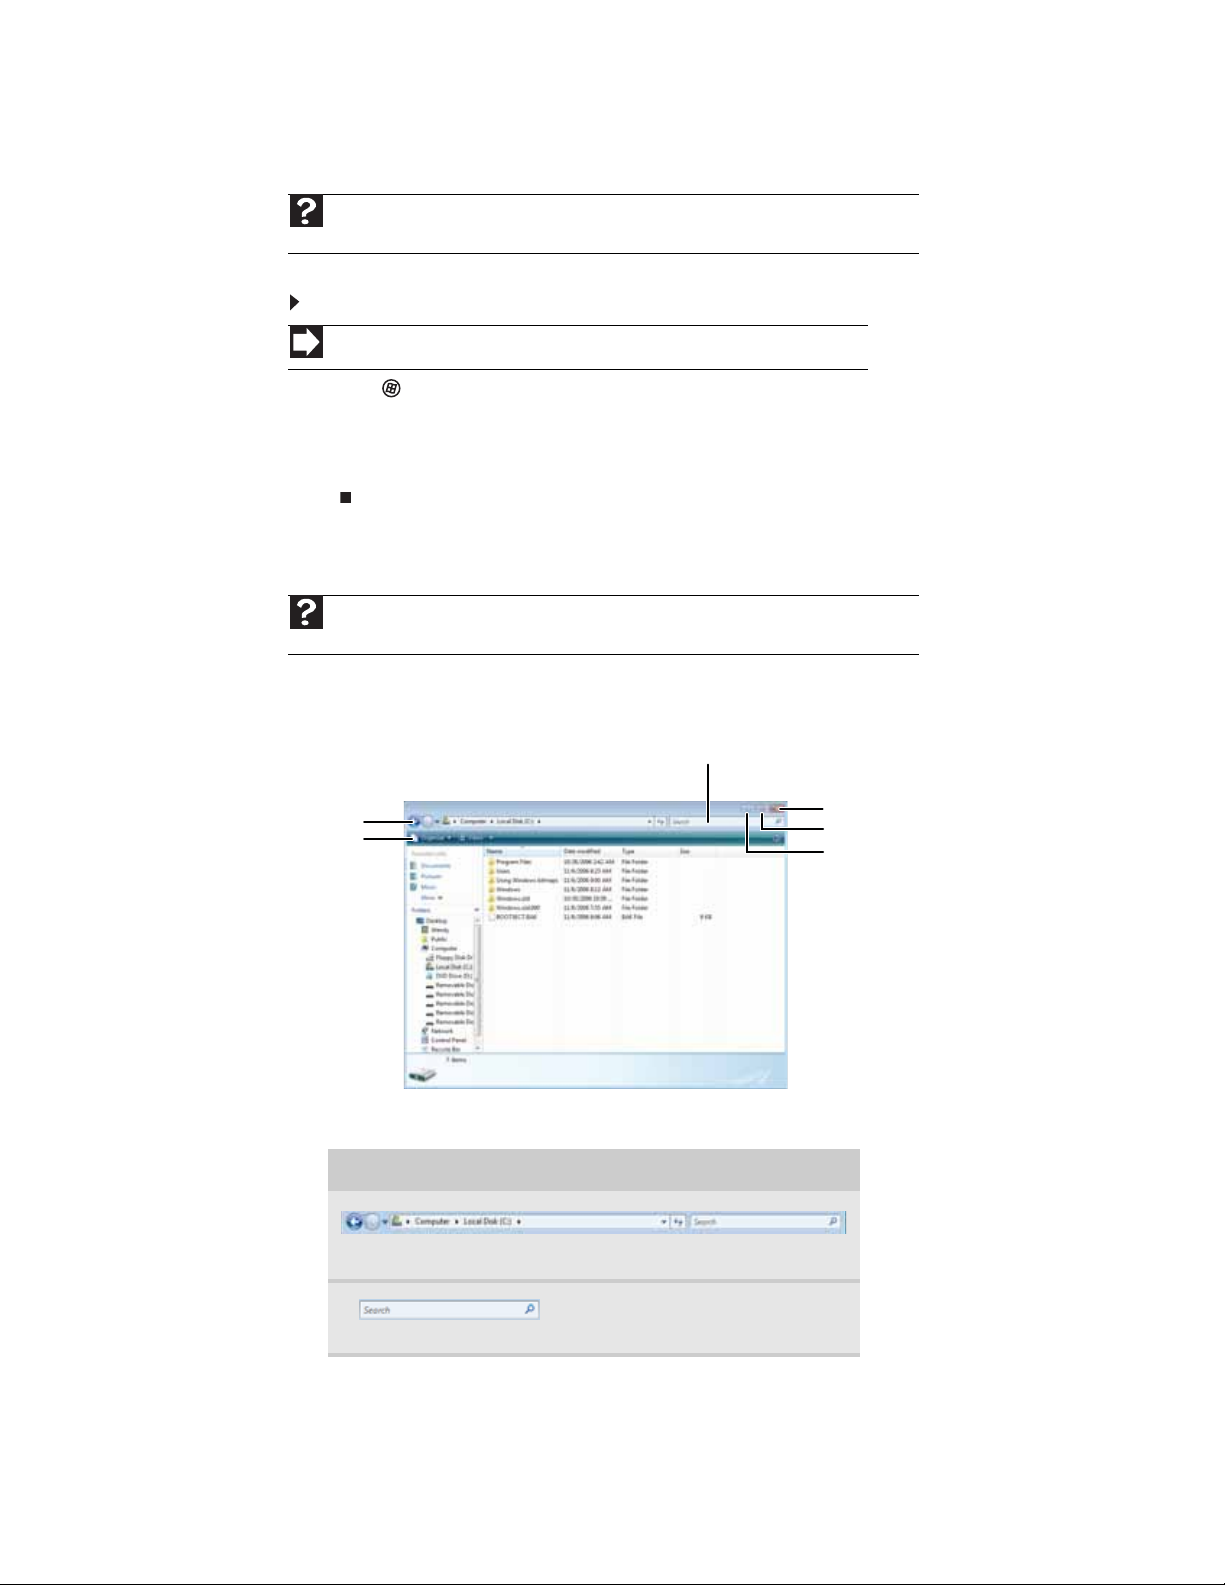
When you double-click the icon for a drive, folder , file , or program, a window opens on the desktop.
This example shows the LocalDisk (C:) window, which opens after you double-click the
Local Disk (C:) icon in the Computer win dow.
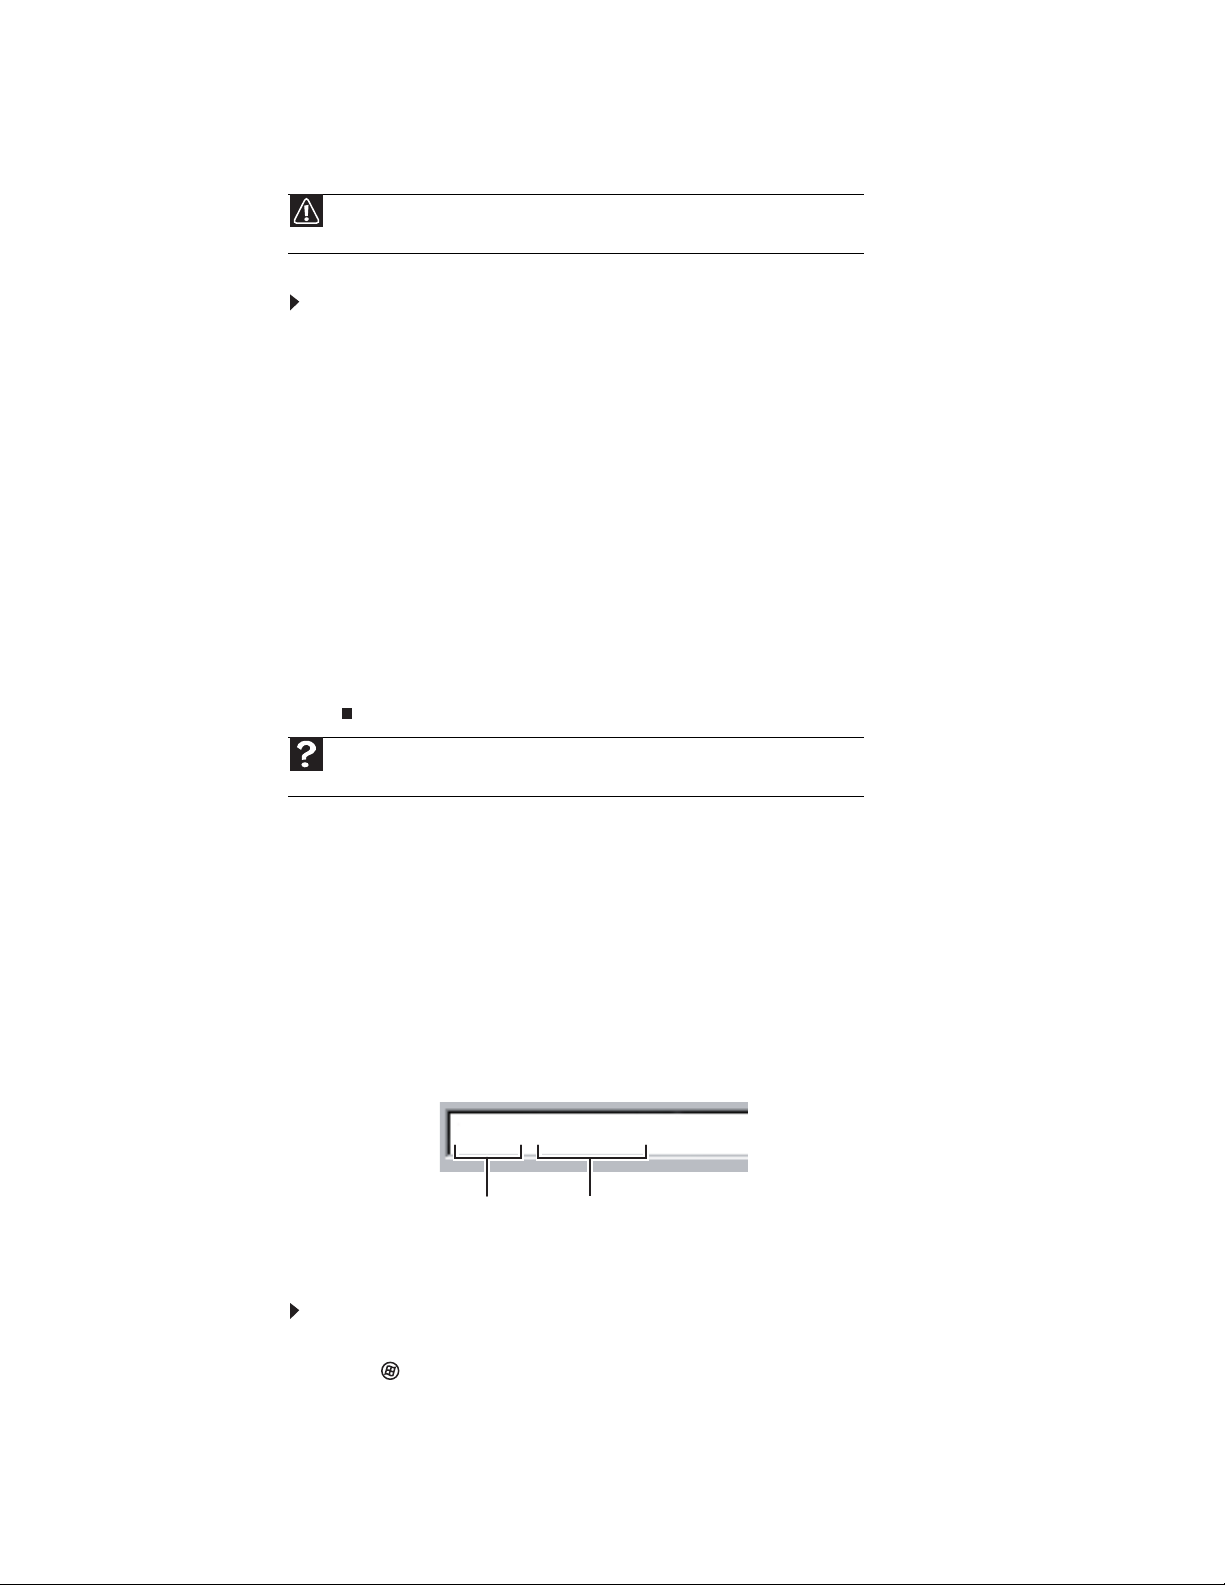
Search box
Title bar
Menu bar
Close
Maximize
Minimize
Every progr am window looks a little dif fer ent because eac h has its ow n menus, icons, and controls.
Most windows include these items:
Window item Description
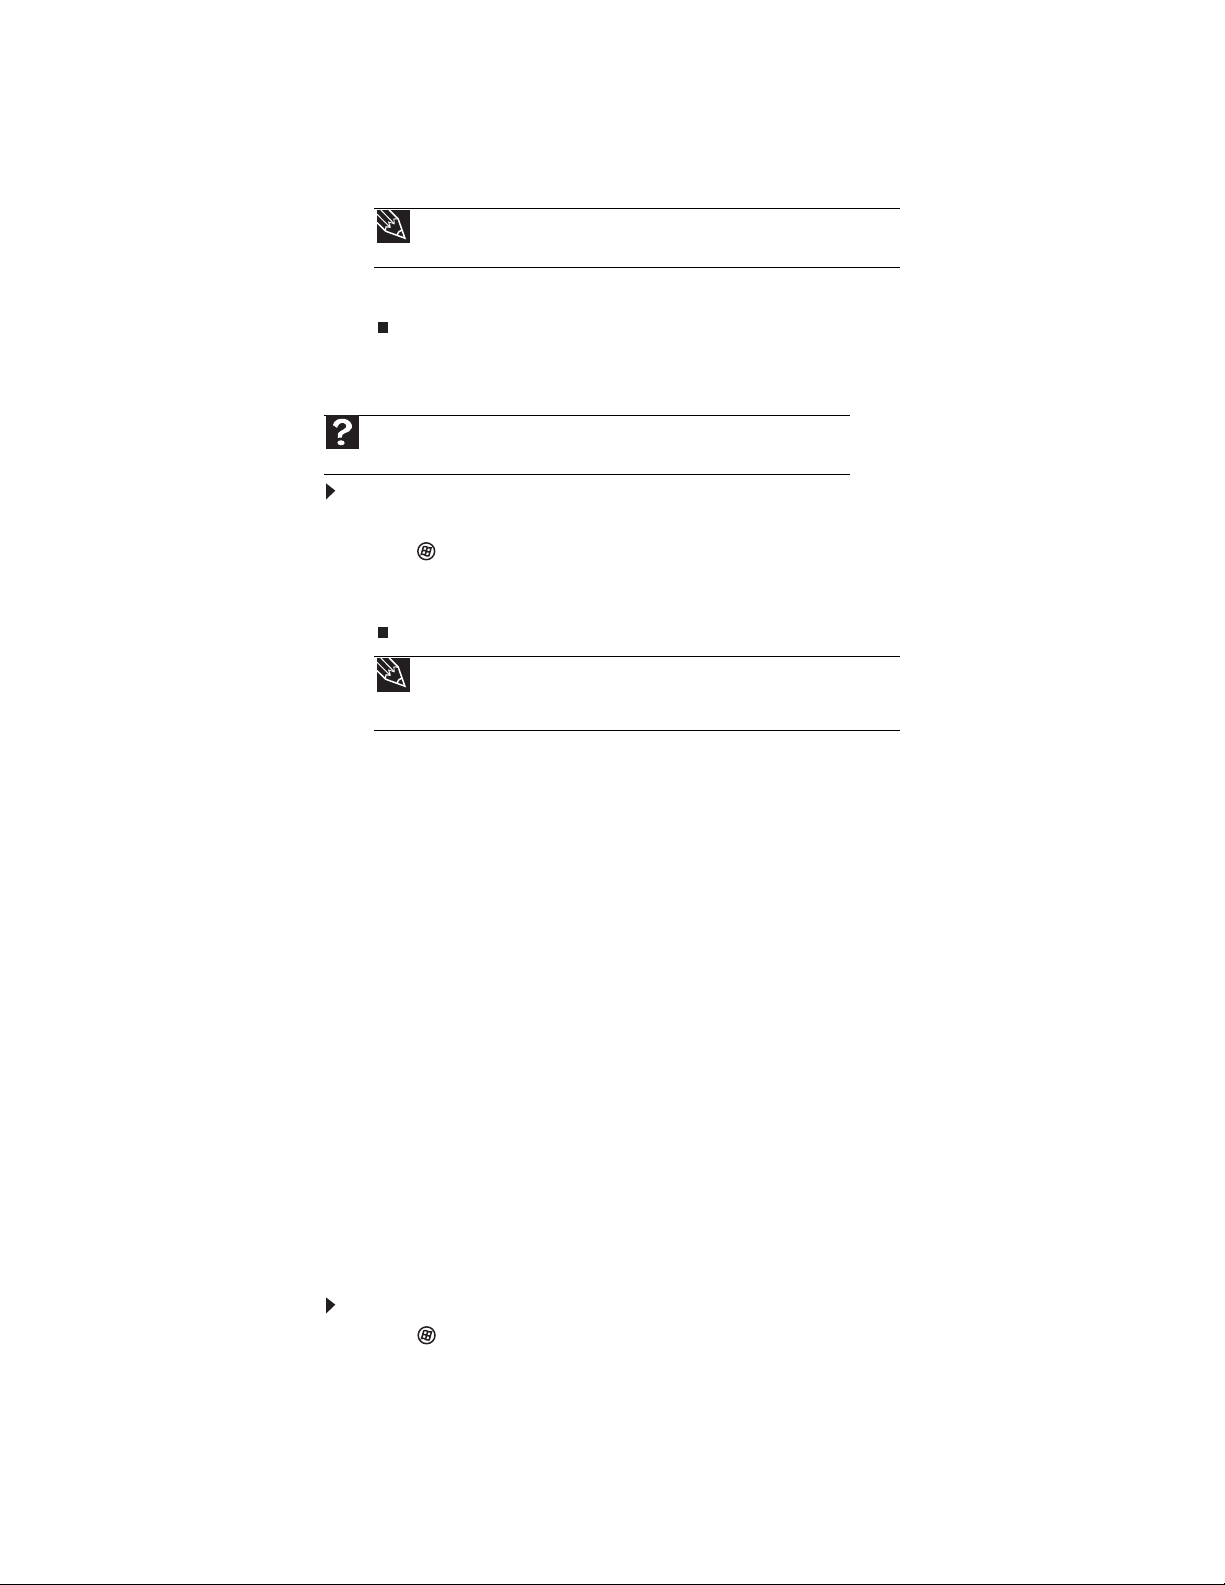
The title ba r is the horizontal bar at the top of a window that shows
the window title.
8
The Search box lets you search for
a word or phrase in the current
window.
Page 15
www.gateway.com
Window item Description
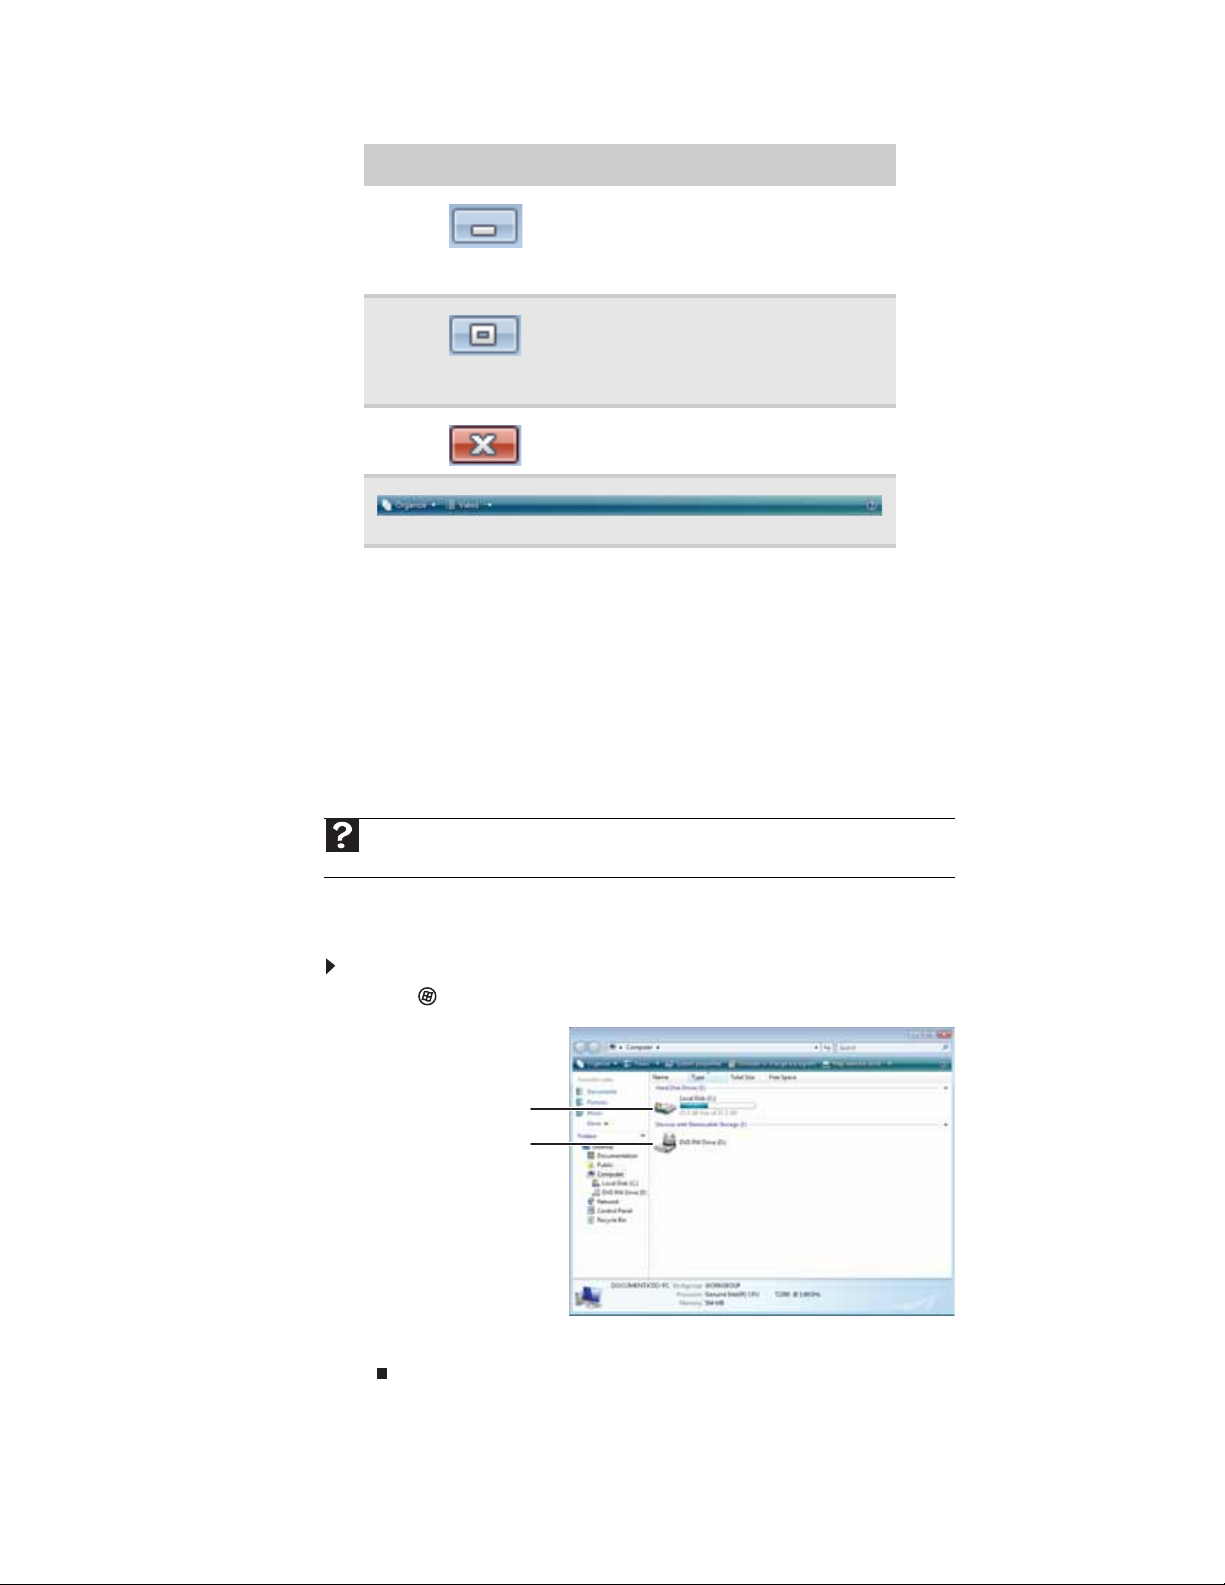
Clicking t he minimize but ton re duces
the active window to a button on the
taskbar. C licking the program button
in the taskbar opens the window
again.
Clicking the max imize button
expands the ac tiv e windo w to fit t he
entire computer display. Clicking the
maximize button again restores the
window to its former size.
Clicking the cl ose butto n closes the
active window or program.
Clicking an item on the menu bar starts an action such as Print or Save.
Wo rking with fi les and f olders
Viewing drives
You can organize your files and programs to suit your preferences much like you would store
information in a file cabinet. You can store these files in folders and copy, move, and delete the
information just as you would reorganize and throw away information in a file cabinet.
Help
For more information about files and folders, click Start, then click Help and Support. Type
files and folders in the Search Help box, then press E
Drives are like file cabinets because they hold files and folders. A computer almost always has more
than one drive. Each drive has a letter, usually Local Disk(C:) for the hard drive. You may also have
more drives such as a CD or DVD drive.
To view the drives, folders, and files on your computer:
NTER.
1 Click (Start), then click Computer.
Hard drive
Disc drive
2 Double-click the drive icon.
9
Page 16
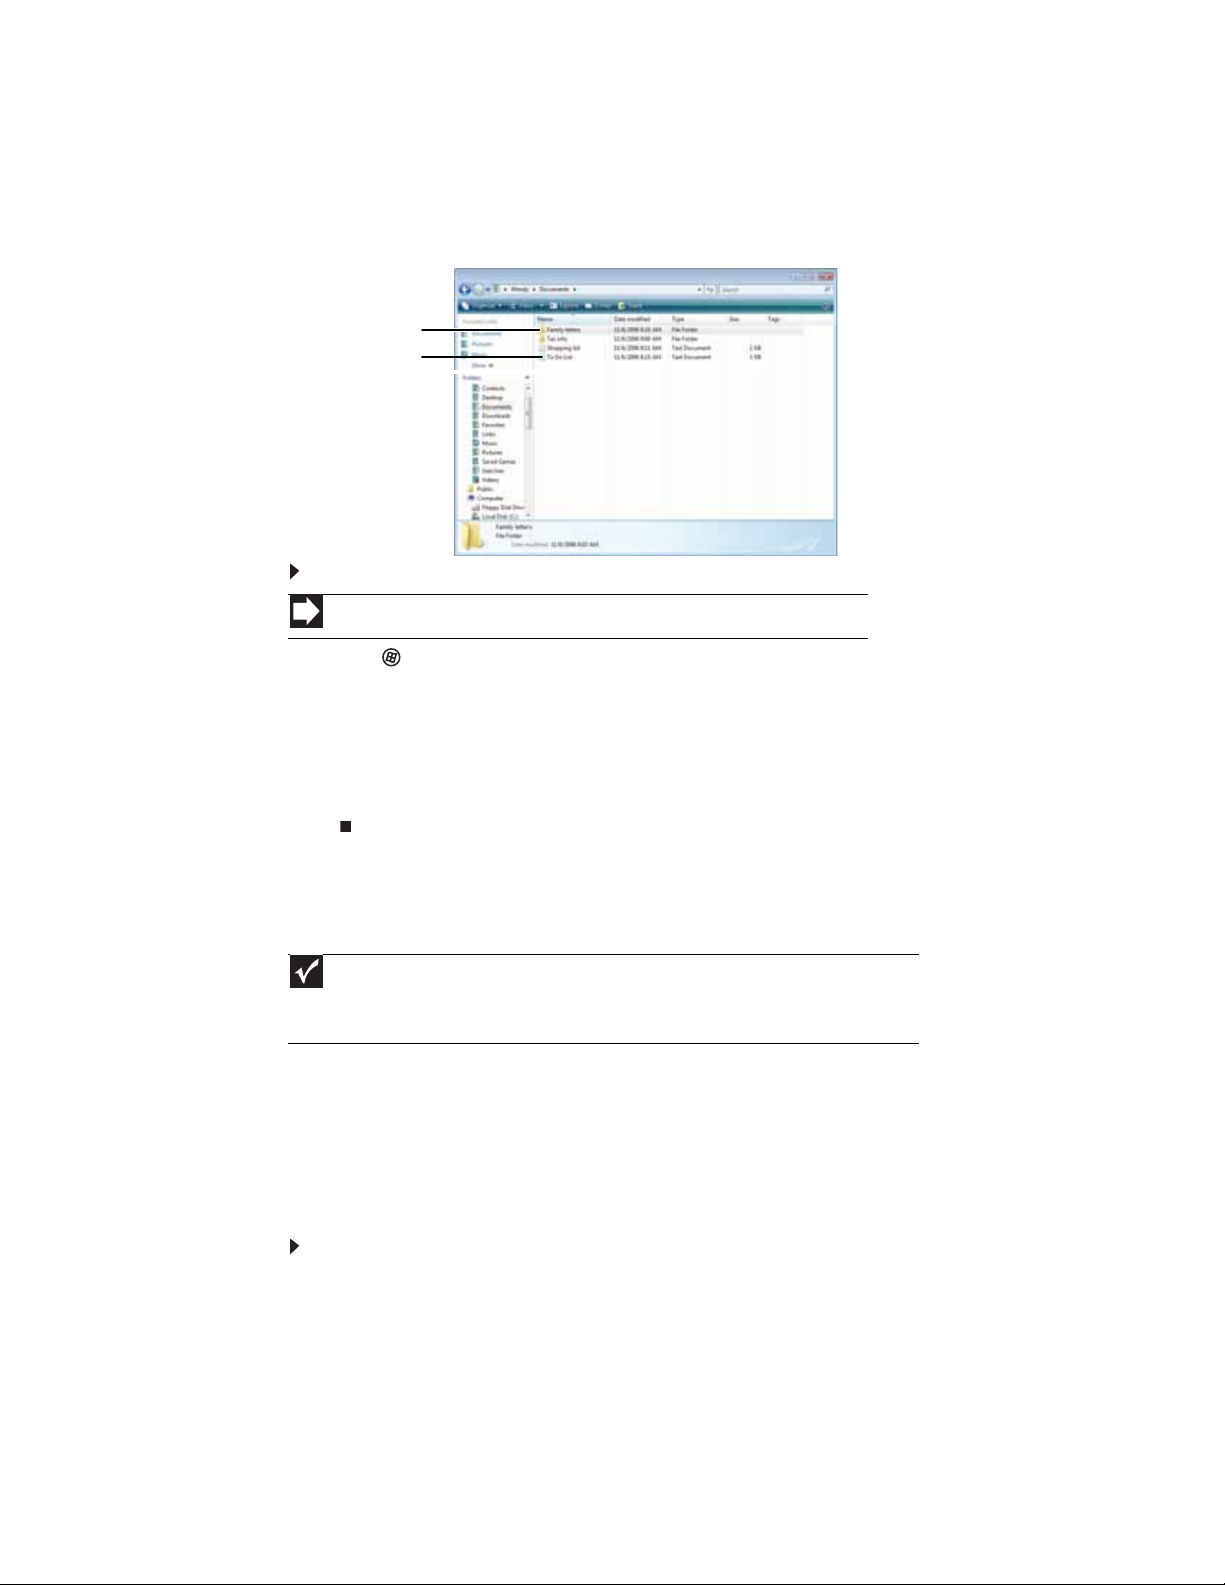
Creating f olders
Folders are much like the folders in a file cabinet. They can contain files and other folders.
Files are much like paper documents—letters, spreadsheets, and pictures—that you keep on your
computer. In fact, all information on a computer is stored in files.
CHAPTER 2: Using Windows
Folders
Files
To create a folder:
Shortcut
ClickFile ➧ New ➧Folder➧ type name
1 Click (Start), then click Computer on the Start menu.
2 Double-click the drive where y ou w ant to put the ne w f o lder. Ty picall y, Local Disk (C:) is your
hard drive and 3½ Floppy (A:) is your diskette drive (if installed).
3 If you want to create a new folder inside an existing folder, double-click the existing folder.
4 Click Organize, then click New Folder. The new folde r is created.
5 T ype a name f or t he f older, then press ENTER. The ne w folde r name appears by the folder icon.
For information about renaming folders, see “Shortcuts” on page 16.
Cop ying and mo ving file s and f olders
Important
The clipboard stores whatever you cut or copy until you cut or copy again. Then the clipboard
contains the new information only. Therefore, you can paste copies of a file or folder into more than
one place, but as soon as you copy or cut a different file or folder, the original file or folder is deleted
from the cl ipb oard .
The skills you need to copy and move files are called copying, cutting, and pasting.
When you copy and paste a file or folder, you place a copy of the file or folder on the Windows
clipboard, which temporarily stores it. Then, when you decide what folder you want the copy to
go in (the destination fo ld e r), yo u paste it there.
When you cut and paste a file or folder, you remove the file or folder from its original location and
place the file or folder on the Windows clipboard. When you decide where you want the file or
folder to go, you paste it there.
To copy a file or folder to another folder:
1 Locate the file or folder you want to copy. For more information, see “Viewing drives” on
page 9 and “Searching for files” on page12.
2 Right-click (press the right mouse button) the file or folder that you want to copy. A pop-up
menu opens on the desktop.
3 Click Copy on the pop-up menu.
4 Open the destination folder.
10
Page 17

www.gateway.com
5 With the pointer inside the destination folder, right-click.
6 Click Paste. A copy of the file or folder appears in the new location.
Help
For more information about copying files and folders or moving files or
folders, click Start, then click Help and Support. Type copying files and
folders or moving files and folders in the Search He lp bo x, the n pre ss E
To move a file or folder to another folder:
NTER.
1 Locate the file or folder you want to move. For more information, see “ Viewing drives” on
page 9 and “Searching for files” on page12.
2 Right-click (press the right mouse button) the file or folder that you want to move. A pop-up
menu opens on the desktop.
3 Click Cut on the pop-up menu.
4 Open the destination folder.
5 With the pointer inside the destination folder, right-click.
6 Click Paste. The file or folder you moved appears in its new location and is removed from
its old loca tion.
Deleting file s and f olders
When you throw away paper files and folders, you take them from the file cabinet and put them
in a trash can. Eventually the trash can is emptied.
In Windows, you t hrow a wa y files and f olders by first mo ving them to t he Window s trash can, called
the Recycl e Bi n, where they remain until you decide to empty the bin.
You can recover any file in the Recycle Bin as long as the bin has not been emptied.
To delete files or folders:
1 In the Computer or Windows Explorer window, click the files or folders tha t you want to
delete . For instru ctions on how t o selec t multiple file s and folde rs, see “Short cuts” on page16.
If you cannot find the file you want to delete, see “Searching for files” on page12.
2 Click Organize, then click Delete. Windows moves the files and folders to the Recycle Bin.
To recover files or folders from the Recycle Bin:
1 Double-click th e Recycle Bin icon on your Windows desktop. The Recycle Bin window opens
and lists the files and folders you have thrown away since you last emptied it.
2 Click the files or folders that you want to restore. For instructions on how to select multiple
files and folders, see “Shortcuts” on page16.
3 Click Restore. Windows returns the deleted files or folders to their original locations.
11
Page 18
To empty the Recycle Bin:
Caution
Emptying the Recycle Bin permanently erases any files or folders in the bin.
These files cannot be restored.
1 Double-click th e Recycle Bin icon on your Windows desktop. The Recycle Bin window opens.
2 Click Empty the Recycle Bin. Windows asks you if you are sure that you want to empty
the bin.
3 Click Yes. Windows permanently deletes all files in the Recycle Bin.
Help
For more information about emptying the Recycle Bin, click Start, then click
Help and Support. Type emptyi n g the Recycle Bin in the Search Help box,
then press E
NTER.
Searc hing for f iles
If you are looking for a particular file or folder or a set of files or folders that have characteristics
in common, but you do not remember where they are stored on your hard drive, you can use the
Search utility.
Files and folders found using this utility can be opened, copied, cut, renamed, or deleted directly
from the list in the resul ts window.
CHAPTER 2: Using Windows
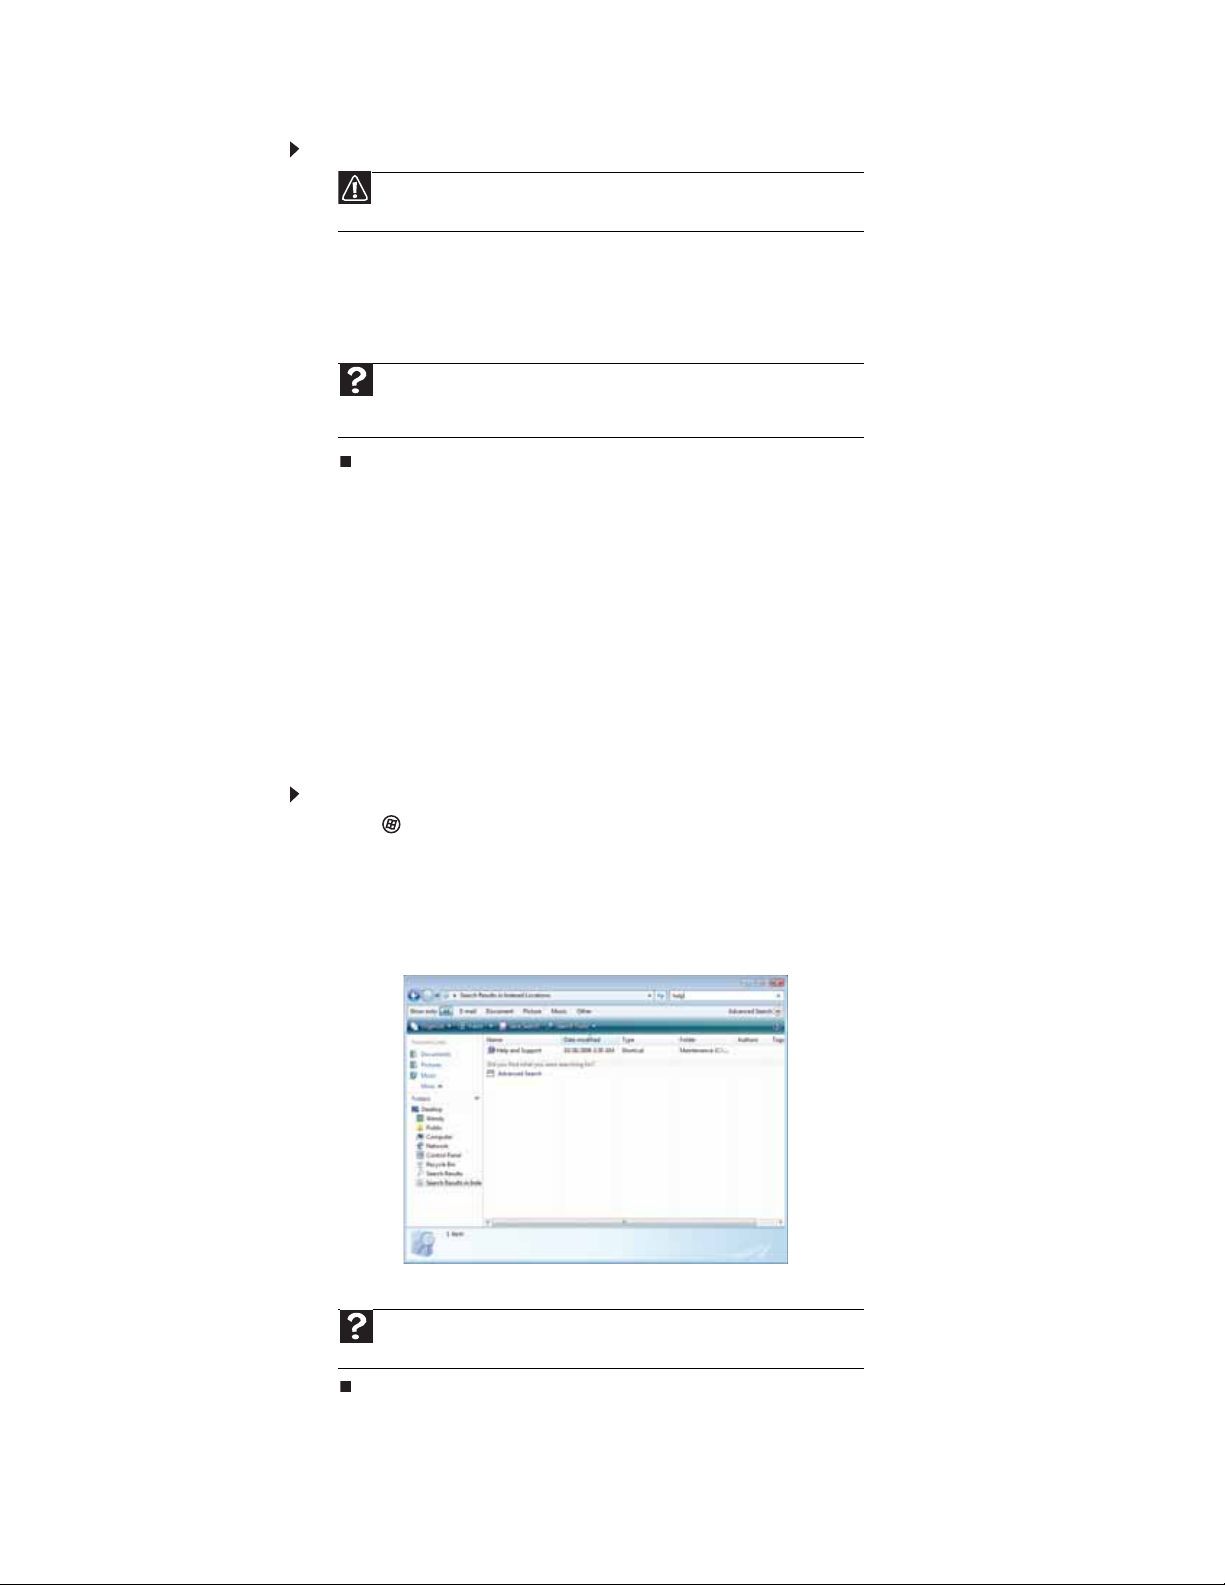
Using the W indow s Sear ch
To find files and folders using the Search:
1 Click (Start), then click Search. The Search Results window o pens.
2 If you want to search on your computer by file or folder name, type in all or part of the file
or folder name in the Search box in the top right of the window.
• If you type all of the name, Search will list all files and folders of that name.
• If you type part of the name, Search will list all of the file and folder names containing
the letters you type d.
3 Open a file, folder, or program by double-clicking the name in the list.
Help
For more information about searching for files and folders, click Start, then
click Help and Suppor t. T ype searching in the Search Help box, then pr es s E
NTER.
12
Page 19

Using adv anced sea rch options
Search can find files mee ting more cri ter ia than file n ame. You can narrow y our sear ch b y selec ting
the search options that you want. You can search by the:
• Name or part of a name
• Creation date
• Modification da te
• File type
• Tag
• Author
• Text contained in the file
• Time period in which it was created or modified
You can also combin e search criteria to refine sea rches.
Files and folders found using this utility can be opened, copied, cut, renamed, or deleted directly
from the list in the resul ts window.
Brow sing f or files and f olders
A file or folder that you need is rarely right on top of your Windows desktop. It is usually on a
drive inside a folder that may be inside yet another folder, and so on.
Windows drives, folders, and files are organized in the same way as a real file cabinet in that they
may have many levels (usually many more levels than a file cabinet, in fact). So you usually will
have to search through levels of folders to find the file or folder that you need. This is called
browsing.
To b r ow s e f o r a f i l e:
1 Click (Start), then click Computer. The Computer window open s.
2 Double-click the drive or f older that y ou think contains the file or folder t hat you want t o find.
3 Continue double-clicking folders and their subfolders until you find the file or folder you
want.
www.gateway.com
Help
For more information about browsing for files and folders, click Start, then
click Help and Support. Type files and folders in the Search Help box, then
press E
NTER.
Wo rking with doc uments
Computer documents include word processing files, spreadsheet files, or other similar files. The
basic methods of creating, s aving, opening, and printing a document apply to most of these types
of files.
The following examples show how to create, save, open, and print a document using Microsoft
WordPad. Similar procedures apply to other programs such as Corel
Word, an d M icros oft E xce l.
For more information about using a program, click Help on its menu ba r.
®
WordPe rfect®, Microsoft
®
13
Page 20
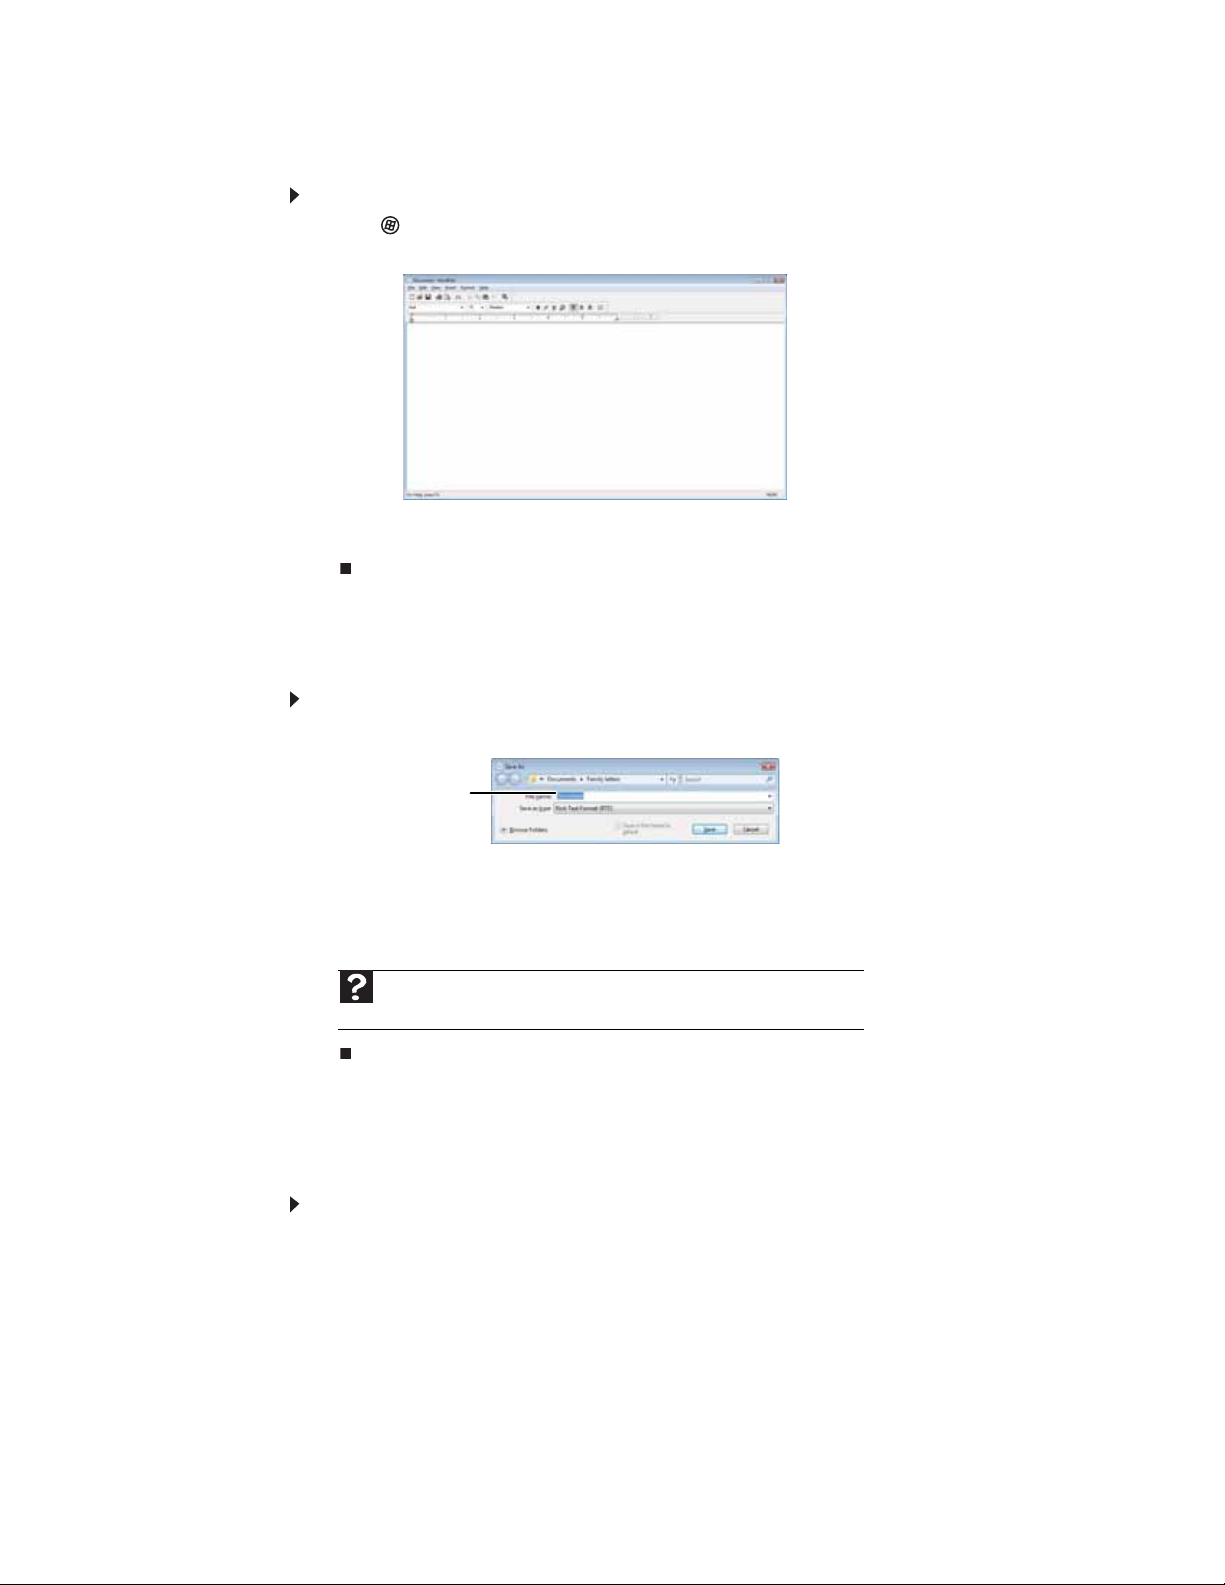
Creating a ne w doc ument
To create a new document:
1 Click (Start), All Programs, Accessories, then click WordPad. Microsoft WordPad starts
and a blank document opens.
2 Begin composing your document. Use the menus and toolbar buttons at the top of the
wind ow to form at the d ocum ent .
Sav ing a doc ument
CHAPTER 2: Using Windows
After you create a document, you need to save it if you want to use it later.
To s a ve a do c u m e nt :
1 Click File, then click Save. The Save As dialog box opens.
2 Click Browse Folders to open the Folders list, then click the folder where you want to save
the file.
3 Type a new file name in the File name box.
4 Click Save.
and Support. Type saving in the Search Help box, then press E
Opening a document
To view, revise, or print an existing document, first you need to open it. Open the document in
the program that it was created in.
To o p e n a d o c u me n t :
1 Start the pro gram.
2 Click File, then click Open.
File name
Help
For more information about saving documents, click Start, then click Help
NTER.
14
Page 21
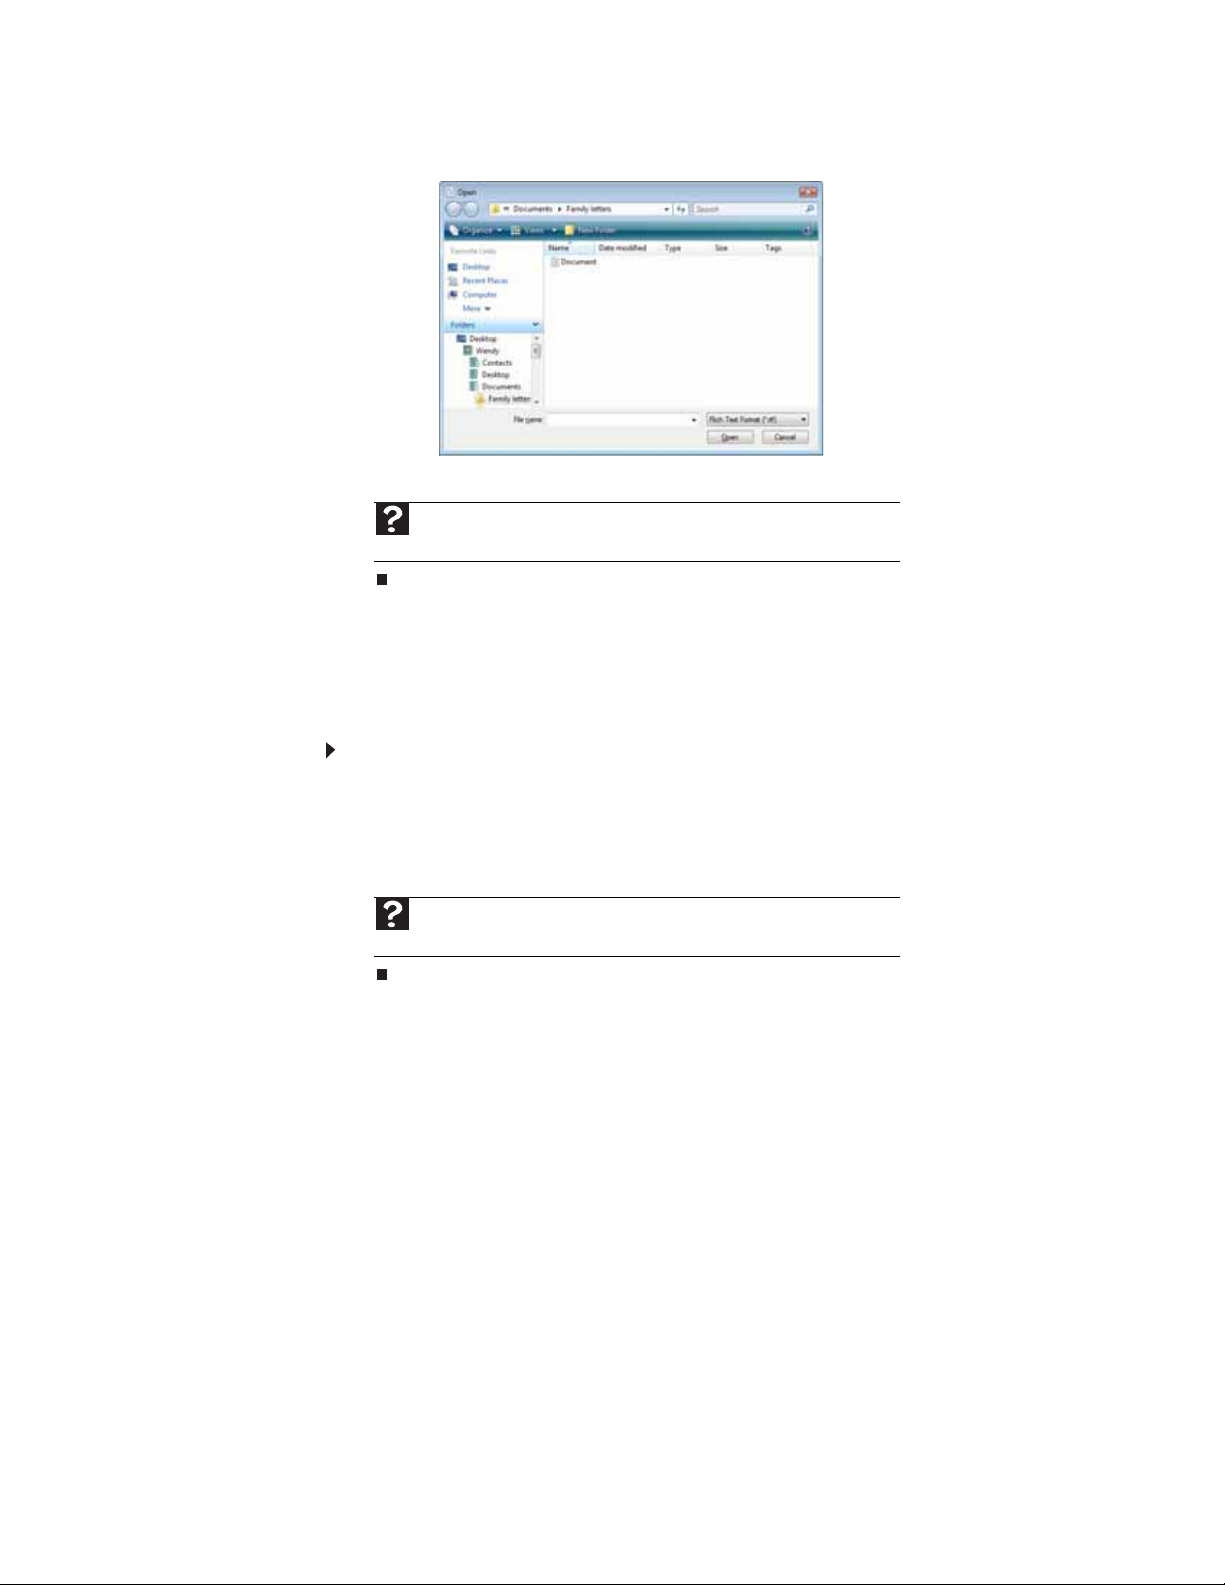
3 Click Folders to open the Folders list, then click the folder you want to open.
4 Double-click the document file name. The document opens.
and Support. Type opening files in the Search Help box, then press E
Printing a document
www.gateway.com
Help
For more information about opening documents, click Start, then click Help
NTER.
To print a document, you must have a printer connected to your computer or have access to a
network printer. For more information about installing or using your printer, see the printer
documentation.
To print a document:
1 Make s ure th at the pri nte r is tu rn ed on a nd lo ad ed with pa pe r.
2 Start the program and open the document.
3 Click File, then click Print. The Print dialog box opens.
4 Set the print options, then click Print. The document prints.
Help
For more information about printing documents, click Start, then click Help
and Support. Type printing in the Search Help box, then press E
NTER.
15
Page 22

Shortcuts
CHAPTER 2: Using Windows
Help
For more information about Windows keyboard shortcuts, click Start, then click Help and
Support. Type Windows keyb oard sh ortcuts in the Searc h Help box, then press E
NTER.
The following table shows a few shortcuts that you can use in Windows and almost all programs
that run in Windows. For more information about shortcuts, see your Windows or program
documentation.
To... Do this...
Copy a file, folder, text, or
graphic
Paste a file, folder, text, or
graphic
Select multiple items in a
list or window
Select multiple adjacent
items in a list or window
Permanently delete a file
or folder
Rename a file or folder Click the file or folder, press F2, type the new
Close the acti ve window or
program
Switch to a different file,
folder, or running
program
Click the item, then press CTRL +C.
Click inside the folder or window where you
want to pas te th e o bj ect , th e n pr ess C
Click the first item, press and hold down the
CTRL key, then click each of the remaining
items.
Click the first item in the list, press and hold
down the S
the list.
Click the file or folder, then press
SHIFT +DELETE. The file or folder is
permanently deleted. The file or folder is not
stored in the Recycle Bin.
name, then press E
Press ALT +F4.
Press ALT +TAB.
HIFT key, then click the last item in
NTER.
TRL +V.
16
Page 23

CHAPTER 3
Using the Inter net and Faxing
• Learning about the I nterne t
• Setting up an Int ernet account
• Using the World Wide Web
• Using e-mail
• Using Windo ws F ax and Scan
• Sending a fax
• Receiv ing and vie wing a fax
17
Page 24
CHAPTER 3: Using the Internet and Faxing
Lear ning about the Inter net
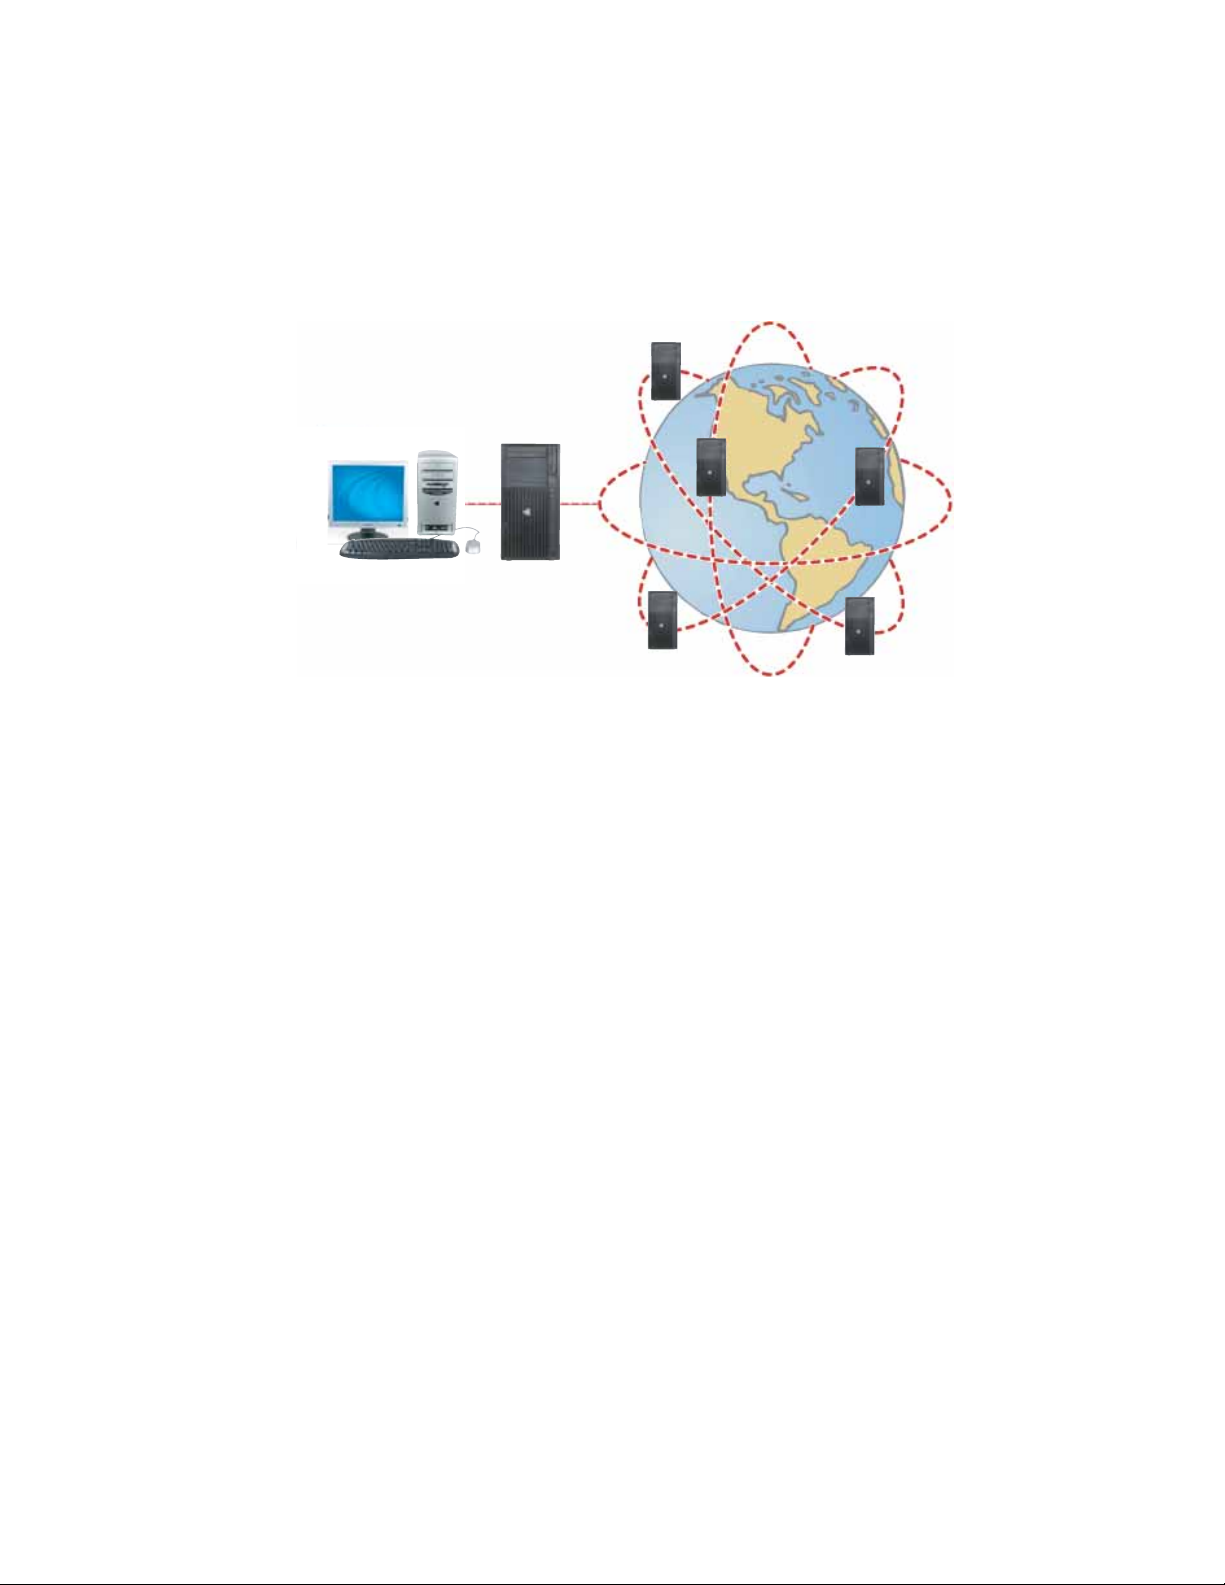
The Internet is a world wide ne twork of c omputers li nk ed to gether to pr ov ide inf ormat ion to p eople
everywhere. The two most popular services on the Internet are e-mail and the World Wide Web.
You can access this network by connecting your computer to a telephone, DSL (Digital Subscriber
Line), or cable television line and signing up with an Internet service provider( ISP) .
Internet Servers
store information so other computers can
access it from the Internet.
You r c o m p u t er
connects to the Internet
through an ISP.
If you want to access the Internet you need:
ISP Servers
let you connect to t he Internet
and access your e-mail
messages.
• A modem—a device that connects your computer to other computers or servers using a
telephone, D SL, or cable tele v ision line. Your computer may hav e a built -in dial-up telephone
modem. Cable and DSL modems connect to your computer through an Ethernet jack and
provide a faster connection speed than a standard telephone modem.
• An Internet service provider—a company that provides access to the Internet through an
ISPserver . W hen y ou co nnec t to an ISP, the ISPserver lets you a cces s th e Int erne t and y our e-mail
messages. Check your telephone book for a list of Internet service providers available locally.
• A Web browser—a program that displays information from the World Wide Web. Microsoft
Internet Explorer was included with your computer. For more information, see “Using the
World Wide We b” on pag e 19.
• An e-mail program—a program that lets you create, send, and receive e-mail messages over
the Internet. Microsoft Outlook or Outlook Express was included with your computer. For
more informat ion, see “Using e-mail” on page 20.
Set ting up an Interne t account
Before y ou can view t he information on the W orld Wide W eb, you need to s et up an Internet a ccount
with an Internet service provider(ISP) . To set up an ISP service or to transfer an existing account
to this computer, contact the ISP directly.
Dial-up Internet connections are those using a telephone system to connect to the Internet. This
may include ordinary analog telephone lines, ISDN connections, and in some cases ADSL over PPP,
or other technologies. Because dial-up connections are designed to be temporary connections to
the Internet, dial-up charges (with both your telephone company and Internet service provider)
often increase the longer you connect to the Internet. To mi nimize the cost for dial-up Internet
service, we suggest that you only connect to the Internet during your e-mail and Web browsing
session, then disconnect when you are finished. Your Internet service provider can provide
instructions on how to connect to and disconnect from the Internet.
Cable and DSL modems, a connection known as broadband, use your cable television or sp ecial
telephone lines to connect to your ISP and access the Internet. In many instances, broadband is
considered an always-connected service. With this type of service, your cost is the same regardless
of the amount of time you use your Internet connection.
18
Page 25
www.gateway.com
Acces sing your In ter net account
Help
For general information about using Internet accounts, click Start, then click Help
and Support. Type ISP in the Search Hel p box, then press E
The method you use to access your Internet account varies from ISP to ISP. Contact your ISP for
the correct procedure.
Using t he WorldWideWeb
The World Wide Web is a multimedia window to the Internet that gives you access to millions of
information sou rces.
Information on the Web comes to you on Web p ages , which are electronic documents that you
view using a Web page display program called a browser. You can use any of the commercially
available Web browsers, like Microsoft Internet Explorer or Netscape Navigator.
Web pages can contain tex t, animations, mus ic, and other multimedia featur es. A group of related
Web pages is called a Web site. You can acce s s We b site s t o shop, tr ack in v es tments, read th e new s,
download programs, and much more.
You can explore a Web site or visit other Web sites by clicking areas on a Web page c alled links
or hyperlinks. A link may be colored or underlined text, a picture, or an animated image. You can
identify a link by moving the mouse pointer over it. If the pointer changes to a hand, the item is
a link.
To learn more about using the Web browser feat ures, click Help in the menu bar.
NTER.
Connec ting to a W ebsite
After you set up an account with an Internet service provider (ISP) , you can access the many
information sources on the World Wide Web.
To connect to a Web site:
1 Connect to your Internet account.
2 Depending on the method you use to connect to your Internet account, you may need to
start your Web browser. Click (Start), then click Internet. Your default Web browser
opens showing an opening page or welcome screen.
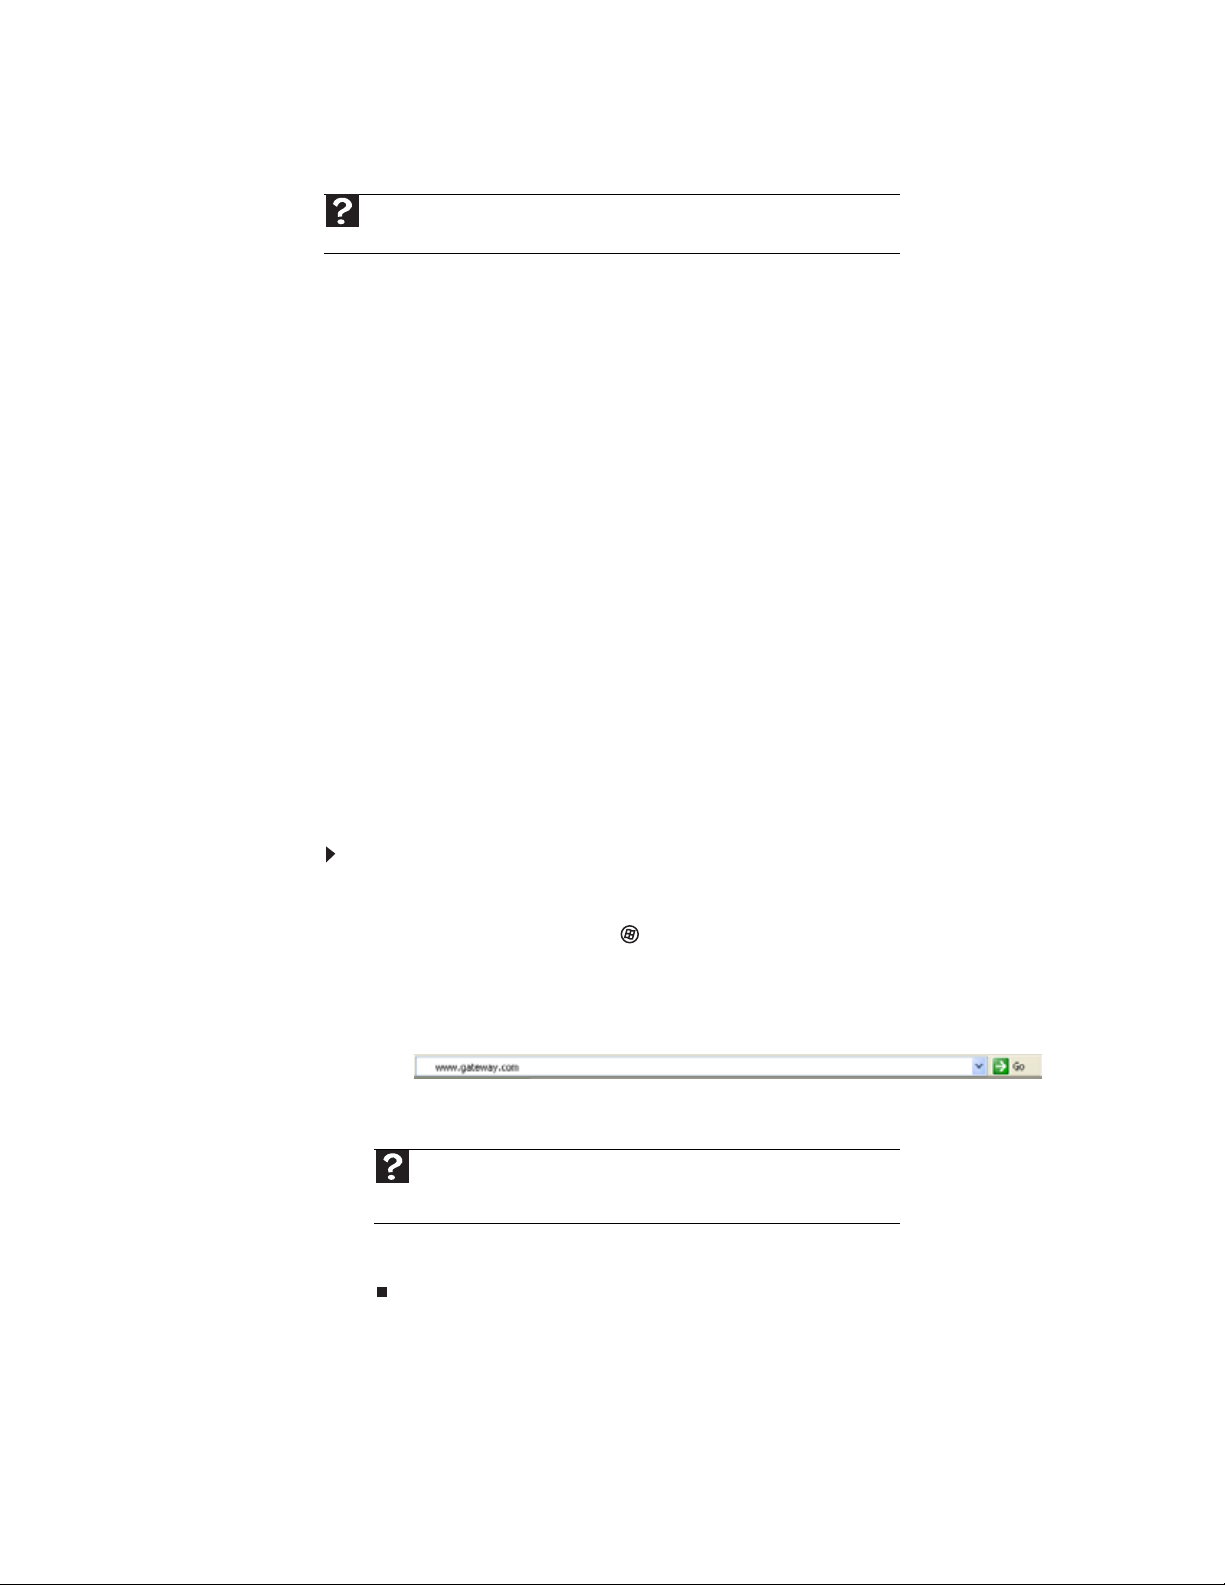
3 To go to a different Web site, type the address (called a URL for “Uni versal R esour ce Loc ator”)
in the browser address bar (for example www.gateway.com), then click GO
browser address bar.
- OR On the current Web page, click a link to a Web site.
Help
For more information about connecting to a Web site, click Start, then click
Help and Support. Type connecting to a Web site in the Searc h Help box,
then press E
The Web browser loc ates the server computer on the Internet, downloads (transfers) data
to your computer, and displays the page on the site that you requested.
Sometimes Web pages displa y slowl y. The speed that a Web page displays on your s cr een depends
on the complexity of the Web page and other Internet conditions. Additionally, the speed of your
connection will determine how fast Web pages display.
on the
NTER.
19
Page 26
Downloading files
download. For more information, see “Protecting your computer from viruses” on page 57.
Downloading is the process of transferring files from a computer on the Internet to your computer.
To download files or programs from a Web site:
1 Connect to your Internet account.
2 In the address bar, type the address of the Web site that contains the file or program you
3 Create or locate the folder where you want to store the file on your computer. For more
4 Click the link on the Web page for the file that you want to download.
5 Follow the on-screen instructions for saving the file in the folder that you want. A copy of
6 Open the folder that you created.
7 Install or v ie w the downloaded file by double-clicking it. If applic able, follow t he in stru c tions
CHAPTER 3: Using the Internet and Faxing
Caution
To protect your computer against viruses, make sure that you scan the files you
want to down load , th en p ress ENTER.
- OR Click a l i nk on a Web p ag e to navi ga te to t he Web s ite c on ta in in g th e fi l e th a t yo u wa nt to
download.
information, see “Working with files and folders” on page9 .
the file is downloaded to your computer. The time that it takes to transfer the file to your
computer depends on file size and Internet conditions.
provided on the Web site to run or install the program.
Help
For more information about downloading files, click Start, then click Help and
Support. Type downloading files in the Search Help box, then click E
Using e-mail
E-mail (electronic mail) lets you send messages to anyone who has an Internet connection and
e-mail address. E-mail is usually a free service of your Internet account.
The Internet never closes, so you can send e-mail messages at any time. Your e-mail messages
arrive at most e-mail addresses in minutes.
An e -mail ad dress consists of a user name, the @symbol, and the Internet domain name of the
Internet ser vice p rovider ( IS P) o r co mp any that “hos ts” that user. Your e-mail a ddress i s assig ne d
when you sign up f or an account w ith an ISP. F or example, a person with an account w it h Hotmail
mig ht h ave an e -m ai l ad dress that is s imi lar to th is on e:
Sending e-mail
To send e-mail using Windows Mail:
1 Connect to your Internet service provider.
2 Click (Start), then click E-mail. Your default e-mail program opens.
3 Click Create Mail.
4 Type the e-mail address of the recipient you want to send e -mail to in the To box.
NTER.
jdoe@hotmail.com
User name Internet domain name
20
Page 27
5 Type the subject of your e-mail in the Subject box.
6 Type the e-mail message.
e-mail. For more information, see the help for your e-mail program.
7 When finished, click Send. Your e-mail is sent over the Internet to the e-mail address you
specified.
Checkin g your e-mail
Help
For general information about using e-mail, click Start, then click Help and
Support. Ty pe e-mail in the Sea rch Help box, then press E
To check your e-mail using Windows Mail:
1 Connect to your Internet service provider.
2 Click (Start), then click E-Mail. Your default e-mail program opens.
3 Click Send/Receive.
4 Double-click the message you want to read.
www.gateway.com
Tip
Most e-mail programs let you attach files, such as photographs, to your
NTER.
Tip
To protect your computer from viruses, check any e -mail attachments using
anti-virus software. For more information, see “Protecting your computer from
viruses” on p age 57.
For more information about managing and organizing your e-mail messages, see the online help
in your e- mail pro gram.
Using W indow s Fax and Scan
Windows Fax and Scan comes pre-installed with Windows Vista Business, Enterprise, or Ultimate
Editions. Windows automati cally det ec ts the optional built - in fax modem during the se tup proce ss.
You can connect your computer to one local fax modem, although you can connect to multiple
fax servers or devices on a network. If you are not sure whether your computer has a built-in fax
modem, check the hardware information that came with your computer. If you have an external
fax modem, follow the manufacturer's instructions for attaching it to your computer. Make sure
that the modem is turned on before proceeding.
Y our fax cov er page, on which you can include all requir ed informati on, is set up when you prepar e
to send the firs t fax from th is c omp uter.
Y ou cannot send or receiv e a fa x using a cable or DSL modem by f ollow ing these inst ructions. Man y
Internet services exis t that let you send or receive faxes using a broadband connection.
Your dial-up modem c able must be installed before you can send and receive faxes. You cannot
use your standard te lephone modem to connect to the Internet while sending and receiving faxes.
Sending a f ax
Windows Fax and Scan lets you send and receive faxes using your dial-up modem.
To s e n d a f a x:
1 Click (Start), All Programs, then click Windows Fax and Scan. Windows Fax and Scan
opens.
2 If Windows Fax and Scan is in Scan view, click Fax in the lower left corner of the window.
21
Page 28
CHAPTER 3: Using the Internet and Faxing
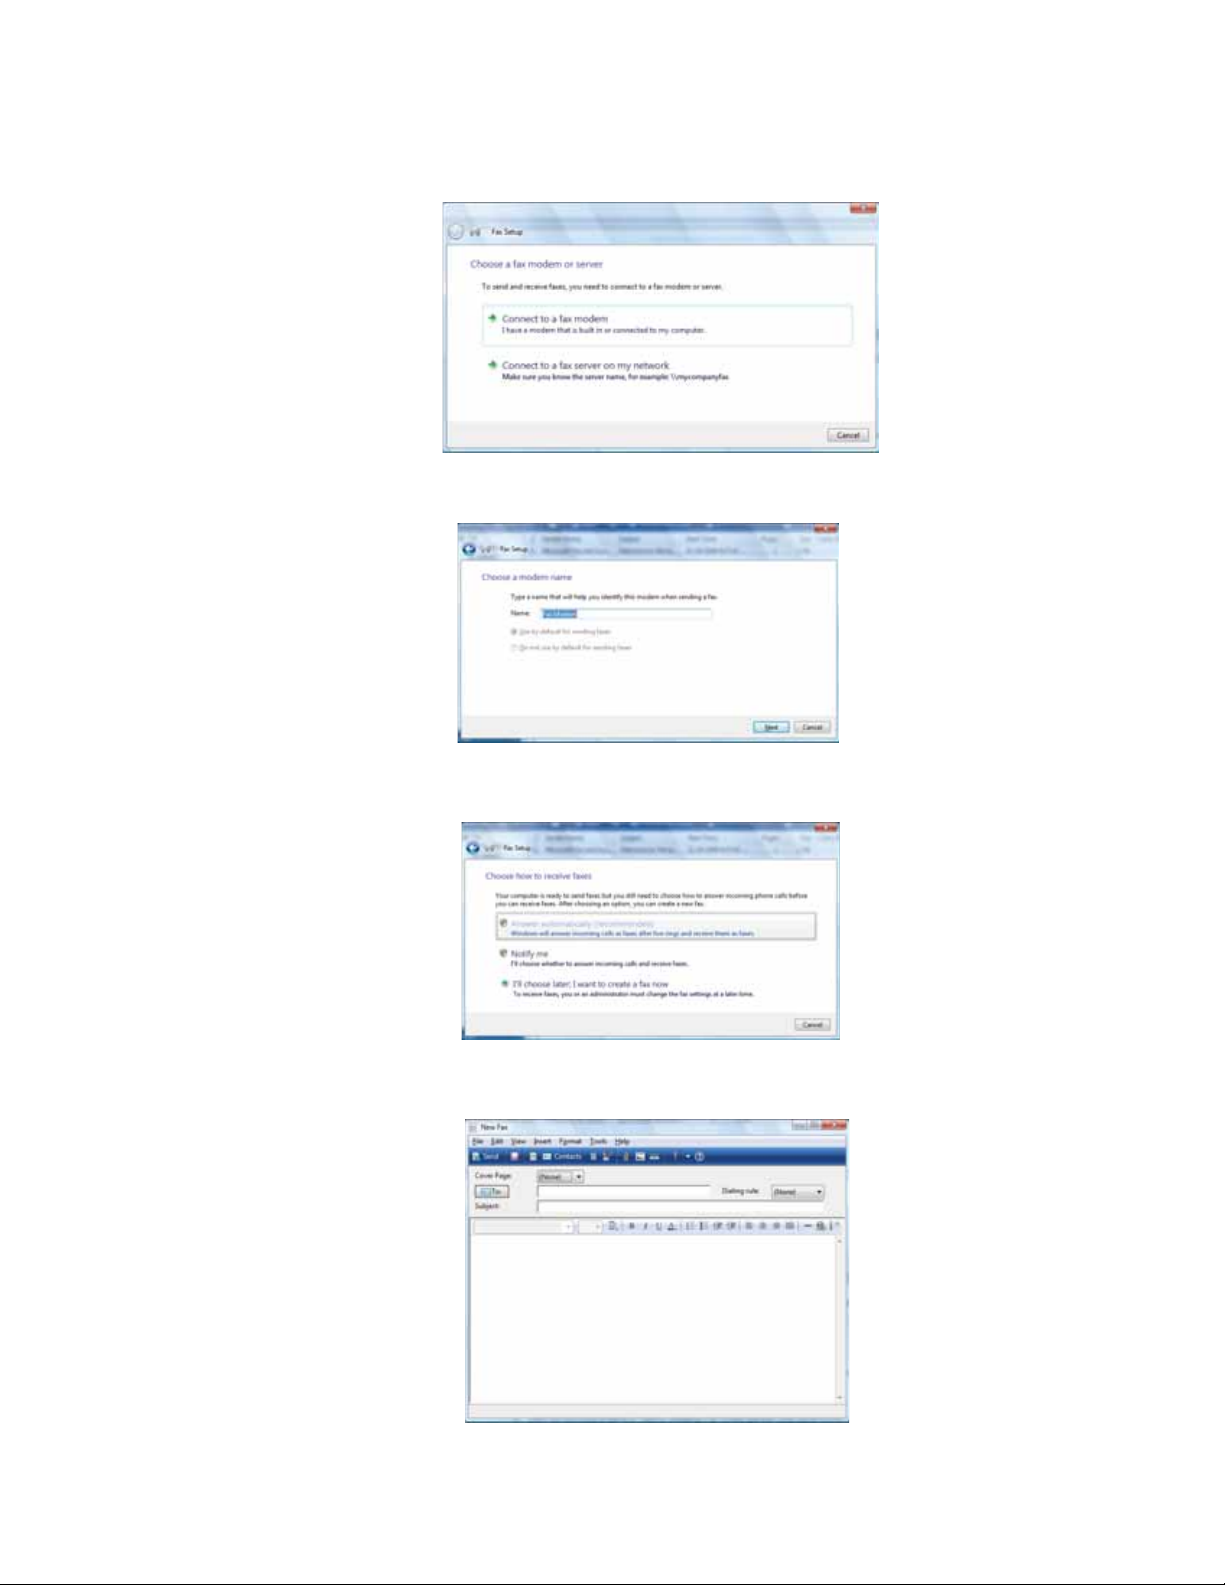
3 If you have never sent a fax on this computer before, click New Fax on the toolbar. The Fax
Setup window opens.
4 Click the type of connection you will be using (fax modem or fax server) . The Choose a
modem name screen opens.
5 T ype the name of the f ax modem in the dialog box, t hen clic k Next. T he Choose how to receive
faxes screen opens.
6 Click how you want to receive faxes, then click Unblock when the The Security Alert window
opens. The New Fax wind ow op ens .
22
Page 29
www.gateway.com
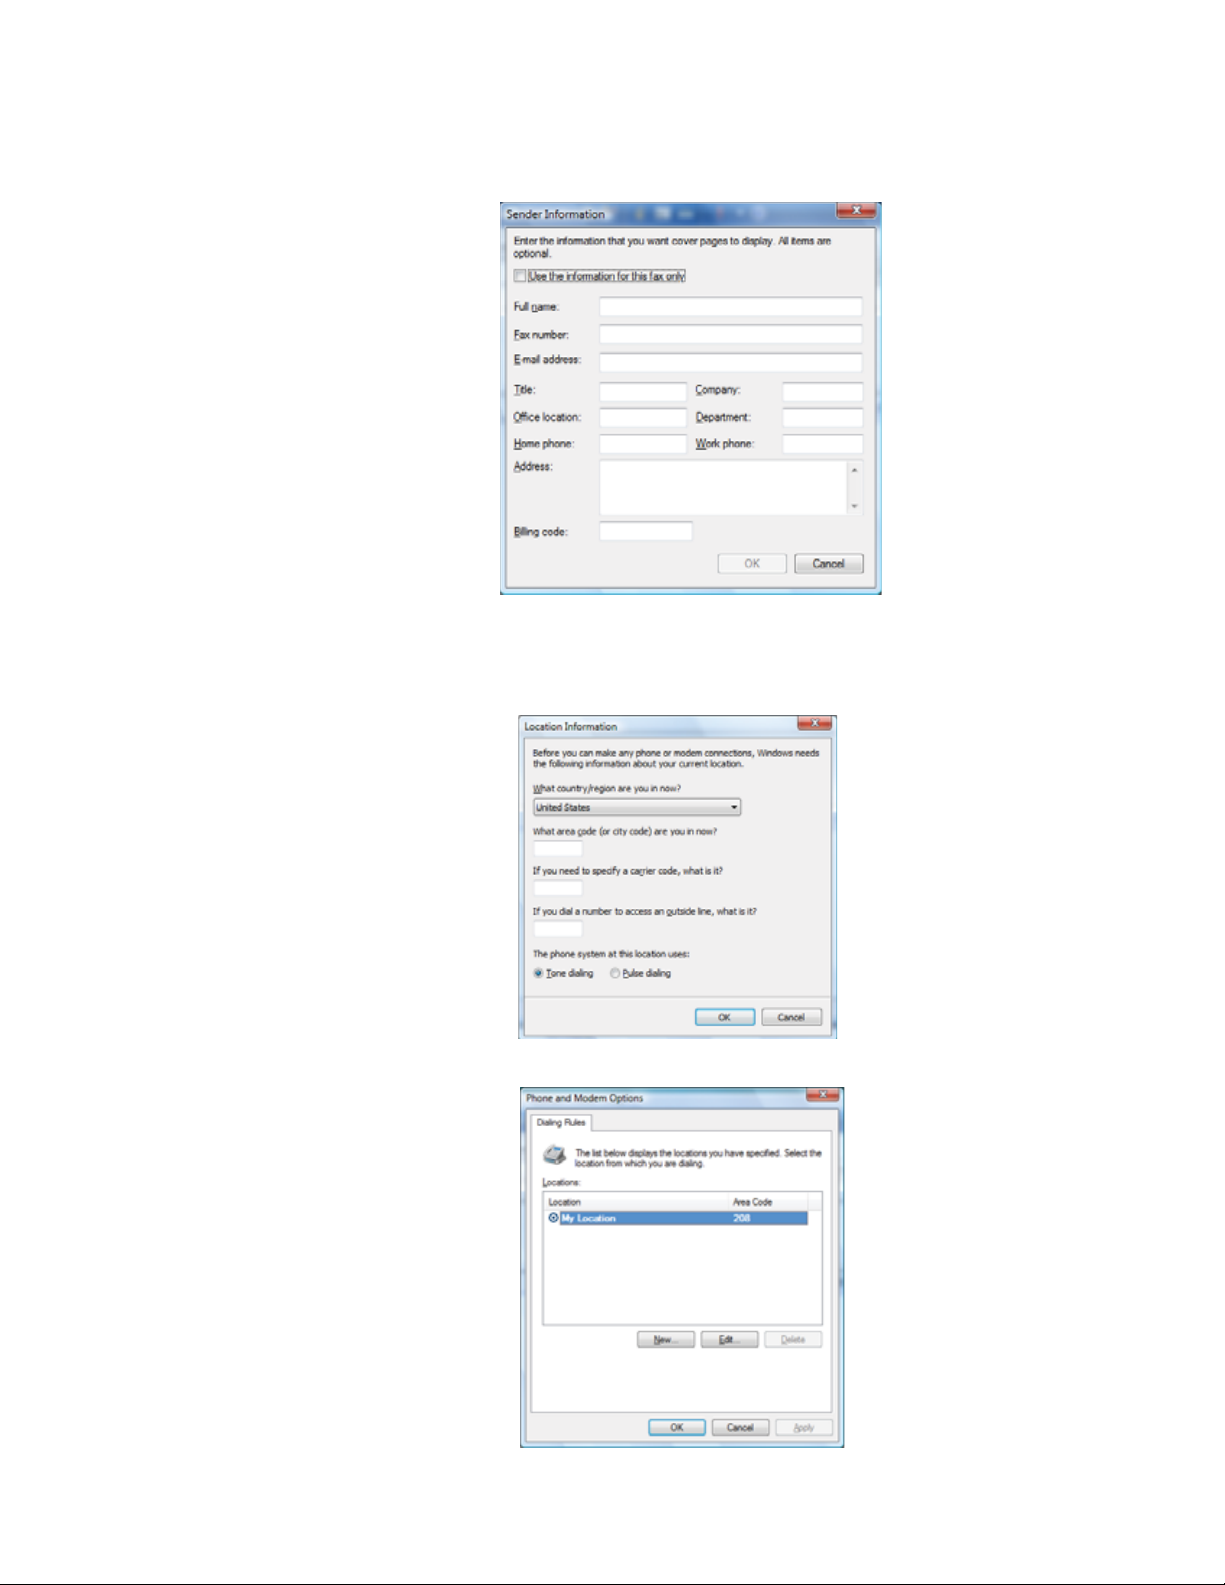
7 Create your f ax, then open the Cov er Page menu by clicking the arrow and selecting a co ver
page from the list . The Sender Info rmatio n dialog box opens.
8 Type your information in the spaces provided, then click OK. The New Fax dialog box opens.
9 To enter optional dialing rule information, click Dialing Rule and select a rule f rom the menu.
If you have not set up a dialing rule, select New Rule from the menu. The Location
Information d ialog box opens.
10 Type your location informat ion, then click OK. The Dialing Rules dialog box opens.
23
Page 30

CHAPTER 3: Using the Internet and Faxing
11 Highlight your location, then click Edit. The Edit Lo cati on dialog box opens.
12 Complete the location inf ormatio n, then clic k OK. Y ou are returned to the Dialing Rules dialog
box.
13 Click OK. The New Fax dialog box opens.
14 Enter, scan, or attach the fax information you want to send, then click Send.
Setting up your cover page template
Y ou can create your o wn cov er page template that y ou can use in place of the cover page templates
that Windows Fax and Scan provides for you. To create a cover page template, you use the Fax
Cover Page Editor. On this templat e, you insert information fields that automatically import value s
you enter in both the Send Fax Wizard and the Fax Configuration Wizard when you send your fax.
To set up your fax cover page template:
1 Click (Start), All Programs, then click Windows Fax and Scan. Windows Fax and Scan
opens.
2 If Windows Fax and Scan is in Scan view, click Fax in the lower left corner of the window.
24
Page 31

www.gateway.com
3 Click Tools, Cover Pages, then click New. The Fax Cover Page Ed itor open s.
• If you want to include fields that are imported from the Send Fax Wizard or the Fax
Configuration Wizard (such as To or From ), add them to the page by using the Insert
menu, then move them t o the appropriate place on your template. You can also use the
Insert menu to include information that is automatically calculated (such as numb er of
pages or date and time sent).
• If you want t o include t ex t that al wa y s appears on your c ov er page (such a s a let te rhead
or address), draw a box using the text box tool, type your text inside of it, then move
the box to the appropriate place on your template.
• If you want to include a logo that appears on your cover page, copy it to the Windows
clipboard, then paste it into the Cover Page Editor and move it to the appropriate place
on yo ur te mp late.
4 To save you r co ver p a g e te mp l a te, cl ic k File, then click Save. The Sa ve As dialog box opens
with your personal cover pages folder already in the Save in list.
5 Type the new cover page template name, then click Save.
Faxing a s canned docu ment or fr om progr ams
To fax a scanned document or to fax directly from programs:
1 Scan the document using the program for your scanner, or open your document in the
program it was created in.
2 Click File, then click Print. The Print dialog box opens.
3 Click the arr ow b utto n to op en the Name list, then click the Fax printer.
4 Click Print. The Send Fax Wizard opens.
5 Complete the wizard by following the instructions in “Sending a fax” on page 21, or “Faxing
a scanned document or from programs” on page25.
Canceling a f ax
You can cancel a fax that you have set up to send at a time in the future.
To cancel a fax that has not been sent:
1 Click (Start), All Programs, then click Windows Fax and Scan. Windows Fax and Scan
opens.
2 If Windows Fax and Scan is in Scan view, click Fax in the lower left corner of the window.
3 Click Outbox, then rig ht-cl ick the fax you wa nt to can cel .
4 Click Delete to cancel the fax.
25
Page 32

CHAPTER 3: Using the Internet and Faxing
5 Click Yes.
Rece iv ing and v ie wing a f ax
To r e c e iv e a n d vi e w a f a x:
1 Click (Start), All Programs, then click Windows Fax and Scan. Windows Fax and Scan
opens.
2 If Windows Fax and Scan is in Scan view, click Fax in the lower left corner of the window.
3 To view a fax, click Inbox, then double-click the fax you want t o vie w . T he f ax vie w er opens,
where you can view and print the fax.
26
Page 33

CHAPTER 4
Playing and Creating
Media Files
• Play ing music and mo vie s
• Creating audio file s and music librar ies
• Creating music CDs and v ideo DVDs
• Creating and copy ing data discs
• Using Wi ndows Media Cent er
27
Page 34

CHAPTER 4: Playin g and Cr eating Media Files
Pla ying mu sic and movie s
Pla ying aud io and video f iles
WindowsMedia Player can play several types of audio and video files, including WAV, MIDI, MP3,
AU, AVI, and MPEG formats. For more information about using Windows Media Player, click Help.
To play a file using WindowsMedia Player:
Shortcut
Start➧Computer ➧ f ind the fi le ➧ double-click the file
1 Click (Start), All Programs, then click Windows Media Player. Windows Media Player
opens.
2 Click Library, then double-click the media file you want to play.
28
Media libraryPlayback controls
Page 35

www.gateway.com
3 Click one of the following to control playback:
• Shuffle randomizes the playback order of the files in the playlist.
• Repeat starts playing the list over again after it reaches the end.
• Stop stops playback and rewinds the current file to the beginning.
• Rewind quickly rewinds the current file (when you click and hold it) or skips to the
• Pause/Play alternately pauses an d resumes playback.
• Fast forward quickly fast forwards the current file (when you click and hold it) or skips
• Volume adjusts the volume.
Pla ying optical dis cs
Optical discs are flat dis c s that u s e a la se r t o read and wr ite data. CDs, DVDs, HD-DVDs, and Blu-ra y
Discs are all optical discs.
Important
Some music CDs have copy protection software. You may not be able to play these
CDs on your computer.
Help
For more information about playing optical discs, click Start, then click Help and
Support. Type playing discs in the Search Help box, then press E
Repeat
Shuffle Stop
previous file in the playlist (when you click it).
to the next file in the playlist (when you click it) .
Rewind
Fast forward Volume
Pause/Play
NTER.
Mute
Use Windows MediaPlayer to listen to CDs or watch movies on DVDs, HD-DVDs, or Blu-ray Discs.
For more information about using Windows Media Player, click Help.
To p l ay a n o p t i c al d i s c:
Shortcut
Insert disc➧Windows Media Player automati cally plays
1 Make sure that the speakers are turned on or headphon es are plugged in and that the
volume is turned up.
2 Insert an optical disc into the optical disc drive.
29
Page 36

CHAPTER 4: Playin g and Cr eating Media Files
3 If a dialog box opens and asks you what you want the computer to do with the disc, click
Play. WindowsMedia Player opens and begins playing the disc.
If Windows Media Player does not open automatically, click (Start), All Programs, the n
click Windows Media Player. WindowsMedia Player opens.
Playback controls
4 If the disc is not already playing, click (play).
Playlist
Video screen
30
Page 37

www.gateway.com
5 Click one of the following to control playback:
Repeat
Shuffle Stop
Rewind
Fast forward Volume
Pause/Play
Mute
• Shuffle randomizes the playback order of the files on the disc.
• Repeat starts playing the list over again after it reaches the end.
• Stop stops playback and rewinds the current file to the beginning.
• Rewind quickly rewinds the current file (when you click and hold it) or skips to the
previous file on the disc (when you click it).
• Pause/Play alternately pauses an d resumes playback.
• Fast forward quickly fast forwards the current file (when you click and hold it) or skips
to the next file on the disc (when you click it).
• Volume adjusts the volume.
Creating a udio files and mu sic libraries
Creating music f iles
Help
For more information about making or playing an audio recording, click Start, then
click Help and Support. Type recording audio or ripping in the Search Help box,
then press E
NTER.
You can create several types of audio files for your listening enjoyment, including WAV, MP3, and
WMA files.
Recording audio files
Sound recorder is a simple Windows program that lets you record and play audio files. For
information about playing audio files, see “Playing audio and video files” on page 28.
To record an audio file:
Shortcut
Start➧ All Programs➧ Accessories➧ Sound Recorder
1 Plug a microphone into one of the microphone jacks on your computer. For the location of
the microphone jacks, see your computer’s Referen ce Gu i de.
2 Click (Start), All Programs, Accessories, then click Sound Recorder. The
SoundRecorder opens.
3 Click Start Recording, then speak or make other sounds into the microphone.
31
Page 38

CHAPTER 4: Playin g and Cr eating Media Files
4 When you finish recording, click Stop Recording. The Save As dialog box opens.
5 Type a name for the recording, specify the file type and location where you want to save
the recordin g, then click Save. The recording is saved.
Creating WMA and MP3 music files
Important
Some music CDs have copy protection software. You cannot copy tracks from
copy-protected CDs.
Using Windows Media Player, you can c opy the tracks from a music CD to your computer’s hard
drive as WMA or MP3 files. WMA and MP3 are met hods for di gitally comp res sing high-fi delity music
into compact files without noticeably sacrificing quality. WMA files end in the file extension WMA,
and MP3 files end in the file extension MP3.
To create WMA or MP3 files:
1 Click (Start), All Programs, then click Windows Media Player. WindowsMedia Player
opens.
2 Right-click the Rip tab, then click Format, th en clic k W indows Media Audio or mp3 to select
the format you want for your music files.
3 Insert a music CD into your optical disc drive.
4 Click the Rip tab . The Rip screen opens.
5 Click to clear the check box for any track you do not want to record, then click Start Rip.
Windows Media Player records the tracks to your hard drive. A progress bar appears n ext
to each track as it is recorded.
32
Tip
For more information about ripping music from CDs, click the Rip tab, then
click Help with Ripping.
Page 39

Building a music libr ary
Use Windows Media Player to build a music library. You can organize your music tracks (individual
MP3 or WMA audio files) by categories, find a track quickly by sorting, and add information to a
music file.
You can add music tracks to your music library by:
• Creating MP3 or WMA files—When you create MP3 or WMA files from the tracks on your
music CD, WindowsMedia Player automatically adds these files to your music library.
• Dragging and Dropping—Drag and drop files from Wi ndow s Explorer or your des kt op to t he
music library.
Caution
During the download pr oces s, WMA and MP3 fil es may becom e corrupt. If y ou
are having trouble playing a downloaded file, try downloading the file again.
• Downloading files fr om the Internet—W hen you are connect ed to the Inter net, WMA and MP3
files that you download are automatically added to your music library.
Editing track in for mation
After you add a WMA or MP3 file to your music library, you can edit the track’s tags
(informationalfields).
To edit track information:
1 Click (Start), All Programs, then click Windows Media Player. Windows Medi a Player
opens.
2 Click the Library tab.
3 Right-click the track or album you want to edit, then click Advanced Tag E ditor. The
Advanced Tag Editor dialog box opens.
www.gateway.com
4 Enter track informati on such as Title, Artist, Album, and Genre, then click OK. The new
track information appears in the Windows Media Player library.
33
Page 40

CHAPTER 4: Playin g and Cr eating Media Files
Creating mu sic CDs and video D VDs
Creating a music CD
Important
We recommen d th at y ou do not u se y our com put er for other tasks while c r eat ing CDs
or DVDs.
If you record copyrighted material on a CD or DVD, you nee d permission from the copyright
owner . Oth erwise, you m ay be v iolatin g copyrig ht law and be subjec t t o payment of damage s
and other remedies. If you are uncertain about your rights, contact your legal advisor
To create a music CD using Windows Media Player:
1 Click (Start), All Programs, then click Windows Media Player. Windows Media Player
opens.
2 Insert a blank, writable CD into your recordable disc drive.
3 Click the Burn tab, then click and drag songs that you want to burn to CD from the Library
to the Burn List .
34
Library Burn List
4 Click Start Burn. The music is recorded onto the blank CD.
Page 41
Creating a v ideo DVD
If your computer has Windows Vista Home Premium or Windows Vista Ultimate Edition, you can
create video DVDs using Windows DVD Maker.
To create a video DVD using Windows DVD Maker:
creating CDs or DVDs.
If you record copyrighted material on a CD or DVD, you need permission from the
copyright owner. Otherwise, you may be violating copyright law and be subject to
payment of damages and other remedies. If you are uncertain about your rights,
contact your legal advisor.
1 Insert a blank, writeable DVD into your recordable optical disc drive.
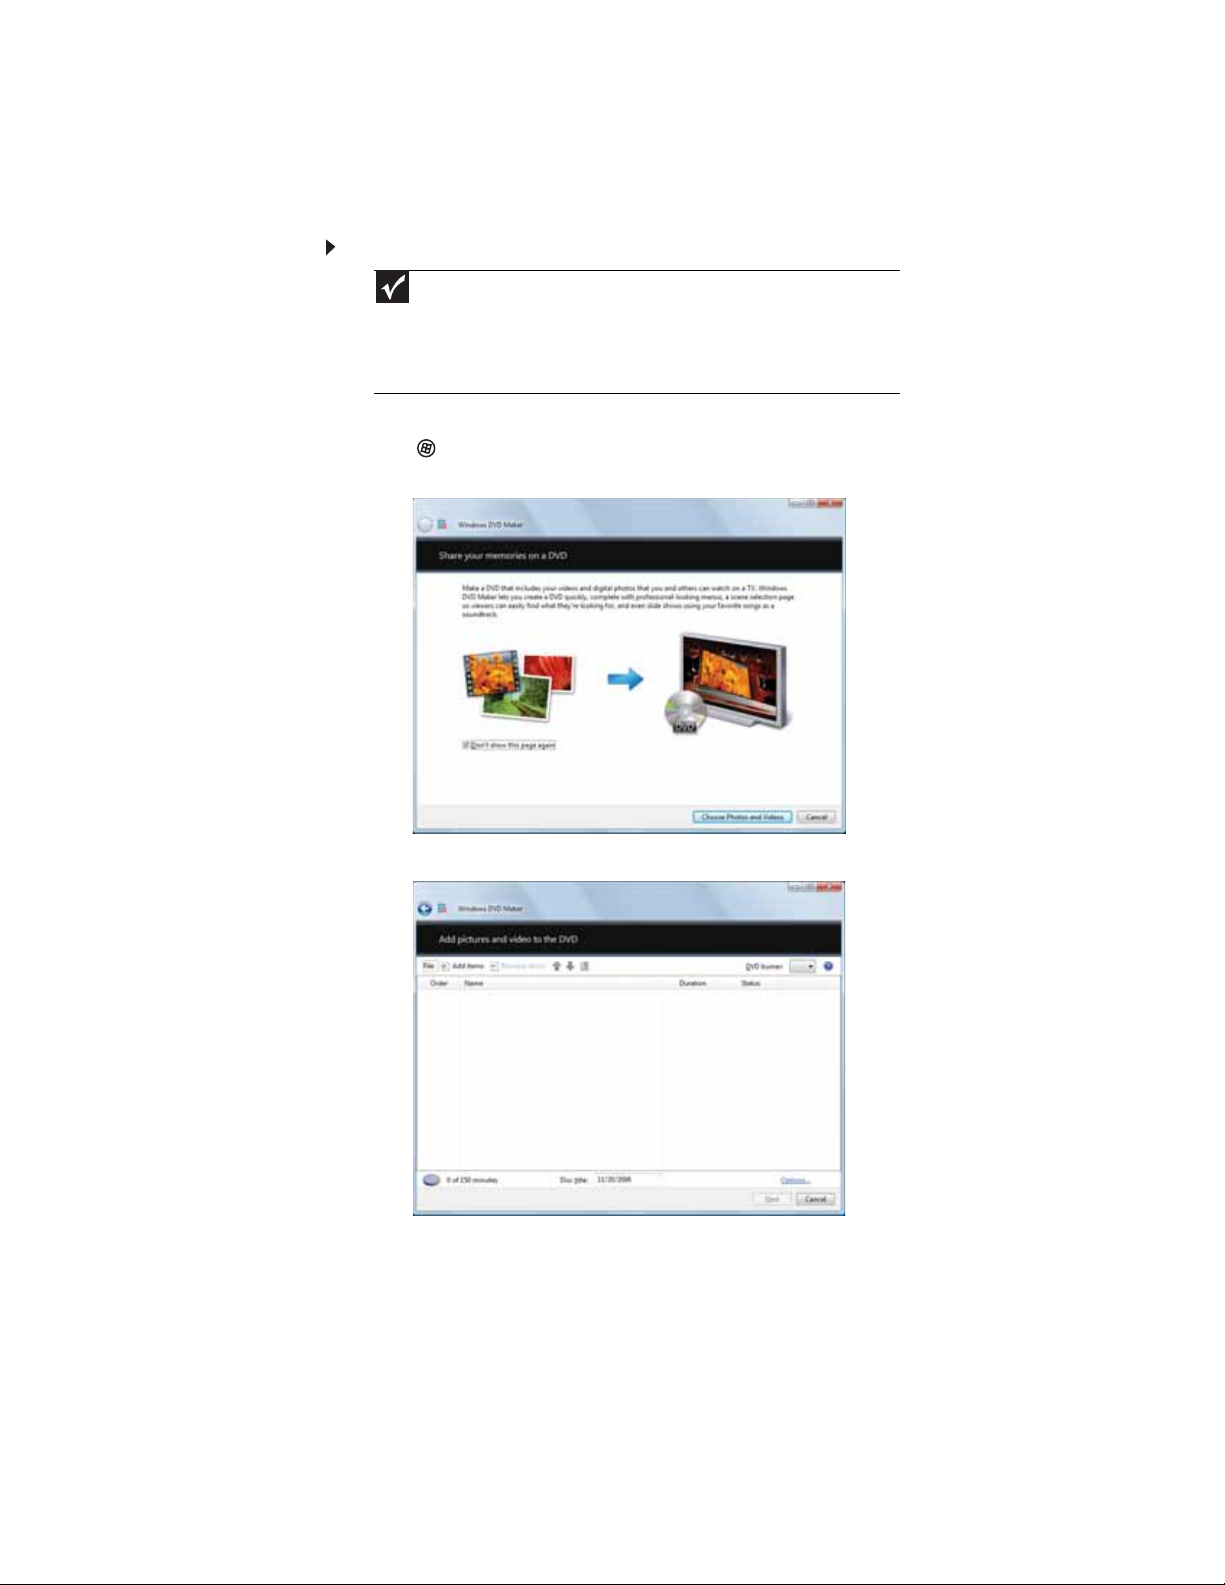
2 Click (Start), All Programs, then click Windows DVD Maker. The WindowsDVDMaker
introduction window opens.
www.gateway.com
Important
We recommend that you do not use your computer for other tasks while
3 Click Choose Photos and Videos. The main screen opens.
35
Page 42

CHAPTER 4: Playin g and Cr eating Media Files
4 Click Add items. The Add Items to DVD dialog box opens.
5 Find and select the videos you want to add to the video DVD, then click Add. The videos are
added to the video list, and a graphic in the lower left corner of t he window show s y ou how
much disc capacity will be used.
36
6 Click Next. The Ready to burn disc dialog box opens.
Page 43

www.gateway.com
7 Click any of the following options to customize your video disc:
• Preview shows how your DVD’s opening menu will look using the current settings.
• Menu text changes the disc title, font, and button names.
• Customize menu changes the menu fon ts, background and foreground videos, audio
track, and button styles.
• Slide show creates a slide show from photo files.
8 Click Burn. Your DVD is record ed.
Creating and cop ying data dis cs
You can burn two types of data discs:
• Live File System writes files immediately to the recordable di sc, making it a o ne-step
process like copying files to a flash drive. The resulting disc is compatible with WindowsXP
and later versions of Windows.
• Mastered copi es f il es to a tem p ora r y fo lde r be fore you tel l the c om pu ter to bu rn th e fi l es
to the disc. Although this is a slower process than Live File System, the resulting disc is
compatible with all operating systems.
The following instructions show you how to burn a disc using the Mastered format, which can be
read by all personal computers, regardless of the operating system installed.
Help
For information about burning a disc using the Live File System format, click Start,
then click Help and Support. Type live file system in the Search Help box, then
pressE
NTER.
Creating a data disc
To c r e a te a d a t a d is c :
1 Insert a blank, writable optical disc into your optical disc drive. The Autoplay dialog box
opens.
2 Click Burn files to disc. The Prepare this blank disc dialog box opens.
3 Type the titl e of the disc, th en click Show formatti ng options .
4 Click Mastered, then click Next. An empty folder opens.
5 Open the f old er that contains the files y o u want to burn to disc , then click and drag the files
to the empty disc folder.
6 Click Burn to disc. The files are burne d to the disc.
37
Page 44
CHAPTER 4: Playin g and Cr eating Media Files
Using W indow s Media Cent er
If your computer has Windows Vista Home Premium or Windows Vista Ultimate Edition, you can
use Window s Media Center to w atch TV , v ideos, and movi es, listen to musi c, and view photo s. Media
Center is a simplified, streamlined interface that is ideally suited for playing and managing media
files.
Because the remote control is an optional accessory, most instructions in this section assume you
are using a mouse to navigate the Media Center menus.
Starting Windo ws Media C enter
To start Windows Media Center:
1 Click (Start), All Programs, then click Windows Media Center.
- OR Press the Start butto n on th e re mo te c ont rol .
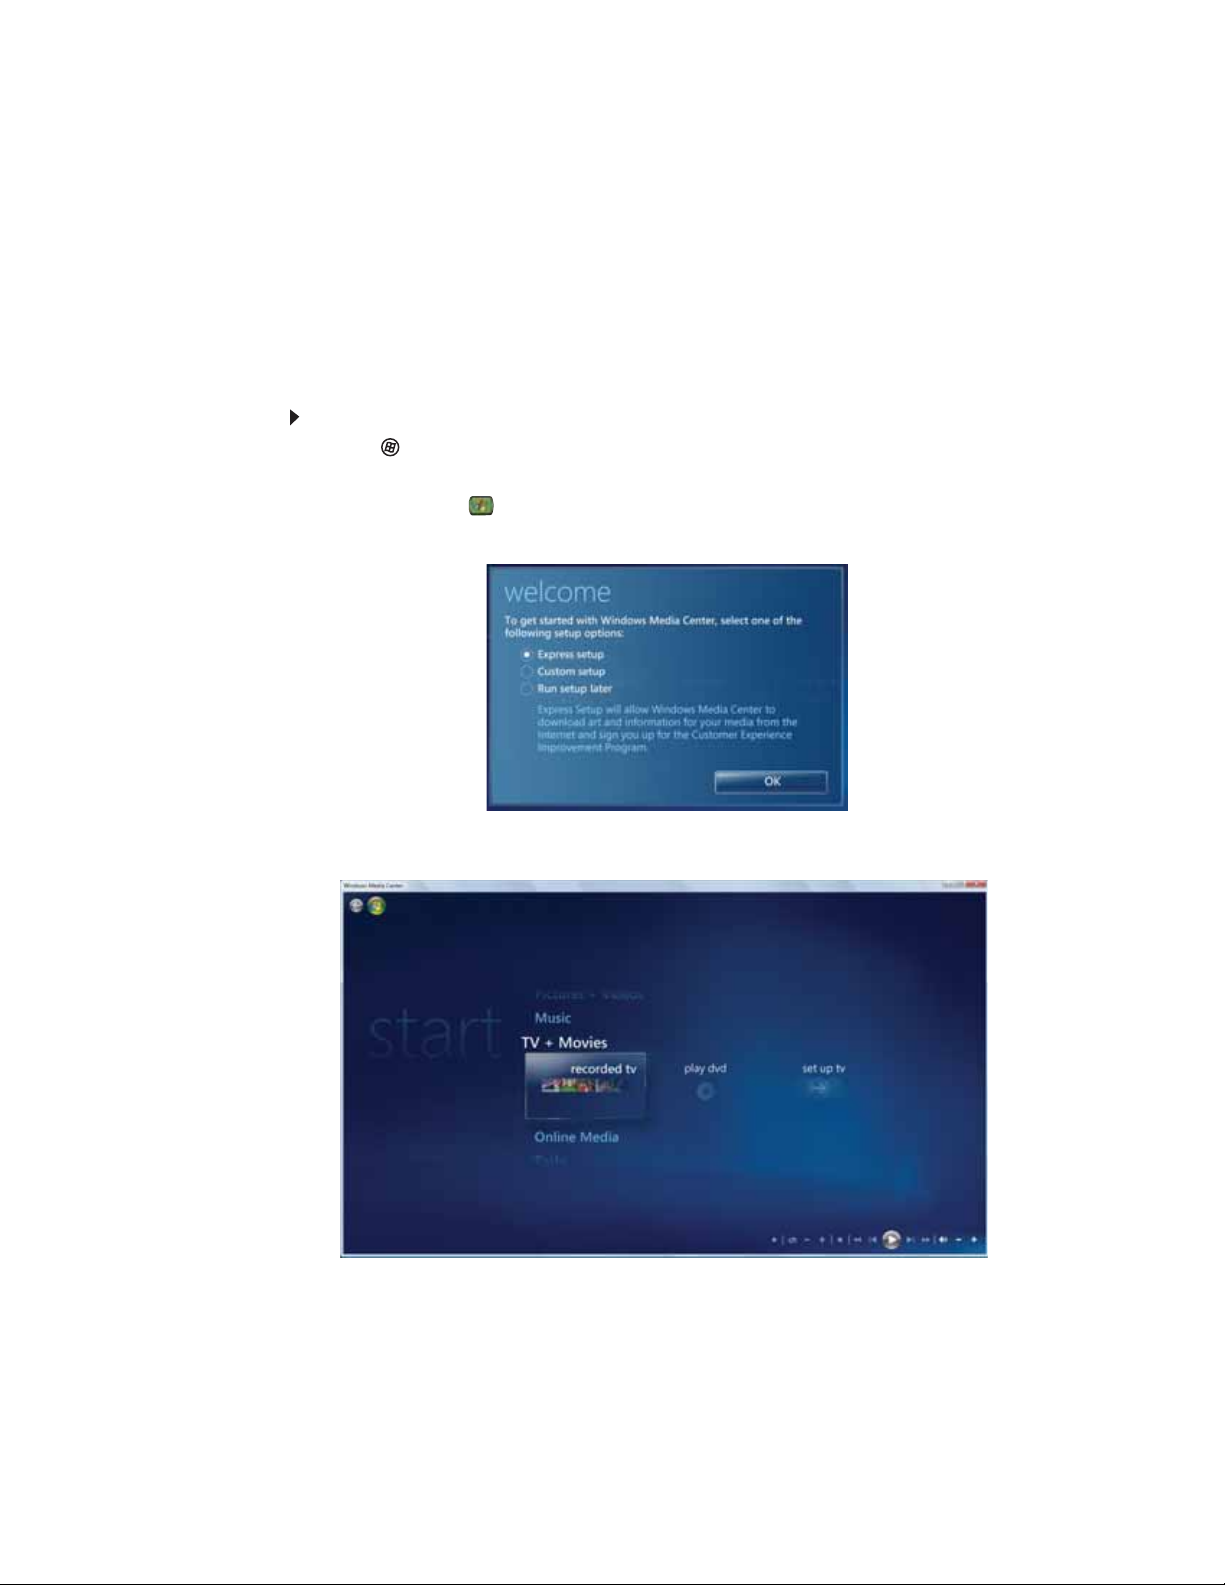
The first time you start Windows Media Center, the Welcome screen opens.
2 For the easiest setup, click Express setup, then click OK. The Windows Media C enter’s main
screen opens.
38
Page 45

www.gateway.com
3 Use the remote control navigation buttons to select a Media Center menu option, then
pressOK.
• TV + Movies le ts you play TV progr ams you hav e recorded, pla y a DVD or Blu-ra y movie ,
or set up your TV tuner card (if installed).
• Online Media lets you play online games.
• Tasks lets you set up y our display and media types, shut down or re start your computer,
burn an optical disc (CD or DVD), and synchronize with another digital media devi ce (such
as an MP3 player).
• Pictures + Videos lets you view individual pictu res, pictures in a slideshow, or select
movies from your video library.
• Music lets you selec t s ongs f r om y our mu sic libr ary, set up and use your FM r adio tuner
card (if installed), and play music playlists.
4 To exit Windows Media Center, click the × in the uppe r-right corne r of the screen.
39
Page 46
CHAPTER 4: Playin g and Cr eating Media Files
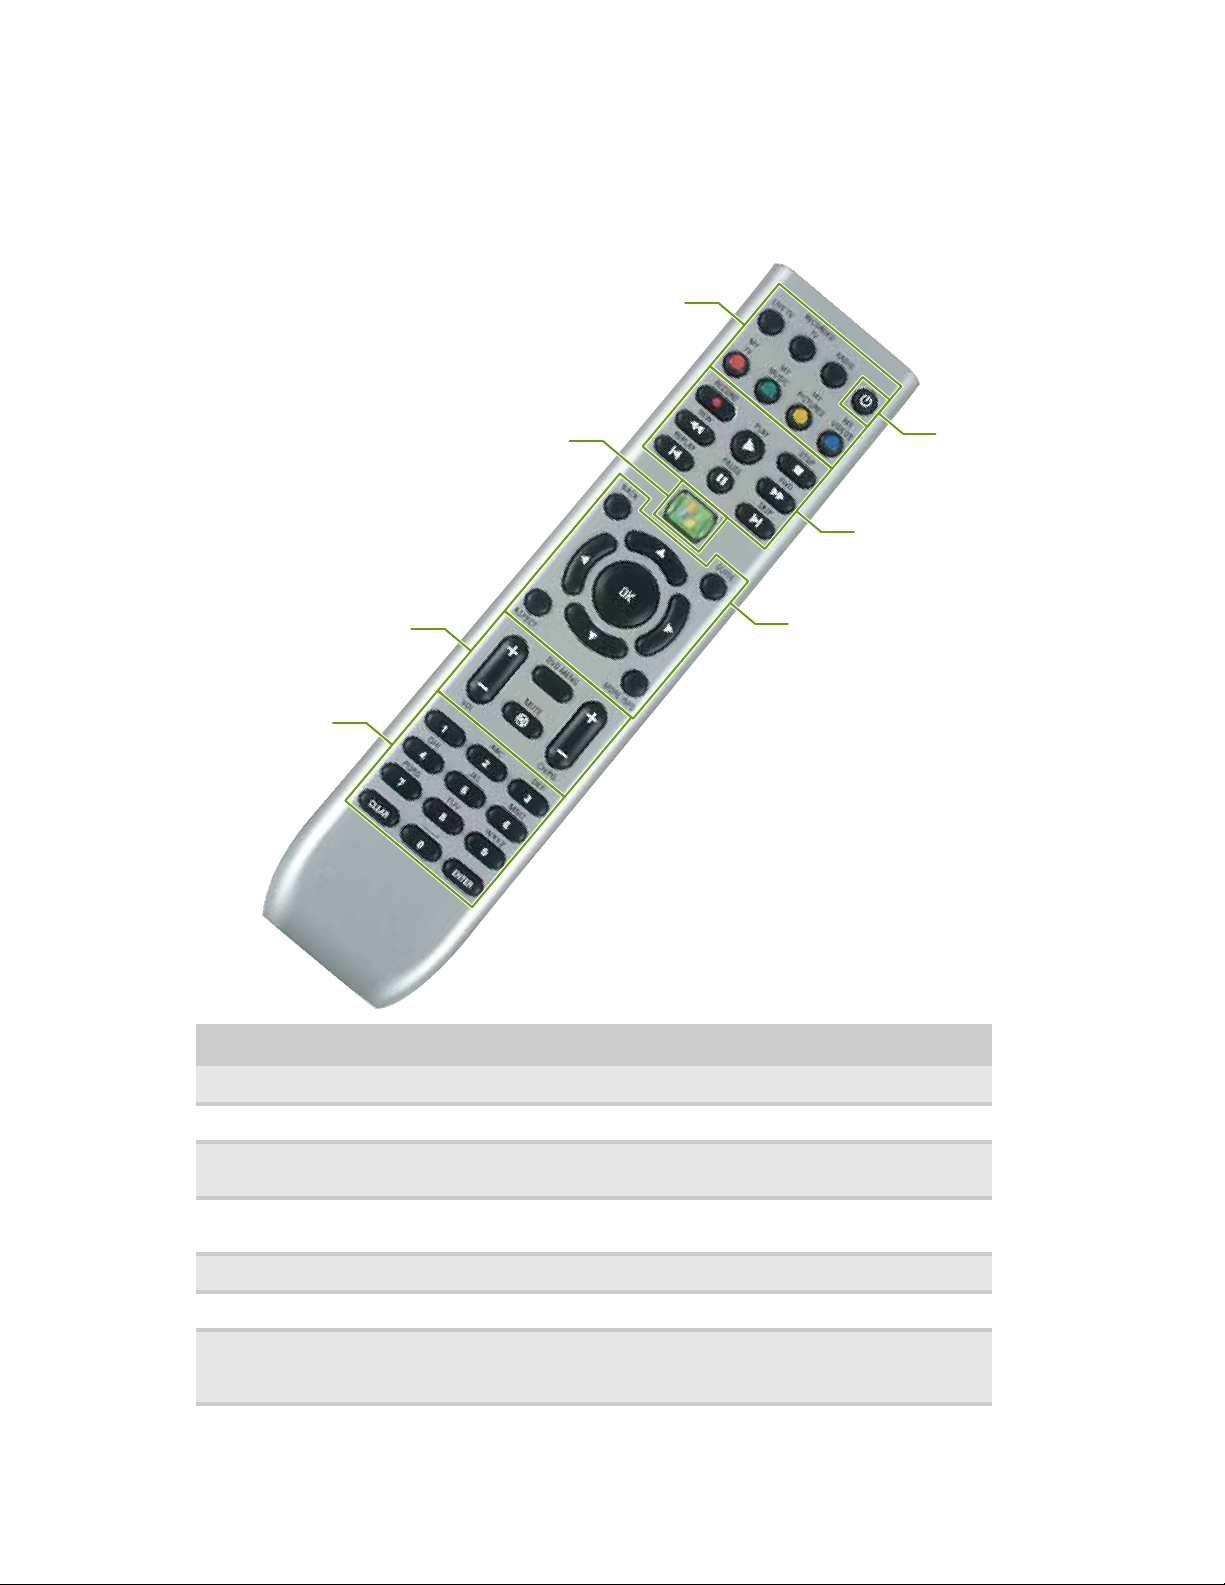
Using the Me dia Cent er remot e control
With Media Center mode active, you can use the optional remote control to play all of your media
files fr om ac ro s s t he r oom. (T he re mot e control, if inc luded wit h y our comput er, may look diff er ent
from th at s hown belo w.)
Sho rtcu t bu tto ns
Audio/Video (A/V) control buttons
Numeric keypad/data entry buttons
Sta rt b utto n
Power b u tton
Transport buttons
Navigation buttons
40
Button(s) Functions
Shortcut buttons Give you direct access to Media Center features.
Start button Opens the Media Center’s main menu.
Audio/Video (A/V) control
buttons
Numeric keypad/data entry
buttons
Power bu tto n Puts the Media Center computer in Sleep mode (reduced power).
Transport buttons Let you control the playback of media files and optical discs.
Navigation buttons Let you move the cursor around the Guide and menus, make selections,
Lets you c ontr ol vo lume le ve ls, vo lume mut e , chann el selec tion s, and the
movie menu.
Lets you en te r nu m be rs an d ch ar acte rs fro m t he rem ote co nt ro l.
navigate back to the previous screen, change the screen display aspect
ratio, and get more information. Press the OK button to make a selection.
Page 47

CHAPTER 5
Networking Your Computer
• Introduction t o Netw orking
• Ethernet ne tworking
• Bluetoot h networ king
41
Page 48

CHAPTER 5: Netw orking Your Computer
Introduc tion to Ne tworking
Networking t erms y ou should know
DHCP—Dynamic Host Configuration Protocol (DHCP) lets a router temporarily assign an IP address
to a computer on the network.
IP address—Internet Protocol (IP) address is a number that uniquely identifies a computer on the
network.
LAN—A local area network (LAN) is a computer network covering a local area, like a home or office.
Wired and wireless Ethernet are common methods of creating a LAN.
PAN—A personal area network (PAN) is a computer network used for communication among
computer devices (including cellular telephones, personal digital assistants, and printers) close to
one person. A wireless personal area netw ork (WPAN) is made pos sible with Bluet ooth. Th e primary
purpose of a WPAN is to replace USB or Firewire c ables.
Subnet mask—Subnet mask is a number that identifies what subnetwork the computer is located
on. This number will be the same on all computers on a home network.
WAN—A wide area network (WAN) is a computer network that covers a broad geographical area.
The largest and most well-known example of a WAN is the Internet.
Ether net netw orking
Wir ed Ether net netw orking
An wired Ethernet network consists of two or more computers connected together through an
Ethernet cable. This connection type is commonly used in offices around the world and can be
used to build computer networks in the home.
Ethernet, F ast Ethernet, or Gigabit Ethernet
Important
Check local code requirements before installing Ethernet cable or other wiring in your home or office. Your
municipality may require you to obtain a permit and hire a licensed installer.
Ethernet is available at three different sp eeds. Standard Ethernet runs at 10 Mbps, Fast Ethernet
runs at 100Mbps, and Gigabit Ethernet runs at 1000 M bps. Most home networks are built using
Standard or Fast Ethernet components. Business networks are typically built using Fast or Gigabit
Ethernet comp onents.
To create a wired Ethernet network, you or your electrician must install special Ethernet cables in
your home or office.
Using a router
The most common way t o set up a w ired Ethernet netw ork is Dyna mic Host Control Pr otocol (DHCP)
using a router. A DHCP network configuration uses a router to automatically assign IP addresses
to each computer or network device. For information on setting up a router, see the router’s
documentation.
42
Example router-bas ed Ethernet network
The following is an example of a wired Ethernet network. The network is made up of a router, a
cable or DSL modem, y our comput ers, and cables connecting eac h of thes e components. The r outer
is the central control point for the network.
Tip
To add the ability to access a wireless Ethernet network to your wired Ethernet network, connect an access point
to the router or use a router that has a built-in access point.
Page 49

www.gateway.com
Attached to the router are all of your computers or Ethernet-ready devices. Also connected to the
router is a cable or DSL modem that provides access to the Internet.
Cable/DSL
modem
Router
Equipment you need for a rout er-based Ethernet network
Important
For best results, all Ethernet components shou ld be either stan dard Ethernet (10 Mbps), Fast Ethernet (100 Mbps or
10/100), or Gigabit Ethernet (1000 Mbps or 10/100/1000). A mixture of components rated at different speeds will result
in your network running at the speed of the slowest rated component.
For a wired Ethernet network you need:
• Two or more computers with Ethernet jacks
• One router
• One broadband Internet connection (optional)
• Ethernet cables connecting all of the network equipment
When buying your router, be sure the model includes everything your network needs, including:
• Internet security features, such as a firewall, to protect your network from unwanted
intruders
• 4-port switch to eliminate the need for additional network hardware
• DHCP server/dynamic IP address assignment to automatically configure network and IP
addresses
Determining if an E thernet card is already in stalled on your computer
To determine if an Ethernet card is already installed on your computer:
1 Click (Start), then click Control Panel. The Co ntro l Pane l wind ow opens .
2 Click System and Maintenance, then click System.
3 Click Device Manager from the task list on the left. The Device Manager wi nd ow op ens .
4 Click the plus (+) in front of Network adapters. The Ethernet device installed in your
computer is listed. If one is not listed, you must install one.
43
Page 50

CHAPTER 5: Netw orking Your Computer
Setting up wired Ethern et network hardw are
Making sure your broadband connection works
Important
If you do not have a broadband connection already installed, make the necessary arrangements with your ISP. Be
sure to find out how soon after the installation the line will be activated.
Broadband Internet settings differ from ISP to ISP. Before you begin setting up your network, you should contact your ISP
for any specific instructions they have for setting up a network.
Before you change anything about your home setup, make sure that your broadband connection
is wo rkin g co rre c t ly. To tes t the connection, log on to the Interne t u s ing yo ur cu r re nt set up. If the
connection is not working, contact your Internet ser vice provider.
Installing Ethernet cards and drivers
After you ha v e det ermined the ty pe of Ethernet y ou are u sing for your netw ork, y ou need to install
Ethernet cards and drivers on the computers that do not have Ethernet already installed.
Use the documentation that comes with your Ethernet cards for instructions on installing the card
and any required drivers.
Plug your Ethernet cable into your computer’s jack and the router or the cable or DSL mode m at
this point, if you have not already done so.
Connecting network cables
We recommend using category 5 (Cat 5), unshielded, twisted-pair cable (about 1/4-inch diameter
with a thin outer-jacket, containin g ei ght color-coded wires), and equipment compatible with this
type of cable. This type of cable is equipped with RJ-45 connectors (like a large telephone jack
connector, but with eight pins) on each end.
Cat 5 cables are available in two different types; straight-through cables, used to connect
computers to a router, and crossover cables, used to connect two computers.
T o det er mine whic h type of cable y ou ha v e, hold both ends of the cable with the connectors f ac ing
away from you and with the spring clip on the bottom. For straight-through cable, the wires on
both co nn ector s a re a tta che d to cop pe r p in s i n th e sa me ord er (sa me co lor s, le ft to rig ht ) . Fo r a
crossover cable, the wires on each connector are attached to the copper pins in a different order
(different colors, left to right) .
Setting up a network using a router
If you are setting up a network for more than two computers and you will be connecting your
network to a high-speed Broadband Internet connection (cable or DSL modem), we recommend
the use of a router. A router lets you access the Internet connection from any network computer.
The router can assign IP addresses to the computers on the network and can provide firewall
protection for your network as well.
44
Page 51

www.gateway.com
In addition to a router, you need a straight-through cable for each computer you want to connect
to the net wor k.
Cable/DSL
modem
Router
WAN por t
To set up a network using a router:
1 Plug one end of the power adapter into the AC connector on the router and the other end
into a grounded, 110V electrical outlet.
2 Tu r n o n y our comput e rs.
3 Plug one end of a straight-through network cable into any numbered port on the router
(except the W AN port). The WAN port is used t o connect the r outer t o the DS L or cable modem
and is identified by a label or a switch. Plug the other end of the cable into the network
jack on the computer. As each computer is connected to the r out er, the corresponding green
indicator should light on the front of the router, indicating a good connection.
4 Repeat Step3 for each computer on the network.
5 For an Internet connection, plug a straight-through cable into the WAN port on the router
and the other end into the Ethernet jack on the DSL or cable modem.
Wir eless Et hernet ne tworking
Wireless Ethernet networking is the latest advance in computer communication. With a wireless
home network, you can set up your computer wherever you like.
A wireless Ethernet network uses radio waves to communicate. Typically, a wireless Ethernet
network is made up of an access point, a cable or DSL modem (for Internet access), and your
wirel ess c om pu ters .
Wirele ss Ethern et standard s
Current wireless Ethernet standards include the following:
• 802.11a — 54M bps
• 802.11b — 11Mbps
• 802.11g — 54M bps
• 802.11n — 54 0Mbps
45
Page 52

CHAPTER 5: Netw orking Your Computer
Speed is not the only issue if you decide to use equipment with different standards. Compatibility
can also be an issue . Take the f ol low ing int o cons ideration when y ou pur cha s e wir eles s equipme nt:
Access point Wireless cards supported
802.11a 802.11a only
802.11b 802.11b only
802.11g 802.11b and 802.11g
802.11n 802.11b, 802.11g, and 802.11n
Using an access point
An access point is a small el ectronic dev ice that serv es as the ce ntral contro l point for y our netw ork.
You conn ect your modem to the access point, set up a network con nection, then browse the
Internet, send e-mail, share files and folders with other networked computers, and access other
devices, like a printer or scanner.
Cable or DSL modem
Access point
Equipment you need f or an access point -based netw ork
Tip
When you buy your access point, make sure it has:
• IEEE 802.11n support. 802.11n is the fastest method for wireless communications. 802.11n is compatible with the older
IEEE 802.11g and IEEE802.11b formats but not with the competing IEEE 802.11a format. Make sure that you get the
correct format that matches your computer.
• DHCP server/dynamic IP address assignment capability that makes it easier to set up and access your network.
• Internet security features like a firewall to keep intruders out of your network.
• Wireless security features like SecureEasySetup ™ or 128-bit WEP encryption.
For a wireless Ethernet network you need:
• Your Gateway computer with wireless networking installed
• A broadband Internet connection (optional)
• An access point
Determining if a wireless Ethernet device is already installed in your computer
To determine if a wireless Ethernet device is already installed:
1 Click (Start), then click Control Panel. The Co ntro l Pane l wi nd ow o pen s.
2 Click System and Maintenance, then click System.
3 Click Device Manager from the task list on the left. The Device Manager wi nd ow op ens .
4 Click the plus (+) in front of Network adapters. The wireless Ethernet device installed on
your computer is listed. If one is not listed, you must install one.
46
Page 53
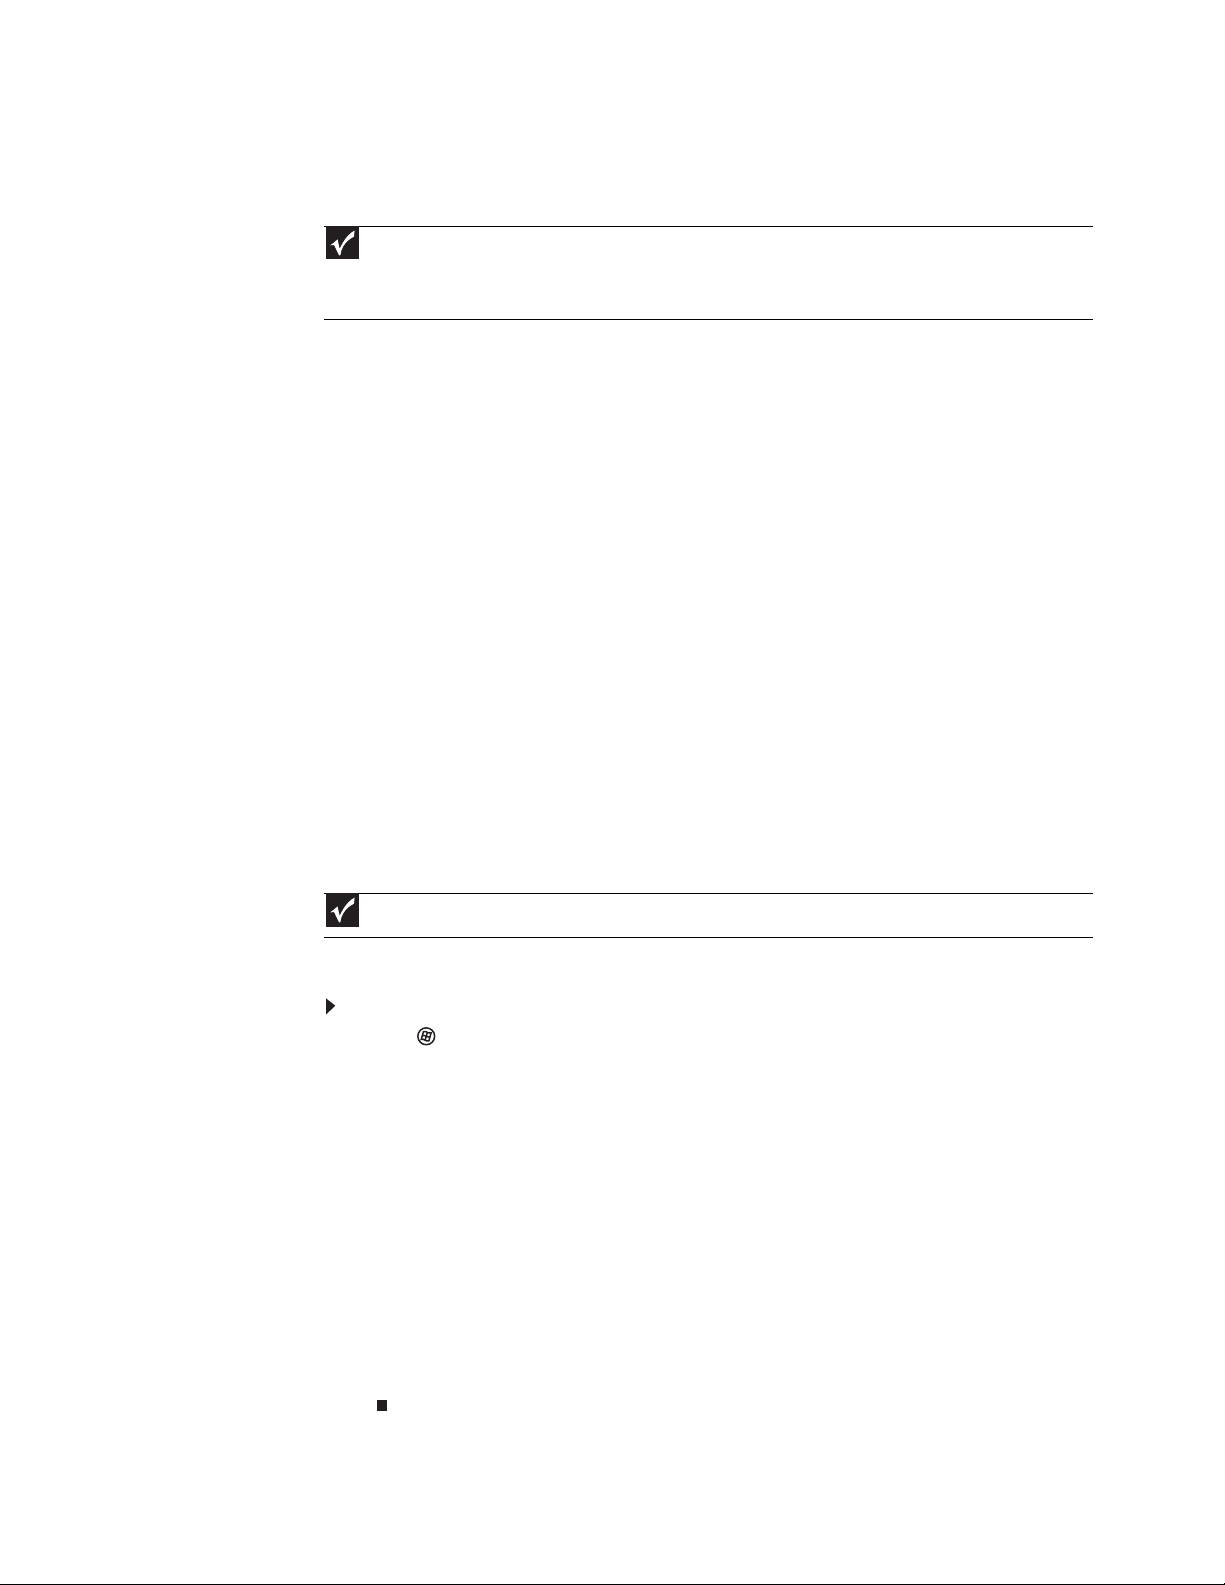
www.gateway.com
Setting up wireless Ethernet netw ork hardware
Making sure your broadband connection works
Important
If you do not have a broadband connection already installed, make the necessary arrangements with your ISP. Be
sure to find out how soon after the installation the line will be activated.
Broadband Internet settings differ from ISP to ISP. Before you begin setting up your network, you should contact your ISP
for any specific instructions they have for setting up a network.
Before you change anything about your home setup, make sure that your broadband connection
is working correctly. To test the connection, log onto the Internet using your current setup. If the
connection is not working, contact your Internet service provider.
Installing wireless cards and drivers
After you have determined the type of wireless equipment you are using for your network, you
need to install wireles s cards and driv ers on the computers that do not hav e them alread y installed.
Use the documentation t hat come s w ith your wireless cards f or i nstruc tions on install ing the car ds
and any required drivers.
Setting up your access point
A wireless Etherne t network sends and recei v es inf ormation thr ough radio wa v es. T his means that
another computer outside your network can intercept the radio waves and take control of your
network.
If you do not set up sec urity f or y our netw ork, a hacker can gain access to your Interne t connection
to send spam e-mail and to your hard drive to download viruses or view your personal data, like
credit card numbers, Social Security numbers, and personal online banking information.
Check your access point documentation for information about installing the access point and
setting network securit y.
Establishing y our Etherne t netw ork connec tion
Naming the computers and the workgroup
Important
You must give each computer on the network a unique Computer Name and the same Workgroup Name.
Make sure that you have set up your router (wired network) or access point (wireless network) .
If you are setting up a wired network, make sure that you have connected the network ca bling.
To identify this computer on the network:
1 Click (Start), then click Control Panel. The Co ntro l Pane l wind ow opens .
2 Click System and Maintenance. The System and Maintenance window opens.
3 Click System, then click Change Settings in the Computer Name, Domain and
Workg ro up se tti ng s area. The System Prop erties dialog box opens.
4 Click Change.
5 If your computer does not already have a name, type a unique computer name in the
Computer name box. This name identifies the computer to other users on the network.
Use a computer name of up to 15 characters with no blank spaces. Each computer name
must be unique on your network. All-numeric computer names ar e not allowed. Names mu st
contain some letter s.
6 Type a name for your workgroup in the Workgroup box. Use a workgroup name of up to
15 c harac ters w ith no blank spaces. The work group name mu st be the s ame for al l computers
in your network workgroup, and the name must be different than any computer name on
you r ne two rk .
7 Click OK. When you are prompted to restart your computer, click Resta rt Now.
47
Page 54

CHAPTER 5: Netw orking Your Computer
Configuring the T CP/IP prot ocol
A networking protocol is a language computers use to talk to each other. One of several available
protocols must be se t up on each computer you plan to use on your network. We recommend you
use the Transmission Control Protocol/Internet Protocol (TCP/IP), which is widely accepted and
compatible for local area networks (LANs), as well as for Internet communications.
When networking is set up in Windows Vista™, TCP/IP is automatically installed as the default
protocol.
Using a DHCP server
In order to us e t he TCP/IP protocol on a computer w it h a router or access point rout er, the prot ocol
must be set to “Obtain an IP address from a DHCP server.” This is typically preset when you receive
your computer.
Configuring your router
After you have named your computers and set up TCP/IP on them, you can configure your router
using your Web browser. For instructions, see your router’s documentation.
Connectin g to a wireless Ether net network
Important
Each computer on your network needs a unique Computer Name. All the computers on your network need the same
Workgroup Name. You may have already named your computer and workgroup the first time you turned on your computer.
Connecting to your network
Help
For more inf orma tion about connec ting t o y our net work, c lic k Start, then click Help and Support. Type t he f ollowing
in the Search Help box, then press E
• Connect to an available network
• Manually add a wireless Ethernet network
• Connecting to wireless Ethernet network.
After you have named your computer and workgroup, you need to set up t he network connection
on your computer.
To connect to your wireless Ethernet network:
NTER.
1 Click (Start), then click Network. The Network window o pens.
48
Page 55
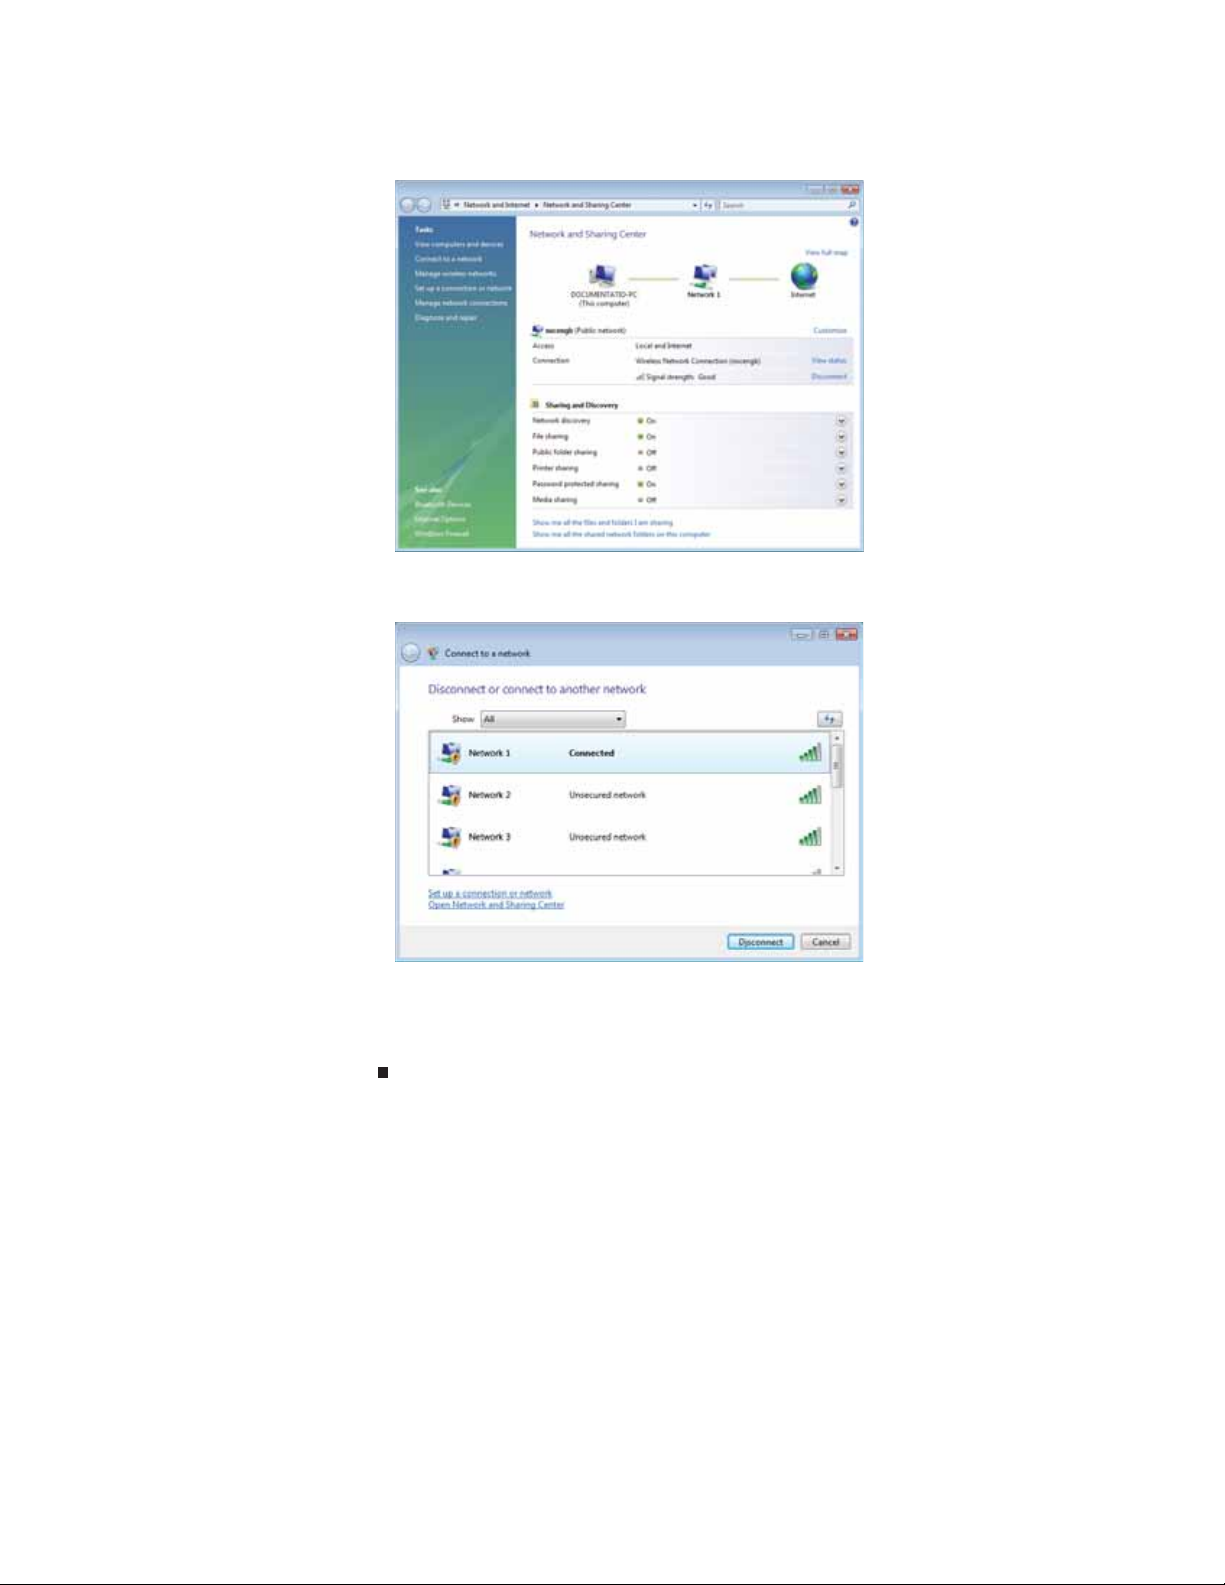
www.gateway.com
2 Click Network and Sharing Center. The Network and Sharing Center wi ndow ope ns.
3 Click Connect to a network on the left of the window. The Conn ect to a net wo rk dialog
box opens.
4 Click a network, then click Connect.
If you can see the network name , but you cannot connect t o it, your network is u sing security .
Right-click on the network, then click Properties. Modify the security settings to match the
settings you set on your access po int.
49
Page 56

Wireless security
For information on wireless security, refer to the documentation that came with your access point.
Help
For more information about wireless network security methods, click Start, then click Help and Support. Type
wireless network secu rity methods in the Searc h Help box, then press E
T esting y our netw ork
Now that your home network is set up, log onto one of your computers and access a favorite
Inte rnet Web si te.
If you are unable to connect to the Internet:
• Click Start, Control Panel, Network and Internet, then click Network and Sharing
Center. Select Diagn ose and Repair on the left of the window. Take any actions suggested.
• If you are using a wired Ethernet network, check all physical cable connections.
• Make sure that your router or access point is plugged in and compare the status lights on
the fro nt of the rou ter or ac cess po int wi th th e p atte rns de scrib ed in the rou ter or acc ess
point documentation.
• Temporarily turn off any firewall software on your desktop computer.
• Turn off all of the devices, then power them back on.
• Refer to your router’s or access point’s troubleshooting information.
• Contact your Internet service provider.
CHAPTER 5: Netw orking Your Computer
NTER.
Adding a print er to y our ne twork
Instead of plugging a printer into each of your computers, you can add a printer to your network.
To add a printer to the network, do one of the following:
• Connect your printer to your networked computer, then share the printer. For information
about sharing printers, see “Sharing drives and printers” on page50.
• Connect your printer to your router or access point if the router or access point includes a
USB or parallel port. For more information, see the instructions that came with your router
or access point.
• Use a printer that has built-in networking.
• Use a pri nt serve r.
Sharing re sour ces
With a network, you can share your Internet connection, drives, and printers.
Sharing driv es and printers
With a network, y ou can share drives (for e xample hard dr iv es and D VD dri ve s) and printe rs among
the computers connected to the network.
Important
To share a printer among the network computers, each computer must have the shared printer’s drivers installed.
Follow the instructions included with your printer to install the printer drivers on each computer.
Aft er the driv e s and pr inte rs on eac h netw ork co mput er are share d, yo u can acce ss t hem a s thoug h
they were attached directly to your computer. Then you can:
• View a network drive
• Open and copy files stored on other network computers
• Print documents on network printers
50
Page 57

www.gateway.com
Sharing drives or folders
To share drives or folders:
1 Click (Start), then click Computer.
2 Right-click the drive or folder that you want to share, then click Share. The Properties dialog
box opens.
If you share a drive, the entire contents of that drive will be available to everyone on your
network. If you share a folder, only the contents of that folder will be available to everyone
on the network.
3 Click the Sharing tab.
Click Share.
- OR If Share is grayed out, click Advanced Sharing to set sh ar in g fo r th is dr ive or fol de r.
4 Click OK, then click Close.
Un-sharing drives and folders
To un-share drives or folders:
1 Click (Start), then click Computer.
2 Right-click the drive or folder that you want to un-share, then click Share.
3 Click Advanced Sharing, then click Share this folder (or drive) to uncheck the box.
4 Click Apply, then click OK.
Sharing printers
To s h a re p r i nt e rs :
1 Click (Start), then click Control Panel. The Co ntro l Pane l wind ow opens .
2 Under Hardware and Sound, click Printer The Printers window opens.
3 Right-click the name and icon of the printer you want to share, then click Sharing on the
menu.
4 On the Sharing tab, click Share this printer, then click OK.
51
Page 58

Using the network
After the drives and printers on each network computer are shared, you can:
• View sha red d rives an d folde rs
• Map a network drive
• Open and copy files stored on other network computers
• Print documents on network printers
Viewing shared drives and folders
Help box, then press E
To view shared drives and folders:
1 Click (Start), then click Network. The Network window opens.
2 If no drives or folders are displayed, click the option bar under the menu bar, then click Turn
3 Double-click the name of the computer containing the drive or folder you want to view. All
CHAPTER 5: Netw orking Your Computer
Help
For more inf ormation about work gr oups, clic k Start, then click Help and S uppor t. T ype workgroups in the Search
on network discover and file sharing.
shared drives and folders are listed.
NTER.
Creating a shortcut to a netw ork driv e
After a shortcut is created on a computer for a drive or folder on another computer, the contents
of the drive or folder can be accessed as if the drive were attached directly to the computer.
For example, a shortcut is created on computer 2 to the Documents folder on computer 1. To access
the Documents folder on computer 1 from computer 2, double-click the shortcut icon.
To map a network drive:
1 Locate the drive or folder by completing the steps in “Viewing shared drives and folders”
on page 52.
2 Right-click the drive or folder, then click Create Shortcut. A shortcut is created for the drive
or folder and the icon for the shortcut is placed on your desktop.
3 Click × to close the window.
Opening files across the network
To open files across the network:
1 Start the p rogram for the file you wan t to open .
2 Click File, then click Open.
3 Browse to the network drive that contains the file you want to open.
4 Double-click the folder containing the file, then double-click the file.
Copying files across the network
52
To copy files across the network:
1 Click (Start), then click Computer. The Computer window opens.
2 Browse to the network drive that contains the file you want to copy.
3 Browse to the file you want to copy.
4 Right-click the file, then click Copy.
5 Right-click the folder where you want to copy the file to, then click Paste.
Page 59

Printing files across the network
Important
Before you ca n print a file across the network, you must install the driver for the printer on the computer you are
sending the file from. You can obtain the printer driver and installation instructions from the CD that shipped with your
prin ter o r fro m the m a nu factu rer ’s We b si te.
To print files across the network:
1 Open the file you want to print, then click Print.
2 Click the arr ow b utto n to op en the pri nte r na me li st , th en c li ck th e n etw or k pr in ter.
3 Click Print.
Bluet ooth netw orking
You can use Bluetooth to communicate with other Bluetooth-enabled devices. These devices may
include printers, MP3 play ers, cellular telephones, and other computers. Bluet ooth lets y ou transfer
information between th ese devices withou t the use o f a USB or Firewire ca ble. To access a
Bluet o oth-enabled device , you must in st al l t he device, t h en co nn e c t t o t he Bl uetooth p ersonal area
network.
Important
Your notebook may have a Bluetooth radio built-in. If you are using a desktop computer or if your notebook does
not have built-in Bluetooth, you can purchase a Bluetooth adapter to connect to a USB port on your computer.
www.gateway.com
To install a Bluetooth enabled device:
1 Turn on your Bluetooth radio and the Bluetooth device.
2 Click (Start), Control Panel, then click Hardware and Sound.
3 Click Bluetooth Devices.
4 Click Add, then follow the on-screen instructions.
To install a Bluetooth printer:
1 Turn on your Bluetooth radio and the Bluetooth printer.
2 Click (Start), Control Panel, then click Hardware and Sound.
3 Click Add a printer.
4 Click Add a network, wireless, o r Blueto oth print er, click Next, then f ollow t he on-screen
instructions.
To connect to a Bluetooth personal area network:
1 Turn on your Bluetooth radio and the Bluetooth device.
2 Click (Start), Control Panel, then click Network and Internet.
3 Click Network and Sharing Center.
4 Click Manage Network Connections. The Network Connections window opens.
5 Under Personal Area Network, click Bluetooth Network Connection.
6 On the toolbar, click View Bluetooth network devices. The Bluetooth Personal Area
Network Devices dialog box opens.
7 Under Bl uetooth devices, click that device you want to connect to, then click Connect.
Help
For more information about Bluetooth, click Start, then click Help and Support. Type Bluetooth in the Search
Help box, then press E
NTER.
53
Page 60

CHAPTER 5: Netw orking Your Computer
54
Page 61

Protecting y our computer
• Hardware security
• Data security
• Security updat es
CHAPTER 6
55
Page 62

CHAPTER 6: Protecting your computer
Hardware security
Although you may be able t o replace your comput er with a call to your insurance agent, you cannot
replace the information stored on your computer. Take steps to prevent theft of your computer.
K ensington loc k slot
The first step in computer security is preventing your computer from being stolen.
Attach a cable lock to t he K ensingt on lock slot on y our comput er, then wrap the lock ’ s cable around
the leg of a desk or table. You can buy a cable lock at most electronics st ores and man y department
stores.
For the location of the Kensington lock slot, see your Reference Gui de.
Data security
The second s tep in co mputer securi ty is keep ing your d ata safe and secure.
Startup and har d driv e pas sw ord
Use a startup and hard drive password to keep other people from using your computer. You have
to enter your password when you turn on your computer or access your files.
These passwords are set in your computer’s BIOS setup uti lity. Use a password that you can
remember but that would be hard for someone else to guess.
Tip
For instructions on creating a startup and hard drive password, see your computer’s
Referenc e G ui d e. Make sure that you use a password you can remember. The password
feature is very secure, and you cannot bypass it. If you forget your password, you will have
to return your computer to Gateway so we can reset it.
Windo ws us er accounts
Windows lets you set up a user account for each person who uses your computer. When you set
up user accounts, Windows sets up a My Documents folder for each account. You can assign a
password to each account so only the account owner can access files in the My Documents folder.
When you set up a user account, you can also limit the programs that a user can install or run.
56
Help
For more information about Windows us er acc ount s, click Start, then click Help and
Support. Type user accounts in the Search Help box, then press E
NTER.
Page 63

www.gateway.com
Prot ecting y our comput er f rom v iru ses
A virus is a program that attaches itself to a file on a computer, then spreads from one computer
to another. Viruses can damage data or cause your computer to malfunction. Some viruses go
undetected for a period of time because they are activated on a certain date.
Protect your computer from a virus by:
• Subscribing to N orton Interne t Security for regula r virus an d spyware p rotection upd ates.
• Using Norton Internet Securit y to check fi les an d progra ms that are atta ched to e -m ail
messa ges or down lo ad ed from the In tern et.
• Checking all programs for viruses before installing them.
• Disabling macros on suspicious Microsoft Word and Excel files. These programs will warn
you if a document that you are opening contains a macro that might have a virus.
• Making sure that the Windows Sec urity C ent er is configured t o pro v ide y ou wit h the highest
level of protection.
Tip
For more information about modifying security settings, see “Modifying security
settings” on page 59.
Help
For more information about protecting your computer against viruses, click Start,
then click Help and Support. Type viruses in the Search Help box, then pressE
NTER.
Using Norton Internet Security
Norton Internet Security helps protect your computer from viruses, spyware, and identity theft.
T o learn mor e about the s e f eat ure s, inc luding how t o s chedule s y stem scans and security updates,
click Learn More on the right side of the screen. For additional help and technical support, click
Help & Support in the upper right corner of the screen. The Help & Support screen opens.
57
Page 64
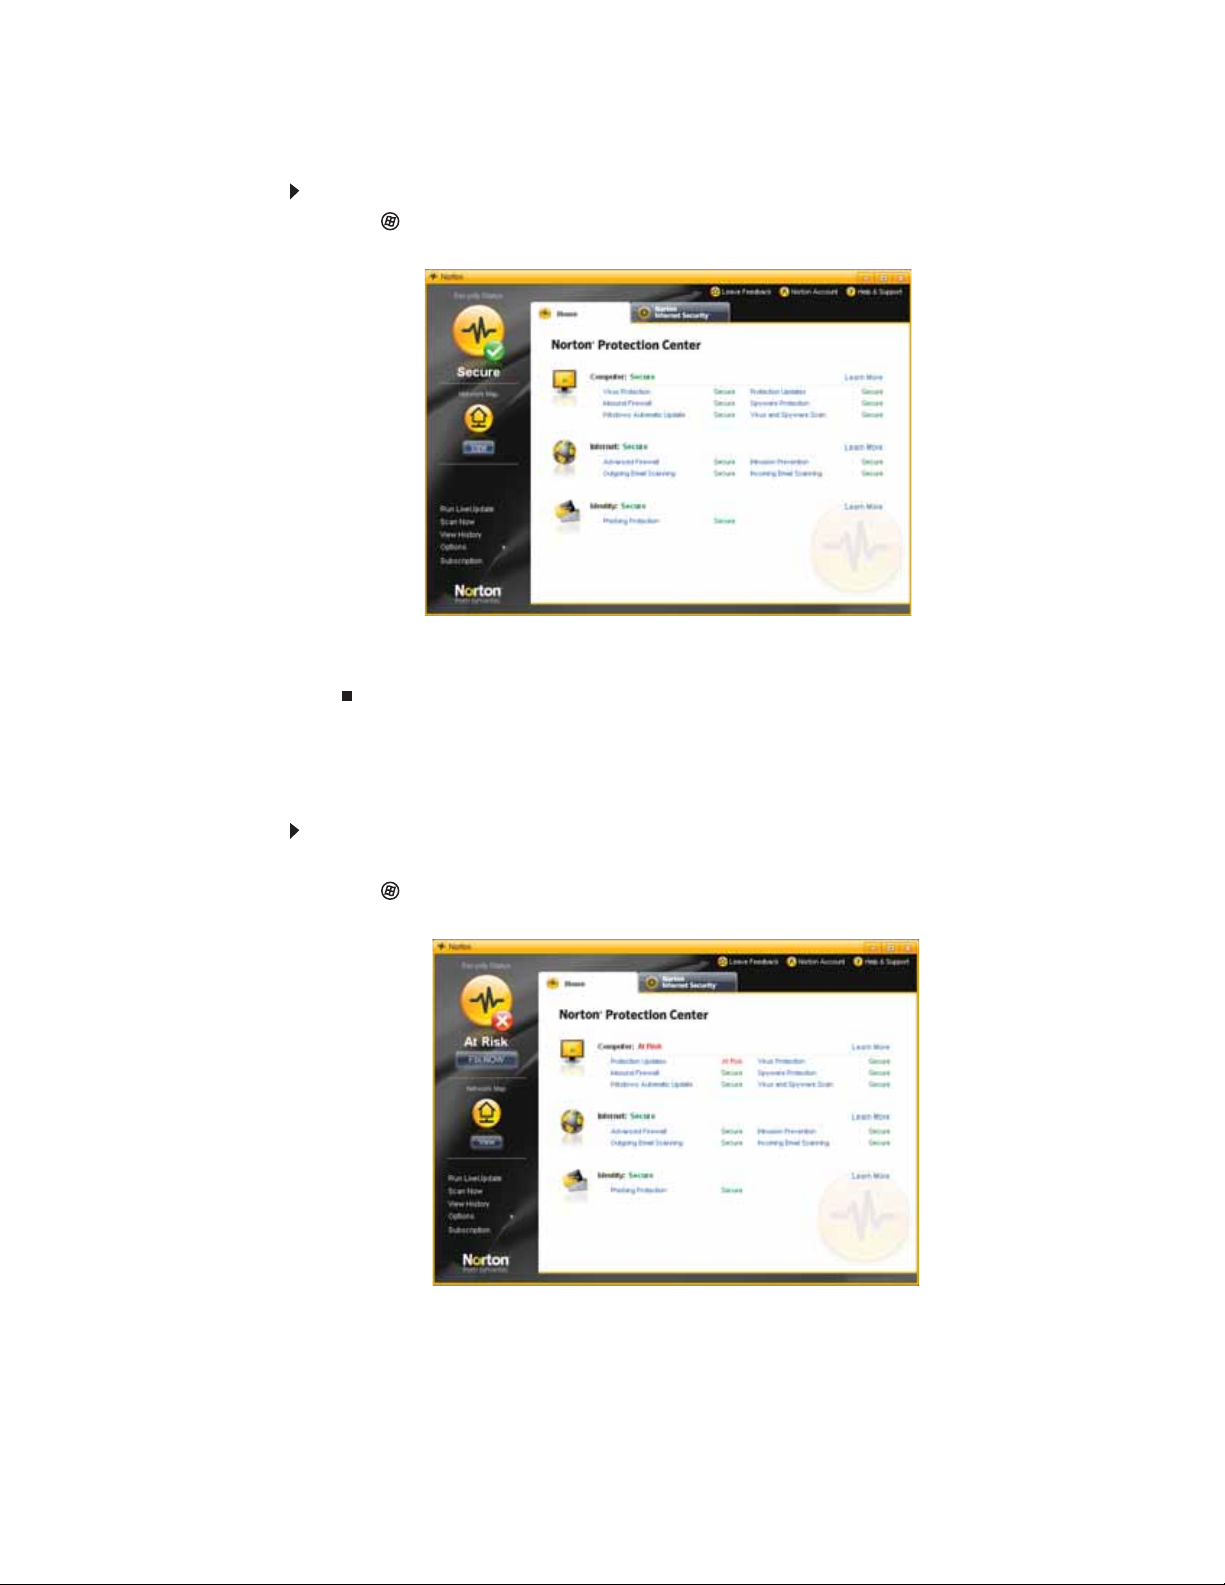
CHAPTER 6: Protecting your computer
Removing viruses and spyware
To scan for and remove viruses and spyware:
1 Click (Start), All Programs, Norton In ternet Securit y, then click Norton Intern et
Security. No rton Internet Se curity open s.
2 On the left si de of the windo w , clic k Scan Now . Norton Internet Security scans your computer
for vir use s and spyw are and remo ve s any that it f inds. When the sca n is finished, a summary
of fixed problems appears.
Updating your virus and spyware definitions
You should u pdate your virus definitions frequently so Norton Internet Security can recognize the
latest threats.
To update your virus and spyware definitions:
1 Make s ure th at yo u a re c on ne cted to th e In tern et .
2 Click (Start), All Programs, Norton In ternet Securit y, then click Norton Intern et
Security. No rton Internet Se curity open s.
58
Page 65

3 On the left side of the window, click Run Liv eUpdate . Y our comput er downloads and installs
the latest virus definitions.
Important
To update Norton Internet Security after the 60-day subscription period ends,
you must extend your subscription.
Using W indows Se curity C ente r
www.gateway.com
Windows Security Center helps protect your computer through:
• A firewall
• Automatic Windows updates
• Third party virus protection software
• Security options in Internet Explorer
Modifying security settings
To modify security settings:
1 Click (Start), Control Panel, then Click Security.
2 Click Security Center. The Windows Security Center dialog box opens.
59
Page 66
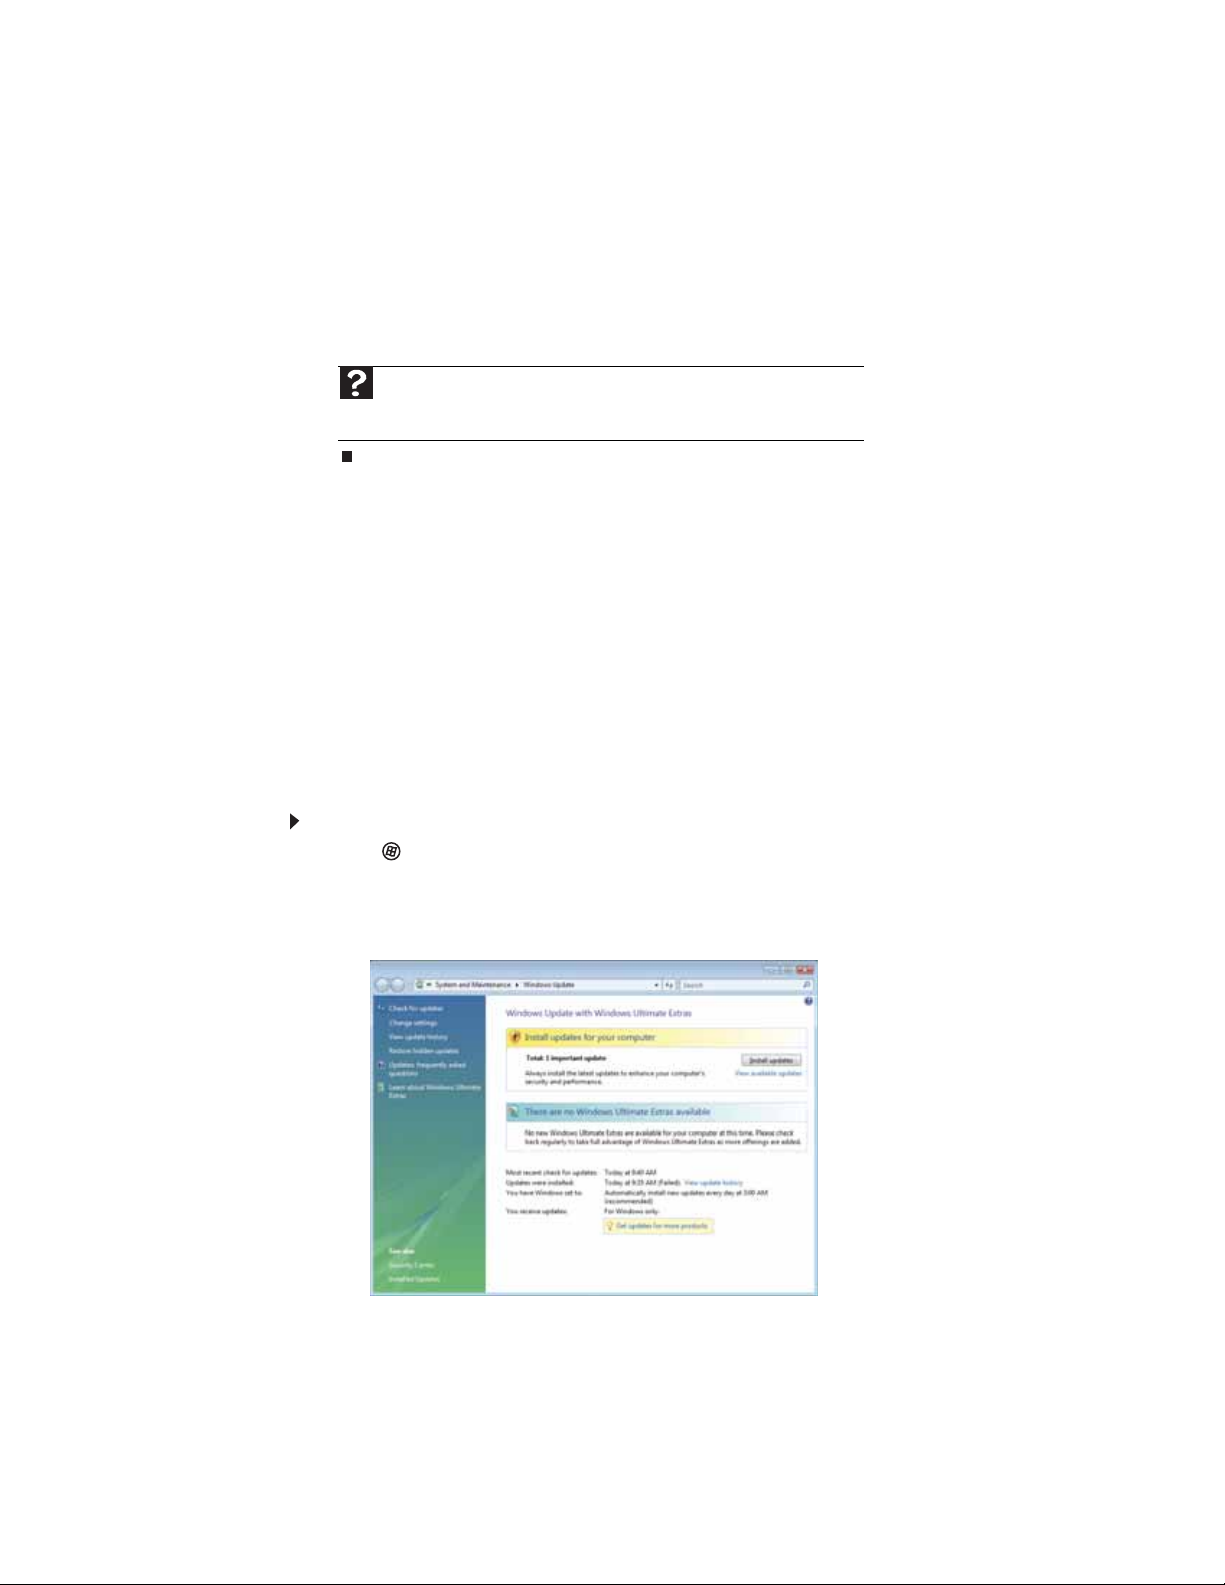
3 Click:
• Windows Update to run Windows Update or modify the Windows Update settings.
• Windows Fir ewall to prevent outsiders from accessing the information on your
computer.
• Windows Defen der to scan your computer for malicious or unwanted software that
may have been placed on your computer either from an Internet Web site or from other
programs that you have installed.
• Internet Options to prevent certain programs from running on your com puter that
might be found on Web sites.
Help
For more information about Windows Security Center, click Start, then
click Help and Support. Type secu rity cente r in the Search Help box, then pr ess
E
NTER.
For more informat ion a bo ut the Wind ows Securit y Center, click Get help about Security Center.
Secur ity updates
To keep your computer secure, you need to keep Windows and your computer’s system software
up to date.
CHAPTER 6: Protecting your computer
Windo ws Updat e
If a hacker finds a way to bypass the security features built into Windows, Microsoft creates a
high-priority Windows update to fix the problem. You should update Windows regularly to keep
your computer secure.
To u p d at e Wi n d ow s :
1 Click (Start), Control Panel, then click Security.
2 Click Security Center. The Windows Security Center dialog box opens.
3 Click Windows Update. Windows checks the Microsoft web site to see if any updates are
available.
60
Page 67

www.gateway.com
4 Click:
• Install Updates to download and install updates on your computer. These updates
include security updates.
• Install Extras to download additional Windows software for your computer.
Help
For more information about Windows Update, click Start, then
click Help and Support. Type Windows update in the Search box, then press
NTER.
E
Scheduling automatic updates
Use the Windows Security Center to schedule automatic updates. Windows can routinely check for
the latest updates for your computer and install them automatically.
To schedule automatic updates:
1 Click (Start), Control Panel, then click Security.
2 Click Security Center. The Windows Security Center dialog box opens.
3 Click Windows Update.
4 Click Change Settings. The Change Setti ngs dialog box opens.
BigFix
5 Make your changes to the schedule settings, then click OK.
Your computer may include BigFix. BigFix monitors your computer for problems and conflicts. It
automatically gathers information about the latest bugs, security alerts, and updates from BigFix
sites on the Internet. Whenever BigFix detects a problem, it alerts you by flashing the blue taskbar
icon. To fix the problem, click on that icon to open BigFix.
61
Page 68

CHAPTER 6: Protecting your computer
62
Page 69

CHAPTER 7
Cust omizing Windo ws
• Changing screen settings
• Changing sy stem s ounds
• Changing mouse settings
• Adding and modifying us er accounts
• Changing pow er -sa ving se ttings
• Changing accessibility se ttings
• Setting up parental cont rols
63
Page 70

CHAPTER 7: Customizing Windows
Changing s cr een set tings
Adjusting the color depth and screen area ar e two of t he most basic display set ting s you ma y need
to change. You can also adjust settings such as the screen background and screen saver.
Changing color dept h and sc reen re solution
Color depth and screen resolution are two of the most basic monitor settings you may nee d to
change to suit your needs.
Color depth is the number of colors your computer uses to display images on your monitor. Most
images look best displayed with the maximum number of colors available. If the color in your
images seems “false” or “jump y,” espec iall y af t er y ou have played a game or run a video-intensiv e
program, check the color depth setting and return it to the highest color setting, if necessary.
Screen resol uti on is the number of pixels (individual colored dots) your computer uses to display
images on your monitor. The higher the resolution, the more information and screen components
(such as icons and menu bars) can be displayed on the monitor.
Help
For more information about adjusting the screen, click Start, then click Help and
Support. Type adjusting monitor sett ings in the Searc h Help box, the n press E
To change the color depth or screen resolution:
1 Click (Start), Control Panel, then under Appearance and P ersonalizati on, c lic k Adjust
Screen Resolution. The Display Settings dialog box opens.
NTER.
64
2 To change the color depth, click the Colors list, then click the color depth you want.
• Low (8-bit) = 256 colors
• Medium (16-bit) = 65,500 colors
• Highest (32-bit) = 16,700,000 colors
3 To change the screen resolution, drag the Resolution slider to the size you prefer.
4 Click Apply. If the new settings do not look right, click No. If the new settings make the screen
illegible and you cannot click No, the sett in gs retu rn to t hei r p revio us valu es afte r seve ra l
seconds.
5 Click OK, then click Yes to save yo ur cha ng es.
Page 71

www.gateway.com
Changing the ap pearance of wind ows and bac k grounds
You can change the appearance of Windows desktop items, such as the colors of windows and
dialog boxes and the color and design of the desktop background.
To change window colors an d effects:
1 Click (Start), Control Panel, then under Appearance and Personalization, click
Customize colors. The Window Color and Appearance dialog box opens.
2 Click one of the color choices and adju st the Color intensity slider, then click OK. Your new
color settings are ap plied.
3 For even more color adjustment options, such as color schemes, shading effects, and scree n
fon t s , c l i c k (Start), Control Panel, then under Appearance and Personalization, click
Change the color scheme. Change the setting you want, then click OK.
To change the Windows desktop background:
1 Click (Start), Control Panel, then under Appearance and P ersonalization, c lick Change
desktop background. The Choose a desktop background dialog box opens.
2 Click t he Picture Location list, then click the location where you w ant to look f or back ground
images. If the loc ation you w ant is not in t he list, c lick Browse and locate the drive and f older .
3 Click the picture or color you want to use for the background, then click OK.
65
Page 72

Selecting a sc reen sa ver
Caution
If you are using a monitor (not a flat-panel display) , an image may get burned in on
your monitor screen if you leave your computer on for long periods of time without using
it. You should use a screen saver which constantly changes its image to avoid this damage.
Flat panel displays cannot be damaged with image burn-in.
Y ou can use a sc r een sa ver to keep others from vi ew ing y our s cr een while y ou are a w a y f r om y our
computer. Windows supplies a variety of screen savers that you can choose from, and many more
are available from the Internet and as commercial products.
To select a screen saver:
1 Click (Start), Control Panel, Appearance and Personalization, then click Change
screen saver. The Screen Saver Settings dialog box opens.
CHAPTER 7: Customizing Windows
2 Click the Screen saver list, then click the screen saver you want to use. An example of the
screen saver plays on the preview screen.
• To change the settings for the screen saver, click Settings, change the settings, then
click OK.
Important
If the Settings button is not available, you cannot customize the screen saver
you se le cted .
• To see a full-screen preview of the screen saver, click Preview.
• To change the length of computer inactivity time that passes before the screen saver
starts, change the number of minutes in the Wait box.
3 Click OK. Your screen saver changes are applied.
Help
For more information about selecting a screen saver, click Start, then click
Help and Support. Type screen savers in the Search Help box, then pr es s E
NTER.
66
Page 73

Changing gadgets
Gadgets are constantly running mini-programs that are visible on your Windows desktop. They
can be moved, removed, resized, and configured according to your preference. Although you can
position them anywhere on your desktop, gadgets are usually visible on the right edge of your
screen in the Sidebar.
Gadgets can include:
• Clocks and timers
• News feeds, weather forecasts, and stock tickers
• Slide shows and puzzles
• Calendars and contact lists
• Sticky notes
To a d d a ga d g e t:
1 Click the + at the top of the Sidebar, or right-click in an empty area of the Sidebar and click
www.gateway.com
Add Gadgets. The gadget selection window opens.
2 Click the gadget you want, then drag it to the Sidebar.
Tip
To shop online for more gadgets, click Get more gadgets online.
To delete a gad get, right-click the gadget, then click Close Gadget.
To configure a gadget:
1 In the Sidebar, right-click the gadge t, t hen clic k Options. The gadget’s configuration w indow
opens.
2 Make the changes you want, then click OK. Your changes are saved.
67
Page 74

CHAPTER 7: Customizing Windows
Using a gadge t’s control pane l
Some gadgets have built-in control panels that you can use to control their behavior.
To use a gadget ’s control panel:
1 In the Sidebar, hold the mouse pointer over the gadget. The gadget’s built-in control panel
appears on the gadget. (Slideshow gadget shown)
2 Click the control you want to operate.
Config uring the gadget Side bar
You can change the appearance and behavior of the Sidebar.
To change Sidebar properties:
1 Right-click in an empty area of the Sidebar, then click Properties. The Windows Sidebar
Properties dialog box opens.
68
You can change:
• Whether the Sidebar starts each time Windows starts
• Whether the Sidebar is always on top of other windows (always visible)
• The side of the screen th e side bar app ears on
• The monitor that the sidebar appears on (if you have multiple monitors)
Page 75

Setting up multiple monitors
Important
The dialog boxes shown in this sect i on a re for demonstrative purposes only and may
not represent the screens on your computer.
If your computer’s video card supports additional moni tors (it must have two video ports) , you
can connect an additional monitor or projector to your computer.
You can use the second monitor or projector as a duplicate of the primary display, or as an
extension to roughly double the size of your Windows desktop. Use the additional desktop space
to accommodate additional windows.
To use a projector or additi onal monitor:
1 Turn off your computer.
2 Plug the projector or monitor cable into the secondary monitor port on your computer. For
the location of the monitor port on your computer, see the setup poster or your Reference
Guide.
3 Plug the pr oje ctor ’s or m oni tor ’s pow er co rd i nto an AC p ower o utl et, then tur n it o n.
4 Turn on your computer. Windows recognizes the new hardware and searches for its driver.
You may need to install the driver from the disc supplied by the manufacturer or download
the driver from the manu facturer’s Web s ite.
5 After the driver is installed, click (Start), Control Panel, Appearance an d
Personalization, Personalization, then click Display Settings. The Display Se ttings dialog
box opens.
www.gateway.com
Shortcut
Right-click an empty space on the desktop➧ Personalize➧
Display Settings.
6 Right-click the second monitor icon (labeled 2) , click Attached, then click Apply.
7 Adjust properties such as Resolution or Color Quality i f necessar y.
Tip
To help identify your multiple monitors in t he Display Settin gs dialog box, c lic k
Identify Monitors. A la rge number appears on the screen of each monitor.
8 T o use the second monitor or projec tor as a “mir ror” (duplicate) of the primary monitor (both
monitors have the same content), click to deselect the check box for Extend my Windows
desk top o nto t his mon itor.
69
Page 76
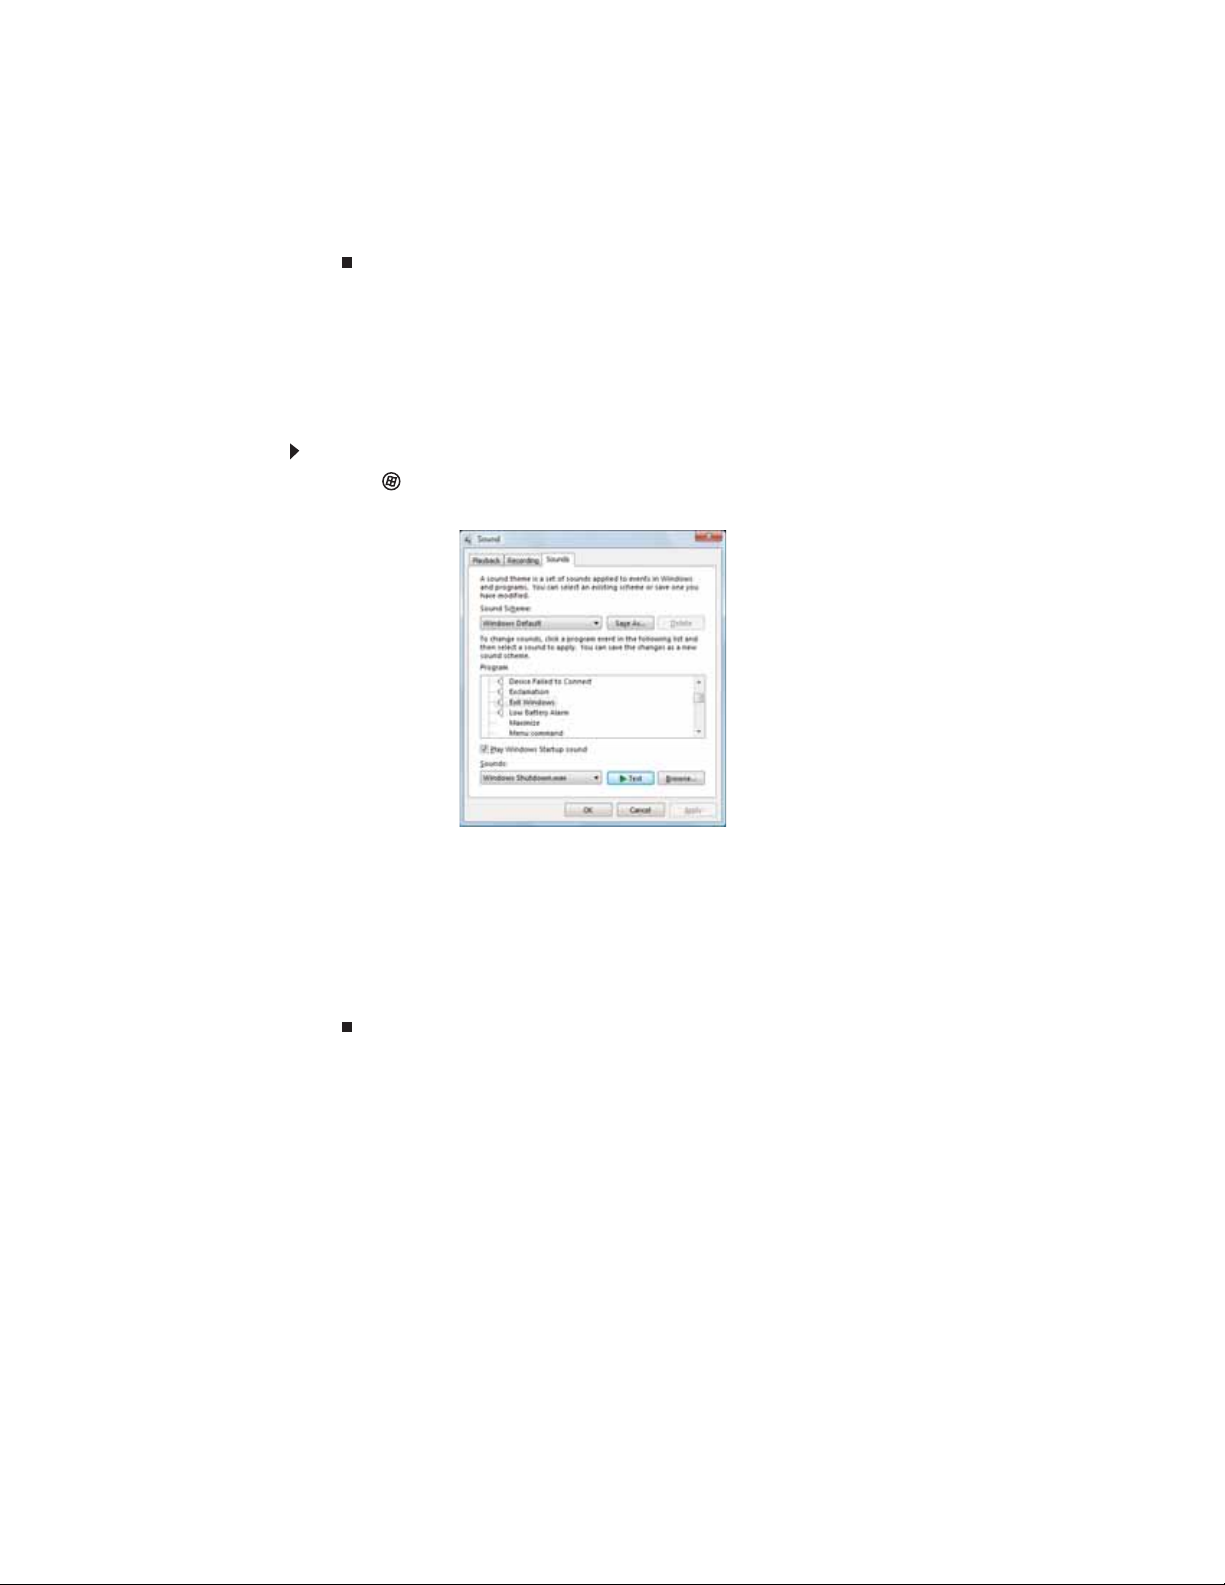
CHAPTER 7: Customizing Windows
9 To use the second monitor or projector as an extension of your desktop (increasing the size
of your Windows desktop) , click to select the check box for Extend my Windows desktop
onto t h i s m o n i tor. You can click and drag the “2” monitor icon to position it the same way
the physical monitor is arranged on your desk.
10 Click OK.
Changing s yst em sounds
You can change the sounds that play for system events, such as Windows startup and shut d own,
logging on and logging off, window maximizing and minimizing, and error messages.
To change system sounds:
1 Click (Start), Control Panel, Hardware and Sound, then under Sound, click Change
system sounds. The Sound dialog box opens.
2 Click the Sound Scheme list, then click the sound scheme you want.
- OR Click an event in the Program list, then click the Sounds list and click the sound file you
want associated with the event. If you do not see the sound file in the Sounds list, click
Browse and find the file in the appropriate folder.
3 To test a sound you have selected, click Test.
4 Click OK to save your changes.
70
Page 77

www.gateway.com
Changing mouse settings
Help
For more inf ormation about mou se setting s, clic k Start, then click Help and Support.
Type m ouse settings in the Search Help box, then press E
You can adjust the double -click speed, pointer speed, left-hand or right-hand configuration, and
other mouse settings.
To change your mouse settings:
Shortcut
Start➧ Control Panel ➧ Hardware and Sound ➧ Mouse
1 Click (Start), Control Panel, then under Hardware and Sound, c lick Mouse. The Mouse
Properties dialog box opens.
NTER.
2 Change the settings you want. You can:
• Switch the left and right buttons
• Change the double-click speed
• Change the pointer appearance and speed
• Change the mouse wheel actions
3 Click OK to save your changes.
Adding and modifying u ser accounts
You can create and customize a user account for each person who uses your computer. You can
also change between user accounts without turning off your computer.
User account tips
• If you want to create an account for someone, but you do not want that user to have full
access to your computer, be sure to make that account limited. Remember that limited
accounts may not be able to install some older programs.
• Files cr eated in one account ar e not accessible f rom ot her accounts unless t he files a re stor ed
in the Shared Documents folder. The Shared Documen ts folde r is acce s sible f r om all accounts
on that computer and from other computers on the network.
71
Page 78

CHAPTER 7: Customizing Windows
To add, delete, or modify user accounts:
1 Click (Start), Control Panel, then under U ser Ac counts and Fami ly Safety, click Add
or remove user acco unts.
• To create a new account, click Crea te a new account, then follow the on-screen
instructions to finish the setup.
• T o c hange an account, clic k the account name, then click the option you want t o c hange .
• To delete an account, click the account name, then click Delete the account and confirm
the deletion of related files. T he account is deleted. (Y ou cannot delete t he administrator
account.)
Help
For more information about user accounts, click Start, then click Help and
Support. Type user accounts in the Search Help box, then press E
To switch between user accounts:
NTER.
1 Save any open documents that are being worked on in your current account.
2 Click (Start), click the arrow next to the lock icon, then click Switch User or Log Off.
• Switc h U s er opens the account selection screen but does not log off the current user,
and any programs that were running for the previous user continue to run.
• Log Off logs off the current user, then opens the account selection screen.
Caution
If you click Log Off, any programs that were running may be closed, and
unsaved document changes may be lost.
3 Click the user acco unt that you want to use.
72
Page 79

www.gateway.com
Changing po wer - sav ing set tings
Changing the po wer plan
Power plans (groups of power settings) let you change power saving options such as when the
monitor or hard drive is automatically turned off. You can select one of the defined power plans
or crea te a cus tom po wer p lan .
Help
For more in forma tio n a bou t p owe r pl an s, click Start, then click Help and Support.
Type power plan or power management in the Search Help box, then press E
To change the power plan:
Shortcut
Start➧ Control Panel ➧ System and Maintenance➧ Po wer Op tio ns
1 Click (Start), Control Panel, Hardware and Sound, then under Po wer Op t io ns, click
Change power-saving settings. The Select a power plan dialog box opens.
NTER.
2 Click a power plan (default plans shown):
• Balanced uses several energy-saving features while maintaining reasonable
performance and convenience.
• Powe r save r maximizes energy savings but reduces performance and convenience.
• High performance maximizes performance but reduces energy savings.
3 To change a power plan, click Change plan settings, change the settings you want, then
click Save changes.
73
Page 80

CHAPTER 7: Customizing Windows
4 T o change ad vance d power s etti ngs, clic k Change plan settings, Change advanced pow er
settings.
5 Change the settings you want, then click OK.
You can change:
• Power-down times for your hard drive, wireless network adapter, USB devices, and
processor
• Power management settings for your display, processor, and expansion cards
• Behavior of your compu ter’s power button
6 Click Save changes.
7 To create a new power plan, on the left side of the Select a power plan window click Create
a power plan, then follow the on-screen instructions.
Changing acce ssibility s ettings
Your computer can be a powerful tool, but it may be less useful to you if items on the screen are
difficult to see, or if the mouse is difficult to control. Windows has several tools that help you use
it more easily.
74
Page 81

Using the Ease of Access Center
Use the Ease of Acc ess Center to change several system display settings.
To use the Ease of Access Center:
1 Click (Start), Control P anel, Ease of Access, then click Ease of Access Center. The Ease
of Access Center opens.
www.gateway.com
2 In the Quic k ac ce ss to c om mon too ls section, click one of the following options to make
some of the most common accessibility changes to Windows:
• Start Magnifier provides a close-up view of the area near your mouse pointer.
• Start On-Screen Keyboard displays a keyboard on the screen. You can p ress keys on
the on-screen keyboard by clicking them with your mouse.
• Start Narrator reads on-screen text and describes graphics.
• Set up High Contrast changes the Windows color scheme to use high-contrast colors.
You can also use the Ease of Access Center to:
• Use the computer without a display, mouse, or keyboard
• Make the computer display easier to see
• Make the m ou se an d keyb o ard e asi e r to us e
• Use text or visual alternatives for sounds
75
Page 82

Using v oice recognition
You can attach a microphone to your computer and configure Windows to create typed text from
you r voi ce.
To set up voice recognition:
1 Click (Start), Control Panel, E ase of Access, then click Speech Recognition Options.
The Speech Recognition Options window opens.
CHAPTER 7: Customizing Windows
2 Click one of the following settings to start setting up speech recognition:
• Start Speech Recognition turns on speech recognition. With an attached microphone,
you can then control your computer using voice commands.
• Set up microphone configures your attached microphone to work correctly with
speech recognition.
• Take Speech Tutorial helps you learn how to use speech recognition.
• Train your computer to better understand you helps you create several voice
samples that your computer can use to better recognize the words you speak.
• Open the Speech Reference Card lets you view and print a list of common voice
commands.
3 If you want to configure your computer’s settings for reading aloud on-screen text, click
Text to Speech o n th e left of th e wi ndow.
Set ting up parental controls
You can use parental controls to:
• Control and monitor the Internet activity of your children
• Block inappropriate games and programs
• Schedule the times your children can use the computer
• Print activity reports that contain a detailed history of computer use
To use parental controls most effectively, you should set up a separate user account for each of
your children. For information on setting up user accounts, see “Adding and modifying user
accounts” on page 71.
76
Important
You must be logged in to an administrator account to set up parental controls. You
cannot set up parental controls for an administrator user account.
Page 83

Filter ing Inter net access
You can specify the type of Internet content that can be accessed by a user.
To set up Internet filtering:
1 Click (Start), Control Panel, then under User Accounts and Family Safety, click Set
up parenta l controls for any user. The Parental Controls dialog box opens.
2 Click the user account to set up restrictions for. The User Contro ls dialog box opens.
www.gateway.com
3 Click On, enforce current settings, then click Windows Vista Web Filter. The Web
Restrictions dialog box opens.
4 Spe cify the sett in gs yo u wa nt to use for thi s use r, the n cl ick OK. The settings are saved.
77
Page 84

CHAPTER 7: Customizing Windows
Scheduling computer and I ntern et us e
To schedule the times a user can access the Internet:
1 Click (Start), Control Panel, then under User Accounts and Family Safety, click Set
up parenta l controls for any user. The Parental Controls dialog box opens.
2 Click the user account to schedule for, then click Time limits. The Time Restri ctio ns dialog
box opens.
3 Click inside the grid to set when the user can access the computer. Blocked hours are blue,
and allowed hours are white.
Restricting game access
You can restrict games by game ratings, or you can specify the games which are not allowed.
To restrict games by game ratings:
1 Click (Start), Control Panel, then under User Accounts and Family Safety, click Set
up parenta l controls for any user. The Parental Controls dialog box opens.
2 Click the user account to set up restrictions for, then click Games. The Game Controls dialog
box opens.
78
Page 85

www.gateway.com
3 Click Set game ratings. The Game Restrictions dialog box opens.
4 Click the level of games you want allowed, then click OK. The settings are saved.
To restrict specific games:
1 Click (Start), Control Panel, then under User Accounts and Family Safety, click Set
up parenta l controls for any user. The Parental Controls dialog box opens.
2 Click the user account to set up restrictions for, then click Games. The Game Controls dialog
box opens.
3 Click Block or Allow specific games. The Game Ove rrides dialog box opens.
79
Page 86

CHAPTER 7: Customizing Windows
4 Click the level of access you want for each game listed, then click OK. If the game you want
to restrict access to is not shown on the list, see “Restricting specific programs” on page 80.
Re stricting spec ific pr ograms
To restrict specific programs:
1 Click (Start), Control Panel, then under User Accounts and Family Safety, click Set
up parenta l controls for any user. The Parental Controls dialog box opens.
2 Click the user account to set up restrictions for, then click Allow and block specific
programs. The Application Restrictions dialog box opens.
3 Click [User name] can only use the programs I allow , click the c heckbox f or each progr am
you want to allow access to, then click OK.
Tip
Click Check All, then click to uncheck the checkboxes of the programs you
want to restrict access to.
Creating acti vity reports
To create a report of a user’s computer and Internet use:
1 Click (Start), Control Panel, then under User Accounts and Family Safety, click Set
up parenta l controls for any user. The Parental Controls dialog box opens.
2 Click the user account to create a report for, then click View activity reports. The activity
report is displayed.
The activity report includes such information as:
• Top 10 Web sites visited
• Most recent 10 Web sites blocked
• File downloads
• Applications run
• Logo n t im es
80
Page 87

Notices
www.gateway.com
Copyrig ht © 20 07 Ga teway, Inc .
All Rights Reserved
7565 Ir vi ne Ce nte r D rive
Irvine, CA 92618USA
All Rights Reserved
This publication is protected by copyright and all rights are reserved. No part of it may be
reproduced or transmitted by any means or in any form, without prior consent in writing from
Gateway.
The inf orm ation in this manual has been car eful ly c hec k ed a nd is be lie v ed t o be a cc urat e . How e v er,
changes are made periodically. These changes are incorporated in newer publication editions.
Gateway may improve and/or change products described in this publication at any time. Due to
continuing system improvements, Gateway is not responsible for inaccurate information which
may appear in this manual. For the latest product updates, consult the Gateway Web site at
www.gateway.com
incidental, or consequential damages resulting from any defect or omission in this manual, even
if advised of the possibility of such damages.
In the interest of continued product development, Gateway reserves the right to make
improvements in this manual and the products it describes at any time, without notices or
obligation.
. In no event will Ga teway be liable for direct, indirect, s pecial, exempla ry,
T radem ark acknow ledgments
Gateway and the Black-and-White Spot Design are trademarks or registered trademarks of
Gateway, Inc. in the U.S. and other countries. Intel, Intel Inside logo, and Pentium are registered
trademarks and MMX is a trademark of Intel Corporation. Microsoft, MS, MS-DOS, and Windows
are trademarks or registered trademarks of Microsoft Corporation. All other product names
mentioned herein are used for identification purposes only, and may be the trademarks or
registered trademarks of their respective companies.
81
Page 88

CHAPTER 7: Customizing Windows
82
Page 89

Index
A
access point
setting up
using 46
accessibility
high contrast color scheme
Magnifier 74
Narrator 74
on-screen keyboard 74
settings 74
accessing
shared drives
shared files 52
shared folders 52
accounts
Internet 18
ISP 18
user 71
Windows user 56
adding
user account s 71
address
e-mail 20
Web 19
AU file
playing
audio
playing
recording file 31
audio CD
adding tracks to library
editing track information 33
playing 29
AVI file
playing
47
74
52
28
28
33
28
B
background
changing Windows 65
BigFix 61
Bluetooth network 53
installing device 53
installing printer 53
personal area netw ork 53
Blu-ray Disc
playing 29
broadband Int ernet connect ion
18, 44, 47
browser
Web
browsing for files and folders 13
18, 19
C
cable modem 18, 42, 44
CD
adding tracks to library
creating audio 34
creating data 37
editing track information 33
playing musi c 29
clipboard 10
close button 9
closing
program
window 9, 16
color
changing scheme
depth 64
high contrast scheme 74
computers
naming
configuring
router
TCP/IP protocol 48
connecting
to Internet
to Web site 19
connections
monitor (VGA) 69
projector 69
VGA 69
copying
files across netwo rk
files and folders 10, 16
text and graphics 16
creating
data disc
desktop icon 8
desktop shortcut 8
document 14
folder 10
MP3 file 32
music file 32
video DVD 35
WMA file 32
customizing 63
cutting
files and folders
9, 16
47
48
19
37
10
33
65
52
D
deleting files and folders 6, 11, 16
desktop
adding icon
adding shortcut 8
adjusting settings 64
changing background 65
changing color scheme 65
extending 69
selecting screen saver 66
using 6
8
using Start menu 7
DHCP 42, 48
disconnecting from Internet 18
display
using screen saver
documentation
Gateway Web site
help 2
Help and Support 2
online help 3
documents
creating
opening 14
printing 15
saving 14
downloadin g files 20
drivers
updating
drives
mapping ne twork
sharing 51
un-sharing 51
viewing contents 9
viewing files and folders 9
DSL modem 18, 42, 44
DVD
creating data
creating video 35
playing 29
Dynamic Host Configuration
14
2
Protocol 48
66
2
52
37
E
Ease of Access Center 75
editing
music track inform ation
e-mail
address
checking for messages 21
sending 20
using 18, 20
Ethernet netw ork
See wired Ethernet network
See wi reless Eth ernet netwo rk
20
33
F
Fast Ethernet 42
faxes
canceling
receiving and viewing 25
sending 21, 25
sending from program 25
sending scanned image 25
setting up cover page
25
template
25
83
Page 90

Index
files
copying
cutting 10
deleting 6, 11, 16
downloading 20
finding 12, 13
moving 10
opening 7
opening shared 52
pasting 10, 16
recovering 11
renaming 16
searching for 12, 13
sharing 51
un-sharing 51
viewing list 9
finding
files and folders
Help and Support topics 2
folders
copying
creating 10
cutting 10
deleting 6, 11, 16
finding 12, 13
moving 10
opening 9
pasting 10, 16
recovering 11
renaming 16
searching for 12, 13
sharing 51
un-sharing 51
viewing list 9
10, 16
10, 16
G
gadgets
adding
changing 67
configuring 67
configuring Sidebar 68
using cont rol pane l 68
game access
restricting 78
Gateway
contact information 3
model number 3
serial number 3
Web address 2
Web site 2
Gigabit Ethernet 42
67
H
HD-DVD
playing
help
Media Center
29
3
12, 13
online 3
using 2
Help and Support 2
searching 2
hyperlinks 19
I
Internet
account 18
connecting to 19
downloadin g files 20
filtering 77
requirements to access 18
using 18
Internet Explorer 18
Internet service provider (ISP) 18
connecting to 19
disconnecting from 18
setting up account 18
IP address 42
entering 48
ISP
See Internet service provi der
K
Kensington lock slot 56
keyboard
on-screen
shortcuts 16
74
L
labels
model number
serial number 3
LAN 42
LCD panel
using screen saver
links 19
local area network (L AN) 42
lock slot
Kensington
3
66
56
M
maintenance
virus protection
mapping netw ork drives 52
maximize button 9
Media Center
See Windows Media Cen ter
Media Player
See Windows Media Play er
menu bar
messages
checking e-mail
9
57
21
sending e-mail 20
MIDI file
playing
minimize button 9
model number 3
modem
cable
dial-up 18
DSL 18, 42, 44
monitor
color quality
controls 64
screen resolution 69
setting up m ultiple 69
using screen saver 66
mouse
changing settings
using Magnifier 74
moving
files 10
folders 10
MP3 file
creating
editing track information 33
playing 28
MPEG file
See MP3 file
multimedia
playing audio CD
playing DVD 29
recording audio 31
using Windows Medi a Player
music library
building
editing 33
music tracks
copying
28
18, 42, 44
69
71
32
29
28
33
32
N
name
computer
workgroup 47
naming
computers
workgroup 47
Narrator 74
network
Bluetooth
testing 50
using 52
wired Ethernet 42
wireless Ethernet 45
Norton Internet Security
scanning for viruses
starting 58
47
47
53
58
84
Page 91

www.gateway.com
updating 58
O
online help 2, 3
opening
documents
14
files 7
files across network 52
folders 9
programs 7
optical disc
creating data 37
playing 29
Outlook 18
Outlook Express 18
P
PAN 42
parental controls
activity repo rts 80
blocking specific games 79
game ratings 78
Internet filt ering 77
restricting game access 79
restricting games 78
restricting programs 80
scheduling comput er use 78
scheduling Internet access 78
setting up 76
time limits,setting 78
password
hard drive
startup 56
pasting
files and folders
text and graphics 16
personal ar ea network (P AN) 42
playing
audio CD
audio file 28
multimedia files 28
music CD 29
video files 28
Windows Media Player file 28
power
changing plans
plans 73
schemes 73
printer
adding Bluetooth
sharing 51
printing
documents
files across network 53
programs
closing
56
10, 16
29
73
53
15
16
opening 7
restricting 80
projector
color quality
69
connecting 69
screen resolution 69
R
recording
audio file 31
CD tracks 32
recovering files and folders 11
Recycle Bin 6
deleting file s and folders 11
emptying 12
recovering files and folders
11
remote control
Windows Medi a Center 40
removing files and fo lders 6, 11,
12, 16
renaming files and folders 16
resolution
changing screen
64
restoring file s and fold ers 11
router
configuring
48
example netwo rk 42
setting up 44, 45
using 42
S
saving
documents 14
scheduling
computer use 78
screen
adjusting settings
resolution 69
saver 66
screen saver
changing
66
Search utility 12
searching
for files and folders
in Help and Support 2
security
BigFix
61
data 56
hardware 56
lock slot 56
Norton Internet Security 57
password 56
user account s 56
virus protection 57
Windows Security C enter 59
64
12, 13
Windows Update 60
wireless Ethernet 50
serial number 3
Shared Document s folder 71
sharing
drives 51
folders 51
printer 51
shortcuts
adding to desktop
8
closing programs 16
closing windows 16
copying 16
deleting files and folders 16
keyboard 16
pasting 16
renaming files and folde rs 16
selecting adjacent items in
16
list
selecting items in li st 16
switching between files,
folders, or programs
16
Sidebar
configuring 68
gadgets 68
software
See programs
sound
changing system
70
scheme 70
Sound Recorder
recording audio
31
speech recognition 76
Start button 6
Start menu 7
starting programs 7
subnet mask 42
entering 48
support
using
2
system identification label 3
T
taskbar 6
TCP/IP protocol
configuring 48
telephone
canceling fax 25
installing Windows Fax and
Scan
receiving and viewing faxes
25
sending fax 25
sending fax from progra m 25
sending scanned image fax
21
85
Page 92

Index
25
setting up fax cover page
template 25
testing networ k 50
text to speech 76
title bar 8
transferring
files from In ternet 20
U
un-sharing
drives
folders 51
updating
device drivers 2
Norton Internet Security 58
Windows 60
user account s
adding in Windows
deleting 71
switching in Windows 71
51
71
V
VGA port 69
video
playing
viewing
shared drives
shared folders 52
virus
protecting ag ainst 57
removing 57
voice recognition 76
28
52
W
WAN 42
WAV file
playing
Web browser 18, 19
Web page 19
Web site 19
connecting to 19
downloadin g files 20
Gateway 2
wide area network (WAN) 42
window 8
changing colors 65
close button 9
closing 9, 16
maximize button 9
menu bar 9
minimize button 9
title bar 8
Windows
changing background
28
65
clipboard 10
Search utility 12
user account s 56
Windows Fax and Scan 21
Windows Medi a Center 38
help 3
starting 38
Windows Medi a Player
building mus ic library 33
creating MP3 32
creating music files 32
creating WMA files 32
editing tack info rmation 33
playing audio CD 29
playing audio file 28
viewing video file 28
Windows Security C enter
6
icon
using 57
Windows Updat e 60
wired Ethernet network 42
equipment needed 43
example 42
installing card s 44
installing drivers 44
setting up 44
wireless Ethernet network 45
connecting to 48
equipment needed 46
installing card s 47
installing drivers 47
security 50
setting up 47
WMA file
creating
editing track information 33
playing 28
Wordpad 13
workgroup
naming
World Wide Web (WWW) 19
downloadin g files 20
32
47
86
Page 93

Page 94

MAN GW GENERIC DT USR GDE V R2 10/07
 Loading...