

Page 1
XERO® S1
Owner’s Manual
Page 2

© 2019 Garmin Ltd. or its subsidiaries
All rights reserved. Under the copyright laws, this manual may not be copied, in whole or in part, without the written consent of Garmin. Garmin reserves the right to change or improve its
products and to make changes in the content of this manual without obligation to notify any person or organization of such changes or improvements. Go to www.garmin.com for current updates
and supplemental information concerning the use of this product.
Garmin® and the Garmin logo are trademarks of Garmin Ltd. or its subsidiaries, registered in the USA and other countries. Garmin Connect™, Garmin Express™ and Xero® are trademarks of
Garmin Ltd. or its subsidiaries. These trademarks may not be used without the express permission of Garmin.
The BLUETOOTH® word mark and logos are owned by the Bluetooth SIG, Inc. and any use of such marks by Garmin is under license. Mac® is a trademark of Apple Inc, registered in the U.S.
and other countries. Windows® is a registered trademark of Microsoft Corporation in the United States and other countries. Other trademarks and trade names are those of their respective
owners.
Page 3

Table of Contents
Getting Started............................................................... 1
Device Overview......................................................................... 1
Tripod Adjustments..................................................................... 1
Installing the Tripod.................................................................... 1
Adjusting the Tripod Angle......................................................... 2
Charging the Device................................................................... 2
Turning On the Device................................................................ 2
Adding a Gun Profile...................................................... 2
Activating a Gun Profile.............................................................. 2
Trap Game Modes.......................................................... 2
Starting a Trap Shooting Session............................................... 2
Display Modes............................................................................ 3
Changing the Shooting Station................................................... 3
Upland Training Mode.................................................... 3
Positioning the Device for Upland Training................................ 3
Starting an Upland Training Session.......................................... 3
Shot Analysis.................................................................. 4
Adding a Shot............................................................................. 4
Changing the Score.................................................................... 4
Reshooting..................................................................................4
Ending a Round.......................................................................... 4
Scores............................................................................. 4
Break Factor Score..................................................................... 4
Scorecards..................................................................................4
Accuracy Summary.....................................................................5
Clay Angle and Station............................................................... 5
Upland Factor............................................................................. 5
Xero App......................................................................... 5
Pairing Your Smartphone........................................................... 5
Customizing Your Device.............................................. 5
Device Settings........................................................................... 5
System Settings.......................................................................... 5
Device Information......................................................... 6
Product Updates......................................................................... 6
Connecting the Device to Your Computer.................................. 6
Viewing Scorecards, Pictures, and Animations on a
Computer.................................................................................... 6
Device Care................................................................................ 6
Cleaning the Outer Casing......................................................... 6
Cleaning the Touchscreen.......................................................... 6
Cleaning the Camera Lens......................................................... 6
Specifications..............................................................................6
Viewing E-label Regulatory and Compliance Information.......... 6
Troubleshooting............................................................. 7
The device is showing incorrect distances................................. 7
Resetting Data and Settings....................................................... 7
Getting More Information............................................................ 7
Index................................................................................ 8
Table of Contents i
Page 4

Page 5

Getting Started
WARNING
This device is intended to provide accurate aiming solutions
based on calibrated measurements of current conditions only.
Depending on your environment, conditions may change rapidly.
Changes in environmental conditions, like wind gusts or
downrange winds, may have an effect on the accuracy of your
shot. Aiming solutions are suggestions only based upon your
input into the device. Always allow a margin of safety for
changing conditions and reading errors.
Always inspect your equipment before using a firearm. You are
responsible for understanding and complying with any
applicable regulations for using a firearm.
Always understand your target and what lies beyond your target
before taking a shot. Failure to account for your shooting
environment could cause property damage, injury, or death.
See the Important Safety and Product Information guide in the
product box for product warnings and other important
information.
The Xero S1 Trapshooting Trainer helps you improve your
trapshooting score by tracking a clay target and your shot using
a combination of sensors. The device can track orange, green,
and pink clays in both 108 mm and 110 mm sizes. Other sizes
and colors are not supported.
NOTE: This device is intended to track one clay and one shot at
a time. Doubles trap and trap games that allow multiple shots
are not supported.
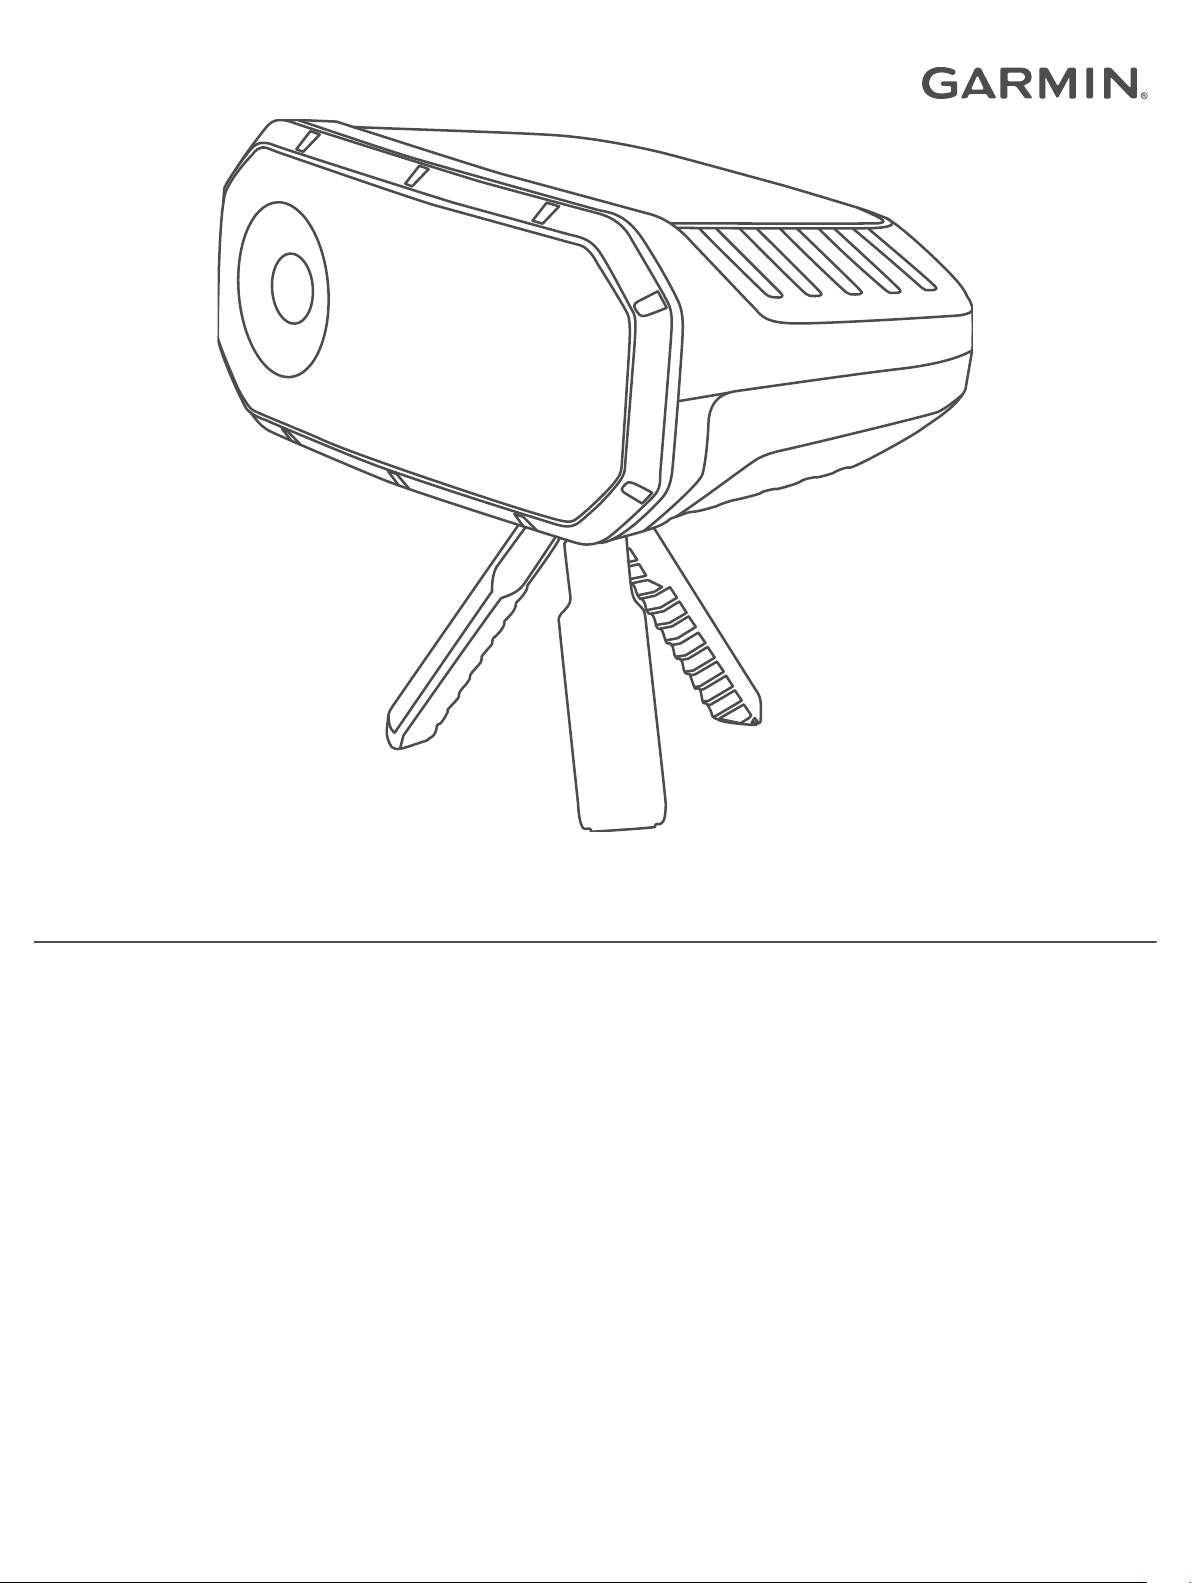
Device Overview
Swipe to scroll through features, data
Touchscreen
Protective cover
screens, and menus.
Tap to select.
Remove before using the device.
Replace when not in use.
Tripod Adjustments
The tripod adjustment controls are located on the underside of
the Xero S1 device.
Adjusts the angle of the Xero S1 device on
Tripod adjustment
button
Tripod release lever
the tripod ball mount
Opens the socket to install or remove the
tripod ball mount
Power button
Micro-USB power and
data port (under weather
cap)
Press to turn on the device.
Hold to turn off the device.
Connect a compatible USB cable to charge
the device or transfer data using your
computer.
Installing the Tripod
Screw the tripod ball mount onto the tripod assembly .
1
NOTE: You should tighten the tripod ball mount so it does not
move during use. The tripod ball mount uses 1/4"-20 thread
size and is compatible with most tripods. For best
performance, do not raise the device beyond waist height or
a total height of 1.2 m (4 ft.).
Completely depress and hold the tripod release lever .
2
Getting Started 1
Page 6

While depressing the tripod release lever, insert the tripod
3
ball mount into the socket .
NOTE: The ball mount should insert easily into the socket. If
it is difficult to insert, you should confirm the tripod release
lever is depressed completely.
Adjusting the Tripod Angle
You can adjust the angle of the device on the tripod ball mount
to align it with your target.
While holding the tripod adjustment button , tilt the device.
1
Release the tripod adjustment button to set the position.
2
Charging the Device
NOTICE
To prevent corrosion, thoroughly dry the USB port, the weather
cap, and the surrounding area before charging or connecting to
a computer.
NOTE: The device does not charge when it is outside the
approved temperature range (Specifications, page 6).
Lift the weather cap .
1
Adding a Gun Profile
The device uses gun profiles with each shooting session. The
gun profile you enter should match the firearm you are using for
each session. You can add up to 10 gun profiles.
Select > GUN PROFILES > ADD PROFILE.
1
Select a field to enter information about your firearm.
2
Select .
3
Activating a Gun Profile
Before you can activate a gun profile, you must add a gun profile
(Adding a Gun Profile, page 2).
Select > GUN PROFILES.
1
Select a profile.
2
Select ACTIVATE.
3
Trap Game Modes
The device includes various trap game modes to best suit your
shooting needs.
PRACTICE: Practice mode lets you shoot a standard round of
American trap, or work through a custom practice session.
Each round consists of 25 shots. Feedback is provided after
each shot.
LEAGUE: League mode consists of a standard round of
American Trap. Shooters take five shots from five stations.
You can choose to receive real-time feedback or use the
device for scorekeeping. When the device is configured for
scorekeeping only, each shot is recorded for review at the
end of a round.
TOURNAMENT: You can customize tournament mode to work
with the rules of your tournament. If necessary, you can set
the display mode to present feedback only when a round is
complete.
NOTE: This product is not intended for double trap
environments or games that allow multiple shots for each
target.
Starting a Trap Shooting Session
Position the device directly in front of you at your shooting
1
station.
Plug the small end of the power cable into the USB port on
2
the device.
Plug the other end of the power cable into the included AC
3
power adapter.
Plug the AC power adapter into a standard wall outlet.
4
Charge the device completely.
5
NOTE: A complete charge may take up to 3 hours.
Turning On the Device
Press POWER.
The first time you turn on the device, you must follow the on-
screen instructions to complete the setup process.
2 Adding a Gun Profile
Stand directly behind the Xero S1 device with your front foot
2
no more than 46 cm (18 in.) away from it.
Select TRAP MODE.
3
Select a trap game mode (Trap Game Modes, page 2).
4
If necessary, select a data field to change information about
5
your shooting session.
Page 7

TIP: Information entered on the setup screen is used to
calibrate the device for your shooting session. You should
verify all information is accurate.
Select .
6
Select your current shooting station, and select .
7
Align the device so the point of the arrow is centered
8
above the trap house .
NOTE: The arrow and trap house could appear in different
positions depending on your shooting station. You should
verify the top of the alignment window is aligned with the top
edge of the trap house.
Select .
9
When the READY notification appears, begin your shooting
10
session.
NOTE: The device will not detect a shot until the READY
notification is on the screen. You should always confirm the
device is ready before taking a shot.
After five shots, you are prompted to change shooting stations.
Follow the on-screen instructions to set up your device at a
different shooting station.
Positioning the Device for Upland Training
WARNING
Never stand in front of the shooting position when operating this
device or a trap thrower. Always understand your target and
what lies beyond your target before taking a shot. Failure to
account for your shooting environment could cause property
damage, injury, or death.
Use upland training mode only with a remote-operated
electronic trap thrower. Compatible trap throwers must be
capable of launching clay targets in a consistent trajectory each
time. This device does not support hand throwers or manually
operated throwers.
Position your trap thrower so it consistently launches clays
1
into an area that is safe for shooting.
Place your Xero S1 device 1.5 m (5 ft.) away from the trap
2
thrower in the 7 o'clock or 5 o'clock position.
Display Modes
Display modes configure how the device displays information
between shots. When you start a shooting session, select
DISPLAY MODE.
FULL DETAILS: Enables the device to keep score and display
shot analysis information after each shot.
SCOREKEEPER: Enables the device to keep score, but it does
not show shot analysis information between shots.
BLACK BOX: Disables the display of score and shot analysis
information between shots. You can view your scorecard only
after the round is complete.
Changing the Shooting Station
If necessary, you can change stations manually.
During a shooting session, select .
1
Select a shooting station, and select .
2
Follow the on-screen instructions to align the device for your
3
shooting station.
Upland Training Mode
Upland training mode lets you practice your skills with a
compatible trap thrower in environments outside of the trap field.
A standard round of upland shooting consists of 25 targets. Up
to six shooters can compete against each other in a single round
of upland shooting. Each shooter must stand behind the Xero
S1 device when taking their shot.
Stand directly behind the Xero S1 device with your front foot
3
no more than 46 cm (18 in.) away from it.
Starting an Upland Training Session
Select UPLAND MODE.
1
Select the number of shooters.
2
Select the shooter who owns the device, and select .
3
NOTE: The device saves data only for the device owner to
the Xero app and the device memory.
If necessary, select a data field to change information about
4
your shooting session.
TIP: Information entered on the setup screen is used to
calibrate the device for your shooting session. You should
verify all information is accurate.
Select .
5
Position the device for an upland training session (Positioning
6
the Device for Upland Training, page 3), and select .
Verify the device is level and the trap thrower is not visible on
7
the screen, and select .
Launch a test clay to verify the clay target is visible on the
8
screen for the entire flight, and select .
Launch a test clay, observing where the clay target first
9
appears on the screen.
Upland Training Mode 3
Page 8

Select the area at the edge of the screen where the clay
10
enters the field of view.
NOTE: If the clay does not pass through one of the
selectable areas, adjust the angle of the device until it does.
Select .
11
When the READY notification appears, begin your shooting
12
session.
NOTE: The device will not detect a shot until the READY
notification is on the screen. You should always confirm the
device is ready before taking a shot.
Shot Analysis
After each shot, the device shows you an analysis of your shot.
You can use this information to improve your accuracy and
consistency. The analysis screen shows the location of the
center of the shot pattern. The size of a shot pattern may vary
depending on your firearm and choke diameter.
Reshooting
If necessary, you can reshoot your last shot. This can be useful
if there was a malfunction with the trap thrower.
Select > RESHOOT LAST SHOT.
1
When the READY notification appears, take your shot.
2
Ending a Round
Select an option:
• If you are using trap mode, select > END ROUND.
• If you are using upland mode, select .
Scores
Break Factor Score
Each of your shots earns a point value based on how well you
break a clay target. You can earn up to 100 points for each 25shot round.
Trapshooting Value Point Value
SMASH 4
CLEAN 3
CHIP 1
MISS 0
Upland Training Value Point Value
CLEAN 4
BLASTED 3
WOUND 1
MISS 0
The location of the center of the shot pattern in relation to the clay
The distance from the clay to the center of the shot pattern
The direction of the shot pattern in relation to the clay
The distance of the clay at the moment it was broken
The number of clays hit out of the total number of shots
Shooting station information (trap mode) or shooter number (upland
training mode)
Adding a Shot
You can manually add a shot if the device did not detect it. The
device does not record positional data for added shots.
Select > ADD SHOT.
1
Select a score.
2
Changing the Score
You can edit the last shot if it was detected incorrectly.
Select > CHANGE SCORE.
1
Select a score (Break Factor Score, page 4).
2
Scorecards
You can review the scorecard at the end of each round.
Scorecards are saved to the device memory automatically. You
can select to view additional information about the round.
Targets
Stations
Total targets hit per station
Round score
Score distribution
Break factor score
Viewing Saved Scorecards
From the main menu, select .
1
Select a scorecard.
2
4 Shot Analysis
Page 9

Accuracy Summary
When viewing your scorecard, you can select to view the
accuracy summary for the round. The accuracy summary shows
the distance and direction of each shot in relation to the clay
target. You can use this information to see your aiming trends
throughout each round.
Indicates whether the shot was a hit or miss
The angle of the shot pattern in relation to the clay target
The distance of the center of the shot pattern from the center of the
clay target
A graphical representation of each shot in relation to the clay target
The absolute average distance of the shot in relation to the clay
target when hitting or missing
The absolute average distance of all shots in relation to the clay
target for the entire round
A graphical representation of all shots in relation to the clay target
for the entire round
Clay Angle and Station
When viewing your scorecard, you can select to view clay
angle and station information for each round. The clay angle and
station page shows your success rate when the clay is thrown at
different angles. You can use this information to see your
accuracy trends when the clay is thrown at different angles at
each station.
optimal distance for upland shooting based on your accuracy
trends.
Target number
Set number
A graph of hits or misses at different distances
Xero App
The Xero app stores information from each round for historical
review and statistical analysis. You can download the Xero app
from the app store on your smartphone.
Pairing Your Smartphone
To use the connected features of the Xero S1 device, it must be
paired directly through the Xero app, instead of from the
Bluetooth® settings on your smartphone.
From the app store on your smartphone, install and open the
1
Xero app.
Bring your smartphone within 10 m (33 ft.) of your device.
2
On your Xero S1 device, select > PHONE.
3
Verify the toggle switch is set to ON.
4
From the Xero app, select , and follow the on-screen
5
instructions.
Customizing Your Device
Device Settings
From the main menu, select .
GUN PROFILES: Sets custom profiles for your firearm and
ammunition (Adding a Gun Profile, page 2).
PHONE: Sets options for pairing the device with a compatible
phone and the Xero app (Pairing Your Smartphone, page 5).
SCREEN TIMEOUT: Sets the amount of time before the screen
turns off.
BRIGHTNESS: Sets the screen brightness.
LED INDICATOR: Enables or disables the status LED located
The angle of the clay.
Clay targets hit or missed at different stations. You can tap the grid
to view additional shots, if available. Shots are listed by station and
shot number. For example, 2-5 means station 2, shot 5.
The number of hits out of the total number of clay targets at each
angle.
Upland Factor
When viewing your scorecard after an upland training session,
you can select to view upland factor information for each
round. The upland factor shows how you hit or missed at
different distances. You can use this information to find your
Xero App 5
below the device screen.
SAVE POST-SHOT PICTURE: Enables the device to take a
picture of the clay target after a shot is detected.
SAVE CLAY ANIMATION: Enables the device to save an
animation of the clay target after a shot is detected (Viewing
Scorecards, Pictures, and Animations on a Computer,
page 6).
SYSTEM: Sets system preferences (System Settings,
page 5).
System Settings
From the main menu, select > SYSTEM.
Page 10

DATE AND TIME: Sets options for the date and time.
AUTO OFF: Sets the device to turn off automatically after five
minutes of inactivity.
RANGE RENTAL RESET: Resets the device to default settings
and clears all scorecards.
LANGUAGE: Sets the device language.
UNITS: Sets the units of measure (Changing the Units of
Measure, page 6).
RESET: Sets options for resetting the device settings, clearing
scorecards, formatting the device storage, or returning the
device to factory settings (Resetting Data and Settings,
page 7).
REGULATORY INFO: Displays regulatory and compliance
information.
ABOUT: Displays technical information about the device.
Changing the Units of Measure
You can customize units of measure displayed on the device.
Select > SYSTEM > UNITS.
1
Select measurement system.
2
Select a picture, animation, or scorecard to view it on your
7
computer.
NOTE: Pictures are saved in PNG format. Animations are
saved in GIF format. Scorecards are saved in BMP format.
Device Care
NOTICE
Do not store the device where prolonged exposure to extreme
temperatures can occur, because it can cause permanent
damage.
Never use a hard or sharp object to operate the touchscreen, or
damage may result.
Avoid chemical cleaners, solvents, and insect repellents that can
damage plastic components and finishes.
Secure the weather cap tightly to prevent damage to the USB
port.
Avoid extreme shock and harsh treatment, because it can
degrade the life of the product.
Cleaning the Outer Casing
Device Information
Avoid chemical cleaners and solvents that can damage plastic
components.
NOTICE
Product Updates
Clean the outer casing of the device (not the screen) using a
On your computer, install Garmin Express™ (www.garmin.com
/express).
This provides easy access to these services for Garmin
devices:
• Software updates
• Product registration
®
Connecting the Device to Your Computer
NOTICE
To prevent corrosion, thoroughly dry the USB port, the weather
cap, and the surrounding area before charging or connecting to
a computer.
Pull up the weather cap from the USB port.
1
Plug the small end of the USB cable into the USB port.
2
Plug the large end of the USB cable into a computer USB
3
port.
Your device appears as a removable drive in My Computer
on Windows® computers and as a mounted volume on Mac
computers.
1
cloth dampened with a mild detergent solution.
Wipe the device dry.
2
Cleaning the Touchscreen
Use a soft, clean, lint-free cloth.
1
If necessary, lightly dampen the cloth with water.
2
If using a dampened cloth, turn off the device and disconnect
3
the device from power.
Gently wipe the screen with the cloth.
4
Cleaning the Camera Lens
NOTICE
Avoid chemical cleaners and solvents that can damage plastic
components.
You should clean the camera lens regularly to keep the camera
lens free of dirt and debris.
®
Wipe the lens with a non-scratch lens cloth, optionally
1
dampened with isopropyl alcohol.
Allow the lens to air dry.
2
Viewing Scorecards, Pictures, and Animations on a Computer
Before you can record post-shot pictures and animations, you
must first enable the device to save pictures and animations
(Device Settings, page 5).
Connect the device to your computer using the included USB
1
cable (Connecting the Device to Your Computer, page 6).
Open the device drive.
2
Open Garmin > Results.
3
Open the folder named with the date of your shooting
4
session.
Open the folder named with the round number you want to
5
view.
If necessary, open the folder named with your shooter
6
number (upland mode only).
1
*The device withstands incidental exposure to water of up to 1 m for up to 30 min. For more information, go to
www.garmin.com/waterrating.
Specifications
Battery type Rechargeable, built-in lithium-ion battery
Wireless frequency/protocol 2.4 GHz @ -0.74 dBm nominal
24 GHz @ 19.51 dBm nominal
Operating temperature range From 0º to 60ºC (from 32º to 140ºF)
Charging temperature range From 7º to 43°C (from 45º to 109°F)
Water rating IEC 60529 IPX7
Viewing E-label Regulatory and Compliance Information
The label for this device is provided electronically. The e-label
may provide regulatory information, such as identification
numbers provided by the FCC or regional compliance markings,
as well as applicable product and licensing information.
1
6 Device Information
Page 11

Select .
1
Select SYSTEM.
2
Select REGULATORY INFO.
3
Troubleshooting
The device is showing incorrect distances
• When using trap mode, verify that no part of the trap thrower
extends above the alignment window.
• When using upland mode, verify that no part of the trap
thrower is visible on the device screen.
• Verify the clay target is visible on the screen during its entire
flight path.
• Verify there are no obstructions in front of the device that
could interfere with wireless frequencies, such as tall grass or
branches.
Resetting Data and Settings
The device offers several options for deleting your user data and
resetting all settings to factory default values.
Select > SYSTEM > RESET.
1
Select an option:
2
• To reset all settings to default values, select SETTINGS.
• To format and erase all user data stored on the device,
select FORMAT STORAGE.
• To delete all user data and reset all settings to factory
default values, select FACTORY RESET.
Getting More Information
You can find more information about this product on the Garmin
website.
• Go to support.garmin.com for additional manuals, articles,
and software updates.
• Go to buy.garmin.com, or contact your Garmin dealer for
information about optional accessories and replacement
parts.
Troubleshooting 7
Page 12

Index
A
accessories 7
applications 5
apps, smartphone 5
B
battery 6
charging 2
break factor score 4
C
cleaning, device 6
cleaning the device 6
cleaning the touchscreen 6
computer, connecting 6
customizing the device 5
D
data
storing 5
transferring 5, 6
device
care 6
cleaning 6
display settings 3
G
game modes 2
Garmin Express, updating software 6
gun profile 2
H
history, sending to computer 5
K
keys 1
M
menu 1
P
pairing, smartphone 5
power key 2
R
resetting the device 7
S
scorecard 4, 5
viewing 6
screen 5
settings 6
shot analysis 4
smartphone 5
pairing 5
software, updating 6
specifications 6
storing data 5, 6
system settings 5
T
temperature 6
touchscreen 1
trap shooting 2, 3
ending 4
tripod 1
adjusting 2
installing 1
troubleshooting 7
U
units of measure 6
upland training mode 3
position 3
W
water rating 6
8 Index
Page 13

Page 14

support.garmin.com
July 2019
190-02532-00_0A
 Loading...