

Page 1

Page 2

No part of this document may be reproduced in any form or by
any means without the express written consent of II Morrow
Inc.
II Morrow, Apollo, and Precedus are trademarks of
II Morrow Inc.
Windows is a trademark of Microsoft, Inc.
© 1998 by II Morrow Inc. All rights reserved. Printed in the
U.S.A.
II Morrow Inc.
Consumer Products Division
2345 Turner Road S.E.
Salem, OR 97302
U.S.A. Toll Free 800.525.6726
Canada Toll Free 800.654.3415
International 503.391.3411
FAX 503.364.2138
Visit our web page at http://www.iimorrow.com
Send comments about this manual by e-mail to:
techpubs@iim.ups.com
History of Revisions
October 1996 Original Release
January 1997 Rev 01A
October 1998 Rev 2, Waypoint Manager 4.0
Ordering Information
II MORROW
VISIONARY THINKING TODAY
To receive additional copies of the Waypoint Manager User’s
Guide, order part #560-0138-02.
Page 3

TABLE OF CONTENTS
History of Revisions ............................................2
Ordering Information ..........................................2
Getting Started ................................................1
System Requirements ........................................1
Minimum ··········································1
Recommended ······································2
Making a Backup Copy of the Program Disks ...................2
Using Windows “Copy Disk” (Windows 3.1/3.11) ········2
Using “My Computer” (Windows 95/98/NT)············2
Installation ................................................3
Windows 3.1/3.11 ···································3
Windows 95/98/NT··································3
Starting Waypoint Manager ..................................4
Exiting Waypoint Manager...................................4
Uninstalling Waypoint Manager ..............................4
Connecting to the Apollo GPS ................................4
Apollo GPS·········································4
Waypoint Manager ··································5
Waypoint Manager Features..................................6
Application Window ........................................6
Program Title Bar ···································7
Control-Menu Box ··································7
Maximize/Minimize Buttons ··························7
Menu Bars ·········································7
Keyboard Operation ........................................8
Basic Operation................................................9
Starting Waypoint Manager ..................................9
Connect the Apollo GPS Receiver ............................10
Install A New Database to Hard Drive ........................10
Send
Database to Apollo.........................................11
Save User Waypoints .......................................11
Save Routes...............................................11
i
Page 4

Save Track History ........................................12
Reference ....................................................13
File......................................................13
Open a File in Notepad ·····························13
Application ········································13
Communications ···································17
Databases ................................................17
Send Database to GPS Unit ··························17
Delete Database from GPS Unit ······················19
Install Databases to Hard Drive·······················20
Waypoints ................................................21
Send Waypoints to GPS Unit·························21
Delete User Waypoints from GPS Unit ················22
Receive User Waypoints from GPS Unit ···············22
Routes ...................................................23
Send Routes to GPS Unit ····························23
Delete All Routes from GPS Unit ·····················24
Receive Routes from GPS Unit ·······················24
Track History .............................................25
Receive Track History from GPS Unit ·················25
Delete Track History from GPS Unit ··················26
Help.....................................................26
Waypoint Manager Help ····························26
About·············································26
Working with Data Files.......................................27
Editing Data Files .........................................27
Data File Structures........................................28
Waypoint Files·····································28
Route Files ········································29
Track History Files ·································31
Sample Data Files .........................................32
Error Messages ...............................................33
Apollo GPS Product Information................................37
Data Bases Available .......................................37
Apollo GPS Units With Software Updates Available On Diskette. . 37
Apollo GPS Serial Data Cables ..............................37
Apollo GPS Serial Port Selections for PC Interface ..............38
Apollo 920·········································38
Apollo 360 GPS ····································38
Apollo Precedus ····································38
Apollo SL50/60 ····································38
ii
Page 5

Apollo GPS Database Update Operation ......................38
Apollo 360, 920, and Precedus ························38
Apollo SL50 ·······································39
Apollo SL60 ·······································39
Update Apollo GPS Application Software .....................40
Apollo 360 ········································40
Apollo Precedus ····································41
Apollo 920·········································41
iii
Page 6

Getting Started
Waypoint Manager for Windows is a program that uses a serial
data interface to communicate with your Apollo GPS product
from a personal computer. Functions that can be performed
with this product include:
Update the internal database of your Apollo GPS
•
Transfer user waypoints between the Apollo GPS and your
•
PC
Transfer routes between the Apollo GPS and your PC
•
Transfer track history waypoints from the Apollo GPS to
•
your PC
Update the applications program in the Apollo GPS
•
Display, edit, and print user waypoint and route files
•
This manual assumes that you have a basic understanding of
Windows and can comfortably navigate in the Windows
environment. If you need further help in understanding the
basics of Windows, please refer to your Windows user’s guide.
System
Requirements
The minimum requirements will allow you to use the
program adequately; however, the recommended system
requirements will provide better performance.
Getting Started
Minimum
Computer Intel 386-based, or more
powerful PC with 3.5”
high density floppy drive.
Operating System Windows version 3.1, 3.11,
Windows 95/98, or Windows NT.
Memory 4 Mb of RAM.
Serial Port 9-pin serial port configured as
COM1, 2, 3, or 4.
Hard Disk About 1 Mb of free space for
programs, 5 Mb for databases.
Apollo GPS 360, 920, SL-series or Precedus.
Serial Data Cable Cable appropriate for your unit.
1
Page 7

Getting Started
Recommended
Computer 486, or more powerful PC with
3.5” high density floppy drive.
Operating System Windows version 3.1, 3.11,
Windows 95/98, or Windows NT.
Memory 8 Mb of RAM.
Hard Disk About 3 Mb of free space
for programs, 10 Mb for
data.
Making a
Backup
Copy of the
Program
Disks
Before installing Waypoint Manager, make backup copies
to protect your investment. Waypoint Manager is
distributed on 3.5” High Density (1.44 Mb) floppy disks.
Using Windows “Copy Disk” (Windows 3.1/3.11)
1. Insert the original disk into drive A.
2. Open File Manager.
3. Click on “Disk” on the Menu Bar.
4. Click on “Copy Disk.”
5. Follow the instructions in the prompts.
6. Repeat this process for all disks.
Using “My Computer” (Windows 95/98/NT)
1. Insert the original disk into drive A.
2. Double click on the “My Computer” icon.
3. Right click on the “3½ Floppy (A:)” icon.
4. Click on “Copy Disk.”
5. Follow the instructions in the prompts. Repeat this process
for all disks.
2
Page 8

Getting Started
Installation The installation program will create a directory and
necessary subdirectories to put the files for Waypoint
Manager. In Windows 3.1, the main directory will be
called “WPTMGR” unless you choose another name. In
Windows 95/98/NT, the program will be located in
“program files\II Morrow\Waypoint Manager 4.0.
Subdirectories named WAYPOINT, ROUTE,
DATABASE, HISTORY, APOLLOSW, and SYSTEM
will be created for the necessary files.
Windows 3.1/3.11
1. Insert Disk 1 in your floppy disk drive.
2. From the File menu in the Program Manager, choose
RUN.
3. In the Command Line box, type x:\Setup (where x is the
letter for your floppy drive) and click on the OK button.
4. You will be prompted for the destination directory. You
may change the destination if you wish. Click on OK. The
installation progress will be shown on the screen. Prompts
will appear when it is time to insert a new disk.
Windows 95/98/NT
1. Insert the original disk into drive A.
2. Double click on the “My Computer” icon.
3. Double click on the “3½ Floppy (A:)” icon.
4. Double click on the executable file (*.exe). Follow the
on-screen directions.
Note
If you have a previous version of Waypoint Manager
and would like to install the new version over the old
one, change the install path to the location of the
previous version. No previous information will be
changed or deleted.
3
Page 9

Getting Started
Starting
Waypoint
Manager
Exiting
Waypoint
Manager
Uninstalling
Waypoint
Manager
Connecting
to the Apollo
GPS
Apollo GPS
A new Program Group with program icons has been
created for the Waypoint Manager. Double-click on the
Waypoint Manager icon to start the program or select it
from the Start Menu.
1. From the File menu, choose “Exit.” You may also
double-click on the Control-Menu box to exit or click on
the “x” in the top right corner (Windows 95/98/NT).
2. If you haven’t saved the file that you are working on, you
will be prompted to save it.
1. In the Waypoint Manager Program Group, double-click on
the Uninstall icon.
2. Choose “Yes” to uninstall all of the Waypoint Manager
components. Choose “No” to retain the program.
Use the PC Serial Data Cable to connect your Apollo GPS
product to your personal computer.
1. Use the PC Serial Data Cable that came with your Apollo
GPS PC Interface kit. Insert the plug into the Serial Port
socket on the Apollo GPS.
2. Plug the 9-pin connector into a 9-pin serial port socket on
the computer with the Waypoint Manager program
installed.
3. Turn on your Apollo GPS.
4. Refer to the User’s Guide for your Apollo GPS and set it to
the Serial I/O type to prepare for communicating with your
PC. See “Serial Port Selections” on page 38.
5. Go to the Main Menu on the Apollo GPS (not necessary
on the SL50/60).
Now, use the Waypoint Manager program to download or
extract data from your Apollo GPS.
4
Page 10
Getting Started
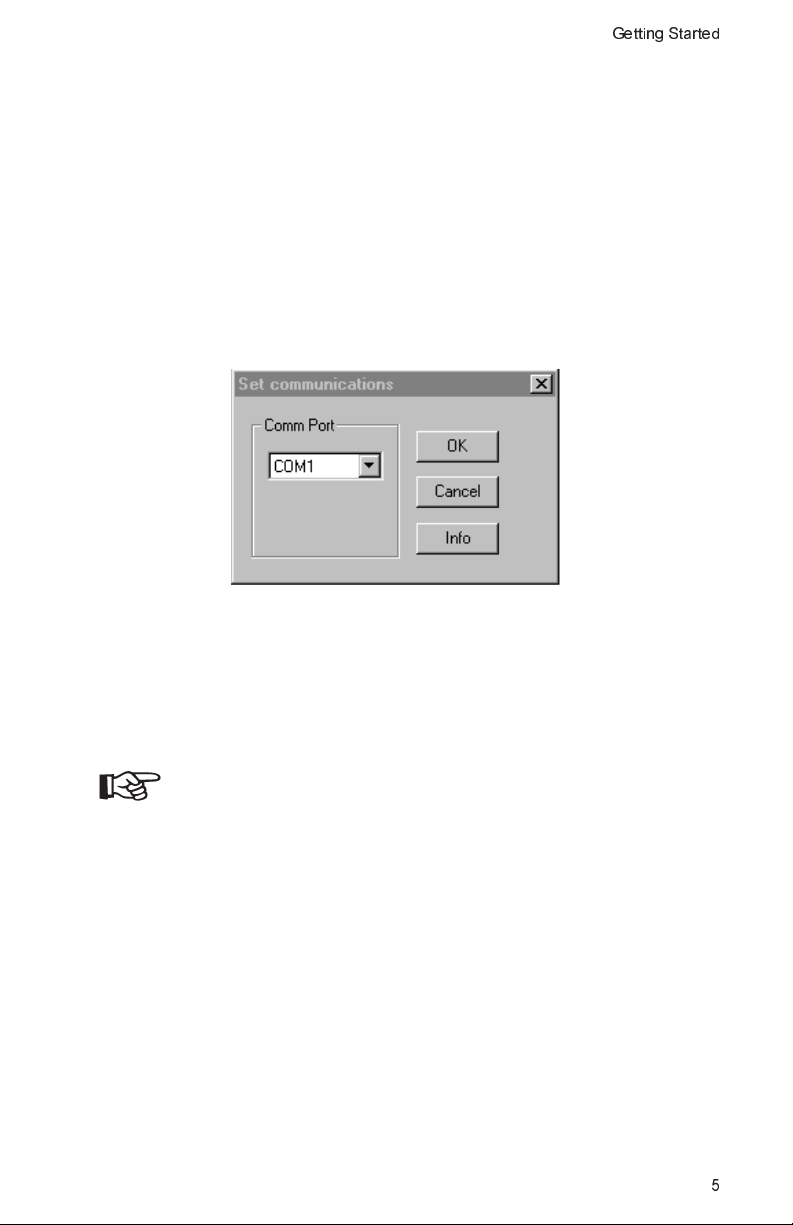
Waypoint Manager
Use your personal computer to manage information inside
your Apollo GPS product.
1. Turn on the computer. Start Windows™ and then the
Waypoint Manager program.
2. Click on “File.”
3. Click on “Communications.”
4. Click on the down arrow and select comm port that you are
using (com1-4).
5. Click on “OK” or press ENTER.
Note
If you have problems connecting to your Apollo GPS,
you may need to exit Waypoint Manager and then
restart the program. You will not have to reselect the
comm port.
5
Page 11
Getting Started
Waypoint
Manager
Features
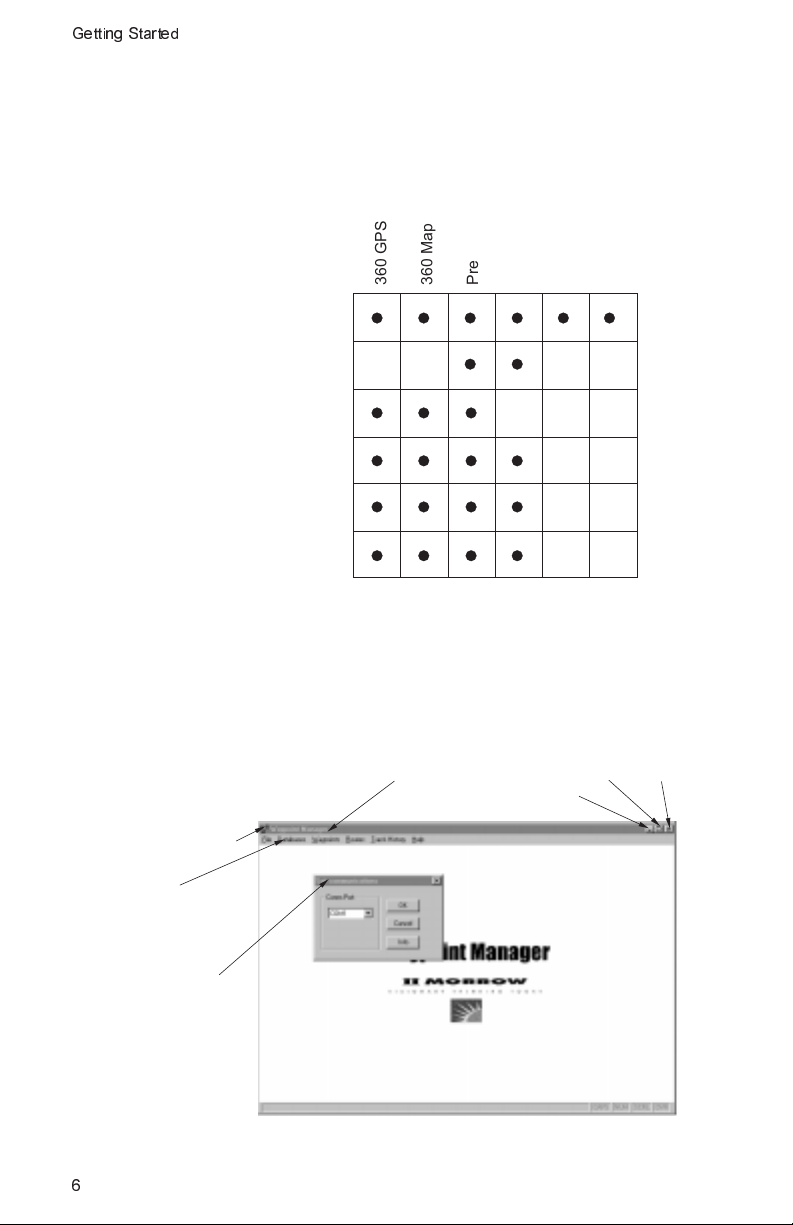
Multiple Database Capable
The Waypoint Manager features cover the Apollo products
as shown in the following table. A given Apollo product
may not take advantage of all features available with
Waypoint Manager.
Waypoint Manager Compatibility
360 GPS
360 Map
Precedus
920
SL50
SL60
Aviation Database
*
**
Applications
Waypoints
Routes
Track History
Only one database may be loaded at a time.
*
Only one database may be present unless
**
4M memory is available, with one exception.
The 2M version can hold the international
aviation and world boundaries database.
Application
Window
Control-Menu
Menu Bar
Window Title Bar
6
The Waypoint Manager application window is shown below.
Program Title Bar
Minimize
Maximize
Close
Page 12

Getting Started
Program Title Bar
The Program Title Bar shows the title of the program.
Control-Menu Box
Click on the Control-Menu box to display a menu of
commands you can use to manipulate a window. To open the
Control menu, click on the Control-Menu box to the left of the
Program Title bar in a window.
Maximize/Minimize Buttons
The Maximize and Minimize buttons are the two arrow
buttons on the top right corner of a window. Click on the
Maximize button to enlarge a window to its maximum size.
Click on the Minimize button to reduce a window to an icon.
Menu Bars
The menu bar shows the list of functions available in Waypoint
Manager. Click on the menu item with the mouse to view the
functions available for each menu item.
The available functions on the Menu Bar are: File, Databases,
Waypoints, Routes, Track History, and Help. A full description
of each function is given in the Reference section of this guide.
7
Page 13

Getting Started
Keyboard
Operation
If for some reason a mouse is not available, all operations
can be performed from the keyboard. The keystrokes
necessary to perform all operations are consistent for
operating within Windows without a mouse. The
following keystrokes will allow operation of Waypoint
Manager for Windows without a mouse.
ALT Moves cursor to menu bar.
TAB Moves cursor forward through menu
headings or changes button selections,
moves cursor into and out of list box
items, and check boxes.
SHIFT-TAB Moves cursor in reverse direction
through menu items and button
selections. Moves cursor into and out of
check boxes and list boxes.
RIGHT ARROW Moves cursor to the right through menu
headings, down through list box items,
and down through check box items.
DOWN ARROW Moves cursor down through the menu
items, list boxes, and up through check
box items.
LEFT ARROW Moves cursor to the left through menu
headings, up through list box items, and
up through check box items.
UP ARROW Moves cursor up through menu items,
list box items, and check box items.
ENTER Activates menu items and selected
buttons.
SPACE BAR
Activates the CANCEL button in the “Transferring Data”
window. Activates selected buttons.
8
Page 14
Basic Operation
This section illustrates some of the basic operations of the
Waypoint Manager. More detailed descriptions of all features
are provided in the Reference section.
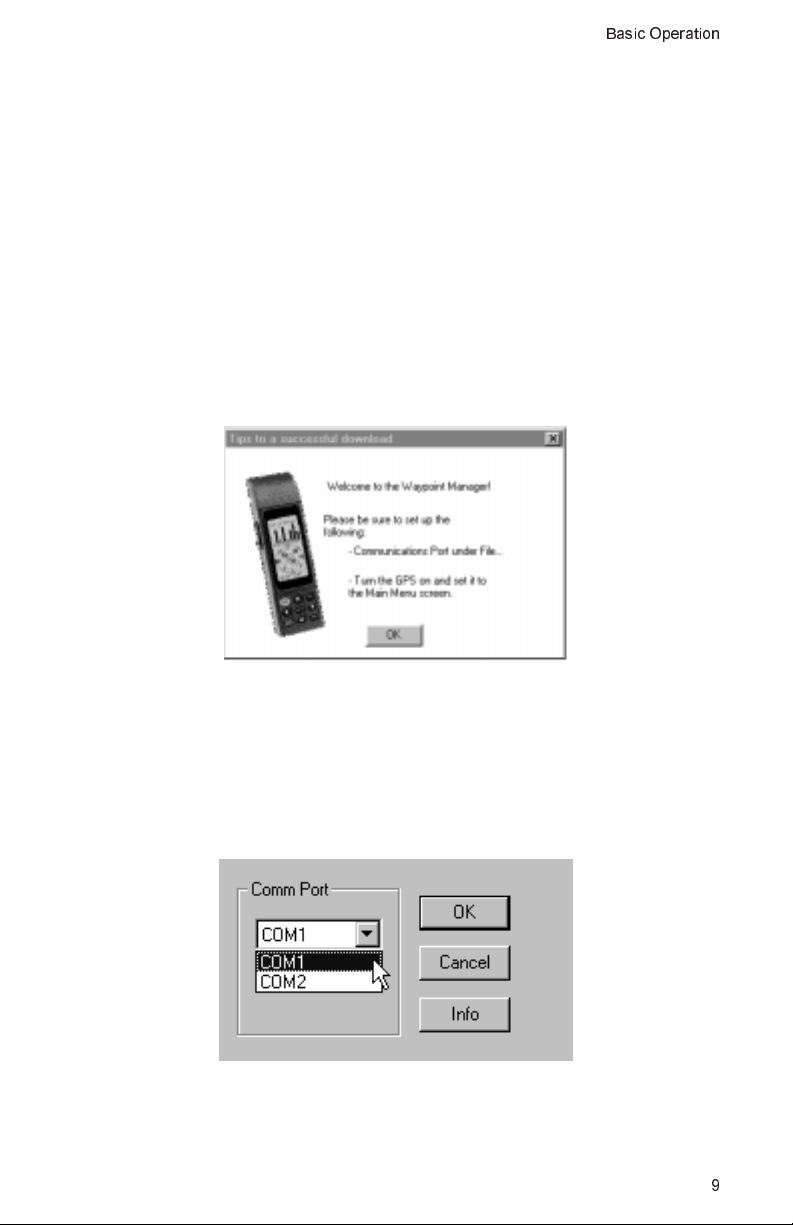
Starting
Waypoint
Manager
Start your Waypoint Manager software in your personal
computer. You can also connect your GPS receiver first, if
you wish.
1. Turn on your PC.
2. In the Waypoint Manager program group, double-click on
the Waypoint Manager icon.
Basic Operation
3. Click on “OK.”
4. Select the File menu item and choose “Communications.”
Set the proper Comm Port on your computer for the GPS
receiver connection.
9
Page 15

Basic Operation
Connect the
Apollo GPS
Receiver
A selection of typical operations that you may use on a frequent
basis are described in summarized form in the following steps.
For more detailed information, see the Reference section for
each topic.
Install A New
Database to
Hard Drive
Connect and turn on your GPS receiver. You can also first
start your Waypoint Manager software in your personal
computer, if you wish.
1. Connect the serial data cable between your computer and
the Apollo GPS receiver. If you have a 360 GPS receiver
installed in an aircraft, you may use a laptop to connect to
the installed receiver.
2. Turn on the Apollo GPS receiver.
3. Set your Apollo GPS receiver I/O setting to communicate
with a PC (refer to your Apollo GPS User’s Guide). See
the section on serial ports on page 38.
Your Waypoint Manager program will allow you to easily
update the database in your Apollo GPS receiver.
10
1. Insert the floppy disk with your new Apollo database disk
into the floppy drive on your computer.
2. Click on the Databases menu item. Select “Install
Databases to Hard Drive.”
3. The “Choose Path” dialogue box will show floppy drive A:\
as the default drive. Select the appropriate drive letter if
your floppy drive has a different letter. Click on “OK.”
4. After the file has been copied to your hard drive, click on
the Databases menu item. Select “Send Database to GPS
Unit...”
5. In the “Open” dialogue box, select the appropriate file from
the displayed list. Now, press “OK.” The transfer will take
several minutes.
Page 16

Basic Operation
Send
Database to
Apollo
Save User
Waypoints
After loading your database to your hard drive, you may
copy it to your Apollo unit.
1. Click on the Databases menu.
2. Click on “Send Database to GPS Unit.”
3. Select the desired database from the list by clicking on the
database selection to highlight it.
4. Click on “OK.”
5. Restart your Apollo after sending the database.
You can transfer User waypoints from your GPS receiver to
your personal computer for archiving or editing. This
feature is not available for the SL series.
1. Click on the Waypoint menu item. Select “Receive User
Waypoints from GPS Unit.”
2. Type the name for the Waypoint file that you would like to
save.
3. The User waypoints in your Apollo GPS have now been
saved to the hard drive of your computer. Files are sent to
the Waypoint subdirectory by default.
Save Routes You can transfer flight plan routes from your GPS receiver
to your personal computer for archiving or editing. This
feature is not available for the SL series.
1. Click on the Routes menu item. Select “Receive Routes
from GPS Unit.”
2. Type the name for the Route file that you would like to
save.
3. The Route in your Apollo GPS has now been saved to the
hard drive of your computer. Files are sent to the Route
subdirectory by default.
11
Page 17

Basic Operation
Save Track
History
You can transfer Track History points from your GPS
receiver to your personal computer for archiving,
processing, or editing. This feature is not available for the
SL series.
1. Click on the Track History menu item. Select “Receive
Track History from GPS Unit.”
2. Type the name for the Track History file that you would
like to save.
3. The Track History in your Apollo GPS has now been
saved to the hard drive of your computer. Files are sent to
the History subdirectory by default.
12
Page 18

Reference
This section provides detailed information on the functions
available with Waypoint Manager.
File The File menu is where you perform the file operations for
Waypoint Manager, such as, Open a File in Notepad, set
the comm port on your computer, and exit the program.
Open a File in Notepad
The Open a File in Notepad menu item allows you to open a file
for editing. See the section called Working with Data Files for
more information. Using this function you can modify or create a
User Waypoint, Route, or Track History file.
1. Click on “File.”
Reference
2. Click on “Open a File in Notepad.”
3. Select the file for editing from the proper directory
(waypoint, route, or history).
4. When you finish editing, save the file and exit Notepad.
Application
The Application menu item allows you to copy new Apollo
application software to your hard drive and then load it into
your Apollo GPS. Loading a new operating system yourself
allows you to have the latest features without having to send
your Apollo GPS back to the factory or to a dealer. The
“What’s Installed” selection shows the version of application
software that is installed on your hard drive.
13
Page 19

Reference
Install Application to Hard Drive
The “Install Application to Hard Drive” selection will install
Application software files to your hard drive. You must install
the Application files to your hard drive before transferring them
to your GPS unit.
1. Insert the floppy disk with your new Apollo application
software into the floppy drive on your computer.
2. Click on the Application selection under the File menu
item. Select “Install Application to Hard Drive.”
3. The “Choose Path” dialogue box will show floppy drive A:
as the default drive. Select the appropriate drive letter if
your floppy drive has a different letter. Click on “OK.”
14
Page 20

Reference
Send Application to GPS Unit
After installing the Application software to your hard drive you
may transfer it to your GPS Unit. If you are not sure about
this procedure, call technical support before loading
application software.
1. After the file has been copied to your hard drive, click
on the Application selection under the File menu item.
Select “Send Application to GPS Unit.”
2. In the “Open” dialogue box, select the appropriate file in
the Apollosw subdirectory. Now, press “OK.”
Note
Apollo 360 units require a special power-on button
sequence to update the application software. See the
Apollo GPS Product Information section in this
manual (page 37). Newer information may be on the
diskette that came with your software upgrade.
The transfer will take several minutes. After the transfer is
completed, verify that the download was successful by checking
the Waypoint Manager and Apollo GPS screens. Your new
software will be in place the next time you turn on your Apollo
GPS.
15
Page 21

Reference
Delete Application from Hard Drive
The “Delete Application...” selection will remove Application
software files from your hard drive.
1. Click on the Application selection under the File menu
item. Select “Delete Application from Hard Drive.”
2. A list of application software files is displayed. Use the
up/down arrows to choose the file you want to remove.
Now, click on “OK.”
What’s Installed
The “What’s Installed” selection shows the name, serial
number, and date of the Application Software that is installed
on your hard drive.
16
Page 22

Reference
Communications
The Communications menu item sets the serial
communications port that you will use on your computer to
connect to the handheld. You must select the number (1-4) of
the comm port that you will use.
1. Click on “File.”
2. Click on “Communications.”
3. Click on the appropriate number for the desired serial
comm port (COM1, 2, 3, or 4).
4. Click on “OK.”
Databases The Databases menu allows you to manage the databases in
your GPS receiver. After installing databases onto your hard
drive, you can add to or delete databases from your Apollo GPS
as your needs dictate.
Send Database to GPS Unit
The Send Database to GPS Unit menu item allows you to load
a new database into your GPS receiver. In multiple database
products there are several database types: Aviation, Cities,
Highways, Marine, Political Borders, and Other. You may only
load one database of each type. You may load a database for
each of the four types into your GPS receiver at the same time
as long as there is enough memory available. You must install
the database to your hard drive before transferring it to your
GPS unit.
Note
If you have a multiple database capable product, such
as the Precedus version 6.0 or later, loading a database
will replace an existing database of the same type.
17
Page 23

Reference
1. Click on “Databases.”
2. Click on “Send Database to GPS Unit.”
3. Select the desired database from the list by clicking on the
database to highlight it.
18
4. After making your selection, click on “OK.” It may take
several minutes for the file transfer. When you restart your
Apollo GPS, the new database will be available for use.
Page 24

Reference
Delete Database from GPS Unit
Use this function to remove a database from your Apollo GPS.
As long as you have the database on your hard drive, you can
always reload it at a different time into your Apollo GPS. You
can only use this function with an Apollo GPS that uses
multiple databases, such as the Precedus version 6.0 or later.
Do not use this function with the Apollo 360, 920, or SL50/60.
1. Click on Databases and then on “Delete Database
from GPS Unit.”
2. Select the database type and then click on OK.
19
Page 25

Reference
Install Databases to Hard Drive
This function will install the database from the database
diskette onto your hard drive. After the database is installed
onto your hard drive, you can then load the database onto your
Apollo GPS.
1. Insert the floppy disk with your new database into the
floppy drive on your computer.
2. Click on the database menu item. Select “Install Database
to Hard Drive.”
20
3. The “Choose Path” dialogue box will show floppy drive A:
as the default drive. Select the appropriate drive letter if
your floppy drive has a different letter. Click on “OK.”
Page 26

Waypoints The Waypoint function allows you to manage
User-defined waypoints. You can transfer the User
waypoints to your computer that you have created in the
Apollo GPS. You can send User-defined waypoints from
your computer into your Apollo GPS. Using Notepad, or
another text editor, you can create or edit User waypoints.
See the section on Working with Data Files (page 27) for
more details on how to edit your files.
Send Waypoints to GPS Unit
Select a user waypoint file on your computer and send it to
your Apollo GPS.
1. Click on the Waypoints menu and then select “Send
Waypoints to GPS Unit.”
Reference
2. Choose the waypoint file that you want to send to your
Apollo GPS and then click on OK.
3. Then next time you start your Apollo GPS, the waypoints
you sent will be available as User waypoints.
21
Page 27

Reference
Delete User Waypoints from GPS Unit
Use this function to remove the User waypoints from your
Apollo GPS. As long as you have the User waypoints stored on
your hard drive, you can always reload them at a different time
into your Apollo GPS. User waypoint deleted from your Apollo
GPS cannot be recovered from the Apollo GPS.
1. Choose the Waypoints menu and then select the “Delete
User Waypoints from GPS Unit” function.
2. After you click on the “Delete User Waypoints from GPS
Unit” function, the User waypoints are deleted from the
Apollo GPS.
Receive User Waypoints from GPS Unit
Use this function to transfer the User waypoints from your
Apollo GPS to your computer. As long as you have the User
waypoints stored on your hard drive, you can always reload
them at a different time into your Apollo GPS.
1. Choose the Waypoints menu and then select the
“Receive User Waypoints from GPS Unit” function.
22
2. Type the name for the User waypoint file you want to
save on your computer. Then, click on OK.
Page 28

Reference
Routes The Routes function allows you to manage routes you have
created in the Apollo GPS. You can transfer the Routes to
your computer that you have created in the Apollo GPS.
You can send Routes from your computer into your Apollo
GPS. Using Notepad, or another text editor, you can create
or edit Routes. See the section on Working with Data Files
( page 27)for more details on how to edit your files.
Send Routes to GPS Unit
Select a Route file on your computer and send it to your Apollo
GPS.
1. Click on the Routes menu and then select “Send Routes to
GPS Unit.”
2. Choose the Route file that you want to send to your Apollo
GPS and then click on OK.
3. Then next time you start your Apollo GPS, the Routes you
sent will be available.
23
Page 29

Reference
Delete All Routes from GPS Unit
Use this function to remove the Routes from your Apollo GPS.
As long as you have the Routes stored on your hard drive, you
can always reload them at a different time into your Apollo
GPS. Routes deleted from your Apollo GPS cannot be
recovered from the Apollo GPS.
1. Choose the Routes menu and then select the “Delete
Routes from GPS Unit” function.
2. After you click on the “Delete Routes from GPS Unit”
function, the Routes are deleted from the Apollo GPS.
Receive Routes from GPS Unit
Use this function to transfer the Routes from your Apollo GPS
to your computer. Once you have the Routes stored on your
hard drive, you can always reload them at a different time into
your Apollo GPS.
1. Choose the Routes menu and then select the “Receive
Routes from GPS Unit” function.
24
2. Type the name for the Route file you want to save on your
computer. Then, click on OK.
Page 30

Reference
Track History You can transfer Track History points from your GPS
receiver to your personal computer for archiving,
processing, or editing. As long as you have the Track
History stored on your hard drive, you can always reload
them at a different time into your Apollo GPS.
Receive Track History from GPS Unit
Use this function to transfer the Track History from your
Apollo GPS to your computer.
1. Choose the Track History menu and then select the
“Receive Track History from GPS Unit” function.
2. Type the name for the Track History file you want to save
on your computer. Then, click on OK.
25
Page 31

Reference
Help
Delete Track History from GPS Unit
Use this function to delete the Track History from your Apollo
GPS. When the Track History is deleted from your Apollo
GPS it cannot be recovered from the Apollo GPS.
1. Choose the Track History menu and then select the
“Delete Track History from GPS Unit” function.
2. After you click on the “Delete Track History from GPS
Unit” function, the Track History is deleted from the
Apollo GPS.
Waypoint Manager Help
1. Click on the Help menu item.
26
2. Click on “Waypoint Manager Help.” A list of available
help topics is listed.
About
1. Click on the Help menu item.
2. Click on “About... .” Version information is provided about
Waypoint Manager.
Page 32

Working with Data Files
Working with Data Files
Editing Data
Files
Waypoint Manager allows you to use Microsoft’s Notepad,
or other text editor, to edit or create waypoint, route, and
track history files. The data files can also be edited using a
standard ASCII text editor. If you use a text editor other
than Notepad, follow the instructions for that program for
opening and editing. When editing your files, make sure to
keep the information in the proper format used by the
Apollo GPS. The data file structures are shown in the
following pages. Also, sample files are available on the
Waypoint Manager diskette.
1. Choose the File menu and select the “Open File in
Notepad” function.
2. Select the desired file and press the ENTER key.
3. Make desired changes to file.
4. After completing the changes, save the file in ASCII text
mode and exit.
27
Page 33

Working with Data Files
Data File
Structures
Waypoint
Identifier
(upto6
characters)
This section contains information about the structure of
each of the following file types.
Waypoint files (stored in \WPTMGR\WAYPOINT
•
directory)
Route files (stored in \WPTMGR\ROUTE directory)
•
Track history files (stored in \WPTMGR\HISTORY
•
directory)
These files are transferred and stored in ASCII text format. A
simple editor is included in the program for editing these files,
or they can be edited using a standard text editor.
The files can be given any name desired. They will be stored in
the directories listed above.
Waypoint Files
A waypoint file can contain from 1,000 to 2,000 waypoints
depending on your model. Each waypoint in the file is a line of
text with the following information:
• Waypoint identifier
• Degrees latitude to the nearest 1/1,000th of a minute
•
North or South hemisphere.
•
Degrees longitude to the nearest 1/1,000th of a minute
• East or West hemisphere
HANGER
OFFICE
USER1
45 54.467 N 122 59.930 W
44 54.431 N 122 59.696 W
44 54.573 N 123 00.150 W
Longitude
hemisphere
(E or W)
Latitude
degrees
(2 digits)
Latitude
minutes
(5 digits)
Latitude
hemisphere
(N or S)
28
Longitude
minutes
(5 digits)
Longitude
degrees
(3 degrees)
Page 34

Working with Data Files
Route Files
A route file can contain up to 20 routes, with each route having
up to 30 waypoints. Each route in the file begins with a route
header followed by a list of waypoints. Each route includes the
following information:
Route header (with route number)
•
List of waypoints, up to 30
•
Each waypoint listed includes the following information:
Waypoint identifier
•
Waypoint type
•
Degrees latitude to the nearest 1/1,000th of a minute
•
North or South hemisphere
•
Degrees longitude to the nearest 1/1,000th of a minute
•
East or West hemisphere
•
The route header contains the route number. When assigning
route numbers, use a number from 01 to 20. A route number
will be automatically assigned by the Apollo GPS if none is
entered.
When creating or editing a route file, waypoints may be entered
by waypoint identifier and type only. If only the waypoint
identifier and type is entered, the Apollo GPS will look up the
latitude and longitude in the internal data base when the route
file is sent to the unit.
29
Page 35

Working with Data Files
Route
Header
Waypoint
Identifier
(upto6
characters)
Waypoint
Type
Latitude
degrees
(2 digits)
Latitude
minutes
(5 digits)
Route
Number
*ROUTE 01
SLE A 44 54.573 N 123 00.150 W
UBG V 45 21.194 N 122 58.690 W
PDX A 45 35.323 N 122 35.850 W
OLM V 46 58.298 N 122 54.110 W
SEA A 47 26.279 N 122 18.673 W
*ROUTE 02
SEA A 47 26.279 N 122 18.673 W
HIO A 45 32.423 N 122 56.998 W
SLE A 44 54.573 N 123 00.150 W
Longitude
hemisphere
(E or W)
Longitude
minutes
(5 digits)
Longitude
degrees
(3 degrees)
Latitude
hemisphere
(E or W)
Waypoint Types: A=Airport V=VOR N=NDB I=Intersection
U=User C=City O=Other
If a waypoint already exists in the Apollo GPS internal data
base with the same identifier and type, then the latitude and
longitude found in the data base will be used if it is within 1
nm the latitude and longitude in the route file. If a waypoint
does not exist in the Apollo GPS, then it will be created as a
user waypoint and entered in the route.
30
Page 36

Working with Data Files
Track History Files
A track history file can contain up to 1,000 or 2,000 track points
saved in the Apollo GPS during use, depending on your model.
The track history can be saved in two different formats, selected
when receiving the track history file from the Apollo GPS.
These formats are the following:
User waypoint format
•
Comma delimited latitude and longitude
•
Each track point in a user waypoint type track file is a line of
text with the following information:
Track point identifier
•
Degrees latitude to the nearest 1/1,000th of a minute
•
North or South hemisphere.
•
Degrees longitude to the nearest 1/1,000th of a minute
•
East or West hemisphere
•
Each track point in a comma delimited type track file is a line
of text with:
• Degrees latitude to 0.0001 degree resolution
• Degrees longitude to 0.00001 degrees resolution
TH0001 44 54.573 N 123 00.150 W
TH0002 44 35.323 N 122 35.850 W
TH0003 44 07.310 N 123 13.040 W
Track History
reference #
(up to 6
characters)
Latitude
degrees
(2 digits)
Longitude
hemisphere
(E or W)
Longitude
minutes
(5 digits)
Latitude
minutes
(5 digits)
Latitude
hemisphere
(E or W)
Comma Delimited File Example
Latitude
degrees
44.9096,-123.0025
44.5887,-122.5975
44.1218,-123.2173
Longitude
degrees
Longitude
degrees
(3 degrees)
The Lat or Lon number will be
preceded by "-" for South or West.
31
Page 37

Working with Data Files
Sample Data
Files
Waypoint Manager includes several sample data files for
user waypoint, route, and track history files. These files are
found in the appropriate directory in Waypoint Manager
and may be edited using Notepad.
32
Page 38

Error Messages
If your PC or the Waypoint Manager detects an error, it will
display a message. The table below lists those messages, a
description of the error, and possible solutions. If you are
unable to resolve the problem, contact II Morrow Technical
Support at 503-391-3411 or 800-525-6726.
PC Message Description Possible Solutions
Serial numbers do
not match. New data
file: ####### Apollo
GPS: #######
Bad waypoint format
on line: #. Please
check route file and
try again.
Errors have occurred
during the sending of
waypoints to the
handheld. Please
examine the
wpterror.txt file for
more info.
Track History is not
available in GPS.
The serial number for
the database or
Apollo software does
not match the serial
number of the Apollo
GPS.
Line number # in the
route file has a
formatting problem.
The waypoint being
transferred to the
Apollo GPS already
exists as a user
waypoint or an error
was made in the
waypoint format.
Track History
information cannot be
extracted from the
GPS.
Call II Morrow and
report the problem to
get a replacement
disk with the correct
serial numbers. Files
in the “NOSERIAL”
directory (e.g., USA
City database) do not
require matching
serial numbers.
Check and correct
the format of the file
with a text editor.
This message will
flash on the screen at
the end of a user
waypoint transfer to
the Apollo. The
waypoint in the
Apollo will not be
updated. The
wpterror.txt file is
created and will tell
you which line
contains the
duplicate waypoint.
1. Check your GPS
to see if the Track
History is present.
2. The serial cable
may not be
connected properly to
the PC or Apollo.
Error Messages
33
Page 39

Error Messages
PC Message Description Possible Solutions
Insufficient memory
in the GPS to
transmit database
Route Waypoints are
not available in GPS.
User Waypoints are
not available in GPS.
The Apollo GPS is
out of memory.
The waypoint transfer
has stopped because
the Apollo GPS’s
User database is full.
Route Waypoints
cannot be extracted
from the GPS.
User Waypoints
cannot be extracted
from the GPS.
Verify that the
database is
compatible with your
Apollo GPS. Try
switching the Apollo
power off then on
and resending the
database. If you still
have problems, the
database file may be
corrupt. Try
reinstalling the file
from the original
database floppy disk.
For Apollo GPS units
with multiple
databases, another
database may need
to be deleted before
loading the new
database.
Check your User’s
Guide for the limits
on your Apollo GPS.
1. Check your GPS
to see if the Route
Waypoints are
present.
2. The serial cable
may not be
connected properly to
the PC or Apollo.
1. Check your GPS
to see if the
information is
present.
2. The serial cable
may not be
connected properly to
the PC or Apollo.
34
Page 40

Error Messages
PC Message Description Possible Solutions
Data is not available
in GPS.
Insufficient memory
in the GPS to
transmit waypoints.
Please DELETE all
waypoints and retry.
Error Detected in the
Waypoint File
Error Detected in the
Route File
Unknown type.
Cannot find this file.
Please verify correct
path and filename
are given.
An error occurred
while attempting to
upload the
waypoints. Please
check the saved file
to ensure all
waypoints have the
correct format.
The information you
tried to access is not
present or there is a
communication
problem.
The Apollo GPS is
out of memory.
The waypoint file has
a formatting problem.
The route file has a
formatting problem.
The selected file was
not found in the
expected directory.
The waypoint file has
a formatting problem.
1. Check your GPS
to see if the
information is
present.
2. The serial cable
may not be
connected properly to
the PC or Apollo.
Check your User’s
Guide for the limits
on your Apollo GPS.
Check and correct
the format of the file
with a text editor.
Check and correct
the format of the file
with a text editor.
Verify that you
started Waypoint
Manager from the
correct directory. If
this error occurs after
selecting a database
file or Apollo software
file, reinstall the
database or Apollo
software disk.
Check and correct
the format of the file
with a text editor.
35
Page 41

Error Messages
PC Message Description Possible Solutions
No connection or
busy
GPS can’t DELETE
database.
or
GPS can’t program
current block of the
database.
The PC is not able to
communicate with
the Apollo GPS.
The Apollo GPS is
unable to erase it’s
flash memory
(database).
1. The serial cable may
not be connected
properly to the PC or
Apollo.
2. The serial port on the
PC may have a conflict
with another device
install in the PC (i.e.
Modem/Fax board).
3. The serial port setting
on the Apollo may not
be set correctly (i.e.
“PC” for the Apollo 360
and “none” for the
Apollo 920.
4. Verify that the COM
port IRQ# and base
addresses don’t conflict
with another device in
the PC.
5. Verify that the serial
port is working by
connecting known
good device to the port
and test for good
communications.
6. Call II Morrow for
technical assistance at
the phone number
listed in the front of this
guide.
7. Unit must be
powered on.
Try downloading the
database again. If
you continue to get
this message, call
II Morrow for
technical assistance
at the phone number
listed in the front of
this guide.
36
Page 42

Apollo GPS Product Information
Apollo GPS Product Information
October 2, 1998
New data that updates the information in this section is
provided on the database or applications disk supplied. Contact
the II Morrow factory for update information.
Data Bases
Available
The following databases are available on diskette for these
products at this time. Later information will be included in
a readme.txt file on the Waypoint Manager diskette.
Database Database
P/N
North America 139-0218-012 140-0036 no yes yes no no
South America 139-0219-012 140-0037 no yes yes no no
International 139-0189-012 140-0010 no yes yes no no
North America 139-0325-012 140-0040 no no no yes no
International 139-0203-012 140-0020 no no no yes no
Americas 139-0302 140-0043 no no no no yes
International 139-0303 140-0044 no no no no yes
Apollo GPS
Units With
Software
Updates
Available On
Diskette
Model S/W Type Appl. P/N Disk P/N Version
Apollo 360 GPS Application 139-0195-20 140-0018 2.0
Apollo Precedus Application 139-0204-60 140-0022 6.1
Apollo GPS
Serial Data
Cables
The following application software is available.
Each cable has a connector on one end to connect to the
Apollo GPS serial data port connector and a 9-pin dsub on
the other end for connection to the COM port on a PC.
Disk P/N 920 920+ 360 Precedus SL50/
60
500-0595-00 Serial data cable for Apollo 920, 910, and 940
500-0263-00 Serial data cable for Apollo 360
500-0315-00 Serial data cable for Apollo Precedus
500-4026-xx Serial data cable for the Apollo SL50/60
37
Page 43

Apollo GPS Product Information
Apollo GPS
Serial Port
Selections
for PC
Interface
Apollo GPS
Database
Update
Operation
The serial port selection for the following units is described
below.
Apollo 920
Using the serial outputs selection from the main menu on the
Apollo 920, select the “none” setting and press ENTER.
Apollo 360 GPS
Using the Serial Outputs selection from the main menu on the
Apollo 360, select the “PC [R/T]” setting for port 2 and press
ENTER.
Apollo Precedus
Using the serial outputs selection from the main menu on the
Apollo Precedus, select the “none” setting and press ENTER.
Apollo SL50/60
No special setup required.
Summaries of the database update operation for sending a
database to your Apollo GPS are provided below for
selected products. You must install the database onto your
hard drive first (see page 20).
38
(Not For Application Or Boot Software!)
Apollo 360, 920, and Precedus
1. Power on the Apollo. (no special key sequence is needed)
2. Make sure the Apollo is set up to communicate with the PC.
3. Start Waypoint Manager.
4. Under the Databases menu item, select the “Send Database
to GPS Unit” option on the PC.
6. Send the database to the Apollo.
7. The PC will read the database, wait for the Apollo to erase
the old database, then send the blocks of data. After the
data has been sent, the PC is finished, but the Apollo must
still verify the new database. The Apollo will display
Page 44

Apollo GPS Product Information
“PASS” or “FAIL”. If the message is “pass,” continue. If
the message is “fail,” try again. If the procedure continues
to “fail,” call technical support.
8. You can now exit from Waypoint Manager.
9. Follow the directions shown on the Apollo screen.
Apollo SL50
1. The SL50 must be removed from the aircraft. Connect the
SL50 to the PC and power supply with the proper cable
harness. Power on the Apollo SL50.
2. Start Waypoint Manager.
3. Under the Databases menu item, select the “Send Database
to GPS Unit” option on the PC.
4. Press WPT. Turn the Large knob to the Database Update
page. Press ENT to enable updating. No controls may be
used until the update is complete.
5. Send the database to the Apollo. Follow the directions
shown on the Apollo screen.
6. The PC will read the database, wait for the Apollo to erase
the old database, then send the blocks of data. After the
data has been sent, the PC is finished, but the Apollo must
still verify the new database. The Apollo will display
“PASS” or “FAIL.” If the message is “pass,” continue. If
the message is “fail,” try again. If the procedure continues
to “fail,” call technical support.
7. You can now exit from Waypoint Manager.
Apollo SL60
1. The SL60 must be removed from the aircraft. Connect the
SL60 to the PC and power supply with the proper cable
harness. Power on the Apollo SL60.
2. Start Waypoint Manager.
3. Under the Databases menu item, select the “Send Database
to GPS Unit” option on the PC.
39
Page 45

Apollo GPS Product Information
4. Select the “Send Database to GPS Unit” option on the PC.
5. In the SL60, press SYS. Turn the Large knob to Waypoint
Database. Turn the Small knob to the Database Update
page. Press ENT to enable updating. No controls may be
used until the update is complete.
6. Send the database to the Apollo. Follow the directions
shown on the Apollo screen.
7. The PC will read the database, wait for the Apollo to erase
the old database, then send the new database. After the
data has been sent, the PC is finished, but the Apollo must
still verify the new database. The Apollo will display
“PASS” or “FAIL”. If the message is “pass,” continue. If
the message is “fail,” try again. If the procedure continues
to “fail,” call technical support.
8. You can now exit from Waypoint Manager.
Update
Apollo GPS
Application
Software
!
Summaries of the application software update operation
for your specific Apollo GPS are described below for
selected products. You must install the application software
onto your hard drive first (see page 14).
(Not For Databases!)
CAUTION
If you are not sure about this procedure, call technical
support before loading application software.
Apollo 360
1. Press the GOTO and INFO buttons at the same time
while you power on the 360.
2. Press ENT on the 360 to proceed with the download.
3. Make sure the serial cable connects the 360 to the PC.
4. Start Waypoint Manager.
5. In the File menu item, click on Application, and then select
the “Send Application to GPS Unit” options on the PC.
6. Send the software to the 360.
40
Page 46

Apollo GPS Product Information
7. The PC will read the software, wait for the 360 to erase the
old software, then send the blocks of data. After the data
has been sent, the PC is finished, but the 360 must still
verify the new software. The 360 will display “PASS” or
“FAIL”. If the message is “pass,” continue. If the message
is “fail,” try again. If the procedure continues to “fail,” call
technical support.
8. You can now exit from Waypoint Manager.
9. Follow the directions shown on the 360 screen.
Apollo Precedus
1. Make sure the serial cable connects the Precedus to the PC.
2. Start Waypoint Manager.
3. In the File menu item, click on Application, and then select
the “Send Application to GPS Unit” options on the PC.
4. Send the software to the Precedus.
5. The PC will read the software. Wait for the Precedus to
erase the old software, then send the blocks of data. After
the data has been sent, the PC is finished, but the
Precedus must still verify the new software. The Precedus
will display “PASS” or “FAIL.” If the message is “pass,”
continue. If the message is “fail,” try again. If the
procedure continues to “fail,” call technical support.
6. You can now exit from Waypoint Manager.
7. Follow the directions shown on the Precedus screen.
Apollo 920
The Apollo 920 does not allow for application software update
from the PC.
41
Page 47

Apollo GPS Product Information
Notes
42
Page 48

INDEX
A
Apollo 360 ...1,15,36,37,38,40
Apollo 920 .....1,36,37,38,41
Apollo 940 .............37
Application menu.........13
Application software .......40
Application window ........6
ASCII .............27,28
B
Backup copies ...........2
Basic Operation ....9,10,11,12
C
Choose path........10,14,20
Communications........9,17
Compatibility............6
Connect ..............10
Connecting to the GPS ......4
Copy disk ..............2
Exiting Waypoint Manager ....4
F
Features...............6
File ...............9,13
G
Getting Started . 1, 2, 3, 4, 5, 6, 7, 8
H
Help ................26
I
I/O setting .............10
Install application.........14
Install database ..........20
Installation .............3
Insufficient memory .......34
L
Load database...........10
M
Memory...............1
Menu bars .............7
Multiple Database ........17
D
Data file structure.........28
Data files . . . 27, 28, 29, 30, 31, 32
Database............17,37
Database update .......17,38
Delete application ........16
Delete database ..........19
Delete routes ...........24
Delete track history ........26
Delete waypoints .........22
E
Error messages ....33,34,35,36
N
Notepad ........13,21,27,32
O
Open..............15,27
P
Precedus ......1,17,37,38,41
Product information . 37, 38, 39, 40,
41, 42
R
Receive routes .........11,24
Receive track history .....12,25
Receive user waypoints ....11,22
Page 49

Reference . 13, 14, 15, 16, 17, 18, 19,
20, 21, 22, 23, 24, 25, 26
Routes .............23,29
S
Sample data files .........32
Save routes ............11
Save track history .........12
Save waypoints ..........11
Send application .........15
Send database . 10, 17, 18, 38, 39, 40
Send database to GPS ......11
Send routes ............23
Serial cable ...........1,37
Serial number ...........33
Serial port settings ........38
SL50/60 ..............38
Software update..........37
Starting Waypoint Manager . . 4, 9
System Requirements .......1
T
Track history .......25,31,33
Troubleshooting . . . 33, 34, 35, 36
U
Uninstalling ............4
Unknown type ..........35
User waypoints ..........21
W
Waypoint files...........28
Waypoints .............21
What's Installed..........16
Page 50

II MORROW
VISIONARY THINKING TODAY
© 1998 by II Morrow Inc.
2345 Turner Rd., S.E.
Salem, OR 97302 U.S.A.
U.S.A. Toll Free 800.525.6726
Canada Toll Free 800.654.3415
International 503.391.3411
FAX 503.364.2138
http://www.iimorrow.com
Part Number 560-0138-02
 Loading...