

Garmin vivofit 2 Owners Manual
vívofit® 2 Owner's Manual
WARNING
See the
product box for product warnings and other important
information.
Always consult your physician before you begin or modify any
exercise program.
Getting Started
To get the most out of your vívofit 2 device,
recommends setting it up with your computer or compatible
mobile device.
1
2
3
4
5
Downloading the Software
1
2
Downloading the Mobile App
You can use the
vívofit 2
to share and analyze data and download software updates from
your mobile device. Unlike other Bluetooth
paired from the
vívofit
Connect Mobile app.
NOTE:
order to pair with your
to www.garmin.com/ble
1
Important Safety and Product Information guide in the
®
Garmin
Go to www.garminconnect.com/vivofit2.
Select an option:
• If you are using a computer to set up your device, plug the
wireless USB ANT Stick™ into an empty USB port, and
download and install the Garmin Express™ setup software
(Downloading the Software,
• If you are using a mobile device to set up your device,
install and open the Garmin Connect™ Mobile app
(Downloading the Mobile App,
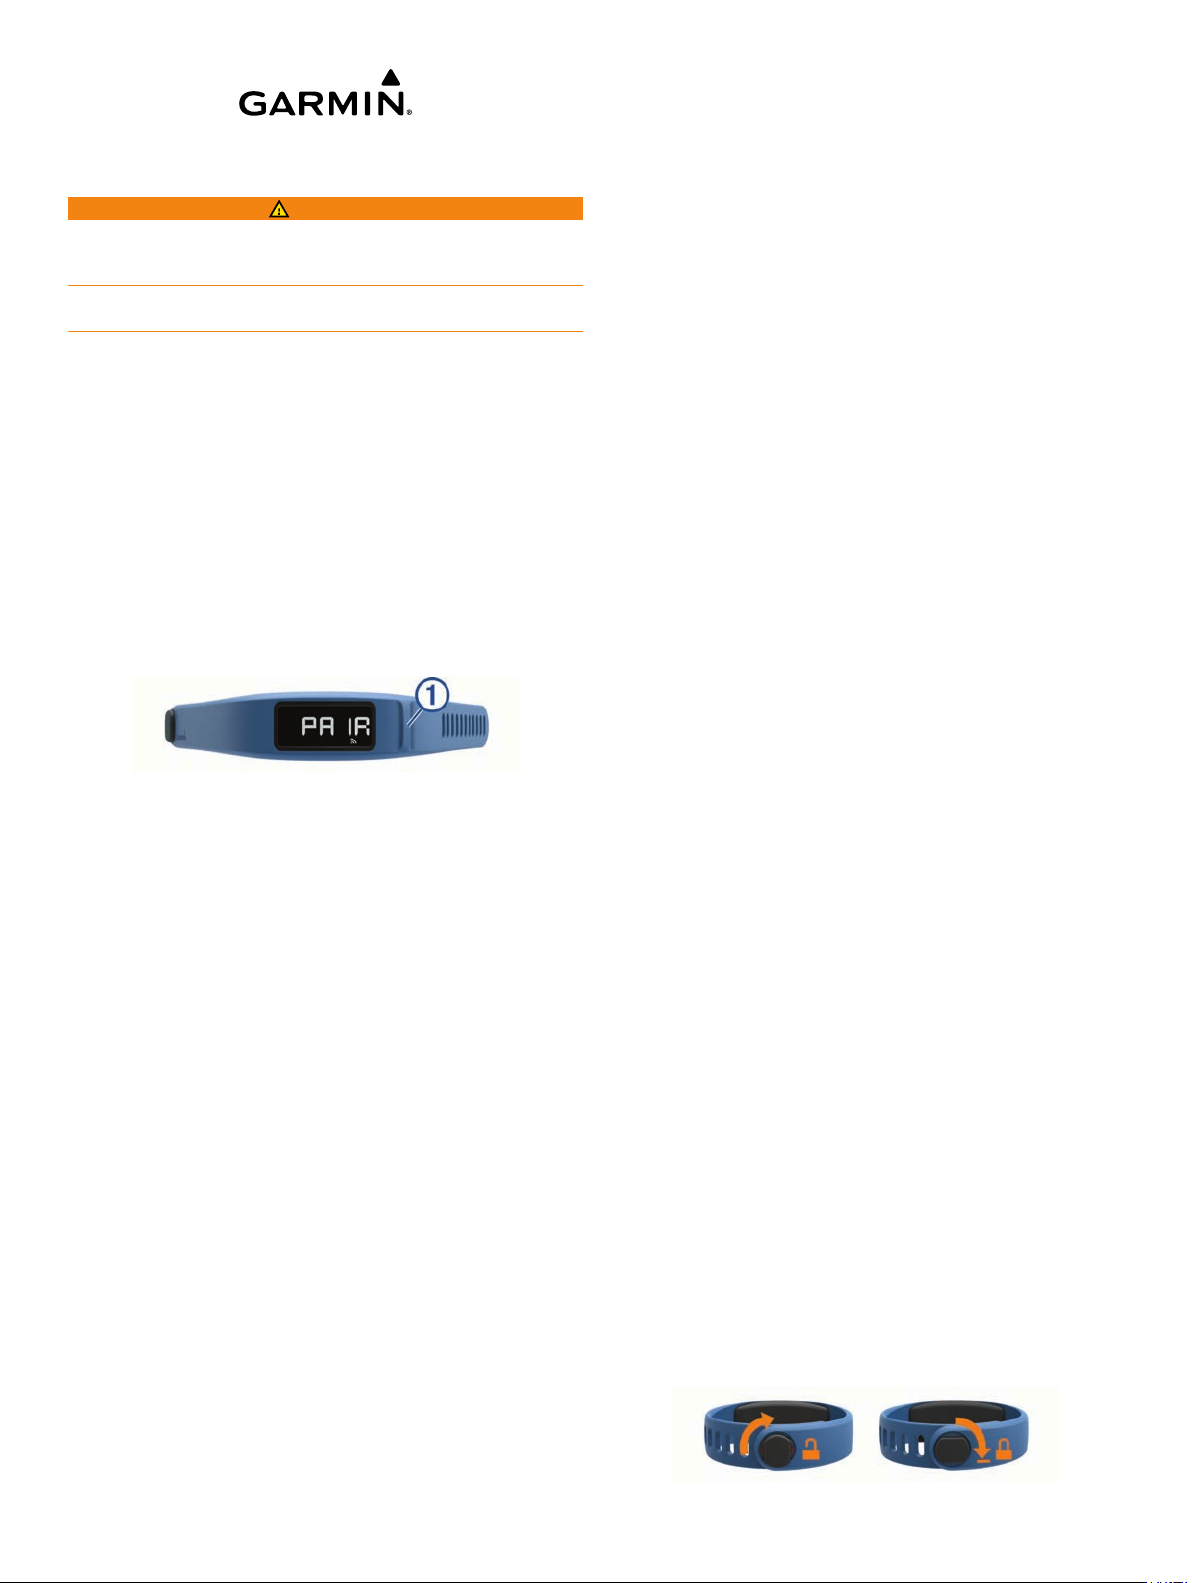
Select the device key À to turn on the device.
When you turn on the device for the first time, it is in pairing
mode. If your device is not in pairing mode when you turn it
on, you must hold the device key until PAIR
NOTE:
process, the device has limited functionality.
Follow the instructions on your computer or mobile device to
pair your vívofit 2
Synchronize your step count with your Garmin Connect
account (Synchronizing Your Data with Your Computer,
page 1) (Synchronizing Your Data with the Garmin
Connect Mobile App, page 1).
From your computer, go to www.garminconnect.com/vivofit2.
Select an option:
• If you are using a
• If you are using a Mac® operating system, select
From your mobile device, go to www.garminconnect.com
/vivofit2.
Until you pair your device and complete the setup
device and complete the setup process.
Windows
Download for Windows, and follow the on-screen
instructions.
Download for Mac, and follow the on-screen instructions.
Garmin Connect Mobile app to pair your
device and complete the setup process. This allows you
Bluetooth settings on your mobile device, your
2 device must be paired directly through the Garmin
Your mobile device must support Bluetooth Smart in
vívofit 2 device and synchronize data. Go
for compatibility information.
page
1).
page
1).
appears.
®
operating system, select
®
devices that are
Select the
2
follow the on-screen instructions.
App Store
SM
button or the
Google Play
™
button, and
Synchronizing Your Data with Your Computer
You should synchronize your data regularly to track your
progress in the Garmin Connect
Bring the device within 3 m (10 ft.) of your computer.
1
Hold the device key until SYNC appears.
2
View your current data in the Garmin Connect application.
3
Pairing Your Device with Multiple Computers
You can pair your vívofit
example, you can pair your
work computers. Go to
dealer for information about optional accessories and
replacement parts.
Plug the USB ANT Stick
1
Download the Garmin Express setup software for Windows
2
or
Hold the device key until PAIR appears.
3
Follow the instructions on your computer to pair your vívofit 2
4
device and complete the setup process.
If necessary, repeat steps 1 through 4 for each additional
5
computer.
Downloading the Software,
Mac (
2 device with multiple computers. For
buy.garmin.com, or contact your
application.
vívofit
2 device with your home and
into a computer USB port.
1).
page
Garmin
Synchronizing Your Data with the Garmin
Connect
You should synchronize your data regularly to track your
progress in the Garmin Connect Mobile app.
Your device periodically synchronizes data with the Garmin
Connect Mobile app without any action required. You can also
manually synchronize your data at any time.
Bring the device within 3 m (10 ft.) of your mobile device.
1
Hold the device key until SYNC
2
View your current data in the Garmin Connect Mobile app.
3
Pairing Multiple Mobile Devices
You can pair your vívofit 2 device with multiple mobile devices.
For example, you can pair your vívofit 2 device with a
smartphone and a tablet.
Install and open the
1
mobile device (
Hold the device key until PAIR appears.
2
Follow the instructions on your mobile device to pair your
3
vívofit
If necessary, repeat steps 1-3 for each additional mobile
4
device.
Mobile App
appears.
Garmin Connect Mobile app on your
Downloading the Mobile App, page 1).
2 device and complete the setup process.
Wearing the Device
Select a band that fits best on your wrist (Replacing the
1
Band
, page 5).
Make sure the pegs on the clasp are fully inserted into the
2
band.
When the pegs are fully inserted, the device fits securely
against your wrist.
Turn the clasp to the locked position.
3
Red marks on the clasp indicate the unlocked position.
October 2015 Printed in Taiwan 190-01839-00_0C
http://j.mp/vivo2clasp
NOTE: To prevent loss, the clasp must be turned to the
locked position while wearing the device.
Wear the device all day and night (Using Sleep Tracking,
4
page 2)
.
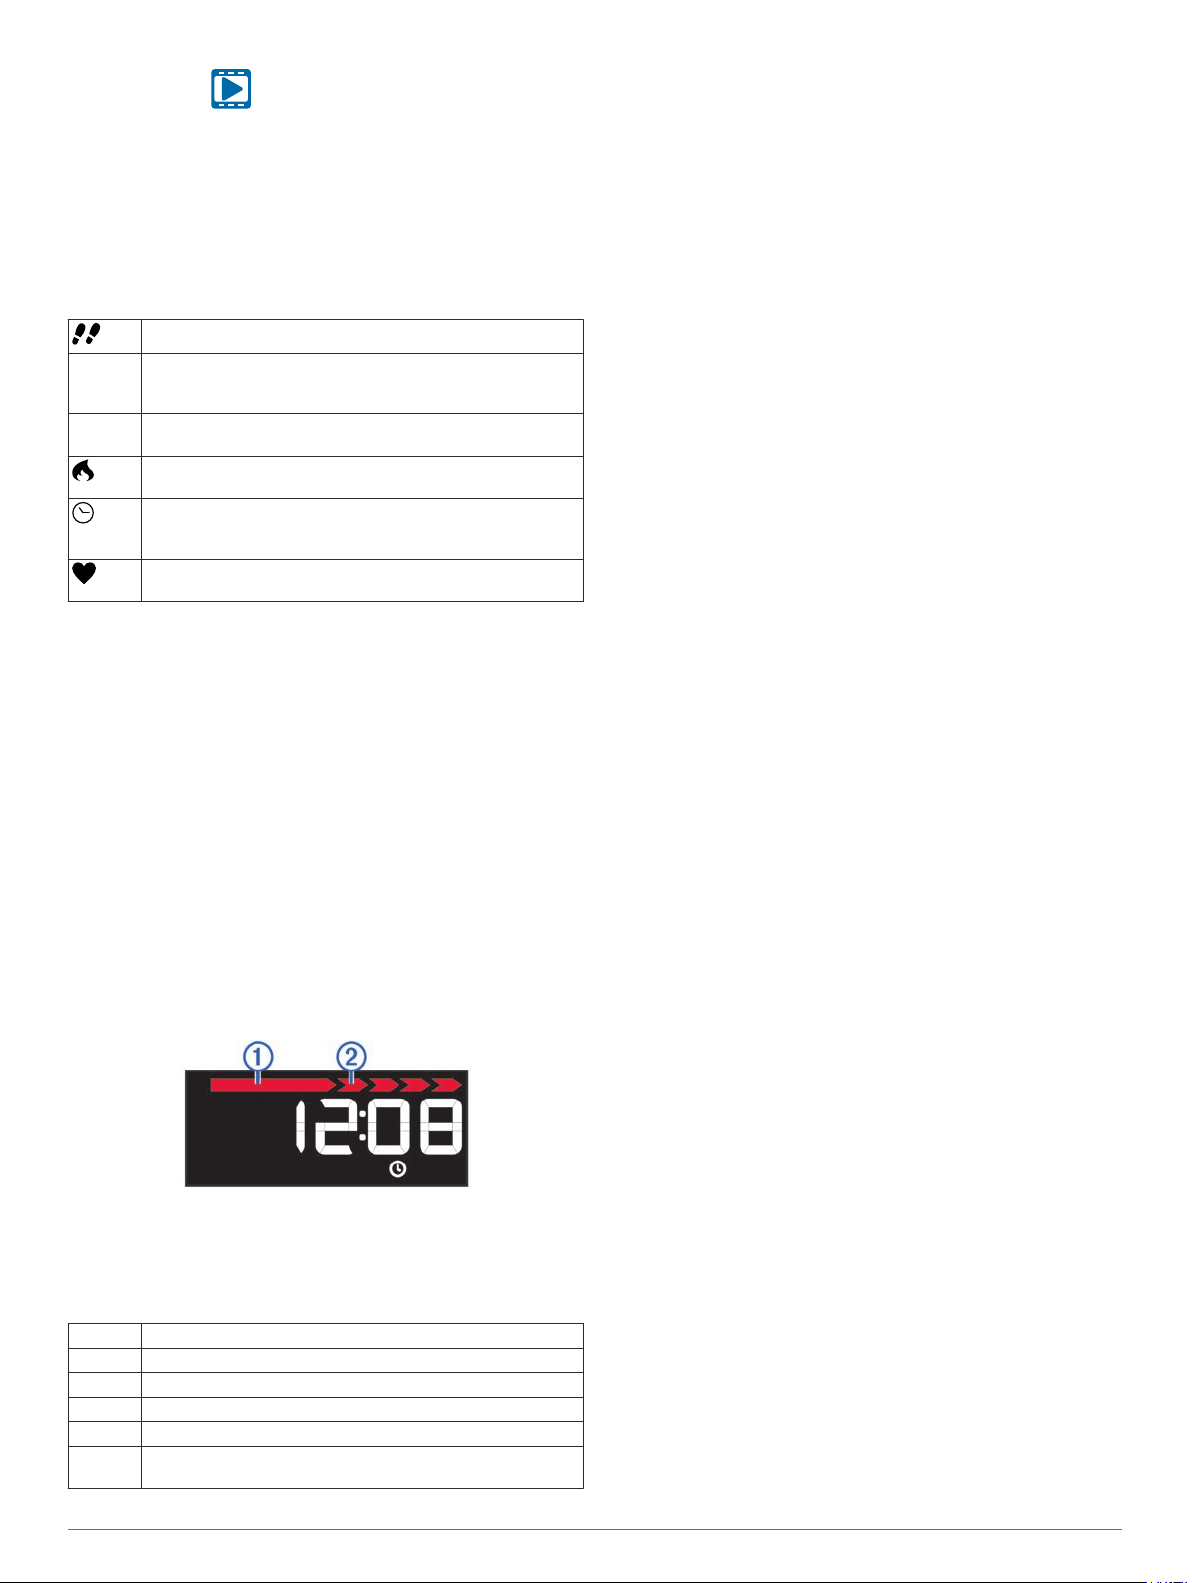
Icons
Icons appear at the bottom of the display. Each icon represents
a different feature. You can select the device key to cycle
through the different device features.
The total number of steps taken for the day.
GOAL The number of remaining steps needed to reach your step
KM
goal for the day. The device learns and proposes a new goal
for you at the beginning of each day.
The distance traveled in kilometers or miles for the current
or MI
day.
The amount of total calories burned for the current day,
including both active and resting calories.
The current time of day and date based on your location. The
device updates the time and date when you synchronize
your device to a computer or mobile device.
Your current heart rate and heart rate zone from a paired
heart rate monitor.
Auto Goal
Your device creates a daily step goal automatically based on
your previous activity levels. As you begin your walk or run, the
device counts down the number of remaining steps in your daily
goal. When you reach your step goal, the device displays
GOAL+
, and begins counting the number of steps taken that
exceed your daily goal.
When you set up your device for the first time you must
designate an activity level. This level determines your initial step
goal.
If you choose not to use the auto goal feature, you can set a
personalized step goal on your Garmin Connect account.
Move Bar
Sitting for prolonged periods of time can trigger undesirable
metabolic state changes. The move bar reminds you to keep
moving. After one hour of inactivity, the move bar À appears.
The device also beeps if alert tones are turned on (Device
Settings
15 minutes of inactivity.
You can reset the move bar by walking a short distance.
3). Additional segments Á appear after every
, page
Key Functions
You can hold the device key to cycle through the secondary key
functions.
Backlight Turns on the backlight. The backlight turns off automatically.
START Starts a timed activity.
STOP Stops a timed activity.
SYNC Sends data to your computer or mobile device.
SLEEP Starts sleep mode.
PAIR Pairs your vívofit
device.
2 device with your computer or mobile
Starting a Fitness Activity
Before you can use an optional ANT+® heart rate monitor for
your activity, you must put on the sensor and pair it with your
device (Pairing Your ANT+ Heart Rate Monitor, page 3).
You can record a timed fitness activity, such as a walk or run,
which can be sent to your Garmin Connect account.
Hold the device key until START appears.
1
The timer begins.
NOTE:
The device does not record your fitness activity or
optional ANT+ sensor data until you start the timer.
Start your activity.
2
TIP:
You can select the device key to cycle through your
activity data while the timer is running.
After you complete your activity, hold the device key until
3
STOP
appears.
A summary appears. The device displays the total time,
distance traveled, steps taken, and calories burned during
the activity.
Select the device key to end the summary and return to the
4
default screen.
Your device attempts to send your activity data to your
Garmin Connect account.
Sleep Tracking
During sleep mode, the device monitors your rest. Sleep
statistics include total hours of sleep, sleep levels, and sleep
movement.
Using Sleep Tracking
Using sleep mode turns off the move alert. If you do not use
sleep mode, your device still records sleep statistics. You can
view sleep statistics on your Garmin Connect account.
Wear the device while sleeping.
1
Hold the device key until SLEEP
2
When you wake, hold the device key to exit sleep mode.
3
appears.
History
Your device keeps track of your daily steps and sleep statistics,
as well as your timed fitness activities and optional ANT+
information. This history can be sent to your Garmin Connect
account.
Your device stores your activity data for up to 3 weeks.
NOTE:
When using a heart rate monitor, your data storage is
significantly reduced (approximately 12 days).
When the data storage is full, the device deletes the oldest files
to make room for new data.
Garmin Connect
You can connect with your friends on your Garmin Connect
account.
share, and encourage each other. Record the events of your
active lifestyle including runs, walks, rides, swims, hikes,
triathlons, and more. To sign up for a free account, go to
www.garminconnect.com/start
Track your progress
Store your activities: After you complete and save an activity
Analyze your data
Garmin Connect gives you the tools to track, analyze,
.
: You can track your daily steps, join a
friendly competition with your connections, and meet your
goals.
with your device, you can upload that activity to your Garmin
Connect account and keep it as long as you want.
: You can view more detailed information
about your activity, including time, distance, heart rate,
calories burned, and customizable reports.
NOTE:
Some data requires an optional accessory such as a
heart rate monitor.
sensor
2 vívofit 2 Owner's Manual
Press the tab down.
2
Wet the electrodes  on the back of the module to create a
3
strong connection between your chest and the heart rate
monitor module.
Share your activities
each other's activities or post links to your activities on your
favorite social networking sites.
Manage your settings: You can customize your device and
user settings on your Garmin Connect account.
: You can connect with friends to follow
Customizing Your Device
Device Settings
You can customize your device settings and user settings on
Garmin Connect account. From the devices widget, select
your
Device Settings.
Visible Screens: Allows you to customize the screens that
appear on your device.
Default Screen: Sets the default home screen on the device.
Alert Tones: Allows you to turn alert tones on and off. The
device beeps when alert tones are turned on.
Auto Goal: Allows your device to determine your step goal
automatically.
NOTE:
step goal manually.
Time Format: Sets the device to display time in a 12-hour or 24-
hour format.
Units: Sets the device to display the distance traveled in
kilometers or miles.
Custom Step Length: Allows your device to more accurately
calculate the distance traveled using your custom step
length.
Heart Rate: Allows you to estimate your maximum heart rate
and determine custom heart rate zones.
ANT+
Your device can be used with wireless ANT+ sensors. For more
information about compatibility and purchasing optional sensors,
go to
Putting On the Optional Heart Rate Monitor
The heart rate monitor may cause chafing when used for long
periods of time. To alleviate this issue, apply an anti-friction
lubricant or gel to the center of the module where it contacts
your skin. Do not apply anti-friction gel or lubricant on the
electrodes. Do not use gels or lubricants that contain sunscreen.
You should wear the heart rate monitor directly on your skin, just
below your sternum. It should be snug enough to stay in place
during your activity.
Push one tab À of the strap through the slot Á in the heart
1
rate monitor module.
After you disable this feature, you must enter your
Heart Rate Monitor
http://buy.garmin.com.
NOTICE
Wrap the strap around your chest and attach it to the other
4
side of the heart rate monitor module.
The Garmin logo should be right-side up.
Bring the device within 3 m (10 ft.) of the heart rate monitor.
5
After you put on the heart rate monitor, it is active and sending
data.
Pairing Your ANT+ Heart Rate Monitor
Before you can pair your heart rate monitor, you must enable
the heart rate data screen on your vívofit 2 device. For more
information about customizing the device screens, see Device
Settings, page 3.
NOTE: If your device was packaged with a heart rate monitor,
the heart rate data screen is already enabled and the heart rate
monitor is paired.
Put on the heart rate monitor.
1
Bring the device within 3 m (10 ft.) of the sensor.
2
NOTE: Stay 10 m (33 ft.) away from other ANT+ sensors
while pairing.
Select the device key until HEART appears.
3
When the sensor is paired with your device, your heart rate
and heart rate zone appear.
About Heart Rate Zones
Many athletes use heart rate zones to measure and increase
their cardiovascular strength and improve their level of fitness. A
heart rate zone is a set range of heartbeats per minute. The five
commonly accepted heart rate zones are numbered from 1 to 5
according to increasing intensity. Generally, heart rate zones are
calculated based on percentages of your maximum heart rate.
Fitness Goals
Knowing your heart rate zones can help you measure and
improve your fitness by understanding and applying these
principles.
• Your heart rate is a good measure of exercise intensity.
• Training in certain heart rate zones can help you improve
cardiovascular capacity and strength.
• Knowing your heart rate zones can prevent you from
overtraining and can decrease your risk of injury.
If you know your maximum heart rate, you can use the table
(Heart Rate Zone Calculations, page 6) to determine the best
heart rate zone for your fitness objectives.
If you do not know your maximum heart rate, use one of the
calculators available on the Internet. Some gyms and health
vívofit 2 Owner's Manual 3
 Loading...