

Garmin VIRB 360 Owner’s Manual
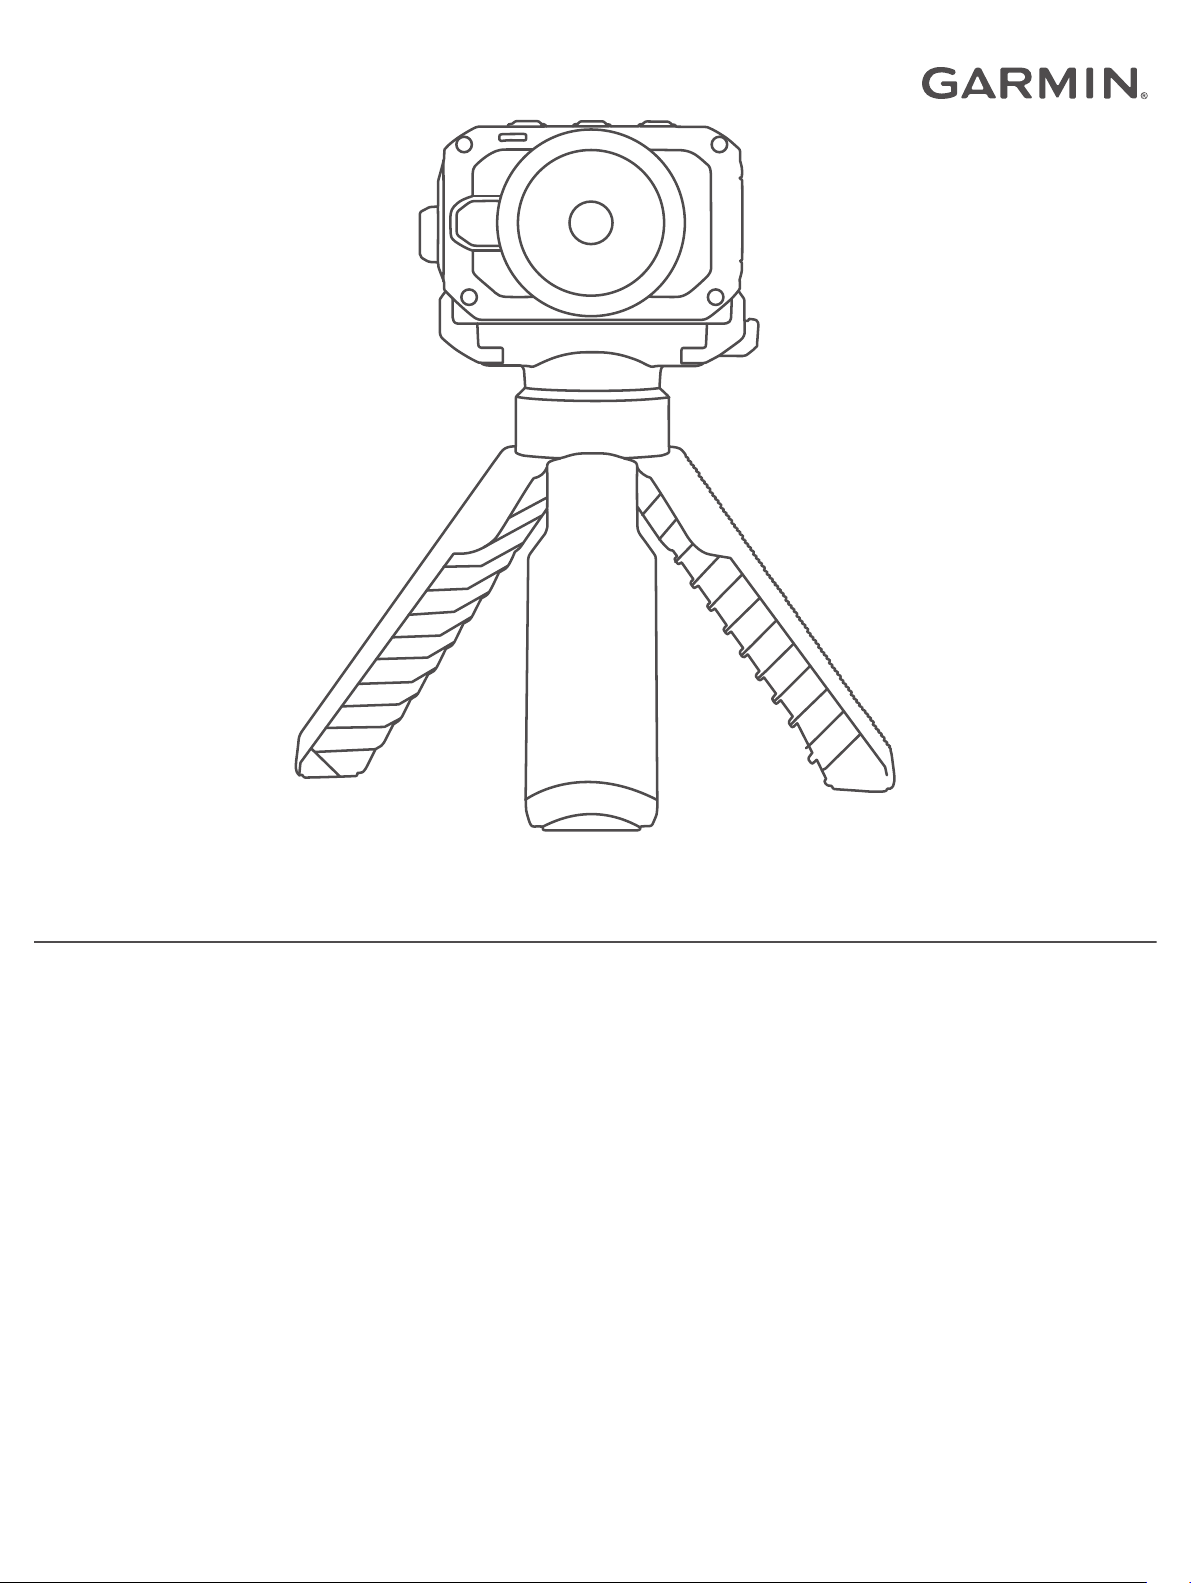
VIRB® 360
Owner’s Manual

© 2017 Garmin Ltd. or its subsidiaries
All rights reserved. Under the copyright laws, this manual may not be copied, in whole or in part, without the written consent of Garmin. Garmin reserves the right to change or improve its
products and to make changes in the content of this manual without obligation to notify any person or organization of such changes or improvements. Go to www.garmin.com for current updates
and supplemental information concerning the use of this product.
Garmin®, the Garmin logo, ANT+®, fēnix®, and VIRB® are trademarks of Garmin Ltd. or its subsidiaries, registered in the USA and other countries. G-Metrix™ is a trademark of Garmin Ltd. or its
subsidiaries. These trademarks may not be used without the express permission of Garmin.
Android™, Google™, Google Cardboard™, and YouTube™ are trademarks of Google Inc. Apple® and Mac® are trademarks of Apple Inc., registered in the U.S. and other countries. The Bluetooth
®
word mark and logos are owned by the Bluetooth SIG, Inc. and any use of such marks by Garmin is under license. Facebook™ and the Facebook logo are trademarks of Facebook and its affiliate
companies. HDMI® is a registered trademark of HDMI Licensing, LLC. microSD® and the microSDXC logo are trademarks of SD-3C, LLC. Wi‑Fi® is a registered mark of Wi-Fi Alliance
Corporation. Windows® is a registered trademark of Microsoft Corporation in the United States and other countries. Other trademarks and trade names are those of their respective owners.
This product is ANT+® certified. Visit www.thisisant.com/directory for a list of compatible products and apps.

Table of Contents
Introduction.....................................................................1
Camera Controls.........................................................................1
Device Overview......................................................................... 1
Installing the Battery................................................................... 1
Installing a Memory Card............................................................ 1
Charging the Battery................................................................... 1
Turning On the Camera.............................................................. 2
Turning Off the Camera......................................................... 2
Turning the Camera On and Off Using the Recording
Switch.................................................................................... 2
Home Screen Overview.............................................................. 2
Status Bar Icons.....................................................................2
Main Menu............................................................................. 2
Camera Mounts.............................................................. 3
Assembling the Tripod and Cradle............................................. 3
Assembling the Action Cradle and Mounts................................. 3
Removing the Camera from the Cradle...................................... 3
Video................................................................................ 4
Preparing to Record a Video...................................................... 4
Tips for Shooting 360-degree Video...................................... 4
Recording a Video...................................................................... 4
Lens Modes................................................................................ 4
Changing the Stitching Distance............................................ 4
Video Modes............................................................................... 4
Recording a Time-Lapse Video............................................. 4
Video Mode Specifications.....................................................5
Slo-Mo Mode Specifications.................................................. 5
Time-Lapse Mode Specifications........................................... 5
Microphone Modes..................................................................... 5
Planar Spatial Audio.............................................................. 5
Outputting Live Video to an External Device.............................. 5
Photos............................................................................. 5
Taking Photos............................................................................. 5
Setting the Default Photo Self Timer.......................................... 5
Photo Modes...............................................................................6
Voice Control.................................................................. 6
Setting Up Voice Control............................................................ 6
Controlling the Camera Using Voice Commands....................... 6
Voice Control Commands...................................................... 6
Voice Control Tips...................................................................... 6
G-Metrix........................................................................... 6
G-Metrix Data............................................................................. 6
Garmin VIRB App........................................................... 7
Connecting to the Garmin VIRB App Using NFC....................... 7
Connecting to the Garmin VIRB App Using Wi‑Fi Settings........ 7
Remote Viewfinder..................................................................... 7
Pro Settings........................................................................... 8
Recording a Video Using the Garmin VIRB App................... 8
Taking a Photo Using the Garmin VIRB App......................... 8
Broadcasting Live Video............................................................. 8
App and Camera Settings...........................................................8
Photo Exposure Types...........................................................9
Recording 5.7K RAW Video...................................................9
Recording a Video Loop........................................................ 9
Time-Lapse Photos and Video............................................ 10
Garmin VIRB App Gallery......................................................... 11
Viewing a Photo or Video.................................................... 11
Using Virtual Reality (VR) Viewing Mode.............................11
Editing and Sharing a Video................................................ 11
Connecting to a Wi‑Fi Network................................................. 11
Turning the Wi‑Fi Radio On or Off....................................... 12
Changing the Wi‑Fi Connection........................................... 12
Forgetting a Wi
Multiple Camera Network......................................................... 12
Setting Up a Camera Network............................................. 12
Adding a Camera to the Network......................................... 12
Switching Cameras.............................................................. 13
‑Fi Network
.................................................. 12
Remote Control............................................................ 13
Controlling Your VIRB Camera Remotely.................................13
Controlling Multiple VIRB Cameras.......................................... 13
Enabling the Remote Wake Up Feature................................... 13
ANT+ Sensors............................................................... 14
Pairing ANT+ Sensors.............................................................. 14
Removing Paired ANT+ Sensors......................................... 14
Bluetooth Devices........................................................ 14
Connecting a Wireless External Microphone............................ 14
Connecting an OBD-II Device...................................................14
Removing Paired Bluetooth Devices........................................ 14
VIRB Edit....................................................................... 14
Customizing the Device............................................... 14
Setup Menu.............................................................................. 14
Formatting Your Memory Card............................................ 14
System Settings........................................................................ 14
Device Information....................................................... 15
Status LEDs.............................................................................. 15
Connecting Directly to a Wi‑Fi Network Using WPS.................15
Garmin Support Center.............................................................15
Software Updates..................................................................... 15
Updating the Camera Software Using the Garmin VIRB
App.......................................................................................15
Updating the Software with Garmin Express....................... 15
Specifications............................................................................16
Low Temperature Performance Tips................................... 16
Viewing Regulatory and Compliance Information..................... 16
Device Care.............................................................................. 16
Water Exposure and Rating................................................. 17
Cleaning the Device............................................................. 17
Replacing a Cover Lens........................................................... 17
Symbol Definitions.................................................................... 17
Troubleshooting........................................................... 17
My camera does not turn on..................................................... 17
My camera feels warm while it is operating.............................. 17
Some G-Metrix data is missing................................................. 17
My video recordings do not look smooth.................................. 18
My device turns off when I stop recording video...................... 18
Extending the Battery Life........................................................ 18
Index.............................................................................. 19
Table of Contents i

Introduction
Installing the Battery
WARNING
See the Important Safety and Product Information guide in the
product box for product warnings and other important
information.
It is your responsibility to use the device in a safe manner.
Garmin® will not be responsible for any property damage, injuries
or deaths resulting from any use of this device in any activities.
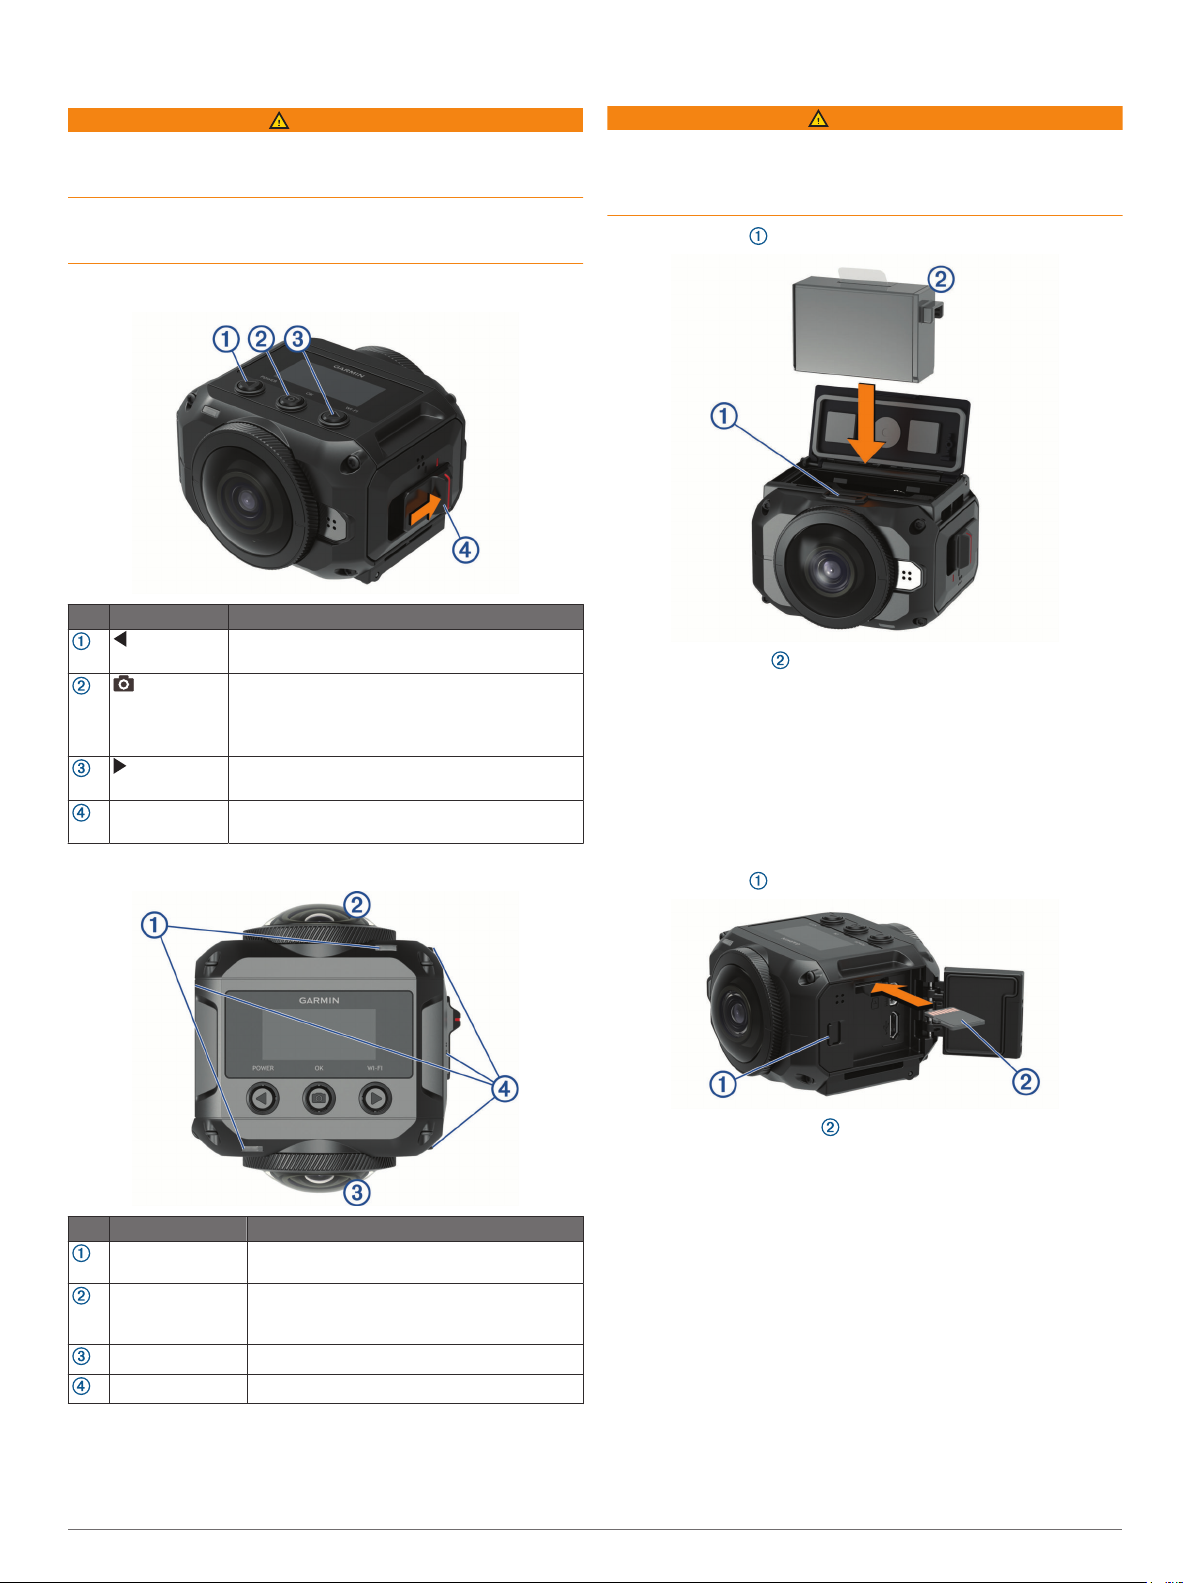
Camera Controls
Item Name Description
Select to scroll through menus and menu items.
POWER
OK
WI-FI
Recording
switch
Hold to turn the device on or off.
From the home screen, select to take a photo.
From the home screen, hold to set the photo
delay timer.
From a menu, select to choose a menu item.
Select to scroll through menus and menu items.
Hold to turn the Wi‑Fi® radio on or off.
Move the switch to start or stop recording video
(Recording a Video, page 4).
Device Overview
WARNING
This product contains a lithium-ion battery. To prevent the
possibility of personal injury or product damage caused by
battery exposure to extreme heat, store the device out of direct
sunlight.
Slide the latch to open the battery compartment door.
1
Insert the battery into the compartment.
2
Close the battery compartment door, and press it until it
3
clicks.
Installing a Memory Card
You must install a compatible microSD® memory card to use
your device. You should use a UHS-I microSD card from a
quality manufacturer with a speed class rating of U3 or better
and a storage capacity of up to 128 GB. For more information
about compatible memory cards, go to garmin.com/VIRBcards.
Slide the latch to open the side door.
1
Insert the memory card into the slot, and press it in until it
2
clicks.
TIP: The memory card label must face down.
Close the door, and press it until it clicks.
3
Item Camera Part Description
Status LEDs (2) Indicate status information about the camera
and features (Status LEDs, page 15).
Front camera lens Captures the front half of the video sphere. By
default, the starting view for 360-degree
videos is centered on this lens.
Rear camera lens Captures the rear half of the video sphere.
Microphones (4) Capture 360-degree spatial audio.
Introduction 1
Charging the Battery
The status LEDs flash rapidly when the battery charge level is
low. You can charge the battery using a standard wall outlet or a
USB port on your computer. The camera is powered by a
removable lithium-ion battery.
TIP: The optional external battery charger accessory allows you
to charge up to two batteries outside the camera. Go to
garmin.com/virb to purchase the battery charger accessory and
spare batteries.
NOTE: The battery will not charge when outside the approved
charging temperature range (Specifications, page 16).
Turn off the camera.
1
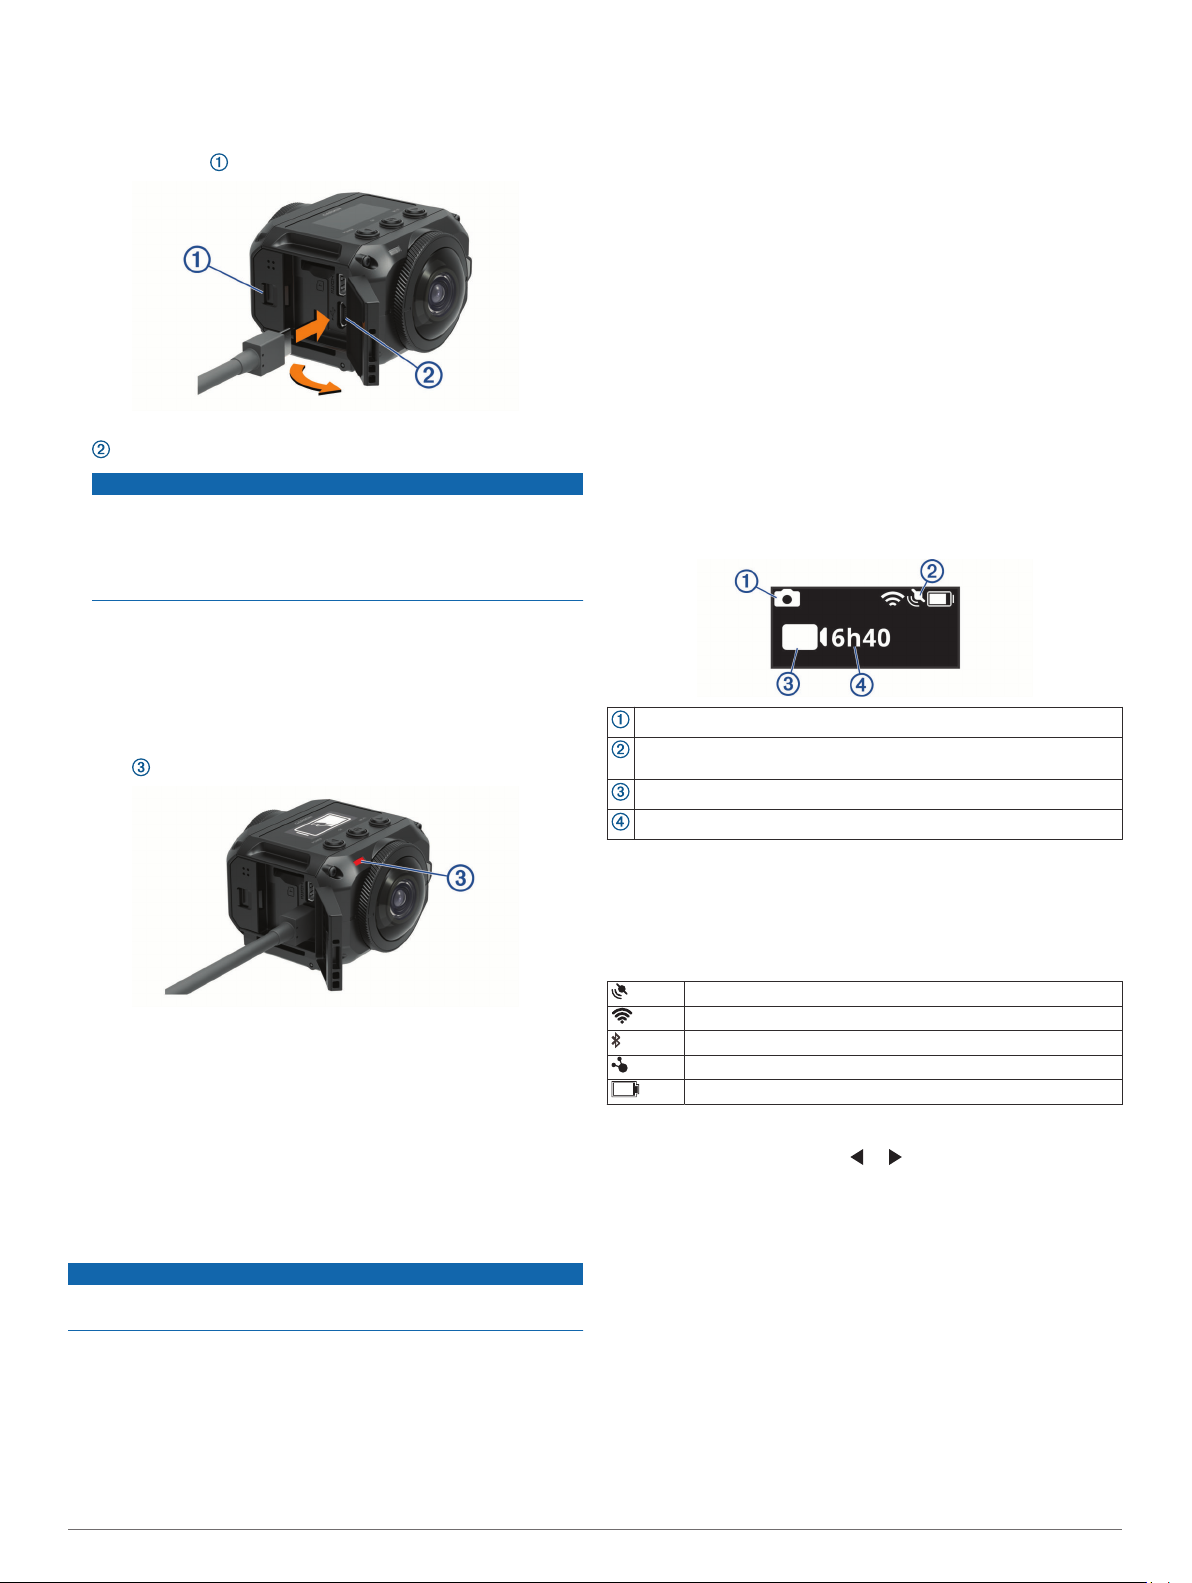
The camera does not charge the battery while it is turned on.
It is possible to operate the camera using external power, but
the battery charge level does not increase until you turn off
the camera.
Slide the latch to open the side door.
2
Plug the small end of the USB cable into the micro-USB port
3
on the camera.
NOTICE
Use only the included micro-USB cable or another cable with
a straight micro-USB connector. Do not use a microUSB cable with an right-angle connector. A right-angle
connector may cause damage to the recessed microUSB port.
Plug the large end of the USB cable into a USB wall charger
4
or a computer USB port.
NOTE: For the best results, a USB wall charger that provides
at least a 2 A power output is recommended. Many
USB power adapters for smartphones or tablets may be
compatible.
When you connect the device to a power source, one status
LED turns solid red.
Turning the Camera On and Off Using the Recording Switch
You can use the recording switch to turn the camera on and
immediately start recording video. If you turn the camera on
using the recording switch, it turns off automatically when you
stop the recording using the recording switch. This feature
allows you to start and stop recording quickly, while
automatically turning off the camera to conserve battery power
when you are not recording.
NOTE: The camera does not turn off using the recording switch
unless you use the recording switch to turn it on.
With the device turned off, move the recording switch
1
forward.
The device turns on and starts recording video.
When you are finished recording, move the recording switch
2
backward.
The device stops recording and turns off.
Home Screen Overview
The home screen provides at-a-glance details about the
remaining memory card space and current settings of your
device.
Displays the photo mode.
Displays the sensor status and remaining battery capacity. Includes
ANT+® sensors, Bluetooth®, Wi‑Fi, and GPS.
Displays the video mode.
Displays the remaining memory card space for video recording.
Charge the battery.
5
It takes approximately two hours to charge the battery to 80%
capacity, and approximately three hours to fully charge the
battery. When the battery is fully charged, the red status LED
turns off.
Turning On the Camera
Hold POWER.
The status LEDs flash green when the camera is on.
Turning Off the Camera
NOTICE
To prevent loss of data, always turn off the camera before
removing the battery.
NOTE: You cannot turn off the camera while recording video.
If necessary, move the recording switch backward to stop
1
recording video.
Hold POWER.
2
The camera saves your data and turns off.
If you need to remove the battery, wait until the screen and
status LEDs turn off before removing the battery.
Status Bar Icons
Icons appear at the top of the home screen.
• A flashing icon means the device is searching for a signal.
• A solid icon means the signal is acquired or the wireless
device is connected.
GPS status
Wi‑Fi technology status
Bluetooth technology status
ANT+ sensor status
Battery level
Main Menu
From the home screen, select or to scroll through the main
menu.
Video Mode: Sets the video shooting mode (Video Modes,
page 4).
Photo Mode: Sets the photo shooting mode (Photo Modes,
page 6).
Lens Mode: Enables one or both lenses, and sets the field of
view (Lens Modes, page 4).
Wireless: Allows you to connect to other devices, including
mobile devices, Bluetooth microphones and sensors, ANT+
sensors, and compatible Garmin devices and remotes.
Setup: Allows you to set up camera features, change system
settings, and view system information (Setup Menu,
page 14).
2 Introduction
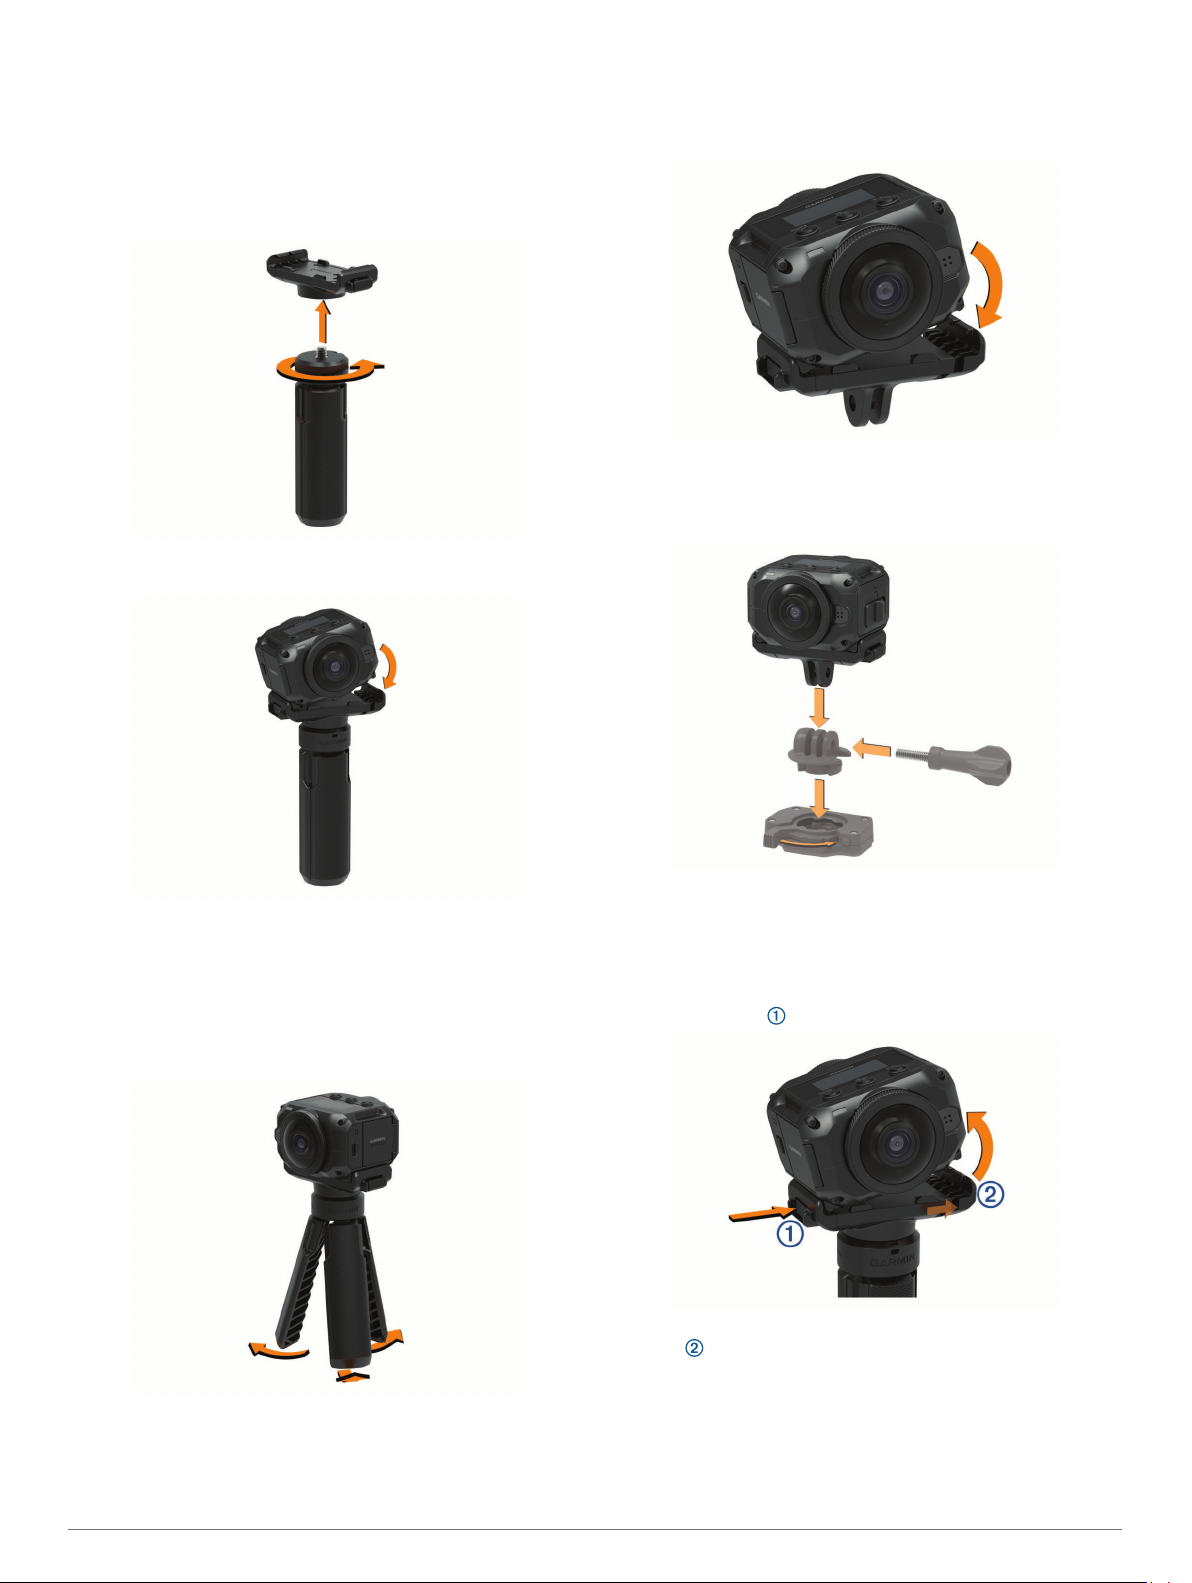
Camera Mounts
Assembling the Tripod and Cradle
You can use the universal tripod cradle to attach the camera to
the included tripod or a standard camera tripod.
Screw the tripod into the threaded hole in the bottom of the
1
tripod cradle.
Place one side of the camera into the cradle, fitting the
2
grooves in the side of the camera onto the teeth.
included). Go to garmin.com/virb to purchase mounting
accessories.
Place one side of the camera into the cradle, fitting the
1
grooves in the side of the camera onto the teeth.
Press the other side of the camera down until it clicks.
2
Place the flanges on the bottom of the action cradle into the
3
compatible mount (not included), and secure the cradle with
a thumbscrew.
Press the other side of the camera down until it clicks.
3
Select an option:
4
• To shoot handheld video, keep the tripod legs closed.
The tripod operates as a handheld grip when the legs are
closed.
• To shoot video from a stationary location, open the tripod
legs and place the camera at the shooting location.
Assembling the Action Cradle and Mounts
You can use the included action cradle to attach your camera to
compatible VIRB action camera mounting accessories (not
NOTE: Some mounting accessories may use a different
method to secure the camera to the mount. See the
instructions included with the mounting accessory for more
information.
Removing the Camera from the Cradle
Press the button to open the cradle.
1
TIP: Avoid squeezing or obstructing the sliding portion of the
cradle when you press the button.
Tilt one side of the camera up, and remove the camera from
2
the mount.
Camera Mounts 3

Video
Preparing to Record a Video
Before you start recording, you should set up your camera for
the kind of footage you want to capture.
Select a lens mode to choose the size of the video and the
1
lens or lenses to use (Lens Modes, page 4).
Select a video recording mode (Video Modes, page 4).
2
Attach the camera to a mount or tripod suitable for the kind of
3
video you want to shoot (Camera Mounts, page 3).
Find a good shooting location and camera position (Tips for
4
Shooting 360-degree Video, page 4).
Use the Garmin VIRB app to preview the camera view
5
(Remote Viewfinder, page 7) and fine-tune the video
settings (Pro Settings, page 8).
Start recording (Recording a Video, page 4).
6
Tips for Shooting 360-degree Video
Your VIRB 360 camera may be unlike cameras you have used
before. Traditional cameras capture a fixed, rectangular field of
view, which requires you to frame shots carefully and follow the
subject to keep it in the frame. The VIRB 360 camera captures a
full 360-degree sphere of video, recording everything around it,
in every direction.
Shooting 360-degree video requires some considerations that
may differ from traditional video recording.
• Put the VIRB 360 camera in the middle of the action.
A traditional forward-shooting camera is often placed with all
the action in front of it. Because the VIRB 360 camera
records in all directions, you should consider every angle and
place the camera so that interesting video can be recorded in
front, behind, above, and below the camera.
• Avoid blocking portions of the video sphere.
You may block a large portion of the recorded video sphere if
you hold the camera closely in front of you or place it near a
wall or other obstruction. You should place the camera where
it has a clear view of the surroundings in all directions.
• Point the front lens toward the primary subject.
Although the camera records in all directions, the initial view
for a 360-degree video centers on the front lens.
• Try placing the camera in a higher position to capture a
broader, less-obstructed view.
A higher vantage point often provides a clearer, wider view.
When recording action, you can hold the camera higher using
the included tripod and grip, or you can mount the camera
above you using an optional head mount or helmet mount.
When recording an event, you can use a tripod to place the
camera in a higher location that provides a line of sight above
crowds and other visual obstructions.
• Check the lighting conditions in all directions.
When feasible, you should use the remote viewfinder in the
Garmin VIRB app to verify the lighting conditions in all
directions from the camera.
Recording a Video
NOTE: If the battery power becomes very low while recording
video, the device automatically stops recording, saves the video,
and safely turns off. The status LEDs flash rapidly when the
battery charge level is low.
Move the recording switch forward to start recording video.
1
If the device is off, it turns on automatically. The device starts
recording video immediately, and the red light turns on.
Move the recording switch backward to stop recording video.
2
The video is saved on the memory card as an .mp4 file. The
G-Metrix™ sensor data is saved on the memory card as a .fit
file.
Lens Modes
The lens mode determines which lens or lenses the camera
uses while shooting video, and the size of the field of view.
Select > Lens Mode.
360: Records spherical 360-degree video using both lenses.
The camera automatically stitches video from the two lenses
into one 360-degree video file. The camera captures 360degree video at 4K resolution. When you select 360 mode,
you should select a stitching distance.
Front Only, Rear Only: Records rectangular 16:9 video using
one lens. or points to the active lens. The camera
captures 16:9 video at 1080p resolution.
RAW: Records separate 200-degree hemispherical video files
from each lens, with a combined resolution of up to 5.7K. You
can edit or share the video from each lens separately, or you
can stitch both video files into a complete video sphere using
video editing software.
Changing the Stitching Distance
Each camera lens captures 200 degrees horizontally and
vertically, or slightly more than half of a sphere. When you are
shooting 360-degree video, the camera joins, or "stitches," the
two lens images at a set focal distance and removes the
overlapping parts of the images. This creates a full sphere of
video with little or no transition between the two lens images.
You can select the focal distance used for video stitching based
on your shooting environment.
From the main menu, select Setup > Stitch Distance.
1
Select a stitching distance:
2
• If you are shooting closer objects, indoors, or in closer
surroundings, select Near.
This option sets a stitching distance of about 5 m (16 ft.) to
optimize video stitching for most environments.
• If you are shooting distant objects, outdoors, or in a large,
open venue, select Far.
This sets a farther stitching distance to optimize video
stitching for distant objects or landscapes.
Video Modes
Select > Video Mode.
Video: Captures full motion video using one or both lenses,
based on the Lens Mode setting (Lens Modes, page 4).
Slow-Mo: Captures slow motion video. This mode is not
available when you are using the 360 lens mode.
Time-lapse: Captures time-lapse video at a selected frame
interval.
Recording a Time-Lapse Video
Time-lapse mode captures individual video frames at longer
intervals and creates a video that plays much faster than real
time. You can use time-lapse mode to record movements,
changes, or events that take place slowly over a long period of
time.
Time-lapse videos play at 30 frames per second. The length of
the video depends on the amount of time between video
frames. For example, if frames are recorded at a one-second
interval, each second of video covers 30 seconds of real time. If
frames are recorded at a 60-second interval, each second of
video covers 30 minutes of real time.
From the main menu, select Video Mode > Time-lapse.
1
Select a time interval between video frames.
2
4 Video
 Loading...