

Page 1
Owner’s Manual
™
zumo
the personal motorcycle navigator
500/550
Page 2

© 2006–2007 Garmin Ltd. or its subsidiaries
Garmin International, Inc.
1200 East 151st Street,
Olathe, Kansas 66062, USA
Tel. 913/397.8200
or 800/800.1020
Fax 913/397.8282
Garmin (Europe) Ltd.
Liberty House, Hounsdown Business Park,
Southampton, Hampshire, SO40 9RB UK
Tel.+44 (0) 870.8501241 (outside the UK)
0808 2380000 (within the UK)
Fax +44 (0) 870.8501251
Garmin Corporation
No. 68, Jangshu 2nd Road,
Shijr, Taipei County, Taiwan
Tel. 886/2.2642.9199
Fax 886/2.2642.9099
All rights reserved. Except as expressly provided herein,
no part of this manual may be reproduced, copied,
transmitted, disseminated, downloaded or stored in any
storage medium, for any purpose without the express
prior written consent of Garmin. Garmin hereby grants
permission to download a single copy of this manual
onto a hard drive or other electronic storage medium to
be viewed and to print one copy of this manual or of any
revision hereto, provided that such electronic or printed
copy of this manual must contain the complete text
of this copyright notice and provided further that any
unauthorized commercial distribution of this manual or
any revision hereto is strictly prohibited.
Information in this document is subject to change
without notice. Garmin reserves the right to change or
improve its products and to make changes in the content
without obligation to notify any person or organization
of such changes or improvements. Visit the Garmin
Web site (www.garmin.com) for current updates and
supplemental information concerning the use and
operation of this and other Garmin products.
Garmin® and MapSource® are trademarks of Garmin
Ltd. or its subsidiaries, registered in the USA and other
countries. zūmo™, MyGarmin™, Garmin Travel Guide™,
Garmin TourGuide™, Garmin Lock™, GTM™, and
February 2007 Part Number 190-00697-00 Rev. B
GXM™ are trademarks of Garmin Ltd. or its subsidiaries.
These trademarks may not be used without the express
permission of Garmin.
The Bluetooth® word mark and logos are owned by
the Bluetooth SIG, Inc. and any use of such marks
by Garmin is under license. Windows® is a registered
trademark of Microsoft Corporation in the United
States and/or other countries. Mac® and iTunes® are
registered trademarks of Apple Computer, Inc. The
Winamp trademark is the property of Nullsoft, Inc.
and its parent company, America Online, Inc. Audible.
com® and AudibleReady® are registered trademarks
of Audible, Inc. © Audible, Inc. 1997-2005.
SiRF®, SiRFstar® and the SiRF logo are
registered trademarks of SiRF Technology,
Inc. SiRFstarIII™ and SiRF Powered™ are
trademarks of SiRF Technology, Inc. Google™
and Google Earth™ are trademarks of Google Inc. RDS-
TMC Trafc Information Services France © ViaMichelin
2006. SaversGuide® is a registered trademark of
Entertainment Publications, Inc. XM™ is a trademark
of XM Satellite Radio Inc. Other trademarks and trade
names are those of their respective owners.
Page 3

Preface
Preface
Thank you for purchasing the Garmin
zūmo™.
Manual Conventions
When you are instructed to “touch”
something, use your nger to touch an
item on the screen. You will see arrows
(>) used in the text. They indicate that
you should touch a series of items. For
example, if you see “touch Where to >
Favorites,” you should touch the Where
to button, and then touch Favorites.
Contact Garmin
Contact Garmin if you have any
questions while using your zūmo. In
the USA, contact Garmin Product
Support by phone: 913/397.8200 or
800/800.1020, Monday–Friday, 8 AM–5
PM Central Time; or go to www
.garmin.com/support, and click Product
Support.
®
In Europe, contact Garmin (Europe) Ltd.
at +44 (0) 870.8501241 (outside the UK)
or 0808 2380000 (within the UK).
myGarmin™
Go to http://my.garmin.com to access the
latest services for your Garmin products.
From the myGarmin Web site, you can:
• Register your Garmin unit.
• Subscribe to online services for safety
camera information (see page 55).
• Unlock optional maps.
Return to myGarmin often for new
Garmin product services.
About Google Earth™
Go to http://earth.google.com to
download the Google Earth application.
With Google Earth installed on your
computer, you can view waypoints,
tracks, and routes saved in MapSource®.
From the View menu, select View in
Google Earth.
zūmo 500/550 Owner’s Manual
Page 4

Preface
Preface.............................................i
Manual Conventions .......................... i
Contact Garmin ................................. i
myGarmin ..........................................i
About Google Earth ...........................i
Important Information ...................... iv
Getting Started ...............................1
Looking at Your zūmo .......................1
Quick Links .......................................2
zūmo Tips and Shortcuts ..................2
Adjusting the Volume ........................2
Adjusting the Brightness ...................2
Mounting the zūmo on Your
Motorcycle ...................................3
Conguring Your zūmo .....................7
Acquiring Satellites ...........................7
Using Your zūmo ..............................7
Finding Your Destination .................8
Following Your Route .......................9
Adding a Stop ...................................9
Adding a Detour .............................10
Stopping the Route .........................10
Locking Your zūmo .........................10
Where to ....................................... 11
Finding an Address ......................... 11
Go Page Options ............................11
Go Home ........................................12
Finding Points of Interest ................12
Recently Found Locations ..............14
Favorites .........................................14
Creating a Saved Route .................16
Finding a Location Using the
Map ...........................................18
Entering Coordinates ......................19
Expanding Your Search ..................19
Using the Main Pages .................20
Map Page .......................................20
Trip Information Page .....................21
Turn List Page ................................22
Next Turn Page ..............................22
Compass Page ...............................22
Using Hands-free Features ......... 23
Pairing Your Device ........................23
Getting a Call ..................................25
Phone Menu ...................................26
Trafc Information ....................... 30
Trafc in Your Area .........................30
Trafc on Your Route ......................30
Trafc Codes and Symbols ............31
Purchasing Trafc Subscriptions ....32
zūmo 500/550 Owner’s Manual
Page 5

Preface
Using XM ......................................33
Listening to XM Radio ....................33
Managing Files on Your zūmo .... 35
Supported File Types......................35
Deleting zūmo Files ........................37
Using the Media Player ...............38
Listening to MP3 Files ...................38
Listening to Audible Books .............39
Customizing the zūmo ................41
Changing the Map Settings ............41
Changing the System Settings .......42
Localizing Your zūmo .....................42
Managing User Data ......................43
Bluetooth Technology Settings .......45
Changing the Navigation
Settings .....................................46
Customizing the Display .................47
Changing the Keyboard ..................48
Managing Trafc Settings ...............48
Restoring All Settings .....................48
Clearing All User Data ....................48
Appendix ......................................49
zūmo Audio Options .......................49
Installing the zūmo in Your
Automobile ................................50
Charging the zūmo .........................52
Resetting the zūmo ........................52
Calibrating the Screen ...................52
Updating the zūmo Software ..........52
Purchasing and Loading
Additional Map Data ..................53
Optional Accessories ......................53
Battery Information ........................57
Using a Remote Antenna ...............58
Caring for Your zūmo .....................58
About GPS Satellite Signals ...........60
Specications .................................60
zūmo Troubleshooting ....................62
USB Interface Troubleshooting ......63
Index .............................................65
zūmo 500/550 Owner’s Manual
Page 6

Preface
Important Information
See the Important Safety and Product Information guide in the product box for
product warnings and other important information.
Declaration of Conformity
Hereby, Garmin declares that this product is in compliance with the essential
requirements and other relevant provisions of Directive 1999/5/EC.
To view the full Declaration of Conformity, see the Garmin Web site for your
Garmin product: www.garmin.com/products/zumo500 or
www.garmin.com/products/zumo550. Click Manuals, and then click Declaration
of Conformity.
v zūmo 500/550 Owner’s Manual
Page 7
GettinG Started
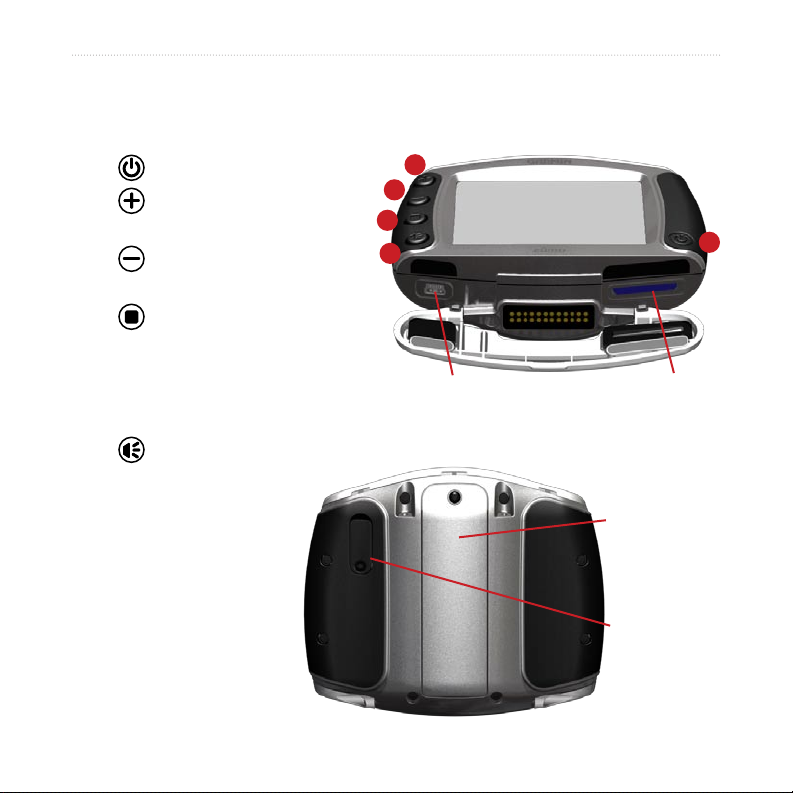
Looking at Your zūmo
A. Power button
B. Zoom in, raise volume, or
increase brightness.
C. Zoom out, lower volume, or
decrease brightness.
D. Page button—scroll
through the Map, Compass, Trip
Information, Media Player, and
Phone Menu pages. Press and
hold to adjust brightness.
E. Speak button—
press to adjust volume
level. Press and hold
to announce voice
directions.
B
C
D
E
Mn-USB port for AC power,
USB Mass Storage mode, and
updatng software
GettinG Started
A
SD card
slot
Battery pack
(see page 57)
MCX connector
under weather
cap (see page
58)
zūmo 500/550 Owner’s Manual
Page 8
GettinG Started
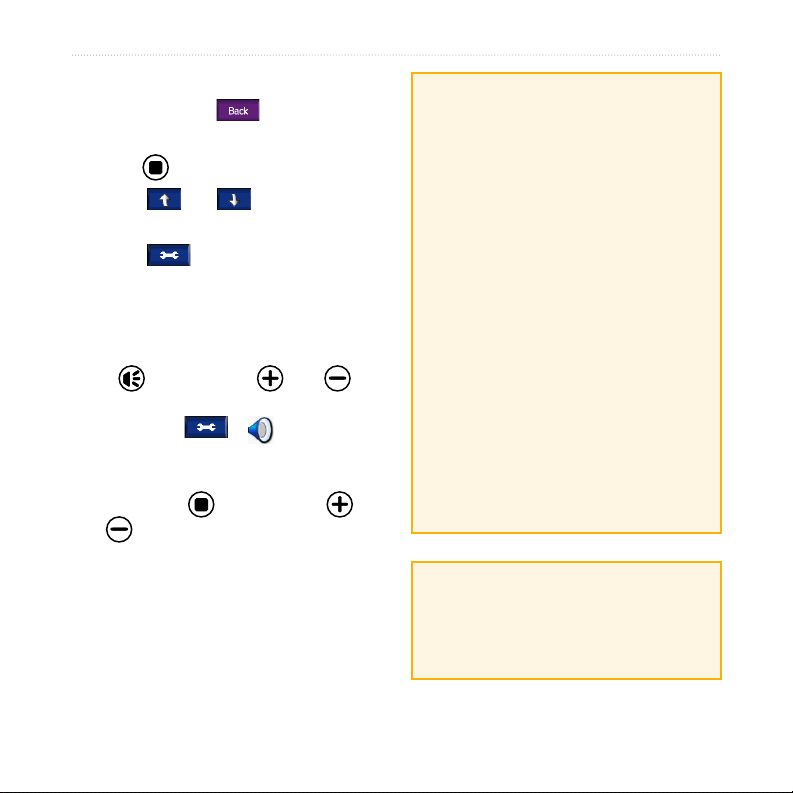
zūmo Tips and Shortcuts
• Touch and hold to quickly
return to the Menu page.
• Press
• Touch
choices.
• Touch
as volume, brightness, language, and
keyboard.
to return to the map.
and to see more
to adjust settings such
Adjusting the Volume
Press , and then use and to
adjust the volume. For advanced volume
settings, touch > Volume.
Adjusting the Brightness
Press and hold , and then use
and to adjust the brightness. See
page 47 for additional display settings.
Quick Links
• Finding an address: page 11
• Viewing the map: page 20
• Using hands-free mobile phone
features: page 23
• Using the Garmin Lock™ antitheft feature: page 10
• Listening to MP3 les: page 38
• Transferring les to your zūmo:
pages 35–37
• zūmo audio options, see page 49
• Cleaning and storing your zūmo:
page 58
• Mounting the zūmo in your
automobile: page 50
Fill out the product documentation
survey. Go to www.garmin.com/
contactUs, and click Product
Documentation Survey.
zūmo 500/550 Owner’s Manual
Page 9
GettinG Started
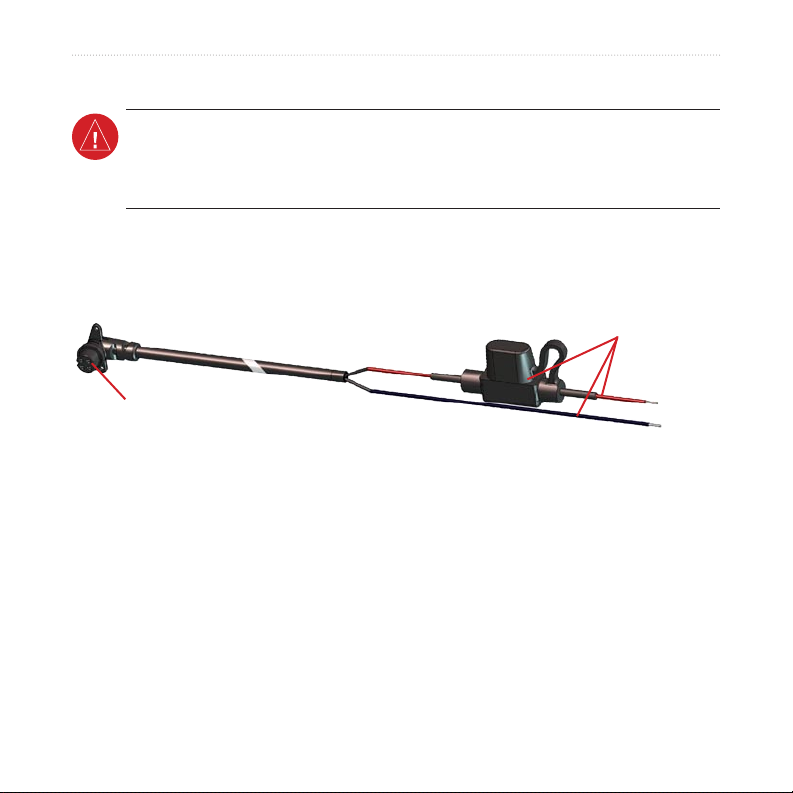
Mounting the zūmo on Your Motorcycle
WARNING: The terms of the Garmin warranty require that the power cable
with bare wire leads be installed by experienced installers having the proper
knowledge of automotive electrical systems and skill in the use of special tools
or hardware required for installation.
1: Connect Power to the Mount
Select a suitable and secure location to mount the zūmo on your motorcycle based on
available power sources and safe cable routing.
Bare wres
wth nlne
fuse for power
connecton
Power connector
About Connecting Audio
Standard jacks for microphone (2.5 mm) and audio out (3.5 mm) are located on the
left side of the mount (under a weather cap). When connecting your audio system to
the zūmo, be sure to consider the pathways needed to route the necessary cables. For
information about hands-free audio and phone options, see page 23. For additional
audio congurations, see page 49.
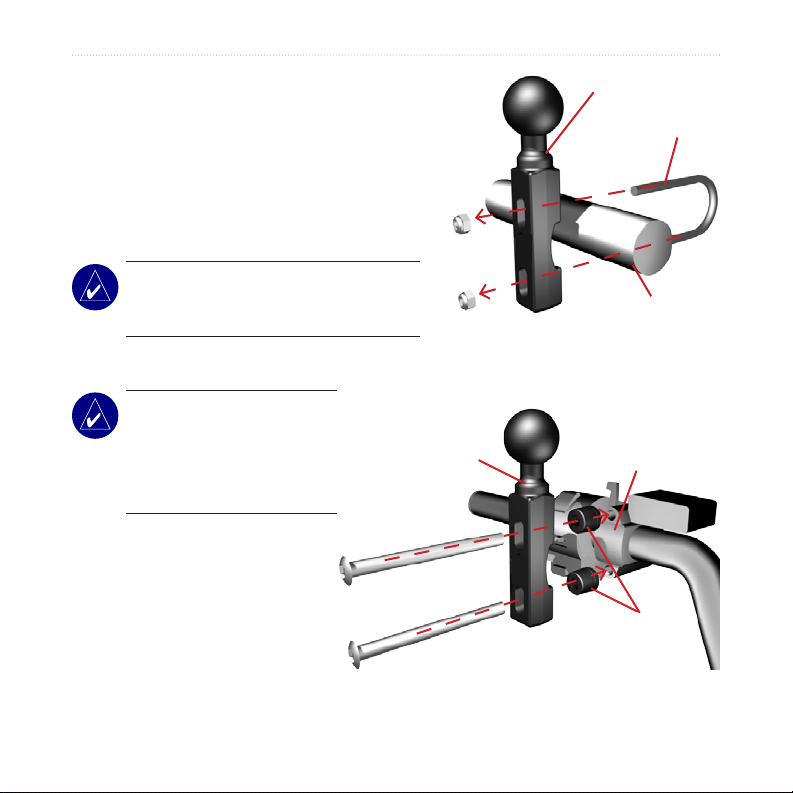
2: Install the Handlebar Base
The zūmo includes parts for two handlebar installation solutions. Custom mounts can
require additional hardware (www.ram-mount.com).
zūmo 500/550 Owner’s Manual
Page 10
GettinG Started
A) To install the U-bolt and handlebar
base:
1. Place the U-bolt around the handlebar,
and thread the ends through the handlebar
base.
2. Tighten the nuts to secure the base. Do
not overtighten.
NOTE: The recommended torque
is 50in-lb. Do not exceed maximum
Handlebar
base
Handlebar
torque of 80in-lb.
B) To install the handlebar base to the clutch/brake clamp bracket:
NOTE: Both 1/4” standard
and M6 bolts are included.
Match the size of the
Handlebar
base
Clutch/brake
clamp bracket
factory bolts on your
clutch/brake clamp bracket.
1. Remove the two factory bolts
on your clutch/brake clamp
bracket.
2. Thread the new bolts through
the handlebar base, spacers,
and clamp bracket.
3. Tighten the bolts to secure the base.
Spacers
U-bolt
zūmo 500/550 Owner’s Manual
Page 11
GettinG Started
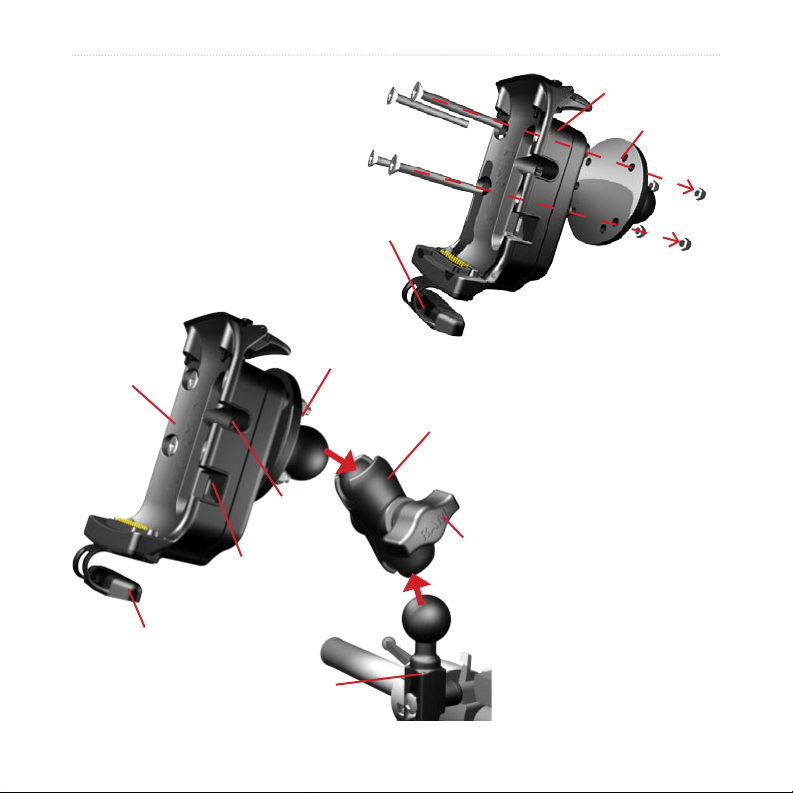
3: Attach the Base Plate
to the zūmo Mount
1. Thread the M4 x 40 mm
athead bolts and nuts to
attach the base plate to the
zūmo mount.
2. Tighten the nuts to secure the
base plate.
Base plate
zūmo mount
Power
socket
Mn-USB
port
Weather cap
Handlebar base
Weather cap
Double-
socket arm
Knob
zūmo mount
Base plate
4: Attach the
Base Plate to the
Handlebar Base
1. Align the ball of the
handlebar base and the
ball of the base plate
with the double-socket
arm.
2. Tighten the knob slightly.
3. Adjust for better viewing
and operation.
4. Tighten the knob to
secure the mount.
zūmo 500/550 Owner’s Manual 5
Page 12
GettinG Started
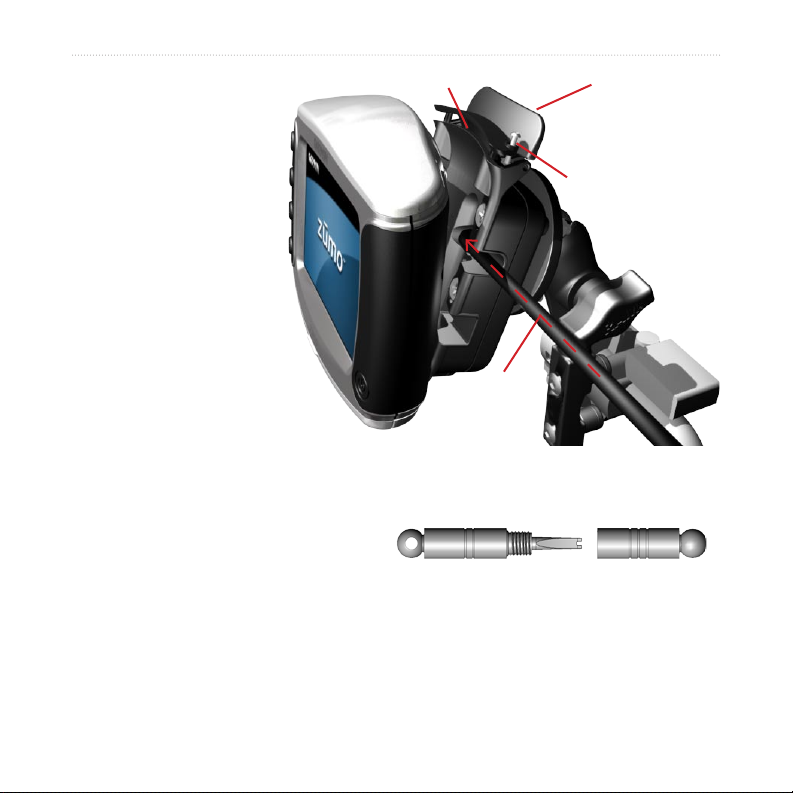
5: Install the zūmo
zūmo mount
in the Mount
1. Plug the power cable
into the zūmo mount.
For a better seal,
tighten the screws on
the power connector.
2. Flip the lever up.
3. Flip the weather cap
down and under
(magnetic).
4. Place the zūmo into
the mount, and ip the
lever down.
5. Tighten the security
screw.
About the Security Screwdriver
Use the security screw to better secure
the zūmo to the mount. You can connect
the screwdriver to your key chain for
easy access.
Lever
Securty screw
Power
cable
Securty screwdrver
zūmo 500/550 Owner’s Manual
Page 13
GettinG Started
Conguring Your zūmo
To turn on your zūmo, press and hold . Follow the on-screen instructions to
congure your zūmo.
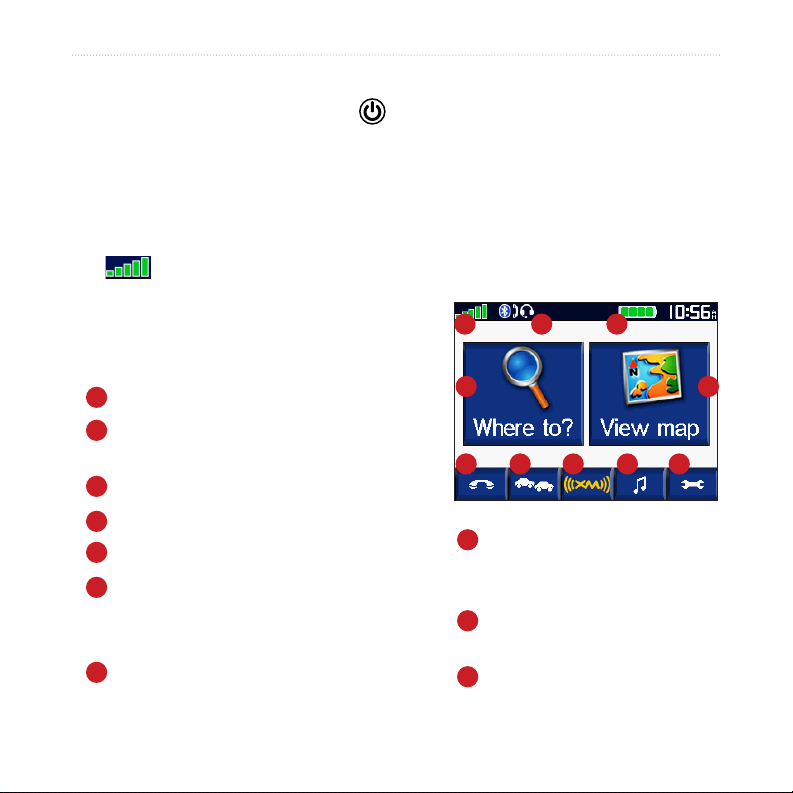
Acquiring Satellites
Go outdoors to an open area, out of garages, and away from tall buildings. Stop your
vehicle, and turn on the zūmo. Acquiring satellite signals may take a few minutes.
The bars indicate GPS satellite strength. When the bars are green, your zūmo
has acquired satellite signals, and you can start
navigating.
A B C
Using Your zūmo
Displays satellite strength.
A
Displays phone and headset connection
B
status.
C
Displays battery status.
Touch to nd a destination.
D
E
Touch to view the map.
Touch to open the Phone menu (when
F
connected to a mobile phone with
Bluetooth® wireless technology).
Touch to view trafc incidents (requires
G
antenna or receiver and subscription).
zūmo 500/550 Owner’s Manual
D E
F G H I J
Touch to view XM weather and
H
radio tuner (requires antenna
and subscription).
Touch to open the Media
I
Player.
J
Touch to adjust the zūmo’s
settings.
Page 14
GettinG Started
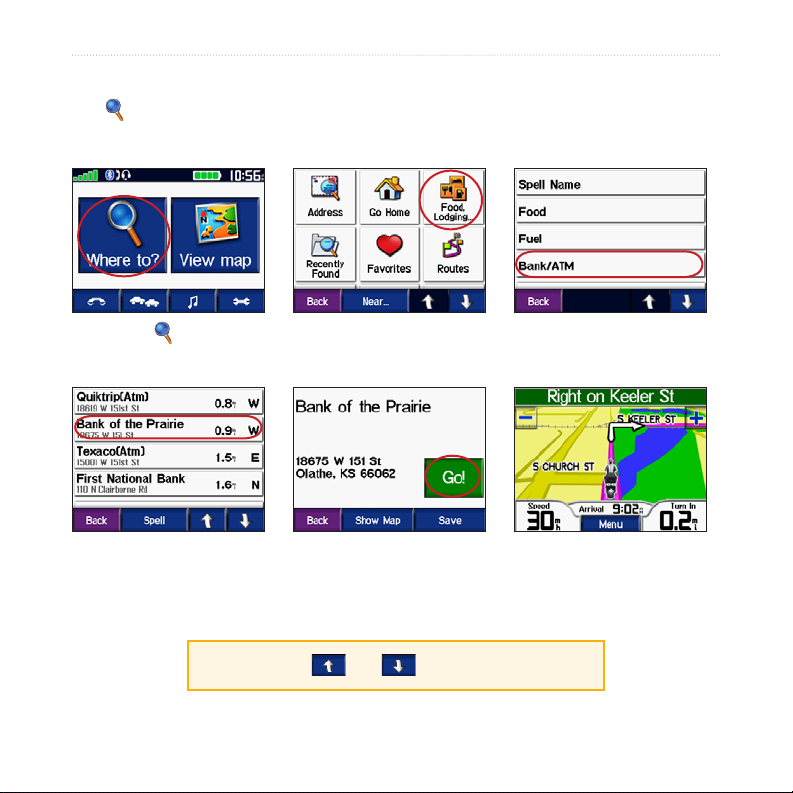
Finding Your Destination
The Where to menu provides several different categories for you to use when you
search for locations.
Touch Where to.
Select a destination. Enjoy the route!
➍
TIP: Touch and to see more choices.
zūmo 500/550 Owner’s Manual
Select a category.
➋➊
Touch Go.
➎
Select a sub-
➌
category.
➏
Page 15

GettinG Started
Following Your Route
As you travel, your zūmo guides you
to your destination with voice prompts,
arrows on the map, and directions at the
Adding a Stop
You can add a stop (via point) to your
route. The zūmo gives you directions to the
stop and then to your nal destination.
top of the map. If you depart from the
original route, your zūmo recalculates
the route and provides new directions.
Your route s marked wth a purple lne.
Follow the arrows as you take turns.
A checkered ag marks your destnaton.
1. With a route active, touch Menu on
2. Search for the extra stop.
3. Touch Go.
4. Touch Add as Via Point to add this
TIP: If you want to add more
than one stop to the route,
consider editing the active route.
See page 16.
the map, and touch Where to.
stop before your destination. Touch
Set as new Destination to make this
your new nal destination.
zūmo 500/550 Owner’s Manual
Page 16
GettinG Started
Adding a DetourDetour
If a road on your route is closed, you can
take a detour.
1. With a route active, touch Menu.
2. Touch Detour.
Stopping the Route
1. With a route active, touch Menu.
2. Touch Stop.
What is a Security Location?
You can select any location, such as
your home or ofce, for your security
location. If you are at your security
location, you do not need to enter a PIN.
If you forget your PIN, drive to your
security location to unlock the zūmo.
Locking Your zūmoocking Your zūmo
1. Touch > System >
Garmin Lock.
2. Touch OK, and enter a four-digit PIN.
3. Re-enter your four-digit PIN.
4. Touch OK.
5. Drive to a security location, and touch
Set.
Each time you turn on the zūmo, enter
the four-digit PIN or drive to the security
location.
NOTE: To unlock your zūmo at
your security location, the zūmo
must have acquired satellite
signals.
NOTE: If you forget your PIN
and your security location, you
must send your zūmo to Garmin
to get it unlocked. You must also
send a valid product registration
or proof of purchase.
0 zūmo 500/550 Owner’s Manual
Page 17
Where to
Where to
The Where to menu provides several
different categories you can use to search
for locations. To learn how to perform a
simple search, see page 8.
Finding an Address
1. Touch Where to > Address.
2. Select a country, state/province, and
city/postal code, if necessary.
3. Enter the address number, and touch
Done.
4. Enter the street name until a list of
streets appears, or touch Done.
5. Select the street and city, if
necessary.
6. Select the address, if necessary. The
Go page opens.
7. Touch Go to create a route to this
address.
TIP: Do not enter the street prex
or sufx. For example, to nd North
Main Street enter Main, and to nd
Highway 7 enter 7.
About Postal Codes
You can search for a postal code. Enter
the postal code instead of the city name.
Not all map data provides postal code
searching.
Intersections
Finding an intersection is very similar
to nding an address. Touch
Intersection, and enter the two street
names.
Go Page Options
Touch an item in the search results list to
view the Go page.
zūmo 500/550 Owner’s Manual
Page 18

Where to
Touch Go to create a turn-by-turn route
to this location.
Touch Show Map to view this location
Changing Your Home
Location
1. Touch > User Data > Set
on the map. If the GPS is off, touch
Set Loc. to set this as your current
2. Select Yes, enter my Address or
location.
Touch Save to save this location as one
of your Favorites. See page 14.
Finding Points of Interest
1. Touch Where to > Food,
If a mobile phone with Bluetooth
wireless technology is connected, touch
to call this location.
Go Home
You can set a home location for the place
you return to most often.
1. Touch Where to > Go Home.
2. Select an option.
2. Select a category and a sub-category,
3. Select a destination.
4. Touch Go.
Going Home
After you set your home location, you
can route to it at any time by touching
Where to > Go Home.
Home Location.
Yes, use my current location.
Hotels.
if necessary. (Touch the arrows to see
more categories.)
zūmo 500/550 Owner’s Manual
Page 19
Finding a Location by
Spelling the Name
If you know the name of the location you
are looking for, you can spell it using the
on-screen keyboard. You can also enter
letters contained in the name to narrow
the search.
1. Touch Where to > Food,
Hotels.
2. Touch Spell Name.
3. Using the on-screen keyboard, enter
letters in the name. Touch Done.
4. Touch the location you are looking
for, and touch Go.
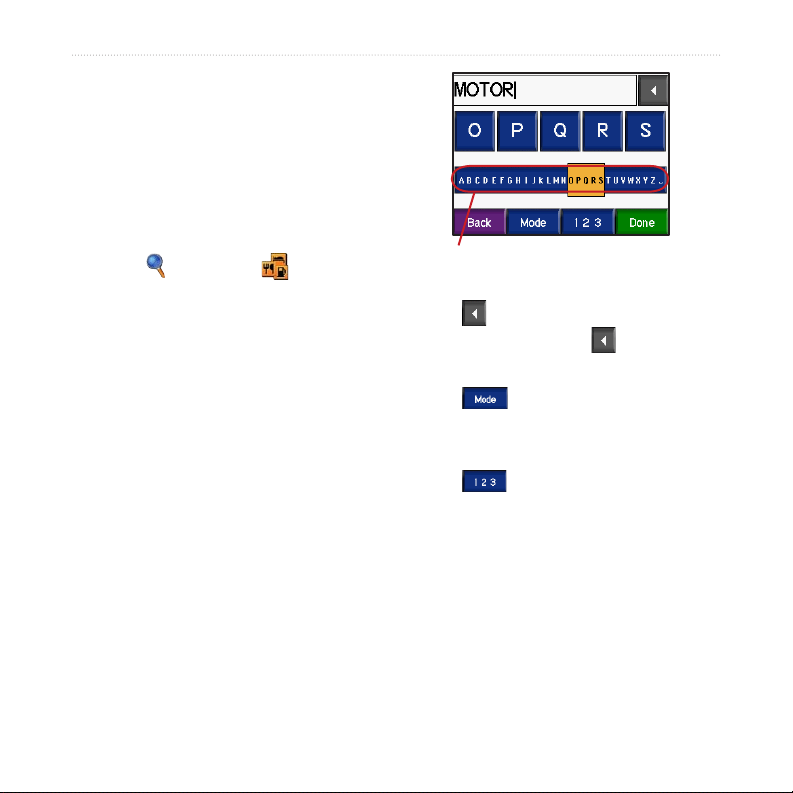
Using the On-Screen
Keyboard
Touch and slide the yellow box to view
the characters. Touch a character button
to enter it.
Where to
TIP: Tap anywhere on the alphabet
row to quckly move the yellow box.
Touch to delete the last character
entered; touch and hold to delete the
entire entry.
Touch to change the keyboard
mode to use diacritical characters or
special characters.
Touch to enter numbers.
To change the keyboard display, see
page 48.
zūmo 500/550 Owner’s Manual
Page 20
Where to
Recently Found Locations
Your zūmo stores the last 50 of your
recent nds in the Recently Found list.
The most recently viewed locations
appear at the top of the list. Touch
Where to > Recently Found to
view your recently found items.
Touch Save > OK to add a recently
found location to your Favorites.
Touch Clear > Yes to delete all locations
from the Recently Found list.
NOTE: When you delete recently
found locations, all items are
removed from the list. It does not
delete the actual location from
your unit.
Favorites
You can save up to 500 locations in your
Favorites, so you can quickly nd them
and create routes to them. Your home
location is also stored in Favorites.
Saving Locations You Find
1. After you have found a location you
want to save, touch Save.
2. Touch OK. The location is saved in
Favorites.
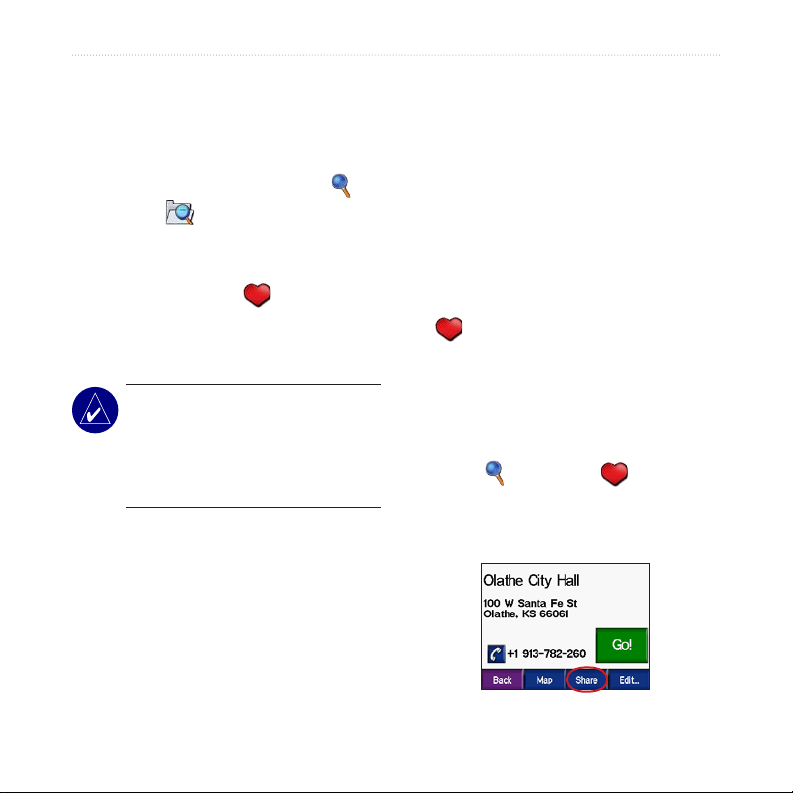
Sharing Locations
Share your Favorites with other zūmo
owners. You must insert an SD card with
available storage space.
1. Touch Where to > Favorites.
2. Select the location you want to share.
3. Touch
Share.
zūmo 500/550 Owner’s Manual
Page 21
Where to
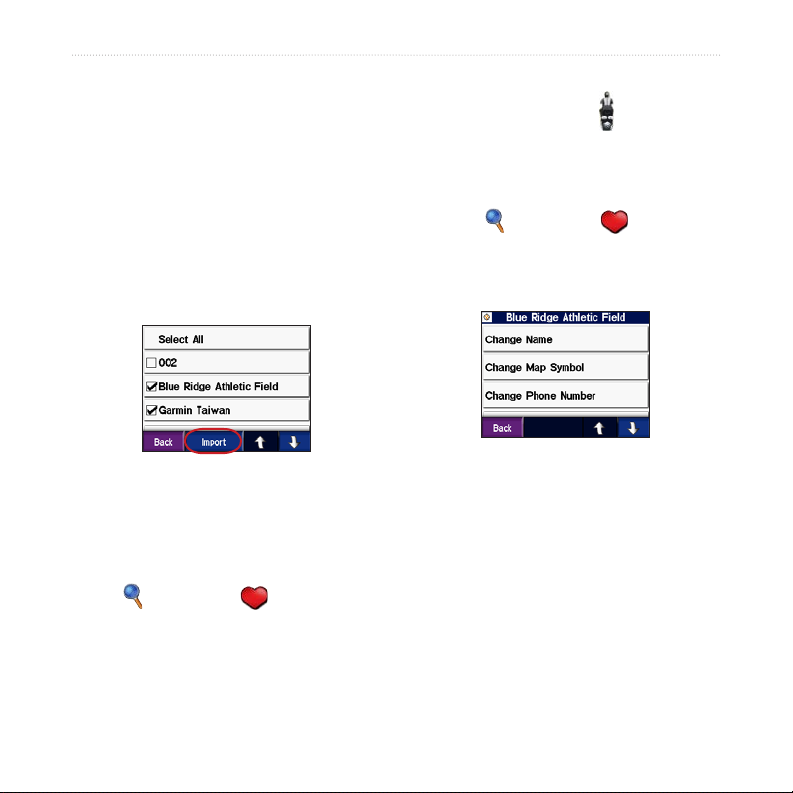
4. Verify that the correct location is
selected, and then touch Export.
5. Touch OK.
6. Eject your SD card, and insert it into
another zūmo.
7. A message appears. Touch Yes to
import the shared locations.
8. Touch Favorites, and then touch the
location you want to import.
9. Touch Import, and then touch OK.
10. Touch Done to go back to the Menu
page.
Saving Your Current Location
From the map, touch the vehicle icon.
Touch Yes to save your current location
as a Favorite.
Editing Saved Locations
1. Touch Where to > Favorites.
2. Touch the location you want to edit.
3. Touch Edit.
4. To edit the location:
Finding Saved Locations
Touch Where to > Favorites.
The locations are listed by distance from
your current location. Touch Spell to
narrow your search.
Touch Change Name. Enter a name,
and touch Done.
Touch Change Map Symbol. Touch
a symbol.
zūmo 500/550 Owner’s Manual 5
Page 22

Where to
Touch Change Phone Number. Enter
a phone number, and touch Done.
Touch Delete to remove this item.
A list of all your Favorites appears.
Touch the item you want to delete.
Touch Delete > Yes.
Creating a Saved Route
6. Touch to add another location to
7. Touch Map to calculate your route,
8. Touch Back to exit and save the
Use your zūmo to create and save routes
before your next trip. You can save up to
50 routes.
1. Touch Where to > Routes >
New.
2. Touch Add New Start Point.
3. Find a location as your starting point,
and touch Select.
4. Touch Add New End Point.
5. Find a location as your ending point,
and touch Select.
Editing Saved Routes
1. Touch Where to > Routes.
2. Select the route you want to edit.
3. Touch Edit.
your route. TIP: Touch Near to narrow
your search, see page 19. Touch
to remove a location.
and view it on the map.
route.
zūmo 500/550 Owner’s Manual
Page 23
Where to
4. To edit the route:
• Touch Change Name. Enter a new
name, and touch Done.
• Touch Add/Remove Points to add
new start, via, or end points to the
route.
• Touch Manual Reorder to change
the order of points along your route.
• Touch Optimal Reorder to
automatically order the points
according to straight line distance
between your start and end points.
• Touch Recalculate to change the
route preference to calculate by faster
time, shorter distance, or off road.
• Touch Delete to remove this item. A
list of all your routes appears. Touch
the item you want to delete. Touch
Delete > Yes.
NOTE: Your changes are
automatically saved when you
exit any of the route edit pages.
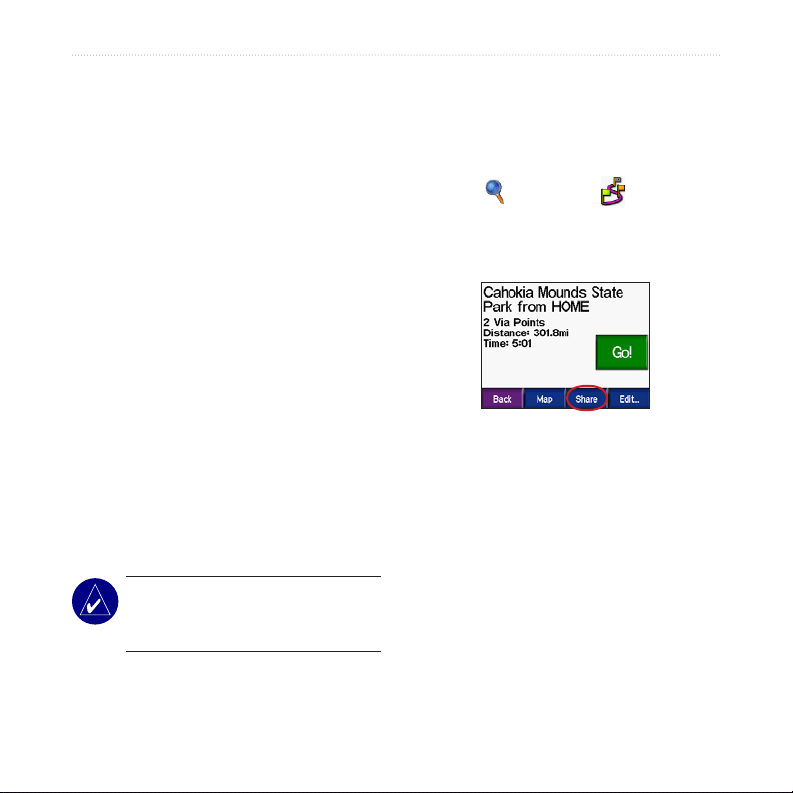
Sharing Routes
Share your saved routes with other zūmo
owners. You must insert an SD card with
available storage space.
1. Touch Where to > Routes.
2. Select the route you want to share.
3. Touch Share.
4. Verify that the correct route is
selected, and then touch Export.
5. Touch OK.
6. Eject your SD card, and insert it into
another zūmo.
7. A message appears. Touch Yes to
import the shared route.
8. Touch Routes, and then touch the
route you want to import.
zūmo 500/550 Owner’s Manual
Page 24

Where to
Tips for Browsing the Map
• Touch the map and drag to view
• Touch
• Touch any object on the map. An
9. Touch Import, and then touch OK.
10. Touch Done to go back to the Menu
page. To view your imported routes,
touch Where to > Routes.
NOTE: You can also share routes
• Touch
• Touch
using Google Earth. Go to
http://earth.google.com.
Finding a Location UsingUsing
• Touch
• If the GPS is off, touch
the Map
Touch View map to open the map.
Touch and drag anywhere on the map to
browse and view different parts of the
map. You can also touch Where to >
> Browse Map.
different parts of the map.
and to zoom in and out.
arrow appears pointing at the object
you selected.
Back to return to the previous
screen.
Save to save this location to
your Favorites.
Go to create a turn-by-turn
route to the location.
Set Loc. to
set the arrow location as your current
location.
zūmo 500/550 Owner’s Manual
Page 25

Where to
Entering Coordinates
If you know the geographic coordinates
of your destination, you can use your
zūmo to navigate to any location using
its latitude and longitude coordinates.
Touch Where to > >
Coordinates.
Touch Format to change the type of
coordinates. Because different maps and
charts use different position formats, the
zūmo allows you to choose the correct
coordinate format for the type of map
you are using.
Touch Next for more options:
• Touch Go to create a turn-by-turn
route to the coordinates.
• Touch
Show Map to view this
location on the map.
• Touch Save to save this location to
your Favorites.
Expanding Your Search
1. Touch Where to > Near.
2. Select an option:
Where I Am Now—searches near
your current location.
A Different City—searches near the
city you specify.
My Current Route—searches along
the route you are currently navigating.
My Destination—searches for
locations near your current route
destination.
3. Touch OK.
NOTE: Your zūmo automatically
searches near your current
location.
zūmo 500/550 Owner’s Manual
Page 26

USinG the Main PaGeS
USinG the Main PaGeS
Map Page
On the Menu page, touch View map to open the map. The vehicle icon shows
your current location.
Touch the vehcle con to vew your current coordnates and
elevaton. Then touch
Yes to save ths locaton.
Touch to zoom out.
Touch Menu to return
to the Menu page.
Touch Speed to open
the Trp Informaton
page.
Map Page while Navigating a Route
Turn List Page Next Turn PageTrip Information Page
0 zūmo 500/550 Owner’s Manual
Touch the drectons
bar to open the Turn
Lst page.
Touch to zoom n.
Touch Turn In to open
the Next Turn page.
Page 27

USinG the Main PaGeS
Trip Information Page
The Trip Information page shows your
current speed and provides helpful
statistics about your trip. To view the
Trip Information page, touch Speed on
the map.
Resetting Trip Information
Using the Fuel Gauge
The fuel gauge is for motorcycle use
only. You can track your fuel usage when
the zūmo is in the motorcycle mount.
The fuel gauge is only as accurate as the
data you enter.
1. On the map, touch Speed to open
If you want accurate trip information,
reset the trip information before
beginning a trip. If you make frequent
stops, leave the zūmo turned on so it can
2. Touch Reset > Miles Per Tank.
3. Enter an amount, and touch Done.
4. A message appears when you have
accurately measure elapsed time during
the trip.
5. On the map, touch the
Touch Reset to reset the odometer,
maximum speed, trip data, fuel gauge,
and miles per tank.
6. To reset the fuel gauge, go
Touch More to view speed data and
travel time data.
the Trip Information page.
30 miles (~48.3 km) remaining.
icon to
search for a nearby fuel station.
Touch OK.
to the Trip Information page,
and touch the fuel gauge >
Yes.
zūmo 500/550 Owner’s Manual
Page 28

USinG the Main PaGeS
Turn List Page
When you are navigating a route, the
Turn List page shows turn-by-turn
instructions for your entire route and
the distance between turns. Touch the
directions bar on the top of the map to
open the Turn List page. Touch a turn on
the list to view the Next Turn page for
that turn. Touch Show Map to view the
entire route on the map.
Next Turn PageTurn Page
To view an upcoming turn on the map,
touch Turn In on the map, or touch any
turn from the Turn List page. When you
are navigating a route, the Next Turn
page shows the turn on the map and the
distance and time left before you reach
the turn. Touch and to view
other turns in the route.
Compass Page
To view the Compass page, touchCompass page, touch
Driving on the map or press .
Bug
ndcator
Bearng
ponter
When you are navigating a route, the
compass rotates and the bug indicator
shows the direction you should be
travelling to stay on the route. The
bearing pointer indicates your current
direction. If the arrow points up, you
are going directly to the destination. If
the arrow points any other direction,
navigate the direction of the bug
indicator until the arrow points up.
Touch More to see additional data elds.
Data
elds
22 zūmo 500/550 Owner’s Manual
Page 29

USinG handS-free featUreS
USinG handS-free
featUreS
Using Bluetooth® wireless technology,
your zūmo can connect to your mobile
phone and wireless headset to become a
hands-free device. To see if your device
with Bluetooth technology is compatible
with the zūmo, visit www.garmin.com/
bluetooth.
Bluetooth wireless technology
establishes a wireless link between
devices, such as a mobile phone,
wireless headset, and the zūmo. The
rst time you use two devices together
you must “pair” them by establishing a
relationship using a PIN/ passkey. After
the initial pairing, the two devices can
connect automatically each time you turn
them on.
NOTE: You might have to
set your device to connect
automatically when the zūmo is
turned on.
Pairing Your Device
To pair and connect, your device and the
zūmo must be turned on and be within
10 meters of each other.
Initiate pairing from your zūmo or
from your mobile phone. Refer to your
phone’s instructions.
Why should I pair my
phone and headset with
my zūmo?
To get the full features of the zūmo,
you should pair your phone to the
zūmo and also pair your headset to
the zūmo. In addition to hands-free
phone use, you can also hear zūmo
navigation prompts through your
headset.
For additional zūmo audio options,
see page 49.
zūmo 500/550 Owner’s Manual
Page 30

USinG handS-free featUreS
To pair using the zūmo settings:
1. On the zūmo’s Menu page, touch
> Bluetooth.
2. Touch the Add button next to the
“Connect Phone” or “Connect
Headset” option.
3. Enable your device’s Bluetooth
component and enable Find Me/
Discoverable/Visible mode. These
settings might be in a Bluetooth,
Connections, or Hands-free menu.
4. Touch OK on the zūmo.
5. Select your device, and touch OK.
6. Enter the zūmo’s Bluetooth PIN
(1234) in your phone, if necessary.
7. On the zūmo, touch and hold Back to
return to the Menu page.
To pair using the phone settings:
1. Enable the phone’s Bluetooth
component. This might be in a
menu called Settings, Bluetooth,
Connections, or Hands-free.
2. Initiate a search for Bluetooth
devices. This might be located in a
menu called Bluetooth, Connections,
or Hands-free.
3. Select the zūmo from the list of
devices.
4. Enter the zūmo’s Bluetooth PIN
(1234) into your phone.
5. On the zūmo, touch and hold Back to
return to the Menu page.
NOTE: Each time you turn on
the zūmo, it tries to connect to
the last device with which it was
connected.
24 zūmo 500/550 Owner’s Manual
Page 31

Getting a Call
When your phone is connected with
the zūmo, the icon appears in the
upper-left corner. When your headset
is connected with the zūmo, the
icon appears in the upper-left corner.
When you get a call, the Incoming Call
window opens.
Touch Answer to answer the call. Touch
Ignore to ignore the call and stop the
phone from ringing.
In a Call
After you have made or answered a
call, the In Call icon appears on the
screen. Touch for more options:
USinG handS-free featUreS
Touch End Call to hang up.
Touch Call Options view the following
in call settings:
Touch Tones—displays a keypad page
so you can use automated systems, such
as voice mail.
Transfer Audio To Phone—to switch
audio to your phone. This is helpful if
you plan to turn off the zūmo, but want
to stay on the call. You can also transfer
a call to your phone if you need privacy
or your headset is malfunctioning. To
switch back, touch Transfer Audio To
Device.
Mute Microphone—to mute the
microphone during a call. It mutes a
wired microphone, wireless headset
microphone, or the internal microphone
on the automotive mount.
zūmo 500/550 Owner’s Manual 5
Page 32

USinG handS-free featUreS
Using Call Waiting
NOTE: If your phone does not
support call waiting through
Bluetooth, this feature will not
work.
If you get a call during a call, the
Incoming Call window appears. Touch
Answer to answer the call. The rst call
is placed on hold.
To switch between calls:
1. Touch to open the In Call menu.
2. Touch Switch To.
3. Touch End Call to hang up; this does
not disconnect the call on hold.
Phone Menu
On the Menu page, touch to open
the Phone menu. Not all phones support
all features of the zūmo Phone menu.
Refer to your phone’s instructions.
Press Status to view the connected
phone’s signal strength, battery level,
carrier, and name.
26 zūmo 500/550 Owner’s Manual
Page 33

USinG handS-free featUreS
Using Your Phone Book
NOTE: The phone book feature
is only available if your phone
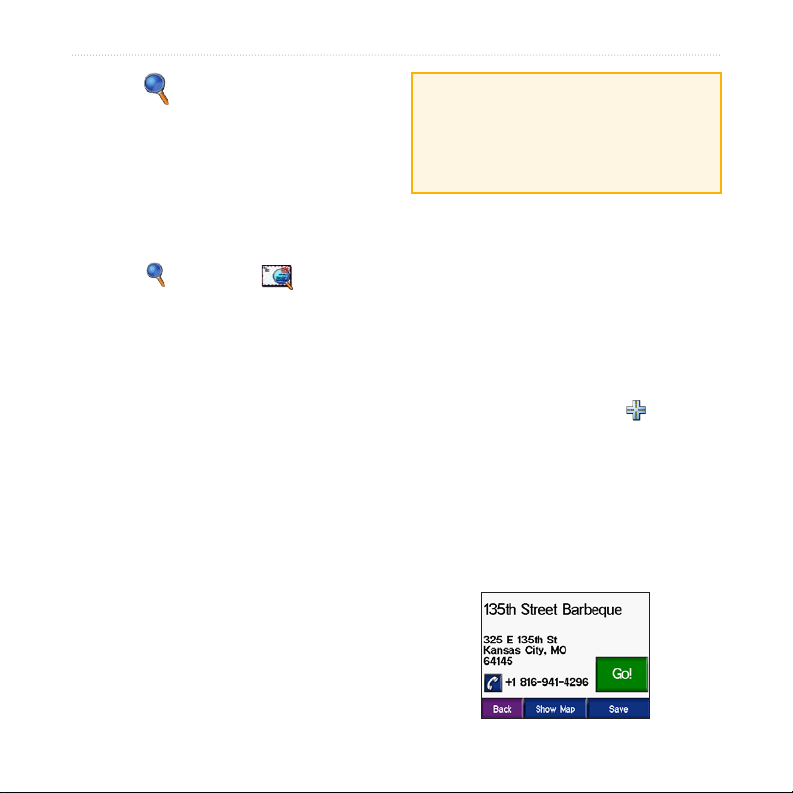
Dialing a Point of Interest
1. Touch > Food, Hotels.
2. Search for the point of interest you
supports phone book transfer.
Each time your mobile phone connects
with the zūmo, the phone book is
automatically loaded into the zūmo. It
may take a few minutes for the phone
book to be available.
1. Touch > Phone Book.
3. Touch Dial or .
Dialing a Number
1. Touch > Dial.
2. Touch the phone book entry you want
to call.
3. Touch Dial.
2. Enter the number, and touch Dial.
want to call.
zūmo 500/550 Owner’s Manual
Page 34

USinG handS-free featUreS
Viewing Your Call History
NOTE: Call history is only
available if your phone supports
call history transfer.
Each time your phone connects to the
Calling Home
Enter a phone number for your home
location, so you can quickly call home.
Enter a Home Phone Number
1. Touch > Call Home.
zūmo, your call history is automatically
transferred to the zūmo. It may take a
few minutes to transfer this data to the
zūmo.
1. Touch > Call History.
2. Touch Missed, Dialed, or Received
to view those calls. The calls are
listed in chronological order; the most
recent calls are at the top of the list.
3. Touch an entry, and touch Dial.
2. Touch Enter Phone Number to use
3. Touch Done > Yes. The zūmo dials
the keypad page or Select From
Phonebook (only available if your
phone supports phone book transfer).
your home phone number.
NOTE: To edit home location or
phone number, touch Where
to > Favorites > Home >
Edit.
28 zūmo 500/550 Owner’s Manual
Page 35

Call Your Home
Touch > Call Home. The
zūmo dials your home phone number.
Placing Calls Using Voice Dial
NOTE: Voice dial is only
available if your phone supports
voice dialing.
You can place calls by speaking the
contact’s name into the microphone.
1. Touch > Voice Dial.
2. Speak the contact name.
NOTE: You may need to “train”
your mobile phone to recognize
your voice commands. Refer to
your phone’s instructions.
USinG handS-free featUreS
zūmo 500/550 Owner’s Manual
Page 36

traffic inforMation
traffic inforMation
Your zūmo can receive and use trafc
information using an optional FM
TMC (Trafc Message Channel) trafc
receiver (such as the GTM™ 20) or an
XM smart antenna (such as the GXM™
30). When a trafc message is received,
your zūmo displays the incident on the
map and can change your route to avoid
the trafc incident.
NOTE: Garmin is not
responsible for the accuracy
of the trafc information. The
trafc receiver or antenna simply
receives signals from the trafc
service provider and displays that
information on your zūmo.
NOTE: You can only access the
trafc information if the zūmo is
connected to a trafc receiver or
antenna (see page 54).
Trafc in Your Area
On the Menu page, touch or
> Trafc.
Trafc on Your Route
The map displays or when
there is a trafc delay on your route.
The number in the icon represents the
delay time in minutes. The delay time is
automatically calculated into the arrival
time shown on the map.
1. Touch or to view a map and
2. Touch the yellow text bar for more
more information.
information. If there is more than one
delay, touch Details.
0 zūmo 500/550 Owner’s Manual
Page 37

traffic inforMation
3. Touch Avoid to recalculate your route
to avoid this delay.
Trafc Codes and Symbols
Green = Low severity; trafc is
owing normally.
Yellow = Medium severity; trafc is a
bit congested.
Red = High severity; trafc is heavily
congested or stopped.
North
American
Meaning International
Road
condition
Road
construction
Road closed
Slow trafc
Accident
Incident
Information
zūmo 500/550 Owner’s Manual
Page 38

traffic inforMation
Purchasing Trafc
Subscriptions
You can renew and purchase new
subscriptions at www.garmin.com/
trafc.
Adding a Subscription
1. Touch > > Services
or Trafc.
2. Touch FM Trafc or XM
Subscriptions.
3. Touch Add or Subscribe.
4. Follow the on-screen instructions.
NOTE: Additional
documentation is included with
your Garmin trafc receiver or
antenna.
FM Trafc
For more information about an FM
trafc receiver, go to www.garmin
.com/trafc. For participating FM trafc
subscription providers and coverage
cities, go to www.garmin.com/fmtrafc.
NOTE: The FM trafc receiver
and zūmo must be in data range
of an FM station transmitting
TMC data to receive trafc
information.
XM Trafc
For more information about an XM
smart antenna, go to www.garmin
.com/xm. For subscription information
and coverage cities for XM NavTrafc,
go to www.xmnavtrafc.com.
NOTE: XM subscriptions are
available for North America only.
zūmo 500/550 Owner’s Manual
Page 39

USinG XM
•
Your zūmo can receive XM radio and
XM weather using an optional XM smart
antenna (such as the GXM™ 30). For
•
more information about an XM smart
antenna and XM subscriptions, go to
www.garmin.com/xm.
NOTE: You must purchase and
Listening to XM Radio
1. Connect the antenna to the zūmo
activate your XM service before
you can use the XM features.
On the Menu page, touch .
2. On the Menu page, touch to
3. Touch Source to view the XM tuner.
• XM Radio—opens the XM tuner.
•
Local Weather—displays current
weather conditions based on your
present location. Touch Forecast to
view a ve-day weather forecast for
this area.
USinG XM
Weather Map—displays current
weather conditions on the map. See
page 18 for tips on browsing the map.
Trafc—displays a list of current
trafc events. Touch an item for more
details.
mount (see pages 3 and 54). External
power is required.
open the Media Player.
See page 38, to learn about the MP3
player.
zūmo 500/550 Owner’s Manual
Page 40

USinG XM
XM sgnal
strength
Now
playng
Browse
category
Touch to go to the next channel in
the browse category.
Touch to go to the previous channel
in the browse category.
Touch Browse to search a category, such
as Recent Channels, Kids, or Urban.
Next to each channel is the current
program information. Touch a channel to
listen to that channel.
Touch 123 to enter an XM channel. Then
touch Done to listen to that channel.
Touch Save to save a channel to Presets
(maximum of 20).
Touch to remove the current
channel from your Presets. To delete
more than one channel from Presets,
touch Browse > Presets > Delete. A list
of all your Presets appears. Touch the
items you want to delete. Touch Delete
> Yes.
Removing
Channels From
Presets
Adjusting the Volume
Press , and then use and to
adjust the volume. For advanced volume
settings, touch > Volume. For
zūmo audio options, see page 49.
zūmo 500/550 Owner’s Manual
Page 41

Managing Files on Your zūMo
ManaGinG fileS on
Your zūmo
You can load les to the internal memory
or an optional SD card.
NOTE: The zūmo is not
compatible with Windows® 95,
Windows 98, or Windows Me
operating systems. This is a
common limitation of most USB
Mass Storage Devices.
Supported File Types
• MP3 music les
• M3U playlist les
• JPEG and JPG image les for splash
screen or picture viewer
• GPI custom POI les from Garmin’s
POI Loader
• GPX waypoint les and maps from
MapSource
NOTE: The zūmo does not
support iTunes® M4A/M4P les.
Step 1: Insert an SD Card
(Optional)
To insert or remove the card, press it in
until it clicks.
Mn-USB port for AC
power, USB Mass Storage
mode, and updatng
software
SD card
slot
Step 2: Connect the USBUSB
Cable
1. Plug the small end of the USB cable
into the mini-USB port.
2. Connect the larger end of the USB
cable to an available USB port on
your computer.
zūmo 500/550 Owner’s Manual 5
Page 42

Managing Files on Your zūMo
Two additional drives appear in your
6. Select Edit > Paste. The le appears
computer’s list of drives. “Garmin”
is the available storage in the zūmo’s
internal memory. The other removable
disk drive is the SD card.
NOTE: If the drive is not named
automatically, see your Help le
or page 63 to rename the drive.
For Mac
1. Connect the zūmo to your
Step 3: Transfer Files to
Your zūmo
For Windows
1. Connect the zūmo to your computer.
2. Double-click My Computer.
3. Browse your computer for the le you
want to copy.
4. Highlight the le, and select Edit >
Copy.
5. Open the Garmin drive or the SD
card drive.
2. To copy les to your Garmin or SD
in the list of les on the Garmin or SD
card drive.
NOTE: You can also drag and
drop les to and from your
drives.
®
computer. Your Garmin
and SD card drives should
mount onto your Mac
desktop as two mounted
volumes.
card drive, drag and drop any le or
folder onto the volume icon.
Volume
icon
zūmo 500/550 Owner’s Manual
Page 43

Managing Files on Your zūMo
Step 4: Eject and Unplug
For Windows
When you are nished transferring les,
double-click the Unplug or Eject
icon in your Windows system tray.
Select USB Mass Storage Device, and
click Stop. Select the drive, and click
OK. You can unplug the USB cable from
your zūmo now.
Deleting zūmo Files
You can delete les from your zūmo
just as you would delete les from your
computer.
Connect the zūmo to your computer,
and open your Garmin or SD card
drive. Select the le that you want to
delete, and press the Delete key on your
computer’s keyboard.
For Mac
When you are nished transferring
les, drag the volume icon to the Trash
(it turns into an Eject icon) to
unmount the device. You can unplug the
USB cable from your zūmo now.
CAUTION: If you are not sure
about a le’s purpose, do not
delete it. Your zūmo memory
contains important system les
that should not be deleted. Be
cautious of les located in folders
entitled “Garmin.”
zūmo 500/550 Owner’s Manual
Page 44

USinG the Media Player
USinG the Media
Player
Listening to MP3 Files
Load MP3 les to the internal memory
or an optional SD card. See pages 35–37
for more information.
1. On the Menu page, touch to
open the Media Player.
2. Touch Source to view the MP3
player.
3. Touch Browse.
4. Touch a category.
5. To play the entire category from the
beginning of the list, touch Play All.
To play all starting with a specic
song, touch the title.
Album art
Touch the album art to view details
about the MP3 le.
Touch to adjust the volume. For
zūmo audio options, see page 49.
Tap to go to the beginning of the
song; touch and hold to skip back.
Tap to skip to the next song; touch
and hold to skip ahead.
Touch to pause the song.
Touch to repeat.
Touch to shufe.
NOTE: The zūmo plays MP3
les only; it does not support
iTunes® M4A/M4P les.
zūmo 500/550 Owner’s Manual
Page 45

USinG the Media Player
Using a Playlist
This feature involves managing les on
your zūmo (see pages 35–37).
1. Using your computer and an audio
program such as Winamp™, create a
playlist of MP3 les.
2. Save the playlist as an M3U le.
NOTE: You may need to edit the
M3U le with a text editor, such
as Notepad, to remove the path
(location) to the MP3. The M3U
le should only list the MP3 les
in your playlist, not their location.
Refer to the audio program’s
Help le for instructions.
3. Transfer the playlist and the
associated MP3 les to the Garmin or
SD card drive. The M3U le must be
in the same location as the MP3 les.
4. On the zūmo, touch > Source
to open the MP3 player.
5. Touch Browse > Import Playlist.
The available playlists appear.
6. Touch a playlist to start playing the
MP3 les.
NOTE: You cannot change the
order of the playlist from your
zūmo.
Listening to Audible Books
To purchase books from Audible
.com, go to http://garmin.audible.com.
See page 40 to load books to your zūmo.
1. On the Menu page, touch >
Source to open the audible book
player.
2. Touch Browse, and touch a category.
3. To play a book, touch the title.
zūmo 500/550 Owner’s Manual
Page 46

USinG the Media Player
Loading Audible Books to
Book
cover art
Your zūmo
1. Create an Audible.com account at
2. Purchase a book.
3. Download AudibleManager to your
Moving Around the Book
Touch to adjust the volume.
Touch the book cover art to view more
detailed information about the book.
Touch to skip a section and to
jump back. Press and hold those buttons
to move forward or backward through
the book.
Touch to pause the book.
4. Activate your zūmo. The rst time you
5. Connect the zūmo to your computer.
6. Download the book to your computer.
7. Open AudibleManager and use it to
Using Bookmarks
To create a bookmark, touch and
Bookmark. To view your bookmarks,
touch and then touch a bookmark.
Touch Play to listen to the book from the
bookmark.
http://garmin.audible.com.
computer.
open AudibleManager, you are led
through the activation process. This is
a one-time process.
transfer the book to your Garmin or
SD card drive.
TIP: Refer to AudibleManager’s
Help le for detailed instructions.
Select Help from the menu, and
click Help.
0 zūmo 500/550 Owner’s Manual
Page 47

CustoMizing the zūMo
cUStoMizinG the zūmo
1. From the Menu page, touch .
2. Touch the setting you want to change.
Each setting contains a submenu or a
list.
Changing the Map Settings
Touch > Map.
Map Detail—adjust the amount of detail
shown on the map. Showing more detail
may cause the map to redraw slower.
Map View—change the perspective of
the map.
• Track Up—display the map in 2
• North Up
•
Vehicle—touch Change to change
the icon used to show your position
on the map. Touch the icon you want
to use, and then touch OK. Download
additional vehicle icons at www.garmin
.com/vehicles.
Trip Log—touch Show to display your
current trip log on the map as a thin blue
line. To manage your trip log data, touch
Map Info—view the maps loaded on
your zūmo and their version. Touch a
map to enable (check mark) or disable
(no check mark) that map.
dimensions (2D) with your direction
of travel at the top.
—display the map in 2D
with North at the top.
3D—display the map in 3 dimensions
(3D) in Track Up.
> User Data > Manage Trip Log.
zūmo 500/550 Owner’s Manual
Page 48

CustoMizing the zūMo
Restore—restore the default map
settings.
Changing the System Settings
Touch > System.
GPS Mode—enable and disable GPS
and WAAS/EGNOS. Turning on the
WAAS/EGNOS setting might improve
GPS accuracy, but it consumes more
battery power. Go to www.garmin.com/
aboutGPS/waas.html for information
about WAAS/EGNOS.
Safe Mode—turn Safe Mode on or off.
When your vehicle is moving, Safe
Mode disables all functions that require
signicant operator attention and could
become a distraction while driving.
Garmin Lock—turn on Garmin Lock
to lock your zūmo. Enter a 4-digit PIN,
and set a security location. For more
information, see page 10.
About—display your zūmo’s software
version number, unit ID number, and
audio version number. You need this
information when you update the system
software (see page 49) or purchase
additional map data (see page 53).
Restore—restore the default system
settings.
Localizing Your zūmo
Touch > Locale.
To change a setting, touch the button
next to the icon.
42 zūmo 500/550 Owner’s Manual
Page 49

CustoMizing the zūMo
To change all settings, touch Change
All
. In each screen, select the setting,
and then touch OK.
Locale—select your location.
Text Language—set all on-screen
text to the selected language. Changing
the text language does not change the
language of user-entered data or map
data, such as street names.
Voice Language—set the language
for voice prompts. Languages noted
with a person’s name are text-to-
speech (TTS) voices, which have an
extensive vocabulary and pronounce
the street names as you approach
turns. The prerecorded voices (those
without a person’s name) have a limited
vocabulary and do not speak names of
locations or streets.
Time Format—choose a 12-hour,
24-hour, or UTC time format.
Time Zone—select a time zone or
nearby city from the list.
Daylight Saving—set to On, Off , or
Auto, if it is available.
Units—set units of measure to
Kilometers or Miles.
Managing User Data
Touch > User Data.
Set Home Location—enter or change
your home location. See page 12.
Import Data—load Favorites, routes,
trip logs, and pictures from your Garmin
drive or SD card.
zūmo 500/550 Owner’s Manual
Page 50

CustoMizing the zūMo
Manage Trip Log—view the current
trip log usage. This is shown as a percent
of the total available space. You can
manage the most current 10,000 points
of trip data on your zūmo. Beyond
10,000 points, the zūmo moves the
oldest trip data from the current log to
an archive le on the zūmo’s internal
memory. Archive les can store up
to 1 MB each, and a maximum of
20 archive les can be stored on the
internal memory, depending on the space
available. Using this method, the zūmo
can store as many as 200,000 points of
trip data for very long rides.
• Clear Trip Log
before your next big trip. Clearing a
large trip log may take a few minutes.
• Save As Route
recent trip log as a route. This allows
you to reuse recent trip data. For
more information about routes, see
page 16.
To view your trip log on the map, touch
> Map > Trip Log > Show.
View Pictures—view pictures saved to
your Garmin drive or SD card. Touch
a thumbnail to view the image. Touch
the image again to zoom using and
—reset the trip log
—select and save a
. Touch the picture and drag to view
NOTE: Archived trip logs are
different parts of the picture.
intended to be used on your
computer with MapSource,
Google Earth, or myGarmin Web
site. Archived trip logs are not
visible on the zūmo.
To share pictures with another
zūmo user:
1. Touch a thumbnail.
2. Touch Share.
To view available space in your Garmin
drive, connect the zūmo to your
computer, and select the Garmin drive.
See page 35.
44 zūmo 500/550 Owner’s Manual
Page 51

3. Eject your SD card, and insert it into
another zūmo.
4. A message appears. Touch Yes to
import the shared picture.
5. Touch Pictures > touch a thumbnail
> Import.
Touch Slide Show to display each image
for a few seconds and then display the
next image. During the slide show, touch
the screen at any time to stop and see
more options.
CustoMizing the zūMo
Bluetooth Technology Settings
Touch > Bluetooth.
Connect Phone—select Add Device
> OK to pair with a mobile phone that
has Bluetooth® wireless technology. See
pages 23–29.
NOTE: The zūmo’s PIN code (or
passkey) is 1234.
Drop—select the phone you want to
•
disconnect, and touch Yes.
• Remove
to delete from the zūmo’s memory,
and touch Yes.
Phone Help—scroll through the list
containing compatible devices. If
your phone is not in this list, go to
—select the phone you want
zūmo 500/550 Owner’s Manual 5
Page 52

CustoMizing the zūMo
www.garmin.com/bluetooth for more
information.
Connect Headset—connect to a headset
that has already been paired, or select
Add Device.
Bluetooth—enable and disable the
Bluetooth component. The Bluetooth
icon appears on the Menu page if the
Bluetooth component is enabled. To
prevent a phone from automatically
connecting, select Disabled.
Friendly Name—touch Edit to enter a
friendly name that identies your zūmo
on devices with Bluetooth technology.
Touch Done.
Audio—specify which types of audio
are sent to the Bluetooth headset.
Restore—restore the default Bluetooth
settings. Restoring the Bluetooth settings
does not clear the pairing information.
Changing the Navigation Settings
Touch > Navigation.
Route Preference—select a preference
for calculating your route:
• Faster Time—to calculate routes that
•
are faster to drive but can be longer in
distance.
Shorter Distance—to calculate
routes that are shorter in distance but
can take more time to drive.
46 zūmo 500/550 Owner’s Manual
Page 53

CustoMizing the zūMo
• Off Road—to calculate point-topoint routes (without roads). On the
Customizing the Display
Touch > Display.
map, touch or press to scroll
to the Compass page.
Color Mode—select Daytime for a
light background, Nighttime for a dark
Vehicle Type—specify your vehicle type
to optimize routes.
Avoidances—select the road types you
want to avoid on your routes. The zūmo
uses these road types only if alternative
background, or Auto to automatically
switch between the two.
Splash Screen—select an image to be
shown when you turn on the zūmo. First,
load JPEG images. See pages 35–37.
routes take you too far out of your way
or if no other roads are available. If you
have a trafc receiver or antenna, you
can also avoid trafc incidents.
Attention Tone—turn on or off the
attention tone.
Brightness— raise and lower the
backlight brightness using and .
Screen Shot—enable Screen Shot mode.
Touch the camera icon to take a
picture of the screen. The picture bitmap
le is saved in the Garmin\scrn folder
Restore—restore the default navigation
on the Garmin drive.
settings.
zūmo 500/550 Owner’s Manual
Page 54

CustoMizing the zūMo
Changing the Keyboard
Touch > Keyboard.
Standard—displays a full alphabetic
keyboard.
Managing Trafc Settings
Touch > > Services or
Trafc to view optional FM and XM
subscription information and settings.
Trafc Source—select Auto, FM, or
XM based on which optional trafc
accessory is connected.
Restoring All Settings
Touch > Restore > Yes. This
Large Buttons—displays a large button
touch-screen keyboard. This option is
suited for motorcyclists wearing gloves.
See page 13.
Auto—select to automatically switch
between the standard keyboard when
using the zūmo in the automotive mount
and the large button keyboard when
using the zūmo in the motorcycle mount.
restores all of the factory default
settings.
Clearing All User Data
1. Hold your nger on the lower-right
2. Keep your nger pressed until a
3. Touch Yes.
CAUTION: This deletes all
user-entered information
including Favorites, routes, trip
logs, settings, and recent nds.
corner of the zūmo’s screen while
turning on the zūmo.
message appears.
48 zūmo 500/550 Owner’s Manual
Page 55

aPPendiX
aPPendiX
zūmo Audio Options
NOTE: Audio from MP3s and XM radio is stopped during phone calls and
navigation prompts. Navigation prompts are muted during phone calls.
Power
Source
Motorcycle
mount with
external power
Automotive
mount with
external power
(included with
zūmo 550)
Battery power Bluetooth headset ● ● ○ ● Fully charged battery lasts
zūmo 500/550 Owner’s Manual
Audio Option
Wired headset
or helmet with
microphone
Bluetooth headset ● ● ○ ●
Internal speaker
and microphone
Wired headset or
headphones with
wired microphone
Bluetooth headset
and
internal speaker○●○●○●●-
● Audio available, ○ No audio available, - Not applicable
MP3
Prompts
Navigation
● ● ● ●
● ● ● ●
● ● ● ●
XM Radio
Phone
Adjust volume on headset.
Adjust volume on zūmo.
up to 4 hours.
Notes
Page 56

aPPendiX
Installing the zūmo in Your Automobile
Your zūmo 550 includes an additional mount for your automobile so you can easily
transfer the unit. Select a suitable location in your vehicle for safe cable routing and
safe operation. Clean and dry the selected area of your windshield.
Mounting on Your
Windshield
1. Place the suction cup on the
windshield. Flip the suction
lever back, toward the
windshield.
2. Plug the power cable into the
side of the mount.
3. Place the zūmo into the
automotive mount, and ip the
lever down.
4. Plug the power cable into a
power receptacle in your
vehicle. Your zūmo should
turn on automatically if the
vehicle is running.
Sucton
cup
Lever
Wndsheld
Sucton
lever
Power cable
Automotve
mount
Sucton cup arm,
lever back
Lever
Mn-USB
.5 mm audo out jack
.5 mm mcrophone jack
50 zūmo 500/550 Owner’s Manual
port
Page 57

aPPendiX
Mounting on Your Dashboard
Use the enclosed mounting disk to
mount your zūmo on the dashboard and
to comply with state regulations.
NOTE: The permanent
mounting adhesive is extremely
difcult to remove after it is
installed.
1. Clean and dry the dashboard where
you want to place the disk.
2. Remove the backing from the
permanent mounting adhesive on the
bottom of the disk.
3. Place the disk on the dashboard.
4. Remove the clear plastic cover from
the top of the disk.
5. Place the suction cup part of the
automotive mount on top of the disk.
6. Flip the suction lever down (toward
the disk).
7. Follow steps 2–4 on page 50.
Removing the zūmo from the
Mount
To remove the zūmo from the mount,
ip up the lever on the mount. Lift out
the zūmo.
You can separate the suction cup from
the automotive mount. Turn the mount as
far as you can to the right or left. Apply
pressure in that direction until the mount
snaps off the arm.
To remove the suction cup from the
windshield or mounting disk, ip the
suction lever up. Pull the tab on the
suction cup toward you.
NOTE: Reconnecting the
suction cup to the automotive
mount requires signicant force.
Press the ball end rmly into the
socket.
zūmo 500/550 Owner’s Manual 5
Page 58

aPPendiX
Charging the zūmo
1. Connect the power cable to a mount
and a power source.
2. Place the zūmo in the mount, and ip
the lever down.
OR
1. Charge the zūmo with the AC power
cable. Plug the small end of the AC
power cable into the mini-USB port
on the bottom of the zūmo.
2. Plug the other end into a standard
wall outlet.
pdating the zūmopdating the zūmo
Software
1. Go to www.garmin.com/products/
webupdater to download the
WebUpdater program to your
computer.
2. Connect the zūmo to your computer
using the mini-USB cable.
Resetting the zūmo
If your unit freezes up, press and hold
and press .
Calibrating the Screen
If the touch screen is not responding
properly, calibrate the touch screen.
Turn the unit off. Press and hold for
about one minute until the calibration
screen appears. Follow the on-screen
instructions.
5 zūmo 500/550 Owner’s Manual
Mn-USB port for AC power, USB Mass
Storage mode, and updatng software
3. Run WebUpdater, and follow the
screen prompts. After conrming
that you want to perform an update,
WebUpdater automatically downloads
the update and installs it on your
zūmo.
4. Eject and unplug your zūmo (see
page 37).
Page 59

aPPendiX
Register your zūmo to receive
notication of software and map
updates. To register your zūmo, go to
http://my.garmin.com.
You can also download software updates
from www.garmin.com/products/
zumo500 or www.garmin.com/
products/zumo550. Click Updates and
Downloads, and follow the instructions.
You can also purchase additional map
data from Garmin and load the maps to
the internal memory or an optional SD
card.
Refer to the MapSource Help le
for more information about using
MapSource and loading maps and
waypoints on your zūmo.
Optional Accessories
Purchasing and Loading Additional Map Data
To nd out the version of the maps that
are loaded on your zūmo, touch
> Map > Map Info. To unlock
additional maps, you need your unit ID
and serial number.
Check www.garmin.com/unlock/update
.jsp to see if an update for your map
software is available.
For more information about optional
accessories, go to www.garmin.com/
products/zumo500 or www
.garmin.com/products/zumo550,
and click Accessories. You can also
contact your Garmin dealer to purchase
accessories. Optional accessories
include:
• Trafc receiver or
• External remote antenna
• External microphone
• Extras (see
antenna
pages 54–56)
zūmo 500/550 Owner’s Manual 5
Page 60

aPPendiX
Connecting Accessories to
Your zūmo
Some Garmin trafc receivers and
XM antennas must be plugged into a
mini-USB port on the zūmo mount.
The microphone and audio out jacks
are located on the left side of the zūmo
mount.
Mcrophone
and audo
out jacks
Mn-USB
port
zūmo Motorcycle Mount Shown
TIP: Carefully connect and
disconnect cables. To disconnect,
do not pull on the cable (cord),
pull on the plug.
To see the automotive mount
connections, see page 50.
Garmin Travel Guide™
Much like a paper travel guide, the
Garmin Travel Guide provides detailed
information about locations, such as
restaurants and hotels. To purchase the
Travel Guide accessory, go to
www.garmin.com/extras.
To use the Travel Guide:
1. Insert the SD card into your zūmo.
2. Touch Where to > Extras.
3. Touch the Travel Guide.
4. Touch a category. Touch a subcategory, if necessary.
5. Touch a location in the list.
6. Do one of the following:
Touch Go to go to the location.
5 zūmo 500/550 Owner’s Manual
Page 61

aPPendiX
Touch Map to view this item on the
map.
Touch Save to save this location to
your Favorites.
Touch More to view more information
about the location.
Safety Cameras
Safety camera information is available in
some locations. (Check www.garmin
.com/accessories/safetycamera for
availability.) For these locations, your
zūmo includes the locations of hundreds
of safety cameras. Your zūmo alerts
you when you are approaching a safety
camera and can warn you if you are
driving too fast. The data is updated at
least weekly, so you always have access
to the most up-to-date information.
To get updated safety camera
information:
1. Go to http://my.garmin.com.
2. Sign up for a subscription.
You can purchase a new region at
any time, and you can extend existing
subscriptions at any time. Each region
that you purchase has its own expiration
date.
Custom POIs �Points ofPOIs �Points of
Interest)
Load custom points of interest (POIs)
onto your zūmo. POI databases are
available from various companies on the
Internet. Some custom databases contain
alert information for points, such as
school zones. A warning appears if you
are traveling too fast near these custom
POIs.
Use the Garmin POI Loader to load
POIs on your Garmin drive or SD card.
Download the POI Loader from
www.garmin.com/extras.
Refer to the POI Loader Help le for
more information; press F1 to open the
Help le.
zūmo 500/550 Owner’s Manual 55
Page 62

aPPendiX
To view your custom POIs, touch
Where to > Extras >
Custom POIs.
To turn on or off custom POIs, touch
> Proximity Points >
Proximity Alerts.
To delete the custom POIs from your
zūmo, connect your zūmo to your
computer. Open the Garmin\poi folder
in the Garmin or SD card drive. Delete
the le entitled poi.gpi.
is triggered by GPS signals. For more
information, go to www.garmin.com/
extras and click POI Loader.
To view your Garmin TourGuide les,
touch Where to > Extras >
Custom POIs.
To change the Garmin TourGuide
settings, touch > Proximity
Points > TourGuide. Select Auto
Play to hear the complete tour as
programmed, Prompted to show the
speaker icon on the map when tour
CAUTION: Garmin is not
responsible for the consequences
of using a custom POI database
or the accuracy of the safety
camera or other custom POI
database.
information is available during your
route, or Off.
SaversGuide
®
The SaversGuide is an optional
accessory that is available only in North
America (www.garmin.com/extras).
Garmin TourGuide™
The Garmin TourGuide allows your
zūmo to play third-party, GPS-guided
audio tours. These audio tours can take
you on a route while playing interesting
facts about historical sites along the way.
As you travel, the audio information
5 zūmo 500/550 Owner’s Manual
With the SaversGuide preprogrammed
SD data card and membership card,
your zūmo is a digital coupon book that
noties you of merchants near your
current location where you are eligible
for a discount, such as restaurants,
hotels, and movie theaters.
Page 63

aPPendiX
Battery Information
NOTE: See the Important Safety
and Product Information guide
for additional battery information
and warnings.
Your zūmo contains an internal lithium-
ion battery. The battery lasts up to 4
hours, depending on usage.
The battery icon on the Menu
page indicates the status of the internal
battery. If the icon is not present, your
zūmo is connected to external power. For
information about charging your zūmo,
see page 52.
Maximizing the Battery Life
• Turn off GPS ( > System
> GPS Mode > GPS Off) when you
do not need to receive GPS signals,
or use Normal mode when WAAS or
EGNOS is not available.
• Turn the backlight brightness down.
Press and hold , and then use
and to adjust the brightness.
• Do not leave your zūmo in direct
sunlight. Avoid prolonged exposure
to excessive heat or cold.
Replacing the Battery
To purchase a replacement lithium-ion
battery pack, go to www.garmin.com/
products/zumo500 or www.garmin
.com/products/zumo550, and click
Accessories.
Unscrew the battery pack and replace
the battery. Contact your local waste
disposal department for information on
properly disposing of the battery.
Screw
Battery
pack
MCX
connector
under
weather cap
zūmo 500/550 Owner’s Manual 5
Page 64

aPPendiX
Using a Remote Antenna
You can use an optional external remote
antenna (Garmin GA 25MCX). To
purchase, go to www.garmin.com/
products/zumo500 or www.garmin
.com/products/zumo550, and click
Accessories.
Pull back the weather cap from the MCX
connector located on the back of the
zūmo, and connect the antenna.
Cleaning the Unit
The zūmo is constructed of high-
quality materials and does not require
user maintenance other than cleaning.
Clean the unit’s outer casing (not the
touch screen) using a cloth dampened
with a mild detergent solution, and
then wipe dry. Avoid chemical cleaners
and solvents that can damage plastic
components.
Cleaning the Touch Screen
Caring for Your zūmo
Your zūmo contains sensitive electronic
components that can be permanently
damaged if exposed to excessive shock
or vibration outside normal motorcycle
or automobile use. To minimize the
risk of damage to your zūmo, avoid
dropping your unit and operating it in
extreme high-shock and high-vibration
environments.
Clean the touch screen with a soft, clean,
lint-free cloth. Use water, isopropyl
alcohol, or eyeglass cleaner, if needed.
Apply the liquid to the cloth, and then
gently wipe the touch screen.
Protecting Your zūmo
• Carry and store your zūmo in the
• Do not
included carrying case.
store your zūmo where
prolonged exposure to extreme
temperatures can occur (such as in
the trunk of a car), because it can
cause permanent damage.
5 zūmo 500/550 Owner’s Manual
Page 65

aPPendiX
• Though a PDA stylus can also be
used to operate the touch screen,
never attempt this while operating
a vehicle. Never use a hard or sharp
object to operate the touch screen or
damage may result.
Avoiding Theft
• To avoid theft, remove the zūmo and
mount from sight when not in use.
• Use the
Garmin Lock™ feature. See
page 10.
Changing the Fuse
If your unit will not charge in your
vehicle, you may need to replace the fuse
located at the tip of the vehicle adapter.
CAUTION: When replacing the
fuse, do not lose any of the small
pieces, and make sure they are
put back in the proper place.
1. Unscrew the black (or silver), round
end piece and remove it.
Unscrew
2. Remove the fuse (glass and silver
cylinder) and replace with a 3A fast
blow fuse.
3. Ensure that the silver tip is placed in
the black end piece. Screw on the
black end piece.
End pece
Slver tp
Fuse
zūmo 500/550 Owner’s Manual 5
Page 66

aPPendiX
About GPS Satellite SignalsSatellite Signals
Your zūmo must acquire GPS (Global
Positioning System) satellite signals
to operate. If you are indoors, near tall
buildings or trees, or in a parking garage,
your zūmo cannot acquire satellites.
Go outside to an area free from tall
obstructions to use your zūmo.
When your zūmo has acquired satellite
signals, the signal strength bars on the
Menu page are green . When it
loses satellite signals, the bars turn red or
clear .
For more information about GPS, go to
www.garmin.com/aboutGPS.
Specications
Physical size: 4.4” W x 3.2” H x
2.87” D (11.3 x 8.2 x 7.2 cm)
Weight: 0.59 pounds (269 g)
Display: 2.8” W x 2.1” H (7.2 x 5.4 cm);
320 x 240 pixels; bright, 16-bit LCD,
with white backlight and touch screen
Case: IPX7 waterproof
Temperature range: 32°F to 140°F
(0°C to 60°C)
Data storage: Internal memory and
optional removable SD card. Data stored
indenitely.
Computer interface: USB mass storage,
plug-and-play
Charge time: Approximately 6 hours
Power input: DC vehicle power cable or
AC power cable.
Usage: 15 W max. @ 13.8 VDC
Battery life: up to 4 hours depending on
usage
0 zūmo 500/550 Owner’s Manual
Page 67

GPS Performance
Specications
Receiver: WAAS enabled
Acquisition times*:
Warm: < 1 sec
Cold: < 38 sec
Factory Reset: < 45 sec
*On average for a stationary receiver
with a clear view of the sky
Update rate: 1/sec, continuous
GPS accuracy:
Position: < 10 meters, typical
Velocity: 0.05 meter/sec RMS
GPS (WAAS) accuracy:
Position: < 5 meters, typical
Velocity: 0.05 meter/sec RMS
For a complete list of specications, go
to www.garmin.com/products/zumo500
or www.garmin.com/products/zumo550,
and click Specications.
aPPendiX
zūmo 500/550 Owner’s Manual
Page 68

aPPendiX
zūmo Troubleshooting
Problem/Question Solution/Answer
It can take a few minutes to acquire satellite signals. Go to an
The zūmo does not
acquire satellite
signals.
open area, out of garages, and away from tall buildings. Stop
your vehicle, and position the zūmo where there is a clear
view of the sky. The bars in the upper-left corner indicate
satellite strength.
How do I clear all my
user data?
The zūmo is locked
up/frozen.
The suction cup will not
stay on my windshield.
My battery gauge does
not seem accurate.
The touch screen is not
responding to my taps
properly.
My Bluetooth device
will not connect to the
zūmo.
62 zūmo 500/550 Owner’s Manual
Hold your nger on the lower-right corner of the zūmo’s screen
while turning on the zūmo. Keep your nger pressed until the
message appears. Touch Yes to clear all user data.
To reset your zūmo, press and hold and press .
Clean the suction cup and windshield. Dry with a clean, dry
cloth. Mount the suction cup as described on page 50.
Allow the unit to fully discharge, and then fully charge it (without
interrupting the charge cycle).
Calibrate the touch screen. Turn the unit off. Press and hold
for about one minute until the Calibration page appears.
the on-screen instructions.
Verify that the Bluetooth eld is set to Enabled. Make sure your
Bluetooth device is turned on and is less than 10 meters (about
33 feet) away from your zūmo. Go to www.garmin.com/bluetooth
for a list of compatible phones and headsets.
Follow
Page 69

SB Interface Troubleshooting
Problem/Question Solution/Answer
aPPendiX
How do I know my
zūmo is in USB Mass
Storage Mode?
My computer never
senses that the zūmo is
connected.
I cannot nd any drives
named “Garmin” in my
list of drives.
I get a message saying
“Unsafe Removal of
Device” when I unplug
the USB cable.
zūmo 500/550 Owner’s Manual
When your zūmo is in USB Mass Storage Mode, a picture of a
zūmo connected to a computer is shown. Also, you should see
a new removable disk drive listed in My Computer (Windows) or
a new volume (drive) on your desktop (Mac).
1. Unplug the USB cable from your computer.
2. Turn the zūmo off.
3. Plug the USB cable into your computer and your zūmo.
The zūmo automatically turns on and goes into USB Mass
Storage Mode.
If you have several network drives mapped on your computer,
Windows may have trouble assigning drive letters to your
Garmin or SD drives. Follow the steps on the next page to
assign (map) your drive letters.
Windows: Double-click the Unplug or Eject icon in your
system tray. Select USB Mass Storage Device and click Stop.
Select the Garmin drive and click OK. You can unplug your
zūmo now.
Mac: Drag the volume icon to the Trash. The Trash icon
changes to an Eject icon. You can unplug your zūmo now.
Page 70

aPPendiX
Problem/Question Solution/Answer
How can I rename
my Garmin drives in
Windows?
How do I assign (map)
my Garmin drives in
drives in
Windows?
1. Open
2. Select the drive you want to rename.
3. Right-click your mouse, and select
4. Type the new name, and press the
1. Turn off your zūmo.
2. Plug the USB cable into the zūmo and your computer. Your
3. Click
4. Click a zūmo removable disk drive (either the internal
5. Select
My Computer.
Rename.
Enter key on your
computer’s keyboard.
zūmo automatically turns on.
Start > Settings > Control Panel > Administrative
Tools > Computer Management > Storage > Disk
Management.
memory or your SD card drive). Right-click your mouse, and
select Change Drive Letter and Path.
Edit, select a drive letter from the drop-down list, and
click OK.
64 zūmo 500/550 Owner’s Manual
Page 71

indeX
indeX
Symbols
2-D, 3-D map view 41
A
About button 42
accessories 53
address 11
add a stop 9
alerts, safety camera 55
antennas 30, 33, 53, 58
anti-theft feature 10, 42
audio
jacks
3, 50, 54
options 49
version 42
avoiding
road types
trafc 47
B
battery 57, 60
Bluetooth technology 23–29
PIN 24
settings 45–48
brightness 2, 47
browsing the map 18
C
calibrating the touch screen 52
calling home 28
call history 28
zūmo 500/550 Owner’s Manual 5
47
call waiting 26
caring for your zūmo 58
car installation 50
charging the zūmo 52
clearing user data 48
Compass page 22, 47
computer connection 35
contact Garmin i
coordinates 19, 20
current location, saving 15
customizing your zūmo 41–48
Custom POIs 55
D
data storage drives 35, 60
daylight saving 43
Declaration of Conformity iv
deleting
all user data
character 13
custom POIs 56
Favorites 16, 17
les 37
detail maps 41
detours 10
diacritical characters 13
display settings 47
drives, Garmin 36
driving directions 22
48
E
editing saved places 15
EGNOS 42
ejecting the USB 37
elevation 20
ending a call 25
expanding your search 19
Extras 54–55
F
Favorites 14
editing 15
nding 15
saving 14
sharing 14
FCC compliance iv
les
deleting
37
managing 35, 43
supported types 37
transferring 35–37
nding places
by address
by coordinates 19
by name 13
by postal code 11
intersection 11
item on the map 18
near another location 19
saved places (Favorites) 15
FM trafc 32
fuel gauge 21
fuse, changing 59
11
Page 72

indeX
G
Garmin Lock 10, 42, 59
Garmin TourGuide
playing les
Garmin Travel Guide 54
going home 12–19
Google Earth i
Go page 11
GPS 7, 60
56
H
hands-free features 23–29
headsets 23, 49
home location 12
I
importing data 43
intersection 11
K
keyboard 13, 48
kilometers 43
L
languages 43
loading additional maps 53
locking your zūmo 10
M
managing les 35–37
map
browse
18
customize 41
Map Info button 41
66 zūmo 500/550 Owner’s Manual
moving 18
update maps 52
using the Map page 18, 20
version 41
view 18, 41
zoom 18
MapSource i, 35, 53
menu page 7
miles 43
mini-USB. See USB
motorcycle installation
mounting the zūmo
in a car
50, 51
on a motorcycle 3
MP3 les
loading
35
playing 38
mute a call 25
myGarmin i, 53, 55
3
N
navigation settings 46
Near button 19
Next Turn page 22
North Up map view 41
O
off road, routing 17, 47
P
pairing a headset 24
pairing a mobile phone 24
phone book 27
phone calls 25
picture viewer 44
PIN
Bluetooth
Garmin Lock 10
playing music 38
POIs, custom 55
position icon 20, 41
postal code 11
45
R
recently found location 14
registering your zūmo 53
remote antenna 58
removable disk drive 36
removing/deleting a phone 45
removing the mount 51
resetting
the trip data
your zūmo 52
restoring settings 48
routes 16–18
routing preferences 46
21
S
safety cameras 55
Safe Mode 42
satellite signals 7, 60
SaversGuide 56
saving
places you nd
routes 16
your current location 15, 18
school zone database 55
12, 14
Page 73

indeX
Screen Shot mode 47
SD card 1, 35, 60
sharing 14, 17
security location 10
settings 41–48
setting your location 12, 18
show map 12, 22
slide show 45
software
updating
version 42
special characters 13
specications 60
spelling the name of a place 13
splash screen 47
storing your zūmo 58
supported le types 35
system settings 42
52
T
text language 43
time format 43
time zone 43
tones 47
touch screen
aligning
52
cleaning 58
Track Up map view 41
trafc
avoiding
incidents 30
settings 48
subscriptions 32
zūmo 500/550 Owner’s Manual
30, 47
transferring les 35–37
Trip Information page 21
trip log 44
troubleshooting 62–64
turn-by-turn directions 22
Turn List page 22
U
unit ID 42
updating
maps
53
zūmo software 52
USB
mass storage mode
ports 1, 35, 50, 52, 54
troubleshooting 62
user data 43
35–37
V
vehicle icon 20, 41
vehicle type 47
view pictures 44
voice dial 29
voice language 43
volume 2, 34
W
WAAS 42
WebUpdater 52
X
XM NavTrafc 32
XM radio 33
Z
zoom 18, 20, 44
Page 74

For the latest free software updates (excluding map data)
throughout the life of your Garmin products, visit the Garmin
Web site at www.garmin.com.
© 2006–2007 Garmin Ltd. or its subsidiaries
Garmin International, Inc.
1200 East 151st Street, Olathe, Kansas 66062, USA
Garmin (Europe) Ltd.
Liberty House, Hounsdown Business Park, Southampton, Hampshire, SO40 9RB UK
Garmin Corporation
No. 68, Jangshu 2nd Road, Shijr, Taipei County, Taiwan
www.garmin.com
Part Number 190-00697-00 Rev. B
 Loading...