

Garmin StreetPilot III User Manual
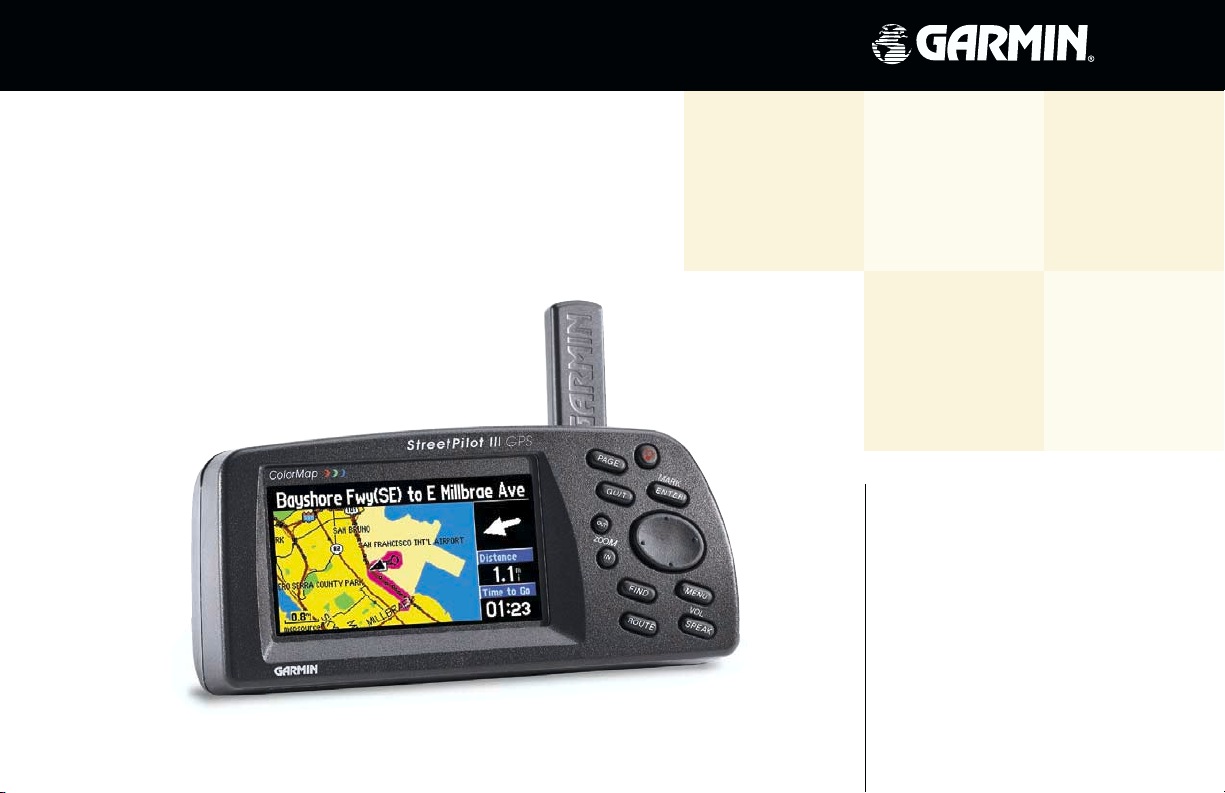
StreetPilot™ III
portable GPS with
auto-routing and voice
owner’s
manual
and
reference
guide

© 2001 GARMIN Corporation
GARMIN International, Inc.
1200 E 151st Street, Olathe, Kansas 66062 U.S.A.
Tel. 913/397.8200 or 800/800.1020
Fax. 913/397.8282
GARMIN (Europe) Ltd.
Unit 5, The Quadrangle, Abbey Park Industrial Estate,Romsey, SO51 9AQ U.K.
Tel. 44/1794.519944
Fax. 44/1794.519222
GARMIN Corp.
No. 68, Jangshu 2nd Road, Shijr, Taipei County, Taiwan
Tel. 886/2.2642.9199
Fax. 886/2.2642.9099
All rights reserved. Except as expressly provided herein, no part of this manual may be reproduced, copied, transmitted, disseminated, downloaded or
stored in any storage medium, for any purpose without prior written consent of GARMIN Corporation. GARMIN Corporation hereby grants permission to
download a single copy of this manual onto a hard drive or other electronic storage medium to be viewed for personal use, provided that such electronic
or printed copy of this manual contains the complete text of this copyright notice and provided further that any unauthorized commercial distribution
of this manual is strictly prohibited.
Information in this manual is subject to change without notice. GARMIN Corporation reserves the right to change or improve its products and to make
changes in the content without obligation to notify any person or organization of such changes. Visit the GARMIN web site for downloadable upgrades to
the operating software and the Owner’s Manual. The web site also contains information concerning the use and operation of other GARMIN products.
Web site address: www.garmin.com
GARMIN®, AutoLocate®, MapSource® and TracBack® are registered trademarks and StreetPilotTM is a trademark of GARMIN Corporation and may not
be used without the express permission of GARMIN Corporation.
March 2001 Part Number 190-00206-00 Rev. A
Printed in Taiwan

Welcome
Thank you for choosing the GARMIN StreetPilot III. The StreetPilot III offers true turn-by-turn
navigation with its auto-routing feature. At the touch of a button, you now have access to the shortest
and fastest routes, turn directions, and estimated time of arrival at your intended destination. Along the
way, the StreetPilot III provides automated voice prompts, alerting you to necessary turns, distance to
upcoming turns, route deviation, and distance to the fi nal destination.
The StreetPilot III is compact and portable. This dash-mounted unit can be operated by your
vehicle’s battery using the included 12-volt power adapter, or by six AA batteries. Voice commands
are clearly heard through a speaker which is built into the power adapter cable. The StreetPilot III
can easily be viewed in any lighting condition, due to its 4-inch, high resolution, 16-color display.
The unit’s built-in basemap provides detail for interstates, interstate exit data, highways, rivers and
lakes in the United States, Canada and Mexico (no exit data for Mexico), plus commonly used streets
in metropolitan areas. With the press of a button, the built-in basemap will provide turn-by-turn
guidance to a destination via interstates and highways. With downloaded maps from the MapSource
City Navigator CD-ROM, StreetPilot III provides turn-by-turn guidance down to residential street-level
detail.
About This Manual
Make sure you take the time to read the Quick Start Guide fi rst to get acquainted with all of the
basic features of the StreetPilot III. After you have read the Quick Start Guide, you can read through this
owner’s manual in order to understand the operating features of the StreetPilot III in detail. This manual
is organized into three sections for your convenience. The Introduction Section provides FCC and
safety information and the table of contents. The Reference Section provides details about all of the
features of the StreetPilot III, organized by topic. The Appendices contain information on items such as
accessories, specifi cations, and an index organized by subject.
Introduction
Welcome
The StreetPilot III uses GPS technology in order to
fi nd your precise location. GPS stands for Global
Positioning System, a group of 24 satellites, circling the earth twice a day, at an altitude of
about 12,000 miles. The satellites transmit very
low power radio signals containing position and
time information, allowing anyone with a GPS
receiver to determine their location on the earth
within 100 meters. For more detailed information
regarding GPS, we have prepared a booklet called
“GPS Guide for Beginners” which is available
to you from our web site at www.garmin.com.
1

Introduction
Table of Contents
Introduction . . . . . . . . . . . . . . . . . . . . . . . . . . . . .1
Welcome . . . . . . . . . . . . . . . . . . . . . . . . . . . . .1
About This Manual . . . . . . . . . . . . . . . . . . . . . . 1
Table Of Contents . . . . . . . . . . . . . . . . . . . . . . 2
Safety Warnings and Cautions . . . . . . . . . . . . .4
Software License Agreement . . . . . . . . . . . . . . .6
FCC Compliance . . . . . . . . . . . . . . . . . . . . . . .7
Limited Warranty . . . . . . . . . . . . . . . . . . . . . . .8
Unit Description . . . . . . . . . . . . . . . . . . . . . . . . 9
Keys . . . . . . . . . . . . . . . . . . . . . . . . . . . . . . . .10
Features/Data Entry . . . . . . . . . . . . . . . . . . . .11
Unit Pages at a Glance . . . . . . . . . . . . . . . . . . 12
Reference Section . . . . . . . . . . . . . . . . . . . . . . .13
The Map Page . . . . . . . . . . . . . . . . . . . . . . . . .13
Map Page Nav Info . . . . . . . . . . . . . . . . . .14
Zooming, Panning, and Pointing . . . . . . .15
Routing to a Map Feature or Location . . . .17
Map Page Options . . . . . . . . . . . . . . . . . .18
Next Turn Page . . . . . . . . . . . . . . . . . . . . . . . .21
Current Route Page . . . . . . . . . . . . . . . . . . . .22
Trip Information Page . . . . . . . . . . . . . . . . . . .24
Marking Waypoints . . . . . . . . . . . . . . . . . . . .26
Using the Find Menu . . . . . . . . . . . . . . . . . . .27
Finding Items by Name or by Nearest . . . .27
Finding a Waypoint . . . . . . . . . . . . . . . . . 28
Finding a City . . . . . . . . . . . . . . . . . . . . . .28
Finding an Exit . . . . . . . . . . . . . . . . . . . . 29
Finding a Point of Interest . . . . . . . . . . . .30
Finding an Address or Intersection . . . . . .31
Recently Found Places . . . . . . . . . . . . . . .32
Using the Routes Menu . . . . . . . . . . . . . . . . .33
GPS Information Page . . . . . . . . . . . . . . . . . .35
Sky View and Signal Strength Bars . . . . . .35
Receiver Status . . . . . . . . . . . . . . . . . . . . .36
Accuracy . . . . . . . . . . . . . . . . . . . . . . . . . .37
GPS Info Page Options . . . . . . . . . . . . . . .38
Map Source Information . . . . . . . . . . . . . . . . .39
System Info . . . . . . . . . . . . . . . . . . . . . . . . . .39
2

System Setup . . . . . . . . . . . . . . . . . . . . . . . . .40
System Setup Pages . . . . . . . . . . . . . . . . . .40
General File Tab . . . . . . . . . . . . . . . . . . . .41
Guidance File Tab . . . . . . . . . . . . . . . . . . .42
Routing File Tab . . . . . . . . . . . . . . . . . . . .43
Time File Tab . . . . . . . . . . . . . . . . . . . . . .45
Track Log File Tab . . . . . . . . . . . . . . . . . .46
Interface Tab . . . . . . . . . . . . . . . . . . . . . . . 46
Appendices . . . . . . . . . . . . . . . . . . . . . . . . . . . .48
Appendix A: Accessories . . . . . . . . . . . . . . . . 48
Appendix B: Wiring and Interfacing . . . . . . . .49
Appendix C: Maintenance . . . . . . . . . . . . . . .50
Appendix D: Messages . . . . . . . . . . . . . . . . . .51
Appendix E: Specifi cations . . . . . . . . . . . . . . .53
Appendix F: Time Offset . . . . . . . . . . . . . . . .55
Appendix G: Index . . . . . . . . . . . . . . . . . . . . .56
Introduction
Table of Contents
3
Introduction
Warnings and Cautions
Safety Warnings and Cautions—Read This First!
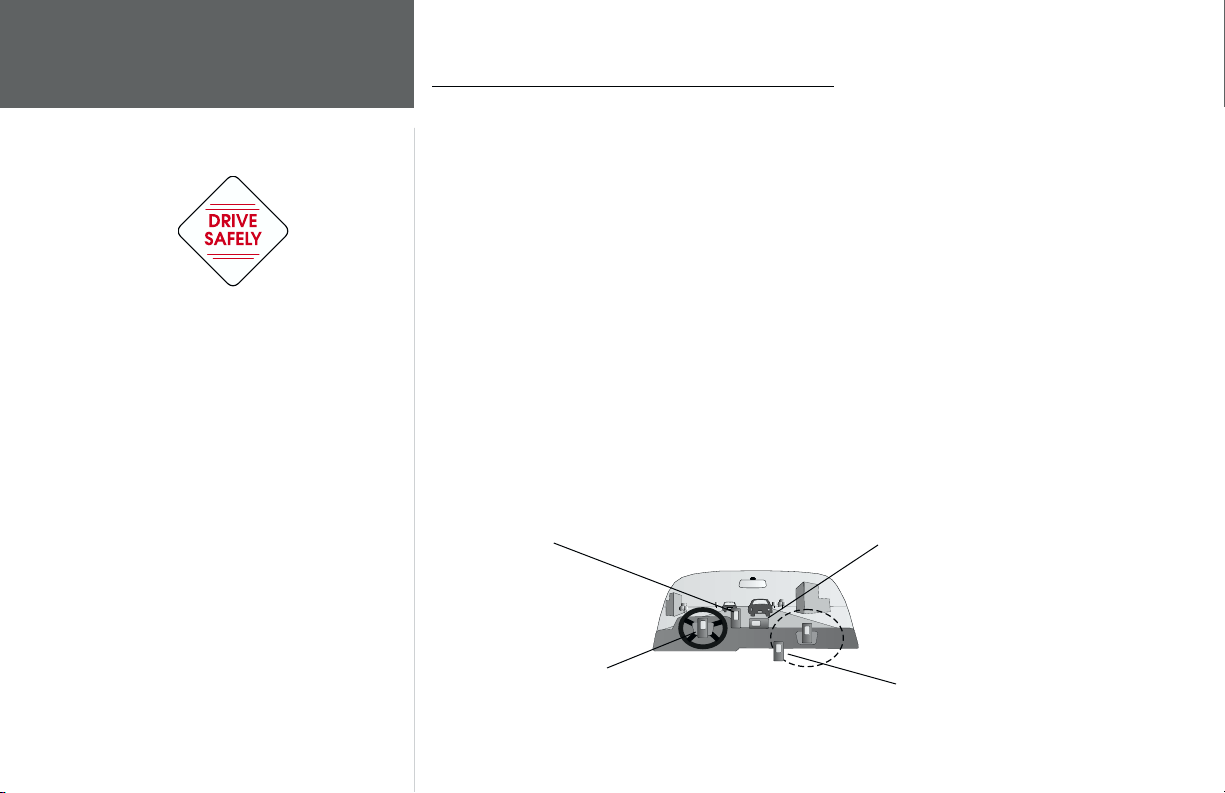
WARNING: For use in vehicles, it is the sole responsibility of the owner/operator of the
StreetPilot III to place and secure the GPS unit so that it will not interfere with the vehicle operating
controls and safety devices, obstruct the driver’s view of driving conditions, or cause damage or
personal injury in the event of an accident. Do not mount the StreetPilot III over airbag panels or
in the fi eld of airbag deployment. Airbags expand with a rapid force that can propel objects in their
path towards the vehicle driver or passengers causing possible injury. Refer to airbag safety precautions
contained in the vehicle owner’s manual. Do not mount the StreetPilot III in a place where the driver
or passengers are likely to impact it in an accident or collision. The mounting hardware provided by
GARMIN is not warranted against collision damage or the consequences thereof.
WARNING: When used in vehicles, it is the sole responsibility of the driver of the vehicle to
operate the vehicle in a safe manner, maintain full surveillance of all driving conditions at all times,
and not become distracted by the StreetPilot III to the exclusion of safe driving practices. It is unsafe
to operate the controls of the StreetPilot III while you are driving. Failure by the driver of a vehicle
equipped with a StreetPilot III to pay full attention to operation of the vehicle and road conditions
while the vehicle is in motion could result in an accident or collision with property damage and
personal injury.
Do Not Mount Where Driver’s Field
of Vision is Blocked
Do Not Mount in Front of
Airbag Panels
Do Not Place Unsecured on the
Vehicle Dash
Do Not Mount in Front of an Airbag
Field of Deployment
4

MAP DATA INFORMATION: One of the goals of GARMIN is to provide customers with the
most complete and accurate cartography that is available to us at a reasonable cost. We use a combination of governmental and private data sources, which we identify as required in product literature
and copyright messages displayed to the consumer. Virtually all data sources contain inaccurate or
incomplete data to some degree. This is particularly true outside the United States, where complete and
accurate digital data is either not available or prohibitively expensive.
CAUTION: IT IS THE USER’S RESPONSIBILITY TO USE THIS PRODUCT PRUDENTLY. THIS
PRODUCT IS INTENDED TO BE USED ONLY AS A TRAVEL AID AND MUST NOT BE USED FOR
ANY PURPOSE REQUIRING PRECISE MEASUREMENT OF DIRECTION, DISTANCE, LOCATION,
OR TOPOGRAPHY. THIS PRODUCT SHOULD NOT BE USED TO DETERMINE GROUND PROXIMITY FOR AIRCRAFT NAVIGATION.
When you are driving, it will help at times (because of
the accuracy of the map data) to look around in the
general area to confi rm that you are arriving at the exact
destination.
Introduction
Map Data
5

Introduction
Software License
Agreement
Software License Agreement
BY USING THE STREETPILOT III, YOU AGREE TO BE BOUND BY THE TERMS AND CONDITIONS OF THE FOLLOWING SOFTWARE LICENSE AGREEMENT. PLEASE READ THIS AGREEMENT CAREFULLY.
GARMIN Corporation (“GARMIN”) grants you a limited license to use the software embedded in
this device (the “Software”) in binary executable form in the normal operation of the product. Title,
ownership rights and intellectual property rights in and to the Software remain in GARMIN.
You acknowledge that the Software is the property of GARMIN and is protected under the United
States of America copyright laws and international copyright treaties. You further acknowledge that
the structure, organization and code of the Software are valuable trade secrets of GARMIN and that
the Software in source code form remains a valuable trade secret of GARMIN. You agree not to
decompile, disassemble, modify, reverse assemble, reverse engineer or reduce to human readable form
the Software or any part thereof or create any derivative works based on the Software. You agree
not to export or re-export the Software to any country in violation of the export control laws of the
United States of America.
6

FCC Compliance
The GARMIN StreetPilot III has been tested to comply with FCC Standards for home and offi ce
use. It complies with Part 15 of the Federal Communications Commission (FCC) limits for Class
B digital devices. This equipment generates, uses, and can radiate radio frequency (RF) energy and,
if not installed and used in accordance with instructions, may cause harmful interference to radio communications. There is no guarantee that interference will not occur in a particular installation. If this
device does cause harmful interference to other equipment, which can be determined by turning this
device off and on, you are encouraged to try and correct the interference by increasing the separation
between this device and other equipment or reorienting or relocating the receiving antenna.
Introduction
FCC Compliance
Consult an authorized dealer or other qualifi ed service technician for additional help if these
remedies do not correct the problem. Operation is subject to the following conditions: (1) This device
cannot cause harmful interference, and (2) this device must accept any interference received, including
interference that may cause undesired operation. Specifi cally when operating inside an automobile,
interference is possible from AM/FM radios, cassette or CD players, or mobile telephones, among other
electronic devices. If you suspect the unit is experiencing harmful interference (as evidenced by poor
satellite reception), try relocating the StreetPilot III in the automobile to remedy the situation.
The StreetPilot III does not contain
any user-serviceable parts. Repairs
should only be made by an authorized GARMIN service center. Unauthorized repairs or modifi cations
could void your warranty and your
authority to operate this device
under Part 15 regulations.
7

Introduction
Limited Warranty
Limited Warranty
GARMIN Corporation warrants this product to be free from defects in materials and manufacture
for one year from the date of purchase. GARMIN will, at its sole option, repair or replace any
components that fail in normal use. Such repairs or replacement will be made at no charge to the
customer for parts or labor. The customer is, however, responsible for any transportation costs. This
warranty does not cover failures due to abuse, misuse, accident or unauthorized alteration or repairs.
THE WARRANTIES AND REMEDIES CONTAINED HEREIN ARE EXCLUSIVE AND IN LIEU OF
ALL OTHER WARRANTIES EXPRESS OR IMPLIED OR STATUTORY, INCLUDING ANY LIABILITY
ARISING UNDER ANY WARRANTY OF MERCHANTABILITY OR FITNESS FOR A PARTICULAR
PURPOSE, STATUTORY OR OTHERWISE. THIS WARRANTY GIVES YOU SPECIFIC LEGAL RIGHTS,
WHICH MAY VARY FROM STATE TO STATE.
IN NO EVENT SHALL GARMIN BE LIABLE FOR ANY INCIDENTAL, SPECIAL, INDIRECT OR
CONSEQUENTIAL DAMAGES, WHETHER RESULTING FROM THE USE, MISUSE, OR INABILITY
TO USE THIS PRODUCT OR FROM DEFECTS IN THE PRODUCT. SOME STATES DO NOT
ALLOW THE EXCLUSION OF INCIDENTAL OR CONSEQUENTIAL DAMAGES, SO THE ABOVE
LIMITATIONS MAY NOT APPLY TO YOU.
To obtain warranty service, contact your GARMIN dealer or call the GARMIN Customer Service
department (913-397-8200) for a returned merchandise tracking number. The unit should be securely
packaged with the tracking number clearly marked on the outside of the package and sent freight
prepaid and insured to a GARMIN warranty service station. A copy of the original sales receipt is
required as the proof of purchase for warranty repairs. GARMIN retains the exclusive right to repair
or replace the unit or software or offer a full refund of the purchase price at its sole discretion.
SUCH REMEDY SHALL BE YOUR SOLE AND EXCLUSIVE REMEDY FOR ANY BREACH OF WARRANTY.
8
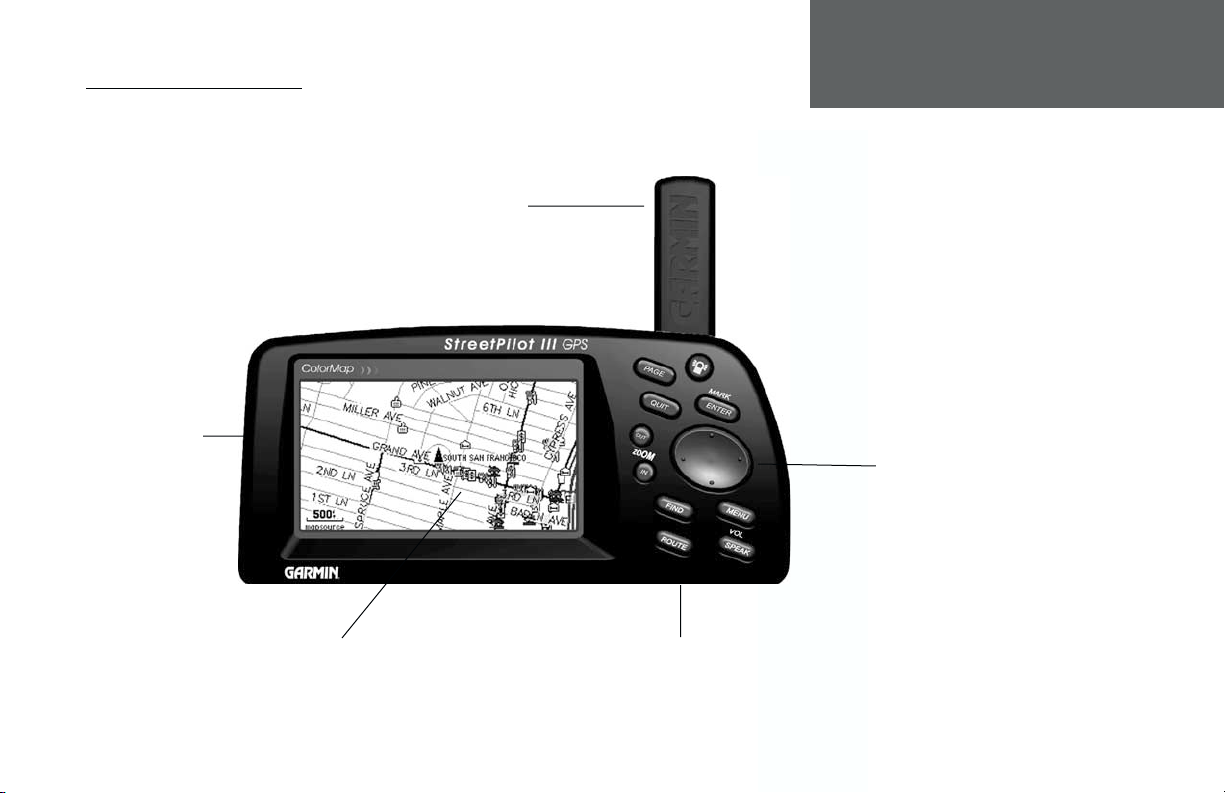
StreetPilot III Description
Introduction
Unit Description
Back of Unit
Insert AA Batteries
Rotate upright for best satellite
Antenna
reception
LCD Display
16-Color DSTN LCD with Backlighting
Keypad
See page 10 for Key
descriptions
Bottom of the Unit
Insert Data Cartridge
9

Introduction
Keys
Keys
POWER (Red Bulb Symbol)- Turns the unit on and off. A momentary press while the power is on displays
the backlight/contrast adjustment window. Press and hold to turn the StreetPilot III off.
PAGE- Switches between the main pages and returns the display from an option window back to a
main page.
QUIT- Returns the display to a previous page. When entering data, restores the previous value (cancels
data entry).
ENTER/MARK- Confi rms a selected menu option. When entering data, it allows you to initiate entry, and
then to accept the selected value(s). It also marks the location of the panning arrow on the Map Page.
Press and hold to capture your present position and save it as a waypoint.
ROCKER KEYPAD- Selects menu options and enters data. Also controls movement of cursor on the
Map Page.
Zoom OUT- Adjusts the map scale to show a larger area with less detail.
Zoom IN- Adjusts the map scale to show a smaller area with more detail.
FIND- Searches the database for Cities, Interstate Exits, Waypoints, and Recently Found places. If an
optional MapSource City Navigator or MetroGuide map data card is installed, it also searches for Points
of Interest, Addresses, or Intersections. Allows the listed items to be viewed on a map or selected as a
destination (Note: MetroGuide will not provide turn by turn navigation or voice commands).
MENU- Displays a menu of available options for the current page. Press twice to display System Setup
options.
ROUTE- Displays a pop-up window of route navigation features.
VOL/SPEAK- Press and hold to adjust the speaker volume. Pressing SPEAK triggers the voice repeat
function when navigating.
10

Features/Data Entry
The following features and data entry procedures are referred to throughout this manual.
CURSOR- A highlighted area on the screen which can be moved up/down/left/right with the
ROCKER KEYPAD to select individual fi elds on the display. Moving the cursor to a given location
allows you to begin data entry or scroll through a list.
FIELD- The location on a page where a group of characters or an option is entered and displayed.
The cursor is placed on a fi eld (using the ROCKER KEYPAD) to begin data entry or selection of
options.
To enter data in a data fi eld:
1. Use the ROCKER KEYPAD to highlight the desired data fi eld. Press ENTER to begin data entry.
2. Use the ROCKER KEYPAD to enter the desired data. UP/DOWN to select the desired character and
RIGHT to move to the next character fi eld. LEFT allows you to back up to the previous character
fi eld or, when at the left most character fi eld, to clear the entire data fi eld.
3. Once the desired data has been entered, press ENTER to confi rm.
An example of a “button”—the ‘Route to It’ button on the
Waypoint Marked Page.
ON-SCREEN BUTTON- Similar to “Field”. Place the cursor on a button and press ENTER to
select the action corresponding to that button. An example of an on-screen button is the ‘Route to It’
button appearing at the bottom of the Waypoint Marked Page.
SCROLL BAR- When viewing a list of items too long to display on a single page, a scroll bar will
appear along the right-hand side of the list. The position of the scroll bar indicates which portion of the
list is currently being displayed. The height of the scroll bar indicates the number of items in the list. To
scroll through a list of items, use the UP/DOWN portion of the ROCKER KEYPAD.
The scroll bar is always located on the right side of the
display.
DEFAULT- A system-selected format, built into the operating software or the unit’s memory, that
will be followed unless the user chooses a different setting. For example, the default setting for speed
readings is ‘miles per hour’ or but can be changed to ‘kilometers per hour’. Once a setting is changed,
the new setting is retained until another change is made or a ‘Restore Original Settings’ menu option
is selected.
Introduction
Features/Data Entry
11

Introduction
Unit Pages
Unit Pages at a Glance
All of the information needed to operate the StreetPilot III is found on ‘pages’ i.e., display screens.
There are three main pages, the Map, Trip Information, and Current Route. A fourth screen is available
during navigation, the Next Turn Page. Press the PAGE or QUIT key to switch back and forth between
pages. The Reference Section describes in detail what each page does and how they are confi gured.
12
PAG E
KEY
SPEAK
KEY
Map Page
Current Route Page—Available
only during navigation
Next Turn Page—Available only
during navigation
Trip Information Page
QUIT
KEY
SPEAK
KEY
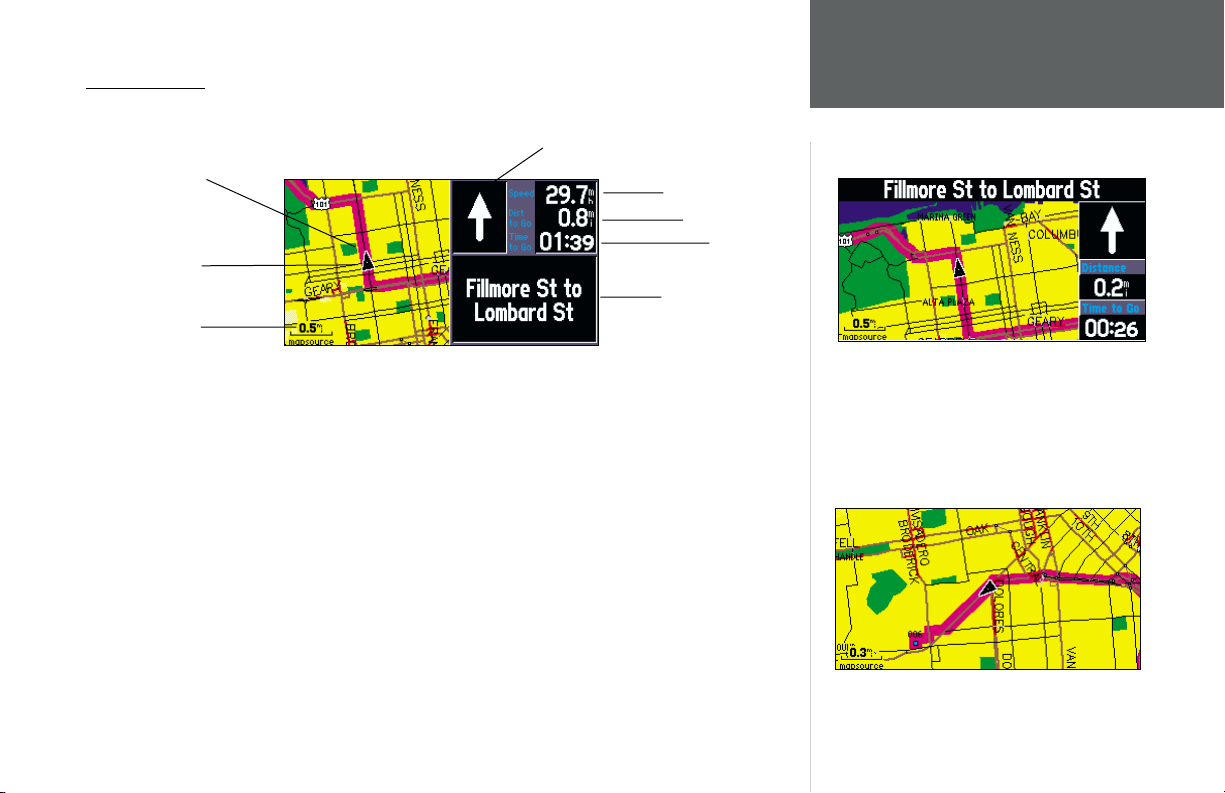
The Map Page
Reference
Direction to Go
Route Line
Vehicle Speed
Distance to Go
Your Current
Position
Map Scale
The Map Page is the main operating page of the StreetPilot III. It graphically shows you map details,
your current location, and marks your route to a destination with a magenta colored route line. It tells
you what direction to go or the direction you are traveling. It tells you your speed, the distance you
have traveled, or the distance to travel to the next turn, and the time remaining before reaching the next
turn. If the StreetPilot III has yet to calculate your location, there is a fl ashing question mark over the
Time to Go
Driving Instructions
The map can be displayed in a ‘square’ or
‘wide’ confi guration for custom viewing. The square
confi guration is shown to the left, the wide
confi guration is shown above. Both show Navigation
Information. For maximum map display, you can select
‘Full Screen Map’. This section of the manual discusses
how to select between the displays.
vehicle pointer and the status text displays, ‘Acquiring Satellites’.
The map display shows your present position and direction of movement as a triangular ‘Position
Icon’ in the center of the map. The map display also shows the map scale and geographic details
such as lakes, rivers, highways, and towns. You can use the IN and OUT keys to change the map
scale to show more map area with less detail, or less map area with more detail. Press and hold to
zoom the map scale rapidly. In many instances the map will display an ‘Accuracy Circle’ surrounding
the ‘Position Icon’.
The ‘Full Screen Map’ confi guration showing no
Navigation Information.
The Map Page
13

Reference
The Map Page
Clear driving instructions are displayed when you are
navigating a route.
Your vehicle speed can be displayed in miles per hour or
kilometers per hour.
The StreetPilot III uses both map resolution and GPS accuracy in defi ning your location to a point
within the accuracy circle. The smaller the circle, the more accurate your location. More detailed map
features as well as information about those features can be displayed using a data card containing
map data transferred from a GARMIN MapSource CD-ROM. When using MapSource data, the word
“MapSource” will appear below the map scale whenever you zoom in to view map details.
Map Page Navigation Information
The following navigation information can be displayed on the Map Page:
Current Direction (N. S. E. W.) - Cardinal letters indicate the direction you are traveling when not
navigating a route. This is not displayed when you are navigating.
Direction To Go (Arrow) - An arrow that points to the next turn in the route when moving on
an active route.
Speed - Your rate of travel which can be displayed in miles per hour or kilometers per hour.
Distance To Go - When navigating a Route, the distance remaining to reach the next turn will be
displayed. When not navigating a Route, this fi eld is not displayed.
Time To Go - When navigating a Route, the time to go before reaching the next turn is displayed.
When not navigating a Route, the time for the current time zone is displayed in either 12 or 24
hour format.
Driving Instructions - Given in text format only when you are only navigating a route. When you
are not navigating, the next intersection is displayed.
14

Zooming, Panning and Pointing
There are three main actions you can perform on the Map Page: zooming, panning, and pointing.
The map display has 24 map scales (from 120 feet to 800 miles) which are selected by pressing
the IN and OUT zoom keys. The current map scale is indicated in the bottom left corner of the
map display.
To change the map scale:
1. Press the IN zoom key to see a smaller area with more detail.
2. Press the OUT zoom key to see a larger area with less detail.
When zoomed in to smaller map areas, ‘overzoom’ appears directly below the map scale. This
indicates the current scale exceeds the optimum resolution of available map detail. Extra caution should
be used in ‘overzoom’ since some detail, such as roads, are drawn using widely spaced points and the
actual layout of these details may differ from the map presentation.
The Map Page showing the panning arrow and a
highlighted map feature or point of interest.
Panning allows you to move the map in order to view areas beyond the current map area. This
provides a ‘look ahead’ capability which is particularly useful with smaller map areas. To pan, use the
ROCKER KEYPAD to move the map in any direction, including diagonally.
As you begin to pan the map, a pointer appears. This map pointer will serve as a target marker
for the map. If you change the scale, the map is redrawn with the pointer at the center. When the
pointer is placed on an object, the name of that object will be highlighted. (If the name wasn’t originally
displayed, it will appear when the pointer is placed on the object.) This feature applies to everything
displayed on the map except route lines and track log data. When a waypoint name is highlighted, you
can review information about the waypoint, list waypoint options, or execute a ‘Route to It’ directly
The Information Page for the park highlighted
in the screen above.
from the Map Page.
Reference
The Map Page
15

Reference
The Map Page
Once the ‘Waypoint Created’ Page appears, the waypoint
is stored in memory.
The ‘Waypoint Created’ Page appears with a default
three digit number for its name which can be changed to
something a little more meaningful.
To select an on-screen location with the panning pointer:
1. Use the ROCKER KEYPAD to highlight the desired item.
2. To view information for the selected item, press ENTER.
3. To exit the information pages, press QUIT.
The ‘Route to It’ function can be used anywhere on the map. If nothing currently exists at the
map pointer position, a new waypoint will be created at the pointer’s location before the Route to
It is started. You can also create a waypoint on the Map Page without selecting it as a ‘Route to It’
destination.
To create a new waypoint from the Map Page:
1. Use the ROCKER KEYPAD to point to the desired location on the map and press ENTER briefl y.
A ‘Waypoint Created Page’ will appear, with an auto-assigned name (3-digit number) for the
waypoint.
2. You can delete the waypoint, show it on the map, or Route to It. Select the desired option and
press ENTER.
Once you are fi nished with panning, you can quickly remove the panning arrow and re-center
the map on your present position by pressing the QUIT key.
16

To mark your current location on the Map Page and save as a waypoint:
1. Press and hold the ENTER key for approximately two seconds. A ‘ Waypoint Marked’ page will
appear with a pre-assigned name, symbol, position and elevation for the new waypoint. When the
‘Waypoint Marked Page’ appears, the waypoint is marked.
2. The StreetPilot III will automatically assign a three-digit number as the waypoint name, but you
may select any name you want, up to ten characters in length. To change the name, highlight the
identifi er fi eld, press ENTER and use the ROCKER KEYPAD to enter the desired waypoint name.
Press ENTER once all characters for the waypoint name have been entered.
3. To select a different waypoint symbol, which will appear on the map, highlight the symbol fi eld
and press ENTER. A list of available symbols will appear. Use the ROCKER KEYPAD to select the
desired symbol and press ENTER.
4. You can Route to the waypoint, show it on the map page, or delete it. Select the option you
desire and press ENTER.
Routing to a Map Feature or Location
1. Use the ROCKER KEYPAD to move the arrow to the desired feature or location on the map.
2. Press ENTER to display detailed information about the item.
3. To route to the location on the map, select ‘Route to It’ on the information page for that item and
press ENTER. The ROUTE preference window appears. Select Faster Time, Shorter Distance, or Off
Road, and press ENTER. The StreetPilot III will route you to the selected destination using turn by
turn navigation and voice prompting.
Reference
The Map Page
You can route to a waypoint, show it on the map, or
delete it once you have marked it.
Detailed information (above) can be shown for any
waypoint that is marked.
17
 Loading...