

Garmin StreetPilot III User Manual

StreetPilot™III
portable GPS with
auto-routing and voice
quick
reference
guide
Quick Start
Unit Features
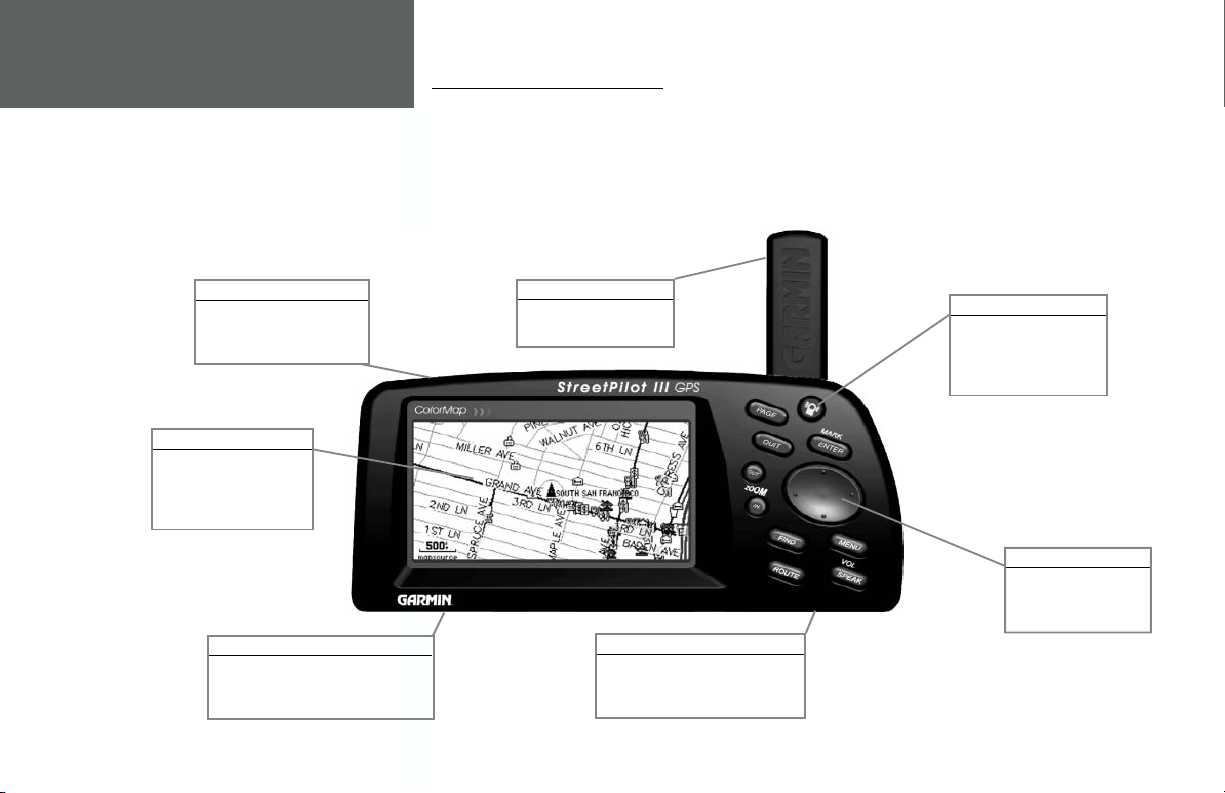
StreetPilot III Unit Features
Thank you for purchasing the GARMIN StreetPilot III—the result of our continuing effort to provide
quality, user-friendly automotive navigation systems to suit all your needs. This Quick Start Guide
is designed to introduce the basic functions of the unit. Please take a few moments now to review
the features of your StreetPilot III, as illustrated below. After reading through this guide, if you have
additional questions regarding a particular feature, please refer to the Owner’s Manual.
Power/Data Connector
(Back Side) Connections for
Power, Ground, Serial Data In
and Serial Data Out.
16-Color LCD Display
On-screen information is
referred to as a “page”.
Press PAGE key to select a
different screen.
Battery Door
(Back Side) To open, turn metal D-ring
counterclockwise 1/4 turn and pull
battery door away from unit.
Detachable Antenna
Rotate upright for best
satellite reception.
(Bottom) Insert programmed card
for increased map detail and
information lookup capability.
Power/Backlight Key
Press and hold to turn
on/off. Press momentarily
to adjust screen backlight
and contrast.
Rocker Keypad
Moves the cursor, pans
the Map Page and
enters data.
Cartridge Door
2

Keypad Usage
POWER (Red Bulb Symbol) – Press and hold to turn the StreetPilot III on and off. Press momentarily while
power is on to display the backlight/contrast adjustment window.
PAGE – Switches between main pages and returns display from an option window back to a main page.
QUIT – Returns display to a previous page. When entering data, restores the previous value (cancels
data entry).
ENTER/MARK – Confi rms a selected menu option. When entering data, it allows you to initiate entry, and
then to accept the selected value(s). Press and hold to capture your present position and save it as a
waypoint. ENTER/MARK can also capture the location of the panning arrow on the Map Page.
ROCKER KEYPAD – Selects menu options and enters data. Also controls movement of the panning cursor
on the Map Page.
Zoom IN and OUT – Adjusts map scale to show a smaller area (more detail) or a larger area (less detail).
FIND – Searches the database for Cities, Interstate Exits, Waypoints, and Recently Found Places. If a data
card is installed containing MapSource City Navigator or MetroGuide map data, it also searches for Points
of Interest, Addresses, and Intersections. The listed items may be saved as waypoints, viewed on a map
or selected as destinations.
MENU – Displays a menu of options for the current page. Press twice to display System Setup options.
ROUTE – Displays a pop-up window of route navigation features.
VOL/SPEAK – Adjusts the speaker volume. Press and hold until the controller appears on the left side
of the screen. To hear the volume count (i.e. 1, 2, 3, 4, 5, 6, 7, 8) press up or down on the rocker
keypad. Each press will activate the audio number. Pressing VOL/SPEAK also triggers the voice repeat
NOTE: When the external speaker is connected, your
StreetPilot III provides audible prompts during route
navigation. These ‘spoken’ prompts include approaching
turn notifi cation (direction of turn and distance), off
course notifi cation, and arrival at destination. Spoken
messages are also provided for poor GPS coverage and
low battery power. Automatic voice prompting can be
turned off via a system setup option (but can always be
triggered by pressing the VOL/SPEAK key).
function when navigating.
Quick Start
Keypad Usage
3

Quick Start
Features/Data Entry
Features and Entering Data
Cursor— A highlighted area on the screen which can be moved up/down/left/right with the
ROCKER KEYPAD to select individual fi elds on the display. Moving the cursor to a given location allows
you to begin data entry or scroll through a list.
Default— A system-selected format, built into the operating software or the unit’s memory, that will
be followed unless the user chooses a different setting. For example, the default setting for speed readings
is ‘miles per hour’ but can be changed to ‘kilometers per hour’. Once a setting is changed, the new setting
is retained until another change is made or the ‘Restore Original Settings’ menu option is selected.
Field—
The location on a page where a group of characters or an option is entered and displayed.
The cursor is placed on a fi eld (using the ROCKER KEYPAD) to begin data entry or select options.
An example of an on-screen button—the ‘Route to It’ button
on the Waypoint Marked Page.
When viewing a list of items too long to display on a
single page, a scroll bar will appear along the right-hand
side of the list. Also, using the Left/Right portion of the
Rocker Keypad will scroll information one full screen at
a time.
4
To enter data in a data fi eld:
1. Use the ROCKER KEYPAD to highlight the desired data fi eld. Press ENTER to begin data entry.
2. Use the ROCKER KEYPAD to enter the desired data. UP/DOWN to select the desired character and
RIGHT to move to the next character fi eld. LEFT allows you to back up to the previous character fi eld
or, when at the left-most character fi eld, to clear the entire data fi eld.
3. Once the desired data has been entered, press ENTER to confi rm.
On-Screen Button— Similar to “Field”. Place the cursor on a button and press ENTER to select
the action corresponding to that button. An example of an on-screen button is the ‘Route to It’ button
appearing at the bottom of the Waypoint Marked Page (see example at left).
Scroll Bar— When viewing a list of items too long to display on a single page, a scroll bar will appear
along the right-hand side of the list (see example at left). The position of the scroll bar indicates which
portion of the list is currently being displayed. The height of the scroll bar indicates the number of items
in the list. To scroll through a list of items, use the UP/DOWN portion of the ROCKER KEYPAD.
 Loading...