

Page 1

GARMIN SPEAK™ PLUS
WITH AMAZON ALEXA
Owner’s Manual
Page 2

© 2018 Garmin Ltd. or its subsidiaries
All rights reserved. Under the copyright laws, this manual may not be copied, in whole or in part, without the written consent of Garmin. Garmin reserves the right to change or improve its
products and to make changes in the content of this manual without obligation to notify any person or organization of such changes or improvements. Go to www.garmin.com for current updates
and supplemental information concerning the use of this product.
Garmin®, VIRB®, and the Garmin logo are trademarks of Garmin Ltd. or its subsidiaries, registered in the USA and other countries. These trademarks may not be used without the express
permission of Garmin. Garmin Speak™ and Garmin Express™ are trademarks of Garmin Ltd. or its subsidiaries. These trademarks may not be used without the express permission of Garmin.
Amazon, Alexa, and Amazon Music and all related logos and motion marks are trademarks of Amazon.com, Inc. or its affiliates. Android™ is a trademark of Google Inc. Apple®, the Apple logo,
iPad®, iPad Air®, iPod®, iPod touch®, iPod classic®, iPod nano®, iPhone®, and Mac® are trademarks of Apple Inc., registered in the U.S. and other countries. The Bluetooth® word mark and logos are
owned by the Bluetooth SIG, Inc., and any use of such word mark or logo by Garmin is under license. microSD® and the microSD logo are trademarks of SD-3C, LLC. PANDORA®, the
PANDORA logo, and the Pandora trade dress are trademarks or registered trademarks of Pandora Media, Inc. Pandora is only available in certain countries. Please visit http://www.pandora.com
/legal. Wi‑Fi® is a registered mark of Wi-Fi Alliance Corporation. Windows® and Windows XP® are registered trademarks of Microsoft Corporation in the United States and other countries.
Made for iPhone 8 Plus, iPhone 8, iPhone 7 Plus, iPhone 7, iPhone SE, iPhone 6s Plus, iPhone 6s, iPhone 6 Plus, iPhone 6, iPhone 5s, iPhone 5c, iPhone 5, iPad Pro (12-inch) 1st generation,
iPad Pro (9.7-inch), iPad mini 4, iPad mini 3, iPad mini 2, iPad Air 2, iPad Air, iPad (4th and 5th generation).
"Made for iPod/iPhone/iPad" means that an electronic accessory has been designed to connect to iPhone, iPad, and iPod models and has been certified by the developer to meet Apple
performance standards. Apple is not responsible for the operation of this device or its compliance with safety and regulatory standards. Please note that the use of this accessory with an iPhone
may affect wireless performance.
Page 3

Table of Contents
Getting Started............................................................... 1
Mounting Considerations............................................................ 1
Installing the Adhesive Disc onto Your Windshield................ 1
Installing and Powering the Garmin Speak Plus Device........ 1
Pairing with Your Smartphone.................................................... 2
Connecting to the Vehicle Stereo............................................... 2
Connecting to the Stereo Using a Bluetooth® Connection.... 2
Connecting to the Stereo Using an Auxiliary Audio Cable..... 2
Device Overview......................................................................... 3
Muting the Microphones.........................................................3
Turning the Device On or Off................................................. 3
Speaking to the Garmin Speak Device....................................... 3
Canceling a Request..............................................................3
Adjusting the Volume............................................................. 3
Navigation....................................................................... 3
Launching the Garmin Skill......................................................... 3
Enabling the Garmin Skill.......................................................4
Acquiring GPS Signals............................................................... 4
Saving Locations........................................................................ 4
Starting a Route.......................................................................... 4
Going to a Saved Location.................................................... 4
Going to a Business or Named Location............................... 4
Going to a City or Intersection............................................... 4
Going to an Address or Location Using the Garmin Speak
App.........................................................................................4
Following Your Route................................................................. 4
Navigation Symbols............................................................... 5
Getting Information About Your Route................................... 5
Stops and Route Interruptions............................................... 5
Arriving at Your Destination........................................................ 5
Stopping a Route........................................................................ 5
Dash Cam........................................................................ 5
Dash Cam Recording................................................................. 5
Stopping or Starting Dash Camera Recording...................... 5
Saving a Dash Cam Video Clip..............................................6
Taking a Photo....................................................................... 6
Turning Audio Recording On or Off....................................... 6
Garmin VIRB® App.................................................................... 6
Setting Up the Garmin VIRB App...........................................6
Viewing the Dash Cam on Your Smartphone........................ 6
Garmin VIRB App Gallery...................................................... 6
Videos and Photos on Your Computer....................................... 6
Connecting the Device to Your Computer............................. 7
Advanced Driver Assistance System........................... 7
Go Alert.......................................................................................7
Forward Collision Warning System.............................................7
Forward Collision Warning System Performance Tips.......... 7
Lane Departure Warning System............................................... 7
Setting the Camera Position.................................................. 8
Lane Departure Warning Performance Tips.......................... 8
Enabling or Disabling Driver Assistance Features..................... 8
Incoming Phone Calls.................................................... 8
Enabling Incoming Phone Calls.................................................. 8
Receiving a Phone Call.............................................................. 8
Amazon Alexa Skills and Features............................... 8
Playing Music..............................................................................8
Stopping or Resuming Playback............................................ 8
Adding Music Accounts..........................................................8
Checking the Weather Forecast................................................. 8
Enabling Skills............................................................................ 8
Device Settings in the Garmin Speak App................... 9
Navigation Settings..................................................................... 9
Audio Settings
Camera Settings......................................................................... 9
.............................................................................9
Device Information......................................................... 9
Software Updates....................................................................... 9
Updating the Software Using the Garmin Speak App............ 9
Updating the Software Using a Computer............................. 9
Device Care................................................................................ 9
Cleaning the Camera Lens.................................................... 9
Specifications............................................................................10
Viewing Regulatory and Compliance Information..................... 10
Troubleshooting........................................................... 10
Error Symbols........................................................................... 10
I cannot hear sound from my device........................................ 10
When is the Garmin Speak Plus device listening?................... 10
A skill I want to use is not available.......................................... 10
My video recordings are blurry................................................. 10
My memory card has degraded and needs to be replaced...... 11
Appendix....................................................................... 11
Replacing the Memory Card..................................................... 11
Pairing an Additional Smartphone with Your Garmin Speak Plus
Device....................................................................................... 11
Pairing an Additional Garmin Speak Plus Device with Your
Smartphone
Removing the Adhesive Disc from Your Windshield................ 12
Replacing the Adhesive on the Disc.................................... 12
.............................................................................. 11
Index.............................................................................. 13
Table of Contents i
Page 4

Page 5

Getting Started
WARNING
See the Important Safety and Product Information guide in the
product box for product warnings and other important
information.
Mounting Considerations
Before you mount the device on your windshield, you should
carefully consider the mounting location. The adhesive is
extremely sticky, can be difficult to remove, and is not reusable.
One extra adhesive pad is included in the product packaging.
You should keep it in a safe place so that you can use it if you
decide to change the mounting location in the future.
• Choose a location that allows you to route the power cable
safely and out of sight.
WARNING
When installing the device in a vehicle, install the device and
power cable securely so they do not interfere with the vehicle
operating controls, such as the foot pedals, or the driver's
feet. Interference with the vehicle operating controls or feet
can result in a collision, which could result in injury or death.
The included long, lightweight power cable is designed to be
routed out of sight. To hide the cable, you can route it around
the windshield and tuck it into the gap between the
windshield and the trim.
• Do not mount the device in a location that obscures the
driver's view of the road.
• Choose a location that is within easy reach and provides
access to the device buttons.
• Choose a location that allows the device to clearly hear your
voice.
For example, you should avoid placing the device near a
speaker or air vent, which can introduce noise that interferes
with the microphones. Also, placing the device in a central
location, such as near the rear-view mirror, allows the device
to hear both the driver and the passenger.
• Choose a location that provides the dash cam with a clear
view of the road.
You should verify the vehicle's windshield wipers clear the
windshield area in front of the dash cam, and you should
avoid placing the dash cam behind a tinted area of the
windshield.
• Thoroughly clean the windshield before installing the mount.
Installing the Adhesive Disc onto Your Windshield
NOTICE
The adhesive disc is difficult to remove after it is installed. You
must carefully consider the mounting location before you install
the mount (Mounting Considerations, page 1).
For the best results, you should install the adhesive disc onto
your windshield while the ambient temperature is from 21° to
38°C (from 70° to 100°F).
Clean the windshield using water or alcohol, and a lint-free
1
cloth.
The windshield must be free of dust, wax, oils, or coatings.
Remove the protective film from the mount adhesive.
2
Position the mount over the mounting location.
3
TIP: The adhesive is extremely sticky. Do not touch the
adhesive to the windshield until the mount is properly
positioned and aligned.
Press the mount firmly onto the windshield, and maintain
4
pressure for 30 seconds.
Pull the device and mount away from the windshield.
5
The metal adhesive disc remains attached to the windshield.
Using your finger, press firmly on the disc for 30 seconds.
6
This helps to ensure the disc adhesive has proper contact
with the windshield.
For the best results, especially in low temperature environments,
you should allow the adhesive on the metal disc to bond to the
windshield for 24 hours before installing the device onto the
mount. Failure to allow adequate bonding time may cause the
adhesive to detach from the windshield.
Installing and Powering the Garmin Speak Plus Device
NOTE: For the best results, especially in low temperature
environments, you should allow the adhesive on the metal disc
to bond to the windshield for 24 hours before installing the
device onto the mount. Failure to allow adequate bonding time
may cause the adhesive to detach from the windshield.
Place the device and mount onto the metal disc.
1
Plug the power cable into the USB port on the device.
2
Route the power cable to your vehicle power outlet.
3
Getting Started 1
Page 6
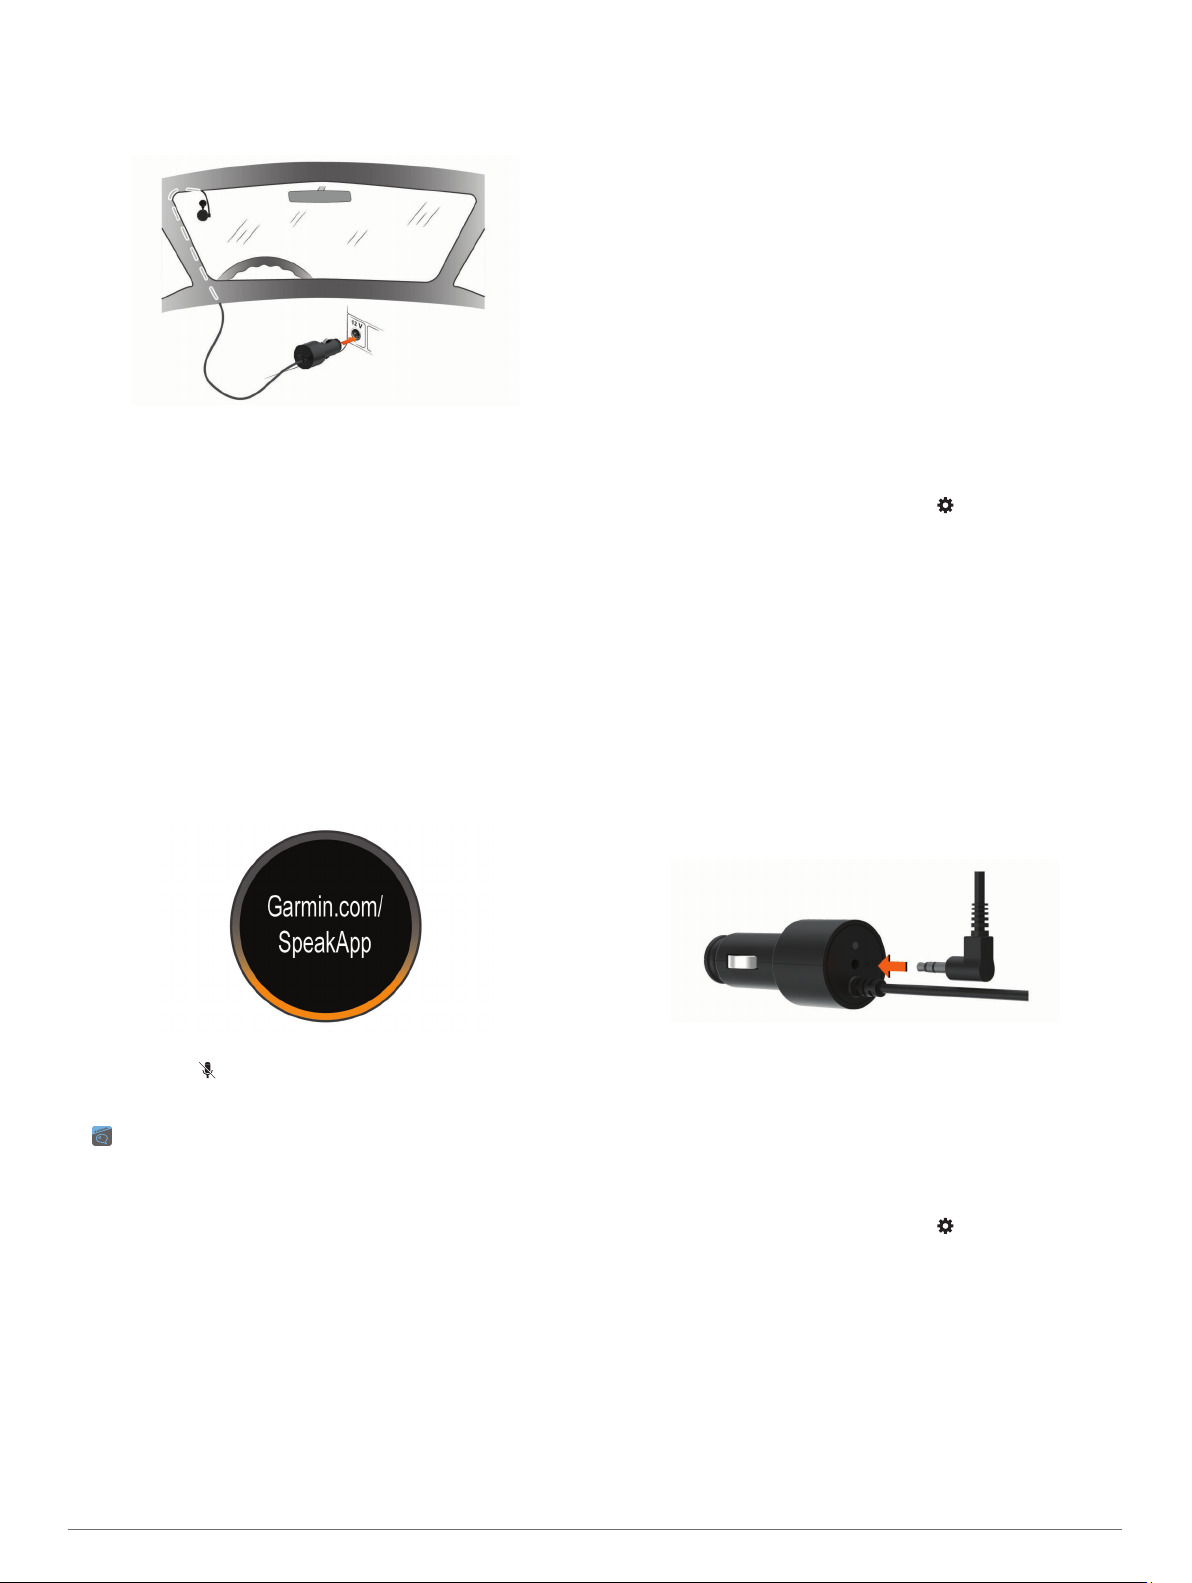
The included long, lightweight power cable is designed to be
routed out of sight. To hide the cable, you can route it around
the windshield and tuck it into the gap between the
windshield and the trim.
Plug the Garmin Speak Plus power cable into a power outlet
4
in your vehicle.
If necessary, turn on the vehicle ignition switch to provide
5
power to the power outlet in your vehicle.
The device turns on.
Follow the on-screen instructions to complete the initial
6
device setup (Pairing with Your Smartphone, page 2).
Pairing with Your Smartphone
The Garmin Speak Plus device requires a connection to the
Garmin Speak app to operate. To use the device, you must pair
it with your smartphone using the Garmin Speak app and
complete the initial setup.
Connect the device to power (Installing and Powering the
1
Garmin Speak Plus Device, page 1).
The first time the device turns on, it enters pairing mode
automatically. The LED ring glows amber and animates while
the device is in pairing mode.
an Additional Garmin Speak Plus Device with Your Smartphone,
page 11).
Connecting to the Vehicle Stereo
Connecting to the Stereo Using a Bluetooth
Connection
If you have a compatible vehicle stereo, you can send the
Garmin Speak Plus audio to the vehicle stereo using a wireless
Bluetooth connection. This allows you to hear high-quality audio
for media, Alexa responses, and phone calls from your vehicle
speakers without a wired connection.
NOTE: If your stereo does not have Bluetooth technology, you
can send audio to the stereo using an auxiliary audio cable
(Connecting to the Stereo Using an Auxiliary Audio Cable,
page 2).
From the Garmin Speak app, select an option:
1
• During the initial device setup, select Yes when the app
asks whether you currently use Bluetooth technology to
connect your smartphone to your vehicle.
• After the initial device setup, select > Audio, and verify
Other is selected in both the Alexa and Media section
and the Phone Calls section.
Set the audio source for your vehicle stereo to the Bluetooth
2
input.
Connecting to the Stereo Using an Auxiliary Audio Cable
If your Garmin Speak Plus is not connected to the vehicle stereo
using a Bluetooth connection, you can send the Garmin
Speak Plus audio to the vehicle stereo using a 3.5 mm stereo
auxiliary audio cable (not included).
NOTE: For the best audio quality, a Bluetooth connection to the
stereo is recommended, when available (Connecting to the
Stereo Using a Bluetooth® Connection, page 2).
Connect one end of the cable to the 3.5 mm audio output
1
jack on the Garmin Speak Plus power cable plug.
®
Connect the other end of the audio cable to the auxiliary input
TIP: If the device does not enter pairing mode automatically,
you can hold for 5 seconds to manually enter pairing
mode.
From the app store on your smartphone, install and open the
2
Garmin Speak app.
The app searches for the device automatically. When it finds
the device, your smartphone and the Garmin Speak Plus
device display a pairing code.
Verify the codes match, and press any button on the Garmin
3
Speak Plus device to accept the pairing request.
On your smartphone, select the option to authorize pairing
4
with the device.
The device connects to your smartphone.
Follow the on-screen instructions to finish setting up the
5
device.
TIP: If multiple people need to use your Garmin Speak Plus
device, you can pair it with additional smartphones (Pairing an
Additional Smartphone with Your Garmin Speak Plus Device,
page 11). If you have Garmin Speak Plus devices in multiple
vehicles, you pair each of them with your smartphone (Pairing
2 Getting Started
2
jack for your vehicle stereo.
This jack may be labeled AUX or Line In. See your vehicle
owner's manual for more information.
From the Garmin Speak app, select an option:
3
• During the initial device setup, select No when the app
asks whether you currently use Bluetooth technology to
connect your smartphone to your vehicle.
• After the initial device setup, select > Audio, and verify
Garmin Speak is selected in both the Alexa and Media
section and the Phone Calls section.
Set the audio source for your vehicle stereo to the auxiliary
4
input.
Page 7

Device Overview
Mute button. Press to mute or unmute the microphones.
À
When you receive an incoming phone call, press to ignore the call.
Hold to manually enter pairing mode.
Action button. Press to start speaking to the device.
Á
TIP: You can also say Alexa to start speaking to the device.
When you receive an incoming phone call, press to accept the call.
When an alarm or timer sounds, press to dismiss the alarm or time.
Press to turn on the device manually.
Hold for two seconds to turn off the device manually.
LED ring. Provides device status and navigation information, such
Â
as volume, listening mode, or upcoming turns.
OLED screen. Provides device status and navigation information
Ã
using symbols and text.
Microphones.
Ä
Muting the Microphones
You can mute the microphones to prevent the device from
listening for spoken requests or recording dash cam audio.
Press .
While the microphones are muted, the LED ring is solid red.
The bottom of the LED ring glows cyan while the device
listens to your request.
If necessary, specify a skill.
2
For example, to make a navigation request from the Garmin
skill, say ask Garmin or tell Garmin.
Speak your request or command clearly toward the device.
3
For example, you can try these complete commands to
practice.
• Alexa, ask Garmin to take me to work.
• Alexa, what's the weather today?
• Alexa, play some classical music.
When you are finished speaking, the LED ring animates with
blue and cyan while the device processes your request.
Listen to the voice response, and respond to prompts by
4
speaking to the device, if necessary.
If the device did not understand your request correctly, you can
phrase your request differently to try again.
Canceling a Request
If you make a mistake while speaking a phrase, you can cancel
your request using your voice or the device buttons.
• While you are speaking to the device, pause briefly and say
cancel or nevermind.
• While the device is listening, press .
Adjusting the Volume
The device provides ten volume levels. You can say phrases
like these to adjust the volume level.
• Alexa, turn it up.
• Alexa, turn it down.
• Alexa, set the volume to four.
A portion of the LED ring briefly glows white to indicate the
volume level. For example, if half of the ring is white, the volume
level is set to five.
®
Turning the Device On or Off
Navigation
The device automatically turns off after an extended period of
non-use. When the device is connected to an ignition-switched
power outlet, it turns off automatically when you turn off the
vehicle.
You can also turn the device on or off manually. This is useful
when the device is connected to an always-on power outlet.
• To turn off the device, hold for two seconds.
• To turn on the device, press .
Speaking to the Garmin Speak Device
The Garmin Speak Plus device uses natural language
processing to understand the intent of your requests. You can
ask questions or speak commands in natural language, using
complete sentences. Many example phrases are provided
throughout the manual, but you can experiment with speaking to
the device using the language most comfortable to you.
Start each request by either saying Alexa or pressing .
1
Navigation 3
Launching the Garmin Skill
The Garmin skill provides access to exclusive navigation
features for your Garmin Speak Plus device, including location
searching, routing with turn-by-turn directions, traffic conditions,
and more.
You can specify the Garmin skill as part of a request to the
device, or you can start the Garmin skill before you make a
request.
• To use the Garmin skill directly in a request, start your
request with Alexa, ask Garmin or Alexa, tell Garmin.
For example, you can say phrases like these to request
information from the Garmin skill:
◦ Alexa, ask Garmin to take me to work.
◦ Alexa, ask Garmin, where's the library?
• To open the Garmin skill separately, say Alexa, open Garmin.
Page 8

The device prompts you to speak a request to the Garmin
skill. You can say phrases like these:
◦ Take me home
◦ Find a nearby coffee shop
Enabling the Garmin Skill
To use the navigation features for your device, the Garmin skill
must be enabled. The Garmin skill is enabled during the pairing
and setup process. If you have disabled the skill, you can enable
it again at any time.
Say Alexa, enable the Garmin skill.
Acquiring GPS Signals
When you turn on your device, the GPS receiver must collect
satellite data and establish the current location. The time
required to acquire satellite signals varies based on several
factors, including how far you are from the location where you
last used your device, whether you have a clear view of the sky,
and how long it has been since you last used your device.
The device must acquire GPS signals before it can calculate a
route. If the device has not acquired GPS signals when you
attempt to start a route, appears on the screen.
If appears, go to an open area with a clear view of the
sky, away from tall buildings and trees.
Saving Locations
You can save your home, school, and work locations to quickly
start routes to them (Going to a Saved Location, page 4).
From the Garmin Speak app, select > My Locations.
1
Select Home, School, or Work.
2
Enter the location address.
3
As you type, suggestions appear below the address entry
field.
Select a suggested address.
4
Locations near an intersection:
• Alexa, ask Garmin to find barbecue near 12th Street and
Vine.
• Alexa, ask Garmin to find Arthur Bryant’s Barbecue near
12th Street and Vine.
Going to a City or Intersection
You can say phrases like these to find and navigate to a city or
intersection.
• Alexa, ask Garmin to find Chandler, Arizona.
• Alexa, ask Garmin to find Michigan Avenue and Erie Street.
Going to an Address or Location Using the Garmin Speak App
You can use the Garmin Speak app to search for an address,
business, or point of interest, and send it to your Garmin Speak
device for navigation.
From the Garmin Speak app, select Where To?.
1
Select an option:
2
• To search for an address near you, enter the house
number and street name.
• To search for an address in another city, enter the house
number, street name, city, and state.
• To search for a business name, enter all or part of the
name.
• To search for a city, enter the city and state.
As you type, suggestions appear below the search field.
Select a suggested search result.
3
The app displays the location on a map.
Select Go! to start a route.
4
The Garmin Speak device starts navigating to the selected
location, and the location is added to your recent searches in the
Where To? menu.
Starting a Route
Going to a Saved Location
It is useful to start a route on your Garmin Speak Plus device
each time you travel to a saved location, even though you may
already know how to get there. Your device can help you avoid
reported traffic delays and construction that may affect your
route.
You can say phrases like these to start a route to your saved
locations for home, work, and school (Saving Locations,
page 4).
• Alexa, ask Garmin to take me home.
• Alexa, ask Garmin to navigate to work.
• Alexa, ask Garmin to start a route to school.
Going to a Business or Named Location
You can say phrases like these to find and navigate to a
business or location by name or category.
Nearby locations:
• Alexa, ask Garmin to find a coffee shop.
• Alexa, ask Garmin to find a library.
• Alexa, ask Garmin to take me to Starbucks.
Locations near a different city:
• Alexa, ask Garmin to find Mexican food near Denver,
Colorado.
• Alexa, ask Garmin to find The Field Museum near
Chicago, Illinois.
• Alexa, ask Garmin to find Casa Bonita near Denver,
Colorado.
Following Your Route
As you travel, the device guides you to your destination with
voice prompts and on-screen information.
• Refer to the on-screen information to prepare for your next
turn.
The device screen displays the distance to your next turn,
exit, or other action, and a symbol to indicate the type of turn
(Navigation Symbols, page 5). As you approach your turn,
the LED ring fills with green from the bottom to the top. When
the LED ring is fully green, you are at your turn.
• Say phrases like these to repeat the most recent voice
prompt:
◦ Alexa, ask Garmin, what's my next turn?
◦ Alexa, ask Garmin, how far is my next turn?
◦ Alexa, ask Garmin, which lane should I be in?
• Ask the Garmin Speak Plus device for information about your
route, such as arrival times, distances, or traffic conditions
(Getting Information About Your Route, page 5).
4 Navigation
Page 9

Navigation Symbols
While you are navigating a route, the device screen displays the
distance to your next turn, exit, or other action, and a symbol to
indicate the type of turn.
Start route: The arrow points toward the starting point of the
calculated route. This symbol appears when you need to
drive through an unmapped area, such as a parking lot, to
reach the starting point for the route.
Left or right turn: The device displays the distance to an
upcoming left or right turn.
Sharp turn: The next turn is a sharp turn. You should prepare
to reduce your speed more than usual to complete the turn.
Highway exit: Your next turn requires you to exit the road
using an exit ramp. The arrow indicates whether you should
exit on the left or on the right.
Lane guidance: The upcoming turn or exit must be
completed from a specific lane or lanes. You should move
into one of the lanes indicated by the filled arrow or arrows. If
the road has more than four lanes, ... indicates more lanes
exist to the left or right of the lanes shown.
Roundabout: The arrow indicates the exit you should use to
exit the roundabout.
U-turn: You should make u-turn at the next safe and legal
opportunity to return to your route.
Destination arrival: Your destination is ahead. The arrow
indicates the direction of your destination. This can help you
determine which side of the street your destination is on, or
help you navigate to your destination through an unmapped
area, such as a parking lot.
Getting Information About Your Route
With a route active, you can say phrases like these to learn
about the route ahead of you.
Turns on your route:
• Alexa, ask Garmin, what's my next turn?
• Alexa, ask Garmin, what lane should I be in?
Traffic conditions:
• Alexa, ask Garmin, how's traffic?
Time and distance:
• Alexa, ask Garmin, are we there yet?
• Alexa, ask Garmin, how much farther?
• Alexa, ask Garmin, what time will we arrive?
Taking a Detour or Alternate Route
You can ask the device to calculate an alternate route to take a
detour, such as avoiding a traffic delay or a road closure. If a
significant traffic delay is reported on your route, the device
alerts you, provides the delay time, and tells you when you are
still on the fastest route.
At any time, you can say phrases like these to search for and
start an alternate route, if one is available.
• Alexa, ask Garmin to start an alternate route.
• Alexa, ask Garmin to take a detour.
• Alexa, ask Garmin to find a faster route.
Stops and Route Interruptions
If you make a stop and turn off your vehicle while navigating a
route, your device resumes the route automatically the next time
you start your vehicle.
If you depart from the route while navigating, the device
automatically recalculates a new route to your destination and
starts guiding you to it. To recalculate your route, the device
may require your phone to have an active mobile data
connection with access to the internet. If no internet connection
is available, the device displays the distance and a directional
pointer to your destination until an internet connection becomes
available.
Arriving at Your Destination
When you approach your destination, the device displays a
checkered flag, a directional pointer, and the distance to your
destination.
• The pointer points to the approximate physical location of
your destination. You can use the pointer to determine which
side of the street your destination is on, or to navigate to your
destination through an unmapped area, such as a parking lot.
• If you must turn onto a road to enter your destination, a turn
symbol appears next to the checkered flag.
• When you stop at your destination, the device automatically
ends the route. If the device does not detect your arrival
automatically, you can say, Alexa, ask Garmin to stop the
route.
Stopping a Route
You can say phrases like these to stop navigating a route.
• Alexa, ask Garmin to stop the route.
• Alexa, ask Garmin to stop navigating.
Dash Cam
Dash Cam Recording
NOTICE
Some jurisdictions regulate or prohibit use of this device. It is
your responsibility to know and comply with applicable laws and
rights to privacy in jurisdictions where you plan to use this
device.
By default, the device immediately starts recording video when it
turns on. It continues recording, overwriting the oldest, nonsaved video until the device is turned off. You can also start or
stop recording manually at any time. The camera saves
recorded video to the camera memory card (Replacing the
Memory Card, page 11).
Stopping or Starting Dash Camera Recording
• To stop dash cam recording, say Alexa, ask Garmin to stop
recording.
• To start dash cam recording, say Alexa, ask Garmin to start
recording.
Dash Cam 5
Page 10

• To stop or start dash cam recording using the Garmin Speak
app, select .
is red while the dash cam is recording.
Saving a Dash Cam Video Clip
You can save a portion of the recorded video to prevent it from
being overwritten by new video.
• To save a video clip using a voice command, say Alexa, ask
Garmin to save video.
• To save a video clip using the Garmin Speak app, select
Save Clip.
The device saves a three-minute video clip, which includes the
video footage recorded before, during, and after you asked the
device to save video.
The memory card has limited storage. After you save a video
recording, you should transfer the recording to your computer or
other external storage location for permanent storage (Videos
and Photos on Your Computer, page 6).
Taking a Photo
You can take still photos with this device. By default, the device
stores time and location information with the photo.
• To take a photo using a voice command, say Alexa, ask
Garmin to take a picture.
• To take a photo using the Garmin Speak app, select Take a
Snapshot.
The device takes a photo and saves it to the memory card.
Turning Audio Recording On or Off
While recording dash cam video, the device can record audio
using the integrated microphones. You can turn audio recording
on or off at any time.
• To disable audio recording and keep the microphones
enabled for voice commands, open the Garmin Speak app,
and select .
indicates the device is recording audio. indicates audio
recording is disabled.
• To completely mute the microphones for both audio recording
and voice commands, press on the Garmin Speak Plus
device.
• To view the live dash cam view, from the Garmin Speak app,
select Dash Cam > View Camera.
The Garmin VIRB app opens and shows the view from the
dash cam.
• To view saved video clips and photos, from the Garmin
Speak app, select Dash Cam > View Media.
The Garmin VIRB app opens and the gallery of dash cam
videos and photos.
Garmin VIRB App Gallery
Select to change the camera settings.
Displays a preview of the selected video or photo.
À
Drag up or down to expand or shrink the library.
Á
Select to mark the selected video or photo as a favorite.
Select to edit, save, and share the selected photo or video.
Garmin VIRB® App
The free Garmin VIRB app allows you to view and share
recorded dash cam videos and photos on your smartphone. To
download the Garmin VIRB app or for more information, go to
(Garmin VIRB® App, page 6).
Setting Up the Garmin VIRB App
To view dash cam videos and photos on your smartphone, you
must install the Garmin VIRB app and pair it with your Garmin
Speak Plus device.
From the app store on your mobile device, install the Garmin
1
VIRB app.
Verify your Garmin Speak Plus device is turned on.
2
On your smartphone, open the Garmin Speak app, and
3
select View Camera > Continue.
The app searches for your Garmin Speak Plus device and
connects automatically.
If necessary, enter the wi-fi password that appears on your
4
Garmin Speak Plus screen.
Viewing the Dash Cam on Your Smartphone
Before you can view the dash cam, video clips, or photos on
your smartphone, you must install the Garmin VIRB app and
pair it with your Garmin Speak Plus device (Setting Up the
Garmin VIRB App, page 6).
Select to delete the selected video or photo.
Select a photo or video thumbnail to preview it.
Â
Editing and Sharing a Video
From the Garmin VIRB app gallery, select a video.
1
Select an option:
2
• If you are using an Apple® device, select .
• If you are using a device with Android™, select .
Use the sliders to trim the video clip and select the section of
3
video to share.
When you are finished editing the video, select Next.
4
The app processes the video. This may take a while
depending on the length of the video.
After the app finishes processing the video, select an option:
5
• To save the video to your mobile device, select .
• To share the video to a social network using an Apple
device, select .
• To share the video to a social network using a device with
Android, select .
Videos and Photos on Your Computer
Videos and photos are stored in the DCIM folder on the camera
memory card. Videos are stored in MP4 file format, and photos
6 Dash Cam
Page 11

are stored in JPG format. You can view and transfer photos and
videos by connecting the memory card or the device to your
computer (Connecting the Device to Your Computer, page 7).
The videos and photos are sorted into several folders.
100EVENT: Contains videos saved automatically when the
device detected an incident.
101SAVED: Contains videos saved manually by the user.
102PHOTO: Contains photos.
104UNSVD: Contains unsaved video footage. The device
overwrites the oldest unsaved video when the storage space
for unsaved video is full.
Connecting the Device to Your Computer
You can view videos and photos on your computer using a
micro-USB cable.
Plug the small end of the micro-USB cable into the port on
1
the device.
Plug the larger end of the micro-USB cable into a port on
2
your computer.
Depending on your computer operating system, the device
appears as either a removable drive or a removable volume.
Advanced Driver Assistance System
Your device includes an advanced driver assistance system
(ADAS), which uses the integrated dash camera to provide
warnings and alerts about your driving environment.
You can enable or disable each of the advanced driver
assistance features in the Driver Assistance settings (Enabling
or Disabling Driver Assistance Features, page 8).
Go Alert
The go alert plays a tone and displays an alert when stopped
traffic ahead of your vehicle starts moving again. This alert
appears only after the vehicle ahead has moved a substantial
distance and your vehicle has remained stopped. This can be
useful at stop lights or in traffic delays. This feature uses the
dash camera to detect the stopped or moving vehicle and
requires a clear view of the road.
speed using GPS, and it calculates an estimated safe following
distance based on your speed. The FCWS activates
automatically when your vehicle speed exceeds 48 km/hr
(30 mph).
When the device detects that you are too close to the vehicle
ahead of you, the device plays an audible alert, and a warning
appears on the screen.
Forward Collision Warning System Performance Tips
Several factors affect the performance of the forward collision
warning system (FCWS). Some conditions may prevent the
FCWS feature from detecting a vehicle ahead of you.
• The FCWS feature activates only when your vehicle speed
exceeds 50 km/h (30 mph).
• The FCWS feature may not detect a vehicle ahead of you
when the camera's view of the vehicle is obscured by rain,
fog, snow, sun or headlight glare, or darkness.
• The FCWS feature may not function properly if the camera is
incorrectly aligned .
• The FCWS feature may not detect vehicles greater than 40 m
(130 ft.) away or closer than 5 m (16 ft.).
• The FCWS feature may not function properly if the camera
placement settings do not correctly indicate your vehicle
height or the placement of your device in the vehicle .
Lane Departure Warning System
WARNING
The lane departure warning system (LDWS) feature is for
information only and does not replace your responsibility to
observe all road and driving conditions, abide by all traffic
regulations, and use safe driving judgment at all times. The
LDWS relies on the camera to provide warnings for lane
markers and, as a result, may have limited functionality in low
visibility conditions. For more information, go to garmin.com
/warnings.
The LDWS feature alerts you when the device detects you may
be crossing a lane boundary unintentionally. For example, the
device alerts you if you cross some solid painted lane
boundaries. The LDWS feature provides alerts only when your
vehicle speed exceeds 64 km/h (40 mph). The alert appears on
Forward Collision Warning System
WARNING
The forward collision warning system (FCWS) feature is for
information only and does not replace your responsibility to
observe all road and driving conditions, abide by all traffic
regulations, and use safe driving judgment at all times. The
FCWS relies on the camera to provide a warning of upcoming
vehicles and, as a result, may have limited functionality in low
visibility conditions. For more information, go to garmin.com
/warnings.
NOTE: This feature is not available in all areas or for all product
models.
The FCWS feature alerts you when the device detects that you
are not maintaining a safe distance between your vehicle and
the vehicle in front of you. The device determines your vehicle
Advanced Driver Assistance System 7
the left or right side of the screen to indicate which lane
boundary you crossed.
NOTE: For the best LDWS performance, you should set the
Placement option to indicate the location of the device in your
vehicle.
Page 12

Setting the Camera Position
You can mount the device in the left, center, or right of your
windshield. During the initial device setup, the Garmin Speak
app asks you to select your vehicle type and the horizontal
position of the device on your windshield. These settings help to
improve the accuracy of driving alerts. You can change these
settings at any time.
From the Garmin Speak app, select > Camera >
Placement.
Lane Departure Warning Performance Tips
Several factors affect the performance of the lane departure
warning system (LDWS). Some conditions may prevent the
LDWS feature from detecting lane departures.
• The LDWS feature provides alerts only when your vehicle
speed exceeds 65 km/h (40 mph).
• The LDWS feature may not function properly if the camera is
incorrectly aligned.
• The LDWS feature may not function properly if the camera
placement settings do not correctly indicate your vehicle
height or the placement of your device in the vehicle .
• The LDWS feature requires a clear, continuous view of the
lane divider lines.
◦ Lane departures may not be detected when divider lines
are obscured by rain, fog, snow, extreme shadows, sun or
headlight glare, road construction, or any other visual
obstruction.
◦ Lane departures may not be detected if lane divider lines
are misaligned, missing, or heavily worn.
• The LDWS feature may not detect lane departures on
extremely wide, narrow, or winding roads.
Enabling or Disabling Driver Assistance Features
From the Garmin Speak app, scroll to the Driver Assistance
1
section.
Select Forward Collision, Lane Departure, or Go Alert to
2
turn each feature on or off.
A green dot indicates a feature is enabled.
Incoming Phone Calls
When the incoming phone calls feature is enabled, you can use
your Garmin Speak Plus device to accept or ignore incoming
calls while your phone is stowed away. You can communicate
with the caller hands-free using the device microphones, and
you can hear the caller's voice through your vehicle speakers or
the device speaker.
Enabling Incoming Phone Calls
You can enable the incoming phone calls feature during the
initial Garmin Speak Plus device setup in the Garmin Speak
app. You can also enable the feature at any time from the
Garmin Speak app settings.
From the Garmin Speak app, select > Audio.
1
In the Phone Calls section, select Garmin Speak.
2
Receiving a Phone Call
Before you can receive a phone call using your Garmin
Speak Plus device, you must enable phone calls for your device
(Enabling Incoming Phone Calls, page 8).
When you receive a phone call, the LED ring flashes magenta,
and the device displays the contact name or phone number of
the caller.
• To accept the phone call, press on the Garmin Speak Plus
device.
Your phone accepts the call, and you can speak to the caller
using the Garmin Speak Plus microphones and speaker. If
the audio cable is connected to your vehicle stereo
(Connecting to the Stereo Using an Auxiliary Audio Cable,
page 2), the device broadcasts the call audio to your vehicle
speakers.
• To decline the phone call, press on the Garmin
Speak Plus device.
Amazon Alexa Skills and Features
In addition to the navigation features offered by the Garmin skill,
the Garmin Speak Plus device provides access to many
Amazon Alexa features, such as playing music, checking the
weather, or listening to the news. You can use the Amazon
Alexa app to customize features and to explore thousands of
skills in the Alexa Skills Store. Some skills require linking to your
Amazon account.
NOTE: Some skills may not be compatible with the Garmin
Speak Plus device. Device compatibility is determined by the
skill developer.
Playing Music
You can play streaming music from your Amazon Music library
and subscriptions, or from compatible streaming music services.
You can use the Alexa app to add your streaming music service
accounts (Adding Music Accounts, page 8).
You can play music based on genre, artist, title, album, recent
releases, and more. You can say phrases like these to play
music.
• Alexa, play music.
• Alexa, play some popular new rock music.
• Alexa, play my driving music station on Pandora.
Stopping or Resuming Playback
• To stop music or audio playback, say Alexa, stop.
• To resume music or audio playback, say Alexa, resume.
Adding Music Accounts
You can use the Amazon Alexa app to connect your Garmin
Speak Plus to your streaming music service accounts, such as
Amazon Music service or Pandora® internet radio. Not all
streaming music services are compatible with the Garmin
Speak Plus device.
See the Amazon Alexa app documentation on the Amazon web
site for more information about adding streaming music service
accounts.
Checking the Weather Forecast
You can say phrases like these to check the weather forecast
near you or in another area.
Today's weather:
• Alexa, how's the weather?
• Alexa, what's the temperature today?
Future weather:
• Alexa, will it rain tomorrow?
• Alexa, what's the weather this weekend?
Weather in another location:
• Alexa, what's the weather in Atlanta?
• Alexa, will it snow in Chicago this weekend?
Enabling Skills
You can enable additional skills by speaking to your Garmin
Speak Plus device, or by using the Amazon Alexa app.
8 Incoming Phone Calls
Page 13

• To enable a skill using your voice, say a phrase like Alexa,
enable the Garmin skill.
• To browse and enable skills from the Amazon Alexa app,
select Skills from the Amazon Alexa app menu.
Device Settings in the Garmin Speak
App
You can use the Garmin Speak app to customize the device
settings.
Navigation Settings
To change the settings, your Garmin Speak Plus device must be
turned on and connected to the Garmin Speak app.
From the Garmin Speak app, select > Navigation.
Units: Sets the units of measure to use for navigation distances.
Avoidances: Allows you to select features you want to avoid in
your routes, such as toll roads, highways, or unpaved roads.
You can select the check box next to each feature.
Audio Settings
To change the settings, your Garmin Speak Plus device must be
turned on and connected to the Garmin Speak app.
From the Garmin Speak app, select > Audio.
Phone Calls: Sets whether to use the Garmin Speak Plus
device as a hands-free calling device. If you usually connect
to your vehicle for hands-free phone calls, you should select
Other.
Alexa and Media: Sets whether to play media and Alexa audio
through the Garmin Speak Plus device. If you are connected
to your vehicle using Bluetooth wireless technology or your
smartphone's headphone jack, you should select Other. If
you are using the Garmin Speak Plus speaker or the audio
output jack on the Garmin Speak Plus power cable plug, you
should select Garmin Speak.
Guide Me: Allows you to answer guided questions to determine
the best audio settings for your Garmin Speak Plus device.
Start of Alexa Request Sound: Sets the device to play a tone
when the device detects the Alexa keyword and starts
listening to your request.
End of Alexa Request Sound: Sets the device to play a tone
when the device detects you are finished speaking and starts
processing your request.
Camera Settings
From the Garmin Speak app, select > Camera.
Quality: Adjusts the video resolution.
Record Audio: Turns on and off audio recording. This feature is
not available in all areas or for all product models.
Data Overlay: Adjusts the type of data displayed on videos and
pictures.
Event Detection: Turns on and off event detection (Saving a
Dash Cam Video Clip, page 6).
Placement: Allows you to set the vehicle height and camera
position.
Device Information
Software Updates
Updating the Software Using the Garmin Speak App
When an update is available, the Garmin Speak app sends it to
the device automatically.
The next time you start your device, it displays Software
Updating while it installs the update.
Do not turn off your vehicle or unplug the device while the
update is installing.
After the update is complete, the device restarts and operates
as usual.
Updating the Software Using a Computer
You can use Garmin Express™ software to download and install
the latest software updates for your device. Garmin Express is
available for Windows® and Mac® computers.
On your computer, go to garmin.com/express.
1
Select an option:
2
• To install on a Windows computer, select Download for
Windows.
• To install on a Mac computer, select Download for Mac.
Open the downloaded file, and follow the on-screen
3
instructions to complete the installation.
Open the Garmin Express application.
4
Connect your Garmin Speak Plus device to your computer
5
using a micro-USB cable.
When the device prompts you, press to enable USB mass
6
storage mode.
The device connects as a USB mass storage device, and
appears on the device screen.
From the Garmin Express application, click Add a Device.
7
The Garmin Express software detects your device.
Click Add Device.
8
Follow the on-screen instructions to register your device and
9
add it to the Garmin Express software.
When setup is complete, the Garmin Express software
searches for software updates for your device.
Select an option:
10
• To install all available updates, click Install All.
• To install a single update, click View Details and select an
update.
The next time you start your device, it displays Software
Updating while it installs the update.
Do not turn off your vehicle or unplug the device while the
11
update is installing.
Device Care
NOTICE
Avoid dropping your device.
Do not store the device where prolonged exposure to extreme
temperatures can occur, because it can cause permanent
damage.
Do not expose the device to water.
Cleaning the Camera Lens
NOTICE
Do not use a dry cloth to clean the lens. Use of a dry cloth may
damage the lens.
Avoid chemical cleaners and solvents that can damage plastic
components.
You should clean the camera lens regularly to improve the
quality of recorded video.
Wipe the lens with a soft, non-scratch cloth dampened with
1
water or alcohol.
Allow the lens to air dry.
2
Device Settings in the Garmin Speak App 9
Page 14

Specifications
Input voltage 5 V, 1 A DC using the included vehicle power
Operating
temperature range
Wireless frequencies
and protocols
cable
From -20 to 55°C (from -4 to 141°F)
Wi‑Fi® 2.4 GHz @ 9.5 dBm nominal
Bluetooth 2.4 GHz @ 4 dBm nominal
Viewing Regulatory and Compliance Information
You can view the unit ID, software version, and e-label
regulatory information.
Hold and for 5 seconds.
The device automatically scrolls through the information
screens.
Troubleshooting
Error Symbols
These error symbols may appear on the device screen to
indicate a problem with the device or the device connections.
Poor GPS reception: The device has not acquired
GPS satellites and cannot determine your location.
Go to an open area and verify the device has a clear view of
the sky through the windshield (Acquiring GPS Signals,
page 4).
Smartphone is not connected: The device is not
connected to your smartphone.
Verify Bluetooth technology is enabled on your smartphone
and the device is paired with your smartphone (Pairing with
Your Smartphone, page 2).
Garmin Speak app is not connected: The device has
established a Bluetooth connection to your smartphone, but it
cannot connect to the Garmin Speak app.
On your smartphone, open the Garmin Speak app.
No internet connection: The device is connected to the
Garmin Speak app, but no internet connection is available.
Verify your smartphone is receiving a mobile data or Wi‑Fi
signal with access to the internet.
High device temperature: The device temperature is too
high, and the device cannot operate.
• Move the device to a cooler location, and allow it to cool
down before operating it.
• Avoid leaving the device in direct sunlight when your
vehicle is parked.
I cannot hear sound from my device
The Garmin Speak Plus device and app provide several options
for audio output to accommodate different vehicles and
installation methods. If you cannot hear audio from the device,
verify the device settings and connections for your installation
method below.
• For all installation methods, verify each of these items:
◦ Verify your Garmin Speak Plus device is paired with your
smartphone and connected to the Garmin Speak app
(Pairing with Your Smartphone, page 2).
◦ Verify the Garmin Speak Plus device volume is loud
enough to hear.
You can say Alexa, turn it up or use your smartphone
volume controls to increase the volume.
◦ Verify the media volume setting on your smartphone is not
muted.
• If you want to connect to your vehicle or vehicle stereo using
a Bluetooth connection, verify each of these items:
◦ In the Garmin Speak app, select > Audio, and verify
Other is selected in the Alexa and Media section.
◦ Verify your smartphone is paired with your vehicle and
connected using Bluetooth wireless technology.
For more information about pairing your smartphone with
your vehicle, see your vehicle owner's manual.
◦ Verify your vehicle stereo is set to the Bluetooth audio
source.
• If you want to connect to your vehicle stereo using the
Garmin Speak Plus auxiliary audio output, verify each of
these items:
◦ Verify that a 3.5 mm audio cable is connected to the audio
output jack in the Garmin Speak Plus power cable plug
and to the auxiliary input jack for your vehicle stereo
(Connecting to the Stereo Using an Auxiliary Audio Cable,
page 2).
NOTE: You should not use your phone's headphone jack
for auxiliary output. Some types of audio cannot be played
using the phone's headphone jack.
◦ In the Garmin Speak app, select > Audio, and verify
Garmin Speak is selected in the Alexa and Media
section.
◦ Verify your vehicle stereo is set to the auxiliary input audio
source.
• If you want to use the internal Garmin Speak Plus device
speaker, verify each of these items:
◦ In the Garmin Speak app, select > Audio, and verify
Garmin Speak is selected in the Alexa and Media
section.
◦ Verify no cable is connected to the audio output jack in the
Garmin Speak Plus power cable plug.
When is the Garmin Speak Plus device listening?
While the Garmin Speak Plus device is turned on and the
microphones are not muted, the device continuously listens for
you to say Alexa to start a request. The device itself does not
record or store any audio data. After you say Alexa or press ,
the audio data of your request is sent to the Alexa system for
processing. You can view a record of your processed requests
in the Amazon Alexa app.
If you want to prevent the device from hearing any audio, you
can mute the microphones by pressing (Muting the
Microphones, page 3).
A skill I want to use is not available
The Garmin Speak Plus device is compatible with many Alexa
skills and features. However, some skills and features are
exclusive to certain devices or are not available for the Garmin
Speak Plus device. Skill compatibility is determined by the skill
developer.
If a skill you want to use is not available, you can contact the
skill developer to suggest adding support for the Garmin
Speak Plus device.
My video recordings are blurry
• Clean the camera lens (Cleaning the Camera Lens, page 9).
• Clean the windshield in front of the camera.
• Verify the area of the windshield in front of the camera is
cleared by the windshield wipers, and move the device, if
necessary.
10 Troubleshooting
Page 15

My memory card has degraded and needs to be replaced
All microSD® memory cards wear out after they are overwritten a
large number of times. Because the dash camera records
continuously, you should replace the memory card periodically
(Replacing the Memory Card, page 11). Your device detects
memory card errors automatically and alerts you when it is time
to replace your memory card.
You can take these actions to help extend the useful life of the
memory card.
• Turn off the device when your vehicle is not in use.
If your device is not connected to an ignition-switched vehicle
power outlet, you should turn off the device when your
vehicle is not in use to prevent the dash camera from
recording unneeded footage.
• Transfer saved video footage to a computer.
The memory card lasts longer when more free space is
available on the card.
• Use a high-quality memory card with a speed rating of class
10 or higher.
Purchase your replacement memory card from a high-quality
manufacturer and a reputable vendor.
Appendix
Replacing the Memory Card
NOTICE
You should only remove the memory card if you need to replace
it. Removing the card may cause the most recent video footage
to be corrupted. To transfer files to a computer, you should
leave the card in the Garmin Speak Plus device and connect the
device to your computer using a USB cable (Videos and Photos
on Your Computer, page 6).
You can replace the dash cam memory card to increase the
capacity or to replace a card that has reached the end of its
useful life. The dash cam requires a microSD memory card from
4 to 64 GB with a speed rating of class 10 or higher.
Press the current memory card in until it clicks, and release
1
the card.
The card ejects from the slot.
Remove the old card from the slot.
2
TIP: The card fits tightly in the slot. If the card does not eject
fully from the slot, you may need to use tweezers to remove
it.
Insert the new memory card À into the slot Á.
3
Pairing an Additional Smartphone with Your Garmin Speak Plus Device
If multiple people need to use your Garmin Speak Plus device,
you can pair it with additional smartphones.
With the Garmin Speak Plus turned on, hold for 5 seconds
1
to manually enter pairing mode.
The LED ring glows amber and animates while the device is
in pairing mode.
From the app store on your smartphone, install and open the
2
Garmin Speak app.
Follow the on-screen instructions to pair and set up the
3
device.
Each time the Garmin Speak Plus turns on, it attempts to
connect to the most recently connected smartphone first. If that
smartphone is not within range, it connects to another paired
smartphone within range.
Pairing an Additional Garmin Speak Plus Device with Your Smartphone
If you have Garmin Speak Plus devices in multiple vehicles, you
can pair each of them with your smartphone. You must use the
Bluetooth settings on your smartphone to pair additional
devices.
NOTE: Only one device can have an active connection to the
app at a time.
Turn off all your Garmin Speak Plus devices except the one
1
you want to pair.
With the Garmin Speak Plus turned on, hold for 5 seconds
2
to manually enter pairing mode.
The LED ring glows amber and animates while the device is
in pairing mode.
On your smartphone, go to the Bluetooth settings, select the
3
Garmin Speak Plus device from the list of nearby devices,
and select the option to pair with the device.
For more information about pairing your smartphone with
Bluetooth devices, see your smartphone owner's manual.
Your smartphone and the Garmin Speak Plus device display
a pairing code.
Verify the codes match, and press any button on the Garmin
4
Speak Plus device to accept the pairing request.
On your smartphone, select the option to authorize pairing
5
Press the card in until it clicks.
4
Appendix 11
with the device.
Open the Garmin Speak app.
6
Page 16

Say Alexa, ask Garmin to register my device.
7
After the device is paired and registered, your smartphone and
the Garmin Speak app connect to it automatically in the future.
Removing the Adhesive Disc from Your Windshield
The adhesive metal disc is intended for a long-term installation
and can be difficult to remove.
Using a non-sharp, non-metal object, carefully pry one edge
1
of the disc away from the windshield, applying steady
pressure until the adhesive releases from the windshield.
Remove all remaining adhesive from the windshield and disc.
2
Clean the windshield and disc.
3
You can replace the adhesive on the disc to attach it to
another location (Replacing the Adhesive on the Disc,
page 12).
Replacing the Adhesive on the Disc
You can replace the adhesive on the metal disc to install the
device in a new location. Your device includes one extra
adhesive pad. Go to buy.garmin.com to purchase additional
adhesive pads.
If necessary, remove the old adhesive pad from the disc.
1
Clean the disc.
2
The disc must be free of dust, wax, oils, or coatings.
Remove one side of the protective film from the new
3
adhesive pad.
Position the adhesive pad over the disc.
4
TIP: The adhesive is extremely sticky. Do not touch the
adhesive to the disc until the adhesive pad is properly
aligned.
Press the adhesive pad firmly onto the disc, and maintain
5
pressure for 30 seconds.
Place the metal disc into the device mount, and install it onto
6
your windshield (Installing the Adhesive Disc onto Your
Windshield, page 1).
12 Appendix
Page 17

Index
A
addresses, finding 4
advanced driver assistance system (ADAS) 7,
8
advanced driving assistance system (ADAS) 7
alerts 7
Alexa skills 10
audio, connecting 2, 10
B
buttons 3
C
cameras, dash cam 11
cleaning, device 9, 10
computer, connecting 7
D
dash cam 11
memory card 11
photos 6
playing video 6
recording audio 6
recording video 5, 6
detours 5
device care 9
driver alerts 7
E
e-label 10
F
finding locations
addresses 4
businesses 4
cities 4
intersections 4
points of interest 4
forward collision warning system (FCWS) 7
G
going home 4
GPS 4
H
hands-free phone calls 8
L
lane departure warning system (LDWS) 7, 8
locations, saving 4
M
memory card 6, 11
installing 11
microphone 3
muting 3, 10
microSD card 11
mount 12
removing 12
mounting, windshield 1
music
playing 8
streaming 8
N
navigation 3, 4
next turn 4, 5
P
pairing, smartphone 2, 11
phone calls, answering 8
photos 6
viewing 6
playing, music 8
points of interest, finding 4
power 3
power key 3
privacy 10
R
recalculating routes, detours 5
removing mount 12
routes 5
arrival time 5
following 4, 5
stopping 5
taking a detour 5
S
satellite signals, acquiring 4
saved locations 4
savjng, locations 4
settings 9
setup 1
skills 4, 8, 10
enabling 8
software
updating 9
version 10
speaking commands 4, 5, 8
specifications 10
T
troubleshooting 10
turn-by-turn directions 5
U
unit ID 10
updating, software 9
V
video 6
editing 6
quality 10
recording 5, 6
saving 6
viewing 6
voice command
activating 3
canceling 3
tips 3
volume, adjusting 3
W
weather 8
Wi‑Fi, connecting 6
Index 13
Page 18

support.garmin.com
February 2018
190-02276-04_0A
 Loading...