

Garmin nüviCam LMTHD, nüviCam LMT-D, nüviCam LMT, nüviCam LM User Manual
nüviCam
™
Owner’s Manual
May 2015 Printed in Taiwan 190-01874-00_0C

All rights reserved. Under the copyright laws, this manual may not be copied, in whole or in part, without the written consent of Garmin. Garmin reserves the
right to change or improve its products and to make changes in the content of this manual without obligation to notify any person or organization of such
changes or improvements. Go to www.garmin.com for current updates and supplemental information concerning the use of this product.
Garmin® and the Garmin logo are trademarks of Garmin Ltd. or its subsidiaries, registered in the USA and other countries. These trademarks may not be used
without the express permission of Garmin.
ecoRoute™, Garmin Express™, Garmin Real Vision™, myGarmin™, nüviCam™, myTrends™, trafficTrends™, nüMaps Guarantee™, and nüMaps Lifetime™ are
trademarks of Garmin Ltd. or its subsidiaries. These trademarks may not be used without the express permission of Garmin.
The Bluetooth® word mark and logos are owned by the Bluetooth SIG, Inc., and any use of such word mark or logo by Garmin is under license. Foursquare® is
a trademark of Foursquare Labs, Inc. in the U.S. and in other countries. microSD™ and the microSDHC logo are trademarks of SD-3C, LLC. Windows®,
Windows Vista®, and Windows XP® are registered trademarks of Microsoft Corporation in the United States and other countries. Mac® is a trademark of Apple
Inc, registered in the USA and other countries. HD Radio™ and the HD logo are trademarks of iBiquity Digital Corporation. HD Radio Technology manufactured
under license from iBiquity Digital Corporation. U.S. and foreign patents.

Table of Contents
Getting Started............................................................... 1
Installing the Dash Camera Memory Card..................................1
Mounting and Powering the nüviCam Device in Your
Vehicle........................................................................................ 1
Acquiring GPS Signals............................................................... 1
Status Bar Icons......................................................................... 1
Using the On-Screen Buttons..................................................... 2
Entering and Exiting Sleep Mode............................................... 2
Turning Off the Device........................................................... 2
Adjusting the Volume.................................................................. 2
Enabling Automatic Volume................................................... 2
Adjusting the Screen Brightness................................................ 2
Dash Camera.................................................................. 2
Aligning the Camera................................................................... 2
Dash Camera Recording............................................................ 2
Saving a Video Recording..................................................... 2
Taking a Photo....................................................................... 2
Starting and Stopping Dash Camera Recording.................... 2
Camera Key Tips................................................................... 3
Viewing Videos and Photos................................................... 3
Videos and Photos on Your Computer.................................. 3
Turning Audio Recording On or Off....................................... 3
Deleting a Video or Photo...................................................... 3
Advanced Driving Assistance System........................................ 3
Forward Collision Warning System........................................ 3
Lane Departure Warning System...........................................3
Navigating to Your Destination..................................... 4
Routes........................................................................................ 4
Starting a Route.......................................................................... 4
Going Home........................................................................... 4
Your Route on the Map...............................................................4
Active Lane Guidance............................................................ 4
Viewing a List of Turns...........................................................4
Viewing the Entire Route on the Map.................................... 4
Destination Arrival with Garmin Real Vision™............................4
Adding a Location to Your Route................................................ 5
Shaping Your Route................................................................... 5
Taking a Detour.......................................................................... 5
Stopping the Route..................................................................... 5
Changing the Route Calculation Mode....................................... 5
Starting a Route by Using the Map............................................. 5
Previewing Multiple Routes........................................................ 5
Trip Planner................................................................................ 5
Planning a Trip....................................................................... 5
Navigating to a Saved Trip.....................................................6
Optimizing the Order of Stops in a Trip..................................6
Editing and Reordering Locations in a Trip............................ 6
Editing and Saving Your Active Route................................... 6
Changing Trip Routing Options..............................................6
Scheduling a Trip................................................................... 6
Using Suggested Routes............................................................ 6
Avoiding Delays, Tolls, and Areas.............................................. 6
Avoiding Traffic Delays on Your Route.................................. 6
Avoiding Toll Roads............................................................... 6
Avoiding Toll Stickers.............................................................6
Avoiding Road Features........................................................ 7
Avoiding Environmental Zones.............................................. 7
Custom Avoidances............................................................... 7
Navigating Off Road................................................................... 7
Finding Locations...........................................................7
Finding a Location Using the Search Bar................................... 7
Changing the Search Area......................................................... 7
Points of Interest......................................................................... 7
Finding a Location by Category
Searching Within a Category................................................. 7
Navigating to Points of Interest Within a Venue.................... 8
Foursquare®.......................................................................... 8
Search Tools...............................................................................8
Finding an Address................................................................ 8
Finding an Intersection...........................................................8
Finding a City......................................................................... 8
Finding a Location Using Coordinates................................... 8
Finding Recently Found Destinations......................................... 8
Clearing the List of Recently Found Locations...................... 9
Finding Your Last Parking Spot.................................................. 9
Viewing Current Location Information........................................ 9
Finding Emergency Services and Fuel.................................. 9
Getting Directions to Your Current Location.......................... 9
Adding a Shortcut....................................................................... 9
Removing a Shortcut............................................................. 9
Saving Locations........................................................................ 9
Saving a Location.................................................................. 9
Saving Your Current Location................................................ 9
Saving a Home Location........................................................ 9
Editing a Saved Location....................................................... 9
Assigning Categories to a Saved Location............................ 9
Deleting a Saved Location..................................................... 9
............................................. 7
Using the Map................................................................. 9
Map Tools................................................................................. 10
Viewing a Map Tool............................................................. 10
Enabling Map Tools............................................................. 10
Up Ahead.................................................................................. 10
Finding Upcoming Points of Interest.................................... 10
Customizing the Up Ahead Categories................................ 10
Trip Information.........................................................................10
Viewing Trip Data from the Map.......................................... 10
Viewing the Trip Information Page....................................... 10
Viewing the Trip Log............................................................ 10
Resetting Trip Information....................................................10
Viewing Upcoming Traffic......................................................... 10
Viewing Traffic on the Map.................................................. 10
Searching for Traffic Incidents............................................. 10
Safety Cameras........................................................................ 10
Customizing the Map................................................................ 11
Customizing the Map Layers............................................... 11
Changing the Map Data Field.............................................. 11
Changing the Map Perspective............................................ 11
Traffic............................................................................ 11
Receiving Traffic Data Using a Traffic Receiver....................... 11
Receiving Traffic Data Using Smartphone Link........................ 11
Traffic Receiver.........................................................................11
Positioning the Traffic Receiver........................................... 11
About Traffic Subscriptions....................................................... 11
Subscription Activation.........................................................12
Viewing Traffic Subscriptions............................................... 12
Adding a Subscription.......................................................... 12
Enabling Traffic......................................................................... 12
Voice Command........................................................... 12
Setting the Wakeup Phrase...................................................... 12
Activating Voice Command.......................................................12
Voice Command Tips............................................................... 12
Starting a Route Using Voice Command.................................. 12
Muting Instructions....................................................................12
Voice Control............................................................................ 12
Configuring Voice Control.................................................... 12
Using Voice Control............................................................. 12
Voice Control Tips................................................................12
Hands-Free Calling....................................................... 12
Table of Contents i

Pairing Your Phone...................................................................13
Enabling Bluetooth Wireless Technology............................ 13
Tips After Pairing the Devices..............................................13
Disconnecting a Bluetooth Device....................................... 13
Deleting a Paired Phone...................................................... 13
Placing a Call............................................................................ 13
Dialing a Number................................................................. 13
Calling a Contact in Your Phone Book................................ 13
Calling a Location................................................................ 13
Receiving a Call........................................................................ 13
Using the Call History............................................................... 13
Using In-Call Options................................................................ 13
Saving a Home Phone Number................................................ 13
Calling Home....................................................................... 13
Using the Apps............................................................. 13
Using Help................................................................................ 13
Searching Help Topics......................................................... 13
Smartphone Link.......................................................................13
Downloading Smartphone Link............................................ 13
Connecting to Smartphone Link.......................................... 13
Sending a Location from Your Phone to Your Device......... 14
Disabling Calls While Connected to Smartphone Link........ 14
Garmin Live Services................................................................14
Subscribing to Garmin Live Services................................... 14
About Traffic Cameras......................................................... 14
About ecoRoute........................................................................ 14
Setting Up the Vehicle......................................................... 14
Changing the Fuel Price...................................................... 14
Calibrating the Fuel Economy.............................................. 14
About ecoChallenge............................................................ 14
Viewing Fuel Economy Information..................................... 15
Mileage Reports................................................................... 15
Resetting ecoRoute Information.......................................... 15
Driving Tips.......................................................................... 15
Viewing myGarmin Messages.................................................. 15
Viewing the Weather Forecast..................................................15
Viewing Weather Near a Different City................................ 15
Viewing the Weather Radar................................................. 15
Viewing Weather Alerts........................................................15
Checking Road Conditions.................................................. 15
Viewing Previous Routes and Destinations.............................. 15
Customizing the Device............................................... 15
Map and Vehicle Settings......................................................... 15
Enabling Maps..................................................................... 16
Navigation Settings................................................................... 16
Calculation Mode Settings................................................... 16
Setting a Simulated Location............................................... 16
Camera Settings....................................................................... 16
Bluetooth Settings.....................................................................16
Disabling Bluetooth.............................................................. 16
Display Settings........................................................................ 16
Traffic Settings.......................................................................... 16
Units and Time Settings............................................................16
Setting the Time................................................................... 17
Language and Keyboard Settings............................................ 17
Proximity Alerts Settings........................................................... 17
Device and Privacy Settings..................................................... 17
Restoring Settings.................................................................... 17
Device Information....................................................... 17
Device Care.............................................................................. 17
Cleaning the Outer Casing...................................................17
Cleaning the Touchscreen................................................... 17
Avoiding Theft...................................................................... 17
Resetting the Device.................................................................17
Specifications............................................................................17
Appendix....................................................................... 17
Support and Updates................................................................ 17
Setting Up Garmin Express................................................. 17
Updating Maps and Software with Garmin Express............ 17
Data Management.................................................................... 18
About Memory Cards........................................................... 18
Installing a Memory Card for Maps and Data...................... 18
Connecting the Device to Your Computer........................... 18
Transferring Data From Your Computer.............................. 18
Viewing GPS Signal Status...................................................... 18
Power Cables........................................................................... 18
Charging the Device............................................................ 19
Changing the Fuse in the Vehicle Power Cable.................. 19
Removing the Device, Mount, and Suction Cup....................... 19
Removing the Device from the Mount..................................19
Removing the Mount from the Suction Cup......................... 19
Removing the Suction Cup from the Windshield................. 19
Purchasing Additional Maps..................................................... 19
Purchasing Accessories........................................................... 19
Troubleshooting........................................................... 19
The suction cup will not stay on my windshield........................ 19
My device is not acquiring satellite signals............................... 19
The device does not charge in my vehicle............................... 19
My battery does not stay charged for very long........................ 19
My device does not appear as a removable drive on my
computer................................................................................... 19
My device does not appear as a portable device on my
computer
My device does not appear as either a portable device or a
removable drive or volume on my computer.............................19
My phone will not connect to the device................................... 20
................................................................................... 19
Index.............................................................................. 21
ii Table of Contents
Getting Started
WARNING
See the Important Safety and Product Information guide in the
product box for product warnings and other important
information.
• Install the camera memory card (Installing the Dash Camera
Memory Card).
• Update the maps and software on your device (Updating
Maps and Software with Garmin Express).
• Mount the device in your vehicle and connect it to power
(Mounting and Powering the nüviCam Device in Your
Vehicle).
• Align the dash camera (Aligning the Camera).
• Acquire GPS signals (Acquiring GPS Signals).
• Adjust the volume (Adjusting the Volume) and display
brightness (Adjusting the Screen Brightness).
• Navigate to your destination (Starting a Route).
Installing the Dash Camera Memory Card
Before the device can record video from the integrated dash
camera, you must install a camera memory card. The camera
requires a microSD™ or microSDHC memory card up to 64GB
with a speed rating of class 4 or higher. You can use the
included memory card, or you can purchase a compatible
memory card from an electronics supplier.
Insert a memory card À into the camera memory card slot Á.
1
NOTE: If you install the memory card into the incorrect slot,
the camera cannot record video.
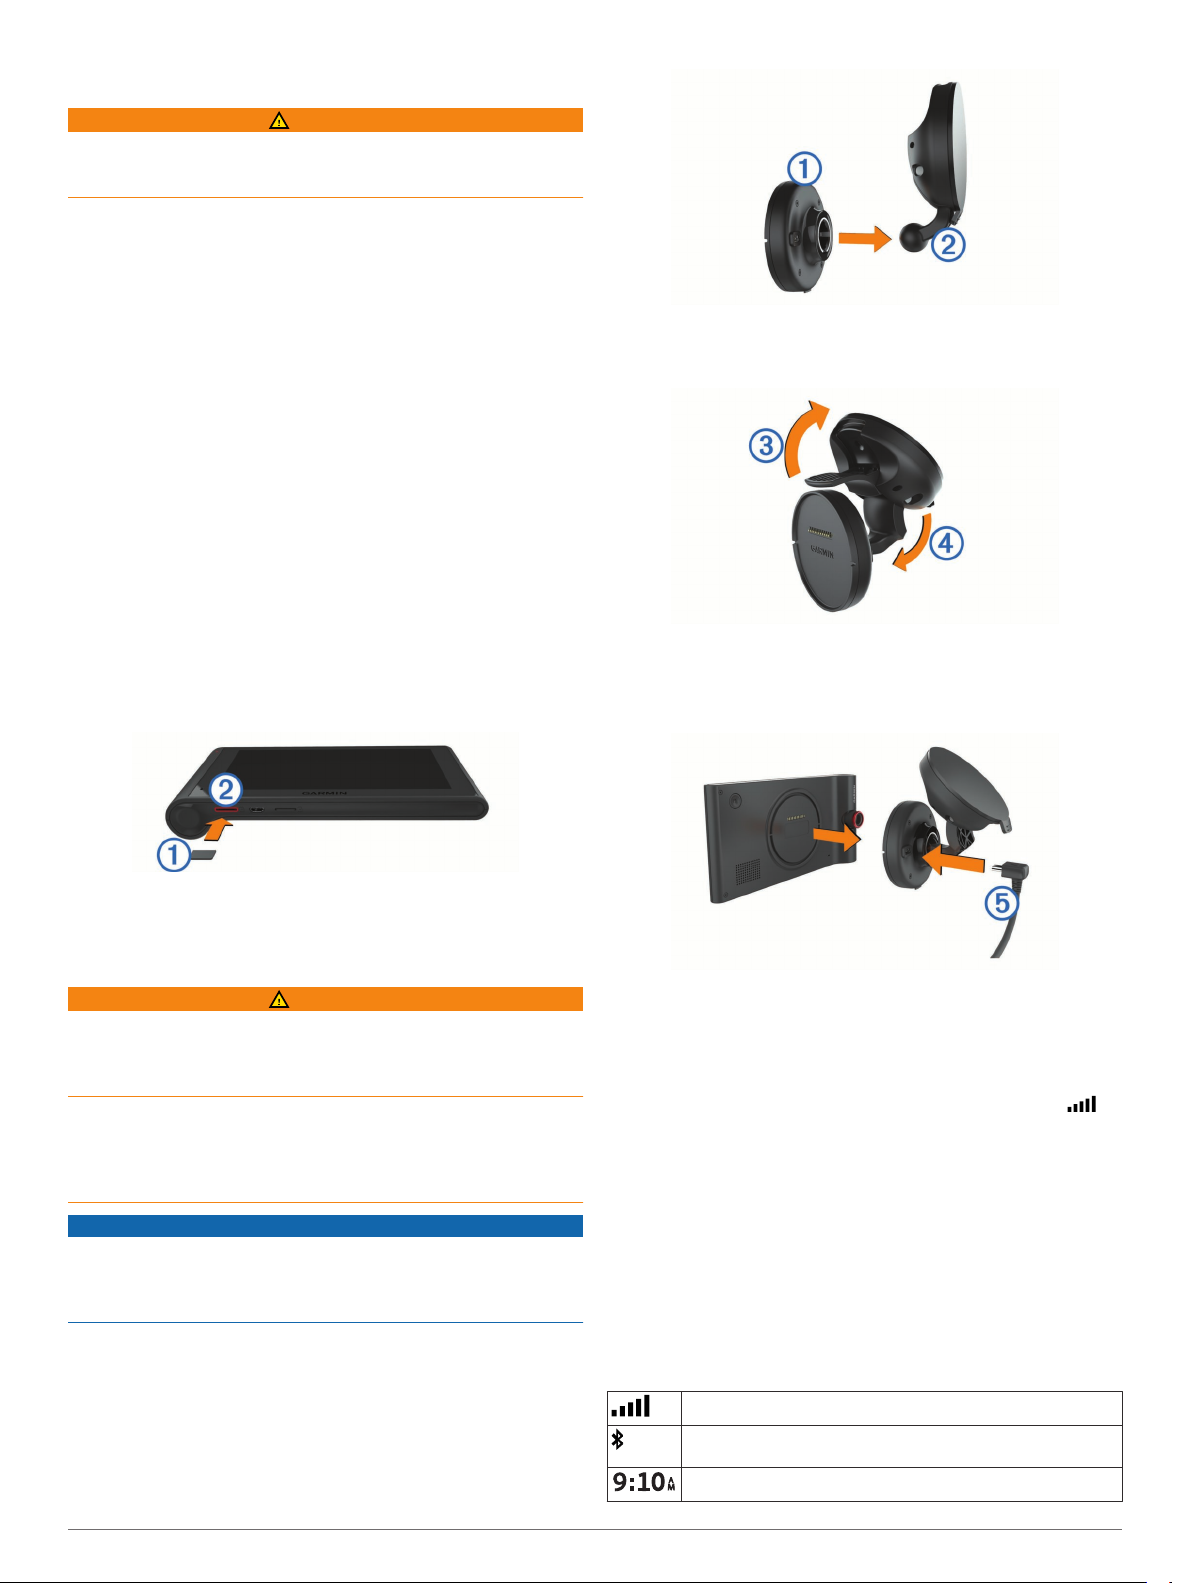
Open the lever Â, press the suction cup to the windshield,
2
and flip the lever back toward the windshield.
The lever must be oriented toward the top of the windshield.
Extend the suction cup arm Ã.
3
If necessary, rotate the mount so the Garmin® logo faces
4
right-side up.
Plug the vehicle power cable Ä into the port on the mount.
5
Press it in until it clicks.
2
Mounting and Powering the nüviCam Device in Your Vehicle
WARNING
This product contains a lithium-ion battery. To prevent the
possibility of personal injury or product damage caused by
battery exposure to extreme heat, store the device out of direct
sunlight.
Both the device and its mount contain magnets. Under certain
circumstances, magnets may cause interference with some
internal medical devices, including pacemakers and insulin
pumps. Keep the device and its mount away from such medical
devices.
NOTICE
Both the device and its mount contain magnets. Under certain
circumstances, magnets may cause damage to some electronic
devices, including hard drives in laptop computers. Use caution
when the device or its mount is near electronic devices.
Before you use your device on battery power, you should charge
it.
Press the mount À onto the suction cup Á until it snaps into
1
place.
Place the back of the device onto the mount.
6
Plug the other end of the vehicle power cable into a power
7
outlet in your vehicle.
Acquiring GPS Signals
To navigate with your device, you must acquire satellites. in
the status bar indicates the satellite signal strength. Acquiring
satellites can take several minutes.
Turn on the device.
1
Wait while the device locates satellites.
2
If necessary, go outdoors to an open area, away from tall
3
buildings and trees.
Status Bar Icons
The status bar is located at the top of the main menu. The status
bar icons display information about features on the device. You
can select some icons to change settings or view additional
information.
GPS signal status
Bluetooth® technology status (appears when Bluetooth is
enabled)
Current time
Getting Started 1
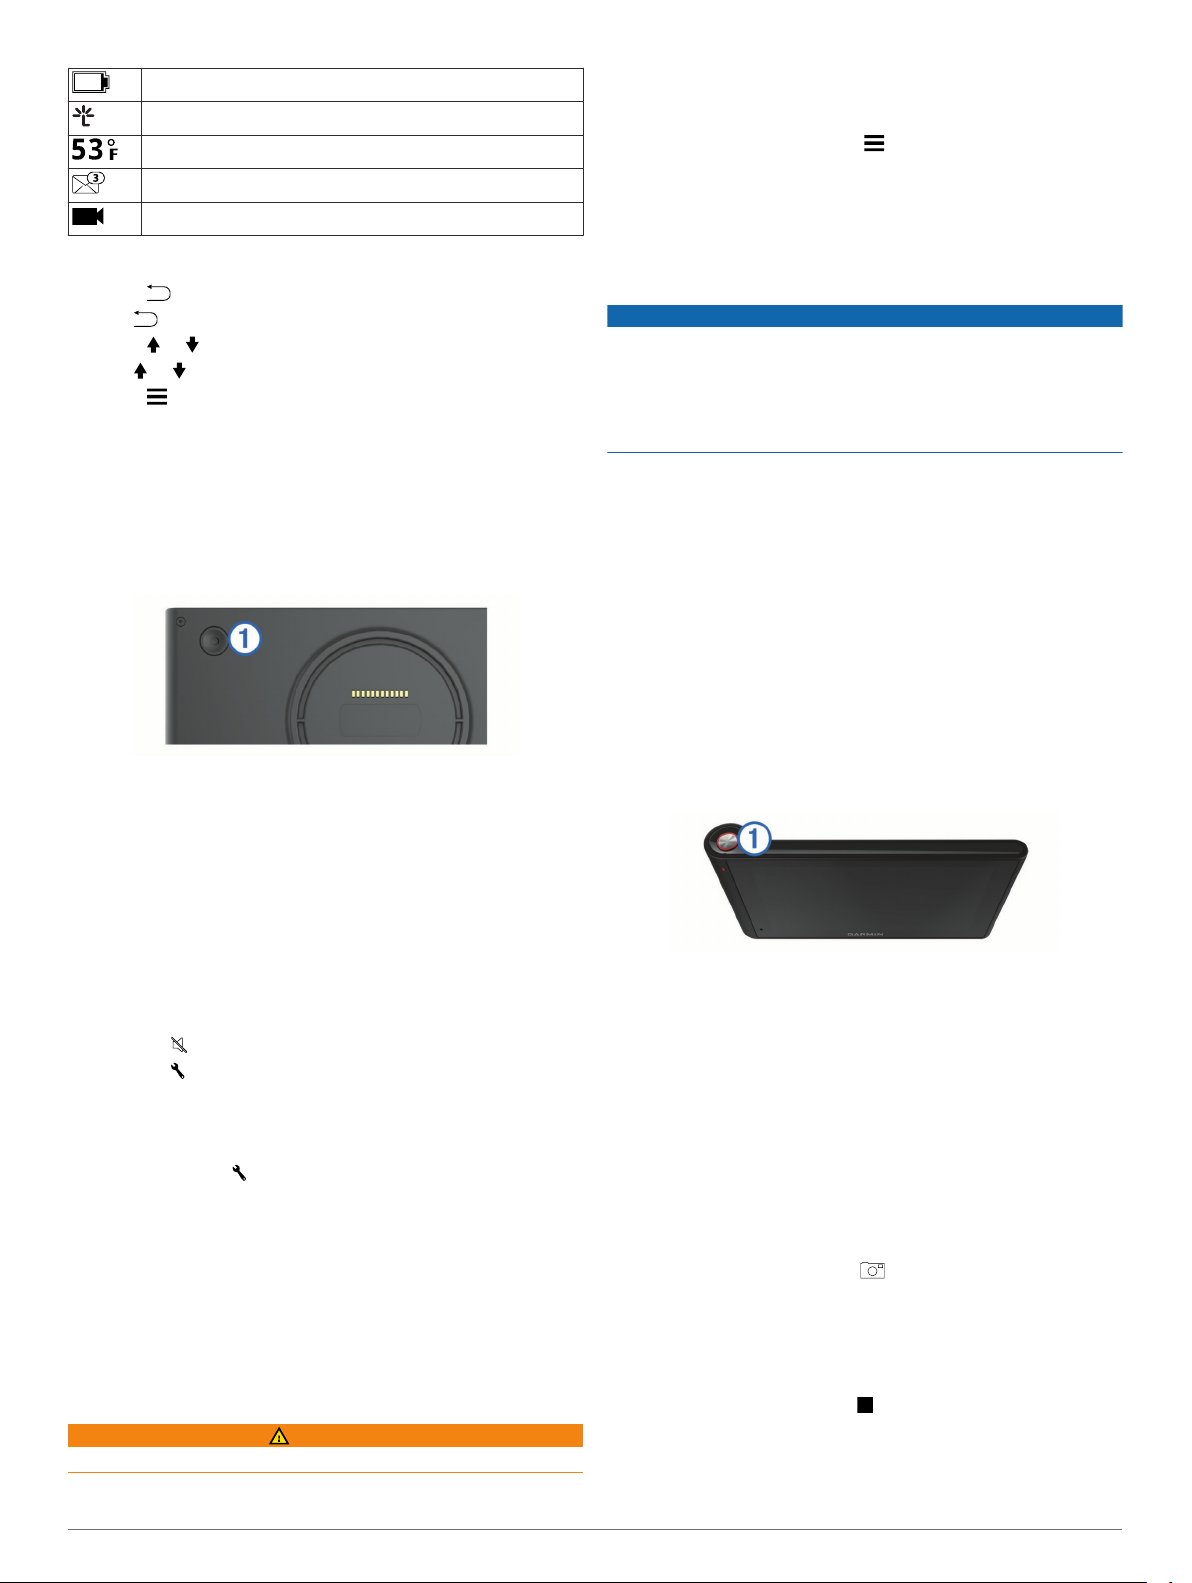
Battery status
Connected to Smartphone Link
Temperature
Unread myGarmin™ messages
Dash camera recording status
Using the On-Screen Buttons
• Select to return to the previous menu screen.
• Hold to quickly return to the main menu.
• Select or to see more choices.
• Hold or to scroll faster.
• Select to see a menu of options for the current screen.
Entering and Exiting Sleep Mode
You can use sleep mode to conserve battery power when your
device is not in use. While in sleep mode, your device uses very
little power and can wake instantly for use.
TIP: You can charge your device faster by putting it in sleep
mode while charging the battery.
Press the power key À.
Turning Off the Device
Hold the power key until a prompt appears on the screen.
1
The prompt appears after five seconds. If you release the
power key before the prompt appears, the device enters
sleep mode.
Select Off.
2
You should align the dash camera each time you mount the or
reposition the device. The advanced driver assistance features
may not perform properly if the camera is not aligned.
Select Settings > Camera > > Alignment.
1
Tilt the device and rotate the camera to align the camera.
2
The crosshairs should point straight ahead, and the horizon
line should be centered between the top and bottom of the
screen.
Dash Camera Recording
NOTICE
Legal Restrictions
In some jurisdictions it could be considered an invasion of
privacy rights to take or publicly display photographs or videos
of people or their vehicles using this product. It is your
responsibility to know and comply with applicable laws and
rights to privacy in your jurisdiction.
Before you can record video using the integrated dash camera,
you must install a camera memory card (Installing the Dash
Camera Memory Card).
By default, the device immediately starts recording video when it
turns on. It continues recording, overwriting the oldest, nonsaved video until it turns off. While recording, the LED is solid
red.
The device records continuously until the device is turned off or
video recording is disabled.
Saving a Video Recording
By default, the device uses a sensor to detect possible
accidental collisions and saves video footage before, during,
and after the detected event.
You can also manually save video at any time.
While recording, select the camera key À.
1
Adjusting the Volume
Select Volume.
1
Select an option:
2
• Use the slider bar to adjust the volume.
• Select to mute the device.
• Select for additional options.
Enabling Automatic Volume
Your device can increase or decrease the volume automatically
based on the level of background noise.
Select Volume > .
1
Select Automatic Volume.
2
Adjusting the Screen Brightness
Select Settings > Display > Brightness.
1
Use the slider bar to adjust the brightness.
2
Dash Camera
Aligning the Camera
WARNING
Do not attempt to align the camera while driving.
The device saves a photo and the video footage before,
during, and after you select the key. The LED flashes red
while the device is saving video footage.
Select the camera key again to extend the saved recording
2
time (optional).
A message indicates the amount of video footage to be
saved.
The memory card has limited storage. After you save a video
recording, you should transfer the recording to your computer or
other external storage location for permanent storage.
Taking a Photo
You can take still photographs with this device. By default, the
device stores time and location information with the photo.
Select Apps > Dash Cam > .
The device takes a photo and saves it to the memory card.
Starting and Stopping Dash Camera Recording
Select Apps > Dash Cam.
1
Select an option:
2
• To stop recording, select .
The LED is solid green while recording is stopped.
TIP: By default, recording starts automatically the next
time you turn on the device. You can disable this option in
the camera settings (Camera Settings).
2 Dash Camera
• To start recording, select .
The LED is solid red while the dash camera is recording.
Camera Key Tips
The camera key provides quick access to several dash camera
functions.
• Select the camera key to save a video recording and capture
a photo.
• While saving a video recording, select the camera key to
extend the saved recording time.
• While recording video, hold the camera key for several
seconds to stop recording.
• While recording is stopped, select the camera key to start
recording.
Viewing Videos and Photos
NOTE: The device stops recording video while you view videos
or photos.
Select Apps > Gallery > Yes.
1
Select a video or photo.
2
The device displays the video or photo. Videos start playing
automatically. If the video or photo includes location
information, a map shows the location.
Videos and Photos on Your Computer
The Garmin Dash Cam Player application allows you to view,
save, and edit recorded videos on your computer. You can also
view and overlay time, date, location, and speed information
recorded with the video. Go to www.garmin.com/dashcamplayer
for more information.
Turning Audio Recording On or Off
The device can record audio using the integrated microphone
while recording video. You can turn audio recording on or off at
any time.
Select Settings > Camera > Record Audio.
Deleting a Video or Photo
Select Apps > Gallery > Yes.
1
Select a video or photo.
2
Select > Yes.
3
Forward Collision Warning System Performance Tips
Several factors affect the performance of the forward collision
warning system (FCWS). Some conditions may prevent the
FCWS feature from detecting a vehicle ahead of you.
• The FCWS feature activates only when your vehicle speed
exceeds 48 km/h (30 mph).
• The FCWS feature may not detect a vehicle ahead of you
when the camera's view of the vehicle is obscured by rain,
fog, snow, sun or headlight glare, or darkness.
• The FCWS feature may not function properly if the camera is
incorrectly aligned (Aligning the Camera).
• The FCWS feature may not detect vehicles greater than 40 m
(130 ft.) away or closer than 5 m (16 ft.).
Lane Departure Warning System
WARNING
The lane departure warning system (LDWS) feature is for
information only and does not replace your responsibility to
observe all road and driving conditions, abide by all traffic
regulations, and use safe driving judgment at all times. The
LDWS relies on the camera to provide warnings for lane
markers and, as a result, may have limited functionality in low
visibility conditions.
The LDWS feature alerts you when the device detects you may
be crossing a lane boundary unintentionally. For example, the
device alerts you if you cross some solid painted lane
boundaries or cross into an incoming traffic lane. The LDWS
feature provides alerts only when your vehicle speed exceeds
64 km/h (40 mph). The alert appears on the left or right side of
the screen to indicate which lane boundary you crossed.
Advanced Driving Assistance System
Your device includes an advanced driving assistance system
(ADAS), which uses the integrated dash camera to provide
forward collision warnings and lane departure warnings while
you are driving.
Forward Collision Warning System
WARNING
The forward collision warning system (FCWS) feature is for
information only and does not replace your responsibility to
observe all road and driving conditions, abide by all traffic
regulations, and use safe driving judgment at all times. The
FCWS relies on the camera to provide a warning of upcoming
vehicles and, as a result, may have limited functionality in low
visibility conditions.
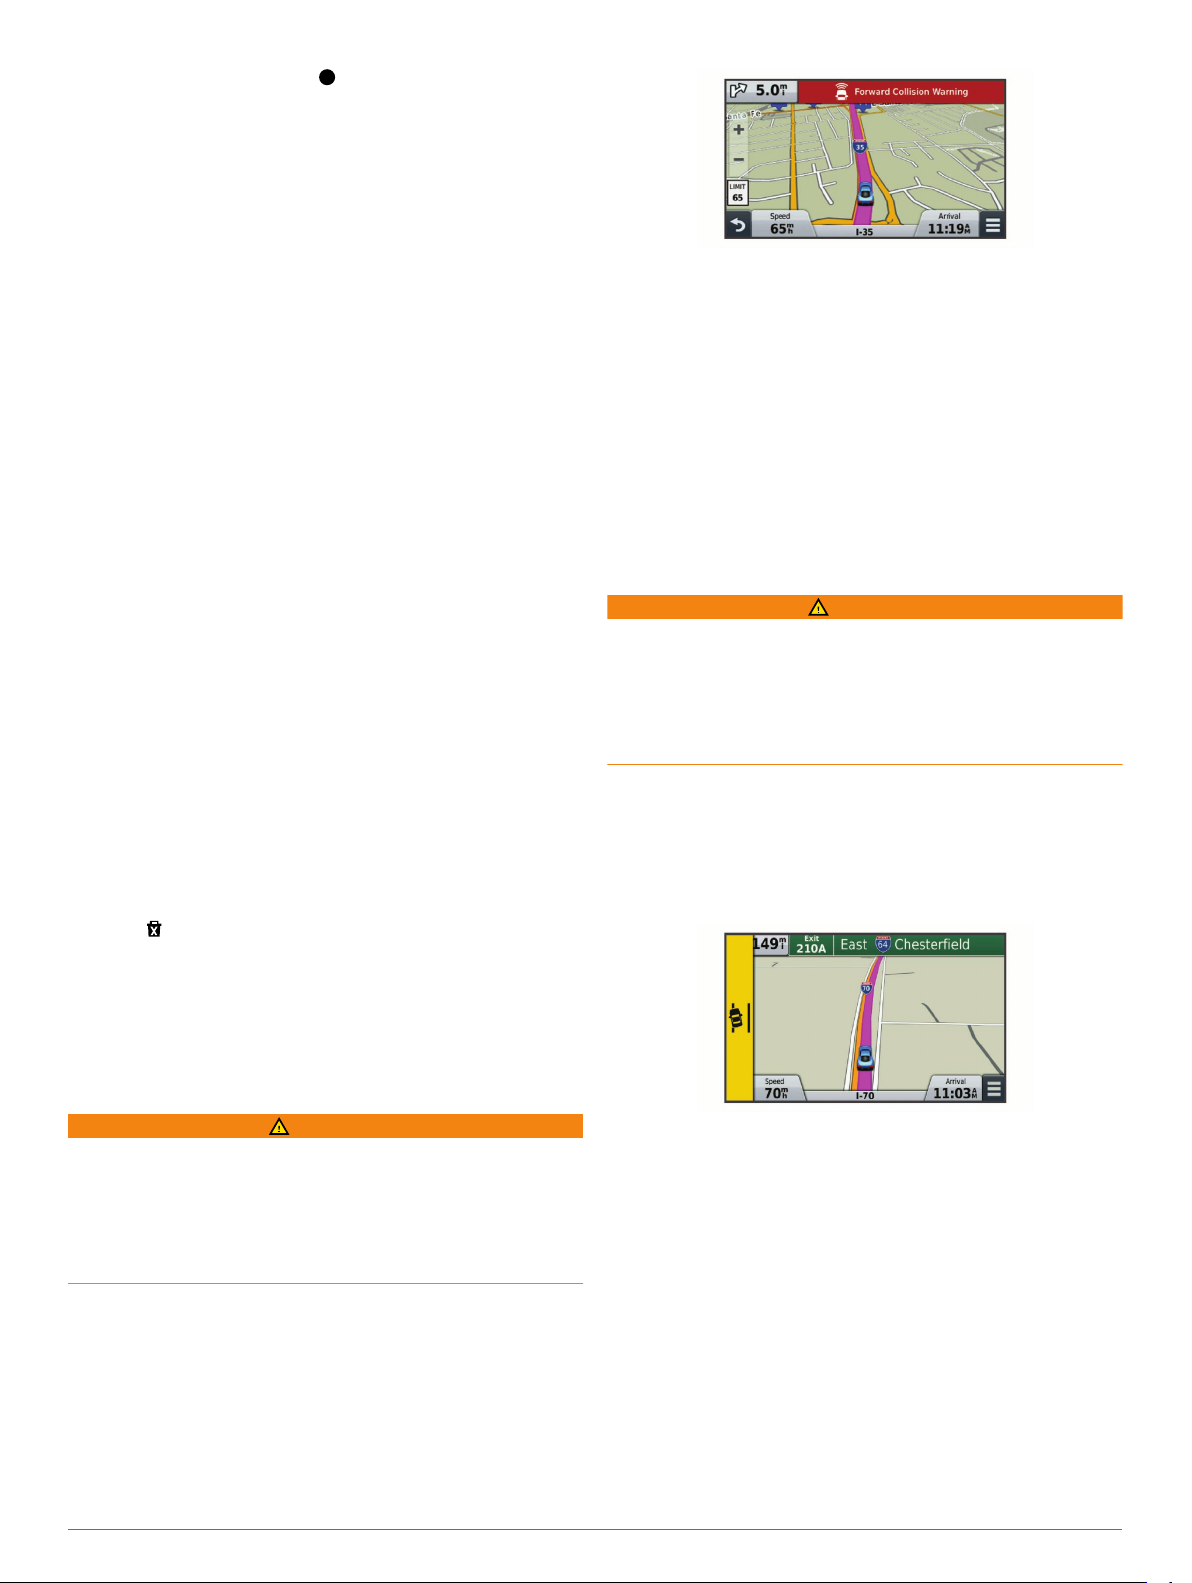
The FCWS feature alerts you when the device detects you are
not maintaining a safe distance between your vehicle and the
vehicle in front of you. The device determines your vehicle
speed using GPS and calculates an estimated safe following
distance based on your speed. The FCWS activates when your
vehicle speed exceeds 48 km/hr (30 mph).
When the device detects you are too close to the vehicle ahead
of you, the device plays an audible alert, and a warning appears
at the top of the screen.
Dash Camera 3
NOTE: For the best LDWS performance, you should set the
Camera Placement option to indicate the location of your device
in the vehicle.
Setting the Camera Placement
You can mount the device in the left, center, or right of your
windshield or dash. For the best LDWS performance, you
should set the Camera Placement option to indicate the location
of your device in the vehicle.
Select Settings > Camera > Camera Placement.
1
Select the location of the device.
2
Lane Departure Warning Performance Tips
Several factors affect the performance of the lane departure
warning system (LDWS). Some conditions may prevent the
LDWS feature from detecting lane departures.
• The LDWS feature provides alerts only when your vehicle
speed exceeds 64 km/h (40 mph).
• The LDWS feature does not provide alerts on certain types of
roads, such as highway ramps or merging lanes.
• The LDWS feature may not function properly if the camera is
incorrectly aligned (Aligning the Camera).
• The LDWS feature may not function properly if the Camera
Placement option does not correctly indicate the placement
of your device in the vehicle.
• The LDWS feature requires a clear, continuous view of the
lane divider lines.
◦ Lane departures may not be detected when divider lines
are obscured by rain, fog, snow, extreme shadows, sun or
headlight glare, road construction, or any other visual
obstruction.
◦ Lane departures may not be detected if lane divider lines
are misaligned, missing, or heavily worn.
• The LDWS feature may not detect lane departures on
extremely wide, narrow, or winding roads.
Navigating to Your Destination
Routes
A route is a path from your current location to a destination. A
route may include multiple locations, or stops, on the way to the
destination (Adding a Location to Your Route). The device
calculates the route to your destination based on the
preferences you select in the navigation settings, such as the
route calculation mode (Changing the Route Calculation Mode)
and avoidances (Avoiding Delays, Tolls, and Areas).
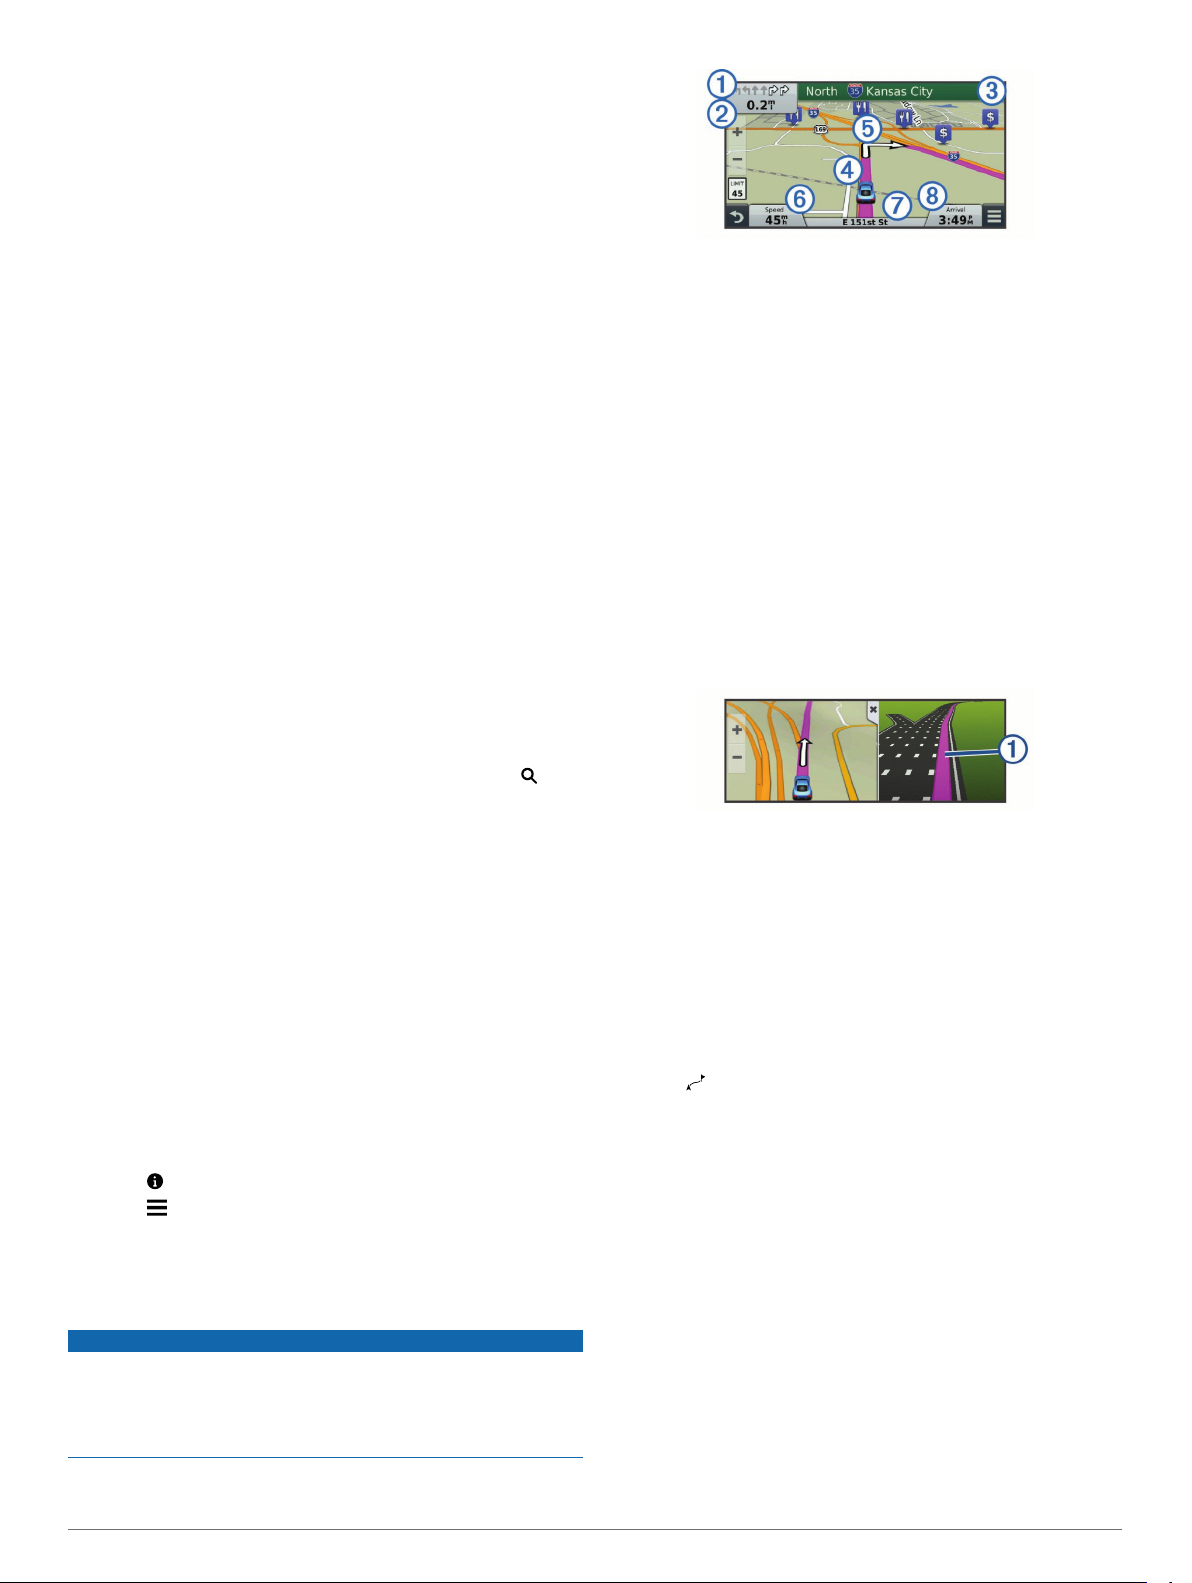
Instructions for your next turn or exit, or other action appear
across the top of the map. The symbol À indicates the type of
action and the lane or lanes in which you should be traveling, if
available. The device also displays the distance to the next
action Á and the name of the street or exit associated with that
action Â.
A colored line à highlights the course of your route on the map.
Arrows on the map Ä indicate upcoming turns. When you
approach your destination, a checkered flag indicates the
location of your destination.
Your vehicle speed Å, the road on which you are traveling Æ,
and your estimated arrival time Ç appear at the bottom of the
map. You can customize the arrival time data field to display
other information (Changing the Map Data Field).
A data field displaying the speed limit may appear as you travel
on major roadways. This feature is not available in all areas.
Active Lane Guidance
As you approach a turn while navigating a route, a detailed
simulation of the road appears beside the map, if available. A
colored line À indicates the proper lane for the turn.
Starting a Route
Select Where To?.
1
Select Enter Search, enter a search term, and select
2
(Finding a Location Using the Search Bar).
TIP: You can also search for locations using categories,
search tools, or other methods (Finding Locations).
Select a location.
3
Select Go!.
4
The device calculates a route to the location and guides you
using voice prompts and information on the map (Your Route on
the Map).
If you need to stop at additional locations, you can add the
locations to your route (Adding a Location to Your Route). You
can also shape the route to adjust its course (Shaping Your
Route).
Going Home
Select Where To? > Go Home.
Editing Your Home Location Information
Select Where To? > Saved > Home.
1
Select .
2
Select > Edit.
3
Enter your changes.
4
Select Done.
5
Your Route on the Map
NOTICE
The speed limit feature is for information only and does not
replace your responsibility to abide by all posted speed limit
signs and to use safe driving judgment at all times. Garmin will
not be responsible for any traffic fines or citations you receive for
failing to follow all applicable traffic laws and signs.
As you travel, the device guides you to your destination using
voice prompts and information on the map.
Viewing a List of Turns
While navigating a route, you can view all of the turns and
maneuvers for your entire route and the distance between turns.
While navigating a route, select the text bar on the top of the
1
map.
Select a turn.
2
The details for the turn appear. If available, an image of the
junction appears for junctions on major roadways.
Viewing the Entire Route on the Map
While navigating a route, select anywhere on the map.
1
Select .
2
Destination Arrival with Garmin Real Vision
Garmin Real Vision automatically displays a camera view when
approaching some destinations, including addresses and
geographic coordinates. The location of your destination
appears on an image of your surroundings captured by the dash
camera.
Some conditions may prevent this feature from appearing.
• This feature is not available in all areas or for all types of
destinations.
• This feature may not appear for destinations far from the
route or road, close to a turn or maneuver, or located on a
very curvy or hilly road.
• This feature may not appear when the road or destination is
obscured by weather, vegetation, or other obstructions.
• This feature may not appear in very bright or dark
environments.
™
4 Navigating to Your Destination

Adding a Location to Your Route
Before you can add a location to your route, you must be
navigating a route (Starting a Route).
You can navigate to additional locations on the way to your
destination. For example, you can add a fuel station as the next
stop in your route. You can also add a location to the end of
your route.
TIP: To create complex routes with multiple locations or
scheduled stops, you can use the trip planner to plan, edit, and
save your route (Planning a Trip).
From the map, select > Where To?.
1
Search for a location (Finding Locations).
2
Select a location.
3
Select Go!.
4
Select an option:
5
• To add the location as the next stop in your route, select
Add As Next Stop.
• To add the location to the end of your route, select Add
As Last Stop.
• To add the location and adjust the order of locations in
your route, select Add to Active Route.
Your device re-calculates the route to include the added location
and guides you to the locations in order.
Shaping Your Route
Before you can shape your route, you must start a route
(Starting a Route).
You can manually shape your route to change its course. This
allows you to direct the route to use a certain road or go through
a certain area without adding a stop or destination to the route.
Touch anywhere on the map.
1
Select .
2
The device enters route shaping mode.
Select a location on the map.
3
TIP: You can select to zoom in on the map and select a
more precise location.
The device recalculates the route to travel through the
selected location.
If necessary, select an option:
4
• To add more shaping points to the route, select additional
locations on the map.
• To remove a shaping point, select .
When you are finished shaping the route, select Go!.
5
Taking a Detour
Before you can take a detour, you must be navigating a route
and you must add the change route tool to the map tools menu
(Enabling Map Tools).
You can take a detour for a specified distance along your route
or detour around specific roads. This is useful if you encounter
construction zones, closed roads, or poor road conditions.
From the map, select > Change Route.
1
Select an option:
2
• To detour your route for a specific distance, select Detour
by Distance.
• To detour around a specific road on the route, select
Detour by Road.
Stopping the Route
From the map, select > Stop.
Changing the Route Calculation Mode
Select Settings > Navigation > Calculation Mode.
1
Select an option:
2
• Select Faster Time to calculate routes that are faster to
drive but can be longer in distance.
• Select Off Road to calculate point-to-point routes (without
roads).
• Select Less Fuel to calculate routes that are more fuel-
efficient.
• Select Shorter Distance to calculate routes that are
shorter in distance but can take more time to drive.
Starting a Route by Using the Map
You can start route by selecting a location from the map.
Select View Map.
1
Drag and zoom the map to display the area to search.
2
If necessary, select to filter the displayed points of interest
3
by category.
Location markers ( or a blue dot) appear on the map.
Select an option:
4
• Select a location marker.
• Select a point, such as a street, intersection, or address
location.
Select Go!.
5
Previewing Multiple Routes
Search for a location (Finding a Location by Category).
1
From the search results, select a location.
2
Select Routes.
3
Select a route.
4
Trip Planner
You can use the trip planner to create and save a trip, which you
can navigate later. This can be useful for planning a delivery
route, a vacation, or a road trip. You can edit a saved trip to
further customize it, including reordering locations, optimizing
the order of stops, adding scheduling information, and adding
shaping points.
You can also use the trip planner to edit and save your active
route.
Planning a Trip
A trip can include many locations, and it must include at least a
starting point and a destination. The starting location is the
location from which you plan to start your trip. If you start
navigating the trip from a different location, the device gives you
the option to route to your starting location first. The destination
is the final location in the trip. For a round trip, the starting
location and destination can be the same. You can also include
additional locations, or stops, between your starting location and
your destination.
Select Apps > Trip Planner > > Create Trip.
1
Select Select Start Location.
2
Select a location for your starting point, and select Select.
3
Select Select Destination.
4
Select a location for your destination, and select Select.
5
If necessary, select Add Location to add additional
6
locations.
After you have added all the necessary locations, select Next
7
> Save.
Enter a name, and select Done.
8
Navigating to Your Destination 5
 Loading...