

Page 1
)(&1$and )(&1$
WARNING
See the Important Safety and Product
Information guide in the product box for
product warnings and other important
information.
Instructions
Installing the 'HYLFH
NOTE: If you do not have this GHYLFH, you can
skip this task.
TIP: Garmin® recommends you secure your
SURGXFW while installing the GHYLFH.
Place and hold the GHYLFH on top of
1
the SURGXFW.
Pull the strap À around,
2
and attach it to the hook Á on the GHYLFH.
The GHYLFH may be tilted when installed on
an asymmetrical DVVHPEO\. This does not affect
operation.
Rotate the SURGXFW to check for clearance.
3
2
Page 2
The GHYLFH should not contact other parts
of your SURGXFW.
NOTE: The LED flashes green for five
seconds to indicate activity after two
revolutions.
Installing the 'HYLFH
NOTE: If you do not have this GHYLFH
skip this task.
TIP: Garmin recommends you secure your
while installing the GHYLFH.
SURGXFW
Select the band size that fits your SURGXFW
1
securely.
The band you select should be the
smallest one that stretches across the
SURGXFW.
On the non-drive side, place and hold the
2
flat side of the GHYLFH on the
inside of the SURGXFW.
Pull the bands À around the SURGXFW,
3
and attach them to the hooks Á on the
GHYLFH.
, you can
Rotate the SURGXFW
4
clearance.
The GHYLFH should not contact the
other parts of your SURGXFW, or you.
to check for
3
Page 3
NOTE: The LED flashes green for five
WARNING
Do not use a sharp object to remove userreplaceable batteries.
Contact your local waste disposal department
to properly recycle the batteries. Perchlorate
Material – special handling may apply. Go to
www.dtsc.ca.gov/hazardouswaste/perchlorate.
4
seconds to indicate activity after two
revolutions.
Pairing the Sensors with Your
Device
Pairing is the process of connecting an
wireless sensor, with a Garmin ANT+
compatible device.
NOTE: The pairing instructions differ for each
Garmin compatible device. See your owner's
manual.
• Bring the Garmin compatible device within
3 m of the ANT+ sensor.
• Stay 10 m away from other ANT+ sensors
while pairing.
After you pair the first time, your Garmin
compatible device automatically recognizes
the ANT+ sensor each time it is activated.
Batteries
ANT+™
Page 4
Replacing the Battery
2
Twist the cover counter-clockwise until the
marker points to unlocked and the cover is
loose enough to remove.
3
Remove the cover and the battery Á.
4
Wait 30 seconds.
5
Insert the new battery with the positive
side facing up.
NOTE: Do not damage or lose the O-ring
gasket.
6
Twist the cover clockwise until the marker
points to locked.
NOTE: The LED flashes red and green for
a few seconds after battery replacement.
When the LED flashes green and then
stops flashing, the device is active and
ready to send data.
5
The LED flashes red to indicate a low battery
level after two revolutions.
Locate the circular battery cover À on the
1
back of the sensor.
Page 5
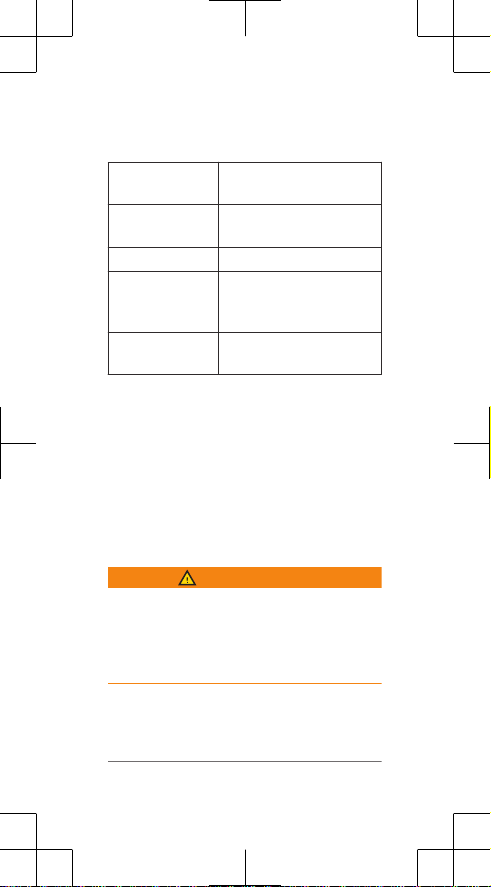
Specifications
Battery type User-replaceable
Battery life Approximately 12 months
Water resistance 32.9 ft. (10 m )
Operating
temperature
range
Radio frequency/
protocol
CR2032, 3 volts
(1 hour per day)
From -4º to 140ºF (from
-20º to 60ºC)
2.4 GHz ANT+ wireless
communications protocol
Limited Warranty
The
Garmin standard limited warranty applies
to this accessory. For more information, go to
www.garmin.com/support/warranty.html.
6
 Loading...