

Garmin Meteor Installation Instructions Manual
Meteor™ Remote Control Installation Instructions.................................................. 2
Instructions d'installation de la télécommande Meteor™......................................... 5
Istruzioni di installazione del telecomando Meteor™............................................... 9
Meteor™ Fernbedienung – Installationsanweisungen........................................... 13
Instrucciones de instalación del mando a distancia Meteor™............................... 17
Garmin International, Inc.
1200 East 151st Street
Olathe, Kansas 66062, USA
Garmin (Europe) Ltd.
Liberty House, Hounsdown Business Park
Southampton, Hampshire, SO40 9LR UK
Garmin Corporation
No. 68, Zhangshu 2nd Road, Xizhi Dist.
New Taipei City, 221, Taiwan (R.O.C.)
Garmin® and the Garmin logo are trademarks of Garmin Ltd. or
its subsidiaries, registered in the USA and other countries.
Meteor™ is a trademark of Garmin Ltd. or its subsidiaries.
These trademarks may not be used without the express
permission of Garmin.
NMEA 2000® and the NMEA 2000 logo are registered
trademarks of the National Marine Electronics Association.
Android™ is a trademark of Google Inc. Apple®, the Apple logo,
iPod®, and iPhone® are trademarks of Apple Inc., registered in
the U.S. and other countries. Other trademarks and trade
names are those of their respective owners.
December 2013 190-01685-92_0A Printed in China
Meteor™ Remote Control
Installation Instructions
This remote control connects to a NMEA 2000
®
network to control connected Garmin® Meteor
devices.
Important Safety Information
WARNING
See the Important Safety and Product Information
guide in the product box for product warnings and
other important information.
CAUTION
Always wear safety goggles, ear protection, and a
dust mask when drilling, cutting, or sanding.
NOTICE
When drilling or cutting, always check what is on the
opposite side of the surface.
Registering Your Device
Help us better support you by completing our online
registration today.
• Go to http://my.garmin.com.
• Keep the original sales receipt, or a photocopy,
in a safe place.
Contacting Garmin Product Support
• Go to www.garmin.com/support and click
Contact Support for in-country support
information.
• In the USA, call (913) 397.8200 or (800)
800.1020.
• In the UK, call 0808 2380000.
• In Europe, call +44 (0) 870.8501241.
Tools Needed
• Phillips screwdriver
• Drill
• 2.5 mm (3/32 in.) drill bit
• 50 mm (2 in.) hole saw
• Marine sealant (optional)
NMEA 2000 Connection Considerations
This remote connects to a NMEA 2000 network on
your boat using the attached NMEA 2000 cable and
included connector. Through the NMEA 2000
network, you can control a connected Garmin
Meteor device. You can connect an unlimited
number of remote controls to the NMEA 2000
network to control a Meteor device, although you
must build a properly balanced NMEA 2000 network.
If you are unfamiliar with NMEA 2000, you should
read the “NMEA 2000 Network Fundamentals”
chapter of the Technical Reference for NMEA 2000
Products. To download this document, select
Manuals on the product page for your device at
www.garmin.com.
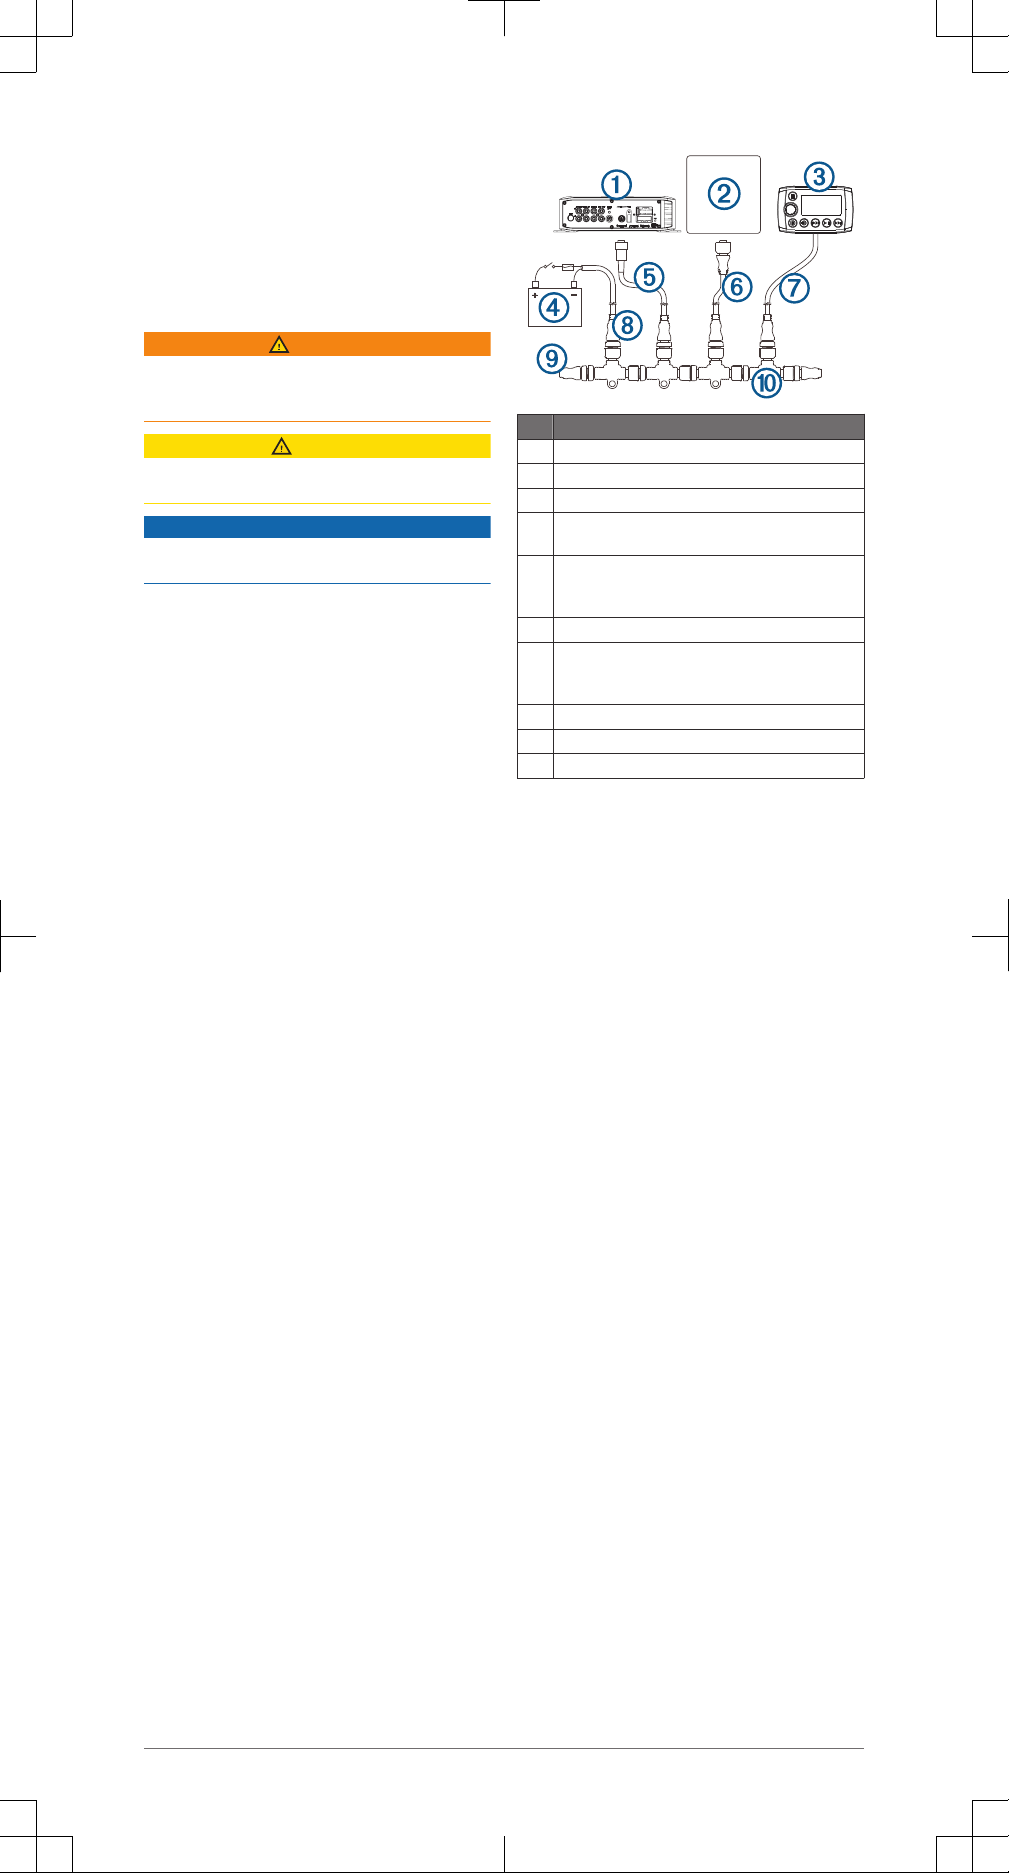
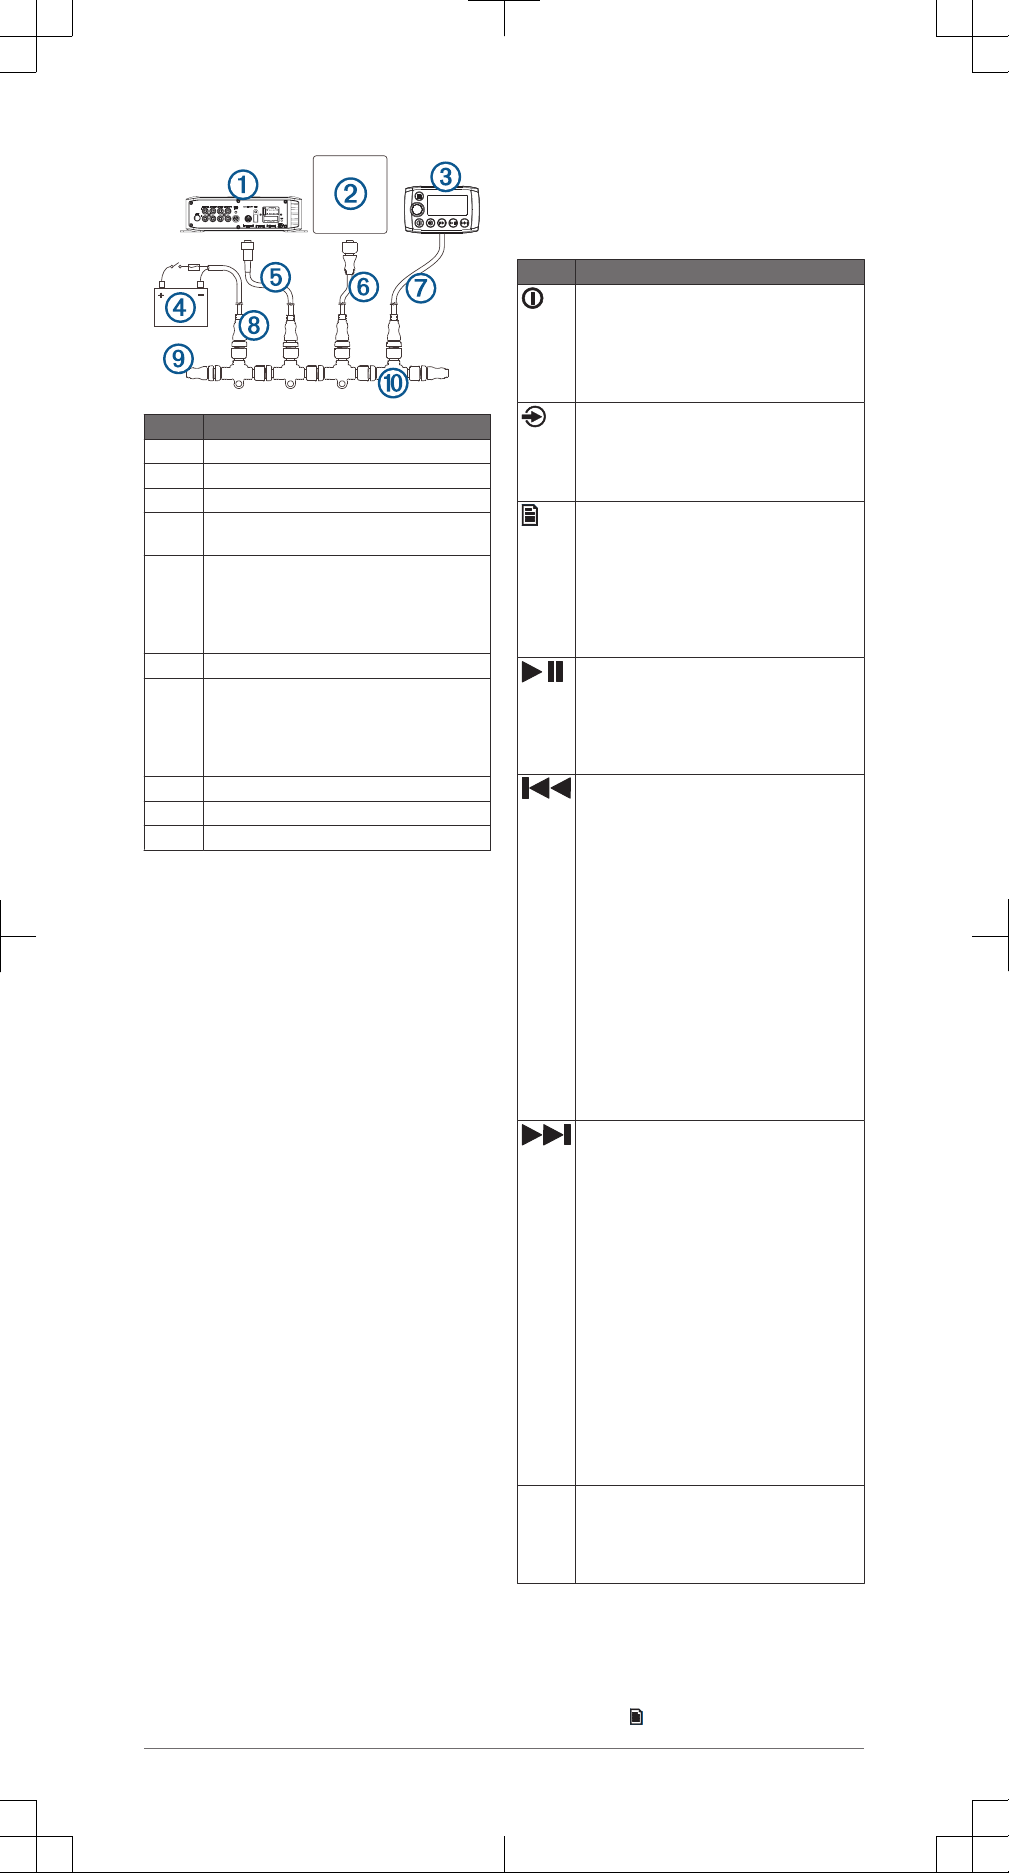
Item Description
À
Garmin Meteor device
Á
Garmin device
Â
Meteor remote control
Ã
12 Vdc power source with an ignition or in-line
switch
Ä
Meteor 300 NMEA 2000 drop cable
This can be extended to a maximum length of 2 m
(6 ft.) using a standard NMEA 2000 cable.
Å
NMEA 2000 drop cable
Æ
Meteor remote control drop cable.
This can be extended to a maximum length of 2 m
(6 ft.) using a standard NMEA 2000 cable.
Ç
NMEA 2000 power cable
È
NMEA 2000 terminator or backbone cable
É
NMEA 2000 T-connector
Mounting Considerations
When selecting a mounting location, observe these
considerations.
• The device must be mounted in a location where
there is at least 75 mm (3 in.) of clearance
behind the mounting surface and you can access
the controls after it is mounted.
• If you want to mount the device outside the boat,
it must be mounted in a location well above the
waterline, where it is not submerged.
• If you want to mount the device outside the boat,
it should be mounted in a location where it will
not be damaged by a docks, pilings, or other
pieces of equipment.
Mounting the Remote Control
1
At the mounting location, use a 50 mm (2 in.)
hole saw to cut through the mounting surface.
2
Place the remote control in the cutout and mark
the pilot holes.
3
Remove the remote control from the cutout, and
using a 2.5 mm (3/32 in.) drill bit, drill the pilot
holes.
4
Apply marine sealant around the cutout
(optional).
5
Place the gasket on the back of the remote
control.
6
Feed the attached NMEA 2000 cable through the
cutout.
7
Place the remote control in the cutout.
8
Secure the remote control to the mounting
surface using the included screws.
9
Install the decorative bezel around the edges of
the remote control.
10
Route the NMEA 2000 cable away from sources
of interference and connect it to the NMEA 2000
network.
2
Operation
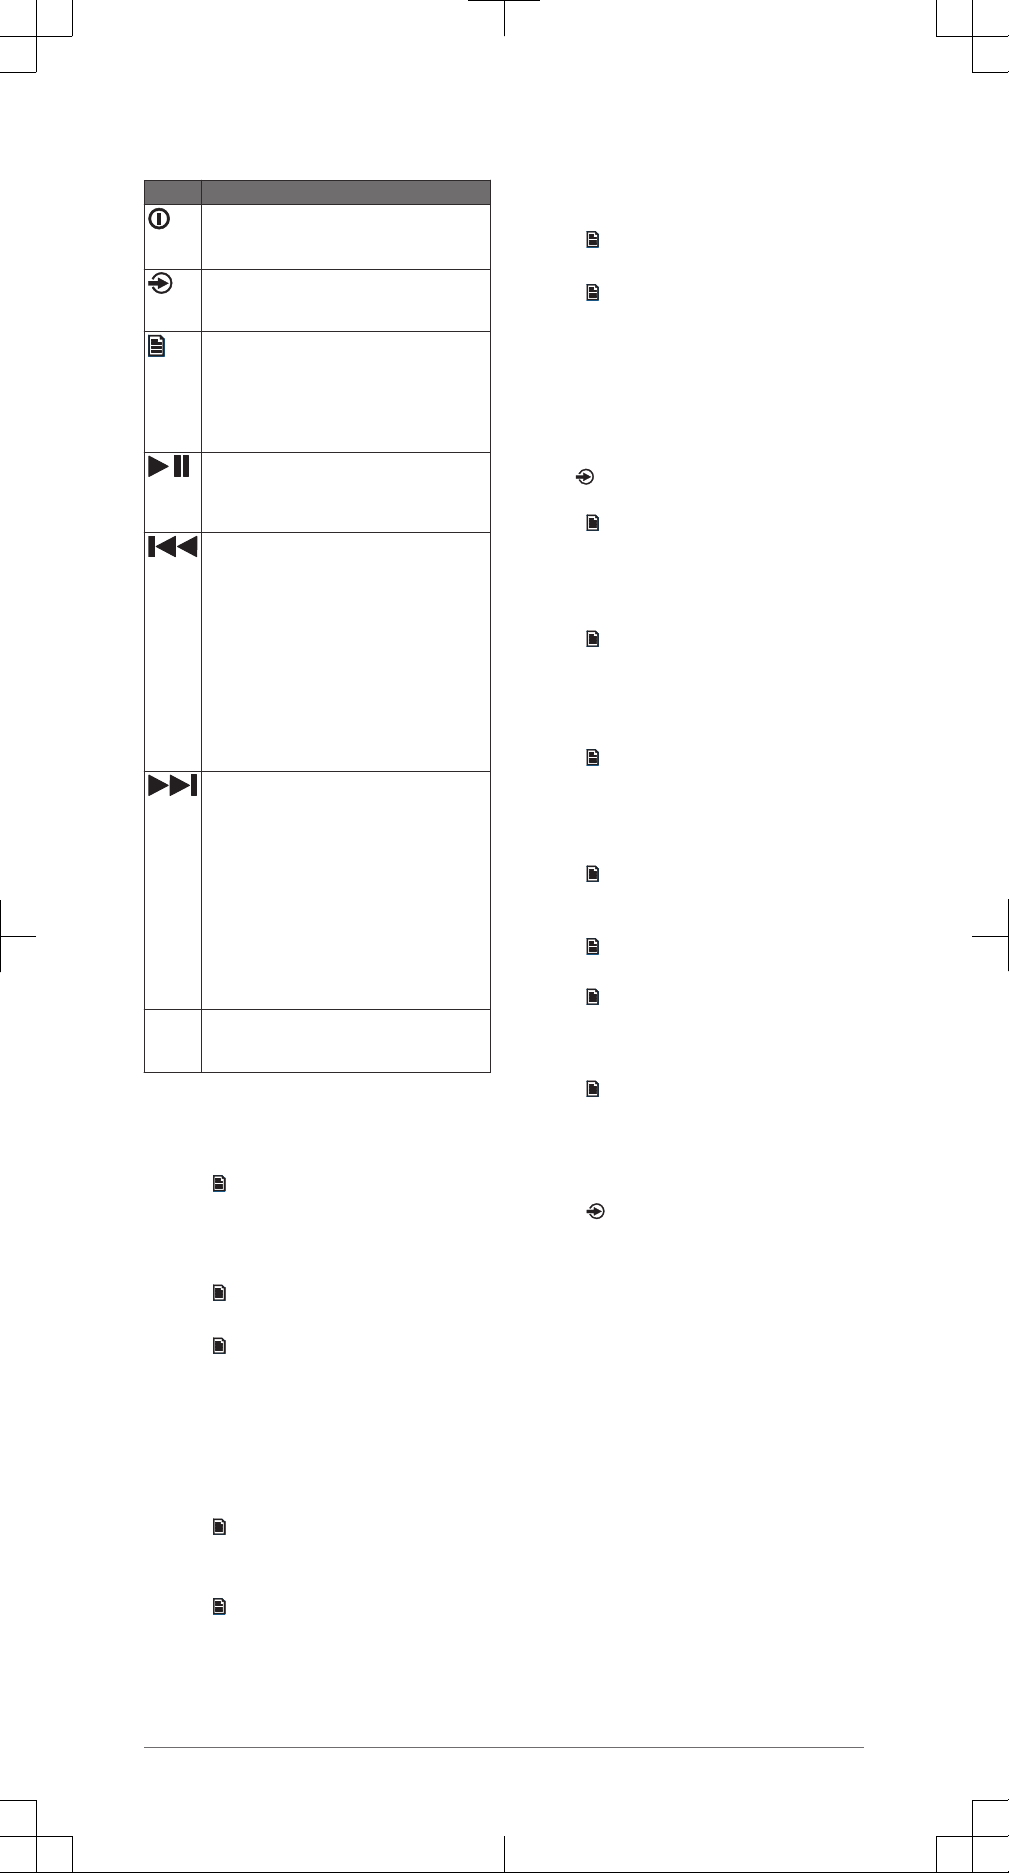
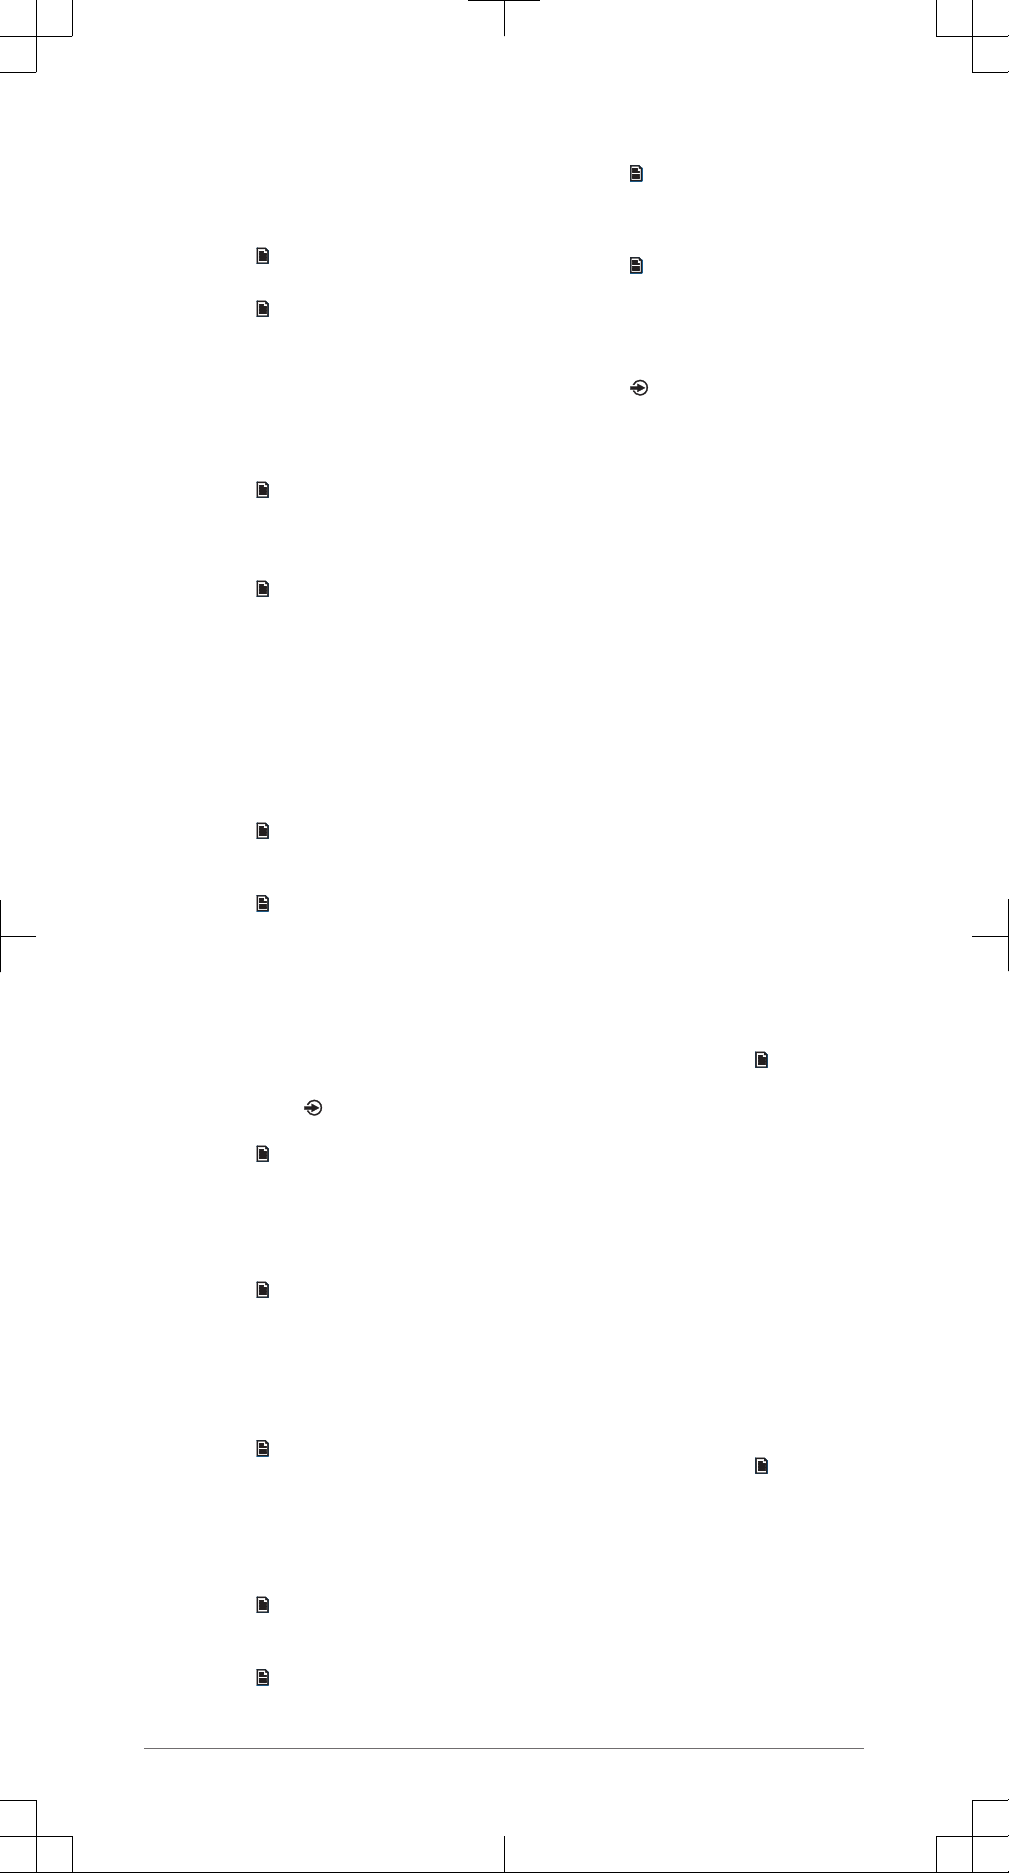
Button Function
• Select to turn on the device.
• Select to mute and un-mute the audio.
• Hold to turn off the device.
• Select to cycle the available sources.
• Hold to switch from remote control mode to
NMEA 2000 mode.
• Select to open the menu.
• Select to return to the previous screen when
in the menu.
• Hold to exit the menu.
• Select to switch from NMEA 2000 mode to
remote control mode.
• Media player or USB: Select to pause or
resume the current track.
• AM/FM: Select to cycle through the tuning
modes (auto, manual, and presets)
• Media player or USB:
◦ Select to skip to the previous track.
◦ Hold to rewind the current track.
• AM/FM:
◦ Auto or manual tuning: Select to tune
down through the channels.
◦ Hold for faster channel skipping.
◦ Presets: Select to change to the previous
preset.
• Aux
◦ Select to decrease the gain for the
connected source.
• Media player or USB:
◦ Select to skip to the next track.
◦ Hold to fast forward the current track.
• AM/FM:
◦ Auto or manual tuning: Select to tune up
through the channels.
◦ Hold for faster channel skipping.
◦ Presets: Select to change to the next
preset.
• Aux
◦ Select to increase the gain for the
connected source.
Dial • Turn to adjust volume, move through the
menus, or adjust a setting.
• Press to select an option or a setting.
Assigning the Remote to a Meteor Device
When multiple Meteor devices are installed on the
NMEA 2000 network, you can assign a remote
control to a specific device.
1
Select > Settings > Stereo.
2
Select a Meteor device.
3
Press the dial to save and exit the menu.
Assigning the Remote to a Zone
1
Select > Settings > Zone > Assign.
2
Select a zone or all zones.
3
Select to exit the menu.
Adjusting the Volume
1
Press the dial to switch between zones
(optional).
2
Use the dial to adjust the volume.
Adjusting the Backlight Brightness and Contrast
1
Select > Settings > LCD.
2
Press the dial to select brightness or contrast.
3
Adjust the brightness or contrast.
4
Select to exit the menu.
NOTE: After a period of inactivity, the remote
turns off the backlight. You can disable this
power saving feature.
Disabling the Power Save Feature
After you manually adjust the backlight, it turns off
automatically after a period of time to save power.
You can disable this feature.
1
Select
> Settings > Power Save.
2
Press the dial to enable or disable the feature.
3
Select to exit the menu.
Switching Between Remote Control Mode and NMEA 2000 Mode
By default, the remote control is in remote control
mode when you power it on, allowing you to control
a connected meteor device. You can switch to
NMEA 2000 mode to view information from
connected NMEA 2000 devices.
1
Hold to switch from remote control mode to
NMEA 2000 mode.
2
Select to switch from NMEA 2000 mode to
remote control mode.
Selecting NMEA 2000 Information to View
Before you can view NMEA 2000 information, you
must set the remote control to NMEA 2000 mode.
1
Select > Settings > NMEA Monitor.
2
Select the NMEA 2000 information to view.
You can view information only from sensors
connected to the same NMEA 2000 network as
the remote control.
3
Select to exit the menu.
Cycling NMEA 2000 Information Automatically
By default, when in NMEA 2000 mode, the remote
shows one type of information. You can cycle
through all available NMEA 2000 information.
1
Select > Settings > NMEA Monitor > Cycle
Screens.
2
Select the time between cycles.
3
Select to exit the menu.
Selecting Units of Measure
1
Select > Settings > NMEA Monitor > Set
Units.
2
Select the units of measure for distance, speed,
and depth.
3
Select to exit the menu.
Connecting a Bluetooth® Device
You can use the remote control to connect a
Bluetooth smartphone or media player to a
connected Meteor device.
1
Select to switch to the Bluetooth source.
2
Press the dial to show a list of paired Bluetooth
devices.
3
Select Discoverable to make the Meteor device
visible to your smartphone or media player.
4
If necessary, enable Bluetooth on your
compatible smartphone or media player.
5
Bring Bluetooth device within 1 m (3 ft.) of the
Meteor device.
6
On your compatible smartphone or media player,
search for Bluetooth devices.
7
Follow the on-screen directions to connect to the
discovered Meteor device.
When connecting, your Bluetooth device may
ask you to confirm a code on the remote control.
The remote control does not display a code, but
it will connect correctly when you confirm the
message on the Bluetooth device.
Additional Settings
The available settings vary based on the on the
source selected.
3
iPhone® and iPod® Settings
When a compatible iPhone or iPod is connected to
the USB port of your Meteor device, you can play
media and change options using the remote control.
From the iPod source, select > iPod Settings.
Repeat: Sets the repeat method for the track or
playlist.
Shuffle: Sets the shuffle method for the tracks or
album.
Subtitles: Shows or hides subtitles.
Artwork: Shows or hides album art on a connected
Garmin device.
NOTE: Album art cannot be shown on the
remote control.
iPhone and iPod Search Settings
If your iPhone or iPod contains more than 100
artists, songs, or albums, you can enable a fast
search to quickly navigate by letter or number.
From the iPod source, select > iPod Settings >
Searching.
Off: The artist, song, and album lists are displayed
using the default layout.
100-800: Displays lists using the fast search menu
when your iPhone or iPod contains more than
100 artists, songs or albums.
MTP Settings
When a compatible MTP device, such as an
Android™ smartphone, is connected to the USB port
of your Meteor device, you can play media and
change options using the remote control.
From the MTP source, select .
Repeat: Sets the repeat method for the track or
playlist.
Shuffle: Sets the shuffle method for the tracks or
album.
Artwork: Shows or hides album art on a connected
Garmin device.
NOTE: Album art cannot be shown on the
remote control.
USB Settings
When a compatible USB flash drive is connected to
the USB port of your Meteor device, you can play
media and change options using the remote control.
From the USB source, select .
Repeat: Sets the repeat method for the track or
folder.
Shuffle: Sets the shuffle method for the tracks or
folder.
Bluetooth Settings
When a compatible Bluetooth smartphone or media
player is paired and connected to your Meteor
device, you can play media and change options
using the remote control.
From the Bluetooth source, select .
Discoverable: Allows the Meteor device to be
discovered by a Bluetooth smartphone or media
player when pairing.
Remove Device: Removes a saved paired
Bluetooth smartphone or media player from the
Meteor device.
FM and AM Settings
In addition to changing stations, you can manage
your preset stations using the remote control.
From the FM or AM source, select > Presets.
Save Current: Saves the currently playing station as
a preset.
Remove Preset: Allows you to remove one or all
preset stations from the device.
General Settings
Select .
LCD: Sets the brightness and contrast.
Power Save: Enables and disables the backlight
power-save feature.
Key Sound: Enables and disables the sound.
NMEA Monitor: Sets the data to view, the data
display cycle, and the units of measure for NMEA
2000 data.
Language: Sets the language on the remote.
Tuner Region: Sets the region used by the FM or
AM source.
Tel Mute: Sets the behavior of the mute wire. The
device can either mute the audio or switch to the
Aux input when the optional mute wire is
activated.
Set Device Name: Assigns a name to a connected
Meteor device.
Stereo: Assigns the remote control to a connected
Meteor device.
Update: Updates the remote control through a
connected Meteor device, or resets the remote
control to factory defaults.
About: Shows the installed software version.
Zone Settings
You can adjust the settings for each available zone
using the remote control. Each zone has different
settings you can adjust.
Select > Zone.
Tone: Sets the bass, mid, and treble for all zones.
Assign: Assigns the remote control to a single zone
or to all zones.
Zone 1 Settings
Select > Zone > Zone 1.
Balance: Sets the left and right balance of the zone.
Volume Limit: Sets the maximum volume for the
zone.
Set Zone Name: Assigns a name to the zone.
Zone 2 Settings
Select > Zone > Zone 2.
Enable: Enables and disables the zone.
Link to Zone 1: Enables zone 2 to use the same
settings as zone 1.
Balance: Sets the left and right balance of the zone.
Volume Limit: Sets the maximum volume for the
zone.
Set Zone Name: Assigns a name to the zone.
Zone 3 Settings
Select > Zone > Zone 3.
Enable: Enables and disables the zone.
Balance: Sets the left and right balance of the zone.
Volume Limit: Sets the maximum volume for the
zone.
Subwoofer: Sets the output level of the subwoofer
and adjusts the frequency filter.
Set Zone Name: Assigns a name to the zone.
Specifications
Specification Measurement
NMEA 2000 Load Equivalency Number
(LEN)
3 (150 mA)
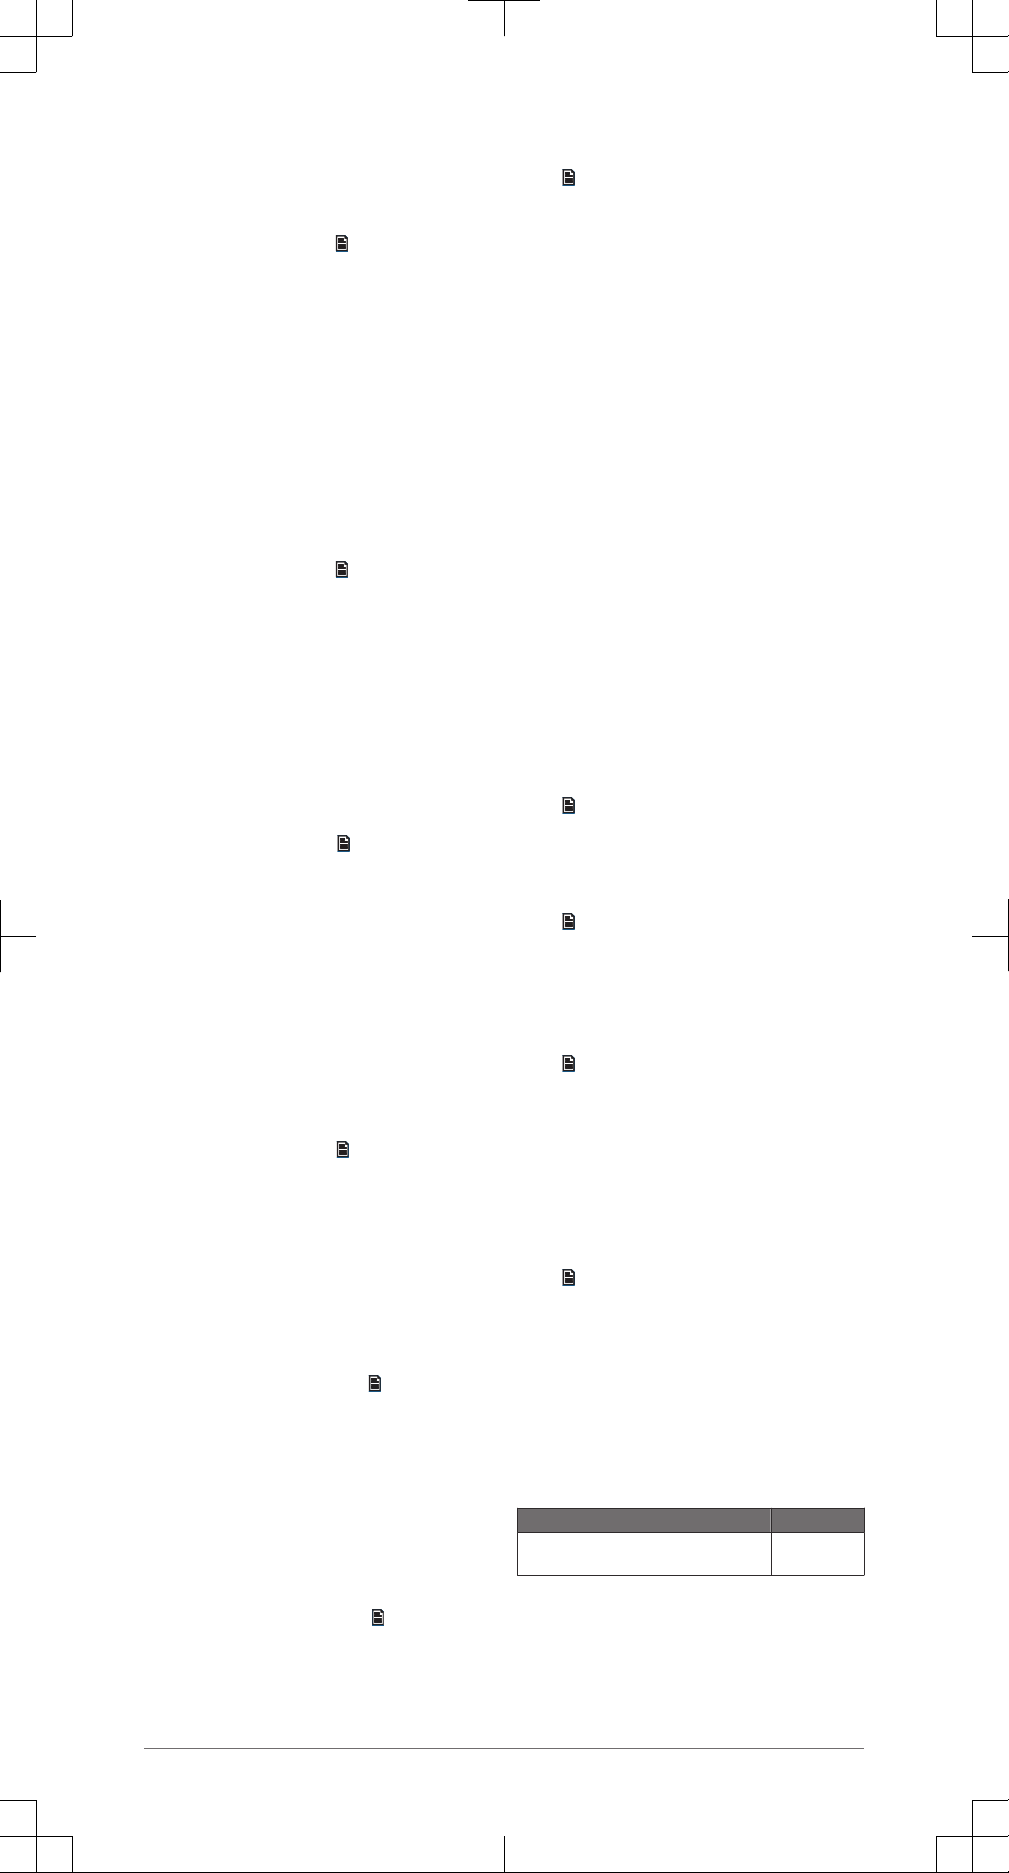
4
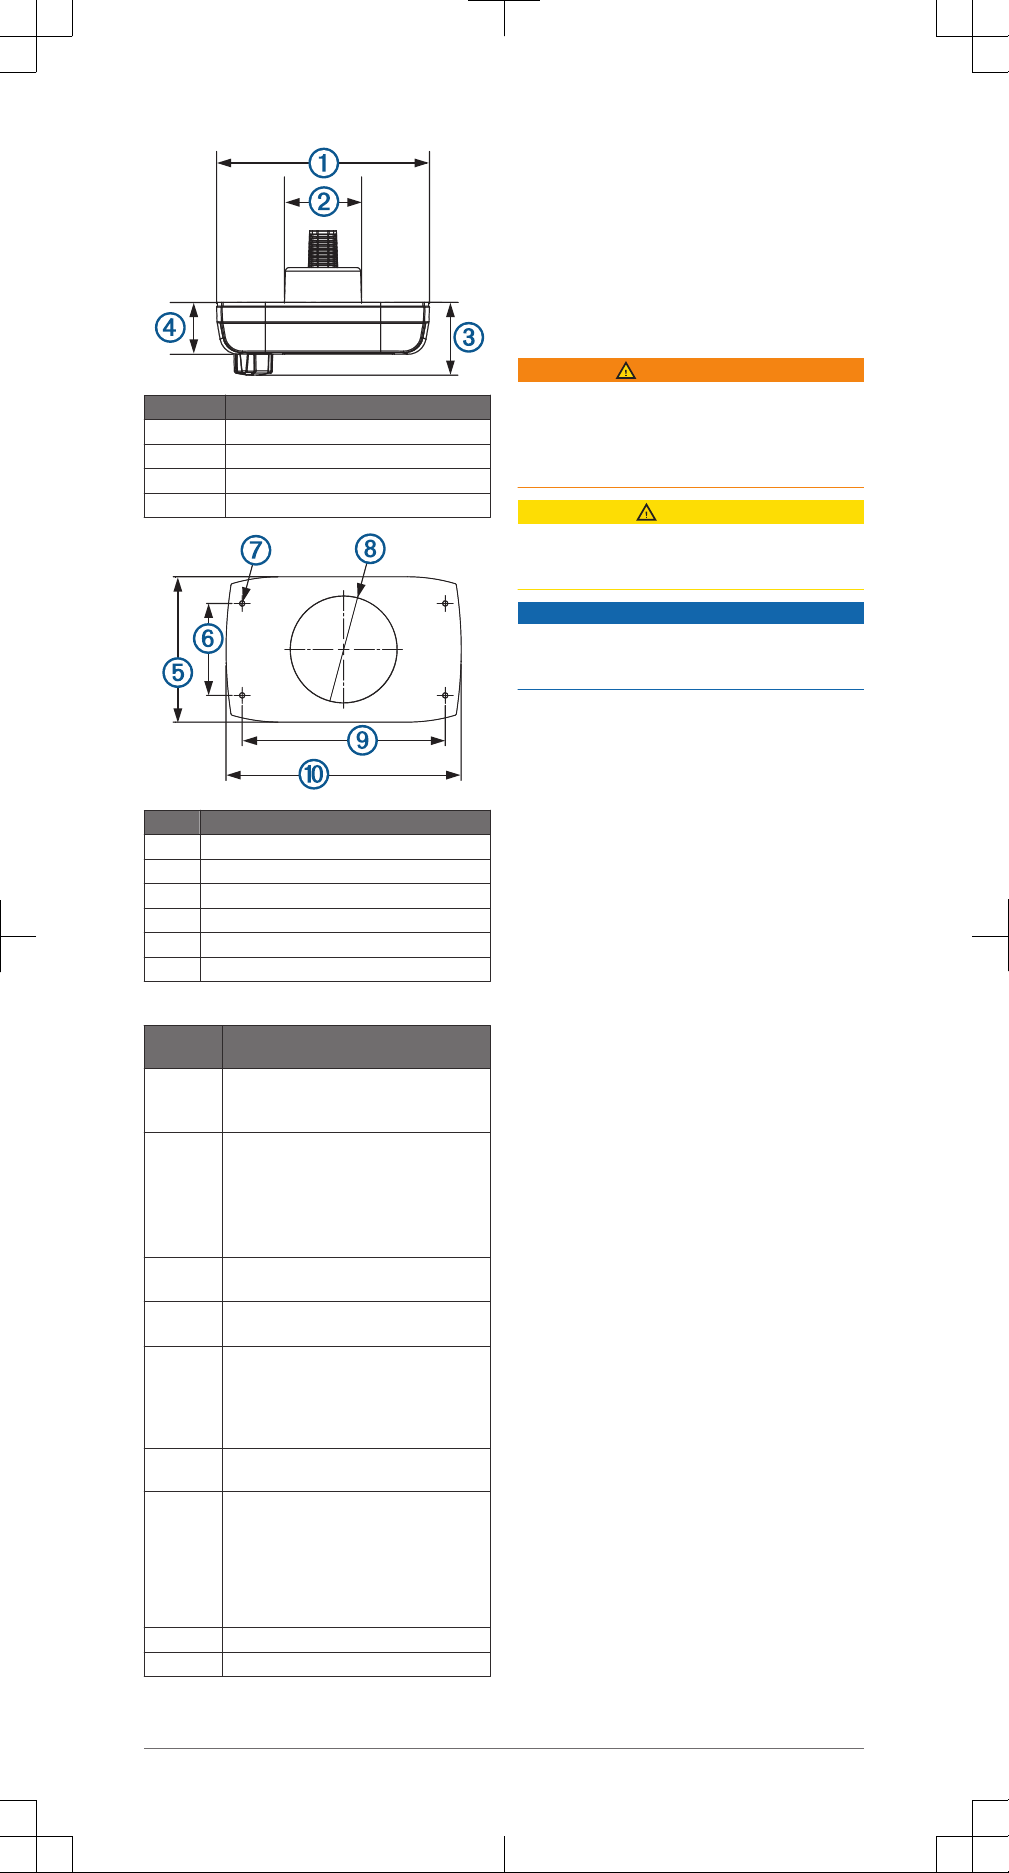
Item Measurement
À
110 mm (4 3/8 in.)
Á
40 mm (1 5/8 in.)
Â
30 mm (1 3/16 in.)
Ã
17.5 mm (11/16 in.)
Item Measurement
Ä
62 mm (2 11/16 in.)
Å
43 mm (1 11/16 in.)
Æ
2.5 mm (3/32 in.) (pilot hole bit)
Ç
50 mm (2 in.) (hole saw)
È
95 mm (3 ¾ in.)
É
110 mm (4 3/8 in.)
Supported NMEA 2000 PGN Information
PGN
Number
Data Field
127250 Heading sensor reference:
• 0: True
• 1: Magnetic
128259 Water speed reference:
• 00: Paddle wheel
• 01: Pitot tube
• 02: Doppler log
• 03: Correlation log (ultrasound)
• 04: Electromagnetic (EM) log
128267 Water depth:
• Offset add or subtract
129025 Position:
• Latitude and longitude
129026 Course Over Ground (COG) and Speed
Over Ground (SOG)
COG reference:
• 0: True
• 1: Magnetic
129029 Global Navigation Satellite System (GNSS)
position data
130306 Wind data reference:
• 0×00: theoretical wind (ground
referenced to true north; calculated using
COG and SOG)
• 0×01: theoretical wind (ground
referenced to magnetic north; calculated
using COG and SOG)
130310 Water temperature and air pressure
130311 Water temperature and air pressure
Instructions d'installation de la
télécommande Meteor™
Cette télécommande se connecte à un réseau
NMEA 2000 afin de commander les appareils
Garmin Meteor connectés.
Informations importantes relatives à la sécurité
AVERTISSEMENT
Consultez le guide Informations importantes sur le
produit et la sécurité inclus dans l'emballage du
produit pour prendre connaissance des
avertissements et autres informations importantes
sur le produit.
ATTENTION
Portez toujours des lunettes de protection, un
équipement antibruit et un masque antipoussière
lorsque vous percez, coupez ou poncez.
AVIS
Lorsque vous percez ou coupez, commencez
toujours par vérifier la nature de la face opposée de
l'élément.
Enregistrement de l'appareil
Aidez-nous à mieux vous servir en remplissant dès
aujourd'hui notre formulaire d'enregistrement en
ligne.
• Rendez-vous sur le site http://my.garmin.com.
• Conservez en lieu sûr l'original de la facture ou
une photocopie.
Contacter le service d'assistance produit de Garmin
• Rendez-vous sur le site www.garmin.com
/support et cliquez sur Contact Support pour
obtenir une assistance par pays.
• Aux Etats-Unis, appelez le (913) 397 8200 ou le
(800) 800 1020.
• Au Royaume-Uni, appelez le 0808 2380000.
• En Europe, appelez le +44 (0) 870 8501241.
Outils requis
• Tournevis cruciforme
• Perceuse
• Foret de 2,5 mm (3/32 po)
• Scie-cloche de 50 mm (2 po)
• Mastic d'étanchéité (facultatif)
Considérations relatives à la connexion NMEA 2000
Cette télécommande se connecte à un réseau
NMEA 2000 sur votre bateau à l'aide du câble
NMEA 2000 et du connecteur fournis. Via le réseau
NMEA 2000, vous pouvez commander un appareil
Garmin Meteor connecté. Vous pouvez connecter un
nombre illimité de télécommandes au réseau NMEA
2000 pour commander un appareil Meteor, bien que
vous deviez constituer un réseau NMEA 2000
correctement équilibré.
Si le NMEA 2000 ne vous est pas familier, consultez
le chapitre « Concepts fondamentaux sur le réseau
NMEA 2000 » du Référentiel technique pour les
produits NMEA 2000. Pour télécharger ce document,
sélectionnez Manuals sur la page du produit de
votre appareil du site www.garmin.com.
5
Elément Description
À
Appareil Garmin Meteor
Á
Appareil Garmin
Â
Télécommande Meteor
Ã
Source d'alimentation 12 V CC avec
commutateur d'allumage ou en ligne
Ä
Câble de dérivation NMEA 2000 pour Meteor
300
Peut être utilisé avec une rallonge de 2 m
(6 pieds) maximum à l'aide d'un câble NMEA
2000 standard.
Å
Câble de dérivation NMEA 2000
Æ
Câble de dérivation de la télécommande
Meteor.
Peut être utilisé avec une rallonge de 2 m
(6 pieds) maximum à l'aide d'un câble NMEA
2000 standard.
Ç
Câble d'alimentation NMEA 2000
È
Borne ou câble de dorsale NMEA 2000
É
Connecteur en T NMEA 2000
Considérations relatives au montage
Lorsque vous sélectionnez un emplacement de
montage, tenez compte des considérations
suivantes.
• L'appareil doit être monté à un emplacement
avec un espace minimum de 75 mm (3 po)
derrière le support de montage et permettant un
accès facile aux commandes une fois le montage
terminé.
• Si vous souhaitez monter l'appareil à l'extérieur
du bateau, il doit être installé à un emplacement
situé bien au-dessus de la ligne de flottaison
pour ne pas être immergé.
• Si vous souhaitez monter l'appareil à l'extérieur
du bateau, il doit être installé à un emplacement
éloigné des quais et autres équipements.
Montage de la télécommande
1
A l'emplacement de montage, utilisez une sciecloche de 50 mm (2 po) pour découper le
support de montage.
2
Placez la télécommande dans la découpe et
marquez les trous d'implantation.
3
Retirez la télécommande de la découpe et à
l'aide d'un foret de 2,5 mm (3/32 po), percez les
trous d'implantation.
4
Appliquez du mastic d'étanchéité autour de la
découpe (facultatif).
5
Placez le joint au dos de la télécommande.
6
Acheminez le câble NMEA 2000 relié à travers la
découpe.
7
Placez la télécommande dans la découpe.
8
Fixez la télécommande au support de fixation à
l'aide des vis fournies.
9
Installez le cadre de décoration autour des bords
de la télécommande.
10
Eloignez le câble NMEA 2000 des sources
d'interférences et connectez-le au réseau NMEA
2000.
Fonctionnement
Bouton Fonction
• Sélectionnez cette touche pour allumer
l'appareil.
• Sélectionnez cette touche pour désactiver ou
réactiver le son.
• Maintenez cette touche enfoncée pour
mettre l'appareil hors tension.
• Sélectionnez cette touche pour parcourir les
sources disponibles.
• Maintenez cette touche enfoncée pour
basculer du mode télécommande au mode
NMEA 2000.
• Sélectionnez cette touche pour aller au
menu.
• Sélectionnez cette touche pour revenir à
l'écran précédent quand le menu est ouvert.
• Maintenez cette touche enfoncée pour
quitter le menu.
• Sélectionnez cette touche pour passer du
mode NMEA 2000 au mode télécommande.
• Lecteur audio ou USB : sélectionnez cette
touche pour faire pause ou pour reprendre la
piste en cours.
• AM/FM : sélectionnez cette touche pour faire
défiler les modes de réglage (auto, manuel
et stations préréglées)
• Lecteur audio ou USB :
◦ Sélectionnez cette touche pour passer à
la piste précédente.
◦ Maintenez cette touche enfoncée pour
faire un retour arrière dans la piste en
cours.
• AM/FM :
◦ Réglage auto ou manuel : sélectionnez
cette touche pour régler les stations vers
le bas.
◦ Maintenez la touche enfoncée pour faire
défiler les stations plus rapidement.
◦ Stations préréglées : sélectionnez cette
touche pour passer à la station préréglée
précédente.
• Aux
◦ Sélectionnez cette touche pour diminuer
la sensibilité de la source connectée.
• Lecteur audio ou USB :
◦ Sélectionnez cette touche pour passer à
la piste suivante.
◦ Maintenez cette touche enfoncée pour
faire avance rapide dans la piste en
cours.
• AM/FM :
◦ Réglage auto ou manuel : sélectionnez
cette touche pour régler les stations vers
le haut.
◦ Maintenez la touche enfoncée pour faire
défiler les stations plus rapidement.
◦ Stations préréglées : sélectionnez cette
touche pour passer à la station préréglée
suivante.
• Aux
◦ Sélectionnez cette touche pour
augmenter la sensibilité de la source
connectée.
Molette • Tournez la molette pour régler le volume,
parcourir les menus ou configurer un
réglage.
• Appuyez dessus pour sélectionner une
option ou un réglage.
Affectation de la télécommande à un appareil Meteor
Quand plusieurs appareils Meteor sont installés sur
le réseau NMEA 2000, vous pouvez affecter une
télécommande à un appareil particulier.
1
Sélectionnez > Réglages > Stereo.
6
2
Sélectionnez un appareil Meteor.
3
Appuyez sur la molette pour enregistrer et quitter
le menu.
Affectation de la télécommande à une zone
1
Sélectionnez > Réglages > Zone > Affecter.
2
Sélectionnez une zone ou toutes les zones.
3
Sélectionnez pour quitter le menu.
Réglage du volume
1
Appuyez sur la molette pour basculer d'une zone
à l'autre (facultatif).
2
Utilisez la molette pour régler le volume.
Réglage de la luminosité et du contraste du rétroéclairage
1
Sélectionnez > Réglages > LCD.
2
Appuyez sur la molette pour sélectionner la
luminosité ou le contraste.
3
Réglez la luminosité ou le contraste.
4
Sélectionnez pour quitter le menu.
REMARQUE : après une période d'inactivité, la
télécommande éteint le rétroéclairage. Vous
pouvez désactiver cette fonction d'économie
d'énergie.
Désactivation de la fonction d'économie d'énergie
Quand vous avez réglé manuellement le
rétroéclairage, il est automatiquement désactivé
après un certain temps pour économiser de
l'énergie. Vous pouvez désactiver cette fonction.
1
Sélectionnez > Réglages > Veille.
2
Appuyez sur la molette pour activer ou
désactiver la fonction.
3
Sélectionnez pour quitter le menu.
Basculement entre le mode télécommande et le mode NMEA 2000
Par défaut, la télécommande est en mode
télécommande quand vous l'allumez, ce qui vous
permet de commander un appareil meteor connecté.
Vous pouvez basculer au mode NMEA 2000 pour
consulter des informations depuis des appareils
NMEA 2000 connectés.
1
Maintenez la touche enfoncée pour basculer
du mode télécommande au mode NMEA 2000.
2
Sélectionnez pour basculer du mode NMEA
2000 au mode télécommande.
Sélection d'informations NMEA 2000 à afficher
Avant de pouvoir afficher des informations NMEA
2000, vous devez régler la télécommande sur le
mode NMEA 2000.
1
Sélectionnez > Réglages > NMEA Monitor.
2
Sélectionnez les informations NMEA 2000 à
afficher.
Vous pouvez uniquement afficher les
informations de capteurs connectés au même
réseau NMEA 2000 que celui de la
télécommande.
3
Sélectionnez pour quitter le menu.
Navigation automatique entre les informations NMEA 2000
Par défaut, en mode NMEA 2000, la télécommande
affiche un seul type d'informations. Vous pouvez
faire défiler toutes les informations NMEA 2000
disponibles.
1
Sélectionnez > Réglages > NMEA Monitor >
Cycle Screens.
2
Sélectionnez le temps entre chaque cycle.
3
Sélectionnez pour quitter le menu.
Sélection d'unités de mesure
1
Sélectionnez
> Réglages > NMEA Monitor >
Choix des Unités.
2
Sélectionnez les unités de mesure de distance,
de vitesse et de profondeur.
3
Sélectionnez pour quitter le menu.
Connexion d'un appareil Bluetooth
Vous pouvez utiliser la télécommande pour
connecter un smartphone Bluetooth ou un lecteur
audio à un appareil Meteor connecté.
1
Sélectionnez pour basculer sur la source
Bluetooth.
2
Appuyez sur la molette pour afficher la liste des
appareils Bluetooth couplés.
3
Sélectionnez Discoverable pour rendre
l'appareil Meteor visible pour votre smartphone
ou lecteur audio.
4
Si besoin, activez Bluetooth sur votre
smartphone ou lecteur audio.
5
Placez l'appareil Bluetooth à une distance d'1 m
(3 pieds) de l'appareil Meteor.
6
Sur votre smartphone ou lecteur audio
compatible, recherchez des appareils Bluetooth.
7
Suivez les instructions à l'écran pour connecter
l'appareil Meteor détecté.
Lors de la connexion, votre appareil Bluetooth
peut vous demander de confirmer un code sur la
télécommande. La télécommande n'affiche pas
un code, mais elle se connecte correctement
quand vous confirmerez le message sur
l'appareil Bluetooth.
Paramètres supplémentaires
Les paramètres supplémentaires dépendent de la
source sélectionnée.
Paramètres iPhone et iPod
Quand un iPhone ou iPod compatible est connecté
au port USB de votre appareil Meteor, vous pouvez
écouter de la musique et modifier des options à
l'aide de la télécommande.
Depuis la source iPod, sélectionnez > Réglages
iPod.
Répéter : permet de définir la méthode de répétition
de la piste ou de la liste de chansons.
Aléat : permet de définir la méthode de lecture
aléatoire des pistes ou de l'album.
Sous-titres : permet d'afficher ou de masquer les
sous-titres.
Artwork : permet d'afficher ou de masquer la
pochette d'un album d'un appareil Garmin
connecté.
REMARQUE : la pochette de l'album n'apparaît
pas sur la télécommande.
Paramètres de recherche iPhone et iPod
Si votre iPhone ou iPod contient plus de 100 artistes,
titres ou albums, vous pouvez activer la recherche
rapide pour naviguer rapidement par lettre ou par
chiffre.
Depuis la source iPod, sélectionnez > Réglages
iPod > Recherche.
Off : les listes d'artistes, de titres et d'albums sont
affichées en utilisant la disposition par défaut.
100-800 : permet d'afficher les listes à l'aide du
menu de recherche rapide quand votre iPhone
ou iPod contient plus de 100 artistes, titres ou
albums.
Paramètres MTP
Quand un appareil MTP compatible, comme un
smartphone Android, est connecté au port USB de
votre appareil Meteor, vous pouvez écouter de la
7
 Loading...