

Page 1

Max7BT Model Name
Attn.: Arcelia Maldonado
EMC Compliance Management Group
670 National Avenue,
Mountain View, CA 94043
Date: July 23, 2004
To Whom It May Concern:
Concerning the product model name. The Max7BT will be labeled and sold under the
model name “AY4301”.
Please refer to the product labeling for additional information.
Yours Sincerely,
Victor Beda
EET
Page 2

PPrreeppaarraattiioonnss
IInnssttaallll
1
Insert the supplied CD into your computer’s CD-ROM drive.
Follow screen instructions to complete installation.
AATTTTEENNTTIIOONN!!
WINDOWS 98SE USERS:
To avoid installation problems,
computer until
CChhaarrggee
2
Open the USB cover. Connect the supplied charger to the USB port
and the main power supply. For extended battery power, please
charge for at least 4 hours for first time use.
TIP
✔
This indicator shows your battery information during charging.
CCoonnnneecctt ppllaayyeerr ttoo ccoommppuutteerr
3
Open the USB cover. Connect your player to your computer using
the supplied USB cable.
TIP
✔
Please refer to your computer’s manual for the exact position of
your USB port. Look for the USB symbol on the processing unit of
your computer.
AAFFTTEERR
DDOO NNOOTT CCOONNNNEECCTT
installation completes.
your player to your
OOrrggaanniizzee aanndd ttrraannssffeerr mmuussiicc vviiaa DDMMMM // MMUUSSIICCMMAATTCCHH
4
Launch DMM/ MUSICMATCH on your PC from Windows desktop
SSttaarrtt
or
menu.
Launch DMM on your MAC from desktop or
Organize and transfer music files from your computer to your player.
5
UUnnpplluugg ssaaffeellyy
To avoid loss of data, disconnect your player safely.
Exit any active application working with your player.
MMaacc uusseerrss
Remove the USB cable.
PPoowweerr oonn aanndd eennjjooyy!!
6
Press and hold 22;; for 2 seconds to power on if the player does not
power on automatically. Enjoy your new running / music experience!
: Drag and drop your player into
MMaacciinnttoosshh HHDD
PPCC uusseerrss
TTrraasshh
before disconnecting.
.
: click on the task tray.
1
Page 3
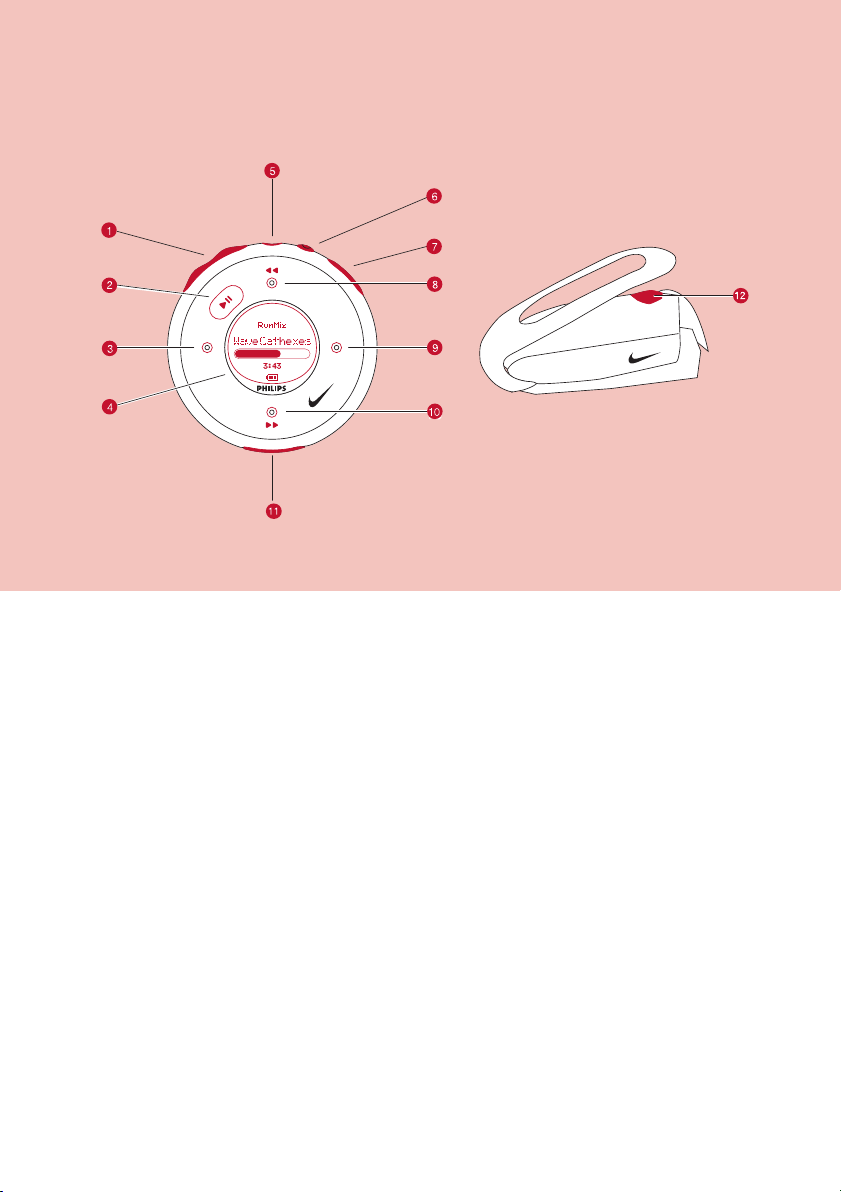
NNaammee ooff PPaarrttss
−− // ++
1
2 22 ;; Press and hold to power on / off; press briefly to play / pause
3 11 Left
LLCCDD ddiissppllaayy
4
HHeeaaddpphhoonneess jjaacckk
5
VVooiiccee ffeeeeddbbaacckk
6
RRuunn
7
8 33 , 55 Up / Previous / Fast rewind
9 22 Right
0 44 , 66 Down / Next / Fast forward
UUSSBB ppoorrtt //
!
CChhaarrggiinngg ssoocckkeett
SSDDMM
@
Volume control, press −−to decrease; press ++to increase
Dynamically displays menu, options and track information
Connects headphones or waistband remote control
Activates running feedback
Starts / stops recording running activities
Open cover to connect to computer / charge your player
Power ON / OFF speed and distance monitor
2
Page 4

MMeennuu NNaavviiggaattiioonn
1
Press and hold 22 ;; to power on.
Press and hold 11 for the root menu.
See specific chapters for details of each setting.
2
MMuussiicc
RRuunnnniinngg
RRaaddiioo
SSeettttiinnggss SSttrroobbee lliigghhtt
PPllaayylliissttss
AArrttiissttss
AAllbbuummss
GGeennrreess
AAllll TTrraacckkss
HHiissttoorryy
CCaalliibbrraattiioonn
Preset 1
...
44
Preset 10
Autosearch
SShhuuffffllee && RReeppeeaatt
DDBBBB
EEqquuaalliizzeerr
e.g. Playlist001... PlaylistXXX
e.g. A ... Z
e.g. A ... Z
e.g. A ... Z
e.g. A ... Z
List of Freerun logs by date
MMaannuuaall
AAuuttoommaattiicc
Left
Up
33
11 22
44
Down
Right
BBaacckklliigghhtt
CCoonnttrraasstt
LLaanngguuaaggee
SSyynncchhrroonniizzee
VVooiiccee ffeeeeddbbaacckk
DDiissttaannccee uunniittss
FFaaccttoorryy sseettttiinnggss
3
Page 5
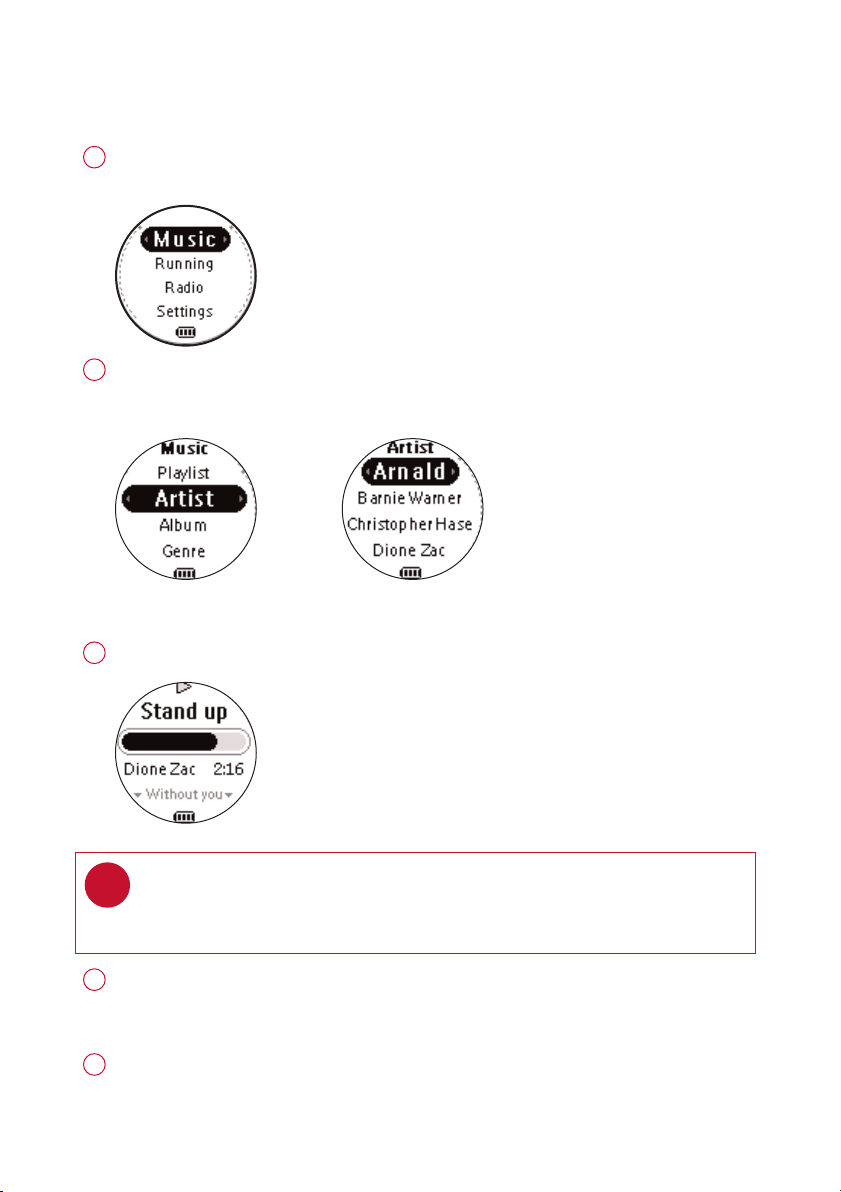
MMuussiicc MMooddee:: BBaassiicc OOppeerraattiioonn
Press and hold 22 ;; to power on.
1
From the root menu, press 22 to enter the music mode.
Any radio playback will stop as you enter the music mode.
Press 33 to scroll up or 44 to scroll down for your option.
2
Press 22 for next or 11 for previous levels of library.
Press 22 ;; to play.
Library options Artists list
Press 22 ;; to pause during playback.
3
Playscreen
TIP
✔
> To display library options during playback, press 11 .
> To display the root menu, press and hold 11 .
Press 33 , 33 for the previous or 44, for the next track.
4
Press 33 to play the same track again.
Press and hold 44 to fast forward or 33 to rewind in a track during playback.
Press and hold 22 ;; to power off. Your player will save your current
5
music playback status and resume next time you power on.
*Actual display varies with use
4
Page 6

MMuussiicc MMooddee:: LLiibbrraarryy OOppttiioonnss aanndd FFaasstt SSccrroolllliinngg
1
Press 33 to scroll up or 44 to scroll down for your library option.
Press 22 on
Press 22 for the next or 11 for the previous level of library.
2
Artists list in alphabetical order
3
Press and hold 44 for 2 seconds to scroll down quickly.
Press and hold 33 for 2 seconds to scroll up quickly.
Release button to stop scrolling.
Browsing tracks quickly.
AArrttiisstt
to display the artist library
*Actual display varies with use
5
Page 7
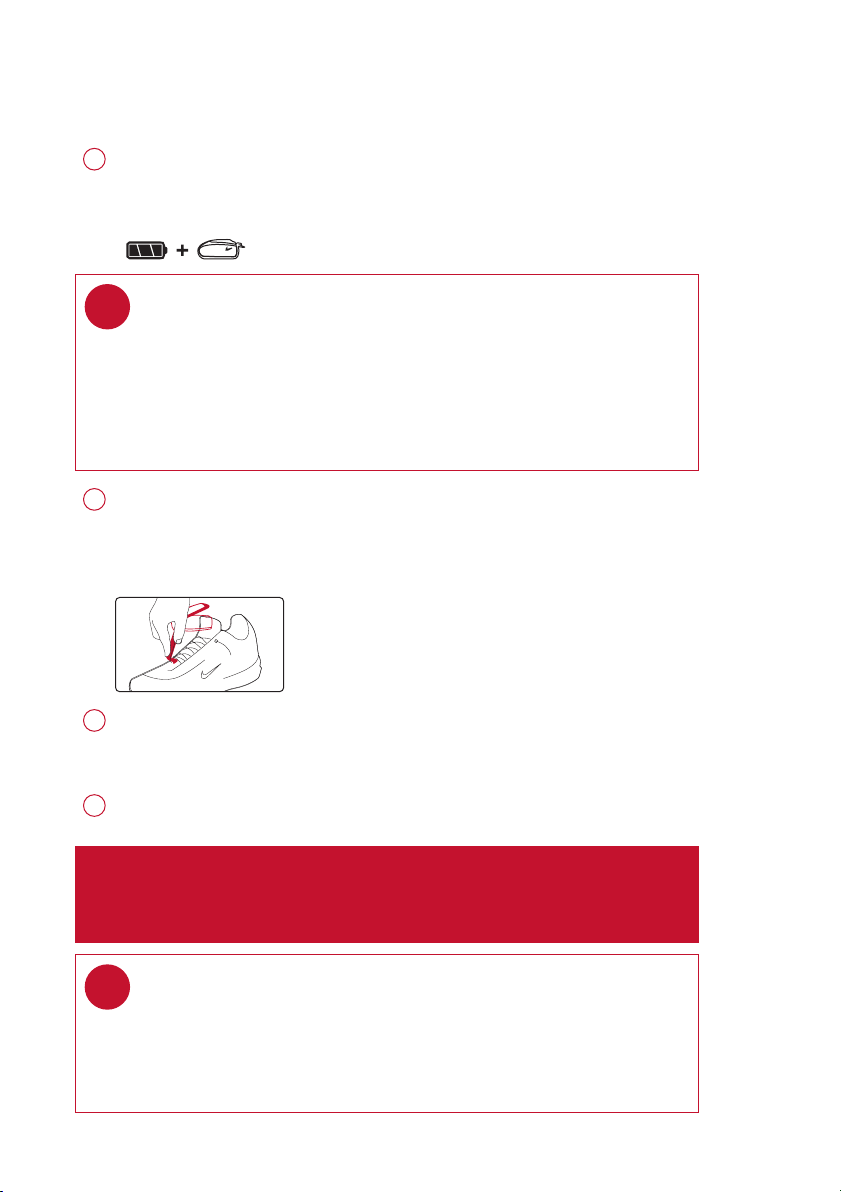
IInnssttaalllliinngg tthhee ssppeeeedd aanndd ddiissttaannccee mmoonniittoorr
TBD
Use an appropriately-sized coin to twist clockwise to open the speed monitor
1
battery door. Remove the plastic insert (first time users only). Insert an AAA
alkaline battery with matching polarity. Replace the battery door, pressing
fully in and twist anti-clockwise to secure the closing.
TIP
✔
Batteries contain chemical substances, so they should be disposed of
properly.
Incorrect use of batteries can cause the electrolyte leakage
and will corrode the compartment or cuase the batteries to burst.
Remove the batteries if the set is not to be used for a long time.
Unhook the rubber strap and detach the clip. Loosen shoelaces and slide
2
monitor clip under laces. Securely attach the monitor to your running shoe.
The monitor should rest just below where laces tie and be secure enough to
stay in place during running for optimal accuracy.
3
4
✔
Press and hold 22;; for 2 seconds to power on your player.
SSDDMM
Press
The monitor is now ready to record your running activities.
After running is completed, terminate the logging (see page 11).
Press and hold
AATTTTEENNTTIIOONN
(especially users of pacemakers or other implanted devices) should
consult a physician or health professional before using the MP3RUN.
for 2 seconds to power on the monitor. You monitor will blink.
SSDDMM
for 2 seconds to power off your monitor after use.
: Anyone beginning an exercise regimen for the first time
TIP
> Your SDM automatically shutdown when there is no connection with
your player for 10 minutes or no activity is detected for 30 minutes.
SSDDMM
Press
> Replace the battery when your monitor blinks rapidly (usually after 50 hrs
of use for a high quality alkaline battery).
for 2 seconds to power on the monitor again.
6
Page 8

2 SEC
SSyynncchhrroonniizziinngg ppllaayyeerr wwiitthh
ssppeeeedd aanndd ddiissttaannccee mmoonniittoorr
Please synchronize your player with the speed and distance monitor if:
> you have bought a new speed and distance monitor; or
> you cannot establish connection between your player and the speed and distance monitor
Press and hold 22;; for 2 seconds to power on your player.
1
From the root menu, press 44 , 44 , 44, 22 to enter the settings mode.
2
3
SSYYCCHHRROONNIIZZEE
Select
when prompted.
IIMMPPOORRTTAANNTT!!
Your player will link with the first monitor which gives out signals.
Make sure there is no activated sensors within 15 meters.
Press and hold
The speed and distance monitor light will blink rapidly.
Wait for the player screen to display
SSyycchhrrnnooiizzee ccoommpplleettee
Your player is now synchronized with your monitor.
and press 22 . Press 22;; for 4 seconds to start synchronization
SSDDMM
on your monitor for 2 seconds.
.
*Actual display varies with use
7
Page 9
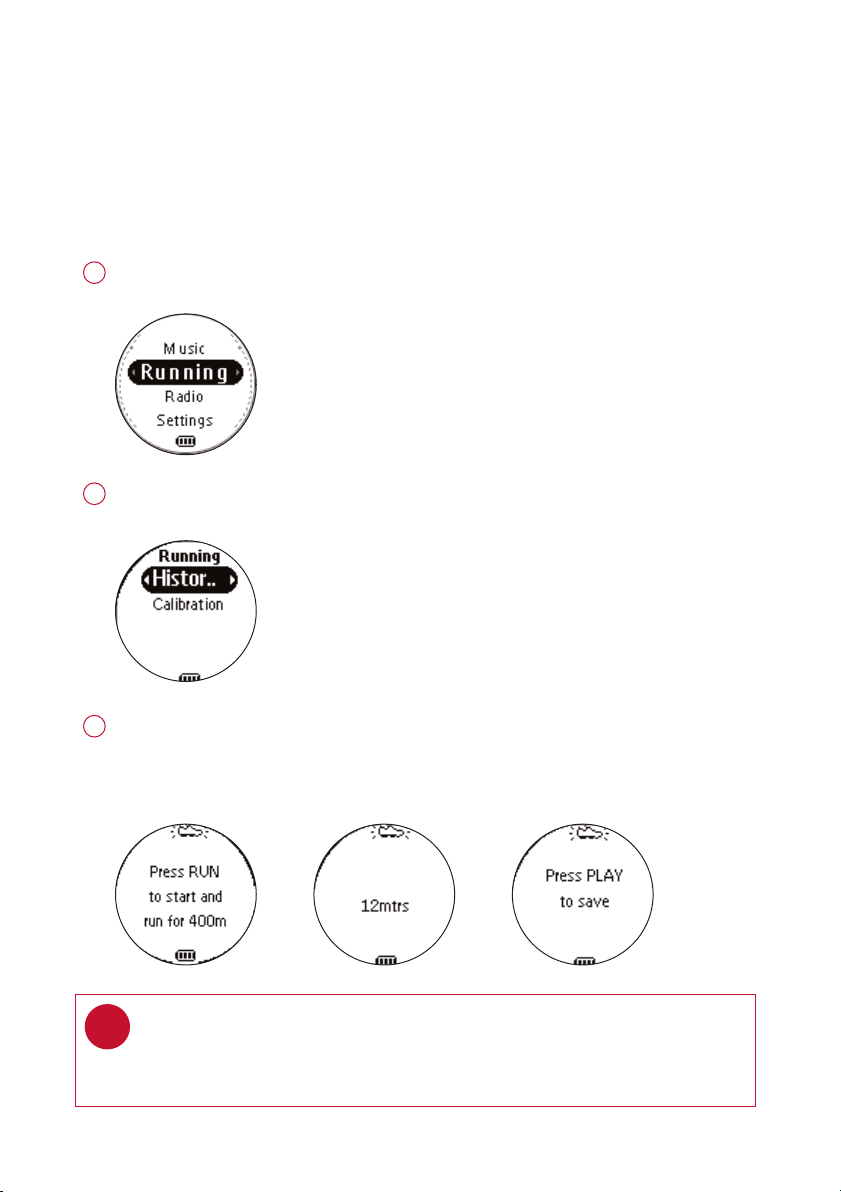
RRuunnnniinngg mmooddee:: AAuuttoommaattiicc ccaalliibbrraattiioonn
Your speed and distance sensor provides unprecedented accuracy right out of the box.
In addition, an optional calibration procedure can be performed to guarantee optimal accuracy
for a specific user, which will correct for individual stride variations such as pronation or supination. Calibration can be performed either automatically or manually.
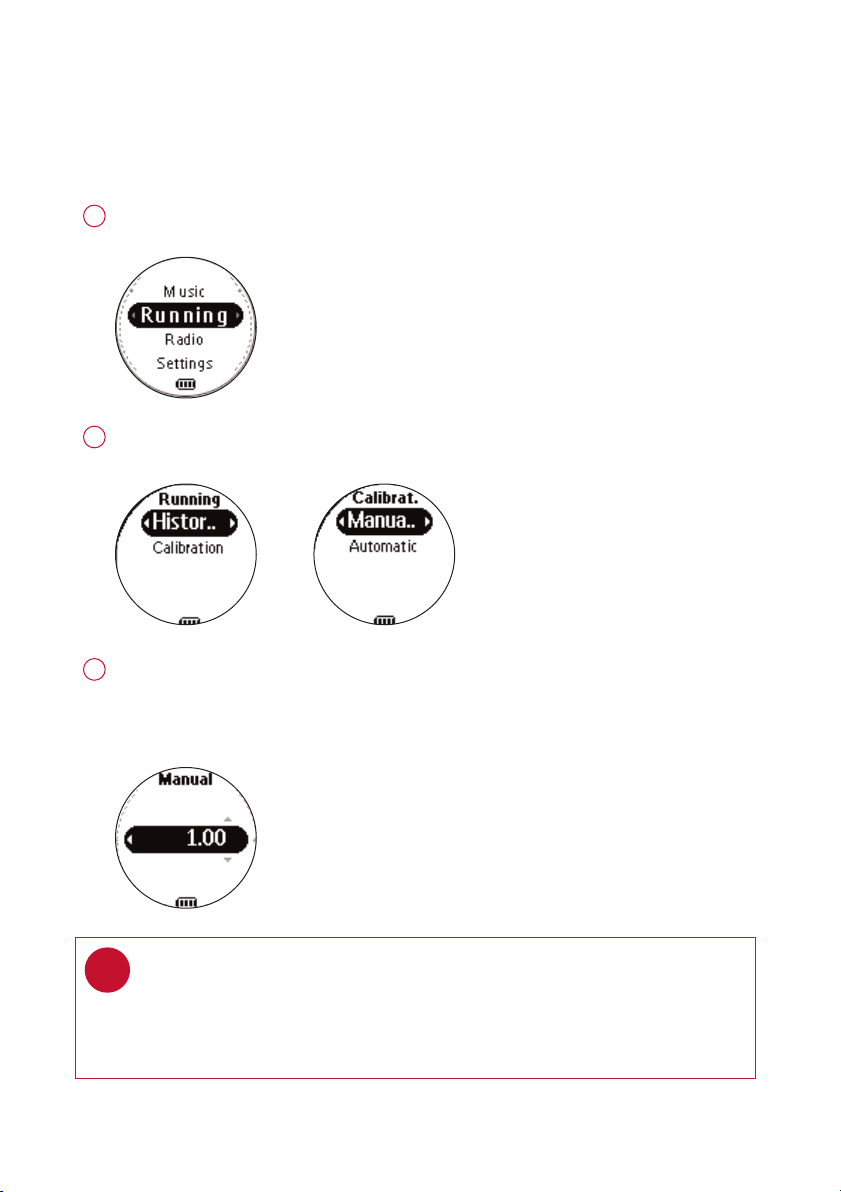
Press and hold 22 ;; to power on.
1
From the root menu, press 44 , 22 to enter the running mode.
2
To calibrate the speed and distance sensor, select CALIBRATION > AUTOMATIC.
3
Press RUN and start running 400 metres on the inner lane of a marked track as prompted.
Press RUN again when you have completed your track.
22 ;;
Press
✔
*Actual display varies with use
to save the calibration value.
TIP
If you want to stop the calibration during running, press 11 to
discard the calibration value.
8
Page 10
RRuunnnniinngg mmooddee:: MMaannuuaall ccaalliibbrraattiioonn
To optimize SDM performance for different running style, you can manually
calibrate the SDM.
Press and hold 22 ;; to power on.
1
From the root menu, press 44 , 22 to enter the running mode.
2
To calibrate the speed and distance sensor, select CALIBRATION > MANUAL.
3
Press 33 or 44 to select calibration offset (from 0.50 to 1.50). Change the offset value
to make small adjustments. If the monitor is under measuring a known distance,
increase the offset value. Different shoe models may affect the monitor’s calibration.
Adjust the offset value accordingly if you notice differences between shoes.
TIP
✔
> If you run 400m and the monitor returns a reading of 380m (5% under), you
should adjust the offset value to 1.05.
> Write down and keep your offset value. It will come in handy if your friends
borrow your MP3RUN and they change your calibration setting.
*Actual display varies with use
9
Page 11
LLooggggiinngg yyoouurr rruunnnniinngg aaccttiivviittiieess
To keep your workout log synchronized with summer / winter timing, please connect
your player to your computer and start DMM before logging your running activities.
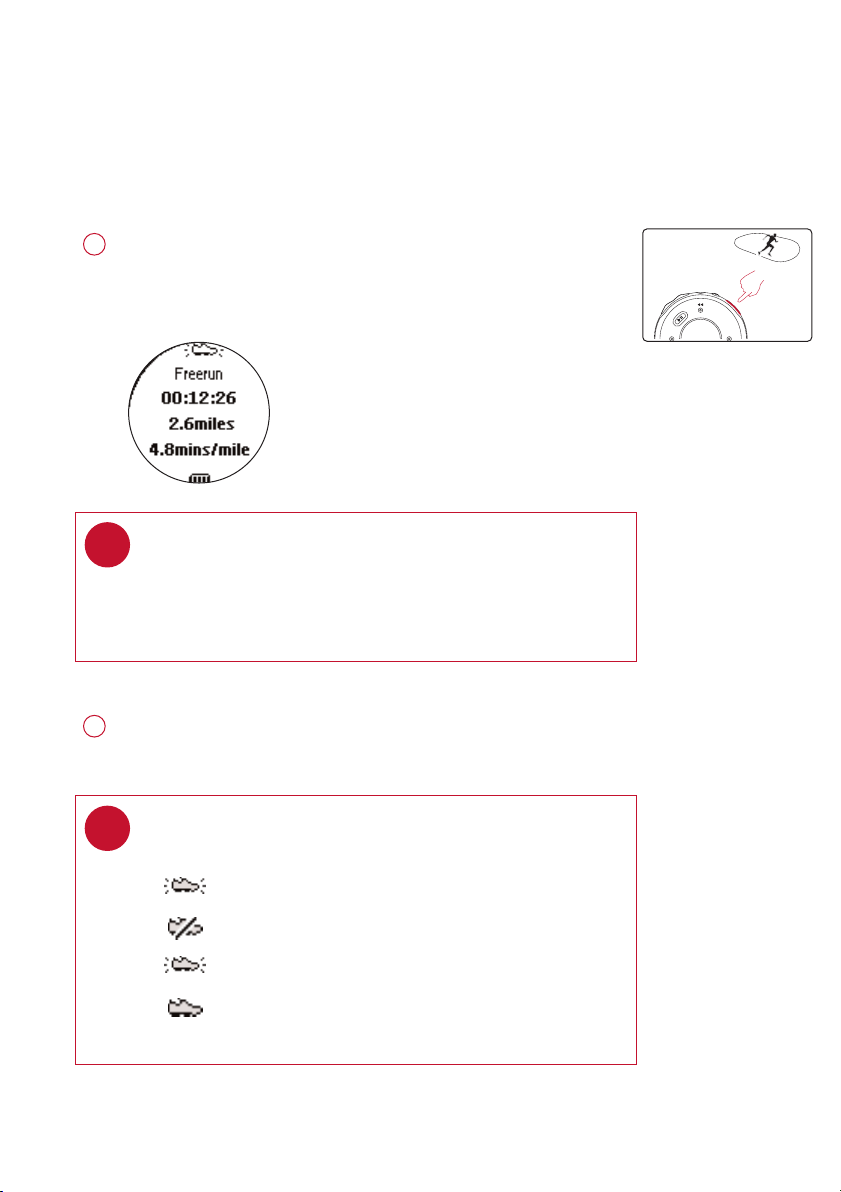
RRUUNN
Press
1
The screen will display an SDM connection status icon.
Start running. Your running activities will now be logged.
✔
and wait for a beep.
TIP
Any radio playback will stop as you start logging your running
activities. You can select an item from the music mode to
accompany your running. (See page 4 for more information.)
RRUUNN
Press
2
Press
✔
*Actual display varies with use
briefly to pause logging.
RRUUNN
briefly again to resume logging.
TIP
Check your SDM connection status from the following icons:
> SDM active
> SDM inactive
> (blinking) SDM trying to establish connection
> SDM not yet sychronized (see page 7)
10
Page 12
0.5 SEC
1 SEC
GGeettttiinngg ffeeeeddbbaacckk oonn yyoouurr rruunnnniinngg
You can receive voice feedback when you are running. The voice feedback will be in English
or French, depending on your region.
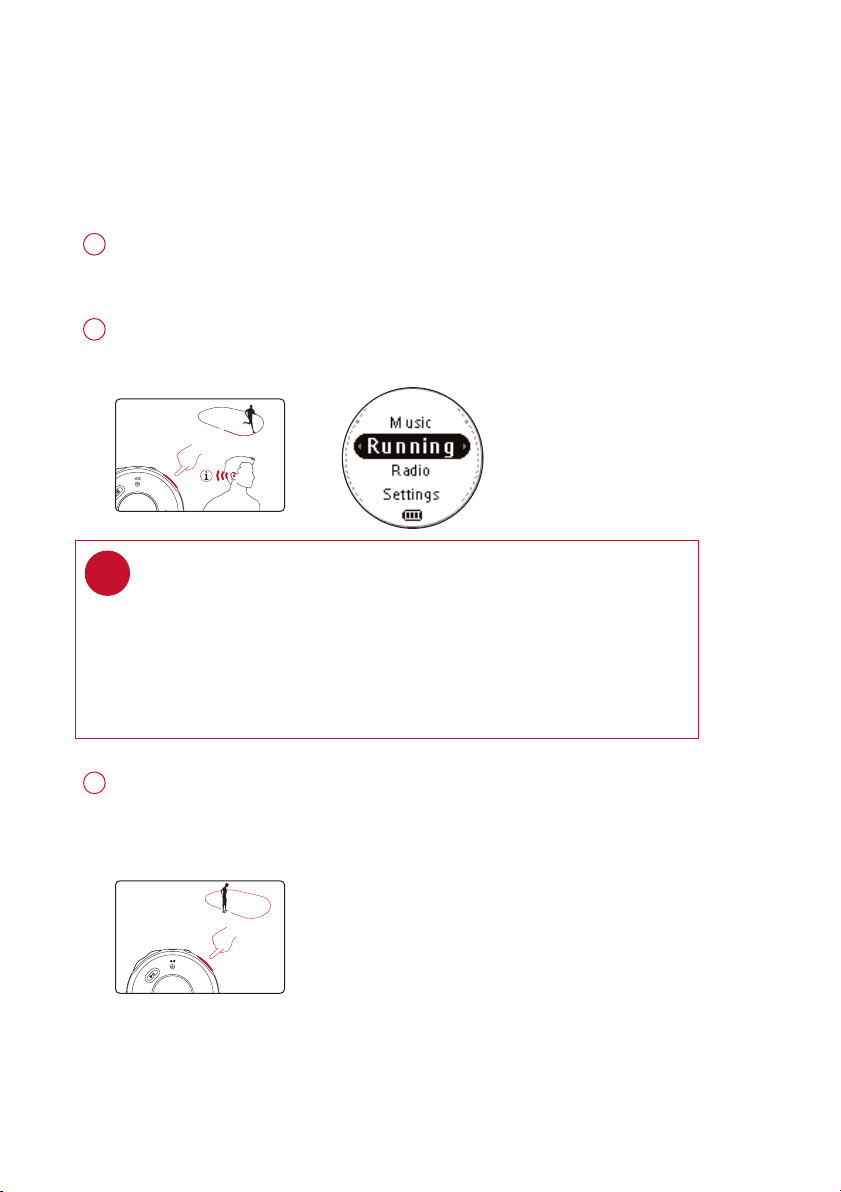
Start logging your running activities. (see page 10)
1
FFEEEEDDBBAACCKK
Press
2
running progress.
Your player screen will display VOICE FEEDBACK ACTIVE.
TIP
✔
You can also get feedback automatically according to distance
(every km / mile) and time (every 5 minutes).
Select this option from
to get information (in English / French) about your
SSEETTTTIINNGGSS➔VVOOIICCEE FFEEEEDDBBAACCKK
.
During VOICE FEEDBACK, your player will not respond to any key
press until you stopped the running log.
Press and hold
5
Your running data will be saved and your music playback will continue.
(See page 20 for information on how to manage your running data on
your computer.)
RRUUNN
for 1 second to stop logging.
11
Page 13
RRaaddiioo MMooddee:: AAuuttoommaattiicc TTuunniinngg
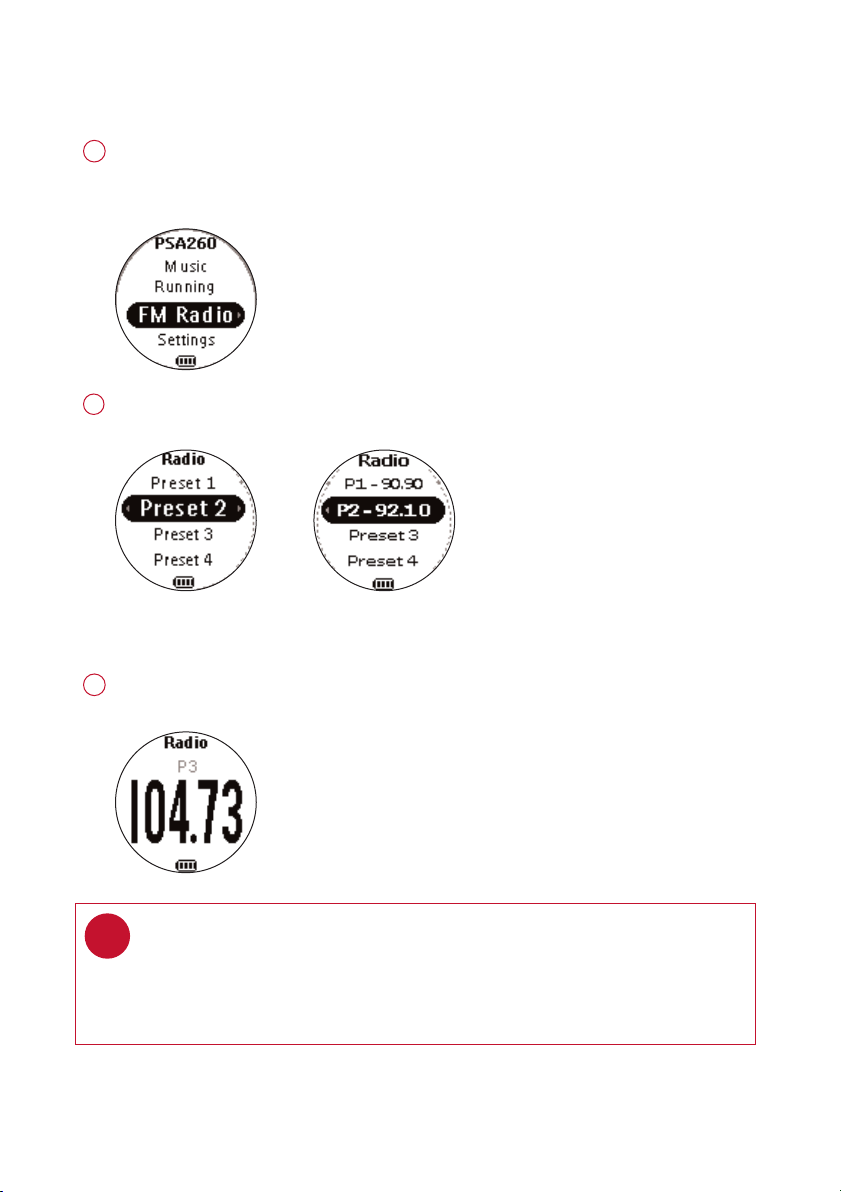
1
From the root menu, press 44, 44, 22 to enter the radio mode (disabled during
running logging).
Any music playback will stop as you enter the radio mode.
2
Press 44 to scroll down to
the 10 strongest radio stations. Press 11 to abort
Radio mode, no station
stored
Press 33 to scroll up or 44 to scroll down for your preset.
3
Press 22 ;; to play the selected station.
TIP
✔
> Connect your headphones before you start tuning.
> No stations are tuned if you are using your player for the first time.
> Some settings and functions are not available in the radio mode.
AAUUTTOO SSEEAARRCCHH
Stations tuned
. Press 22;; to automatically select
AAUUTTOO SSEEAARRCCHH
.
*Actual display varies with use
12
Page 14

RRuunnnniinngg mmooddee:: HHiissttoorryy
Press and hold 22 ;; to power on.
1
From the root menu, press 44 , 22 to enter the running mode.
To list your running history, select HISTORY and press 22.
2
Your running logs will be listed by date.
3
Press 33 or 44 to select your running log.
Press 22 to view the results of the highlighted running log.
4
If you want to delete the running log, press 22 ;; as prompted.
If you want to keep the running log, press 11 .
*Actual display varies with use
13
Page 15

RRaaddiioo MMooddee:: MMaannuuaall TTuunniinngg
Press 33 to scroll up or 44 to scroll down for your preset.
1
Radio preset menu
Press 22 ;; to play the selected station.
2
Press 44 or 33 to fine tune (tune step by step).
Press and hold 44 to search for the next available station.
Press and hold 33 for the previous available station.
Press 11 to abort searching.
Manual tuning
Press 22 ;; to save your setting.
3
Station stored
TIP
✔
If you want to discard the newly searched station, press 11 to exit the radio menu.
*Actual display varies with use
14
Page 16

SSeettttiinnggss MMooddee
From the root menu, press 44, 44, 44, 22 to enter the settings mode.
1
Settings mode
Press 33 to scroll up or 44 to scroll down for your setting.
2
Press 22 for next or 11 for previous levels of options.
Repeat / Shuffle Strobe light Equalizer
Press 22 to confirm your selection.
3
TIP
✔
To display player information, select and highlight
press and hold 22 for 2 seconds.
*Actual display varies with use
FFaaccttoorryy sseettttiinnggss
;
15
Page 17

AAddvvaanncceedd SSeettttiinnggss aanndd AAccttiioonnss
You can adjust the following settings from the settings mode.
Press 33 to scroll up or 44 to scroll down for your setting.
Press 22 for next or 11 for previous levels of options.
Press 22 to confirm your selection.
SSeettttiinnggss SSttrroobbee lliigghhtt
SShhuuffffllee &&
RReeppeeaatt
DDBBBB
EEqquuaalliizzeerr
BBaacckklliigghhtt
CCoonnttrraasstt
LLaanngguuaaggee
SSyynncchhrroonniizzee
ooffff
on /
Repeat All
Shuffle
Shuffle & Repeat
ooffff
ooffff
on /
Rock
Funk
Techno
HipHop
ooffff
5 sec
1100 sseecc
30 sec
Off
Levels 1 to 10
EEnngglliisshh
Français
Italiano
Deutsch
Español
Portugués
((LLeevveell 77))
Up
33
Left
11 22
44
Down
Default setting in
Right
bboolldd
.
VVooiiccee ffeeeeddbbaacckk
DDiissttaannccee UUnniittss
FFaaccttoorryy sseettttiinnggss
On Time (5min)
On Distance (1km/1mile)
OOnn DDeemmaanndd
MMiilleess
/ Kilometres
Restore
Cancel
16
Page 18

SSttrroobbee LLiigghhtt
Strobe light is an illumination technology setting that allows the backlit LCD
display to gradually radiate bursts of light, enhancing visibility of the runner
in low light conditions.
WWeeaarriinngg yyoouurr ppllaayyeerr
TIP
✔
Use armband and player holder to wear player on your arm.
17
Page 19

AAbboouutt DDiiggiittaall MMeeddiiaa MMaannaaggeerr ((DDMMMM))
Digital Media Manager contains all the necessary software components you need to work
properly with your player. These include:
- running log management
- running log upload to support site
- playlist creation
- MP3 / WMA transfer for playback on player
- paths and supporting link for DMM software and player firmware upgrades.
*Actual display varies with use
18
Page 20

IInnssttaallll DDMMMM
1
Insert the supplied CD into your computer’s CD-ROM drive.
2
Follow screen instructions to begin and complete DMMinstallation.
3
Launch DMM to customize your settings when prompted to do so.
Select DMM’s display language*
Specify one or more music folder*
*Actual display varies with use
19
Page 21

LLaauunncchh DDMMMM ((ppllaayyeerr ccoonnnneecctteedd))
1
Open the USB cover.
Connect your player to your computer using the supplied USB cable.
The USB connection screen will automatically appear.
✔
TIP
Please refer to your computer’s manual for the exact position of your USB port.
Look for the USB symbol on the processing unit of your computer.
2
Launch DMM. (see page 15 for first time launch settings)
New running data on your player will be automatically transferred to DMM.
Please wait for the process to complete. Never disconnect the USB cable
while transfer is in progress.
3
Organize your running data, music and playlists in DMM.
4
Transfer your music from DMM to your player.
*Actual display varies with use
20
Page 22

1
2
1
3
2
4
*Actual display varies with use
TThhee mmaaiinn RRUUNNNNIINNGG ssccrreeeenn ((ppllaayyeerr ccoonnnneecctteedd))
5
6
1
RRUUNNNNIINNGG TTAABB
MMYY WWOORRKKOOUUTTSS
2
3
Workout information area
PPLLAAYYEERR SSTTAATTUUSS
4
TTrraannssffeerr ttoo oonnlliinnee lloogg wweebbssiittee
5
6
Click to display workout history according to pace, speed or distance
TTrraasshh
: deletes workout history selection.
: click to display running logs
: Click on desired workout to show detailed information.
: Displays player connection status
: transfer all workhout history to online log website
21
Page 23

*Actual display varies with use
TTrraannssffeerr ttoo oonnlliinnee lloogg wweebbssiittee ((UUSSAA oonnllyy))
1
2
3
✔
TTrraannssffeerr ttoo oonnlliinnee lloogg wweebbssiittee
Click on
Login / Create new user name in the pop-up screen as shown above.
OOKK
Click
until transfer completes.
to complete your transfer. Do not disconnect your internet connection
TIP
DMMwill transfer a summary of your workout log to the online log website.
.
22
Page 24

DDMMMM MMeennuuss aanndd AAccttiioonnss
Use menus to customize DMM:
FFiillee
RReeffrreesshh ccoonntteennttss
SSttaarrtt ppllaayyeerr lliinnkk//
SSttoopp ppllaayyeerr lliinnkk
QQuuiitt
EEddiitt
TTrraacckk iinnffoorrmmaattiioonn
DDeelleettee aallll wwoorrkkoouuttss
OOnnlliinnee DDeevviiccee RReeggiissttrraattiioonn
UUsseerr nnaammee
PPrreeffeerreenncceess
LLaanngguuaaggee
MMuussiicc ffoollddeerrss
TTrraannssffeerr ooppttiioonnss
DDiissttaannccee uunniittss
IInntteerrnneett ccoonnnneeccttiioonn
PPllaayyeerr ffiirrmmwwaarree
UUppggrraaddee DDMMMM
For updating the latest status of the selected window
For disconnecting your player from DMM
For exiting DMM
For editing track information (in music tab only)
For deleting all workout logs
For online device registration
For changing the name of the user
For selecting a language for DMM
For adding, deleting or re-arranging your Music folders
(in music tab only)
For selecting transfer options (in music tab only)
For selecting distance units
For selecting internet connection options
For checking, upgrading and restoring player firmware
For checking and upgrading DMM
HHeellpp
DDMMMM HHeellpp
SSuuppppoorrtt
AAbboouutt DDMMMM HHeellpp
AAbboouutt PPllaayyeerr
AAbboouutt NNiikkeerruunnnniinngg..ccoomm
TIP
✔
The menus will call up various messages or windows where you need to input
some information. Follow screen instructions to complete your settings.
For additional help and tips
For instant access to support site
For software version information
For player information
For online log site information
23
Page 25

1
2
*Actual display varies with use
TThhee mmaaiinn MMUUSSIICC ssccrreeeenn ((ppllaayyeerr ccoonnnneecctteedd))
1
MMYY MMUUSSIICC
: displays the contents of your music folders; click on to minimize / maximize.
2
PPLLAAYYEERR MMUUSSIICC
NNeeww ppllaayylliisstt::
IImmppoorrtt mmuussiicc
TTrraasshh
EEddiitt IIDD33 ttaagg
SSeeaarrcchh
: displays the contents of your player; click on to minimize / maximize.
creates a new playlist.
: adds music or playlist.
: deletes selection.
: edits track information of selected track.
: searches for music from
MMYY MMUUSSIICC
and / or
PPLLAAYYEERR MMUUSSIICC
.
24
Page 26

4
1
2
3
5 6 8 9
7
*Actual display varies with use
SSeelleeccttoorr ppaanneell aanndd ccoonntteenntt ppaanneell
SSeelleeccttoorr ppaanneell
1
CCoonntteenntt ppaanneell
2
and drop to
SSccrroollll bbaarr
3
PPuullll ddoowwnn mmeennuuss
4
TTeexxtt aarreeaa
5
6
HHeeaaddeerr sseeppaarraattoorr
7
PPllaayyeerr mmeemmoorryy iinnddiiccaattoorr
8
RReessiizziinngg bbuuttttoonnss
9
: arranges the display order of the content panel.
: displays the contents of
PPLLAAYYEERR MMUUSSIICC..
: type your search criteria here.
: transfers highlighted tracks and / or playlists.
: resizes column width.
: shows available memory on your player.
: minimizes, maximizes DMM view / exit DMM.
MMYY MMUUSSIICC
, highlight to drag from
MMYY MMUUSSIICC
25
Page 27

1
2
3
4
5
IInnddiiccaattoorrss oonn tthhee ccoonntteenntt ppaanneell
1
: expanded view, displays item contents in full.
*Actual display varies with use
: track / playlist not on the player.
2
3
Click to highlight an item.
Press <Delete> on your keyboard to delete the highlighted item.
4
5
: indicates track is playing by DMM.
: collapsed view: item contains more contents to display.
26
Page 28

*Actual display varies with use
CClliicckk aanndd TTrraannssffeerr
1
Make sure your player is connected when you launch DMM.
2
Click and highlight an item (e.g. track, artist, album, genre, playlist).
Click on to copy your selection from your computer to your player.
3
4
Your selection is now transferred to your player.
TIP
✔
PPCC uusseerrss
than one item. To select consecutive items, click the first item, press and hold
<Shift> on your keyboard, and then click the last item.
MMAACC uusseerrss
than one item.
IIMMPPOORRTTAANNTT:: KKEEEEPP AA CCOOPPYY OOFF YYOOUURR OORRIIGGIINNAALL FFIILLEESS!!
Please keep a copy of the original files transferred to your player. Philips is not
responsible for any loss of content if the player is damaged or not readable.
: Press and hold <Ctrl> on your keyboard and click to select more
: Press and hold <Shift> on your keyboard and click to select more
27
Page 29

DDrraagg aanndd DDrroopp ttoo TTrraannssffeerr
1
Make sure your player is connected when you launch DMM.
Click to highlight an item (e.g. track, artist, album, genre, playlist).
2
Drag the selection to
Your selection is now transferred to your drop destination.
3
TIP
✔
PPCC uusseerrss
than one item. To select consecutive items, click the first item, press and hold
<Shift> on your keyboard, and then click the last item.
MMAACC uusseerrss
than one item.
IIMMPPOORRTTAANNTT:: KKEEEEPP AA CCOOPPYY OOFF YYOOUURR OORRIIGGIINNAALL FFIILLEESS!!
Please keep a copy of the original files transferred to your player. Philips is not
responsible for any loss of content if the player is damaged or not readable.
: Press and hold <Ctrl> on your keyboard and click to select more
PPLLAAYYEERR MMUUSSIICC
: Press and hold <Shift> on your keyboard and click to select more
or a specific playlist.
*Actual display varies with use
28
Page 30

*Actual display varies with use
AAdddd aa TTrraacckk ttoo aa PPllaayylliisstt bbyy DDrraagg aanndd DDrroopp
1
Click on a track.
2
Drag the selected track to a playlist.
3
Hold the mouse button and move your selection to a destination playlist.
4
Your selected track is now in the playlist.
TIP
✔
PPCC uusseerrss
than one item. To select consecutive items, click the first item, press and hold
<Shift> on your keyboard, and then click the last item.
MMAACC uusseerrss
than one item.
: Press and hold <Ctrl> on your keyboard and click to select more
: Press and hold <Shift> on your keyboard and click to select more
29
Page 31

CCrreeaattee PPllaayylliissttss
Click on to create a new playlist.
1
2
Fill in the information in the pop up window.
3
Follow screen instructions to save your new playlist.
You can now drag more tracks to the new playlist.
IImmppoorrtt PPllaayylliissttss
1
Click on to import a playlist.
Fill in the information in the pop up window.
2
3
Follow screen instructions to import your new playlist.
You can now drag more tracks to the imported playlist.
*Actual display varies with use
30
Page 32

DDeelleettee TTrraacckkss aanndd PPllaayylliissttss
1
Click to highlight an item.
2
Drag your selection to to delete.
3
Alternatively, press <Delete> on your keyboard to delete your selection.
TIP
✔
PPCC uusseerrss
than one item. To select consecutive items, click the first item, press and hold
<Shift> on your keyboard, and then click the last item.
MMAACC uusseerrss
than one item.
: Press and hold <Ctrl> on your keyboard and click to select more
: Press and hold <Shift> on your keyboard and click to select more
*Actual display varies with use
31
Page 33

EEddiitt TTrraacckk IInnffoorrmmaattiioonn
1
Click on a track to edit its information.
*Actual display varies with use
2
Click on to call up the
Click on the text boxes of
3
4
CCoommmmeennttss
Click on
to edit relevant information.
OOKK
to save the information. Click
IIDD33 TTaagg EEddiittoorr
TTrraacckk nnaammee, TTrraacckk nnuummbbeerr, AArrttiisstt, AAllbbuumm, GGeennrree, YYeeaarr
.
CCaanncceell
to discard changes made.
,
32
Page 34

SSeeaarrcchh ffoorr TTrraacckkss oorr PPllaayylliissttss
*Actual display varies with use
1
Type a search string in the
Click on to start searching.
2
3
You will see tracks and / or playlists that contain the search string.
4
You can transfer, delete or drag and drop these tracks as described in previous sections.
Click on the
5
✔
SSeelleeccttoorr ppaanneell
TIP
Deleting items from the searched results will delete them from your library!
SSeeaarrcchh
field.
to exit the search view.
33
Page 35

MMaakkee UUssee ooff tthhee DDiiffffeerreenntt VViieewwss
DMM provides different view options. This is to minimize content refreshing time.
There are a few ways to customize DMMviews.
1
SSeeccttiioonn iiccoonnss
You can click on or to expand or minimize respective content panels.
2
BBoorrddeerr aarreeaa
Drag the border area between
panel is reduced to a certain size, the content panel will only show the section icon.
MMYY MMUUSSIICC
PPLLAAYYEERR MMUUSSIICC
and
. When the content
3
DDrroopp ZZoonnee
PPLLAAYYEERR MMUUSSIICC
When
selected items and drop them here. Note that the
player memory is full.
is minimized, you will see a
DDrroopp ZZoonnee
DDrroopp ZZoonnee
. You can drag
icon turns grey when
34
Page 36

DDiissppllaayy TTrraacckkss YYoouurr WWaayy
SSoorrttiinngg
1
You can click on the contents header (Track, Artist, Album, Genre) to
arrange music tracks according to the order you selected.
DDeettaaiilleedd // ssuummmmaarryy vviieeww
2
Click on the next to the contents header to turn on / turn off
detailed display of item contents.
detailed view
summary view
35
Page 37

UUppggrraaddeess
Since it is possible for you to upgrade your product, we recommend that you register your
product on www.nike-philips.com/register so we can inform you as soon as new free upgrades
become available.
We know you will enjoy your product for a long time. For best performance, we recommend that
you regularly check in to www.nike-philips.com for free upgrades of the latest software and
firmware for your product.
FFiirrmmwwaarree UUppggrraaddee
Your player is controlled by an internal program called
the latest firmware to keep your player updated.
PPrreeffeerreenncceess ➔PPllaayyeerr FFiirrmmwwaarree ➔ UUppggrraaddee FFiirrmmwwaarree
Click
1
information on how to download and upgrade your player firmware.
Follow screen instructions to complete firmware upgrade.
2
TIP
✔
Because you are updating the program of your player, please make sure
your player is connected to your computer before you launch DMM.
Keep it connected during the firmware upgrade process.
ffiirrmmwwaarree
. You can download and install
. This will give you further
DDMMMM UUppggrraaddee
DMM is the software that enables best interactions between your player and your computer
Keep it updated by doing upgrades.
1
PPrreeffeerreenncceess ➔ UUppggrraaddee DDMMMM
Click
download and upgrade your DMM.
. This will give you further information on how to
Follow screen instructions to complete DMM upgrade.
2
36
Page 38

UUnniinnssttaallll DDMMMM
PC Users:
Close all applications, including DMM.
1
From the Start menu, go to Control Panel. Select Add / Remove Programs.
2
Select DMM from your currently installed programs to uninstall.
For further information on uninstalling programs, please refer to Windows’
3
user manual.
MAC Users:
Close all applications, including DMM.
1
Double-click on uninstall.jar (
2
For further information on uninstalling programs, please refer to Mac OS’
3
user manual.
Install directory/PSADMM/_uninst
) to uninstall DMM.
37
Page 39

TTrroouubblleesshhoooottiinngg ((11))
If a fault occurs, first check the points listed. For further help and other troubleshooting tips,
please also check out FAQ for your player at w
If you are unable to find a solution from these hints, consult your dealer or service center.
WARNING:
Under no circumstances should you try to repair the set yourself, as this will invalidate
the warranty.
PPrroobblleemm CCaauussee SSoolluuttiioonn
Cannot power on player Battery drained Charge the battery
Loose key press Press and hold 22 ;; for 2 seconds
USB connected Disconnect player from
Firmware / databse error Connect player to computer and
USB doesn’t work Loose connection Check connection
Wrong OS version Your operation system must be
USB driver not installed Windows 98SE user only: install
Player connected to Connect your player to another
Mac keyboard USB port
Player does not respond Player busy Press and hold [VOLUME +] and
Automatic power off Your player automatically powers
ww.nike-philips.com.
(See page 1, step 2)
computer (See page 1, step 5)
restart DMM
Win 98SE or Mac OS 10.3 or
later
the USB driver provided in bypacked CD
33 to reset. Press and hold 22 ;; for
2 seconds to power on again if the
power on screen does not appear
automatically
if there is no operation and no
music played within 60 seconds.
Press and hold
22 ;;
to power on.
38
Page 40

TTrroouubblleesshhoooottiinngg ((22))
PPrroobblleemm CCaauussee SSoolluuttiioonn
Cannot play track Track format not Your player is not able to play
Tracks not shown in Track format not Ensure that all your music on your
by-packed music supported computer is in formats supported by
management software your player.
SDM doesn’t work Synchronization problem
No voice feedback Essential files for voice Connect player to computer and
supported AAC encrypted or WMA songs
bought from the internet.
Since it is possible for you to upgrade
your product firmware, we recommend
that you regularly check in to
www.nike-philips.com* for free
upgrades.
Tracks were copied Your player will play tracks only if they
from your computer they are transferred using the byto your player using packed music management software
drag and drop in Windows
Explorer or Finder
Please synchronize your player with
the speed and distance monitor if:
you have bought a new speed and
distance monitor (see page 7)
Workout started before Wait for the and the audible
SDM connection is beep before starting running
established
SDM connection lost Re-establish SDM connection
due to surrounding (see page 6)
interference
SDM connection lost Install batteries or charge your
because of low battery player
feedback deleted restart DMM
during USB connection
39
Page 41

SSaaffeettyy aanndd MMaaiinntteennaannccee
TTaakkee ccaarree wwhheenn uussiinngg hheeaaddpphhoonneess
HHeeaarriinngg ssaaffeettyy
Listen at a moderate volume. Using headphones at high volume can impair your hearing.
TTrraaffffiicc ssaaffeettyy::
Do not use headphones while driving or cycling as you may cause an accident.
TTaakkee ccaarree wwhheenn uussiinngg ssttrroobbee lliigghhtt
Do not look directly into the strobe light for prolonged period as this may cause
damage to your eyes.
GGeenneerraall mmaaiinntteennaannccee
TToo aavvooiidd ddaammaaggee oorr mmaallffuunnccttiioonn::
– Do not expose to excessive heat caused by heating equipment or direct sunlight.
– Do not drop your player or allow objects to fall on your player.
– Do not allow your player to be submersed in water. Do not expose earphone socket or
battery compartment to water as water entering the set may cause major damage.
– Do not use any cleaning agents containing alcohol, ammonia, benzene, or abrasives as
these may harm the set.
– Active mobile phones in the vicinity may cause interference.
UUssiinngg DDMMMM
Avoid the risk of corrupting and losing data with the following precautions when using DMM:
– Never disconnect the USB cable while file transfer is in progress.
– Never close DMM while file transfer is in progress.
– Operate using one file management system only. When transferring files, do not attempt to
transfer files via Windows Explorer / Finder whilst waiting for transfer to complete on DMM.
– Do not delete any track via Windows Explorer / Finder when file transfer is active in DMM.
If you wish to delete a file, please only do so from either DMM or from Windows Explorer / Finder
after file transfer completes.
:
UUssiinngg tthhee ppoowweerr aaddaapptteerr // cchhaarrggeerr
– Use only the power adapter that came with your player. Adapters for other electronic
devices may look similar, but they may damage your player.
– The only way to shut off power completely to your power adapter/charger is to disconnect
it from the power source.
– Always leave space around your power adapter. Do not use this equipment in a location
where airflow around the power adapter is confined, such as a bookcase.
– When connecting or disconnecting your power adapter, always hold the power adapter by
its sides. Keep fingers away from the metal part of the plug.
– The power adapter for your player is a high-voltage component and should not be opened
for any reason, even when your player is off.
EEnnvviirroonnmmeennttaall iinnffoorrmmaattiioonn
We have reduced the packaging to its minimum and made it easy to separate into
materials: cardboard, PS, PE, PET.
Your set consists of material which can be recycled if disassembled by a specialized company
Please observe the local regulations to dispose of packaging, exhausted
batteries and old equipment.
40
Page 42

NNoottiiccee ffoorr tthhee UUSSAA
Nike-Philips
PSA260
Note:
This equipment has been tested and found to comply with the limits for a Class B
digital device, pursuant to part 15 of the FCC Rules. These limits are designed to provide
reasonable protection against harmful interference in a residential installation. This
equipment generates, uses, and can radiate radio frequency energy and, if not installed
and used in accordance with the instruction manual, may cause harmful interference to
radio communications.
However, there is no guarantee that interference will not occur in a particular installation.
If this equipment does cause harmful interference to radio or television reception, which
can be determined by turning the equipment off and on, the user is encouraged to try to
correct the interference by one or more of the following measures:
0 Relocate the receiving antenna.
0 Increase the separation between the equipment and receiver.
0 Connect the equipment into an outlet on a circuit different from that to which
the receiver is connected.
0 Consult the dealer or an experienced radio/ TV technician for help.
Notice for Canada
This Class B digital apparaatus complies with Canadian ICES-003.
This product complies with the radio interference requirements of the European Community.
MMooddiiffiiccaattiioonnss
Modifications not authorized by the manufacturer may void user authority to operate this device.
CCooppyyrriigghhtt iinnffoorrmmaattiioonn
All other brand and product names are trademarks of their respective companies
or organizations.
Unauthorized duplication of any recordings downloaded from the internet or made from audio
CDs is a violation of copyright laws and international treaties.
41
Page 43

Pls provide info on:
TTeecchhnniiccaall DDaattaa
GGeenneerraall
Dimension 27 (D) x 27 (H) x 71 mm
Weight 70g
PPoowweerr ssuuppppllyy
Built-in 600mAh Li-ion rechargeable battery
Multi-voltage AC power adapter / charger
BBaatttteerryy ppllaayyttiimmee
12 hours using built-in rechargeable battery (4 hours fully charged, 1 hour fast charge)
*Battery life may vary according to use.
DDiissppllaayy
IInnddiiccaattiioonnss
SSoouunndd
AAuuddiioo PPllaayybbaacckk
IIDD33--ttaagg ssuuppppoorrtt
SSttoorraaggee MMeeddiiaa
Album name, artist name, battery status, DBB, frequency, pre-set station, time, track
White Backlight LCD
Bass enhancement Dynamic Bass Boost
Equalizer settings Funk, Hip hop, Rock, Techno
Frequency Response 20 - 20 000 Hz
Output power (RMS) 2 x 5 mW (16 Ω)
Signal to noice ratio >80
Volume control Digital
MP3 (8 - 320 kbps and VBR)
WMA (32 - 192 kbps)
Album title, genre title, track title and artist name
Mass storage class, 256MB* NAND Flash
Music memory capacity: up to 65 MP3 tracks (128kbps) or 130 WMA tracks (64kbps)
* Actual formatted capacity will be less.
Dimension, weight, power
supply, battery playtime, etc.
TTuunneerr
CCoonnnneeccttiivviittyy
BBlluueettooootthh
MMuussiicc ttrraannssffeerr
FFiillee ttrraannssffeerr
AAcccceessssoorriieess
The type plate is at the back of the set.
Philips, Nike, Inc. reserves the right to make design and specification changes for product
improvement without prior notice.
All rights reserved.
Frequency range 87.5 - 108 MHz
Station presets 10
Tuner bands FM stereo
5V DC, headphones (3.5mm line-out), remote control, USB 1.1, Bluetooth 1.1
SPP, Class 3, range up to 5m
via DMM / Musicmatch for music playback
via Windows Explorer (PC) / Finder (MAC) of data in general
(availability subject to regions)
AY4102 AC/ DC adapter
AY4208 Armband
AY4212 Carrier
SBC HJ030/771 Headphones
AY3192 USB cable
42
 Loading...