

Garmin GRT 10 Transceiver, GRC 10 Remote Control, Appliance Data, LRU, Non-Airframe Specific Instruction
Page 1

SiriusXM
Activation Instructions
GDL 69 Series
®
Satellite Radio
190-00355-04 March 2015 Revision L
Page 2
© 2004-2015 Garmin International, Inc., or its subsidiaries
All Rights Reserved
Except as expressly provided herein, no part of this manual may be reproduced, copied, transmitted,
disseminated, downloaded or stored in any storage medium, for any purpose without the express prior
written consent of Garmin. Garmin hereby grants permission to download a single copy of this manual and
of any revision to this manual onto a hard drive or other electronic storage medium to be viewed and to
print one copy of this manual or of any revision hereto, provided that such electronic or printed copy of this
manual or revision must contain the complete text of this copyright notice and provided further that any
unauthorized commercial distribution of this manual or any revision hereto is strictly prohibited.
SiriusXM
®
, Sirius®, XM® and all related marks and logos are trademarks of Sirius XM Radio Inc. All
other marks and logos are property of their respective owners. All rights reserved.
At Garmin, we value your opinion. For comments about this guide please e-mail:
Techpubs.Salem@garmin.com.
Avionics@garmin.com
.
For comments about Garmin aviation products, email
Garmin International, Inc.
1200 E. 151st Street
Olathe, KS 66062 USA
Telephone: (913) 397-8200
Aviation Dealer Technical Support Line (Toll Free): (888) 606-5482
www.garmin.com
Garmin (Europe) Ltd.
Liberty House
Bull Copse Road
Hounsdown Business Park
Southampton, SO40 9LR, UK
Telephone: 44 (0) 23 8053 4000
Fax: 44 (0) 23 8052 4004
Garmin AT, Inc.
2345 Turner Road, SE
Salem, Oregon 97302
Telephone: (503) 581-8101
Toll Free: (800) 525-6726 (US) or (800) 654-3415 (Canada)
190-00355-04 GDL 69/69A SiriusXM Satellite Radio Activation Instructions
Rev. L Page A
Page 3
DEFINITIONS OF WARNINGS, CAUTIONS, AND NOTES
NOTE
WARNING
CAUTION
NOTE
Warnings indicate that immediate attention must be given to avoid potential
equipment damage and personal injury should the instructions be disregarded.
Cautions indicate an alert to potential damage to the equipment, if the
procedural step is not directly followed.
Notes indicate additional information is needed.
All screen shots used in this do cument are current at the time of publication. Screen shots
are intended to provide visual reference only. All information depicted in screen shots,
including software file names, versions, and part numbers, is subject to change and may
not be up to date.
190-00355-04 GDL 69/69A SiriusXM Satellite Radio Activation Instructions
Rev. L Page i
Page 4

ACKNOWLEDGMENT
Hardware and required monthly subscription sold separately. USER ACKNOWLEDGES THAT
GARMIN HAS NO CONTROL OVER THE TERMS AND REQUIRMENTS OF THE SUBSCRIPTION.
COMPATABILITY OF HARDWARE EQUIPMENT WITH THEN-CURRENT SUBSCRIPTION
OFFERING OF SERVICE PROVIDER IS ALSO BEYOND GARMIN’S CONTROL. GARMIN SHALL
HAVE NO LIABILITY IF CHANGES IN SERVICE PROVIDER’S SUBCRIPTION OFFERING
NEGATIVELY IMPACTS OR RENDERS IMPOSSIBLE THE USE OF PURCHASED GARMIN
HARDWARE EQUIPMENT WITH THE SERVICE PROVIDER’S OFFERING IN THE FUTURE.
Subscription fee is consumer only. Other fees and taxes, including a one-time activation fee may apply. All
programming fees and weather data subject to change. SiriusXM weather data and individual product
availability vary by hardware equipment. Reception of the SiriusXM signal may vary depending on
location. Subscriptions subject to Customer Agreement included with the SiriusXM Welcome Kit and
available at www.siriusxm.com/sxmaviation
INTENDED THIRD PARTY BENEFICIARY OF SUCH CUSTOMER AGREEMENT, AND THAT
ALL DISCLAIMERS CONTAINED THEREIN EQUALLY APPLY AS IF SUCH DISCLAIMERS
WERE MADE DIRECTLY BY GARMIN. Available only in the 48 contiguous United States.
THE USER AGREES THAT THE SIRIUSXM WEATHER SERVICE OFFERING IS PROVIDED “AS
IS”, THAT YOUR GARMIN HARDWARE EQUIPMENT ONLY ALLOWS THE DISPLAY OF SUCH
SERVICE OFFERING, AND THAT ANY CHANGES BY THE SERVICE PROVIDER MAY
INTERFERE WITH THE ABILITY OF YOUR GARMIN HARDWARE EQUIPMENT TO RECEIVE
OR DISPLAY SUCH SERVICE OFFERING. FURTHER, SUCH SERVICE OFFERING CONTAINS
INFORMATION FURNISHED BY OTHERS WHO ARE NOT UNDER THE CONTROL OF GARMIN,
AND THEREFORE THE SERVICE OFFERING IS ACCORDINGLY FURNISHED WITHOUT ANY
WARRANTY OF GARMIN, EXPRESS OR IMPLIED, INCLUDING WITHOUT LIMITATION,
IMPLIED WARRANTIES OF MERCHANTABILITY AND FITNESS FOR A PARTICULAR
PURPOSE.
. USER ACKNOWLEDGES THAT GARMIN IS AN
GDL 69/69A SiriusXM Satellite Radio Activation Instructions 190-00355-04
Page ii Rev. L
Page 5

TABLE OF CONTENTS
1 OVERVIEW .......................................................................................................................................1-1
1.1 Introduction ...............................................................................................................................1-1
1.2 General Activation Information ................................................................................................1-1
1.3 Refreshing Activation ...............................................................................................................1-1
1.4 Deactivation/Reactivation .........................................................................................................1-2
1.5 Reference Documents ...............................................................................................................1-2
2 MX20/GMX 200 A
2.1 Activation Steps ........................................................................................................................2-1
2.2 Verify Activation .......................................................................................................................2-3
3 G1000/G900X/G950 A
3.1 Activation Steps ........................................................................................................................3-1
3.2 Verify Activation .......................................................................................................................3-3
4 G500/G600 A
4.1 Activation Steps ........................................................................................................................4-1
4.2 Verify Activation .......................................................................................................................4-2
5 GNS 400/500 S
5.1 Activation Steps ........................................................................................................................5-1
5.2 Verify Activation .......................................................................................................................5-3
6 GNS 400W/500W S
6.1 Activation Steps ........................................................................................................................6-1
6.2 Verify Activation .......................................................................................................................6-2
7 GTN 6XX/7XX A
7.1 Activation Steps ........................................................................................................................7-1
7.2 Verify Activation .......................................................................................................................7-3
CTIVATION ..........................................................................................................2-1
CTIVATION ....................................................................................................3-1
CTIVATION ...................................................................................................................4-1
ERIES ACTIVATION ...................................................................................................5-1
ERIES ACTIVATION ...........................................................................................6-1
CTIVATION ............................................................................................................ 7-1
190-00355-04 GDL 69/69A SiriusXM Satellite Radio Activation Instructions
Rev. L Page iii
Page 6

LIST OF FIGURES
Figure 2-1 GMX 200 ID Locations ..................................................................................................2-2
Figure 2-2 GMX 200 Channel List ...................................................................................................2-2
Figure 3-1 AUX Group .....................................................................................................................3-1
Figure 3-2 XM Info Page ..................................................................................................................3-2
Figure 3-3 XM Radio Subpage .........................................................................................................3-2
Figure 3-4 Lock Activation Screen ...................................................................................................3-3
Figure 4-1 XM Information Page .....................................................................................................4-1
Figure 4-2 Lock Activation Screen ...................................................................................................4-2
Figure 4-3 XM Radio Page ...............................................................................................................4-3
Figure 5-1 Data Link Status Page .....................................................................................................5-2
Figure 5-2 Weather Page ..................................................................................................................5-3
Figure 6-1 XM Information Page .....................................................................................................6-2
Figure 6-2 Lock Data Link Activation Screen ..................................................................................6-2
Figure 7-1 GDL 69 Status Page ........................................................................................................7-1
Figure 7-2 Accessing GDL 69 Status Page through Music Key ......................................................7-2
Figure 7-3 Accessing GDL 69 Status Page through System Key .....................................................7-2
Figure 7-4 GTN Subscription List ....................................................................................................7-3
Figure 7-5 GTN Lock Activation Screen ..........................................................................................7-3
LIST OF TABLES
Table 1-1 Referenced Publications..................................................................................................1-2
Table 5-1 SAT ID Field....................................................................................................................5-2
Table 5-2 Connectivity Field...........................................................................................................5-2
190-00355-04 GDL 69/69A SiriusXM Satellite Radio Activation Instructions
Rev. L Page iv
Page 7

1OVERVIEW
NOTE
1.1 Introduction
The GDL 69/69A SiriusXM Satellite Radio Activation Instructions are applicable to the following GDL 69
Series products:
MX20/GMX 200
G1000/G900X/G950
G500/G600
GNS 400/500 Series
GNS 400W/500W Series
GTN 6XX/7XX
The use of the term GDL 69 Series encompasses all the different models in this document unless otherwise
specified. The term GDL 69/69A SXM is used to indicate receiver models compatible with the updated
SiriusXM G4 satellite network.
The GDL 69 models are a weather data link only. The GDL 69A models combine a weather data link and
an audio receiver.
1.2 General Activation Information
Before activating, the GDL 69 Series must be installed in accordance with GDL 69 Series TSO Installation
Manual or GDL 69/69A Part 23 AML STC Install ation Manual. Before the GDL 69 Series can be used, the
unit must have active SiriusXM Satellite Radio subscriptions. This document will take you through the
process.
To activate a GDL 69 Series receiver, the Radio ID(s) are required. The Data Radio ID is for SiriusXM
weather while the Audio Radio ID is for SiriusXM audio entertainment (available only on
GDL 69A models). The Radio ID information is printed on a label affixed to the last page of this document
and can be retrieved electronically from the interfaced display unit. To activate a GDL 69 SXM receiver,
only one Radio ID is required (both Data and Audio use the same ID).
To activate service, refer to SiriusXM’s website at www.siriusxm.com/sxmaviation
(855) 796-9847.
, or call
1.3 Refreshing Activation
Refresh the unit if it has been inactive for more than one hour. Activation refresh can be performed through
the SiriusXM website at https://care.siriusxm.com/retailrefresh_view.action
website. If both data (weather) and audio packages need to be refreshed on a first generation GDL 69
Series, the refresh must be performed for each Radio ID.
If the aircraft has not been powered on for an extended period of time, the SiriusXM
subscription may have been automatically deactivated. In this event, the unit must be
refreshed.
. Follow the instructions on the
190-00355-04 GDL 69/69A SiriusXM Satellite Radio Activation Instructions
Rev. L Page 1-1
Page 8
1.4 Deactivation/Reactivation
When the GDL 69 Series is not properly activated, it may be necessary to perform a full deactivation and
reactivation of the system. This procedure is complicated and should not be attempted without the
guidance of Garmin technical support.
1.5 Reference Documents
The following publications are sources of additional information for activating the GDL 69 Series
products. Before activating the GDL 69 Series, all referenced materials applicable to the installation should
be read. Be sure to visit www.garmin.com
equipment.
Table 1-1 Referenced Publications
Document P/N
G500 Pilot’s Guide 190-01102-02
G500 AML STC Installation Manual 190-01102-06
G600 Pilot’s Guide 190-00601-02
G600 AML STC Installation Manual 190-00601-06
G900X Integrated Flight Deck Pilot’s Guide 190-00726-00
G950 Integrated Avionics System Pilot’s Guide 190-00870-( )
G1000 Pilot’s Guide [1]
and verify the latest revision of documents applicable to your
GDL 69 Series Pilot’s Guide 190-00355-12
GDL 69 Series TSO Installation Manual 190-00355-07
GDL 69/69A Part 23 AML STC Installation Manual 190-00355-02
GMX 200 Pilot’s Guide and Reference 190-00607-02
GMX 200 Multi-Function Display Installation Manual 190-00607-04
GNC 420(A) Pilot’s Guide and Reference 190-00140-20
GNS 430(A) Pilot’s Guide and Reference 190-00140-00
GNS 530(A) Pilot’s Guide and Reference 190-00181-00
GPS 400 Pilot’s Guide and Reference 190-00140-60
GPS 500 Pilot’s Guide and Reference 190-00181-60
400W/500W Series Pilot’s Guide Addendum 190-00356-30
GTN 625/635/650 Pilot’s Guide 190-01004-03
GTN 725/750 Pilot’s Guide 190-01007-03
MX20 Multi-Function Display Installation Manual 560-1025-( )
MX20 Pilot’s Guide 560-1026-( )
[1] G1000 Pilot’s Guides are airframe specific. Refer to the Garmin Dealer Resource Center
at www.
garmin.com for additional information.
GDL 69/69A SiriusXM Satellite Radio Activation Instructions 190-00355-04
Page 1-2 Rev. L
Page 9
2 MX20/GMX 200 ACTIVATION
NOTE
NOTE
The MX20/GMX200 must be configured to accept information from a GDL 69 Series unit in accordance
with MX20 Multi-Function Display Installation Manual or the GMX 200 Multi-Function Display
Installation Manual. The complete activation process may take over 45 minutes, depending on the
demands of the SiriusXM activation system. Do not cycle or remove power from the units during the
activation process. It is recommended that the aircraft is outside and away from metallic structures. For
activation, you will need the SiriusXM Radio ID(s) and your billing information. The SiriusXM Radio IDs
are located on the Data Link Status page (see figure 2-1) and on the back page of this document.
GDL 69/69A units have separate Data and Audio Radio IDs, and will not function
correctly with both audio and data services activated under one ID. GDL 69 SXM
receivers use one Radio ID for both data and audio services.
2.1 Activation Steps
1. Ensure the aircraft’s SiriusXM antenna has an unobstructed view of the southern sky.
2. Connect aircraft to an external power source, if available.
3. With the MX20/GMX 200 and GDL 69 Series unit powered up, verify the yellow GDL 69 failure
flag is not displayed. A flag indicates potential communication issue between the
MX20/GMX 200 and GDL 69 Series unit.
4. Go to the SiriusXM Activation page.
a. Press the FN key until the FIS function is displayed. Press the FIS soft key.
b. Press the fourth soft key on the bottom of the page, until “STATUS” is displayed.
c. Press the MENU/ENT key .
d. Press the soft key on the right hand side next to Products. “Diagnostics” and “Start Diag”
will be displayed (“Start Diag” is not displayed in software version 5.5).
e. Press the Diagnostics soft key.
f. The Activation page will be displayed.
5. To activate service, refer to SiriusXM’s website at www.siriusxm.com/sxmaviation
(855) 796-9847.
, or call
Specify subscription class when activating the data service. The activation process takes
approximately 45-60 minutes, but may take longer depending on system load. During the
activation process, the unit may display several differ ent activation levels. This is common
and should be ignored.
6. Once the service class and all of the weather products subscribed to are displayed, press the
Accept soft key . Wait 10 to 30 seconds to allow the GDL 69 Series to process the accept command
and lock in the activation.
190-00355-04 GDL 69/69A SiriusXM Satellite Radio Activation Instructions
Rev. L Page 2-1
Page 10
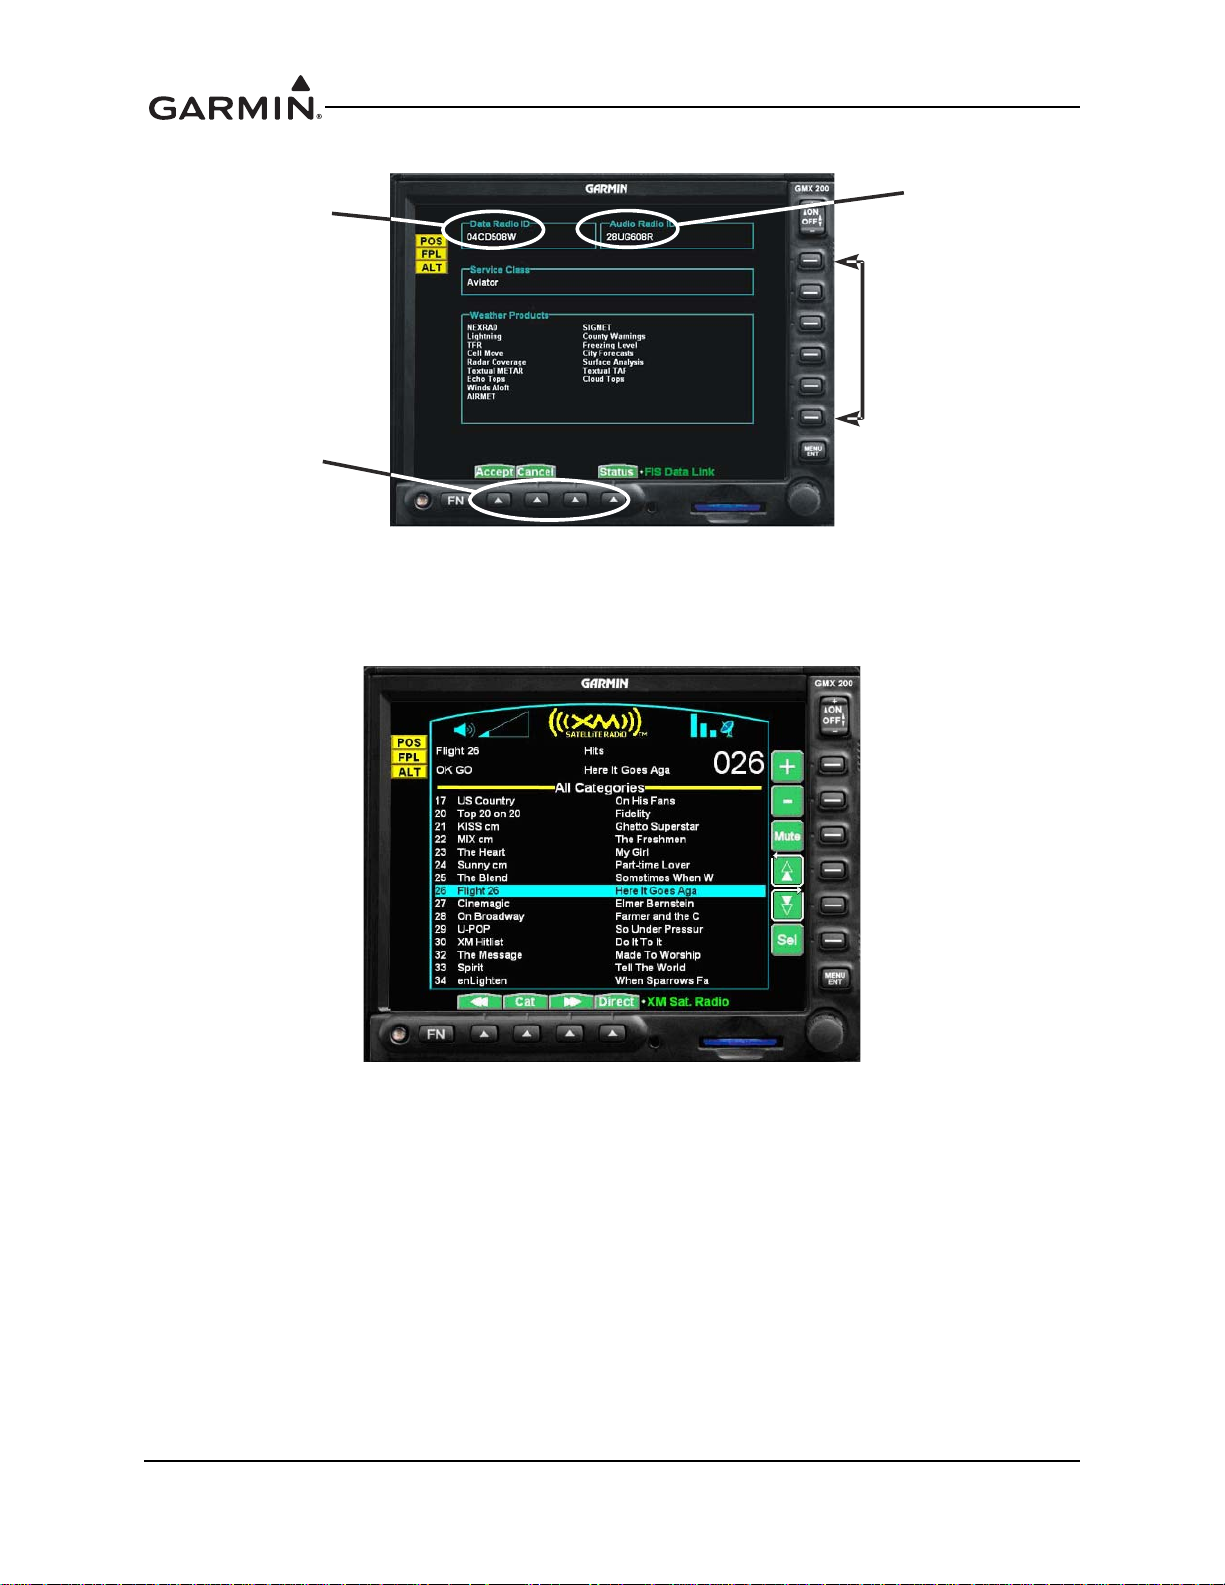
Figure 2-1 GMX 200 ID Locations
Soft Keys
Soft Keys
Data Radio ID
Audio Radio ID
(MX20 functionally identical to GMX 200 shown)
Figure 2-2 GMX 200 Channel List
(MX20 functionally identical to GMX 200 shown)
GDL 69/69A SiriusXM Satellite Radio Activation Instructions 190-00355-04
Page 2-2 Rev. L
Page 11

2.2 Verify Activation
NOTE
NOTE
Weather data activation is verified by observing weather products displayed on the Data Link Status page.
The audio portion is activated independently from the weather for GDL 69 Series units with an audio
receiver. Once the data service is activated, access the SiriusXM Radio page by pressing the FN key until
XM is displayed. If the full channel list displays, the audio portion has been activated.
Some display software versions will not correctly display GDL 69/69A SXM service class
and subscribed weather products. Refer to GDL 69 Series Pilot’s Guide for more
information.
An activated unit will display the full channel list. A non-activated unit will display only
channel 0 (Radio ID) and channel 1 (XM Preview).
190-00355-04 GDL 69/69A SiriusXM Satellite Radio Activation Instructions
Rev. L Page 2-3
Page 12

This page intentionally left blank
GDL 69/69A SiriusXM Satellite Radio Activation Instructions 190-00355-04
Page 2-4 Rev. L
Page 13

3 G1000/G900X/G950 ACTIVATION
NOTE
Outer FMS Knob
Inner FMS Knob
Soft Keys
The G1000/G900X/G950 must be configured to accept information from a GDL 69 Series unit in
accordance with the applicable display installation manual. The complete activation process may take over
45 minutes, depending on the demands of the SiriusXM activation system. Do not cycle or remove power
from the units during the activation process. It is recommended that the aircraft is outside and away from
metallic structures. For activation, you will need the SiriusXM Radio ID(s) and your billing information.
The SiriusXM Radio IDs are located on the XM Info page (see figure 3-2) and on the back page of this
document.
GDL 69/69A units have separate Data and Audio Radio IDs, and will not function
correctly with both audio and data services activated under one ID. GDL 69 SXM
receivers use one Radio ID for both data and audio services.
3.1 Activation Steps
1. Ensure the aircraft’s SiriusXM antenna has an unobstructed view of the southern sky.
2. Connect aircraft to external power source if available.
3. Once the G1000/G900X/G950 is powered up, turn the outer FMS knob clockwise on the MFD
until the AUX group is highlighted. See figure 3-1 for details.
Figure 3-1 AUX Group
190-00355-04 GDL 69/69A SiriusXM Satellite Radio Activation Instructions
Rev. L Page 3-1
Page 14

4. Turn the inner FMS knob clockwise until the XM Radio page is displayed. The XM Radio page
NOTE
Page Mode - Default mode
INFO
has two subpages, Radio and Info. These are selected by pressing the RADIO or INFO soft keys.
Pressing the RADIO soft key will display the XM Radio page. See figure 3-3 for details. If the
radio is not activated, the G1000/G900X/G950 will only display the free-to-air channels, channel 0
(Radio ID) and channel 1 (XM Preview). If the free-to-air channels display and audio can be heard
from channel 1, the system is ready to activate the radios. When calling for activation, the system
must be on the Info subpage. Press the INFO soft key to view your Audio and Data Radio IDs. See
figure 3-2 for additional information. The Weather Products window at the bottom of the screen
shows current subscriptions in green.
Figure 3-2 XM Info Page
G1000/G900X/G950 must be on the Info subpage during activation.
Figure 3-3 XM Radio Subpage
GDL 69/69A SiriusXM Satellite Radio Activation Instructions 190-00355-04
Page 3-2 Rev. L
Page 15

5. To activate service, refer to SiriusXM’s website at www.siriusxm.com/sxmaviation, or call
NOTE
NOTE
(855) 796-9847.
Specify subscription class when activating the data service. The activation process takes
approximately 45-60 minutes, but may take longer depending on system load. During the
activation process, the unit may display several differ ent activation levels. This is common
and should be ignored.
6. Activation begins once the SiriusXM system has your information. During activation the Info page
will display the various weather products being activated.
7. Once activation is complete, press the LOCK soft key for a prompt to lock the data link activation.
See figure 3-4 for details.
a. The outer FMS knob is used to highlight yes or no.
b. Press the ENT key to lock in your activation.
c. Press the CLR key to cancel.
During the activation process do not anything that could potentially disrupt the process.
Figure 3-4 Lock Activation Screen
190-00355-04 GDL 69/69A SiriusXM Satellite Radio Activation Instructions
Rev. L Page 3-3
Page 16

3.2 Verify Activation
NOTE
NOTE
Once the Data Radio is activated, the subscription level will display in the service class window. Verify the
service class and weather products displayed on the Info page is the service you purchased. To verify the
Audio Radio is activated, press the RADIO soft key. A complete listing of all available subscription
channels will now display.
Some display software versions will not correctly display GDL 69/69A SXM service class
and subscribed weather products. Refer to GDL 69 Series Pilot’s Guide for more
information.
A non-activated unit will display only channel 0 (Radio ID) and channel 1 (XM Preview).
An activated unit will display the full channel list.
GDL 69/69A SiriusXM Satellite Radio Activation Instructions 190-00355-04
Page 3-4 Rev. L
Page 17

4 G500/G600 ACTIVATION
NOTE
GDU 620 SW Version 7.00 or later
GDU 620 SW Version 6.21 or earlier
The G500/G600 must be configured to accept information from a GDL 69 Series unit in accordance with
G500 AML STC Installation manual or G600 AML STC Installation Manual. The complete activation
process may take over 45 minutes, depending on the demands of the SiriusXM activation system. Do not
cycle or remove power from the units during the activation process. It is recommended that the aircraft is
outside and away from metallic structures. For activation, you will need the SiriusXM Radio ID(s) and
your billing information. The SiriusXM Radio IDs are located on the XM Information page (see
figure 4-1) and on the back page of this document.
GDL 69/69A units have separate Data and Audio Radio IDs, and will not function
correctly with both audio and data services activated under one ID. GDL 69 SXM
receivers use one Radio ID for both data and audio services.
4.1 Activation Steps
1. Ensure the aircraft’s SiriusXM antenna has an unobstructed view of the southern sky.
2. Connect aircraft to external power source if available.
3. Power on the avionics and allow the G500/G600 system and the GDL 69 Series unit to power up.
4. Turn the large MFD knob clockwise to the AUX group. Turn the small MFD knob to the XM
Information page.
190-00355-04 GDL 69/69A SiriusXM Satellite Radio Activation Instructions
Rev. L Page 4-1
Figure 4-1 XM Information Page
Page 18

A list of weather products will display in the Weather Products window. For software versions 6.21 or
NOTE
earlier, green boxes indicate subscription access. For software version 7.00 or later, see the LEGEND in
figure 4-1 to determine which products are available, subscribed to, and have current data available.
5. To activate service, refer to SiriusXM’s website at www.siriusxm.com/sxmaviation
(855) 796-9847. Data Radio ID and Audio Radio ID are displayed at the top of the XM
Information page. See figure 4-1 for details. During the activation process, the XM Information
page will show the various weather products being activated.
6. Once activation is complete, press the LOCK soft key for a prompt to lock the data link activation.
a. The inner MFD knob is used to highlight yes or no.
b. Press the ENT key to lock in your activation.
c. Press the CLR key to cancel.
Figure 4-2 Lock Activation Screen
Specify subscription class when activating the data service. The activation process takes
approximately 45-60 minutes, but may take longer depending on system load. During the
activation process, the unit may display several differ ent activation levels. This is common
and should be ignored.
, or call
GDL 69/69A SiriusXM Satellite Radio Activation Instructions 190-00355-04
Page 4-2 Rev. L
Page 19

4.2 Verify Activation
NOTE
NOTE
Once the Data Radio is activated, the subscription level will show in the service class field. Verify the
service class and weather products displayed on the Info page is the service you purchased.
For GDL 69A units only, turn the inner MFD knob to the XM Radio page. Verify a complete listing of all
available subscription channels displays.
Some display software versions will not correctly display GDL 69/69A SXM service class
and subscribed weather products. Refer to GDL 69 Series Pilot’s Guide for more
information.
A non-activated unit will display only channel 0 (Radio ID) and channel 1 (XM Preview).
An activated unit will display the full channel list.
Figure 4-3 XM Radio Page
190-00355-04 GDL 69/69A SiriusXM Satellite Radio Activation Instructions
Rev. L Page 4-3
Page 20

This page is intentionally left blank
GDL 69/69A SiriusXM Satellite Radio Activation Instructions 190-00355-04
Page 4-4 Rev. L
Page 21

5 GNS 400/500 SERIES ACTIVATION
NOTE
NOTE
The GNS 400/500 Series must be configured to accept information from a GDL 69 Series in accordance
with the applicable GNS 400/500 Series installation manual. The complete activation process may take
over 90 minutes, depending on the demands of the SiriusXM activation system. Do not cycle or remove
power from the units during the activation process. It is recommended that the aircraft is outside and away
from metallic structures. For activation, you will need the SiriusXM Radio ID and your billing
information. The SiriusXM Radio ID is located on the Data Link Status page (see figure 5-1) and on the
back page of this document.
The GNS 400/500 Series navigators only support data services. Request DATA ONLY
service using the Data Radio ID if connected to a GDL 69 Series unit with an audio
receiver.
Once service is activated, do not change pages until the DATA LINK STATUS page shows
satellite radio service is activated.
5.1 Activation Steps
1. Ensure the aircraft’s SiriusXM antenna has an unobstructed view of the southern sky.
2. Connect aircraft to external power source if available.
3. Apply power to system and allow GNS 400/500 Series and GDL 69 Series units to power up.
4. Select the DATA LINK page from the AUX page group.
5. Press the inner right knob to activate the cursor . T urn either the outer or inner right knob clockwise
until DATA LINK STATUS is highlighted. Press the ENT key to select Data Link Status page.
6. Locate the Radio Data ID in the SATCOM SER NUM field. See figure 5-1 for additional
information. For information on SAT ID/CONNECTIVITY, see table 5-1 and table 5-2. The
SATCOM Operation field will always indicate Idle. To activate service, refer to SiriusXM’s
website at www.siriusxm.com/sxmaviation
7. Once the activation process with SiriusXM is complete, press the inner right knob to exit the
DATA LINK STATUS page.
, or call (855) 796-9847.
190-00355-04 GDL 69/69A SiriusXM Satellite Radio Activation Instructions
Rev. L Page 5-1
Page 22

Figure 5-1 Data Link Status Page
NOTE
Table 5-1 SAT ID Field
Description Display
System communication not yet established -System not communicating with internal satellite radio hardware (normal
during power-up)
X indicates satellite radio service activated. Numbers indicate satellite
signal quality. 0=none, 1=poor, 2=good, and 3=excellent
- indicates Satellite radio service is not activated. Numbers indicate
satellite signal quality. 0=none, 1=poor, 2=good, and 3=excellent
XM
X0, X1, X2, X3
-0, -1, -2, -3
GDL 69 SXM units will appear to indicate satellite service is not active. If data shows up
during the verify activation steps, the activation is valid.
Table 5-2 Connectivity Field
Description Display
Satellite is not in view, signal quality is 0 Searching...
Satellite is in view, signal quality between 1 and 3 Satellite in view
Satellite is in view and linked Linked to sat
GDL 69/69A SiriusXM Satellite Radio Activation Instructions 190-00355-04
Page 5-2 Rev. L
Page 23

5.2 Verify Activation
NOTE
To verify included products display them on the unit.
1. Select the WEATHER page by turning the outer right knob until the NAV group is selected. Turn
the inner right knob until the WEATHER page is selected.
2. Press the inner right knob to activate the cursor. The upper left hand corner field will flash.
3. Turn the inner right knob to cycle through displaying NXRD, METAR, WINDS, and TEMP/DP
weather data.
4. Press the ENT key to select data to display. If information displays, then a valid activation has
occurred. If observing NXRD screen and weather does not display, verify the NEXRAD timer in
the upper right corner to confirm delivery of NEXRAD data. See figure 5-2 for details.
Figure 5-2 Weather Page
T o allow the subscription lock pr ocess to occur, the 400/500 Series units must be left on for
an additional 1.5 hours after verifying all weather products.
190-00355-04 GDL 69/69A SiriusXM Satellite Radio Activation Instructions
Rev. L Page 5-3
Page 24

This page is intentionally left blank
GDL 69/69A SiriusXM Satellite Radio Activation Instructions 190-00355-04
Page 5-4 Rev. L
Page 25

6 GNS 400W/500W SERIES ACTIVATION
NOTE
NOTE
NOTE
The GNS 400W/500W Series must be configured to accept information from a GDL 69 Series unit in
accordance with the applicable GNS 400W/500W installation manual. The complete activation process
may take over 90 minutes, depending on the demands of the SiriusXM activation system. Do not cycle or
remove power from the units during the activation process. It is recommended that the aircraft is outside
and away from metallic structures. For activation, you will need the SiriusXM Radio ID(s) and your billing
information. The SiriusXM Radio IDs are located on the XM Information page (see figure 6-1) and on the
back page of this document.
GDL 69/69A units have separate Data and Audio Radio IDs, and will not function
correctly with both audio and data services activated under one ID. GDL 69 SXM
receivers use one Radio ID for both data and audio services.
Once activation process has been started, do not change pages until the XM Information
page shows satellite radio service has been activated.
6.1 Activation Steps
1. Ensure the aircraft’s SiriusXM antenna has an unobstructed view of the southern sky.
2. Connect aircraft to external power source if available.
3. Apply power to system and allow GNS 400/500 Series and GDL 69 Series units to power up.
4. Select the XM Information page from the AUX page group.
5. Locate the Data ID and Audio ID (GDL 69A only) on the XM Information page. See figure 6-1 for
additional information. The Service Class field will initially read “DETECTING ACTIVATION.”
To activate service, refer to SiriusXM’s website at www.siriusxm.com/sxmaviation
(855) 796-9847.
6. The Service Class will read “DETECTING ACTIVATION” until the activation request is
processed completely by the SiriusXM activation system. The activation process is not complete
until a valid service class is displayed. Once the correct service class is displayed, press the
MENU soft key and select “Lock Data Link Activation” by pressing the ENT key. See figure 6-2
for additional information. This will lock the system activation to the GDL 69 Series unit.
, or call
Specify subscription class when activating the data service. The activation process takes
approximately 45-60 minutes, but may take longer depending on system load. During the
activation process, the unit may display several differ ent activation levels. This is common
and should be ignored.
190-00355-04 GDL 69/69A SiriusXM Satellite Radio Activation Instructions
Rev. L Page 6-1
Page 26

Figure 6-1 XM Information Page
Figure 6-2 Lock Data Link Activation Screen
GDL 69/69A SiriusXM Satellite Radio Activation Instructions 190-00355-04
Page 6-2 Rev. L
Page 27

6.2 Verify Activation
NOTE
NOTE
NOTE
Verify the following:
1. Verify Service Class on the XM Information page.
Some display software versions will not correctly display GDL 69/69A SXM service class
and subscribed weather products. Refer to GDL 69 Series Pilot’s Guide for more
information.
2. Verify data subscription by navigating to the XM WX Timestamps and XM WX Timestamps 2
pages in the AUX group. Verify all services included in the subscription have a valid time stamp
and do not display “N/A.”
3. Verify the audio subscription by navigating to the XM Audio page of the AUX group. Verify
channels in the top window and channel information in the bottom window are both populated.
A non-activated unit will display only channel 0 (Radio ID) and channel 1 (XM Preview).
An activated unit will display the full channel list.
To allow the subscription lock process to occur, the 400W/500W Series units must be left
on for an additional 1.5 hours after verifying all weather products.
190-00355-04 GDL 69/69A SiriusXM Satellite Radio Activation Instructions
Rev. L Page 6-3
Page 28

This page is intentionally left blank
GDL 69/69A SiriusXM Satellite Radio Activation Instructions 190-00355-04
Page 6-4 Rev. L
Page 29

7 GTN 6XX/7XX ACTIVATION
NOTE
The GTN 6XX/7XX must be configured to accept information from a GDL 69 Series in accordance with
the applicable GTN 6XX/7XX installation manual. The complete activation process may take over 45
minutes, depending on the demands of the SiriusXM activation system. Do not cycle or remove power
from the units during the activation process. It is recommended that the aircraft is outside and away from
metallic structures. For activation, you will need the SiriusXM Radio ID(s) and your billing information.
The SiriusXM Radio IDs are located on the Data Link Status page (see figure 7-1) and on the back page of
this document.
GDL 69/69A units have separate Data and Audio Radio IDs, and will not function
correctly with both audio and data services activated under one ID. GDL 69 SXM
receivers use one Radio ID for both data and audio services.
7.1 Activation Steps
1. Ensure the aircraft’s SiriusXM antenna has an unobstructed view of the southern sky.
2. Connect aircraft to external power source if available.
3. Power on the avionics and allow the GTN to power up in normal mode.
4. There are two methods to display the status and Radio ID(s) of the GDL 69 series. See figure 7-1
for details.
Figure 7-1 GDL 69 Status Page
190-00355-04 GDL 69/69A SiriusXM Satellite Radio Activation Instructions
Rev. L Page 7-1
Page 30

a. One method is to select the Music key on the Home page, followed by the Status key.
NOTE
Figure 7-2 Accessing GDL 69 Status Page through Music Key
b. The second method is to select the System key on the Home page, followed by the External
LRUs key, an d then the More Info key.
Figure 7-3 Accessing GDL 69 Status Page through System Key
5. To activate service, refer to SiriusXM’s website at www.siriusxm.com/sxmaviation
(855) 796-9847.
Specify subscription class when activating the data service. Service should activate in 4560 minutes, but may take longer depending on system load. During the activation process,
the unit may display several different activation levels. This is normal and should be
ignored.
GDL 69/69A SiriusXM Satellite Radio Activation Instructions 190-00355-04
Page 7-2 Rev. L
, or call
Page 31

7.2 Verify Activation
NOTE
NOTE
Once the weather receiver has been activated, the subscription level will be displayed under the
Subscription Level field, see figure 7-4 for details. The legend in the bottom right corner displays the status
of the weather products. Verify the subscription level and weather products displayed are the services that
were purchased. Once satisfied with all products, select the Menu key for a prompt to lock the data link
activation. See figure 7-5 for details. Select the Lock Activation key to lock in subscription.
Some display software versions will not correctly display GDL 69/69A SXM service class
and subscribed weather products. Refer to GDL 69 Series Pilot’s Guide for more
information.
A non-activated unit will display only channel 0 (Radio ID) and channel 1 (XM Preview).
An activated unit will display the full channel list.
Figure 7-4 GTN Subscription List
Figure 7-5 GTN Lock Activation Screen
190-00355-04 GDL 69/69A SiriusXM Satellite Radio Activation Instructions
Rev. L Page 7-3
Page 32

IMPORTANT!
PLACE
XM RADIO ID#
HERE
CONTAINS GDL 69 SERIES
INFORMATION
REQUIRED FOR SIRIUSXM SATELLITE
RADIO ACTIVATION
This document MUST be given to the aircraft
owner at time of delivery.
IMPORTANT!
CONTAINS GDL 69 SERIES
INFORMATION
REQUIRED FOR SIRIUSXM SATELLITE
RADIO ACTIVATION
This document MUST be given to the aircraft
owner at time of delivery.
SEE ACKNOWLEDGMENT ON PAGE ii
 Loading...