

Garmin inReach Explorer Online Manual

inReach Explorer Online Manual
Download the PDF version of the inReach Explorer Manual to use when you're not connected to the internet.
Store the PDF on your tablet or smartphone for access anywhere.
The inReach Explorer™ two-way satellite communicator with GPS and navigation keeps you in reach and on
track wherever you go—whether you want to share your trip, track your route, check in with loved ones, or
send an SOS in an emergency.
The inReach Explorer is a handheld device that sends and receives text messages and emergency messages
using the Iridium® satellite network. With the inReach Explorer, you can travel to the farthest reaches of the
globe and still stay in touch with your family and friends.
Use the inReach Explorer by itself or pair it with a mobile device, like a smartphone or tablet, to take full
advantage of two-way messaging and navigation.
WARNING: Messaging, tracking and SOS functions require an active Iridium satellite subscription. Always test
your device before you go.
This manual is provided as a convenience. GARMIN IS NOT RESPONSIBLE FOR THE ACCURACY OF THIS MANUAL
AND DISCLAIMS ANY LIABILITY ARISING FROM THE RELIANCE THEREON.
Getting Started
Check the contents of your box.
Use the inReach Explorer by itself or pair it with a mobile device, like a smartphone or tablet, to take full
advantage of two-way messaging and navigation.
inReach Explorer device
Lanyard
USB cable
AC adaptor
Pack clip
Quick Start Guide
Please note: Charge your inReach Explorer fully before using. Connect the device to the AC adaptor and plug it
into an electrical outlet or use the USB cable to charge from your computer.
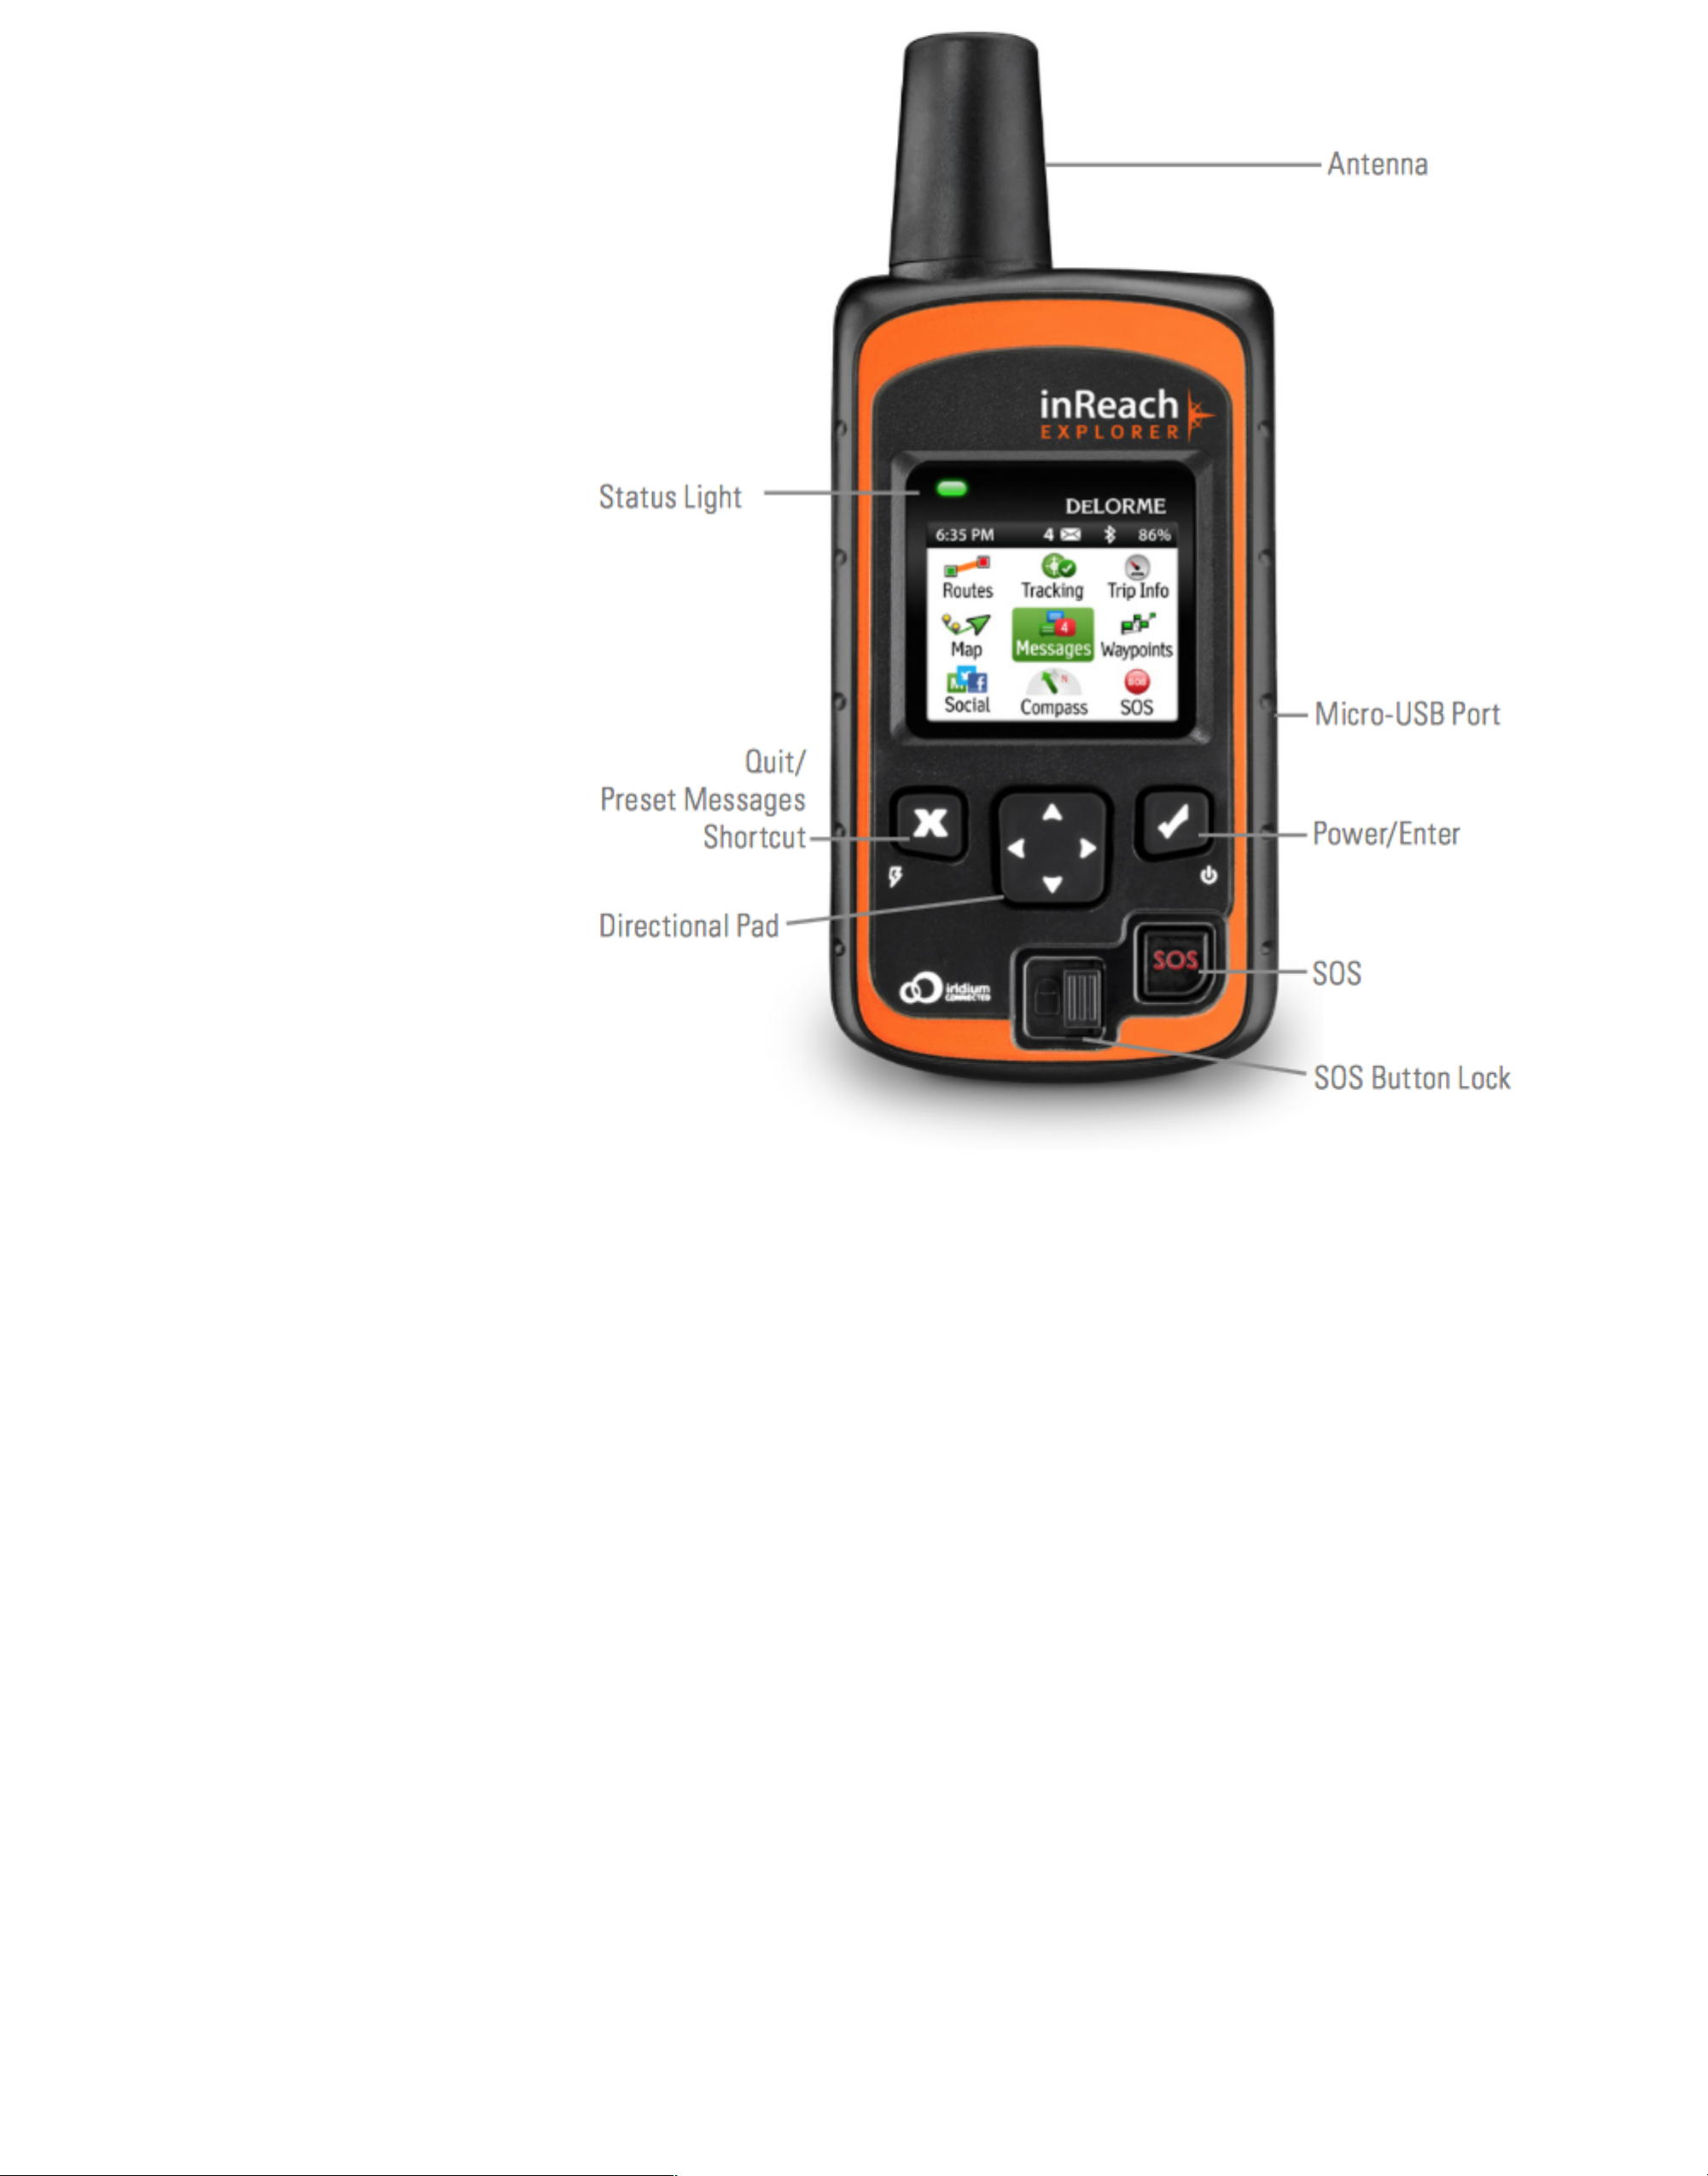
Antenna - When using the inReach Explorer, point the antenna up toward the sky and position the face of the
device away from your body when attached to a pack or a vest.
Display Screen - The screen turns o! automatically after 30 seconds without activity to preserve power and
prevent accidental button presses. To unlock the screen, press the Power/Enter button, and then press the Left
Arrow and Enter to select Unlock. This sequence must be done within 5 seconds or the screen remains locked.
Change the timing of the auto-lock feature by selecting Settings, then Display, and modifying the Display
Timer.
Status Light - The Status Light flashes green when there is a new message waiting. The Status Light flashes
red when there is something important for you to see, like low power or a sending message delay. The light is
NOT an indicator of satellite connection.
Micro-USB Port - Lift the protective cover to access the micro-USB port. Plug in your USB cable for charging
and for updates (when notified). While the cover is not part of the internal waterproofing, it does protect
against dust and corrosion from salt water.
Power/Enter - To turn the device on, press and hold the Power/Enter button for 1.5 seconds. When the Power
On screen appears, press the Left Arrow and then Enter to select Power On. Note that this sequence must be
done in 5 seconds or the device turns back o!.
To turn the device o!, press and hold the Power/Enter button for 1.5 seconds. When the Power O! screen
appears, press the Up Arrow and then Enter to select Power O!. This sequence must also be done in 5 seconds
or the device remains on.
When the device is turned on, press the Power/Enter button to select highlighted objects or hold it down to
access keyboard shortcuts when sending messages.
Directional Pad - Press arrows to highlight a selection on the screen or hold arrows down to access keyboard
shortcuts when sending messages.
Quit/Preset Messages Shortcut - Press Quit/Preset to back out of pages or operations. Press and hold
Quit/Preset to access the Preset Messages page.
SOS Button Lock - In an emergency, slide the SOS button lock to the left to unlock the SOS.
To avoid triggering a false alarm, make sure your SOS slider is locked. Slide left to unlock and slide right
until you HEAR IT CLICK to lock it! If you do not HEAR IT CLICK, then the SOS is not locked.
SOS Button - Press and hold the SOS button for three seconds to send a “distress” message to emergency
response. If SOS is no longer needed, press and hold the SOS button for 5 seconds to send a “cancel SOS”
message to emergency response.
See the Familiarize Yourself With Functionality section for more details on the SOS features of inReach.
Activating inReach Explorer
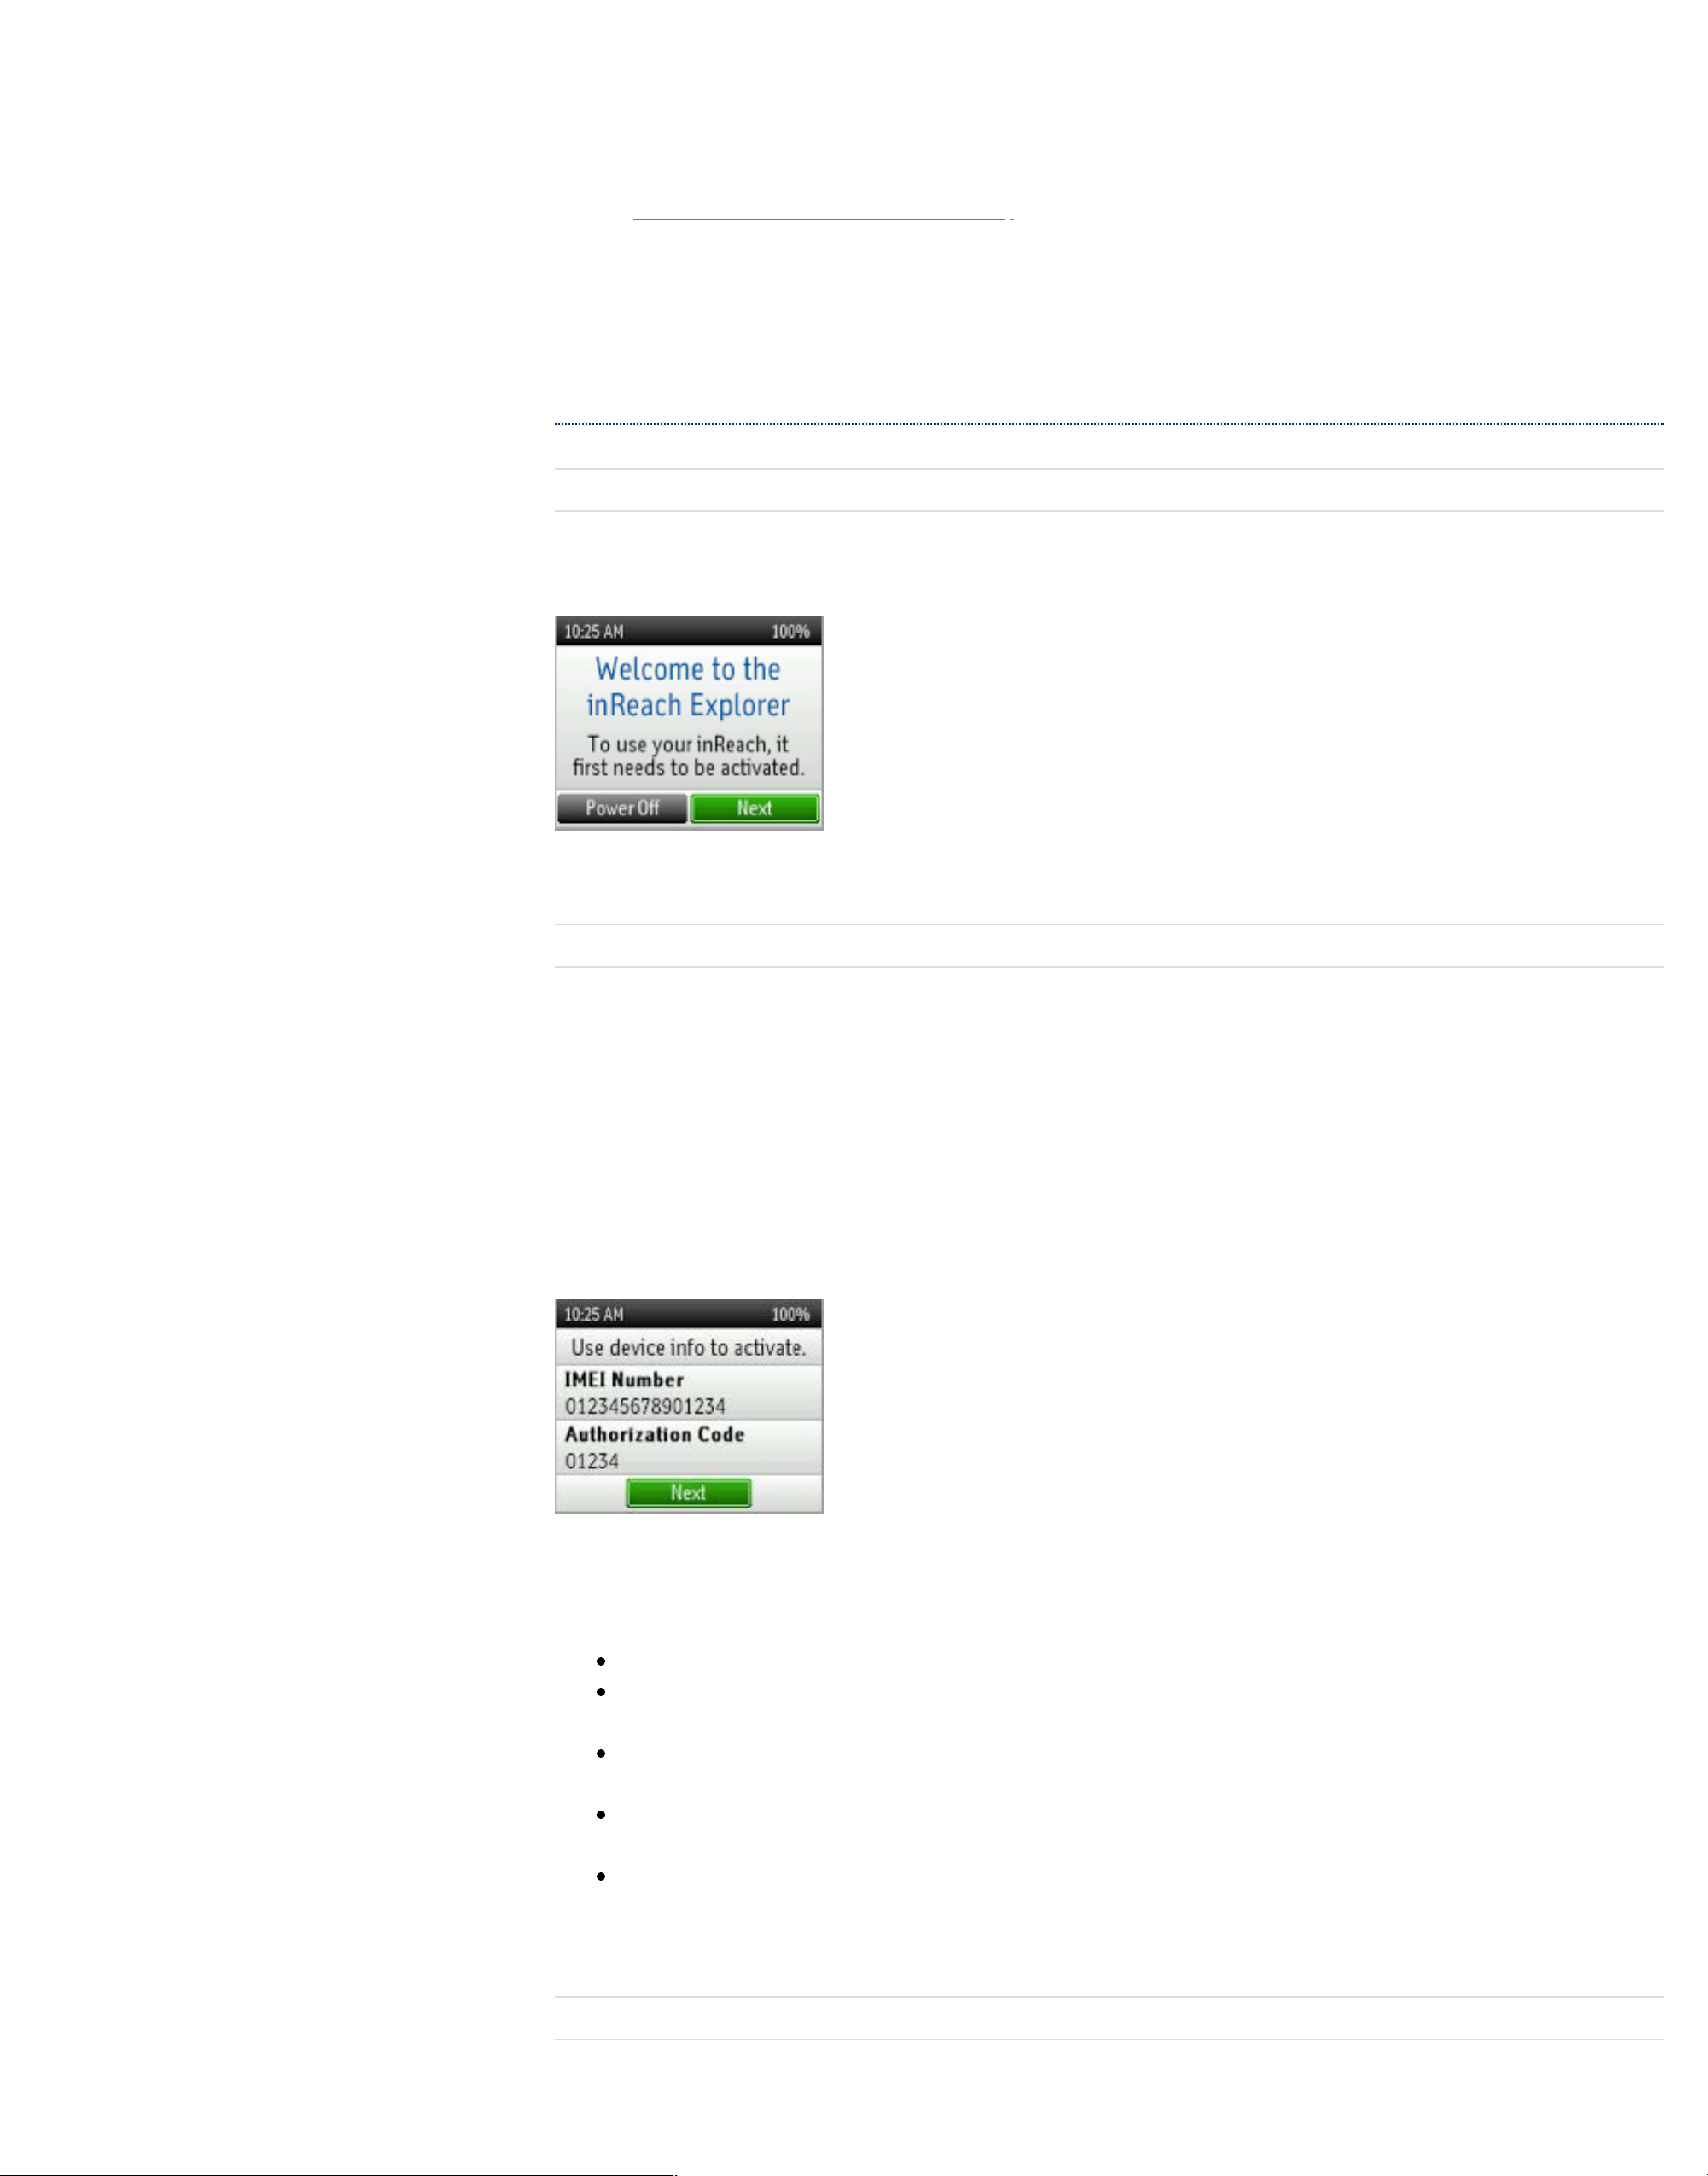
Step One: Power on your device
Turn your inReach Explorer on by holding down the Power button until the Power On screen displays. Press the
Left Arrow and then Enter. The screen displays a welcome message and begins the setup process.
Follow the on-screen instructions to continue the setup process.
Step Two: Set up your airtime plan and Explore account
Your inReach Explorer requires a satellite airtime plan and an online Explore account to send and receive
messages, much like a mobile phone plan (Note: Your inReach Explorer GPS features will not work without a
satellite airtime plan). The inReach uses Iridium's satellite network to track, share information, and send and
receive messages. To choose your plan and set up your account, use the DeLorme Explore website:
Go online from your computer to explore.delorme.com and click Get Started then follow the instructions to
create a new account.
The Explore website prompts you for your IMEI number and Authorization Code; find these in the Setup Wizard
on the inReach Explorer device.
During the online account setup process, choose your inReach service plan, enter your payment information
and contact details, and add your emergency contacts that will be used if your inReach Explorer is placed into
SOS mode.
Add contacts to your device by selecting the Contacts tab.
Link your Twitter and Facebook accounts to share messages with your friends by selecting the Social
tab.
Set up your MapShare web page to let others follow your trip and send you messages on your inReach
Explorer by adjusting the MapShare options on the Social tab.
Create some commonly used text messages that are stored in your device, e.g. “Busy, will reply later!”
Select the Messages tab and edit the Quick Text Messages.
Write special Preset Messages that you think you’ll use often, e.g. “Just arrived and doing well” or
“Leaving now for my next destination.” Select the Messages tab and edit the Preset Messages. Specify a
group of recipients to whom you’ll send regular updates in the form of Preset Messages.
Step Three: Check your connection
The inReach Explorer needs a clear satellite signal from the sky to complete the setup process. Go outside and
stand in an open area away from tall buildings, roof overhangs, and trees.
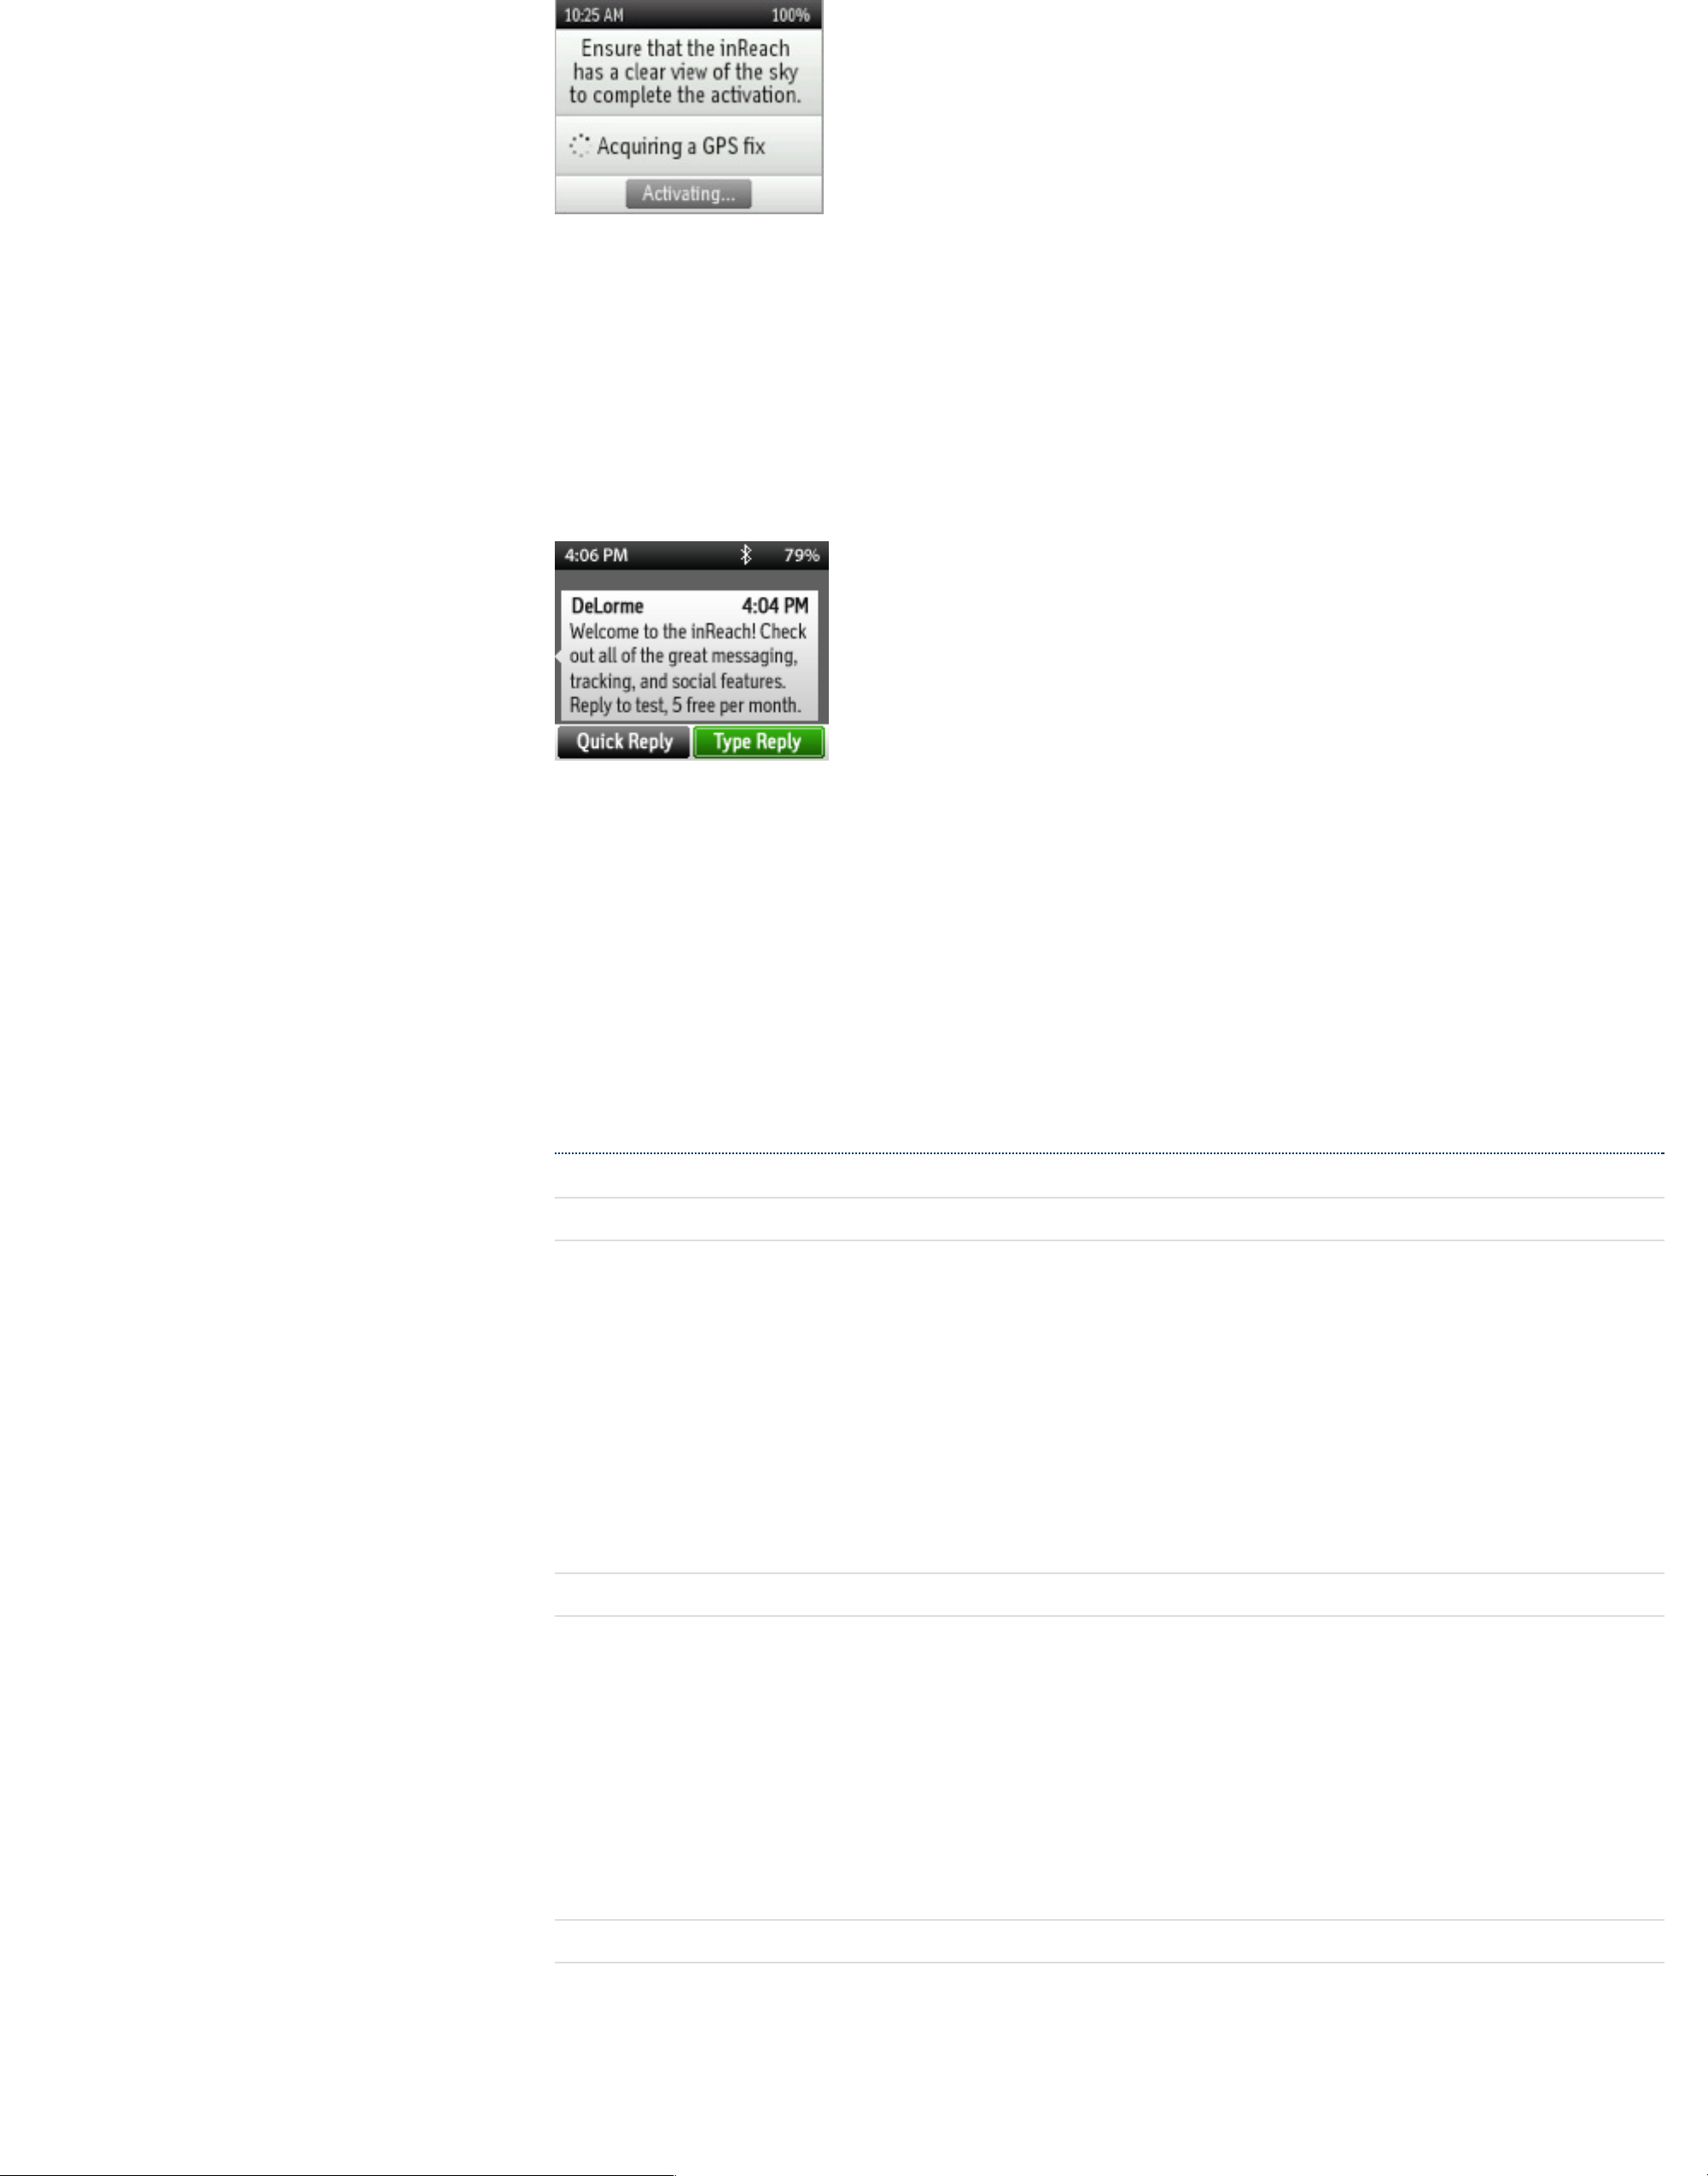
When you set up your Explore account, DeLorme sent you a welcome message for testing your inReach. Your
device receives this message during the activation process. When you have a clear view of the sky, press Enter
to activate and receive your message.
The activation process could take up to 20 minutes. Activation of your inReach with the Iridium satellite
network is a one-time step that uses a di!erent process than standard inReach functions. Please be
patient while your inReach communicates with the Iridium network for the first time.
To read your welcome message, select Messages from the device's home page and choose the new message
from DeLorme.
Send a test reply to DeLorme. You are allowed five free test messages per month. Select Type Reply, and then
type a message using the on-screen keyboard. Press Send. DeLorme sends you an automatic reply when your
message is received.
Your inReach Explorer listens for waiting messages every 20 minutes by default. Select the Messages page and
press Check Now to look for the reply from DeLorme.
Setting up your inReach Explorer
Step One: Sync your inReach Explorer
After activating your inReach Explorer, set up the device with the information you will need while on your trip.
On the Explore website, create your Contacts, Preset and Quick Text Messages, Waypoints, Routes, and set up
your Social Media links. You can return to the Explore website at any time to change or update this
information.
Step Two: Calibrate your digital compass
The inReach Explorer uses a digital compass to give accurate heading and bearing information whether you’re
stationary or moving. The device automatically checks compass calibration and tells you to calibrate when
necessary. For best performance, calibrate your digital compass any time the device prompts you, or manually
calibrate before a trip when you expect compass use to be important.
To manually calibrate the compass, go to Settings>Compass & Altimeter, and then choose Calibrate Compass.
Rotate the inReach, turning all six sides of the device to the ground. Continue until the inReach beeps to report
successful calibration.
Step Three: Calibrate your barometric altimeter
The inReach Explorer uses a barometric altimeter to give accurate elevation readings when you are climbing or
descending. The device automatically calibrates the barometric altimeter using GPS elevation each time it is
powered on. Auto calibrating with GPS elevation is best if you do not know the correct elevation or pressure for
your location.
For best performance, manually calibrate your barometric altimeter when you can enter the atmospheric

pressure from an accurate source like a local weather report. To manually calibrate the altimeter, go to
Settings>Compass & Altimeter and choose Calibrate Altimeter. There are three methods to calibrate the
altimeter:
Known Elevation – Enter the true elevation from a source such as a trail marker or a topographic map.
Known Pressure – Enter the atmospheric pressure from a current source such as a local weather report.
GPS Elevation – Use this option if you do not know the correct elevation or pressure.
Select a method and follow the on-screen instructions.
Note: Manually calibrating disables auto-calibration until the device is restarted. Changes in weather
conditions can impact barometric altimeter readings, so consider enabling auto calibration when weather is
likely to change.
Pairing the inReach Explorer
While the inReach Explorer works as a stand-alone device, you have the option of using your inReach Explorer
in conjunction with your mobile device — such as a smartphone or tablet — through a process called pairing. If
you choose to pair your mobile device with your inReach, you will have increased functionality including
mapping and access to your mobile device’s Contacts list.
Step One: Download the Earthmate app to your mobile device
Download the free Earthmate app by visiting your mobile device's app store. The Earthmate app is available
from the App StoreSM and Google Play.
Note: Your Android mobile device must have 2.2 or later firmware. Your Apple mobile device must have iOS
5.0 or later.
Step Two: Pair your inReach to your mobile device
To pair your inReach SE to a mobile device, you must first download DeLorme’s free Earthmate app to your
mobile device. Using your device, visit the app store and search for “Earthmate.” The Earthmate app is available
from the Apple Store and Google Play.
Download the app, and then open it. Enter your email address and your Explore site password, which you set
up during the activation process.
Pair with Bluetooth
To pair your inReach with your mobile device, go to Settings>Bluetooth>Pair inReach from your inReach
Explorer. Follow the instructions on the screen.
On your iOS device: Go to Settings>Bluetooth and make sure it is turned on. Select the inReach Explorer from
the Devices list.
On your Android device: Go to Settings>Wireless and Networks>Bluetooth Settings and make sure Bluetooth is
turned on. Select Scan Devices and choose inReach Explorer from the Bluetooth Devices list.
Your inReach notifies you when it has successfully paired with your mobile device.
Tip: You only need to pair the devices once; from then on, the devices will communicate with each other
anytime they are in range, turned on and Bluetooth is active.
Once your devices are paired and you have a data connection, enter your inReach account information into the
Earthmate app Options page to sync it with the Explore website.
NOTE: Your inReach only pairs with one device at a time. If you want to change the mobile device with
which your inReach is paired, you must unpair it first. To unpair the inReach Explorer, go to
Settings>Bluetooth>Connected and select Forget this device.
On your Android mobile device, select "Unpair"; on an Apple mobile device, select "Forget this device."
After you have unpaired your inReach and mobile device, you can go through the pairing process again
with a new mobile device.
Step Three: Add your contacts
If you have synced your inReach with the Explore website, the device already has the information for any
contacts you added on the Explore website. To move the same contacts into the Earthmate app on your mobile
device, sync it with your Explore account as well:
1. From your mobile device, open the Earthmate app.
2. For iOS devices, select Options, and then Account & Sync. For Android devices, select Menu, and then
Settings and Account.
3. For iOS devices, select Options, and then Account & Sync. For Android devices, select Menu, and then
Settings and Account.
4. Select Sync.
Once you’ve synced your mobile device with the Explore site, all your contacts appear in the Earthmate app
Contacts list and are available when creating a new message.
Familiarize Yourself with the Device
If you’ve followed all the instructions to activate your device, set up your online account, and set up your
device, you can now use your inReach device to send and receive messages, track your locations, and share
your trip through text messages and social media. You can also use your inReach device for navigating during
your trip.
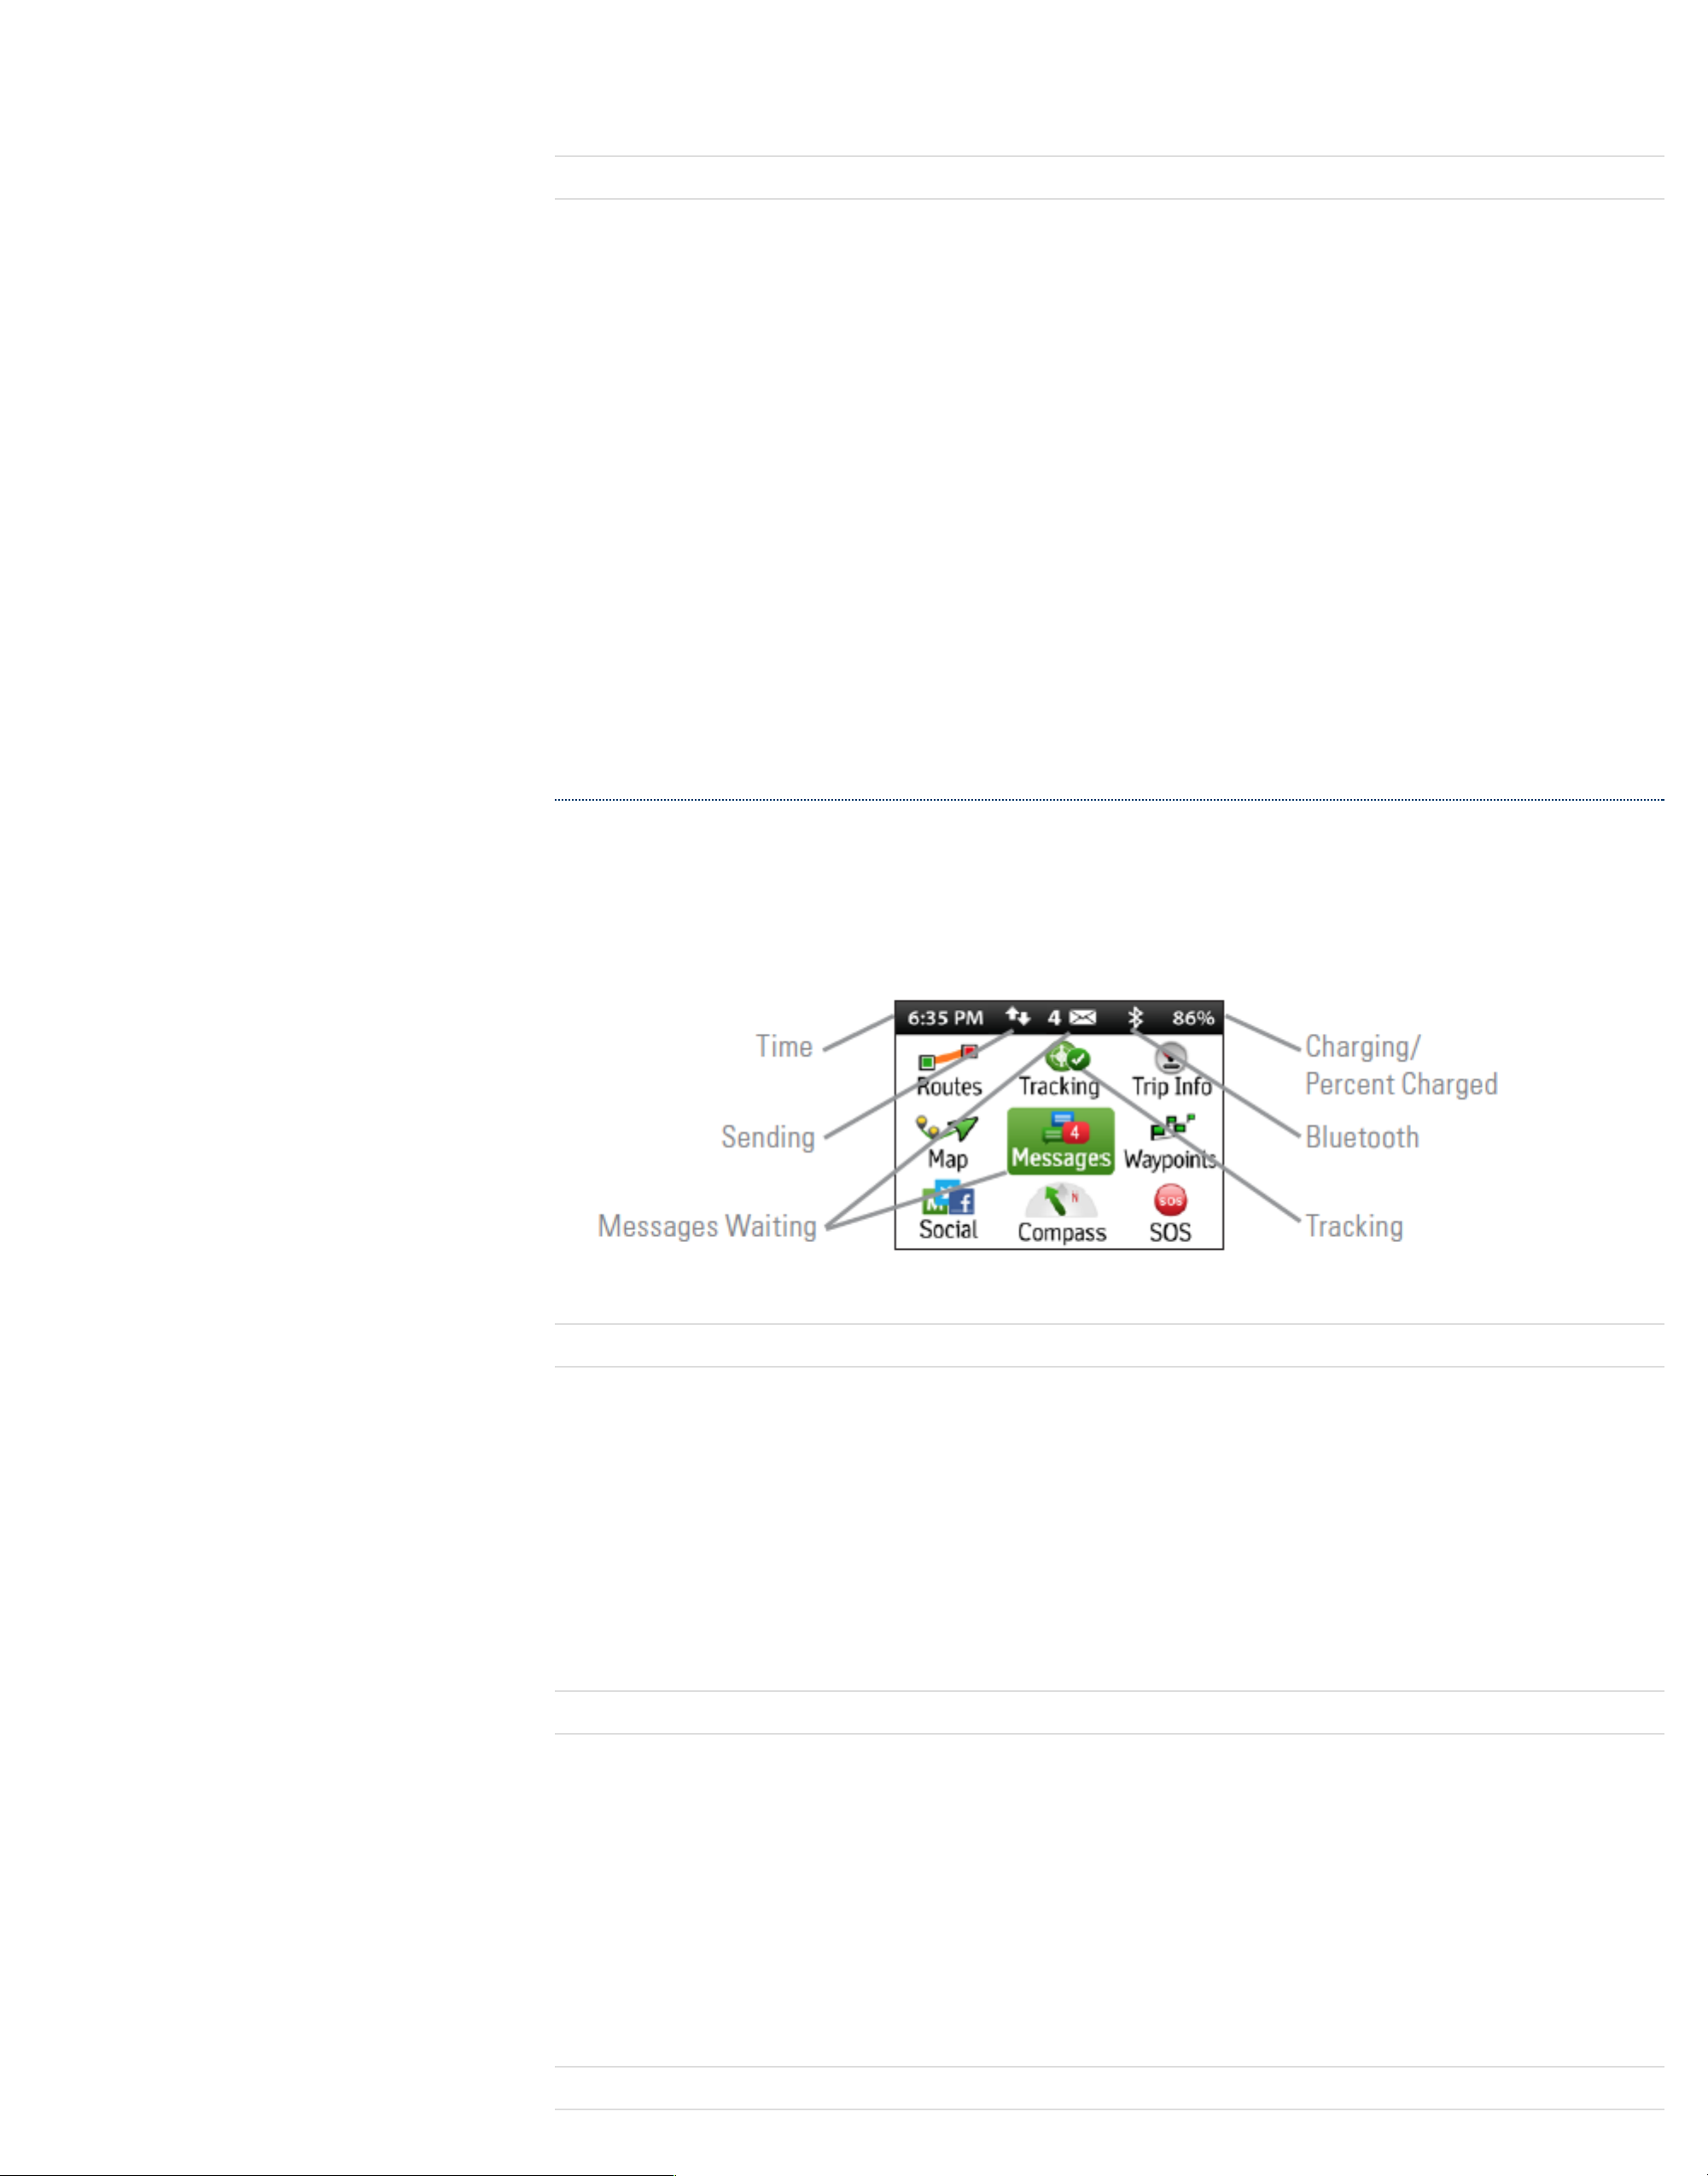
Charging
Charge your inReach Explorer fully before using. Connect the device to the AC adaptor and plug it into an
electrical outlet or use the USB cable to charge from your computer.
A lightning bolt icon appears on the inReach screen to let you know you are connected to external power and
charging. A percentage appears to tell you how full your battery is. When the device reaches 100%, the
lightning bolt is replaced with a plug icon to indicate the device is running from external power.
Tip: An exclamation point appears next to the battery percentage when attempting to charge a device
outside the supported temperature range.
Data Use
View the Data Use page to view your data plan, renewal date, billing cycle, and availability of your next
allotment of messages.
Monitor your data usage to see how many Messages, Preset Messages, and Tracking Points you have sent.
Read plan details to learn about included features and message allotments.
Press Check for Update to download new plan details after making a plan change in your Explore account.
Tip: Activity counters automatically reset at the beginning of each billing cycle.
LED Light
A green or red LED light flashes to indicate there is something to review.
 Loading...