

Page 1
GPSMAP® 500/700 Series and echoMAP™ 50/70
Series
Quick Start Manual
February 2013 190-01556-01_0A Printed in Taiwan
Page 2
Introduction
WARNING
See the Important Safety and Product Information guide in the
product box for product warnings and other important
information.
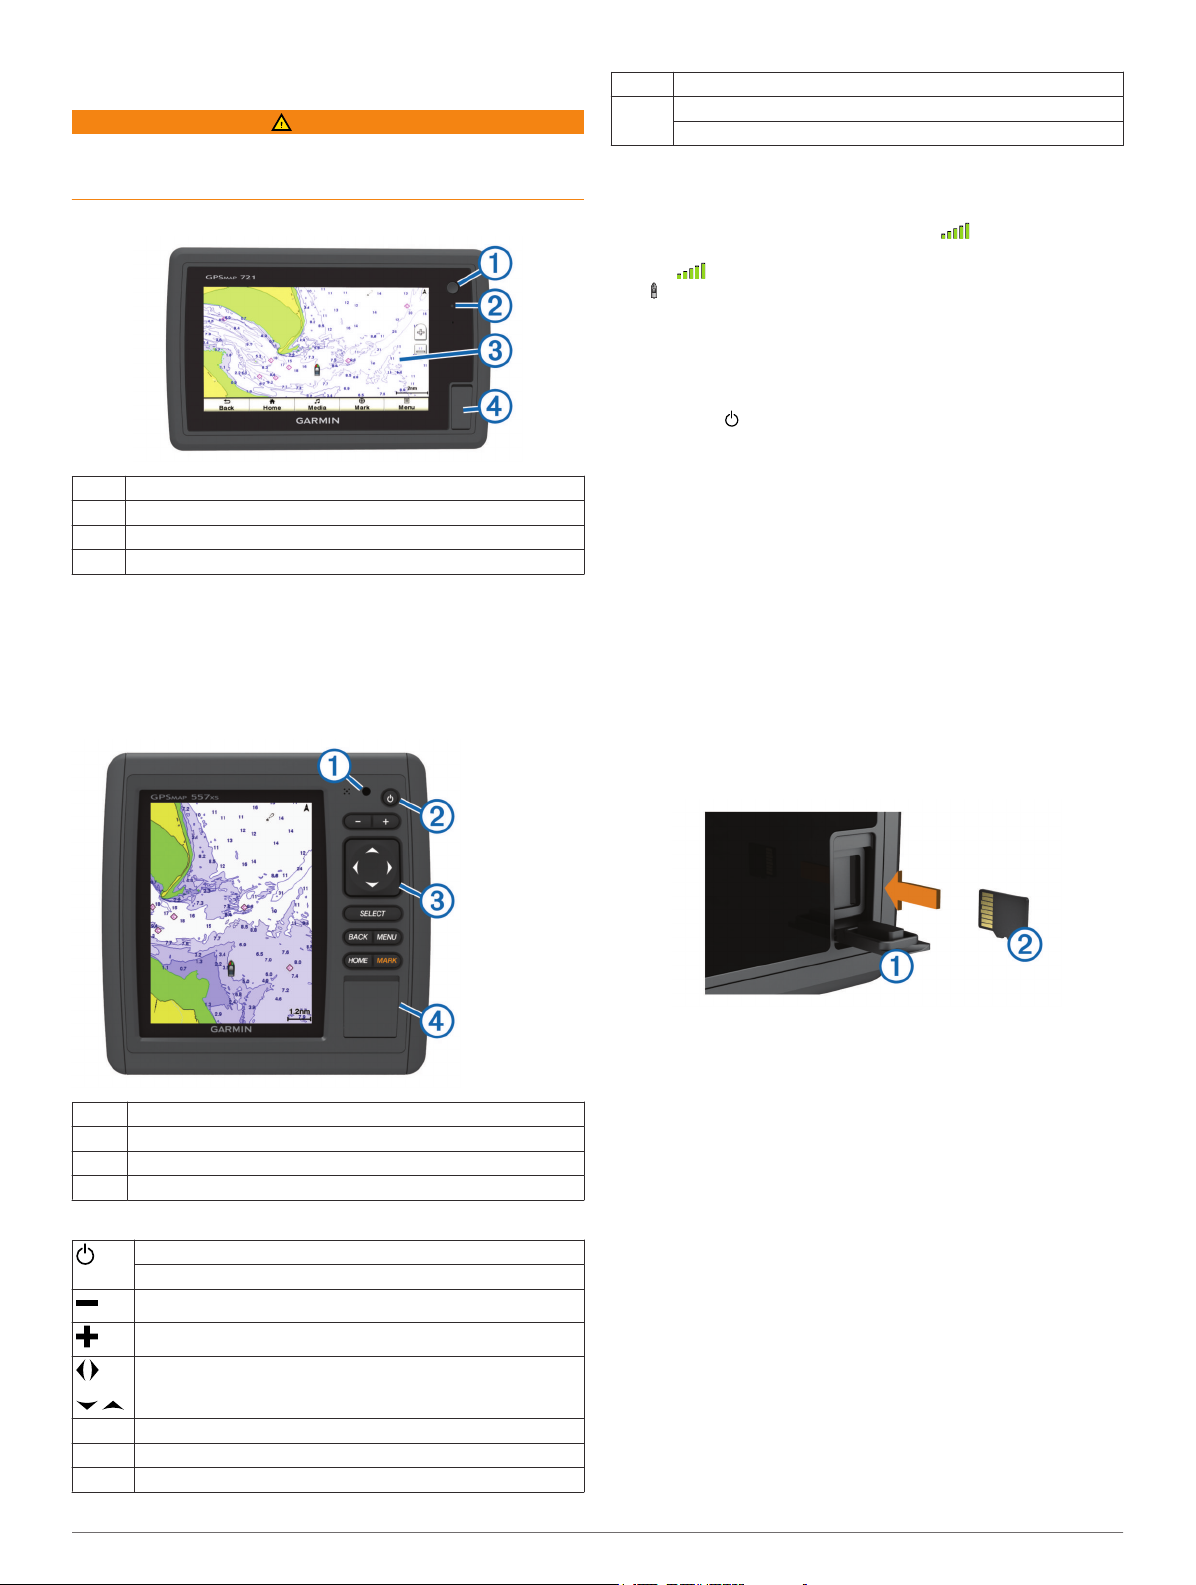
echoMAP 70 Series and GPSMAP 700 Series
Power key
À
Automatic backlight sensor
Á
Touchscreen
Â
microSD™ memory card slot
Ã
Using the Touchscreen
• Tap the screen to select an item.
• Drag or swipe your finger across the screen to pan or scroll.
• Pinch two fingers together to zoom out.
• Spread two fingers apart to zoom in.
echoMAP 50 Series and GPSMAP 500 Series
Home Returns to the Home screen.
Menu Opens a menu of options for the page, when applicable.
Closes a menu, when applicable.
GPS Satellite Signals
When you turn on the chartplotter, the GPS receiver must
collect satellite data and establish the current location. When
the chartplotter acquires satellite signals, appears at the top
of the Home screen. When the chartplotter loses satellite
signals, disappears and a flashing question mark appears
over on the chart.
For more information about GPS, go to www.garmin.com
/aboutGPS.
Adjusting the Backlight
Select Settings > System > Display > Backlight.
1
TIP: Press from any screen to access the backlight
settings.
Select an option:
2
• Adjust the backlight level.
• Select Enable Auto Backlight or Auto.
Adjusting the Color Mode
Select Settings > System > Display > Color Mode.
1
Select an option.
2
Inserting Memory Cards
You can use optional memory cards in the chartplotter. Map
cards allow you to view high-resolution satellite imagery and
aerial reference photos of ports, harbors, marinas, and other
points of interest. You can use blank memory cards to transfer
data such as waypoints, routes, and tracks to another
compatible Garmin chartplotter or a computer.
Open the access door À on the front of the chartplotter.
1
Automatic backlight sensor
À
Power key
Á
Device keys
Â
microSD memory card slot
Ã
Device Keys
Turns on and off the device when held.
Adjusts the backlight and color mode.
Zooms out of a chart or view.
Zooms in to a chart or view.
Scrolls, highlights options, and moves the cursor.
Select Acknowledges messages and selects options.
Back Returns to the previous screen.
Mark Saves the present location as a waypoint.
2
Insert the memory card Á with the label facing to the right.
2
Press the card in until it clicks.
3
Close the door.
4
Waypoints
Waypoints are locations you record and store in the device.
Marking Your Present Location as a Waypoint
From any screen, select Mark.
Creating a Waypoint at a Different Location
Select Nav Info > Waypoints > Create Waypoint.
1
Select an option:
2
• To create the waypoint by entering position coordinates,
select Enter Coordinates, and enter the coordinates.
• To create the waypoint using a chart, select Use Chart,
select the location, and select Move Waypoint.
Marking and Navigating to an MOB Location
When you mark a waypoint, you can designate it as a man
overboard (MOB) location.
Page 3

Select an option:
• From any screen, select Mark > Man Overboard > Yes.
• From the Home screen, select Man Overboard > Yes.
An international MOB symbol marks the active MOB point and
the chartplotter sets a direct course back to the marked location.
Navigation
Navigating to a Point on the Chart
CAUTION
The Auto Guidance feature is based on electronic chart
information. That data does not ensure obstacle and bottom
clearance. Carefully compare the course to all visual sightings,
and avoid any land, shallow water, or other obstacles that may
be in your path.
When using Go To, a direct course and a corrected course may
pass over land or shallow water. Use visual sightings, and steer
to avoid land, shallow water, and other dangerous objects.
NOTE: The offshore Fishing chart is available with premium
charts, in some areas.
NOTE: Auto Guidance is available with premium charts, in
some areas.
From the Navigation chart or Fishing chart, select a location.
1
If necessary, select Select.
2
Select Navigate To.
3
Select an option:
4
• To navigate directly to the location, select Go To.
• To create a route to the location, including turns, select
Route To.
• To use Auto Guidance, select Guide To.
Review the course indicated by the magenta line.
5
NOTE: When using Auto Guidance, a gray segment within
any part of the magenta line indicates that Auto Guidance
cannot calculate part of the Auto Guidance line. This is due
to the settings for minimum safe water depth and minimum
safe obstacle height.
Follow the magenta line, steering to avoid land, shallow
6
water, and other obstacles.
Creating and Navigating a Route From Your Present Location
You can create and immediately navigate a route on the
Navigation chart or the Fishing chart. This procedure does not
save the route or the waypoint data.
NOTE: The offshore Fishing chart is available with premium
charts, in some areas.
From the Navigation chart or Fishing chart, select a
1
destination.
Select Navigate To > Route To.
2
Select the location of the last turn before the destination.
3
Select Add Turn.
4
If necessary, repeat step 3 and 4 to add additional turns,
5
working backward from the destination to the present
location of your vessel.
The last turn you add should be the first turn you make,
starting from your present location. It should be the turn
closest to your vessel.
If necessary, select Menu.
6
Select Navigate Route.
7
Review the course indicated by the magenta line.
8
Follow the magenta line, steering to avoid land, shallow
9
water, and other obstacles.
3
Page 4

www.garmin.com/support
913-397-8200
1-800-800-1020
+32 2 672 52 54 +45 4810 5050 +358 9 6937 9758 + 331 55 69 33 99
+49 (0)1805-427646-880 + 39 02 36 699699
00800 4412 454
+44 2380 662 915
Garmin International, Inc.
1200 East 151st Street
Olathe, Kansas 66062, USA
Garmin (Europe) Ltd.
Liberty House, Hounsdown Business Park
0808 238 0000
+44 870 850 1242
+ 35 1214 447 460 + 34 902 007 097 + 46 7744 52020
1-866-429-9296 +43 (0) 820 220 230
0800 - 023 3937
035 - 539 3727
+ 47 815 69 555
Garmin®, the Garmin logo, and GPSMAP® are trademarks of
Garmin Ltd. or its subsidiaries, registered in the USA and
other countries. echoMAP™ is a trademark of Garmin Ltd. or
its subsidiaries. These trademarks may not be used without
the express permission of Garmin.
Southampton, Hampshire, SO40 9LR UK
Garmin Corporation
No. 68, Zhangshu 2nd Road, Xizhi Dist.
New Taipei City, 221, Taiwan (R.O.C.)
© 2013 Garmin Ltd. or its subsidiaries
 Loading...