

Garmin GPS Kit User Manual
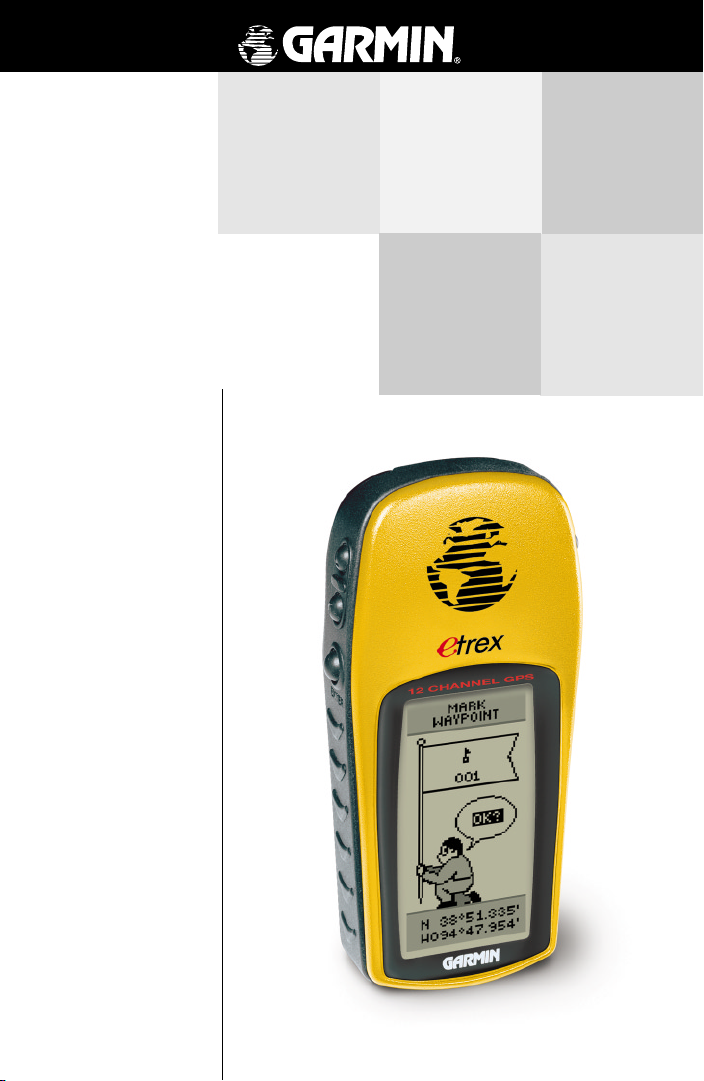
eTrex
personal navigator
owner’s
manual

©2000 GARMIN Corporation
GARMIN International, Inc.
1200 East 151st Street, Olathe, Kansas 66062 U.S.A.
Tel. 913/397.8200
Fax 913/397.8282
GARMIN (Europe) Ltd.
Unit 5, The Quadrangle, Abbey Park Industrial Estate, Romsey, SO51 9AQ, U.K.
Tel. 44/1794.519944
Fax 44/1794.519222
GARMIN (Asia) Corporation
No. 68, Jangshu 2nd Road., Shijr, Taipei County, Taiwan
Tel. 886/2.2642.8999
Fax 886/2.2642.9099
All rights reserved. Except as expressly provided herein, no part of this manual may
be reproduced, copied, transmitted, disseminated, downloaded or stored in any
storage medium, for any purpose without prior written consent of GARMIN
Corporation. GARMIN Corporation hereby grants permission to download a single
copy of this manual onto a hard drive or other electronic storage medium to be
viewed for personal use, provided that such electronic or printed copy of this
manual contains the complete text of this copyright notice and provided further that
any unauthorized commercial distribution of this manual is strictly prohibited.
Information in this manual is subject to change without notice. GARMIN
Corporation reserves the right to change or improve its products and to make
changes in the content without obligation to notify any person or organization of
such changes. Visit the GARMIN website for current updates and supplemental
information concerning the use and operation of this and other GARMIN products.
Website address: www.garmin.com
GARMIN is a registered trademark and eTrex is a trademark of GARMIN Corporation and may not be used without the express permission of GARMIN Corporation.
April 2000 Part Number 190-00205-00 Rev. A Printed in Taiwan
Let the Fun Begin
fun (noun):
1. A source of enjoyment, amusement, or
pleasure.
2. Enjoyment; amusement: have fun at the
party.
3. Playful, often noisy, activity.
We don’t know about the noise, but fun and simplicity
is what the eTrex is all about. To get the most out of your
new eTrex, take the time to read through this Owner’s
Manual to understand the operating features of the unit.
This manual has been designed to provide all that you
need to know to operate your eTrex.
eTrex Registration
Help us better support you by completing your
on-line registration today!
Introduction
On Your Mark...
Why should you register your eTrex?
• Notification of Product Updates
• Notification of New Products
• Lost or Stolen unit tracking
Connect to our website (www.garmin.com) and look
for the Product Registration link on the home page.
Thanks for choosing the GARMIN eTrex. If you have
any questions or comments regarding the use of the eTrex
you can visit our website or contact our Customer Service
Department M-F, 8:00-5:00 CST (except holidays) at
1-800-800-1020.
If you have previously
registered your GARMIN
product purchase using a
mail-in registration card, we
invite you to reregister using
our NEW on-line system.
Many services provided by
our new product registration
system are now being
automated and reregistering
your purchase ensures you
the best possible support from
GARMIN.
1

Introduction
Table of
Contents
Introduction......................................................................... 1-8
Getting Started ................................................................... 9-17
Reference Section .................................................................. 18
Map Page Options ................................................................. 18
Pointer Page Options ............................................................. 19
Menu Page Selections ............................................................ 20
Mark Waypoint Page ............................................................. 21
Review Waypoint Page .......................................................... 22
Nearest Waypoints ................................................................ 23
Routes .............................................................................. 24-26
Track Logs ........................................................................ 27-28
Setup Page ....................................................................... 29-30
Display and Units Pages ........................................................ 31
Map Datums ......................................................................... 32
Units of Measure .............................................................. 33-34
Interface Page ........................................................................ 35
System Page .......................................................................... 36
Demo Mode .......................................................................... 37
Appendix A: Specifications .................................................... 38
Appendix B: What is GPS? .................................................... 39
Appendix C: Reception Tips ............................................. 40-41
Appendix D: Time Offset Chart ............................................. 42
Appendix E: Wiring Diagram ................................................. 43
Appendix F: Troubleshooting ................................................ 44
Appendix G: FAQ’s ........................................................... 45-46
Appendix H: Index ........................................................... 47-49
Warranty ............................................................................... 50
2

Introduction
WARNING: If you choose to use the eTrex in a vehicle,
it is the sole responsibility of the owner/operator of the eTrex
to secure the GPS unit so that it will not cause damage or
personal injury in the event of an accident. Do not mount
the eTrex over airbag panels or in a place where the driver
or passengers are likely to have an impact with it in an accident or collision.
WARNING: If you choose to use the eTrex in a
vehicle, it is the sole responsibility of the operator of the
vehicle to operate the vehicle in a safe manner, maintain
full surveillance of all driving conditions at all times, and
never become distracted by the eTrex to the exclusion of
safe operating practices. It is unsafe to operate the eTrex
while you are driving. Failure by the operator of a vehicle
equipped with an eTrex to pay full attention to operating
the vehicle and road conditions while the vehicle is in
motion could result in an accident or collision with
property damage and personal injury.
CAUTION: IT IS THE USER’S RESPONSIBILITY TO
USE THIS PRODUCT PRUDENTLY. THIS PRODUCT IS
INTENDED TO BE USED ONLY AS A TRAVEL AID
AND MUST NOT BE USED FOR ANY PURPOSE
REQUIRING PRECISE MEASUREMENT OF DIRECTION, DISTANCE, LOCATION, OR TOPOGRAPHY.
Warnings and
Cautions
Remove the batteries from
your eTrex if you don’t
expect to use it for several
months. Be sure to
observe the proper
polarity when inserting
the batteries. Follow the
battery manufacturer’s
instructions on the proper
care and handling of the
batteries.
CAUTION: The Global Positioning System (GPS) is
operated by the government of the United States, which is
solely responsible for its accuracy and maintenance. The
system is subject to changes which could affect the
accuracy and performance of all GPS equipment.
Although the eTrex is a precision electronic NAVigation
AID (NAVAID), any NAVAID can be misused or misinterpreted and, therefore, become unsafe.
3

Introduction
FCC Compliance
Statement
The eTrex complies with Part 15 of the FCC limits for
Class B digital devices. This equipment generates, uses,
and can radiate radio frequency energy and, if not
installed or used in accordance with the instructions may
cause harmful interference to radio communications.
There is no guarantee that interference will not
occur in a particular instance. If this equipment does
cause harmful interference to other equipment, try to
correct the problem by relocating the equipment.
Consult an authorized GARMIN dealer or other
qualified service technician if the problem cannot be
corrected. Operation is subject to the following conditions: (1) This device cannot cause harmful interference,
and (2) this device must accept any interference received,
including interference that may cause undesired
operation.
The eTrex does not contain any user-serviceable
parts. Repairs should be made only by an authorized
GARMIN service center. Unauthorized repairs can void
the warranty.
4

Introduction
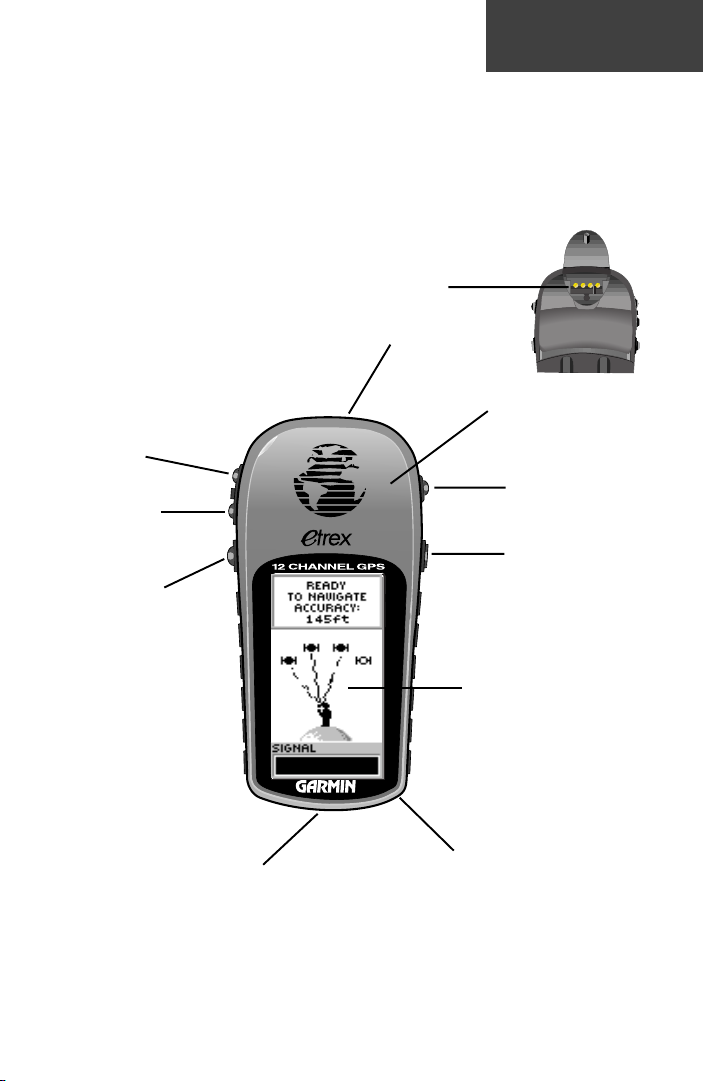
The eTrex is a six ounce, 12 channel, hand held GPS
receiver. It has a built-in GPS antenna and only five userbuttons. All buttons are located on either side of the unit,
allowing for simple, one-handed operation that won’t
obstruct your view of the display. It runs for 22 hours on
two AA batteries in battery save mode.
In addition to determining your location, the eTrex
will create, name and save a location (as an electronic
waypoint) in its memory, allowing you to navigate back
to this point any time you want. And once you start
moving, your GPS provides other data, like speed,
direction of movement, time and distance to destination,
and more.
From these basic features, your GARMIN GPS can
provide one more critical benefit; peace of mind, because,
with GPS you’ll know where you are, where you’ve been
and where you’re going. And since you’ll always know the
way back home, you can concentrate on what you set out
to do and enjoy the great outdoors.
Other features include:
Waypoints: 500 with name and graphic symbol.
Tracks: Automatic track log; 10 saved tracks
let you retrace your path in both
directions.
eTrex Features
NOTE: You should
always be prepared and
capable of navigating
without the eTrex. It is
designed to augment
other forms of basic
navigation, not entirely
replace them.
Route: Route lets you navigate up to 50
waypoints in sequence.
Trip Computer: Current speed, average speed,
maximum speed, direction of
movement, bearing, elevation, time
of sunrise/sunset, trip timer and trip
odometer.
5
Introduction
eTrex Buttons
The eTrex is ergonomically
designed to be held in your
left hand.
Operating the eTrex is as simple as pressing a button!
The POWER Button:
PWR
PWR
• Turns the unit on and off
• Turns the display backlight on and off
The PAGE Button:
PAGE
PAGE
• Switches between pages and backs you out
of pages. If you start to do something and
you don’t want to continue, you can stop
by pressing the PAGE Button.
The UP/DOWN Buttons:
• Select options on pages and menus
• Adjust Display Contrast on Satellite Page
• Zoom in and out on Map Page
• Cycle through trip data on Pointer Page
The ENTER Button:
ENTER
ENTER
• Confirms data entry or menu selections
F
This symbol identifies notes
throughout the manual
which will give you helpful
information.
6
Owner's
Manual
UP Button
DOWN
Button
ENTER
Button
Introduction
eTrex
Description
External Power
and
Data Connector
(top rear)
Internal
GPS Antenna
PAGE
Button
POWER
Button
Battery
Compartment
(in rear)
LCD Display
(with backlight)
Waterproof Case
7
Introduction
Accessories
Lanyard
Auto Power AdapterConverts 12VDC output
from the lighter to 3VDC
input to the eTrex. Not
interchangeable with
power adapters for
GARMIN VHF 720,
725, and 725e, or GPS
170, 175, 190, and 195.
Bicycle Mounting Kit
Standard Accessories
Lanyard....................................... Part No. 013-00052-00
Provides convenient method for carrying the eTrex. Attaches to a slot on the
bottom of the unit.
Owner’s Manual .......................... Part No. 190-00205-00
Quick Start Guide ....................... Part No. 190-00205-01
Optional Accessories
Carrying Case ............................. Part No. 010-10266-00
Protects the eTrex when not in use.
Auto Power Adapter .................... Part No. 010-10203-00
Provides eTrex operation from a automobile cigarette lighter.
PC Data Cable ............................. Part No. 010-10206-00
Allows for transfer of data from a PC to an eTrex.
Data Cable .................................. Part No. 010-10205-00
Wiring harness. Connections for data input/output.
Bicycle Mounting Kit ................... Part No. 010-10267-00
Allows the eTrex to be mounted on bicycle handle bars.
PC Cable/Auto Power Adapter .... Part No. 190-10268-00
Allows transfer of waypoints and routes from a PC to the eTrex and
provides unit operation from an automobile cigarette lighter.
MapSource® Map Data CD-ROMs
An excellent tool for creating waypoints and routes on your PC using a
background map and downloading them to your eTrex. See your
GARMIN dealer for MapSource details.
PC Interface Cable with
Auto Power Adapter
8
Installing the Batteries
The eTrex operates on 2 AA batteries (not included),
which are installed at the back of the unit. To install the
batteries, remove the battery cover by turning the lock
ring at the back of the unit 1/4 turn counter-clockwise.
Insert the batteries observing proper polarity. Attach the
battery cover by turning the lockring 1/4 turn clockwise.
The 2 AA batteries should last about 22 hours in battery
save mode.
Getting
Started
The Getting Started Section introduces you to the basic operation of the eTrex. The Reference Section shows you how to use
all of eTrex’s remaining features.
The First Step
The eTrex operates on information gathered from
satellites. To gather this information, take your eTrex
outside and find a large, open area that has a clear view of
the sky (a nearby park would work fine). Press and hold
the POWER Button to turn the unit on. You’ll see the
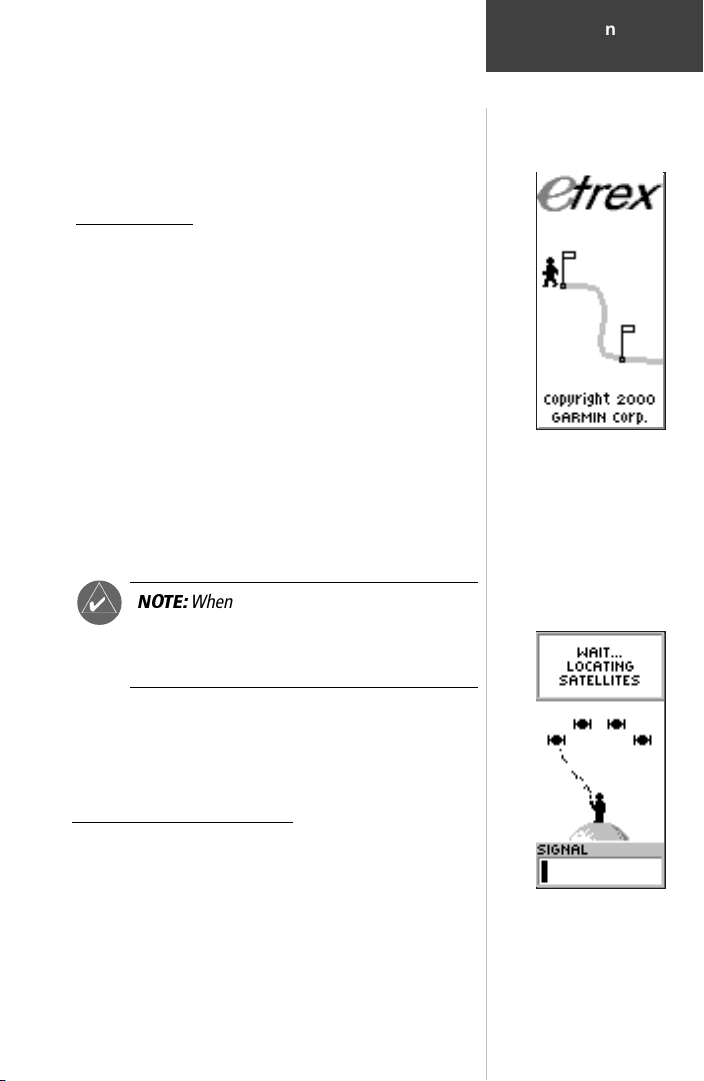
Welcome Page for a few seconds while the eTrex performs
a self-test, followed by the Satellite Page.
The eTrex needs to receive at least three strong satellite
signals to find your location. The Satellite Page shows you
graphically eTrex tracking satellites, the strength of the
satellite signals, and the satellite tracking status.
NOTE:
F
When you use the eTrex for the first
time, it will take up to five minutes to find your
location. After the first use, eTrex only needs
about 15 to 45 seconds to find your location.
Here We Go. . .
The Welcome Page
When you see the “READY TO NAVIGATE” message
on the Satellite Page, eTrex has found your location and
you are ready to go!
Backlighting and Contrast
If the lighting conditions make it hard for you to see the
screen, you can adjust the contrast or turn on the backlight.
Press and release the POWER Button from any screen to
turn on the backlight. The backlight is timed to stay on for
30 seconds to save battery power. To adjust the screen contrast, press the PAGE Button until you see the Satellite Page.
Press the UP button to make the screen darker, press the
DOWN Button to make the screen lighter.
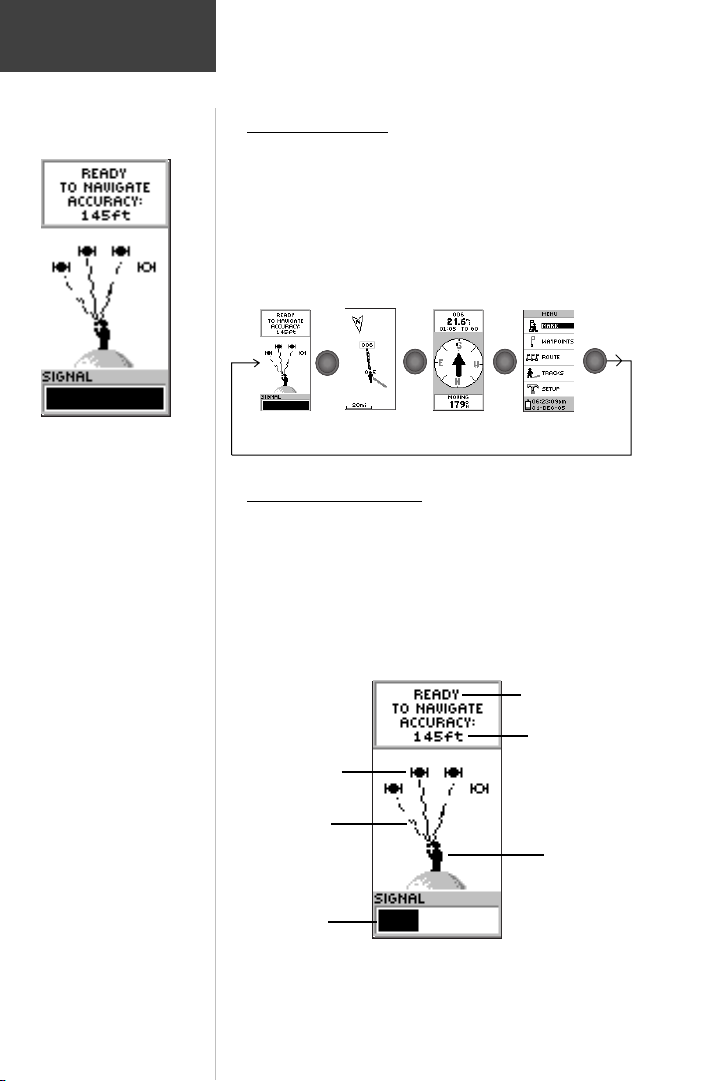
The Satellite Page
9
Getting
Started
Page Basics
The “READY TO
NAVIGATE” message
must appear before you
can begin using your
eTrex to navigate.
Selecting a Page
All of the information needed to operate the eTrex is
found on four main “pages” (or display screens). These
pages are the Satellite, Map, Pointer, and Menu.
Simply press the PAGE Button to switch between
pages.
PAGE
PAGE
Menu
Satellite
PAGE
PAGE
Map Pointer
PAGE
PAGE
PAGE
PAGE
Satellite Page Basics
The Satellite Page shows you in animation, the eTrex
gathering the necessary satellite information in order to
work. It also shows you when the satellite signals are
weak or when you need to move to a different location for
better reception. The shorter the signal strength bar, the
weaker the signals.
Status Message
10
Satellites
Satellite
Signals
Satellite Signal
Strength Bar
Location Accuracy
(estimated)
“You”; Your
Location
The Satellite Page
Getting
Started
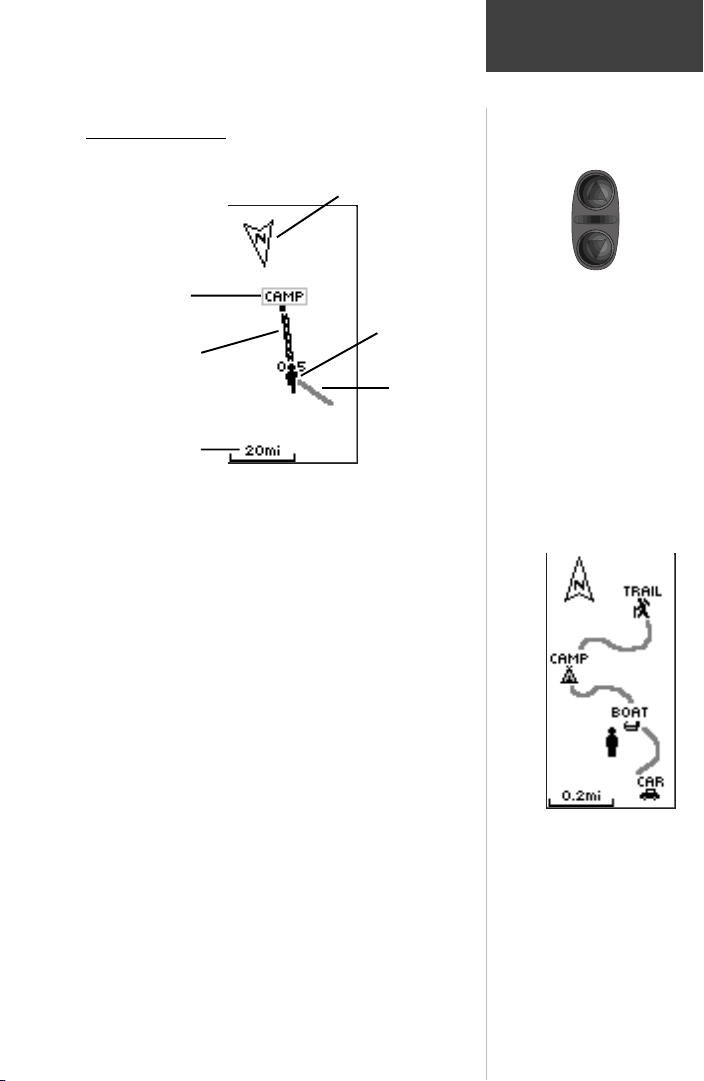
Map Page Basics
North Pointer
Destination
Waypoint
Path to
Destination
Map Scale
The Map Page
“You”; your
location
“Trail” (track log)
The Map Page shows where you are (the animated
figure) and provides a real picture of where you are going.
As you travel (the animated figure “walks”) and leaves a
“trail” (track log). Waypoint names and symbols are also
shown on the map. We will show you how to record your
location by marking a waypoint in the “discovering the
fun” section.
Page Basics
On the Map Page, the UP
and DOWN Buttons are
used to adjust the map
scale from 500 feet to 800
miles.
To help you better visualize the “real world”, eTrex
automatically rotates the map as you move, so that
waypoints that are ahead of you are always displayed in
front of the animated figure. The North Pointer always
shows you where north is.
To make sure you can see your entire trip, you can
change the map scale (from 500 feet to 800 miles!) by
pressing and holding the UP Button to view a larger area,
and the DOWN Button for viewing a smaller area.
The Map Page showing
different symbols and
waypoints.
11
Getting
Started
Page Basics
On the Pointer Page, the
UP and DOWN Buttons
are used to cycle through
different trip data.
Pointer Page Basics
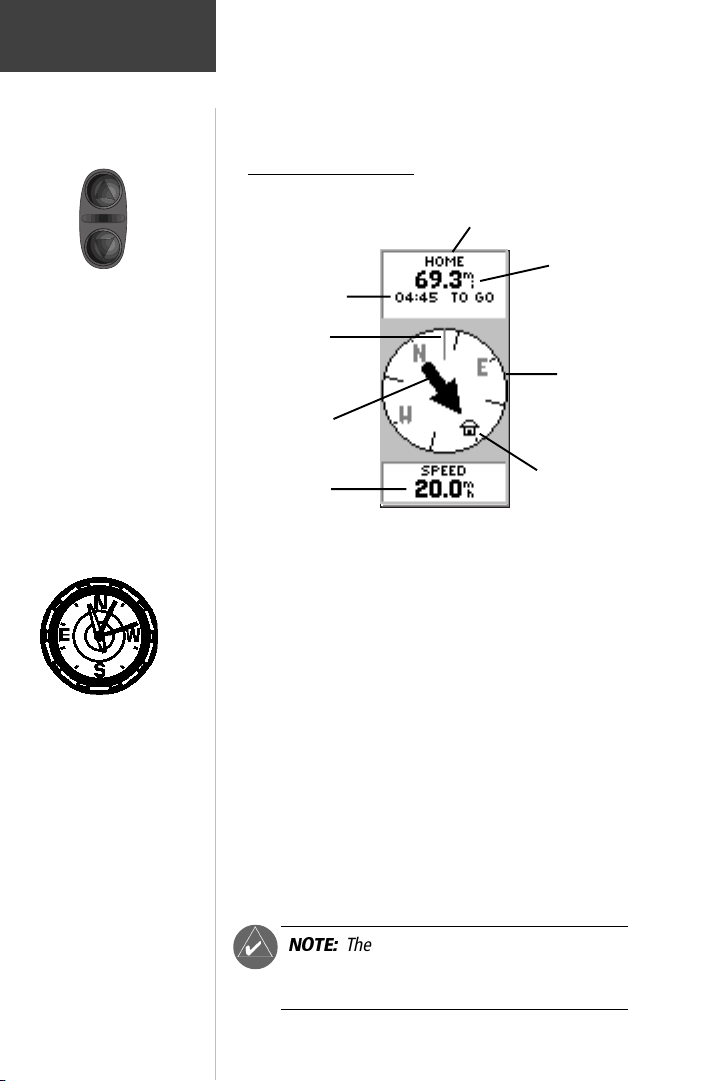
Time to reach
the Destination
Moving
Direction Line
Direction Arrow
(follow this)
Waypoint (Location) Name
Straight Line
Distance to the
Destination
Compass Ring
The eTrex is not a compass.
You must be moving in order
for it to track your movement.
12
Speed
The Pointer Page
Destination Symbol
The Pointer Page helps guide you to a destination.
When you’re moving with no particular destination in
mind, the Pointer Page shows you your moving direction
and speed. When you’re moving towards a specific
destination, the Pointer Page shows you the name of the
location, the distance, and time to go.
By pressing the UP or DOWN Buttons, you can cycle
through other trip computer information such as average
speed, maximum speed, moving direction (heading),
bearing, lat/lon, elevation, time of sunrise/sunset, trip
timer and trip odometer.
NOTE:
F
The direction arrow and destination
symbol only appear on the Pointer Page when
you have started a GOTO.
.
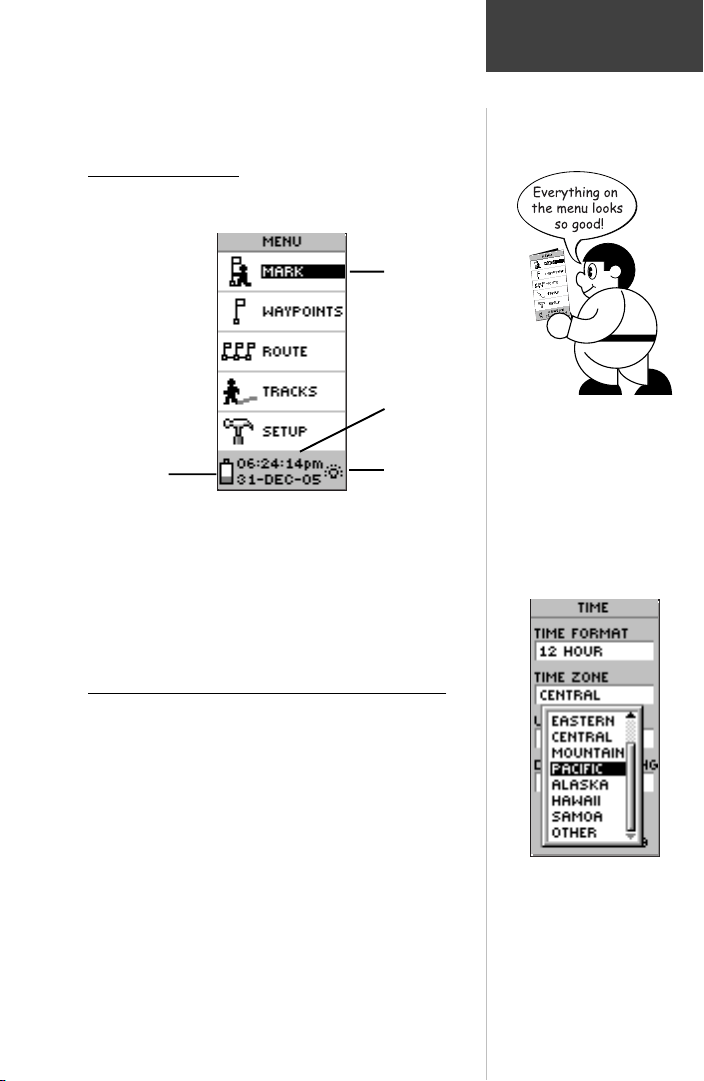
Menu Page Basics
Getting
Started
Page Basics
Menu Options
Time and Date
Battery
Strength
The Menu Page
Backlight
Indicator
The Menu Page gives you access to eTrex’s more
advanced features. With the Menu Page you can do neat
things like customize the display, transfer information
from a computer to eTrex and back again, and manage
and organize all of your waypoints.
What Time is it?—Changing the Time Zone
Let’s practice using the Menu Page and change the
time zone.
To change the time zone:
1. Press the PAGE Button and switch to the MENU
Page. Press the UP or DOWN Button and highlight
‘SETUP’. Press ENTER. The SETUP Page appears.
2. Press the UP or DOWN Button and highlight
‘TIME’ and press ENTER.
3. Press the UP or DOWN Button and select the
‘TIME ZONE’ field and press ENTER.
4. Press the UP or DOWN Button, scroll through the
selections, and press ENTER when you have found
the correct zone. Press PAGE to get back to the
page of your choice.
You can select your
particular time zone on
the TIME page.
13
Getting
Started
Let the Fun
Begin!
You’ll find the MARK
option on the MENU
Page
This completes a basic explanation of the page features
of the eTrex. Now let’s have some fun.
Discovering the Fun
Discovering the fun of using your eTrex is as easy as
taking a quick walk around an open outdoor area. In this
brief exercise, you’ll mark your current location (your
home for example), travel a short distance away, and then
have the eTrex guide you back to where you started (to get
the most out of this exercise, make sure to walk for at least
the time noted for each step).
.
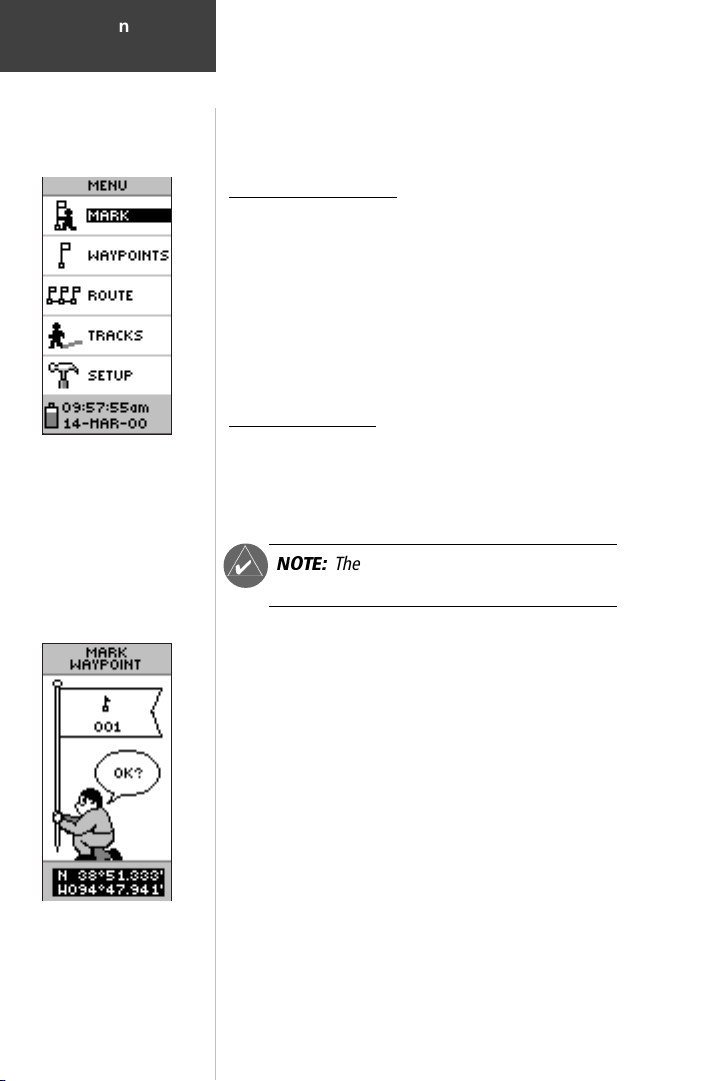
“X” Marks the Spot
The first step in the exercise is to mark your location as
a waypoint so you can return to it later.
NOTE:
F
To Mark a Waypoint:
1. Press the PAG E Button and switch to the MENU
2. Press the UP or DOWN Button and highlight the
3. Press ENTER. The MARK WAYPOINT Page appears
The eTrex must be “READY TO
NAVIGATE” before you mark a waypoint.
Page.
‘MARK’ field.
with ‘OK?’ highlighted.
The Latitude and
Longitude is displayed at
the bottom of the MARK
WAYPOINT Page and
the REVIEW
WAYPOINT Page.
14
Before we actually mark the wayoint, let’s change the
symbol to a house and the name ‘001’ to something a little
more meaningful such as HOME.
To change the waypoint symbol:
1. On the MARK WAYPOINT page, press the UP or
DOWN Button to highlight the small flag symbol
and press ENTER. Using the UP or DOWN Button,
scroll through the symbols and highlight the house
symbol. Press ENTER.
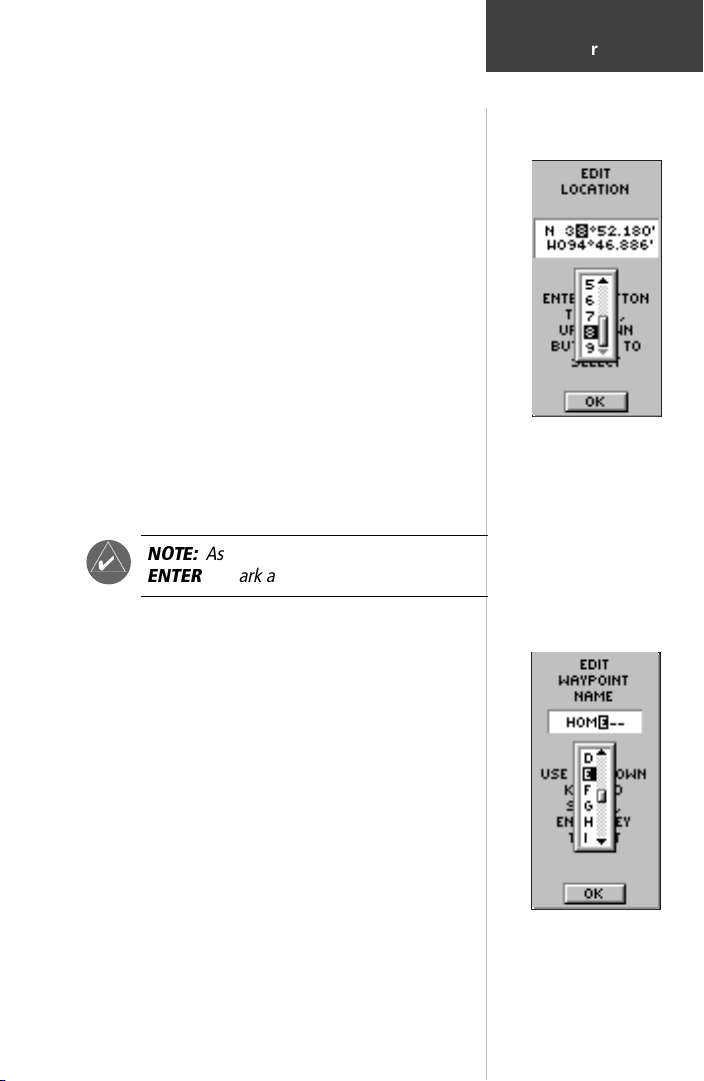
To change the waypoint name:
1. On the MARK WAYPOINT page, press the UP or
DOWN Button to highlight the Waypoint Name
‘001’.
2. Press ENTER. The EDIT WAYPOINT NAME Page
appears.
3. Press ENTER. Using the UP or DOWN Button, scroll
through the letter selections. Select ‘H’ and press
ENTER. Repeat this process and finish the word
‘HOME’.
4. Press the UP or DOWN Button to highlight the ‘OK’
field and press ENTER. The MARK WAYPOINT page
appears.
5. Press the UP or DOWN Button to highlight the ‘OK’
field and press ENTER. Your location, named HOME,
is now marked and stored in memory.
NOTE:
F
As a shortcut tip, press and hold
ENTER
to mark a waypoint.
Getting
Started
Edit Waypoints
You can create or edit a
waypoint on the EDIT
LOCATION Page. From
the MARK WAYPOINT
Page, highlight the Lat/
Lon field and press
ENTER. Then follow the
on-screen instructions.
Now that you’ve marked your location, it’s time to go
for a brisk walk. Press the PAGE Button and switch to the
MAP Page
Walk in a straight line for 3-4 minutes at a fast
pace and watch the Map Page.
Your location is shown by the figure in the middle of
the screen. As you move, watch the animated figure walk,
and a line—called a “track”—appear along the path you
have just covered.
Now take a sharp right turn and walk at a brisk
pace for another 3-4 minutes.
The EDIT WAYPOINT
NAME Page.
15
 Loading...