

Garmin eTrex Touch 25 Instruction Manual
eTrex® Touch 25/35
Owner’s Manual
July 2015 Printed in Taiwan 190-01836-00_0A

All rights reserved. Under the copyright laws, this manual may not be copied, in whole or in part, without the written consent of Garmin. Garmin reserves the
right to change or improve its products and to make changes in the content of this manual without obligation to notify any person or organization of such
changes or improvements. Go to www.garmin.com for current updates and supplemental information concerning the use of this product.
Garmin®, the Garmin logo, Auto Lap®, BlueChart®, City Navigator®, eTrex®, and TracBack® are trademarks of Garmin Ltd. or its subsidiaries, registered in the
USA and other countries. ANT+®, BaseCamp™, chirp™, Garmin Connect™, Garmin Express™, HomePort™, tempe™, VIRB®, and GSC™ are trademarks of Garmin
Ltd. or its subsidiaries. These trademarks may not be used without the express permission of Garmin.
The Bluetooth® word mark and logos are owned by the Bluetooth SIG, Inc. and any use of such marks by Garmin is under license. Mac® is a registered
trademark of Apple Computer, Inc. Windows® is a registered trademark of Microsoft Corporation in the United States and other countries. microSD™ and the
microSDHC logo are trademarks of SD-3C, LLC. Other trademarks and trade names are those of their respective owners.
NMEA® is a registered trademark of the National Marine Electronics Association. NMEA 2000® and the NMEA 2000 logo are registered trademarks of the
National Marine Electronics Association.
This product is ANT+® certified. Go to www.thisisant.com/directory for a list of compatible products and apps.
Introduction
WARNING
See the Important Safety and Product Information guide in the
product box for product warnings and other important
information.
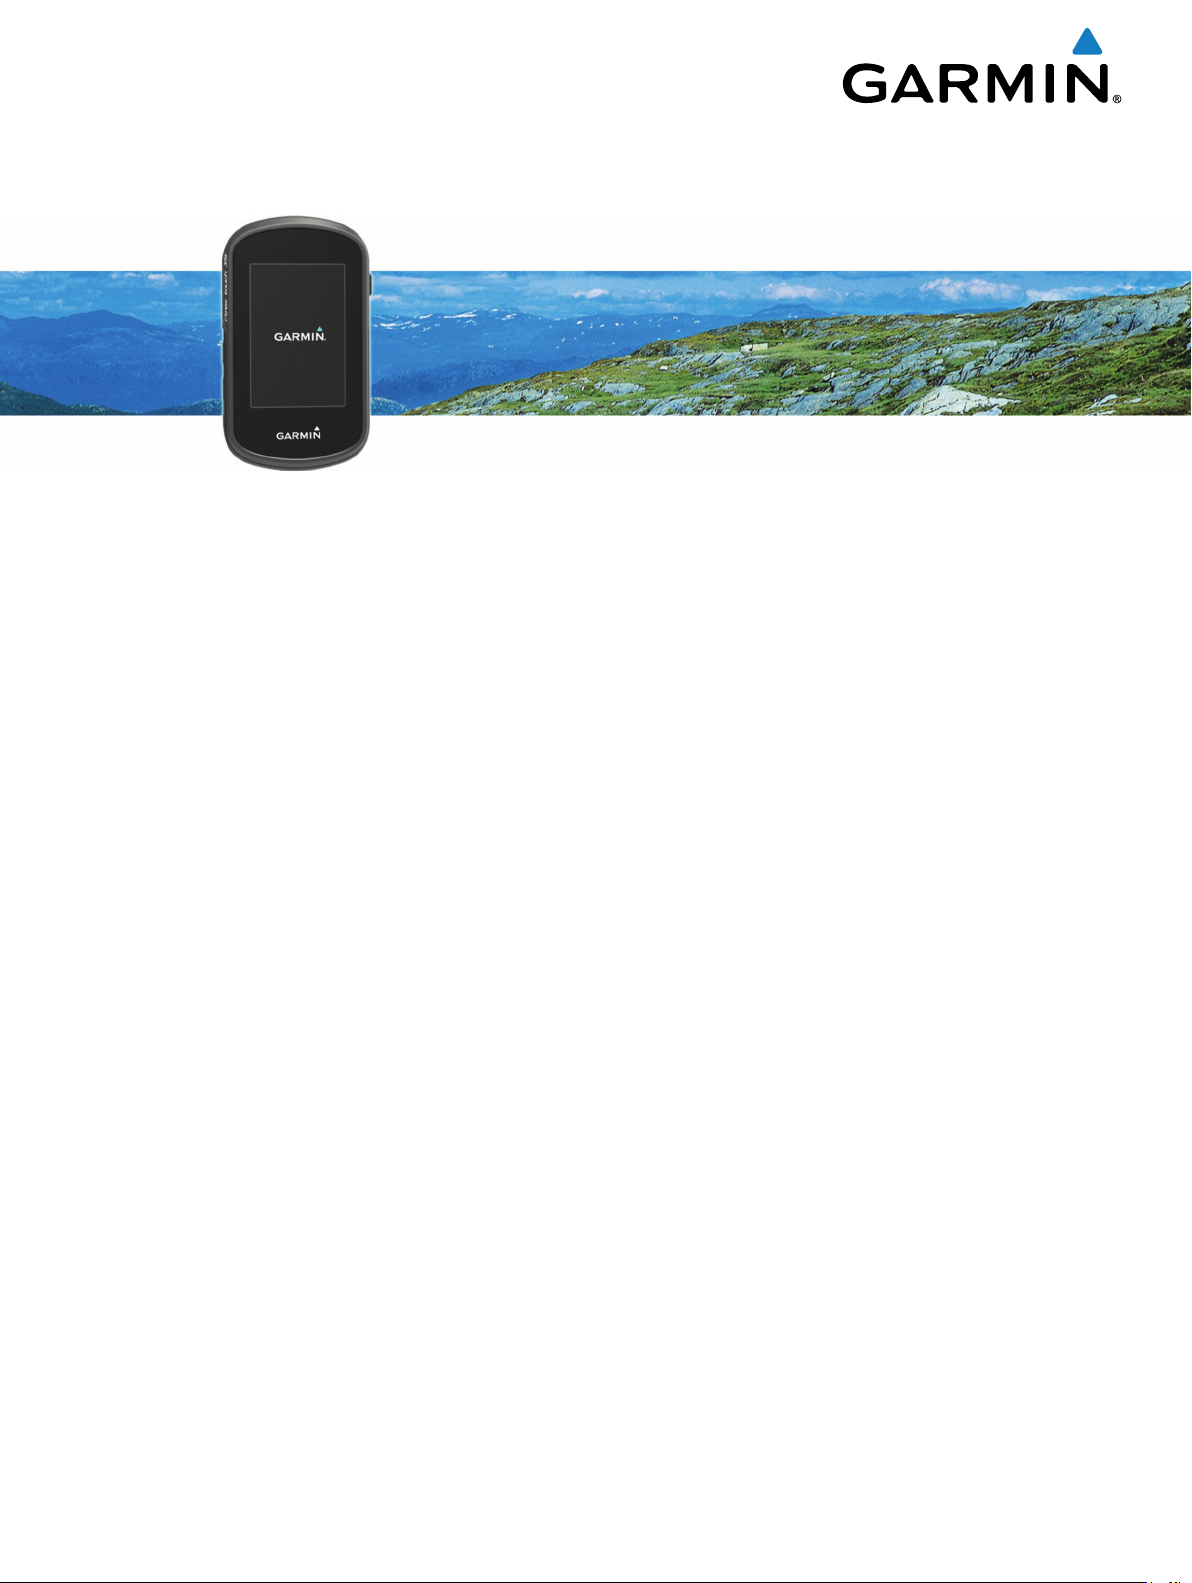
Device Overview
Power key
À
Mini-USB port (under weather cap)
Á
Battery cover D-ring
Â
microSD™ card slot (under battery door)
Ã
Installing AA Batteries
The handheld device operates on two AA batteries (not
included). Use NiMH or lithium batteries for best results.
Turn the D-ring counter-clockwise, and pull up to remove the
1
cover.
Insert two AA batteries, observing polarity.
2
Turning On the Device
Hold .
Using the Touchscreen
• Tap the screen to select an item.
• Make each touchscreen selection a separate action.
• Select to save your changes and close the page.
• Select to return to the previous page.
• Select to return to the main menu.
• Select to view specific menu items for the page you are
viewing.
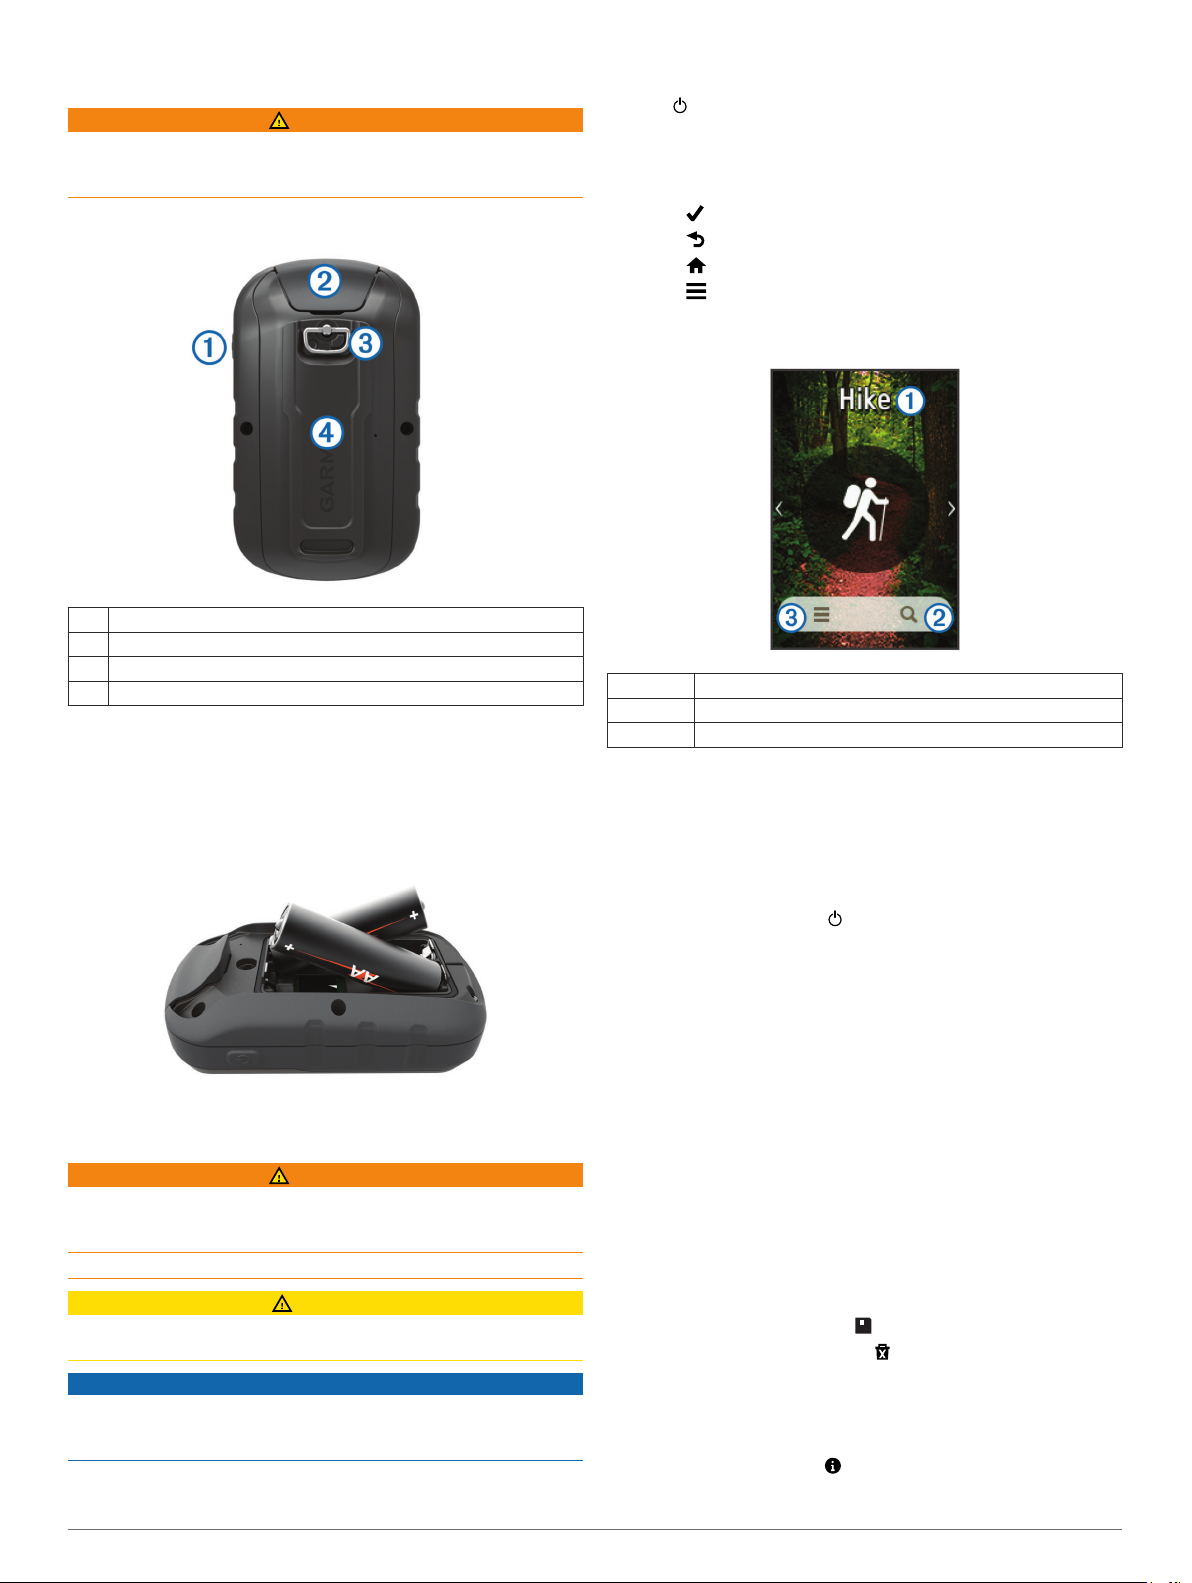
Home Screen
À
Á
Â
Activity
Where To?
Activity settings
Using the Power Key Menu
Before you can use certain features, you may need to select the
power key.
You can access many features, such as Track Manager,
Waypoint Manager, and geocaching, from the power key menu.
From any screen, select , and select a feature.
Tracks
A track is a recording of your path. The track log contains
information about points along the recorded path, including time,
location, and elevation for each point.
Replace the battery cover, and turn the D-ring clockwise.
3
Battery Information
WARNING
The temperature rating for the device may exceed the usable
range of some batteries. Alkaline batteries can rupture at high
temperatures.
Do not use a sharp object to remove batteries.
CAUTION
Contact your local waste disposal department to properly
recycle the batteries.
NOTICE
Alkaline batteries lose a significant amount of their capacity as
the temperature decreases. Use lithium batteries when
operating the device in below freezing conditions.
Introduction 1
Recording a Track Log
Select an activity.
1
After the GPS indicator bars turn green, select Start.
2
After your activity, swipe up from the bottom of the screen.
3
Select Stop.
4
The data summary page appears.
Scroll vertically to see all the data (optional).
5
TIP: You can select the name of the track to change it.
Select an option:
6
• To save the track, select .
• To discard the track, select .
Customizing Your Track Log
You can customize how your device displays and records
tracks.
Select Current Track > .
1

Select an option:
2
• To change the color of the track line on the map, select
Color.
• To display a line on the map indicating your track, select
Show On Map.
Select > Setup Tracks > Record Method.
3
Select an option:
4
• To record tracks at a variable rate that creates an
optimum representation of your tracks, select Auto.
• To record tracks at a specified distance, select Distance.
• To record tracks at a specified time, select Time.
Select Interval.
5
Complete an action:
6
• If you selected Auto for the Record Method, select an
option to record tracks more or less often.
NOTE: Using the Most Often interval provides the most
track detail, but fills up the device memory quicker.
• If you selected Distance or Time for the Record Method,
enter a value, and select .
Navigating Using TracBack
While navigating, you can navigate back to the beginning of your
track. This can be helpful when finding your way back to camp
or the trail head.
Select Track Manager > Current Track > > TracBack.
1
The map displays your route with a magenta line, start point,
and end point.
Navigate using the map or the compass.
2
®
Saving the Current Track
Select Track Manager > Current Track.
1
Select an option:
2
• Select to save the entire track.
• Select > Save Portion, and select a portion.
Viewing Track Information
Select Track Manager.
1
Select a track.
2
Select .
3
The beginning and the end of the track are marked by flags.
Select the information bar at the top of the screen.
4
Information about the track appears.
Viewing the Elevation Plot of a Track
Select Track Manager.
1
Select a track.
2
Select .
3
Select Track Manager.
1
Select a track.
2
Select Color.
3
Select a color.
4
Archiving Saved Tracks
You can archive saved tracks to save memory space.
Select Setup > Tracks > Advanced Setup > Auto Archive.
1
Select When Full, Daily, or Weekly.
2
Clearing the Current Track
From the current track screen, swipe up from the bottom of
1
the screen.
Select Stop > > Clear.
2
Deleting a Track
Select Track Manager.
1
Select a track.
2
Select > Delete > Delete.
3
Waypoints
Waypoints are locations you record and store in the device.
Creating a Waypoint
You can save a location as a waypoint.
Tap a location on the map.
1
Select the information text box.
2
The review page appears.
Select .
3
If necessary, select a field to change it.
4
Select Save.
5
Finding a Waypoint
Select Waypoint Manager.
1
Select a waypoint from the list.
2
If necessary, select to narrow the search.
3
Select an option:
4
• Select Spell Search to search using the name of the
waypoint.
• Select Select Symbol to search using the symbol of the
waypoint.
• Select Search Near to search near a recently found
location, another waypoint, your current location, or a
point on the map.
• Select Sort to view the list of waypoints based on nearest
distance or alphabetical order.
Saving a Location on a Track
Select Track Manager.
1
Select a track.
2
Select .
3
Select a location on the track.
4
Select the information bar at the top of the screen.
5
Information about the location appears.
Select > OK.
6
Changing the Track Color
You can change the color of a track to improve the view on the
map or compare it to another track.
2 Waypoints
Editing a Waypoint
Before you can edit a waypoint, you must create a waypoint.
Select Waypoint Manager.
1
Select a waypoint.
2
Select an item to edit, such as the name.
3
Enter the new information, and select .
4
Deleting a Waypoint
Select Waypoint Manager > > Delete.
1
Select a waypoint.
2
Select Delete > Yes.
3

Increasing the Accuracy of a Waypoint Location
You can refine a waypoint location for more accuracy. When
averaging, the device takes several readings at the same
location and uses the average value to provide more accuracy.
Select Waypoint Manager.
1
Select a waypoint.
2
Select > Average Location.
3
Move to the waypoint location.
4
Select Start.
5
Follow the on-screen instructions.
6
When the confidence status bar reaches 100%, select Save.
7
For best results, collect 4 to 8 samples for the waypoint, waiting
at least 90 minutes between samples.
Projecting a Waypoint
You can create a new location by projecting the distance and
bearing from a marked location to a new location.
Select Waypoint Manager.
1
Select a waypoint.
2
Select > Project Waypoint.
3
Enter the bearing, and select .
4
Select a unit of measure.
5
Enter the distance, and select .
6
Select Save.
7
Routes
A route is a sequence of waypoints or locations that leads you to
your final destination.
Creating a Route
Select Route Planner > Create Route > Select First Point.
1
Select a category.
2
Select the first point in the route.
3
Select Use > Select Next Point.
4
Repeat steps 2–4 to add all the points in the route.
5
Select to save the route.
6
Editing the Name of a Route
Select Route Planner.
1
Select a route.
2
Select Change Name.
3
Enter the new name.
4
Editing a Route
Select Route Planner.
1
Select a route.
2
Select Edit Route.
3
Select a point.
4
Select an option:
5
• To view the point on the map, select Review.
• To change the order of the points on the route, select
Move Up or Move Down.
• To insert an additional point on the route, select Insert.
The additional point is inserted before the point you are
editing.
• To remove the point from the route, select Remove.
Select to save the route.
6
Viewing a Route on the Map
Select Route Planner.
1
Select a route.
2
Select View Map.
3
Deleting a Route
Select Route Planner.
1
Select a route.
2
Select Delete Route.
3
Viewing the Active Route
While navigating a route, select Active Route.
1
Select a point in the route to view additional details.
2
Reversing a Route
Select Route Planner.
1
Select a route.
2
Select Reverse Route.
3
Garmin® Adventures
You can create adventures to share your journeys with family,
friends, and the Garmin community. You can group related
items together as an adventure. For example, you can create an
adventure for your latest hiking trip. The adventure could contain
the track log of the trip, photos of the trip, and geocaches you
hunted. You can use BaseCamp™ to create and manage your
adventures. For more information, go to adventures.garmin.com.
NOTE: BaseCamp is not available for all device models.
Sending Files to BaseCamp
Open BaseCamp.
1
Connect the device to your computer.
2
On Windows® computers, the device appears as a removable
drive or a portable device, and the memory card may appear
as a second removable drive. On Mac® computers, the device
and memory card appear as mounted volumes.
NOTE: Some computers with multiple network drives may not
display device drives properly. See your operating system
documentation to learn how to map the drive.
Open the Garmin or memory card drive or volume.
3
Select an option:
4
• Select an item from a connected device and drag it to My
Collection or to a list.
• From BaseCamp, select Device > Receive from Device,
and select the device.
Creating an Adventure
Before you can create an adventure and send it to your device,
you must download BaseCamp to your computer and transfer a
track from your device to your computer (Sending Files to
BaseCamp, page 3).
Open BaseCamp.
1
Select File > New > Garmin Adventure.
2
Select a track, and select Next.
3
If necessary, add items from BaseCamp.
4
Complete the required fields to name and describe the
5
adventure.
If you want to change the cover photo for the adventure,
6
select Change, and select a different photo.
Routes 3

Select Finish.
7
Starting an Adventure
Before you can start an adventure, you must send an adventure
from BaseCamp to your device.
Select Adventures.
1
Select an adventure.
2
Select Start.
3
Where To? Menu
You can use the Where To? menu to find a destination to
navigate to. Not all Where To? categories are available in all
areas and maps.
Optional Maps
You can use additional maps with the device, such as BirdsEye
satellite imagery, BlueChart® g2, and City Navigator® detailed
maps. Detailed maps may contain additional points of interest,
such as restaurants or marine services. For more information,
go to http://buy.garmin.com or contact your Garmin dealer.
Finding a Location Near Another Location
From an activity screen, select > > Search Near.
1
Select an option.
2
Select a location.
3
Finding an Address
You can use optional City Navigator maps to search for
addresses.
Select Where To? > Addresses.
1
Select the country or state, if necessary.
2
Enter the city or postal code.
3
NOTE: Not all map data provides postal code searching.
Select the city.
4
Enter the house number.
5
Enter the street.
6
may need a clear view of the sky to acquire satellite signals. It
may take 30 to 60 seconds to acquire satellite signals.
Hold .
1
Select an activity.
2
Wait until the GPS indicator bars turn green.
3
Navigating with the Map
Begin navigating to a destination (Navigating to a
1
Destination, page 4).
Select Map.
2
A blue triangle represents your location on the map. As you
travel, the blue triangle moves and leaves a track log (trail).
Complete one or more actions:
3
• Select , and drag the map to view different areas.
• Select and to zoom in and out of the map.
• Select a location on the map (represented by a pin), and
select the information bar at the top of the screen to view
information about the selected location.
Navigating a Driving Route
Before you can navigate street routes, you must purchase and
load City Navigator maps.
Select Profile Change > Automotive.
1
Select a destination.
2
Navigate using the map.
3
Turns appear in the text bar along the top of the map. Audible
tones signal turns in the route.
Navigating with the Compass
When navigating to a destination, points to your destination,
regardless of the direction you are moving.
Begin navigating to a destination (Navigating to a
1
Destination, page 4).
Select Compass.
2
Turn until points toward the top of the compass, and
3
continue moving in that direction to the destination.
Calibrating the Compass
Navigation
You can navigate routes and tracks, to a waypoint, geocache,
photo, or any saved location in the device. You can use the map
or the compass to navigate to your destination.
Navigating to a Destination
From an activity screen, select .
1
Select a category.
2
Select a destination.
3
Select Go.
4
The map opens and your route is marked with a magenta
line.
Navigate using the map (Navigating with the Map, page 4)
5
or compass (Navigating with the Compass, page 4).
Stopping Navigation
From the map or compass, swipe up from the bottom of the
1
screen.
Select Stop.
2
Acquiring Satellite Signals
Before you can use the GPS navigation features, such as
recording a track, you must acquire satellite signals. The device
NOTICE
Calibrate the electronic compass outdoors. To improve heading
accuracy, do not stand near objects that influence magnetic
fields, such as vehicles, buildings, and overhead power lines.
Your device was already calibrated at the factory, and the
device uses automatic calibration by default. If you experience
irregular compass behavior, for example, after moving long
distances or after extreme temperature changes, you can
manually calibrate the compass.
Select Compass.
1
Swipe up from the bottom of the screen, and select >
2
Calibrate Compass > Start.
Follow the on-screen instructions.
3
Course Pointer
The course pointer is most useful if you are navigating on water
or where there are no major obstacles in your path. It also can
also help you avoid hazards to either side of the course, such as
shoals or submerged rocks.
To enable the course pointer, from the compass, select Setup >
Heading > Go To Line (Pointer) > Course (CDI).
4 Where To? Menu
 Loading...