

Garmin eTrex H Owner Manual
®
Owner’s Manual
eTrex
personal navigator
H

© 2007 Garmin Ltd. or its subsidiaries
Garmin International, Inc.
1200 East 151st Street,
Olathe, Kansas 66062, USA
Tel. (913) 397.8200 or (800) 800.1020
Fax (913) 397.8282
All rights reserved. Except as expressly provided herein, no part of this manual may be reproduced, copied, transmitted,
disseminated, downloaded or stored in any storage medium, for any purpose without the express prior written consent of Garmin.
Garmin hereby grants permission to download a single copy of this manual onto a hard drive or other electronic storage medium
to be viewed and to print one copy of this manual or of any revision hereto, provided that such electronic or printed copy of this
manual must contain the complete text of this copyright notice and provided further that any unauthorized commercial distribution
of this manual or any revision hereto is strictly prohibited.
Information in this document is subject to change without notice. Garmin reserves the right to change or improve its products and
to make changes in the content without obligation to notify any person or organization of such changes or improvements. Visit the
Garmin Web site (www.garmin.com) for current updates and supplemental information concerning the use and operation of this
and other Garmin products.
Garmin® is a trademark of Garmin Ltd. or its subsidiaries, registered in the USA and other countries. myGarmin™, eTrex®,
AutoLocate®, TracBack®, BlueChart®, and MapSource® are trademarks of Garmin Ltd. or its subsidiaries. These trademarks may
not be used without the express permission of Garmin.
Garmin (Europe) Ltd.
Liberty House
Hounsdown Business Park,
Southampton, Hampshire, SO40 9RB UK
Tel. +44 (0) 870.8501241 (outside the UK)
0808 2380000 (within the UK)
Fax +44 (0) 870.8501251
Garmin Corporation
No. 68, Jangshu 2nd Road,
Shijr, Taipei County, Taiwan
Tel. 886/2.2642.9199
Fax 886/2.2642.9099
August 2007 Part Number 190-00818-00 Rev. B Printed inTaiwan

IntroductIon
IntroductIon
Thank you for choosing the Garmin® eTrex® H. Take
a moment to compare the contents of this package
with the packing list on the box. If any pieces are
missing, contact your Garmin dealer immediately.
Contact Garmin
Contact Garmin if you have any questions while using
your unit. Contact Garmin Product Support by phone:
(913) 397-8200 or (800) 800-1020, Monday–Friday,
8 AM–5 PM Central Time; or go to
www.garmin.com/support/.
In Europe, contact Garmin (Europe) Ltd. at
+44 (0) 870.8501242 (outside the UK) or
0808 2380000 (within the UK).
Product Registration
Help us better support you by completing our online
registration today! Connect to our Web site at
http://my.garmin.com. Keep the original sales receipt,
or a photocopy, in a safe place.
Optional Accessories
For a complete list of available accessories for use
with the eTrex, refer to http://buy.garmin.com.
WARNING: See the Important Safety and Product
Information sheet in the product box for product
warnings and other important information.
eTrex H Owner’s Manual i

IntroductIon
Table of Contents
Introduction ........................................................i
Contact Garmin ....................................................i
Product Registration ............................................i
Optional Accessories ...........................................i
Getting Started ..................................................1
Unit Overview ......................................................1
Installing Batteries and Lanyard ........................2
Operating the eTrex .............................................3
Key Functions ......................................................4
Turning on the eTrex ...........................................5
Main Pages ........................................................7
SkyView Page ......................................................7
Map Page ..............................................................7
Pointer Page ........................................................9
Trip Computer Page ........................................ 10
Main Menu ......................................................11
Routes Page ...................................................... 14
Tracks Page ...................................................... 16
Appendix .........................................................23
Specications ................................................... 23
Interface Formats ............................................. 24
Connecting Your eTrex to a Computer ........... 24
Software License Agreement .......................... 25
Declaration of Conformity ............................... 25
Index ................................................................26
ii eTrex H Owner’s Manual
GettInG Started
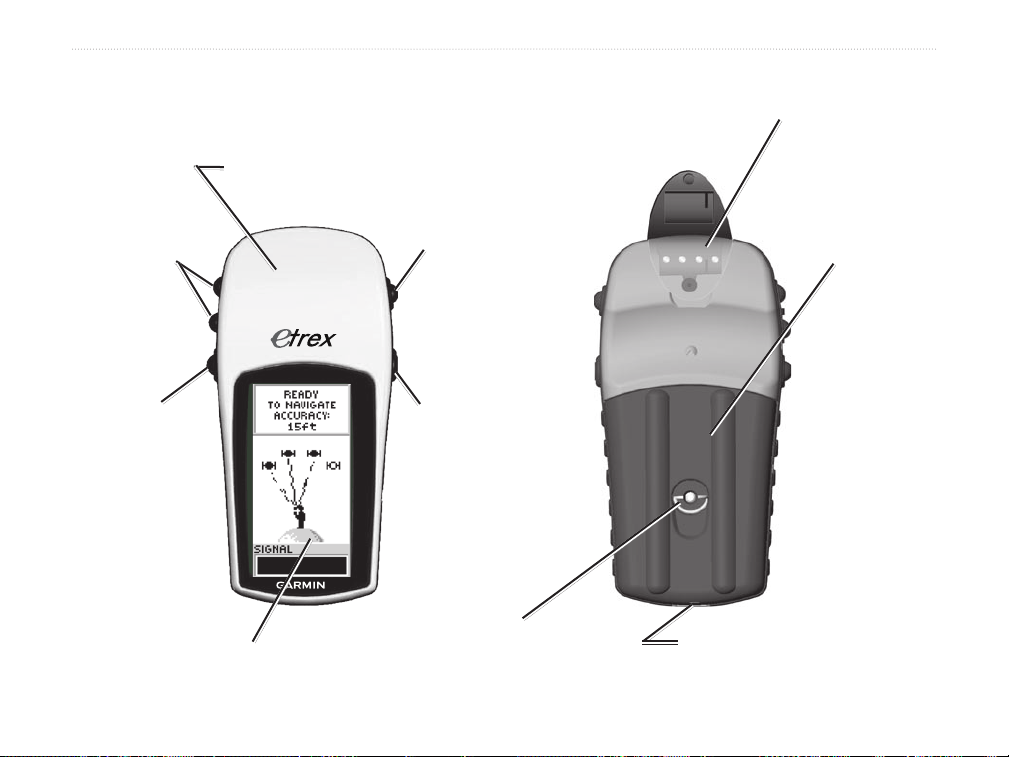
Unit Overview
GPS antenna
UP/DOWN
keys
ENTER/
MARK key
LCD display
GettInG Started
QUIT/PAGE
key
POWER key
Battery compartment
locking ring
External power and data
connector
(under weather cap)
Battery compartment
cover
Carry lanyard
attachment slots
eTrex H Owner’s Manual 1
GettInG Started
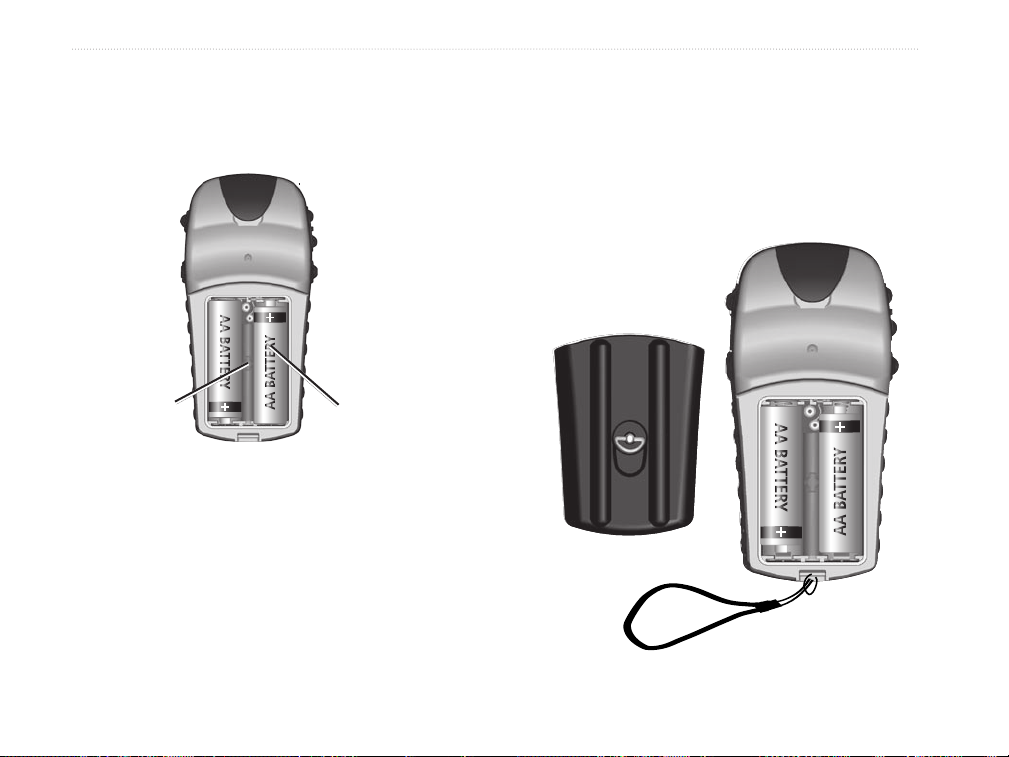
Installing Batteries and Lanyard
The eTrex operates on two AA batteries (not
included). You can use Alkaline or NiMH batteries.
Locking
pin slot
To install the batteries:
1. Remove the battery cover by turning the
Locking ring counter-clockwise and pulling out.
2. Insert the batteries, observing the proper
polarity.
Remove the batteries if the unit is not being used for
several months. Stored data is not lost when batteries
are removed.
Battery
compartment
To install the lanyard:
1. Remove the battery cover and place the loop of
the lanyard through the slot in the base of the
unit.
2. Route the strap through the loop, and pull tight.
Lanyard installation
2 eTrex H Owner’s Manual

GettInG Started
Operating the eTrex
Understanding Terms
Select—move the highlighted area on the screen up
or down, using the UP and DOWN keys to select
individual fields.
Key—when you are directed to press a key, press and
quickly release the key.
Field—the location on a page where data or an option
can be shown or entered.
Scroll bar—when viewing a list of items too long to
appear on the screen, a scroll bar appears next to the
list. To scroll through a list, press the UP or DOWN
keys.
Default—the factory setting saved in the unit’s
memory. You can change the settings, but you can
revert to the factory settings when you select Restore
Defaults.
Manual Conventions
In this manual, when you are instructed to select
an item, small arrows (>) appear in the text. They
indicate that you should select a series of items on
the screen using the UP or DOWN keys, and press
ENTER after each item. For example, if you see
“select TRACKS > SETUP >,” you should highlight
TRACKS, and press ENTER. Then highlight
SETUP, and press ENTER.
eTrex H Owner’s Manual 3
GettInG Started
Key Functions
UP/DOWN keys
From the Map page, press to zoom
the map in or out.
From any other page, press to scroll
up or down a list or move a slider
bar.
ENTER/MARK key
Press and release to enter data or
menu selections.
Press with a main page open to view
its option menu.
HIGH SENSITIVITY
QUIT/PAGE key
Press to cycle through the main pages.
Press to exit a page or quit a function.
POWER key
Press and hold to turn unit on or off.
Press and release to turn backlighting
on or off.
Press and hold to MARK your
location as a waypoint.
4 eTrex H Owner’s Manual

GettInG Started
Turning on the eTrex
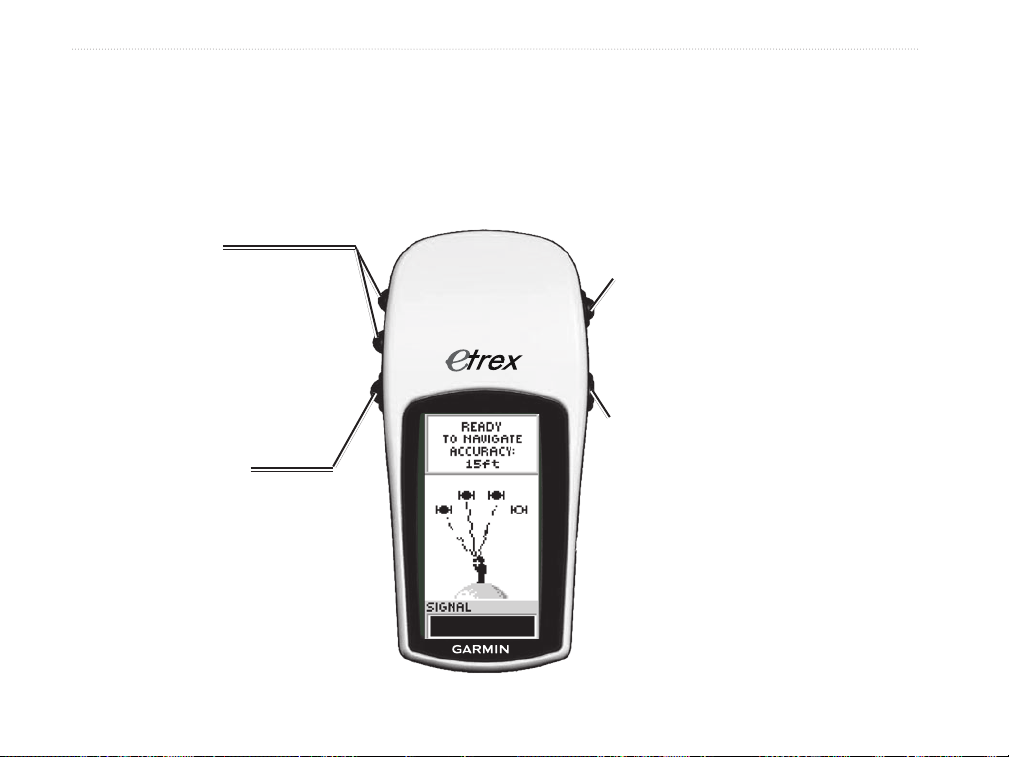
Backlight and Contrast Adjustment
When you turn on the eTrex, the SkyView page
appears, followed by a READY TO NAVIGATE
message after the unit has collected enough satellite
data to establish its current location (initialized).
To turn the eTrex on and off:
1. Press and hold POWER. When the unit turns
on, a Welcome page appears followed by the
SkyView page.
2. To turn off the eTrex, press and hold POWER.
SkyView Page
Ready to navigate
To turn on the backlight:
Press and quickly release POWER.
To set the timeout and adjust the contrast:
1. Press PAGE until the SkyView page appears,
then press ENTER twice to open the backlight/
contrast window.
2. Press ENTER to view the timeout options,
make a selection > ENTER.
3. Press DOWN to move to the contrast slider >
ENTER.
4. Press UP or DOWN to adjust the contrast >
QUIT to close.
Backlight time out options
and contrast adjustment
slider
eTrex H Owner’s Manual 5

GettInG Started
Selecting Options and Entering Data
Press UP/DOWN to highlight, select, or choose an
item in a list or a eld on the screen.
To select and activate an option:
1. From any page except the Menu page, press
ENTER to view the options menu.
2. Press UP or DOWN to move the highlight up
and down on the menu. To select an option,
press ENTER.
To exit a menu or return to the previous
setting:
Press QUIT/PAGE. The QUIT/PAGE key
moves backward through your steps. Press
QUIT/PAGE repeatedly to return to the starting
page. Once at the starting page, pressing the
key cycles you through the ve main pages.
On-Screen Messages
When a signicant event in the operation of the
unit occurs, an on-screen message appears to advise
you of the occurrence. In each case, the condition
is described and often a remedy is provided. Press
ENTER to acknowledge the message and close.
6 eTrex H Owner’s Manual
 Loading...