

Page 1
Edge® 510
Owner’s Manual
September 2013 190-01531-00_0B
Page 2

All rights reserved. Under the copyright laws, this manual may not be copied, in whole or in part, without the written consent of Garmin. Garmin reserves the
right to change or improve its products and to make changes in the content of this manual without obligation to notify any person or organization of such
changes or improvements. Go to www.garmin.com for current updates and supplemental information concerning the use of this product.
Garmin®, the Garmin logo, Auto Lap®, Auto Pause®, Edge®, and Virtual Partner® are trademarks of Garmin Ltd. or its subsidiaries, registered in the USA
and other countries. ANT+™, BaseCamp™,Garmin Connect™, and GSC™ are trademarks of Garmin Ltd. or its subsidiaries. These trademarks may not be
used without the express permission of Garmin.
The Bluetooth® word mark and logos are owned by the Bluetooth SIG, Inc. and any use of such marks by Garmin is under license. Mac® is a registered
trademark of Apple Computer, Inc. Android™ is a trademark of Google Inc. New Leaf® is a registered trademark of the Angeion Corporation. Training Stress
Score™ (TSS), Intensity Factor™ (IF), and Normalized Power™ (NP) are trademarks of Peaksware, LLC. Windows® is a registered trademark of Microsoft
Corporation in the United States and other countries. Other trademarks and trade names are those of their respective owners.
This product is ANT+™ certified. Visit www.thisisant.com/directory for a list of compatible products and apps.
Page 3

Table of Contents
Introduction.................................................................... 1
Getting Started........................................................................... 1
Charging the Device.................................................................. 1
About the Battery.................................................................. 1
Installing the Standard Mount.................................................... 1
Installing the Out-Front Mount................................................... 1
Releasing the Edge............................................................... 2
Turning On the Device............................................................... 2
Keys...................................................................................... 2
Acquiring Satellite Signals......................................................... 2
Training........................................................................... 3
Going for a Ride......................................................................... 3
Alerts.......................................................................................... 3
Setting Range Alerts............................................................. 3
Setting a Recurring Alert....................................................... 3
Workouts.................................................................................... 3
Following a Workout From the Web...................................... 3
Creating a Workout............................................................... 3
Repeating Workout Steps..................................................... 3
Starting a Workout................................................................ 4
Stopping a Workout............................................................... 4
Editing a Workout.................................................................. 4
Deleting a Workout................................................................ 4
Using Virtual Partner®............................................................... 4
Courses...................................................................................... 4
Creating a Course on Your Device....................................... 4
Following a Course From the Web........................................ 4
Tips for Training with Courses.............................................. 4
Changing the Course Speed................................................. 4
Stopping a Course................................................................ 4
Deleting a Course................................................................. 4
Personal Records...................................................................... 4
Restoring Your Personal Records......................................... 5
Training Zones........................................................................... 5
Setting Your Speed Zones.................................................... 5
ANT+ Sensors................................................................ 5
Putting On the Heart Rate Monitor............................................. 5
Setting Your Heart Rate Zones............................................. 5
About Heart Rate Zones....................................................... 5
Fitness Goals........................................................................ 5
Installing the GSC 10................................................................. 5
About the GSC 10................................................................. 6
Data Averaging for Cadence or Power ................................ 6
Training with Power Meters....................................................... 6
Setting Your Power Zones.................................................... 6
Calibrating Your Power Meter............................................... 6
Pairing Your ANT+ Sensors....................................................... 7
Pairing a Heart Rate Monitor..................................................... 7
Using the Weight Scale.............................................................. 7
History.............................................................................7
Viewing Your Ride..................................................................... 7
Viewing Data Totals.............................................................. 7
Sending Your Ride to Garmin Connect...................................... 7
Garmin Connect.................................................................... 7
Connected Features.............................................................. 7
Sending a Ride to Your Smartphone.................................... 8
Deleting History.......................................................................... 8
Data Recording.......................................................................... 8
Data Recording Settings....................................................... 8
Data Management..................................................................... 8
Connecting the Device to Your Computer............................. 8
Transferring Files to Your Device.......................................... 8
Deleting Files........................................................................ 8
Disconnecting the USB Cable
............................................... 8
Customizing Your Device..............................................9
Profiles....................................................................................... 9
Updating Your Bike Profile.................................................... 9
Updating Your Activity Profile................................................ 9
Setting Up Your User Profile................................................. 9
About Lifetime Athletes......................................................... 9
Bluetooth Settings...................................................................... 9
About Training Settings.............................................................. 9
Customizing the Data Pages................................................. 9
Using Auto Pause................................................................. 9
Marking Laps by Position.................................................... 10
Marking Laps by Distance................................................... 10
Using Auto Scroll................................................................. 10
Changing the Start Notice................................................... 10
System Settings....................................................................... 10
GPS Settings....................................................................... 10
Display Settings.................................................................. 10
Data Recording Settings..................................................... 10
Changing the Units of Measure........................................... 11
Changing the Configuration Settings.................................. 11
Changing the Device Language.......................................... 11
Setting the Device Tones.................................................... 11
Time Zones......................................................................... 11
Device Information.......................................................11
Specifications........................................................................... 11
Edge Specifications............................................................. 11
Heart Rate Monitor Specifications....................................... 11
GSC 10 Specifications........................................................ 11
Device Care............................................................................. 11
Cleaning the Device............................................................ 11
Caring for the Heart Rate Monitor....................................... 11
Heart Rate Monitor Battery...................................................... 11
Replacing the Heart Rate Monitor Battery.......................... 11
Replacing the GSC 10 Battery................................................. 12
Troubleshooting...........................................................12
Resetting the Device................................................................ 12
Clearing User Data.................................................................. 12
Maximizing Battery Life............................................................ 12
Decreasing the Backlight.................................................... 12
Adjusting the Backlight Timeout.......................................... 12
Using the Auto Power Down Feature.................................. 12
Calibrating the Touchscreen.................................................... 12
Locking the Touchscreen......................................................... 12
Unlocking the Touchscreen................................................. 12
Getting More Information......................................................... 12
Temperature Readings............................................................ 12
Viewing Device Information..................................................... 12
Updating the Software............................................................. 13
Appendix.......................................................................13
Registering Your Device.......................................................... 13
Data Fields............................................................................... 13
Heart Rate Zone Calculations.................................................. 14
Wheel Size and Circumference............................................... 14
Index..............................................................................16
Table of Contents i
Page 4

Page 5
Introduction
WARNING
See the Important Safety and Product Information guide in the
product box for product warnings and other important
information.
Always consult your physician before you begin or modify any
exercise program.
Getting Started
When using your device the first time, you should complete
these tasks to set up the device and learn about the basic
features.
Install your device using the standard mount (page 1) or
1
the out-front mount (page 1).
Turn on the device (page 2).
2
Locate satellites (page 2).
3
Go for a ride (page 3).
4
Charge the device (page 1).
5
Register the device (page 13).
6
Upload your ride to Garmin Connect™ (page 7).
7
Charging the Device
NOTICE
To prevent corrosion, thoroughly dry the mini-USB port, the
weather cap, and the surrounding area before charging or
connecting to a computer.
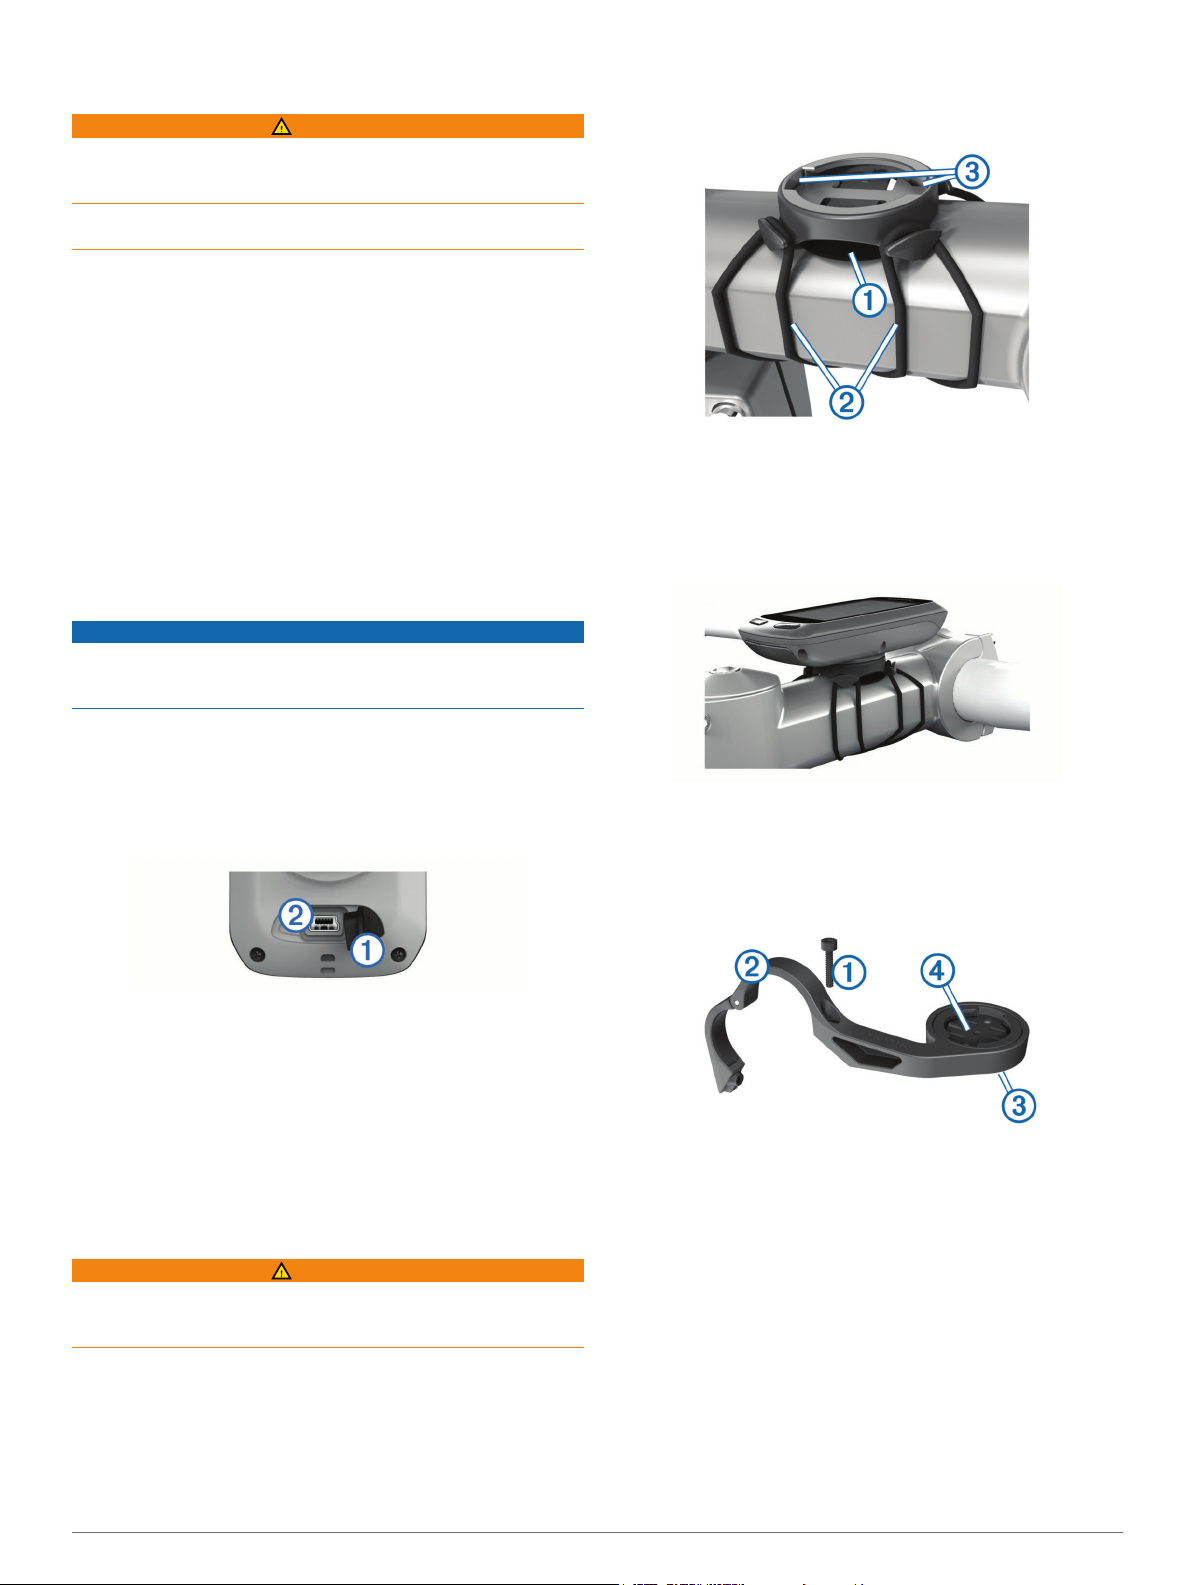
Place the rubber disk À on the back of the bike mount.
2
The rubber tabs align with the back of the bike mount so it
stays in place.
Place the bike mount on the bike stem.
3
Attach the bike mount securely using the two bands Á.
4
Align the tabs on the back of the Edge with the bike mount
5
notches Â.
Press down slightly and turn the Edge clockwise until it locks
6
into place.
The device is powered by a built-in lithium-ion battery that you
can charge using a standard wall outlet or a USB port on your
computer.
NOTE: The device will not charge when outside the
temperature range of 32° to 113°F (0° to 45°C).
Pull up the weather cap À from the mini-USB port Á.
1
Plug the small end of the USB cable into the mini-USB port.
2
Plug the USB end of the cable into the AC adapter or a
3
computer USB port.
Plug the AC adapter into a standard wall outlet.
4
When you connect the device to a power source, the device
turns on.
Charge the device completely.
5
A fully charged battery can run for up to 15 hours before it must
be recharged.
About the Battery
WARNING
This device contains a lithium-ion battery. See the Important
Safety and Product Information guide in the product box for
product warnings and other important information.
Installing the Standard Mount
For the best GPS reception, position the bike mount so the front
of the Edge is oriented toward the sky. You can install the bike
mount on the stem or the handlebars.
Select a secure location to mount the Edge where it does not
1
interfere with the safe operation of your bike.
Installing the Out-Front Mount
Select a secure location to mount the Edge where it does not
1
interfere with the safe operation of your bike.
Use the hex key to remove the screw À from the handlebar
2
connector Á.
If you want to change the orientation of the mount, remove
3
the two screws on the back side of the mount Â, rotate the
connector Ã, and replace the screws.
If the handlebar diameter is 26 mm, place the rubber pad
4
around the handlebar.
Place the handlebar connector around the rubber pad or
5
handlebar (31.8 mm diameter).
Replace the screw.
6
NOTE: Garmin® recommends a torque specification of 7 lbf-
in. (0.8 N-m). Check the tightness of the screw periodically.
Align the tabs on the back of the Edge with the bike mount
7
notches Ä.
Introduction 1
Page 6
Press down slightly and turn the Edge clockwise until it locks
8
into place.
Releasing the Edge
Turn the Edge clockwise to unlock the device.
1
Lift the Edge off the mount.
2
Turning On the Device
The first time you turn on the device, you are prompted to
configure system settings and profiles (page 9).
Hold .
1
Follow the on-screen instructions.
2
If your device included a heart rate monitor and a GSC™ 10,
3
activate the ANT+™ sensors during configuration.
For more information about ANT+ sensors, see page 5.
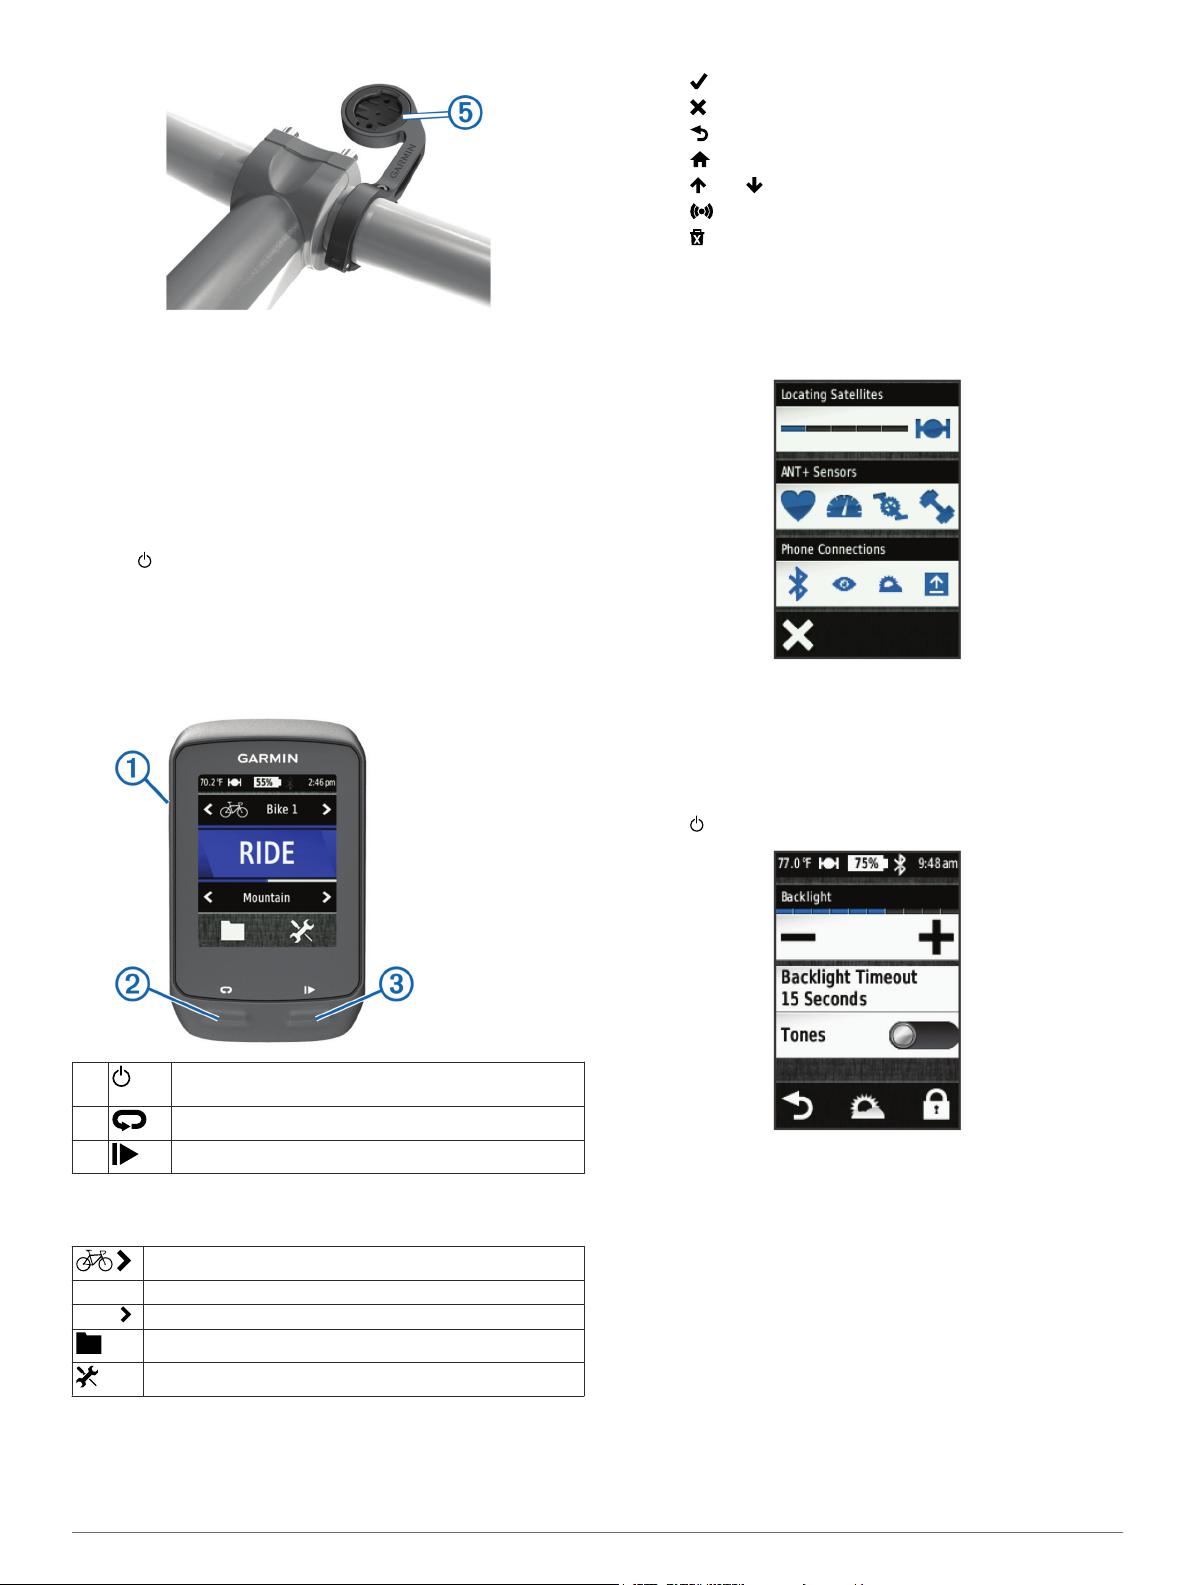
Keys
• Select to save your changes and close the page.
• Select to close the page and return to the previous page.
• Select to return to the previous page.
• Select to return to the home screen.
• Select and to scroll.
• Select to view the connections page.
• Select to delete an item.
Viewing the Connections Page
The connections page displays the status of the satellite
signals, ANT+ sensors, and your smartphone.
From the home screen, select the status bar at the top of the
page.
The connections page appears. A flashing icon means the
device is searching. You can select any icon to change the
settings.
Using the Backlight
• At any time, select anywhere on the screen to turn on the
backlight.
• Select to adjust the backlight brightness and timeout.
À
Á
Â
Home Screen Overview
The home screen gives you quick access to all the features of
the Edge.
RIDE Select to go for a ride.
Road Select to change your activity profile.
Using the Touchscreen
• When the timer is running, tap the screen to view the timer
overlay.
The timer overlay allows you to use the settings and search
features during a ride.
2 Introduction
Select to turn the backlight on and off.
Hold to turn the device on and off.
Select to mark a new lap.
Select to start and stop the timer.
Select to change your bike profile.
Select to manage your history, courses, and workouts.
Select to view the setup menu.
Acquiring Satellite Signals
Before you can use the GPS tracking and navigation features,
you must acquire satellite signals.
The device may need a clear view of the sky to acquire satellite
signals. The time and date are set automatically based on the
GPS position.
Go outdoors to an open area.
1
The front of the device should be oriented toward the sky.
From the home screen, select RIDE.
2
Wait while the device locates satellites.
3
It may take 30–60 seconds to locate satellite signals.
TIP: Do not begin moving until the timer page appears
(page 3).
Page 7
Training
Each time you reach the alert value, a message appears. The
device also beeps if audible tones are turned on (page 11).
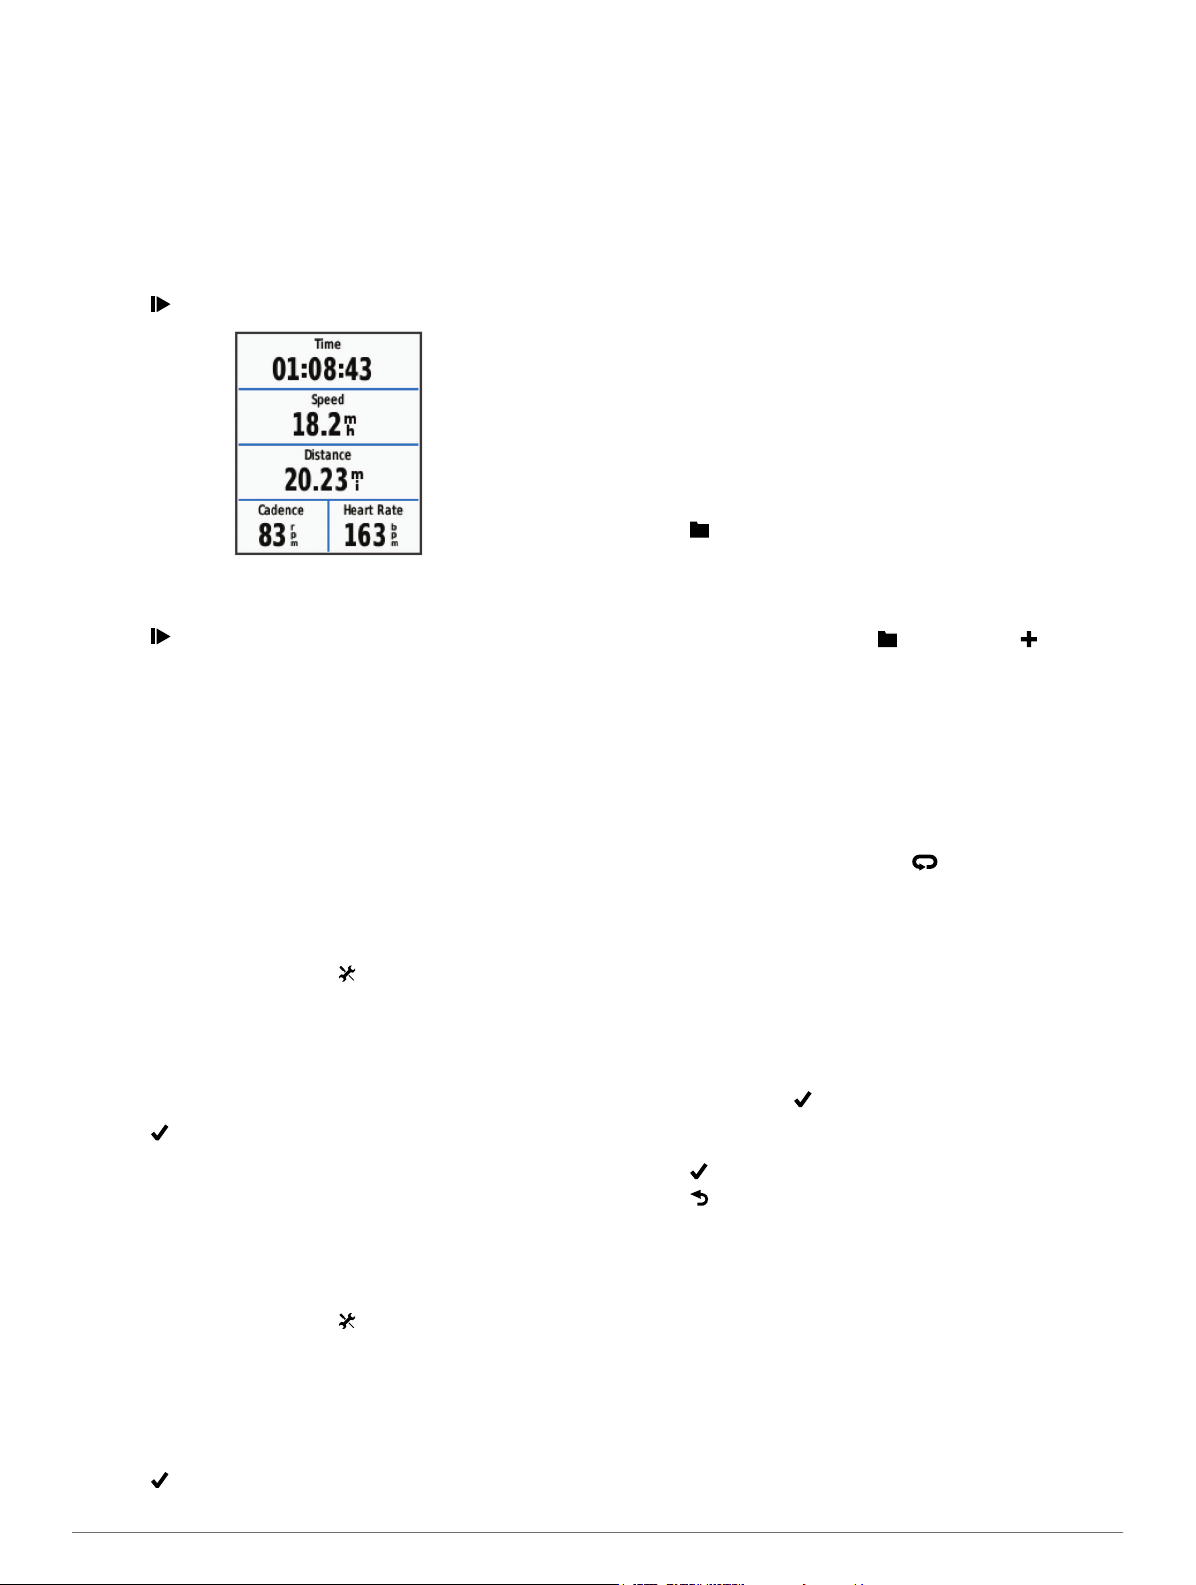
Going for a Ride
Before you can record speed and distance, you must locate
satellite signals (page 2) or pair your device with an optional
ANT+ sensor.
NOTE: History is recorded only while the timer is running.
From the home screen, select RIDE.
1
Wait while the device locates satellites.
2
Select to start the timer.
3
Swipe the screen for additional data pages.
4
If necessary, tap the screen to view the timer overlay.
5
Select to stop the timer.
6
Select Save.
7
Alerts
You can use alerts to train toward specific time, distance,
calorie, heart rate, cadence, and power goals. Alert settings are
saved with your activity profile.
Setting Range Alerts
If you have an optional heart rate monitor, GSC 10, or power
meter, you can set up range alerts. A range alert notifies you
any time the device is above or below a specified range of
values. For example, you can set the device to alert you when
your heart rate is below 60 beats per minute (bpm) and over
210 bpm. You can also use a training zone (page 5) for the
range alert.
From the home screen, select > Activity Profiles.
1
Select a profile.
2
Select Alerts.
3
Select Heart Rate, Cadence, or Power.
4
Turn on the alert.
5
Enter the minimum and maximum values or select a zone.
6
Select .
7
Each time you exceed or drop below the specified range, a
message appears. The device also beeps if audible tones are
turned on (page 11).
Setting a Recurring Alert
A recurring alert notifies you every time the device records a
specified value or interval. For example, you can set the device
to alert you every 30 minutes.
From the home screen, select > Activity Profiles.
1
Select an activity profile.
2
Select Alerts.
3
Select Time, Distance, or Calorie.
4
Turn on the alert.
5
Enter a value.
6
Select .
7
Workouts
You can create custom workouts that include goals for each
workout step and for varied distances, times, and calories. You
can create workouts using Garmin Connect, and transfer them
to your device. You can also create and save a workout directly
on your device.
You can schedule workouts using Garmin Connect. You can
plan workouts in advance and store them on your device.
Following a Workout From the Web
Before you can download a workout from Garmin Connect, you
must have a Garmin Connect account (page 7).
Connect the device to your computer.
1
Go to www.garminconnect.com/workouts.
2
Create a new workout.
3
Select Send to Device.
4
Disconnect the device, and turn it on.
5
Select > Workouts.
6
Select the workout.
7
Select Do Workout.
8
Creating a Workout
From the home screen, select > Workouts > .
1
A new workout appears. The first step is open by default,
and it can be used as a warmup step.
Select Name, and enter a workout name.
2
Select Add New Step.
3
Select a step, and select Edit Step.
4
Select Duration to specify how the step is measured.
5
For example, select Distance to end the step after a specific
distance.
If you select Open, you can select at anytime to end the
step.
If necessary, enter a value in the field below Duration.
6
Select Target to choose your goal during the step.
7
For example, select Heart Rate to maintain a consistent
heart rate during the step.
If necessary, select a target zone or enter a custom range.
8
For example, you can select a heart rate zone. Each time
you exceed or drop below the specified heart rate, the device
beeps and displays a message.
If necessary, select in the Rest Lap field.
9
During a rest lap, the timer continues to run and data is
recorded.
Select to save the step.
10
Select to save the workout.
11
Repeating Workout Steps
Before you can repeat a workout step, you must create a
workout with at least one step.
Select Add New Step.
1
Select Duration.
2
Select an option:
3
• Select Repeat to repeat a step one or more times. For
example, you can repeat a 5-mile step ten times.
• Select Repeat Until to repeat a step for a specific
duration. For example, you can repeat a 5-mile step for 60
minutes or until your heart rate reaches 160 bpm.
Select Back to Step, and select a step to repeat.
4
Training 3
Page 8

Select to save the step.
5
Starting a Workout
From the home screen, select > Workouts.
1
Select a workout.
2
Select Do Workout.
3
After you begin a workout, the device displays each step of the
workout, the target (if any), and current workout data. An
audible alarm sounds when you are about to finish a workout
step. A message appears, counting down the time or distance
until a new step begins.
Stopping a Workout
• At any time, select to end a workout step.
• At any time, select to stop the timer.
• At any time, select > > Workouts > Stop Workout to
end the workout.
Editing a Workout
From the home screen, select > Workouts.
1
Select a workout.
2
Select .
3
Select a step, and select Edit Step.
4
Change the step attributes, and select .
5
Select to save the workout.
6
Deleting a Workout
From the home screen, select > Workouts.
1
Select a workout.
2
Select > > .
3
Using Virtual Partner
Your Virtual Partner is a training tool designed to help you meet
your goals.
Go for a ride.
1
Scroll to the Virtual Partner page to see who is leading.
2
If necessary, use and to adjust the speed of the Virtual
3
Partner during your ride.
®
Courses
Following a previously recorded activity: You can follow a
saved course simply because it is a good route. For
example, you can save and follow a bike friendly commute to
work.
Racing against a previously recorded activity: You can also
follow a saved course, trying to match or exceed previously
set performance goals. For example, if the original course
was completed in 30 minutes, you can race against a Virtual
Partner trying to complete the course in under 30 minutes.
Following an existing ride from Garmin Connect: You can
send a course from Garmin Connect to your device. Once it
is saved to your device, you can follow the course or race
against the course.
Creating a Course on Your Device
Before you can create a course, you must have history with
GPS track data saved to your device.
From the home screen, select > Courses > .
1
Select an activity on which to base your course.
2
Enter a name for the course.
3
Select .
4
The course appears in the list.
Select the course, and review the course data.
5
If necessary, select Settings to edit the course features.
6
For example, you can change the name of the course or turn
on Virtual Partner.
Select > RIDE.
7
Following a Course From the Web
Before you can download a course from Garmin Connect, you
must have a Garmin Connect account (page 7).
Connect the device to your computer.
1
Go to www.garminconnect.com.
2
Create a new course or select an existing course.
3
Select Send to Device.
4
Disconnect the device, and turn it on.
5
Select > Courses.
6
Select the course.
7
Select RIDE.
8
Tips for Training with Courses
• If you include a warmup, select to begin the course, and
warm up as normal.
• Stay away from your course path as you warm up. When you
are ready to begin, head toward your course. When you are
on any part of the course path, a message appears.
NOTE: As soon as you select , your Virtual Partner starts
the course and does not wait for you to warm up.
• Scroll to the map to view the course map.
If you stray from the course, the device displays a message.
Changing the Course Speed
From the home screen, select > Courses.
1
Select a course.
2
Select RIDE.
3
Scroll to the Virtual Partner page.
4
Use or to adjust the percentage of time to complete the
5
course.
For example, to improve your course time by 20%, enter a
course speed of 120%. You will race against the Virtual
Partner to finish a 30-minute course in 24 minutes.
Stopping a Course
Tap the screen to view the timer overlay.
1
Select > Courses > Stop Course.
2
Deleting a Course
From the home screen, select > Courses.
1
Select a course.
2
Select > .
3
Personal Records
When you complete a ride, the device displays any new
personal records you achieved during that ride. Personal
4 Training
Page 9

records include your fastest time over a standard distance,
longest ride, and most ascent gained during a ride.
Restoring Your Personal Records
You can revert a personal record back to the previous saved
record.
From the home screen, select > Personal Records.
1
Select .
2
Select a record, and select .
3
NOTE: This does not delete any saved activities.
Training Zones
• Heart rate zones (page 5)
• Power zones (page 6)
• Speed zones (page 5)
Setting Your Speed Zones
Your device contains several different speed zones, ranging
from very slow to your maximum speed. The values for the
zones are default values and may not match your personal
abilities. You can customize your zones on the device or using
Garmin Connect.
From the home screen, > Training Zones > Speed.
1
Select a zone.
2
You can enter a custom name for the zone.
Enter the minimum and maximum speed values.
3
Repeat steps 2–3 for each zone.
4
ANT+ Sensors
Your device can be used with wireless ANT+ sensors. For more
information about compatibility and purchasing optional
sensors, go to http://buy.garmin.com.
Putting On the Heart Rate Monitor
NOTE: If you do not have a heart rate monitor, you can skip this
task.
You should wear the heart rate monitor directly on your skin,
just below your breastplate. It should be snug enough to stay in
place during your activity.
Snap the heart rate monitor module À onto the strap.
1
The Garmin logos (on the module and the strap) should be
right-side up.
Wet the electrodes Á on the back of the strap to create a
2
strong connection between your chest and the transmitter.
If the heart rate monitor has a contact patch Â, wet the
3
contact patch.
Wrap the strap around your chest, and connect the strap
4
hook à to the loop Ä.
The
Garmin logos should be right-side up.
Bring the device within 10 ft. (3 m) of the heart rate monitor.
5
After you put on the heart rate monitor, it is active and sending
data.
Setting Your Heart Rate Zones
The device uses your user profile information from the initial
setup to determine your heart rate zones. You can manually
adjust the heart rate zones according to your fitness goals
(page 5). For the most accurate calorie data during your
activity, set your maximum heart rate, minimum heart rate,
resting heart rate, and heart rate zones.
From the home screen, select > Training Zones > Heart
1
Rate.
Enter your maximum, minimum, and resting heart rate
2
values.
The zone values update automatically, but you can also edit
each value manually.
Select Based On:.
3
Select an option:
4
• Select BPM to view and edit the zones in beats per
minute.
• Select % Max. to view and edit the zones as a percentage
of your maximum heart rate.
• Select % HRR to view and edit the zones as a percentage
of your resting heart rate.
About Heart Rate Zones
Many athletes use heart rate zones to measure and increase
their cardiovascular strength and improve their level of fitness. A
heart rate zone is a set range of heartbeats per minute. The five
commonly accepted heart rate zones are numbered from 1 to 5
according to increasing intensity. Generally, heart rate zones
are calculated based on percentages of your maximum heart
rate.
Fitness Goals
Knowing your heart rate zones can help you measure and
improve your fitness by understanding and applying these
principles.
• Your heart rate is a good measure of exercise intensity.
• Training in certain heart rate zones can help you improve
cardiovascular capacity and strength.
• Knowing your heart rate zones can prevent you from
overtraining and can decrease your risk of injury.
If you know your maximum heart rate, you can use the table
(page 14) to determine the best heart rate zone for your
fitness objectives.
If you do not know your maximum heart rate, use one of the
calculators available on the Internet. Some gyms and health
centers can provide a test that measures maximum heart rate.
Installing the GSC 10
NOTE: If you do not have a GSC 10, you can skip this task.
ANT+ Sensors 5
Page 10

Both magnets must be aligned with their respective indication
lines for the Edge to receive data.
Place the GSC 10 on the rear chain stay (on the side
1
opposite the drive train).
If necessary, place the flat rubber pad À or the triangle-
2
shaped rubber pad between the GSC 10 and the chain stay
for stability.
Loosely attach the GSC 10 using two cable ties Á.
3
Attach the pedal magnet  to the crank arm using the
4
adhesive mount and a cable tie
The pedal magnet must be within 5 mm of the GSC 10. The
indication line Ä on the pedal magnet must line up with the
indication line Å on the GSC 10.
Unscrew the spoke magnet Æ from the plastic piece.
5
Place the spoke in the groove of the plastic piece, and
6
tighten it slightly.
The spoke magnet can face away from the GSC 10 if there is
not enough room between the sensor arm and the spoke.
The spoke magnet must line up with the indication line Ç on
the sensor arm.
Loosen the screw È on the sensor arm.
7
Move the sensor arm to within 5 mm of the spoke magnet.
8
You can also tilt the GSC 10 closer to either magnet to
improve alignment.
Select Reset É on the GSC 10.
9
The LED turns red, then green.
Pedal to test the sensor alignment.
10
.
Ã
The red LED blinks each time the pedal magnet passes the
sensor. The green LED blinks each time the spoke magnet
passes the sensor arm.
NOTE: The LED blinks for the first 60 passes after a reset.
Select Reset again if you require additional passes.
When everything is aligned and working correctly, tighten the
11
cable ties, the sensor arm, and the spoke magnet.
Garmin recommends that the torque is 1.9 to 2.4 lbf-in. (0.21
to 0.27 N-m) to ensure a water tight seal on the GSC 10
sensor arm.
About the GSC 10
Cadence data from the GSC 10 is always recorded. If there is
no GSC 10 paired, GPS data is used to calculate the speed and
distance.
Cadence is your rate of pedaling or “spinning” measured by the
number of revolutions of the crank arm per minute (rpm). There
are two sensors on the GSC 10: one for cadence and one for
speed.
Data Averaging for Cadence or Power
The non-zero data-averaging setting is available if you are
training with an optional cadence sensor or power meter. The
default setting is to exclude zero values that occur when you are
not pedaling.
To change this setting, see page 8.
Training with Power Meters
• Go to www.garmin.com/intosports for a list of third-party
ANT+ sensors that are compatible with your device.
• For more information, see the owner's manual for your power
meter.
• Adjust your power zones to match your goals and abilities
(page 6).
• Use range alerts to be notified when you reach a specified
power zone (page 3).
• Customize the power data fields (page 9).
Setting Your Power Zones
The values for the zones are default values and may not match
your personal abilities. You can manually adjust your zones on
the device or using Garmin Connect. If you know your functional
threshold power (FTP) value, you can enter it and allow the
software to calculate your power zones automatically.
From the home screen, select > Training Zones >
1
Power.
Enter your FTP value.
2
Select Based On:.
3
Select an option:
4
• Select Watts to view and edit the zones in watts.
• Select % FTP to view and edit the zones as a percentage
of your functional threshold power.
Calibrating Your Power Meter
Before you can calibrate your power meter, it must be properly
installed, paired with your GPS device, and actively recording
data.
For calibration instructions specific to your power meter, refer to
the manufacturer's instructions.
From the home screen, select .
1
Select Bike Profiles.
2
Select a profile.
3
Select > Calibrate.
4
Keep your power meter active by pedaling until the message
5
appears.
6 ANT+ Sensors
Page 11

Follow the on-screen instructions.
6
Sending Your Ride to Garmin Connect
Pairing Your ANT+ Sensors
Before you can pair, you must put on the heart rate monitor or
install the sensor.
Pairing is the connecting of ANT+ wireless sensors, for
example, connecting a heart rate monitor with your Garmin
device.
Bring the device within range (3 m) of the sensor.
1
NOTE: Stay 10 m away from other ANT+ sensors while
pairing.
From the home screen, select > Bike Profiles
2
Select a profile.
3
Select a sensor.
4
Enable the sensor, and select Search.
5
When the sensor is paired with your device, the sensor
status is Connected. You can customize a data field to
display sensor data.
Pairing a Heart Rate Monitor
Before you can pair, you must put on the heart rate monitor.
Bring the device within range (3 m) of the heart rate monitor.
1
NOTE: Stay 10 m away from other ANT+ sensors while
pairing.
Select > Heart Rate > Enable > Search.
2
When the heart rate monitor is paired with your device, the
sensor status is Connected.
Using the Weight Scale
If you have an ANT+ compatible weight scale, the device can
read the data from the weight scale.
From the home screen, select > Weight Scale.
1
A message appears when the weight scale is found.
Stand on the scale when indicated.
2
NOTE: If using a body composition scale, remove shoes and
socks to ensure that all body composition parameters are
read and recorded.
Step off the scale when indicated.
3
TIP: If an error occurs, step off the scale. Step on when
indicated.
NOTICE
To prevent corrosion, thoroughly dry the mini-USB port, the
weather cap, and the surrounding area before charging or
connecting to a computer.
Pull up the weather cap À from the mini-USB port Á.
1
Plug the small end of the USB cable into the mini-USB port.
2
Plug the large end of the USB cable into a computer USB
3
port.
Go to www.garminconnect.com/start.
4
Follow the on-screen instructions.
5
Garmin Connect
Connect with your friends on Garmin Connect. Garmin Connect
gives you the tools to track, analyze, share, and encourage
each other. Record the events of your active lifestyle including
runs, walks, rides, swims, hikes, triathlons, and more. To sign
up for a free account, go to www.garminconnect.com/start.
Store your activities: After you complete and save an activity
with your device, you can upload that activity to Garmin
Connect and keep it as long as you want.
Analyze your data: You can view more detailed information
about your activity, including time, distance, elevation, heart
rate, calories burned, an overhead map view, pace and
speed charts, and customizable reports.
History
History includes time, distance, calories, speed, lap data,
elevation, and optional ANT+ sensor information.
NOTE: History is not recorded while the timer is stopped or
paused.
When the device memory is full, a message appears. The
device does not automatically delete or overwrite your history.
Upload your history to Garmin Connect periodically to keep
track of all your ride data.
Viewing Your Ride
From the home screen, select > Rides.
1
Select Last Ride or All Rides.
2
Select an option.
3
Viewing Data Totals
You can view the accumulated data you have saved to the
Edge, including the number of rides, time, distance, and
calories.
From the home screen, select > Totals.
History 7
Plan your training: You can choose a fitness goal and load
one of the day-by-day training plans.
Share your activities: You can connect with friends to follow
each other's activities or post links to your activities on your
favorite social networking sites.
Connected Features
The Edge has several connected features for your compatible
Bluetooth® enabled smartphone. For more information about
how to use your Edge, go to www.garmin.com/intosports/apps.
NOTE: Your Edge must be connected to your Bluetooth
enabled smartphone to take advantage of these features.
LiveTrack: Allows friends and family to follow your races and
training activities in real time. You can invite followers using
email or social media, allowing them to view your live data on
a Garmin Connect tracking page.
Activity upload to Garmin Connect: Automatically sends your
activity to Garmin Connect as soon as you finish recording
the activity.
Course and workout downloads from Garmin Connect:
Allows you to search for activities on Garmin Connect using
Page 12

your smartphone and send them to your device so you can
repeat them as a course or workout.
Social media interactions: Allows you to post an update to
your favorite social media website when you upload an
activity to Garmin Connect.
Weather updates: Sends real-time weather conditions and
alerts to your device.
Pairing an Edge with Your Smartphone
You can pair the Edge with an Apple® or Android™ smartphone
with the Garmin Connect Mobile application installed to use
connected features.
Place the smartphone and the Edge within 33 ft. (10 m) of
1
each other.
On the Edge, select > Bluetooth > Enable > Pair
2
Smartphone.
On the smartphone, enable Bluetooth.
3
A list of nearby Bluetooth devices appears.
Select the Edge from the list.
4
Confirm that the same passkey appears on both the Edge
5
and the smartphone.
You can now enable connected features using Garmin Connect
Mobile.
Sending a Ride to Your Smartphone
Before you can send a ride to your smartphone, you must install
and open the Garmin Connect Mobile application on your
smartphone and pair your device with your smartphone
(page 9).
From the home screen, select > Rides.
1
Select a ride.
2
Select .
3
Deleting History
From the home screen, select > Delete.
1
Select an option:
2
• Select All Rides to delete all saved activities from the
history.
• Select Old Rides to delete activities recorded more than
one month ago.
• Select All Totals to reset all distance and time totals.
NOTE: This does not delete any saved activities.
• Select All Courses to delete all courses you have saved
or transferred to the device.
• Select All Workouts to delete all workouts you have
saved or transferred to the device.
• Select All Personal Records to delete all personal
records saved to the device.
NOTE: This does not delete any saved activities.
Select .
3
Data Recording
The device uses smart recording. It records key points where
you change direction, speed, or heart rate.
When a power meter is paired, the device records points every
second. Recording points every second provides an extremely
detailed track, and uses more of the available memory.
For information about data averaging for cadence and power,
see page 6.
Data Recording Settings
Select > System > Data Recording.
Recording Interval: Controls how the device records activity
data. Smart records key points where you change direction,
speed, or heart rate. 1 Sec. records points every second. It
creates a very detailed record of your activity and increases
the size of the activity.
Data Averaging: Controls whether the device includes zero
values for cadence and power data that occur when you are
not pedaling.
Data Management
NOTE: The device is not compatible with Windows® 95, 98,
Me, Windows NT®, and Mac® OS 10.3 and earlier.
Connecting the Device to Your Computer
NOTICE
To prevent corrosion, thoroughly dry the mini-USB port, the
weather cap, and the surrounding area before charging or
connecting to a computer.
Pull up the weather cap from the mini-USB port.
1
Plug the small end of the USB cable into the mini-USB port.
2
Plug the large end of the USB cable into a computer USB
3
port.
Your device appears as a removable drive in My Computer
on Windows computers and as a mounted volume on Mac
computers.
Transferring Files to Your Device
Connect the device to your computer (page 8).
1
Your device and memory card (optional) appear as
removable drives in My Computer on Windows computers
and as mounted volumes on Mac computers.
NOTE: Some computers with multiple network drives cannot
display device drives. See your operating system help file to
learn how to map the drive.
On your computer, open the file browser.
2
Select a file.
3
Select Edit > Copy.
4
Open the Garmin or memory card drive or volume.
5
Select Edit > Paste.
6
The file appears in the list of files in the device memory or on
the memory card.
Deleting Files
NOTICE
If you do not know the purpose of a file, do not delete it. Your
device memory contains important system files that should not
be deleted.
Open the Garmin drive or volume.
1
If necessary, open a folder or volume.
2
Select a file.
3
Press the Delete key on your keyboard.
4
Disconnecting the USB Cable
If your device is connected to your computer as a removable
drive or volume, you must safely disconnect your device from
your computer to avoid data loss. If your device is connected to
your Windows computer as a portable device, it is not
necessary to safely disconnect.
Complete an action:
1
• For Windows computers, select the Safely Remove
Hardware icon in the system tray, and select your device.
• For Mac computers, drag the volume icon to the trash.
Disconnect the cable from your computer.
2
8 History
Page 13

Customizing Your Device
Profiles
The Edge has several ways for you to customize the device
including profiles. Profiles are a collection of settings that
optimize your device based on how you are using it. For
example, you can create different settings and views for training
and mountain biking.
When you are using a profile and you change settings such as
data fields or units of measurement, the changes are saved
automatically as part of the profile.
Bike Profiles: You can create bike profiles for each bike you
own. The bike profile includes optional ANT+ sensors, bike
weight, wheel size, odometer value, and crank length.
Activity Profiles: You can create activity profiles for each type
of biking. For example, you can have a profile for training,
racing, and mountain biking. The activity profile includes
customized data pages, alerts, training zones (such as heart
rate and speed), training settings (such as Auto Pause and
Auto Lap), and navigation settings.
User Profile: You can update your gender, age, weight, height,
and lifetime athlete settings. The device uses this information
to calculate accurate ride data.
Updating Your Bike Profile
You can customize 10 bike profiles. The device uses the bike
weight, odometer value, wheel size, and crank length to
calculate accurate ride data.
From the home screen, select > Bike Profiles.
1
Select an option:
2
• Select a profile.
• Select to add a new profile.
Select the name of the bike.
3
If necessary, edit the name, color, and image for the profile.
4
If you are using a speed and cadence sensor or power
5
sensor, select an option:
• Select Wheel Size > Automatic to calculate your wheel
size using GPS distance.
• Select Wheel Size > Custom to enter your wheel size.
For a table of wheel sizes and circumferences, see
page 14.
• Select Crank Length > Automatic to calculate your
crank length using GPS distance.
• Select Crank Length > Custom to enter your crank
length.
Any changes you make are saved to the active profile.
Updating Your Activity Profile
You can customize five activity profiles. You can customize your
settings and data fields for a particular activity or trip.
From the home screen, select > Activity Profiles.
1
Select an option:
2
• Select a profile.
• Select to add a new profile.
If necessary, edit the name and background image for the
3
profile.
Select an option:
4
• Select Training Pages to customize the data pages and
data fields (page 9).
• Select Alerts to customize your training alerts (page 3).
• Select Auto Pause to change when the timer
automatically pauses (page 9).
• Select Auto Lap to set how laps are triggered
(page 10).
• Select Auto Scroll to customize the display of the training
data pages when the timer is running (page 10).
All changes you make are saved to the active profile.
Setting Up Your User Profile
You can update your gender, age, weight, height, and lifetime
athlete settings. The device uses this information to calculate
accurate ride data.
From the home screen, select > User Profile.
1
Select an option.
2
About Lifetime Athletes
A lifetime athlete is an individual who has trained intensely for
many years (with the exception of minor injuries) and has a
resting heart rate of 60 beats per minute (bpm) or less.
Bluetooth Settings
Select > Bluetooth.
Enable: Enables Bluetooth wireless technology.
NOTE: Other Bluetooth settings appear only when Bluetooth
is enabled.
Friendly Name: Allows you to enter a friendly name that
identifies your devices with Bluetooth wireless technology.
Pair Smartphone: Connects your device with a compatible
Bluetooth-enabled smartphone.
About Training Settings
The following options and settings allow you to customize your
device based on your training needs. These settings are saved
to an activity profile. For example, you can set time alerts for
your racing profile and you can set an Auto Lap® position
trigger for your mountain biking profile.
Customizing the Data Pages
You can customize data pages for each activity profile (page 9).
From the home screen, select > Activity Profiles.
1
Select a profile.
2
Select Training Pages.
3
Select a data page.
4
If necessary, enable the data page.
5
Select the number of data fields you want to see on the
6
page.
Select .
7
Select a data field to change it.
8
Select .
9
Using Auto Pause
You can use Auto Pause® to pause the timer automatically
when you stop moving or when your speed drops below a
specified value. This feature is helpful if your ride includes stop
lights or other places where you need to slow down or stop.
NOTE: History is not recorded while the timer is stopped or
paused.
From the home screen, select > Activity Profiles.
1
Select a profile.
2
Select Auto Pause > Auto Pause Mode.
3
Select an option:
4
• Select When Stopped to pause the timer automatically
when you stop moving.
• Select Custom Speed to pause the timer automatically
when your speed drops below a specified value.
If necessary, customize optional time data fields (page 9).
5
Customizing Your Device 9
Page 14

The Time - Elapsed data field displays the entire time
including paused time.
Marking Laps by Position
You can use Auto Lap to automatically mark the lap at a specific
position. This feature is helpful for comparing your performance
over different parts of a ride (for example, a long climb or
training sprints). During courses, use the By Position option to
trigger laps at all of the lap positions saved in the course.
From the home screen, select > Activity Profiles.
1
Select a profile.
2
Select Auto Lap > Auto Lap Trigger > By Position > Lap
3
At.
Select an option:
4
• Select Lap Press Only to trigger the lap counter each
time you select and each time you pass any of those
locations again.
• Select Start and Lap to trigger the lap counter at the GPS
location where you select and at any location during
the ride where you select .
• Select Mark and Lap to trigger the lap counter at a
specific GPS location marked before the ride and at any
location during the ride where you select .
If necessary, customize the lap data fields (page 9).
5
Marking Laps by Distance
You can use Auto Lap to automatically mark the lap at a specific
distance. This feature is helpful for comparing your performance
over different parts of a ride (for example, every 10 miles or 40
kilometers).
From the home screen, select > Activity Profiles.
1
Select a profile.
2
Select Auto Lap > Auto Lap Trigger > By Distance > Lap
3
At.
Enter a value.
4
If necessary, customize the lap data fields (page 9).
5
Using Auto Scroll
You can use the auto scroll feature to automatically cycle
through all of the training data pages while the timer is running.
From the home screen, select > Activity Profiles.
1
Select a profile.
2
Select Auto Scroll > Auto Scroll Speed.
3
Select a display speed.
4
Changing the Start Notice
This feature automatically detects when your device has
acquired satellites and is moving. It is a reminder to start the
timer so you can record your ride data.
From the home screen, select > Activity Profiles.
1
Select a profile.
2
Select Start Notice > Start Notice Mode.
3
Select an option:
4
• Select Once.
• Select Repeat > Repeat Delay to change the amount of
time to delay the reminder.
System Settings
Select > System.
• GPS Settings (page 10)
• Display Settings (page 10)
• Data Recording Settings (page 8)
• Unit Settings (page 11)
• Configuration Settings (page 11)
• Language Settings (page 11)
• Tone Settings (page 11)
GPS Settings
Training Indoors
You can turn GPS off when you are training indoors or to save
battery life.
From the home screen, select > System > GPS > GPS
Mode > Off.
When GPS is off, speed and distance are not available unless
you have an optional sensor that sends speed and distance
data to the device (such as the GSC 10). The next time you turn
on the device, it will search for satellite signals again.
Setting Your Elevation
If you have accurate elevation data for your present location,
you can manually calibrate the altimeter on your device.
From the home screen, select > System > GPS > Set
1
Elevation.
Enter the elevation, and select .
2
Viewing Satellites
The satellite page shows your current GPS satellite information.
For more information about GPS, go to www.garmin.com
/aboutGPS.
From the home screen, select > System > GPS > View
Satellites.
GPS accuracy appears at the bottom of the page. The green
bars represent the strength of each satellite signal received (the
number of the satellite appears below each bar).
Changing the Satellite Settings
By default, the Edge connects to GPS and GLONASS satellites
for increased performance in challenging environments and
faster position acquisition. You can set the device to use only
GPS satellites to increase battery life.
From the home screen, select > System > GPS > GPS
1
Mode.
Select an option:
2
• For increased performance, select GPS+GLONASS.
• For increased battery life, select GPS Only.
Display Settings
Select > System > Display.
Backlight Timeout: Adjusts the length of time before the
backlight turns off (page 2).
Color Mode: Sets the device to display day or night colors. You
can select Auto to allow the device to automatically set day
or night colors based on the time of day.
Screen Capture: Allows you to save the image on the device
screen.
Calibrate Screen: Aligns the screen to properly respond to
touches (page 12).
Data Recording Settings
Select > System > Data Recording.
Recording Interval: Controls how the device records activity
data. Smart records key points where you change direction,
speed, or heart rate. 1 Sec. records points every second. It
creates a very detailed record of your activity and increases
the size of the activity.
Data Averaging: Controls whether the device includes zero
values for cadence and power data that occur when you are
not pedaling.
10 Customizing Your Device
Page 15

Changing the Units of Measure
You can customize units of measure for distance and speed,
elevation, temperature, weight, position format, and time format.
Select > System > Units.
1
Select a measurement type.
2
Select a unit of measure for the setting.
3
Changing the Configuration Settings
You can modify all of the settings you configured in the initial
setup.
Select > System > Device Reset > Initial Setup.
1
Follow the on-screen instructions.
2
Changing the Device Language
From the home screen, select > System > Language.
Setting the Device Tones
From the home screen, select > System > Tones.
Time Zones
Each time you turn on the device and acquire satellites, the
device automatically detects your time zone and the current
time of day.
Device Information
Specifications
Edge Specifications
Battery type Rechargable, built-in lithium-ion battery
Battery life 20 hours, GPS only
15 hours, GPS and GLONASS
6 hours, GPS and GLONASS with 100%
backlight
Water resistance IPX7
Operating
temperature range
Charging
temperature range
Bands (O-rings) for
the standard mount
From -4º to 158ºF (from -20º to 70ºC)
From 32º to 113ºF (from 0º to 45ºC )
Two sizes:
• AS568-125
Inner diameter: 1.3 in.
Outer diameter: 1.5 in.
Cross section: 0.1 in.
• AS568-131
Inner diameter: 1.7 in.
Outer diameter: 1.9 in.
Cross section: 0.1 in.
NOTE: Use Ethylene Propylene Diene Monomer
(EPDM) replacement bands only. Go to
http://buy.garmin.com, or contact your Garmin
dealer.
Water resistance Water resistant to 98.4 ft. (30 m)
NOTE: This product does not transmit heart rate
data while swimming.
Operating
temperature range
Radio frequency/
protocol
From 23° to 122°F (from -5° to 50°C)
2.4 GHz ANT+ wireless communications
protocol
GSC 10 Specifications
Battery type User-replaceable CR2032, 3 volts
Battery life Approximately 1.4 years (1 hour per day)
Water resistance IPX7
Operating temperature
range
Radio frequency/protocol 2.4 GHz ANT+ wireless communications
From 5º to 158ºF (from -15º to 70ºC)
protocol
Device Care
NOTICE
Do not store the device where prolonged exposure to extreme
temperatures can occur, because it can cause permanent
damage.
Never use a hard or sharp object to operate the touch screen,
or damage may result.
Avoid chemical cleaners and solvents that can damage plastic
components.
Secure the weather cap tightly to prevent damage to the miniUSB port.
Cleaning the Device
Wipe the device with a cloth dampened with a mild detergent
1
solution.
Wipe it dry.
2
Caring for the Heart Rate Monitor
NOTICE
You must unsnap and remove the module before cleaning the
strap.
A build up of sweat and salt on the strap can decrease the
ability of the heart rate monitor to report accurate data.
• Go to www.garmin.com/HRMcare for detailed washing
instructions.
• Rinse the strap after every use.
• Machine wash the strap after every seven uses.
• Do not put the strap in a dryer.
• When drying the strap, hang it up or lay it flat.
• To prolong the life of your heart rate monitor, unsnap the
module when not in use.
About IPX7
NOTICE
The device is water resistant to IEC Standard 60529 IPX7. It
can withstand immersion in 1 meter of water for 30 minutes.
Prolonged submersion can cause damage to the device. After
submersion, be certain to wipe dry and air dry the device before
using or charging.
Heart Rate Monitor Battery
WARNING
Do not use a sharp object to remove user-replaceable batteries.
Contact your local waste disposal department to properly
recycle the batteries. Perchlorate Material – special handling
may apply. Go to www.dtsc.ca.gov/hazardouswaste
/perchlorate.
Heart Rate Monitor Specifications
Battery type User-replaceable CR2032, 3 volts
Battery life Up to 4.5 years (1 hour per day)
Device Information 11
Replacing the Heart Rate Monitor Battery
Use a small Phillips screwdriver to remove the four screws
1
on the back of the module.
Remove the cover and battery.
2
Page 16

Wait 30 seconds.
3
Insert the new battery with the positive side facing up.
4
NOTE: Do not damage or lose the O-ring gasket.
Replace the back cover and the four screws.
5
After you replace the heart rate monitor battery, you must pair it
with the device again.
Replacing the GSC 10 Battery
Locate the circular battery cover À on the side of the GSC
1
10.
While holding your finger on the touchscreen, turn on the
3
device.
Select .
4
Maximizing Battery Life
• Decrease the backlight (page 12).
• Shorten the backlight timeout (page 12).
• Select the Smart recording interval (page 8).
• Turn on the Auto Power Down feature (page 12).
• Turn off the Bluetooth wireless feature (page 9).
• Select the GPS Only setting (page 10).
Decreasing the Backlight
Select to open the status page.
1
Use and to adjust the brightness.
2
Adjusting the Backlight Timeout
You can decrease the backlight timeout to maximize the battery
life.
Select > Backlight Timeout.
1
Select an option.
2
Using the Auto Power Down Feature
This feature automatically turns off the device after 15 minutes
of inactivity.
Select > System > Auto Power Down.
1
Select On.
2
Use a coin to twist the cover counter-clockwise until it is
2
loose enough to remove (the arrow points to unlocked).
Remove the cover and the battery Á.
3
Wait 30 seconds.
4
Insert the new battery with the positive side facing up.
5
NOTE: Do not damage or lose the O-ring gasket.
Use a coin to twist the cover clockwise back into place (the
6
arrow points to locked).
After you replace the GSC 10 battery, you must pair the GSC
10 with the device again.
Troubleshooting
Resetting the Device
If the device stops responding, you may need to reset it. This
does not erase any of your data or settings.
Hold for 10 seconds.
The device resets and turns on.
Clearing User Data
You can restore all of the device settings to the factory default
values.
NOTE: This deletes all user-entered information, but it does not
delete your history.
Turn off the device.
1
Place your finger on the top left corner of the touchscreen.
2
Calibrating the Touchscreen
From the home screen, select > System > Display >
1
Calibrate Screen.
Follow the on-screen instructions.
2
Locking the Touchscreen
You can lock the screen to prevent inadvertent screen touches.
Select .
1
Select .
2
Unlocking the Touchscreen
Select .
1
Select .
2
Getting More Information
You can find more information about this product on the Garmin
website.
• Go to www.garmin.com/intosports.
• Go to www.garmin.com/learningcenter.
• Go to http://buy.garmin.com, or contact your Garmin dealer
for information about optional accessories and replacement
parts.
Temperature Readings
The device may display temperature readings that are higher
than the actual air temperature if the device is placed in direct
sunlight, held in your hand, or is charging with an external
battery pack. Also, the device will take some time to adjust to
significant changes in temperature.
Viewing Device Information
You can view the unit ID, software version, and license
agreement.
From the home screen, select > System > About.
12 Troubleshooting
Page 17

Updating the Software
NOTE: Updating the software does not erase any of your data
or settings.
Connect your device to a computer using the USB cable.
1
Go to www.garmin.com/products/webupdater.
2
Follow the on-screen instructions.
3
Appendix
Registering Your Device
Help us better support you by completing our online registration
today.
• Go to http://my.garmin.com.
• Keep the original sales receipt, or a photocopy, in a safe
place.
Data Fields
Some data fields require ANT+ accessories to display data.
Balance: The current left/right power balance.
Balance - 10s Avg.: The 10-second moving average of the left/
right power balance.
Balance - 30s Avg.: The 30-second moving average of the left/
right power balance.
Balance - 3s Avg.: The three-second moving average of the
left/right power balance.
Balance - Avg.: The average left/right power balance for the
current activity.
Balance - Lap: The average left/right power balance for the
current lap.
Battery Level: The remaining battery power.
Cadence: The revolutions of the crank arm or strides per
minute. Your device must be connected to a cadence
accessory.
Cadence - Avg.: The average cadence for the current activity.
Cadence - Lap: The average cadence for the current lap.
Calories: The amount of total calories burned.
Calories - Fat: The amount of fat calories burned. Requires a
New Leaf® assessment.
Calories to Go: During a workout, the remaining calories when
you are using a calorie target.
Course Pt. Dist.: The remaining distance to the next point on
the course.
Dist. - Lap: The distance traveled for the current lap.
Dist. - Last Lap: The distance traveled for the last completed
lap.
Dist. to Dest.: The remaining distance to the final destination.
You must be navigating for this data to appear.
Dist. to Go: During a workout or course, the remaining distance
when you are using a distance target.
Dist. to Next: The remaining distance to the next waypoint on
the route. You must be navigating for this data to appear.
Distance: The distance traveled for the current track or activity.
Elevation: The altitude of your current location above or below
sea level.
ETA at Destination: The estimated time of day you will reach
the final destination (adjusted to the local time of the
destination). You must be navigating for this data to appear.
ETA at Next: The estimated time of day you will reach the next
waypoint on the route (adjusted to the local time of the
waypoint). You must be navigating for this data to appear.
GPS Accuracy: The margin of error for your exact location. For
example, your GPS location is accurate to within +/- 12 feet
(3.65 m).
GPS Signal Strength: The strength of the GPS satellite signal.
Grade: The calculation of rise (elevation) over run (distance).
For example, if for every 10 feet (3 m) you climb you travel
200 feet (60 m), the grade is 5%.
Heading: The direction you are moving.
Heart Rate: Your heart rate in beats per minute (bpm). Your
device must be connected to a compatible heart rate
monitor.
HR - %HRR: The percentage of heart rate reserve (maximum
heart rate minus resting heart rate).
HR - %Max.: The percentage of maximum heart rate.
HR - Avg.: The average heart rate for the current activity.
HR - Avg. %HRR: The average percentage of heart rate
reserve (maximum heart rate minus resting heart rate) for the
current activity.
HR - Avg. %Max.: The average percentage of maximum heart
rate for the current activity.
HR - Lap: The average heart rate for the current lap.
HR - Lap %HRR: The average percentage of heart rate reserve
(maximum heart rate minus resting heart rate) for the current
lap.
HR - Lap %Max.: The average percentage of maximum heart
rate for the current lap.
HR - Last Lap: The average heart rate for the last completed
lap.
HR to Go: During a workout, the amount you are above or
below the heart rate target.
HR Zone: The current range of heart rate (1 to 5). The default
zones are based on your user profile, maximum heart rate,
and resting heart rate.
Laps: The number of laps completed for the current activity.
Location at Dest.: The last point on the route or course.
Location at Next: The next point on the route or course.
Odometer: A running tally of distance traveled for all trips. This
total does not clear when resetting the trip data.
Power: The current power output in watts.
Power - %FTP: The current power output as a percentage of
functional threshold power.
Power - 10s Avg.: The 10-second moving average of power
output.
Power - 30s Avg.: The 30-second moving average of power
output.
Power - 3s Avg.: The three-second moving average of power
output.
Power - Avg.: The average power output for the current activity.
Power - IF: The Intensity Factor™ for the current activity.
Power - kj: The accumulated work performed (power output) in
kilojoules.
Power - Lap: The average power output for the current lap.
Power - Last Lap: The average power output for the last
completed lap.
Power - Max.: The top power output for the current activity.
Power - NP: The Normalized Power™ for the current activity.
Power - NP Lap: The average Normalized Power for the
current lap.
Power - NP Last Lap: The average Normalized Power for the
last completed lap.
Appendix 13
Page 18

Power - TSS: The Training Stress Score™ for the current
activity.
Power - Watts/kg: The amount of power output in watts per
kilogram.
Power Zone: The current range of power output (1 to 7) based
on your FTP or custom settings.
Reps to Go: During a workout, the remaining repetitions.
Speed: The current rate of travel.
Speed - Avg.: The average speed for the current activity.
Speed - Lap: The average speed for the current lap.
Speed - Last Lap: The average speed for the last completed
lap.
Speed - Max.: The top speed for the current activity.
Speed Zone: The current range of speed (1 to 10). Zones can
be set in Garmin Connect.
Sunrise: The time of sunrise based on your GPS position.
Sunset: The time of sunset based on your GPS position.
Temperature: The temperature of the air. Your body
temperature affects the temperature sensor.
Time: The stopwatch time for the current activity.
Time - Avg. Lap: The average lap time for the current activity.
Time - Elapsed: The total time recorded. For example, if you
start the timer and run for 10 minutes, then stop the timer for
5 minutes, then start the timer and run for 20 minutes, your
elapsed time is 35 minutes.
Time - Lap: The stopwatch time for the current lap.
Time - Last Lap: The stopwatch time for the last completed lap.
Time of Day: The current time of day based on your current
location and time settings (format, time zone, daylight saving
time).
Time to Dest.: The estimated time remaining before you reach
the destination. You must be navigating for this data to
appear.
Time to Go: During a workout, the remaining time when you are
using a time target.
Time to Next: The estimated time remaining before you reach
the next waypoint in the route. You must be navigating for
this data to appear.
Time to Sunrise: The estimated time remaining before sunrise.
Time to Sunset: The estimated time remaining before sunset.
Total Ascent: The total elevation distance ascended since the
last reset.
Total Descent: The total elevation distance descended since
the last reset.
Vertical Speed: The rate of ascent or descent over time.
VS - 30S Avg.: The 30-second moving average of vertical
speed.
Heart Rate Zone Calculations
Zone % of
Maximum
Heart Rate
1 50–60% Relaxed, easy pace,
2 60–70% Comfortable pace,
Perceived Exertion Benefits
rhythmic breathing
slightly deeper
breathing, conversation
possible
Beginning-level
aerobic training,
reduces stress
Basic cardiovascular
training, good
recovery pace
Zone % of
Maximum
Heart Rate
3 70–80% Moderate pace, more
4 80–90% Fast pace and a bit
5 90–100% Sprinting pace,
Perceived Exertion Benefits
difficult to hold
conversation
uncomfortable,
breathing forceful
unsustainable for long
period of time, labored
breathing
Improved aerobic
capacity, optimal
cardiovascular training
Improved anaerobic
capacity and
threshold, improved
speed
Anaerobic and
muscular endurance,
increased power
Wheel Size and Circumference
The wheel size is marked on both sides of the tire. This is not a
comprehensive list. You can also use one of the calculators
available on the Internet.
To modify your bike profile, see page 9.
Wheel Size L (mm)
12 × 1.75 935
14 × 1.5 1020
14 × 1.75 1055
16 × 1.5 1185
16 × 1.75 1195
18 × 1.5 1340
18 × 1.75 1350
20 × 1.75 1515
20 × 1-3/8 1615
22 × 1-3/8 1770
22 × 1-1/2 1785
24 × 1 1753
24 × 3/4 Tubular 1785
24 × 1-1/8 1795
24 × 1-1/4 1905
24 × 1.75 1890
24 × 2.00 1925
24 × 2.125 1965
26 × 7/8 1920
26 × 1(59) 1913
26 × 1(65) 1952
26 × 1.25 1953
26 × 1-1/8 1970
26 × 1-3/8 2068
26 × 1-1/2 2100
26 × 1.40 2005
26 × 1.50 2010
26 × 1.75 2023
26 × 1.95 2050
26 × 2.00 2055
26 × 2.10 2068
26 × 2.125 2070
26 × 2.35 2083
26 × 3.00 2170
27 × 1 2145
27 × 1-1/8 2155
27 × 1-1/4 2161
27 × 1-3/8 2169
650 × 35A 2090
650 × 38A 2125
14 Appendix
Page 19

Wheel Size L (mm)
650 × 38B 2105
700 × 18C 2070
700 × 19C 2080
700 × 20C 2086
700 × 23C 2096
700 × 25C 2105
700 × 28C 2136
700 × 30C 2170
700 × 32C 2155
700C Tubular 2130
700 × 35C 2168
700 × 38C 2180
700 × 40C 2200
Appendix 15
Page 20

Index
A
accessories 5, 6, 12
alerts 3
altimeter, calibrating 10
ANT+ sensors 2
pairing 7
ANT+ sensors 5
applications 7
smartphone 8
Auto Lap 10
Auto Pause 9
auto scroll 10
B
backlight 2, 10, 12
bands 11
battery
charging 1
maximizing 12
replacing 11
type 1
Bluetooth technology 7–9
brightness 12
C
cadence 6
alerts 3
calibrating
power meter 6
touchscreen 12
calorie, alerts 3
charging the device 1
cleaning the device 11
computer, connecting 8
courses 4
deleting 4
editing 4
loading 4
customizing the device 9
D
data
storing 7
transferring 7, 8
data averaging 6
data fields 9, 13
data recording 8, 10
deleting
all user data 8, 12
history 8
device
care 11
registration 13
resetting 12
display settings 10
distance, alerts 3
E
elevation 10
F
files, transferring 8
G
Garmin Connect 3, 7
storing data 7
GLONASS 10
GPS
satellite page 10
signal 2
stopping 10
GSC 10 5, 6, 11, 12
H
heart rate
alerts 3
monitor 5
zones 5, 14
heart rate monitor 11
pairing 7
history 3, 7
deleting 8
sending to computer 7
I
icons 2
initial setup 11
installing 1, 5
K
keys 2
L
language 11
laps 2
lifetime athlete 9
locking, screen 12
M
mounting the device 1
O
O-rings 11
on-screen buttons 2
P
pairing 2
heart rate monitor 7
smartphone 8
pairing ANT+ sensors 7
personal records 4, 8
restoring 5
power
alerts 3
zones 6
power meter 6
power meters 6
power save 12
product registration 13
profiles 9
bike 9
user 9
R
registering the device 13
replacing battery 11
resetting the device 12
restoring, settings 12
S
satellite page 10
satellite signals 2
saving activities 3
screen. 10 See also backlight
brightness 12
locking 12
settings 2, 8–11
device 11
smart recording 8
smartphone 2, 7, 9
applications 8
pairing 8
software
updating 13
version 12
software license agreement 12
specifications 11
speed, zones 5
start notice message 10
storing data 7, 8
system settings 10
T
temperature 12
time, alerts 3
time settings 11
time zones 11
timer 2, 3, 7
tones 11
touchscreen, calibrating 12
training pages, viewing 3
troubleshooting 12
U
unit ID 12
units of measure 11
updating software 13
USB, disconnecting 8
user data, deleting 8
user profile 2, 9
V
Virtual Partner 4
W
water resistance 11
weight scale 7
wheel sizes 14
workouts 3, 4
creating 3
deleting 4
editing 4
loading 3
Z
zones
power 6
speed 5
time 11
16 Index
Page 21

Page 22

www.garmin.com/support
913-397-8200
1-800-800-1020
+32 2 672 52 54 +45 4810 5050 +358 9 6937 9758 + 331 55 69 33 99
+49 (0)180 6 427646 + 39 02 36 699699
00800 4412 454
+44 2380 662 915
0808 238 0000
+44 870 850 1242
+ 35 1214 447 460 + 34 93 275 44 97 + 46 7744 52020
1-866-429-9296 +43 (0) 820 220 230
0800 - 023 3937
035 - 539 3727
+ 47 815 69 555
Garmin International, Inc.
1200 East 151st Street
Olathe, Kansas 66062, USA
Garmin (Europe) Ltd.
Liberty House, Hounsdown Business Park
Southampton, Hampshire, SO40 9LR UK
Garmin Corporation
No. 68, Zhangshu 2nd Road, Xizhi Dist.
New Taipei City, 221, Taiwan (R.O.C.)
© 2012–2013 Garmin Ltd. or its subsidiaries
 Loading...