

Garmin D2 Pilot Owners Manual
D2™ Pilot
Owner’s Manual
March 2014 190-01674-00_0B Printed in Taiwan

All rights reserved. Under the copyright laws, this manual may not be copied, in whole or in part, without the written consent of Garmin. Garmin reserves the
right to change or improve its products and to make changes in the content of this manual without obligation to notify any person or organization of such
changes or improvements. Go to www.garmin.com for current updates and supplemental information concerning the use of this product.
Garmin®, the Garmin logo, and TracBack® are trademarks of Garmin Ltd. or its subsidiaries, registered in the USA and other countries. ANT+™,
BaseCamp™, chirp™, D2™, Garmin Connect™, GSC™, HomePort™, and tempe™ are trademarks of Garmin Ltd. or its subsidiaries. These trademarks may
not be used without the express permission of Garmin.
The Bluetooth® word mark and logos are owned by the Bluetooth SIG, Inc. and any use of such marks by Garmin is under license. iPad® and iPhone® are
trademarks of Apple Inc., registered in the U.S. and other countries. Mac® is a registered trademark of Apple Computer, Inc. Windows® is a registered
trademark of Microsoft Corporation in the United States and other countries. Other trademarks and trade names are those of their respective owners.
This product is ANT+ certified. Visit www.thisisant.com/directory for a list of compatible products and apps.

Table of Contents
Introduction.................................................................... 1
Getting Started........................................................................... 1
Charging the Device.............................................................. 1
Keys...................................................................................... 1
Sensors...................................................................................... 1
Viewing the Data Pages........................................................ 1
Data Pages........................................................................... 1
Turning on a Sensor Mode.................................................... 2
Acquiring Satellite Signals and Recording a Track.................... 2
Stopping GPS....................................................................... 3
Profiles....................................................................................... 3
Changing Profiles.................................................................. 3
Creating a Custom Profile..................................................... 3
Deleting a Profile................................................................... 3
Restoring a Default Profile.................................................... 3
Waypoints, Routes, and Tracks....................................3
Waypoints.................................................................................. 3
Creating a Waypoint.............................................................. 3
Finding a Waypoint by Name................................................ 3
Finding Nearby Locations..................................................... 3
Editing a Waypoint................................................................ 3
Increasing the Accuracy of a Waypoint Location.................. 3
Projecting a Waypoint........................................................... 4
Deleting a Waypoint.............................................................. 4
Deleting All Waypoints.......................................................... 4
Routes and Flight Plans............................................................. 4
Creating a Route................................................................... 4
Creating a Flight Plan............................................................ 4
Editing the Name of a Route................................................. 4
Editing a Route...................................................................... 4
Viewing a Route on the Map................................................. 4
Deleting a Route................................................................... 4
Reversing a Route................................................................ 4
Tracks........................................................................................ 4
Recording a Track................................................................. 4
Saving the Current Track...................................................... 5
Viewing Details about the Track............................................ 5
Clearing the Current Track.................................................... 5
Deleting a Track.................................................................... 5
Sending and Receiving Data Wirelessly.................................... 5
Garmin Adventures.................................................................... 5
Navigation.......................................................................5
Navigating to a Destination........................................................ 5
Stopping Navigation.............................................................. 5
Navigating to the Nearest Airport............................................... 5
Navigating to an Airport by Identifier.......................................... 5
Navigating with Sight 'N Go....................................................... 5
Compass.................................................................................... 6
Navigating with the Horizontal Situation Indicator................. 6
Calibrating the Compass....................................................... 6
Map............................................................................................ 6
Browsing the Map................................................................. 6
Navigating Using TracBack®..................................................... 6
Altimeter and Barometer............................................................ 6
Calibrating the Barometric Altimeter..................................... 6
Tracking Weather Changes Overnight.................................. 6
Marking and Starting Navigation to a Man Overboard
Location..................................................................................... 7
Geocaches...................................................................... 7
Downloading Geocaches........................................................... 7
Navigating to a Geocache.......................................................... 7
Logging the Attempt................................................................... 7
chirp™........................................................................................ 7
Finding a Geocache with a chirp Device
............................... 7
Applications................................................................... 7
Jumpmaster............................................................................... 7
Planning a Jump................................................................... 7
Jump Types........................................................................... 7
Entering Jump Information.................................................... 7
Entering Wind Information for HAHO and HALO Jumps....... 8
Entering Wind Information for a Static Jump......................... 8
Constant Settings.................................................................. 8
VIRB™ Remote......................................................................... 8
Controlling a VIRB Action Camera........................................ 8
Clock.......................................................................................... 8
Setting the Alarm................................................................... 8
Starting the Countdown Timer.............................................. 8
Using the Stopwatch............................................................. 8
Adding a Custom Time Zone................................................ 8
Editing a Custom Time Zone................................................. 8
Alerts.......................................................................................... 9
Setting a Proximity Alarm...................................................... 9
Calculating the Size of an Area.................................................. 9
Viewing the Almanacs................................................................ 9
Viewing Satellite Information...................................................... 9
Simulating a Location............................................................ 9
Customizing Your Device..............................................9
Setup Overview.......................................................................... 9
Customizing the Main Menu................................................ 10
Customizing the Arrow Keys.................................................... 10
Customizing the Data Pages................................................... 10
System Settings....................................................................... 10
About UltraTrac................................................................... 10
Compass Settings.................................................................... 10
Setting the North Reference................................................ 10
Altimeter Settings................................................................ 10
Setting the Device Tones......................................................... 10
Display Settings....................................................................... 11
Map Settings............................................................................ 11
Track Settings.......................................................................... 11
Time Settings........................................................................... 11
Changing the Units of Measure............................................... 11
Position Format Settings.......................................................... 11
Fitness Settings....................................................................... 11
Setting Your Fitness User Profile........................................ 11
About Lifetime Athletes....................................................... 11
Geocache Settings................................................................... 11
Fitness.......................................................................... 11
Customizing Your Running or Cycling Profile.......................... 11
Going for a Run........................................................................ 12
History...................................................................................... 12
Viewing an Activity.............................................................. 12
Saving an Activity as a Track.............................................. 12
Deleting an Activity.............................................................. 12
Using Garmin Connect........................................................ 12
ANT+ Sensors.............................................................. 12
Pairing Your ANT+ Sensors..................................................... 12
tempe....................................................................................... 12
Putting On the Heart Rate Monitor........................................... 12
About Heart Rate Zones..................................................... 13
Fitness Goals...................................................................... 13
Setting Your Heart Rate Zones........................................... 13
Tips for Erratic Heart Rate Data.......................................... 13
Heart Rate Monitor Battery................................................. 13
Caring for the Heart Rate Monitor....................................... 13
Foot Pod.................................................................................. 13
Setting the Foot Pod Mode................................................. 14
Going for a Run Using a Foot Pod...................................... 14
Table of Contents i

Foot Pod Calibration........................................................... 14
Calibrating Your Foot Pod by Distance............................... 14
Calibrating Your Foot Pod by GPS..................................... 14
Calibrating Your Foot Pod Manually................................... 14
Using an Optional Bike Cadence Sensor................................. 14
Device Information.......................................................14
Viewing Device Information..................................................... 14
Updating the Aviation Database.............................................. 14
Updating the Software............................................................. 14
Device Care............................................................................. 14
Cleaning the Device............................................................ 15
Specifications........................................................................... 15
Battery Information................................................................... 15
Data Management................................................................... 15
File Types............................................................................ 15
Disconnecting the USB Cable............................................. 15
Deleting Files........................................................................... 15
Troubleshooting....................................................................... 15
Locking the Keys................................................................. 15
Resetting Your Device........................................................ 15
Resetting the Profile to Factory Settings............................. 15
Clearing All Sensor Plot Data.............................................. 15
Getting More Information.................................................... 15
Appendix.......................................................................15
Data Fields............................................................................... 15
Data Pages.............................................................................. 17
Registering Your Device.......................................................... 17
Contacting Garmin Aviation Product Support.......................... 17
Software License Agreement................................................... 17
Heart Rate Zone Calculations.................................................. 17
Altimeter and Barometric Readings......................................... 18
Index..............................................................................19
ii Table of Contents

Introduction
WARNING
Always consult your physician before you begin or modify any
exercise program.
See the Important Safety and Product Information guide in the
product box for product warnings and other important
information.
Getting Started
When using your device the first time, you should complete
these tasks to set up the device and get to know the basic
features.
Charge the device (Charging the Device).
1
Register the device (Registering Your Device).
2
Learn about the sensor data and modes (Viewing the Data
3
Pages).
Acquire satellites and record a track (Acquiring Satellite
4
Signals and Recording a Track).
Create a waypoint (Creating a Waypoint).
5
Charging the Device
NOTICE
To prevent corrosion, thoroughly dry the contacts and the
surrounding area before charging or connecting to a computer.
The device is powered by a built-in lithium-ion battery that you
can charge using a standard wall outlet or a USB port on your
computer.
Plug the USB end of the cable into the AC adapter or a
1
computer USB port.
Plug the AC adapter into a standard wall outlet.
2
Align the left side of the charging cradle À with the groove on
3
the left side of the device.
Keys
À
Á
Â
Ã
Action key Select to open the menu for the current screen. Select
Ä
Viewing the Status Page
You can quickly switch to this page to view the time of day,
battery life, and GPS status information from any other page.
Hold .
Select to turn the backlight on and off. Hold to turn the
device on and off.
Select to scroll through the data pages, options, and
settings. Hold to navigate to an airport by airport code
(Navigating to an Airport by Identifier).
Select to scroll through the data pages, options, and
settings. Hold to navigate to the nearest airport
(Navigating to the Nearest Airport).
Select to return to the previous screen. Hold to view the
status page.
to choose an option and to acknowledge a message.
Hold to mark a waypoint.
Sensors
Viewing the Data Pages
Customizable data pages allow you to quickly access real-time
data from internal and connected sensors. When you begin
tracking or navigating, additional data pages appear.
From the time of day page, select or to cycle through
the data pages.
Data Pages
The data pages available on your device vary based on the
Align the hinged side of the charger Á with the contacts on
4
the back of the device.
When you connect the device to a power source, the device
turns on.
Charge the device completely.
5
Introduction 1
device mode. In low power mode, GPS is disabled, and the
device does not record data. In tracking mode, GPS is enabled
and sensor data is recorded to the track log, but you are not
navigating to a destination. In navigation mode, you are
navigating to a destination.
NOTE: Your body temperature affects the temperature and
density altitude. To get the most accurate temperature reading,
remove the device from your wrist and wait 20–30 minutes.
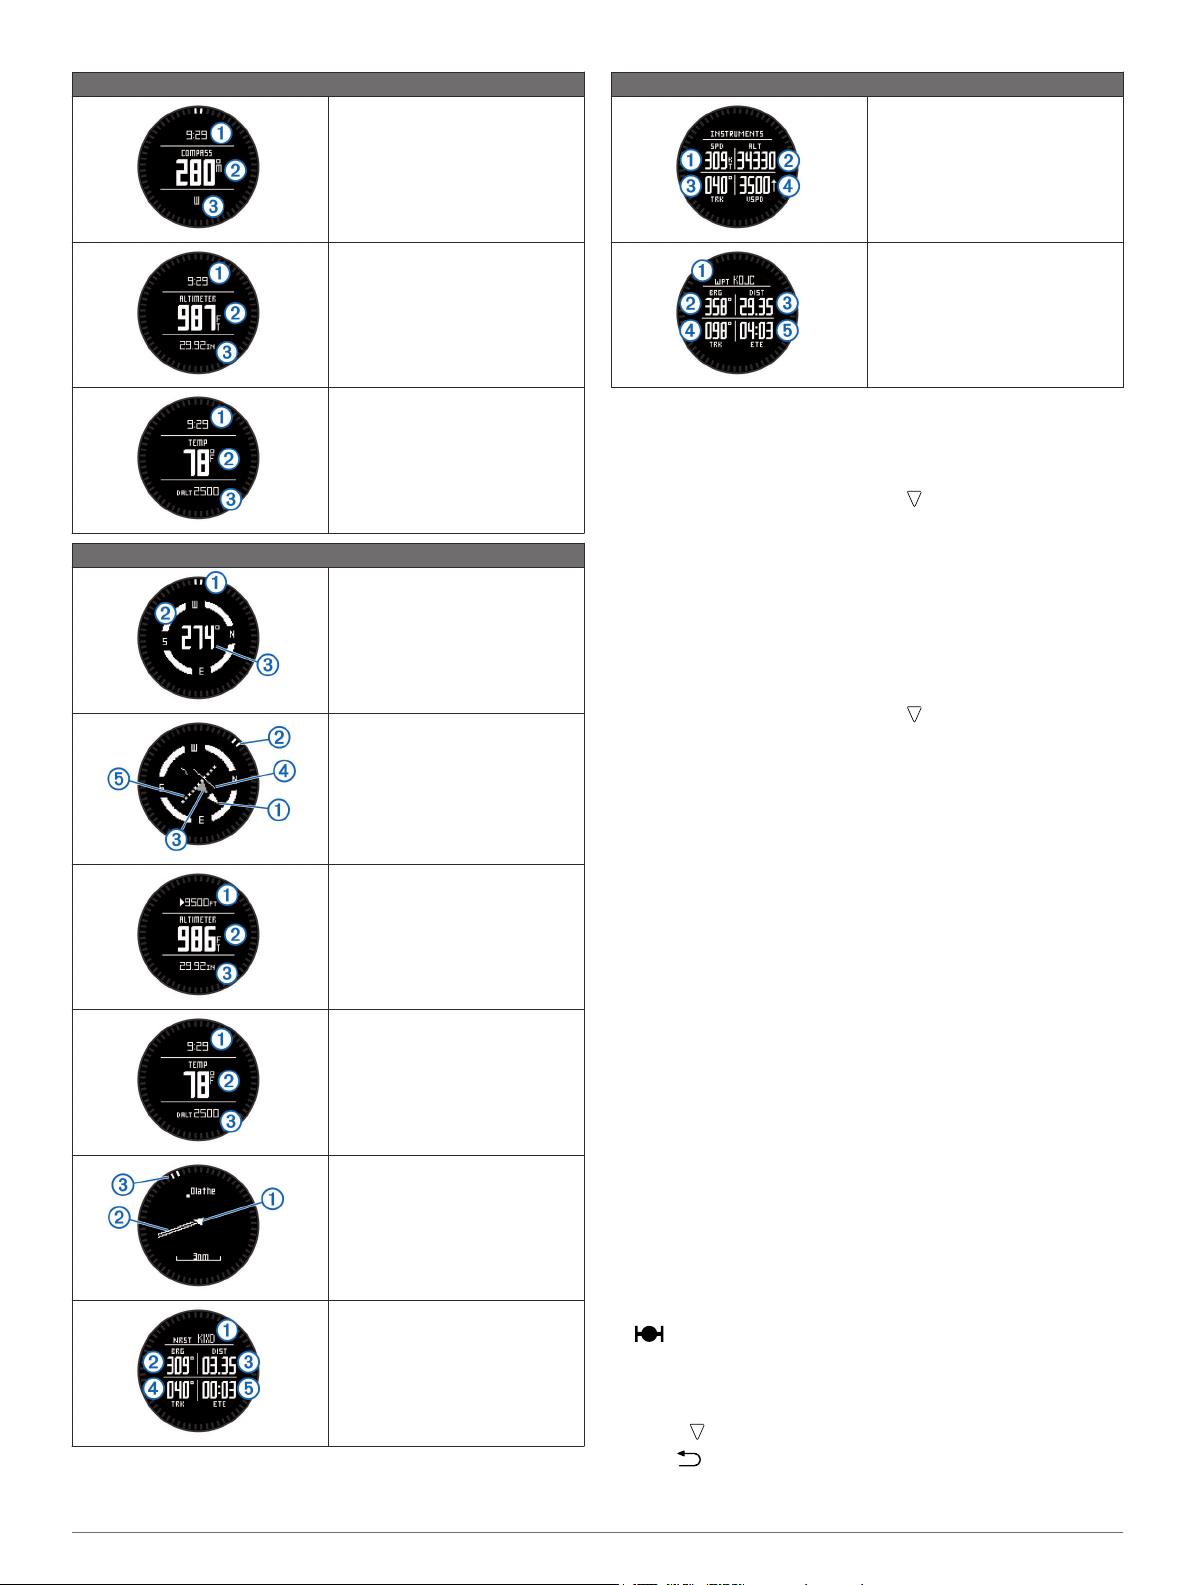
Low Power Mode
The compass page displays the
time of day À, direction of travel in
degrees Á, and cardinal direction
.
Â
Tracking or Navigation Modes
The instruments page displays
your ground speed À, altitude Á,
track over ground Â, and the
vertical speed in feet per minute
.
Ã
Tracking or Navigation Modes
The altimeter page displays the
time of day À, pressure altitude
, and barometric pressure Â.
Á
The temperature page displays the
time of day À, temperature Á,
and density altitude Â.
The compass page displays the
bearing to the nearest airport À,
compass ring Á, and direction of
travel in degrees  (tracking
mode only).
The horizontal situation indicator
(HSI) displays the course line
pointer À, bearing to the next
waypoint Á, to-and-from indicator
, and course deviation indicator
Â
(CDI) Ã. The dots Ä indicate the
distance of deviation (navigation
mode only).
The altimeter page displays the
alert altitude À (Setting the
Altitude Alert), pressure altitude
, and barometric pressure Â.
Á
The temperature page displays the
time of day À, temperature Á,
and density altitude Â.
The next waypoint page displays
the waypoint name À, bearing to
the waypoint Á, distance to the
waypoint Â, track over ground Ã,
and the estimated time to the next
waypoint Ä (navigation mode
only).
Setting the Altitude Alert
You can set an alarm to vibrate when you reach a specified
altitude.
NOTE: The altitude alert is not available in low power mode.
From the time of day page, select until the altimeter page
1
appears.
Select the action key.
2
Select Set Alert.
3
Enter the altitude at which the alert is triggered.
4
Setting the Barometric Pressure
You can manually enter the current barometric pressure. This
can help to improve the accuracy of the pressure altitude
reading.
From the time of day page, select until the altimeter page
1
appears.
Select the action key.
2
Select Set Baro..
3
Enter the current barometric pressure.
4
Turning on a Sensor Mode
The default sensor mode is on demand mode, which offers you
quick access to compass, altimeter, barometer, or temperature
data. You can also put the device in always on mode to display
continuous sensor data.
NOTE: If you have an optional heart rate monitor or speed and
cadence sensor paired with the device, your device can display
continuous heart rate or speed and cadence data.
Select the action key.
1
Select Setup > Sensors > Mode > Always On.
2
Acquiring Satellite Signals and Recording a Track
Before you can use the GPS navigation features, such as
The map displays your current
location and direction À, the route
to your next waypoint Á, and the
bearing to your next waypoint Â.
The nearest airport page displays
the airport identifier À, bearing to
the airport Á, distance to the
airport Â, track over ground Ã,
and the estimated time to the
airport Ä.
2 Introduction
recording a track, you must acquire satellite signals.
The time and date are set automatically based on the GPS
position.
Select the action key.
1
Select Start GPS.
2
Go to an area with a clear view of the sky and remain
3
stationary while the device acquires satellite signals.
indicates the device acquired satellite signals
successfully.
Walk around or travel to record a track.
4
Your distance and time appear.
Select to view the loop of data pages.
5
Hold .
6

Select an option:
7
• Select Pause Track to pause tracking.
• Select Save Track to save your track.
• Select Clear Track to erase the track without saving.
• Select Stop GPS to turn off GPS without deleting your
track.
Stopping GPS
Select the action key.
1
Select Stop GPS.
2
Profiles
A profile is a collection of settings that optimizes your device for
a certain activity. For example, the data pages, settings, and
views can appear differently when you use the device in an
airplane than when you use it for hiking.
When you are using a profile and you change settings such as
data fields or units of measurement, the changes are saved
automatically as part of the profile.
To use profiles on your device, you must add the Profiles menu
option to the main menu (Customizing the Main Menu).
Changing Profiles
When you change activities, you can quickly change the setup
of the device to suit the activity by changing the profile.
Select the action key.
1
Select Profiles.
2
Select a profile.
3
The profile you selected is now the active profile. Any changes
you make are saved to the active profile.
Creating a Custom Profile
You can customize your settings and data fields for a particular
activity or trip.
Select the action key.
1
Select Setup > Profiles.
2
Select an option:
3
• Select a profile.
• Select Create New, and select the new profile.
The profile you selected is now the active profile. The
previous profile was saved.
If necessary, select Edit, and edit the name of the profile.
4
Customize your settings (Customizing Your Device) and data
5
fields for the active profile.
Any changes you make are saved to the active profile.
Deleting a Profile
If you accidentally delete a default profile, you can recreate the
profile (Restoring a Default Profile).
Select the action key.
1
Select Setup > Profiles.
2
Select a profile.
3
Select Delete > Yes.
4
Restoring a Default Profile
If you accidentally delete a default profile, you can restore the
profile with default settings.
NOTE: Custom profiles cannot be restored.
Select the action key.
1
Select Setup > Profiles.
2
Select Create New, and select the new profile.
3
The new profile is the active profile. The previous profile is
saved.
Select Edit and enter the default name of the profile you
4
need to restore.
Reset the profile to default settings (Resetting the Profile to
5
Factory Settings).
This resets the default settings on the current profile only.
Waypoints, Routes, and Tracks
Waypoints
Waypoints are locations you record and store in the device.
Creating a Waypoint
You can save your current location as a waypoint.
Hold the action key.
1
Select an option:
2
• To save the waypoint without changes, select Save.
• To make changes to the waypoint, select Edit, make
changes to the waypoint, and select Save.
Finding a Waypoint by Name
Select the action key.
1
Select Waypoints > Spell Search.
2
Select the action key, , and to enter characters.
3
Select _ > Done.
4
Select the waypoint.
5
Finding Nearby Locations
Select the action key.
1
Select Waypoints > Search Near.
2
Select an option:
3
• Select Waypoints to search near a waypoint.
• Select Cities to search near a city.
• Select Current Loc to search near your current location.
Editing a Waypoint
Before you can edit a waypoint, you must create a waypoint.
Select the action key.
1
Select Waypoints.
2
Select a waypoint.
3
Select Edit.
4
Select an item to edit, such as the name.
5
Select the action key, , and to enter characters.
6
Select _ > Done.
7
Increasing the Accuracy of a Waypoint Location
You can refine a waypoint location for more accuracy. When
averaging, the device takes several readings at the same
location and uses the average value to provide more accuracy.
Select the action key.
1
Select Waypoints.
2
Select a waypoint.
3
Select Average.
4
Move to the waypoint location.
5
Select Start.
6
Follow the on-screen instructions.
7
When the confidence reaches 100%, select Save.
8
For best results, collect four to eight samples for the waypoint,
waiting at least 90 minutes between samples.
Waypoints, Routes, and Tracks 3

Projecting a Waypoint
You can create a new location by projecting the distance and
bearing from a marked location to a new location.
Select the action key.
1
Select Waypoints.
2
Select a waypoint.
3
Select Project.
4
Follow the on-screen instructions.
5
The projected waypoint is saved with a default name.
Deleting a Waypoint
Select the action key.
1
Select Waypoints.
2
Select a waypoint.
3
Select Delete > Yes.
4
Deleting All Waypoints
Select the action key.
1
Select Setup > Reset > Waypoints > Yes.
2
Routes and Flight Plans
A route is a sequence of waypoints or locations that leads you
to your final destination. Flight plans are routes that use direct
routing optimized for aviation. You can create flight plans on
your device or by using the Garmin® Pilot application for mobile
devices.
Creating a Route
Select the action key.
1
Select Routes > Create New.
2
Select First Point.
3
Select a category.
4
Select the first point on the route.
5
Select Next Point.
6
Repeat steps 4–6 until the route is complete.
7
Select Done to save the route.
8
Creating a Flight Plan
Select the action key.
1
Select Flightplan > Create New.
2
Select First Point.
3
Select a category.
4
Select the first point on the route.
5
Select Next Point.
6
Repeat steps 4–6 until the route is complete.
7
Select Done to save the route.
8
Connecting to the Garmin Pilot App
You can use the Garmin Pilot app to create flight plans and
send them to your device. The Garmin Pilot app is available for
some mobile devices. See the application store for your mobile
device for availability and compatibility information.
Your D2 Pilot Watch connects to the Garmin Pilot app using
Bluetooth® Smart wireless technology. This requires an
iPhone® 4S smartphone or newer, or an iPad® 3 mobile device
or newer.
Select the action key.
1
Select Share Data > Garmin Pilot.
2
On your mobile device, start the Garmin Pilot app.
3
The Garmin Pilot app detects your device and connects to it
automatically.
Editing the Name of a Route
Select the action key.
1
Select Routes.
2
Select a route.
3
Select Rename.
4
Select the action key, , and to enter characters.
5
Select _ > Done.
6
Editing a Route
Select the action key.
1
Select Routes.
2
Select a route.
3
Select Edit.
4
Select a point.
5
Select an option:
6
• To view the point on the map, select Map.
• To change the order of the point on the route, select
Move Up or Move Down.
• To insert an additional point on the route, select Insert.
The additional point is inserted before the point you are
editing.
• To add a point to the end of the route, select Next Point.
• To remove the point from the route, select Remove.
Viewing a Route on the Map
Select the action key.
1
Select Routes.
2
Select a route.
3
Select View Map.
4
Deleting a Route
Select the action key.
1
Select Routes.
2
Select a route.
3
Select Delete > Yes.
4
Reversing a Route
Select the action key.
1
Select Routes.
2
Select a route.
3
Select Reverse.
4
Tracks
A track is a recording of your path. The track log contains
information about points along the recorded path, including
time, location, and elevation for each point.
To work with tracks on your device, you must add the Tracks
option to the main menu (Customizing the Main Menu).
Recording a Track
Select the action key.
1
Select Start GPS.
2
Wait while the device locates satellites.
3
Walk around to record a track.
4
Your distance and time appear.
Select to view the loop of data pages including compass
5
data, altimeter data, ascent and speed, the map, and the
time of day page.
You can customize the data pages (Customizing the Data
Pages).
Hold .
6
4 Waypoints, Routes, and Tracks
 Loading...