


Garmin D2 Bravo, D2 Bravo Titanium Owners Manual
D2™ Bravo and D2 Bravo Titanium
Owner’s Manual
May 2016 190-01907-00_0D

All rights reserved. Under the copyright laws, this manual may not be copied, in whole or in part, without the written consent of Garmin. Garmin reserves the
right to change or improve its products and to make changes in the content of this manual without obligation to notify any person or organization of such
changes or improvements. Go to www.garmin.com for current updates and supplemental information concerning the use of this product.
Garmin®, the Garmin logo, Auto Lap®, Auto Pause®, TracBack®, VIRB®, Virtual Partner®, and ANT+® are trademarks of Garmin Ltd. or its subsidiaries, registered
in the USA and other countries. D2™ Bravo, Connect IQ™, Garmin Connect™, Garmin Express™,HRM-Run™, tempe™, and Vector™ are trademarks of Garmin
Ltd. or its subsidiaries. These trademarks may not be used without the express permission of Garmin.
American Heart Association® is a registered trademark of American Heart Association, Inc. Android™ is a trademark of Google Inc. The Bluetooth® word mark
and logos are owned by the Bluetooth SIG, Inc. and any use of such marks by Garmin is under license. The Cooper Institute®, as well as any related
trademarks, are the property of The Cooper Institute. Advanced heartbeat analytics by Firstbeat. iOS® is a registered trademark of Cisco Systems, Inc. used
under license by Apple Inc. Mac® is a trademark of Apple Inc., registered in the U.S. and other countries. Training Stress Score™ (TSS), Intensity Factor™ (IF),
and Normalized Power™ (NP) are trademarks of Peaksware, LLC. Wi‑Fi® is a registered mark of Wi-Fi Alliance Corporation. Windows® is a registered trademark
of Microsoft Corporation in the United States and other countries. Other trademarks and trade names are those of their respective owners.
This product may contain a library (Kiss FFT) licensed by Mark Borgerding under the 3-Clause BSD License http://opensource.org/licenses/BSD-3-Clause.
This product is ANT+® certified. Go to www.thisisant.com/directory for a list of compatible products and apps.

Table of Contents
Introduction.....................................................................1
Keys............................................................................................ 1
Locking the Keys....................................................................1
Charging the Device................................................................... 1
Updating the Aviation Database................................................. 1
Pairing Your Smartphone with Your Device............................... 1
Support and Updates.................................................................. 1
Setting Up Garmin Express................................................... 2
Flying............................................................................... 2
Setting the Altitude Alert............................................................. 2
Setting the Barometric Pressure Manually................................. 2
Flying Activity.............................................................................. 2
Navigating to the Nearest Airport........................................... 2
Nearest Airport.................................................................. 2
Navigating to an Airport by Its Identifier................................. 2
Horizontal Situation Indicator................................................. 2
Stopping Navigation............................................................... 2
Disabling the Automatic Flight Timer..................................... 2
Heart Rate Features....................................................... 2
Wrist-based Heart Rate.............................................................. 2
Wearing the Device and Heart Rate...................................... 2
Tips for Erratic Heart Rate Data.............................................3
Viewing the Heart Rate Widget.............................................. 3
Broadcasting Heart Rate Data to Garmin Devices................ 3
Turning Off the Wrist Heart Rate Monitor.............................. 3
Putting On the Heart Rate Monitor............................................. 3
Tips for Erratic Heart Rate Data.............................................3
Running Dynamics......................................................................3
Training with Running Dynamics........................................... 4
Color Gauges and Running Dynamics Data.......................... 4
Ground Contact Time Balance Data................................. 4
Tips for Missing Running Dynamics Data.............................. 4
Physiological Measurements...................................................... 4
About VO2 Max. Estimates.................................................... 5
Getting Your VO2 Max. Estimate for Running.................. 5
Getting Your VO2 Max. Estimate for Cycling.................... 5
Viewing Your Predicted Race Times..................................... 5
Recovery Advisor................................................................... 5
Turning On the Recovery Advisor..................................... 5
Recovery Heart Rate............................................................. 5
Lactate Threshold.................................................................. 6
Performing a Guided Test to Determine Your Lactate
Threshold
Performance Condition.......................................................... 6
Viewing Your Performance Condition............................... 6
Stress Score.......................................................................... 6
Viewing Your Stress Score............................................... 6
Activities......................................................................... 6
Starting an Activity...................................................................... 6
Stopping an Activity.................................................................... 6
Skiing.......................................................................................... 7
Going Cross-Country Skiing.................................................. 7
Going Downhill Skiing or Snowboarding................................ 7
Viewing Your Ski Runs......................................................7
Hiking.......................................................................................... 7
Going for a Hike..................................................................... 7
Running...................................................................................... 7
Going for a Run......................................................................7
Using the Metronome.............................................................7
Biking.......................................................................................... 7
Going for a Ride..................................................................... 7
Swimming................................................................................... 8
Going for a Pool Swim........................................................... 8
.......................................................................... 6
Swim Terminology
Stroke Types..................................................................... 8
Resting During Pool Swimming.........................................8
Training with the Drill Log..................................................8
Going for an Open Water Swim............................................. 8
Water Sports............................................................................... 8
Starting a Stand Up Paddle Boarding Activity....................... 8
Starting a Rowing Activity...................................................... 9
Indoor Activities.......................................................................... 9
Multisport.................................................................................... 9
Starting a Triathlon or Multisport Activity............................... 9
Creating a Custom Activity.....................................................9
Golfing........................................................................................ 9
Playing Golf............................................................................9
Hole Information.....................................................................9
Viewing Layup and Dogleg Distances................................... 9
Using the Golf Odometer..................................................... 10
Keeping Score..................................................................... 10
Reviewing Scores................................................................ 10
Measuring a Shot................................................................. 10
.............................................................8
Training......................................................................... 10
Setting Up Your User Profile.....................................................10
Fitness Goals....................................................................... 10
About Heart Rate Zones...................................................... 10
Setting Your Heart Rate Zones....................................... 10
Letting the Device Set Your Heart Rate Zones............... 10
Heart Rate Zone Calculations......................................... 10
About Lifetime Athletes........................................................ 11
Setting Your Power Zones................................................... 11
Activity Tracking........................................................................11
Turning On Activity Tracking................................................ 11
Using the Move Alert............................................................11
Auto Goal............................................................................. 11
Sleep Tracking..................................................................... 11
Using Automated Sleep Tracking....................................11
Using Do Not Disturb Mode............................................ 11
Intensity Minutes.................................................................. 11
Workouts...................................................................................11
Following a Workout From the Web.....................................12
Starting a Workout............................................................... 12
About the Training Calendar................................................ 12
Using Garmin Connect Training Plans............................ 12
Interval Workouts...................................................................... 12
Creating an Interval Workout............................................... 12
Starting an Interval Workout................................................ 12
Stopping an Interval Workout...............................................12
Using Virtual Partner®.............................................................. 12
Setting a Training Target.......................................................... 12
Cancelling a Training Target................................................ 13
Racing a Previous Activity........................................................ 13
Personal Records..................................................................... 13
Viewing Your Personal Records.......................................... 13
Restoring a Personal Record............................................... 13
Clearing a Personal Record................................................. 13
Clearing All Personal Records............................................. 13
About Training Effect................................................................ 13
Clock.............................................................................. 13
Setting an Alarm....................................................................... 13
Starting the Countdown Timer.................................................. 13
Using the Stopwatch................................................................. 14
Setting Sunrise and Sunset Alerts............................................ 14
Navigation..................................................................... 14
Projecting a Waypoint............................................................... 14
Saving Your Location............................................................... 14
Editing Your Saved Locations.................................................. 14
Table of Contents i

Deleting All Saved Locations.................................................... 14
Navigating to a Destination....................................................... 14
Navigating with Sight 'N Go...................................................... 14
Compass...................................................................................14
Map........................................................................................... 14
Panning and Zooming the Map............................................ 14
Navigating To Your Starting Point............................................ 14
Altimeter....................................................................................15
History........................................................................... 15
Using History............................................................................ 15
Multisport History................................................................. 15
Viewing Your Time in Each Heart Rate Zone...................... 15
Viewing Step Totals.................................................................. 15
Viewing Data Totals.................................................................. 15
Deleting History........................................................................ 15
Using the Odometer..................................................................15
Connected Features..................................................... 15
Enabling Bluetooth Notifications............................................... 15
Viewing Notifications............................................................ 16
Managing Notifications.........................................................16
Turning Off Bluetooth Technology....................................... 16
Turning On and Off Bluetooth Connection Alerts................ 16
Locating a Lost Mobile Device.................................................. 16
Garmin Connect........................................................................16
Using Garmin Connect Mobile............................................. 16
Manually Uploading Data to Garmin Connect Mobile..... 16
Using Garmin Connect on Your Computer.......................... 16
Wi‑Fi® Connected Features..................................................... 16
Setting Up Wi‑Fi Connectivity.............................................. 16
Connect IQ Features.................................................... 17
Downloading Connect IQ Features.......................................... 17
Downloading Connect IQ Features Using Your Computer....... 17
Widgets..................................................................................... 17
Viewing Widgets.................................................................. 17
Time and Date.................................................................17
Altimeter.......................................................................... 17
Compass......................................................................... 17
Temperature....................................................................18
Weather...........................................................................18
Calendar..........................................................................18
Notifications.....................................................................18
METAR............................................................................18
Customizing the Widget Loop.............................................. 18
VIRB Remote....................................................................... 18
Controlling a VIRB Action Camera.................................. 18
Customizing Your Device............................................ 18
Activity App Settings................................................................. 18
Customizing the Data Screens............................................ 19
Adding a Map to an Activity................................................. 19
Alerts.................................................................................... 19
Setting an Alert................................................................19
Auto Lap...............................................................................20
Marking Laps by Distance............................................... 20
Enabling Auto Pause®......................................................... 20
Enabling Auto Climb............................................................ 20
3D Speed and Distance....................................................... 20
Using Auto Scroll................................................................. 20
UltraTrac.............................................................................. 20
Power Save Timeout Settings..............................................20
Turning On and Off the Lap Key.......................................... 20
Watch Face Settings.................................................................21
Customizing the Watch Face............................................... 21
Sensors Settings.......................................................................21
Compass Settings................................................................ 21
Calibrating the Compass Manually................................. 21
Setting the North Reference
Altimeter Settings................................................................. 21
Calibrating the Barometric Altimeter............................... 21
Elevation Settings................................................................ 21
Navigation Settings................................................................... 21
Customizing Map Features.................................................. 21
Setting Up a Heading Bug................................................... 22
System Settings........................................................................ 22
Time Settings....................................................................... 22
Backlight Settings................................................................ 22
Changing the Units of Measure........................................... 22
............................................21
ANT+ Sensors............................................................... 22
Pairing ANT+ Sensors.............................................................. 22
Using an Optional Bike Speed or Cadence Sensor.................. 22
Foot Pod................................................................................... 22
Improving Foot Pod Calibration........................................... 23
Calibrating Your Foot Pod Manually.................................... 23
Setting Foot Pod Speed and Distance................................. 23
tempe........................................................................................ 23
Device Information....................................................... 23
Contacting Garmin Aviation Product Support........................... 23
Viewing Device Information...................................................... 23
Specifications............................................................................23
Battery Information...............................................................23
HRM-Run Specifications...........................................................23
Data Management.................................................................... 23
Disconnecting the USB Cable..............................................23
Deleting Files....................................................................... 23
Troubleshooting........................................................................ 24
My daily step count does not appear................................... 24
The temperature reading is not accurate............................. 24
Resetting Your Device......................................................... 24
Restoring All Default Settings.............................................. 24
Maximizing the Battery Life.................................................. 24
Getting More Information..................................................... 24
Device Maintenance..................................................... 24
Device Care.............................................................................. 24
Cleaning the Device............................................................. 24
Metal Watch Band Adjustment................................................. 24
Heart Rate Monitor Care Instructions....................................... 24
Caring for the Heart Rate Monitor........................................ 24
User Replaceable Batteries...................................................... 24
Replacing the Heart Rate Monitor Battery........................... 25
Appendix....................................................................... 25
Data Fields................................................................................25
VO2 Max. Standard Ratings..................................................... 27
Wheel Size and Circumference................................................ 28
Software License Agreement................................................... 28
BSD 3-Clause License..............................................................28
Symbol Definitions.................................................................... 29
Index.............................................................................. 30
ii Table of Contents

Introduction
WARNING
See the Important Safety and Product Information guide in the
product box for product warnings and other important
information.
Always consult your physician before you begin or modify any
exercise program.
Keys
LIGHT Select to turn the backlight on and off.
À
START
Á
STOP
BACK Select to return to the previous page.
Â
DOWN Select to scroll through widgets, menus, and messages.
Ã
UP Select to scroll through widgets, menus, and messages.
Ä
Locking the Keys
You can lock the keys to prevent accidental key presses.
Hold LIGHT for two seconds, and select Lock Device to lock
1
the keys.
Hold LIGHT for two seconds, and select Unlock Device to
2
unlock the keys.
Charging the Device
To prevent corrosion, thoroughly clean and dry the contacts and
the surrounding area before charging or connecting to a
computer. Refer to the cleaning instructions in the appendix.
The device is powered by a built-in lithium-ion battery that you
can charge using a standard wall outlet or a USB port on your
computer.
Plug the USB end of the cable into an AC adapter or a
1
computer USB port.
If necessary, plug the AC adapter into a standard wall outlet.
2
Pinch the sides of the charging cradle À to open the arms on
3
the cradle.
Hold to turn the device on and off.
Hold to view the stopwatch.
Hold to view the timer.
Hold to lock or unlock the screen.
Select to start or stop an activity.
Select to choose an option in a menu.
Hold to navigate to an airport by the airport code.
Select to record a lap or a rest during an activity.
Hold to navigate to the nearest airport.
Hold to view the clock from any page.
Select to dismiss a short message or notification.
Hold to view the main menu.
NOTICE
With the contacts aligned, place the device into the cradle
4
and release the arms to hold the device in place.
When you connect the device to a power source, the device
turns on, and the battery charge level appears on the screen.
Charge the device completely.
5
Á
Updating the Aviation Database
Before you can update the aviation database, you must create a
Garmin® account and add your device. You can view your unit ID
on the device information screen (Viewing Device Information,
page 23).
The aviation database is valid for 28 days at a time and includes
only airport locations.
Connect your device to a computer using the included USB
1
cable.
Go to www.flyGarmin.com.
2
Log in to your Garmin account.
3
Follow the on-screen instructions to update the aviation
4
database.
Pairing Your Smartphone with Your Device
You should connect your D2 Bravo device to a smartphone to
use the full features of the device.
Go to (garmin.com/apps), and download the Garmin
1
Connect™ Mobile app to your smartphone.
Bring your smartphone within 10 m (33 ft.) of your device.
2
On the D2 Bravo device, hold UP.
3
Select Settings > Bluetooth > Pair Mobile Device.
4
On your smartphone, open the Garmin Connect Mobile app.
5
Select an option to add your device to your Garmin Connect
6
account:
• If this is the first time you are pairing a device with the
Garmin Connect Mobile app, follow the on-screen
instructions.
• If you already paired another device with the Garmin
Connect Mobile app, from the settings menu, select
Garmin Devices > , and follow the on-screen
instructions.
Support and Updates
Garmin Express™ (www.garmin.com/express) provides easy
access to these services for Garmin devices.
• Product registration
• Product manuals
• Software updates
• Map, chart, or course updates
Introduction 1
Setting Up Garmin Express
Connect the device to your computer using a USB cable.
1
Go to www.garmin.com/express.
2
Follow the on-screen instructions.
3
Flying
Setting the Altitude Alert
You can set an alarm to vibrate when you reach a specified
altitude.
NOTE: The altitude alert is not available in low power mode.
From the clock, select DOWN until the altimeter page
1
appears.
Select START > Altitude Alert > Status > On.
2
Select Altitude.
3
Select UP to select an altitude.
4
Setting the Barometric Pressure Manually
You can set the current barometric pressure manually. This can
help to improve the accuracy of the pressure altitude reading.
From the clock, select DOWN until the barometer page
1
appears.
Select START > Barometer > Manual.
2
Select the current barometric pressure.
3
Flying Activity
Before you start a flying activity, you should charge the device
(Charging the Device, page 1).
A flying activity starts automatically when your detected climb
rate exceeds the value you set in the auto fly settings. The
default auto fly value is 500 fpm.
To set the auto fly value, select Settings > Apps > Fly > Auto
Fly.
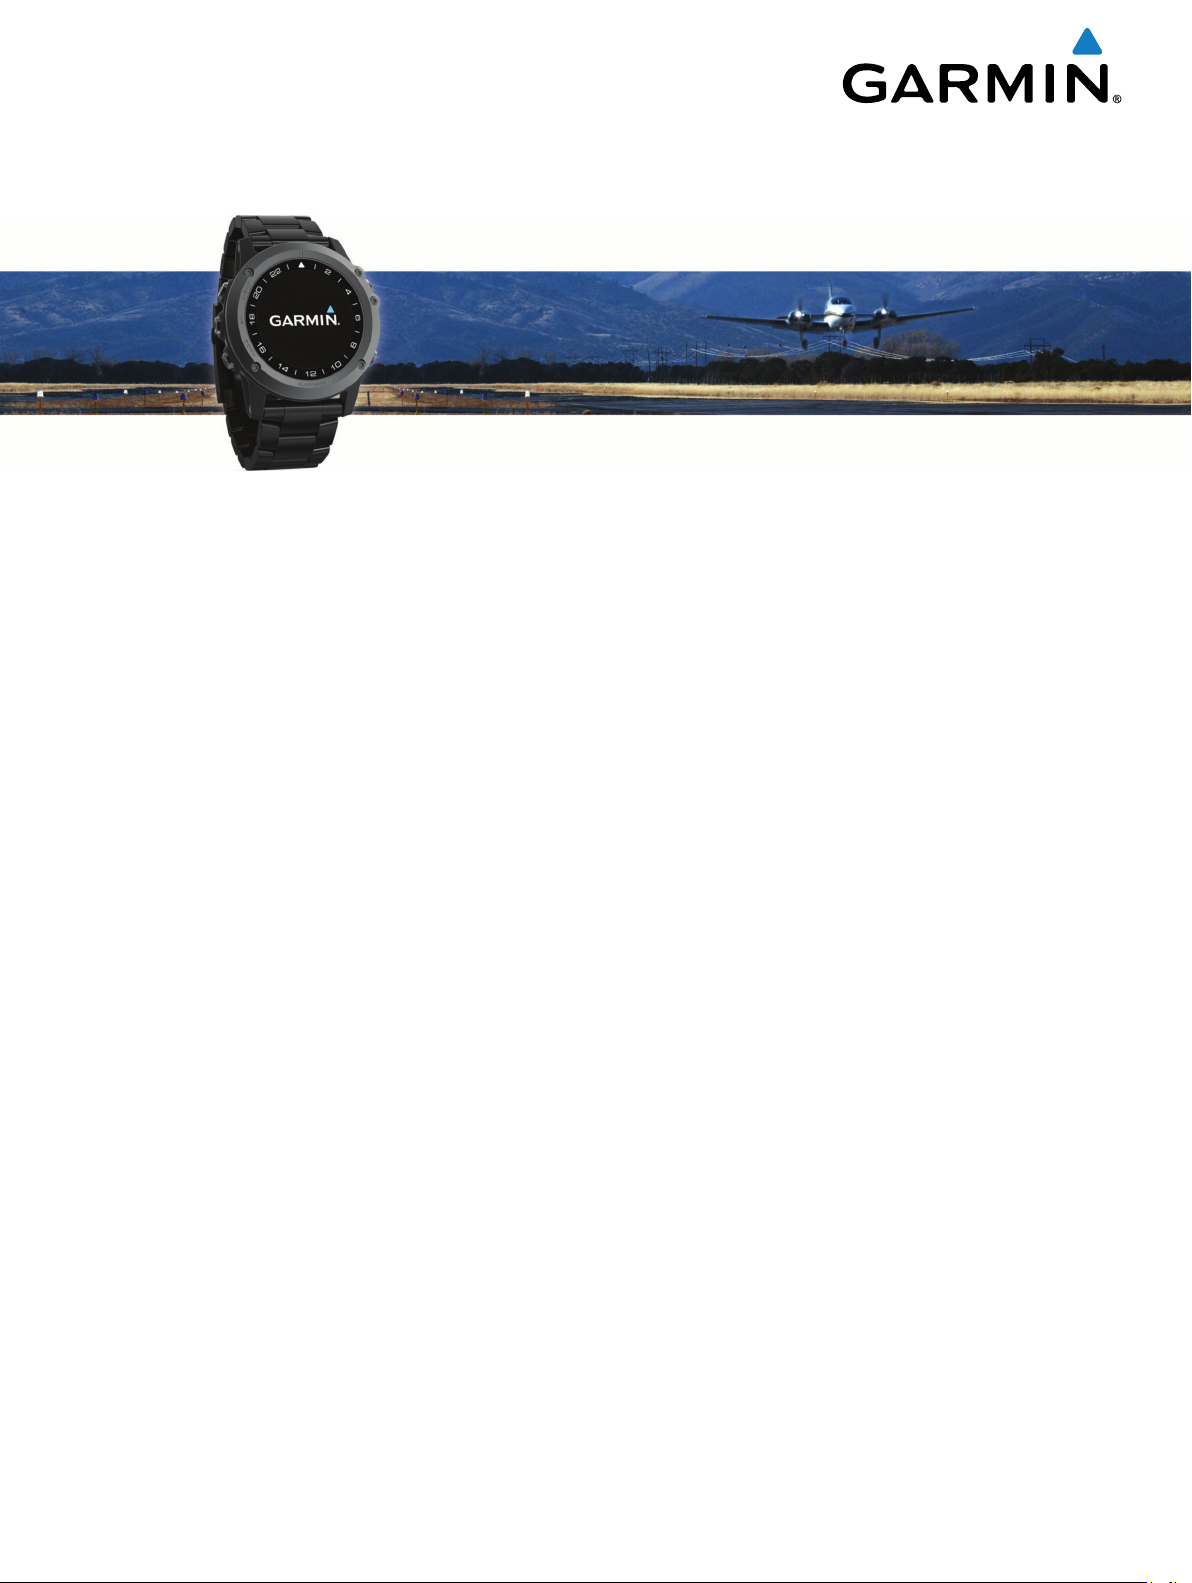
Navigating to the Nearest Airport
Hold .
1
A list of the nearest airports appears.
Select an airport.
2
Nearest Airport
A list of matching airports appears.
Select the airport.
5
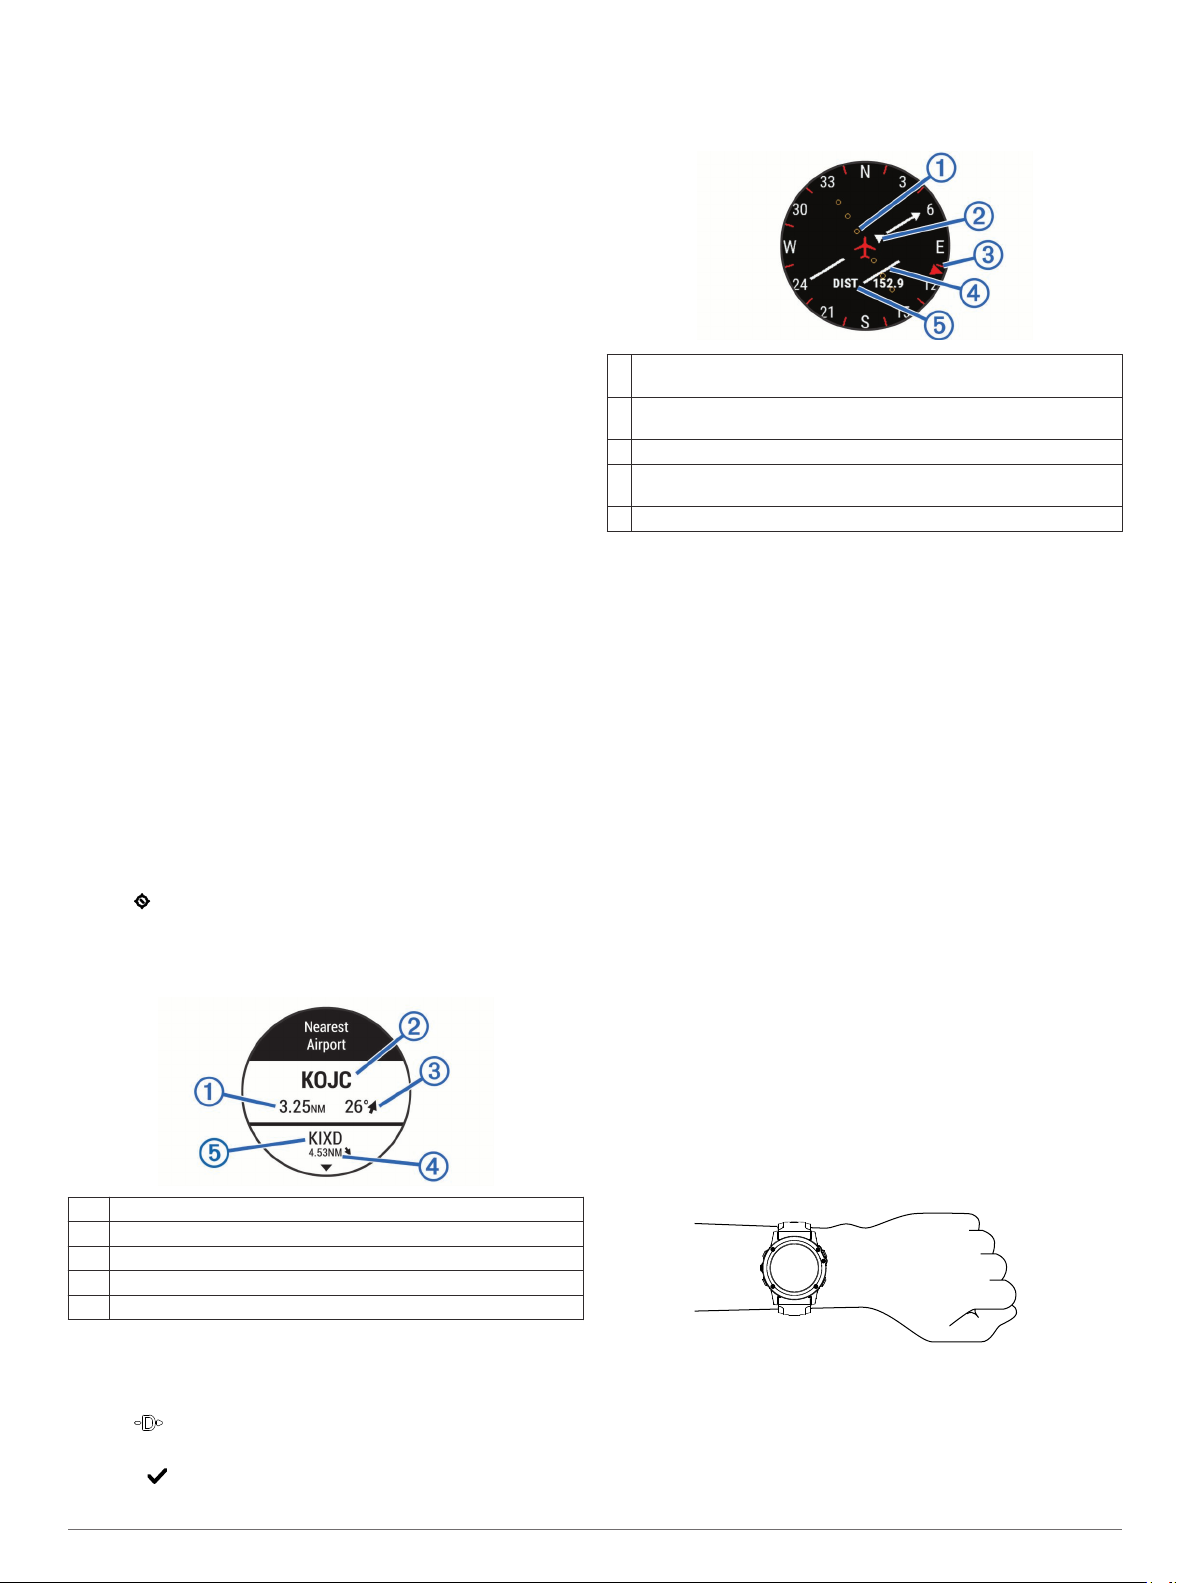
Horizontal Situation Indicator
Course deviation distance. The dots indicate your distance off
À
course.
To-and-from indicator. Indicates whether you are headed toward or
Á
away from the waypoint.
Bearing to the nearest airport.
Â
Course deviation indicator (CDI). Indicates the location of the
Ã
desired course line in relation to your location.
Distance to destination.
Ä
Stopping Navigation
Hold UP, and select Stop Navigation.
Disabling the Automatic Flight Timer
You can disable the automatic flight timer so your device does
not automatically record fight data when your ground speed
exceeds 30 kn.
Hold UP.
1
Select Settings > Apps > Fly > Flight Timer > Manual.
2
Heart Rate Features
This manual is for D2 Bravo models compatible with heart rate
monitors and for wrist-based heart rate models. You must have
a heart rate monitor to use the features described in this section.
D2 Bravo: This device is compatible with ANT+® heart rate
monitors.
D2 Bravo Titanium: This device has a wrist-based heart rate
monitor and is also compatible with ANT+ heart rate
monitors. You can view wrist-based heart rate data on the
heart rate widget. If both wrist-based heart rate and ANT+
heart rate data are available, your device uses the ANT+
heart rate data.
Wrist-based Heart Rate
Wearing the Device and Heart Rate
• Wear the D2 Bravo device above your wrist bone.
NOTE: The device should be snug but comfortable, and it
should not move while running or exercising.
Distance to the nearest airport
À
Nearest airport identifier
Á
Bearing to the nearest airport
Â
Distance to the second nearest airport
Ã
Second nearest airport identifier
Ä
Navigating to an Airport by Its Identifier
You can navigate directly to an airport by searching for the
airport identifier.
Hold .
1
Enter all or part of the alphanumeric airport identifier.
2
Select .
3
Select START.
4
2 Flying
• Do not damage the heart rate sensor on the back of the
device.
• See (Troubleshooting, page 24) for more information about
wrist-based heart rate.
Tips for Erratic Heart Rate Data
If the heart rate data is erratic or does not appear, you can try
these tips.
• Clean and dry your arm before putting on the device.
• Avoid wearing sunscreen under the device.
• Wear the device above your wrist bone. The device should
be snug but comfortable.
NOTE: You can try wearing the device higher on your
forearm. You can try wearing the device on your other arm.
• Warm up for 5 to 10 minutes and get a heart rate reading
before starting your activity.
NOTE: In cold environments, warm up indoors.
• Rinse the device with fresh water after each workout.
• While exercising, use a silicone band.
Viewing the Heart Rate Widget
The widget displays your current heart rate in beats per minute
(bpm), your lowest resting heart rate for today, and a graph of
your heart rate.
From the clock, select DOWN.
1
Select START to view your average resting heart rate values
2
for the last 7 days.
Broadcasting Heart Rate Data to Garmin Devices
You can broadcast your heart rate data from your D2 Bravo
device and view it on paired Garmin devices. For example, you
can broadcast your heart rate data to an Edge® device while
cycling, or to a VIRB® action camera during an activity.
NOTE: Broadcasting heart rate data decreases battery life.
Hold UP.
1
Select Settings > Sensors > Wrist Heart Rate > Broadcast
2
HR.
The D2 Bravo device starts broadcasting your heart rate
data, and appears.
NOTE: You can view only the heart rate widget while
broadcasting heart rate data.
Pair your D2 Bravo device with your Garmin ANT+
3
compatible device.
NOTE: The pairing instructions differ for each Garmin
compatible device. See your owner's manual.
TIP: To stop broadcasting your heart rate data, select any
key, and select Yes.
Turning Off the Wrist Heart Rate Monitor
For the D2 Bravo Titanium, the default value for the Wrist Heart
Rate setting is Auto. The device automatically uses the wristbased heart rate monitor unless you pair an ANT+ heart rate
monitor to the device.
Hold UP.
1
Select Settings > Sensors > Wrist Heart Rate > Off.
2
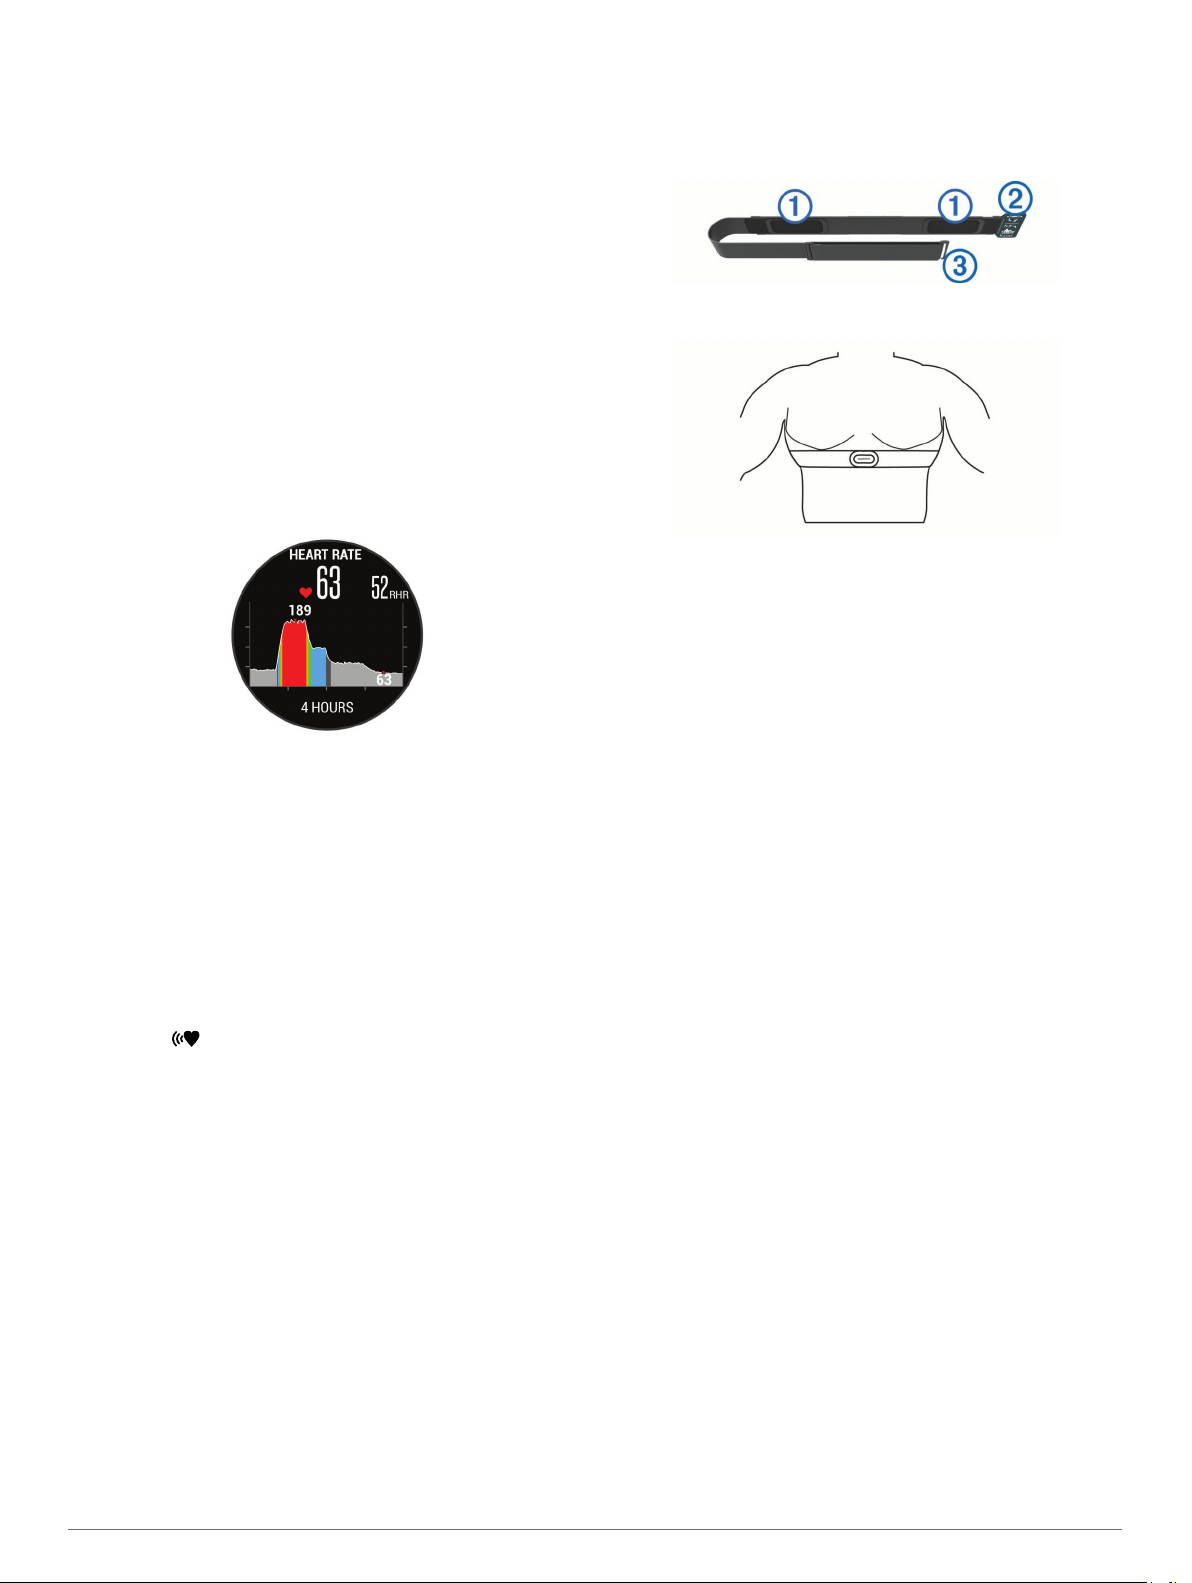
Putting On the Heart Rate Monitor
You should wear the heart rate monitor directly on your skin, just
below your sternum. It should be snug enough to stay in place
during your activity.
If necessary, attach the strap extender to the heart rate
1
monitor.
Wet the electrodes À on the back of the heart rate monitor to
2
create a strong connection between your chest and the
transmitter.
Wear the heart rate monitor with the Garmin logo facing right-
3
side up.
The loop Á and hook  connection should be on your right
side.
Wrap the heart rate monitor around your chest, and connect
4
the strap hook to the loop.
NOTE: Make sure the care tag does not fold over.
After you put on the heart rate monitor, it is active and sending
data.
Tips for Erratic Heart Rate Data
If the heart rate data is erratic or does not appear, you can try
these tips.
• Reapply water to the electrodes and contact patches (if
applicable).
• Tighten the strap on your chest.
• Warm up for 5 to 10 minutes.
• Follow the care instructions (Caring for the Heart Rate
Monitor, page 24).
• Wear a cotton shirt or thoroughly wet both sides of the strap.
Synthetic fabrics that rub or flap against the heart rate
monitor can create static electricity that interferes with heart
rate signals.
• Move away from sources that can interfere with your heart
rate monitor.
Sources of interference may include strong electromagnetic
fields, some 2.4 GHz wireless sensors, high-voltage power
lines, electric motors, ovens, microwave ovens, 2.4 GHz
cordless phones, and wireless LAN access points.
Running Dynamics
You can use your compatible D2 Bravo device paired with the
HRM-Run™ accessory to provide real-time feedback about your
running form. If your D2 Bravo device was packaged with the
HRM-Run accessory, the devices are already paired.
The HRM-Run accessory has an accelerometer in the module
that measures torso movement in order to calculate six running
metrics.
Cadence: Cadence is the number of steps per minute. It
displays the total steps (right and left combined).
Vertical oscillation: Vertical oscillation is your bounce while
running. It displays the vertical motion of your torso,
measured in centimeters for each step.
Heart Rate Features 3
Ground contact time: Ground contact time is the amount of
time in each step that you spend on the ground while
running. It is measured in milliseconds.
NOTE: Ground contact time is not available while walking.
Ground contact time balance: Ground contact time balance
displays the left/right balance of your ground contact time
while running. It displays a percentage. For example, 53.2
with an arrow pointing left or right.
Stride length: Stride length is the length of your stride from one
footfall to the next. It is measured in meters.
Vertical ratio: Vertical ratio is the ratio of vertical oscillation to
stride length. It displays a percentage. A lower number
typically indicates better running form.
Training with Running Dynamics
Before you can view running dynamics, you must put on the
HRM-Run accessory and pair it with your device (Pairing ANT+
Sensors, page 22). If your D2 Bravo was packaged with the
accessory, the devices are already paired, and the D2 Bravo is
set to display running dynamics.
Select an option:
1
• If your HRM-Run accessory and D2 Bravo device are
already paired, skip to step 8.
• If your HRM-Run accessory and D2 Bravo device are not
already paired, complete all the steps in this procedure.
Hold UP.
2
Select Settings > Apps.
3
Select an activity.
4
Select Data Screens.
5
Select a running dynamics data screen.
6
NOTE: The running dynamics screens are not available for
all activities.
Select Status > Enabled.
7
Go for a run (Going for a Run, page 7).
8
Select UP or DOWN to open a running dynamics screen to
9
view your metrics.
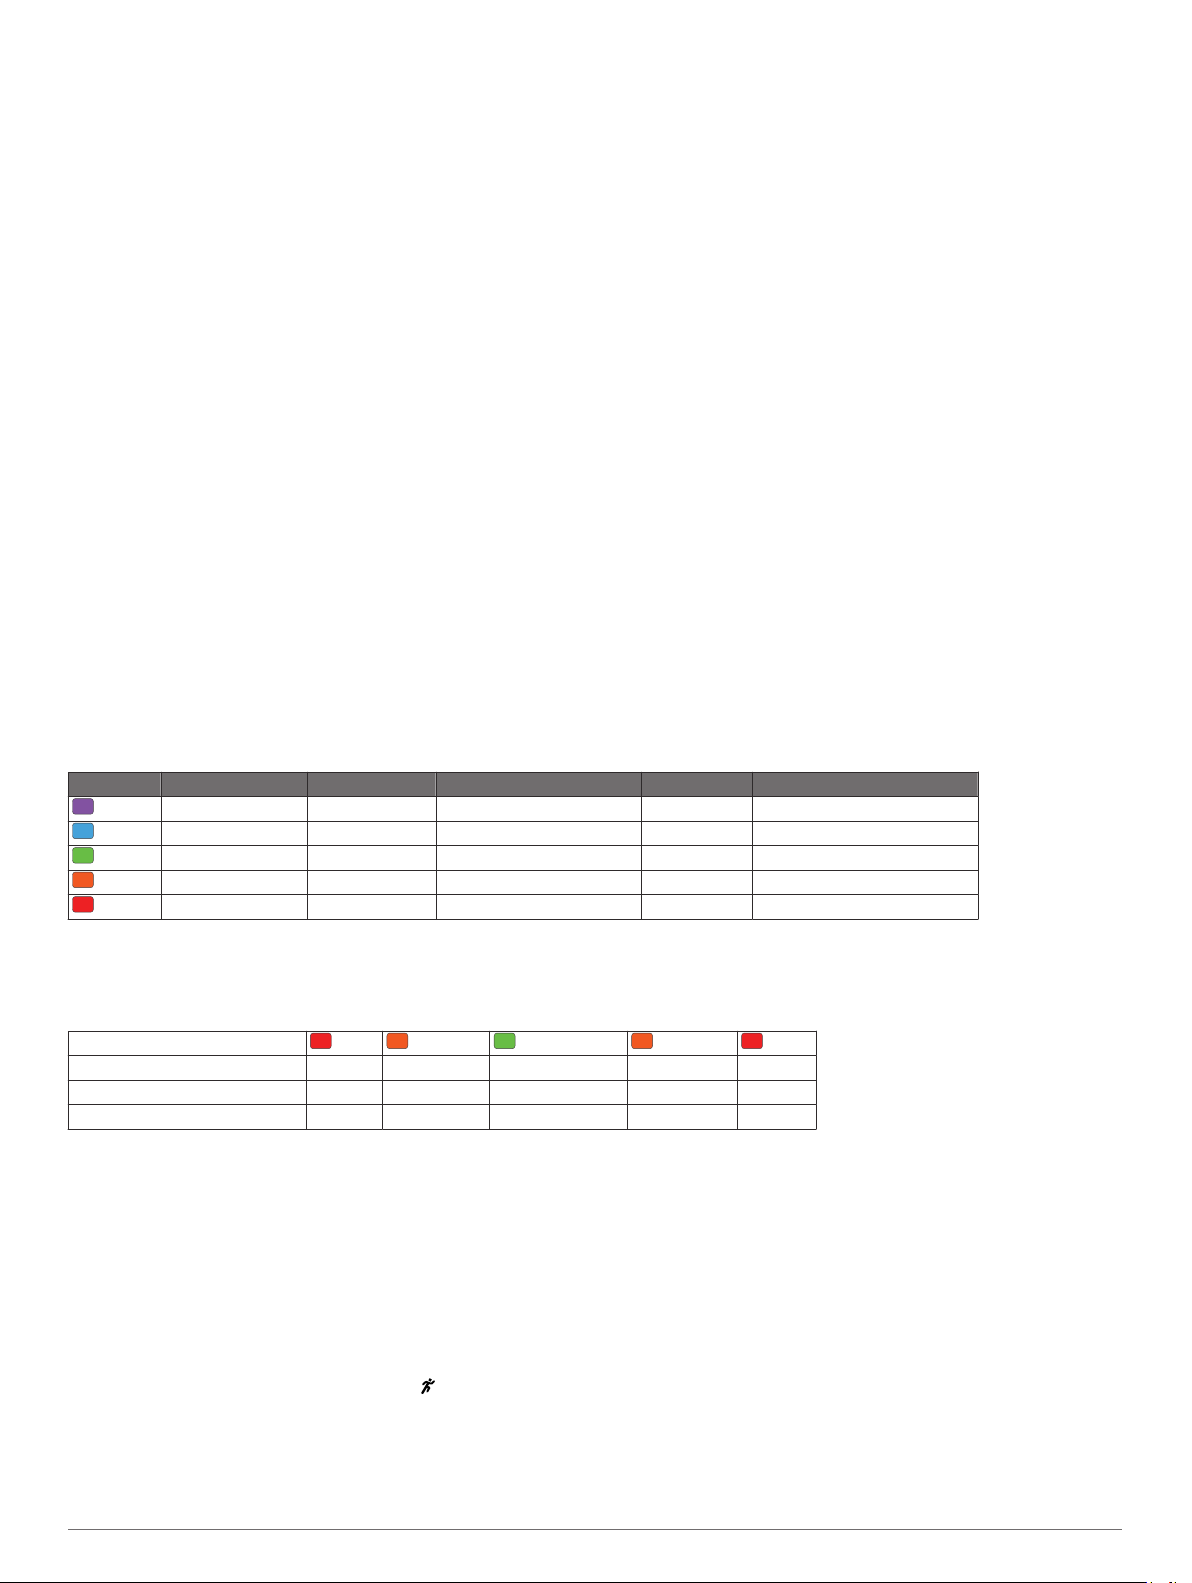
Color Gauges and Running Dynamics Data
The running dynamics screens display a color gauge for the primary metric. You can display cadence, vertical oscillation, ground
contact time, ground contact time balance, or vertical ratio as the primary metric. The color gauge shows you how your running
dynamics data compare to those of other runners. The color zones are based on percentiles.
Garmin has researched many runners of all different levels. The data values in the red or orange zones are typical for less
experienced or slower runners. The data values in the green, blue, or purple zones are typical for more experienced or faster
runners. More experienced runners tend to exhibit shorter ground contact times, lower vertical oscillation, lower vertical ratio, and
higher cadence than less experienced runners. However, taller runners typically have slightly slower cadences, longer strides, and
slightly higher vertical oscillation. Vertical ratio is your vertical oscillation divided by stride length. It is not correlated with height.
NOTE: The color gauge for ground contact time balance is different (Ground Contact Time Balance Data, page 4).
Go to www.garmin.com for more information on running dynamics. For additional theories and interpretations of running dynamics
data, you can search reputable running publications and websites.
Color Zone Percentile in Zone Cadence Range Vertical Oscillation Range Vertical Ratio Ground Contact Time Range
Purple >95 >183 spm <6.4 cm <6.1% <218 ms
Blue 70–95 174–183 spm 6.4–8.1 cm 6.1–7.4% 218–248 ms
Green 30–69 164–173 spm 8.2–9.7 cm 7.5–8.6% 249–277 ms
Orange 5–29 153–163 spm 9.8–11.5 cm 8.7–10.1% 278–308 ms
Red <5 <153 spm >11.5 cm >10.1% >308 ms
Ground Contact Time Balance Data
Ground contact time balance measures your running symmetry and appears as a percentage of your total ground contact time. For
example, 51.3% with an arrow pointing left indicates the runner is spending more time on the ground when on the left foot. If your
data screen displays both numbers, for example 48–52, 48% is the left foot and 52% is the right foot.
Color Zone Red Orange Green Orange Red
Symmetry Poor Fair Good Fair Poor
Percent of Other Runners 5% 25% 40% 25% 5%
Ground Contact Time Balance >52.2% L 50.8–52.2% L 50.7% L–50.7% R 50.8–52.2% R >52.2% R
While developing and testing running dynamics, the Garmin team found correlations between injuries and greater imbalances with
certain runners. For many runners, ground contact time balance tends to deviate further from 50–50 when running up or down hills.
Most running coaches agree that a symmetrical running form is good. Elite runners tend to have quick and balanced strides.
You can watch the color gauge or data field during your run or view the summary on your Garmin Connect account after your run.
As with the other running dynamics data, ground contact time balance is a quantitative measurement to help you learn about your
running form.
Tips for Missing Running Dynamics Data
If running dynamics data does not appear, you can try these
tips.
• Make sure you have the HRM-Run accessory.
Accessories with running dynamics have on the front of the
module.
• Pair the HRM-Run accessory with your D2 Bravo device
again, according to the instructions.
• If the running dynamics data display shows only zeros, make
sure the heart rate monitor is worn right-side up.
NOTE: Ground contact time and balance appears only while
running. It is not calculated while walking.
Physiological Measurements
These physiological measurements require wrist-based heart
rate or a compatible heart rate monitor. The measurements are
estimates that can help you track and understand your training
activities and race performances. These estimates are provided
and supported by Firstbeat.
4 Heart Rate Features
NOTE: The estimates may seem inaccurate at first. The device
requires you to complete a few activities to learn about your
performance.
VO2 max.: VO2 max. is the maximum volume of oxygen (in
milliliters) you can consume per minute per kilogram of body
weight at your maximum performance.
Predicted race times: Your device uses the VO2 max. estimate
and published data sources to provide a target race time
based on your current state of fitness. This projection also
presumes you have completed the proper training for the
race.
Recovery advisor: The recovery advisor displays how much
time remains before you are fully recovered and ready for the
next hard workout.
Stress score: Stress score requires a chest heart rate monitor.
Stress score measures your heart rate variability while
standing still for 3 minutes. It provides your overall stress
level. The scale is 1 to 100, and a lower score indicates a
lower stress level.
Performance condition: Your performance condition is a real-
time assessment after 6 to 20 minutes of activity. It can be
added as a data field so you can view your performance
condition during the rest of your activity. It compares your
real-time condition to your average fitness level.
Lactate threshold: Lactate threshold requires a chest heart rate
monitor. Lactate threshold is the point where your muscles
start to rapidly fatigue. Your device measures your lactate
threshold level using heart rate and pace.
About VO2 Max. Estimates
VO2 max. is the maximum volume of oxygen (in milliliters) you
can consume per minute per kilogram of body weight at your
maximum performance. In simple terms, VO2 max. is an
indication of athletic performance and should increase as your
level of fitness improves. The D2 Bravo device has separate
VO2 max. estimates for running and cycling. You can use your
Garmin device paired with a compatible heart rate monitor and
power meter to display your cycling VO2 max. estimate. You
can use your Garmin device paired with a compatible heart rate
monitor to display your running VO2 max. estimate.
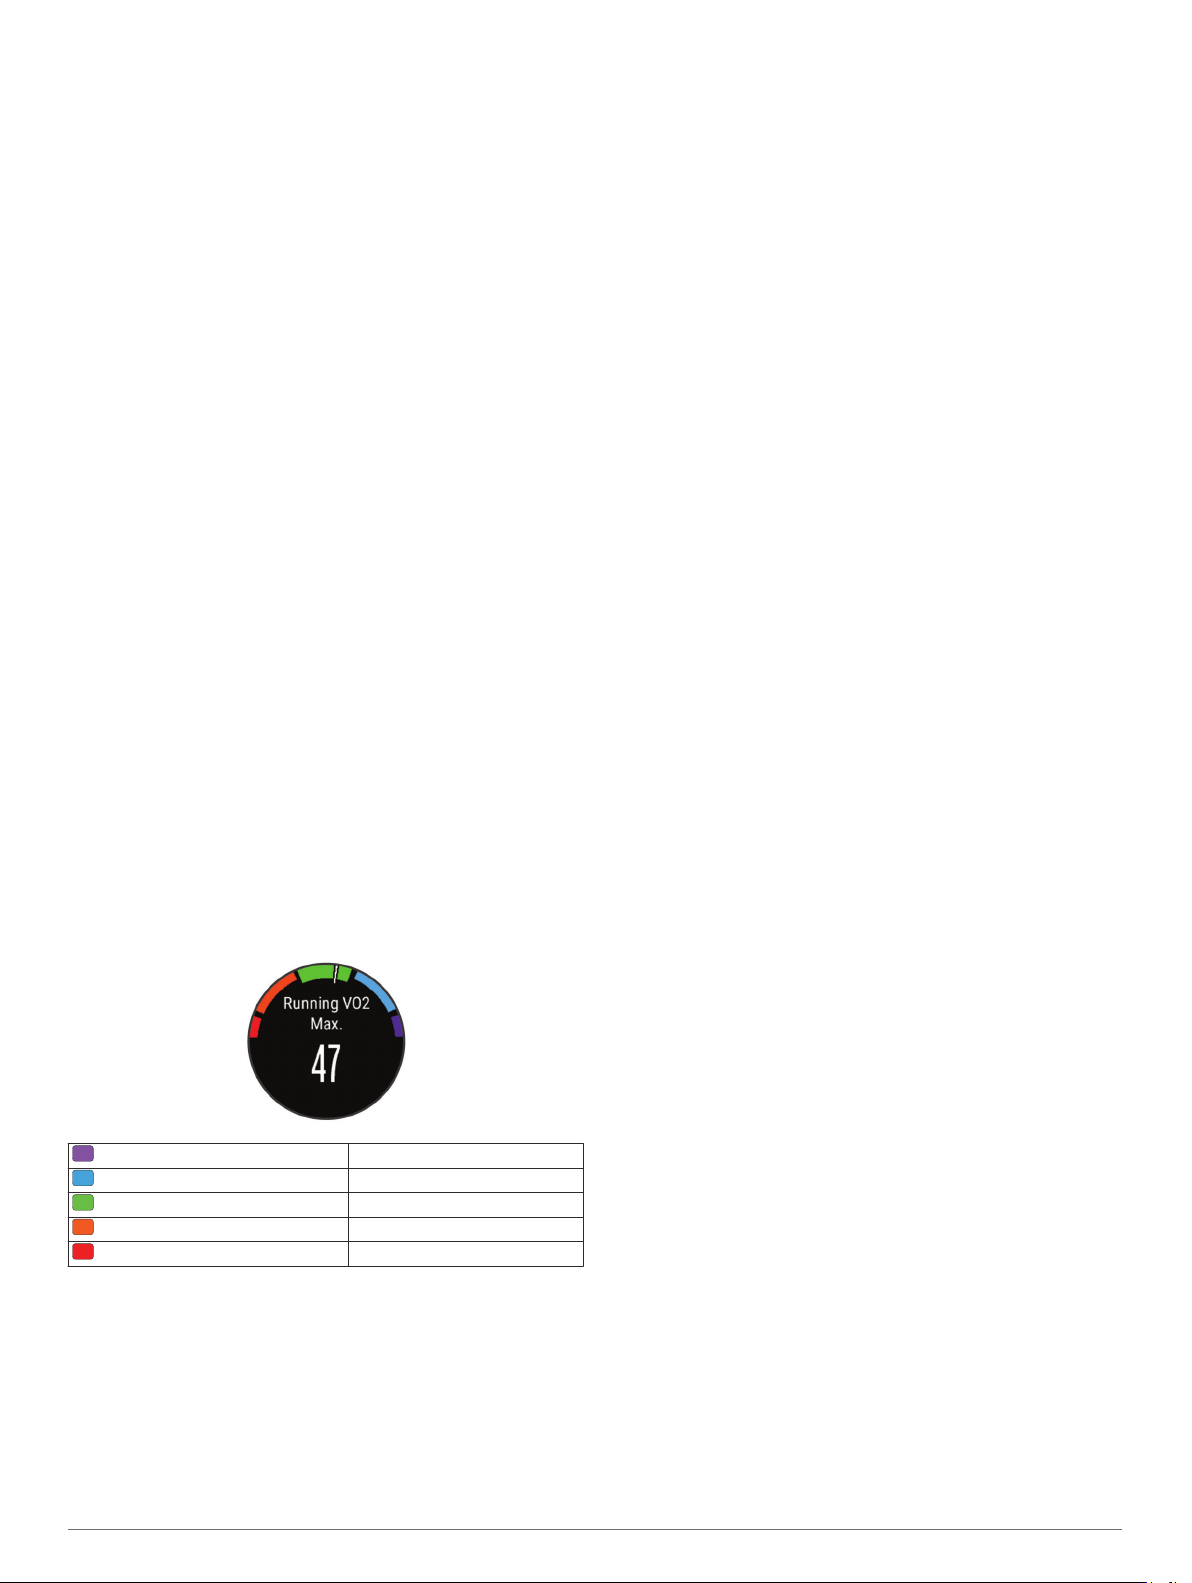
Your VO2 max. estimate appears as a number and position on
the color gauge.
Purple Superior
Blue Excellent
Green Good
Orange Fair
Red Poor
VO2 max. data and analysis is provided with permission from
The Cooper Institute®. For more information, see the appendix
(VO2 Max. Standard Ratings, page 27), and go to
www.CooperInstitute.org.
Getting Your VO2 Max. Estimate for Running
Before you can view your VO2 max. estimate, you must put on
the heart rate monitor and pair it with your device (Pairing ANT+
Sensors, page 22). If your D2 Bravo device was packaged
with a heart rate monitor, the devices are already paired. For the
most accurate estimate, complete the user profile setup (Setting
Up Your User Profile, page 10), and set your maximum heart
rate (Setting Your Heart Rate Zones, page 10).
NOTE: The estimate may seem inaccurate at first. The device
requires a few runs to learn about your running performance.
Run for at least 10 minutes outdoors.
1
After your run, select Save.
2
Hold UP.
3
Select Fitness > My Stats > VO2 Max. > Running.
4
Getting Your VO2 Max. Estimate for Cycling
Before you can view your VO2 max. estimate, you must have a
compatible heart rate monitor and a power meter. The power
meter must be paired with your D2 Bravo device (Pairing ANT+
Sensors, page 22). For the most accurate estimate, complete
the user profile setup (Setting Up Your User Profile, page 10)
and set your maximum heart rate (Setting Your Heart Rate
Zones, page 10).
NOTE: The estimate may seem inaccurate at first. The device
requires a few rides to learn about your cycling performance.
Ride at a steady, high intensity for at least 20 minutes
1
outdoors.
After your ride, select Save.
2
Select START > My Stats > VO2 Max. > Cycling.
3
Viewing Your Predicted Race Times
This feature requires a heart rate monitor.
For the most accurate estimate, complete the user profile setup
(Setting Up Your User Profile, page 10), and set your
maximum heart rate (Setting Your Heart Rate Zones,
page 10). Your device uses the VO2 max. estimate (About
VO2 Max. Estimates, page 5) and published data sources to
provide a target race time based on your current state of fitness.
This projection also presumes you have completed the proper
training for the race.
NOTE: The projections may seem inaccurate at first. The device
requires a few runs to learn about your running performance.
Select UP > My Stats > Race Predictor.
Your projected race times appear for 5K, 10K, half marathon,
and marathon distances.
Recovery Advisor
You can use your Garmin device with a heart rate monitor to
display how much time remains before you are fully recovered
and ready for the next hard workout.
Recovery time: The recovery time appears immediately
following an activity. The time counts down until it is optimal
for you to attempt another hard workout.
Turning On the Recovery Advisor
For the most accurate estimate, complete the user profile setup
(Setting Up Your User Profile, page 10), and set your
maximum heart rate (Setting Your Heart Rate Zones,
page 10).
Hold UP.
1
Select My Stats > Recovery Advisor > Status > On.
2
Go for a run.
3
After 6 to 20 minutes, your performance condition appears
(Viewing Your Performance Condition, page 6).
After your run, select Save.
4
The recovery time appears. The maximum time is 4 days.
Recovery Heart Rate
If you are training with a heart rate monitor, you can check your
recovery heart rate value after each activity. Recovery heart rate
is the difference between your exercising heart rate and your
heart rate two minutes after the exercise has stopped. For
example, after a typical training run, you stop the timer. Your
Heart Rate Features 5

heart rate is 140 bpm. After two minutes of no activity or cool
down, your heart rate is 90 bpm. Your recovery heart rate is 50
bpm (140 minus 90). Some studies have linked recovery heart
rate to cardiac health. Higher numbers generally indicate
healthier hearts.
TIP: For best results, you should stop moving for two minutes
while the device calculates your recovery heart rate value. You
can save or discard the activity after this value appears.
Lactate Threshold
Lactate threshold is the exercise intensity at which lactate (lactic
acid) starts to accumulate in the bloodstream. In running, it is
the estimated level of effort or pace. When a runner exceeds the
threshold, fatigue starts to increase at an accelerating rate. For
experienced runners, the threshold occurs at approximately 90%
of their maximum heart rate and between 10k and half-marathon
race pace. For average runners, the lactate threshold often
occurs well below 90% of maximum heart rate. Knowing your
lactate threshold can help you determine how hard to train or
when to push yourself during a race.
If you already know your lactate threshold heart rate value, you
can enter it in your user profile settings (Setting Your Heart Rate
Zones, page 10).
Performing a Guided Test to Determine Your Lactate Threshold
Before you can perform the guided test, you must put on a heart
rate monitor and pair it with your device (Pairing ANT+ Sensors,
page 22). You must also have a VO2 max. estimate from a
previous run (About VO2 Max. Estimates, page 5).
TIP: The device requires a few runs with a heart rate monitor to
get an accurate maximum heart rate value and VO2 max.
estimate.
Hold UP.
1
Select My Stats > Lactate Threshold > Do Guided Test.
2
Select an outdoor running profile.
3
GPS is required to complete the test.
Follow the on-screen instructions.
4
Performance Condition
As you complete your activity, such as running or cycling, the
performance condition feature analyzes your pace, heart rate,
and heart rate variability to make a real-time assessment of your
ability to perform compared to your average fitness level.
Performance condition values range from -20 to +20. After the
first 6 to 20 minutes of your activity, the device displays your
performance condition score. For example, a score of +5 means
that you are rested, fresh, and capable of a good run or ride.
You can add performance condition as a data field to one of
your training screens to monitor your ability throughout the
activity. Performance condition can also be an indicator of
fatigue level, especially at the end of a long training run or ride.
NOTE: The device requires a few runs or rides with a heart rate
monitor to get an accurate VO2 max. estimate and learn about
your running or riding ability (About VO2 Max. Estimates,
page 5).
Viewing Your Performance Condition
Your device analyzes your performance condition based on
heart rate and power data. You can use an ANT+ heart rate
monitor or a device with wrist-based heart rate.
If necessary, pair your compatible ANT+ sensor with your D2
1
Bravo device (Pairing ANT+ Sensors, page 22).
Add Perform. Cond. to a data screen (Customizing the Data
2
Screens, page 19).
Go for a run or ride.
3
After 6 to 20 minutes, your performance condition appears.
Scroll to the data screen to view your performance condition
4
throughout the run or ride.
Stress Score
Stress score is the result of a three-minute test performed while
standing still, where the D2 Bravo device analyzes heart rate
variability to determine your overall stress. Training, sleep,
nutrition, and general life stress all impact how a runner
performs. The stress score range is from 1 to 100, where 1 is a
very low stress state and 100 is a very high stress state.
Knowing your stress score can help you decide if your body is
ready for a tough training run or yoga.
Viewing Your Stress Score
Before you can view your stress score, you must put on a heart
rate monitor, pair it with your device (Pairing ANT+ Sensors,
page 22), and show the stress score app in the apps list
(Activity App Settings, page 18).
TIP: Garmin recommends that you measure your stress score at
approximately the same time and under the same conditions
every day.
From the clock, select START.
1
Select Stress Score.
2
Select START.
3
Stand still, and rest for 3 minutes.
4
Activities
Your device can be used for indoor, outdoor, athletic, and fitness
activities. When you start an activity, the device displays and
records sensor data. You can save activities and share them
with the Garmin Connect community.
You can also add Connect IQ™ activity apps to your device using
your Garmin Connect account (Connect IQ Features,
page 17).
Starting an Activity
When you start an activity, GPS turns on automatically (if
required). When you stop the activity, the device returns to
watch mode.
From the clock, select START.
1
Select an activity.
2
If necessary, follow the on-screen instructions to enter
3
additional information.
If necessary, wait while the device connects to your ANT+
4
sensors.
If the activity requires GPS, go outside, and wait while the
5
device locates satellites.
Select START to start the timer.
6
NOTE: The device does not record your activity data until
you start the timer.
Stopping an Activity
NOTE: Some options are not available for some activities.
Select STOP.
1
If you do not save the activity manually after stopping the
activity, the device saves it automatically after 25 minutes
have passed.
Select an option:
2
• To resume your activity, select Resume.
• To save the activity and return to watch mode, select
Save.
• To discard the activity and return to watch mode, select
Discard.
• To follow your track back to the starting point of your
activity, select TracBack.
6 Activities

• To suspend your activity and resume it at a later time,
select Resume Later.
Skiing
Going Cross-Country Skiing
Before you go skiing, you should charge the device (Charging
the Device, page 1).
From the clock, select START.
1
Select XC Ski.
2
Go outside, and wait while the device locates satellites.
3
Select START to start the timer.
4
History is recorded only while the timer is running.
Start your activity.
5
Select LAP to record laps (optional).
6
Select UP or DOWN to view additional data pages (optional).
7
After you complete your activity, select STOP > Save.
8
Going Downhill Skiing or Snowboarding
Before you go skiing or snowboarding, you should charge the
device (Charging the Device, page 1).
From the clock, select START.
1
Select Ski / Board.
2
Go outside, and wait while the device locates satellites.
3
Select START to start the timer.
4
History is recorded only while the timer is running.
Start your activity.
5
The auto run feature is turned on by default. This feature
automatically records new ski runs based on your movement.
The timer pauses when you stop moving downhill and when
you are on a chairlift. The timer remains paused during the
chairlift ride.
If necessary, start moving downhill to restart the timer.
6
Select UP or DOWN to view additional data pages (optional).
7
After you complete your activity, select STOP > Save.
8
Viewing Your Ski Runs
Your device records the details of each skiing or snowboarding
run. You can view run details from the paused screen or while
the timer is running.
Start a skiing or snowboarding activity.
1
Hold UP.
2
Select View Runs.
3
Select UP and DOWN to view details of your last run, your
4
current run, and your total runs.
The run screens include time, distance traveled, maximum
speed, average speed, and total descent.
Hiking
Going for a Hike
Before you go for a hike, you should charge the device
(Charging the Device, page 1).
From the clock, select START.
1
Select Hike.
2
Go outside, and wait while the device locates satellites.
3
Select START to start the timer.
4
History is recorded only while the timer is running.
Start your activity.
5
The device records a track while you hike.
When you need to take a break or pause the device from
6
tracking, select STOP > Resume Later.
The device saves the status of your hike and enters low
power mode.
Select START > Hike > Resume to resume tracking.
7
Select UP or DOWN to view additional data pages (optional).
8
After you complete your activity, select STOP > Save.
9
Running
Going for a Run
Before you go for a run, you should charge the device (Charging
the Device, page 1). Before you can use an ANT+ sensor for
your run, you must pair the sensor with your device (Pairing
ANT+ Sensors, page 22).
Put on your ANT+ sensors, such as a foot pod or heart rate
1
monitor (optional).
From the clock, select START.
2
Select Run.
3
When using optional ANT+ sensors, wait while the device
4
connects to the sensors.
Go outside, and wait while the device locates satellites.
5
Select START to start the timer.
6
History is recorded only while the timer is running.
Start your activity.
7
Select LAP to record laps (optional).
8
Select UP or DOWN to view additional data pages (optional).
9
After you complete your activity, select STOP > Save.
10
Using the Metronome
The metronome feature plays tones at a steady rhythm to help
you improve your performance by training at a faster, slower, or
more consistent cadence.
Hold UP.
1
Select Settings > Apps.
2
Select an activity.
3
NOTE: This feature is not available for all activities.
Select Metronome > Status > On.
4
Select an option:
5
• Select Beats / Minute to enter a value based on the
cadence you want to maintain.
• Select Alert Frequency to customize the frequency of the
beats.
• Select Sounds to customize the metronome tone and
vibration.
If necessary, select Preview to listen to the metronome
6
feature before you run.
Hold DOWN to return to the clock.
7
Go for a run (Going for a Run, page 7).
8
The metronome starts automatically.
During your run, select UP or DOWN to view the metronome
9
screen.
If necessary, hold UP to change the metronome settings.
10
Biking
Going for a Ride
Before you go for a ride, you should charge the device
(Charging the Device, page 1). Before you can use an ANT+
sensor for your ride, you must pair the sensor with your device
(Pairing ANT+ Sensors, page 22).
Pair your ANT+ sensors, such as a heart rate monitor, speed
1
sensor, or cadence sensor (optional).
From the clock, select START.
2
Activities 7