

Page 1
GPS 152H
owner’s manual
P R E L I M I N A R Y
Page 2

© 2010 Garmin Ltd. or its subsidiaries
Garmin International, Inc.
1200 East 151st Street,
Olathe, Kansas 66062, USA
Tel. (913) 397.8200 or (800) 800.1020
Fax (913) 397.8282
All rights reserved. Except as expressly provided herein, no part of this manual may be reproduced, copied, transmitted, disseminated, downloaded or stored in any storage
medium, for any purpose without the express prior written consent of Garmin. Garmin hereby grants permission to download a single copy of this manual onto a hard drive
or other electronic storage medium to be viewed and to print one copy of this manual or of any revision hereto, provided that such electronic or printed copy of this manual
must contain the complete text of this copyright notice and provided further that any unauthorized commercial distribution of this manual or any revision hereto is strictly
prohibited.
Information in this document is subject to change without notice. Garmin reserves the right to change or improve its products and to make changes in the content without
obligation to notify any person or organization of such changes or improvements. Visit the Garmin Web site (www.garmin.com) for current updates and supplemental
information concerning the use and operation of this and other Garmin products.
Garmin®, the Garmin logo, MapSource®, and AutoLocate® are trademarks of Garmin Ltd. or its subsidiaries, registered in the USA and other countries. myGarmin™ is a
trademark of Garmin Ltd. or its subsidiaries.
Garmin (Europe) Ltd.
Liberty House
Hounsdown Business Park,
Southampton, Hampshire, SO40 9LR UK
Tel. +44 (0) 870.8501241 (outside the UK)
0808 2380000 (within the UK)
Fax +44 (0) 870.8501251
Garmin Corporation
No. 68, Jangshu 2nd Road,
Sijhih, Taipei County, Taiwan
Tel. 886/2.2642.9199
Fax 886/2.2642.9099
Page 3

Introduction
Warning
See the Important Safety and Product Information guide in the
product box for product warnings and other important information.
Product Registration
Help us better support you by completing our online registration
today. Go to http://my.garmin.com. Keep the original sales receipt,
or a photocopy, in a safe place.
This manual includes information for the GPS 152H.
Tips and Shortcuts
Press Page to return to a main page from a submenu page.
•
Continue to press Page to scroll through the main pages.
Press Menu from any of the main screens to access advanced
•
settings. Press Menu twice to display the Settings Menu.
Press and release the Power key to adjust the display settings.
•
Contact Garmin
Contact Garmin Product Support if you have any questions while
using your unit. In the USA, go to www.garmin.com/support, or
contact Garmin USA by phone at (913) 397.8200 or (800) 800.1020.
In the UK, contact Garmin (Europe) Ltd. by phone at 0808 2380000.
In Europe, go to www.garmin.com/support and click Contact
Support for in-country support information, or contact Garmin
(Europe) Ltd. by phone at +44 (0) 870.8501241.
Manual Conventions
In this manual, when you are instructed to select an item, you should
highlight the item, and press Enter. When small arrows (>) appear
in the text, they indicate that you should highlight a series of items
on the screen using the Rocker, and press the Enter key after each
item. For example, if you see, “Select Trk > Record Mode,” you
should:
1. Use the Rocker to highlight Trk. Press Enter.
2. Use the Rocker to highlight Record Mode. Press Enter.
GPS 152H Owner’s Manual i
Page 4

Table of Contents
Introduction ...........................................................................i
Tips and Shortcuts ........................................................................ i
Manual Conventions ..................................................................... i
Product Registration ..................................................................... i
Contact Garmin ............................................................................. i
Getting Started .....................................................................1
Using the Keypad ......................................................................... 1
Turning the Unit On or Off ............................................................ 2
Acquiring GPS Satellite Signals ................................................... 2
Adjusting the Backlight and the Contrast ..................................... 2
Entering Text in a Field ................................................................ 2
Navigation ............................................................................3
Main Pages .................................................................................. 3
Creating Waypoints ...................................................................... 3
Navigating to a Destination .......................................................... 5
Creating, Navigating, and Editing Routes .................................... 6
Using Tracks ................................................................................ 8
Settings ..............................................................................10
Customizing the Main Pages ..................................................... 10
Using the Settings Menu .............................................................11
Appendix ............................................................................20
Specications ............................................................................. 20
Alarms and Messages ............................................................... 21
Using Simulator Mode ................................................................ 23
Viewing System Information ...................................................... 23
Restoring the Original Factory Settings ..................................... 23
NMEA 0183 ................................................................................ 23
Caring for the Unit ...................................................................... 24
Software License Agreement ..................................................... 24
Index ...................................................................................25
ii GPS 152H Owner’s Manual
Page 5
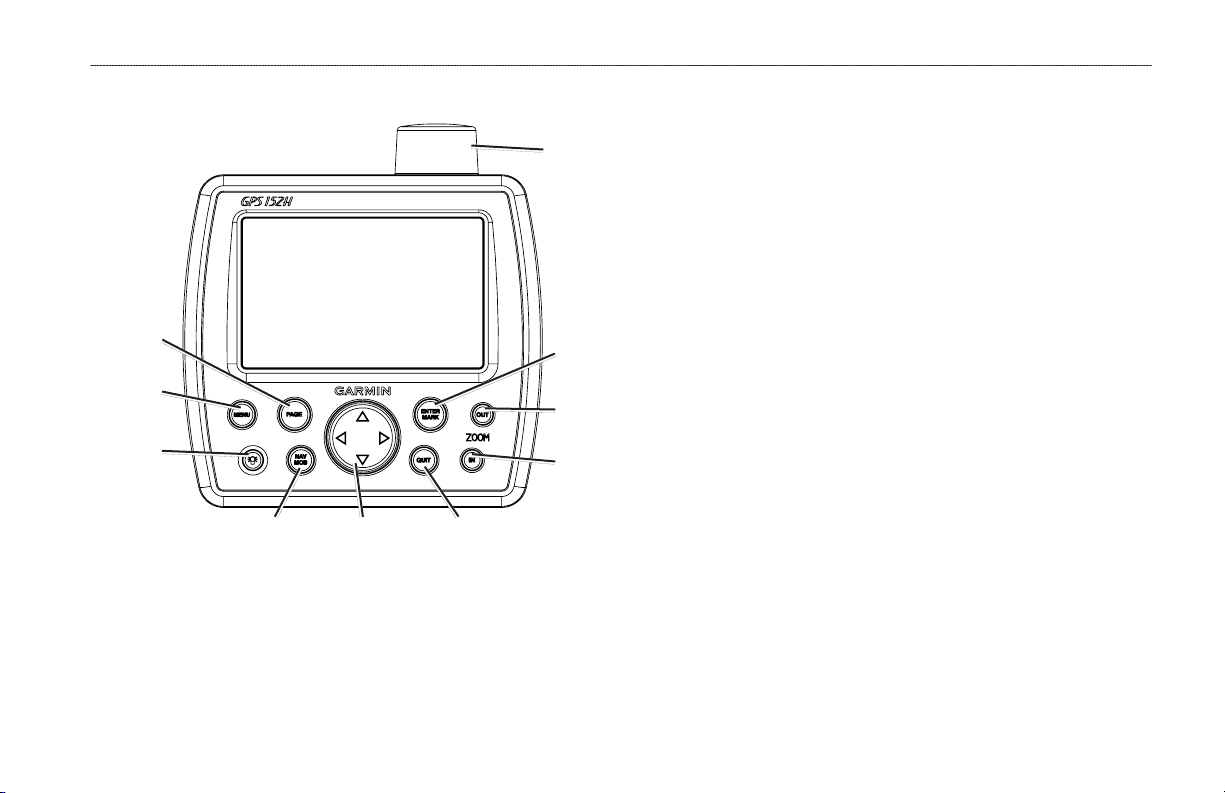
Page
Menu
Power/
Backlight
Getting Started
NAV/MOB
Rocker
Quit
Internal
Antenna
Enter/
Mark
Zoom
Out
Zoom
In
Getting Started
Using the Keypad
Power/Backlight—Press and hold to turn the unit on or off; press
and release to adjust the backlight and day and night modes.
Rocker—Press up, down, left, or right to move through menus,
highlight elds, and enter data.
Enter/Mark—Press to select a highlighted item or mark a
waypoint.
Menu—Press to access additional settings and conguration
options. Press twice to display the Settings menu.
Page—Press to cycle through the home pages.
NAV/MOB—Press and release to display the Navigation menu.
Press and hold to navigate to a man overboard (MOB) location.
Quit—Press to return to the previous page. Press when entering data
to cancel the action and restore the previous value.
Zoom Out—Press to zoom out.
Zoom In—Press to zoom in.
GPS 152H Owner’s Manual 1
Page 6
Getting Started
Turning the Unit On or Off
To turn on the unit, press and release the Power key. When the
To cycle the backlight from your adjusted setting to Off, and to
maximum setting, continue to press and release the Power key.
Warning screen appears, press Enter.
To turn off the unit, press and hold the Power key.
Acquiring GPS Satellite Signals
When you turn on the GPS 152H, it must collect satellite data
and establish the current location. When the unit acquires satellite
signals, the signal strength bars momentarily appear on the Satellites
page. When the unit loses satellite signals, the bars disappear and the
position icon displays a ashing question mark.
For more information about GPS, visit the Garmin Web site at
www.garmin.com/aboutGPS.
Entering Text in a Field
1. Use the Rocker to highlight the eld you want to change. Press
Enter.
2. Press the left arrow on the Rocker to clear the eld.
3. Press the up and down arrows on the Rocker until the desired
character appears. Press Enter.
4. Press the right arrow on the Rocker to enter the next character.
5. Repeat steps 3 and 4 until the text is complete.
6. Press Enter.
Use the Rocker to highlight other elds on the same screen.
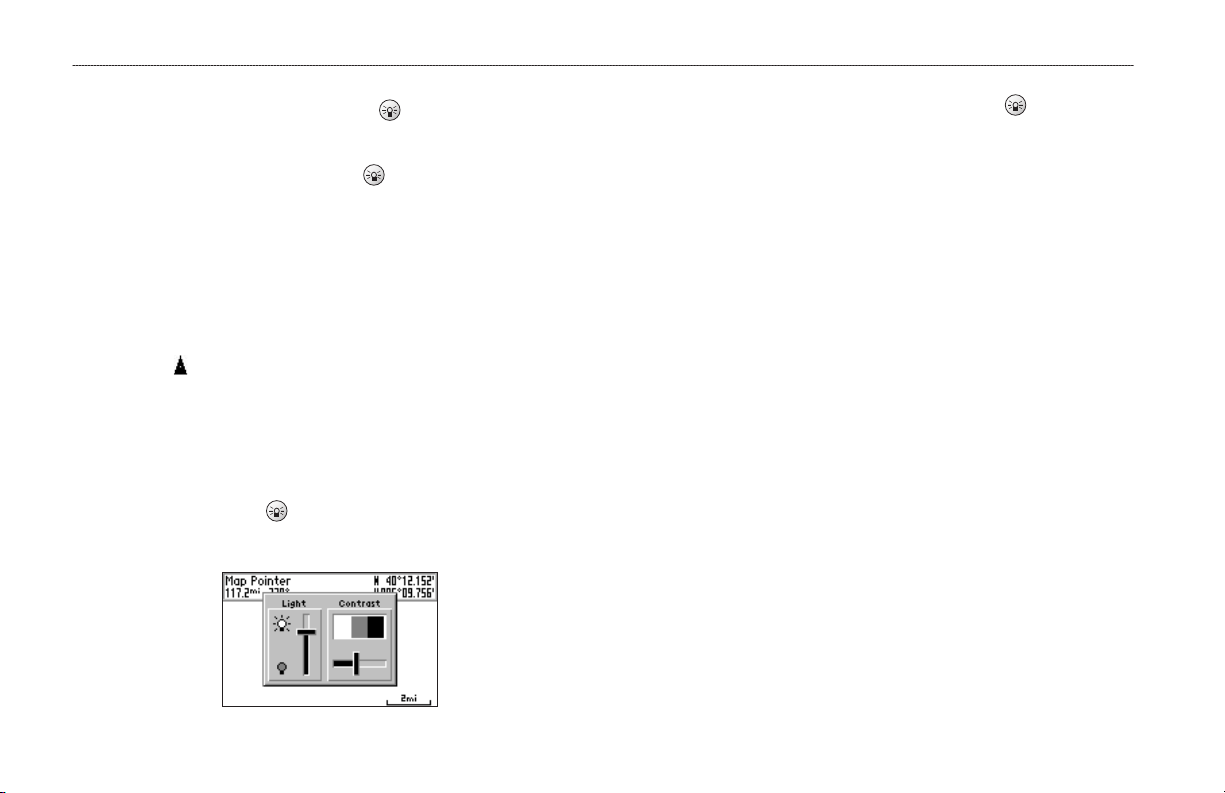
Adjusting the Backlight and the Contrast
1. Press and release the Power key.
2. Use the Rocker to adjust the light and the contrast.
2 GPS 152H Owner’s Manual
Page 7
Navigation
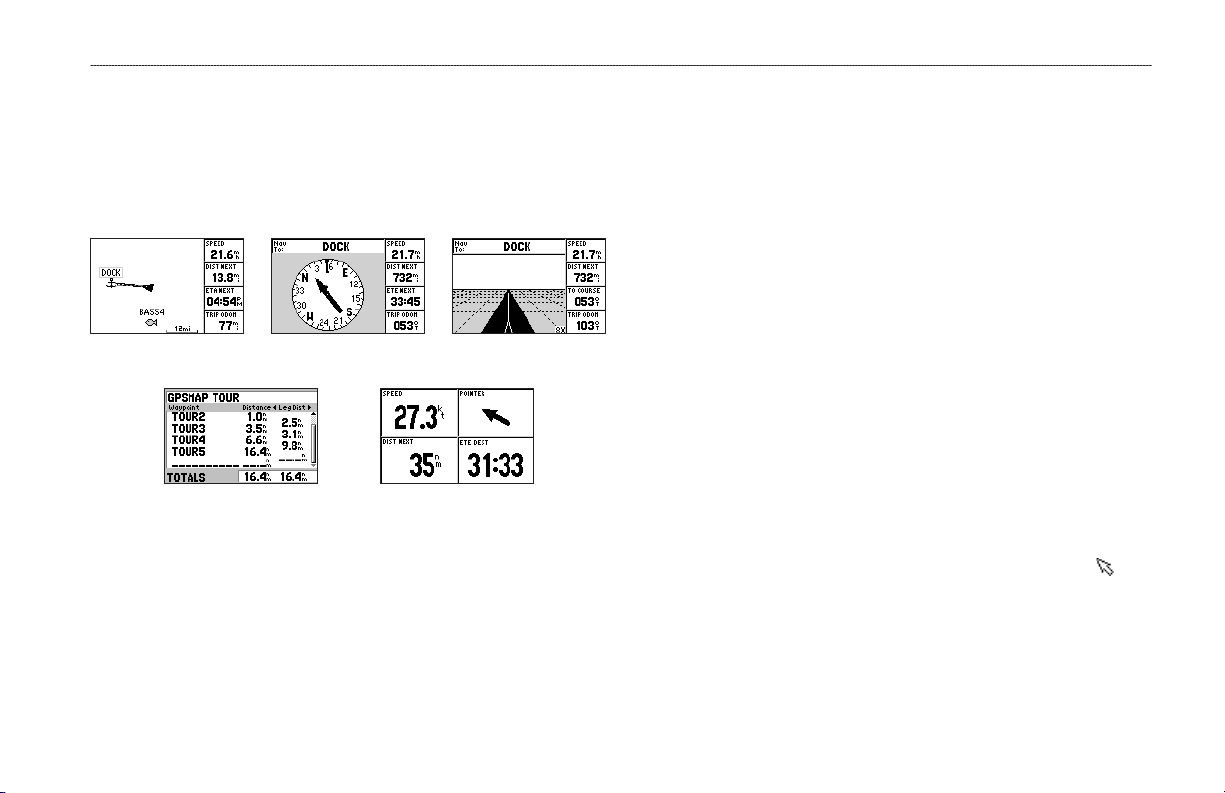
Main Pages
The GPS 152H has ve Main pages.
To cycle through the Main pages, press Page.
Map Page Highway PageCompass Page
Active Route Page Numbers Page
Navigation
Marking Your Present Location as a Waypoint:
1. From any Main page, press and hold ENTER/MARK until the
New Waypoint screen appears.
2. To change the default symbol, name, or depth of the waypoint,
use the Rocker to highlight the eld you want to change. Enter
text as described on page 2.
3. Select OK to save the waypoint.
Creating a Waypoint by Entering Grid Coordinates
1. From any Main page, press Menu twice.
2. Highlight Wpt, and press Menu.
3. Select New Waypoint.
4. Use the Rocker to highlight the coordinates eld.
5. To change the default symbol, name, or depth of the waypoint,
use the Rocker to highlight the eld you want to change. Enter
text as described on page 2.
6. Select OK to save the waypoint.
Creating Waypoints
Waypoints are locations you record and store in the GPS 152H. You
can store up to 3,000 waypoints with a user-dened symbol, name,
and depth for each waypoint.
GPS 152H Owner’s Manual 3
1. From the Map page, use the Rocker to move the pointer ( ) to
the location where you want to create a waypoint.
2. Press and hold Enter/Mark until the New Waypoint screen
appears.
Creating a Waypoint While on the Map Page
Page 8

Navigation
3. To change the default symbol, name, or depth of the waypoint,
use the Rocker to highlight the eld you want to change. Enter
text as described on page 2.
4. Select OK to save the waypoint.
Editing a Waypoint on the Map Page
1. From the Map Page, use the Rocker to move the pointer ( ).
Highlight the waypoint you want to edit.
2. Press Enter.
3. Use the Rocker to edit text as described on page 2.
Editing a Waypoint from a List of Waypoints
1. From any Main page, press Menu twice.
2. Highlight Wpt.
3. Waypoints can be listed by name (alphabetically) or by distance
from your present location. Highlight By Name or Nearest.
4. Select the waypoint you want to edit.
5. Edit text as described on page 2.
Deleting a Waypoint
1. From any Main page, press Menu twice.
2. Highlight Wpt.
3. Highlight By Name or Nearest.
4. Select the waypoint you want to delete.
5. Select Delete > OK.
Creating Waypoint Proximity Alarms
You can dene an alarm radius around saved waypoints you want to
avoid.
1. From any Main page, press Menu twice.
2. Highlight Wpt.
3. Highlight Proximity.
4. Select the Proximity Alarm eld, and select On.
5. Select the rst empty waypoint eld.
6. Select the waypoint for which you want to dene an alarm radius.
7. Optionally, edit text as described on page 2 to change the
waypoint name or to change the symbol, and then select OK.
8. Select the distance eld, and enter the radius of the circle
around the waypoint to create an alarm when you approach the
waypoint.
To add additional proximity alarms, press Menu, select Add
Waypoint, and repeat steps 5 through 8.
To delete all proximity alarms:
1. From any Main page, press Menu twice.
2. Highlight Wpt.
3. Highlight Proximity.
4. Press Menu, and select Clear All > OK.
4 GPS 152H Owner’s Manual
Page 9
Navigating to a Destination
To navigate to a waypoint:
1. From any of the Main pages, press NAV/MOB.
2. Select Go To Waypoint.
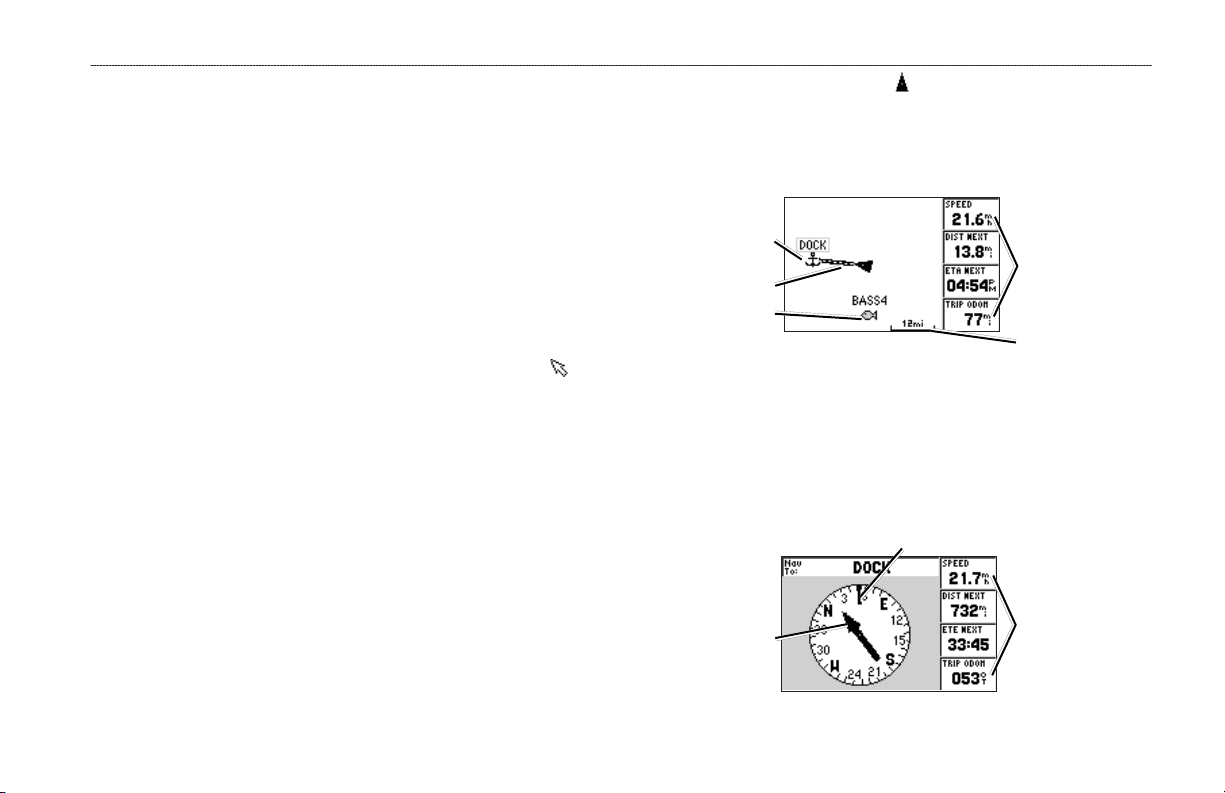
Map page—shows your location ( ), your destination (when
zoomed out far enough), a course line indicating the shortest path to
your destination, and any saved waypoints within the scale of your
map.
3. Highlight By Name or Nearest.
4. Select the waypoint to which you want to navigate.
5. Select Go To. Use the Map page, the Compass page, the
Highway page, or the Numbers page to navigate to your
destination.
To navigate to a point on the map:
1. From the Map page, use the Rocker to move the pointer ( ) to
your destination.
2. Press NAV/MOB.
3. Select Go To Map Point. Use the Map page, the Compass page,
the Highway page, or the Numbers page to navigate to your
Compass page—contains a rotating compass ring that indicates
the bearing (course over ground) to your destination. If the pointer
points toward the top of the compass, you are traveling directly
toward your destination.
destination.
Destination
Course line
Waypoint
Map page
Direction you are
currently traveling
Navigation
Data elds
Zoom scale
Bearing to
destination
Compass page
GPS 152H Owner’s Manual 5
Data elds
Page 10
Navigation
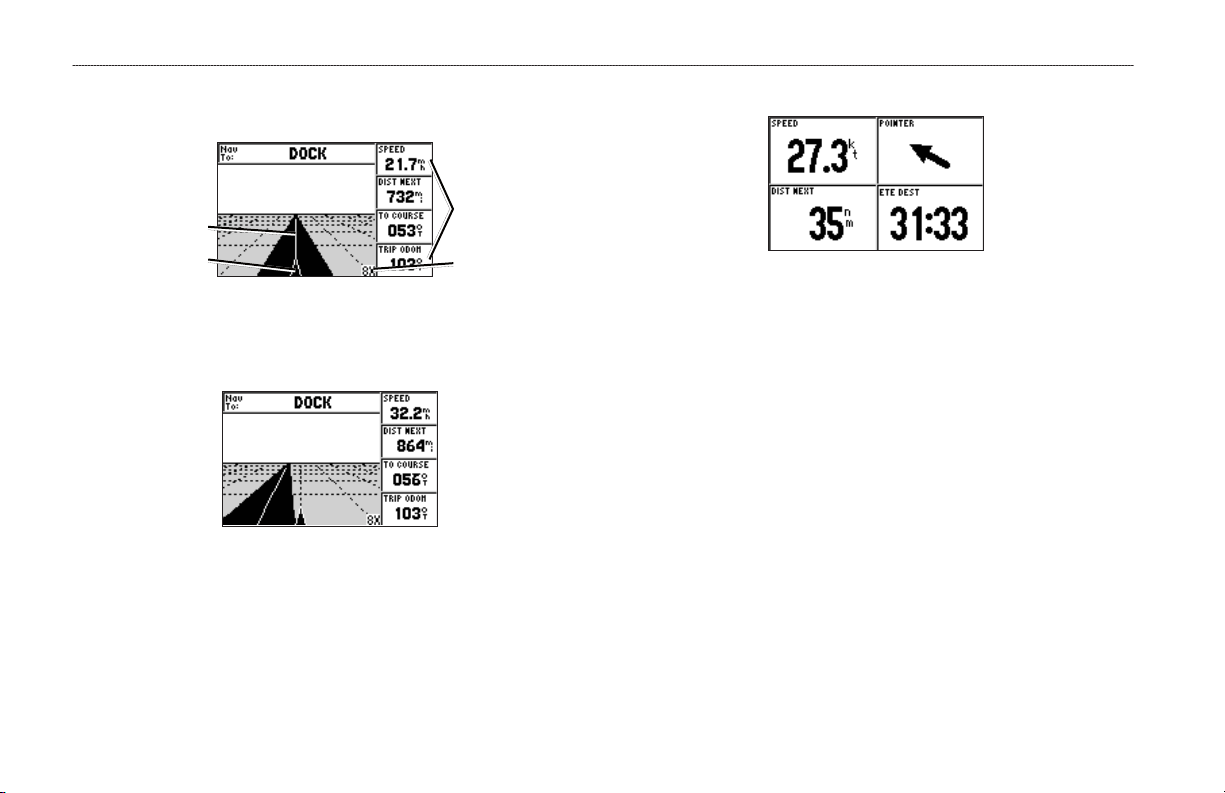
Highway page—provides a 3D view with your location and the
course to your destination.
Numbers page—displays one or four congurable data elds.
Course to
destination
Your location
Highway page
(on course)
Data elds
Zoom scale
Numbers page
To display only one data eld, press Menu and select Big Numbers.
NOTE: To change which data elds are shown, see page 10.
The Highway page also indicates if you have veered off course.
To navigate to a man overboard (MOB) location:
1. From any of the Main pages, press and hold NAV/MOB.
2. Select Yes.
To stop navigating:
From any page, press NAV/MOB and select Stop Navigation.
Highway page
(off course)
Creating, Navigating, and Editing Routes
You can create up to 50 routes, with up to 30 waypoints per route.
Creating a Route from a List of Waypoints
1. From any Main page, press Menu twice.
2. Highlight Rte, and press Menu.
3. Select New Route.
6 GPS 152H Owner’s Manual
Page 11

4. Select the rst blank eld in the list of waypoints.
5. Select a waypoint from the By Name list or the Nearest list.
6. Select OK.
7. Continue to select waypoints until you have selected the last
point on the route.
8. Press Quit to save the route.
To begin navigating the route, press NAV/MOB and select the route.
To begin navigating a saved route:
1. Press NAV/MOB.
2. Select Follow Route.
3. Select the route you want to take, and then select Activate.
4. Use the Map page, Compass page, Highway page, Numbers
While navigating a route, you can view the Active Route page,
which lists all the waypoints on the route.
Creating a Route on the Map Page
1. From the Active Route page, press Menu.
2. Select Create on Map.
3. Select the rst blank eld in the list of waypoints.
4. Move the pointer ( ) to the starting point of the route, and press
Enter.
5. Optionally, edit text as described on page 2 to name the waypoint
or to change the symbol, and then select OK.
6. Continue to create the route waypoints until the route is
complete.
7. Press Menu, and select Stop Editing Route.
8. Optionally, edit text as described on page 2 to name the route.
9. Press Quit to save the route.
Editing a Route
You can insert new waypoints, remove waypoints, and reverse
existing routes.
To insert a new waypoint on a route:
1. From any Main page, press Menu twice.
2. Highlight Rte.
3. Select the route you want to edit.
Navigation
page (pages 5–6), or Active Route page to navigate the route.
Active Route page
GPS 152H Owner’s Manual 7
Page 12

Navigation
4. Highlight the waypoint that is before the waypoint you want to
add, and press Menu.
5. Select Insert Waypoint.
6. Select a waypoint from the By Name list or the Nearest list.
7. Select OK.
8. Continue to add waypoints, if necessary.
9. Press Quit to save the route.
To remove a waypoint on a route:
1. From any Main page, press Menu twice.
2. Highlight Rte.
3. Select the route you want to edit.
4. Highlight the waypoint you want to delete, and press Menu.
5. Select Remove Waypoint.
Note: The waypoint is removed from the route. It is not deleted.
To invert an existing route:
1. From any Main page, press Menu twice.
2. Highlight Rte.
3. Select the route you want to invert.
4. Highlight any waypoint, and press Menu.
5. Select Invert.
To delete a route:
1. From any Main page, press Menu twice.
2. Highlight Rte.
3. Highlight the route you want to delete, and press Menu.
4. Select Delete Route.
To delete all saved routes:
1. From any Main page, press Menu twice.
2. Highlight Rte, and press Menu.
3. Select Delete All.
Using Tracks
A track is a recording of your path. The track currently being
recorded is the active track. An active track can be saved. To adjust
track settings, see page 12.
Turning Tracks On or Off
1. From any Main page, press Menu twice.
2. Highlight Trk > Active.
3. Select Record Mode.
Off—does not record a track log.
•
Fill—record a track log until the track memory is full.
•
Wrap—continuously records a track log, replacing the oldest
•
track data with new data.
8 GPS 152H Owner’s Manual
Page 13

Saving a Track
1. From any Main page, press Menu twice.
2. Highlight Trk.
3. Press Menu, and select Save.
4. Select the time, the date, or the Entire Log you want to save.
Optionally, you can edit the name of the track.
Deleting All Saved Tracks
1. From any Main page, press Menu twice.
2. Highlight Trk > Saved.
3. Press Menu.
4. Select Delete All.
Clearing the Active Track
Navigating a Saved Track
1. Press NAV/MOB.
2. Select Follow Track.
3. Select the track you want to take.
4. Select Original to follow the track as it was originally recorded,
or select Reverse to follow the track in the opposite direction.
1. From any Main page, press Menu twice.
2. Highlight Trk.
3. Press Menu.
4. Select Clear > OK.
Deleting a Saved Track
1. From any Main page, press Menu twice.
2. Highlight Trk > Saved.
3. Highlight the track you want to delete, and press Menu.
4. Select Delete Track.
Navigation
GPS 152H Owner’s Manual 9
Page 14

Settings
Settings
You can customize a Main page by pressing Menu while on the
page.
You can access the Settings menu from any Main page by pressing
Menu twice.
Customizing the Main Pages
The following table indicates the options that can be viewed by
pressing Menu from each of the ve Main pages:
Map
Compass
Page
Page
Add
Waypoint
Big Numbers X X X X
Change Data
Fields
Congure
Map
Create on
Map
Edit on Map X
Full Screen
Map
X X X X
X
X
Highway
Page
Active
Route Page
X
X
Numbers
Page
Hide Tracks X
Invert X
Loran TD X
Measure
Distance
Plan Route X
Re-evaluate X
Remove
Waypoint
Stop
Simulator
Big Numbers—increases the size of the data elds but reduces the
number of data elds.
Change Data Fields—allows you to select different data elds to be
displayed on the main pages. Data elds selected for one Main page
are displayed on all Main pages (except the Active Route page).
To change data elds:
1. From any Main page (except the Active Route page), press
Menu.
2. Select Change Data Fields. One of the eld names is
highlighted.
Map
Page
X
Compass
Page
X
Highway
Page
Active
Route Page
X
Numbers
Page
10 GPS 152H Owner’s Manual
Page 15

3. Select a data eld to change.
4. Select the new eld you want shown.
Full Screen Map On (or Off)—hides or shows the data elds
•
from all main pages (except the Active Route page).
Loran TD On (or Off)—allows you to convert GPS
•
coordinates to Loran (Long Range Navigation) TDs. This
system is no longer a primary source of maritime navigation
and should not normally be used. Refer to the U.S. Coast
Guard site at www.navcen.uscg.gov/loran/default.htm for
additional information.
Congure Map—takes you to the Map tab (see page 13) of
•
the Settings menu.
Measure Distance—allows you to measure the distance and
•
bearing between two points on the Map Page.
To measure the distance and bearing between two points:
1. From the Map page, press Menu and select Measure Distance.
2. Use the Rocker to move the pointer (indicated by “ENT REF”) to
the point you want to measure from, and press Enter.
Settings
3. Move the pointer to the point to which you want to measure. The
bearing, the distance, and the grid coordinates are displayed
along the top of the screen.
Start Simulator—turns the GPS receiver off for use indoors or for
practice using the chartplotter (page 23).
Hide Tracks—shows or hides tracks (page 8) on the Highway page.
Create on Map—creates a route as described on page 7. This option
is available only when you are not currently navigating a route.
Invert—reverses a route (page 8).
Plan Route—allows you to enter the boat speed, the fuel ow and
the departure time and date when planning a route.
Re-evaluate—recalculates and reactivates the current route data.
Using the Settings Menu
The Settings menu can be viewed from any of the Main pages by
pressing Menu twice.
Using the Waypoints Tab
From any Main page, press Menu twice and highlight Wpt.
See page 3 for more information concerning creating and editing
waypoints and proximity alarms.
GPS 152H Owner’s Manual 11
Page 16

Settings
Using the Routes Tab
From any Main page, press Menu twice and highlight Rte.
See page 6 for more information concerning creating, editing, and
deleting routes.
Using the Trip Tab
To view trip information from any Main page, press Menu twice
and highlight Trip. Press Menu to reset the trip, the odometer,
the maximum speed, or all elds to zero.
Resetting trip data resets all elds to zero except the Maximum
Using the Tracks Tab
From any Main page, press Menu twice and highlight Trk.
See page 8 for more information concerning showing, saving, and
deleting tracks.
Record Interval denes the frequency at which the track plot is
recorded. Recording plots more frequently is more accurate but lls
the track log faster.
To set the active track interval:
1. From any Main page, press Menu twice and highlight Trk.
2. Highlight Active, and select Interval.
Distance—records the track based on a distance between
•
points, as dened by the Value eld.
Time—records the track based on a time interval, as dened
•
by the Value eld.
Resolution—records the track based on a variance from your
•
course. This setting is recommended for the most-efcient use
of memory. The value eld denes the maximum error allowed
from the true course before recording a track point.
Speed eld and the Odometer eld.
Using the Time Tab
The Time tab allows you to set the time options.
To set time settings from any Main page, press Menu twice and
highlight Time.
•
•
•
•
Time Format—select 12-hour or 24-hour time format.
Time Zone—set the time zone you want displayed for time
readings.
Daylight Savings Time—select Off, On, or Auto. The auto
setting automatically turns daylight saving time on or off,
depending on the time of year.
Current Time and Date—manually set the time and date.
12 GPS 152H Owner’s Manual
Page 17

Using the Page Tab
The Page tab allows you to select or deselect the main pages. A
check mark indicates that the page will be displayed when you press
Page.
From any Main page, press Menu twice and highlight Page.
To select a preset page combination, press Menu.
Enable All Pages—selects all pages.
•
Basic Trackplotter—selects the Map page only.
•
Nav Tools Only—selects the Compass, Highway, and Active
•
Route pages only.
Press Jump To to display the selected page.
To restore map defaults:
1. From any Main page, press Menu twice and highlight Map.
2. Press Menu.
•
•
Map Tab > General Subheading
Detail—adjusts the amount of detail shown on the map at
•
different zoom levels.
Orientation—changes the perspective of the map display.
•
◦
Using the Map Tab
The Map tab allows you to select preferences one the map including
map detail, map orientation and font size.
From any Main page, press Menu twice and highlight Map.
From any of the subheadings within the Map tab, select Show
Map to view the Map page while you are conguring the map.
◦
◦
Auto Zoom—automatically adjusts the map scale to a lower
•
scale as you approach your destination.
Map Tab > Source Subheading
Not applicable to this unit.
Settings
Restore Defaults—restores the currently selected map
setting to factory default.
Restore All Map Defaults—restores all map settings to
factory default.
North Up—sets the top of the map display to a north
heading.
Track Up—sets the map display to the current track heading.
Course Up—sets the map so the direction of navigation is
always up. The heading line appears vertically on the screen
if shown.
GPS 152H Owner’s Manual 13
Page 18

Settings
Map Tab > Points Subheading
Text—sets the screen size of the name of the waypoint, the active
•
route, the marine navaid, or the geo point on the Map page and
the Highway page.
Zoom—sets the maximum scale at which the feature should
•
appear on the Map page.
Map Tab > Other Subheading
Acc. Circle (Accuracy Circle)—represents the approximate
•
accuracy of the unit. Your location is indicated in the center of
the circle.
Heading Line—draws an extension line from the bow of the
•
boat in the direction of travel.
Bearing Line—shows the bearing from your current location
•
to a destination waypoint. Selecting a distance sets the scale at
which the bearing line will appear on the screen.
Course Line—shows a navigation line from the point where
•
navigation was initiated to a destination waypoint. Selecting a
distance sets the scale at which the course line will appear on the
screen.
Using the Systems Tab
From any Main page, press Menu twice and highlight Page.
Beeper—selects when the unit makes audible sounds.
•
Speed Filter—averages the speed readings of your boat over
•
a period of time for smoother speed values. You can select
Auto, or select On to specify the number of seconds you want
the lter to average.
Language—selects the system language.
•
System Mode—allows you to select simulator mode
•
(page 23) or normal mode.
Using the Units Tab
The Units tab allows you set units of measure for various values, the
map datum, and the heading reference.
From any Main page, press Menu twice and highlight Units.
Position Format—changes the coordinate style in which a given
•
location reading appears. Do not change the position format
unless you are using a map or chart that species a different
position format.
Map Datum—changes the coordinate system in which the map
•
is structured. Do not change the map datum unless you are using
a map or chart that species a different map datum.
14 GPS 152H Owner’s Manual
Page 19

Heading—selects the reference used in calculating heading
•
information.
Auto Mag Var—automatically sets the magnetic declination
◦
From any Main page, press Menu twice and highlight Com.
•
for your location.
True—sets true north as the heading reference.
◦
Grid—sets grid north as the heading reference (000º).
◦
User Mag Var—allows you to set the magnetic variation
◦
value.
Dst, Spd, & Alt—denes the units of measure for distance,
•
speed, and altitude in nautical, statute, or metric formats.
Dpth—denes the units of measure for depth.
•
Temp—denes the units of measure for temperature.
•
•
•
•
Using the Communications Tab
The Communications tab allows you to set the input/output format
used when connecting your unit to other devices, such as NMEA
0183 devices, a PC, or another GPS 152H.
•
•
When Garmin DGPS is selected, additional elds are provided to
control a differential beacon receiver directly from your GPS 152H.
You can set the unit to automatically scan for the DGPS beacon
signal or you can enter the beacon frequency and bit rate.
Settings
Garmin Data Transfer—supports the input or output of
Garmin-proprietary data for communicating with Garmin
software such as MapSource®. There are eleven Transfer
Modes to choose from: Host, Request Almanac, Request
Proximity, Request Routes, Request Tracks, Request
Waypoints, Send Almanac, Send Proximity, Send Routes,
Send Tracks, and Send Waypoints.
Other DGPS (differential GPS)—(input only) provides
interfacing capabilities for 3rd party DGPS receivers.
RTCM In/NMEA Out—allows DGPS input using a standard
RTCM format, and also provides NMEA 0183 version 2.3
output.
NMEA In/NMEA Out—supports the input and output of
standard NMEA 0183 data, and provides sonar NMEA input
support for the DPT, MTW, and VHW sentences (when
connected to a sonar transducer).
None—provides no interfacing capabilities.
Garmin DGPS—used to connect the GPS 152H with a
Garmin DGPS beacon receiver.
GPS 152H Owner’s Manual 15
Page 20

Settings
To automatically scan for a frequency:
1. Select Garmin DGPS in the Serial Data Format eld.
2. Select Scan in the Beacon eld. The unit begins scanning.
If it is necessary to restart the scan, press Menu and select
Restart Scan.
To manually enter the frequency and bit rate:
1. Select Garmin DGPS in the Serial Data Format eld.
2. Select User in the Beacon eld.
3. Enter the desired frequency and bit rate. The Status eld
indicates one of the following:
Tuning—attempting to tune to the specied frequency and bit
•
rate.
Scanning—automatically scanning through the frequencies
•
and bit rates.
Receiving—receiving DGPS signal and ready for operation.
•
Check Wiring—not making a connection with a DGPS
•
receiver.
When the unit is receiving a DGPS signal, the SNR (Signal to
Noise Ratio) and Distance elds contain data. The SNR range
is 0dB to 30dB, with 30dB being the best. The Distance eld
may or may not show data, depending upon the signal being
broadcast from the DGPS site.
Using the Alarms Tab
You can set the unit to sound an audible alarm when certain
conditions are met. By default, all alarms are turned off except the
arrival alarm.
From any Main page, press Menu twice and highlight Alrm.
Anchor Drag—sets an alarm to sound when you exceed a
•
specied drift distance.
Arrival—sets an alarm to sound when you are within a
•
specied distance or time from a destination waypoint. Select
Dist (distance) or Time to set whether the arrival alarm
triggers on distance to arrival or time to arrival.
Off Course—sets an alarm to sound when you are off course
•
by a specied distance.
Clock—sets an alarm using the system (GPS) clock. The unit
•
must be on for the clock alarm to work.
Shallow Wtr—sets an alarm to sound when the depth is less
•
than the specied value.
Deep Water—sets an alarm to sound when the depth is
•
greater than the specied value.
16 GPS 152H Owner’s Manual
Page 21

Acquiring Satellites—The receiver is looking for, and
Using the Celestial Tab
The Celestial tab shows information about sunrise, sunset, moonrise,
moonset, the moon phase, and the approximate sky view location of
the sun and moon. By default, the unit shows celestial information
for the present date and time.
From any Main page, press Menu twice and highlight Celes.
To select a date and time for which to view celestial information,
select the date or time eld and enter text as described on
page 2.
If your orientation is set to North Up and you want to quickly
switch to Track Up while viewing the Celestial screen, press
Menu and select Track Up.
Using the GPS Tab
The GPS tab displays GPS satellite positions and signal strength
bars.
From any Main page, press Menu twice and highlight GPS.
Receiver status is indicated by the bar across the top of the screen.
Looking For Satellites
•
AutoLocate®—The receiver does not know your previous
•
location. This process can take up to ve minutes.
•
collecting, data from satellites visible at the last known or
initialized position, but has not collected enough data to calculate
a x.
2D Navigation—At least three satellites with good geometry
•
have been acquired and a two-dimensional position x (latitude
and longitude) is being calculated.
3D Navigation—At least four satellites with good geometry
•
have been acquired and your position is now being calculated in
latitude, longitude and altitude.
Poor Satellite Reception—The receiver is no longer tracking
•
enough satellites for a 2D or 3D x.
Receiver Not Usable—The receiver is unusable, possibly due
•
to interference or abnormal satellite conditions. Turn the unit off
and back on to reset.
Simulating Navigation—The receiver is in simulator mode
•
(page 23).
GPS accuracy information is indicated along the bottom of the
screen.
Accuracy—indicates the approximate accuracy of the unit.
•
DGPS Rcvr—indicates the status of the DGPS receiver
•
(page 16).
Settings
GPS 152H Owner’s Manual 17
Page 22

Settings
DOP (Dilution of Precision)—displays DOP, which is an
•
indication of satellite geometry quality measured on a scale of
one to ten. Lower numbers indicate higher quality signals.
DGPS SNR—displays the SNR when the unit is receiving a
•
DGPS signal. The SNR range is 0dB to 30dB, with 30dB being
the best.
You can manually enter your altitude when in 2D navigation
or simulator mode. Any altitude entered will be automatically
calculated when the unit is in 3D navigation mode.
To set 2D altitude:
1. From any Main page, press Menu twice and highlight GPS.
2. Press Menu, and select 2D Altitude.
WAAS (Wide Area Augmentation System) can provide moreaccurate GPS position information in North America. However,
when using WAAS, the device takes longer to acquire satellites.
Using the Tide Tab
From any Main page, press Menu twice and highlight Tide.
The Tide tab shows a chart that displays tide station information
To disable WAAS:
1. From any Main page, press Menu twice and highlight GPS.
2. Press Menu, and select Disable WAAS.
in a 24 hour span, starting at midnight station time. You can select
different dates.
When your unit is turned on, it starts the search for your location
based on where you were when it was turned off. AutoLocate is used
by the GPS 152H to nd your location when the unit does not know
your previous location.
To use AutoLocate to nd your location:
1. From any Main page, press Menu twice and highlight GPS.
2. Press Menu, and select AutoLocate.
18 GPS 152H Owner’s Manual
Page 23

The top of the screen displays the tide station. The top of the chart
shows a 24-hour block of local time (LCL) for your position, with
the reported station time (STA) appearing at the bottom. The solid,
light vertical lines are in 4-hour increments, and the light, dotted
vertical lines are in 1-hour increments. A dark, vertical line indicates
the current time.
High tide
Maximum tide level
Minimum tide level
Low tide
Present tide level
Present time
To select the tide station nearest your location:
1. From any Main page, press Menu twice and highlight Tide.
2. Press Menu, and select Nearest Tide Station. The name of the
nearest tide station appears along the top of the screen.
Note: You must be within 100 nautical miles of a tide station to
use this feature.
The four data elds below the chart indicate event times and levels
at which the tide changes.
To view tide information for a different date:
1. From any Main page, press Menu twice and highlight Tide.
2. Press Menu, and select Modify Station Opt.
3. Select the Date eld and enter text as described on page 2.
Settings
GPS 152H Owner’s Manual 19
Page 24

Appendix
Appendix
Specications
Physical Specications
Size : W × H × D: 5.3 in. × 4.9 in. × 2.4 in.
(13.4 cm × 12.5 cm × 6.1 cm)
Weight: 1 lb. (454 g)
Display: 4.0 in. diagonal (10.2 cm) high-contrast, 4-level gray
FSTN with adjustable backlighting (160 x 100 pixels)
Case:
Temp. Range: From 5ºF to 131ºF (from -15ºC to 55ºC)
Compass-Safe Distance: 12 in. (30 cm)
Performance
Receiver:
Differential-ready 12 parallel channel WAAS-capable receiver:
Fully gasketed, high-impact plastic alloy, waterproof to
IEC 529 IPX7 standards.
Acquisition Times: (Average acquisition times for a stationary
receiver with a clear view of the sky)
Warm*: Approximately 15 seconds
Cold**: Approximately 45 seconds
AutoLocate: Approximately 2 minutes
Warm: your unit is at or near the last location where you
*
recently acquired satellites.
**Cold: your unit has moved by more than about 500 mi. (800
km) since it was turned off.
Update Rate: once per second
GPS Accuracy:
Position: <49 ft. (15 m), 95% typical
Velocity: 0.164 ft./sec (0.05 m/sec) steady state
WAAS Accuracy:
Position: <10 ft. (3 m), 95% typical
Velocity: 0.164 ft./sec (0.05 m/sec) steady state
Dynamics: 6 g
Power
Power Source: 10–40 Vdc
Usage: 5 W max at 10 Vdc
Fuse: AGC/3AG - 1.5 A
20 GPS 152H Owner’s Manual
Page 25

Alarms and Messages
The unit uses an on-screen message system to alert you to unit
operating characteristics. When a message appears, press Enter to
acknowledge the message.
Alarm Clock—the alarm clock has sounded.
Anchor Drag Alarm—you have drifted out of the specied distance
range.
Antenna Input Shorted To Ground—a part of the antenna wiring
is crimped, broken, or contacting the chassis.
Approaching Waypoint—you are a specied alarm distance from a
destination waypoint.
Arrival At Waypoint—you have arrived at the destination
waypoint.
Basemap Failed Unit Needs Repair—contact your dealer or
Garmin Product Support.
Database Error—contact your dealer or Garmin Product Support.
Lost Satellite Reception—the unit has lost satellite signals. Check
antenna connections or try moving to a location with a clear view of
the sky.
Memory (RAM) Failed Unit Needs Repair—contact your dealer
or Garmin Product Support.
Memory (ROM) Failed Unit Needs Repair—contact your dealer
or Garmin Product Support.
No Position—no differential correction data is available or not
enough data is available to compute a DGPS position.
No Tide Stations For That Area—there are no tide stations within
100 miles of the specied point. Try another area.
Off Course Alarm—you have exceeded the specied off-course
distance.
Processor Failed Unit Needs Repair—contact your dealer or
Garmin Product Support.
Proximity Alarm List is Full—you have used all ten proximity
waypoints.
Proximity Alarm Waypoint—you have entered the alarm radius for
the proximity waypoint indicated.
Proximity Overlaps Another Proximity Waypoint—the alarm
radius specied overlaps the area specied for another proximity
waypoint. Adjust the distance.
Appendix
GPS 152H Owner’s Manual 21
Page 26

Appendix
Route Already Exists: <route name>—you have entered a route
name that already exists in memory. Modify the route name or delete
the previous route name.
Track Truncated—a complete upload track will not t into
memory. The oldest track log points were deleted to make space for
the most recent data.
Route Does Not Exist: <route name>—the route has been renamed
or removed from memory and cannot be used.
Route Is Full—you have attempted to add more than 100 waypoints
to a route. Reduce the number of waypoints or create a second route.
Route Memory Is Full Can’t Create Route—the maximum
amount of 50 routes is already in unit memory and no additional
routes can be added until existing ones are removed.
Route Truncated—an uploaded route from another device has more
than 100 points. Reduce the number of points.
Running Simulator—the unit is in simulator mode.
Transfer Complete—the unit has nished uploading or
downloading information to the connected device.
Waypoint Already Exists: <waypoint name>—you have entered a
waypoint name that already exists in memory. Modify the waypoint
name or delete the previous waypoint name.
Waypoint Memory Is Full Can’t Create Waypoint—you have
used all 3000 waypoints available. Delete unwanted waypoints to
make space for new entries.
Waypoint Memory Full—you have saved the maximum number
of waypoints. Delete unwanted waypoints to make space for new
entries.
Track Already Exists: <track name>—you have entered a saved
track name that already exists in memory. Modify the track name or
delete the previous track name.
Track Memory Is Full Can’t Create Track—the track log memory
is full. No additional track log data can be stored without deleting
old data to create memory space.
22 GPS 152H Owner’s Manual
Page 27

Using Simulator Mode
WARNING
Do not try to navigate using simulator mode because the GPS
receiver is turned off. Any satellite signal strength bars shown are
simulations and do not represent the strength of actual satellite
signals.
Simulator mode turns the GPS receiver off for use indoors or for
practice using the chartplotter. The chartplotter does not track
satellites in simulator mode.
appears in the lower-left corner of the main pages to indicate
that the unit is in Simulator mode.
To turn on Simulator mode:
1. From any Main page, press Menu twice.
2. Select Sys to set speed, track control, and position.
Appendix
1. From any Main page, press Menu twice.
2. Select Sys, and press Menu.
3. Select Software Version.
Restoring the Original Factory Settings
Note: This procedure deletes all settings information you have
entered.
1. From any Main page, press Menu twice.
2. Select Sys, and press Menu.
3. Select Restore Garmin Setup.
NMEA 0183
The following formats are supported for connection of external
devices: GARMIN proprietary Differential GPS (DGPS), NMEA
0183 (version 2.3), RTCM SC-104 input (version 2.0).
Viewing System Information
You can view the software version and the unit ID number for
your chartplotter. You may need this information to update the
system software or when speaking with a Garmin Product Support
Approved NMEA 0183 Sentences
GPBOD, GPBWC, GPGGA, GPGLL, GPGSA, GPGSV, GPRMB,
GPRMC, GPRTE, GPVTG, GPWPL, GPXTE, and Garmin
proprietary sentences PGRME, PGRMM, PGRMZ, and PSLIB.
Representative.
GPS 152H Owner’s Manual 23
Page 28

Appendix
The GPS 152H also includes support for the WPL sentence and
sonar NMEA 0183 input with support for the DPT (depth) or DBT,
MTW (water temp), and VHW (water temp, speed, and heading)
sentences.
If you are connected to COM2 for sonar NMEA input, the unit
interface must be set to GARMIN DGPS, Other DGPS (4800
only), or NMEA In/NMEA Out. If connecting to COM1, the unit
must be set to NMEA In/NMEA Out (see page 15).
Caring for the Unit
The case is constructed of high-quality materials and does not
require user maintenance, except cleaning.
Cleaning the Case
Clean the unit’s outer casing (except for the screen) using a cloth
dampened with a mild detergent solution, and then wipe dry. Avoid
chemical cleaners and solvents that may damage plastic components.
Cleaning the Screen
The lens on the screen is coated with a special anti-reective coating
that is sensitive to skin oils, waxes, and abrasive cleaners. Cleaners
containing ammonia, alcohol, abrasives, or anti-grease detergents
will harm the anti-reective coating. It is important to clean the lens
using an eyeglass lens cleaner (that is specied as safe for antireective coatings) and a clean, lint-free cloth.
Software License Agreement
BY USING THE UNIT, YOU AGREE TO BE BOUND BY THE TERMS AND
CONDITIONS OF THE FOLLOWING SOFTWARE LICENSE AGREEMENT.
PLEASE READ THIS AGREEMENT CAREFULLY.
Garmin grants you a limited license to use the software embedded in this device
(the “Software”) in binary executable form in the normal operation of the product.
Title, ownership rights, and intellectual property rights in and to the Software
remain in Garmin.
You acknowledge that the Software is the property of Garmin and is protected
under the United States of America copyright laws and international copyright
treaties. You further acknowledge that the structure, organization, and code of
the Software are valuable trade secrets of Garmin and that the Software in source
code form remains a valuable trade secret of Garmin. You agree not to decompile,
disassemble, modify, reverse assemble, reverse engineer, or reduce to human
readable form the Software or any part thereof or create any derivative works based
on the Software. You agree not to export or re-export the Software to any country in
violation of the export control laws of the United States of America.
24 GPS 152H Owner’s Manual
Page 29

Index
Symbols
2D navigation 17
3D navigation 17
A
acc. circle 14
acquiring satellites 17
alarm 16, 21–24
anchor drag 16
arrival 16
clock 16
deep water 16
off course 16
shallow water 16
anchor drag alarm 16
arrival alarm 16
AutoLocate 17, 18
Auto Magnetic 15
auto zoom 13
B
backlight
adjusting 2
basic trackplotter 13
bearing line 14
beeper 14
big numbers 10
brightness 2
buttons 1
C
celestial 17
change data elds 10
clock alarm 16
compass page 5
congure map 11
contact information, Garmin i
contrast 2
course line 14
course up 13
create on map 11
D
data elds 10
daylight savings time 12
depth units 15
detail 13
DGPS SNR 18
distance 11
DOP 18
dpth 15
dst, spd, & alt 15
E
edit existing waypoint 4
enable all pages 13
Enter key 1
F
factory settings
restoring 23
frequency, DGPS 15
full screen map 11
fuse 20
G
GPS 2, 17, 20
Grid (North) 15
grid coordinates 3
H
heading 15
heading line 14
hide tracks 11
highway page 6
I
ID number 23
In key 1
inverting a route 8
J
jump to 13
K
keypad 1
Index
L
language 14
Loran TD 11
M
magnetic variance 15
main pages 3
man overboard 6
map datum 14
map page 5
map settings 13
mark current location 3
Mark key 1
measure distance 11
measurement units 15
Menu key 1
messages 21
MOB 6
N
NAV/MOB key 1
navigating 3
routes 7
stop 6
to a waypoint 5
nav tools only 13
GPS 152H Owner’s Manual 25
Page 30

Index
north
grid 15
magnetic 15
true 15
north up 13
numbers page 6
O
off course alarm 16
orientation 13
Out key 1
P
Page key 1
page tab 13
physical specications 20
plan route 11
position format 14
Power/Backlight key 1
power source 20
product registration i
proximity alarms 4
Q
Quit key 1
R
re-evaluate 11
Receiver Not Usable 17
record interval 12
registering your product i
26 GPS 152H Owner’s Manual
restoring factory settings 23
restoring map defaults 13
reversing a route 8
Rocker 1
S
settings menu 11
shallow wtr 16
simulator
mode 23
small numbers 10
software license agreement 24
software version 23
specications 20
speed lter 14
stop navigating 6
system information
viewing 23
system settings 14
T
temp 15
temperature units 15
text 2
tides 18
time settings 12
track interval 12
track up 13
trip settings 12
true (north) 15
turn the unit off 2
U
unit ID number 23
units of measure 15
user mag var 15
W
WAAS 18
waypoints
edit existing 4
mark current location 3
Z
zoom 1, 14
zoom, auto 13
Page 31

Page 32

For the latest free software updates (excluding map data) throughout the life of your
Garmin products, visit the Garmin Web site at www.garmin.com.
© 2010 Garmin Ltd. or its subsidiaries
Garmin International, Inc.
1200 East 151st Street, Olathe, Kansas 66062, USA
Garmin (Europe) Ltd.
Liberty House, Hounsdown Business Park, Southampton, Hampshire, SO40 9LR UK
Garmin Corporation
No. 68, Jangshu 2nd Road, Sijhih, Taipei County, Taiwan
www.garmin.com
March 2010 Part Number 190-01219-00 Rev. A Printed in Taiwan
 Loading...