

Page 1
Page 2
WARNING: READ BEFORE USING YOUR PLAYSTATION®2 COMPUTER
ENTERTAINMENT SYSTEM.
A very small percentage of individuals may experience epileptic seizures when
exposed to certain light patterns or flashing lights. Exposure to certain patterns
or backgrounds on a television screen or while playing video games, including
games played on the PlayStation 2 console, may induce an epileptic seizure in
these individuals. Certain conditions may induce previously undetected epileptic
symptoms even in persons who have no history of prior seizures or epilepsy. If you,
or anyone in your family, has an epileptic condition, consult your physician prior
to playing. If you experience any of the following symptoms while playing a video
game — dizziness, altered vision, eye or muscle twitches, loss of awareness,
disorientation, any involuntary movement, or convulsions — IMMEDIATELY
discontinue use and consult your physician before resuming play.
WARNING TO OWNERS OF PROJECTION TELEVISIONS:
Do not connect your PlayStation 2 console to a projection TV without first
consulting the user manual for your projection TV, unless it is of the LCD type.
Otherwise, it may permanently damage your TV screen.
USE OF UNAUTHORIZED PRODUCT:
The use of software or peripherals not authorized by Sony Computer Entertainment
America may damage your console and/or invalidate your warranty. Only official or
licensed peripherals should be used in the controller ports or memory card slots.
HANDLING YOUR
P
LAYSTATION 2 FORMAT DISC:
• This disc is intended for use only with PlayStation 2 consoles
with the NTSC U/C designation.
• Do not bend it, crush it or submerge it in liquids.
• Do not leave it in direct sunlight or near a radiator or other source of heat.
• Be sure to take an occasional rest break during extended play.
• Keep this compact disc clean. Always hold the disc by the edges and
keep it in its protective case when not in use. Clean the disc with a lint-free,
soft, dry cloth, wiping in straight lines from center to outer edge.
Never use solvents or abrasive cleaners.
CONTENTS
02>GETTING STARTED
02>SAVING AND LOADING
03>BASIC CONTROLS
04>CAST OF CHARACTERS
06>BASIC GAMEPLAY
06>DEPLOYING UNITS
07>THE BATTLE SYSTEM
07>ACTIONS ON THE BATTLE MAP
08>THE COMMAND MENU
08>ATTACKING
09>BACKPACKS
11>THE STATUS SCREEN
11>STATUS DAMAGE
12>THE SYSTEM MENU
12>THE MINIMAP
12>THE BATTLE SCREEN
13>LINKS
14>SKILLS
14>VICTORY
15>WANZER SETUP
19>PILOT SETUP
20>WANZER SHOP
20>COMPUTER SHOP
21>THE SIMULATOR
22>CREDITS
25>LIMITED WARRANTY
Page 3
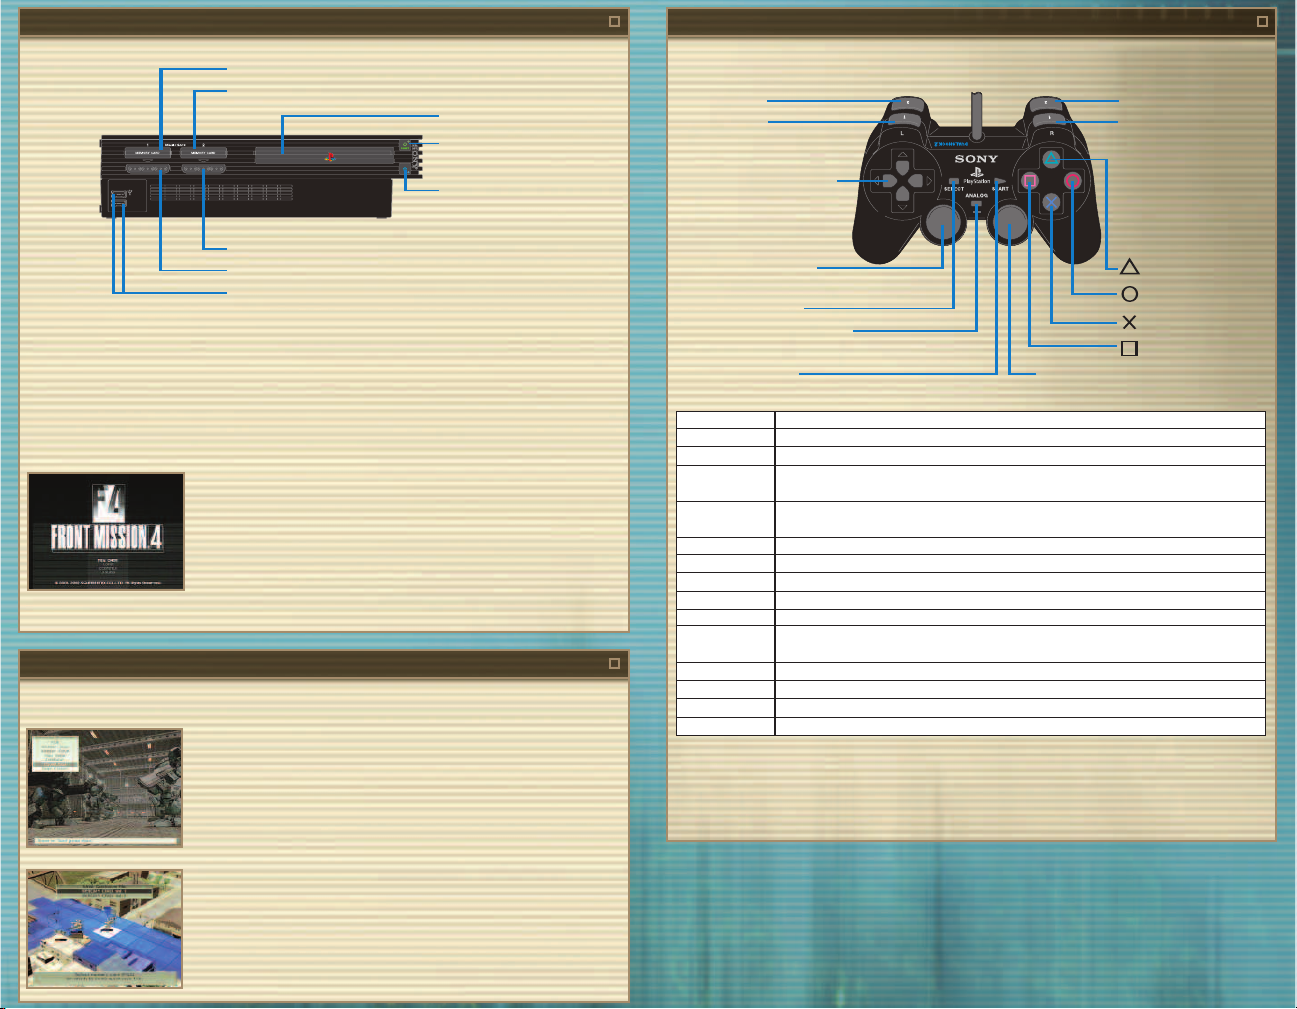
GETTING STARTED
2
BASIC CONTROLS
3
MEMORY CARD slot 1
MEMORY CARD slot 2
disc tray
DUALSHOCK®2 ANALOG CONTROLLER CONFIGURATIONS
L2 button
L1 button
RESET button
OPEN button
directional buttons
controller port 2
controller port 1
USB connector
Set up your PlayStation®2 computer entertainment system according to the instructions in its Instruction
left analog stick
(L3 button when pushed down)
SELECT button
ANALOG mode button
Manual. Make sure the MAIN POWER switch (located on the back of the console) is turned ON. Press the
RESET button. When the power indicator lights up, press the OPEN button and the disc tray will open. Place the
FRONT MISSION
®
4 disc on the disc tray with the label side facing up. Press the OPEN button again and the disc
START button
tray will close. Attach a game controller to controller port 1. Follow on-screen instructions and refer to this
manual for information on using the software.
The main menu will appear after the opening demo or when the START button is pressed.
NEW GAME Begin a new game
LOAD Continue a previously saved game from a memory card (8MB)
(for PlayStation
CONTINUE Resume a mission saved with the quicksave function from a
memory card (8MB) (for PlayStation
®
2)
®
2)
SOUND Select stereo or monaural sound
> Sound selection (stereo or monaural) only applies if you begin a new game.
SAVING AND LOADING
There are two ways to save your game in FRONT MISSION 4: saving during missions, and saving during
intermissions or in towns.
SAVE TO A SAVE FILE
You can save your game in town by selecting “Save/Load” from the menu, and
then selecting “Save.”
> A memory card (8MB) (for PlayStation
required to save the game.
> Up to 30 FRONT MISSION 4 save games can be saved on one memory card
(8MB) (for PlayStation
®
2).
®
2) with at least 35KB of free space is
Left analog stick Move cursor
Right analog stick Move camera on battle map
Directional buttons Move cursor / Select command
≈
button Confirm command / Advance messages and dialogue displayed in windows / Speed up movement of units
Ω
button Cancel command / Return to previous menu / Speed up cursor movement on battle map / Skip battle
ç
button Toggle display of HP bars on battle map
√
button Change unit’s current weapon
START button Display system menu during missions / Skip events
SELECT button Display minimap during missions
L1 button Cycle through targets in range on battle map / Cycle pilots in shops and during setup
R1 button Move cursor to friendly unit on battle map / Change turn order of friendly units / Cycle pilots in shops and
L2 button Zoom out from battle map
R2 button Zoom in on battle map
L3 button Activate and deactivate jetpack
R3 button Rotate battle map 90 degrees
*See p. 12, THE SYSTEM MENU for more information.
> This software does not support the vibration function.
> The ANALOG mode button and red LED light are always set to ON.
> This game may be incompatible with controllers other than the DUALSHOCK
SAVE TO A QUICKSAVE FILE
Press the START button during missions to open the system menu. Then select
“Quicksave” to save your game to the quicksave file.
> A memory card (8MB) (for PlayStation
®
2) with at least 342KB of free space is
required for a quicksave game.
> Only one FRONT MISSION 4 quicksave file may be saved per memory card
(8MB) (for PlayStation
®
2).
R2 button
R1 button
button
button
button
button
right analog stick
(R3 button when pushed down)
on battle map* / Speed up missile flight animations during battle sequences*
scenes / Skip messages and dialogue displayed in windows
during setup
®
2 analog controller.
Page 4
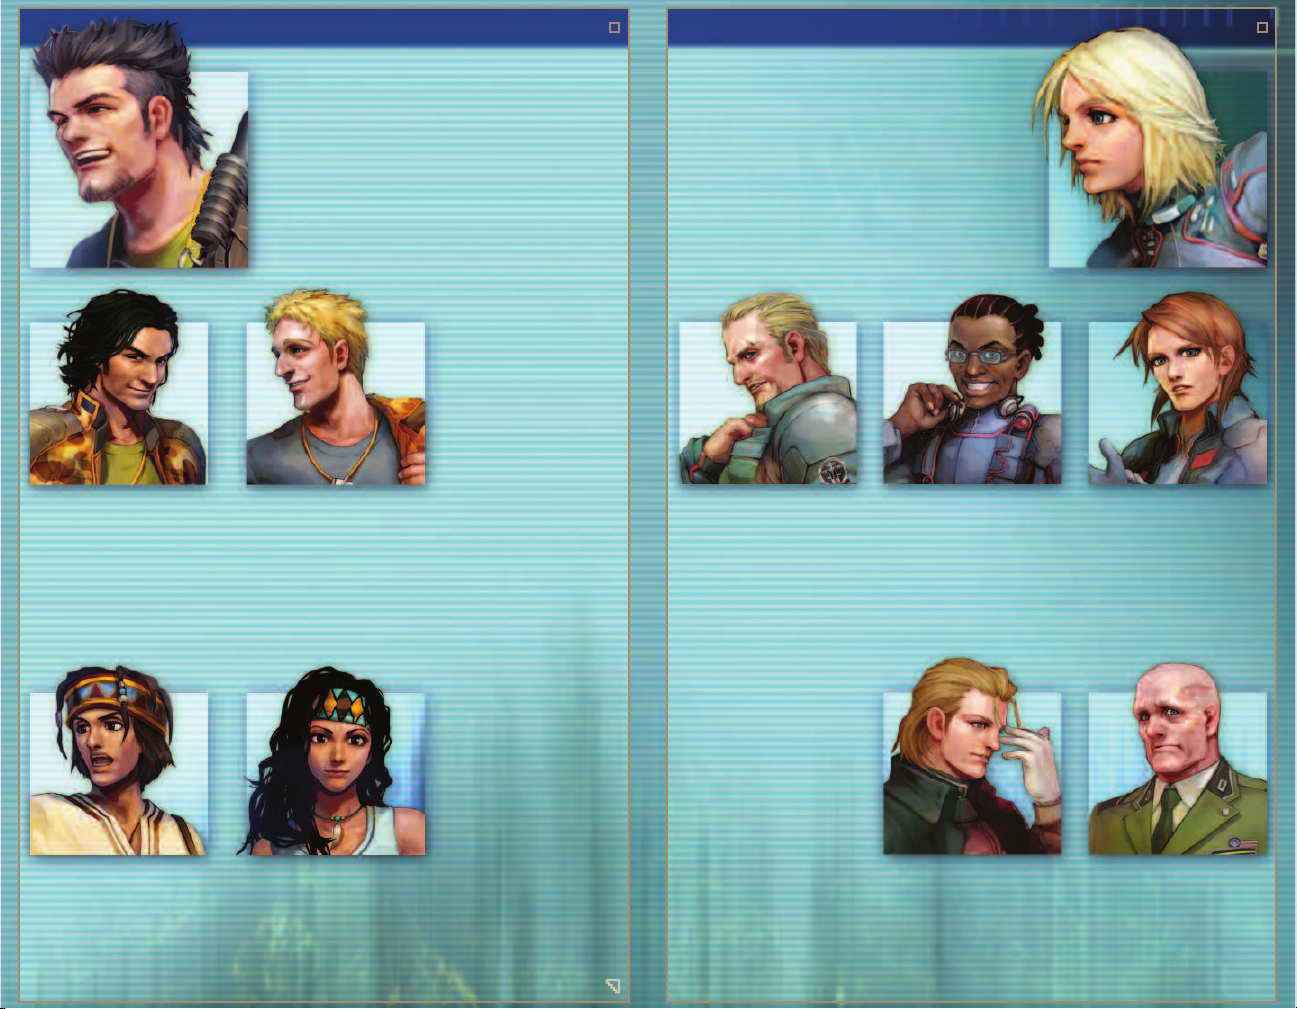
CAST OF CHARACTERS
4
CAST OF CHARACTERS [CONT.]
5
RENGES
Holding the rank of corporal, Renges is
technically under Darril’s command,
but the two soldiers are brothers at
heart. Equipped with a dry wit, Renges
is continually skeptical and aloof when
dealing with others. He disguises his
emotions well, but when they come to
the surface, he’s a totally different
person.
Age: 35
DARRIL
Darril is a sergeant in the U.C.S. Army 332nd Company.
Darril worked his way up the military ranks to become
a promising young officer. However, his strong sense
of justice—combined with an unfortunate tangle with
a commanding officer—resulted in his demotion.
Darril has been cynical ever since his loss of rank,
and is disinterested in military matters. On the outside
Darril seems light-hearted and carefree, but deep
inside, he is looking for a cause he can believe in.
CHAEFFER
A private first class in the U.C.S. Army,
Chaeffer is the youngest member of his
squad. Though his age marks him as the
platoon’s little brother, Chaeffer’s double
dosage of carelessness and recklessness
frequently leaves situations in tatters.
Despite his class-clown demeanor, he is
very compassionate towards others, and is
always there to help someone in need.
Age: 32
Age: 24
ELSA
Age: 22
Formerly a wanzer pilot for the French Army,
Elsa was recently transferred to the E.C.’s
Armored Tactics Research Corps, also known as
the Durandal. Honest and upbeat, Elsa has an
admirable grasp of wanzer combat theory,
but she understands little of the mechanical
engineering behind the giant fighting machines.
Still young, she has a strong sense of justice—
and is a stickler when it comes to principles.
ZEAD
Age: 45
A former British officer, Zead is the
Durandal’s de facto commander. With a
strong military background, Zead is
eternally courteous to others and hard on
himself. He does not, however, demand the
same rigid discipline from his colleagues;
he is patient enough to accept their
individuality. Zead’s subordinates regard
him as both a dependable leader and a
kind father figure.
HERMES
Though Hermes has no military
experience, his elite computer
hacking skills make him a natural as
the Durandal’s systems engineer.
Hermes is always positive and jovial,
but he can be childish when arguing
with those of different opinions.
Age: 20
LATONA
Latona is a skilled wanzer pilot and a
former member of the Zaftran military.
She cannot stand being looked down
upon. Due to her extensive military
background, she talks and behaves in
a masculine way; coaxing a smile out
of her is a herculean task. She is strict
towards both herself and others.
Age: 28
LUIS
Age: 20
Luis is the young leader of la Alianza de
Libertad Venezolana, or “The Venezuelan
Freedom Alliance.” He embodies the spirit
of righteousness, aiding the oppressed
and yielding no mercy to the dishonorable.
Though just and fair, he is occasionally
overcome by his sense of duty.
INES
Ines is a fellow member of la Alianza. She
is also Luis’s lover, and shares his passion
for justice and honor, but she is better able
to assess situations and act accordingly.
Age: 20
WAGNER
Wagner is the commander of the
German Blauer Nebel Special Forces
unit. Always levelheaded and calm, he
speaks in a cold, uncaring manner that
forever masks his true emotions.
Age: 28
GLAESER
Brigadier General Glaeser is a hard-line
career soldier who spent his life working
his way up the chain of command. He
speaks to everyone in the same
displeased tone. He will not tolerate
slack from his subordinates, who fear
nothing more than his icy wrath.
Age: 50
Page 5
BASIC GAMEPLAY
6
The story of FRONT MISSION 4 is told through event sequences and combat missions.
SELECTIONS IN EVENT MODE:
Talk with other characters
Buy parts and weapons from wanzer shops (see p. 20)
Buy skills and abilities from computer shops (see p. 20)
Set up wanzers (see p. 15)
Set up pilots (see p. 19)
Run battle simulator (see p. 20)
Save or load game data (see p. 2)
Shop Setup
Event Scene
World Map Battle Map
FRONT MISSION 4 alternates between the viewpoints of Elsa, a fresh recruit in the E.C.’s “Durandal” research
group, and Darril, a sergeant in the U.C.S. Army.
> Some event scenes feature voice, while others consist of only text.
> Press the START button to skip events.
DEPLOYING UNITS
Before a battle begins, you must select which units to deploy, then place them
on the battlefield. Several of the U.C.S. scenarios feature pre-selected
mercenary units.
> Press the
√
button to cycle between unit placements.
THE BATTLE SYSTEM
7
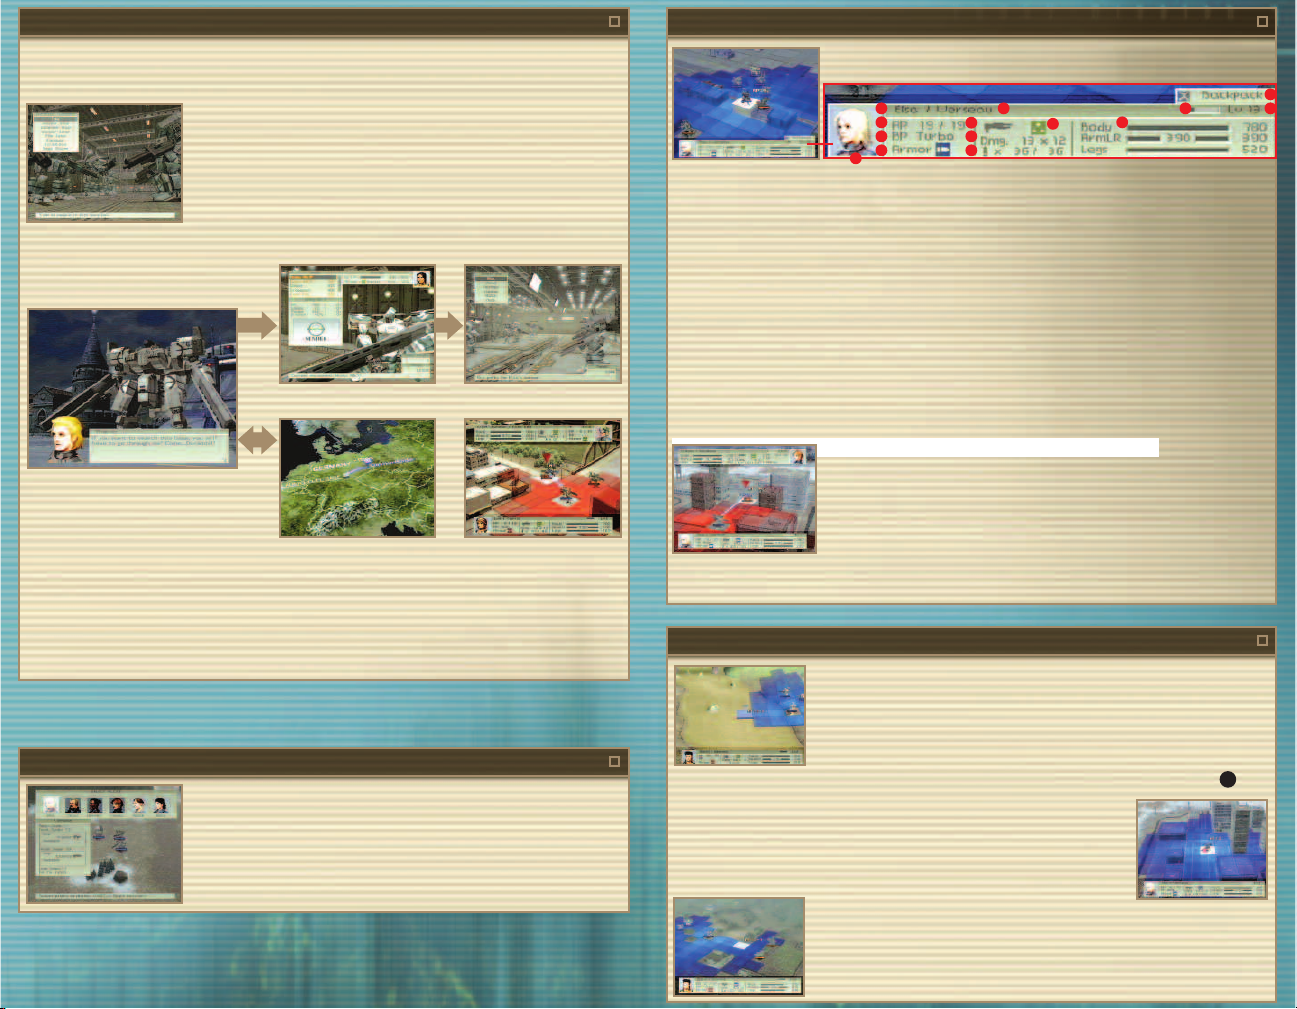
VIEWING THE BATTLE MAP
Unit Data Window
2 3 12 14
4
5
6
1
7
8
9
10
11
13
1 Pilot Portrait Picture of the pilot controlling the unit
2 Pilot Name Name of the pilot controlling the unit
3 Unit Name Name of the pilot’s wanzer
4 Action Points Points used to perform attacks and other various actions
5 Backpack Type of backpack equipped on wanzer
6 Armor Type of armor equipped on wanzer indicated by icon
7 Weapon Type Type of weapon indicated by icon
8 Damage Damage multiplied by number of attacks
9 Ammunition Current ammo / maximum ammo
10 Weapon Properties Weapon damage type indicated by icon
11 Wanzer Parts’ HP Current HP of wanzer parts, presented both numerically and as gauges
12 Experience Gauge Displays pilot’s experience (pilot gains a level once this gauge becomes full)
13 Status Damage Displays current types of status damage induced by enemy
14 Level Pilot’s current level
THE AP SYSTEM
Action Points (AP) dictate how many actions you can perform in one turn.
Every unit must spend AP when moving or attacking. For example, moving one square
costs one AP. Attacking costs a different amount of AP depending on the weapon
used. When a unit runs out of AP, it can no longer move or perform any other action
for the remainder of the turn.
AP is restored at the beginning of each turn. AP capacity differs by pilot. To increase AP totals, upgrade your
computer or purchase skill sets from computer shops.
ACTIONS ON THE BATTLE MAP
Movement
Once you select a unit, a blue grid will appear, indicating how far the selected unit can
move in the current turn. Move the cursor to the unit’s destination and press the
button. The unit will remain stationary for a turn if you move the cursor to the current
≈
location and press the
button, then select “End” from the command menu.
> Your units take turns in a pre-selected order, but you may use the R1 button to select
another unit if you wish to change the order. Wanzers that have completed their turns are marked with an E icon.
Movement Restrictions
A wanzer’s mobility is limited by its currently equipped leg parts. Note that specific leg
types may be required to climb certain surfaces. Jetpacks that greatly affect your
mobility are available, but their performance varies by model. Several jetpacks allow
you to climb to higher surfaces while sacrificing general mobility.
≈
Spending AP
As a rule, moving 1 square costs 1 AP. If you are equipped with a jetpack, the jetpack’s
performance determines the amount of AP required to move 1 square.
Page 6

THE COMMAND MENU
Press the ≈button during or after a unit’s movement to open the command menu.
Attack Attack an enemy unit in range
Items Use items
Repairs Repair damaged parts, restore broken parts,
EMP Induce status damage to enemies in range
Sensors Change detection mode
Air Support Use the radio backpack to call in air support
Status View pilot and wanzer details
End End unit’s turn
> Equipping certain skills will add extra commands to the command menu.
> Commands highlighted in gray are enabled by equipping the corresponding backpack.
or remove status damage from friendly units in range
(only available to Durandal units)
8
ATTACKING
Press the ≈button during or after a unit’s movement to open the command menu. To attack an enemy, use the
cursor to select “Attack” and press the
≈
button.
Attack Range
After “Attack” is selected, a red field appears to indicate the range of the currently
selected weapon.
BACKPACKS
ITEMS
The “Items” command appears on the command menu when you carry items in
your backpack. You can use these items on yourself, or on units that are standing
on squares adjacent to you.
REPAIRS
Units equipped with a repair backpack have access to the “Repairs” command.
This allows you to repair damaged wanzer parts, or restore parts that have been
destroyed. Repairs can be conducted on both your current wanzer and friendly
units. Once you select “Repairs,” a green field will appear, centered on your unit.
Select a friendly unit inside the green field to access the following commands:
Repair Parts Repair a damaged part, or all parts with the “All Parts” option
Restore Parts Restore a destroyed part
Remove Status Remove status damage
By moving the cursor over each command, you can see the amount of AP each command requires.
Press the
≈
button to select a target. If there is no applicable target in range, an error message will appear.
Recovering from Status Damage
“Remove Attack System Down” also removes “Missile System Down.”
“Remove Movement System Down” also removes “Movement System Damage.”
“Remove Systems Down” restores all systems except “Link Cut.”
“Remove Link Cut” only removes “Link Cut.”
9
Switching Weapons
Press the
√
button to view a list of weapons at your disposal.
Selecting Your Target
Use the directional buttons, the left analog stick, or the L1 button to select your
target, then press the
Counterattacks
Enemy units will attack during the enemy phase. When you are attacked, a window
will list your available counterattack options. Select from the list with the directional
buttons, and press the
AP Cost
The amount of AP spent when performing attacks and counterattacks varies by weapon.
≈
button to confirm.
≈
button to confirm.
EMP (Electromagnetic Pulse)
Units equipped with an EMP backpack can unleash focused electromagnetic
pulses. A red field indicates the maximum range for these status attacks. After
selecting an enemy unit inside the red field, you can access your EMP backpack’s
status attacks.
> Wanzers with status damage appear with an icon. Place your cursor over
these units to display which types of status damage the unit has received.
See p. 11 for more about status damage.
Antilock
This function is only available when set as a defense support action in defense links. A unit equipped with an EMP
backpack with antilock can cause missiles to miss nearby friendly units by jamming their guidance systems.
> The effective range of antilock is 4 squares from the unit equipped with an EMP backpack.
SENSORS
Wanzers with sensor backpacks are best used in conjunction with missile-firing
friendly units. Sensor backpacks can guide missiles to nearby targets, regardless
of the missiles’ range.
There are two types of sensor modes: sonar and radar. Both are affected by time of
day and weather. If your unit’s backpack is equipped with both, you can freely
switch between the two.
Radar Pinpoint enemy locations through electromagnetic waves
Sonar Pinpoint enemy locations by sound
Page 7

BACKPACKS [CONT.]
RADIO
10
THE STATUS SCREEN
You can view pilot and wanzer details by selecting “Status” from the command menu.
Units equipped with a radio backpack can call for air support as an action. Only
Durandal units can call for air support.
Select “Air Support” from the command menu to choose from the following
commands:
1 2
Air Strike Call for aerial bombardment
Supply Drop Call for supplies
Armor Coating Call for additional defenses
Supply Drops
This calls for supplies to be dropped to one of several predetermined points on
each battle map. These supplies replenish ammunition a set number of times. To
replenish ammo, you must move a unit next to the supplies and end its turn. The
unit’s ammunition will return to maximum capacity at the end of the current turn.
When you order a supply drop, you must choose from a limited number of drop
points. These squares will appear in blue. Press the
√
button to move the cursor to
one of the available drop points. The supplies will be dropped at the end of the
current player phase. You cannot call for an additional supply drop as long as the
current supply crate is still on the map.
Supplies are considered friendly units, and can be targeted by the enemy. When
their HP reaches zero, they are destroyed along with any remaining supplies.
Air Strikes
When you call down an air strike, a red field will
appear on the map, indicating the target area. Use
the
√
button to rotate the targeting field. Once you
select the target area, the unit’s turn will end and
marks indicating the target area will appear. The air
strike will occur at the end of the following player
phase. All units inside the target area will receive
damage, including friendly units.
Armor Coating
Armor coating renders the armor of all units inside the target area resistant to an
additional damage type. You may choose one of three armor types: piercing, impact,
or fire. When combined with the armor type selected during setup, armor coating
provides protection from a maximum of two damage types.
When you request armor coating, a red field will appear on the map, indicating the
target area. Use the
√
button to rotate the targeting field. Once you select the
target area, the unit’s turn will end and marks indicating the target area will appear.
The armor coating process will occur at the end of the following player phase. All
units inside the target area will receive armor coating, including enemy units.
STATUS DAMAGE
Systems Down
Units suffering from this type of status damage cannot move, attack, or take any other action during their turn, nor
can they counterattack when they come under enemy fire.
Attack System Down
Units suffering from this type of status damage cannot attack during their turn, nor can they counterattack when
they come under enemy fire.
Movement System Damage
Units suffering from this type of status damage suffer halved movement range, rounded down. Thus, legs with a
move of 5 can only move 2 squares, and legs with a move of 3 can only move 1 square. If the unit’s legs are
destroyed in the latter case, the unit may still move 1 square. These units cannot evade enemy attacks.
Movement System Down
Units suffering from this type of status damage are unable to move and cannot evade enemy attacks.
Backpack System Down
Units suffering from this type of status damage cannot use backpacks.
Salvage
Units equipped with a radio backpack with salvage capability can restore destroyed friendly units, but only when
“Salvage” is set as a support action in an attack or defense link. You can see how many times the unit can restore
other units during a mission by viewing the backpack’s status window during setup.
Missile System Down
Units suffering from this type of status damage cannot launch missiles. Other weapon types are unaffected.
Link Cut
Units suffering from this type of status damage cannot give support to, or receive support from, friendly units.
11
3
1 Current wanzer setup
5
2 Pilot’s weapon proficiency levels
and support actions (if linked)
3 Equipped weapons
4 Unit data window (see p. 7)
> Press the
√
button to toggle
attack and defense links display.
4
6
5 Link Line
6 Equipped skills
> Press the
≈
button to toggle
the skill window display.
> Press the
ç
button to toggle
the skill information window.
Page 8

ENEMY YOU
THE SYSTEM MENU
THE MINIMAP
12
Press the START button during missions to view the system menu.
End Turn End the current player phase
Quicksave Save the progress of the current mission
Battle Window Select battle window size: normal, small, or off
Default Speed Select default unit movement speed and missile
animation speed: fast or normal
Display Select display options for target lines, HP bars and
facing indicator: overlay or normal
Objectives View mission objectives and stage details
Give Up Quit the mission and return to the title screen
LINKS
HOW LINKS WORK
Press the SELECT button during missions to display the minimap. Press
the SELECT button again to display a localized minimap. You may
continue play with these maps displayed. The map will be enlarged by
pressing the SELECT button a third time.
In FRONT MISSION 4, you can receive assistance from friendly units when you
attack or are under attack. To do this, you must link pilots to each other from the
“Set Links” menu in the pilot setup screen (see p. 19).
On the battle map:
Blue dotted line represents your own unit’s accuracy.
Red dotted line represents the enemy unit’s accuracy.
Blue lines represent your links.
Red lines represent enemy links.
Renges attacks. Darril attacks.
Chaeffer attacks. Enemy counterattacks.
13
THE BATTLE SCREEN
2
3
Battle Map Guide
1
1 Attackers
2 Linked units
3 Activated battle skills
4 Defenders
4
Blue Friendly units
Red Enemy units
Current field of vision
Green Currently selected friendly unit
AP Spent in Links
Linked units must spend AP for any action they take during linked battles.
Order of Attack
Attack order is influenced by several variables, including which side is attacking, the weapons used by each unit,
and each pilot’s speed.
Page 9

SKILLS
In FRONT MISSION 4, you gain Enhancement Points (EP) in battle and use them to purchase skills (see p. 19 for
more about equipping skills). There are three types of skills: battle skills, which randomly activate during battle;
14
WANZER SETUP
This allows you to change each wanzer’s parts and add items to its backpack. You cannot equip parts or weapons
that exceed your wanzer’s weight capacity, which is equal to the wanzer’s total power output.
passive skills, which are in effect as long as they are equipped; and command skills, which are added to a pilot’s
list of available commands.
Battle Skill Example:
Terror Shot I
This skill reduces the target’s evasion rate by half until the end of the battle
sequence.
Passive Skill Example:
EP Plus
Equip this skill to increase the amount of EP a pilot gains by 120%.
Command Skill Example:
Snipe
When you use this skill, your wanzer crouches and fires at a selected part on an
enemy wanzer. Your unit will remain crouched, and cannot evade or counterattack
until the next turn.
SKILL CHAINS
When units are linked in battle, skills that the units possess can activate
in succession. Each skill has a set chance of chaining with other skills.
Chained attacks receive damage bonuses.
First Chain 1.2
Second Chain 1.5
Third Chain Onward 2
X
X
X
damage
damage
damage
Accuracy = Arm’s accuracy + Weapon’s accuracy
Evasion = Body’s evasion + Leg evasion
CHANGING PARTS
Here you can set up your wanzer’s body, arms, and legs. Select the
part you wish to change by pressing the up and down directional
buttons, then press the
Some arm parts come with built-in weapons. Press the
view information on these integrated weapons.
1 W/P Current weight and power output
2 Armor Type of armor
3 Eva. Evasion rate (calculated by adding body and legs’ evasion)
BODY
HP Hit points
Weight Weight of body
Power Power output
Evasion Evasion rate
LEGS
HP Hit points
Weight Weight of legs
Move Movement rate
Evasion Evasion rate
Type Leg type (affects how high a wanzer can
climb, which terrain it can negotiate,
and AP cost for each movement)
ARM
≈
15
button to confirm.
ç
button to
HP Hit points
Weight Weight of arm
Hit% Accuracy
Built-in Weapons Weapons built into the arm
If an arm contains built-in weapons,
ç
button to view them.
press the
VICTORY
1
2
3
Once you complete a mission, you gain bonus funds and Enhancement Points.
1 Total Current funds
2 Gain Funds gained
3 Maintenance Funds spent to replace disabled parts
4
4EP Each pilot’s EP
Page 10

WANZER SETUP [CONT.]
16
WANZER SETUP [CONT.]
CHANGING WEAPONS
Here you can set up weapons for your left arm, right arm, and both
shoulders. Select a weapon by pressing the up and down directional
buttons, then press the
> If an arm already has built-in weapons, it cannot carry any
additional weapons.
≈
button to confirm.
17
EQUIPPING BACKPACKS
Here you can set up your backpack.
Several backpack types are listed below:
MACHINEGUN, SHOTGUN, RIFLE, BAZOOKA, & MELEE
HIT% 80% 62%
RANGE 14
The gradient in the bar represents
accuracy loss by range. A darker
color indicates greater accuracy.
GRENADE & ROCKET LAUNCHER
23
The number displayed in the “Area”
section represents the radius of the
weapon’s area of attack.
SHIELDS
MISSILES
Shield
Damage Cut Percentage of damage reduced
Block Number of times shield can block
AP AP cost
Weight Weight of shield
Weapon Type Damage type
Damage Damage
Ammo Missile capacity
AP AP cost
Weight Weight of weapon
Range Minimum and maximum range
Homing Homing performance:
Average Not designed to navigate around cover
Good Can navigate around light cover
Excellent Can navigate around full cover
X
X
X
Weapon Type Damage type
Damage Damage
Ammo Ammunition capacity
AP AP cost
Weight Weight of weapon
Hit% Accuracy
Range Minimum and maximum range
Weapon Type Damage type
Damage Damage
Ammo Ammunition capacity
AP AP cost
Weight Weight of weapon
Range Minimum and maximum range
Area Area of effect
number of blocks
number of missiles fired
number of attacks
X
number of attacks
X
number of attacks
X
number of attacks
X
number of attacks
ITEM -
Carries items
Weight Weight of backpack
Item Space Number of spaces for
*Some items require more than one
space.
items
TURBO - Increases power and carries a few items
Weight Weight of backpack
Item Space Number of spaces for
items
Power Additional power output
SENSOR - Guides missiles fired by friendly units
RADIO - Allows you to call for air support
JETPACK - Allows you to reach higher ground when activated
Weight Weight of backpack
AP AP cost
Move Number of squares unit
can move
Wait Recharge time between
uses
REPAIR- Allows you to repair damagd units
Weight Weight of backpack
Range Range of repairs
Repair Maximum HP repaired
Restore Default HP of restored
parts
Remove Types of status damage
that can be removed
EMP - Induces status damage to enemies
Weight Weight of backpack
Sonar Pinpoint enemy locations by sound
Range Normal - Normal range
Radar Pinpoint enemy locations through
Weight Weight of backpack
Air Strike Air strike
Supply Drop Supply drop
Armor Coating Armor coating
Support: Salvage
Weight Weight of backpack
Range Range of status attacks
ST-Attack% Status attacks’ chance of success
Support: Antilock
Rain - Range in rain and snow
electromagnetic waves
Range Normal - Normal range
Night - Range at night
3
X
AP AP cost
Damage Damage
AP AP cost
Charge Number of ammo restocks
AP AP cost
AP AP cost
Turns Status attacks’ duration in turns
5 Area of effect
X
3 - Available calls per mission
X
5 Area of effect
5
Number of times friendly units can
be salvaged (see p. 10 for more
about salvage)
Number of times antilock can be
used (see p. 9 for more about
antilock)
Page 11

WANZER SETUP [CONT.]
18
SETTING ITEMS
Here you can load items into your backpack. You cannot exceed the total capacity
of your backpack.
CHANGING ARMOR TYPE
Here you can change your wanzer’s armor type.
Armor Types:
Piercing Protects against piercing damage
Impact Protects against impact damage
Fire Protects against fire damage
> When you are hit with an attack of the same type as your armor, the damage is
reduced by 30%.
CHANGING WANZER COLORING
Here you can customize the appearance of your wanzer. Choose patterns for your
camouflage, and the color of armored sections and identification lines.
> More camouflage patterns
become available as you
progress through the game.
CHANGING WANZER NAMES
Your wanzers can be renamed to anything you like.
Pilot Default Name
Elsa Verseau
Zead Squire
Hermes Charon
Latona Koroleva
Darril Infernal
Renges Mundane
Chaeffer Celestial
Luis Tierra
Ines Guardia
VIEWING YOUR WANZER
Once you’re finished setting up your wanzer, you can examine it from any angle.
PILOT SETUP
19
In FRONT MISSION 4, pilots can gain new skills and abilities by spending the Enhancement Points they gain in
combat.
GAINING ABILITIES
Here your pilots can learn new abilities.
Buy Abilities Use EP to gain abilities. There are three types of abilities: attribute
Upgrade Use EP to raise the rank of your onboard computer to gain access
Learned Skills Number of skills learned
AP Maximum AP
AP Charge AP regained at the beginning of each turn
Link Points Number of points that can be used to link other pilots
Skill Slots Number of available slots for skills
Speed Pilot’s speed – Speed affects how soon a pilot can act during a battle
Evasion Pilot’s evasion – A pilot’s evasion does not apply when piloting a wanzer with
Weapon Proficiencies Weapon proficiencies can be increased to a maximum of three
MG Machineguns GR Grenades
SG Shotguns RK Rockets
RF Rifles MS Missiles
BZ Bazookas ML Melee
Resistances Resistances against EMP backpack status attacks
> Acquiring resistance abilities increases each resistance level by 50% increments,
up to 100%. A resistance of 100% grants total immunity.
> When an ability is selected, press the
enhancements, weapon proficiency level enhancements, and battle skills.
to additional skills.
sequence.
an evasion of 0%
levels. Increased proficiency results in greater damage when
using the corresponding weapons.
ç
button to view detailed information on the ability.
SETTING SKILLS
Select “Equip Skill” to view a list of your pilot’s unequipped skills. Each skill
requires a certain number of skill slots. Keep this in mind when choosing skills to
equip.
SETTING LINKS
To establish links between pilots, select “Set Links” from the pilot setup menu.
There are two types of links: attack links and defense links.
Attack Links Enables friendly units to support the pilot when attacking enemies
Defense Links Enables friendly units to support the pilot when coming under enemy attack
Linked pilots’ quality of support depends on the number of link points (LP) assigned to them.
1 LP: Only allows linked pilot to perform attacks during linked battles
2 LP: Allows linked pilot to perform attacks and activate battle skills in linked battles
Page 12

PILOT SETUP [CONT.]
WANZER SHOP
COMPUTER SHOP
20
THE SIMULATOR
SETTING SUPPORT ACTIONS
Here you can configure how a pilot supports others when participating in a linked
battle. You can configure individual settings for both attack and defense support.
Attack Support Pilot’s action in an attack link
Defense Support Pilot’s action in a defense link
Left Hand Pilot uses weapon in his left hand during a linked battle
Right Hand Pilot uses weapon in his right hand during a linked battle
Backpack Here you can configure the following two options:
Antilock Prevents missiles from targeting nearby friendlies by disrupting their
Salvage Allows a unit equipped with a radio backpack with salvage capability
Here you can sell and purchase full wanzer sets, wanzer parts, weapons,
and items.
Here you can use funds to purchase additional skills and abilities that are
otherwise unavailable from the upgrade menu.
guidance systems. Requires an EMP backpack with antilock capability.
Only usable for defense support.
to restore units when they are destroyed. Can be set for either
defense support or attack support.
21
BATTLE
The simulator lets you train on previously cleared battle maps. You can gain
experience, EP, and additional funds by training in the simulator.
Additional simulation programs are unlocked as the game progresses.
Note that some simulation programs can only be unlocked by fulfilling
certain conditions.
ONLINE SHOP
Here you can purchase wanzer parts and weapons from earlier stages.
TUTORIAL
Here you can view tutorials on combat, wanzer setup, and pilot setup.
Page 13

CREDITS
22
CREDITS
23
SQUARE ENIX CO., LTD.
Product Development Division 6
Producer & Director Toshiro Tsuchida
Planners Ko Sato
Programmers Fumiaki Fukaya
Designers Yusuke Naora
Production Manager Kiyoko Maeda
Production Assistants Rie Saito
Hiroyuki Saegusa
Kenji Muraoka
Hideo Iwasaki
Jun Ushizawa
Kiminori Ono
Rie Tamura
Shingo Matsui
Shuhei Ishikawa
Toshiaki Suzuki
Toshimitsu Ohdaira
Yasuhiro Yamaguchi
Yoichi Kuroda
Masafumi Uchida
Hideki Shibuya
Hitomi Kogure
Kiyotaka Akaza
Makoto Goto
Mamoru Oyamada
Nobuhiro Kono
Shinichi Aoyama
Atsushi Ebisawa
Shintaro Tamai
Yoshihiko Ohta
Junichi Murata
Shouji Obata
Takahiro Matsumoto
Hideyuki Matsumoto
Hiroaki Kusano
Takeshi Shiba
Naoko Yamashita
Arata Takahashi
Daisaku Nakamura
Daisuke Komatsu
Kouichi Nakayama
Takuji Sasaki
Yasushi Iwasaka
Yoshihisa Akashi
Yoshio Yamakawa
Yuji Takasu
Mitsuhiro Yoshida
Sho Okamura
Takashi Kamitakahara
Yuichi Kikuchi
Atsushi Inuzuka
Shinya Ichida
Tatsuya Zaizan
Nao Matsuda
Visual Works
CG Movie Director Koji Kobayashi
CG Designers Takuji Yasuda
Editor Keiichi Kojima
CG Engineers Masashi Nakata
Coordinators Hazuki Fujimoto
Production Manager Norimichi Kurosawa
CG Movie Producer Satoshi Tsukamoto
Sound Section
Music Hidenori Iwasaki
Synthesizer Operator Ryo Yamazaki
Sound Programmer Minoru Akao
Sound Editors Jun Nakamura
Movie Sound Editor Shojiro Nakaoka
Dialogue Supervisor Teruaki Sugawara
Dialogue Editors Hideki Uchimura
Sound Tool Programmer Satoshi Akamatsu
Production Manager Masayuki Tanaka
Production Assistant Masashi Kitagawa
Localization Department
Localization Manager Akira Kashiwagi
Localization Director Atsushi Matsushita
Localization Coordinator Mayumi Kawakami
English Translator Aziz Hinoshita
Editor Colin Williamson
Spanish Advisor Seikoh Hokama
German Advisor Tet Hara
Special Thanks Katrin Darolle
Naoya Shigematsu
Takaomi Moto
Kazuhito Shimada
Takuya Suzuki
Koki Nara
Sanae Nakanishi
Takafumi Nishimura
Masumi Hakamada
Kuniaki Saito
Keisuke Miyazaki
Fred T.Y. Hui
Taku Wakisaka
Atsuko Hashimoto
Nahoko Nakamura
Atsushi Ohnishi
Alex Moresby
Andre Woitczyk
Quality Management Division
QA Coordinator Hironori Akiyama
QA Assistant Coordinators Tomokazu Nagamori
QA Staff Toshihiro Takemoto
Special Thanks Koji Shirasugi
General Manager Akihito Shoji
Rating and Proofreading Section
Rating Advisors Reiko Kondo
Legal & Intellectual Property Division
General Manager Michihiro Sasaki
Staff Shigeharu Kobayashi
Sales & Marketing Division
Executive Manager Shinji Hashimoto
General Manager Hitoshi Isosu
Sales & Marketing Staff Koji Suga
Sales Administration Division
Manager Shinobu Hidaki
Sales Administration Staff Yasuhiro Takamatsu
Executive Producers Yoichi Wada
U.S. Recording
Producers Yutaka Maseba
Director Joe Romersa
Recording Facility Magnitude 8 Post
Digital Trackers Michael McCarty
Produced by ZRO Limit Productions
in association with Animaze.. iNC
Special Thanks Marcus Wehner
Naoyuki Hirayama
Hisato Iwatsuki
Tamotsu Ueno
...and ALL QA STAFF
Masashi Nagai
Naoya Matsuda
Hiroko Hamada
Sueko Kogai
Hiroshi Harada
Tetsuya Otsuji
Naoya Yamagami
Misa Murohashi
Yumi Toshihiro
Aki Moriwaki
Sachie Kitamura
Keiji Honda
Haruyo Kanesaku
Osamu Maseba
Collin McQueen
SQUARE ENIX USA., INC.
Quality Assurance Manager David "Ribs" Carrillo
Senior Lead Product Analyst Mohammed A.C. Wright
Lead Product Analyst Aaron J. Adams
Assistant Lead Analyst Matt Hilton
Product Analysts Andy Bellinger
QA Translators Frederick K. Hashi
Localization Manager Yutaka Sano
Customer Support Ryan Riley
Marketing Communications Kyoko Yamashita
Marketing Kenji Mimura
Sales Sean Montgomery
Business Development Ken Berry
Legal Kazumi Hasegawa
Senior Vice President & CFO Kenzo Nogimura
President & CEO Jun Iwasaki
Special Thanks
BradyGAMES
The Kenwood Group
Ruder Finn Los Angeles
Saatchi & Saatchi Los Angeles
Studio QED, Inc.
Virtual Interactive, Inc.
Brody Phillips
© 2003, 2004 SQUARE ENIX CO., LTD. All Rights Reserved.
Carmelo Cabezo
Johnny Fournier II
Yuichi Haga
Alicia Y. Kim
Michael V. Liu
Matt L. Martinez
Joshua Martinsson
Max P. Mena
Jason Sanders
Jae Shin
Sachiyo Ikeda
Anthony Montana
Sonia Im
Felice Wu
Fernando Bustamante
Patrick H. Cervantes
Alaine C. DeLeon
Traci Jones
Page 14

with the Official Strategy
Guide from BradyGames!
• Comprehensive Walkthrough
with Maps.
• Complete Coverage of All Missions
in the Two Intertwining Storylines.
• Pilot Skills, Including Coverage of
the All-New “Link System”.
• Expert Combat Tactics and Stats
for Every Wanzer.
• Game Secrets and More, Revealed!
To purchase BradyGames’ Front Mission® 4 Official Strategy Guide,
visit your local electronics, book, or software retailer.
Also available online at bradygames.com.
ISBN: 0-7440-0389-X
UPC: 7-52073-00389-0
PRICE: $14.99 US / $21.99 CAN
PROTECT THE FUTURE
OF THE WORLD…
LIMITED WARRANTY
25
The following warranty and support information applies only to customers in the United States and Canada,
and only to original consumer purchasers of products covered by this warranty.
LIMITED WARRANTY
Square Enix U.S.A., Inc. (“SEUI”) warrants to the original purchaser of the enclosed product (the “Product”)
that the media containing the Product (which includes any replacement media provided under this warranty)
will be free from defects in materials and workmanship for a period of ninety (90) days from the date of
purchase (the “Warranty Period”). SEUI’s entire liability and your exclusive remedy under this limited warranty
shall be, at SEUI’s option, repair or replacement, without charge, of the whole or affected portion of any
Product that proves to be defective in material or workmanship during the Warranty Period.
EXCLUSIONS FROM WARRANTY
This warranty applies only to defects in factory materials and factory workmanship. Any condition caused by
abuse, unreasonable use, mistreatment, neglect, accident, improper operation, destruction or alteration, or
repair or maintenance attempted by anyone other than SEUI is not a defect covered by this warranty. Parts and
materials subject to wear and tear in normal usage are not covered by this warranty.
IMPLIED WARRANTIES AND INCIDENTAL AND CONSEQUENTIAL DAMAGES
Under state law, you may be entitled to the benefit of certain implied warranties. ANY APPLICABLE IMPLIED
WARRANTIES, INCLUDING WARRANTIES OF MERCHANTABILITY AND FITNESS FOR A PARTICULAR
PURPOSE, WILL CONTINUE IN FORCE ONLY DURING THE WARRANTY PERIOD. Some states and provinces
do not allow limitations on how long an implied warranty lasts, so the above limitation may not apply to you.
NEITHER SEUI NOR YOUR RETAIL DEALER HAS ANY RESPONSIBILITY FOR ANY INCIDENTAL OR
CONSEQUENTIAL DAMAGES RELATING TO YOUR USE OF THE PRODUCT, INCLUDING, WITHOUT
LIMITATION, ANY DAMAGES FOR LOSS OF DATA OR LOSS OF PROFIT, OR FOR ANY INCIDENTAL
EXPENSES, LOSS OF TIME, OR INCONVENIENCE. As some states and provinces do not allow the exclusion or
limitation of incidental or consequential damage, the foregoing limitation or exclusion may not apply to you.
HOW TO OBTAIN WARRANTY SERVICE
To obtain warranty service, please send the defective Product, together with a copy of your original sales
receipt, your return address, name and telephone number, should contact be necessary, and a brief note
describing the defect to SEUI at the following address: Square Enix U.S.A., Inc., Customer Warranty, 6060
Center Drive, Suite 100, Los Angeles, CA 90045. THE DEFECTIVE PRODUCT MUST BE POSTMARKED WITHIN
NINETY (90) DAYS FROM THE DATE OF PURCHASE. PROOF OF PURCHASE IN THE FORM OF A DATED
RECEIPT MUST BE INCLUDED TO OBTAIN WARRANTY SERVICE. The shipping costs for sending the defective
Product to SEUI is a sole responsibility of the Customer. SEUI will not be liable for any damage or loss that
occurs during shipping. To minimize loss during shipping, you may opt to use a trackable shipping method.
If you have warranty questions, you can also contact our Customer Warranty department at (310) 846-0345
during its hours of operation, Monday – Friday, 8:00 am – 12:00 pm and 1:00 pm – 5:00 pm, Pacific Standard
Time.
CUSTOMER SUPPORT
For customer support and technical support questions, please call (310) 846-0345 during the following hours
of operation: Monday-Friday 8:00 am – 12:00 pm and 1:00 pm – 5:00 pm, Pacific Standard Time.
NOTICE: The Product, this manual, and all other accompanying documentation, written or electronic, are
protected by United States copyright law, trademark law and international treaties. Unauthorized reproduction
is subject to civil and criminal penalties. All rights reserved.
Game tips are available (for callers in the U.S. and Canada only) for all SQUARESOFT and SQUARE ENIX
PlayStation
®
and PlayStation®2 titles. CHARGES WILL APPLY. To obtain game tips, please call:
In the U.S.:
1-800-892-5825 (Major credit card required) Charges: $.99/min. Automated Tips only.
In Canada: 1-900-451-KLUE (1-900-451-5583) Charges: $1.50/min. Automated Tips only.
Touch-tone phone required. Prices subject to change without notice. Callers must be at least 18 years old or
have the permission of a parent or guardian. Game tips are available 24 hours a day, 7 days a week.
For information and services by Square Enix, go to www.square-enix-usa.com
 Loading...