

Page 1
1
WARNING: READ BEFORE USING YOUR PLAYSTATION®2
Thank you for purchasing FERRARI F355 Challenge™ for the PlayStation®2. Please read
this instruction manual thoroughly before starting the game.
Contents
Getting Started 2
Starting Up 3
Controls 4
Main Menu 6
The Game Screen 7
Selection Screen 8
Game Modes 11
Arcade 12
Championship 14
Great Driver Challenge 15
Versus Play 16
Car Settings 17
Driving Data 19
Options 21
Save & Load 22
Gallery 23
Courses 24
Car Dimensions
Total Length x Total Width x Total Height: 167.3 in x 74.8 in x 46.1 in
Wheel Base: 96.5 in
Tread: F 59.6 in/R 63.6 in (F1514 mm/R1516 mm)
Weight: 2976 lb (DIN: 1450 kg) <Japanese Specs: 1440 kg>
Front/Rear Load <Japanese Specs>: Front Axle: 600 kg / Rear Axle: 840 kg
Performance
Max Speed: 183 mph (manufacturer’s official figures)
Acceleration: 4.7 sec (0-60 mph), 13 sec. (0-1/4 mile)
Engine Specifications
Engine: F129B/40
Engine Type: Water-cooled, DOHC 8 cylinders in 90˚ V layout
Valvetrain: 5 valves per cylinder (3 radial intake, 2 exhaust)
Maximum Horsepower: 280KW (375 bhp) @ 8250 rpm
Specific Power (Brake Mean Effective Pressure): 109 bhp/liter (1.5kg/cm)
Maximum Torque: 363Nm (268 lb-ft) @6000 rpm
A memory card (8MB) (for PlayStation®2) (sold separately) is needed to save game data.
To save game data, insert a memory card (8MB) (for PlayStation®2) into MEMORY CARD
slot 1 or MEMORY CARD slot 2 before starting up the game. Do not remove or insert
controllers or other peripheral devices when the power is on. 26KB or more available space
is required to save game data. Please ensure there is sufficient available space.
COMPUTER ENTERTAINMENT SYSTEM.
A very small percentage of individuals may experience epileptic seizures
when exposed to certain light patterns or flashing lights. Exposure to certain
patterns or backgrounds on a television screen or while playing video
games, including games played on the PlayStation 2 console, may induce
an epileptic seizure in these individuals. Certain conditions may induce
previously undetected epileptic symptoms even in persons who have no
history of prior seizures or epilepsy. If you, or anyone in your family, has an
epileptic condition, consult your physician prior to playing. If you experience
any of the following symptoms while playing a video game – dizziness,
altered vision, eye or muscle twitches, loss of awareness, disorientation,
any involuntary movement, or convulsions – IMMEDIATELY discontinue use
and consult your physician before resuming play.
WARNING TO OWNERS OF PROJECTION TELEVISIONS:
Do not connect your PlayStation 2 console to a projection TV without first
consulting the user manual for your projection TV, unless it is of the LCD
type. Otherwise, it may permanently damage your TV screen.
USE OF UNAUTHORIZED PRODUCT:
The use of software or peripherials not authorized by Sony Computer
Entertainment America may damage your console and/or invalidate your
warranty. Only official or licensed peripherals should be used in the
controller ports or memory card slots.
HANDLING YOUR PLAYSTATION 2 FORMAT DISC:
• This disc is intended for use only with PlayStation 2 consoles
with the NTSC U/C designation.
• Do not bend it, crush it or submerge it in liquids.
• Do not leave it in direct sunlight or near a radiator or other source of heat.
• Be sure to take an occasional rest break during extended play.
• Keep this compact disc clean. Always hold the disc by the edges and
keep it in its protective case when not in use. Clean the disc with a lint free, soft, dry cloth, wiping in straight lines from center to outer edge.
Never use solvents or abrasive cleaners.
Page 2
2
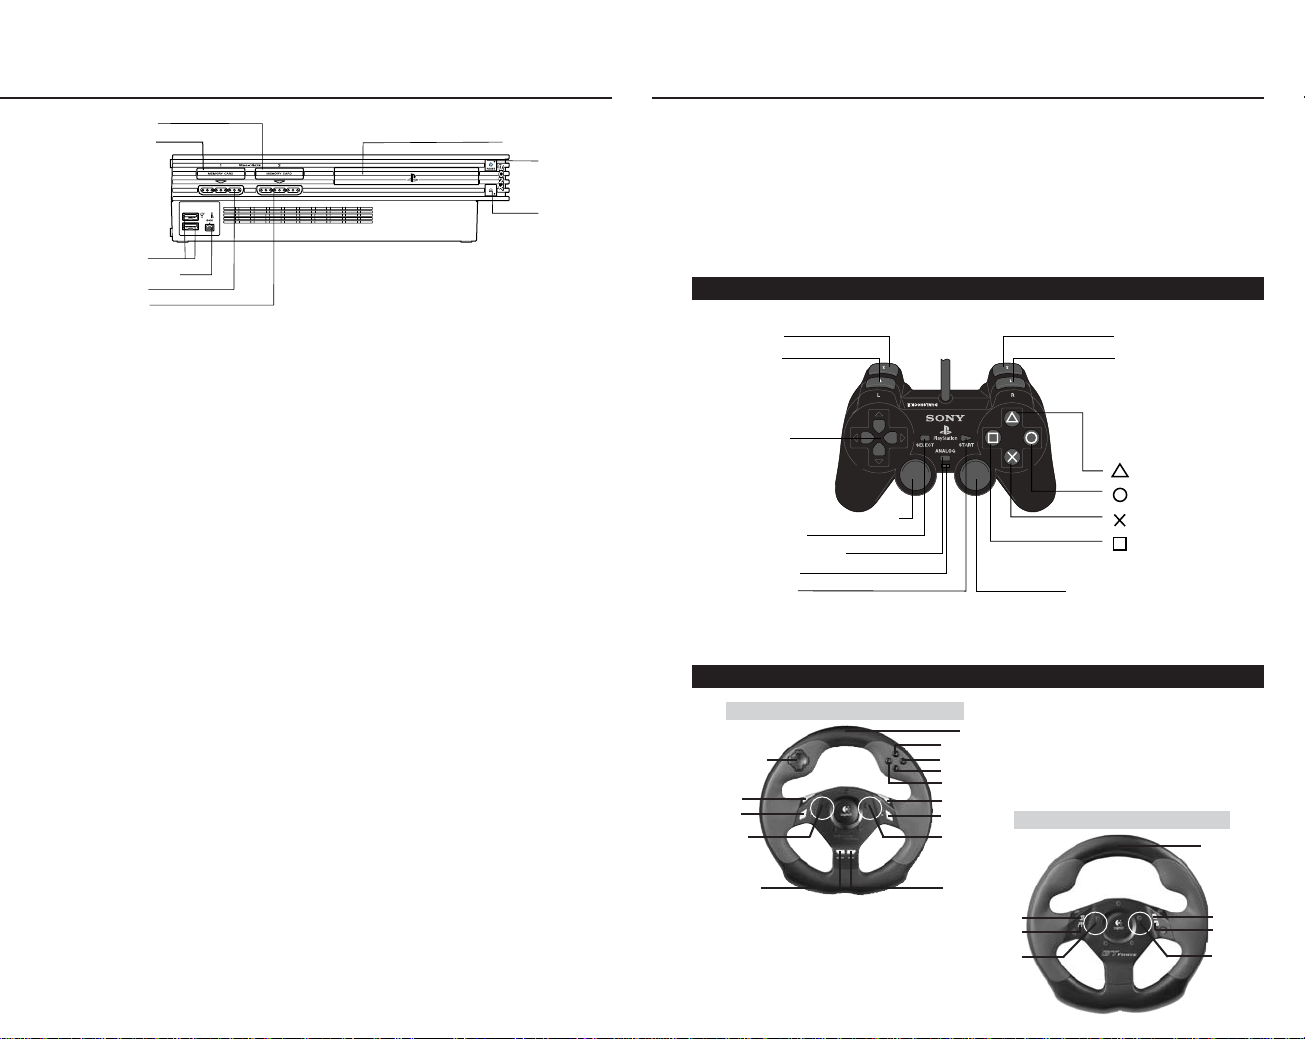
Below is an explanation of peripheral devices and the basic button controls used on the
Menu/Selection Screens and during racing.
This game is for one or two players. It is compatible with the DUALSHOCK®2 analog controller
and the DUALSHOCK®2 analog controller. For 1-player games, connect the controller to be used
to controller port 1. For 2-player games, connect the controller for player 2 to controller port 2.
*Unless otherwise stated the button controls referred to in this manual are for the
DUALSHOCK®2 analog controller.
Starting UpGetting Started
DUALSHOCK®2 analog controller
Directional button
X button Y button
A button
B button
R1 button
L2 button
R2 button
SELECT button
START button
Left paddle
(Behind the
steering wheel)
(Behind the
steering wheel)
(Behind the
steering wheel)
(Behind the
steering wheel)
Right paddle
Steering Wheel
Steering Wheel
Left paddle Right paddle
Logitech Driving Force™ USB Wheel (for PlayStation®2) / Logitech GT Force™ USB Wheel (for PlayStation®2)
D button
A button
S button
F button
Logitech Driving Force™ USB Wheel (PS2)
Logitech GT Force™ USB Wheel (PS2)
3
L1 button
MEMORY CARD slot 2
MEMORY CARD slot 1
USB connector
S400 i.LINK connector
controller port 1
controller port 2
disc tray
RESET button
(OPEN) button
Set up your PlayStation®2 computer entertainment system
according to the instructions in its Instruction Manual. Make
sure the MAIN POWER switch (located on the back of the
console) is turned on. Press the RESET button. When the power
indicator lights up, press the open button and the disc tray will
open. Place the FERRARI F355 challenge™ disc on the disc tray
with the label side facing up. Press the open button again and
the disc tray will close. Attach game controllers and other
peripherals, as appropriate. Follow on-screen instructions and
refer to this manual for information on using the software.
L2 button
L1 button
directional
buttons
left analog stick
(L3 button when pushed down)
SELECT button
ANALOG mode button
Mode indicator
START button
R2 button
R1 button
button
button
button
button
right analog stick
(R3 button when pushed down)
Page 3
54
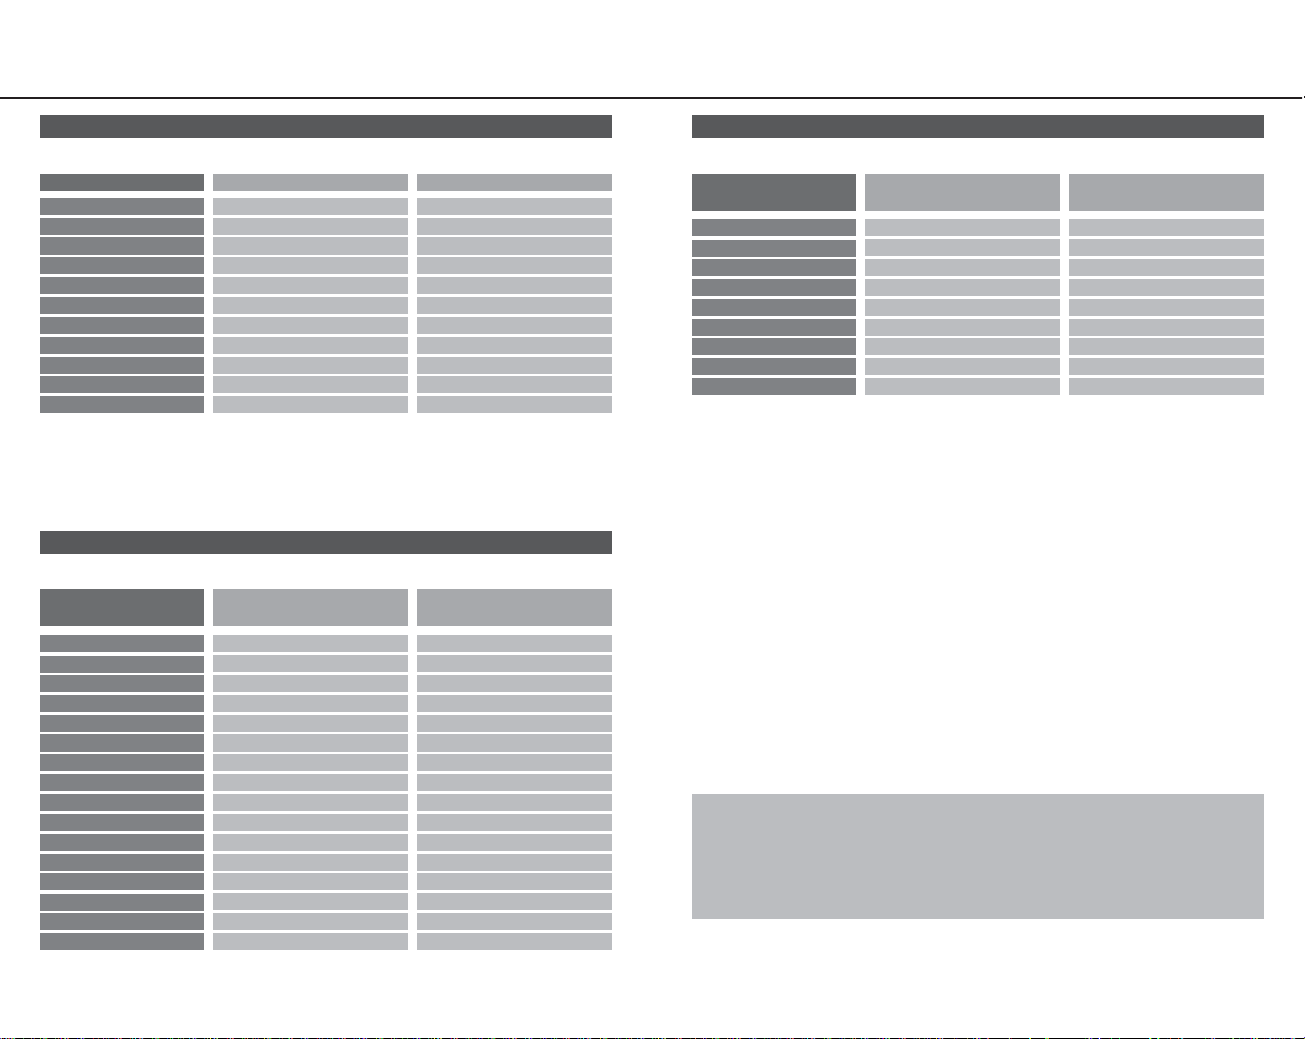
Directional button Move cursor/Select item Not used
Steering wheel
Not used Steering controls
D button Cancel command Driver Assist Functions ON/OFF
F button Cancel command Not used
A button Enter command Not used
S button Enter command Select Driver Assist Functions
R1 button Not used Shift up
R2 button Not used Change view
L1 button Not used Shift down
L2 button Not used Not used
Left paddle Not used Shift down
Right paddle Not used Shift up
SELECT button Not used Not used
Logitech Driving Force™ USB
Wheel (for PlayStation®2)
Function On Menu Screens Function During Racing
START button
Start game Pause/Resume
Left pedal Enter command Accelerator
Right pedal Cancel command Brake
*When a Driving Force™ USB Wheel (for PlayStation®2)/Logitech GT Force™ USB Wheel
(for PlayStation®2) has been connected, controllers/analog controllers cannot be used in
the controller ports.
*Use the Device Settings menu from the Options Screen (P.21) to change button
assignments, steering wheel calibration settings, and turn feedback vibration ON/OFF.
*The above button assignments are the default settings.
The Logitech GT Force™ USB Wheel (for PlayStation®2) (sold separately) and the
Logitech Driving Force™ USB Wheel (for PlayStation®2) (sold separately) are compatible
with FERRARI F355 Challenge™. Both USB wheels bring the arcade sensation of being in
the driver’s seat with realistic steering wheel and pedals. Please read the manual provided
with the Driving Force™ USB Wheel (for PlayStation®2)/Logitech GT Force™ USB Wheel
(for PlayStation®2) before use.
Connect the USB Wheel directly to the USB connector before turning on the power to the
PlayStation®2 computer entertainment system. Do not remove or connect the USB Wheel
during start-up. The USB hub cannot be used. When the USB Wheel is connected, the
analog controller (DUALSHOCK®2) cannot be used. When using one Driving Force™ USB
Wheel (for PlayStation®2)/Logitech GT Force™ USB Wheel (for PlayStation®2), connect it
to the upper USB connector (when the PlayStation®2 computer entertainment system
is set horizontally). When using more than one Driving Force™ USB Wheel (for
PlayStation®2)/Logitech GT Force™ USB Wheel (for PlayStation®2), connect the
Wheels in the following manner: Upper USB connector for Player 1 / Lower USB
connector for Player 2.
The USB Wheel will undergo automatic calibration once the power for the PlayStation®2
computer entertainment system has been turned on. Be sure to leave sufficient space
around the wheel and do not touch it while calibration is in progress.
*The following button assignments are the default settings.
*The following button assignments are the default settings.
*The following button assignments are the default settings.
Controller Function on Menu Screens Function During Racing
Left analog stick
Move cursor Steering
Directional button Move cursor Steering
D button Cancel command Driver Assist Functions ON/OFF
F button Cancel command Brake
A button Enter command Select Driver Assist Functions
S button Enter command Accelerator
R1 button Not used Shift up
R2 button Not used Change view
L1 button Not used Shift down
L2 button Not used Not used
START button Start game Pause/Resume
Analog Controller (DUALSHOCK®2)
Logitech Driving Force™ USB Wheel (for PlayStation®2)
Logitech GT Force™ USB Wheel (for PlayStation®2)
*The mode indicator should be on (red).
*This game uses the vibration function. The vibration function can be switched ON/OFF
from the Options Screen (P.21).
*Button assignments can be changed using the Device Settings menu on the Options
Screen (P.21).
Controls
Steering wheel Move cursor Steering controls
X button
Not used Driver Assist Functions ON/OFF
A button Start game Pause/Resume
Y button Cancel command Select Driver Assist Functions
B button Enter command Change view
Left paddle Move cursor (up) Shift up
Right paddle Move cursor (down) Shift down
Left pedal Enter command Accelerator
Right pedal Cancel command Brake
Logitech GT Force™ USB Wheel
(for PlayStation®2)
Function On Menu Screens Function During Racing
Copyright © 2002 Logitech. All rights reserved.
Page 4
!
76
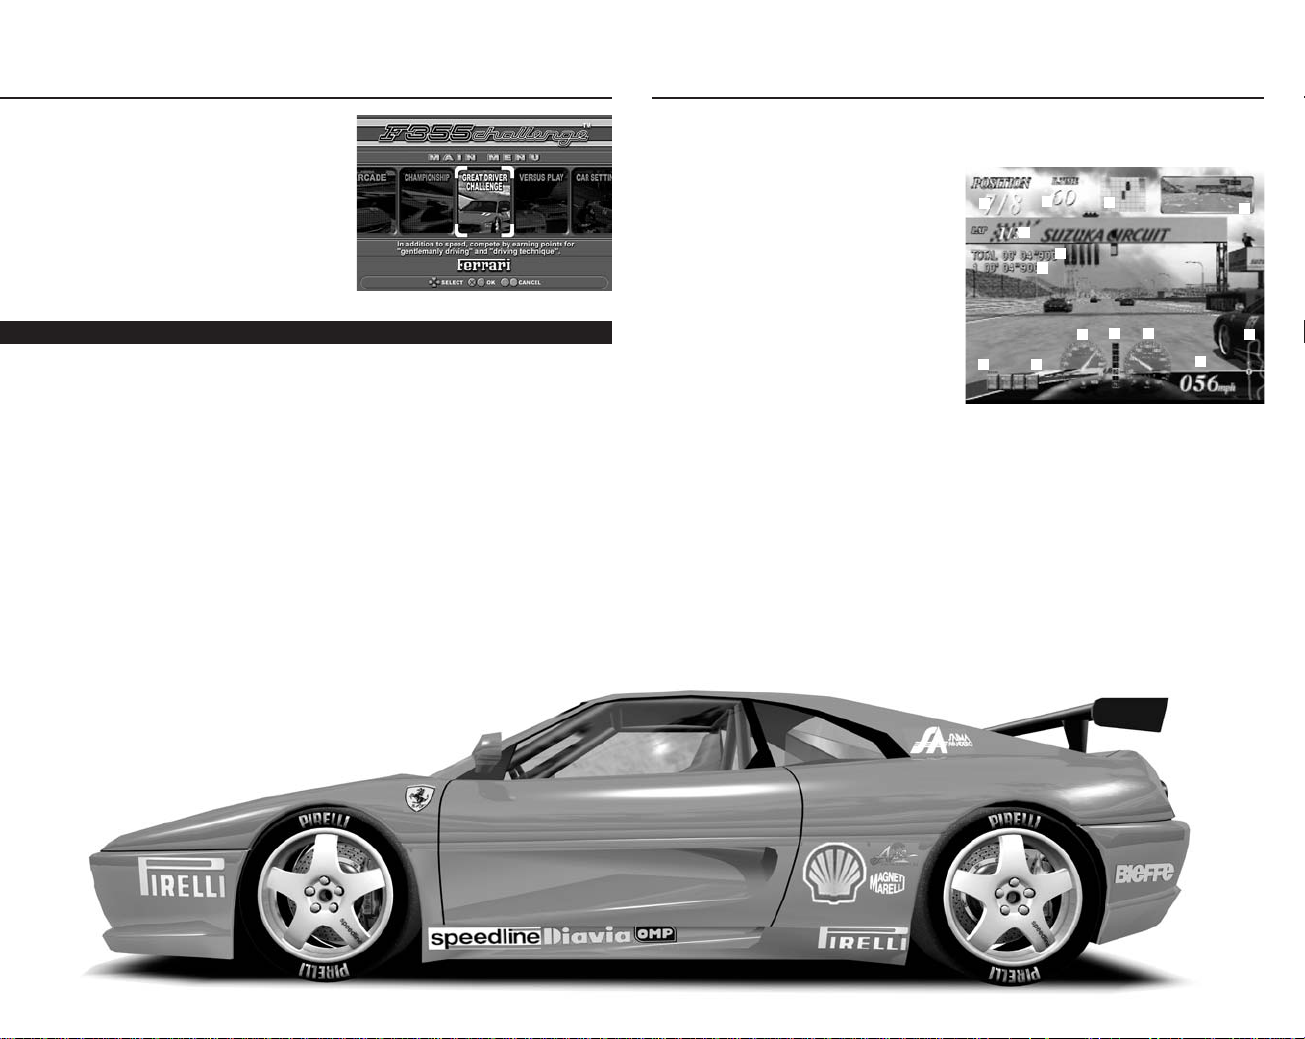
The Game Screen
Ranking/Number of Cars
Participating:
Displayed on the Race
and Versus Screens.
Time Remaining: Displayed only in
modes with a time limit.
Radar Screen: Shows player car and
immediate surroundings.
Back Mirror Screen
Current Lap/Total Laps
Total Elapsed Time
Lap Time
The basic game screen is described here. The screen below is from Arcade Mode.
!
@
#
$
%
^
&
*
(
)
Q
W
E
R
Driver Assist Functions
Selection Cursor: Driver Assist Functions Selection Cursor: Press the A button to
move the cursor for selecting Driver Assist Functions.
Driver Assist Functions Indicator: Press the A button to toggle selected Driver
Assist Functions ON/OFF.
Tachometer
Gear Display
Speedometer (analog)
Speedometer (digital)
Map Display:
In addition to the course map, this also indicates the position of the
player car and leading car.
$
%
&
(
*
)
Q
W
E
R
^
#
@
Main Menu
Below is a brief description of each of the
game menus.
Press the START button at the Title Screen
to bring up the Main Menu Screen. Use left
and right on the directional buttons to select
the Game Mode and press the A button or
S button to enter the selection. If the demo
has started playing, press the START button
to return to the Title Screen.
Arcade Checkpoint-style race based on the arcade version of FERRARI F355 Challenge™.
Championship There are a total of six races in this mode. Compete in all six races for the
highest total point score.
Great Driver Challenge Player is evaluated based on driving performance during
the race.
Versus Play Split-screen two player race.
Car Settings Change the Car Settings.
Driving Data View Driving Data, Race Line Data, Full Lap Replay and various records.
Options Change button assignments and other game settings.
Save & Load Save/load game files.
Game modes
*The screen is from Race of Intermediate level.
Page 5
98
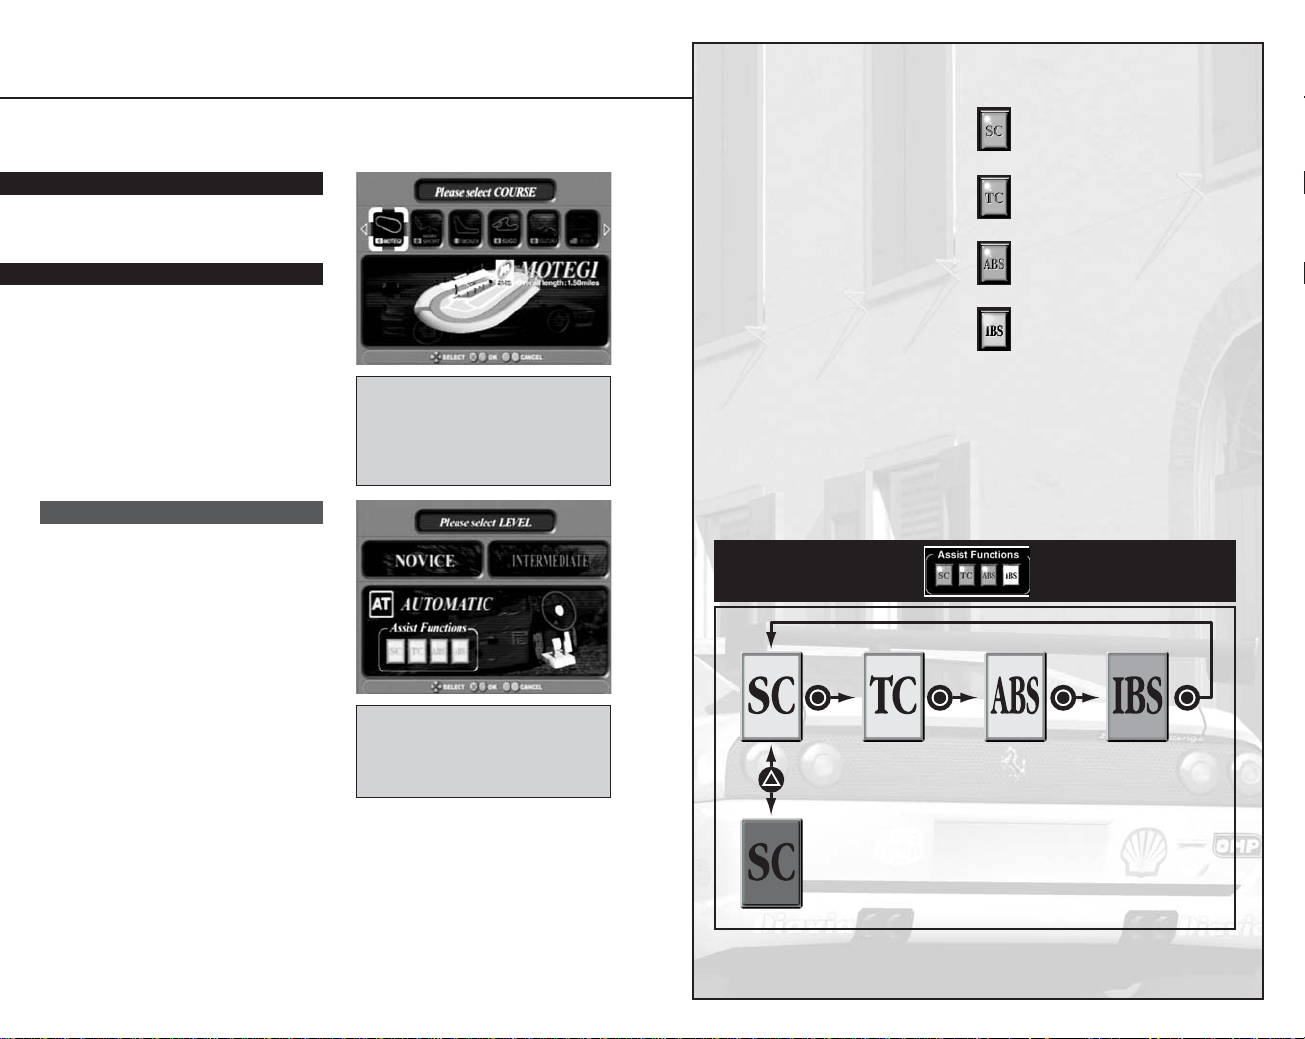
Various Driver Assist Functions have
been provided to help beginners hone
their driving and racing abilities while
enjoying the game.
The Driver Assist Functions can be
individually enabled/disabled during a
race (the available Driver Assist Functions
vary depending on the difficulty level
selected). Gradually disabling Driver
Assist Functions as driving technique
improves is the best way to raise racing
ability to the next level.
Driver Assist Functions can be set to
ON/OFF at the beginning of the race
from the Options Screen (P.21).
Driver Assist Functions
Switching Driver Assist Functions ON/OFF
Use the A button to move the cursor on the Driver Assist Functions indicator and
press the
D button to switch the selected Function ON/OFF.
Stability Control
Limits body roll during cornering
to improve driving stability.
Traction Control
Improves traction and stability.
Antilock Brake System
Keeps tires from locking during
sudden braking.
Intelligent Braking System
Applies the brakes automatically
to slow the car before curves.
This function allows beginners to
concentrate on steering and helps
them get a feel for where on the
course to brake.
Move Driver Assist Functions selection cursor with
the
A button
Toggle selected Function ON/OFF with the
D button
Novice: Shifting is automatic. All Driver
Assist Functions (SC, TC, ABS, and IBS)
can be used.
Intermediate: Shifting is semi-automatic
(six-speed) and gears are shifted manually.
The Driver Assist Functions SC, TC and ABS
can be used but the IBS function cannot.
Pro: The handicap of the selected player is
removed (can only be chosen when the
Handicap option is set to Heat in the
Options Screen, while in Versus Play mode).
Shifting and available Driver Assist Functions
are the same as for Intermediate level.
Selection Screen
Various Selection Screens appear in each mode before the race starts. Below is an
explanation of the Selection Screens and related items for each of the modes.
Select a course from eleven courses
modeled on actual racing circuits.
Use left or right on the directional
buttons to select a course and press
the
A button or S button to enter
the selection.
Select the transmission type and
Driver Assist Functions. Select using
left and right on the directional
buttons and press the
A
button or
S
button to enter the selection.
Course Selection
Difficulty Level
Race Difficulty Levels
Select the difficulty level. The car
transmission type and availability of Driver
Assist Functions vary according to the level
chosen. Driver Assist Functions can be
switched ON/OFF during the race. Details
on Driver Assist Functions can be found on
the next page.
Select the course to race. See P.24 for a
detailed description of each course.
Page 6
1110
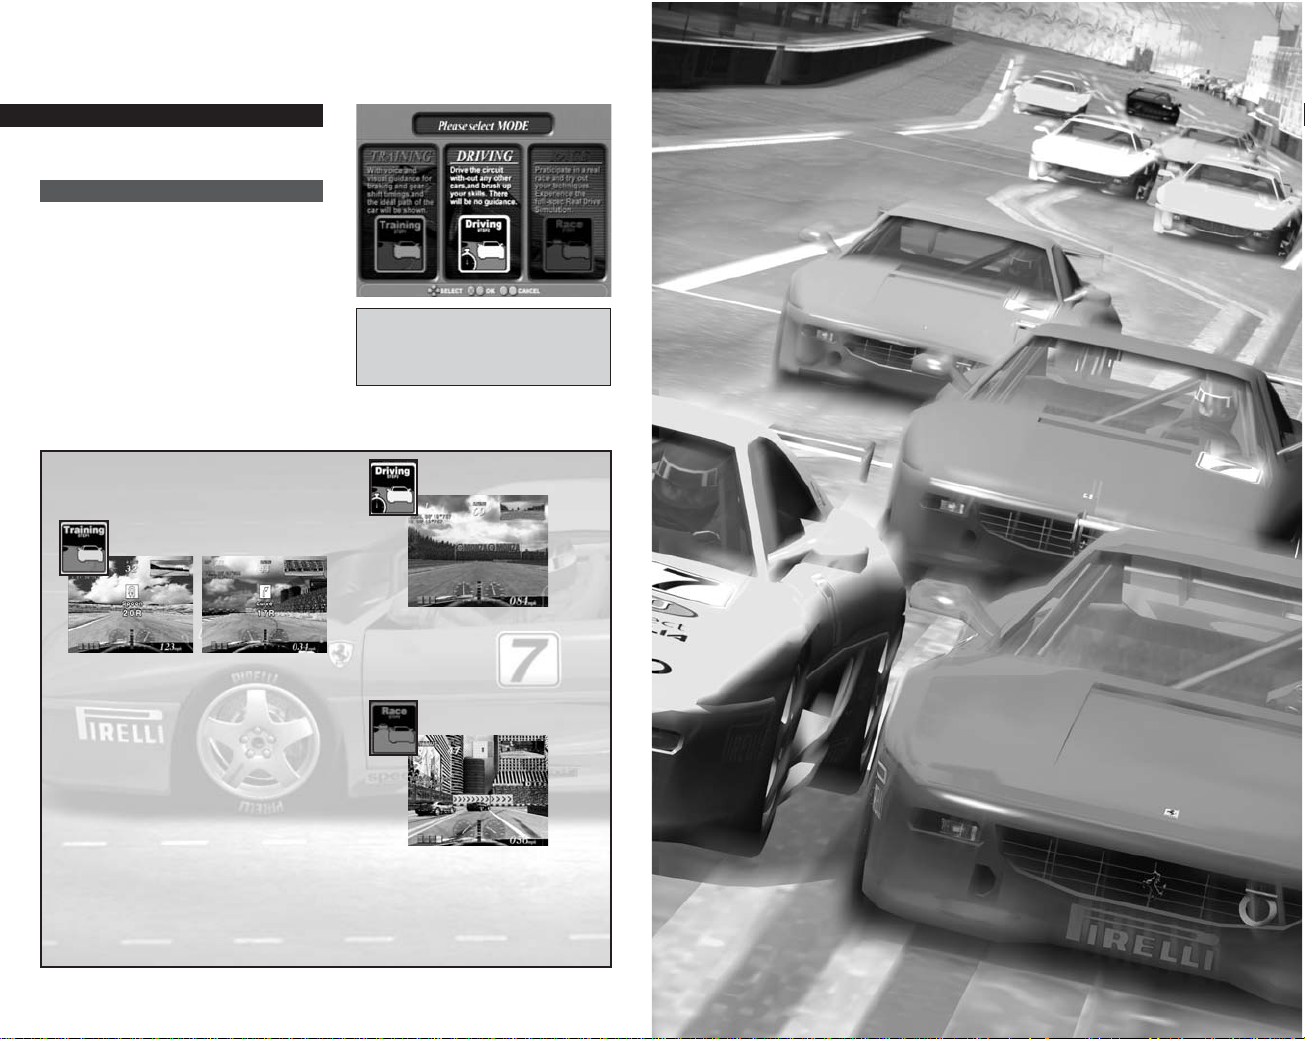
Game Modes
Following is an explanation of the procedures and rules for each of the
Game Modes available in FERRARI F355 Challenge™.
Training Mode
Follow verbal commands and course
markings and try to become familiar with
the course lines, braking points and the
gearshift timing.
Driving Mode
Try the course solo to hone driving
technique. In this Sub-Mode, a ghost car* is
created based on the player’s drive data.
Race Mode
The player can test their technique behind the
wheel in the real race and vie for the top ranking.
Select a Sub-Mode. Use left and right
on the directional buttons to select
and press the
A button or S button to
enter the selection.
Features of Each Sub-Mode
Training
Driving Mode
The red line indicates the optimum
route. The player should pay attention
to markers indicating upcoming corners
and try to stick to the line.
It is important to pay attention to the
braking display and speed advice in
order to handle the corners well. Advice
on speed is displayed only when the IBS
Driver Assist Function is turned OFF.
The player drives the course alone,
utilizing the lessons learned in training
and polishing their racing technique.
Race Mode
Players can try a real race once they
have developed some confidence
behind the wheel. Put techniques
learned to the test and shoot for the
top spot!
*The ghost car is not displayed unless Ghost Car is set to ON on the Options Screen.
Sub-Mode Selection
Sub-Modes
Select a Sub-Mode.
Page 7

Retry Run the course again.
Replay View and save replays. Use
left and right on the directional buttons
to select and press the A button or
S button to enter the selection.
Save Driving Data Save the Driving
Data. See P.19 for detailed description
of Driving Data.
Course Change Return to the Course
Selection Screen.
Car Settings Change the Car
Settings. See P.17 for a detailed
description of Car Settings.
Exit Exit Arcade and return to the
Title Screen
Players placing in a top spot can enter
their names in the Hi-Score. Use left
and right on the directional buttons to
select and press the
A button or S
button to enter the selection.
Arcade
This mode retains the features of the arcade
version of FERRARI F355 Challenge™.
Select “ARCADE” to display the Course
Selection Screen. Then select the course,
difficulty level, mode and time limit and
proceed to the Menu screen.
The conditions for Game Over and the rules
for clearing a race are the same as those in
the arcade version.
There is a time limit for each of the Game
Modes. Passing through a checkpoint
before time expires extends the remaining
time and allows continued play.
When the Sub-Mode is set to Training Mode
or Race Mode, the player arrives at the finish
line after running a specific number of laps,
and the game is over when the remaining
time expires. There are no continues.
Select the course, difficulty level and
Sub-Mode, and enable/disable the
time limit. In each case, select using
the directional buttons and press the
A
button or Sbutton to enter the
selection.
Start Race Start the race.
Car Settings Change Car Settings. See P.17 for a detailed description of Car Settings.
When the Sub-Mode is set to Driving Mode,
the player can continue racing as long as
there is time left. If the time runs out, the
player can press the START button when
CONTINUE is displayed to add 100
seconds to the remaining time and continue
game play.
*When No Time Limit has been selected
there is no time limit. To end game play
when the Sub-Mode is set to Driving
Mode, press the START button to call up
the Pause Menu and select “QUIT.”
Sub-Mode Selection
Hi-Score
Pre-Race Menu
After-Race Menu
12 13
Page 8

1514
Championship Great Driver Challenge
The Race
Race Schedule
Points Acquired
Pre-Race Menu
After-Race Menu
A total of six races are held. Players
compete for the highest total score.
First, select the difficulty level. All six races
will be held at the difficulty level (EASY,
NORMAL, HARD) selected.
A menu is displayed before and after each
race. Adjust the Car Settings based on the
results from the “TEST RUN” and then enter
the race.
Select “Replay” from the After-Race Menu
to view a replay of the race. Replays can be
saved on the memory card (8MB)
(for PlayStation®2).
Start Race Begin the race.
Test Run Do a test run of the course. To
finish the test run, press the START button
to display the Pause Menu and select
“QUIT” (P.16).
Car Settings Change the Car Settings.
Refer to P.17 for a detailed description of
the Car Settings.
The race schedule for all six races
depends on the difficulty level selected.
The number of laps varies with the course.
EASY Mainly carried out on simple
courses, allowing the player to enjoy
the race.
NORMAL The schedule is divided into
three rounds: The Japan Round, the
Americas Round and the European Round.
HARD This level includes more
technical courses and the schedule
includes three rounds: The European
Round, the Americas Round and the
Asian Round.
The points earned according to the
player’s final position in the race are as
follows.
Use up and down on the directional button
to switch between displays showing the
results of the race just held and the overall
point rankings.
Next Proceed to next race.
Replay View and save replays.
Save Save current progress in
Championship as a game file.
Exit End Championship play and return to
the Title Screen.
First Place
15 pts.
Second Place
12 pts.
Third Place
10 pts.
Fourth Place
8 pts.
Fifth Place
6 pts.
Sixth Place
4 pts.
Seventh Place
1 pt.
Eighth Place
1 pt.
Retire
0 pts.
Sportsmanship and driving technique during
the race are evaluated in this mode. Earn
points by running a clean race!
Select “GREAT DRIVER CHALLENGE” to
display the Course Selection Screen. Initially
the player may select one of three courses.
Next, select a difficulty level and proceed to
the Menu Screen.
The race has a time limit. Pass through the
checkpoints within the time allowed to extend
the remaining time and continue gameplay.
There are a total of eight cars in the race,
and the player starts in the last position.
Run the set number of laps within the time
allowed and exceed the point qualification
set for the course to clear the race.
Start Race Start the race.
Car Settings Change the Car Settings. Refer to P.17 for a detailed description of the
Car Settings.
Retry Run the course again.
Replay View and save replays.
Course Change Return to the Course Selection Screen.
Car Settings Change the Car Settings. Refer to P.17 for a detailed description of the
Car Settings.
Exit Exit Great Driver Challenge and return to the Title Screen.
A results screen is displayed once the race is finished. Players are assigned points for
their technical performance, position, and best lap, and are awarded a gold, silver, or
bronze evaluation based on the total of these points.
Technical Points Points are awarded for passing opponent cars, using slip stream, and
drift. Points are taken away if the player hits other cars or walls or runs off the track.
Position Points are awarded based on the player’s final position.
Best Lap Points are awarded for the player’s best lap.
Rules
Results
Pre-Race Menu
After-Race Menu
Page 9

1716
Menu
Load
Load previously saved settings data.
Select the memory card (8MB) (for
PlayStation®2) to load and then the file
name of the data using the directional
button and press the
A button or
S button to enter the selection.
Save
Save settings data under the name
entered in the “File Name” space. Use the
directional button to select the memory
card (8MB) (for PlayStation®2) to save and
press the
A button or S button to save
the setting data, up to 16 data settings
can be saved.
Delete
Delete saved settings data. Use the
directional button to select the memory
card (8MB) (for PlayStation®2) to delete
data from and the file name of the data to
be deleted and press the
A button or
S button to enter the selection.
Default
Return current settings to the default settings.
Exit
Exit Car Settings.
Car Settings
Use this item to alter Car Settings. The
front and rear can be set separately for
all settings except Wing and LSD Lock
Rate.
To change settings, use up and down
on the directional button to select the
item to change and press the
A button
or
S button to enter the selection.
Next, use left and right on the
directional button to change the
selected setting and press the
A button to confirm the changes.
The screen is split in half. Player 1
controls the top half and Player 2
controls the bottom half.
Pause Menu
In the four game modes: Arcade,
Championship, Great Driver Challenge,
and Versus Play, press the START button
during the race to bring up the Pause
Menu. Select using up and down on the
directional button and press the
A button
or
S buttons to enter the selection. Press
the START button a second time to exit
the Pause Menu.
Versus Play
Versus Play Modes
Pause Menu
In this mode, the screen is split horizontally
into two halves so that two players can
compete against each other.
After selecting Versus Play, select the
course, difficulty level, and Versus Play
Mode and proceed to the Menu Screen.
The Menu Screens before and after the race
are the same as those in Arcade, except
that Driving Data cannot be saved.
Player 1 selects the course and Versus Play
Mode, and each player selects their own
difficulty level. The win/loss conditions for the
race depend on the Versus Play Mode
selected. Races in Versus Play Mode can
only be performed in first person perspective.
VS. Race Compete for the best position
after a set number of laps.
Time Lag Race The race continues until
the time difference between cars at the
checkpoint exceeds a certain fixed time.
BGM Turn background music ON/OFF.
Retry Start the race over from the beginning.
Retire Retire from the race.
Quit End play.
*Menu items differ depending on the game mode.
Page 10

1918
Driving Data
Data Analysis Screen Controls
Replay Screen Controls
Directional button + Abutton /
S button: Scroll graph
Directional button: Scroll map
R1/L1 buttons: Zoom in / out
D button / F button: Cancel
Directional button left/right:
Rewind/fast forward
R1/L1 buttons: Zoom in/out
Directional button up: Switch view
Directional button down: Switch
between main data/reference data
display
A button / START button: Pause
D
button / Fbutton: Cancel
Comment
Enter a name when saving modified settings.
Car Number
Set the car number.
Car Color
Set the color of the car.
Ride Height (mm)
Changing the ride height of the car affects the load movement and amount of roll. The car
tends to understeer when the front ride height is set high and the rear ride height is set
low, and tends to oversteer when the front ride height is set low and the rear ride height
set high.
Spring
Reducing the spring rate leads to gentler changes in movement, but lowers car response.
If increased, it tends to do the opposite. If the front springs are set too stiff in relation to
the rear springs, the car tends to understeer, and if the rear springs are set too stiff in
relation to the front springs, the car tends to oversteer.
*Understeer: The car turns through a lesser angle than the steering wheel has
been turned.
*Oversteer: The car turns through a greater angle than the steering wheel has
been turned.
Stabilizer
The value adjusted here is the diameter of the stabilizer. When set to Hard, the stiffness of
the stabilizers (roll bars) increases and this has the effect of reducing body roll in the same
way as stiffening the springs against body roll would.
Raising the stiffness of the stabilizers also increases the load transfer between left and
right tires and reduces the car’s grip. The car tends to understeer when the front stabilizer
is stiff and the rear is soft, and tends to oversteer when the front stabilizer is soft and the
rear is stiff.
Camber (degrees)
The orientation of the tires when the car is viewed from the front. A large negative angle in
the front results in oversteer. A large negative angle in the rear results in understeer.
Toe (mm) (Toe-in)
The alignment of the tires and influences front and rear response, stability, and cornering.
A negative setting is known as toe-in (the tires are pointing inward). A positive setting is
known as toe-out (the tires are facing outward). Toe-in favors understeering and toe-out
favors oversteering.
LSD Lock Rate (%) (rear only)
Limits any difference in driveline torque of the left and right driving wheels. The higher the
lock rate, the greater the tendency to understeer.
Wing (degrees) (rear only)
Downforce and drag change according to the angle of attack selected.
Car Settings (cont.)
View graphs, replays, and records of Driving
Data saved after the race.
Driving Data
View Driving Data.
Replay
View and delete saved replays. Use the
directional buttons to select the mode and
file and press the
A button or S button to
enter the selection.
Records
View the records by mode or by course.
Choose the mode or difficulty level with up
and down on the directional button and
switch items with left and right.
Load
Select the Driving Data. Prepare two
memory cards (8MB) (for PlayStation®2)
and select the same course for Data Area 1
and Data Area 2 to view the first data area
as the main data and the second data area
as reference data.
Data Analysis
View graphs of the driving line and the
speed (thick broken line), engine revolutions
(thin broken line), and shift changes
(perpendicular broken line
at the bottom). The driving line is displayed
red in the main data and yellow in the
reference data.
Data Replay
The F355 runs along the displayed driving
line. A red F355 runs in the main data and a
yellow F355 runs in the reference data.
There are four available views.
Exit
Exit Driving Data.
Menu Options
Driving Data
Page 11

2120
Driving Data
The Driving Data consists of data saved
from the player’s fastest lap (driving line
and engine revolutions and speed, etc.).
Each of the eleven courses is saved as a
different file, and uses 30~50KB of space.
Saving the data allows the following
commands to be performed.
View Data
Check detailed data and view graphic
displays/replays (P.19).
Ghost Car
Data saved here is automatically used as the ghost car data for Driving Mode. On
courses for which no data has been saved, standard data on the disc will be used for
the ghost car.
Caution When Saving
Only one set of Driving Data can be saved for each of the eleven courses per memory
card (8MB) (for PlayStation®2). In order to save several sets of Driving Data for the
same course, several memory cards are needed.
Options
Game Settings
Device Settings
Sound & Screen
Gallery
Credits
When using the analog controller
(DUALSHOCK®2)
When using the Logitech GT Force™ USB
Wheel (for PlayStation®2) or Driving
Force™ USB Wheel (for PlayStation®2)
Change various game settings and button
assignments. Make selections with up and
down on the directional buttons and press
the
A button or S button to confirm the item
to change. Next, change the settings with left
and right on the directional buttons and press
the
A button or S button once again to enter.
Press the
D
button or the Fbutton to return
to the previous screen.
Audio Switch between stereo and mono.
BGM Volume Adjust the volume of the
background music.
BGM Test Listen to the background music.
Default Reset the Audio, BGM Volume and
the BGM Test to the default setting.
Wide Screen Turn wide screen television
view ON/OFF.
Adjust Change the position of the screen display.
Driver Assist Functions Settings
Confirm
the Driver Assist Functions settings.
Time Difficulty Adjust the difficulty
level/time limit in Arcade.
Magic Weather Change the weather
settings for each course.
Handicap Options Handicap options are
available during Versus Play races.
Handicap options include Heat, Aid or
Simulation. With the Heat option, handicaps
are given to players who have chosen
Novice or Intermediate difficulty level. With
the Aid option, handicaps are given only to
players who have chosen Novice difficulty
level. With the Simulation option, handicaps
are removed from all players.
Ghost Car Turn the ghost car display
ON/OFF.
Lap Setting Set the number of course
laps. The number of laps increases in the
order: Sprint, Grand Prix, Endurance.
Button Configuration Change the button
assignments. Players can choose preset
assignments or freely allocate the buttons
themselves.
Steering Adjust the steering.
Vibration Set the vibration function
ON/OFF.
Defaults Return the various settings to the
default settings.
Exit Return to the previous screen.
View the Gallery. (P.23)
Display the staff credits.
Button Configuration Change the
button assignments.
Steering Adjust the steering.
Force Feedback Tur n t he force
feedback function for steering ON/OFF.
Calibration Set the maximum
left/right values for the steering center
and the maximum value for each pedal.
Defaults Return the various settings to
their default settings.
Exit Return to the previous screen.
Select “OK” on the confirmation
screen to erase previously saved
Driving Data for the same course.
Page 12

2322
Gallery
Images and video from the Ferrari vault can be
viewed here. Select “Gallery” from the Options
Screen to view the Gallery.
The number of images that can be viewed
increases with the player’s achievements in
the Arcade, Championship, and Great Driver
Challenge Game Modes.
Video
Special video images provided by Ferrari
and Sega.
Pictures
Images from the world of racing provided by Ferrari.
Save & Load
Save and load game files.
Save System File
Save game data in the System File. To save
game data there must be at least 26KB of
available space on the memory card (8MB)
(for PlayStation®2). Use the directional
buttons to select the memory card (8MB)
(for PlayStation®2) to save and press the
A button or S button to save the System File.
Load System File
Load game data from the System File. Use the directional button to select the memory
card (8MB) (for PlayStation®2) to load from and press the
A button or S button to load
the data.
Game data saved and loaded here is located in the System file (see below). Use the Car
Settings menu to save Car Settings data (see P.17).
Game Files
Three types of files can be saved in this game.
When the game is started up, the system checks for a memory card(s) (8MB) (for
PlayStation®2) in MEMORY CARD slots 1 and/or 2. If a System file is not located at
this time, a new file is automatically created.
System File
Data on the number of times each course has been run and records for each Game
Mode, information entered on the Options Screen (P.21) and in Car Settings are
saved here. 26KB of available space is needed in order to save the System file. One
file may be saved on each memory card (8MB) (for PlayStation®2).
Driving Data
Driving Data is saved here after each race. A file is created for each course (up to a
maximum of 11 files). 30~50KB of available space is needed in order to save Driving
Data. See P. 19 for a detailed description of Driving Data.
Replay File
Replay data is saved here after the race. Data may be saved as long as there is
1200~1800KB of remaining space on the memory card (8MB) (for PlayStation®2).A
maximum of 10 minutes of Driving Data and 6 minutes of Replay File (per Files) can
be saved.
*The space required to save Driving Data and Replay File in the memory card (8MB)
(for PlayStation®2) could end up more or less than the number of space listed above.
Page 13

2524
Motegi
Total Length: 2414 meters (1.5 miles)
Maximum Bank Angle: 10 degrees
The very straightforward layout of
this course allows for extremely
high-speed races. However, the
course is more involved than it
appears at first glance, particularly
in the third corner, where racers
must be careful to sufficiently
reduce their speed or they will hit
the wall.
Suzuka Short
Total Length: 2243 meters (1.39 miles)
Don’t write this course off just
because it is a short version of the
Suzuka course. The section from
the reverse bank to the entrance of
the final corner is particularly
difficult. Player must be aware of
how they approach the final corner
that can significantly effect their lap
time. This course naturally makes
an ideal practice course for the
longer Suzuka.
Courses
The courses that appear in this game have been carefully modeled after actual circuits.
An introduction of the courses follows.
*The course layouts and data used in this game were correct at the time of production.
Circuits that have since undergone modifications may appear different from those
shown in the game.
Panasonic Turn
Kool Turn
Casio Turn
Final Corner
Reverse
Bank
S Curves
First/Second
Corner
Kenwood Turn
Page 14

2726
Suzuka
Total Length: 5864 meters (3.64 miles)
Above all else, this course is
characterized in its long lap length
and few spots where opponents
can be overtaken. Its basic layout is
a figure 8, and it is an extremely
technical course that includes
various types of corners. Its most
important point is the 130R, where
racers should stay calm and try to
keep stalls to a minimum.
Long Beach
Total Length: 2558 meters (1.59 miles)
This course is a masterful blend of
straight-aways and high-speed
sections, 90-degree corners and
tight hairpins. It is critical that the
player get a feel for the braking
points of the right-angle corners that
follow after the long back straights.
Monza
Total Length: 5770 meters (3.59 miles)
Unlike other courses, there are
plenty of areas in the Monza where
the player can open up the throttle
all the way. Aside from the S curve
and the two chicanes, this course is
mostly straight with gentle curves,
but since there are many areas that
are approached at high speeds, the
smallest mistake may result in a
large time loss.
Sugo
Total Length: 3704 meters (2.3 miles)
Maximum Height Differential:
70 meters
Although it has a maximum height
differential of 70 meters, the Sugo is
comparatively easy if the players run
the course keeping its gradient in
mind. The most critical area is the
final corner, which can be taken at a
steady speed if it is entered head-on.
Parabolica
First/Second
Corner
Final Corner
Casio Triangle
130 R
Hairpin
Spoon Curve
Back Stretch
Degner Curve
Shoreline Aquatic Park
Shoreline Village
Lagoon Park
Rainbow
Lagoon
Seaside Way
Shoreline
Drive
Dunlop Corner
Reverse
Bank
S Curves
Variante del Ascari
Final Corner
SP Out
10%
gradient
SP In
Horseback
Corner
Back
Straight
First Corner
S Curves
3rd Corner
Hairpin
Second
Corner
High Point
Corner
Rainbow Corner
Curva di Lesmo
Variante del Rettifilo
Curva Grande
Curve della Roggia
Page 15

2928
Laguna Seca
Total Length: 3602 meters (2.24 miles)
This US circuit is famous for its
steep gradient corner known as the
“corkscrew.” The difference in
height at this corner can be likened
to that of a roller coaster. That
being said, the course can be
mastered relatively easily if it is run
keeping the height differences in
mind. The most critical section is
definitely the corkscrew.
Sepang
Total Length: 5542 meters (3.44)
This brand new international circuit
in Malaysia is known for its wide
track. However there is number of
complex corners makes this course
extremely tricky to run. Quickly set
up and accelerate on the two
straight-aways to improve the lap
time on this track.
Atlanta
Total Length: 2478 meters (1.54 miles)
This track is a 1.5 mile oval in the
US south. It is important that the
player take advantage of the banks,
which are a maximum of 24
degrees, in order to run the course
without killing their speed. If the
player enter the turns too fast they
will understeer and quickly fall prey
to the concrete wall.
Turn 1
Turn 4
Turn 1
Turn 2
Turn 3
Turn 4
Turn 5
Turn 6
Turn 7
Turn 8
Turn 9
Turn 10
Turn 12
Turn 7
Turn 8
Turn 9
Turn 10
Turn 11
Turn 1
Pangkor Laut Chicane
Genting Curve
KLIA Curve
Berjaya Tioman
Corner
Kenyir Lake
Corner
Sunway Lagoon
Corner
Penang Straight
Turn 2
Turn 5
Turn 6
Turn 13
Turn 3
Turn 2
Nürburgring
Total Length: 4556 meters (2.83 miles)
The foremost technical German
racing circuit, it is adopted for
grand prix races. Be careful of the
S-shaped and hairpin corners right
after the start. The Veedol chicane
should be taken on the simpler S
curves side.
Page 16

3130
Fiorano
Total Length: 2976 meters (1.85 miles)
This is the Ferrari test course, and is a
technical circuit designed to
incorporate plenty of well-known
corners from circuits across the world.
14
13
12
11
10
9
2
4
6
Notes
Page 17

32
Notes
*THIS LIMITED WARRANTY IS VALID FOR SEGA PRODUCTS FOR PLAY ON PLAYSTATION®2
COMPUTER ENTERTAINMENT SYSTEM MANUFACTURED FOR SALE IN AND PURCHASED AND
OPERATED IN THE UNITED STATES AND CANADA, ONLY!
Limited Warranty
Sega of America, Inc. warrants to the original consumer purchaser that the PlayStation 2 Game
Disc shall be free from defects in material and workmanship for a period of 90-days from the
date of purchase. If a defect covered by this limited warranty occurs during this 90-day warranty
period, the defective PlayStation 2 Game Disc or component will be replaced free of charge.
This limited warranty does not apply if the defects have been caused by negligence, accident,
unreasonable use, modification, tampering or any other causes not related to defective
materials or workmanship. Please retain the original or a photocopy of your dated sales receipt
to establish the date of purchase for in-warranty replacement. For replacement, return the
Game Disc, with its original packaging and receipt, to the retailer from which the software was
originally purchased. In the event that you cannot obtain a replacement from the retailer, please
contact Sega to obtain support.
Obtaining technical support/service
To receive additional support, including troubleshooting assistance, please contact Sega at:
• web site . . . . . . . . . . . . . . http://www.sega.com
• e-mail . . . . . . . . . . . . . . . support@sega.com
• telephone . . . . . . . . . . . . . . 1-716-650-6702
LIMITATIONS ON WARRANTY
ANY APPLICABLE IMPLIED WARRANTIES, INCLUDING WARRANTIES OF MERCHANTABILITY AND
FITNESS FOR A PARTICULAR PURPOSE, ARE HEREBY LIMITED TO 90-DAYS FROM THE DATE OF
PURCHASE AND ARE SUBJECT TO THE CONDITIONS SET FORTH HEREIN. IN NO EVENT SHALL
SEGA OF AMERICA, INC. BE LIABLE FOR CONSEQUENTIAL OR INCIDENTAL DAMAGES
RESULTING FROM THE BREACH OF ANY EXPRESS OR IMPLIED WARRANTIES. THE PROVISIONS
OF THIS LIMITED WARRANTY ARE VALID IN THE UNITED STATES ONLY. SOME STATES DO NOT
ALLOW LIMITATIONS ON HOW LONG AN IMPLIED WARRANTY LASTS, OR EXCLUSION OF
CONSEQUENTIAL OR INCIDENTAL DAMAGES, SO THE ABOVE LIMITATION OR EXCLUSION MAY
NOT APPLY TO YOU. THIS WARRANTY PROVIDES YOU WITH SPECIFIC LEGAL RIGHTS. YOU
MAY HAVE OTHER RIGHTS WHICH VARY FROM STATE TO STATE.
Sega is registered in the U.S. Patent and Trademark Office. Sega, the Sega logo and FERRARI
F355 challenge™, is a registered trademark or a trademark of Sega Corporation and its
affiliates. All Rights Reserved. Original Game © SEGA CORPORATION © SEGA-AM2 Co.,
LTD./SEGA CORPORATION ,2000,2002. F355 challenge™, Ferrari®, all associated logos, and
the Ferrari F355 Challenge distinctive designs are trademarks of Ferrari S.p.A. This game is
licensed for use with PlayStation 2 only. Copying and/or transmission of this game is strictly
prohibited. Unauthorized rental or public performance of this game is a violation of applicable
laws. SEGA of America, Inc., 650 Townsend Street, Suite 650,San Francisco, CA 94103. All Rights
Reserved. www.sega.com. Programmed in Japan. Made and printed in the USA.
Page 18

34
Outside Cover
 Loading...