

Page 1

1
CONTENTS
GETTING STARTED 2
STARTING UP 3
GAME CONTROLS 4
MAIN MENU 5
THE STORY SO FAR ... 6
STARTING A NEW GAME 7
PLAYING THE GAME 8
HUD (HEADS UP DISPLAY) READOUT 9
MOVEMENT 11
INVENTORY 13
AUGS AND SKILLS 15
GOALS/NOTES/IMAGES 18
TEXT AND READOUTS 19
STEALTH 19
BREAKING AND ENTERING 20
USING EQUIPMENT 21
COMMUNICATING 22
COMBAT 23
THE WORLD 26
CREDITS 28
Is the GAME playing YOU?
Call the EIDOS Interactive Hint Line
U.S.: 1-900-773-4367
Canada: 1-900-643-4367
Cost of call: $0.99-$1.49/minute
Must be 18 years of age or have parent’s permission
Touch-tone phone required
Page 2
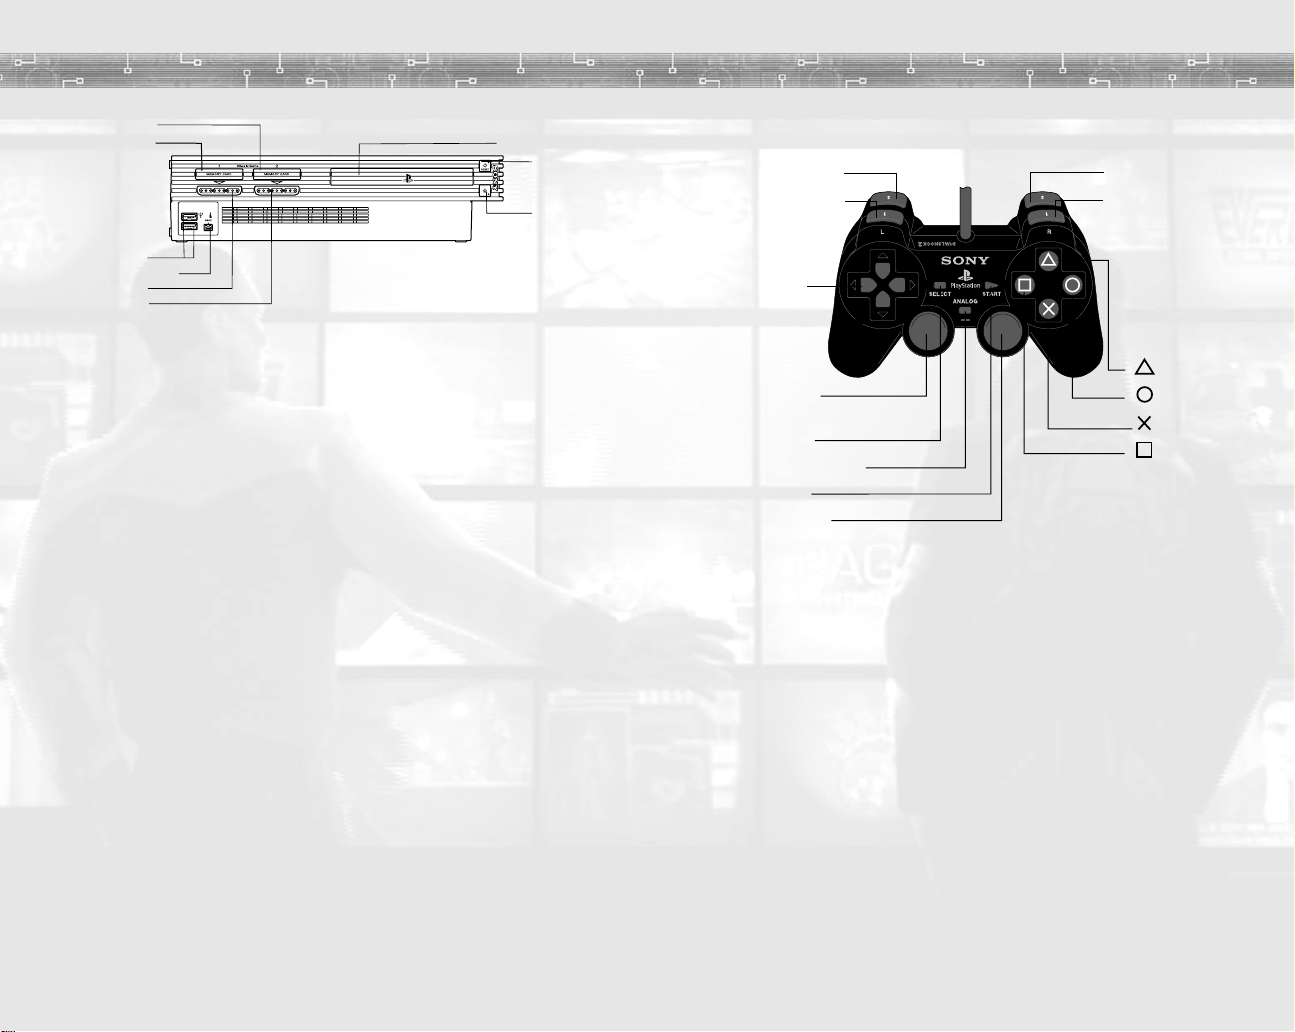
GETTING STARTED
MEMORY CARD slot 1
MEMORY CARD slot 2
USB connector
S400 i.LINK connector
controller port 1
controller port 2
disc tray
RESET button
(OPEN) button
button
button
button
button
directional
buttons
left analog stick
(L3 button when pushed down)
SELECT button
ANALOG mode button
START button
right analog stick
(R3 button when pushed down)
L2 button
L1 button
R2 button
R1 button
Set up your PlayStation®2 computer entertainment system according to the instructions
in its Instruction Manual. Make sure the MAIN POWER switch (located on the back
of the console) is turned on. Press the RESET button.
When the power indicator lights up, press the open button and the disc tray will open.
Place the
Press the open button again and the disc tray will close.
Attach game controllers and other peripherals, as appropriate. Follow on-screen
instructions and refer to this manual for information on using the software.
DEUS EX: THE CONSPIRACY
™
disc on the disc tray with the label side facing up.
STARTING UP
DUALSHOCK®2 ANALOG CONTROLLER CONFIGURATIONS
CONTROLLER
• The controller should be connected to controller port 1. Do not insert or remove
the controller or accessories once the power is turned on.
• The DUALSHOCK®2 analog controller’s ANALOG mode button and mode indicator
are always ON, indicating that the controller is in analog mode.
• When the controller’s vibration function is set to ON (default), the controller will
vibrate in response to game events.
MEMORY CARD
™
, make sure that you
If you wish to save your progress in
have a memory card (8MB) (for PlayStation®2) inserted in MEMORY CARD slot 1
with 600KB of free space, before you start your game.
DEUS EX: THE CONSPIRACY
2
3
Page 3
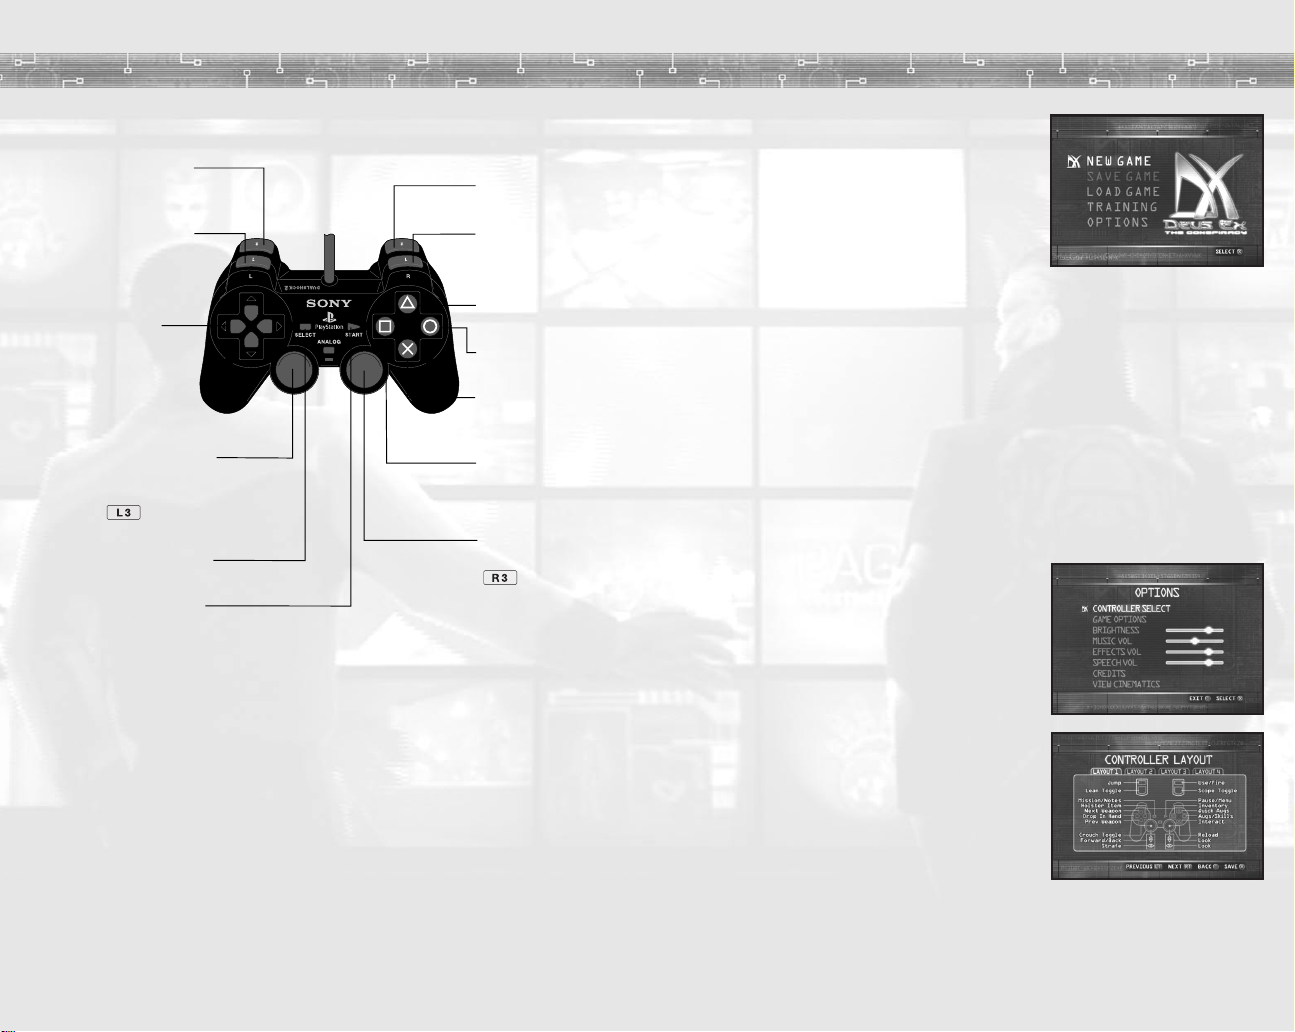
GAME CONTROLS
Ç button
- quick
augs
¸ button
-
augs
/skills
˛ button
- interact/use
object in world
◊ button
- inventory
directional buttons
- */@ next/
previous weapon
- $ drop/throw
object in hand
- ^ holster item
Í button
- lean toggle
- plant & aim
Å button
- jump
Ï button
- scope toggle
Î button
- use/fire object
in hand
left analog stick
- forward/back (*/@)
- strafe ($/^)
button
- crouch toggle
SELECT button
- mission/notes
START button
- pause/Main Menu
right analog stick
- look/aim
button
- reload weapon
GAMEPLAY CONTROLS
MENU CONTROLS
directional buttons */@– highlight menu item
˛
button – select menu item
¸
button – exit/return to previous screen
Note: This guide assumes that you are using the default controls. If you select
an alternate control scheme, the controls and commands listed in this guide
may vary.
MAIN MENU
When
DX: THE CONSPIRACY
Menu with several menu choices. You can return to
the Main Menu at any time during play by pressing
the START button. Use the directional buttons
and @to navigate the menu choices. The following
choices are available from the Main Menu:
NEW GAME
starting with choosing a difficulty level, creating
a character name and selecting your character’s
initial skills.
SAVE GAME
(for PlayStation®2). The Save Game choice is only active if you visit the Main Menu
from gameplay.
LOAD GAME
becomes active when you have at least one
on the memory card.
TRAINING
the training mission before playing
recommended for first-time players.
OPTIONS
See the following section for more details.
— Begin a completely new game,
— Save a game in progress to your memory card (8MB)
— Resume a previously saved game from a memory card. This option
— Begin the tutorial training mission. It is not necessary to complete
— Customize your control, sound and other game settings.
OPTIONS
On the Options Menu, press the directional buttons
*
or @to make your selection, and $or
to adjust a setting. Press the ˛button to display
a submenu.
CONTROLLER SELECT
Layout Menu, and press the Åand
buttons to switch between four controller
configurations. Press the ˛button to select
the configuration that suits you.
GAME OPTIONS
modify your game options, covered in detail
on page 6.
BRIGHTNESS
MUSIC VOL
EFFECTS VOL
SPEECH VOL
CREDITS
VIEW CINEMATICS
Movies, depending on which path you choose ... if you succeed.
— You have the ability to further
— Adjust the game screen brightness.
— Adjust background music volume.
— Adjust sound effects volume.
— Adjust the volume of speech sound.
— Display the game’s credits.
loads you see the Main
*
DX: THE CONSPIRACY
DX: THE CONSPIRACY
^
— View the Controller
Î
— View the Intro Movie and up to three different End-Game
game saved
, but training is strongly
4
5
Page 4
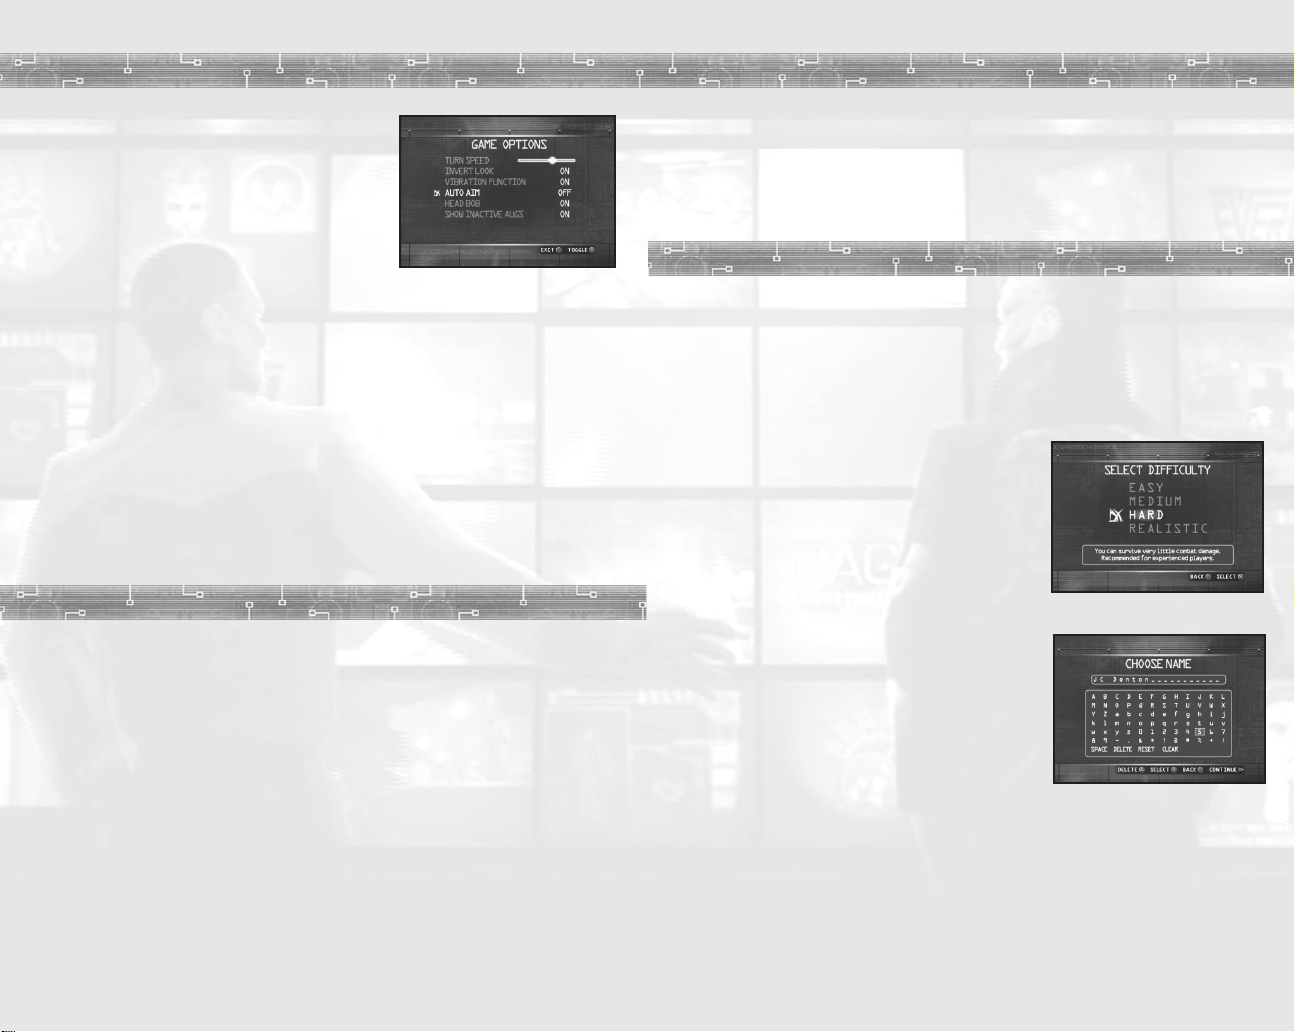
GAME OPTIONS
TURN SPEED
or ^to adjust how quickly you turn and look
in the world. This option affects both the left
and right analog sticks (you can’t adjust them
independently).
INVERT LOOK
this option ON/OFF (default ON). This will switch
the direction you look when you move the right
analog stick *or @.
VIBRATION FUNCTION
ON/OFF (default ON). When this option is ON, the DUALSHOCK®2 analog controller
will vibrate in response to game events.
AUTO-AIM
this option is ON, it automatically targets an enemy when the crosshairs are close
enough. When OFF, you must manually target the enemy. Playing the game
at Realistic level with Auto-Aim OFF is the ultimate challenge!
HEAD BOB
(default ON).
SHOW INACTIVE AUGS
of Aug s is displayed, or just the Augs you are currently using (default ON).
— Press the directional buttons
— Press the ˛button to toggle
— Press the ˛button to toggle the controller vibration
— Press the ˛button to toggle this option ON/OFF (default ON). When
— Press the ˛button to toggle whether the screen “bobs” when you run
— Press the ˛button to toggle whether the entire list
$
THE STORY SO FAR ...
DX: THE CONSPIRACY
Divisions and hostility have been aggravated by the growing gap between the rich
and the poor. A privileged few live high above the dangerous city streets, in protected
penthouses, while the majority of the population struggles below to survive. Besides
the daily threats of violence, the average person also has to deal with an increase in fatal
epidemics, the cures for which are available only to the wealthy or the heavily armed.
The United Nations Anti-Terrorist Coalition (UNATCO) struggles to maintain order
in the face of international attacks, borne out of this fragmentation and disillusionment.
At this time the organization is dealing with the Gray Death, a worldwide plague.
Although there is a cure, called Ambrosia, the development and distribution of it have
been slow. The National Secessionist Force (NSF), a reputed terrorist organization,
claims the cure is being blocked by secret government organizations, so they have taken
terrorist countermeasures.
In the game, you play J.C. Denton, a rookie agent for UNATCO. You follow in the footsteps
of your older brother Paul, who is also an agent for the coalition. You’ve both been
selected as prototypes for the nano-technological augmentation program.
takes place in the near future, in a world on the brink of collapse.
When the game begins, Paul has been an active agent for a few years, and you are on
your first mission. Assigned to retrieve a hijacked shipment of Ambrosia on Liberty
Island in New York, you will finally have the chance to put your Au gs and your training
to the test in the field.
STARTING A NEW GAME
In
DX: THE CONSPIRACY
operative for UNATCO, the United Nations Anti-Terrorist Coalition. To begin a new game,
select the NEW GAME option from the Main Menu and press the ˛button. If you
haven’t already done so, it is highly recommended that you complete the Training
Mission before starting a new game. The Training Mission will ensure that you are
adequately prepared to play
COMBAT DIFFICULTY LEVEL
When you start a new game of
your first choice is selecting a difficulty level. There
are four difficulty level settings: EASY, MEDIUM,
HARD and REALISTIC. At higher difficulty levels your
character has less health and is more susceptible
to combat damage. Once you select a difficulty level,
you cannot change it without starting a new game.
CHARACTER CREATION
After you’ve selected your starting difficulty level, you
are automatically taken to the
Before beginning play, you must give your game
character a name. Use the directional buttons to scroll
through the letters and create a name. This will
become your “real” name in the game, but you will
usually be addressed by your code name,
“J.C. Denton.” Your code name cannot be changed.
After you have named your game character, you will
be taken to the
in 11 different “Skills” by assigning Skill Points. You do not have to upgrade your Skills
before starting a new game. Skill upgrades can be made at any time during gameplay
provided you have enough Skill Points.
A recommendation for UNATCO agents — spend a little time in the field to discover
which Skills might be most useful to you before you upgrade. The situations you
encounter and your individual play style will help determine which Skills you need
to upgrade and which ones you don’t.
Select Skills
, you are agent “J.C. Denton,” a nano-augmented covert
DX: THE CONSPIRACY
DX: THE CONSPIRACY
Choose Name
screen. You can enhance the abilities of your character
.
,
screen.
6
7
Page 5
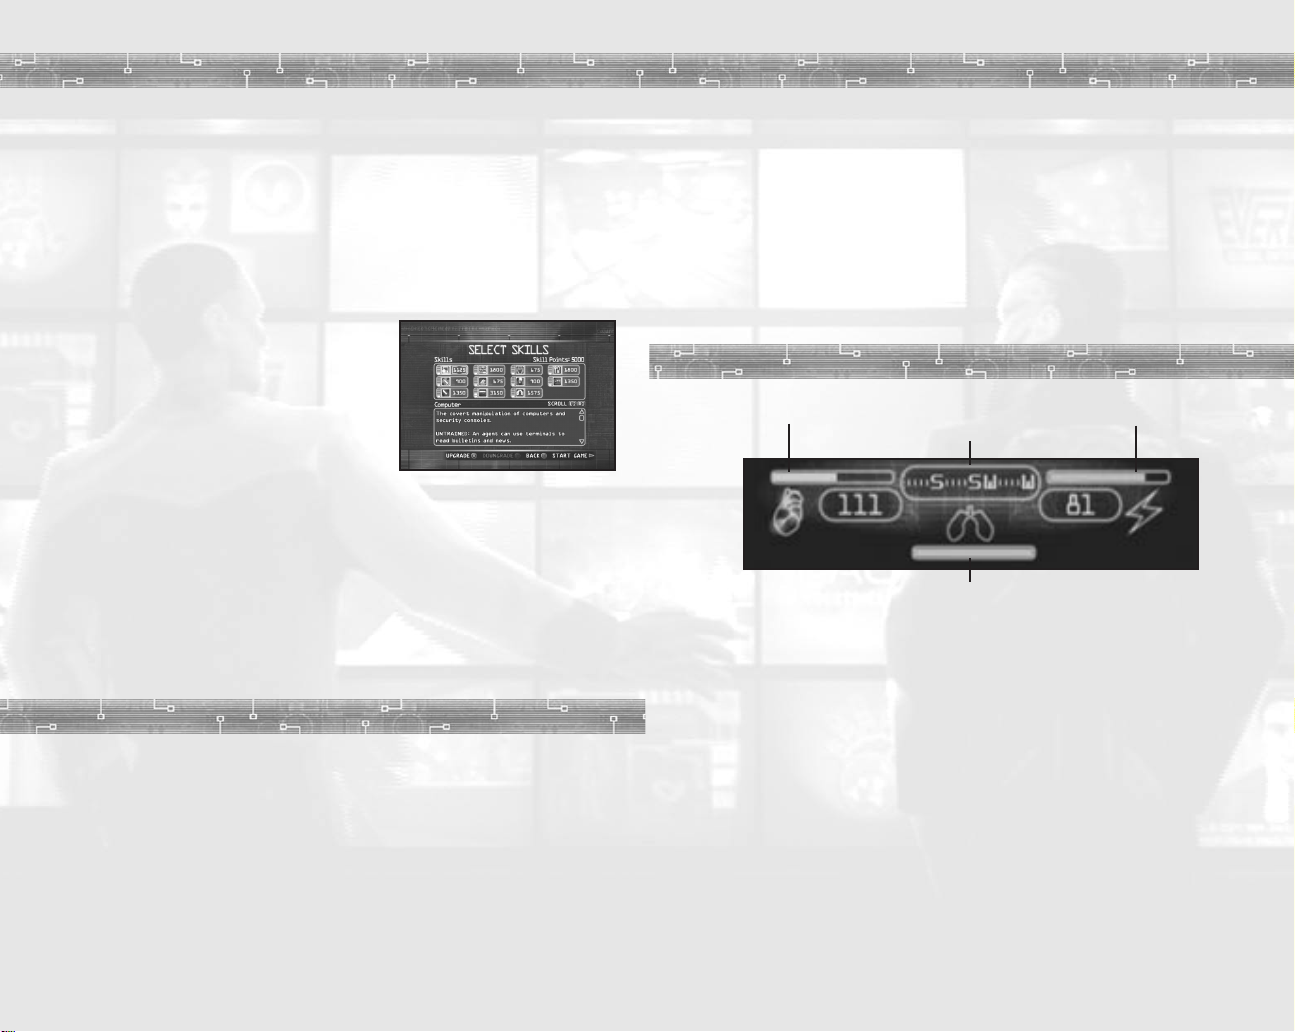
There are 11 Skills listed on the Character Creation screen: Computer, Medicine,
Weapons-Low Tech, Multitool, Swimming, Weapons-Pistol, Environmental Training,
Weapons-Demolition, Weapons-Rifle, Lock-Picking, and Weapons-Heavy. Use
the directional buttons to scroll between the different Skills in the list. Each Skill is
described in detail in the description window below the Skill selection. Scroll through
the description text for each Skill by using the Íand Ïbuttons.
Each Skill has four levels of mastery: Untrained, Trained, Advanced and Master. You begin
the game with each Skill at the Untrained level (except for Weapons-Pistol, which begins
at Trained level), and you are given 5,000 points with which to increase your Skills.
The cost for the next level in each Skill is listed next to the icon.
There are four menu options available
in the
Select Skills
˛
button – UPGRADE
and press the ˛button to increase that Skill
by one level. You can only increase a Skill if you
have sufficient Skill Points available.
◊
button – DOWNGRADE
and press the ◊button to reduce that Skill
by one level (minimum level, Untrained), which
will return the associated points to your point pool. You can downgrade your initial
pistol Skill to increase your point total for other Skills, but this is not recommended
for first-time players.
¸
button – CANCEL
a new game.
START button – START GAME
From this point, you can only make further modifications to your Skills
through normal advancement in the game.
screen:
— Highlight a Skill
— Return to the
— Highlight a Skill
Choose Name
— Save your Skill choices and start the game.
screen without starting
PLAYING THE GAME
This guide is written with the assumption that you are using the default control scheme.
If you have selected an alternate control scheme, the controls and commands listed
below may vary.
LOOKING AROUND
The first thing you’ll want to do when you start a mission or begin training is take
a good look around. Your point of view is controlled by the DUALSHOCK®2
analog controller.
$
• Use the right analog stick to rotate your view
• Push the left analog stick *to move forward and @to move backward.
• To strafe (side-step), push the left analog stick $or ^.
and ^or look *and @.
8
TARGETING AND FOCUS
Your targeting/aiming cursor always appears at the center of the screen. To interact
with an object in the world, you must “focus” on the object by approaching it
and centering your cursor on the object. The name of the object will appear
and brackets will surround it.
While you are focused on an object, press the
with that object in the most appropriate way (pick up an item, open a door, read a book,
talk to another character, etc.).
˛
button to attempt to interact
HUD (HEADS UP DISPLAY) READOUTS
Health Meter
Your internal nano-processors constantly make diagnostic checks on your physical
status. This information is transmitted directly to your optic nerve in the form
of a passive status readout. This information is displayed on your HUD, which is
centered at the top of your screen.
HEALTH METER
and the number below it track your current health status. The number below
the bar represents your health points. If the bar is full, your health is fully charged.
When your health points reach zero your character is dead.
BIO-ENERGY METER
This bar and the number below it track the amount of bio-energy currently
available to power your augmentations. When it is fully depleted you will be unable
to use your augmentations until you find a repair bot or biocell to replenish
your bio-energy.
COMPASS
can detect variations in the earth's electromagnetic field. By using the Geomagnetic
North Pole as a reference, you are effectively equipped with a Compass
to aid navigation.
— On the left side of your HUD is your Health Meter. This bar
— On the right side of the HUD is your Bio-Energy Meter.
— In the center of the HUD is the Compass. The nano-systems in your body
Compass
Air Supply Meter
9
Bio-Energy Meter
Page 6

AIR SUPPLY METER
Meters, is only visible when you’re underwater. The longer you go without air,
the shorter this bar gets. When it is fully depleted, you begin to take physical
damage from drowning. If you get a breath of fresh air, even for a moment,
this bar is fully replenished.
ENVIRONMENTAL HAZARD READOUTS
of the screen when you’re in an environment capable of doing you physical damage.
Environmental hazards include radioactivity, electricity, heat and poison gas.
— This bar, which appears below the Health and Bio-Energy
— These icons appear on the left side
PAUSING THE GAME
During play, if you want to pause the game, press the START button. Pausing the game
returns you to the Main Menu. The game remains paused as long as the Main Menu
or one of its submenus remains up. From the Main Menu, press the ¸button to return
to the game.
SAVING AND LOADING
DX: THE CONSPIRACY requires the use of a memory card (8MB) (for PlayStation®2)
in MEMORY CARD slot 1 if you want to save your game. Make sure that you have a
memory card inserted with 600KB of free space before attempting to save your game.
If you die at any point in the game, you will have the opportunity to continue your
progress. A message will appear stating, “Do you wish to continue?” If you choose
to continue, you will begin at one of two places:
1. If you had saved the game on the same map that you died on, you will continue
your game at the location of this saved game.
2. If you had not saved on the current map, you will continue your game at the map
transition where J.C. Denton entered. You will still have all of your Inventory,
notes and mission goals, but any progress you made since the map transition
or saved game will be lost.
If you choose to exit after dying, you will be taken back to the Main Menu. All progress
since your last saved game will be lost.
SAVING
— If you want to save your progress, press
the START button to bring up the Main Menu
and select SAVE GAME. Highlight NEW SAVE
and press the ˛button. You can also overwrite
an existing saved game. The amount of free
space left on your memory card, along with
the space required to create a new saved file, is
listed at the bottom of the screen. You can create
a maximum of 10 individual saved games;
the Saves Used count is also listed at the bottom of the screen. The Save Game
option is only available when you enter the Main Menu from gameplay. You won’t
be able to save your game during a conversation or infolink message; you must wait
until the conversation or message has finished.
10
Note: If you like to save frequently, it is recommended that you periodically delete some
of your older saved games in order to conserve memory card space. You can also conserve
memory card space by overwriting existing saved games.
LOADING
The Save/Load screens have the following options:
Ç
from your memory card.
˛
game, or load a saved game.
¸
— If you want to load a saved game,
select LOAD GAME from the Main Menu. Your
saves are listed chronologically with the most
recent saved game at the top of the screen.
The saves are identified by game location,
date and time of save, along with the file size.
Highlight the saved game you want to load
and press the ˛button to load that game.
button – DELETE
button – SAVE/LOAD
button – CANCEL
— Delete the selected saved game, erasing it permanently
— Create a new saved game, overwrite an existing saved
— Return to the Main Menu.
MOVEMENT
Push the left analog stick *to move forward and @to move backward. Push the right
analog stick $or ^to rotate your view. To look up and down, press the right analog
stick in the desired direction. Carrying certain weapons or objects in your hand will slow
your movement rate.
STRAFING
Strafing is side-stepping to the right or left without facing in that direction.
Push the left analog stick $or ^to strafe left and right.
LEANING
You can lean to the right or left to take a quick look
around a corner. To lean, hold the Íbutton
to plant your feet, then use the left analog stick
to lean $or ^. When you lean around a corner
or obstacle, you are much less likely to be seen.
While you are leaning, it is possible to aim a weapon
in any direction by using the right analog stick.
JUMPING
You can jump across gaps and up onto objects. The exact height and distance
of your jump depends on your speed, which can vary depending on your active Augs
and selected weapon. Press the Åbutton to jump.
11
Page 7

INVENTORY
LADDERS
Throughout the game you will need to climb up and
down ladders. To climb up a ladder, center yourself
in front of the ladder, look up and push the left
analog stick *. If you believe you’re in front
of a ladder, but you’re not going up or down, try
jumping to get yourself started. When mounting
a ladder from the top, or climbing off a ladder
onto a ledge, it helps if you crouch first. Having your
character crouch while attempting to mount a ladder from the top also decreases
the chances of falling off the top of the ladder. While climbing up or down, you can
prevent yourself from falling off by constantly looking toward the ladder and keeping
your view centered on it. This is especially true while moving down a ladder: if you look
away from the ladder while moving down you may move forward and fall off.
SWIMMING
Swimming is just like regular movement, except that
you can move up or down as well as forward, back
and side to side. If you face down while swimming
you will submerge, and if you face upward you’ll
ascend. Remember that if you’re submerged for too
long you’ll start to take damage and may drown.
Keep an eye on your Air Supply Meter while
you’re underwater.
Note: Only some weapons work underwater.
CROUCHING
Press the button to crouch. Press the button
again to stand back up. You can move while
crouched, but at a reduced rate.
Crouching has a number of important purposes
in the game. First, it allows you to take cover
behind low objects or pass through low openings.
More importantly, however, when you are crouched
you become stealthier, taking full advantage
of whatever cover is available and moving almost silently. It becomes very difficult
for most enemies to see or hear you at all. You cannot crouch while swimming.
JUMP-CROUCH
If you need to crawl over a low obstacle with limited headroom, or climb through
a small window, you can jump-crouch. While you are jumping, press the button
to crouch in mid-air.
Press the ◊button to access your in-game
screen. This screen tracks every usable object you are
currently carrying. Your Inventory contains nine
main slots:
• five weapon slots, one of which is reserved
for melee weapons,
• one slot for grenades,
• one slot for tools,
• one slot for medical items,
• one slot for miscellaneous items.
To navigate the
through the nine Inventory slots. If an Inventory slot contains more than one item,
a submenu of items in that slot appears to the right. Press the directional buttons
and ^to choose between items from the submenu.
If a weapon requires ammo, two numbers will be listed to the right of the weapon.
The top number represents the amount of ammo currently loaded; the number below
indicates the number of clips left.
If a weapon can be upgraded, a Weapon Mods option will appear next to that weapon.
See “Using Equipment" on page 21 for more information on how to upgrade a weapon.
The
Inventory
˛
button – EQUIP/UN-EQUIP
hand, ready for use. This button also un-equips an equipped item. Also used in
conjunction with the directional buttons to upgrade weapons (with Weapon-Mods)
and change ammunition.
◊
button – USE
activated. Each press of this button consumes a single item out of a stack.
Ç
button – INFO
Í
floor, where it can be picked up normally. If you return during the same mission,
the dropped item may still be there. If you return in a later mission, it will be gone.
Ï
and Previous item cycle within the game. To set an item or weapon to the Cycle
Select, highlight the icon for the desired item and press the Ïbutton. An item is
included in the cycle if a Yellow Slash appears in the lower left corner of the item
icon on the
to cycle OFF.
¸
button – RETURN TO GAME
Inventory
screen has the following options:
button – DROP
button – TOGGLE CYCLE
Inventory
screen, press the directional buttons *and @to move
— Place the selected object from Inventory in your
— Instantly use an item. For example, food may be eaten or a medkit
— Display an information window about the selected item.
— Drop an item from your Inventory. The item will fall to the
— Select an item or weapon to be included in the Next
screen. All weapons default to cycle ON; all items default
— Exit the
Inventory
Inventory
$
screen and returns to the game.
12
13
Page 8

AUGS AND SKILLS
EQUIPPED ITEMS AND WEAPONS
HOLSTER ITEM
that object is visible in your view. If you want to put the object away or holster your
weapon, press the directional button^.
DROP IN HAND
NEXT AND PREVIOUS ITEM
the
Inventory
items. You can select which items are included in this cycle by using the Toggle
Cycle option on the
RELOAD WEAPON
you have equipped.
— When you have an object or weapon equipped and in your hand,
— To throw the object in your hand, press the directional button$.
screen, press the directional buttons
— If you want to equip an item without bringing up
Inventory
— Low on ammo? Press the button to reload the weapon
screen.
*
and @to cycle through your
INVENTORY MANAGEMENT
In
DX: THE CONSPIRACY
on your person (in your Inventory). Even if you go back to the same location in different
missions, anything you left behind is gone.
Therefore, it is extremely important that you take only those items that you expect to
find most useful. Your choices in what you take with you and what you leave behind will
have a great impact on your strategy and character development throughout the game.
, there is no place to store items between missions other than
STACKABLE ITEMS
Items that are small, common and identical are usually stackable. That is, many of them
can be carried in a single Inventory slot. The exact number that can be carried in a given
stack depends on the item itself. You can view how many items are in a highlighted
stack by looking at the window in the lower right part of the screen. The item count
for the stack will appear next to the item description.
Stackable items include grenades, food, medkits, biocells, lockpicks, multitools and other
miscellaneous objects. You can only have one type of stackable item in a particular slot.
For weapon slots, you can have only one object of that type in your Inventory. If you try
to pick up another, the game will simply tell you that you already have one (though it
will add the ammo from the second weapon to your Inventory, if applicable and if you
have space).
Augmentations and Skills give your character critical powers and abilities. The Augs
and Skills you select will greatly influence how you play the game and how others react
to you. During gameplay, press the ¸button to access the in-game Augs/Skills Menu.
Press the Åor Îbutton to toggle between the Augs and Skills screens. Press
the ¸button to return to the game. When you pick up an Aug canister during gameplay,
it will be stored on the Augs screen. Aug upgrade canisters are also stored
on the Augs screen.
AUGMENTATION TAB
The Augs screen allows you to keep track
of your augmentations and activate them. Select an
augmentation by pressing the directional buttons
and @and then press the ˛button to toggle it ON
and OFF. When an Aug is activated, it appears
highlighted on the right side of the screen
and remains activate until your turn it off or your
bio-energy is depleted.
You begin the game with three Augs already installed:
INFOLINK
IFF
LIGHT
You have nine additional slots for augmentations. Each slot represents a specific body
location. You can fill these slots by finding augmentation canisters. To install a new
augmentation you must first find the appropriate augmentation canister.
— Your infolink allows HQ to monitor your activities and allows you
to receive real-time neural communications.
— An IFF (Identification: Friend or Foe) system is included in your software
package. This analyzes objects, people and creatures in your field of view
and identifies those that may be hostile. When you target an object or person,
your crosshairs change to red if the object is hostile or green if it is friendly, or
remain white if the object is neutral. Remember to pay close attention to the color
of the crosshairs; some characters who look like enemies may actually be friendly.
— You have the ability to generate a small but powerful beam of light at will.
Of course, the light beam may draw unwanted attention in stealth situations.
Unlike the infolink and IFF, the light can be toggled on and off, and is the only one
of your three “standard” Augs that drains bio-energy when in use.
*
14
15
Page 9

CHOOSING AUGMENTATIONS
Each augmentation canister is designed for one
specific body location. When you pick up an
augmentation canister, it will automatically be placed
in the correct slot for the appropriate body location.
When you install a canister, you must choose one of
two augmentations available for that slot. Once you
fill a slot you can’t change your mind — that
augmentation is permanently installed, and the
second option is gone forever, so choose wisely. The augmentations you select will
greatly affect how your character develops and what strategies are most advantageous
against different foes and challenges.
You will not know what any given augmentation slot can do until the associated canister
is in your possession. At that time you can select the canister on your Augs screen
and press the
UPGRADES
Ç
button to see a description of available options.
All Aug s start at tech level 1 and most can be upgraded to tech level 4. Each Aug has
a tech level indicator on the left side of the Aug icon. Each tech level is represented
by a yellow dot; the number of yellow dots corresponds directly with the Aug’s tech
level. For example; an Aug at tech level 1 will have one yellow dot and an Aug at tech
level 3 will have three yellow dots. Each upgrade makes the Aug more powerful and
energy efficient. Augs that can’t be upgraded will have a plain blue bar for the tech
level indicator.
To upgrade an Aug, you need an upgrade canister. Each upgrade
canister can be used to increase a single Aug by one tech level,
up to the maximum. If you have an upgrade canister in your
possession, it will appear to the left of any Aug that can be
upgraded. When the Aug you want to upgrade is highlighted,
press the directional button
$
to select the upgrade canister
and then press the ˛button to activate the upgrade. Upgrades
are not reversible, so be careful with your selection.
USING AUGMENTATIONS
Almost all of your Augs must be activated to be used. An active Aug drains bio-energy
as long as it remains active, so remember to turn the Aug off after you’re done using it.
You can activate an Aug from the Aug s screen by selecting the Aug and pressing
the ˛button, or bring up a detailed description of the Aug by pressing the Çbutton.
QUICK AUG SELECTION
You can create a set of “Quick Augs,” Augs that you can toggle on and off by pressing
the Çbutton during gameplay. To do this, open the Augs screen, highlight the Aug you
want in your Quick Augs set, and press the Ïbutton. An Aug is included in the Quick
Augs set if you see a Yellow Slash in the lower right corner of the Aug icon. Press
the ¸button to close the Augs Menu when you are done.
Using the Quick Augs function allows you quick and easy access to your favorite Aug
or set of Augs without using the Augs Menu. Experiment with the Quick Augs feature
using your built-in light Aug.
BIO-ENERGY
You can keep track of your bio-energy levels from the main HUD screen. The display
to the right of the HUD shows your current bio-energy level. A biocell recharges your
bio-energy level by 25 points. The number of biocells you currently have available is
shown on your Inventory screen. To use a biocell, select it from within the Inventory
screen and press the ◊button. This applies a single cell to your energy reserves.
You can also use a biocell by equipping it and pressing the Îbutton.
SKILLS TAB
The Skills screen allows you to view and increase
your Skills. Skill Points are gained by completing
primary and secondary mission objectives or through
exploring the
Select a Skill and press the
a detailed description of its function and effectiveness
at successive levels.
At the top of the Skills screen, your current total
unspent Skill Points are displayed. To the right of each Skill icon a number is displayed,
indicating how many Skill Points are required to upgrade that Skill to the next level.
To the left of the Skill icon, four bars are displayed which represent the level to which
that Skill is trained. One bar indicates the skill is Untrained (the lowest level); four bars
indicate that the skill is trained to Master level (the highest level).
UPGRADING
You can upgrade any Skill at any time, provided you have the necessary Skill Points.
Select the Skill you want to upgrade and press the ˛button. Be careful with your
selection. Once you upgrade a skill, you cannot downgrade it.
DX: THE CONSPIRACY
Ç
button to display
world.
16
17
Page 10

GOALS/NOTES/IMAGES
TEXT AND READOUTS
The G
oals/Notes/Images
the SELECT button (also referred to as the “Mission button”). This extremely important
screen tracks your progress throughout the game. The screen has three tabs: Goals,
Notes and Images. Switch between the tabs by pressing the Åand Îbuttons.
screen can be accessed directly during gameplay by pressing
GOALS TAB
The
Goals
Current mission goals are displayed in highlighted
text and divided into Primary and Secondary goals.
You must complete all Primary goals to complete
your current mission. After you have completed
a goal, you will receive an in-game message and it
will no longer be highlighted on the
Secondary goals do not need to be completed
to finish your mission, but you will be rewarded in a variety of ways
when achieving Secondary goals.
tab displays your current mission goals.
Goals
screen.
NOTES TAB
The
Notes
game. Gathered from emails, conversations and
datacubes, these notes include any known passwords,
security codes and other useful information.
tab displays all of your notes for the entire
IMAGES TAB
The
Images
or photographs that you have loaded into your
displays graphics
memory. Images are listed from the most recent
to the oldest, and identified by the name of the object
they depict. Press the directional buttons *and
to cycle through the collected images.
tab
@
Many objects in the game provide information in text
or numeric form. These include books, newspapers
and datacubes. Datacubes are simple, indestructible data
storage devices and they are found throughout the world.
In general, these objects cannot be picked up and placed
in your Inventory. Instead, when you press the ˛button
while the object is selected, a text window opens on your
screen from which you can read the data. If the data is
important to your mission, it is stored in your
and
Images
reading, press the
screen as a note.
¸
When you are done
button to close the window.
Goals, Notes
INTERACTIVE READOUTS
Readouts for email, security systems and the like are
interactive. You not only get information out, you put
it in, in the form of codes or commands. In such
cases, instructions for navigating the readout are
always included on the readout itself.
STEALTH
Many areas of
Of course, stealth has its limits. Even moving silently in darkness, you may still be
vulnerable to detection via electronic sensors, trip wires and enemy patrols. Any noise
you make may give you away. It’s always a good idea to stick to shadows and keep
as much distance between you and the enemy as possible while moving stealthily.
If you openly attack an enemy, you will probably attract the attention of everybody
in the vicinity. However, it is often possible, with some skill and tactical foresight,
to take down an enemy silently and quickly.
DX: THE CONSPIRACY
reward you for silent movement and concealment.
18
19
Page 11

BREAKING AND ENTERING
USING EQUIPMENT
As a UNATCO special agent, you have been trained in advanced intrusion techniques.
Many such techniques require tools like lockpicks and multitools. However, these
items are often in short supply, so it is always a good idea to check around and make
sure nobody’s left a nano-key or a digital code lying around before using up your own
valuable items.
LOCKPICKING
The modern lockpick is an unstable matrix
of nanites, which attempt to configure themselves
into the correct nano-key pattern to open a given
lock. Lockpicks are single-use objects, and it may take
several used in sequence to recreate the correct nanokey pattern. When you approach a locked door your
internal sensors analyze it and estimate the number
of lockpicks required to breach it. This information
automatically displays itself when you are close enough to the door and it is highlighted.
If the door cannot be picked, the display will tell you the door has infinite lock strength,
or “INF.”
BREAKING DOWN DOORS
Your sensors also estimate the relative strength of the door and tell you if you have
a chance of battering through it by physical force. If the door cannot be broken,
it displays as “INF.”
HACKING
This technique is similar to lockpicking, except it is
used to bypass digital keypad locks, security cameras
and turrets. A multitool is used for this purpose.
Like lockpicks, your internal sensors can analyze
a security system and estimate the number
of multitools required to bypass it. If the object
cannot be hacked it will display as “INF.”
Some doors with digital keypads can only be
bypassed with multitools. Others can be bypassed with multitools or opened
with lockpicks. Your sensors will always tell you the difference. Doors with keypads
that display "INF" will require the correct access code, which can be discovered
in a number of different ways (conversations, datacubes, computer emails).
HACKING COMPUTERS AND ATMS
If you have advanced your Computer Skill level to Trained, you will be able to “hack”
into personal computer and ATM systems. Once you have opened a computer or ATM
terminal, press the Çbutton to begin hacking. Depending on your Computer Skill level,
you have a finite amount of hacking time before your intrusion is detected. You will see
the progress of your hacking time in the top right corner of the terminal window. Pay
attention to the amount of hacking time you have left, or you might set off an alarm!
As you progress through the game you will find many objects you can pick up and carry
with you. All the objects in the game that can be carried in your Inventory can be used
for some constructive purpose. The most convenient way to use an object is to have it
in your hand, and press the Îbutton. You can also use an object directly from
the Inventory.
With a weapon or item in your hand, press the directional button
your Inventory without using it, emptying your hand. Pressing the directional button
drops an item without using it. You can pick up any item you’ve dropped into the world.
^
to return an item to
$
NANO-KEYS
A nano-key is a unique pattern of nanites used to
open a particular nano-lock. These keys look like
small blue cylinders and, when found, are stored in
your nano-key ring. If you have the correct nano-key,
a locked door will open when you focus on the door
and press the ˛button.
SELF-POWERED ITEMS
Several defensive and survival items, including, but not limited to powered armor, tech
goggles and rebreathers, have an internal power supply. These expend power when they
are used, and when their power is exhausted they become useless and vanish from your
Inventory. A charge for a single item lasts anywhere from a few seconds to a couple
of minutes — just long enough to get you through the worst part of a firefight
or to the end of a long underwater tunnel.
WEAPON UPGRADES
Reloadable ranged weapons can be upgraded
in a number of ways. These upgrades are found
in the form of Weapon Mods, which are scattered
throughout the game. When you pick up a Weapon
Mod it is automatically added to your Inventory.
To upgrade a weapon, press the
gameplay to display the
the weapon you want to upgrade and press the
directional button ^to access the Weapon Mods selection. A list of available Weapon
Mods is displayed vertically. Select the mod and press the ˛button to complete the
upgrade. Once a weapon is upgraded, that upgrade cannot be removed or transferred.
If you discard an upgraded weapon, you lose all its upgrades as well. Press the Çbutton
with a Weapon Mod selected to show information about that mod.
Some upgrades (e.g. sights and silencers) can only be used once on a given weapon.
Others (e.g. accuracy, speed, recoil and clip mods) can be used multiple times for
cumulative effect, although the effect often diminishes as more identical upgrades
are added.
Inventory
◊
button during
screen. Highlight
20
21
Page 12

COMBAT
VISION ENHANCEMENTS
There are several items in the game that augment your vision:
BINOCULARS
TELESCOPIC SIGHTS
a weapon equipped with the telescopic sight (or scope upgrade) in hand, press
the Ïbutton to zoom in on a distant target and see through the sight. If your
Skill with the weapon is low, or if the target is very far away, you may experience
some wavering of the view.
TECH GOGGLES
they also provide light enhancement. Tech goggles will not allow you to see in pitch
darkness, but they do make it much easier to see in dim conditions. Tech goggles are
powered objects and will exhaust themselves when used.
Press the
— Make distant objects appear closer when you use them.
— Similar to binoculars, but used differently. If you have
— Similar to binoculars but, in addition to magnifying your vision,
Î
button to activate binoculars and tech goggles once they are equipped.
COMMUNICATING
If you walk up to a friendly character (not a "foe" according to your IFF), focus on that
person and press the ˛button. The character will usually have something to say to you.
This might be a brush-off or small talk, but it can also be useful and interesting
information. If you’re not in a hurry it’s worthwhile to talk to everyone in a public place.
CONVERSATIONS
Throughout the game there are certain important
people with whom you’ll need to have longer
conversations. To begin a conversation, approach
a character, focus on the person and press
the ˛button. Once you’re standing next to
the character, the conversation screen opens
and the conversation begins.
You cannot abort a conversation once it begins.
While in conversation you cannot be attacked, but enemies can use the time to get
into position to attack you as soon as you stop talking, so some caution is called for
when conversing under dangerous conditions.
To attack an enemy you must have a weapon in your hand. Make sure you’re in range,
position your cursor over the target and press the Îbutton.
Caution: DX: THE CONSPIRACY is not one of those games where you can run around
everywhere with your gun exposed. Many otherwise friendly locations will turn into deadly
skirmishes if you’re rash enough to enter with a weapon carried openly.
TARGETING
In
DX: THE CONSPIRACY
but also where you’re hitting the target. Enemies can take damage to the following areas
of the body:
HEAD
— Head shots are devastating, but the head is a small target and hard to hit
except from surprise or very close range.
BODY
— Torso shots are easy to make and can take an enemy out, but it takes a lot
of them to down an enemy.
ARMS & LEGS
but they are not fatal. Arm injuries can make an enemy drop his weapons.
SIGHTING
When you have a weapon at the ready, your cursor turns into targeting crosshairs.
If using a telescopic sight, you might notice that your crosshairs may waver. Increased
Skill and weapon upgrades will steady your hand, making it easier to sight on long-range
targets. When you acquire a target, your targeting cursor is unlocked. As you hold your
aim, the cursor will contract around your target. When the targeting cursor is completely
contracted and locked on the target, your chances to hit are at their best.
, it is important to know not only whom you’re shooting at,
— Arm and leg shots are easy to make, and can incapacitate an enemy,
AIMING — PLANT AND AIM FEATURE
With a weapon in hand, you can precisely control your aim by pressing (and holding)
the Íbutton to plant your foot, then using the right analog stick to move your aiming
cursor around the screen. You will not be able to move around in Plant and Aim mode,
so you might want to position yourself behind some cover first. An agent who masters
this method of aiming can be highly effective in the field.
WEAPON TYPES
There are dozens of different weapons in
not limited to blunt instruments, knives, swords, pistols, rifles, assault guns and heavy
weapons of various sorts. There are even exotic weapons such as mini-crossbows
and throwing knives. Some general advice on different kinds of weapons follows.
DX: THE CONSPIRACY
. They include but are
INFOLINK MESSAGES
From time to time you will receive messages from HQ via your neural infolink. Infolink
messages are often warnings or important information, and should be attended to very
closely. Receiving an infolink message does not interrupt your actions in any way.
22
CLOSE COMBAT
The important thing here, of course, is to make sure you’re
in range. Be warned — enemies who know you’re there will not
stand still and wait for you to hit them. Most close-combat
weapons (crowbars, batons, knives, swords) do not require ammo,
but a few powered items (like the riot-prod) do.
23
Page 13

NON-LETHAL
In
DX: THE CONSPIRACY
to kill. Only weapons specifically designed to be non-lethal, like
the riot prod, baton, pepper spray, gas grenades and tranq darts,
can stun an enemy. A non-lethal weapon might stun an enemy
for only a moment or it might put him out for the duration. In
general, if a stunned enemy is still on his feet, either get away or hit him again, pronto.
AUTO-FIRE
Automatic weapons like the assault rifle and assault shotgun are
effective, but have an annoying habit of pulling up in combat,
ruining your aim. To lessen this effect, fire in short bursts.
High Skill and weapon upgrades also minimize this problem.
FIRE AND FORGET
Some weapons, notably the LAW (Light Anti Tank Weapon)
and PS20, are strictly one-shot. Once you use them, they
vanish from your Inventory forever, although you might find
a different one later in the game.
AREA-EFFECT
Some of the most powerful weapons — rockets, grenades,
flame-throwers and plasma rifles — have an area effect.
This can be devastating against groups of enemies.
Remember that if you’re standing too close, your
character can be hurt or even killed by an area-effect
blast. Grenades can be particularly treacherous — they
bounce. If your aim is off, the grenade you were trying
to throw through a window can bounce off the sill and end up right back at your feet.
, it is often better to disable than it is
RELOADING AND AMMUNITION
Your weapon automatically reloads each time it runs
out of ammo (assuming more ammo is available),
but be warned that this takes time — time that may
prove fatal if you’re in combat. Press the
button to manually re-load your current weapon.
Ammunition does not take up space in your
Inventory. When you select a weapon in your
Inventory, the types of ammo currently in your
possession appear to the right of the weapon. It is possible to carry around ammunition
for a weapon you don’t have yet — you will not be able to track such ammunition
until you find a weapon of the correct type.
To find out how much ammunition of a given sort you have available, place the weapon
in hand. A box in the lower left corner of your screen will display the weapon,
the number of rounds in the current clip and the total number of full clips available.
24
BOOBY TRAPS
LAMs (Light Attack Munitions) and other grenades can
be thrown, but they also have another use. Modern
grenades are adhesive and equipped with a proximity
sensor that allows them to be used as a makeshift
mine or booby trap.
To make a booby trap, ready the grenade and press
the
Î
Your hand will turn to show you’re within reach
of a suitable surface. After a few seconds the proximity sensor will activate and anyone
passing within a few feet of the grenade will set it off. You cannot set off your own
booby traps, but you can be caught in the blast if an enemy is close behind.
Enemies can also leave booby traps waiting for you, so keep your eyes open.
button near any flat surface within reach.
HEALING
There is no “natural healing” in
agent to mend your wounds. The main methods for healing are:
MEDKITS
MED-BOTS
AUGS
FOOD
— These compact scientific wonders repair physical
damage almost instantaneously. The amount of damage
a medkit heals is based on your medical skill and your game’s
difficulty level. Medkits can be used in hand or from
the
Inventory
mobile surgery units. A med-bot heals all damage you’ve
acquired.
— Certain augmentations allow you to heal damage.
carbohydrates and use them as “fuel” to repair physical
damage. Food can be eaten from the Inventory or in hand.
While the healing from a single candy bar is negligible, a few
candy bars and a couple of sodas can yield significant results.
Nutritionally balanced soy food is by far the best food
for healing purposes. Fresh water provides some minimal
healing. Alcoholic beverages (beer, wine and liquor) have no
healing effect; however, your nano-metabolism accelerates their intoxicating effects.
You can expect to experience a few moments of disorientation immediately
after metabolizing alcohol. Cigarettes have no healing effect.
screen.
— Med-bots are self-propelled, semi-autonomous
— The nano-systems in your body can take complex
DX: THE CONSPIRACY
. You’ll need access to a healing
25
Page 14

ENERGY
Your Augs are powered by bio-electric energy, "bio-energy"
for short. Your body does not produce bio-energy naturally —
you have to store it in internal “batteries.” When this energy
reserve is exhausted, you cannot use any Au gs except your neural
link and IFF (which are not powered by bio-energy). There are two
ways to replenish your bio-energy when it starts to get low:
REPAIR BOTS
bio-energy fully. You can use a repair bot by focusing
on it and pressing the ˛button.
BIOCELLS
you a one-time shot of bio-energy. It takes about four biocells
to fully restore completely depleted energy reserves.
— These useful little mechs will charge your
— These stackable cells are quite common. They give
THE WORLD
COMPUTER TERMINALS
Computer terminals often contain useful information
in the form of email. They can also be used to control
electrical systems in the immediate area. To use
a computer terminal, you need the correct user name
and password. This information can be obtained
from notes in datacubes, email from other systems
or overheard conversations. If you have sufficient
Computer Skill you can try to hack your way in. Any user names or passwords you
happen to stumble upon are permanently recorded on your
Notes
on the
file, you will automatically be granted access into that computer system.
tab. Once you have a name and password in your Goals, Notes and Images
Goals/Notes/Images
screen,
PUBLIC TERMINALS
These are found in public places such as subway
stations. They do not require a user name or password
to use, but they only convey bulletins of general
public interest.
You can interact directly with many objects in the world.
MOVING AND THROWING
Even if an object is too large or bulky to be placed
in your Inventory, you can still move it from one
place to another. Medium-sized objects such as boxes
and chairs can be picked up and carried if your
hands are empty. To pick up an object, focus on it
and press the ˛button. To throw a carried object,
press the ˛button again. Larger objects such as
crates and barrels can’t be lifted or thrown but they
can be pushed around by positioning yourself behind the object and moving in the
desired direction. Certain Augs allow you to pick up and move larger and heavier items.
CONTAINERS
Keep an eye open for wooden supply crates. These
can contain a variety of useful items, including
ammo, medical supplies and tools. Supply crates are
identified with symbols that indicate whether they’re
carrying munitions, medical supplies or general
supplies. To open a supply crate, break it open with
a crowbar, knife, sword or similar substantial object.
You can even shoot it open if you want to expend
the ammo. Be careful what you smash open, though. Some containers (often barrels)
can contain hazardous materials such as radioactives, poison gas or even explosives.
Smashing or shooting one of these open can be deadly.
26
CREDIT CHITS AND ATMS
The “hard currency” of the world is the credit chit, a sort
of one-use, fixed balance credit card. These can be used
to buy food and supplies. ATMs are available in public
places and allow access to bank accounts from which
you can withdraw funds in the form of credit chits. ATMs
can be hacked for cash provided your Computer Skill is
sufficient. Once you obtain credit from any source,
it’s yours to spend.
SECURITY STATIONS
Security stations are used to turn security cameras on
and off, open sealed doors, and even control automatic
turrets. You can also use a security station to monitor
the situation at a remote security camera. Security
stations require a login and password to access them,
or sufficient Computer Skill to hack your way in.
LONG-RANGE TRANSPORT
When you have to travel from one place to another,
you may need to use a boat, helicopter, subway or other
means of long-range transit. To make such journeys,
just approach the vehicle, focus on it and press
the ˛button.
27
Page 15

CREDITS
ION STORM AUSTIN
Executive Producer Warren Spector
Producer Bill Money
Programming Matt Baer
Sr. Designers Ricardo Bare
Design Andy Dombroski
Art Mike Dean
Cinematic Artists Denis Loubet
Audio Lead Alex Brandon
Audio Techs Todd Simmons
Writing Sheldon Pacotti
QA Manager Marie Lockhart
QA Lead Dane Caruthers
QA Team Brian Glines
Special Thanks John Kavanagh
Ken Cobb
(Westlake Interactive)
Alex Duran
Phil Sulak
(Westlake Interactive)
Al Yarusso
Monte Martinez
Steve Powers
Harvey Smith
Kent Hudson
Jay Lee
Hugh Sugh
Mike Washburn
Mark Vearrier
William Wallace
Sarah Paetsch
Tim Johnson
Nathan Regener
Wendy Regener
Jon Savinelli
Josh Stoke
Chris Carollo
Doug Church
Secret Level
Stan Herndon
Dues Ex 2
& Thief 3 Teams
Glenda Adams
Chris Norden
Bob White
Marsh Andrews
Tara Thomas
EIDOS INTERACTIVE US
Producer Mike Orenich
QA Manager Brian King
Assistant QA Manager Colby McCracken
QA Lead Erik Kennedy
QA Team Eruch Adams
Marketing Director Sean Amann
Product Manager Matt Gorman
PR Manager Michelle Seebach
PR Specialist Kjell Vistad
Manual Design Carol Ann Hanshaw
Special Thanks Nick Earl
Jesse Andrews
James Cabot
Stephen Cavaretto
Nevin Chou
Brian Falls
Dan Franklin
Mark Gloshen
Jeffery Lowe
Ryan Natale
Henry Perez
Matt Ranalli
Fernando Robles
Alex Strayer
Andy Tulley
Nick Wilson
John Miller
Paul Baldwin
Kim Pendleton
Li Shen
Randy Stukes
Michael Minson
Greg Wu
Kevin Weston
Christian Chaterjee
Michael Kelly
David Rose
Rob Dyer
Mike McGarvey
Michael McHale
Kevin Gill
Denny Chiu
28
 Loading...