

Page 1
Operating and assembly instructions
VI 411
Induction wok
Page 2

VI 411
1
1. Important Notes Page 3-4
For your safety Page 3
Operating for the first time Page 4
About use Page 4
The advantages of cooking by induction Page 4
2. Features Page 5
Features Page 5
Special accessories Page 5
3. Operation Page 6-8
Switching on and off Page 6
Indicator light / Pot recognition / Residual heat display
Page 6
Booster function Page 7
Visual signals Page 8
Holiday safeguard Page 8
4. Settings table Page 9
5. Suitable cooking receptacles
and how to use them Page 10
6. Cooking in the wok Page 11
7. Cleaning and Care Page 12
8. Maintenance Page 13
9. Installation Page 14-17
Technical Data Page 14
Important notes on installation Page 14
Preparing the cabinet Page 15
Installing the control panel Page 16
Installing the cooktop Page 17
Page 3
2
Congratulations on buying your new
“Vario” appliance.
Before switching your appliance on for the first
time, we would like you to familiarize yourself with
your new appliance. In this manual you will find
important notes on safety and operation. These
will serve to ensure your personal safety and the
lasting value of your appliance. Keep the
instruction manual near your appliance for further
reference.
You will find notes on Page 4 that you ought to
observe before operating the appliance for the
first time.
The chapters entitled “Features" and “Operation"
tell you all about what your appliance can do and
how you operate it.
The chapter entitled “Cleaning and Care" gives
tips on how to keep your appliance looking good.
And now we wish you lots of fun cooking.
Page 4

3
For your safety
Do not operate the appliance if it is damaged.
The appliance must only be connected by
an authorised specialist, paying attention to
the relevant regulations of the power supply
companies and the regional construction
regulations.
Observe the assembly instructions!
The appliance could be damaged if connected
wrongly!
When connecting electrical appliances in the
proximity of the cooktop, make sure that connecting
cables do not come into contact with hot cooking
surfaces.
Only ever operate the appliance under supervision.
Observe caution with oils and fats. Overheated oils
and fats can easily cause fires. Smother burning fat
or oil. Never extinguish with water!
Caution: the appliance and the wok stand heat up
during operation. Keep children away. Wait until the
residual heat display goes off before taking the wok
stand away.
Do not operate the cooking position without pots
and pans placed on them.
Do not heat up unopened tins on the hob. These
may burst or explode.
To avoid jeopardising the electrical safety of the
appliance, do not use high-pressure or steam jet
cleaning devices.
Do not store any substances that are sensitive to
high temperatures, or which pose a fire hazard
(e.g. cleaning agents or spray cans), in drawers or
cupboards under the appliance.
There are fans beneath the cooking hob. Warning!
Small objects or pieces of paper kept beneath the
cooking hob may either damage the fan if they are
sucked into it or affect the cooling process. Do not
place any objects in the cabinet underneath closer
than 5 cm to the air intake. Remove any cooking
foil / film.
Operation of the appliance must be discontinued
immediately if improper use produces cracks,
breaks or flaws on the cooking surface, with the
result that live parts can come into contact directly
or indirectly with seeping liquid or if there is a risk
of injury. Remove the mains plug or switch off the
corresponding mains fuse. Call after-sales service!
Isolate the appliance from the mains during every
maintenance operation. To do this, remove the
mains plug or switch off the corresponding fuse.
Repairs must be carried out by authorised
specialists, thus ensuring electrical safety.
As the user, you are responsible for maintenance
and proper use in the household. No warranty
claims can be lodged for any damage resulting
from failure to observe these instructions.
Note:
if you have fitted the appliance cover VD 400-000
(special accessory) on the appliance, it must not
be closed until the appliance has cooled down
completely. Do not operate the appliance with the
cover closed! Heat development may damage the
appliance and the cover. Do not use the appliance
cover as a surface for placing objects or for
keeping things warm.
Subject to technical change without notice.
1. Important Notes
This appliance is in full compliance with electromagnetic safety and compatibility standards.
Persons fitted with pacemakers, hearing aids or
other similar devices are not, however, recommended to use the appliance, as it is not possible
to rule out interference which may adversely
affect the correct working order of such devices.
Page 5
4
Operating for the first time
Remove the packaging from the appliance and
dispose of it according to local regulations.
Be careful to remove all accessories from the
packaging. Keep packaging elements and plastic
bags away from children.
This appliance is labelled in accordance
with the European Directive 2002/96/EG
concerning used electrical and electronic
appliances (waste electrical and
electronic equipment - WEEE). The
guideline determines the framework for the return
and recycling of used appliances as applicable.
Check the appliance for transport damage before
installing it.
The appliance must be installed and connected by
an authorised specialist before operation. Before
operating the appliance for the first time, make
sure that the mains connection is in proper working
order.
The serial number of the appliance can be found on
the quality control slip which is included with these
instructions. This quality control slip should be kept,
for guarantee reasons, together with your operating
and assembly instructions.
Read through these instructions attentively before
operating your appliance for the first time.
Thoroughly clean the appliance and accessories
before using them for the first time. This will
eliminate any 'newness’ smells and soiling (see
chapter “Cleaning and care”).
About use
The appliance is intended solely for household use
and must not be put to any other uses.
Use the appliance to prepare meals only. Do not use
the appliance to heat up the room in which it is
installed.
The air inlets in the cabinet should not be covered
in any way.
Do not use the cooking surface to store items. Do
not place food wrapped in silver foil, cutlery, pot
lids or any other kind of metal object on the
induction cooking hob. Should the appliance be
switched on accidentally, these objects will heat up
very quickly and may produce burns.
Switch off the hob after use.
Always keep the cooking area dry and clean.
Built-in overheating protection prevents over-
heating of the appliance and of surrounding
kitchen furniture.
In the event of malfunction, first check your household fuses. If the power supply is in proper working
order, but the appliance is still not functioning,
please inform your specialist dealer or your nearest
Gaggenau customer service.
The advantages of cooking by
induction
The heating process takes place at great speed
within the receptacle used in the total absence of
either flame or perceivable heat source. It is not
necessary for heat to pass from the vitroceramic
surface to the cooking receptacle. That is why
cooking by induction offers the following
advantages:
• Fast cooking and frying, saving on both time and
energy consumption.
• The hob supplies or cuts heat once the control
knob is activated. It even cuts the heat supply off
should the receptacle be removed from the
cooking plate without having been previously
turned off.
• Splashes or spillages of foodstuffs do not burn
on the cooking hob and smoke is not formed
because the hob does not reach temperatures
high enough to do so.
Page 6
5
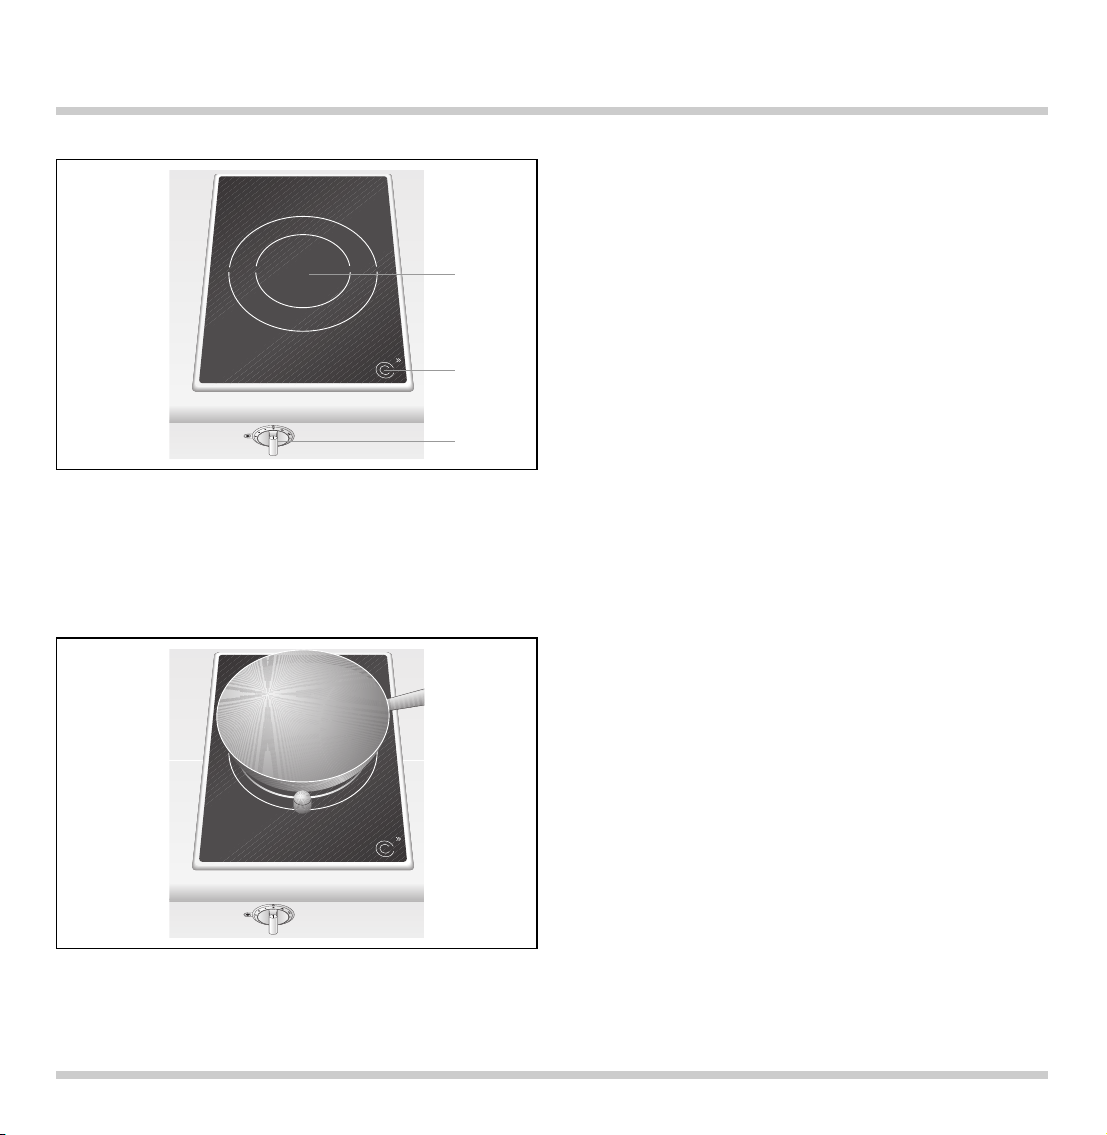
Features
Special accessories
1 Induction cooking zone Ø 18 cm (1700 W, with
booster 2500 W) with automatic extension to
Ø 28 cm (3400 W, without booster function)
2 Display panel
3 Control knob
You can order the following special accessory:
WZ 400-001 Wok stand
WP 400-001 Wok
VV 400-000 Connecting trim
VZ 400-000 Connecting trim with timer
VD 400-000 Appliance cover
2. Features
1
2
3
Page 7

Switching on
Press down the control knob and turn it left or right
to the required position (1-12). The luminous disc
behind the control knob and the indicator light on
the display panel light up, as long as the cooking
zone is switched on.
During operation, a noise may be heard depending
on the material of the pot, the amount of the
contents and the selected cooking level. This is
normal. The cooling fan of the induction unit may go
on and off during operation.
Switching off
Fully turn the control knob to the OFF position.
The luminous disc goes off.
Please note: the induction cooking zone does not
emit any warmth after being switched off.
Indicator light
The indicator light on the display panel lights, as
long as the cooking zone is switched on.
Pot recognition
The indicator light on the display panel flashes and
the cooking zone does not operate, if no pan or an
unsuitable receptacle (too small, non-magnetic) has
been placed on the cooking zone.
Residual heat display
Although induction-cooking plates do not reach the
same high temperatures as traditional cooking
plates, they can remain hot after cooking when
used over long periods of time through contact with
the heated receptacle. This is why the hob has a
residual heat display. After switching off the
indicator light will flash, as long as the cooking
zone has not cooled down sufficiently to be touched
safely.
Note: the duration of the residual heat display is
based on the length of the operation and the
cooking power level. The residual heat display may
still flash for some time despite cooling down,
depending on the food and the size of the cooking
receptacle.
Switching on
Switching off
3. Operation
6
Indicator light /Pot recognition /
Residual heat display
Page 8

Booster function
The booster function will boost the power of the
inner cooking zone for a short time. This allows you
to heat up food even faster. When the outer cooking
zone is used, the booster function cannot be
activated.
Activating the booster function
Press down the control knob and turn it left to the
booster symbol . The indicator light and the
booster indicator on the display panel light up, as
long as the booster function is activated.
De-activating the booster function
Turn the control knob to the required position
(1-12). The booster function is now de-activated. The
booster indicator goes off.
Note: under certain conditions the booster function
will be de-activated automatically in order to
protect the electronic components in your
appliance.
7
Activating
Booster indicator
Page 9

Visual signals
Holiday safeguard
(Automatic switch-off)
The appliance is set to automatically switch off
should a longer period of time elapse without
changing the settings. The switch-off time depends
on the level of setting being used (between 1 to 4
hours). The luminous disc behind the control knob
flashes. Turn the control knob to 0. Now the cooking
zone can be switched on again as normal.
8
luminous disc behind indicator light operating mode
the control knob on the cooker
appliance is OFF
appliance is ON, pot recognized, normal use
appliance is ON, no pot recognized
appliance is OFF, residual heat display
overheating protection*, power cut*
holiday safeguard*, faulty installation
(Connecting cable between the appliance and
the control panel is not plugged in)
Symbol description:
off
flashes
lights
*Turn control knob to 0, if the luminous disc behind the control knob flashes and the appliance
does not heat up. Let overheated appliance cool down before switching back on.
Page 10

9
4. Settings table
Quantity Heat Ongoing cooking Ongoing
setting 12 heat setting cooking time
Melting
Chocolate, chocolate coating, butter, honey 100 g – 1–2 –
Gelatine 1 packet – 1–2 –
Heating
Canned vegetables 400 g–800 g 1–3 mins. 2–4 3–6 mins.
Clear soup 500 ml–1 litre 2–3 mins. 10–11 2–4 mins.
Thick soup 500 ml–1 litre 1–3 mins. 2–4 2–4 mins.
Milk 200 ml–400 ml 1–3 mins. 1–3* 2–4 mins.
Heating and keeping warm
Stew (e.g. lentil stew) 400 g–800 g 1–2 mins. 1–2 –
Milk 500 ml–1 litre 2–3 mins. 1–3* –
Defrosting and heating
Frozen spinach 300 g–600 g 3–4 mins. 3–5 5–15 mins.
Frozen goulash 500 g–1 kg 3–4 mins. 3–5 20–30 mins.
Simmering
Dumplings (1–2 liters water) 4–8 pieces 6–9 mins. 7–9* 20–30 mins.
Fish 300 g–600 g 3–6 mins. 7–9* 10–15 mins.
Cooking
Rice (with double the amount of water) 125 g–250 g 2–4 mins. 3–5 15–30 mins.
Rice pudding (500 ml–1 liter milk) 125 g–250 g 3–5 mins. 2–4 25–35 mins.
Potatoes boiled in their skins
with 1–3 cups water 750 g–1.5 kg 3–5 mins. 6–8 30–35 mins.
Boiled potatoes with 1–3 cups water 750 g–1.5 kg 3–5 mins. 6–8 15–25 mins.
Fresh vegetables with 1–3 cups water 500 g–1 kg 3–4 mins 6–8 10–20 mins.
Pasta (1–2 litres water) 250 g–500 g 6–9 mins. 9–10* 6–10 mins.
Roasting
Roulade 4 pieces 4–6 mins. 6–8 50–60 mins.
Pot roast 1 kg 4–6 mins. 6–8 60–100 mins.
Goulash 500 g 4–8 mins. 6–8 50–60 mins.
Frying
Pancakes – 1–2 mins. 9–10 constant frying
Cutlet, breaded 1–2 pieces 1–2 mins. 9–10 8–12 mins.
Steak 2–3 pieces 1–2 mins. 10–11 8–12 mins.
Fish fingers 10 pieces 1–2 mins. 9–10 8–12 mins.
Deep-fat frying (in 1–2 litres oil)
Deep-frozen foods 200 g per serving 8–13 mins. 11–12* constant deep-fat frying
Others 400 g per serving 8–13 mins. 6–8* constant deep-fat frying
* Ongoing cooking without lid
The values given above must be looked upon as recommended values.
Page 11

Energy saving tips
We recommend that you use high quality pots and
pans with thick flat bases. Uneven pan bases
lengthen the cooking time unnecessarily.
Choose the correct sized pot or pan for the amount
of food to be prepared. A large pan, which is only
partly full will use much more energy.
Pots and saucepans should always be covered by a
matching lid. The cooking time is shortened and
the energy use reduced.
Switch the cooking level of the cooking zone down
when necessary. Boiling water does not need to
bubble.
Only ferromagnetic receptacles are suitable for
cooking by Induction. To see if your receptacles
are suitable, make sure that they are attracted to a
magnet. Receptacles made of enamelled steel,
cast iron or special stainless-steel receptacles
(designed for cooking by induction) can all be
used. Do not use receptacles made of thin normal
steel or glass, earthenware, copper or aluminium.
When a cooking receptacle is made of unsuitable
material or is too small for the cooking zone, then
the cooking zone does not operate and the
indicator light on the display panel flashes.
Ensure saucepans are not allowed to heat up when
empty. Otherwise, both the saucepan base and the
vitroceramic surface may be damaged.
Observe the manufacturer’s instructions before
using a special receptacle.
10
5. Suitable cooking receptacles and how to use them
Page 12

The wok and accessories (not included)
The wok and wok stand can be obtained from your
Gaggenau dealer. The wok pan has a rounded base
and can only be used together with the wok stand.
Please be careful that the wok with the rounded
base is secure on the stand during cooking.
Always place the wok stand over the centre of the
cooking zone.
Do not heat up the empty wok.
Use the wok stand only on the induction wok
VI 411. The wok stand should not be used on a
normal glass ceramic cooking hob.
Use a chan (rounded spatula) or a wooden spatula
to turn foods. Use a ladle to remove foods.
Use a strainer to lift deep fried foods from the fat or
large pieces out of a sauce.
You can use bamboo baskets for steaming.
Cooking in the wok
You can fry, steam, deep fry, stew and cook normally.
Stir frying is the special cooking method for the
wok. Ingredients cut into small pieces are cooked
as briefly as possible under strong heat and
constant stirring. In the large, round pan everything
can be stirred and turned faster and with greater
ease than in a conventional frying pan. Thanks to
stirring, ingredients do not burn onto the pan.
Surplus oil drains off towards the middle. In next to
no time, you obtain delicious fried foods, the pores
in meat close and fish becomes nice and juicy.
Vegetables stay crispy. Aromas and healthy vitamins
are retained.
Important: the cooking time is so short that all
ingredients should be ready for cooking before you
begin. The correct sequence is also important. First
place the ingredients with the longest cooking time
in the wok. For example, these are hard-fibred
vegetables such as carrots. Soft vegetables such
as mushrooms or sprouts should be added later.
Proceed as follows:
– Pour sufficient oil into the wok to coat the surface.
We advise you to use peanut or soya oil.
– Heat up the oil to just before the smoking point;
only then begin with stir frying.
– Cut the food into pieces of equal size, but not too
small, thus making sure they do not burn.
– If you are cooking large quantities, fry in portions
as otherwise not all the food will reach the hot
base of the wok.
11
6. Cooking in the wok
Page 13

Caution, risk of burns! Before cleaning, please
wait until the hob has cooled to hand-warm.
Please thoroughly clean the appliance before
operating it for the first time and after every use.
Clean the hob with a damp, soft cloth or kitchen
paper and the Gaggenau glass ceramic cleaner or
similar cleaner suitable for glass ceramic cooktops.
Polish with a soft, dry cloth.
The Gaggenau glass ceramic cleaner will coat the
glass ceramic hob with a gleaming, dirt repellent
film. This will help to preserve the attractive
appearance of your hob over a long period of time
and make it easier to clean as well.
Do not apply the cleaner while the hob is still hot as
this may cause stains.
Do not use scouring agents, abrasives or chemically
aggressive cleaners (for example oven cleaner)!
Do not use any nitro polishing agents for cleaning!
Do not use any abrasive sponges either.
Food with a high sugar content (e.g. boiled-over
milk, jam) can damage the surface of your hob.
Immediately remove such food using the glass
scraper.
Iridiscent discoloration can be caused by the bases
of some pots.
These do not interfere with the operation of the
glass ceramic hob.
Please refer to the enclosed brochure for further
notes on cleaning.
You can order our blade scraper (Order No.
087670) and the Gaggenau glass ceramic cleaner
(Order No. 098690) from your Gaggenau dealer.
Do not clean
the wok stand in a dishwasher.
The frame of the hob should be cleaned using a
soft, damp cloth and light soapy liquid or a
commercially available stainless steel cleaner.
12
7. Cleaning and Care
Note: to avoid jeopardising the electrical safety of
the appliance, do not use high-pressure or steam
jet cleaning devices – risk of short circuits!
Page 14

If the appliance does not function correctly, check
the household fuses first.
If the power supply is functioning correctly, but your
appliance still does not work, please contact your
dealer or your local Gaggenau customer service
agency. Specify the appliance type. The serial
number and type of the appliance can be found on
the quality control slip which is included with these
instructions.
Repairs may only be carried out by authorised
electricians, in order to guarantee the safety of
the appliance.
Unauthorised tampering with the appliance
will invalidate any warranty claims.
13
8. Maintenance
The appliance must always be disconnected from
the mains when being repaired.
Page 15

Technical Data
Total connected load: 3400 W / 220-240 V
Important notes on installation
This appliance can be combined with all Gaggenau
Vario 400 Series appliances.
This appliance may be installed in kitchen
combinations made of wood or similar combustible
materials without taking additional safety measures.
The built-in furniture and worktop where the
appliance is installed must be heat resistant up
to temperatures of 200° F/90° C.
The appliance must only be connected by an
authorised specialist, paying attention to the
relevant regulations of the power supply companies
and the regional construction regulations.
The mains connecting cable must at least
correspond to type H 05 VV-F (3 x 1.5 mm
2
). Pay
attention to the data on the rating plate. The
appliance must be properly grounded.
When connecting electrical appliances in the
proximity of cooking surfaces, make sure that
connecting cables do not come into contact with
hot cooking surfaces.
The installation technician is responsible for the
correct functioning of the appliance at the place
of installation. He must instruct the user on how to
disconnect the appliance from electricity in an
emergency.
After unpacking, check the appliance for any
transportation damage and report this immediately
to the transportation company.
There must be a gap of at least 20 mm at the side
between the appliance and any walls or furnishings.
Ventilation openings must be installed in the
cabinet, in order to maintain sufficient air
circulation for the underside of the appliance.
Please refer to the installation drawing.
If all poles of the appliances cannot be isolated
from the mains by removing an accessible plug, an
isolating device with a contact gap of at least 3 mm
must be installed (e.g. domestic fuse).
No warranty claims can be lodged for any
damage resulting from failure to observe these
instructions. Pay attention to the “Important
notes" on page 3 and 4.
Subject to technical change without notice.
14
9. Installation
Page 16

Preparing the cabinet
• Cut out the recess for the hob in your worktop.
Proceed as indicated on the installation sketch.
The installation sketch contains the measurements
of the space required for the trim between the
appliances. Several appliances can also be
installed in individual recesses, as long as a
minimum clearance of 50 mm is kept to between
the appliances.
• As shown in the installation sketch, drill the
Ø35mm hole to secure the control knob in the
cabinet front.
• If the cabinet front is thicker than 26 mm, the front
must be routed from the back to max. 26 mm on
an area of 80 x 310 mm.
• It is possible to install the appliance above a
ventilated built-in oven. Observe the installation
instructions. Remove the rear wall of the kitchen
cabinet to ensure air circulation of the appliance.
Leave a ventilation gap of 20 mm behind the oven
or the kitchen cabinet and the wall.
15
510
380
8
50
490
1575
1170
765
360
min. 35
min. 40
35
45
60
72
280
76
220
min.105
max.162,5
min. 5
min. 5
80 x
310
D = 26
16 – 26
D > 26
Page 17

Installing the control panel
• Before installation, remove all styrofoam
packaging from the control knob and peel off
the protective film behind the luminous disc.
• Hold the support plate from the rear against the
cabinet front, insert control knob into the hole,
secure from the rear with the nut. Secure the
support plate additionally with the supplied wood
screw to prevent turning.
• Secure the control panel with the included nuts
onto the support plate.
16
Note:
only install control panel with appliance of the
corresponding type.
Before connecting the appliance, make sure
the electricity is switched off at fuse point!
Page 18

Installing the cooktop
Please note when installing the appliance
cover VD 400-000 (special accessory):
Two brackets are supplied with the cooktop.
Screw the brackets on the rear of the cookop
before installation (see installation instructions
VD 400-000).
• Firmly plug the connecting cable in the cooktop
and in the control panel (the plugs must lock into
place).
• Insert the hob with the control panel on the front
into the cut-out and align it.
Note: do not stick the hob onto the worktop with
silicone.
• Secure the appliance on the worktop with the 4
clamping screws included.
• Connect the appliance to the electricity. Test that
it functions correctly. If the luminous disc behind
the control knob blinks, check the connecting
cable between the appliance and the control
panel is firmly plugged in.
9000076143 en 04.05 EB 17
Page 19

GAGGENAU HAUSGERÄTE GMBH
CARL-WERY-STR. 34 · D-81739 MÜNCHEN
Y (0 89)45 90-03
FAX (089) 45 90-23 47
www.gaggenau.com
 Loading...