


GURU 1.5
© 2007 FXpansion Audio UK Ltd
New features in GURU 1.5
Table of contents
Compatibility 2
Audio Export 3
Randomizer 4
Sample editing 5
Slicer 6
Browser 7
Keyboard support 8
Sequencer 9
MIDI implementation 10
Miscellaneous 10
New Options 11
Full list of new features 14
1
2
Compatibility
GURU v1.5 is 100% compatible with the latest hardware & software platforms including Dual,
Quad and 8-Core systems, Intel-based Macs, Windows Vista, Pro Tools 7.x, Digital Performer
5.x (including DAE mode).
Please note GURU 1.5’s updated system requirements are as follows:
• Mac OS X 10.4.x “Tiger”, or Windows 2000, XP or Vista.
• 512M RAM (768M recommended)
• 733MHz CPU with SSE1 or AltiVec instruction set
• 300MB free hard disk space (6GB for full library)

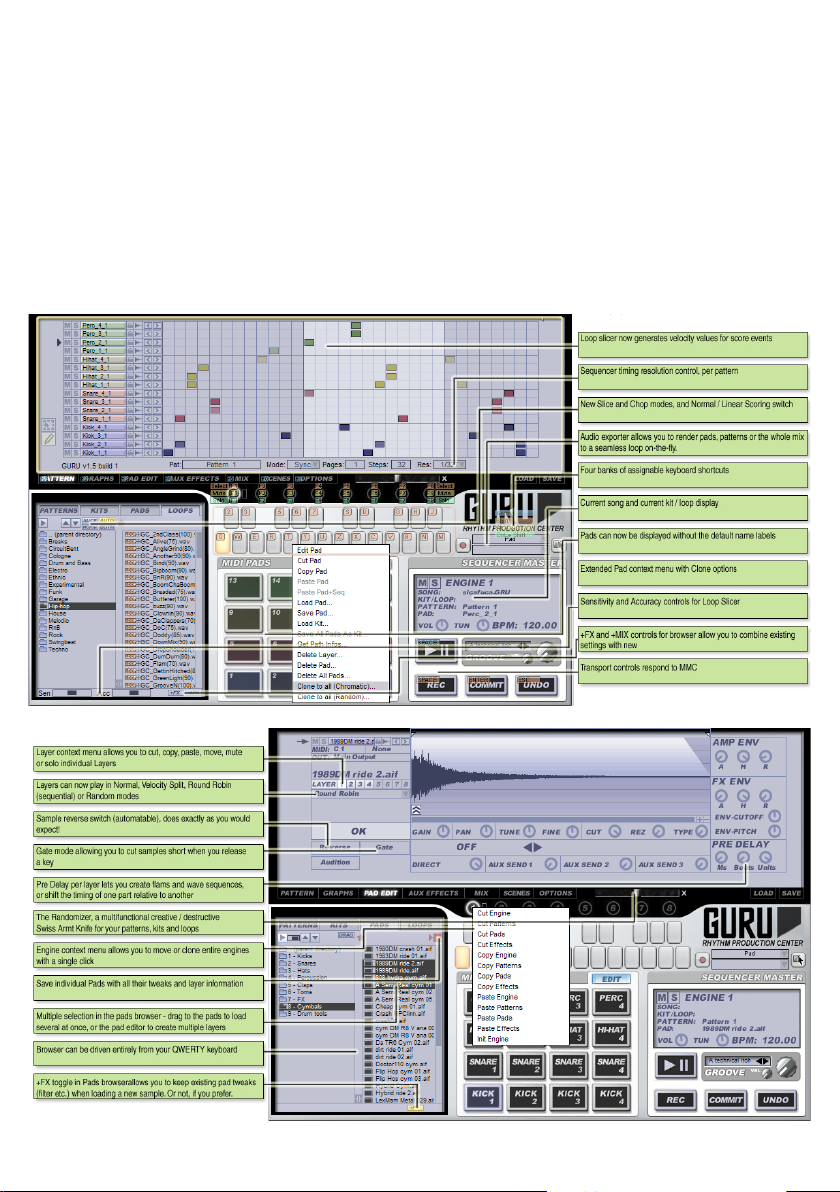
Audio Export
You can now render pads, tracks, engines or the full mix directly within GURU, and instantly
export it via drag + drop to your host or OS, or give the rendered loop a second pass through
GURU for further mangling. The audio exporter automatically tops and tails loops during rendering so they’re ready to use straightaway in Live, Acid or other loop environment.
To use the audio exporter, hit the ARM button (the record symbol below the GURU logo) to arm
the exporter for recording. The upper combo box allows you to choose what will get exported
- a pad, track, group, engine, or the whole mix. The next time you hit PLAY, or next time you hit a
pad (PAD export mode only), the exporter will capture the output. Depending whether you have
the “Cross fade loops on export” option enabled, it may need to record for one cycle or two.
Once recording has been finished, the record light will go out and the newly recorded clip will be
added to the lower combo box in the audio recorder area. You can double click the name of any
recently recorded clip to rename it. To export the clip, select it in the combo box, then drag from
the “Export source” button to the right of the combo boxes to, well, wherever you want -- be that
a pad in Guru, a location in Guru’s browser, an Explorer/Finder folder, or of course your host.
The files it outputs are standard WAVs and can be read by any application.
NB: - The cycle length is determined by the length of the pattern, or for ‘ALL’ mode, the length of
the longest currently selected pattern across all engines. If you want to record a longer passage,
pick an unused engine (e.g. #8), set the page count to 4 and the step count to 128, and then set
its tempo multiplier to a low value (e.g. 1/8th). GURU’s audio recorder is RAM-based, so recording long passages will eat RAM - you have been warned.
3

4
Randomizer
A new creative inspiration factory, the randomize slider can operate on any of GURU’s main
screens – sequence, graphs, pad edit, effects, mixer – and allows you to apply a controllable
amount of randomization to either the current pad or various combinations. Click on the randomize slider to generate a new set of ‘seed’ values, then drag to the left or right to apply them
progressively to your patch. Hold down ALT or SHIFT while dragging the randomize slider to
apply the process over a wider area – if you don’t like what you hear, just hit the Undo button to
the right.
The Randomize slider’s behaviour depends on which page you’re on:
Pattern editor
In the Pattern Editor, it will add or remove random notes from the current pattern, either on the
current lane only, or, if you hold down ALT or SHIFT+ALT, to all lanes in the current group or all
lanes in the whole pattern. Moving it to the RIGHT will slowly add more notes; moving it to the
LEFT will remove notes.
Graph editor
In the Graph Editor, it will randomize the values of the graphs. Depending on which graph page
you’re on, its behaviour may be damped down for some of the others - for example, randomization of the Volume, Shift and Repeat graphs is partially suppressed unless one of those graphs
is selected.
ALT randomizes the current graph across all lanes; SHIFT randomizes all graphs in the current
lane; ALT+SHIFT randomizes all graphs in all lanes.
Pad editor
In the Pad Editor, it will randomize the values of the pad-parameters.
Holding down ALT will randomize all pads in the same group; holding down SHIFT will randomize all pads in the same column; holding down ALT+SHIFT will randomize all pads in the
engine.
Aux FX
In the Aux FX Editor, it will randomize the values of all the aux effect parameters. Holding down
ALT randomizes all auxes in the current engine; SHIFT randomizes all auxes in the current slot
position (1, 2 or 3); ALT+SHIFT randomizes all auxes in all engines.
Mixer
In the Mixer, it will randomize the values of the master effect, as well as tune & pan for the current engine. ALT randomizes all engines.
Note:
Locked pads/patterns are not affected by the randomizer, so if you don’t want to randomize your
kicks, lock them up first!
To cancel the last randomize operation, click the ‘X’ next to the randomizer.

Sample editing
Reverse, gate, new layer modes, pre delay
Samples can now be played backwards, and layers can be stacked in Random and Round
Robin modes as well as the more conventional All Layers and Velocity Split. We’ve also added a
Pre Delay per layer (in both milliseconds and musical units) allowing you to shift individual parts
by a few ticks to get your groove ‘in the pocket’, or to create single-pad flams and ruffs out of
individual samples.
There is now a context menu on the Layer Select buttons allowing you to cut, copy, paste, mute
and solo individual layers. Right + click or Ctrl + click on the layer select buttons to access the
context menu.
Layer modes
To change the layer playback mode, use the drop down menu under the layer select buttons:-
• “All Layers” – all layers play at once
• “Velocity Split” – layers will play depending on the velocity of incoming notes
• “Round Robin” – each time the note is triggered, a different layer will play; the layers play in
sequential order.
• “Random” – each time the note is triggered, a different layer will play; the layers play in random
order.
Note that this setting can be overridden by the FORCE LAYER graph (see the Sequencer section for info).
Reverse
The “Reverse” button does as you’d expect – it makes the sample play backwards. Note that
sample reverse can also be automated via the Graphs, see the Sequencer section for info.
Gate
The “Gate” button causes the sample to respond to note-offs:- when a note-off is received, the
sample will go to its release phase.
Pre-delay
The Pre Delay section in the bottom right corner of the pad editor allows you to set up flams
and ruffs, or to shift individual tracks by a few ticks. The total delay is the sum of the millisecond
value and the musical value, which itself has two elements – a unit size, and the number of
those units to delay by.
To use pre delay to shift a given note, just set it to however much you’d like to shift the note by.
To create Flams and Ruffs, put the pad in All Layers mode, load up a few layers with samples,
and then delay them by different short amounts e.g. 20-80ms. To create wave sequences, set
the ‘Units’ parameter in the pre delay section to something fairly large, e.g. 16ths, load up a few
layers with waves, and then set their musical pre delay counts to different values such that one
sample plays after 1/16th, another plays after 2/16th etc.
5
6
Slicer
We’ve given GURU’s slicer a major overhaul – it is now much more accurate, and has a ‘Sensitivity’ control allowing you to adjust how it responds to possible hit points in your loops. In addition, its slicing and score extraction process is now velocity-aware - slices and scores are now
generated in such a way that hit volumes are consistent when using the sounds from one loop
with the score from another, or the score from a loop with a kit, or the slices from a loop with a
pattern.
As well as the ‘Sensitivity’ control, there is also an ‘Accuracy’ control which specifies how much
CPU time GURU should give to analysing the slice points. Higher accuracy means more precise, but slower, slicing.
The Slicer can now be toggled between SINGLE mode, in which one slice is loaded per pad,
and FULL mode, where up to 8 slices are loaded per pad, using the Layers. This allows Guru to
fit long loops (up to 128 slices) in a single engine; it also supports a Linear Scoring mode where
instead of smart-slicing by drum type, the slices are simply mapped to pads 1..16 in the order
they occur in the loop file, much like a conventional slicer.
When slicing loops and generating Scores, the slicer is now velocity aware – each score note is
assigned a velocity based on the loudness of the slice from which it was generated. This gives
much more useful playback when replacing the slices for a given score with a pre-made kit.
“Equal 16ths” has now been replaced by a “CHOP” mode controlled by the sensitivity slider,
allowing you to set a chop length from 1/4 note down to 1/64th note. Hold SHIFT to set the sensitivity control to non-power-of-2 values in this mode (by default it snaps 1/4, 8, 16, 32, 64).

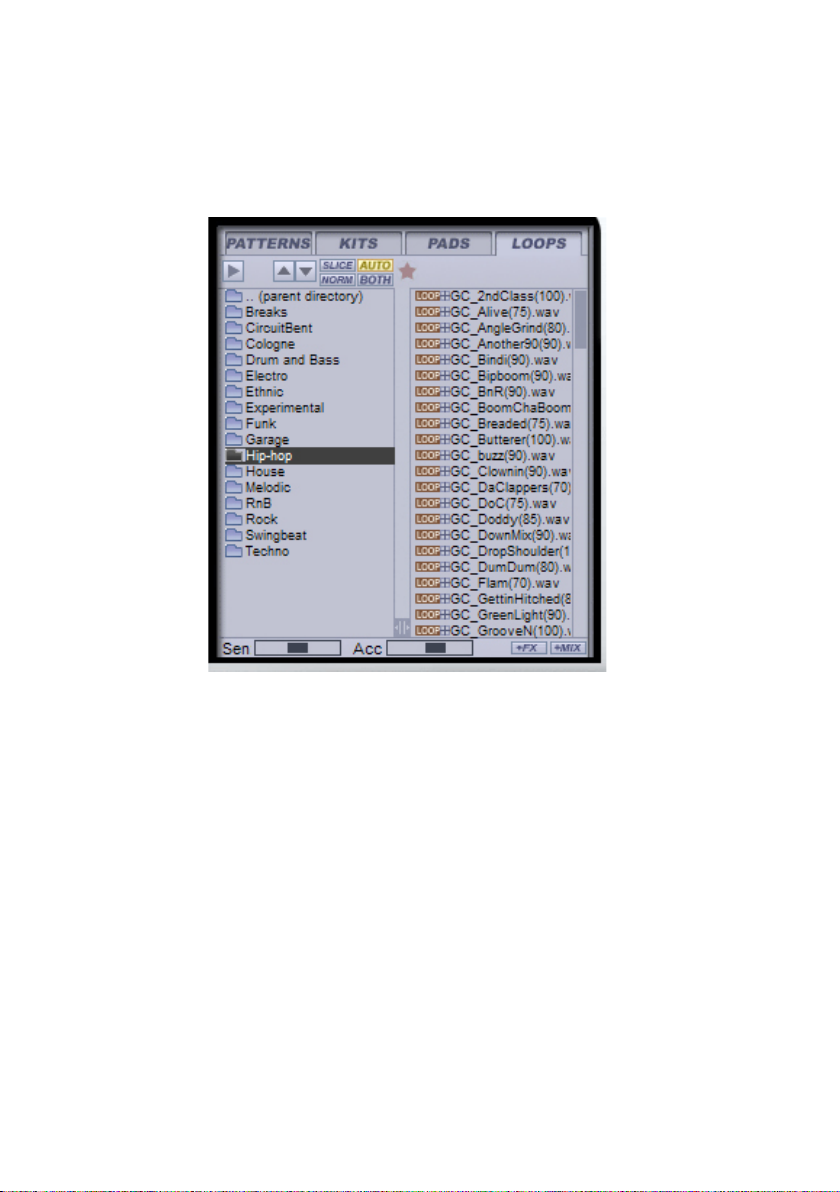
Browser
The Browser is now significantly faster and can be driven entirely from the keyboard. We’ve
made loads of little workflow enhancements like the PlusFX and PlusMIX controls, so you can
now selectively preserve or overload your pad tweaks and mixer effects when loading loops or
kits. Double clicking a browser tab now opens that tab as a folder in Finder/Explorer, and dragging an OS folder to the browser sets the current tab to that location.
In the Pads browser, we’ve added a volume control for auto-preview, and support for multiple
selection so you can drag multiple samples to the pads or layers in one go. CTRL + click to pick
single drums for multiple selection, or SHIFT + click to pick a whole range of drums in one go.
Dragging from the browser to the Pads will load the samples across multiple pads; dragging
from the browser to the Pad Editor will load the samples across multiple layers in the current
pad.
The Pads browser also now shows *.HIT files, and you can also Save a HIT in to the browser. A
HIT contains all the settings for a pad -- up to 8 layers, pad edit effects, etc., plus the samples if
need be.
Favourites is back -- click the ‘*’ in the browser to go to the favourites page for the current tab. In
normal (non-favourites) mode, shift + click a folder in the left-hand pane to add it to the favourites list; in favourites mode, shift + clicking a listed folder will remove it from the favourites list.
The PlusFX and PlusMIX controls are somewhat equivalent to the “Preserve pad effects settings when importing loops” option in GURU v1.0, but are quicker to use and can be applied
more widely. When “+FX” is disabled, any Pad Edit / Layer Edit settings you’ve changed in the
current kit will be preserved when the new samples are loaded; when enabled, they’ll be reset
or overwritten. Similarly with “+MIX”:- when disabled, your Aux and Mix effects for the engine will
be preserved; when enabled, they’ll be reset or overwritten.
7

8
Keyboard support
GURU can now be driven largely without resorting to the mouse – the pads, patterns, browser,
engines and transport all respond to the keyboard. Additionally, you can now mute, solo and unmute individual engines at the touch of a button.
GURU’s new QWERTY implementation is a bit different to those you may have seen before, so
please read this bit in detail!
Essentially, the concept is this: - there are four different keyboard ‘scopes’ active at any one time.
These are accessed by the plain keys, SHIFT + key, CTRL + SHIFT + key, and ALT + SHIFT +
key combinations, respectively. Each scope also has a colour associated with it.
Any time you hold down SHIFT or hit TAB, you’ll see a reminder of these scopes, and what
they’re currently assigned to. Each of the four scopes can be assigned to the Pads, the Patterns, the Folders pane in the browser, or the Files pane in the browser.
There are also some shortcuts available at all times to control the engines, the screen mode,
and the transport.
To change which part of the interface a given scope is assigned to, hold down its modifiers
(nothing, SHIFT, CTRL+SHIFT, and ALT+SHIFT respectively), and then hit the TAB key. You will
see the colour coded highlight associated with that scope move around the screen as you hit
TAB.
At any time, to see what shortcuts you currently have available, just hold down the SHIFT key.
Shortcuts you can access with a simple key press are colour coded BLUE. Shortcuts available
with SHIFT are orange; those available via CTRL+SHIFT are green, and ALT+SHIFT are yellow.
Note that the assignments for the F-keys (select screen-mode, select engine, solo engine,
mute engine) are hard wired and do not change with context. Same goes for the transport keys
(Space = play, Shift + Space = record, Shift + Enter = commit, Shift + Esc = undo).
So, for instance, to assign the SHIFT keys to the PADS, hold down SHIFT and hit TAB until the
orange highlight indicates the Pads. Then when you hold CTRL+ALT+SHIFT to see the current
shortcuts, you’ll see orange letters/numbers over each pad indicating which key controls which
pad.
Similarly, to assign the Plain keys to the FILES pane in the Browser, just hit TAB until the blue
highlight indicates the files pane. Now hitting the plain keys will access the browser.
Note that this allows you to scroll up and down thru the browser with the up/down arrow keys.
PAGE UP and PAGE DOWN are also supported.

Sequencer
Improved sync, new Graphs, note duration / gate
The sequencer now locks to the host tighter than ever, and responds instantaneously to pattern
change / gate messages allowing you to recombine and retrigger patterns at warp speed – perfect for drum and bass. GURU now supports note-duration across-the-board, allowing you to cut
samples off before the full length plays.
There are new sequencer graphs for automating the Sample Reverse feature, and better support across-the-board for triplets, polyrhythms, and non-4/4 meters. Each pattern can be set to
a different resolution - 8th, 16th, 32nd or 64th notes, as well as triplets, and the metronome and
measure divide lines/highlights will adapt to this.
To set the resolution for all patterns at once in a given engine, hold down ALT while adjusting the
resolution dropdown. This also works for the step length, page length and trigger mode controls.
Three new graphs have been added, ‘Duration’, ‘Force Layer’ and ‘Reverse’.
Duration graph
Duration sets the length of any sample in musical units, but only affects samples whose ‘Gate’
option is turned on in the Pad Editor. NB:- to set very short durations, or to affect samples that
don’t have ‘Gate’ turned on, use negative values in the ‘Scrub’ graph. Holding down ALT or
ALT+SHIFT when painting in the graph editor will apply the current edit to multiple tracks at
once.
Force layer graph
The ‘Force Layer’ graph forces the note to play a specific layer from the pad it’s in. This can be
very useful when playing back loops with multiple slices loaded to a single pad. ‘Force Layer’
overrides the layer playback mode control in the pad editor.
Reverse graph
The ‘Reverse’ graph automates sample reversing. It has four values:- ‘Normal’, meaning play the
sample as specified in the pad editor, ‘Reverse’, meaning always play it backwards, ‘Forward’
(self explanatory), and ‘Inverse’, meaning do the opposite of whatever the setting in the pad editor is.
Other new sequencer features
The Pattern Memory keys can now send note-on and note-off events and, as such, can be used
to (re)trigger patterns in GATE, TRIG or SHOT mode. ALT + clicking on the pattern keys now
changes to the selected pattern across all engines.
Pad overview level faders, locks, and mute/solo buttons (to left of sequencer) now respond to
“alt/shift”-linking key combinations:- ALT applies the action to all in the current colour group;
SHIFT+ALT:- applies to all tracks in the engine; CTRL + (ALT, SHIFT+ALT) inverts the value of
the Locks or Mute/Solo toggles rather than setting them.
Options have been added so the sequencer can track the current pattern and the playback cursor, paging forward as playback flows, or ignore them entirely.
9

10
MIDI implementation
GURU’s MIDI implementation has been greatly extended. As well as supporting real time MIDI
out (VST hosts only), GURU can now sync to MMC and MTC, and additional MIDI channels
and controller messages have been added to give you full remote control over engine, pad and
pattern selection, transport controls, and engine mute/unmute, as well as the effects section and
the entire mixer.
See the separate MIDI Implementation document for more details.
Miscellaneous
The audio engine is now drop-out-free, no more gaps or silences when previewing; in standalone mode you can now select which audio and MIDI devices you want to use and which you
want to ignore, and in plug-in mode a new mix option has been added, ‘Send engines direct to
sub-outputs’.
We’ve added value readout tool tips across-the-board and, if you like, you can now hide the
default “Kick”, “Snare” etc. name assignments for the Pads.
We’ve improved the sample file management system a great deal, and added a display of the
currently loaded song and kit or loop name in the transport window.
Finally, we’ve added a context menu to the Engine selectors allowing you to copy, paste, clear
etc. entire Engines with just a couple of clicks – great for creating variations on a kit, for instance.

New Options
MIDI: Allow Pads to respond to Note-Offs
When enabled, pads will receive Note Off events, and those that have ‘GATE’ enabled in the Pad
Editor will go to the release phase.
MIDI: Selected Pad follows MIDI input
When enabled, triggering a pad via MIDI will cause the track and pad edit selection to change to
that pad. When disabled, you must click on the pad or track on-screen to change the selection
focus.
MIDI: Clip MIDI files to bar on export
When enabled, any MIDI clips are shortened to a round number of bars when exporting, so any
notes which trail past the end of the bar will be cut short.
MIDI: Reset gates on playback start
When enabled, any MIDI clips in GATE/SHOT/TRIG mode will be reset to the ‘note off’ state
when playback starts. Turn this on if you’re using these modes and getting stuck notes. Turn it off
if you’re getting dropped notes at the start of the song – some hosts (e.g. Ableton Live 5) actually send Note On events for a song before the Transport Start.
MIDI: Onscreen pattern keys trigger gate/shot patterns
When enabled, hitting the onscreen pattern keys will trigger patterns in gate or shot mode.
MIDI: QWERTY keyboard velocity
This option sets the MIDI-equivalent velocity (0 = quietest, 127 = loudest) that QWERTY key
presses trigger the pads at.
AUDIO: Send engines direct to individual outs
When enabled, Engines 1-8 are sent direct to Outputs 1-8, via their onboard effects section.
Engine 1 also goes via the Master effects insert; 2-8 do not.
AUDIO: Auto-fade samples on load
When enabled, samples will be faded and cropped at load once they drop below a threshold
level. This helps save memory and CPU.
AUDIO: Crossfade loops when exporting audio
When enabled, GURU will record twice as much audio as it needs when exporting a loop, and
then crossfade the tail with the head. This gives smoother loops especially if you’re using lots of
delay + reverb or the samples have long decay tails, however it can cause phasing problems in
some cases.
AUDIO: AutoFade level when loading samples
This option sets the threshold level at which samples are faded if AutoFade is turned on.
11

12
AUDIO: Sequencer retardation (uTicks)
This option sets the sequencer to run a fraction behind the host sequencer (a ‘uTick’ is a
1/16384 note). This is sometimes necessary if you’re using Gate/Shot/Trig mode and your host
has sloppy timing (many do!):- if the host triggers a Gated pattern too late, the first note of the
pattern will be dropped as GURU’s playback cursor will have already moved past the start of the
note. Increasing this value to 100 or so will cure this in almost all cases.
This option can also be used to shift GURU’s timing if a host is sending incorrect time synchronization values, some hosts e.g. Cubase SX2, Tracktion, do this if they have PDC enabled and
GURU is on a track with inserts that require PDC e.g. Powercore, UAD-1, Duende.
AUDIO: Master clock offset (@ 1 PPQ)
This offsets GURU’s sequencer from the host at a coarse resolution in quarter notes. It’s useful
if the host is sending grossly wrong PPQ sync timing values; Logic 5.5 on PC will do this, for
instance, if you have pre-roll or count-in turned on.
BROWSING: Soften attack/release when slicing
This option causes GURU to default the layer amp attack/release sliders to a slightly softened
value when slicing loops. It’s good for avoiding clicks in loops, but you may feel it takes some of
the punch away.
BROWSING: Hide embedded sample folders in files pane
When enabled, the “.samples” folders which hold the WAV files associated with a specific kit or
song will not be shown in the browser.
MISC: Pattern editor follows playback cursor
When enabled, the pattern editor will flip through the pages in a multi-page pattern as playback
progresses. When it is disabled, pick pages via the page select toggle on the right hand side of
the pattern editor.
MISC: Pattern editor follows currently playing pattern
When enabled, the pattern editor will update to the currently playing pattern as it changes. When
disabled, you have to explicitly click on a pattern memory button to select a pattern for editing.
Generally it’s best to leave this ON unless you’re doing rapid-fire Gate/Shot/Trig re-triggering.
MISC: Enable tool tips
When enabled, value tool tips are shown for the knobs, and hints are shown for various other
controls.
MISC: Save settings only (not samples) in songs and kits
When enabled, saving a song or kit will NOT save the samples used in that song or kit – in other
words, you are taking responsibility for your own sample file management. Please don’t switch
this on unless you know what you’re doing and are confident to manage your own sample files
– after all, disk space is cheap, but creativity is priceless!
MISC: Don’t show pad names (requires restart)
When enabled, the default pad names (“KICK”, “SNARE” etc.) are hidden and instead the pads
are just numbered 1..16. This option requires you to restart GURU for it to take effect.

MISC: Load + save Options settings as part of songs
When enabled, all the other Options are loaded and saved as part of your GURU song files and
host song files. When disabled, a single global copy of these Options is stored in your registry
(Windows) or preferences folder (OS X).
13

14
Full list of new features
EXPORT
• Improved drag & drop MIDI export (all Graphs are now exported to MIDI), exported MIDI clips
will trigger Guru exactly like the sequencer does, including all the Graphs
• Export pad audio files via drag and drop (drag from a pad to your host, to Finder / Explorer, or
to another plug-in).
• Full audio export - export pads, tracks, engines, or the entire mix, as ready-cropped loops that
you can drag and drop straight to your host
BROWSING
• You can now double click on a folder in the left hand pane of the browser to open it, rather
than having to go to the other pane. This makes navigating up and down the file system much
quicker.
• Single clicking a folder in the left hand (LH) column simply selects it for display in the RH column, and keeps the LH column at the same level in the file system. This makes it much quicker
for hopping between a few different folders of drums at the same level. Single click a folder in
the RH column, or double click it in the LH column, to make that folder the new display-level in
the file system.
• Much improved performance in the Loops browser.
• Volume control for auto-preview.
• Favourites is back. Click the ‘*’ in the browser to go to the favourites page for the current tab. In
normal (non-favourites) mode, shift+click a folder in the left-hand pane to add it to the favourites list; in favourites mode, shift+clicking a listed folder will remove it from the favourites list.
• When replacing a sliced loop’s audio with a Kit, and playing the Kit with the resulting Score, the
volumes of the hits are much more in line with the original loop, resulting in a much smoother
sounding Score translation
• Browsing individual loop slices in Auto mode now sends them to the current layer, not the
whole pad
• Browser now supports page-up/page down when clicking on the scroll bars
• New option: “Hide embedded sample folders in the browser”, will hide the “Mykit.kit.samples”
folders in the file pane of the browser.
• PlusFX and PlusMIX controls in browser, so you can now selectively preserve or overload your
pad tweaks and mixer effects when loading loops or kits.
• Pads browser now shows HIT files, and you can also Save a HIT in to the browser. A HIT contains all the settings for a pad -- up to 8 layers, pad edit effects, etc.

• Multiple selection in the Pads browser when it’s in Drag mode, so you can now drag 8 files to
the pad editor or the pads themselves at once. Dragging to the pad editor will create layers;
dragging to the pads will replace multiple pads.
• SHIFT+Clicking a browser tab will now sync it with the current tab
• Dragging a Finder/Explorer folder to the browser will set the current browser pane to that location
• Double clicking a browser tab will launch Finder/Explorer at that location
• PlusFX toggle in browser now works for kit and loop elements, and for the FX Graphs in the
patterns. (So you can preserve the current graph tweaks when loading a new pattern)
SLICING
• Completely overhauled slicing algorithm, with slicing sensitivity and accuracy control. NB:- The
higher you set the Acc (accuracy) slider, the longer slicing will take..!
• REX slicing quality is improved.
• Loop Slicer can now be toggled between SINGLE mode, in which one slice is loaded per pad,
and FULL mode, where up to 8 slices are loaded per pad, using the Layers. This allows Guru
to fit long loops (up to 128 slices) in a single engine.
• Velocity aware slicing and normalization -- slices and scores are now generated in such a
way that hit volumes are consistent when using the sounds from one loop with the score from
another, or the score from a loop with a kit, or the slices from a loop with a pattern.
• Linear Scoring mode - instead of smart-slicing by drum type, linear score maps the slices from
pads 0.16 in the order they occur in the loop file.
• Improved loop slicing, score extraction and loop playback.
• You can now access additional slices (beyond the first 16) in the loops slice browser
• Replaced /16 and 16ths modes with a single “CHOP” mode controlled by the sensitivity slider,
allowing you to set a chop length from 1/4 note down to 1/64th note. Hold SHIFT to set the
sensitivity control to non-power-of-2 values in this mode (by default it snaps 1/4, 8, 16, 32, 64).
MIDI IMPLEMENTATION
• VST MIDI Output
• Full MMC (MIDI Machine Control) support
• Standalone now supports MTC (MIDI Time Code) Sync
• More comprehensive MIDI implementation with extensive remote control support
• Full support for note-offs and duration
15

16
• New Option: listen for note-offs or not.
• Standalone now permits selection of specific MIDI devices
• Mixer and aux effects are now CC controllable (CC24-31 on ch. 1)
• Channel 9 is now mapped to ‘All Engines’, any events you send on ch. 9 will apply to all
• Channel 10 is now a ‘drum map’, mapping all 128 pads out across the MIDI keyboard
• Channel 11 always plays the currently selected engine
• Channel 12 offers a whole set of remote commands such as “Select Pad”, “Select Engine”,
“Mute Engine” etc.
WORKFLOW
• Overall consistency of graphical controls has been much improved -- text boxes, menus and
buttons behave in a consistent way.
• Much improved sample file management.
• New Option: Dont show pad names for pads (pads have only numbers, not names) - hides the
default “Kick”, “Snare” etc. pad labelling
• New Option: Selected Pad tracks MIDI input
• New Option: Fast switch to pattern view (Guru will switch to pattern view from whichever view
you’re in when you hit a pattern button)
• New Option: Save songs/kits as settings only (doesn’t create copies of the wave data)
• New key modifiers for pattern mute/solo/lock controls
• Engine selectors now have context menus allowing you to copy, paste, clear etc. engines
• New “Chromatic Clone” and “Random Clone” options on Pattern context menu, allowing you to
clone patterns up and down the keys.
• New “Chromatic Clone” and “Random Clone” options on Pad context menu, allowing you to
clone pads up and down the keys.
• Hold down SHIFT when dragging a Pad to move the associated Pattern lane as well
• Option to save+recall all the other Options as part of each song/instance, instead of globally
• Drag and drop of MIDI files from Finder / Explorer is now supported
• Guru now imports MIDI using enhanced resolution when using an engine with tempo multipliers set. This allows you to import triplet MIDI patterns correctly, for example.
• Pads with samples loaded are now slightly more illuminated vs pads without samples loaded

• You can now drag and drop multiple WAV/AIFF files at once from Finder/Explorer to Guru’s
pads
• Effects and AuxEffects are now saved and loaded properly when saving/loading new KITs
• Song name and kit name are displayed - in the Engine Info panel right above the transport
• Tool tips for value readouts (and an option to switch them on/off)
• Audio export of Pads, Tracks, Groups (all tracks of the current type e.g. kick, hh), Engines or
the whole mix (“ALL” mode)
• Massively improved QWERTY keyboard support, allowing you to drive most GURU functionality without ever touching the mouse
• A new option has been added to “Auto Fade Samples when Loading”, which reduces polyphony & CPU wastage due to badly trimmed samples. You can set the threshold to anything from
-48 to -120dB.
• A new option “QWERTY Keyboard Velocity” has been added, to set the velocity level of pad
triggers from the QWERTY keyboard
• Randomize Slider (black slider above and to the right of engine selector), allowing you to creatively randomize the parameters on any of GURU’s main screens
SEQUENCER, PATTERNS, SEQUENCE EDITOR
• ‘Paint volume’ mode is active by default now, hold down SHIFT while dragging to paint gaps.
• Reworked the graph editor so there are no more hierarchical tabs, can access all graph parameters for all pads from a single page now.
• When in select mode, and you click on a track lane, the pattern editor toggles selection on all
notes in the track lane.
• When in select mode, and you right click to delete a note, all selected notes are now deleted.
• Copy and paste pattern remembers the trigger mode.
• Gate, Shot and Trig modes should now trigger MUCH more precisely - no more sloppiness or
dropped notes - this means you can do some very cool things with rapid-succession triggering
of patterns (retriggering or switching patterns every 16th...).
• Host sync is much more accurate.
• Metronome intelligently supports non-4/4 measure structures -- w using a 12-step or 24-step
pattern, metronome now clicks on every 3rd note instead of every 4th, as tripletted 4/4 is more
useful than 16th-note 3/4. To get 8th-notes in tripleted-3/4, set the shift graph to 100% for the
second triplet note or to -100% for the third triplet note. We suggest using engines 2 thru 8 (as
they have tempo multipliers) with the multiplier set to 3/4.
• Measure divide lines adapt intelligently to resolution and pattern length
17

18
• Lots of dropped-note and double-trigger conditions corrected
• When drawing graphs, ALT+SHIFT now links all tracks in the current pattern.
• Engine tempo multipliers now go to 16 instead of 8, and can be remote controlled from MIDI
CCs (cc24 and cc25 on ch. 2-Cool.
• Per-pattern resolution/multiplier controls (Triplets, 8th and 32nd-notes...!), you can have different resolution patterns in the same engine.
• ALT+clicking on pattern keys now changes pattern across all engines at once
• New Graphs for Reverse, Duration, Force Layer. Duration is now recorded to the sequencer.
• Option:- Pattern Editor Follows Playback Cursor -- the pages will flip over as the playback head
tracks them
• Option:- Pattern Editor Follows Currently Playing Pattern - when enabled, the currently edited
pattern will change as a new pattern is triggered. When disabled, the currently edited pattern
stays the same until you explicitly push a pattern key button on the GUI
• Pattern key buttons can now send note offs and can be used to (re)trigger patterns in GATE,
TRIG or SHOT mode.
• New option: “Pattern keys send gate/trig” - when enabled, the onscreen pattern keys will retrigger and cut off gate/shot/trig patterns the same way a MIDI note would. When disabled, the
onscreen pattern keys just select the pattern, and don’t affect playback in any way.
• Pad overview level faders, locks, and mute/solo buttons (to left of sequencer) respond to “alt/
shift”-linking key combinations:- ALT:- apply to all in current colour; SHIFT+ALT:- apply to all in
engine; CTRL + (alt, shift+alt):- invert the existing values rather than setting them
• A new option “Retard sequencer (uTicks)” has been added, to retard (delay) the sequencer’s
timing if the host is being sloppy with its own event timing. The “uTicks” units are 1/4096 of a
quarter note - a value of 100 on this setting *should* cure even the sloppiest hosts
• A new option “PPQ Offset” has been added, allowing you to adjust GURU’s sync to compensate if the host is sending grossly wrong beat/bar positions. Logic 5.x PC users will find this
useful.
• Option: Reset Gates at song start. If you’re having problems with Guru not playing the first beat
of a gated pattern at song start, try turning this OFF.
• Option: Clip MIDI files to bar when exporting. When enabled, if a pattern is one bar long but the
duration of the last note takes its total export length over 1 bar, the MIDI file exporter will clip
the pattern to the bar length by shortening the last note.
• Alt+clicking on pattern properties (trigger mode, steps, pages, resolution) changes those properties for all patterns in the engine at once
• ALT and ALT+SHIFT to change graph levels in all graphs (in current colour, in current engine)
now works

PAD EDITING
• Can now move the start/end points in PAD EDIT simultaneously (click between the carats).
• Pad Edit wave start/end carats are less fiddly to use.
• In the Pad Editor, the ALT and SHIFT keymodifier commands command now works for dropdown menus and combo boxes as well as knobs. So you can ALT+click to assign all pads in
an engine to an output, or all pads to a specific Cut By mode
• ALT applies any edit to all pads in the current row, SHIFT applies edits to all pads in the current column, ALT+SHIFT applies any edit to all pads in the engine.
• Pre Delay per layer, in both musical and millisecond units. A third knob lets you set the resolution of the musical units.
• Layer context menu with Cut/Copy/Paste Layer, and per-Layer Mute & Solo
• Sample Reverse. Click the new ‘Reverse’ button in the pad editor to play samples backwards.
• Guru’s audio engine now supports Note Offs. A sample will gate when it receives a note off if
the GATE switch is enabled for it in the Pad/Layer editor.
• New layer play modes:- Round Robin and Random (alongside the existing All Layers and Velocity Split modes) (this responds to the same ALT+SHIFT key modifiers as the rest of the Pad
Edit controls... TIP: try chopping some longer loops with “Linear” and “Chop” modes selected,
then switch all the Pads in to Random mode.
MISCELLANEOUS
• Support for the latest OS versions and plugin technologies:- Pro Tools 7.3, VST 2.4, Windows
Vista, OS X 10.4.8, etc.
• Supports DAE mode in MOTU Digital Performer 5.x.
• Drop-out-free audio engine, no more gaps or pauses when previewing
• New Option: Mix Engines direct to sub-outs:- the main outputs of Engines 1-8 are sent directly
(with their effects) to sub outputs 1-8. When this option is ON, the Master Effect is applied only
to Engine 1.
• On Windows, the standalone version now supports WDM and MME devices directly as well as
ASIO
• On OS X, the standalone version now lets you choose whichever CoreAudio device and buffer
size you want to use
• Improved CPU performance.
• Improved GUI performance.
• Numerous bug fixes.
19
 Loading...