


GEIST-2
Table of contents
 Loading...
Geist2

Geist22
Operation Manual
1 Introduction to Geist2
................................................................................................................................... 5Geist2 Architecture and Interface1.1
................................................................................................................................... 10Loading sounds for the first time1.2
................................................................................................................................... 13Playing pads and recording a pattern1.3
................................................................................................................................... 17Slicing loops1.4
................................................................................................................................... 18More about loading sounds and saving work1.5
................................................................................................................................... 22Editing and modulating sounds1.6
................................................................................................................................... 24Mixer pages and Effects1.7
................................................................................................................................... 28Sequencing and arrangement1.8
................................................................................................................................... 29Patterns in more detail1.9
................................................................................................................................... 32Introduction to Graphs1.10
................................................................................................................................... 36Performing with patterns1.11
................................................................................................................................... 38Performing with scenes1.12
................................................................................................................................... 40Arranging patterns into a song1.13
................................................................................................................................... 42Using MIDI and host automation1.14
................................................................................................................................... 44MIDI / audio export and MIDI output1.15
2 Browser
4
46
................................................................................................................................... 47Browser Modes2.1
................................................................................................................................... 48Browser Navigation and Options2.2
................................................................................................................................... 50Sidebar and Files2.3
................................................................................................................................... 53Searches, Favourites and Shortlists2.4
3 Slicing
................................................................................................................................... 57Slicer panel3.1
................................................................................................................................... 59Slicing tools and modes3.2
4 Sampler
................................................................................................................................... 65Sampler controls4.1
5 Pads and Layers
................................................................................................................................... 69Pads and managing pads5.1
................................................................................................................................... 72Layer controls5.2
.......................................................................................................................................................... 75Setup, Mix, Tuning and Filter controls
.......................................................................................................................................................... 78Play, Looping and Timestretch controls
.......................................................................................................................................................... 80Envelope controls
................................................................................................................................... 83Pad Mixer5.3
................................................................................................................................... 86Layer Mixer5.4
56
64
68
6 Engines and Global Mixer
87
© 2016 FXpansion Audio

3
................................................................................................................................... 88Engine Selector6.1
................................................................................................................................... 90Global Mixer6.2
7 Geist2 Effects
................................................................................................................................... 93Effects slot controls7.1
................................................................................................................................... 95Distortion7.2
................................................................................................................................... 98Dynamics7.3
................................................................................................................................... 100EQ7.4
................................................................................................................................... 101Filters7.5
................................................................................................................................... 103FX7.6
................................................................................................................................... 107Reverb7.7
8 TransMod modulation
................................................................................................................................... 110Using TransMod modulation8.1
................................................................................................................................... 113Assignable TransMod modulators8.2
9 Patterns and Graphs
................................................................................................................................... 116Pattern memory keys9.1
................................................................................................................................... 118Pattern editor9.2
................................................................................................................................... 123Pattern editing functions9.3
................................................................................................................................... 125Graphs9.4
92
109
115
10 Scenes and Song pages
................................................................................................................................... 131Scenes page10.1
................................................................................................................................... 133Song page10.2
................................................................................................................................... 137Song page editing functions10.3
11 Other controls, menus, controls and indicators
................................................................................................................................... 140Transport and Status display11.1
................................................................................................................................... 143File, Tools and Help menus11.2
................................................................................................................................... 145Exporting Audio11.3
................................................................................................................................... 146Mapping panel11.4
................................................................................................................................... 148Preferences11.5
12 Using the Geist2 standalone application
130
139
151
© 2016 FXpansion Audio
3
Geist24
1 Introduction to Geist2
Geist2 is an advanced step-sequencer and sample-based drum machine realised in software.
It is intended to be an ergonomic way to effortlessly build grooves and beats although it can be
used for all kinds of musical material.
© 2016 FXpansion Audio
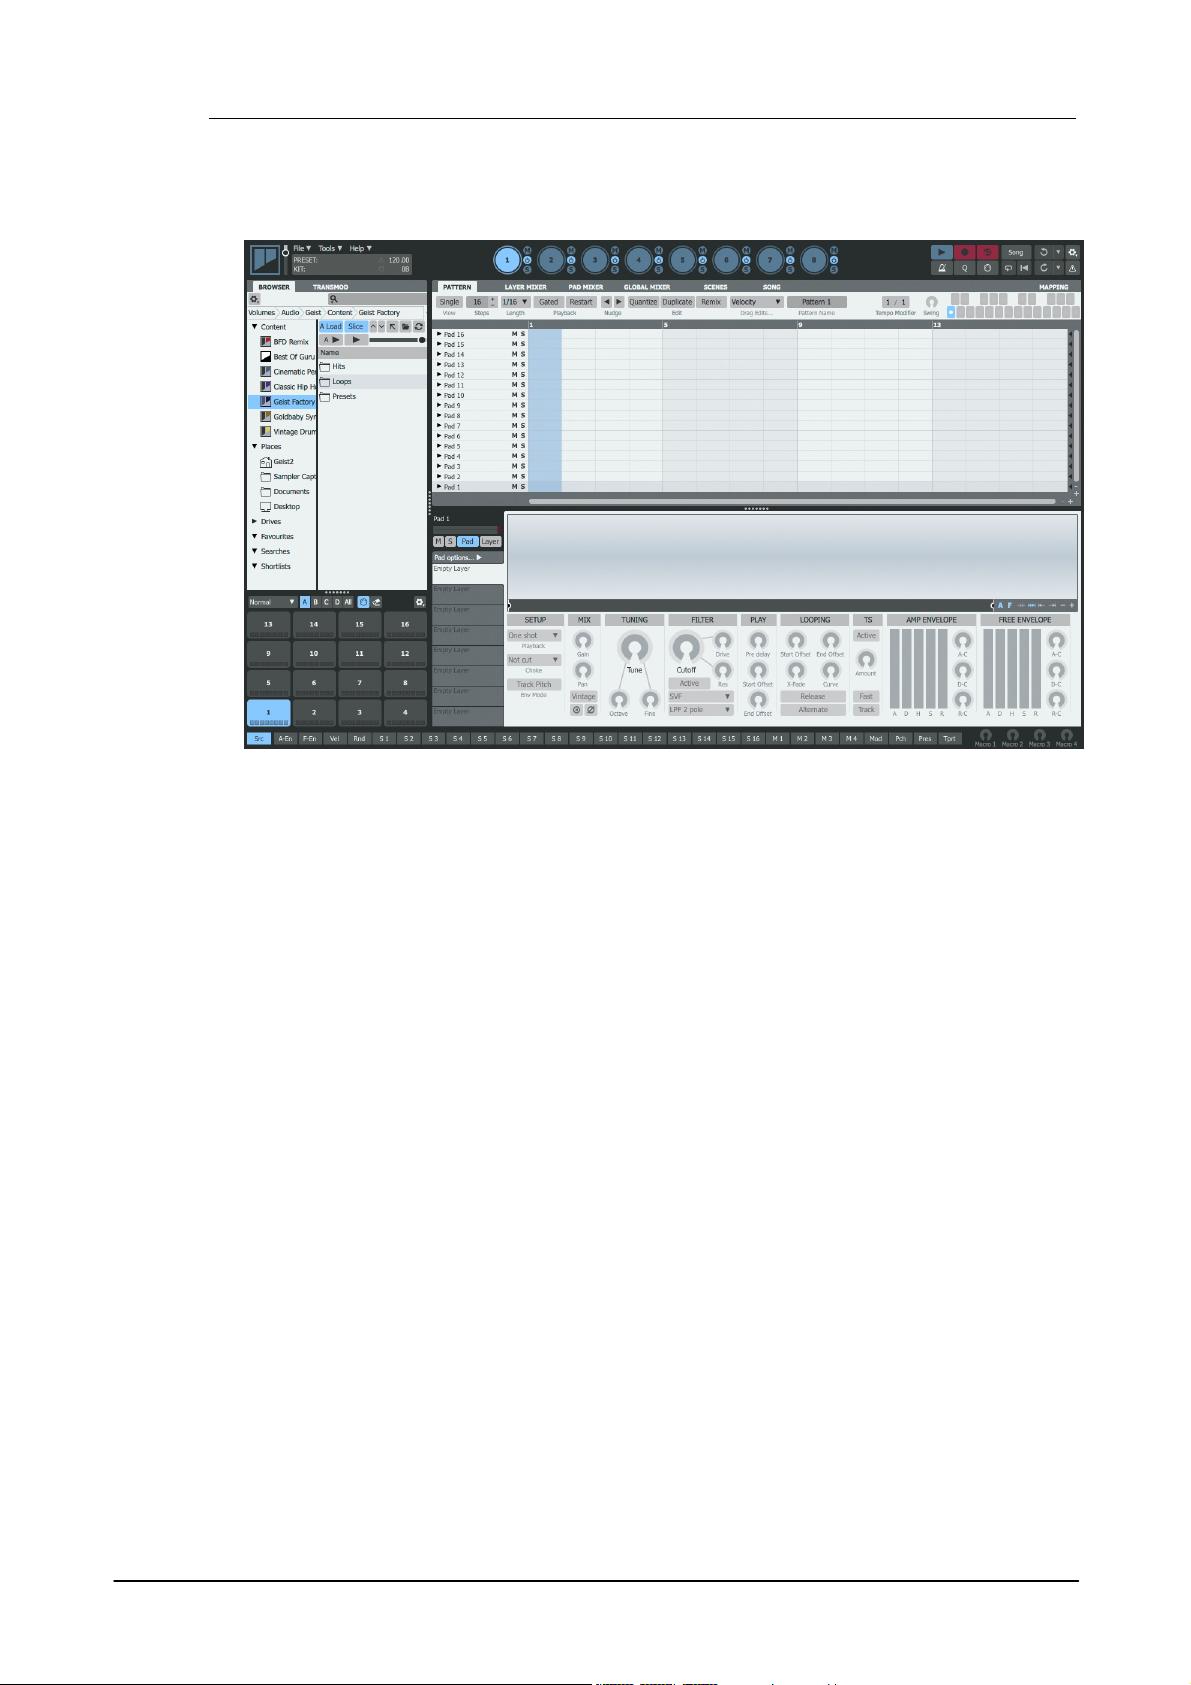
1.1 Geist2 Architecture and Interface
Layers
The basic 'slots' for loading samples in Geist2. There are 8 layers on each pad.
Pads
There are 64 pads in each engine: 4 banks with 16 pads visible at any one time.
Each pad contains 8 layers.
Patterns
Each pattern features 64 tracks – one for each pad in the engine.
There are 24 patterns in each engine.
Engines
There are 8 engines in total: each engine features 64 pads, and 24 patterns.
Scenes
Performance snapshots of the currently playing patterns in all engines
Song
A timeline-based arrangement of pattern references with a track for each engine
Samples
Individual WAV/AIFF files to load onto pad layers
Loops
Loops can be loaded into Geist2's Slicer for non-destructive 'chopping'
Pad presets
Presets for all 8 layers of a pad including samples and additional pad/layer
settings
Kit presets
Presets for all pads within an engine
Engine presets
Presets for the entire engine, including engine effects
Full Geist2 presets
These are also known simply as 'presets' and store the entire state of
Geist2.
Geist2 architecture
• The basic elements in Geist2 are as follows:
• As well as the above elements, Geist2 also has the following features for arranging patterns:
Geist2 interface
Introduction to Geist2 5
Browser
The Browser is the main method of loading sounds into Geist2. It is also used for selecting sounds
to slice into smaller sections before loading these sections to the pads.
Geist2 allows the following types of files to be loaded from the Browser:
© 2016 FXpansion Audio

Geist26
Pads and Pad mode controls
The on-screen pads represent the pads in the current engine. Each pad has a corresponding MIDI
note.
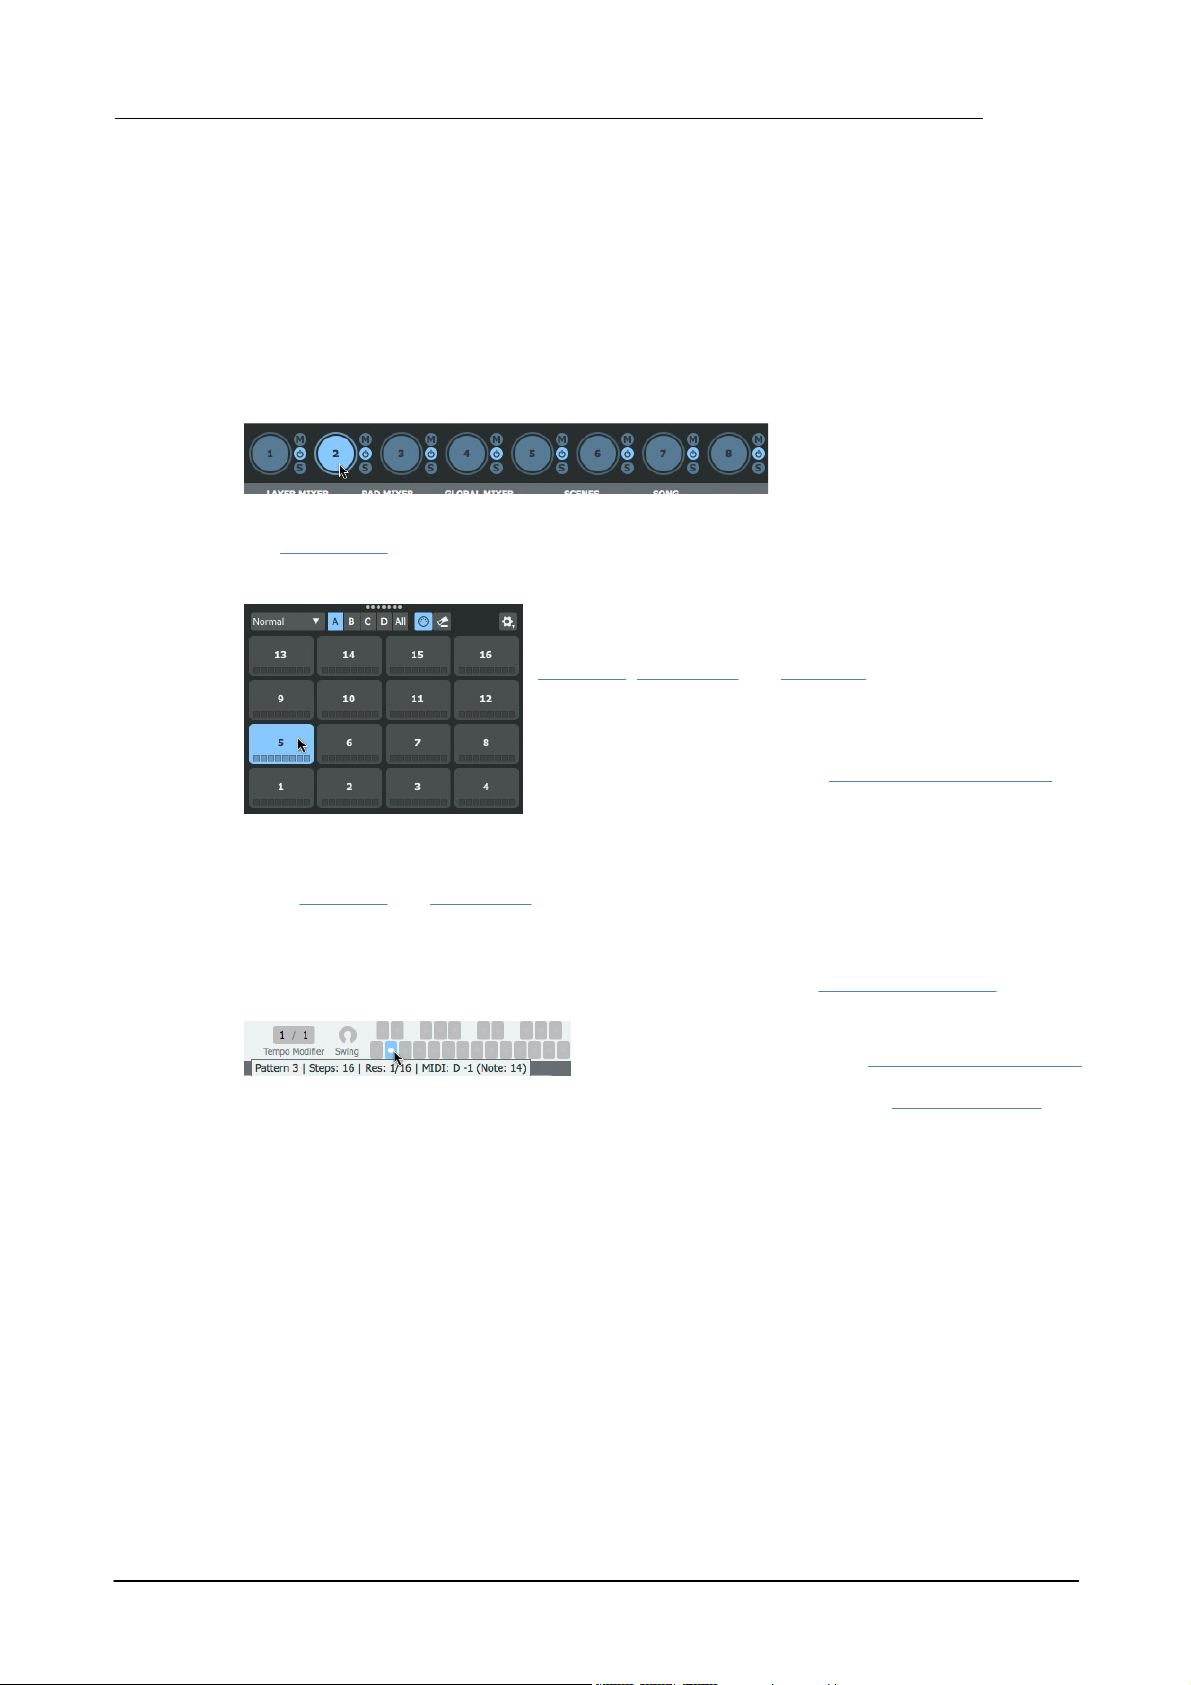
Pattern memory keys
The pattern memory keys, or pattern keys, represent and select the 24 patterns in the current
engine. Each pattern memory key also has a corresponding MIDI note.
Engine selector
The Engine selector buttons select one of the 8 engines for editing.
Pad Editor
The Pad Editor section provides editing controls for the current pad and its 8 layers.
Context-sensitive workspace area
The contents of the workspace are dictated by the Page buttons. The default page shown in this
area is the Pattern page, representing the currently selected pattern in the current engine.
Page buttons
The Pattern, Global Mixer, Pad Mixer, Layer Mixer, Scenes, Song and Mapping buttons
control which page is shown in the workspace area.
Transport
The Transport controls are vital to sequencing within Geist2 – the transport must be running to
play and perform with patterns.
Learn
The Learn button is used for mapping Geist2 controls to MIDI or host automation.
Undo/Redo
Geist2 features a powerful multiple-level Undo/Redo system which even applies to almost all
Browser load actions. Since it is possible to load sounds and kits with a single click, the Undo
function can be very useful if existing sounds are replaced accidentally.
Tempo
Geist2's tempo is locked to the host while it runs as a plugin. In the standalone application, click
and drag the Tempo control up/down or double-click it to type a new tempo. Alternatively, it can
be set via the Tap Tempo function: ALT-click the Tempo control 4 or more times.
Menus
The File menu is used for saving/loading files, the Tools menu provides several additional utility
functions including the Preferences panel and the Help menu provides access to documentation /
support resources.
Preset/Kit indicator
This indicator displays the name of the last loaded Geist2 preset and/or kit.
Status display
The Status display section contains indicators for the amount of memory (RAM) used by samples
in Geist2, for MIDI/Audio engine status and whenever voice stealing occurs.
Master Gain
The Master gain control adjusts the gain of the Master channel - this is an identical control to the
Master channel's Gain fader in the Global Mixer page. Since all Geist2 elements are routed to the
Master channel by default, the control effectively adjusts the level of the default audio destination
for all elements in Geist2.
If any elements are routed to one of the 32 sub-outputs, they will not exist within the Master
channel signal and therefore are not affected by this control.
© 2016 FXpansion Audio
Introduction to Geist2 7
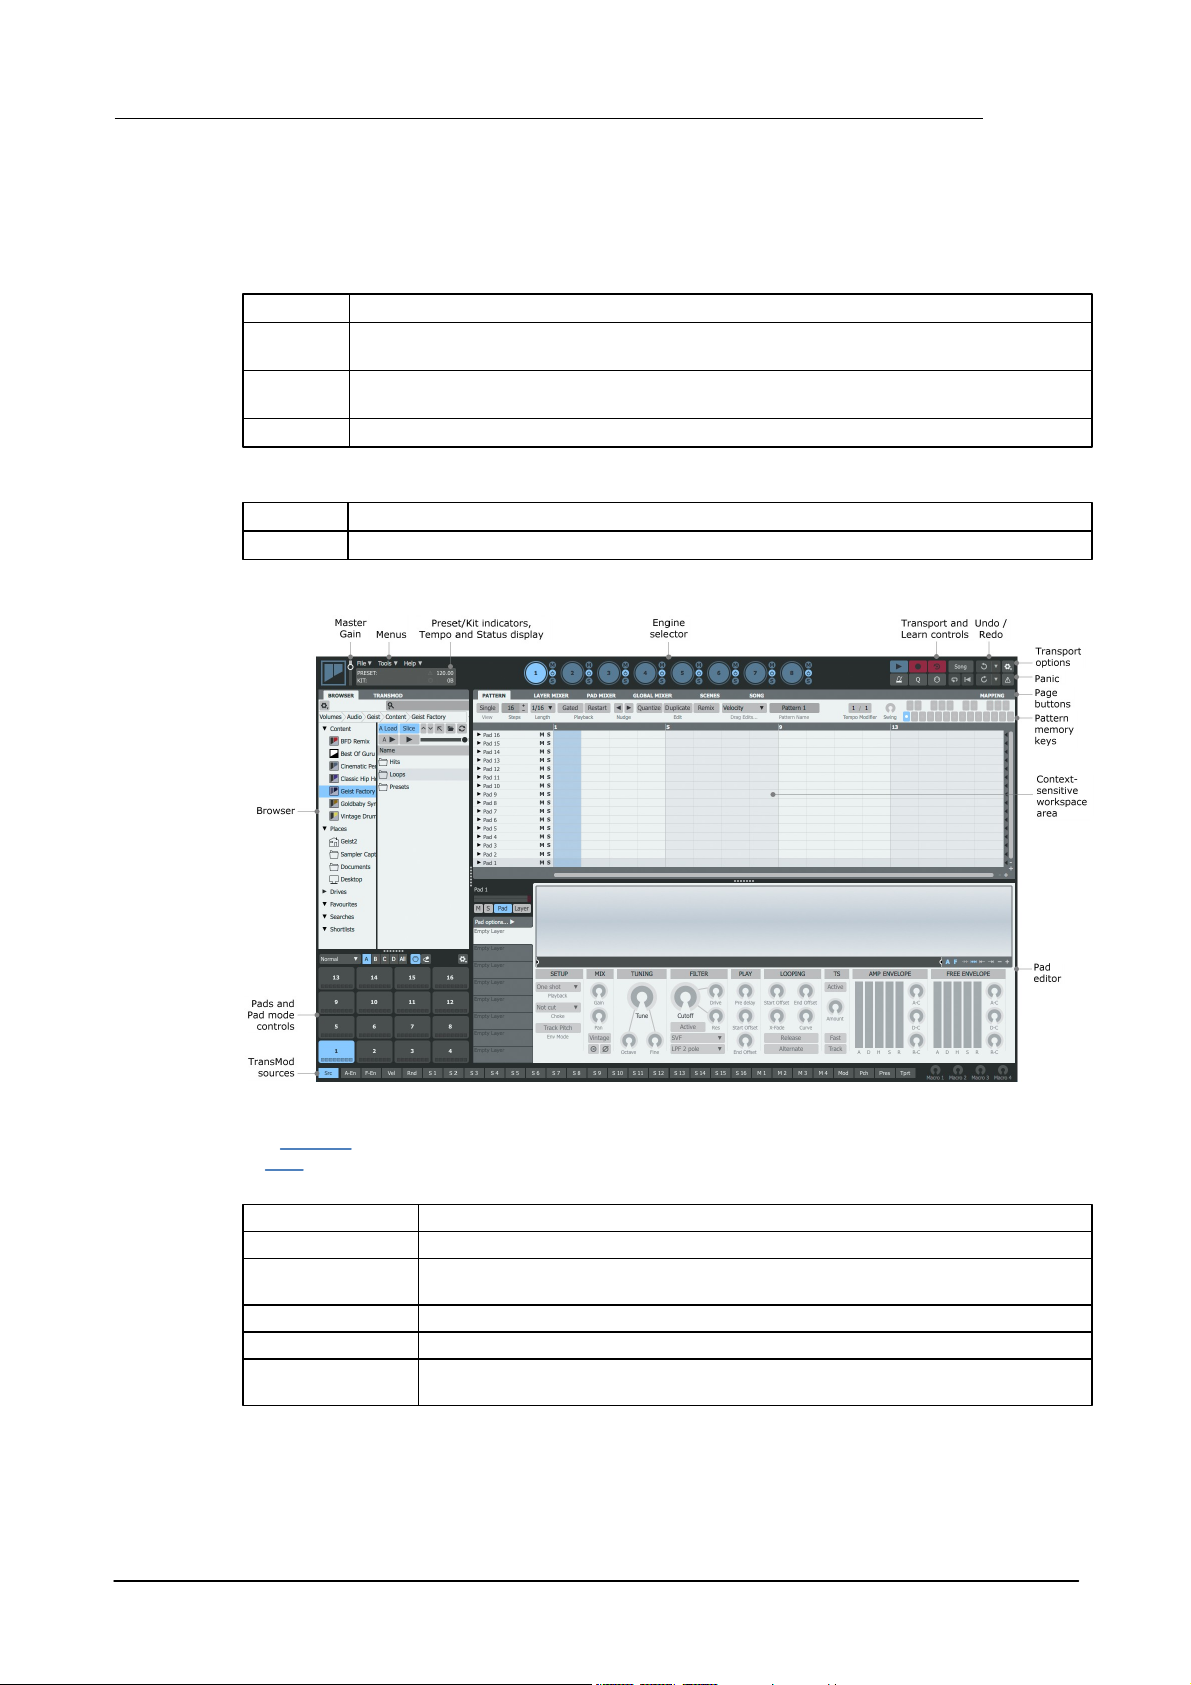
Select the engine to edit by clicking
one of the 8 buttons in the Engine
selector at the top of the Geist2
interface (engine 1 is selected when
Geist2 is initialized).
The concept of the 'selected pad' is used in many situations in
Geist2, such as when using single/double-click processes in the
Browser to load samples from the Browser and when using the
Pad Editor, Layer Mixer and Pad Mixer.
• Click a pad to select it and play its layers
• ALT-click a pad to select it without playing its layers
If the Pad selection follows MIDI button is activated, pads
are also selected by playing their corresponding MIDI notes.
One of 4 Banks of 16 pads are usually visible. To view all pads,
click the All button.
• Click the pattern memory key
• Play the pattern memory key's corresponding MIDI note
Geist2 interface concepts
Many of Geist2's editing functions are selection-dependent and shown on its main workspace or
Pad Editor areas.
Selecting elements for editing
One of the main concepts used in Geist2 is selecting an element for editing.
Selecting an engine
Only one of the 8 engines can be visible for editing at any one time. The other engines are still
active and can play patterns or be triggered via MIDI.
The Global Mixer page can also be used to select engines by clicking an engine channel.
Selecting a pad
Selecting a layer
In the Pad Editor and Layer Mixer, a layer must be selected for editing its sound design and effects
parameters.
Selecting a pattern
Each of the 8 engines contains 24 patterns, each represented by a pattern memory key. Select a
pattern using either of the following methods:
What actually happens when a pattern is selected depends on the pattern's Playback mode
settings – for example, Gated mode requires the pattern's memory key or its MIDI note to be
held down to be heard for the required duration.
© 2016 FXpansion Audio
Geist28
• Rotary and slider controls are adjusted by clicking as
indicated above and dragging up/down.
• Alternatively, use the mousewheel/trackpad scrolling
function.
• In order to achieve fine control over a parameter, hold
down the SHIFT key while making the adjustment.
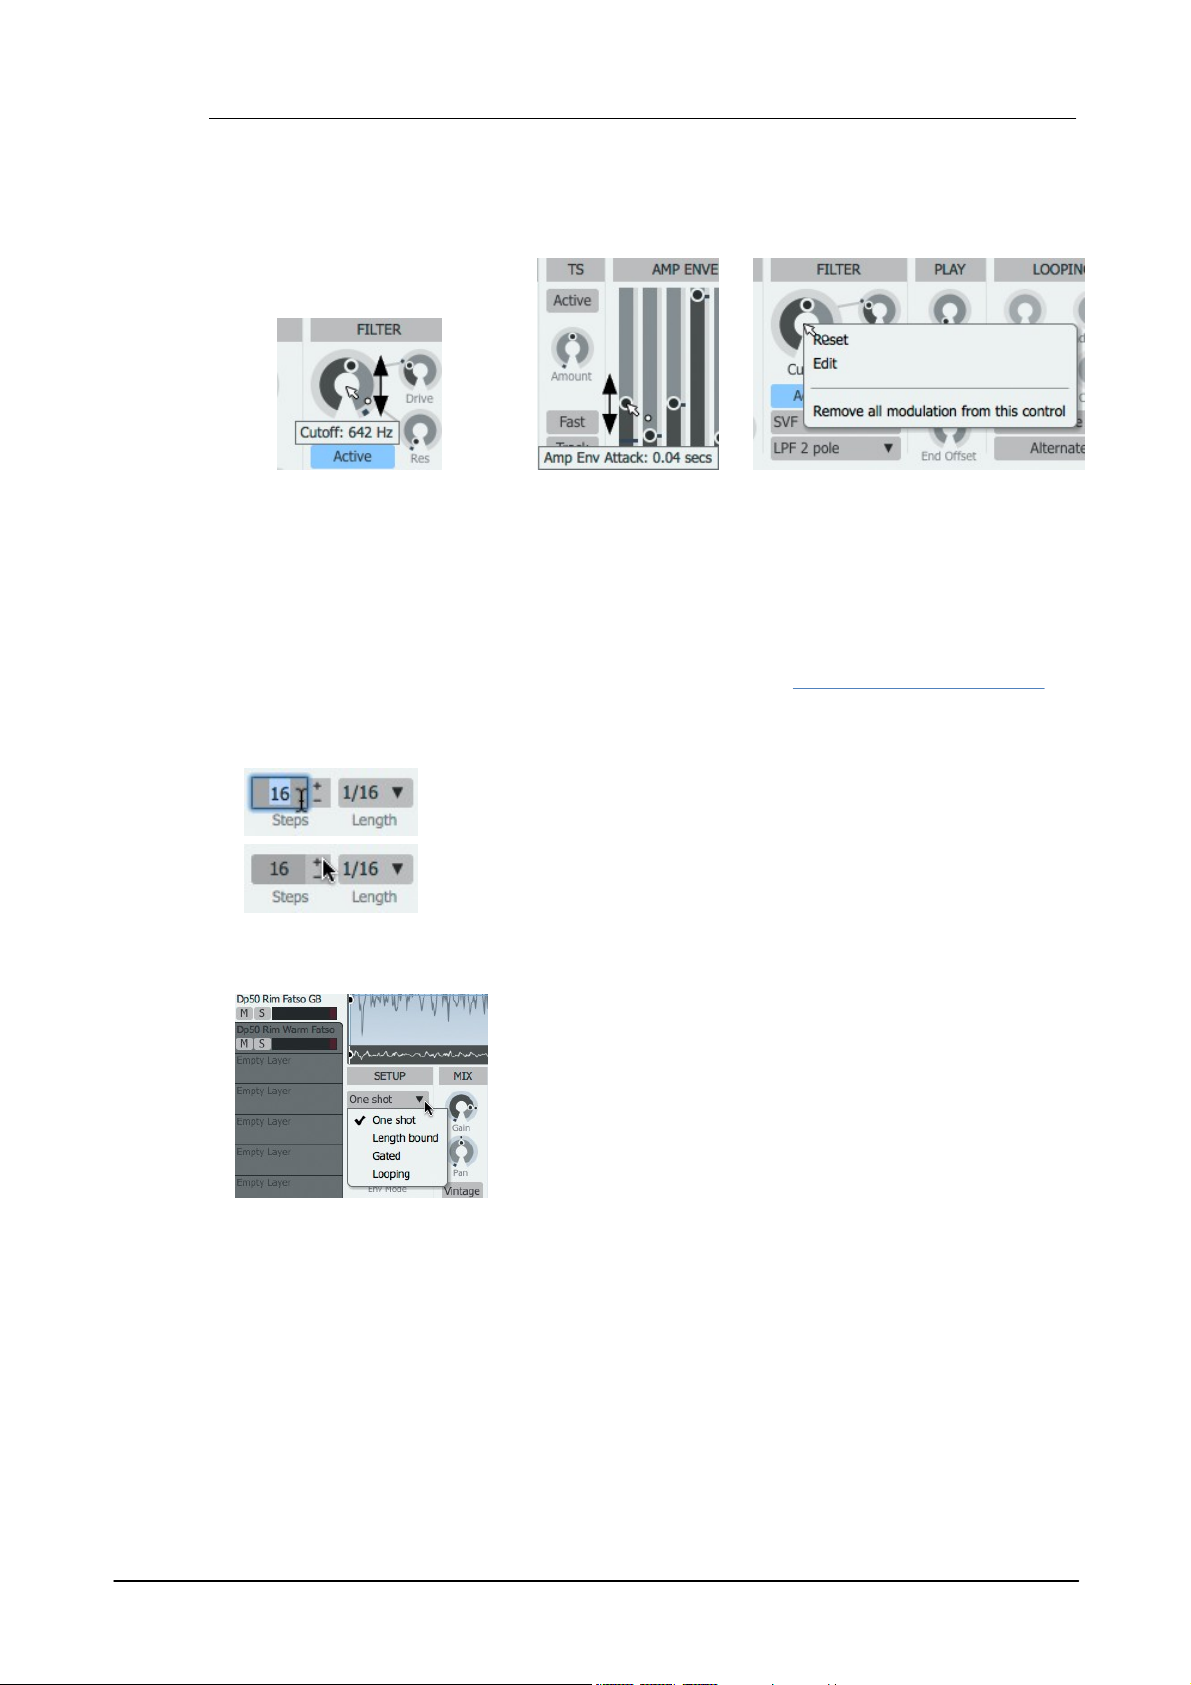
Right-click a control to display the
control context menu, allowing access
to these functions:
• Reset the control to its default value
(alternatively, double-click the control)
• Directly Edit the value with the
computer keyboard
Numeric values can be manipulated in the following ways:
• Click the numerical display to type a value manually
• Click the + and - buttons to increase and decrease the value by 1
• Click while holding down the SHIFT key to adjust the value by +/- 8
• Click while holding down the ALT key to double or halve the value
Drop-down menus are used extensively throughout Geist2 for
selecting between a number of settings for a function. They are
often referred to within this manual simply as 'menus'.
Context menus
As shown for the control context menu above, Geist2 includes
many additional functions on context menus, displayed by right-
clicking on the relevant area of the interface. The various context
menus are documented in full throughout this manual.
Control conventions
Adjusting rotary/slider controls
Many rotary/slider controls in Geist2 can be modulated with the TransMod modulation system.
Numeric values
Drop-down menus
When using a single-button mouse, CTRL-click in order to display context menus.
Tooltips
As shown in the screenshots above, tooltips are used for showing parameter values and other
useful information in Geist2. Hover over a control to display a tooltip containing information about
the control's current value. Tooltips are shown while adjusting a control, with values updated in
real time.
© 2016 FXpansion Audio
Introduction to Geist2 9
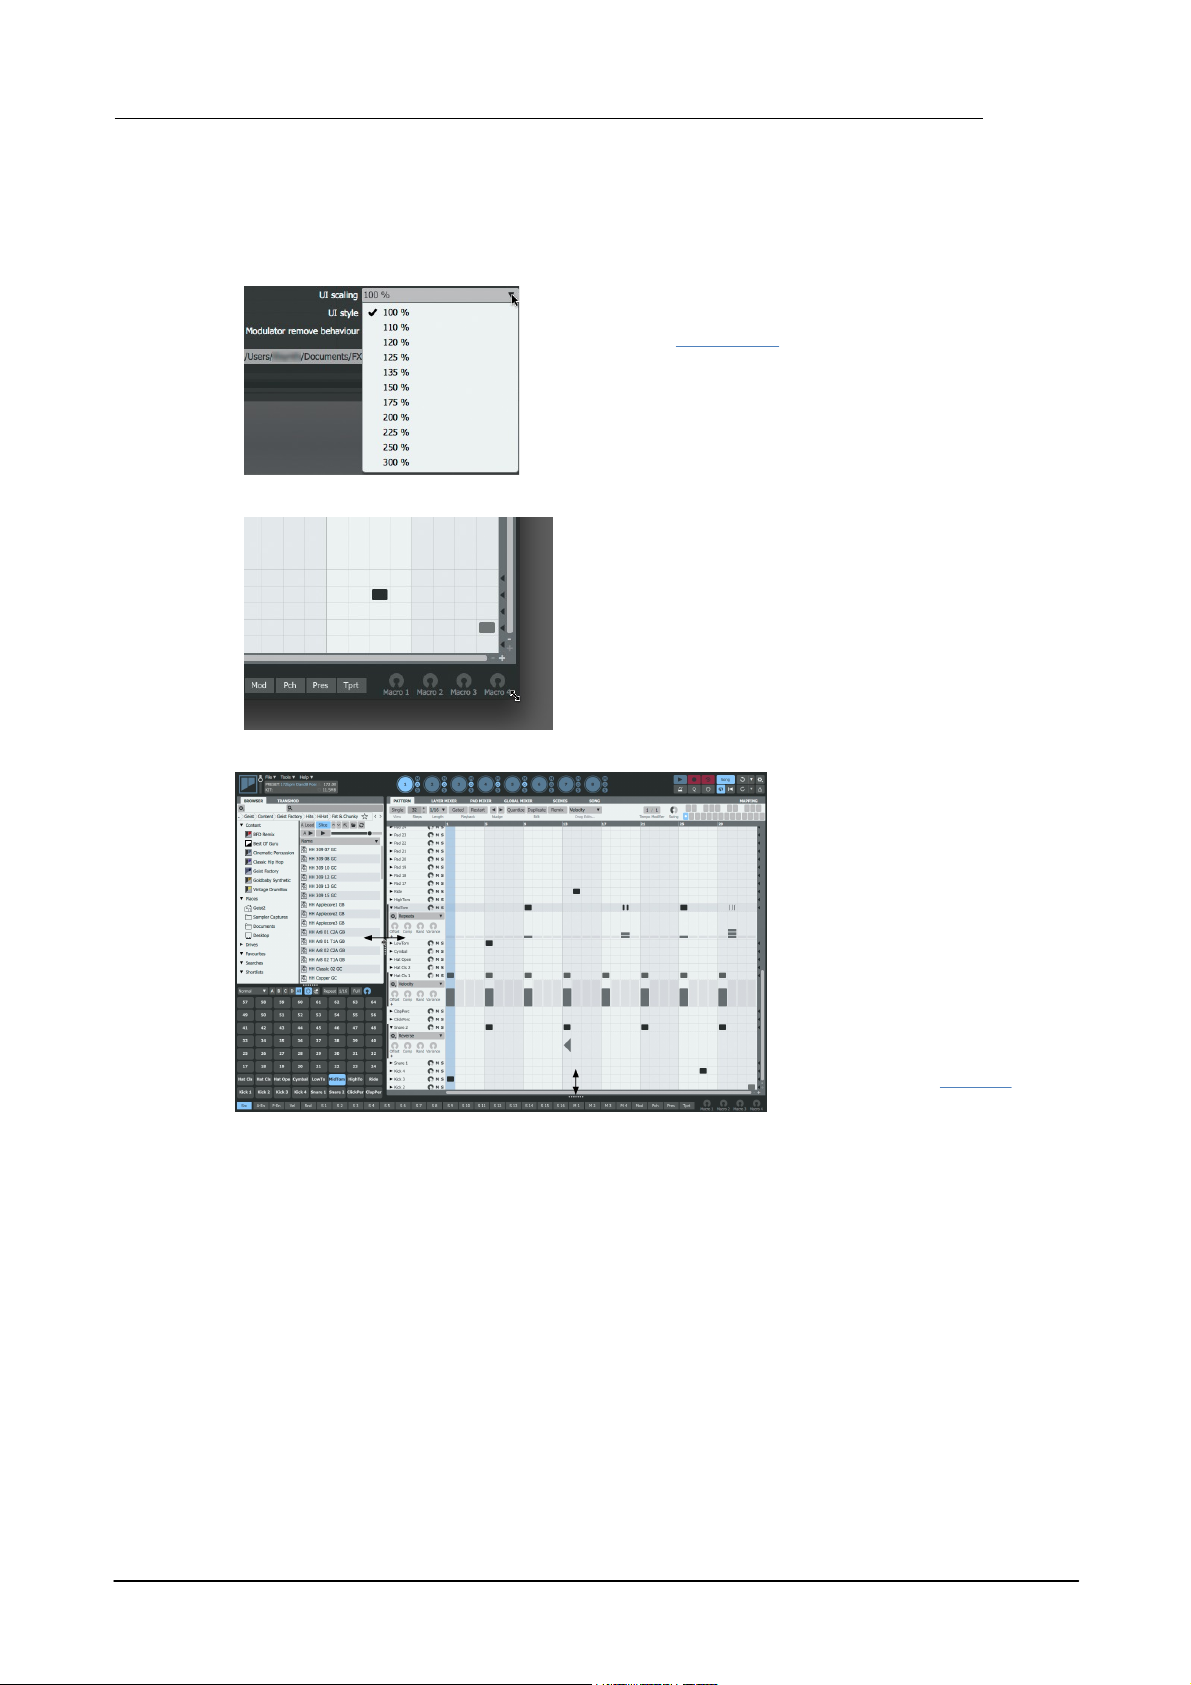
UI scaling
This menu in the Preferences (use the Preferences function in
the Tools menu) adjusts the scaling of the user interface. The
default setting is 100%.
The setting can be changed between 100% and 300% - higher
settings are recommended for Retina/4k or higher resolution
screens.
UI window resize
Click/drag the edges of the Geist2 window to resize it as
required.
Panel reconfiguration
The dividers between panel areas
can be adjusted by clicking and
dragging or double-clicking to
toggle visibility.
In this example, the divider
between the Browser and the rest
of the interface is being resized.
The divider between the contextsensitive editing area and the Pad
Editor has been dragged to the
bottom of the interface for a much
larger pattern editing area.
Panels within the Browser area can
also be reconfigured in this way.
User Interface scaling, size and panel reconfiguration
Geist2's interface is vector-based and can be scaled and resized. Additionally, the various panels
within it can be reconfigured using the dividers between them.
© 2016 FXpansion Audio
Geist210
This section shows how to use the Browser in Auto load mode – with the Auto Load
button (labelled A Load on the interface) activated. In this mode, click a file in the
Browser to load it to the selected pad or engine.
1. Click a Factory item in the
Browser sidebar, then doubleclick the Presets folder.
2. Double-click the Kits folder.
3. Double-click any sub-folder
within Kits and then click a kit
file to load it.
1. Right-click a pad
and use the Lock
pad function in the
context menu. Lock
a few more pads.
2. Click another kit
in the Browser.
• When the new kit is loaded, the locked pads are
not affected – only unlocked pads can be replaced
with sounds from the new kit.
Each pad, pattern and layer features its own Lock
function, available via right-click context menus.
• The Browser options menu
contains functions to Lock/
Unlock all pads or all patterns
in the current engine.
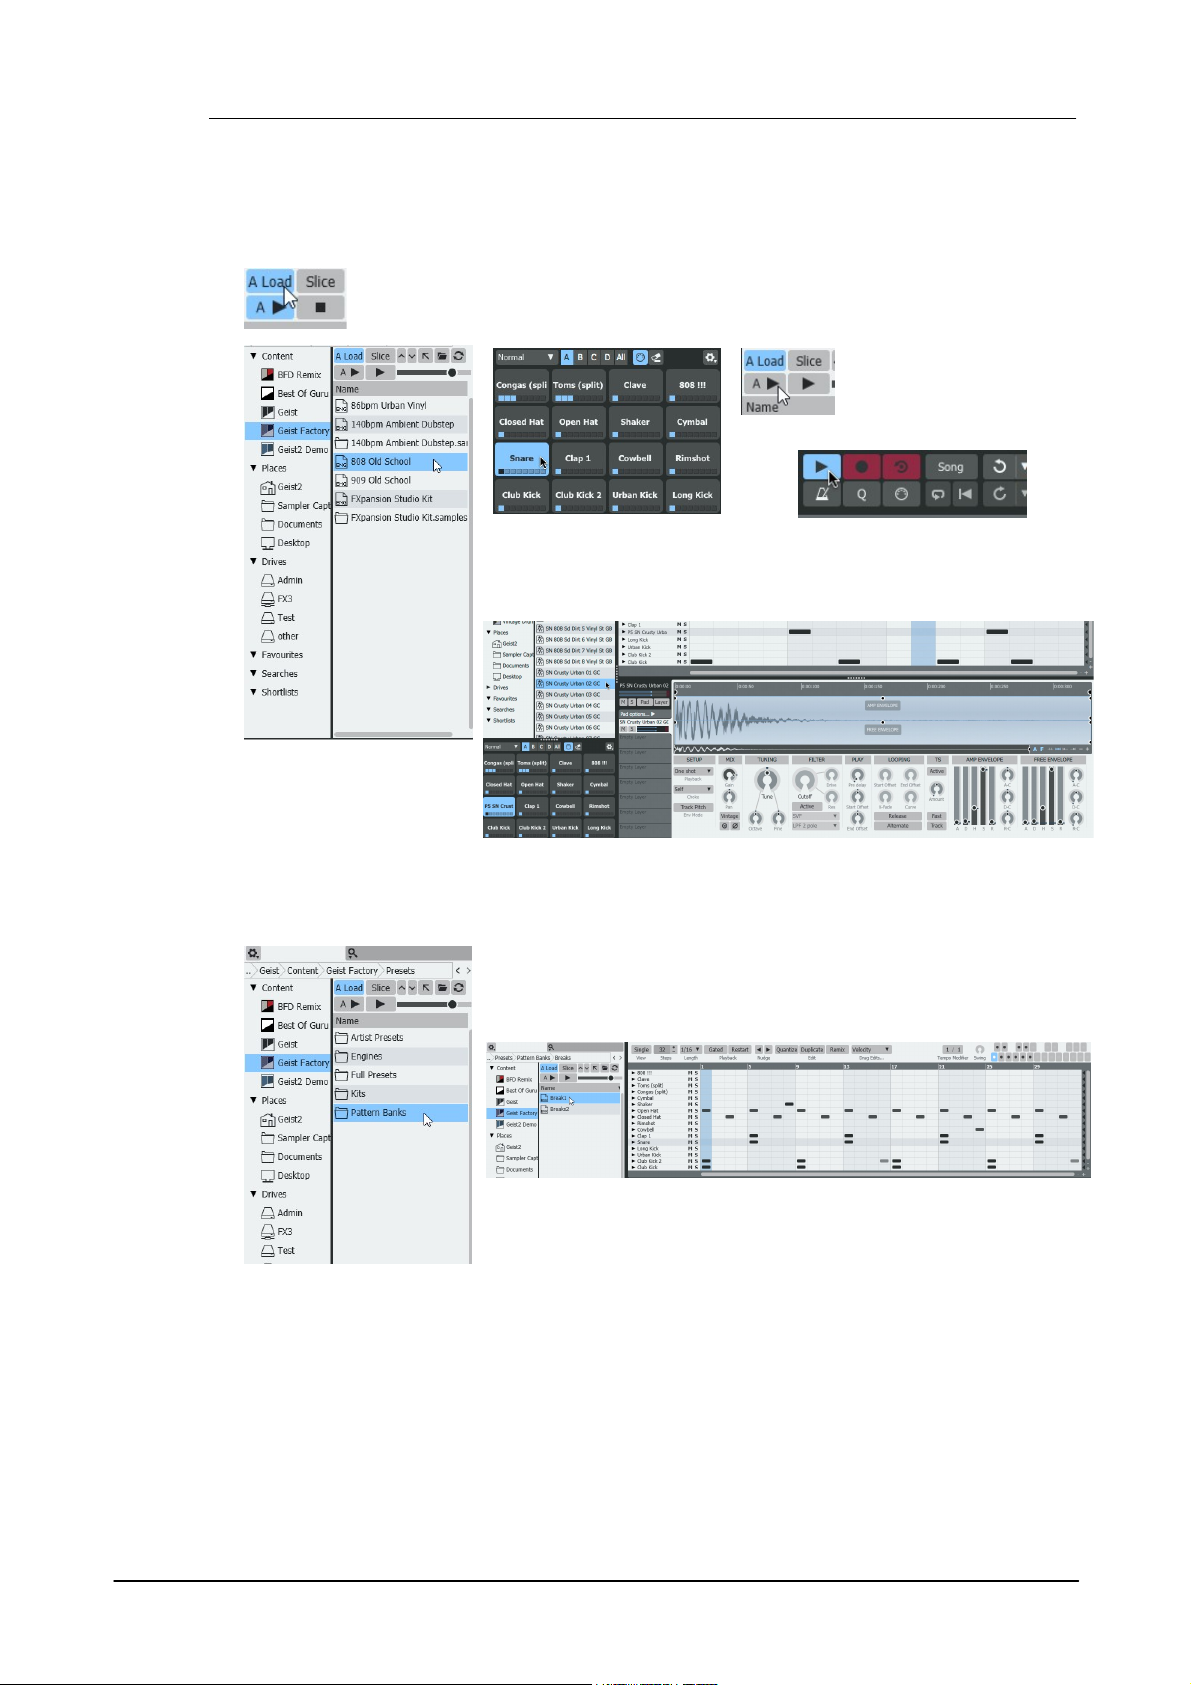
1.2 Loading sounds for the first time
The Browser is the most immediate method of loading sounds into Geist2. It is used for loading
kits, samples and other files. This section includes an introduction to loading sounds in the
Browser. More advanced functions are covered in section 1.5.
For a full reference guide to the Browser's functionality, see chapter 2.
Working in Auto load mode
Loading a kit
• The kit is loaded to the current engine. Click the pads to hear the sounds!
Locking pads and loading another kit
© 2016 FXpansion Audio
Returning to a previous state with the Undo function
If the Auto load functionality causes an undesired change, the
multi-stage Undo and Redo functions can be used to revert to
previous states.
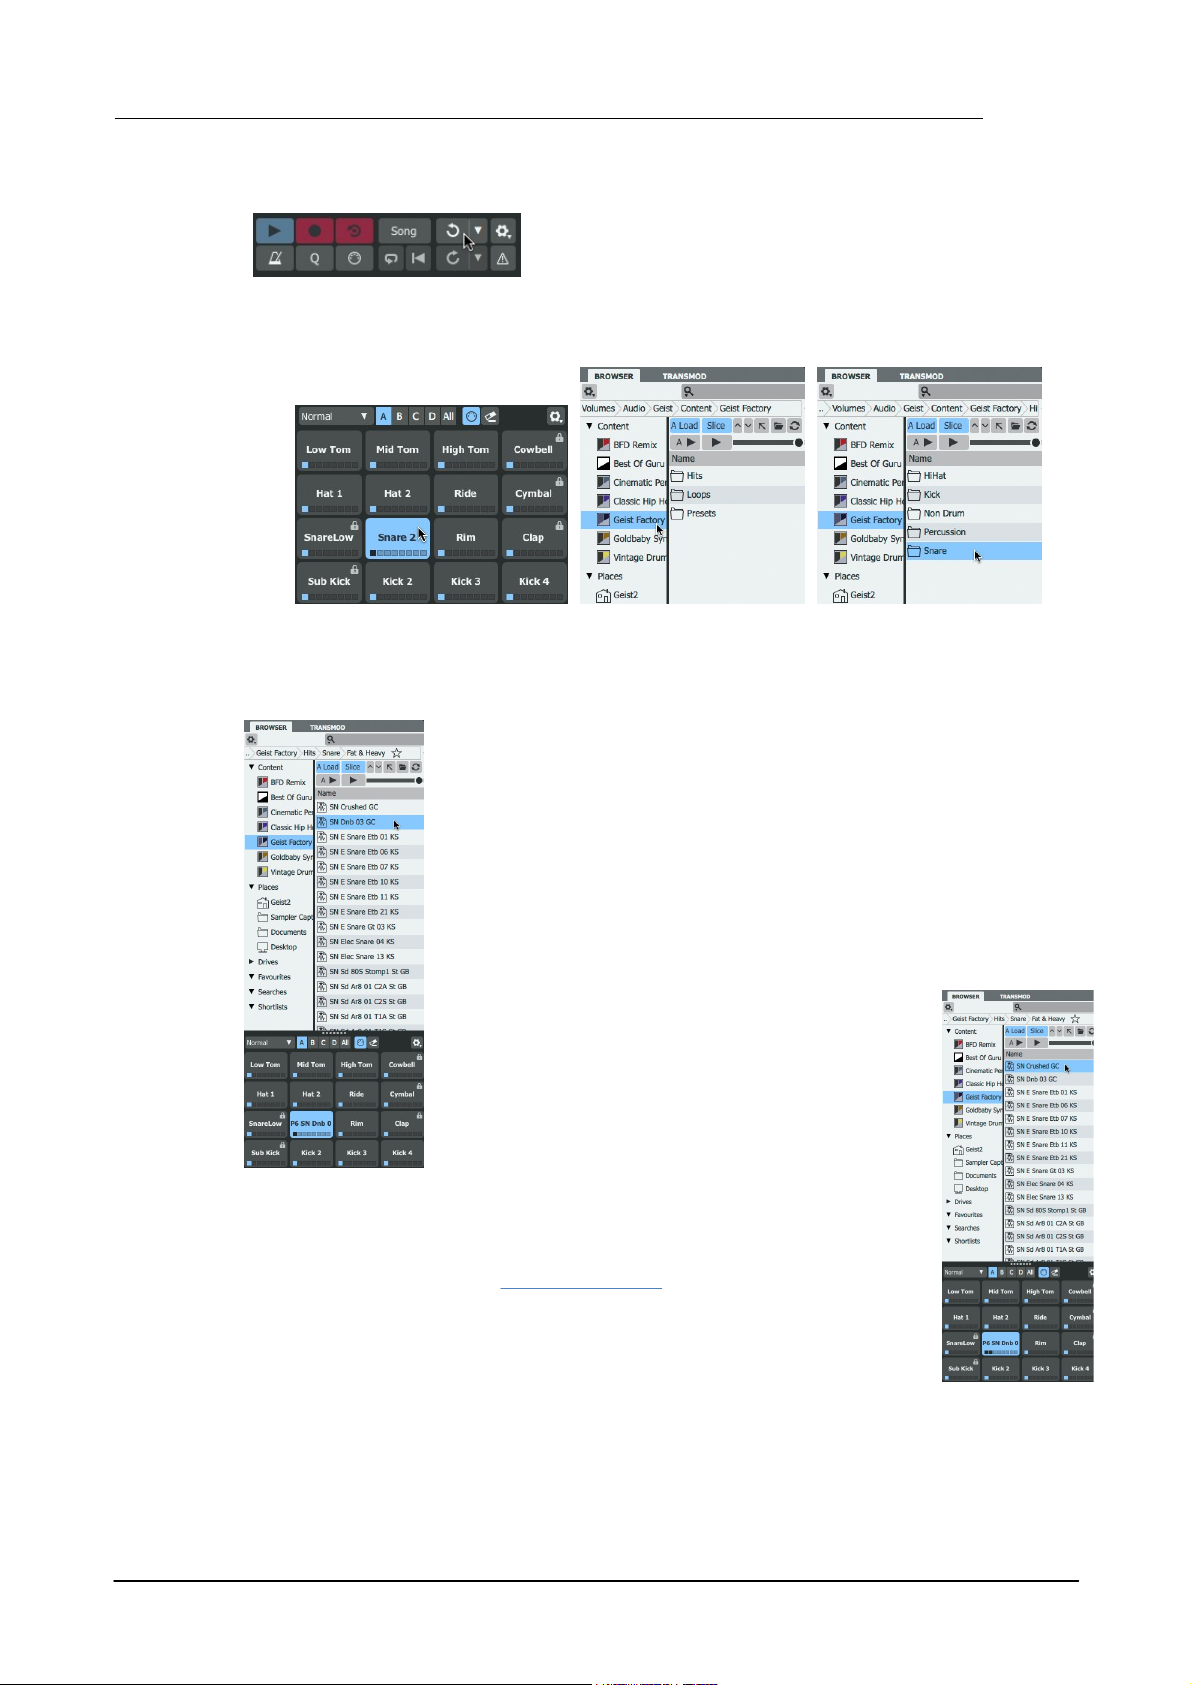
1. Select any pad which is not
currently locked by clicking it.
2. Click on a Factory
item and double-click the
Hits folder.
3. Double-click the
Snares folder.
4. Double-click any sub-folder to enter it and then click
on a sample to load it. The sample is loaded to the
selected pad (see left).
Layering multiple sounds on a single pad
1. Click another sample in the folder while holding
down the ALT key - the sample is loaded to the next
free layer on the pad. Note the extra LED on the pad
that is lit when the 2nd layer is loaded (see right).
2. Click the pad to hear both samples played together.
By default, layered sounds on a pad are played
together when the pad is triggered. By changing a
pad's Layer play Mode from the default setting of All
Layers its layers can be set to play depending on input
velocity (Velocity split), or to be cycled in a 'round-
robin' or random order.
Replacing a pad with a new sound
Introduction to Geist2 11
© 2016 FXpansion Audio
Geist212
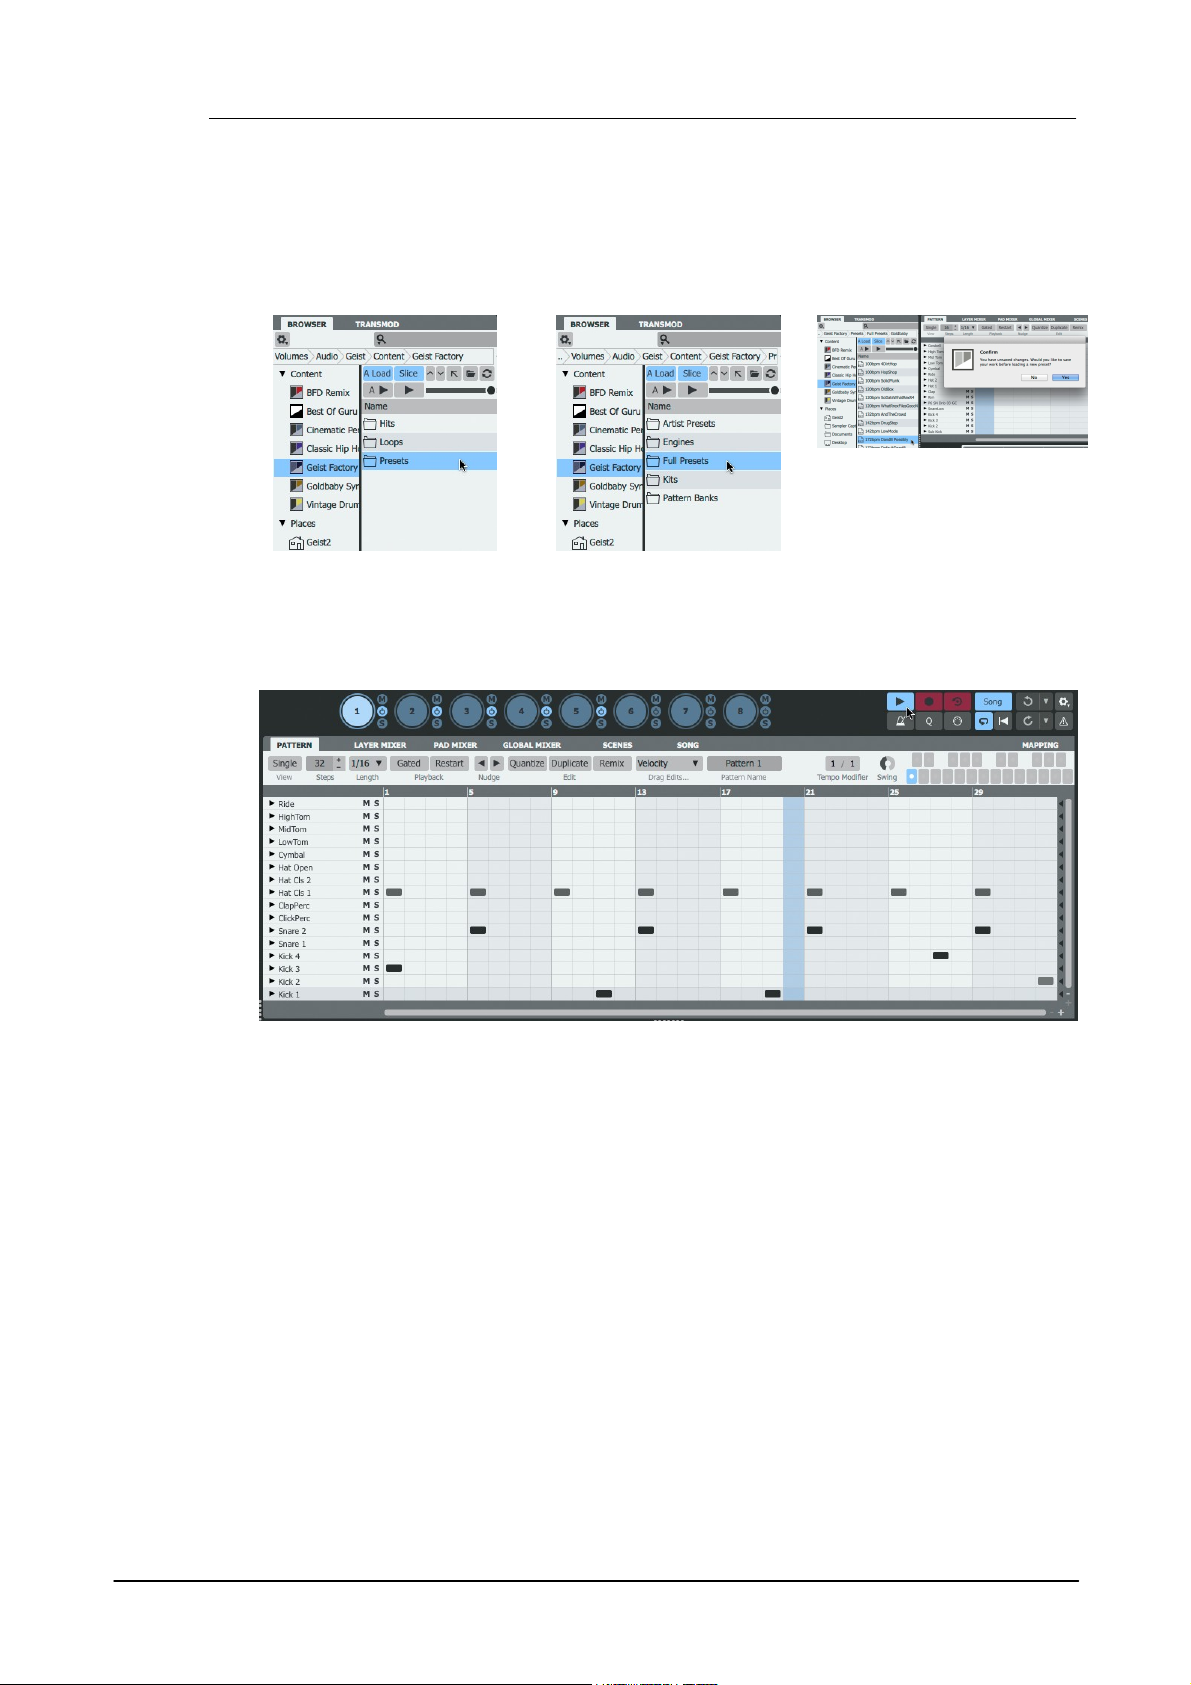
1. Return to a Factory folder
and double-click the Presets
folder.
2. Double-click the Full
Presets folder.
3. Double-click any sub-folder
and then click a Preset file to
load it. Geist2 asks to save
the current session.
4. Click the Play/Stop button on the transport after the preset has loaded, or start the host/DAW
transport if running Geist2 as a plugin.
Loading a preset
A Geist2 preset (also known as a 'full preset') stores the entire contents of a Geist2 session.
Presets are loaded by double-clicking, unlike other file types used in Geist2, as this action cannot
be undone. If any work is unsaved, Geist2 asks to save the current session.
© 2016 FXpansion Audio
1.3 Playing pads and recording a pattern
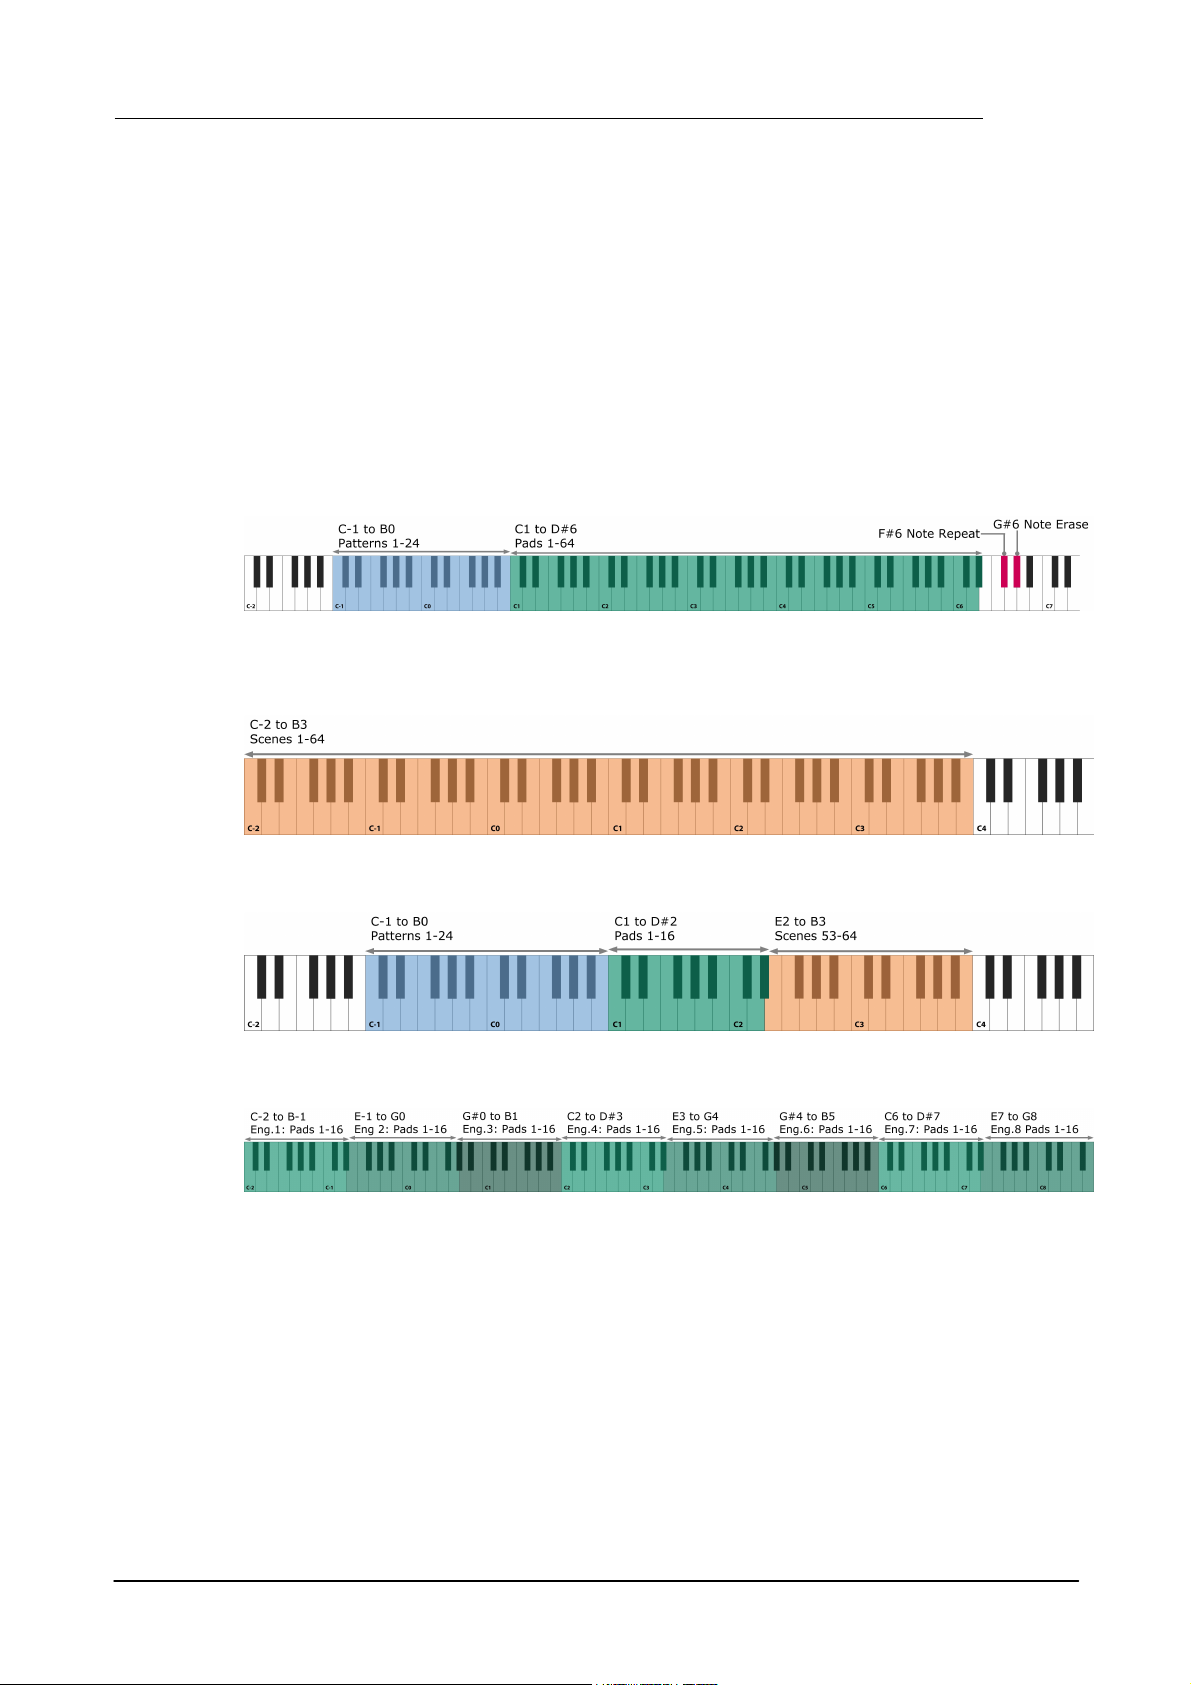
Geist2 MIDI notes and channels
Geist2 is a multitimbral instrument. This means that it responds on more than one MIDI channel.
Please do not confuse this concept with 'multiple outputs', which means that audio can be output
from more than a single stereo audio channel (although Geist2 is also capable of this).
Geist2 contains 8 'engines', each containing 64 pads and 24 patterns, which are all assigned to an
individual MIDI note. Because there simply are not enough MIDI notes in a single MIDI channel,
each of the 8 engines is assigned to a MIDI channel from 1-8. Channel 9 is used for the currently
selected engine.
Channels 1-9: Engine pads and patterns
Channels 1-8: Engines 1-8
Channel 9: Currently selected engine
There are also several other MIDI channels to which Geist2 responds:
Introduction to Geist2 13
Channel 11: Scenes
Channel 16: Current engine and scenes 53-64
Channel 10: Pads 1-16 on all 8 engines
© 2016 FXpansion Audio
Geist214
The pads visible underneath the Browser represent the pads
in the currently selected engine.
Pads can be played in either of the following ways:
• play their corresponding MIDI notes
• click the on-screen pads on the Geist2 interface
It is highly recommended to use a MIDI controller to play the
pads. Playing the Geist2 interface pads with the mouse is
intended for quick previewing during editing - this cannot
provide accurate timing response for playback.
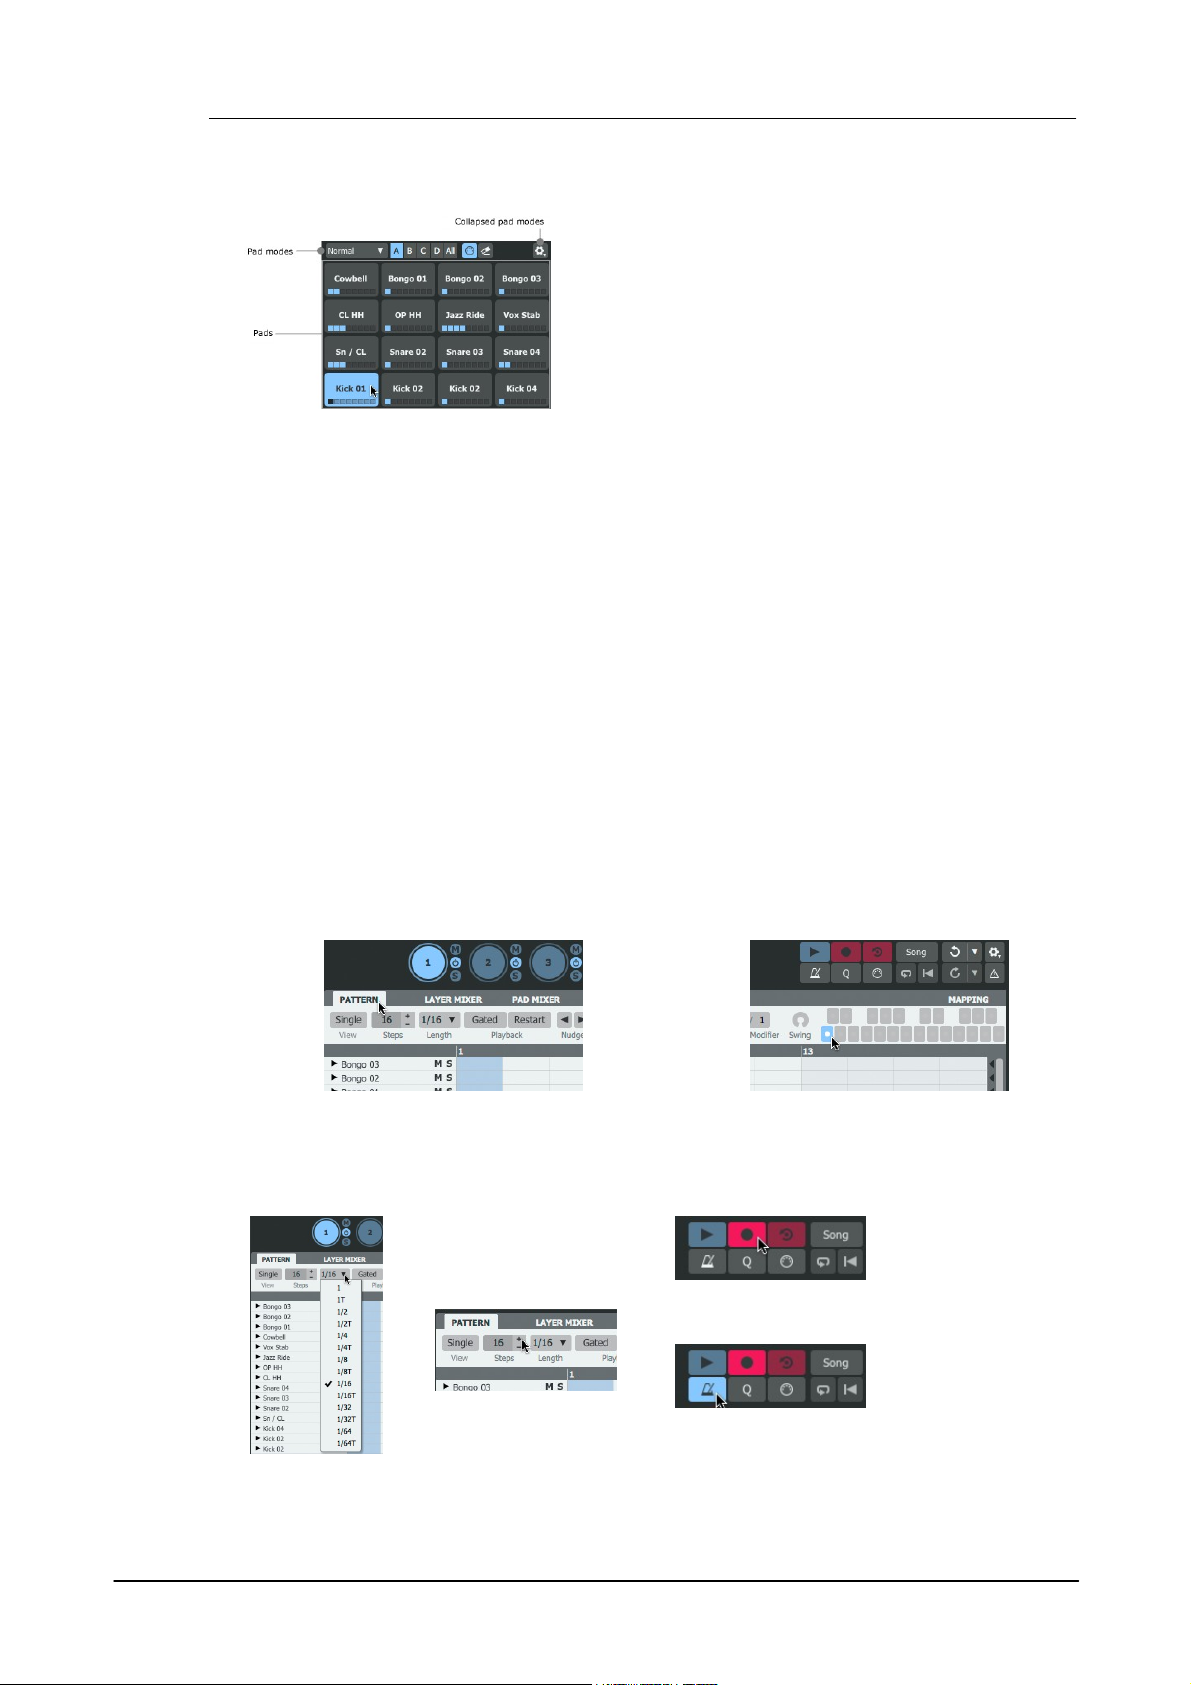
1. Click on the Pattern page button to
display the Pattern page.
2. Select the desired pattern into which to
record by clicking the desired pattern memory
key.
3. Set the required values
for the Steps and Length
parameters.
4. Click the Record
button to 'arm' the
recording function.
5. Click the
Metronome button to
hear a click on every
beat.
Real-time pad triggering
Sequencing pad triggers into a Pattern
Geist2 can record step-based sequences of the pads being played – these sequences are called
patterns and 24 can be created in each engine. Patterns can also be programmed and edited using
the mouse on the Geist2 interface.
An introduction to Geist2's step-sequencing paradigm
It is important to remember that Geist2 is a step-sequencer. Its sequencing system is inherently
based around a set grid, defined by the Steps and Step Length parameters.
However, Geist2 can also accomodate deviations before or after straight grid divisions using Shift
graph values for each step. Graphs are introduced in detail later but, briefly, they provide stepbased automation of various parameters for each step in each pattern. When using the Shift
graph, positive values (above the centre line) result in the step's event being played late and
negative values (below the centre line) mean it is played early. Shift Graph values can be
programmed or edited visually and are also generated during realtime MIDI input recording of
pattern events.
By default, each pattern is set to 16 Steps, with a Step Length of 1/16 (a 16th note). These two
parameters establish the 'grid' of the step-sequencer pattern. Adjusting these values using the
controls on the Pattern page changes the length of the current pattern and its 'step resolution'.
Recording events to a pattern via MIDI
After loading some sounds onto the layers on the engine's pads, proceed as follows in order to
record pattern events in real time:
© 2016 FXpansion Audio
Introduction to Geist2 15
6. Click the Play/Stop button (or start the host transport if using Geist2 as a plugin) to start the
transport and begin recording. Play the pads – events are recorded into the pattern as pad input is
received.
7. Click the Record button to disarm the recording function and return to
playback mode.
8. When recording events, the timing of each event within each
step is captured within each track's Shift graph. To show it, first
click the small triangular button at the left of the track. Ensure
the Single view button is disabled.
9. By default, Velocity values are shown. Click the graph menu that appears and
select Shift.
10. When events feature positive Shift values (above the centre line), events
play later than the start of the step. Negative values (below the centre line)
cause an event to play earlier than the start of the step.
Programming and editing patterns
Patterns in Geist2 can also be programmed/edited with the mouse. Basic pattern event editing is
very simple:
• To add an event, click a step cell with the mouse.
• To erase an event, right-click a step cell containing an event.
Pattern sequencing and editing is covered in more detail in section 1.9.
© 2016 FXpansion Audio
Geist216
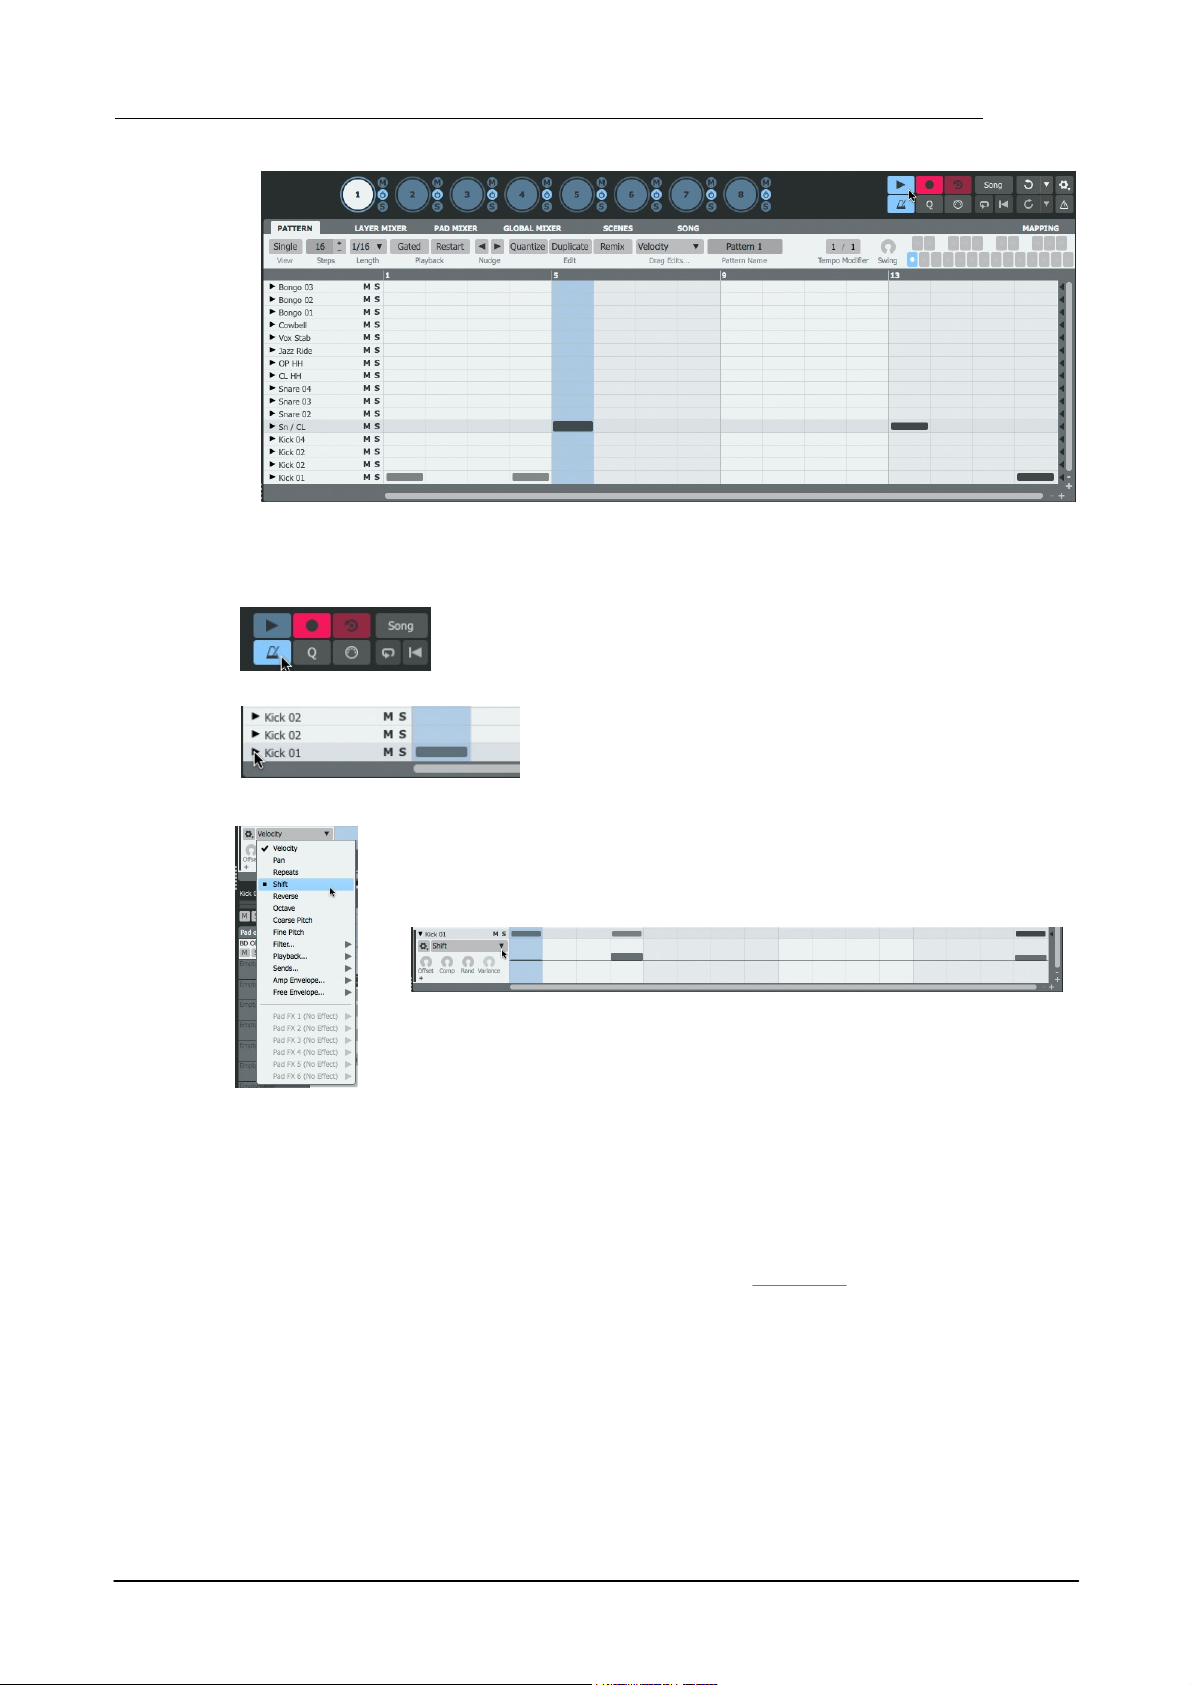
Pad mode
This menu provides a number of modes for the engine pads (and
their corresponding MIDI notes).
• Normal
In the default mode (Normal) each pad plays that pad's layers
(each containing a sample) normally.
• Chromatic
In Chromatic mode the currently selected pad is placed over all
64 pads with different pitches. The pad itself plays at the root
pitch defined by its layer Tune settings. Pads above it ascend by
a semitone, while pads below it descend by a semitone, up to a
maximum of +/- 48 semitones.
Rpt (Note Repeat)
Holding down the Rpt (Note Repeat) function while playing a pad results in
multiple steps being recorded in succession. The drop-down menu under this
button dictates how often events are repeated - various BPM-based settings are
available, from 1 to 1/ 64 (including Triplet versions). The Sync to next
division setting, when activated, ensures that the initial event upon holding
down the pad is quantized to the next BPM division.
This function features a MIDI key mapping on channels 1-9 (F#6).
Full (Full level mode)
When this button is enabled, the velocity of all received notes is forced to the
value set by the control to the right of the button.
Pad modes
Geist2 features a number of additional modes for the pads, intended for performance and pattern
recording via MIDI while the transport is running.
When events are recorded for pad performances in this mode, the different pitches of the pads are
converted to Pitch graph events on a single pad track in the pattern.
• Velocity
With Velocity mode activated, the currently selected pad is placed on all pads at different
velocities. Velocity graph information is captured when recording a performance in this mode.
Unlike Chromatic playback mode, this mode only uses the 16 pads, with velocity proportionally
ascending from the lowest velocity on pad 1.
• Engine M+S
The Engine M+S (Engine Mute+Solo) mode is slightly different to the other modes, as
performances in this mode cannot be recorded. With this mode enabled, the first 8 pads mute
engines 1-8, while pads 9-16 solo engines 1-8. This mode is intended for live performance only.
• Sampler
The Sampler mode is a special mode for sampling directly onto pads in Geist2.
Pad view / Bank
This control dictates whether the A, B, C or D pad bank, each containing 16 of the 64 pads in each
engine are shown in the pads area and in the Pattern page. To view all pads/tracks, click the All
button.
Follow MIDI
With the Follow MIDI button enabled, received MIDI input (on the relevant notes) results in
changing the currently selected pad. Deactivate the button to stop this behaviour.
Erase mode
Hold down the Erase Mode button along with any pad while a pattern is playing back: if the
playback position passes any events for the pad while the Erase mode button is active, they are
erased. This function features a MIDI key mapping on channels 1-9 (G#6).
© 2016 FXpansion Audio
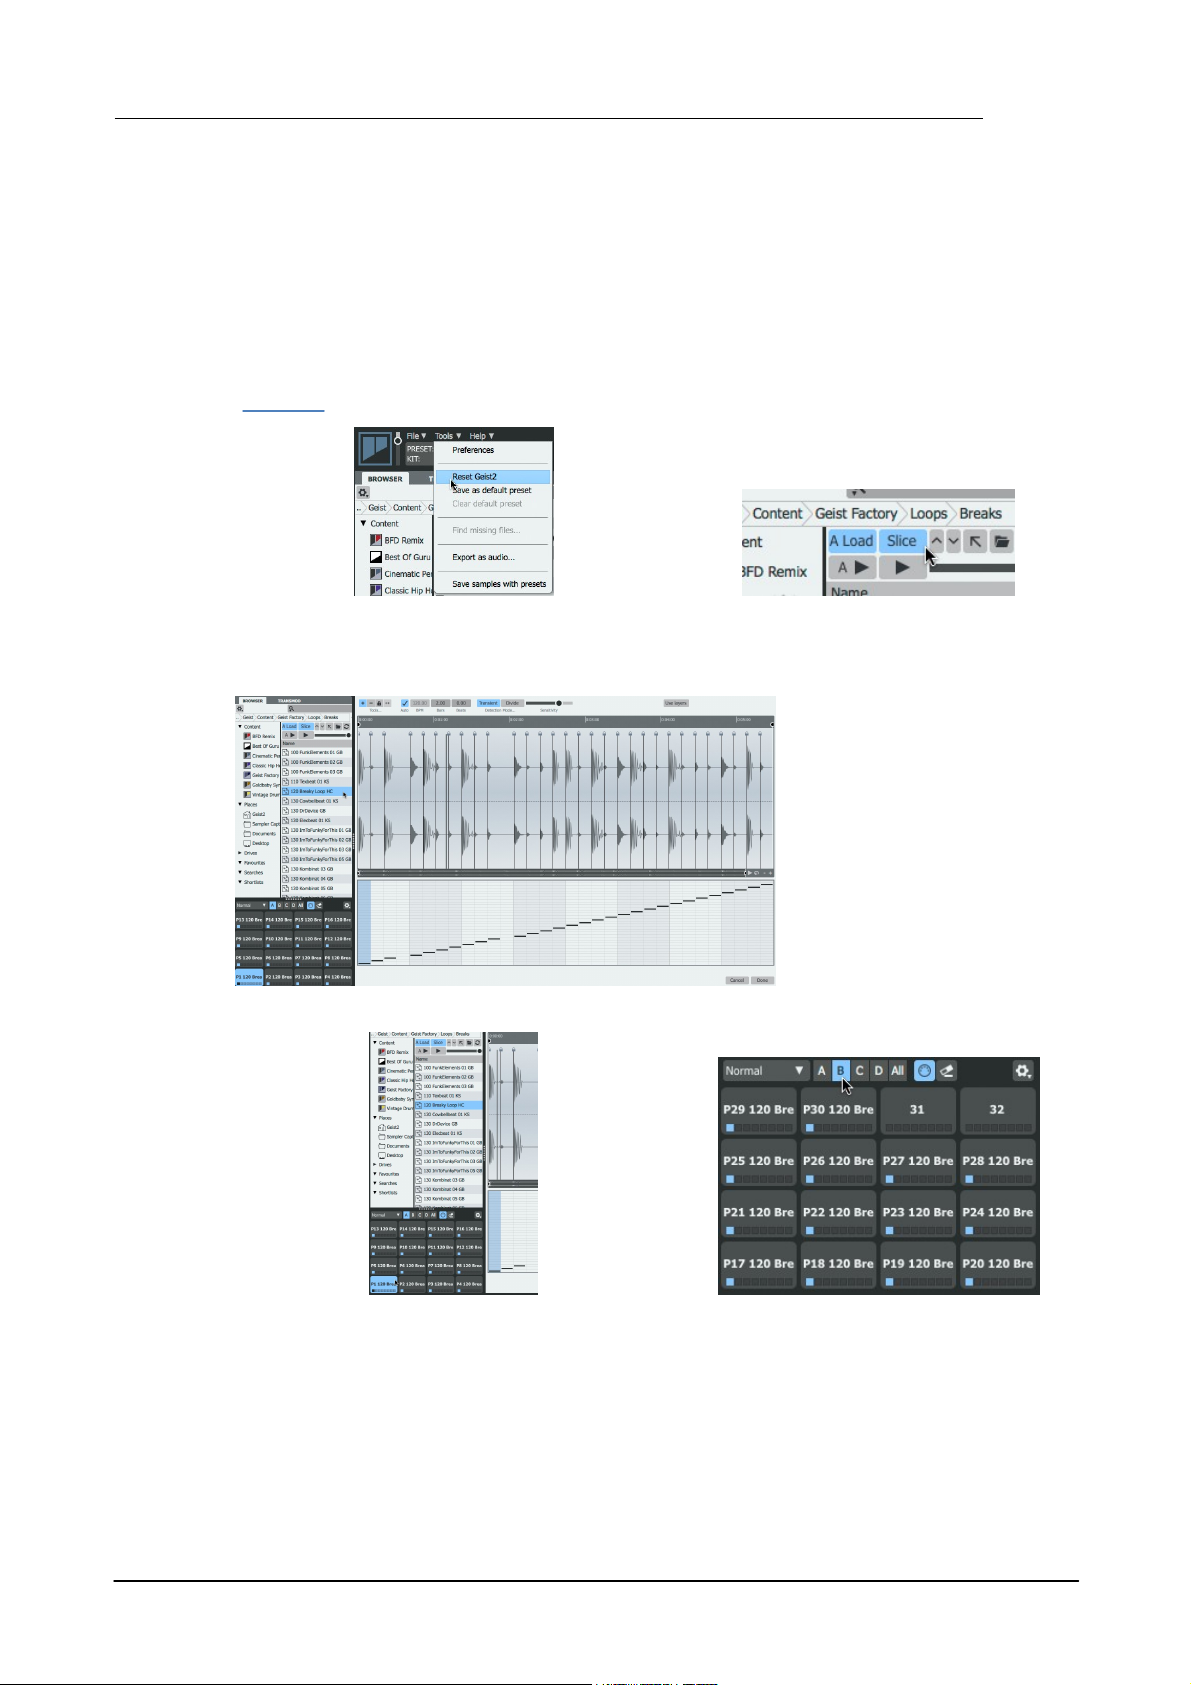
1.4 Slicing loops
1. Initialize Geist2 by using the Reset Geist2
function on the Tools menu.
2. Activate the Slice and Auto Load buttons in
the Browser.
3. Navigate to a subfolder within
the Loops folder in the factory
library and click a loop in the files
listing.
4. Click/play the pads or start the transport –
the slices are already assigned to the pads.
Note the playback indicator on slices when
they are played.
5. When loops possess more than 16 slices, the
additional slices are assigned to pads in the B,
C and D pad banks, up to a maximum of 64
pads.
Geist2 features a Slicer panel which can be considered as an extension of the Browser. It is
displayed when clicking on a file while the Slice button is enabled in the Browser and allows nondestructive 'chop' techniques for loops and breakbeats in order to extract audio slices and
patterns.
This section describes using Geist2's factory loop library which is supplied pre-sliced in RX2 format
- with these loops it is usually unnecessary to adjust slice points upon loading.
However, the Slicer can be used with any WAV or AIFF format samples. When doing so it is usually
necessary to perform some degree of fine-tuning to optimize all slice points for a loop. See
chapter 3 for more details of the Slicer panel's different tools and modes.
Introduction to Geist2 17
© 2016 FXpansion Audio
6. To finish loading the loop, click the Done button at the lower-right of the panel. To exit the
slicer panel without loading anything, click Cancel.
Geist218
1. Initialize Geist2 and activate the Auto load button if it is not already activated.
Also ensure Slice mode is disabled.
2. Click an engine file to
load it into the first
engine. This loads sounds
and patterns.
4. Deactivate the Auto
play button in the Browser
if it is activated.
3. Click the first snare pad
to select it. Ensure that it
features pattern events in
the current pattern.
5. Start the Geist2 transport by clicking
the Play/Stop button.
6. Navigate to an individual sample in the Browser and click it.
8. Click a pattern bank file - the patterns within it replace the existing
24 patterns in the engine.
7. Now navigate to a
pattern bank.
1.5 More about loading sounds and saving work
Using Auto load mode to load-in-context
The sample is not previewed, but it is loaded to the pad and heard when triggered by pattern
events.
© 2016 FXpansion Audio
Introduction to Geist2 19
1. Initialize Geist2 and deactivate the Auto load and Slice buttons.
3. Activate the Auto play button in order to preview
samples when they are selected in the Browser.
4. Click the first snare pad to select it.
Ensure that it features pattern events in
the current pattern.
2. Navigate to a folder
with engine files and
double-click it to load it.
5. Navigate to a folder with samples and
double-click one to load it (see left).
6. Double-click another sample in the
folder while holding down the ALT key - the
sample is loaded to the next free layer on
the pad (see right).
• If automatic previewing is not desired,
deactivate the Auto play button and
manually use the Preview play button to
its right to preview the selected sample.
• Any preview (whether it is automatic or
manual) can be stopped while it is active by
deactivating the Preview play button.
Working with Auto load deactivated
If the Auto load button is deactivated, clicking a loadable element does not result in it being
loaded automatically – instead, elements are loaded by double-clicking or by using drag and drop.
Loading by double-clicking with Auto load deactivated
© 2016 FXpansion Audio
Geist220
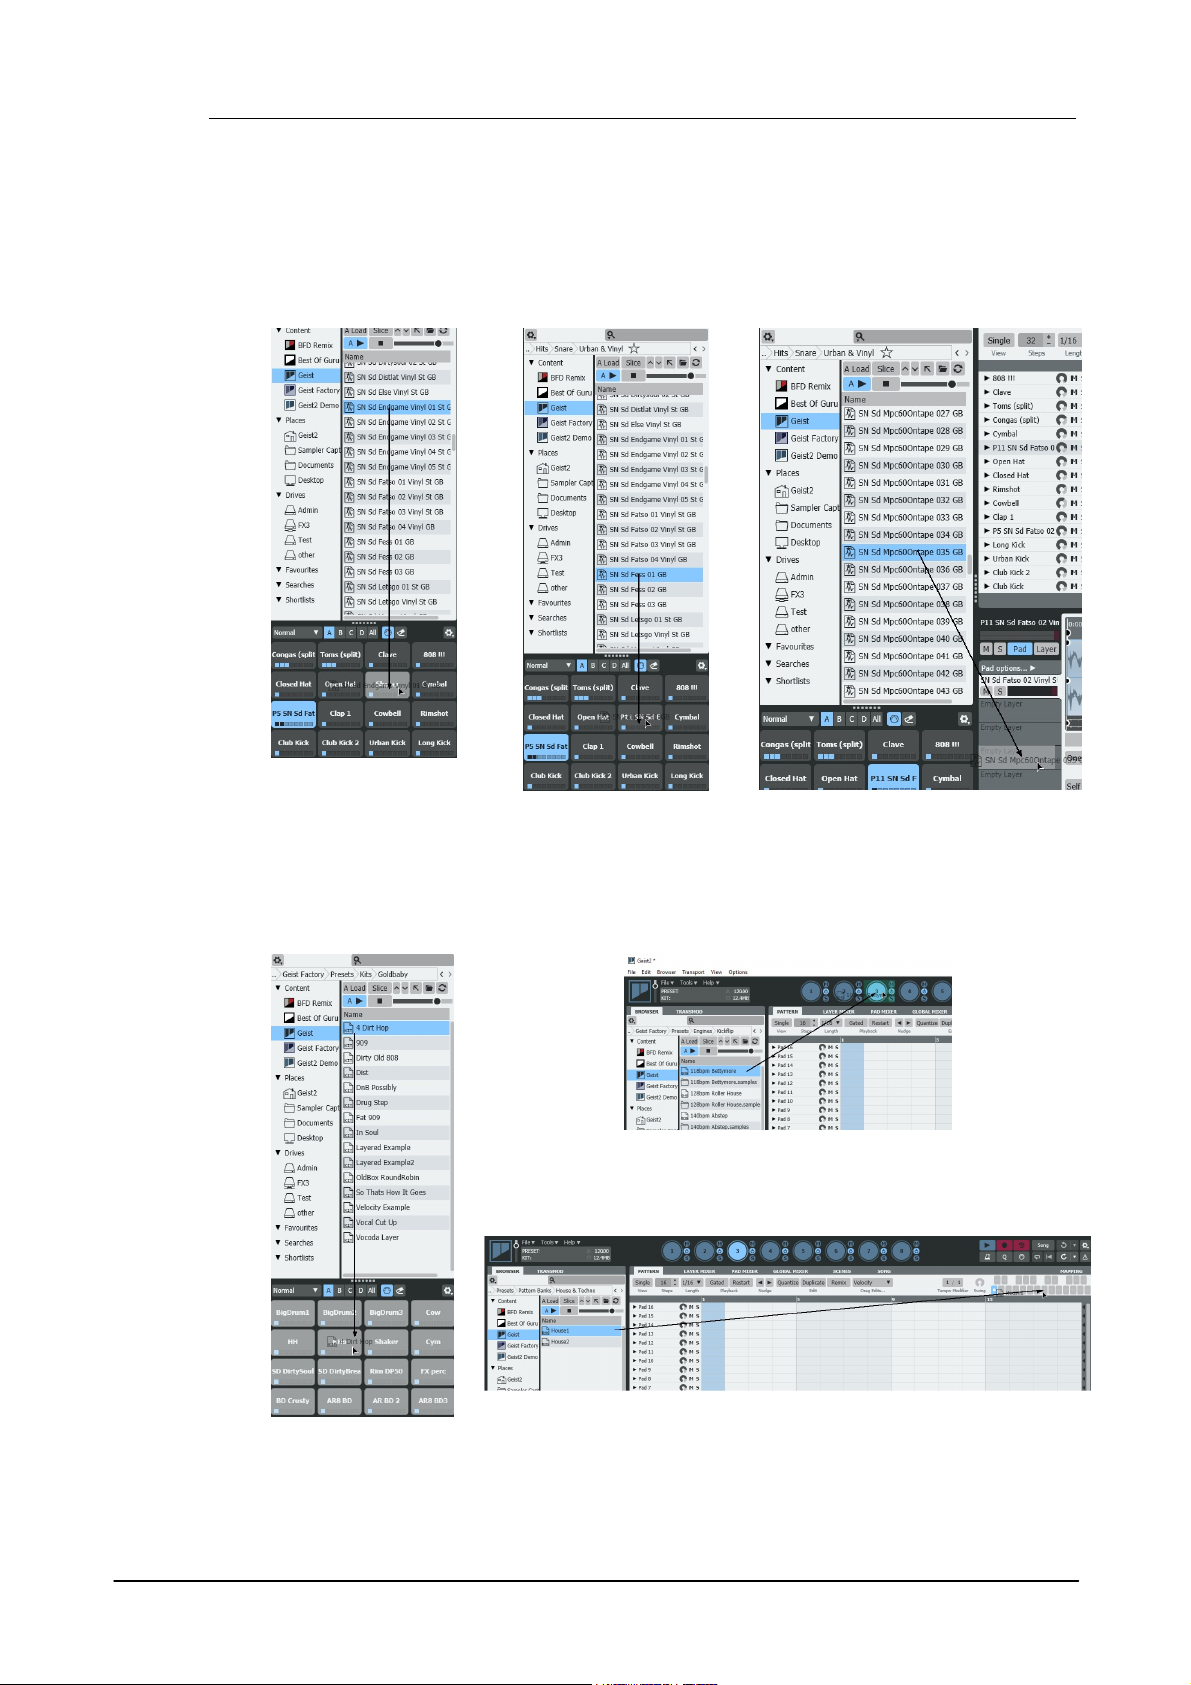
• Drag and drop a sample
onto a pad to load it. Any
existing samples on the
pad are removed first.
• Drag and drop a sample
to a pad while holding
down the ALT key to load
it to the next free layer.
• Drag and drop a sample to any layer
in the Pad Editor's Layer selector to load
it to a specific layer.
• Drag and drop a kit file
onto the pads to load it.
• Drag and drop engine files onto an engine selector.
• Drag and drop patterns onto the pattern memory keys. Drag single
patterns to single keys, or banks to any key.
Loading using drag & drop with Auto load deactivated
While dragging and dropping samples, pads, kits and patterns/pattern banks, hover over any
other engine selector button in order to switch the currently selected engine. This means it is not
necessary to abandon the drag and drop operation if the engine was not switched before starting
it.
• Samples
• Kits, patterns and engines
© 2016 FXpansion Audio

Introduction to Geist2 21
The File menu is used to save any current element in Geist2.
Saving a preset
To save the entire state of Geist2, use the Save preset function. Enter a
filename in the system Save As dialog that appears and press ENTER.
The default save location is the FXpansion/Geist2 folder within the user
documents folder, accessible using the Places/Geist2 item in the Browser
sidebar.
Saving other elements
The File menu also provides functions to save the kit, current engine, pads,
pattern, or the whole bank of 24 patterns in the current engine.
Exporting as MIDI or audio
Geist2 offers several ways to export MIDI and audio material for external
use.
Other Browser functions
The Browser contains a number of features like searches, Favourites and Shortlists to make it as
easy and quick as possible to locate sounds.
See chapter 2 for a full guide to their operation.
Saving work
© 2016 FXpansion Audio
Geist222
1.6 Editing and modulating sounds
The Pad Editor provides numerous controls to edit parameters for altering the sound and playback
characteristics of the currently selected pad and each of its 8 layers. This section introduces the
most important parameters - see chapter 5 for a full guide.
It is always visible on the Geist2 interface, meaning that it is possible to view pages like the
Pattern page, Layer Mixer and Pad Mixer at the same time as viewing selected pad/layer
parameters.
Layer Editor parameters can be modulated over time using graphs and TransMod modulation.
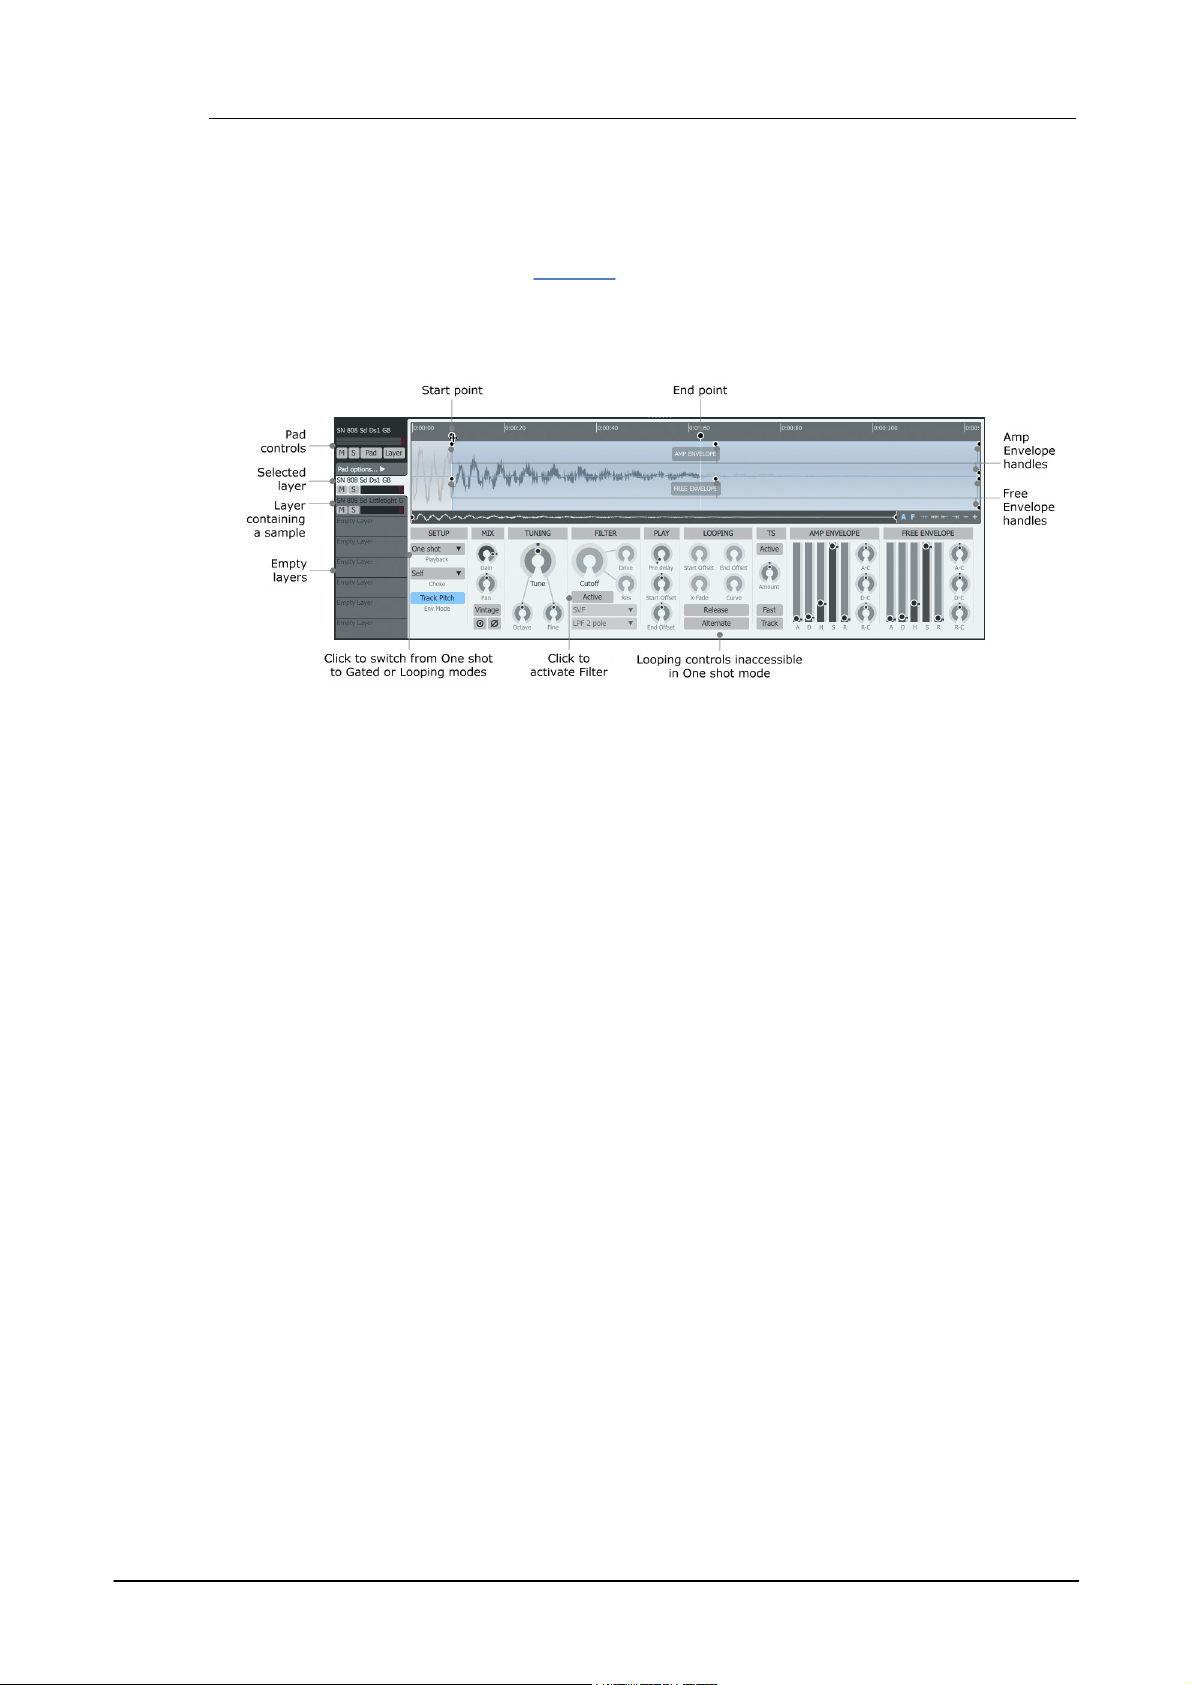
Pad controls
The pad controls provide various controls and settings for the entire pad and how its 8 layers are
played. It also includes the Multiple Edit shortcuts which are described later in this section.
Click the Pad options... to access additional controls for the pad, including the Layer play mode
for dictating how layers are played back. By default, all 8 layers on the pad are played
simultaneously whenever it is triggered, using the All layers setting. Setting this to Velocity split
mode activates controls for defining velocity split points and fades for the pad's layers.
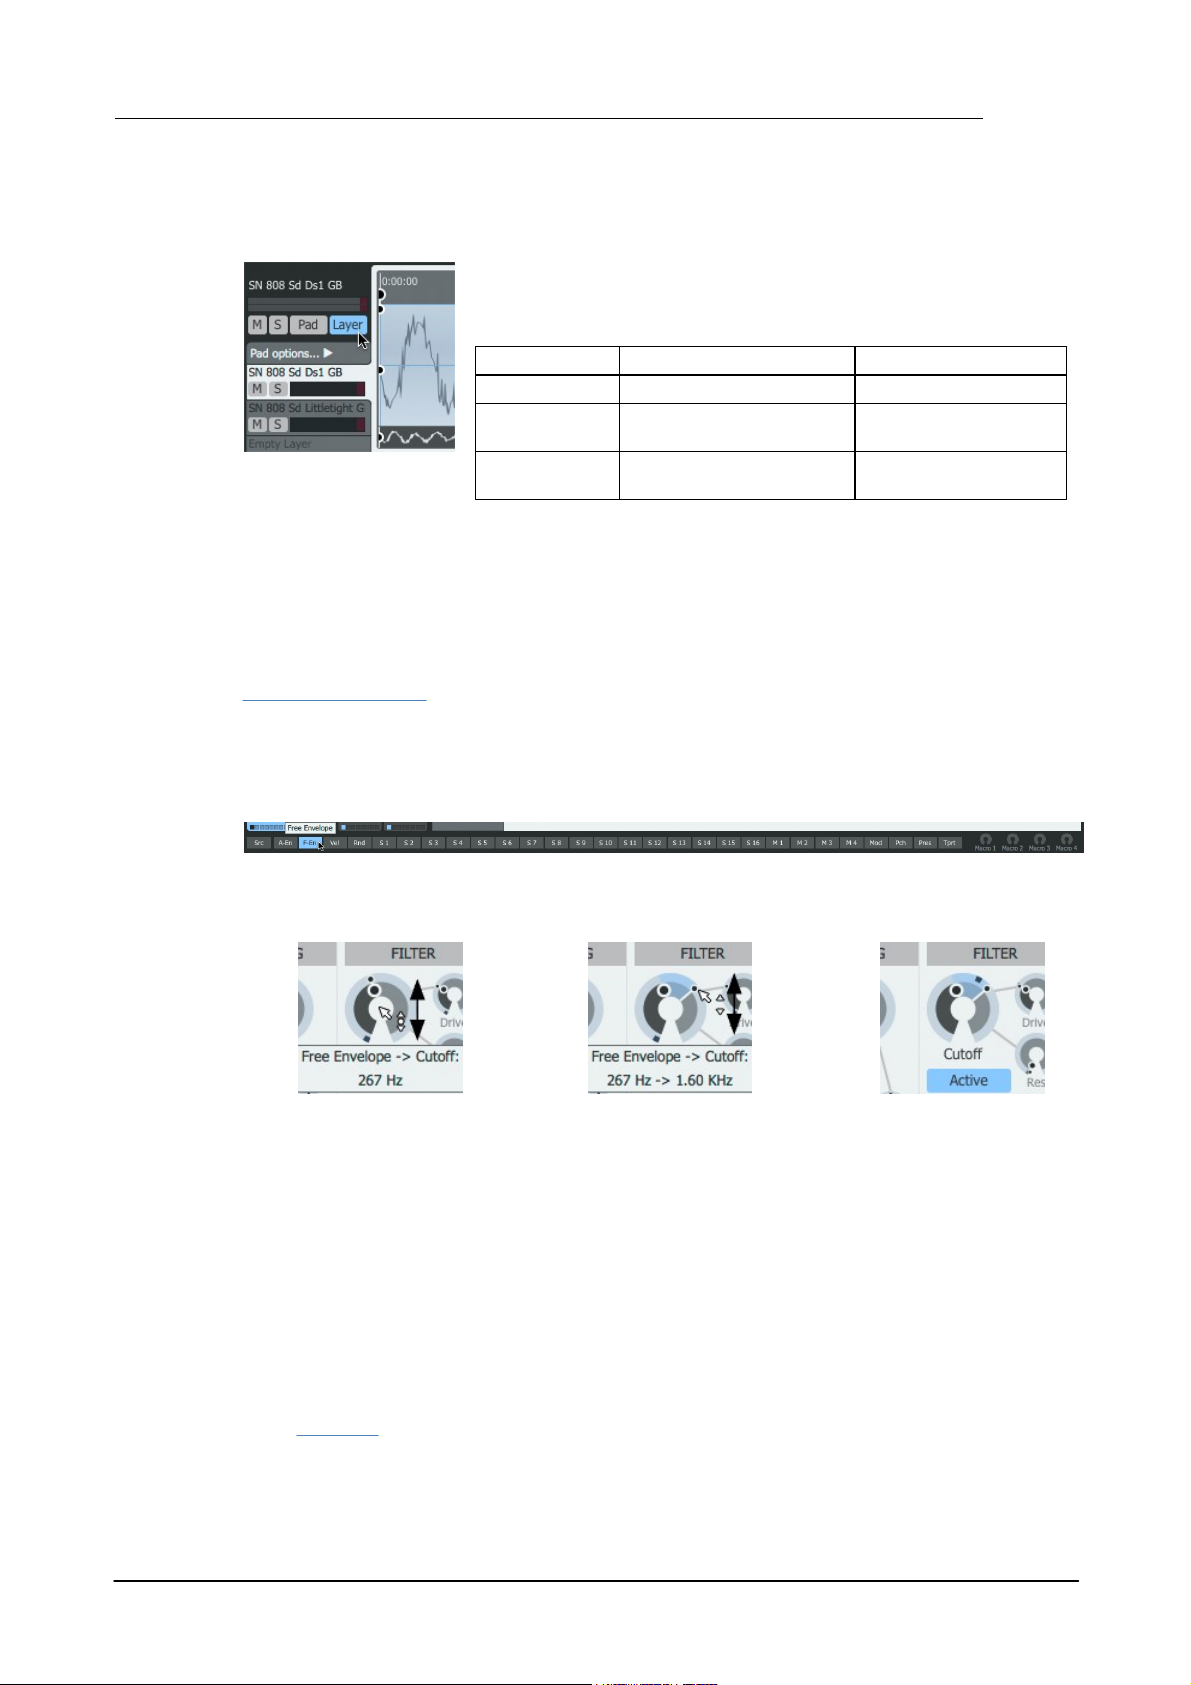
Layer selector
The 8 slots underneath the pad controls represent each of the 8 layers on the pad. Click a layer to
select it for editing in the main Layer controls section of the Pad Editor, containing the waveform
display and editing controls. It is also possible to drag and drop samples onto these layer slots
from the Browser.
Start point and End point
The Start point and End point handles can be dragged left/right in order to set the start and end
of the section of the sample that is played when the layer is triggered.
Playback mode
This menu selects between One shot, Gated and Looping modes. Gated and Looping modes mean
that the layer responds to event duration. When Looping mode is activated, the Looping controls
section becomes accessible and Loop start and Loop end handles become available in the
waveform display - these are adjusted in the same way as the Start point and End point
handles.
Amp Envelope and Free Envelope handles
These handles can be dragged in order to adjust the shape of each envelope, as an alternative to
using the sliders at the lower-right of the Pad Editor panel.
The Free Envelope can be assigned to modulate a variety of destination parameters via the
TransMod system (see below). It is not assigned to any destinations by default.
Activating the Filter
By default, the layer's Filter is deactivated - to activate it, click the Active button in the Filter
controls section.
Selecting and editing multiple layers
To select multiple layers in the Layer selector for simultaneous paramter editing:
© 2016 FXpansion Audio
Introduction to Geist2 23
The Layer and Pad edit shortcuts are provided in order to allow
multiple layers/pads to be edited simultaneously (if they are not
locked). Simply hold down the following keyboard modifiers when
adjusting controls:
Keyboard modifiers
Function
Layer shortcut
CMD (Mac) / CTRL (Win)
Edit all pad layers
Pad shortcut
ALT
Edit same layer on all
engine pads
Layer + Pad
shortcuts
CMD+ALT (Mac)
CTRL+ALT (Win)
Edit all pad layers on
all engine pads
1. First, select the layer for editing and then click the F Env TransMod source near the lower-left
of the Geist2 interface.
2. Click/drag vertically the
central part of the Cutoff
control to set the initial value.
3. Click/drag vertically the outer
ring of the control to set the
maximum modulation depth.
• Whenever the layer is
triggered, the envelope
modulation is indicated in realtime.
• SHIFT-click to create a contiguous selection between 2 layers
• CMD-click (Mac) or CTRL-click (Windows) to add a layer to the selection
Multiple edit shortcuts
As an alternative to using keyboard modifiers, toggle the Layer and Pad buttons in the Pad
controls section.
The Pads shortcut can also be used in conjunction with multiple layer selections (see above) -
parameter adjustments are duplicated in all selected layer numbers across all pads in the engine.
Note that effects devices cannot be added or edited using these edit shortcuts.
Modulating sounds with the TransMod system
TransMod modulation involves selecting a current modulation source (from a variety of available
sources) and drawing modulation amounts directly onto any Geist2 controls capable of being
modulated.
Therefore, modulation can be viewed and edited visually rather than through an abstract
modulation matrix list.
To assign a layer's Free Envelope to its Filter Cutoff parameter, proceed as follows.
• This modulation acts only on the layer on which the modulation depth is set up as shown above.
To operate multiple layers and pads, use the multiple selection/edit methods described above.
• Envelopes are polyphonic and act per layer - an individual Amp Envelope and Free Envelope
exists for each layer on each pad in each engine. There are other polyphonic TransMod modulation
sources such as the Vel (Velocity) and Rnd (Random) sources which provide values for each MIDI
and pattern event triggering the layer.
• There are also a number of 'global' modulation sources such as Macro controls and LFOs (the
latter must first be assigned to one of the 16 assignable modulator slots). These do not operate
polyphonically but can still be used to modulate parameters on individual layers.
• See chapter 8 for a full guide to the TransMod system.
© 2016 FXpansion Audio
Geist224
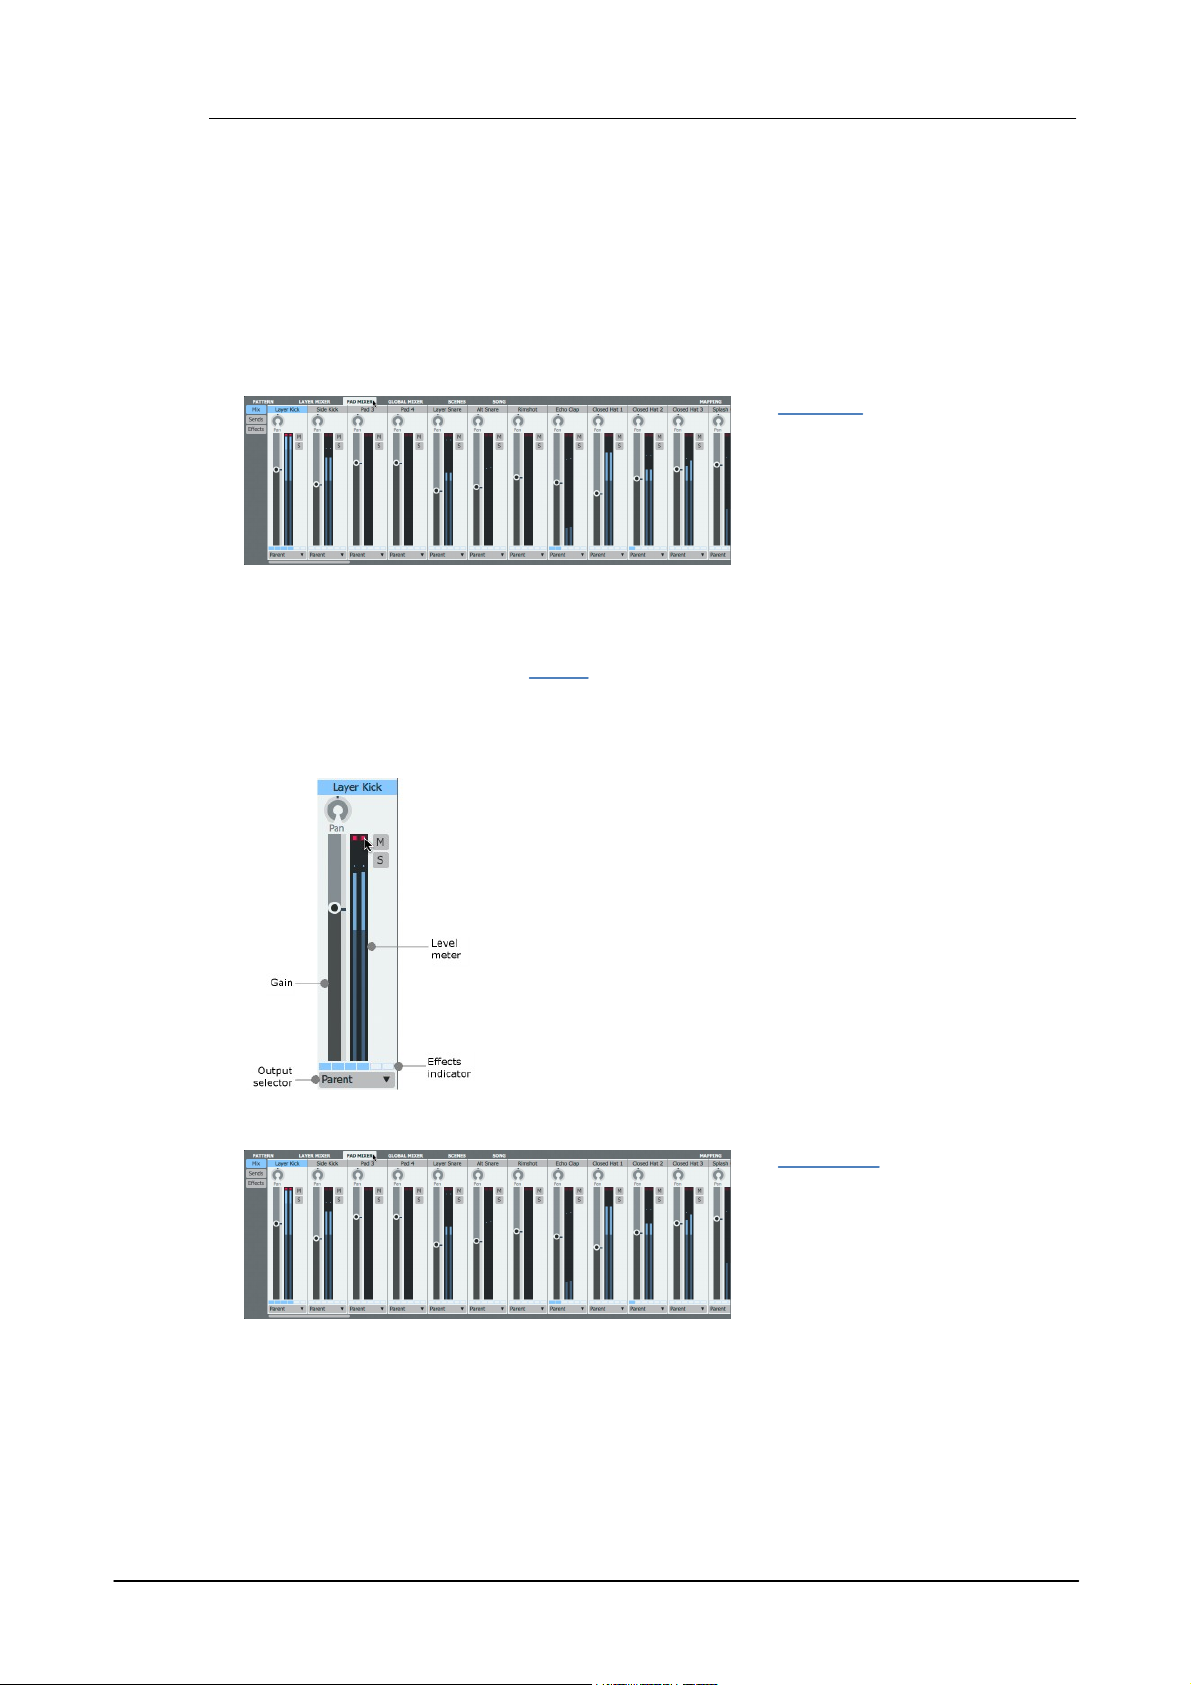
The Pad Mixer page displays as many
channels as the number of pads
currently specified for the engine.
For applying effects to individual sounds
in most situations, it is recommended to
use the Pad Mixer. This means that
usually, all layers on the pad are
processed through the pad's effects
devices.
Pan, Gain, Mute, Solo, Level Meter
Use these controls in order to perform basic mixing functions.
Output selector
If a pad's Output selector is set to Parent, it is mixed with any other
pads in the engine with the same setting. It can then be processed
further in the Global Mixer if required.
If a discrete sub-output is specified, the pad bypasses the Global
Mixer.
Effects indicator
This indicator shows whether each of the channel's 6 Effects slots is
Active or not.
The Layer Mixer page displays 8
channels - each representing one of the
8 layers on the currently selected pad.
It allows mixing and effects processing
of individual layers within a pad.
If a layer's Output selector control is
set to Parent, it is mixed with other
layers with the same setting and sent to
its parent pad channel.
1.7 Mixer pages and Effects
Geist2 features 3 separate mixer pages which provide channel-based layouts alongside effects
processing for the following:
• Engines, Aux busses and the Master channel (Global Mixer page),
• Pads in the current engine (Pad Mixer page)
• Layers on the current pad (Layer Mixer page)
Pad Mixer page
The only exception to this is when individual layers are routed to alternative outputs using the
Output selector control (see below for more details on this control).
One of the main advantages of adding effects to the entire pad is that the effects devices'
parameters become available as graphs so they can be automated per-step in patterns.
It is also more efficient to use effects on the entire pad rather than using the same effects devices
on multiple individual layers.
Important Pad Mixer controls
Layer Mixer page
It can then be further processed in the Pad Mixer page if required.
Layers can also be set to discrete sub-outputs, bypassing the Pad Mixer.
© 2016 FXpansion Audio
Introduction to Geist2 25
The Global Mixer page displays all 8
engines, the 4 Aux channels and the
Master channel as individual mixer
channels.
If any pads or layers have been routed
to a discrete sub-output using their
Output selector controls, they are not
represented in its parent engine channel
in the Mixer page.
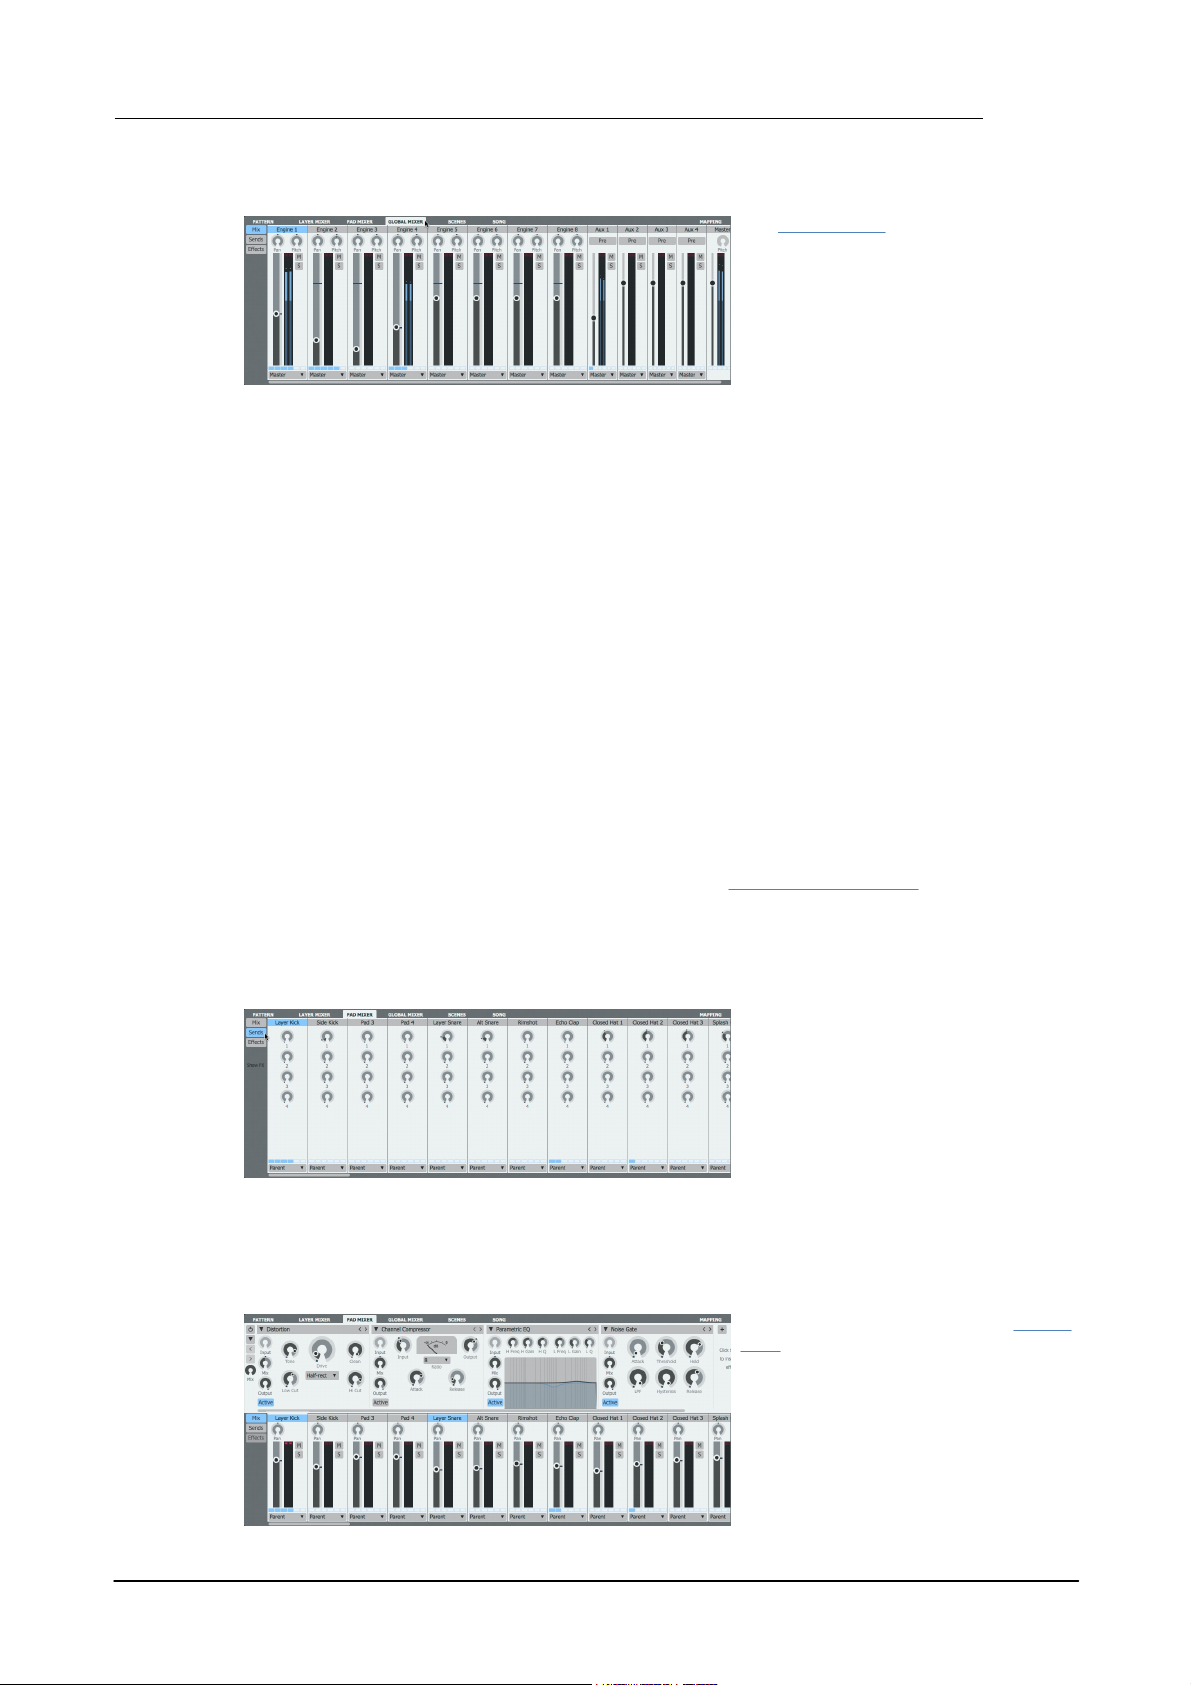
Sends are 'parallel' routings from the
pad to the Aux busses - each pad
channel features 4 Send controls, one
for each of the 4 Aux busses, labelled 1
to 4.
To display the Send controls, click the
Sends button to the left of the mixer.
Each pad features 6 assignable Effects
slots for loading effects devices. The
visibility of the Effects slots is dependent
on the current size/scaling of the Geist2
interface.
• When an adequate vertical area is
available, the Effects slots for the
selected channel are shown above the
mixer.
Global Mixer page
Each engine channel's Pitch control adjusts the pitch of the entire engine's sounds relative to
individual layer Tuning settings.
Engine Effects
Engine Effects are for overall processes for all pads in the engine.
Aux busses
Aux busses are useful for parallel processing and other classic Send-based effects such as
reverbs and parallel compression for multiple channels.
Layer, pad and engine channels can be sent to Aux channels in variable amounts using their S1 to
S4 controls.
Entire pad, layer or engine channels can be routed to Aux channels using their Output selector
controls.
Each Aux channel also features a Pre button for specifying its position in the signal path.
Master channel
The Master channel is the default output routing for all channels in Geist, unless any channel is
specifically assigned to a sub-output with its Output selector.
Editing multiple channels
Multiple channels can be selected or the Layers / Pads multiple edit shortcuts can be used in
order to adjust mix parameters for multiple elements simultaneously.
Note that it is not possible to insert effects devices or adjust their parameters on multiple channels
simultaneously.
Sends
The routing point for all sends to an Aux buss can be set to either pre- or post-fader, using the
Pre button on the Aux buss itself, located in the Global Mixer.
Note that the Aux channels themselves in the Global Mixer do not feature Sends.
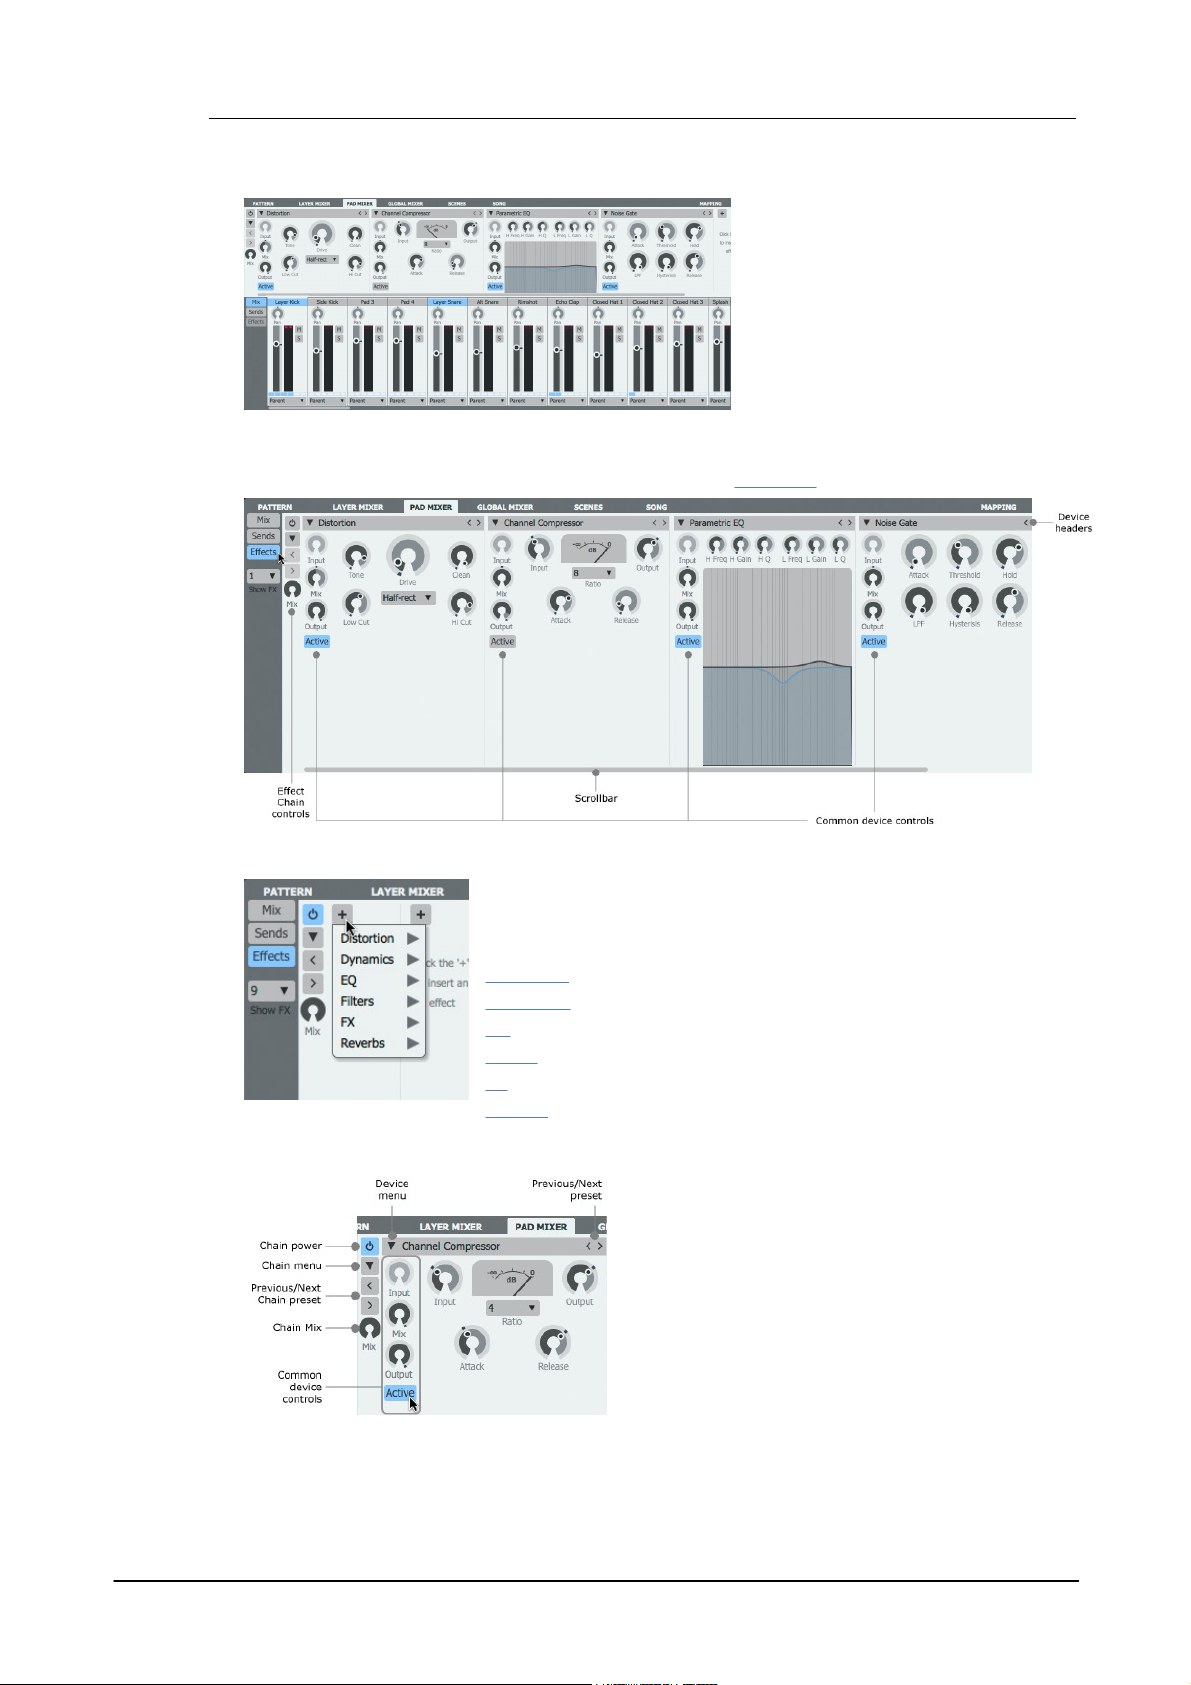
Effects Slots
© 2016 FXpansion Audio
Geist226
• When the required vertical area is
unavailable, click the Effects button to
display the current channel's Effects
slots in place of the mixer channels.
When an effects slot is empty, click the + button to display a menu of
available devices. Click the desired device within the relevant submenu to load it into the slot. See the following sections for details of
each available effects device:
Distortion
Dynamics
EQ
Filters
FX
Reverb
The Active button must be engaged for the device to
process audio. When it is deactivated, the device is
bypassed and audio passes through it unaffected.
The Device menu allows a different Effect device to
be loaded in place of the current device and also
provides access to preset loading and saving
functions. The Previous/Next preset buttons cycle
through the available presets for the device.
The Mix control exists on all effects slots and allows a
wet/dry mix for any device.
In addition to the Mix control, each slot features an
output Level control which is useful for attenuating or
boosting a signal after certain effects settings.
Using the Effects controls
For a full guide to the effects system and its controls see chapter 7.
Loading an effect device into an empty slot
Device headers and common device controls
The Input control is provided for certain devices such as delays and reverbs and sets the input
level to the device.
© 2016 FXpansion Audio

Introduction to Geist2 27
Effect chain controls
The Chain menu and Previous/Next Chain preset buttons provide the ability to save and load
presets for the entire chain of 6 effect slots. The Chain Mix control sets the wet/dry mix of the
entire chain vs. the original signal.
The Chain Power button toggles the entire chain on or off.
Automating Effects
Effects parameters can be automated with the following methods:
• Graphs (for Pad Mixer effects only)
• TransMod modulation
• Host automation or MIDI CC control, either live using hardware controls or from tracks in the
DAW/host when running Geist2 as a plugin
© 2016 FXpansion Audio

Geist228
In such situations the internal sequencing functions can be ignored entirely - if
patterns are not required, the Pattern Power buttons for all 8 engines can be
deactivated.
1.8 Sequencing and arrangement
Geist2's architecture is deep enough to accomodate many different ways of working. No single
way is better than another – it's purely down to the personal preference of the user.
Geist2 as a sample playback module or 'drum sampler'
Geist2 can be used as a sample-playback engine using the MIDI sequencing features in the host/
DAW to trigger the Geist2 plugin's pads.
Using Geist2's internal pattern sequencing
Another method of working is to sequence within Geist2 itself using its patterns and Graphs - this
offers the following advantages:
• The slick step-sequencing environment can be faster and more fun for creating drum patterns
than the sometimes cumbersome and fiddly MIDI editors in many host/DAW applications.
• Its advanced features like retro recording may not exist in the host.
• The step-based parameter automation graphs can efficiently add variation, movement and
experimental effects.
Arranging pattern changes within Geist2's Song page
The Song page allows patterns to be arranged as 'blocks' on a linear timeline.
• Patterns can be recorded into the Song timeline in real-time (using Pattern memory keys or
Scenes when working with multiple engines)
• The Retro Record function can also be used to 'capture' a pattern/scene performance after the
fact
Working in this way can have the following advantages:
• Diverse full Geist2 presets can be loaded within the same host/DAW project for trying different
rhythmic arrangements.
• The Geist2 standalone version can be used for composition work (without having to deal with a
complex, resource-hungry host application) – perhaps on a laptop. The Geist2 session can then be
loaded into a host/plugin environment for detailed work.
• If the kinds of features found in fully-fledged sequencer hosts are not required, it is perfectly
possible to create entire sample-based musical pieces with the standalone version of Geist2 and
nothing else – the built-in audio export functions allow entire songs or individual patterns to be
exported as finished stereo mixdowns.
Hybrid approaches
Exporting patterns from Geist
Patterns can be composed in Geist2 and then exported to MIDI tracks in the DAW/host - working
in this way takes advantage of the fast pattern composition tools in Geist2 along with the host's
detailed arrangement and editing features. Patterns are exported by dragging pattern memory
keys to suitable MIDI tracks in the host.
To stop patterns playing within Geist2 while it is triggered by MIDI notes from the host, deactivate
the Pattern power button for the relevant engine(s).
Triggering patterns and scenes from the host
An alternative to the previous method is to effectively use the DAW/host as the 'song sequencer' patterns can be composed in Geist2 but then played using MIDI notes - either live or from
recorded/programmed notes on MIDI tracks. Patterns can be played either as 'triggers' for
switching continuously looping patterns or as 'gates' to play patterns for the duration of the note.
Scenes provide a convenient way to play patterns on all 8 engines simultaneously using a single
MIDI channel.
© 2016 FXpansion Audio

1.9 Patterns in more detail
The transport is vital to using patterns in Geist.
The Play/Stop button must be active to hear
patterns.
The Song button must be deactivated in order
to Record or Retro record pattern events.
With the Song button activated, these buttons
are used for Song page events.
Activate the Metronome button to hear a
click.
The Swing and Tempo Modifier functions, shown on the Pattern page,
allow control over various aspects of the entire engine's pattern timing
behaviour.
The Swing control in the Pattern page is set per-engine:
• all patterns in the same engine share the same Swing settings
• each of the 8 engines can be set to different Swing settings
Right-click the Swing control in order to display the Swing menu - this
includes a swing template menu, with each template providing a
different type of syncopation. Try the Triplet feel setting for a classic
drum-machine style swing.
The Swing functions are explored in more detail in the Pattern editor
section.
Patterns and pattern recording were introduced earlier. This section introduces features including
pattern editing, Retro recording, Swing and other pattern-related functions.
Transport controls for working with patterns
If the Quantize input button is activated, incoming events are automatically quantized to the
pattern grid.
Use the Panic button to stop any currently playing patterns and pad layers that may be playing.
The Transport options menu includes additional Metronome and count-in settings as well as the
Follow playback cursor function which causes the Pattern and Song pages to scroll with the
current playback position.
Introduction to Geist2 29
Swing and other timing related functions
Applying Swing to the engine's patterns
Each engine features individual swing/shuffle controls to apply a syncopated timing adjustment to
the patterns within the engine. Control the amount for the current engine with the Swing control
on the Pattern page.
Setting the engine's Tempo Modifier
The Tempo Modifier control multiplies the playback speed of the engine's patterns by a ratio,
which can be a fraction (to slow down the tempo of the patterns) or a value greater than 1 (to
increase the tempo). Try a setting of 1/2 to halve the speed of the pattern or 2/1 to double it.
The Tempo Modifier function is explored in more detail in the Pattern editor section.
Convert timing
This function, available by right-clicking on a pattern memory key, allows the 'resolution' of a
pattern to be changed without altering the position of events in the pattern. It can be useful if
triplet steps are required rather than 16ths, for example.
© 2016 FXpansion Audio

Geist230
Adding an event
Adjusting velocity
Event context
menu
• Right-click in the
editing area while
holding down ALT to
display the event
context menu.
• Click to add an event
• Click and drag an
event/selection up or
down to adjust its
velocity*
Deleting an event
These actions can be
swapped using the
Preferences panel.
• Right-click to delete an event (or selection)
Selecting and deselecting events
• SHIFT-click an event to select it. Any
previously selected events are de-selected.
• Click an event while holding SHIFT and CMD
(Mac) or CTRL (Windows) to add it to the
selection. Clicking the event again with these
keyboard modifiers held down de-selects it.
• SHIFT-click and drag to draw a selection
box, from an empty area or from an event
(the event is included in the selection). Also
hold down CMD (Mac) or CTRL (Windows) to
add to an existing selection.
• SHIFT-click an empty area to de-select any
selected events.
Programming and editing pattern events
The guide below shows the main editing functions available for patterns. For a full guide see
chapter 9.
* It is possible to adjust any graph type in this way instead of Velocity, using the Drag edits
function in the Pattern editor.
© 2016 FXpansion Audio
Loading...