


BFD2
Table of contents
 Loading...
2.0.1
Dec 2007
www.fxpansion.com

Contents
.MANUAL
6 chapter 01: INTRODUCING BFD2
6 1:1 An introduction to BFD2
6 • Welcome to BFD2
6 • Credits
7 1:2 BFD2 Architecture
7 • How BFD2 works
7 • Anatomy of a kit-piece
8 • Articulations
8 • Mic channels
10 • Microphone buses
11 1:3 Recording notes
11 • Personnel
11 • Kit preparation and tuning
11 • Recording path
12 • Microphones
13 1:4 Introduction to the BFD2 interface
13 • Control conventions
14 • Interface overview
14 1:5 Control bar
14 • Page buttons
14 • Preset indicator
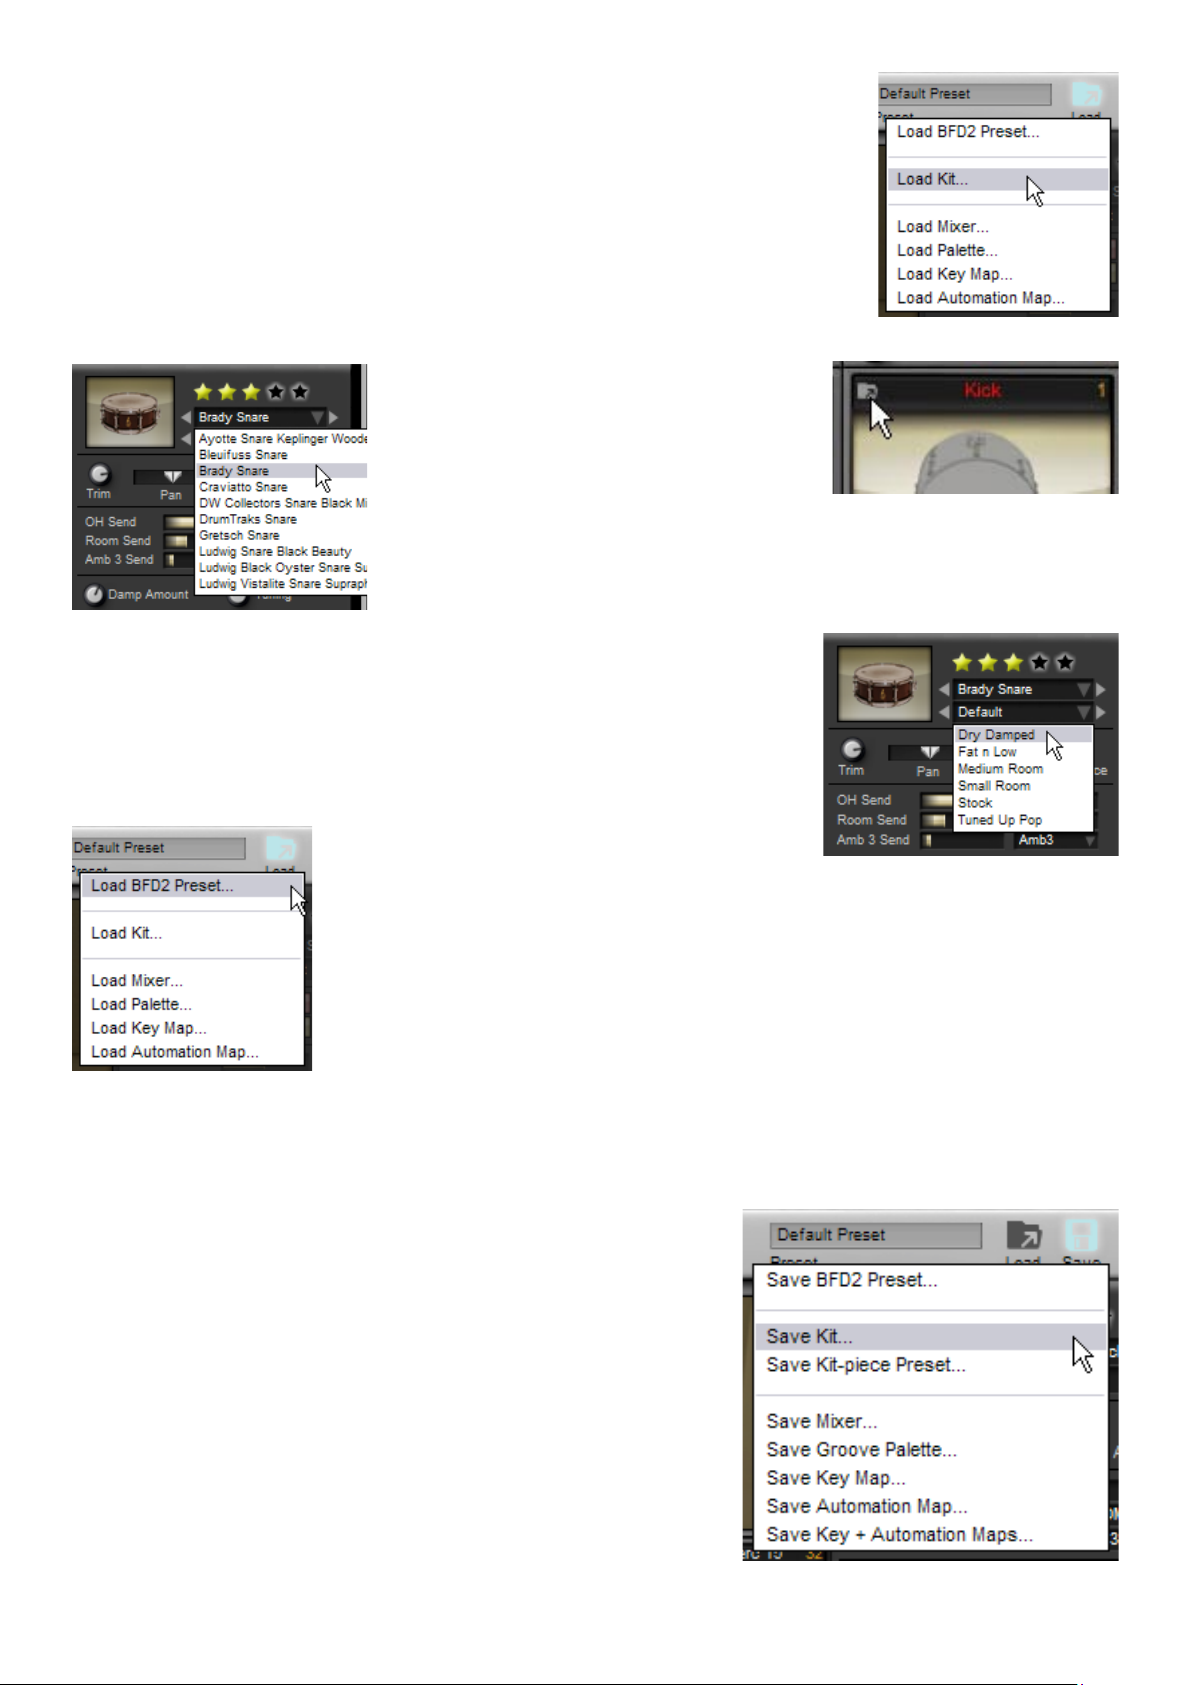
15 • Load menu
15 • Save menu
15 • Gain
15 • Help menu
16 1:6 Status Bar
16 • MIDI Log
16 • Audio stream indicator
16 • MIDI stream indicator
16 • RAM indicator
16 • CPU and hard disk performance meters
16 • Offline switch
17 • Controller learn
17 • Context info display
17 • Transport
18 • Rude Solo light
18 • Beat light
18 • Tempo
18 • Time signature
18 • Playback position
19 1:7 Loading BFD2 Presets
21 1:8 Saving BFD2 Presets
21 • Elements saved with Presets
22 1:9 BFD2 Help functions
22 • Context info display
22 • Tool-tips
22 • Help menu
23 • Getting further help with BFD2
24 chapter 02: KIT PAGE
building and adjusting your kit
24 2:1 Kit page overview
25 2:2 Kit Size
25 • 10-piece kit
25 • 18-piece kit
26 • 32-piece kit
26 • Switching kit sizes
27 2:3 Loading and saving in the Kit page
27 • Loading in the Kit page
27 • Saving in the Kit page
28 2:4 Loading and saving kits
28 • Loading kits – overview
28 • Controls in the kit chooser panel
30 • Saving kits
31 2:5 Kit display and kit-piece slot windows
31 • Kit display
32 • Kit-Piece Slot windows
33 2:6 Loading Kit-Pieces
33 • Overview
33 • Controls in the kit-piece chooser panel
36 • Possible problems when loading
36 • Building unorthodox kits
37 2:7 Importing your own sounds into BFD2
37 • Sample Import panel
37 • Import settings
38 • Photo settings
38 • Velocity layers
38 • Import & Cancel
38 • Progress bar
39 2:8 Kit page toolbar
39 • Select
39 • Link
39 • Note Learn
39 • Clear Kit
40 2:9 Kit-piece inspector
40 • Photo & star rating
40 • Kit-piece quick-load controls
40 • Kit-piece presets
41 • Basic kit-piece controls
42 • Ambience sends
42 • Advanced kit-piece controls
43 • Kit-piece bleed controls
43 • Articulation controls
45 2:10 Mini-mixer
45 • Mixer
45 • Master Dynamics
45 • Master Tuning
45 • Humanize
46 2:11 MIDI Note Learn wizard
46 • Initializing the MIDI learn wizard
47 • Next slot mode
47 • Wait mode
48 chapter 03: MIXER PAGE
engineering your drum sound
48 3:1 Mixer page overview
48 • How to approach mixing
49 3:2 Loading and Saving in the Mixer page
49 • Loading mixer presets
51 • Saving Mixer presets
51 • Varying channels between mixer presets
51 • Loading/saving channel presets
51 • Loading/saving effect presets
52 3:3 Introduction to BFD2 mixer channels
52 • Channel views
52 • Types of channel strips in BFD2
2

55 3:4 Mixer toolbar and utility panel
55 • Reset Mixer
55 • Add Aux
55 • Remove Aux
55 • FX Power
55 • Mixer view switches
56 • Utility Panel
57 3:5 Mixer channel controls and indicators
57 • Controls/indicators in Regular and FX/Sends views
59 • Controls/indicators available in Regular view only
59 • Controls/indicators available in FX/Send view only
61 3:6 Using the mixer
61 • Selecting channels
61 • Rearranging channels on the mixer
61 • Channel processing order
62 • Keyboard shortcuts for mixer operation
62 • Channel context menu
63 • Signal Routing indicators
64 3:7 Using FX
64 • The FX rack
64 • Basic FX controls
65 • Managing FX with the Effect context menu
65 • Swapping and copying FX between slots
66 3:8 Using Sends and Sidechains
66 • Sends panel
66 • Send indicators
67 • Using sends for parallel processing
67 • Using Sidechaining
68 3:9 Mic tools panel
68 • Direct controls
68 • Ambience bus controls
68 • Master bleed controls
69 3:10 Mixer preset panel
70 3:11 Audio Export panel
72 chapter 04: GROOVES PAGE - overview
an introduction to BFD2’s groove engine
72 4:1 Introduction
72 • Key concepts
72 • BFD 1.x users
73 4:2 Grooves page interface
74 4:3 Loading and saving in the Groove page
75 4:4 Undo function
75 4:5 Transport, tempo and time signature
75 • Transport
76 • Beat light
76 • Tempo
76 • Time signature
76 • Playback position
76 4:6 Using the Groove Engine
77 chapter 05: GROOVES PAGE part 1
palettes, grooves and fills
77 5:1 An Introduction to the Palette
77 • MIDI channels and key ranges
77 • Palette and info inspectors visibility
78 5:2 Loading Palettes
78 • Palette chooser
80 • Loading BFD 1.0 and 1.5 Bundles
81 5:3 Loading Grooves
81 • Using the Groove chooser panel to load Grooves
83 5:4 Playing Grooves in the Palette
83 • Triggering Grooves with MIDI notes
84 • Triggering Grooves with Preview buttons
84 • Auto-Play and transport controls
85 5:5 Working with Grooves in the Palette
85 • Selecting Grooves
85 • Operations on Grooves in the Palette
86 • Blending elements of other Grooves in the editor
86 • Slot context menu
87 5:6 Groove Actions
88 • Summary of available Groove Actions
88 • Start Actions for Grooves and Fills
89 • End Actions for Grooves
89 • Slot End Actions for Fills
90 5:7 Importing BFD 1.x Grooves and MIDI files
90 • Importing BFD 1.x Grooves and Bundles
91 • Importing MIDI files into the Palette
91 • MIDI Import panel
92 5:8 Groove and Palette Info Inspectors
92 • Documenting Grooves and Palettes
92 • Palette and Info inspector visibility
92 • Groove Info Inspector
93 • Palette Info inspector
94 5:9 Saving and exporting Grooves
94 • Saving Grooves
94 • Exporting Grooves as MIDI
95 • Export Groove as Audio
96 5:10 Saving Palettes
97 chapter 06: GROOVES PAGE part 2
editing, recording and groove FX
97 6:1 Introduction to the Editor
97 • Editor interface overview
97 • Other topics covered in this chapter
98 • Playing the currently selected Groove
99 6:2 Editor Grid
99 • Kit-piece and Articulation lanes
100 • Events
100 • Ruler and Groove length
101 • Velocity lane
101 • View controls
102 • Zoom and scroll controls
103 6:3 Grooves toolbar
103 • Left and right mouse button tools
103 • Hearing events during editing
103 • Select tool
103 • Draw tool
104 • Erase tool
104 • Mute tool
104 • Velocity tool
104 • Undo button
105 6:4 Other Editor functions
105 • Editor display settings
105 • Metronome
105 • Grid controls
105 • Grid-based destructive processes
106 • Edit menu
106 • Keyboard shortcuts
107 6:5 Combining elements of other Grooves
3

108 6:6 Recording Grooves via MIDI
108 • MIDI Mappings
108 • Initiating recording
108 • Recording modes
108 • Metronome button
108 • Record lead-in
109 6:7 Groove FX panel
109 • Show/Hide advanced Groove FX
109 • Groove FX power
109 • Apply: Groove
109 • Apply: All
110 • Quantize effect
110 • Double/Half time effect
110 • Simplify effect
110 • Dynamics effect
111 • Swing effect
111 • Humanize effects
111 • Humanize Velocity
111 • Humanize Timing
112 chapter 07: GROOVES PAGE part 3
auto-play, drum track and other ways of
using grooves
112 7:1 Auto-Play mode
112 • Auto-Play vs. MIDI triggering
112 • Auto-Play modes
114 7:2 Drum Track Introduction
114 • Enabling the Drum Track
114 • Drum Track synchronization
115 7:3 Drum Track display
116 7:4 Working with the Drum Track
116 • Adding parts to the Drum Track
116 • Manipulating Parts on the Drum Track
117 • Part context menu
118 7:5 Loading, saving and exporting the Drum Track
118 • Saving and loading Drum Track contents
118 • Exporting the Drum track as MIDI
118 • Exporting the Drum track as audio
118 7:6 Combining playback methods
118 • Groove playback and MIDI triggering of articulations
119 7:7 Using BFD2’s MIDI Out
119 • Setting up the MIDI output function
119 • Using the MIDI output as a MIDI input in your host
119 • Latency of the MIDI Out
120 chapter 08: MAPPING PAGE
key and automation mapping
120 8:1 Overview
120 • Loading and saving maps
120 • Key mapping view
120 • Automation mapping view
120 • Switching between views
121 8:2 Loading in the Mapping page
121 • Loading key maps
122 • Key map loaded when BFD2 is launched
123 • Loading Automation maps
123 • Automation map loaded when BFD2 is launched
124 8:3 Saving in the Mapping page
124 • Save Key Map
124 • Save Automation Map
124 • Save Key + Automation maps
124 • Save MIDI Event Log
125 8:4 Key mapping view
125 • Kit-piece listing
125 • Keyboard layout and keyrange selector
125 • Mapping inspector
125 • Clear all keys
126 • Key labelling
127 • Single-articulation previews
127 • Key context menu
127 • MIDI event log
127 • External MIDI Log
128 8:5 Working with the key mapper
128 • Mapping an articulation to a MIDI key
128 • Mapping multiple articulations to neighbouring keys
129 • Layering multiple articulations on a single key
129 • Special articulations
130 8:6 Mapping inspector
130 • Articulation list
130 • Low & High velocity
130 • Velocity Curve
130 • Delete articulation
130 • Variable articulation controls
131 8:7 Introduction to BFD2 automation
131 • Overview
131 • MIDI CCs and host automation
131 • MIDI note automation
131 • Parameter MIDI learn function in the status bar
131 • Automation mapping page
131 • Multiple mappings
131 • Setting a unique MIDI channel for MIDI automation
132 • Automation view interface
134 8:8 Mapping MIDI CCs to BFD2 controls
134 • Automation source table in MIDI CC view
134 • Mapping indication in BFD2 parameter table
134 • Mapping an already-mapped BFD2 parameter
135 8:9 Mapping MIDI notes to BFD2 controls
135 • Automation parameters table in MIDI note view
135 • Creating a MIDI note mapping
135 • Mapping indication in BFD2 parameter table
135 • Mapping an already-mapped BFD2 parameter
136 8:10 Mapping host automation to BFD2 controls
136 • Automation parameters table in host automation view
136 • Creating a host automation mapping
136 • Mapping indication in BFD2 parameter table
136 • Mapping an already-mapped BFD2 parameter
137 chapter 09: ELECTRONIC DRUMS & BFD2
137 9:1 Intoduction to using electronic kits with BFD2
137 • How electronic drumkits work
137 • Cross-talk between triggers and zones
137 • Double-triggering: setting the Retrigger threshold
137 • Latency
138 9:2 Simple hihat control
138 • Advantages and disadvantages of non-variable hihat
control
139 9:3 Variable hihat control
139 • Overview
139 • Assigning variable tip and variable shank articulations
140 • Assigning the hihat height pedal MIDI CC
140 • Customizing hihat pedal response
141 • All Hihats variable setting
142 9:4 Other settings related to hihat control
142 • Preferences
143 • Kit-piece Inspector
4

144 9:5 Positional snare control
144 • Variable snare controls
144 9:6 Controlling cymbals
145 chapter 10: BFD2 PREFERENCES
customizing BFD2
145 10:1 Preferences page overview
146 10:2 Data preferences
146 • Preference Options
146 • Data Path
146 • Startup
147 10:3 Groove preferences
147 • Show Groove Session preferences
147 • MIDI Import
148 • Editor Preferences
149 • Metronome
150 10:4 Session preferences
150 • Session MIDI prefereces
151 • Session Playback preferences
152 10:5 MIDI preferences
152 • MIDI Channels
152 • MIDI Input Transformations
152 • MIDI display
153 • Key Mapping preferences
153 • MIDI Learn Note Wizard preferences
154 10:6 Engine preferences
154 • Streaming Engine
155 • Synth options
156 • Fade preferences
157 • Detail
158 10:7 GUI preferences
158 • Control behaviour
159 • Mixer GUI Options
159 • Kit Page
159 • Keyboard Shortcuts
160 Chapter 11: PROGRAMMING TIPS
160 11:1 Building the kit
160 11:2 Using Velocity layers
160 • The importance of utilising BFD2’s velocity layers
160 • Deploying velocity layers effectively
160 • Dynamics controls
161 11:3 Using articulations effectively
164 chapter 12: MIXING AND EFFECTS USAGE
164 • Overview
164 • D.CAM FX
165 12:1 Mixing basics
165 • Mic channel usage
165 • Panning
165 • Gain levels
166 • Approaching EQ and compression
167 12:2 EQ and filtering
167 • EQ
167 • Filter
168 • Filter Mod
169 12:3 Dynamics processing
169 • Common compression parameters
169 • Advanced features in BFD2’s dynamics processors
170 • Comp Chan
170 • Comp Bus
171 • Noise Gate
172 12:4 Distortion
172 • Drive
173 • Bit Crusher
174 12:5 Other effects
174 • Gain
174 • Delay
175 • Flanger
175 • Chorus
176 • RingMod
176 • Frequency shifter
176 • TinCanVerb
177 12:6 Mixing each part of the kit
177 • Kicks
177 • Snares
177 • Hihats
178 • Toms
178 • Cymbals
179 12:7 Routing scenarios
179 • Creating sub-mixes for processing mic channels
together
179 • Mic channel separation
179 • Creating sends to an external reverb
180 12:8 External processing
180 • Artificial reverb
180 • Distortion and re-amping
180 • Noise
180 • Resampling and re-sequencing
161 11:3 Damping, tuning and tightening
161 • Damping kicks, snares and toms
161 • Tightening closed hihats
161 • Tuning the kit
162 11:4 Layering
162 • Introduction to layering
162 • Simple layering using the Link function
162 • Layering individual articulations in the Mapping page
162 • Creative and experimental layering
163 11:5 Programming patterns
163 • Drumming fundamentals
163 • Transcribe, study and edit existing drum parts
163 • Physical interfacing with the computer
2.0.1
Dec 2007
manual revision 2
5

chapter 01 INTRODUCING BFD2
1:1 An introduction to BFD2
Welcome to BFD2
Thank you for purchasing BFD2!
Welcome to the most advanced acoustic drum production environment ever. As you begin to explore the software and manual
you’ll start to realise the sheer power you have at your fingertips.
About this manual
There is a huge amount of functionality in BFD2, so please take the time to study this manual as you delve into the software. We
realise it’s a rather large manual, but it is broken down into fairly easily digestible sections, logically structured for each part of the
software.
Remember to use the PDF bookmarks integrated into the document to make navigation through the manual quick and easy.
Credits
SKoT McDonald Project lead, Programming (synthesis engine and mixer)
Paul Chana Programming (kit page, panels and Installer)
Steve Baker Programming (Groove engine)
Andy Simper Programming (effect DSP & circuit modelling)
Angus Hewlett Programming (adapters, licensing)
Andreas Schnetzler Programming (website)
Gareth Green Lead audio engineering, production, editing
Alex Akers Graphic design (interface, 3D modelling)
Rus Brockman Graphic design (packaging)
Mayur Maha Documentation
Rob Bantin Quality assurance engineering
Rhiannon Bankston-Thomas Marketing & Sales
Julia Titchfield Artist relations & Publicity
Emre Ramazanoglu Session drumming
Darrin Mooney Session drumming
Kevin Hay Assistant audio engineering
Ben Ferns Photography and video
Ryan Sellers Technical support
Alex Volmer Technical support
Steve Duda & Husky Hoskulds BFD 8BK Audio Content (Electronic)
John Emrich BFD PER Audio Content (Percussion)
BFD2 Grooves: Jacques Mathias, Patchen Preston, Mikael Adle, Jessy Schmidt, Derik White, Kevin Hay
BFD1 Grooves: Chris Dagley, Mayur Maha
Recorded at AIR Studios Lyndhurst Hall, London
Thanks to all the beta testers, especially Rail Jon Rogut, Robert Sfeir, Ralf Steyrer, Jordan L. Chilcott, Christopher Reis, Oliver
Kauert, Andrew Cordani, Mikael Adle, Murray McDowall and Hiroaki Honshuku!
Additional thanks to Apostrophe, BLT, Cay Tre, Karma, all pizza places in a mile for keeping us caffeinated and fed... to the
Foundry, Charlie Wright’s, Bar Music Hall, Pool bar, Bricklayers and every booze emporium in Shoreditch for keeping us sane...
...to all our families and friends.... cheers!
© 2007 FXpansion Audio UK Ltd.
www.fxpansion.com
6

1:2 BFD2 Architecture
How BFD2 works
Disk-streaming multi-channel sample playback engine
At the heart of BFD2 is a sample playback engine that streams multi-channel audio recordings of drum, hihat, cymbal and percussion instruments – called kit-pieces – being played in various ways, and recorded with multiple sets of microphones.
There is an inherent latency when accessing files on a hard drive. Because of this, BFD2 caches a short segment of the start of
every sound in system memory. Therefore, even though BFD2 can use a lot of RAM, it allows you to use sounds with detail levels
far beyond conventional RAM limitations. Hard disk space is far cheaper than RAM, and will be for the foreseeable future.
Dedicated interface for working with multi-channel acoustic drums
Rather than having to work with a generic sampler interface and sample libraries designed within its limitations, BFD2’s user
interface allows you to work with its hyper-detailed sample library as if you were playing and mixing a real drumkit!
There are functions dedicated to building the custom kit of your dreams in seconds, tuning and damping kit-pieces, and high-end
studio quality mixing tools. It features simple-to-use mapping tools, and dedicated support for electronic drumkit systems. Meanwhile, the flexible Groove engine lets you lay down convincing drum tracks quickly and easily.
Anatomy of a kit-piece
Articulations
A kit-piece is made up of one or more articulations. These were referred to as ‘hit types’ in previous versions of BFD. An articulation is an individual way of playing a percussive instrument such as a drum, cymbal or hihat. For example, hihats feature up to
11 articulations – a pedal-down sound (‘foot-chick’) and tip and shank (edge) sounds when the hihat is closed, fully open and at
three positions in-between.
Good use of multiple articulations allows greater realism than using conventional sample-sets, because of the expressive range
possible on a drumkit.
Velocity layers
Each articulation is made up of a number of audio files, called velocity layers. These audio files are recordings of the articulation
being played at varying intensities from soft to hard. As well as the amplitude (‘loudness’), the timbral response of percussive
instruments varies greatly with playing dynamics.
The high amount of velocity layers in BFD2’s sounds lets you recreate the sound of dynamic drumming, giving convincing results
when using accenting. This is very important in the formation of realistic grooves.
Multi-channel audio files
Each velocity layer is an audio file made up of multiple channels. These are recordings from several sets of microphones used to
capture each kit-piece. Real drum recording situations commonly use multiple mic setups in order to capture a variety of different
elements.
Firstly, a kit-piece may sound different depending on where a mic is placed. Snares sound very different when mic’d from above
compared to from below – a mic placed on top captures the ‘pop’ of the skin being struck, while the crunch and sizzle of the mesh
snare is captured at the bottom. Meanwhile, mics inside kick drums tend to pick up the ‘snap’ or ‘click’ of the beater striking the
drum. The main ‘thud’ and low-end power is captured by a mic outside the kick drum.
Drum recording situations also make use of stereo sets of mics to capture the kit as it sounds as a whole within a space. They
capture the projection of the kit and its reflections within the room much more effectively than individual directional close mics on
various parts of the kit, which sound very dry in comparison.
7

Articulations
Here is a summary of possible articulations in BFD2. Please note that some kit-pieces do not contain all possible articulations.
Kicks
Snares
Hihats
Toms
Cymbals
Hit
No Snare
Hit
Rim
Sidestick
Drag
Half-edge*
Pedal
Closed tip
Closed shank
1/4-open tip
1/4-open shank
1/2-open tip
1/2-open shank
3/4-open tip
3/4-open shank
open tip
open shank**
Hit
Hit
Bell
Edge
*Half-edge is the skin or head struck
half-way between the centre and
the edge. Most previous BFD libraries
featured a flam instead
** previous BFD libraries did not include an open shank articulation
To support electronic drums, all tip
and shank hihat articulations can
also be triggered via a MIDI CC and 2
‘virtual articulations’ – variable tip and
variable shank
3-articulation cymbals are new in
BFD2
Percussion
Hit
Alt
[more...]***
***Percussion slots, like all slots in
BFD2, can have more than 2 articula
tions. This allows you to load large,
complex percussion pieces from
the BFD Percussion expansion pack,
which required one of 2 snare slots in
BFD 1.5.
Mic channels
Each velocity layer sample of each Kit-Piece articulation possesses 12 mic channels (3 stereo, 6 mono):
Ambience channels (stereo)
Overhead
Room
• M/S Room in BFD2
• Stereo room in most previous BFD libraries
Amb3
• Room2 in BFD2’s library
• PZM in most previous BFD2 libraries
The signal from the stereo Overhead mic set, above the kit.
The signal from the room mics. BFD2 features an M/S room
mic set. BFD2’s mixing engine decodes each M/S-re
corded kit-pieces on the voice level, so you can mix and
match kit-pieces with previous BFD libraries, most of which
feature a stereo Room.
The signal from the third set of ambient mics. The wide,
high placed Room2 mics in BFD2 and PZMs in previous
libraries all tend to sound huge!
-
-
8

Direct mic channels (mono)
Kick In
Kick Out
Snare Bottom
Snare Top
Snare Top2
Multi
The signal from the mic inside the kick drum.
The signal from the mic outside the kick drum.
The signal from the mic underneath the snare drum.
The signal from the first mic above the snare drum.
The signal from the second mic above the snare drum.
BFD2’s library is the first to contain this mic channel, which
does not exist in previous BFD libraries.
The signal from the direct mic for all Kit-Pieces except
kicks and snares. This is usually empty for kicks and snares.
Primary direct and bleed channels
The kick and snare mics are used for all Kit-Pieces, as bleed signals are recorded through them.
A Kit-Piece’s own close mic’d direct signal is known as the primary direct mic channel. For a kick, this is in the Kick In and Out mic
channels, and for a hihat or cymbal, it is in the Multi mic channel.
The Kick In/Out mic channels are the primary direct mic channels for the kick. Bleed from the kick appears in the Snare Bottom/Top mic channels. The Multi mic channel is empty for kicks, except on certain BFD XFL kicks, which feature bleed captured
through the hihat mic.
The Snare Bottom/Top mic channels are the primary direct mic channels for the snare. Bleed from the snare appears in the Kick
In/Out mic channels. The Multi mic channel is empty for snares, except on certain BFD XFL snares, which feature bleed captured
through the hihat mic.
The Multi mic channel is the primary direct mic channel for all other Kit-Pieces, whose bleed appears in the Kick In/Out and Snare
Bottom/Top mic channels.
Bleed is only present in the kick and snare mic channels. Bleed from the other mics is not included, because the levels were too
low and not useful enough to justify the extra RAM and hard disk bandwidth required. In any case, bleed can be, in many cases,
an annoying side-effect of the drum-recording process, which is often minimized during post-processing by using noise gates.
9

Microphone buses
As well as mic channels, when using BFD you need to be aware of the four microphone buses, which are ‘virtual groups’ of the
mic channels.
Ambience buses
The ambience buses allow you to approach mixing in BFD2 in the same way as a real drumkit recording. Even though BFD2’s kitpieces possess discrete ambience signals, this is impossible to achieve when recording a real drumkit, when any ambient mics
capture the sound of the whole of the kit.
Also, while you can manipulate each kit-piece’s direct mics as channels in the BFD2 mixer, there are too many ambience channels (three channels would be required for each kit-piece) to control each kit-piece’s ambience efficiently.
Therefore, the overhead, room and amb3 signals for all kit-pieces are each organized into groups called the ambience buses.
Please note that you can, in the kit-piece inspector, route the ambience signals to individual Aux channels on the mixer if you
wish. This facility is provided for advanced and experimental mixing applications. If you do this, you can still control the Width of
each ambience type using the Mic Tools panel in the Mixer page’s Utility panel.
Overhead
Room
Amb3
The Overhead mic channels from all
Kit-Pieces.
The Room mic channels from all KitPieces.
The third set of ambient mic channels
from all Kit-Pieces.
Direct bus
There is a fourth mic bus, called the Direct bus, which represents the direct mic channels of all kit-pieces mixed together. This
does not have a dedicated channel on the mixer by default, although you can create one if you wish by adding an Aux channel
and routing all kit-pieces’ direct channels to it.
You can, however, control the level of the Direct Master bus using the Direct fader in the Kit page’s Mini-mixer section, or using
the Direct Master level control in the Mixer page’s Mic Tools panel.
How mic buses are used in BFD2
Mic buses are controlled via the Mic Tools panel, part of the mixer’s Utility panel. In this panel, you can control the level of the
Direct bus, as well as the Width and Distance of the ambience buses.
The ambience channels that exist in the Kit page’s Mini-mixer and in the main Mixer page should not be considered as mic buses.
This is because while ambience signals from individual kit-pieces can be routed to other aux channels, they are still considered
to be part of the ambience buses. They are still affected by the Width parameters in the Mic Tools panel, although for technical
reasons the Distance controls do not apply.
10
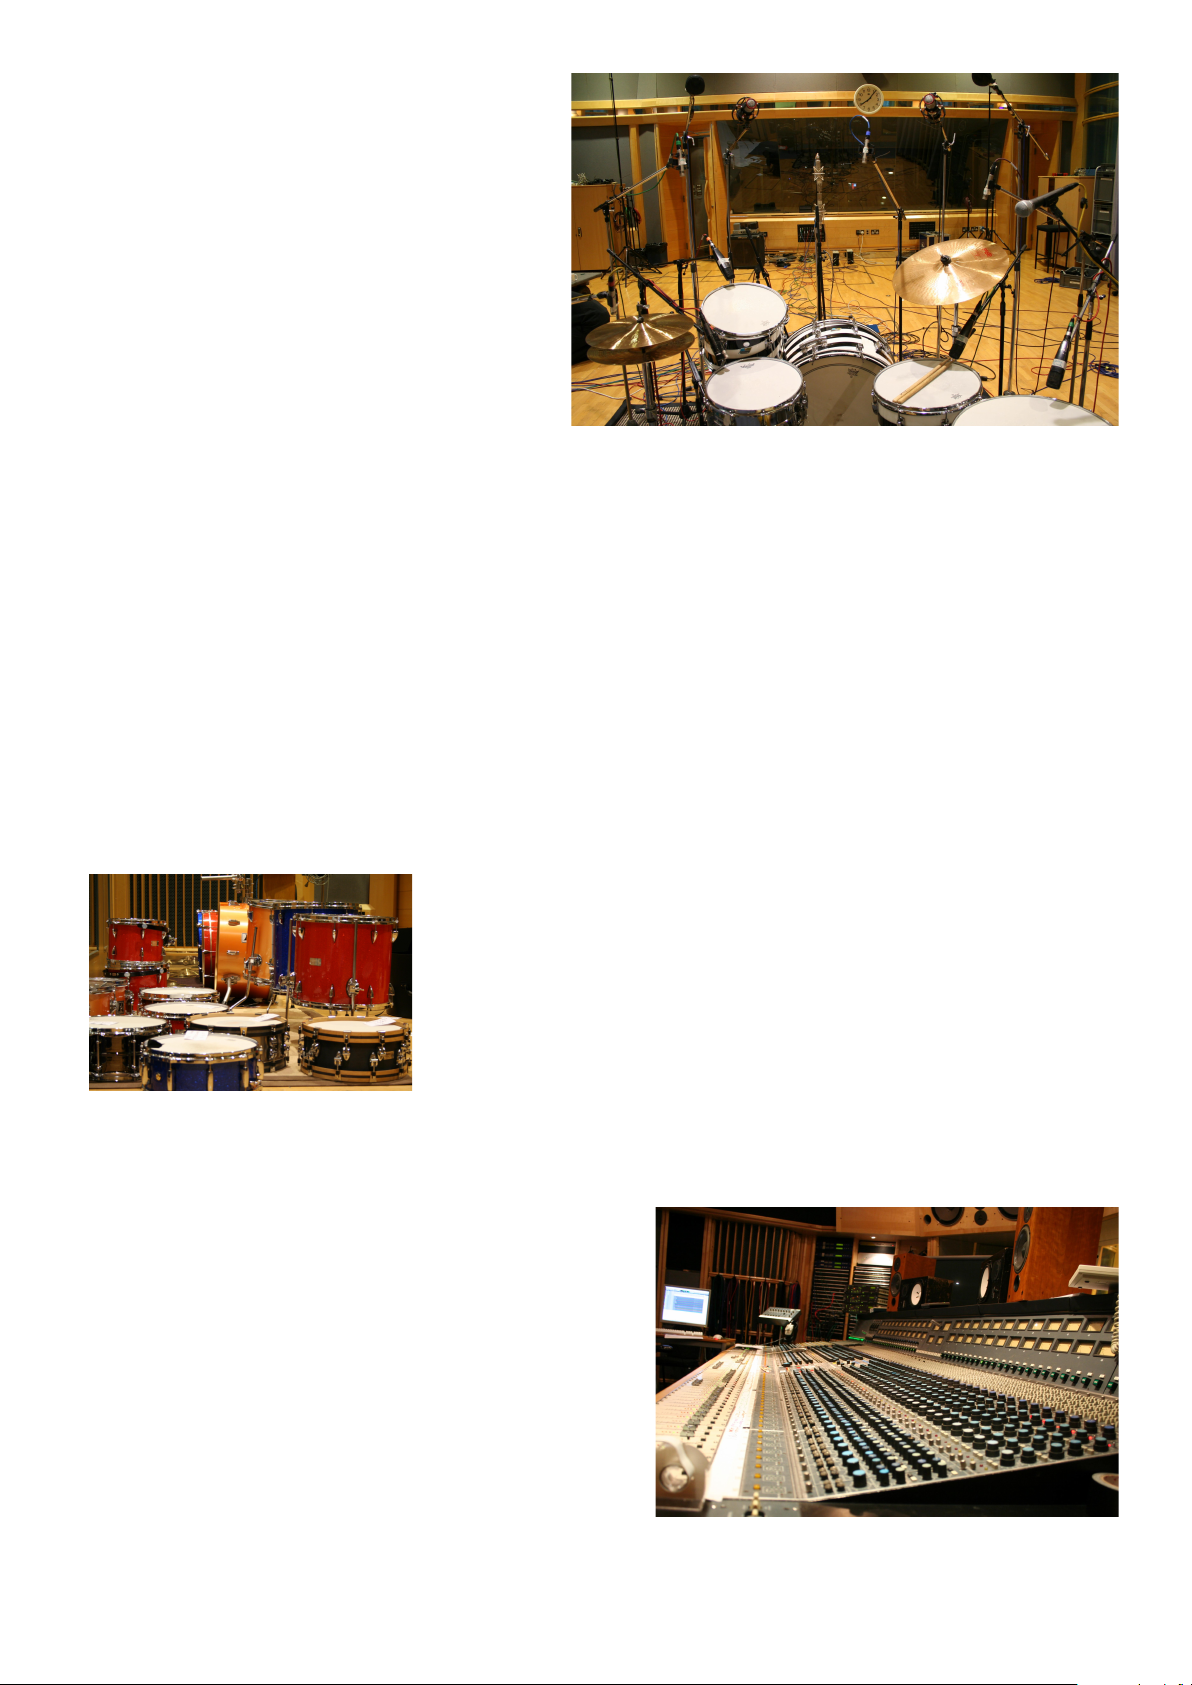
1:3 Recording notes
BFD2’s sounds were recorded in studio 1 at AIR Studios at
Lyndhurst Hall, Hampstead, London.
AIR Studios was started in 1969 by George Martin, a producer famous for his work with The Beatles.
It moved to its present location at Lyndhurst Hall, a stunning
grade II listed converted church in Hampstead, in 1991. It
offers one of the best live rooms in the UK.
Studio 1’s recording room could be described as medium
to large sized. It consists mainly of wooden surfaces with
excellent dispersion characteristics and a fast decaying
‘explosive’ sounding reverb quality.
The size of the room offers a lot of options when recording,
with very different reverb characteristics depending on the
position and height of ambience microphones.
This room was portioned into a slightly smaller space more appropriate for drum recording, without losing its lush reverberant
sound.
The mixing console in the studio 1 control room is a rather special custom Neve featuring ‘AIR Montserrat’ mic preamps. It was
designed in 1989 by Rupert Neve with consultation from George Martin, and is a classic fully-discrete Neve design offering a
bandwidth of 100 kHz.
Personnel
All sounds were recorded and edited by Gareth Green, with engineering assistance from Kevin Hay.
Drumming duties were shared between Emre Ramazonoglu and Darrin Mooney, both respected and experienced session players.
Kit preparation and tuning
During the sessions, the primary objective was to capture the instruments as organically and powerfully as possible, while covering different kinds of voicing and tuning. A lot of the drums, especially the vintage kits, have loose hardware and other supposed
flaws. These have all been retained, as there really is nothing worse than sterile, characterless drums.
The drums, hihats and cymbals themselves are a mixture of modern, vintage and
custom instruments.
The library includes two historic and famous kits. Firstly, a classic Ludwig ‘Spiral’ Vistalite that was once owned and played by the late John Bonham and, secondly, Ringo
Starr’s Blue Oyster Ludwig kit that was used on a number of classic albums.
The other instruments in the library were selected to offer a wide tonal and stylistic
range, from the modern, tight punch of the DW Collector’s Series to the warm, rounded
tones of the vintage Gretsch Round-badge kit. We even managed to drag our ‘house
kit’ at FX HQ down to the sessions – a late 70s Rogers XP-8 with Bosphorus hihat and
Brady jarrah wood snare.
Snares especially were carefully tuned to range from deep and loose to tight and ringy with lots of overtones. Drum heads were
chosen in order to complement each individual instrument, while various types of damping were used when appropriate. The
resulting library offers a very wide and varied selection of sounds, great for all kinds of music.
Recording path
All sounds were recorded through the Neve’s AIR Montserrat preamps
into Pro Tools, via Prism ADA-8 XR converters, at 24-bit resolution
with a sample rate of 44.1 kHz.
No EQ, compression or other processing was used on any channels.
11

Microphones
Several microphones were set up for many mic positions, with the most appropriate sets being used for each kit.
Some snares were mic’d using a slightly different technique involving the top snare mics pointing at the side of the snare shell
instead of at the top skin.
BFD2’s snares offer two mics for the top snare position, allowing even more flexibility than before when mixing.
Microphone delay was edited out from the direct channels so all kick and snare mic channels are time-aligned with reference to
themselves.
Bottom snare and outside kick mic channels have been phase-flipped to ensure they are already in phase.
No time-aligning of ambience channels was performed, as this would affect the natural stereo image provided by their timing
discrepancies.
Directs
Kick In
The most appropriate inside mic from the following was chosen for each
kick:
• AKG D112 on the beater side
• ElectroVoice RE20 inside the kick
Kick Out
The most appropriate outside mic from the following was chosen for each
kick:
• Neumann FET 47
• CAD VX2
AKG D112 ElectroVoice RE20
Neumann FET 47 CAD VX2
Snare Top
Snare Top1: Shure SM57
Snare Top2: Neumann KM84
Snare Bottom
Neumann KM84
Hi Hats
Neumann KM84
Toms
Sennheiser MD421 on top skin only
Cymbals
Neumann KM84
Shure SM57 Neumann KM84
Sennheiser MD421 Coles 4038
Manley Gold AKG C12
Overheads
The most appropriate set from the following was chosen for each kit-piece:
• Coles 4038
• Manley Gold reference
Both sets were arranged as stereo spaced pairs, with the Coles in a Blumlein array as they have a ‘figure of 8’ response.
Sony C800
Room
For the first Room mic set, original AKG C12s were used in M/S configuration. They were placed in front of the kit, approx. 8 ft.
away and aligned just above the kick drum.
The use of the M/S configuration is intended to facilitate a good true mono room sound, something which is heard in many classic
drum sounds.
It also has the benefit of being used for widening the stereo image.
The BFD2 mixing engine handles the M/S decoding in real-time on the voice level to take advantage of this type of recording.
Amb3 (Room2)
For the Room2 mic set on the Amb3 mic bus, a stereo spaced pair of Sony C800’s was used, placed diagonally 23 ft away from
the kit and very high up in the room – around 20-25 ft.
Compared to the Room set, this mic set has a more obvious room ‘slap back’ reverb effect. Because of the height of placement, it
captures the size of the room well. It has a brighter, more dense sound.
12
1:4 Introduction to the BFD2 interface
Control conventions
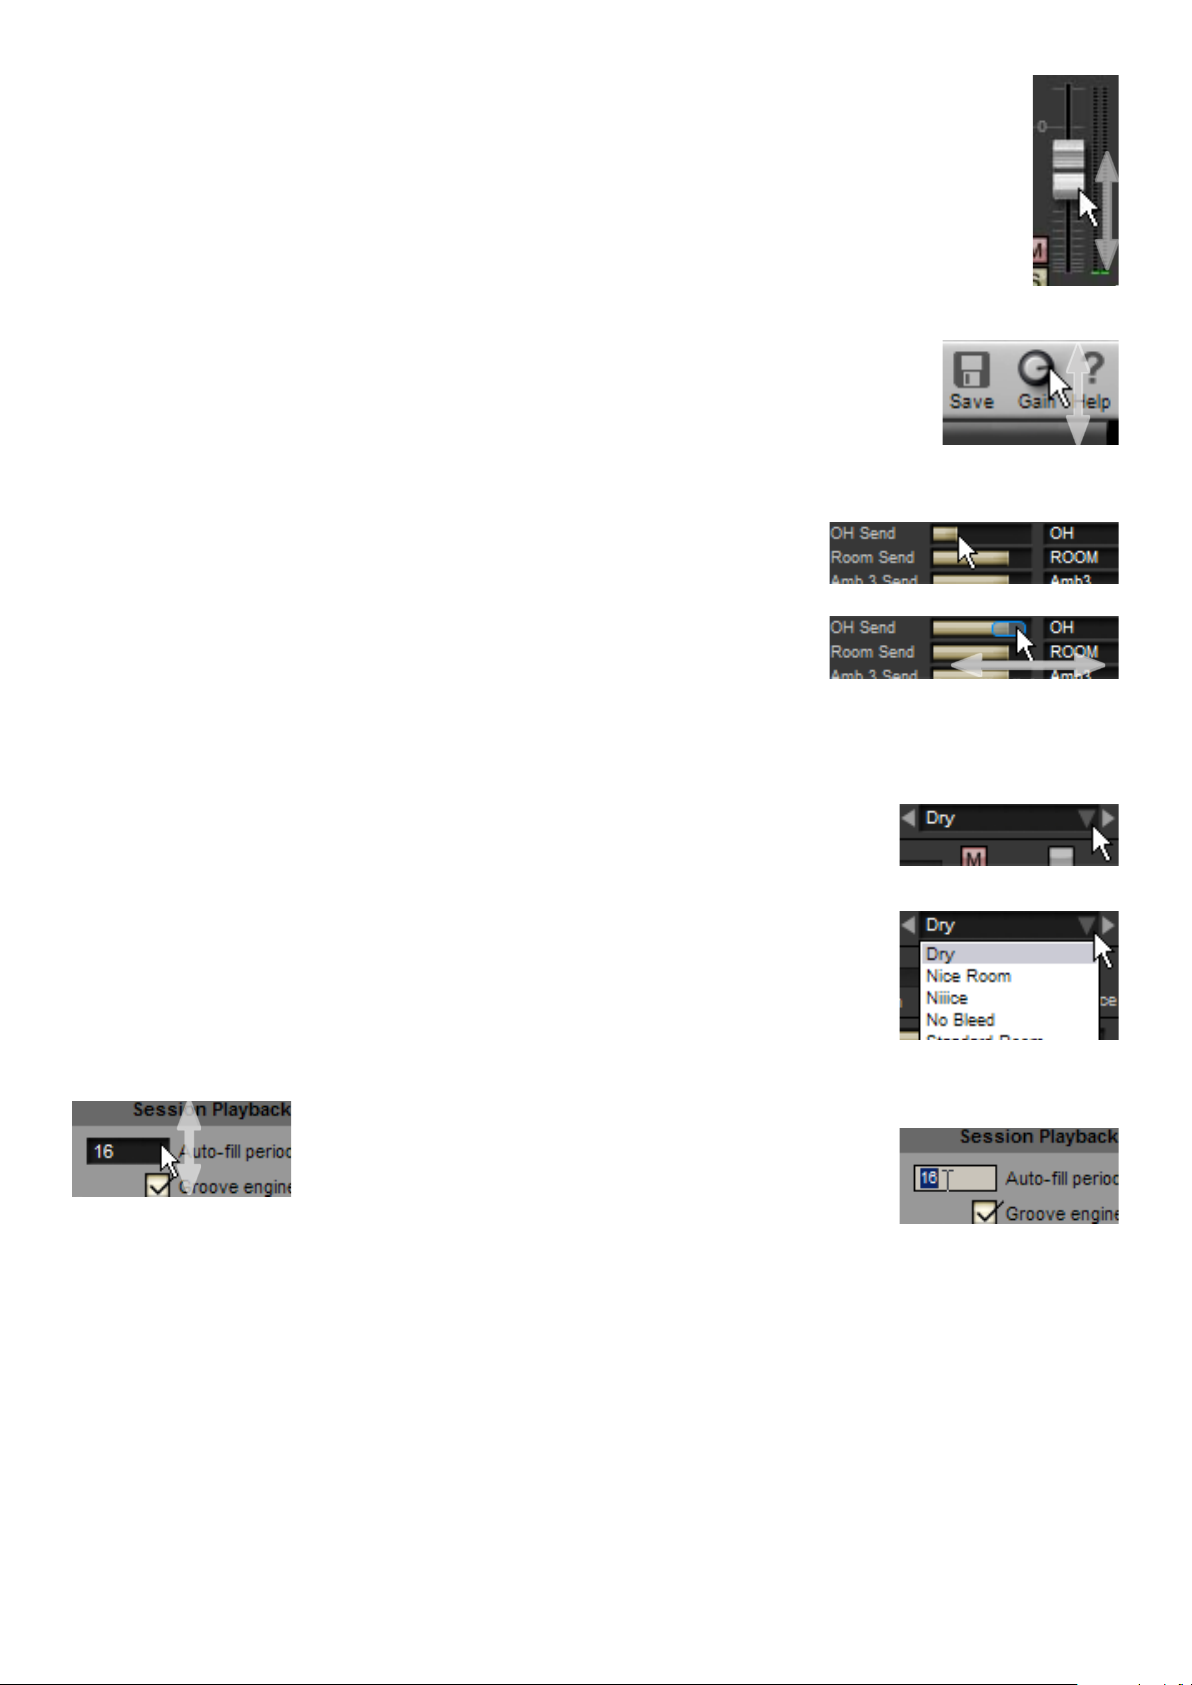
Faders
Faders are controlled by clicking and dragging vertically.
Faders are oriented vertically but some controls, such as the send level controls in the FX/Sends mixer view, are
horizontally aligned but are still controlled by clicking and dragging vertically.
Knobs
Knobs are controlled by clicking and dragging vertically (up/down) by default.
This can be changed to circular motion in the GUI preferences or with the startup wizard.
Graphs
Graphs can be oriented horizontally or vertically. They can be adjusted in 2 ways:
• Click anywhere over the range to jump to a value.
• Hover the mouse near the current value and click and drag in the axis in which the
graph is oriented (horizontally or vertically). This method is much like using the graph as
a fader.
Vertical fader movement
Vertical knob movement
Jumping to a graph value
Adjusting with click and drag
Fine control and returning to default values
• Holding down the SHIFT key while adjusting a knob, fader or graph gives you fine control.
• Double-click a knob, fader or graph to return it to its default value.
Drop-down menus
These are indicated by a downward-facing triangle – click to display the menu.
Click a menu item to select it and hide the menu again, or click elsewhere to just hide the menu.
Other drop-down menus do exist, located on buttons for example. These are detailed in the
manual where necessary.
Click to display the menu
Click any item to select it
Numerical value boxes
These can be adjusted in 2 ways:
• click and drag vertically to adjust the current value.
Click and drag vertically
to adjust
• double-click the box, type a new value and press ENTER or RETURN.
Double-click to type a value
Right-clicking
Right-clicks are used in several parts of the BFD2 interface, particularly for accessing context menus and the secondary tool in
the Groove editing environment.
If you use a Mac and do not have access to a 2-button mouse, you can access right-click functions by holding down the CTRL
key while clicking your mouse button. However, a 2-button mouse is highly recommended!
Some keyboard shortcut that operate with the CTRL key on Windows are accessed on Mac by using the COMMAND key instead.
This is also known as the APPLE key.
13
Interface overview
Page buttons:
These change
the contents of
the main interface.
See section 1:5.
Main interface:
This changes
according to
the currently
selected page.
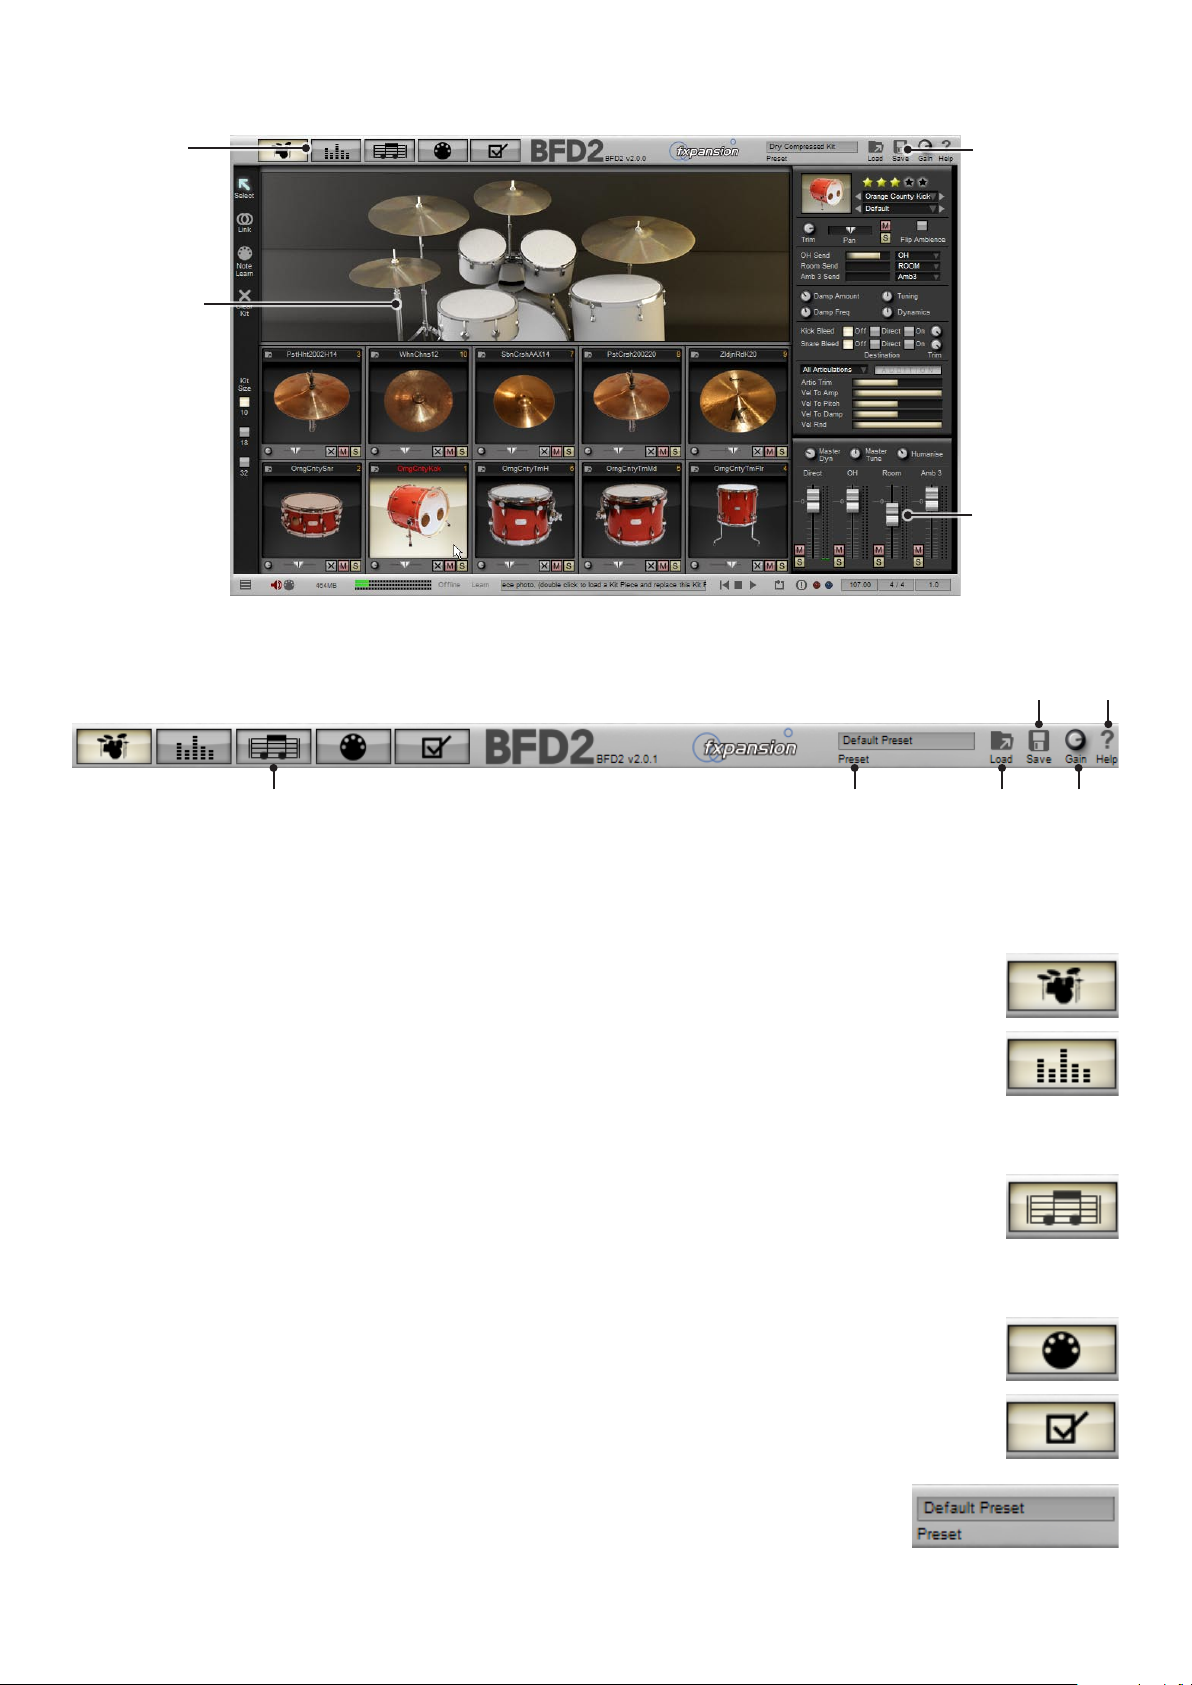
1:5 Control bar
Control bar:
Features the Load,
Save and Help
menus, the Page
buttons and other
functions.
See section 1:5.
Status bar:
Contains various
displays and readouts, and several
important functional controls.
See section 1:6.
Save
menu
Help
menu
Page buttons Preset
indicator
Load
menu
Page buttons
Clicking these large buttons switches to one of the five Pages, each covering a different aspect of BFD2’s operation. Only one
Page can be active at any one time.
Kit page – chapter 2
The Kit page is used for building and tweaking the kit, as well as providing very simple mixing functions.
Mixer page – chapters 3 and 12
BFD2’s advanced and full-featured mixer gives you access to virtually unlimited routing, mixing and effects
processing. The built-in EQ, compression and other effects can be accessed here, as well as advanced mic manipulation and audio export functions. If you’re more of a writer than an engineer, a variety of professional mixer
presets are at your fingertips.
Grooves page – chapters 4, 5, 6 and 7
The Grooves page is an advanced drum sequencing environment allowing you to preview, load and play BFD2’s
library of ready-made Grooves. It also includes an advanced Groove editor, humanization effects and a number
of ways of varying Grooves over time, such as the Drum Track, which allows you to sequence a whole track of
individual Grooves.
Mapping page – chapters 8 and 9
BFD2 features powerful mapping for playing its drum sounds and automating its parameters.
Gain
Preferences page – chapter 10
The Preferences Page allows you to customize BFD2 to your needs by changing a number of settings.
Preset indicator
The Preset indicator displays the name of the last loaded BFD2 Preset. You can also click it to manually
type a new name for the current session, which is also used as the suggested filename when you next
save a BFD2 Preset.
14

Load menu
Clicking the Load button shows a menu allowing you to load various elements into BFD2. The Load menu is partly contextdependent, varying according to whichever Page is currently in view. The menu has 3 sections:
1. BFD2 Preset
A Preset is a snapshot of the entire state of BFD. The Preset loader panel allows you to selectively load different elements of
Presets. For a full guide to loading Presets, please see the ‘Loading presets’ section later in this chapter.
2. Page-dependent elements
Depending on which Page is currently in view, the next part of the menu shows the relevant Load items – the exception is the
Preferences Page, which does not require any loading functions.
3. Commonly used elements
The next section of the menu allows you to load commonly needed elements from Pages other than that currently in view.
The Load menu allows you to load the following elements into BFD2:
• BFD2 presets
• Kits
• Mixer presets
• Palettes
• Grooves
• MIDI keymap
• Automation map – MIDI CC, note and host automation assignments
Save menu
Click the Save button in order to display the Save menu. The save menu is structured in exactly the same way as the Load
menu.
The menu allows you to save the following:
• BFD2 preset
• Kit
• Kit-piece preset
• Mixer preset
• Groove
• Groove Palette
• MIDI keymap
• Automation map – MIDI CC, note and host automation assignments
• Keymap + Automation map
• MIDI event log contents
Groove engine export functions
When in the Groove page, the save menu also gives you access to the groove engine’s export functions.
• Export Groove MIDI
• Export Groove Audio
• Export Track MIDI
• Export Track Audio
Gain
Because it is possible to route audio out of 32 channels when running as a plugin within a host, BFD2 includes an overall
plugin gain control which affects the level of all channels simultaneously.
Do not confuse this control with the Master channel level – the Master channel in the BFD2 mixer is simply a special Aux channel
to which all channels are routed by default, set to outputs 1 & 2 – is all you need if you want to process all BFD2 sounds with the
internal FX and simply output a stereo pair. If this is all that you need, you can use the Master channel level to control the overall
volume of BFD2.
If, on the other hand, you set up more than a stereo output, you can use the Gain control to adjust the volume of all BFD2’s channels together.
Help menu
See section 1:9 for details of the Help menu.
15
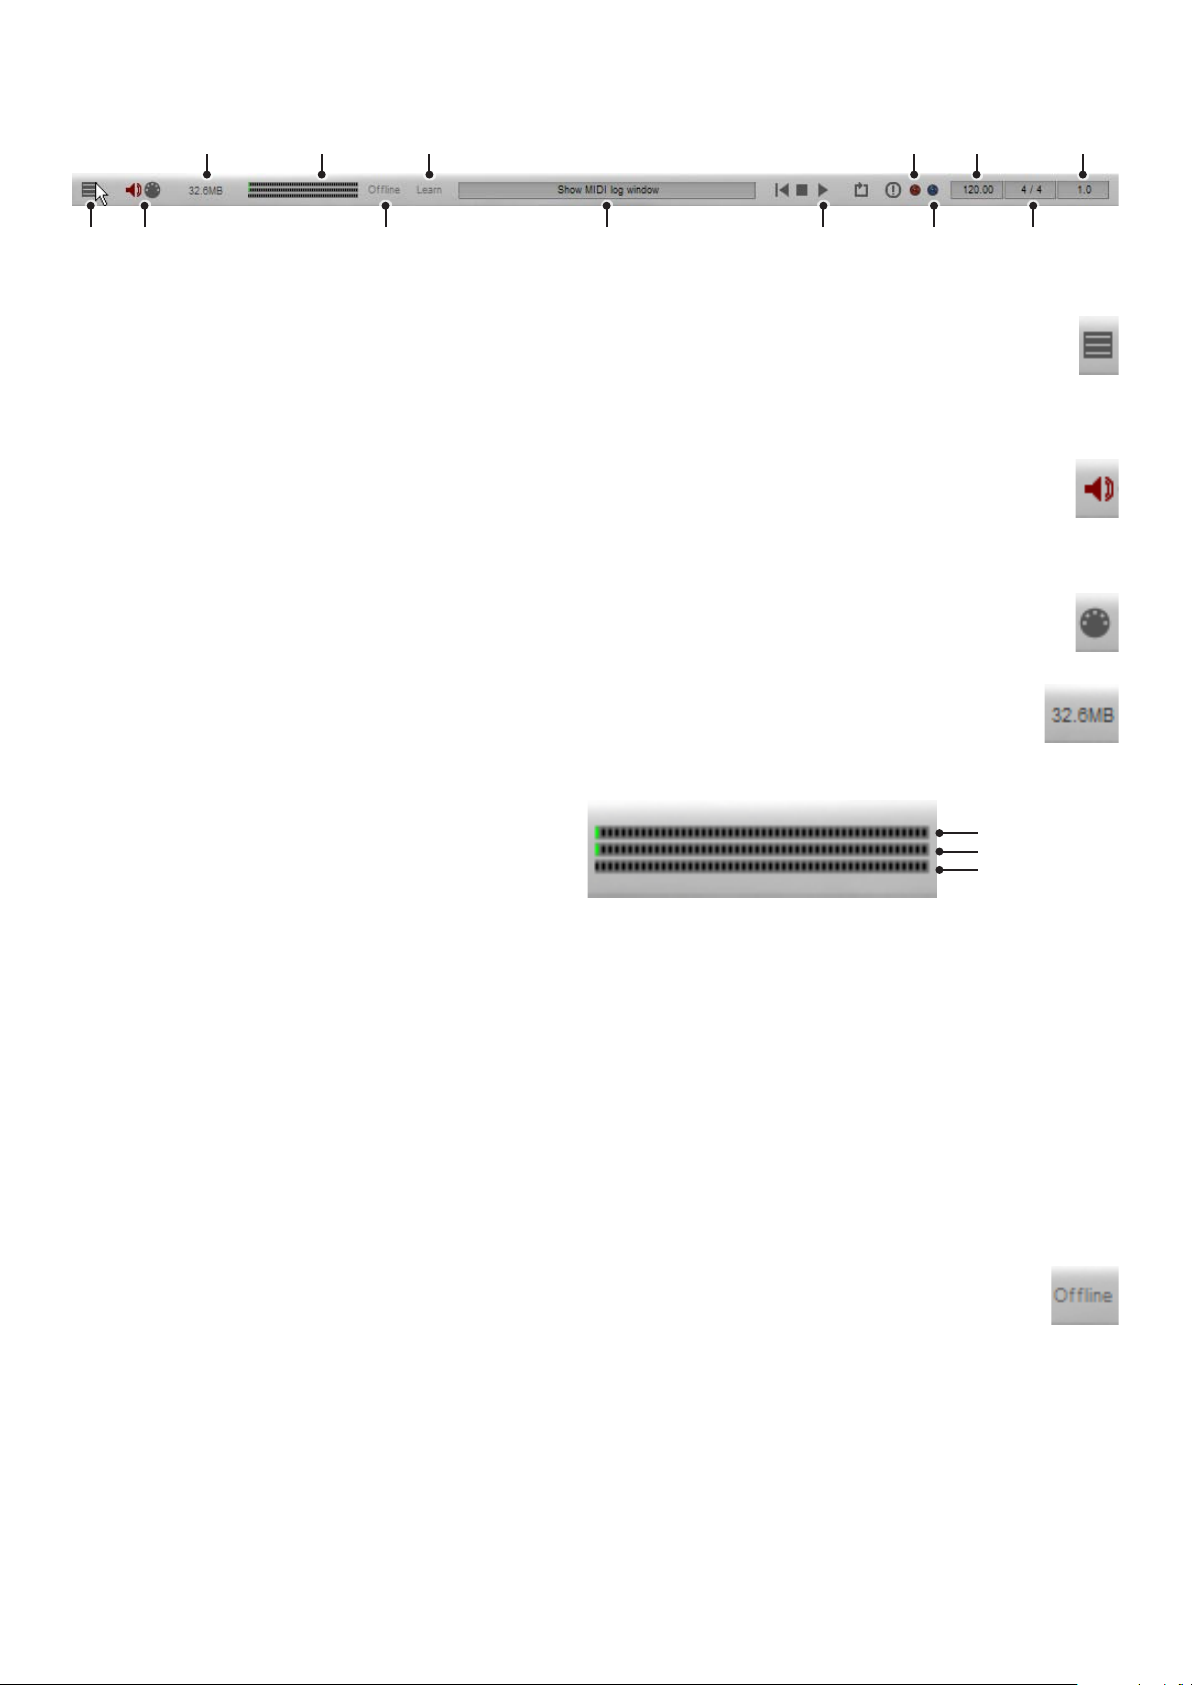
1:6 Status Bar
RAM
indicator
CPU & HD
performance
meters
Controller
learn
Rude
solo light
Tempo
Playback
position
MIDI
Log
MIDI & audio
stream
indicators
Offline
switch
Context info
display
Transport
controls
Beat light Time
signature
MIDI Log
Clicking this button opens an external MIDI log window, making it easy to view and troubleshoot incoming MIDI events. The
contents of the log are identical to the smaller log built into the Keymap page.
See section 8:4 for more details of MIDI logging in BFD2.
Audio stream indicator
The Audio stream indicator lights up when BFD2 has successfully launched and been integrated into the host audio engine
(when running as a plugin) or when the standalone version of BFD2 has successfully established communication with the
specified audio device.
MIDI stream indicator
This indicator lights up whenever BFD2 receives any MIDI input.
RAM indicator
This indicator displays how much RAM is being used by BFD2. This includes the cached start portion of each sound,
plus a small overhead for BFD2’s engine.
CPU and hard disk performance meters
The 3 horizontal meters in the status bar provide a performance guage for several aspects of BFD2’s system resource
usage.
Synthesis CPU
Mixer CPU
Hard disk load
Synthesis engine CPU usage
The synthesis engine is involved in receiving MIDI input or generating Groove engine events and playing back the relevant articulations.
Mixer engine CPU usage
The mixer engine processes all routing, mixing and FX functions in BFD2.
Hard disk load
This meter indicates the intensity of hard disk resource usage. Do not be alarmed if this meter reaches high values, as your
machine may well be able to handle a large amount of disk usage. It is intended as an indicator of the amount of hard disk activity
that is occurring.
If your machine cannot handle the amount of disk usage required, the side-effects are usually clearly audible – tails may be cut or
intermittent, and audio dropouts or other artifacts may occur.
Offline switch
This switch is intended for use with hosts that provide an offline (non-realtime) bounce or mixdown facility. When the Offline switch is on, BFD2 waits for all data to be properly delivered from the hard disk before allowing the host to continue,
ensuring that sounds are not cut off before their full decay is complete.
Please note that Offline mode is non-realtime, and should only be used during offline mixdown or rendering in your sequencer, if
it even offers this feature. Do not leave the Offline switch enabled during ordinary playback.
If your sequencer only provides realtime bouncing facilities (a good example is Pro Tools), you should leave Offline mode turned
off at all times.
16

Controller learn
The controller learn function gives you a quick method of assigning BFD2 controls to MIDI continuous controllers (MIDI
CCs) and even to MIDI notes, so that you can use physical keys, knobs, faders or other controllers to control BFD2 controls such as knobs, faders and buttons.
Using controller learn
1. When the controller learn button is enabled, an overlay appears on the interface, with all MIDI-controllable parameters highlighted in green.
2. Click the desired automatable control and then do one of the following:
• move the physical knob, fader or other controller to assign a MIDI CC
• play a MIDI key to assign the note – this is especially useful for buttons
3. The assignment is made, and the assigned note or MIDI CC number is overlaid on the control.
Please see section 8:8 for more details on automation of BFD2 parameters.
Controller learn context menu
While you are in controller learn mode, right-click on any assignable control to display
the controller learn context menu.
Clear automation
This function clears the control’s current automation mapping.
If the parameter has not yet been mapped, this function is greyed out on the menu.
Context info display
The context info display provides information about the
control currently under the mouse cursor. Parameter names
and values are shown.
While a control is being adjusted, the context info display remains locked to the parameter until the mouse button is released,
showing the value as it changes.
Transport
The transport controls are used in conjunction with BFD2’s Groove engine. Please see section 4:5
for more details about the transport buttons.
17
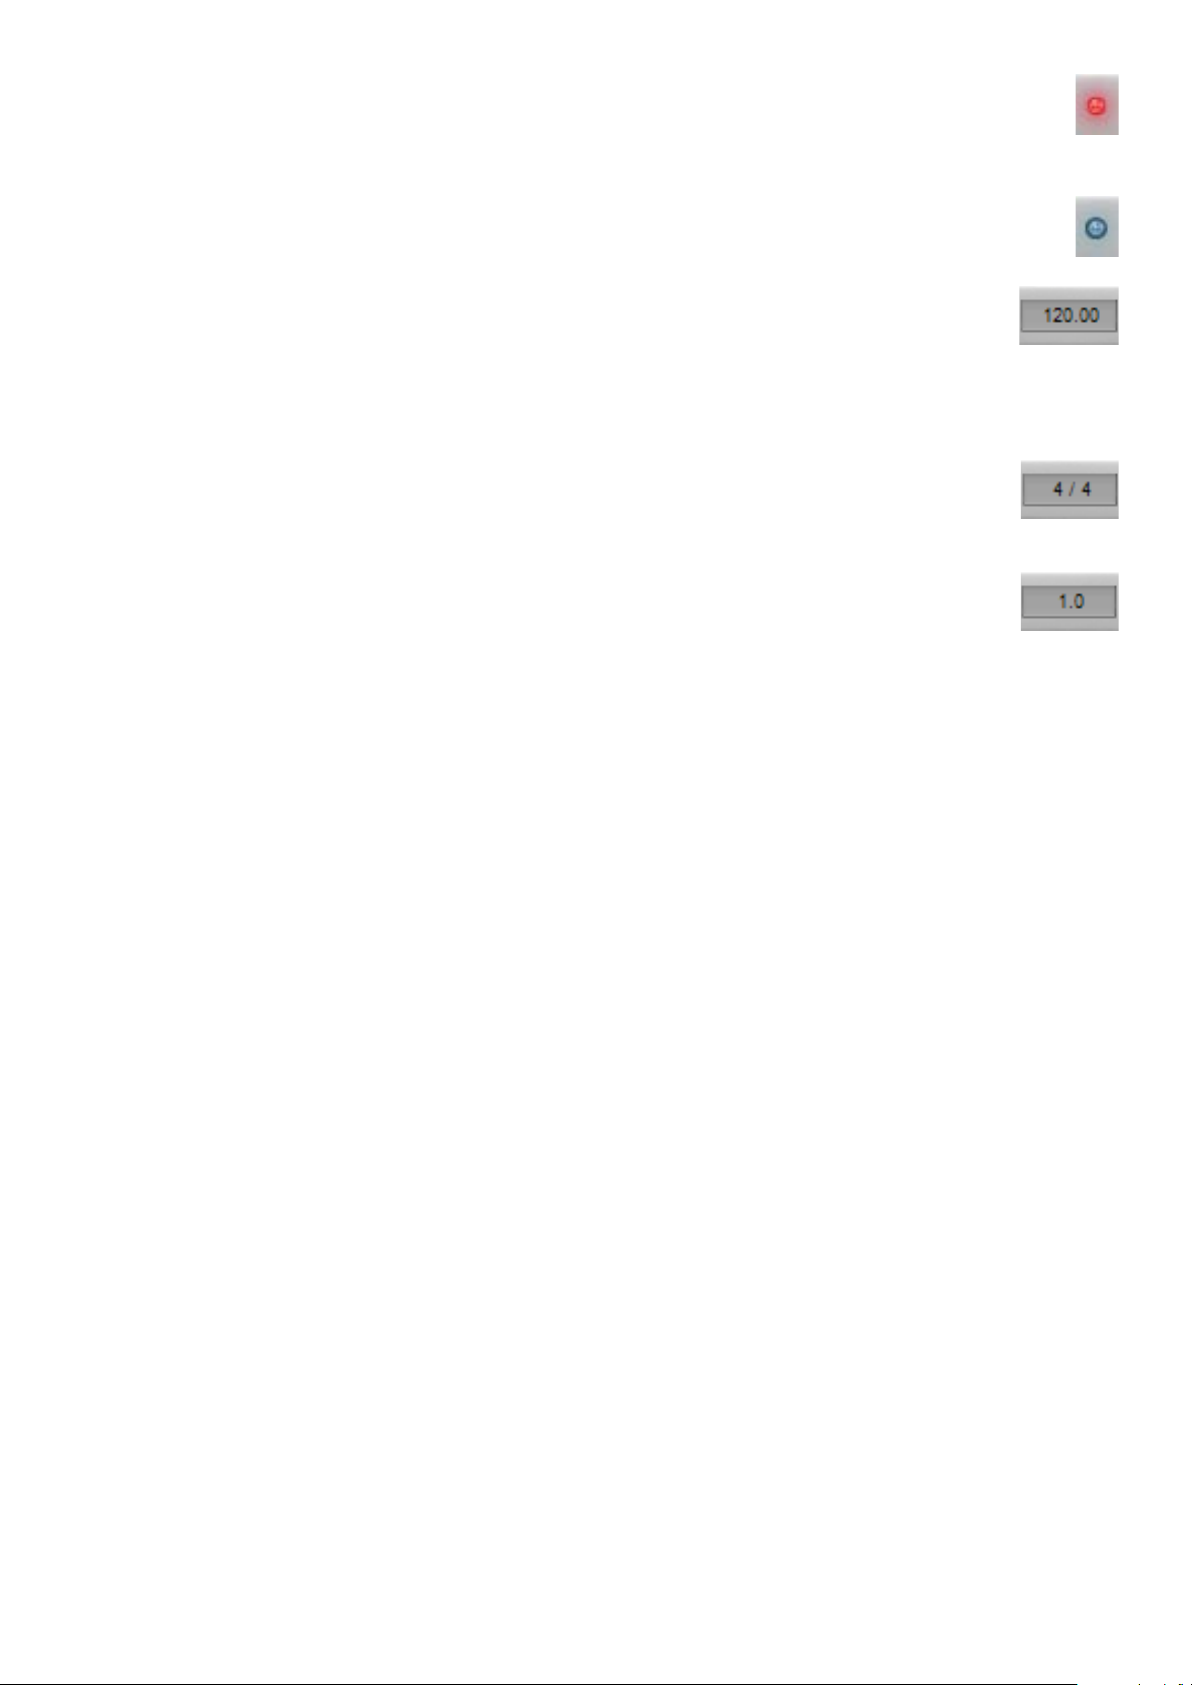
Rude Solo light
The Rude Solo indicator is always lit whenever one or more channels are soloed in the BFD2 mixer.
You can ALT-click this light in order to un-solo all channels currently in a solo state.
Beat light
This indicator flashes on every beat when BFD2’s Groove engine is playing.
Tempo
When using BFD2 as a standalone application, you can enter a tempo for the Groove Engine by double-clicking the
Tempo indicator. Simply type a new tempo and hit ENTER.
You can also click and drag this control up and down to adjust the tempo.
When running BFD2 as a plugin, the Tempo indicator is not editable because BFD2 is locked to the host tempo.
Time signature
Similarly to the tempo, you can enter a new time signature either by double-clicking this indicator and typing a new
value, or clicking and dragging each number in the time signature up and down.
Playback position
This readout is an indicator of the current playback position, in bars and beats, of either the host (when using BFD2
as a plugin), the Drum Track or the current Groove.
18
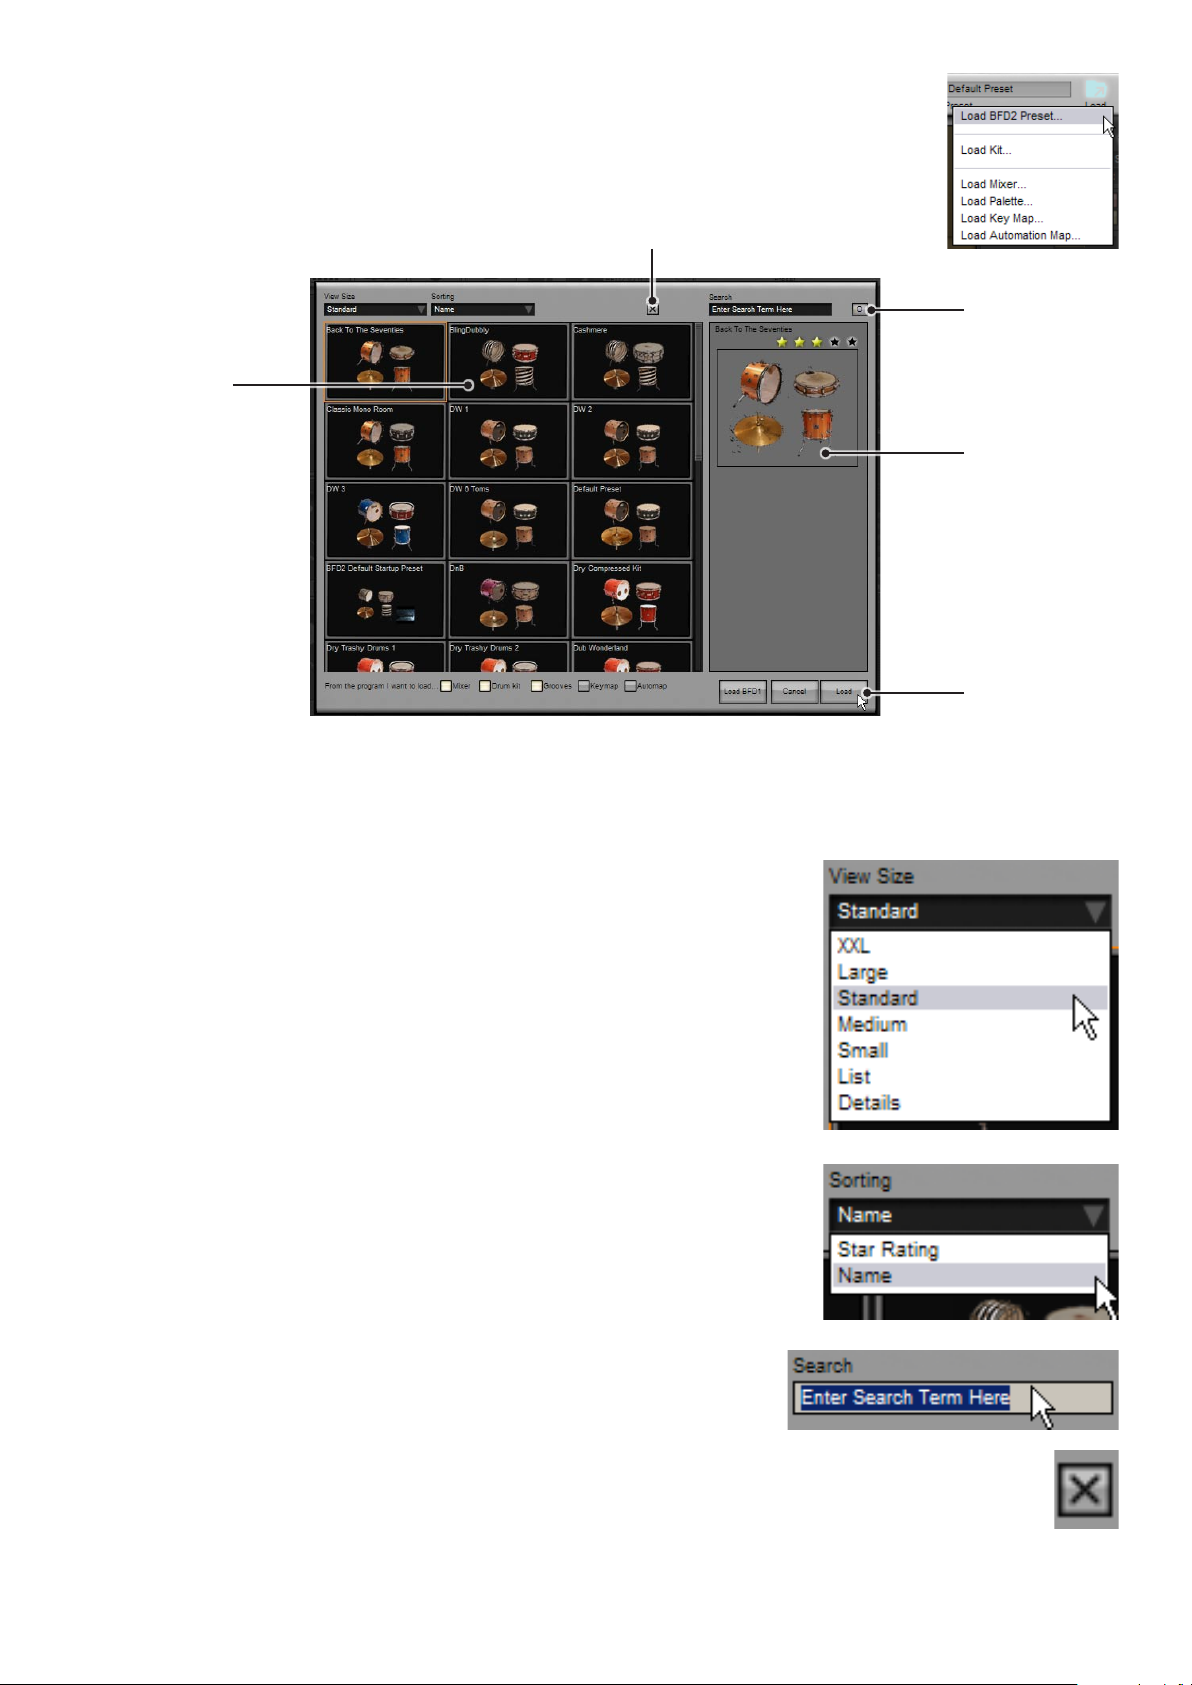
1:7 Loading BFD2 Presets
BFD2 Presets store the entire state of a BFD2 session.
To load a Preset, click the Load button in the Control bar and click on Load BFD2 Preset... from the Load
menu that appears. This opens the Preset chooser panel. Any available preset is displayed with an image
representing its contents.
Delete Preset from database
Preset listing:
click to select or
double-click to
load
Sticky button
Photo &
Star rating
Click a Preset to select it. A larger photo and rating information is displayed in the Info display to the right.
To load a preset, select it by clicking on it and then click the Load button.
You can also load any preset in the listing by double-clicking it.
View size
This drop-down menu selects the size of Preset images shown in the chooser panel listing.
A range of settings are available, including text-only displays. Larger sizes result in larger
photos but requires more use of the scrollbars in order to view all the available Presets.
The ‘List’ and ‘Details’ settings result in faster operation due to the fact that images are not
displayed. You can still see a photo for the Preset by selecting it – its details are displayed on
the right side of the panel.
This setting is recalled between sessions. Its state is stored in the BFD2 preferences
– therefore, if you re-initialize your BFD2 preferences this setting is returned to the default
‘Standard’ size.
Sorting
With this drop-down menu you can sort Presets either by ‘Name’ or ‘Star rating’.
Rating the Presets in the database and sorting the listing by ‘Star rating’ can make it easier
to find your favourite Presets.
This setting is recalled between sessions. Its state is stored in the BFD2 preferences
– therefore, if you re-initialize your BFD2 preferences this setting is returned to the default
(sorting by ‘Name’).
Click to load
the selected
Preset
Search
The Preset chooser panel includes a search facility in order to narrow down the amount
of Presets shown in the listing.
Delete Preset from database
Clicking this button removes the selected preset from the BFD2 database. This feature is provided if you find you have
too many presets and you want to get rid of those which may not be to your taste, making those you do like easier to
find in the Preset chooser. You are asked for confirmation before you can continue.
If you choose to remove a user preset from the database, you are also asked if you want to remove the preset files from disk – if
19

you click ‘Yes’, the preset file and its associated photo are deleted from the <user location>/BFD2/Presets folder. If you click ‘No’,
the preset’s files remain untouched. If you leave user kit files on disk, they are scanned during the next full rescan of the database
(Trash and rebuild all databases in the BFD2 Data preferences).
BFD2 never prompts to delete factory-installed Preset files.
Note that this function always leaves the actual kit-piece audio files untouched – if you want to delete these to recoup hard disk
space, you must go into BFD2’s audio folder and delete the relevant folders.
Sticky button
Enabling the Sticky button results in the Preset chooser panel remaining open after a Preset is loaded.
This is useful if, for example, BFD2 is being played via MIDI and you want to repeatedly change Presets until you find
what you need. Clicking the Sticky button saves you having to keep opening the Preset chooser panel.
Load selective elements from Presets
A BFD2 Preset stores all of the following constituent elements:
• Kit (kit-pieces and kit-piece setups)
• Mixer
• Groove Palette, Drum Track and other Groove page settings
• MIDI keymap
• Automation map – MIDI CC, note and host automation assignments
• Session preferences
A button is provided for each of these elements in the Preset chooser panel, with the exception of embedded Session preferences. Each of these buttons, when enabled, tells BFD2 to load that constituent element of the preset. If an element’s button is
disabled, it is not loaded from the preset.
For example, if you’re working in a session with the Grooves that you want, but you merely want to try out different kit and mixer
settings from various Presets, simply disable the Grooves button – the current Palette in the Grooves page is unaffected when the
new kit and mixer settings are loaded.
By default, the MIDI Map and MIDI CCs buttons are disabled, because you would normally want to stick with the same MIDI mappings when trying Presets.
Load BFD1
Original BFD 1.x Programs are very different types of files to the Preset files used in BFD2. Because of this
they are not shown in the Preset chooser panel, even if you have specified a BFD data path containing valid
BFD 1.x Programs files.
However, BFD2 gives you the ability to load a BFD program file through an additional file load dialog. To do this, click the Load
BFD1 button to bring up a system file open dialog. Then browse to and select the BFD1 program file that you want to import.
After the program file has been loaded in this way, it is recommended that you re-save it as a BFD2 Preset, in order to be able to
load it easily from the Preset chooser panel.
Load / Cancel buttons
To load the currently selected preset, click the Load button.
You can also load any preset by double-clicking it in the listing.
If you change your mind and decide you don’t want to load a new preset, click the Cancel button.
Keyboard operation
You can navigate around the available presets with the cursor (arrow) keys.
The selected preset can be deleted from the database by pressing the DELETE key.
Load the selected preset by pressing the RETURN or ENTER key.
To exit the Preset chooser panel without loading anything, press the ESC key.
20
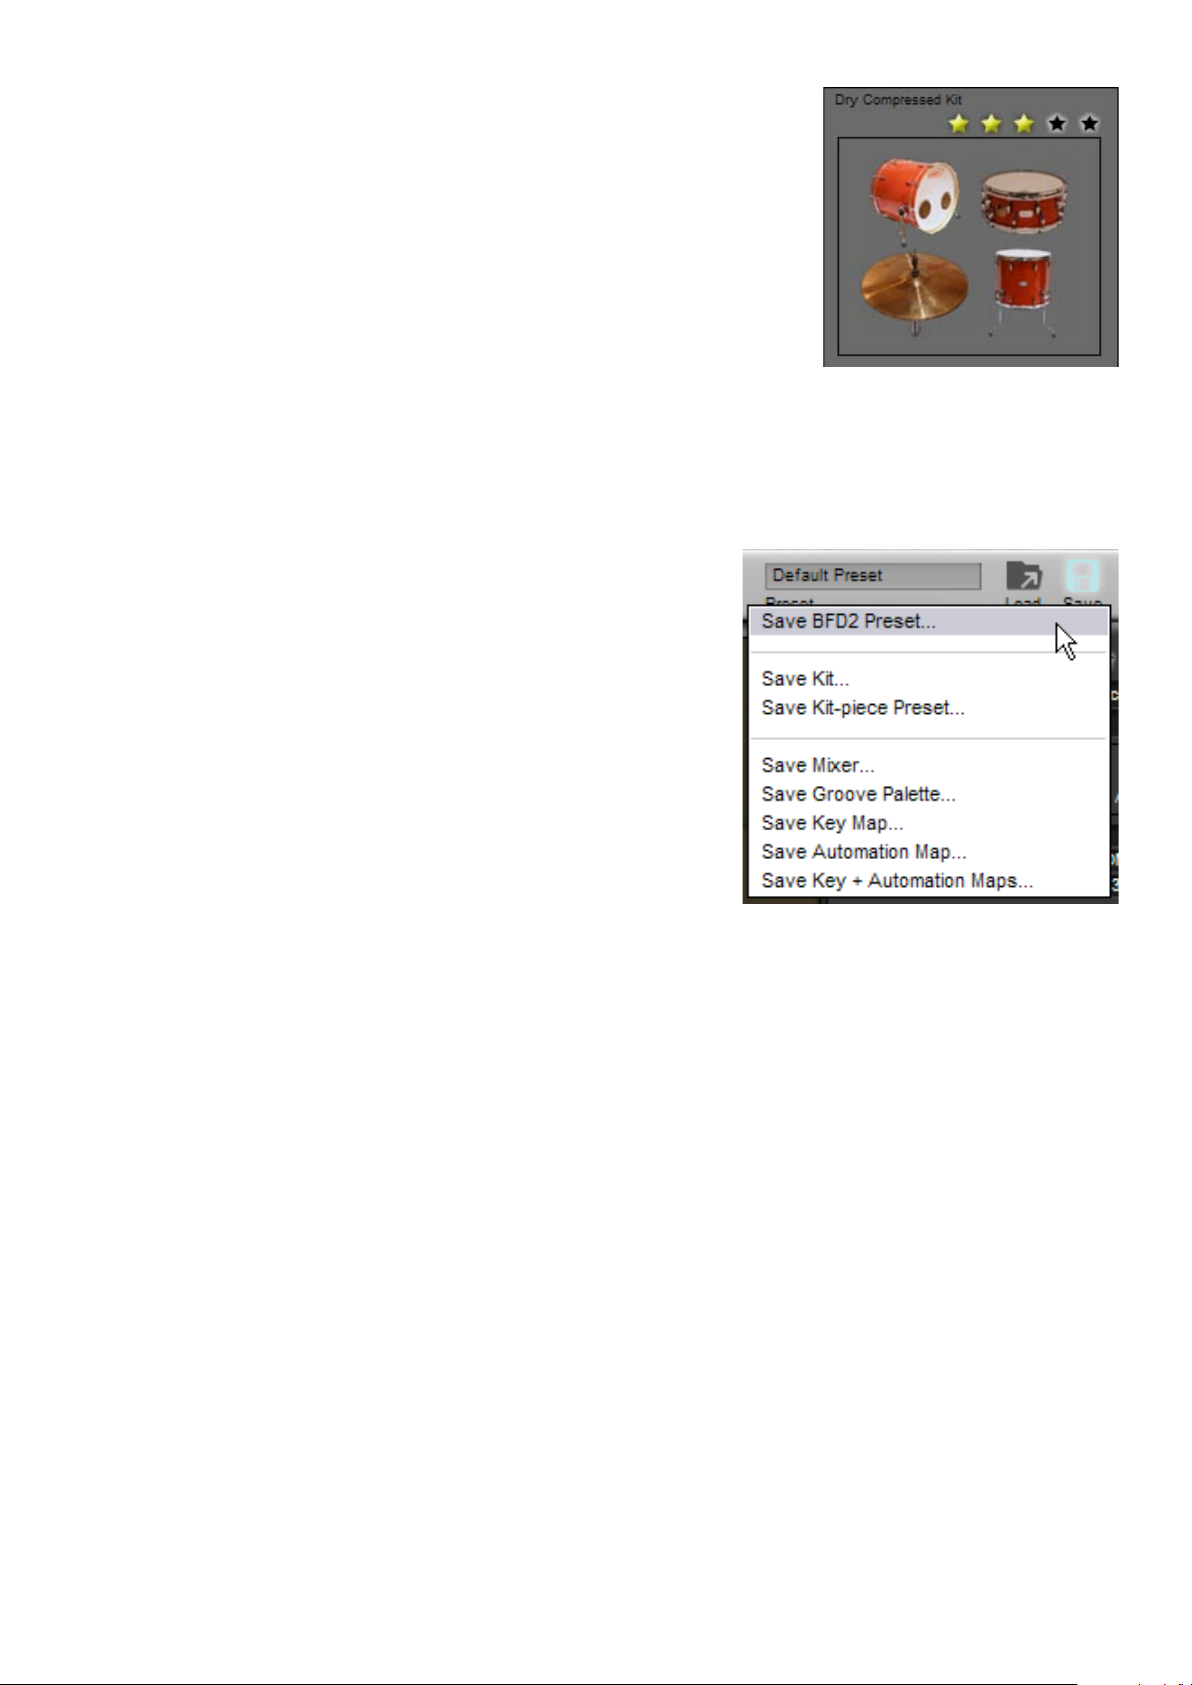
Photo & Rating
The large photo of the Preset, showing a representation of the included kit-pieces, is especially useful when using ‘List’ or ‘Details’ View settings.
Above the photo is the star rating control, with which you can rate the preset by clicking on
one of the stars. This is used as a ‘favourites’ system when the Sorting type is set to ‘Star
rating’: Presets are shown in order of their rating. This means that those with a higher rating
are shown first.
When you set a preset’s Star rating, it is applied immediately to the BFD2 database.
1:8 Saving BFD2 Presets
To save the current state of BFD2 as a Preset, use the Save BFD2 Preset function on the Control bar Save menu.
A system file save dialog is displayed, prompting you to save the Preset to disk.
The suggested filename used for the Preset is that defined in the Preset name
box, although you can type a new filename if you wish.
When you are happy with the filename and location, hit ENTER or click the Save
button.
Save location
When you save your own Presets, you are prompted by default to save them in
the user level BFD2 folder as follows:
<user location>/Presets
It is recommended that you stick to this location, so that your Presets are accessible whenever you use the Preset chooser.
Wherever you save the Preset, it is added to the BFD2 database. It is very important to remember, however, that if it is removed
from the database (or if you trash and rebuild your database), items not saved in the user location are not re-scanned.
Preset photo
When you save a Preset, a TGA graphic file is saved along with it, showing images of the kit-pieces it contains. This photo is then
visible in the Preset chooser panel during future browsing.
Elements saved with Presets
When you save a Preset, all the following elements are saved with it:
• Kit (kit-pieces and kit-piece setups)
• Mixer
• Groove Palette, Drum Track and other Groove page settings
• MIDI keymap
• Automation map – MIDI CC, note and host automation assignments
• Session preferences
It is not possible to opt not to save any of these elements. You can, however, selectively choose to load only certain elements
(with the exception of embedded Session preferences) when recalling Presets at a later time.
If you specifically do not want to save certain elements, for example Grooves or mixer FX, within a Preset, you should first clear
the Palette or remove the FX from the mixer before saving the Preset.
Alternatively, you may want to save a Preset with mixer settings but no kit-pieces, so that you can load whatever kit-pieces you
want into a certain mixer setup. Since mixer channels are dependent on kit-pieces being loaded, it is necessary to first create the
mixer settings with kit-pieces loaded. However, before saving the Preset, clear the kit (remove all kit-pieces from their slots). The
mixer channels remain, but they are inactive until you load kit-pieces into the relevant slots.
21
1:9 BFD2 Help functions
BFD2 offers a number of different help methods to make learning the software as painless as possible.
Context info display
The context info display in the BFD2 Status bar shows information about the control element currently underneath the mouse
cursor.
This also displays the current values of controls, and updates to show any adjustments made while they are adjusted.
Tool-tips
Tool-tips are shown when the mouse is hovered over a control for a definable length of time. This time is set in the BFD2 GUI
preferences, and is defined in animation frames. A setting of 25 is roughly equivalent to 1 second.
If you prefer, you can switch off tool-tips in the BFD2 GUI preferences.
Help menu
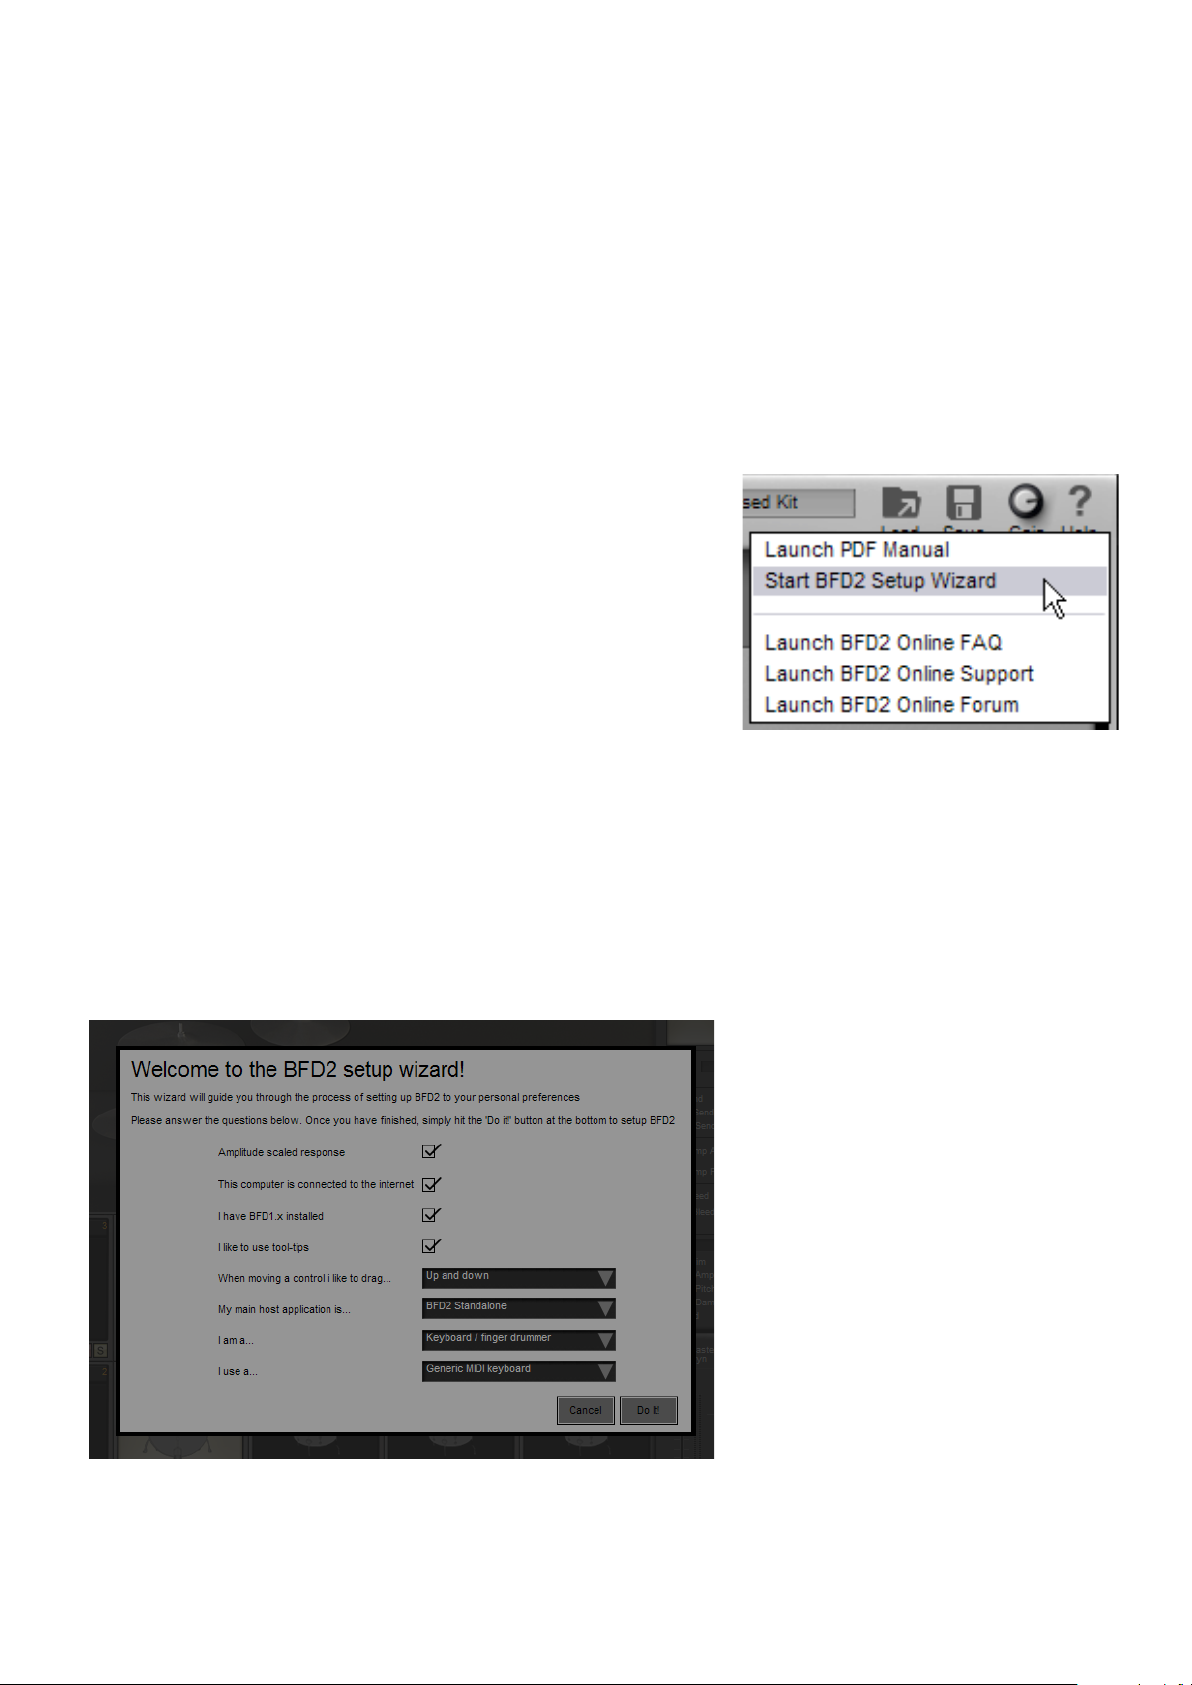
Clicking the Help button on the BFD Control bar displays the Help menu.
Launch PDF Manual
This function launches the BFD2 PDF manual in your system’s PDF reader.
Start BFD2 setup wizard
The BFD2 setup wizard is provided as an easy way to set up BFD2’s preferences in order to achieve the best performance for your particular system.
When you use the Start BFD2 setup wizard function on the Help menu, the
setup wizard panel is displayed.
Amplitude scaled response
This item affects Vel to Amp default amount setting in the BFD2 Engine preferences. With an amplitude-scaled response, the
default Vel to Amp amount is set at 50%, meaning that whenever a kit-piece is initialized – in other words, when it has just been
cleared – the Vel to Amp amount is set to 50%. Therefore, when you subsequently load a kit-piece, it is fully amplitude-scaled with
incoming velocity.
If you un-tick this checkbox, the default Vel to Amp amount is set at 0%: no amplitude scaling is applied when a slot is initialized.
If you want to specify other values for the Vel to Amp default amount preference, it is necessary to adjust the preference itself.
This computer is connected to the internet
Ticking this checkbox enables the Launch web browser for images setting in the BFD2 GUI options. This results in launching factory Groove Palette and mixer preset authors’ websites when their images are clicked on the BFD2 interface.
I have BFD 1.x installed
If this checkbox is ticked, BFD2 adds your BFD
1.x data path and imports all the kits into the
BFD2 database. If BFD2 detects a BFD1 installation on your system, this checkbox is ticked by
default.
I like to use tool-tips
Ticking this checkbox results in tool-tips being
displayed when the mouse cursor is held over a
control for approx. 1 second. If you want to adjust the time it takes for tool-tips to appear, you
must edit the Tool-tip appear time setting directly
in the BFD2 GUI preferences.
22

When moving a control I like to drag... [up and down / around (circular)]
Setting this item to ‘up and down’ requires vertical mouse movement to adjust circular knobs in BFD2, while setting it to ‘around
(circular)’ requires circular mouse movement. The preference that this item affects – Circular knob movement – is located in the
BFD2 GUI preferences.
My main host application is... [BFD2 Standalone / various plugin hosts]
This item affects the -2 octave numbering and -1 octave numbering settings in the BFD2 GUI preferences. If you select the BFD2
standalone here, the -2 octave system of note numbering is used. If you choose one of the other hosts in the list, the note numbering preferences are set accordingly.
I am a... [keyboard/finger drummer / e-drummer / drum programmer]
I use a... [various MIDI controller hardware keymaps]
These items in the wizard specify how you are going to control BFD2. Depending on the setting specified for the first item, a
number of hardware controller keymaps are listed in the second item.
Note that BFD2 overrides this setting if you subsequently load a new keymap, or if you set up a startup Preset with different keymap settings.
Getting further help with BFD2
Further information and help about BFD2 can be found at the fxpansion.com webpage. Internet shortcuts to all of these help
methods are available on the BFD2 Help menu:
1. Launch online FAQ: www.fxpansion.com/bfd2faq
The FAQ is often updated with late-breaking information about BFD2. This includes common solutions to problems which are not
covered in the manual – for example installation and authorization issues.
2. Launch online forum: www.fxpansion.com/forum
Our forum is frequented by our programming and technical support teams, as well as knowledgable and experienced users of
BFD2. If you have a query which is not covered in the provided documentation or webpage FAQs, you can often find an answer
in the forum after a quick search. It is also possible to obtain answers to new questions from other users out of our usual office
hours.
3. Launch online support: www.fxpansion.com/support
If all other help resources have not yielded answers to your questions, you can fill out a technical support request in the Support
section at fxpansion.com.
You must register your copy of BFD2 before you can obtain technical support.
23
chapter 02 KIT PAGE
building and adjusting your kit
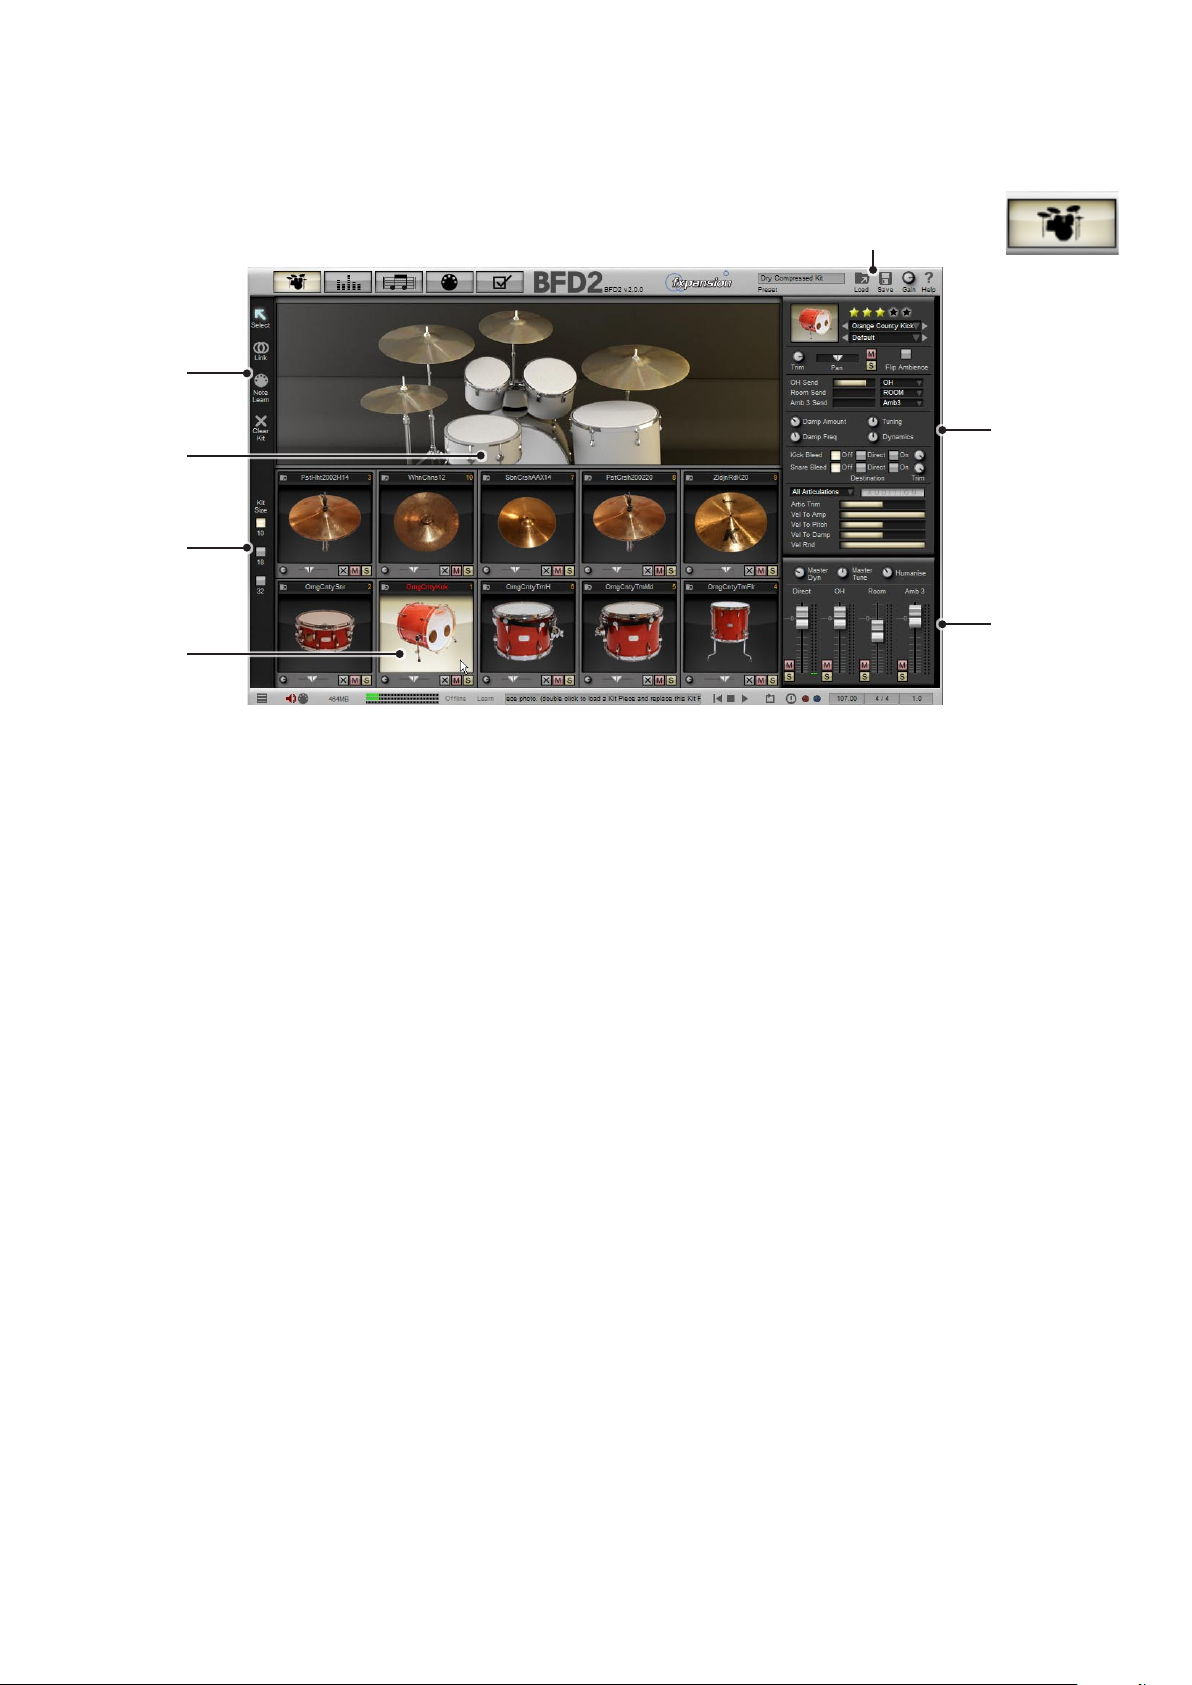
2:1 Kit page overview
1
5
6
3
2
7
4
1. Loading and saving kits – 2:3, 2:4
Use the Load and Save menus in order to load and save kits.
2. Kit Size – 2:2
This selector lets you choose between 10, 18 and 32 piece kits.
3. Kit display – 2:5
This changes for each kit size. Click a kit-piece in the display in order to select it. Each kit-piece in the display flashes when it is
played.
4. Kit-piece slots and loading kit-pieces – 2:5, 2:6, 2:7
The number of kit-piece slots shown depends on the kit size. Each slot features a controls for loading a kit-piece into the slot and
clearing its contents, as well as trim and direct pan controls.
5. Kit page toolbar – 2:8, 2:11
The toolbar features tools for selecting and linking kit-pieces.
It also features a wizard tool for easy MIDI learn-based key assignments for kit-piece articulations.
6. Kit-piece inspector – 2:9
This inspector features a multitude of ways to tweak the sound and response of the selected kit-piece and its articulations.
A preset system is also available for kit-piece inspector settings.
The inspector includes the kit-piece quick-load controls, allowing you to flick through available kit-pieces without opening the kitpiece chooser panel.
7. Mini-mixer 2:10
The mini-mixer contains a number of useful functions.
Firstly, the master tune, master dynamics and humanize controls offer a number of ways of changing the way the kit sounds and
plays.
The mini-mixer itself allows a quick way of setting the mix between direct and ambient mic channels without having to switch to
the Mixer page.
24
2:2 Kit Size
You can choose between 3 kit sizes using the selector buttons on the toolbar.
All slots have an intended purpose – when the kit-piece chooser panel is displayed for each slot, it sets the Type and Search
controls to show the intended variety of kit-piece.
However, you can load any kit-piece into any slot by changing the Type and Search criteria.
10-piece kit
1 Kick1
2 Snare 1
3 Hihat
4 Floor Tom
5 Mid Tom
6 High Tom
7 Crash 1
8 Cymbal 1
9 Ride 1
10 Perc
When the load kit-piece button is clicked for the tom slots, the kitpiece chooser defaults to the appropriate type of tom by setting the
search criteria automatically as required. To view all toms, clear the search text-box.
When loading a kit-piece into the cymbal slots, the kit-piece chooser defaults to the intended cymbal type by putting the relevant
search criteria automatically into the search text-box. To view all cymbals, clear the search text-box.
The Cymbal 1 slot (slot 8) chooser defaults to showing all cymbals.
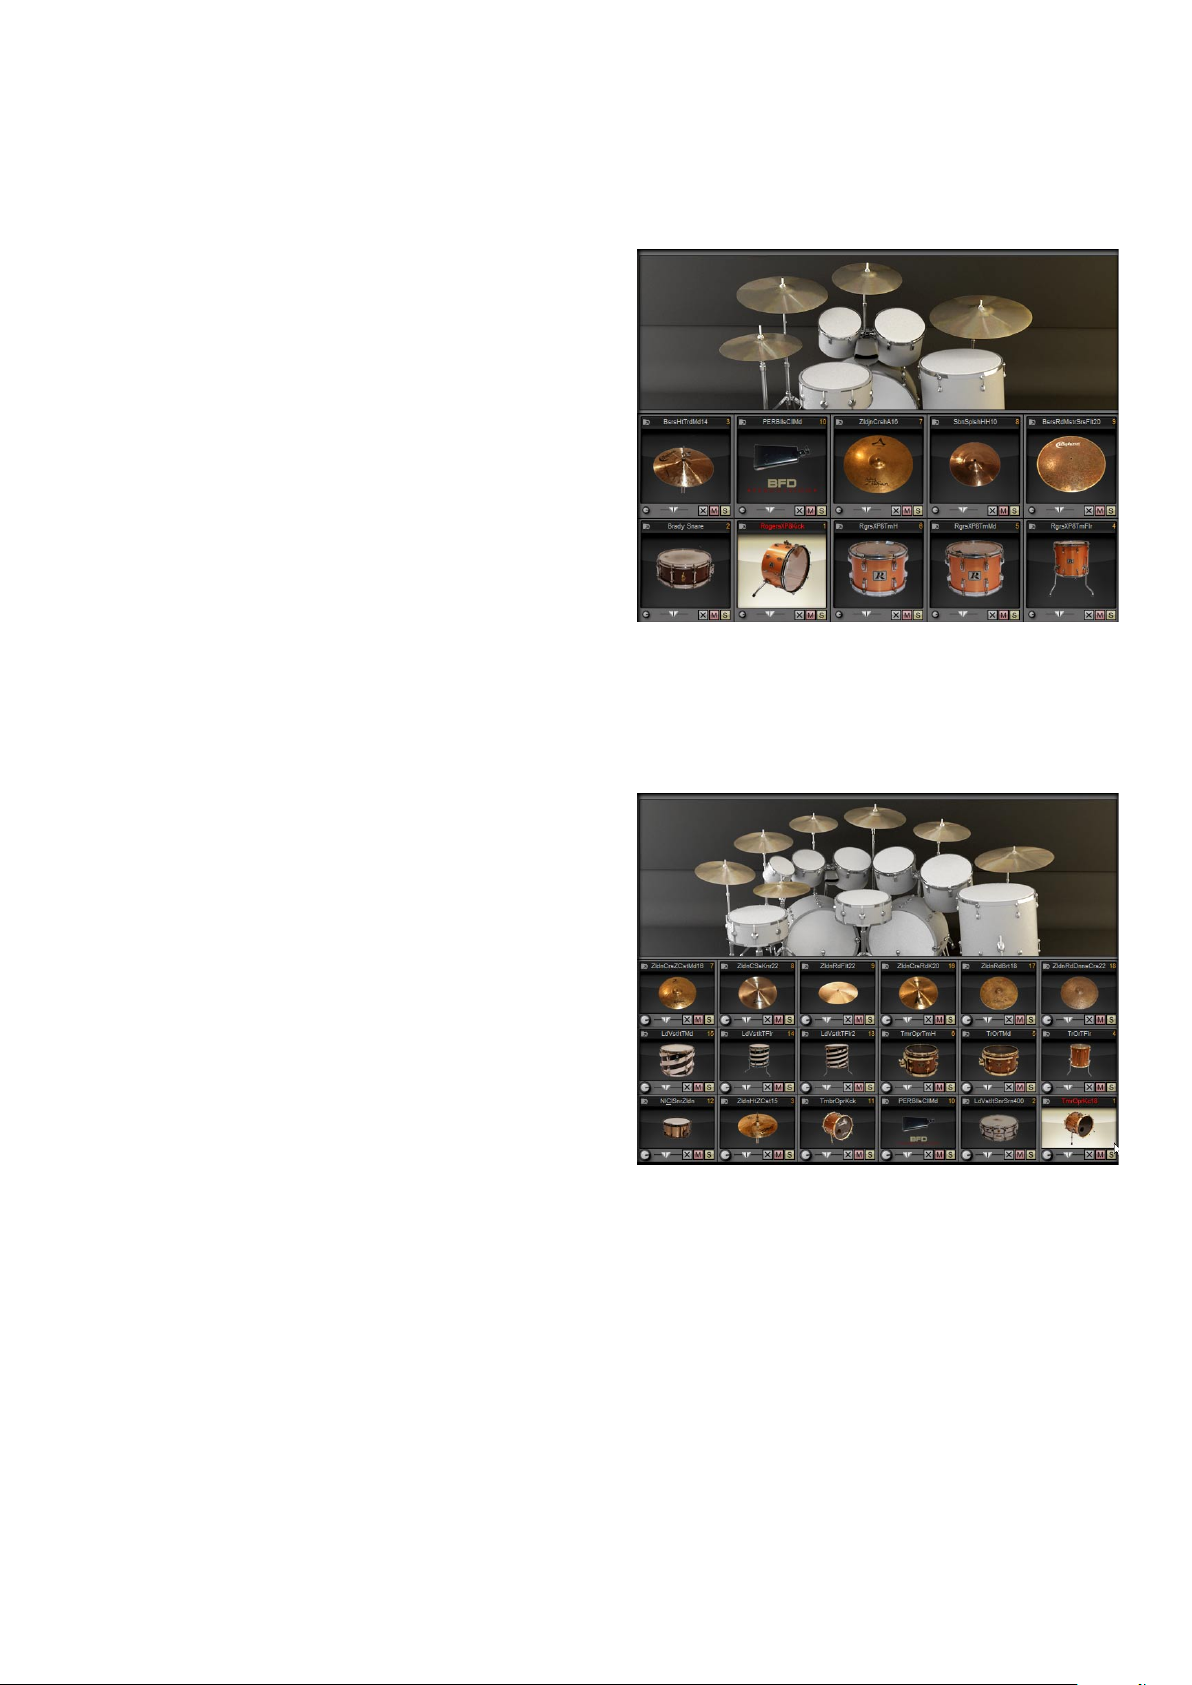
18-piece kit
1 Kick 1
2 Snare 1
3 Hihat
4 Floor Tom
5 Mid Tom
6 High Tom
7 Crash 1
8 Cymbal 1
9 Ride 1
When the load kit-piece button is clicked for the Floor, Mid and High
Tom slots, the kit-piece chooser defaults to the appropriate type of
tom by setting the search criteria automatically as required. To view
all toms, clear the search text-box.
When loading a kit-piece into the Tom 4, Tom 5 and Tom 6 slots, the kit-piece selector defaults to displaying all toms.
When loading a kit-piece into the cymbal slots, the kit-piece chooser defaults to the intended cymbal type by putting the relevant
search criteria automatically into the search text-box. To view all cymbals, clear the search text-box.
The Cymbal 1 and Cymbal 2 slots (slot 8) chooser defaults to showing all cymbals.
10 Kick 2
11 Snare 2
12 Perc
13 Tom 4 (all toms)
14 Tom 5 (all toms)
15 Tom 6 (all toms)
16 Crash 2
17 Cymbal 2
18 Ride 2
25
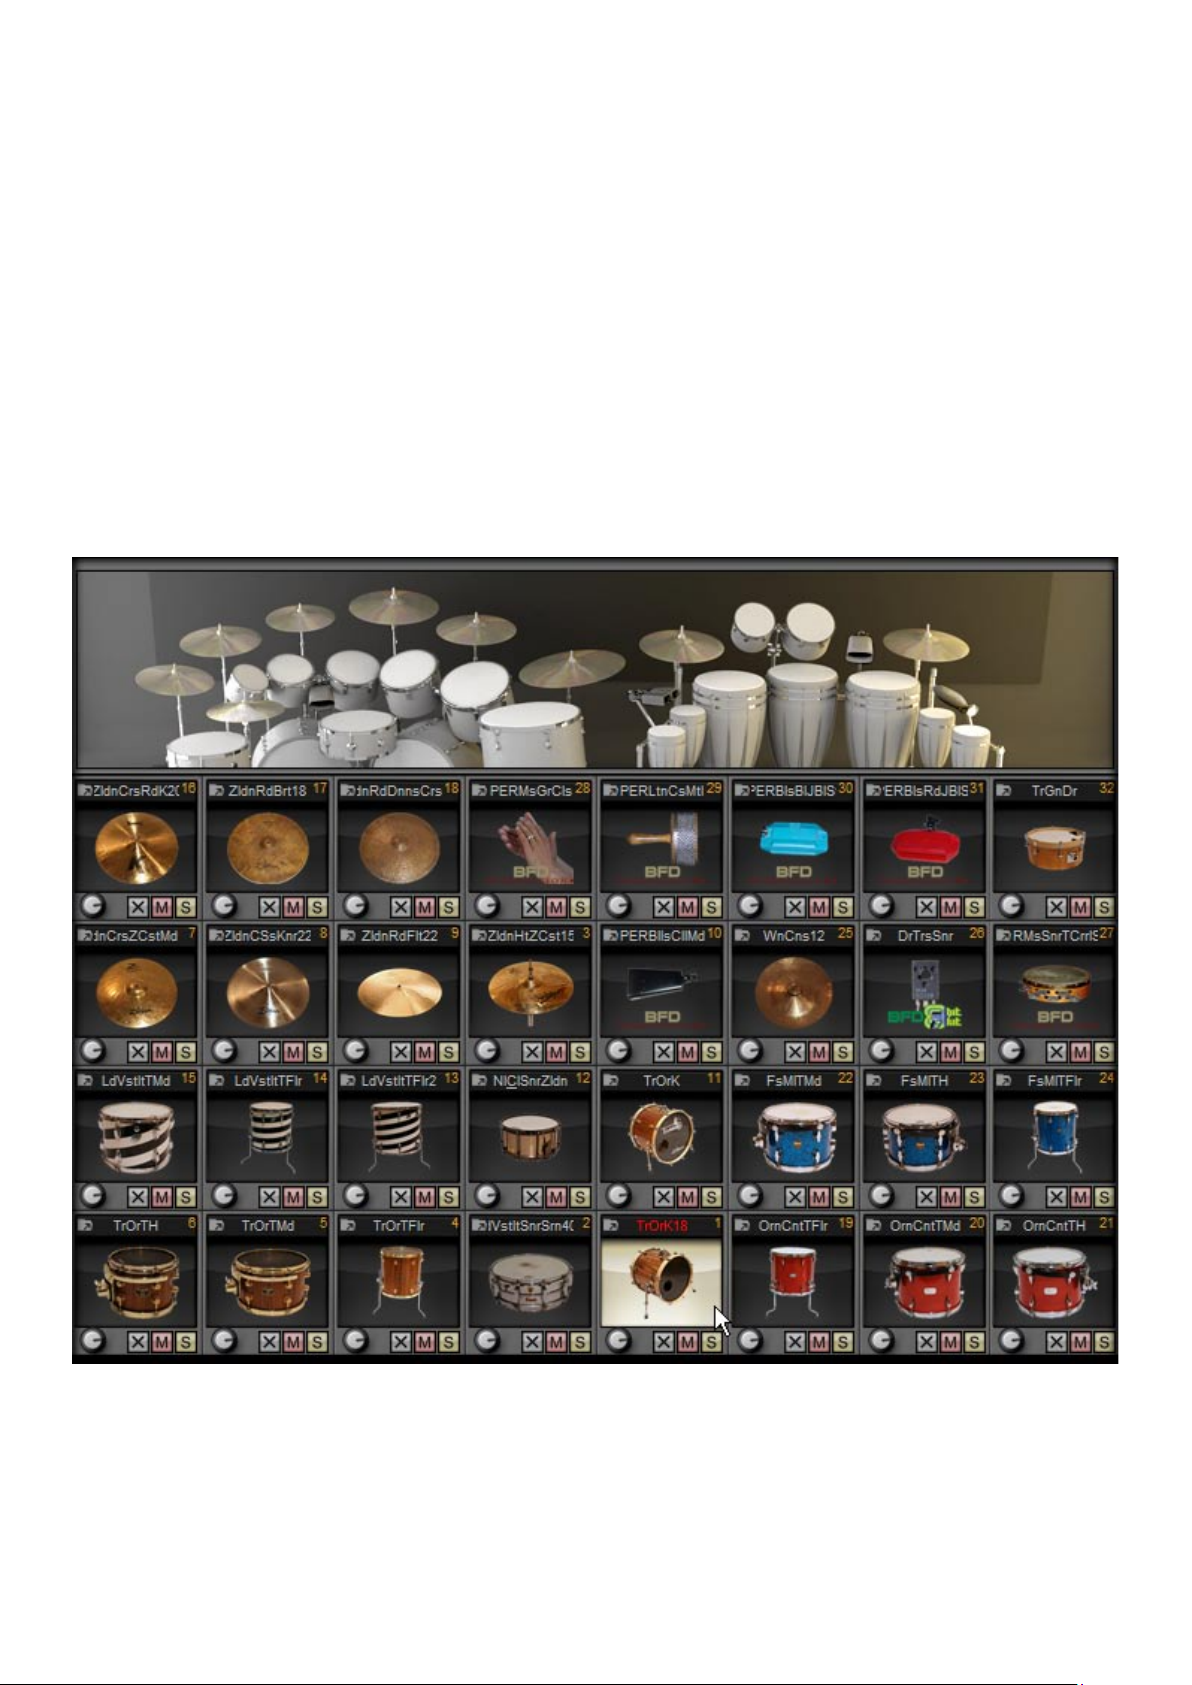
32-piece kit
1 Kick 1
2 Snare 1
3 Hihat
4 Floor Tom
5 Mid Tom
6 High Tom
7 Crash 1
8 Cymbal 1
9 Ride 1
The 32-piece kit features the same first 18 slots as the 18-piece kit, but with an extra 14 percussion slots as shown above.
These slots have no default mapping, due to the fact that they potentially need lots of MIDI keys, so it would really be necessary
to first set the Groove Palette to another MIDI channel.
If you need this many kit-pieces, please set up your desired mapping and save a Program so that it’s set up for future use.
While these slots are intended as a percussion rack, especially for use with the BFD Percussion expansion pack, you can of
course use them to load any kit-piece you like.
10 Kick 2
11 Snare 2
12 Perc
13 Tom 4 (all toms)
14 Tom 5 (all toms)
15 Tom 6 (all toms)
16 Crash 2
17 Cymbal 2
18 Ride 2
19 Perc 2
20 Perc 3
21 Perc 4
22 Perc 5
23 Perc 6
24 Perc 7
25 Perc 8
26 Perc 9
27 Perc 10
28 Perc 11
29 Perc 12
30 Perc 13
31 Perc 14
32 Perc 15
Switching kit sizes
If the kit size is changed to a larger setting, any currently loaded Kit-pieces are unaffected - you simply have more slots available
to you.
If you change to a smaller kit size, the slots which still exist in the smaller size are unchanged. However, any slots that do not exist
in the smaller size are lost – the kit-pieces and any settings made to the slot are cleared from memory.
For example, if you change from an 18-piece kit to a 10-piece kit, slots 11-18 are discarded.
26
2:3 Loading and saving in the Kit page
Loading in the Kit page
You can load and save a number of different elements in the Kit page:
Kits (section 2:4)
A kit is comprised of a number of kit-pieces loaded into kit-piece slots, as well as any Link setups
and additional parameters for each kit-piece (adjustable in the kit-piece inspector). You can, if you
wish, choose to load only the kit-piece arrangement, and dispense with the additional settings.
Kits are loaded and saved using the Load menu in the BFD2 control bar.
Kit-pieces (section 2:6)
You can load individual kit-pieces into the available
slots in order to build a custom kit.
This is achieved via the Load buttons on each kitpiece slot, or by double-clicking anywhere in a slot.
You can also use the kit-piece quick-load controls at
the top of the kit-piece inspector as an alternative way
of loading kit-pieces.
Kit-piece presets (section 2:9)
These are presets of kit-piece inspector settings for each kit-piece class – kicks, snares,
hihats, toms, cymbals and percussion.
Kit-piece presets are saved using the ‘Save kit-piece preset’ function on the BFD2 Load
menu in the control bar.
You can load kit-piece presets via the kit-piece preset loading controls, located in the kitpiece inspector.
BFD2 Presets (section 1:7)
You can also load BFD2 Presets using the Load menu on
the BFD2 Control bar. Presets contain a snapshot of the
entire state of BFD2. In the Preset chooser you can load any or all of the following:
• Kit (kit-pieces and kit-piece setups)
• Mixer
• Groove Palette
• Keymap
• Automation map
• Session preferences
Rather than be able to load default kits, mixer presets, Grooves and mappings when the software is launched, BFD2 instead only
allows you to set up a default Preset to load whenever it is launched. This is to avoid having too many default settings specified,
and also due to the sheer variety of possible kit, mixer and mapping setups that might conflict with each other.
Saving in the Kit page
You can save the following using the Save menu:
Kits: section 2:4
Kit-piece presets: section 2:9
BFD2 Presets: section 1:8
27
2:4 Loading and saving kits
Loading kits – overview
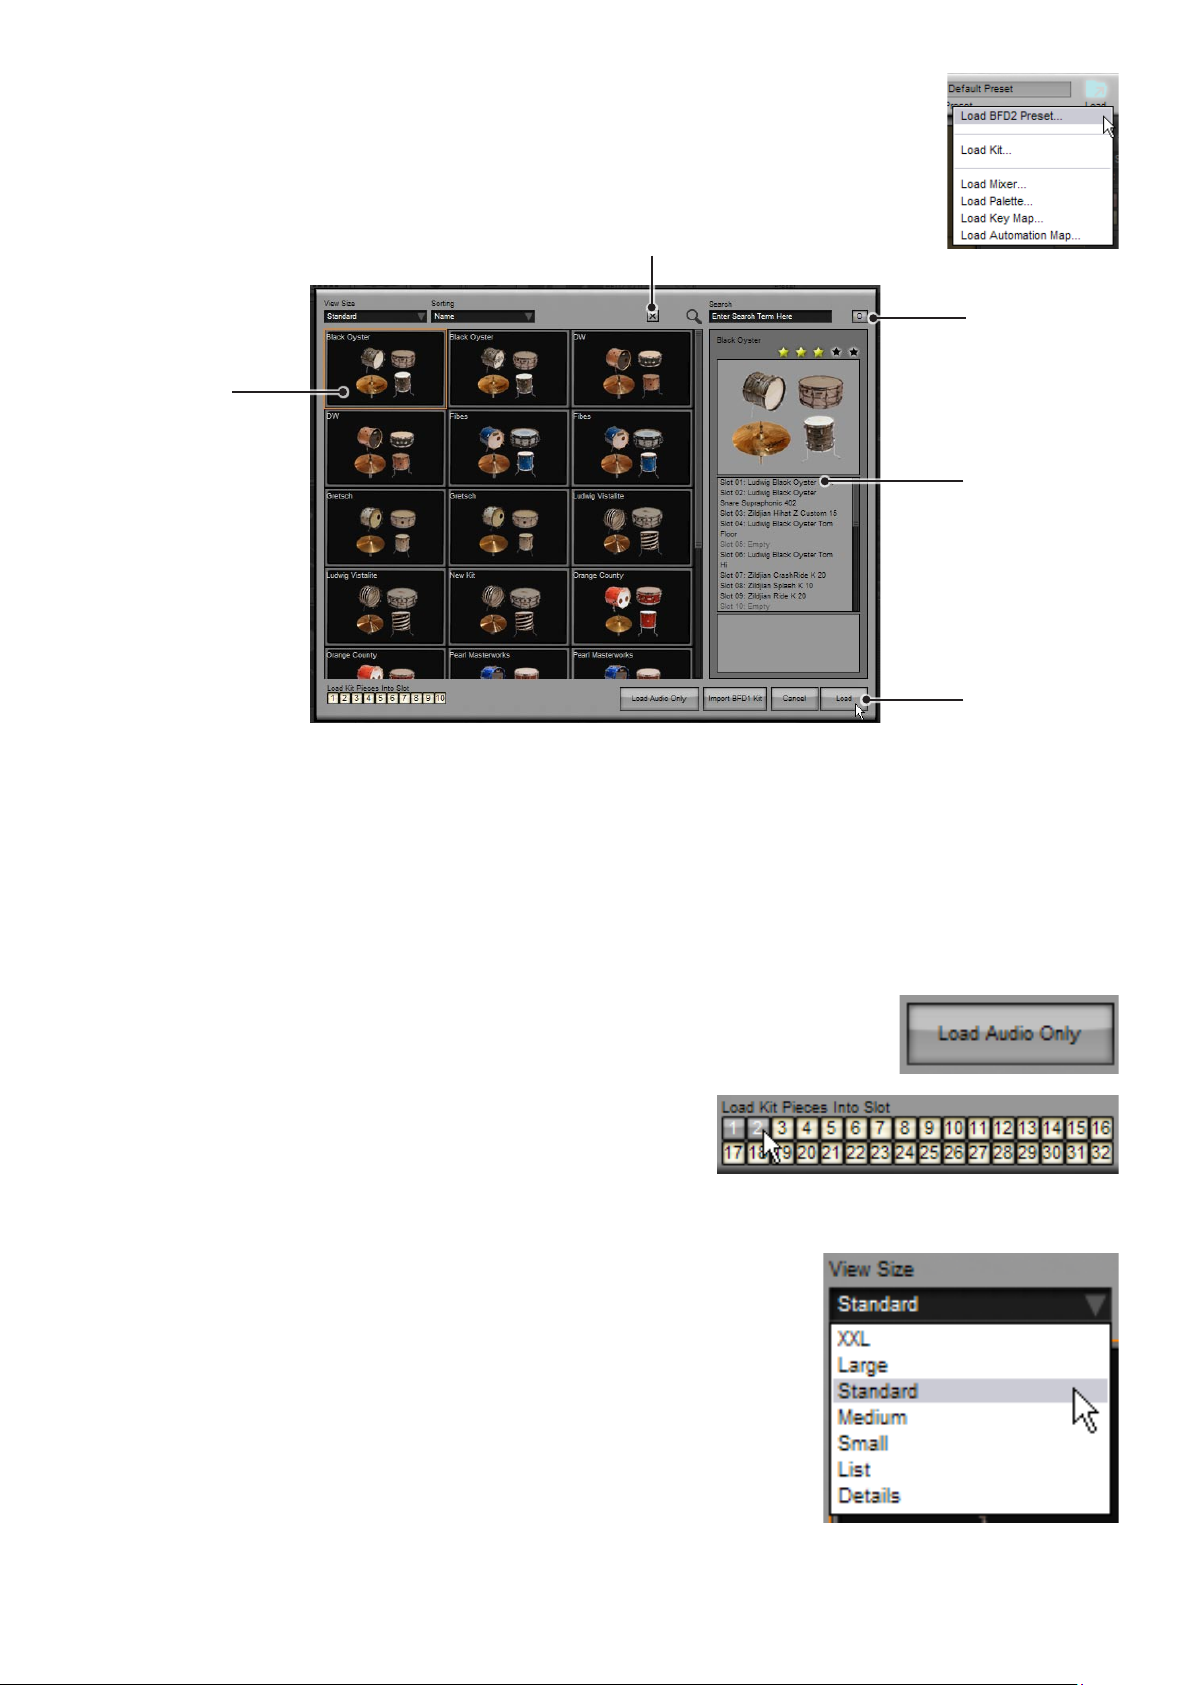
To load a kit, click the Load button in the BFD Control bar and click on Load Kit... from the Load menu that
appears. This opens the kit chooser panel.
Delete kit from database
Kit listing: click to
select or double-
click to load
Sticky button
Info
Click to load
the selected kit
All available kits are displayed with an image representing its contents. To see more information about a kit, click it to select it.
Detailed information about the kit and a larger photo is displayed in the inspector to the right.
To load a kit, select it by clicking on it and then click the Load button.
You can also double-click any kit in the listing in order to load it.
A kit file stores a set of kit-pieces in either of the 3 available kit sizes, as well as further settings in the Kit page, such as Link and
kit-piece inspector setups.
Controls in the kit chooser panel
Load Audio Only button
You can choose to load only the kit-pieces in a kit by clicking the ‘Load Audio only’ button. Leaving
this button off results in a kit’s Link and kit-piece inspector settings being loaded with it.
Slot Load switches
The Slot Load switches allow you to specify which kit-piece slots are replaced
by new sounds and settings from the loaded Kit.
Turning off a Slot Load switch results in the current contents of that slot remaining unchanged when a kit is loaded.
View size
This drop-down menu selects the size of kit images shown in the chooser panel. A range of
settings are available, including text-only displays. Larger sizes result in larger photos but requires more use of the scrollbars in order to view all the available kits. The ‘List’ and ‘Details’
settings result in faster operation due to the fact that images are not displayed. You can still
see a photo for the kit by selecting it – its details are displayed in the inspector.
This setting is recalled between sessions. Its state is stored in the BFD2 preferences
– therefore, if you re-initialize your BFD2 preferences this setting is returned to the default
‘Standard’ size.
28
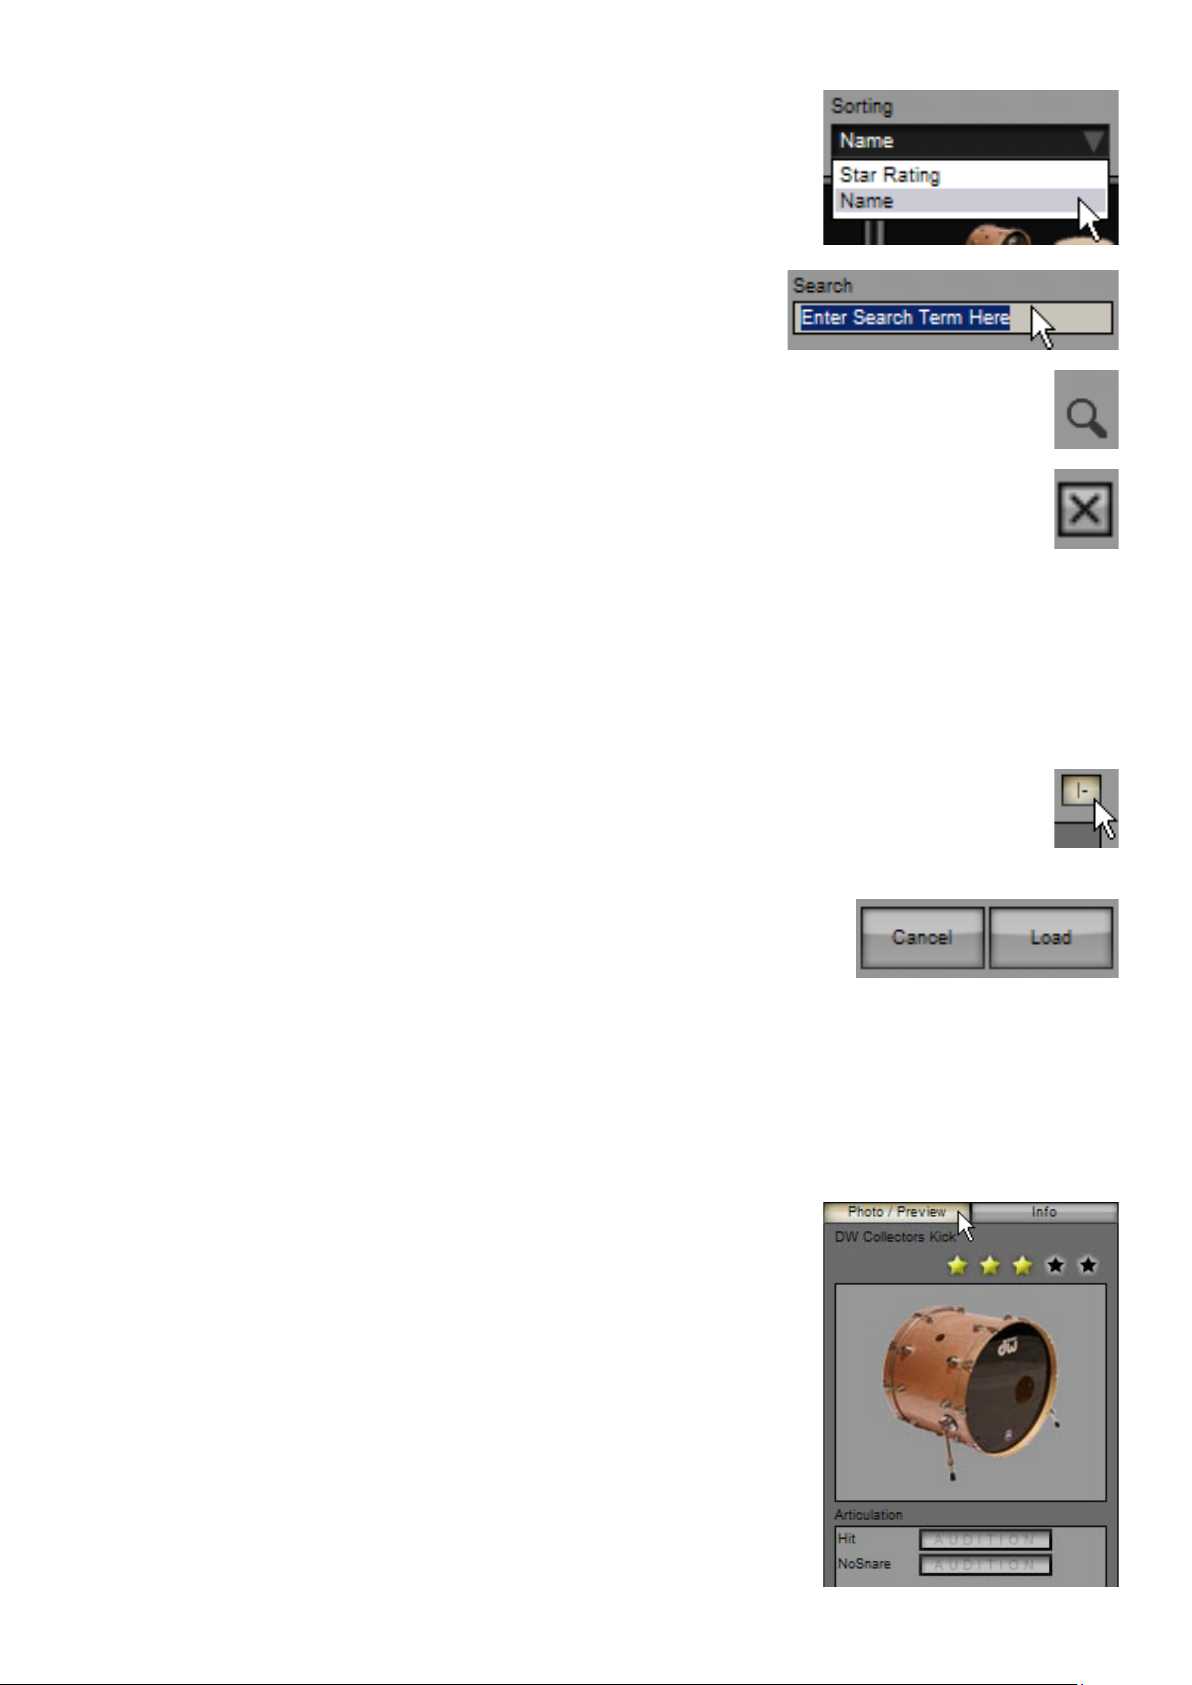
Sorting
With this drop-down menu you can sort kits either by name or by star rating.
Rating your favourite kits and sorting chooser contents by Star rating can make it easier to
find your favourite kits.
This setting is recalled between sessions. Its state is stored in the BFD2 preferences
– therefore, if you re-initialize your BFD2 preferences this setting is returned to the default
(sorting by ‘Name’).
Search
The kit chooser panel includes a search facility in order to narrow down the amount of
kits shown in the chooser panel.
Quick-search
Useful search terms are stored in the quick-search drop-down menu to the left of the Search text-box.
Delete kit-piece from database
Clicking this button removes the selected kit from the BFD2 database. This feature is provided if you find you have too
many kits and you want to get rid of those which may not be to your taste, making kits you do like easier to find in the
chooser panel. You are asked for confirmation before you can continue.
If you choose to remove a user kit from the database, you are also asked if you want to remove the kit files from disk – if you click
‘Yes’, the kit file and its associated photo are deleted from the <user location>/BFD2/Kits folder. If you click ‘No’, the kit’s files remain untouched. If you leave user kit files on disk, they are scanned during the next full rescan of the database (Trash and rebuild
all databases in the BFD2 Data preferences).
BFD2 never prompts to delete factory-installed kit files.
Note that this function always leaves the actual kit-piece audio files untouched – if you want to delete these to recoup hard disk
space, you must go into BFD2’s audio folder and delete the relevant folders.
Sticky button
Enabling the Sticky button results in the kit chooser panel remaining open after a kit is loaded.
This is useful if, for example, BFD2 is playing a sequence or Groove and you want to repeatedly change kits until you find
what you need. Clicking the Sticky button saves you having to keep opening the kit chooser panel.
Load / Cancel buttons
To load the currently selected kit, click the Load button.
You can also load any kit in the listing by double-clicking it.
If you change your mind and decide you don’t want to load a new kit, click the Cancel button.
Keyboard operation
You can navigate around the available kits with the cursor (arrow) keys.
The selected kit can be deleted from the database by pressing the DELETE key.
Load the selected kit by pressing the RETURN or ENTER key.
To exit the chooser panel without loading anything, press the ESC key.
Info
The Info area displays information about the currently selected kit and allows you to rate it.
Photo & rating
The large kit photo shows a representation of the included kit-pieces. It is especially useful if
you are using the ‘List’ or ‘Details’ views.
Above the kit photo is the star rating control, with which you can rate the kit by clicking on
one of the stars. This is used as a ‘favourites’ system when the Sorting type is set to ‘Star
rating’: kits are shown in order of their rating.
When you set a kit’s rating, it is applied immediately to the BFD2 database.
Info
The info display shows information about which kit-pieces exist in each of the kit’s slots.
• Valid kit-pieces’ names are shown in black
• Empty slots or those with unidentifiable contents are shown in grey
29
• Invalid kit-pieces are shown in red – this usually means that the kit-pieces have not been authorized or are somehow corrupt.
If you suspect they are not authorized, exit BFD2 and run the FXpansion License Manager to verify their authorization status.
If necessary, authorize the expansion pack containing the kit-pieces. Then re-run BFD2. It may also be necessary to trash and
rebuild the BFD2 database.
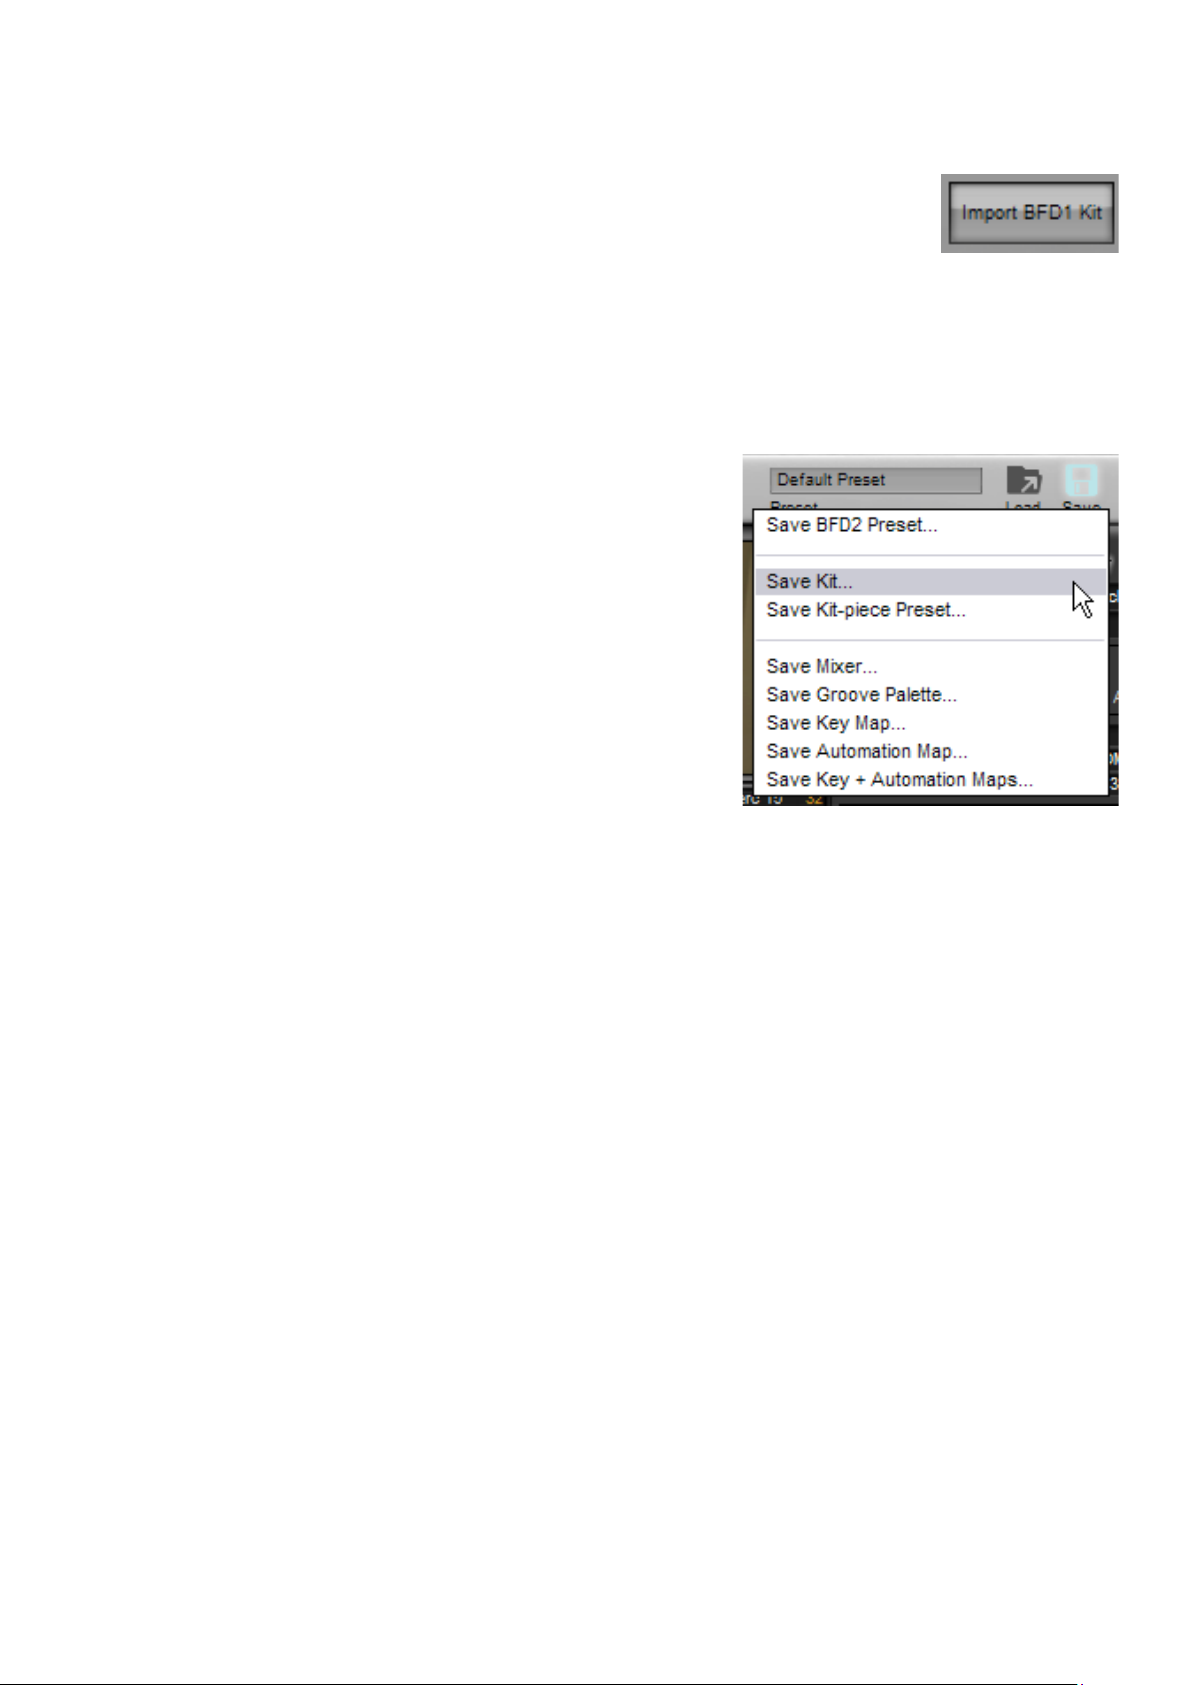
Import BFD1 kit
Original BFD kits are very different types of files to the kit files used in BFD2. Because of this they are not
shown in the kit selector panel, even if you have specified a BFD data path containing kits made for BFD
1.0 or 1.5.
However, BFD2 gives you the ability to import BFD kit files to the BFD2 database. To do this, click the BFD1 Kit Import button
to bring up a system file open dialog. Then browse to and select one or more BFD1 kit files that you want to import. The kits are
converted into BFD2 format and added into the database so that they can be loaded in the kit chooser.
If you specify that you are a BFD1.x user during the BFD2 setup wizard, BFD2 automatically imports any BFD1.x kit files it finds
in the current data paths.
Saving kits
Use the Save Kit... item in the BFD2 Save menu in order to save the current kit.
Clicking this menu item opens a system file save dialog allowing you to save the
kit to any location.
Save location
When you save your own kits, you are prompted by default to save them in the
user level BFD2 folder at the following location:
<user location>/Kits
We recommend that you save your kits into this folder in order for them to be visible in the Kit chooser panel.
Wherever you save the kit, it is added to the BFD2 database. It is very important
to remember, however, that if it is removed from the database and you trash and
rebuild your database, items not saved in the user location are not rescanned.
Kit Photo
When you save a kit, a TGA graphic file is saved along with it, showing images of the kit-pieces it contains. This photo is visible in
the kit chooser panel during future use.
30
Loading...