
1
GURU User Manual: table of contents
INTRODUCTION… Getting Started 6
Welcome to GURU! 6
A word from Devine Machine 6
Credits 7
Installation 8
Windows Installation 8
MacOSX Installation 9
Authorization 10
Instant gratification... 10
CHAPTER 1… GURU: Fundamental Philosophy 11
1:1 Engines, Pads, Patterns and Graphs 11
1:2 SmartSlice: GURU’s enlightened approach to drumloop-slicing 13
1:3 Overview of the GURU interface 14
1:4 Control conventions and keyboard shortcuts 16
CHAPTER 2… Starting to use Guru: the Browser 17
2:1 Operating the Browser 17
Favourites 18
Browsing and Preview tools 18
Auto mode 18
Preview tools 18
2:2 Hit tab 19
Using Auto mode 19
2:3 Loops tab 20
Slicing/Mapping tools 20
Score button 20
Slice mode context menu 20
Using Auto mode 21
Using component slices 22
Operating without Auto mode 22
More about the Score mode 22
Using REX files with GURU 23
2:4 Patterns tab 24
Loading Patterns and Pattern Sets 24
Saving Patterns and Pattern Sets 25
2:5 Kits tab 25

2
CHAPTER 3… Working with Pads & the Pad Edit view 26
Pad signal flow diagram 26
3:1 Pad Edit view 27
Pad Edit Keyboard modifiers 27
Waveform display 28
Utility controls 29
Gain, Pan, Tune/Fine, Cut/Rez/Type 30
Pad effect slot 31
Direct/Aux Controls 31
Amp Envelope 32
FX Envelope 32
Audition 32
Layers and Velocity Splits 32
Velocity Split 33
3:2 Automating Pad Edit view parameters in your host 35
3:3 Other Pad operations 36
Operating Pads 36
Pad context menu 36
Moving/Exchanging/Copying Pads 37
CHAPTER 4… Introduction to Patterns and Graphs 38
Patterns 38
Graphs 39
Sequencer Master 39
CHAPTER 5… Working with Patterns 40
5:1 Pattern view 40
Editing Patterns in the Pattern view 42
Draw mode 42
Select mode 43
Utility controls 43
5:2 Other Pattern operations 44
Undo button 44
Pattern keys 44
Pattern context menu 45
Moving/Copying/Exchanging Patterns 45
Exporting Patterns as MIDI files 46

3
CHAPTER 6… Working with Graphs 47
6:1 Graphs view 47
Graphs Select view 47
Graphs Edit view 48
Editing events in a sub-Graph 48
Instant Graph Recorder 49
6:2 Graphs reference 50
Level Graph type 50
Velocity • 50
Pan • 50
Pitch Graph type 50
Pitch • 50
Fine • 51
Filter Graph type 51
Filter Cutoff • 51
Filter Resonance • 51
Repeat Graph type 51
Repeat • 51
Shift • 52
Scrub • 52
CHAPTER 7… Sequencer Master section 53
7:1 Sequencer Master display 53
Naming Patterns 54
7:2 Tempo control & Tempo multiplier ratio 54
7:3 Recording Patterns 55
Record-arming 55
Click on Record 55
Quantized Record 55
Record mode 55
Commit/Undo 56
Record mode options 56
7:4 Using Groove 57
Groove controls 57
Groove and Shift Graphs 58

4
CHAPTER 8… Working with Engines 59
8:1 Engine controls in GURU toolbar 59
Engine selectors 59
Engine activity display 59
8:2 Aux Effects View 59
8:3 Mix View 60
Engine channels 60
Engine insert effects 61
Master channel 62
Master insert effect 62
8:4 FX Group automation 63
8:5 Scenes view 63
CHAPTER 9… Customizing GURU: the Options panel 65
9:1 MIDI Options 65
9:2 Audio Options 66
9:3 Browsing Options 68
9:4 Misc Options 69
CHAPTER 10… Effects reference 71
10:1 Pad Effects 72
Compressors 72
Waveshaper Distortion effects 72
Ring Modulators 73
Bit crushing type effects 73
Oscillators (Oscs) 74
Equalizers 76

5
10:2 Engine Effects 77
DELAY 77
FLANGER 78
CHORUS 78
COMPRESSOR 79
REVERB 79
DISTORTION 80
Filter LFO and ENV effects 80
Bitcrusher LFO and ENV effects 82
Ring Modulation LFO and ENV effects 84
Parametric Equalizers 86
TRANCEGATE 87
FREEZER 88
CHAPTER 11… Technical Reference 89
11:1 Signal Flow diagram 89
11:2 Keyboard shortcut reference 90
11:3 MIDI Keyboard layout 92
11:4 Host Automation Parameters 92
11:5 Loading and Saving in GURU 94
11:6 Support and Troubleshooting 95
Registering and downloading the latest version of GURU 96
Obtaining technical support 96

6
INTRODUCTION
Getting Started...
Welcome to GURU!
Thank you for buying GURU – prepare to be inspired!
That’s exactly how we felt when our friends at Devine Machine showed us the first prototype,
almost a year ago… inspired by what it could do and, just as importantly, by how much FUN it
was to do it… !
Devine Machine and FXpansion joined forces to help GURU blossom – adding a sophisticated
premium-quality effects suite, hundreds of workflow enhancements, a mountain of exciting, usable audio content and more – so that today you can enjoy performing / producing / exploring the
multitude of new sonic possibilities GURU offers.
We hope you’ll find GURU to be a breath of fresh air in helping you to reclaim your creative freedom, both in the studio and when playing live.
– The FXpansion team
A word from Devine Machine
A reviewer from Computer Music once said about Devine Machine that “We eat our own dog
food”, because we use our creations on stage. This has been the case for GURU too. We sincerely hope you will enjoy it, and appreciate the joining of forces with the talented FXpansion
team. We’d like to thank them, and thank you very much for buying GURU.
– Link & Steve from Devine Machine
• Pour la version Française de ce manuel, veuillez suivre ce lien :
• Die deutschsprachige Version der Bedienungsanleitung ist unter folgender
Internet-Adresse erhältlich:
•
http://www.fxpansion.com/product-guru-manuals.php

7
Credits
Concept and Lead Programming: Devine Machine
Effect Algorithms: Andrew Simper
Additional Programming: Paul Chana, Angus F. Hewlett, SKoT McDonald, Andrew Simper
Interface Design: Devine Machine
Web site: Andreas Schnetzler, Adam Ferns
Additional Graphics: Alex Akers, Joel Zimmerman, FXpansion Team
Manual: Mayur Maha
Packaging Design: Adam Ferns, Rhiannon Bankston-Thomas
Sound Content: Dave Spiers, Gareth Green, Gearshift, Groove Criminals, Groove Monkee, Angus F. Hewlett,
Nu Skool Breakz, Paul Chana, Q Up Arts, Red Shift Audio, Mayur Maha, Steve Duda, Wizoo
Sound Design, Yellow Tools, John Bradshaw
Project Management: Angus F. Hewlett, Rhiannon Bankston-Thomas
Link from Devine Machine
would like to thank… Veronique, Steve Duda, the entire FXpansion crew, Numa, Arash Khalatbari, Paul
Wannebroucq, Peter Freeman, Rory Dow, Jerome Noel, Tristan Delizy, all Devine Machine
customers, respective families, and finally a big kiss to my sweet daughter Melodie.
FXpansion would like to thank… The entire beta-testing team, Steve Duda, Sascha Franck, Matt Hooper, Rory Dow, Frank
Gough, Charlie Norton, Bob Oxley, Mephistoff Ellis, John Bradshaw, Joel Zimmerman, Pink
Pigeon, Jacob Talkington, Dan Waldman, Joe Hoe, Samba, Matthew Broadstreet, The one true
Bean, and our Long Suffering Significant Others.
www.devine-machine.com
www.fxpansion.com
© 2005 Fxpansion Audio UK Ltd. All Trademarks Acknowledged. Mac is a trademark of Apple Computer Inc. The “Built for Mac OS
X” graphic is a trademark of Apple Computer Inc. used under license. RTAS is a trademark of Digidesign. ReWire is a trademark of
Propellerhead Software. VST is a trademark of Steinberg Media Technologies AG. Windows XP is a trademark of Microsoft Corpora-
tion. Other trademarks mentioned are held by their respective owners.

8
Installation
Installation of GURU is very simple, involving two separate
procedures:
1. Installation of the program files (plugins & standalone)
2. Installation of the included audio content
Before installing GURU, always check to see if there is a
newer version available on our website. This requires you
to register your copy of GURU1. Please check the GURU
webpage for details of updates to the program, or look at the
continuously updated GURU FAQ:
http://www.fxpansion.com/product-guru-main.php
The audio content bundled with GURU occupies approximately 4 GB of disk space. You should ensure that there is
enough free space on the drive to which you choose to install
this content.
If you don’t have enough free space, you can choose not to
install the content and simply use your own existing sounds
with it.
If you have any problems with the installation or authorization,
consult the Support & Troubleshooting section of this manual
(section 11:6) for details of what to do next.
Windows Installation
Installing program files on Windows
• Insert the GURU DVD into your DVD drive.
• Navigate to your DVD drive in My Computer (if you have
autoplay enabled, the DVD drive will appear automatically).
• Run the Guru Setup.exe file located on the DVD.
• The installer program will guide you through the installation
process.
1
See section 11:6 for details
on registering GURU.
9
NOTE:
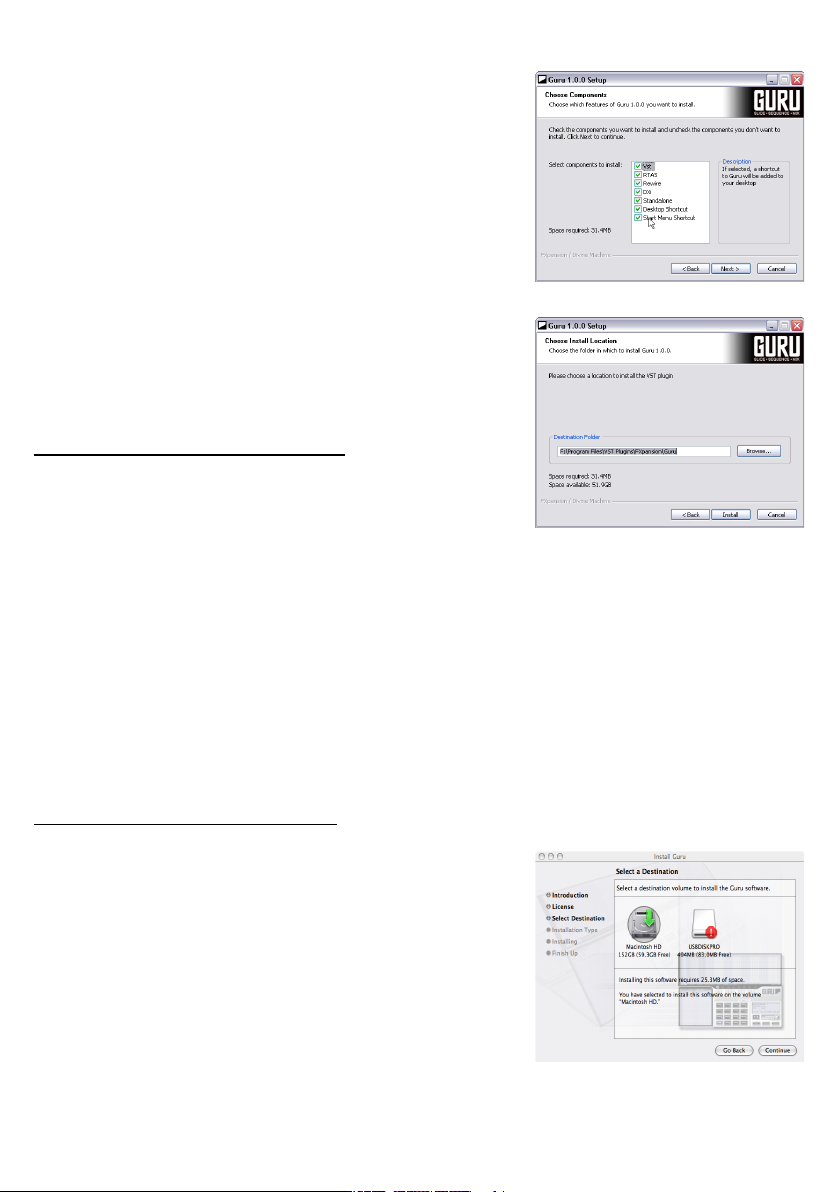
Various options will be presented during installation:
1. Customize which plugin formats are installed.
GURU comes in VST, RTAS, ReWire, DXi and standalone versions. During the installer, deselect any formats you don’t need
(if you’re not sure, leave them all selected!).
When you hover your mouse over an option, information about
it will appear to the right of the installer window.
1
2. If you selected to install the VST plugin during the plugin
format selection, you will be asked to choose the location of
your VSTplugins folder. This defaults to any VSTplugins path
found in your registry, although you can navigate to any folder
that you choose2.
Installing audio content on Windows
• Once the program installation has completed, click the ‘Finish’ button. The audio data installer should then be automatically launched. Follow the on-screen instructions.
• During the audio data installation, you will be asked to
specify a location for the audio content. This can be anywhere
you like, including removable drives. However, please ensure
the chosen location has 4 GB of free space available.
• When you have chosen a location, click ‘Install’ to begin the
audio data installation. There is a lot of data so this may take a
while… please be patient!
MacOSX Installation
Installing program files on MacOSX
• Insert the GURU DVD into your DVD drive
• Navigate into the newly mounted disk, and run the Guru
Setup.pkg file.
• The installer program will guide you through the installation
process.
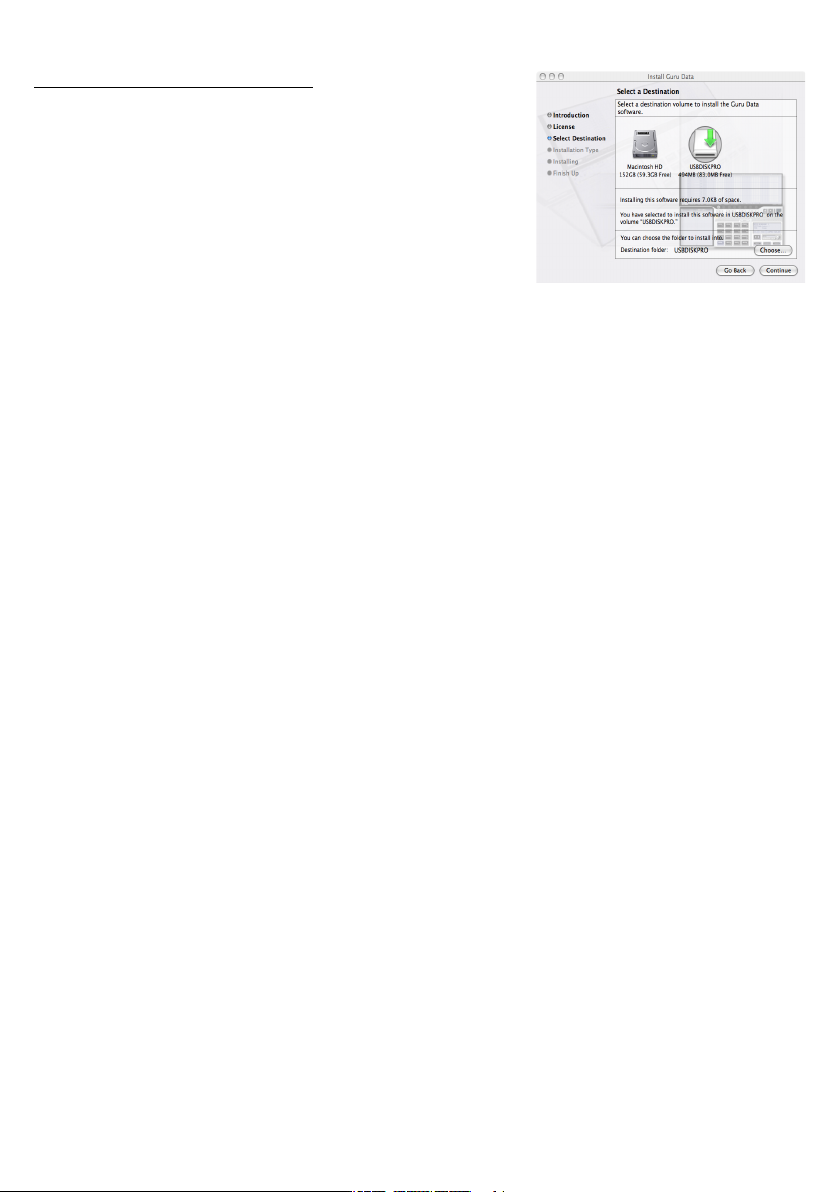
• The GURU program files must be installed on the system
drive3.
1
Choosing options during install •
2
Choosing VSTplugins folder location •
3
Install the program to the system drive •
10
Installing audio data on MacOSX
• Once the program files installation is complete, navigate back
to the DVD drive and run the Guru Data Setup.pkg file and
follow the on-screen instructions.
• You will be asked to choose a location (a drive and a folder)
for the audio content1. This location can be anywhere you
like, including removable drives. However, please ensure the
chosen location has 4 GB of free space available.
• Follow the on-screen instructions to complete the audio data
installation. There is a lot of data so this may take a while…
please be patient!
Authorization
When you run GURU for the first time after installation, you will
need to authorize it by entering your serial/license number. You
will find this number on the DVD packaging.
Your serial number is proof of your license to use GURU. A lost
serial number cannot be replaced.
Therefore, please make sure to register GURU
as soon as possible.
• If you have any problems with the installation or authorization, or if you want to find out how to register your copy of
GURU, see section 11:6.
Instant gratification...
Okay, you’ve just installed GURU and want to have some fun
with it before you sit down to the serious business of reading
this manual, it’s a good idea to load one of the supplied example GURU bundle files. Start GURU (either the standalone
version or as a plugin within your host). Hit the Load button
on the GURU toolbar and navigate to the ‘Example Bundles’
folder within the Guru data folder.
Hit the Play button on GURU or on your host sequencer after
loading one of these bundles, and have a play around with the
interface to get a feel for how it works: we tried to make GURU
as intuitive and quick to learn as possible. However, it does
include some innovative features so it is highly recommended
to thoroughly read this manual as soon as possible.
1
Select destination for the audio content •

11
CHAPTER ONE
GURU: Fundamental Philosophy
1:1 Engines, Pads, Patterns and Graphs
These concepts are crucial to the way that GURU works, so
it’s very useful to read through the following descriptions.
Engines
GURU is made up of 8 ‘Engines’. Each of these Engines
contains 16 Pads. Although these Pads can be sequenced
from your host sequencer using MIDI notes, they can also be
controlled by each Engine’s advanced step sequencer system.
There are sequencers for Pads (the Pattern view) and for
modulating certain sound parameters (the Graph view). An
Engine is essentially an independent entity with its own MIDI
channel (they respond to channels 1-8), although the tempo of
all Engines is locked to multiples of Engine 1’s tempo.
Each Engine also has 3 Aux effects and an Insert effect. There
is also a Master Insert effect which affects the entire Master
output.
Pads
The 16 Pads inside each of GURU’s Engines are categorized
into Kicks, Snares, Hihats and Percussion, with 4 Pads assigned to each type. This is central to SmartSlicing: GURU’s
intuitive new approach to loop-slicing.
Each Pad is a sophisticated sampler with a substantial array of
parameters that can be adjusted in the Pad Edit view, which is
a tweaker’s paradise. You can layer (either stacked or velocitylayered with crossfades) up to 8 samples on a single Pad, adjust start/end points, gain, pan, pitch and filtering, add one of
the built-in effects or adjust send levels to any of the 3 Engine
Aux effects. There are also 2 envelopes to play with in the Pad
Edit view: one for amplitude and one for filter cutoff, pitch and
certain effects destinations.
The Pads are mapped to MIDI notes C1 to D#2 by default.
Patterns
The Pattern view is for step-sequencing Pads. The sequencer
can have up to 4 pages, each with up to 32 steps, giving a total of up to 128 steps. Each sequence is called a Pattern: each
Engine in GURU has 24 Patterns, assigned to MIDI keys from
C3 to B4. Click on the Pattern keys, or hit the corresponding
MIDI key, to access any of the 24 Patterns for each Engine.

12
While all the Engines are tempo-synchronized, Engines 2-8
have a tempo multiplier setting which adjusts the tempo for
each Engine relative to the main tempo (which is used for
Engine 1). By using multiple Engines with different tempo
multipliers, you can create complex multi-layered polyrhythms
with ease.
GURU contains the ability to intuitively record Patterns, so you
can use it as a complete workstation environment. This can be
a breath of fresh air if you find yourself constrained by fiddly
audio/MIDI sequencers, which have too many possibilities that
sometimes get in the way of creativity. GURU even provides a
Scene view, where you can store ‘snapshots’ of the state of all
8 Engines together, and change between them by using MIDI
note input.
Graphs
Graphs are graphical step-automation lanes which control
sound-altering parameters of Pads, synchronized to the Patterns in an Engine. There are 4 Graph types: Level, Pitch, Filter and Repeat. Each type contains the following sub-Graphs:
Level
• Velocity
• Pan
Pitch
• Coarse Pitch
• Fine Pitch
Filter
• Filter Cutoff
• Filter Resonance
Repeat
• Repeat
Repeats a note a variable amount of times within one sequencer step.
• Shift
Shifts play position of a note forward or backwards between
neighbouring steps.
• Scrub
Increases the start point offset for all samples on the Pad.
13
Graphs are very closely linked to Patterns – each of the 24
Patterns in each Engine has individual Graph layouts. All Pad
lanes in each Pattern can have individual Velocity, Pan, Coarse
Pitch, Fine Pitch, Filter Cutoff, Filter Resonance, Repeat, Shift
and Scrub Graphs.
1:2 SmartSlice: GURU’s enlightened approach to drumloop-slicing
GURU introduces SmartSlice… a novel, efficient way to slice
drumloops. As well as performing a transient-based auto-slice
on loops, GURU also analyzes the frequency information of
the slices and categorizes them into kick, snare, hihat and
percussion hits. The best-matching 4 slices in these categories
are then mapped onto the corresponding Pads.
This intelligent slicing and mapping means you can experiment with different audio loops effortlessly, instead of having
to painstakingly re-categorize the slices of new loops manually. Finally there’s no longer any need for the tedious process
of building a manually-categorized drumsound library with
uniform keymapping – any audio is usable in GURU within
seconds!
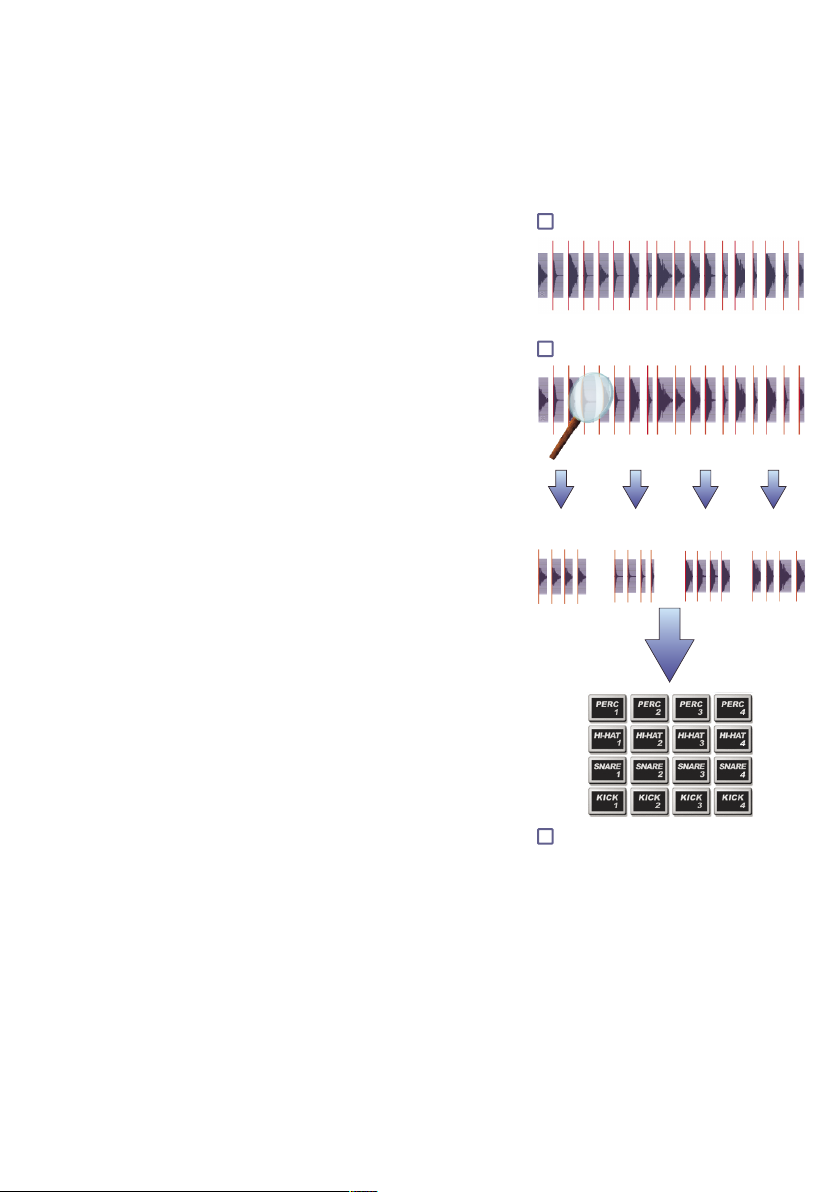
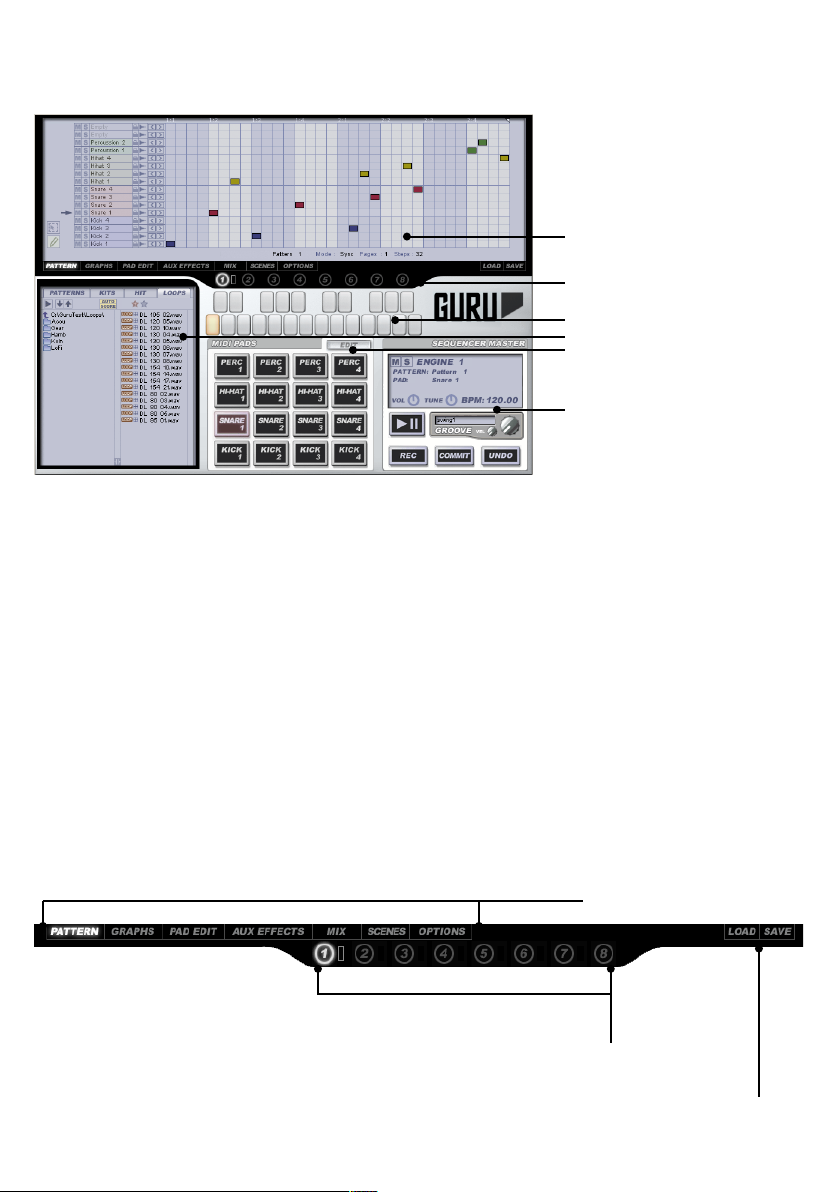
The procedure works as shown in the diagram to the right. The
audio file is first analyzed for transients and sliced according to
them. Then, each slice is frequency-analyzed, and the best 4
kick, snare, hihat and percussion samples are mapped to the
relevant Pads, while any other slices are discarded.
There are other ways to slice loops in GURU… you can
perform a SmartSlice using Score mode, which also extracts
the Pattern from the loop based on the SmartSlicing results.
Alternatively, you can use the Equal-16ths slice mode, avoiding
the SmartSlicing process altogether.
1
Analysis of hit types
2
Transient analysis and slicing
3
Assign slices to pads
Snare
samples
Perc
ussion
samples
Kick
sample
s
Hi hat
samples
14
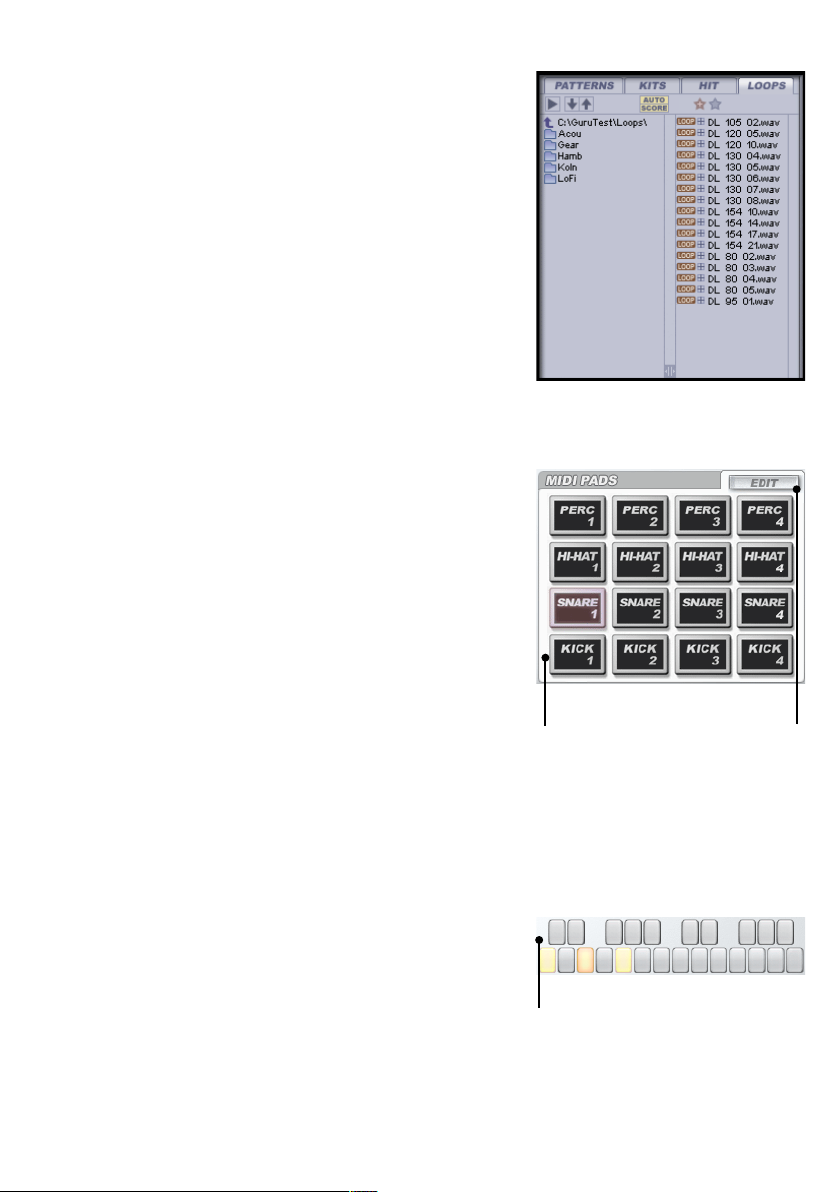
1:3 Overview of the GURU interface
1. GURU LCD
The LCD is the main edit area in GURU. It can be in any of the
following view modes:
• Pattern view
• Graphs view
• Pad Edit view
• Aux Effects view
• Mix view
• Scenes view
• Options panel
Each of these view modes have a corresponding button in the
GURU toolbar.
2. GURU toolbar
The toolbar not only offers access to the different LCD view
modes, but also to the Engine selectors and activity display.
The toolbar also houses the Load/Save Bundle buttons. See
chapters 8 & 11 for details on these features.
1. Guru LCD
2. Guru toolbar
5. Pattern keys
3. Browser
4. MIDI Pads
6. Sequencer Master
LCD view mode selectors
Engine selectors
& activity display
Load/Save Bundle buttons
15
3. Browser
This is where you load sounds and Patterns into GURU. See
chapter 2 for an in-depth look at the Browser.
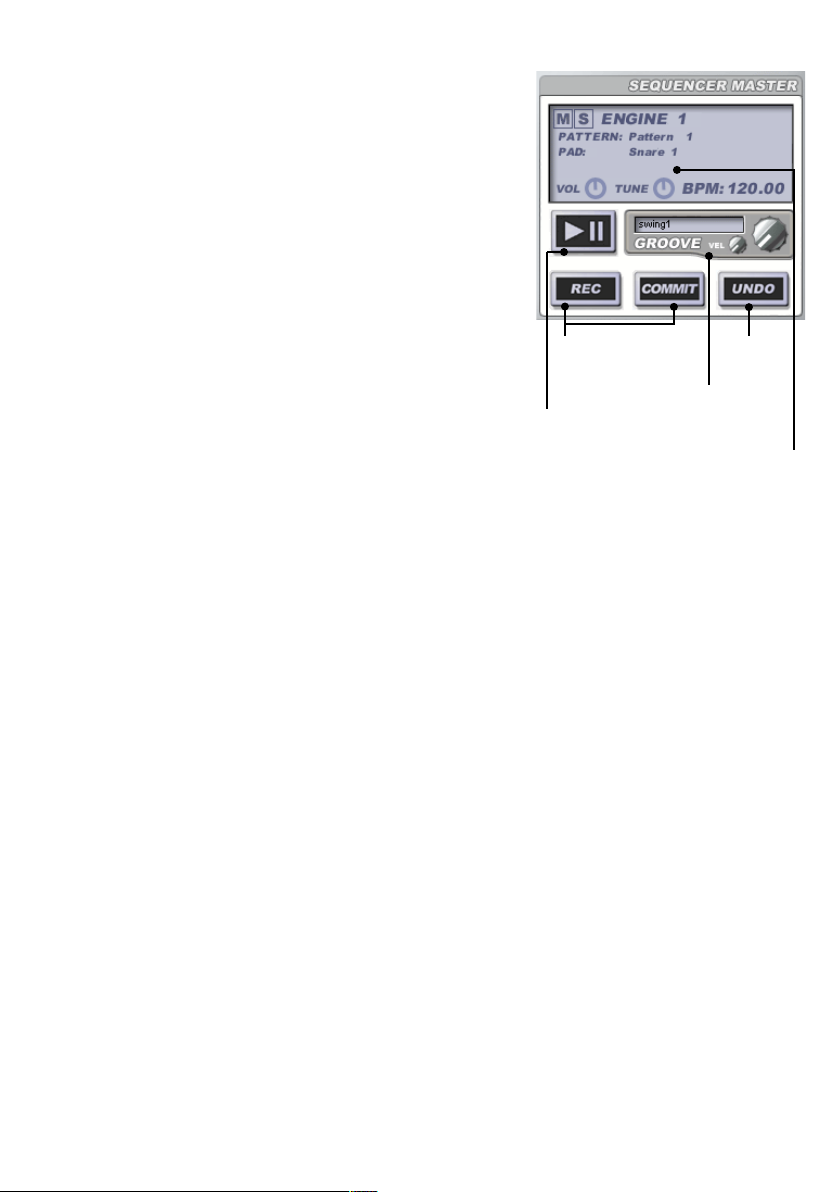
4. MIDI Pads
There are 16 MIDI Pads, with 4 assigned to each drum
category (kicks, snares, hihats and percussion). They can be
played by clicking them on-screen or by hitting their corresponding MIDI notes (by default, C1 to D#2).
The Pads light up blue (kicks), red (snares), yellow (hihats)
and green (percussion hits) in response to being played.
Pads are also selected for editing by clicking them. There is
an Edit button just above the Pads for quick access to the Pad
Edit view, or you can use the Pad Edit button on the toolbar.
See chapter 3 for more details on Pads and the Pad Edit view.
5. Pattern Keys
The Pattern keys are a way of selecting Patterns for editing
when in the Pattern view, and also for playing them. They are
mapped to MIDI notes C3 to B4.
See chapters 4 & 5 for more details on Patterns.
MIDI Pads
C1 to D#2
Pad Edit button
Pattern keys
MIDI notes
C3 to B4
16
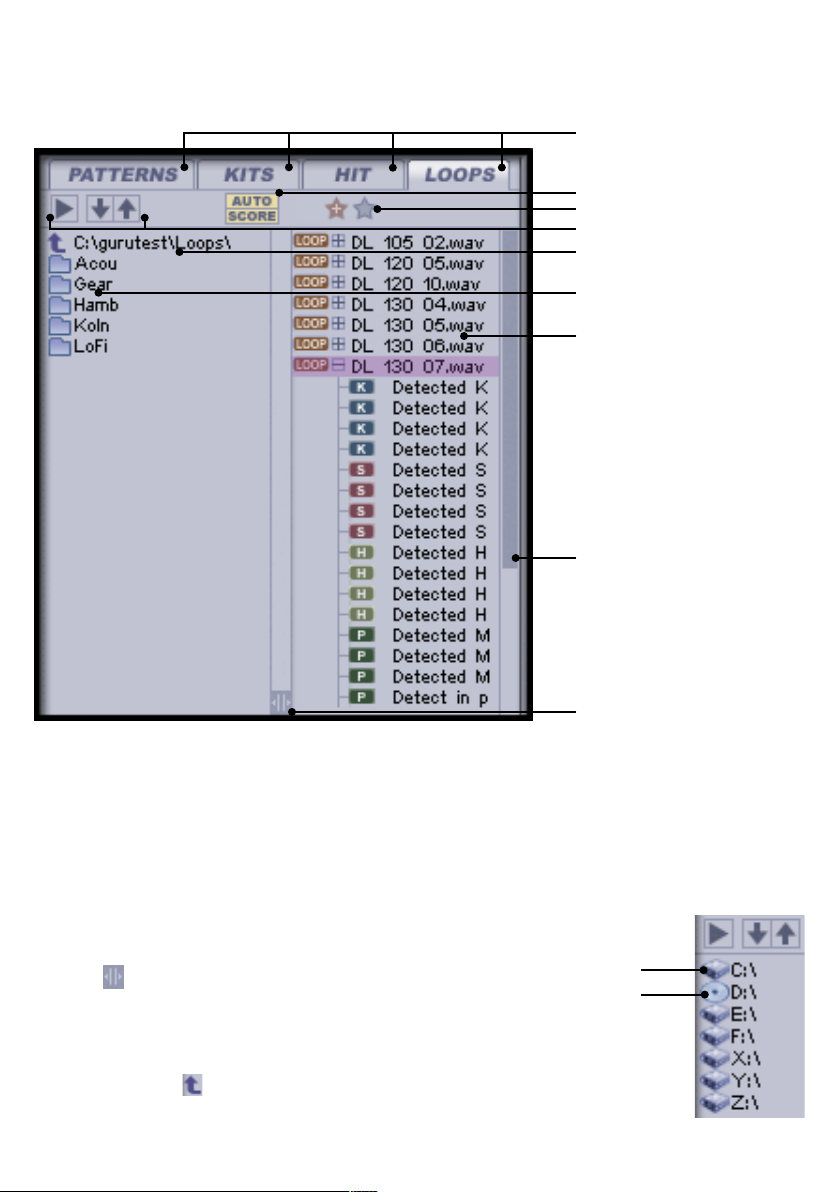
6. Sequencer Master
The Sequencer Master section houses a convenient display
for the current Engine, Pattern and Pad, as well as global
volume, tuning, mute, solo, tempo and Groove controls for the
current Engine.
It also contains the Undo button, and the Playback and Recording controls.
1:4 Control conventions and keyboard shortcuts
The UNDO button
GURU provides a one-level Undo function when editing
Patterns. When there is something to Undo, you’ll see the
Undo button highlighted. Any operation which involves notes
in Patterns can be undone – even loading Patterns from the
Browser.
The Undo button is also used in Record mode, in order to
Undo the last take. When in Record mode, this button can be
controlled by a MIDI note.
Keyboard shortcuts
GURU is quite heavily dependent on keyboard shortcuts, in
order to facilitate quick edits and fast workflow.
One very important shortcut to remember is [CTRL]-click,
which is used for numerous frequently used functions.
• On Windows, [CTRL]-click in GURU is the same as the right
mouse button.
• On Mac, [CTRL]-click in GURU is the same as Apple-click.
You should, therefore, whatever your OS, be able to use rightclick for [CTRL]-click operations (assuming, of course, that you
use a 2-button mouse).
It is also worth remembering that [ALT] is a key modifier which
results in modifying all similar parameters. This depends in
many cases on what is being clicked. Please see section 11:2
for a full list of GURU’s keyboard shortcuts.
Play button
Recording controls
Groove controls
Current Engine/Pattern/Pad
display & Vol/Tune/Mute/
Solo/Tempo for Engine
Undo
17
CHAPTER TWO
Starting to use Guru: the Browser
The Browser is a very important part of Guru, as it is central
to getting sounds into it! You will see 4 tabs in the Browser:
Patterns, Kits, Hit and Loops. Before we examine them, it’s
essential to explain how the Browser works, and to explain its
preview functionality.
2:1 Operating the Browser
The Guru browser is a dual-pane browser: the left pane is for
folders, and the right pane is for files – Loops, Hits, Kits and
Patterns. You can make either pane wider by clicking and dragging the button at the bottom of the divider.
It’s very easy to navigate around drives and folders… simply
click on any folder or drive name to explore it. When you are
in a folder, the parent drive/folder will appear at the top of the
folder list, with the icon to its left. Again, simply click on the
name to go up a folder level.
Browser tabs
Favourites controls
Preview tools
Auto button
Files in the files pane
Scrollbar
Pane resizer
Folders in the folders/
drives pane
Parent folder/drive
Hard drive
CD/DVD drive
18
If you are in a certain location in one Browser tab, you can
make any other tab go to the same location, by clicking the
other tab while holding down [SHIFT].
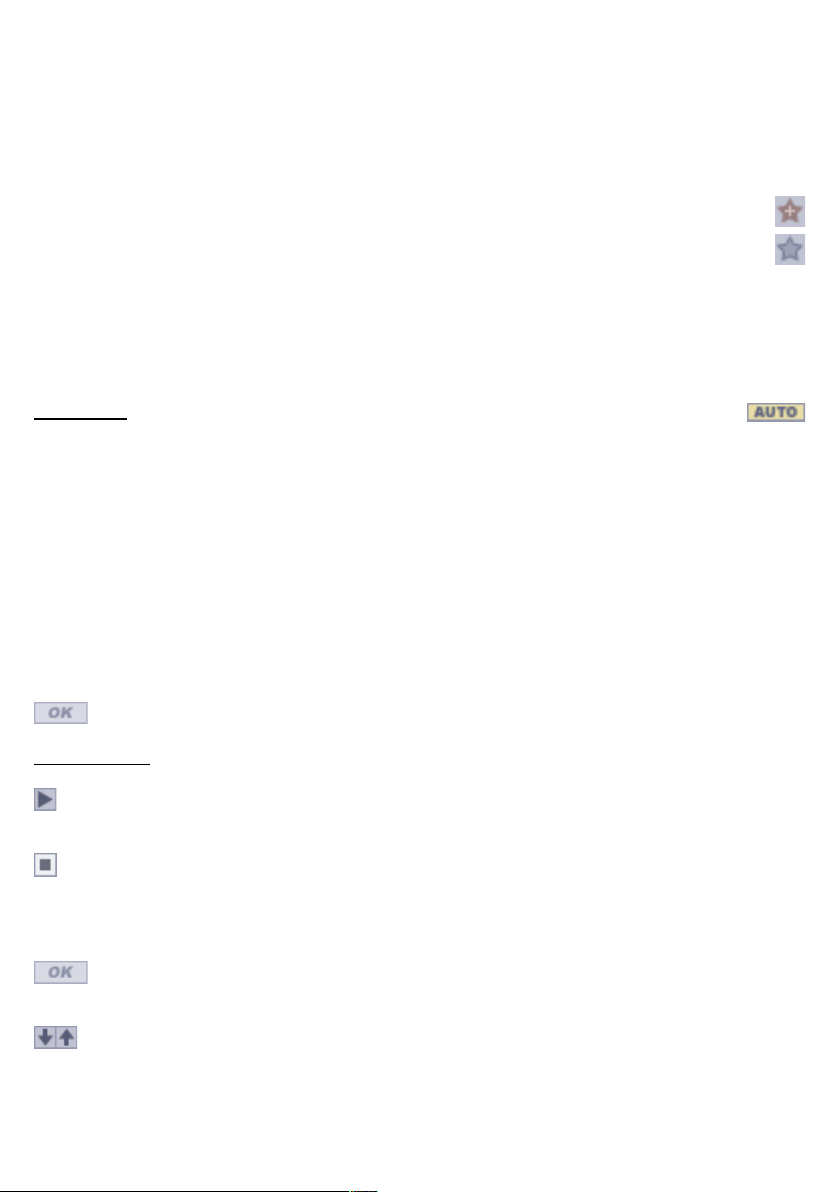
Favourites
The Guru browser has a useful Favourites function for folder
locations. When in any folder/drive, simply click the Add Favourite button to set up a Favourite – you will be prompted to
name it. The Show Favourites button toggles the left pane of
the Browser between a list of Favourites and the normal folder
browser display. You can click on a Favourite while holding
down [SHIFT] in order to remove it from the Favourites list.
Browsing and Preview tools:
Auto mode
You will notice that all tabs of the Browser have the Auto button. Auto mode allows ‘preview in context’: the elements which
are selected in the Browser play in place of the elements you
are replacing which are already loaded into Guru, while unaffected parts play as normal. Thus you can hear what the file
you’re thinking of loading onto Pad(s), Pattern(s) or an Engine
will sound like within the context of your current Guru song.
When the Auto button is activated in any tab of the Browser,
any of the browsable elements within it can be auditioned in
context before loading them. If Guru is not playing when you
click on a previewable file, it will start playing1, and you will be
able to hear the new element in context. You can then click the
button in order to load it, or preview another.
Preview tools
• Play/Stop control
When no elements are being previewed, the play/
stop control will show a ‘play’ icon.
When a file is being previewed, the control becomes
a clickable ‘stop’ icon. If it is clicked, the preview will
be cancelled and no file will be loaded.
• Other controls
This button appears while previewing. Click it to load
the currently previewed file.
Use these buttons in order to browse through the
contents of the current folder, sequentially.
1
This behaviour is controlled
by the ‘Auto-play if Auto-previewing in Browser option in
the GURU Options panel. If
the option is disabled, you will
need to hit play on Guru before
using Auto mode. Guru will not
start playing automatically. The
descriptions in this manual
assume that the option is enabled.
Add favourite
Show favourites
19
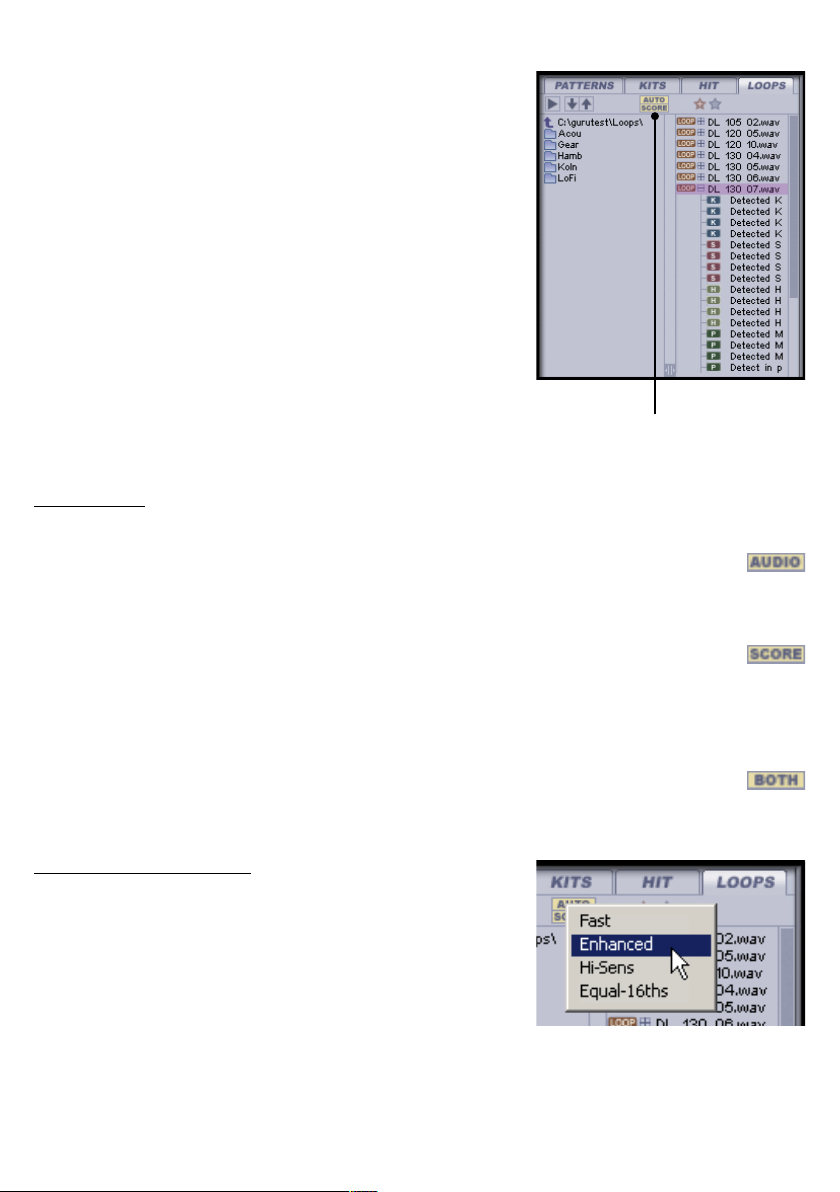
2:2 Hit tab
The Hit tab of the Browser lets you load single-hit sounds – in
other words, sounds which can be loaded onto a single Pad.
• To load a sound onto a Pad, simply click and drag and drop a
sample from the files pane to the Pad. Pads can contain up to
8 layered sounds: please see chapter 3 for details on loading
multiple layers.
• .WAV and .AIFF files of any sample-rate or bit-depth can be
loaded.
Using Auto mode
Auto mode is designed to work with Patterns: you won’t hear
anything unless there’s a Pattern playing. If you’re just starting out with GURU, jump forward to section 2:4 and load a
Pattern.
• Engage the Auto button.
• Click the Pad on which you want to load a sample and navigate to the desired sample in the Hit tab of the Browser.
• When the sample is clicked, the Pad will start flashing. Guru
will begin to play if it was previously stopped, with the selected
sound playing whenever the relevant Pad is triggered by the
Pattern.
• When you’re happy with the sound, click in order to
load it to the Pad.
• Otherwise, you can click another sample, or use the
buttons to browse through the samples in the current folder.
• If you change your mind and decide you don’t want to load a
new sound onto the Pads, click the button – the previewing
will stop and the contents of the Pads will not be changed.
20
2:3 Loops tab
The Loops tab is crucial to one of Guru’s most exciting features: the SmartSlicing process. It allows an audio file to be
auto-sliced according to its transients, with each resulting slice
being analysed according to frequency and other criteria for
kicks, snares, hihats and percussion. The best-matching 4
slices in each drum category are then mapped to the corresponding Pads in the Engine.
This feature is designed to be used with loops, especially with
the Score mode. However, it can be used with any audio file.
However, the Score function won’t be very useful on audio
files which do not ‘loop’ properly when they are continuously
repeated.
Slicing/Mapping tools
The Loops tab features a few more tools than the rest of the
Browser tab.
Score button
The Score button has 3 states:
• Audio (Audio-only)
Only the sounds within the loop will be extracted to the Pads
after the slicing process.
• Score (Score-only)
Only the Pattern will be extracted from the loop after the slicing process, and imported to the current Pattern. This mode
is similar to using the Pattern Browser, except that the Pattern
will be extracted straight from an audio loop.
• Both (Audio & Score)
The sounds within the loop will be imported to the Pads and
the extracted Pattern will be imported to the current Pattern.
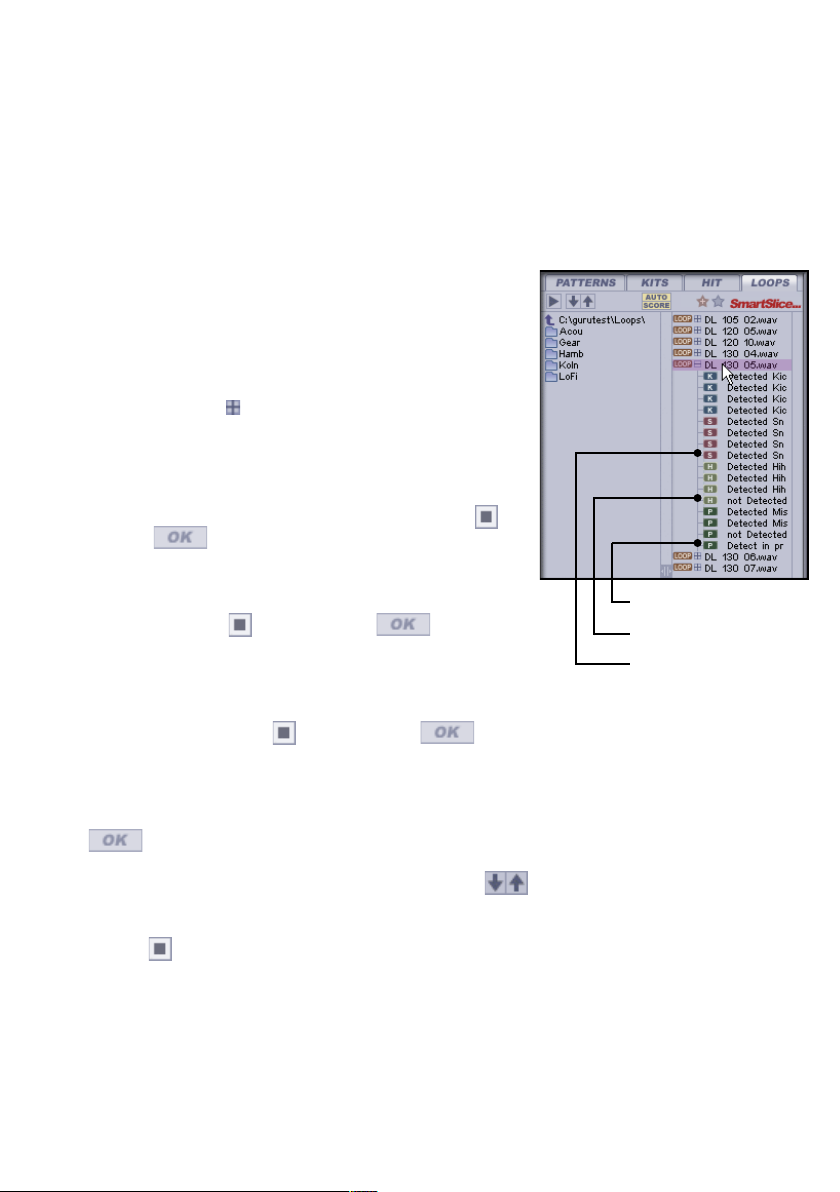
Slice mode context menu
It is possible to select one of 4 different loop-slicing algorithms
when using the Loops tab. [CTRL]-click on the Auto or Score
buttons in order to bring up the Slice mode context menu.
• Fast (Fast SmartSlice)
This is the default slicing algorithm using the SmartSlice
technology.
• Enhanced (Enhanced SmartSlice)
This SmartSlice algorithm features more accurate transient
detection, but is also slower.
Auto/Score buttons
21
• Hi-Sens (Hi-Sensitivity SmartSlice)
This is the third SmartSlice algorithm, which is a version of the
Enhanced technique, optimized for ‘busier’ loops with lots of
transients close together.
• Equal-16ths (No SmartSlice, loop split into 16 equal slices)
With this algorithm, the SmartSlice process is avoided, and
the loop is sliced into 16 equal segments.
Using Auto mode
With Auto mode enabled, GURU will preview the selected loop
in context, depending on the state of the Score button:
• The SmartSlice… message will appear momentarily while
the loop is analysed and sliced. After this message disappears, you can click the to display the slices detected in the
loop.
• If it is set to ‘Audio’ only the Pads will be heard in context,
played by the current Pattern (you won’t hear anything unless
there are some Pattern events present!). The Pads, the
button and the buttons will begin to flash.
• With the button set to ‘Score’, only the Pattern will be extracted, and previewed using the currently-loaded Pad sounds.
The current Pattern, the button and the buttons will
begin to flash.
• With the button set to ‘Both’, you’ll hear the new loop’s
sounds being played by the Pattern extracted from it. The
Pads, the current Pattern, the button and the buttons will begin to flash.
You can then do one of the following:
• Click in order to load the loop.
• Click another loop in the Browser to preview or use the
buttons to browse through the loops in a folder.
• Click the the button – the previewing will stop and the
contents of the Pads and/or the Pattern will not be changed.
Detected slices
Undetected slice
Detect in progress

22
Using component slices
The button can be used to ‘expand’ the loop to show the
slices detected within it. When the component slices are
displayed in this way, a single slice can be loaded, effectively
as a Hit. In Auto mode, this procedure works exactly as the Hit
Browser Auto mode.
When using the Equal-16ths slice mode, the expanded slices
will represent each of the 16 slices generated by the slicing
process, rather than SmartSliced categorized hits.
Operating without Auto mode
With Auto turned off, no preview in context will occur when a
loop is clicked.
• To load all the the sounds from a loop, drag and drop the
loop from the Browser to the Pads. The Score button should
be set to ‘Audio’.
• To load a Pattern from the loop, drag and drop the loop to a
Pattern key. The Score button should be set to ‘Score’.
• To load the Pattern and sounds from the Loop, drag and drop
the loop from the Browser to a Pattern key, or to the Pads (if
you drag and drop to the Pads, the Pattern will be imported to
the current Pattern. The Score button should be set to ‘Both’.
• To load one of the component slices from the loop, expand it
with the button and drag and drop the required slice to the
desired Pad, or to the waveform display.
More about the Score mode
Guru’s Score function is useful for preserving the original
timing feel of a loop: even though Guru’s on-board sequencing system is step-based, any timing deviations are preserved
using Shift Graph1 values.
Please note that this method does not perform the same
function as other drumloop slicers: although the entire loop is
turned into a Pattern, Guru still discards everything but the 4
best matches for kicks, snares, hihats and percussion. Each
slice of the detected Score is re-directed to the closest matching Pad.
1
See section 6:2 for details on
Shift graphs.

23
The Score mode works best with 1, 2 or 4 bar loops, and best
results are obtained if the tempo of the loop is between 70%
and 130% of the current tempo. Anything which falls outside
these limits is liable to be detected at half or double the tempo,
for example. However, you can use the tempo multipliers in
Engines 2-8 in order to adjust the timing1.
Guru will look at the length of the loop and adjust the step/
page length of the Pattern accordingly. If there are multiple
notes within 1 step, the notes will be placed on separate Pad
lanes of the correct type, with Shift graph values generated for
each ensuring that they play at the correct time.
Using REX files with GURU
As well as .WAV and .AIFF files, ReCycle-format .REX, .RCY
and .RX2 files will also be displayed in the Loops Browser.
GURU will use the slice information stored within the ReCycle
file instead of using a SmartSlice-based slice mode. The drumdetection analysis will still take place, however, and GURU will
map the best-matching drum slices to the relevant Pads. The
Score button operates as normal.
The Equal-16ths slice mode is an exception, however: it overrides the slice information from the ReCycle file. When using
this mode with a ReCycle file, GURU divides it into 16 segments as normal, mapping them to the Pads sequentially.
Auto mode operates with REX files in the same way as with
other audio files.
1
See section 7:2 for details on
tempo multipliers.

24
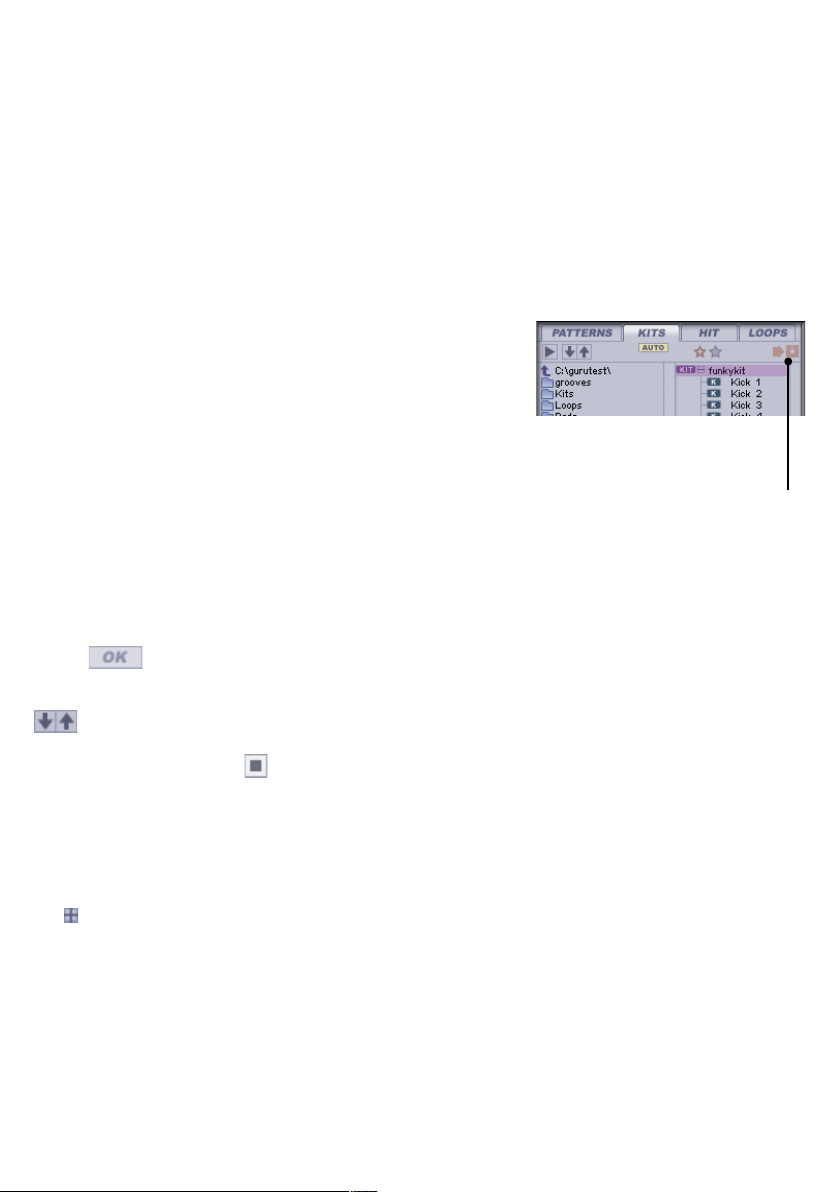
2:4 Patterns tab
The Browser’s Pattern tab allows you to save and load Patterns, either individually (the current Pattern), or the whole
bank of 24 Patterns in the current Engine using ‘Pattern Sets’.
If you save a Pattern Set, the filename can be expanded with
the button to reveal each Pattern contained within it.
As well as GURU’s own .G01and .G24 formats, standard MIDI
files (.MID) can be loaded from the Patterns Browser.
Loading Patterns and Pattern Sets
To load a Pattern while in Auto mode:
• Click the Pattern key (or its corresponding MIDI key) on
which you want to load a new Pattern.
• Navigate in the Browser to the desired Pattern and click on
it. You will notice that the Pattern key starts flashing. Guru will
start playing if it isn’t already, and if there are sounds already
loaded onto the Pads in the current Engine, the previewed
Pattern will be heard in context, triggering the sounds on the
Pads.
• Click in order to load a Pattern once you’re done
previewing.
• Otherwise, you can click another Pattern, or use the
buttons to browse through the Patterns in the current folder.
• If you change your mind and decide you don’t want to load a
new Pattern, click the button – the previewing will stop and
a new Pattern will not be loaded.
• If you want to load a Pattern Set, the process is the same,
except that multiple Pattern keys will start flashing. The currently viewed Pattern will play in context.
To load a Pattern while not in Auto mode, simply drag and
drop a Pattern from the Browser to a Pattern key. By holding
down the [SHIFT] key, you can also drag and drop a component Pattern in a Pattern Set to a Pattern key.
Save Pattern Set
Save Pattern
Unused Patterns
within Set
Patterns
Pattern Set
25
Saving Patterns and Pattern Sets
• To save the current Pattern, navigate to the folder to which
you wish to save the Pattern. Then, click the Save Pattern button on the right hand side of the Patterns Browser and enter a
filename into the dialog box which appears.
• To save all the Patterns in the current Engine, navigate to the
folder to which you wish to save the Patterns as a Set. Then,
click the Save Pattern Set button and enter a filename.
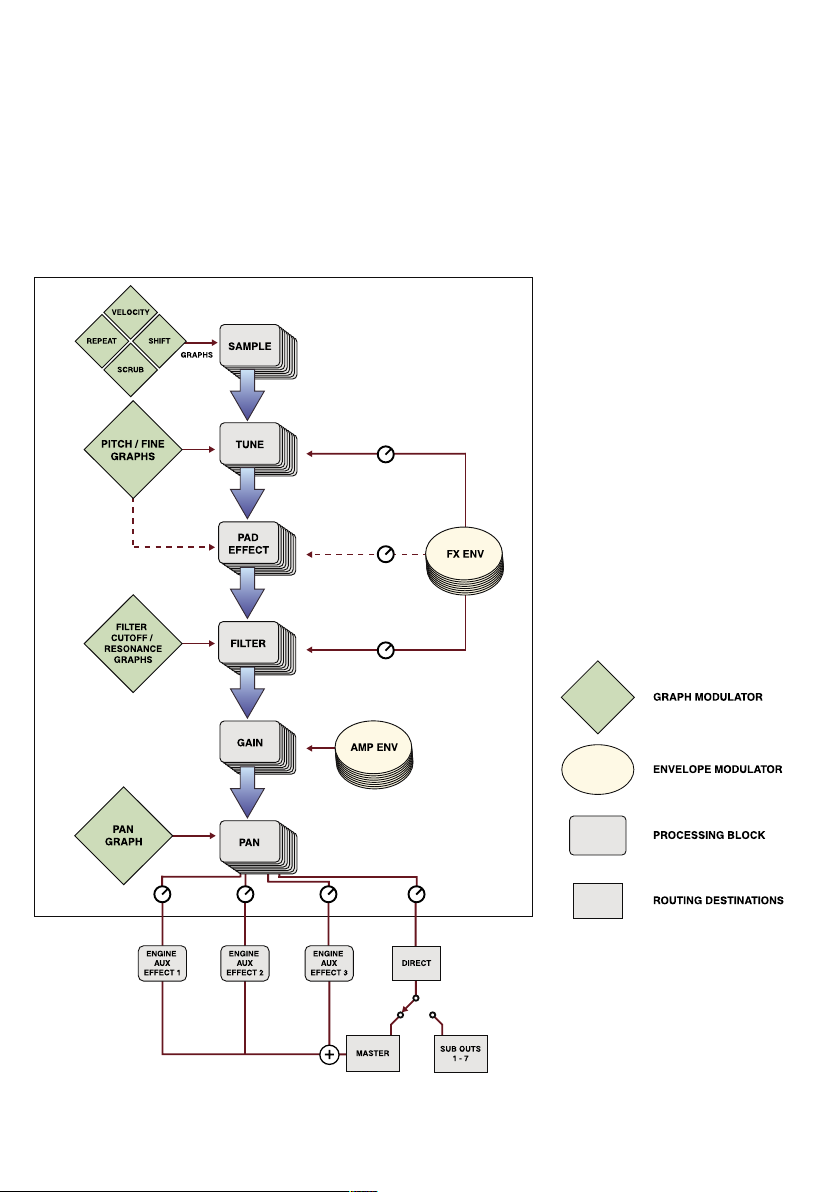
2:5 Kits tab
This tab of the browser is where you load and save Kits.
When a Kit is saved, by using the Save Kit button on the Kits
Browser, all the following are saved to a .KIT file:
• the Pads
• their Pad Edit settings including Pad insert FX and Aux sends
• the Engine’s Aux FX
• the Engine insert effect as deployed in the Mix view
Auto mode applies to Kits in the same way as Patterns: if Guru
is playing, and Auto mode is enabled, any Kit selected in the
Browser will begin previewing in context. As usual, you can:
• Click to load it
• Click another Kit or browse through the folder’s Kits with the
buttons
• Stop previewing with the button – no Kit will be loaded
and the contents of the Pads will not be changed.
When not in Auto mode, simply drag and drop a Kit onto the
MIDI Pads area in order to load it.
Like loops in the Loop tab, Kits can be expanded, by clicking
the button to the left of the filename, to show all the constituent Pads in the Kit. Any of these can be dragged onto one of
Guru’s Pads. Please note that the Engine Aux FX setup and
the Engine insert effect will not be recalled when dragging
individual Pads from a Kit in this way.
Save Kit
26
CHAPTER THREE
Working with Pads & the Pad Edit view
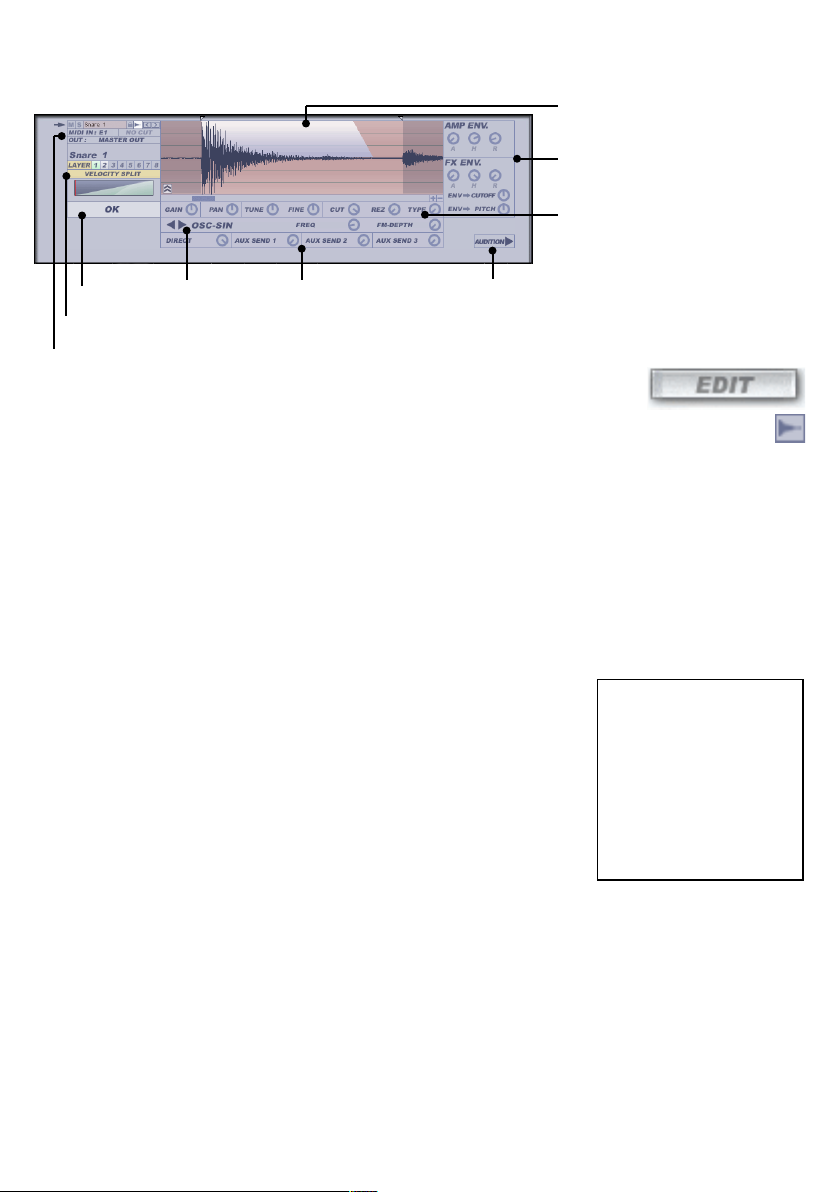
GURU’s Pads are mapped to MIDI notes C1 to D#2 by default.
They can be controlled by MIDI tracks in your sequencer, or
by GURU’s internal Patterns and Graphs. Pads are immensely
tweakable, and offer a fairly complex signal path, as the following signal flow diagram suggests.
for Osc effects
for Osc effects
To Mix view To host
27
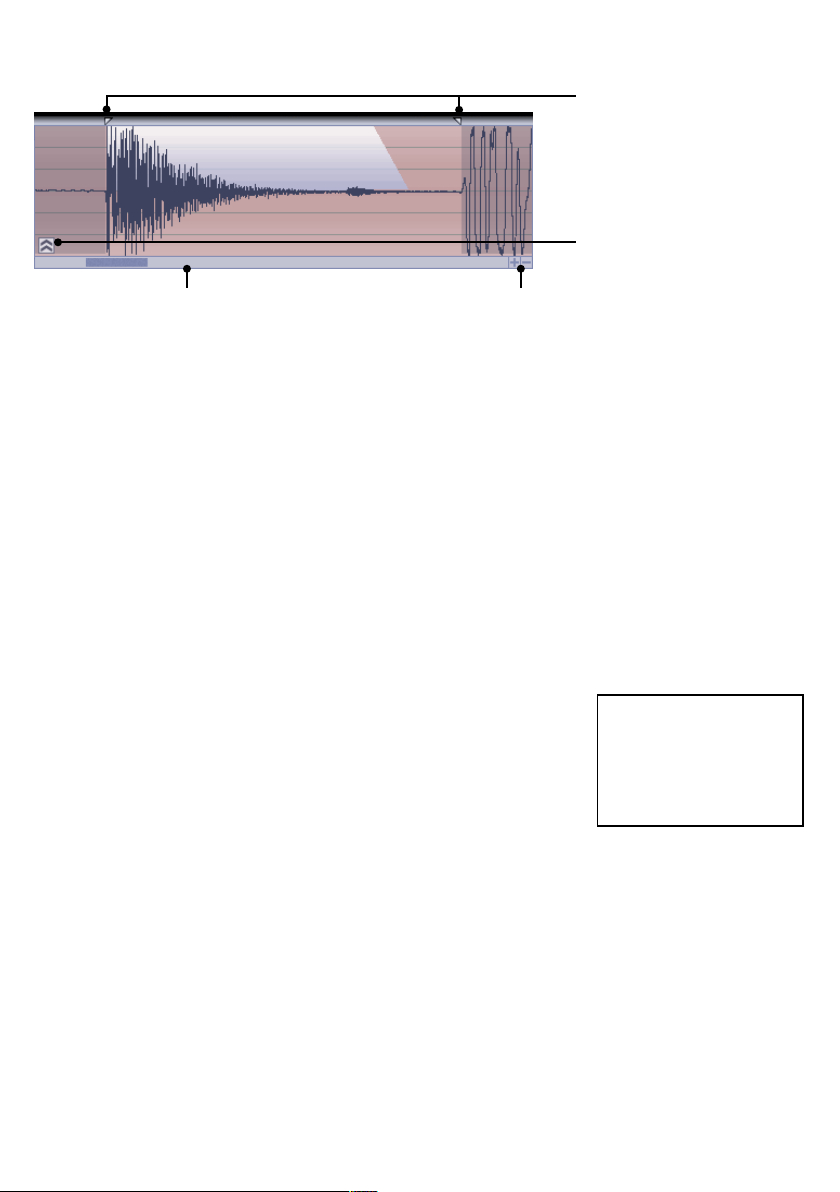
3:1 Pad Edit view
When you click the Pad Edit button on the GURU toolbar, the
Edit button just above the Pad display, or the Pad Edit toggle
button in the Pattern view, the Pad Edit view appears in the
GURU LCD. This view allows you to adjust the various settings
for the last Pad selected via the onscreen Pad buttons.
You can exit the Pad Edit view by clicking the large OK button
or the Pad Edit toggle button in the Utility controls section.
You can quickly jump to the Pad Edit settings for any other Pad
by clicking the relevant Pad on the screen.
Each layer in each Pad has its own Pad Edit settings.
Pad Edit Keyboard modifiers
• If you hold down the [ALT] key on your computer keyboard
while adjusting any parameter control in the Pad Edit view
(with the exception of the start and end markers in the waveform display, and the Velocity split display), the parameter will
be adjusted to the same value for all Pads (and each layer
within them) in the current Engine.
• You can also [CTRL]-click in order to reset a parameter to its
default value (again, this does not apply to the start/end markers or the velocity split display).
• It logically follows that you can click a control while holding
down [CTRL] and [ALT] in order to reset that control on all layers to defaults.
Please refer to section 11:2 for a full list of Pad Edit view keyboard modifiers.
The behaviour of the [ALT] key
in the Pad Edit view can be
altered via the Options panel,
using the ‘[Alt] key in Pad Edit
links only current Pad layers’
option.
This results in [ALT]-key edits
affecting all layers on the current PAD, rather than layers in
all Pads in the current Engine.
Direct/Aux controls
Utility controls
Layer/Velocity split controls
OK (exit) Insert slot Audition
Gain, pan & filter controls
Amp & FX Envelopes
Waveform display
Pad edit button
Pad edit toggle
28
Waveform display
• At the top of the waveform display, there are markers for the
start and end of the sound – by clicking and dragging these
points, the start/end can be freely adjusted. This is very useful
for fine-tuning slice points. It can also be used to manually find
alternative segments of a loop which have been discarded by
GURU’s SmartSlice process.
• The start/end markers can be moved at the same time by
clicking and dragging the end marker while holding down the
[SHIFT] key.
• GURU’s waveform display is capable of zooming in and out
horizontally: simply click the display and drag down/up. Alternatively, use the zoom buttons. You can also use the Quick
zoom button in order to instantly zoom into the area between
the start and end markers. Clicking the Quick zoom button
again zooms out to view the whole sample.
• When zoomed in sufficiently, zero crossings are conveniently
displayed as white lines, and any adjustments to the start/end
markers will ‘snap’ to them.
• You can scroll left and right through the waveform by clicking
and dragging it left and right, or use the scrollbar.
The zero-crossing functionality
can be disabled by turning off
the ‘Show/snap to zero crossings in Pad Edit waveform
display’ option in the Guru Options panel.
Start & end markers
Zoom buttonsScrollbar
Quick zoom

29
Utility controls
Mute/Solo
These mute/solo the Pad.
Pad name
[CTRL]-click on this box in order to name the layer. When a
sample is loaded onto the layer, the Pad name is updated with
the sample’s filename.
Lock
This locks the Pad so that no new samples can be dragged
onto the Pad’s layers, across all Engines. It is the same lock
function as in the Pattern view: it also prevents any newlyloaded Pattern data from affecting any of the Pad’s events in
its Patterns. You can also [ALT]-click the Lock button in order
to lock all other Pad types – in other words, [ALT]-click on a
Kick Pad layer to lock all Snare, Hihat and Perc Pads on all
Engines.
Pad Edit toggle
This button exits back to the Pattern view (it has exactly the
same effect as the large OK button).
Move left/right
These are for shifting the Pad lane backwards and forwards by
one step at a time. You can [ALT]-click these buttons in order to
move all lanes in the Pattern at the same time.
Cut
This function allows you to define the Pad’s ‘Cut’ functionality
– i.e., the ability to stop the Pad’s sound output while it is playing with a subsequent event. Clicking on the Cut box cycles
through the following settings:
• No Cut
No Cut is the default value. In this mode, the Pad will not be
cut by anything.
• Itself
In this mode, the Pad will be cut when it is triggered again.
• By Color
This mode results in the Pad being cut by all Pads in its colour
group in the Engine, including itself. For example, setting the
Cut parameter to ‘By Color’ (yellow) on a hihat Pad can result
in hihat-style choke effects.
Mute/Solo
Out
MIDI In
Pad name
Lock
Pad Edit toggle
Cut
Move left/right
Large Pad name
(inc.Value display
& Output meter)
 Loading...